anges-notes-to-self
~Just a Friendly Reminder~
A blog for reminders, to-do lists, &
resource/reference posts.
1326 posts
Don't wanna be here? Send us removal request.
Last Seen Blogs

makoto3222
題名未設定
tu-maravilloso-desastre
Maravilloso desastre

alterego-tilda-blog
Other Self

godliepje-blog
Annelie Gottlieb

ouicertes
experiment. experience.
Photo

Theme [02]: Midnight Rose by glenthemes
This theme features Tracer from Overwatch.
2019/02/03: facelift: newly re-coded, new colors and images
► STATIC PREVIEW | CODE
Theme features:
background: optional full size, optional blur
top bar: custom title, up to 6 custom links
sidebar: render image, icon image, description (optional transparency), default navigation links
posts: 1 column, optional transparency, multiple customization fields
back-to-top button: custom image
Credits:
background image: pparnxoxo on Unsplash
sidebar image: in-game screenshot | rendered & edited by me
sidebar icon by @zaryamei
fonts: Big Noodle Titling, Pixel Operator Bold
LinearIcons icon font
Be sure to follow the terms of use and like/reblog if you’re using this theme! Please contact me if you have any questions/problems with the coding and I’ll try to help you as much as I can! ♥
1K notes
·
View notes
Note
I rlly love your art! I like to draw too but I'm having trouble with chubby/fat characters. Is there any advice you could give? (Sorry if this is weird or annoying, if so you don't gotta answer it.)
I get this question a lot, and for once I’m going to try to give a proper answer.
I what most people get wrong is how to distribute fat. People gain fat in different parts of their body, but no one gains fat in only one part. I often see people draw “fat” characters by just drawing a skinny character and making their belly stick out, like in the picture below.
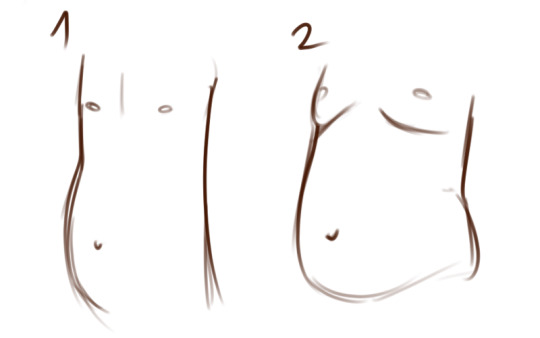
as you can see, the first drawing looks kinda weird and unnatural, and it certainly does not look “fat”. in the second drawing the fat distribution is more natural, with fat on the characters’ sides and chest as well as the belly. if you want to get better at drawing fat you should practice adding fat to those areas, as well as the arms, face and neck. another thing that makes the first one look strange is how “hard” the fat looks. there’s a really visible border between the “skinny” part of the body and the “fat” part. fat doesn’t work the same way as muscle. fat is soft and doesn’t have any strenght - meaning that unless you physically lift it up its going to hang and sag. a lot of people are afraid of drawing fat that looks fat - as in fat that bulges, sags and gathers in rolls. that is a shame, because you can’t really skip that stuff if you want to draw natural looking fat.
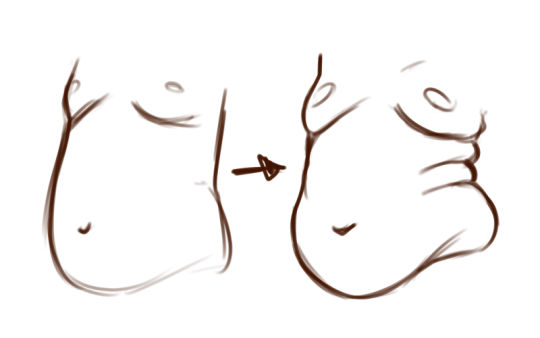
like you see in the drawing above, adding rolls and visible sagging makes the fat look, well, fatter. all I can say is; don’t be afraid of making your fat look like real fat!
4K notes
·
View notes
Text
art cheats
hello i am here today to not lose track of the art cheats i have discovered over the years. what i call art cheat is actually a cool filter/coloring style/way to shade/etc. that singlehandedly makes art like 20 times better
80’s anime style
glitch effect
glow effects
adding colors to grayscale paintings
foreshortening ( coil )
foreshortening ( perspective )
clipping group (lines)
clipping group (colors)
dramatic lighting ( GOOD )
shading metal
lighting faces
that is all for today, do stay tuned as i am always hunting for cool shit like this
318K notes
·
View notes
Text
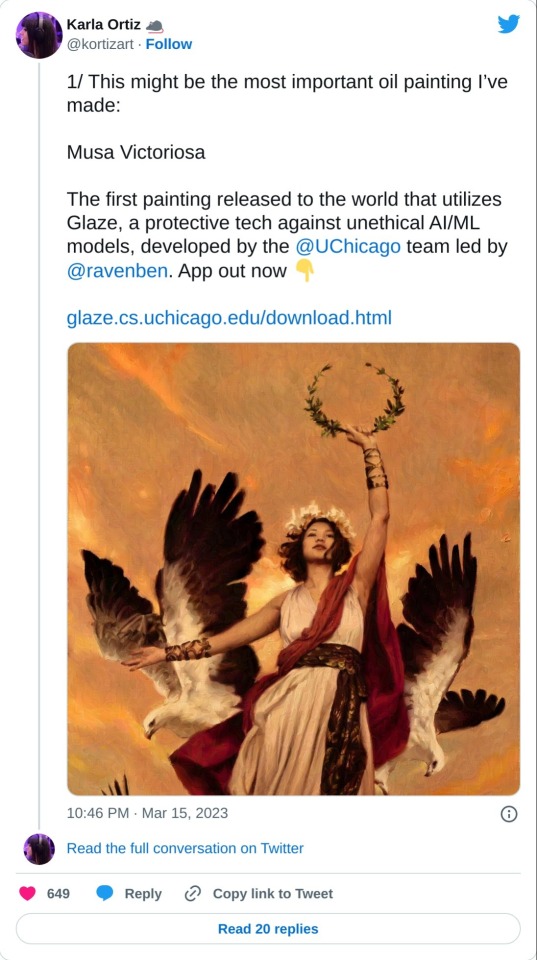
Glaze is out!
Tired of having your artwork used for AI training but find watermarks dismaying and ineffective?
Well check this out! Software that makes your Art look messed up to training AIs and unusable in a data set but nearly unchanged to human eyes.
I just learned about this. It's in Beta. Please read all the information before using.
164K notes
·
View notes


Photo
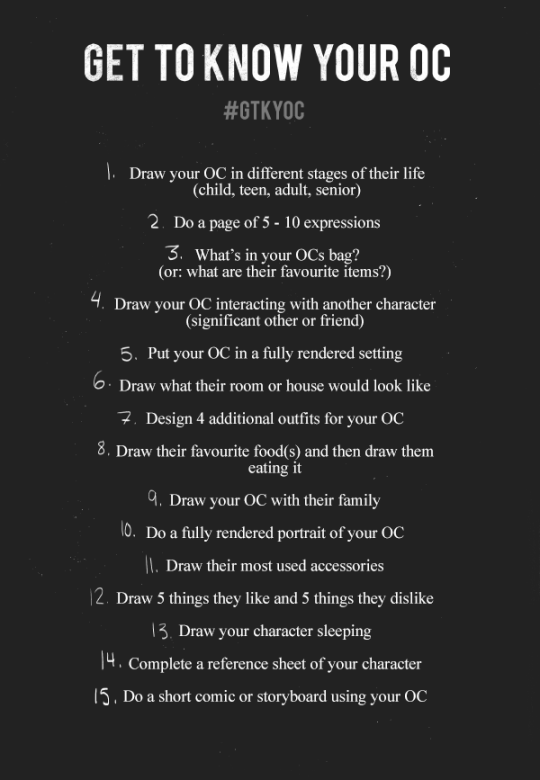
I made this list up to help me out with my OC developing so feel free to use it as well!
If you wanna join me just tag your stuff #GTKYOC so I can take a peek : ^ ) (might make a blog later and reblog all the stuff in the tag!!)
Feel free to add onto this or do your own version too!
13K notes
·
View notes
Text
hey. don’t cry. crush three cloves of garlic into a pot with a dollop of olive oil and stir until golden then add one can of crushed tomatoes a bit of balsamic vinegar half a tablespoon of brown sugar half a cup of grated parmesan cheese and stir for a few minutes adding a handful of fresh spinach until wilted and mix in pasta of your choice ok?
247K notes
·
View notes
Text
tiktok has me STRESSED with their “cleaning aesthetic” vids, so here’s some things you should NOT mix when cleaning, and keep in mind that these can be components in cleaners that should not be mixed (for example, windex usually has ammonia in it and thus should be treated the same way):
bleach and vinegar: creates chlorine gas
bleach and ammonia: creates chloramine gas
bleach and rubbing alcohol: creates chloroform, hydrochloric acid, and chloroacetone
bleach and toilet bowl cleaner: if you’re using an acid-based toilet bowl cleaner, combining it with bleach will create chlorine gas
bleach and mold or mildew stain removers: acid-based stain remover=same as above
bleach and oven cleaners: many oven cleaners contain sodium hydroxide, which creates chlorine gas when combined with bleach
bleach and lysol: chlorine gas once again
(really just never mix bleach with anything other than water) (please stop fucking around with bleach)
drain cleaners: if you use one drain cleaner, do NOT follow it up with another. follow package directions on the one you’re using. you could cause an explosion that could also blind you if it gets in your eyes.
hydrogen peroxide and vinegar: you can spray these on the same surface and wipe down in between and make sure it’s dry before applying the other, but don’t combine them in one container bc you’re going to make peracetic acid.
surface cleaning powders: products based on oxalic acid-based cleaners (Bar Keepers Friend) and products based on trichloroisocyanuric acid (Ajax/Comet powders) create chlorine gas
source 1
source 2
source 3
source 4
source 5
good rule of thumb: always stick to one cleaner per surface/item that you’re cleaning to avoid interactions
29K notes
·
View notes
Text
them: you don’t watch game of thrones?? really? how come?
me:

304K notes
·
View notes
Text
I just discovered foodtimeline.org, which is exactly what it sounds like: centuries worth of information about FOOD. If you are writing something historical and you want a starting point for figuring out what people should be eating, this might be a good place?
202K notes
·
View notes
Text
Upside-Down Cobbler (God I'm Tired--But Here's Dessert)
This is the easiest baked dessert I know, and a great way to use up fruit from the food bank.
Requires one of the following baking dishes: A 10-inch pie dish, a 9-inch cake layer pan, or an 8x8 baking dish. If you double everything you can fill a 9x13 baking pan, for company.
You also need:
small mixing bowl
cutting board (optional if using berries)
kitchen knife or butter knife (ditto)
spatula
measuring cups and spoons.
Steps:
Preheat oven to 350 degrees.
Drain some canned fruit, wash and peel some fresh fruit, or get some berries. Anything that works in a pie will work here; you can also use a mixture. Dice the fruit. Measure 2 cups total.
Grease your pan or dish with anything from cooking spray to butter.
In the mixing bowl, combine ½ cup EACH white sugar, flour, and milk (any kind). Add 1 teaspoon EACH baking powder, vanilla extract, and any ground sweet spice you like (or leave it out). Add ¼ teaspoon salt. Stir well and pour into pan.
Put the fruit on top.
Put into oven, set timer for 40 minutes, go sit down. The batter will rise through the fruit and bake on top.
Serve warm or cooled, by itself or with vanilla ice cream, vanilla yogurt, cream, or a vegan equivalent.
297 notes
·
View notes

Text
Easy Spanish Rice
I got this from a flyer my grocery store sent out many years ago:
1 can black beans (15-16ish oz), rinsed and drained
1 ½ cups of salsa (I use medium)
2 cups cooked brown rice (which is 1 cup uncooked instant, or you can use the already cooked stuff in the pouch. If you use the pouch stuff, you might need to add more or less salsa, depending on how much rice is in the pouch.)
Start the rice cooking, either on the stovetop or in the microwave, according to the package directions. Skip this step if you’re using the already cooked rice in the pouch. Just dump it into a big leftover dish that has a lid, so you can store any leftovers.
Dump the beans in a strainer and rinse the gunk from the can off them.
Measure out the salsa.
Sit down and wait until the rice is done.
When it is, add the beans and salsa to the pot or big leftover dish. Mix well.
You might need to heat it a little more - put a helping in a microwave safe dish and heat it up. Eat as much as you want, and save the rest for later!
This ratio of salsa to rice is barely spicy/hot. The original recipe called for 2 cups of salsa, but I’m a weenie, so I only use 1 ½! I like to eat it with a slice or 2 of sharp cheddar cheese, which has dairy to cut the heat of the salsa if necessary.
This has tons of protein and fiber, and the salsa has all the spices already in it, so no fussing with that - and salsa totally counts as vegetables!
201 notes
·
View notes
Note
Spicy, Creamy, Bell Pepper Pasta
INGREDIENTS
• 1 Lb pasta of your choice
• 4 Red peppers, Sliced Thin
• 1 Onion, Sliced Thin
• 3 Tablespoons Olive Oil
• 1/2 teaspoon Red Pepper Flake
1 Tablespoon of oregano
• 6 cloves of Garlic, Sliced Thin
• 4 Tablespoons Tomato Paste
• 1 Pint of Heavy Cream
• Pecorino Romano To Taste
• Salt to taste
• 1 Tablespoon of Cold Butter
INSTRUCTIONS
1 To remove the skin of the peppers, coat with a touch of oil and then place in the oven under the broilers and cook until the skin starts to char slightly, moving the peppers around until evenly charred all the way around. You don’t need too much char for this. That smokey char is not a flavor I want to emphasize in this dish. Once charred, place in a bowl and cover in plastic wrap and let it steam for 15 minutes. While that steams, prep the rest of the ingredients.
2 Slice the onion and garlic thinly, measure out the chili flake and seed the Calabrian Chili and leave them whole along with a little of the oil they were packed in.
3 By now the peppers should be steamed. Using your knife, scrape the skin off the peppers, remove the seeds and stem, and cut them into thin slices.
4 Now get a pot of salted water up to a boil along with a large sauté pan and get it preheated on medium-high heat. Add a few tablespoons of olive oil and then get the onions in first to get them going. Season with salt and once softened and begins to turn translucent, add the peppers. Cook for a few minutes until the onions are fully translucent and soft and starting to brown slightly. Then add the garlic, chili flake, Calabrian chilis and cook until the garlic softens and begins to slightly brown around the edges. Then add two tablespoons of tomato paste and then incorporate that into the vegetables and cook for 2-3 minutes. Then add the pint of cream, lower the heat to medium and cook for about 5 minutes or until the cream has thickened. Let cool slightly and then blend until smooth.
5 Add the pasta to the water and start to cook the pasta. Add the sauce back to the pan and get it on a lower heat until the pasta is cooked. Slowly melt in a tablespoon of cold butter and adjust the seasoning before adding the pasta. Then 1-2 minutes before the pasta is perfectly cooked, add it to the sauce with a tablespoon or two of the pasta water, marry the sauce and the pasta until the pasta becomes perfectly al dente. Turn the heat off, toss in some parmesan until creamy and thickened and then plate and enjoy
Thanks bro
4 notes
·
View notes
Text
WEBSITES FOR WRITERS {masterpost}
E.A. Deverell - FREE worksheets (characters, world building, narrator, etc.) and paid courses;
Hiveword - Helps to research any topic to write about (has other resources, too);
BetaBooks - Share your draft with your beta reader (can be more than one), and see where they stopped reading, their comments, etc.;
Charlotte Dillon - Research links;
Writing realistic injuries - The title is pretty self-explanatory: while writing about an injury, take a look at this useful website;
One Stop for Writers - You guys... this website has literally everything we need: a) Description thesaurus collection, b) Character builder, c) Story maps, d) Scene maps & timelines, e) World building surveys, f) Worksheets, f) Tutorials, and much more! Although it has a paid plan ($90/year | $50/6 months | $9/month), you can still get a 2-week FREE trial;
One Stop for Writers Roadmap - It has many tips for you, divided into three different topics: a) How to plan a story, b) How to write a story, c) How to revise a story. The best thing about this? It's FREE!
Story Structure Database - The Story Structure Database is an archive of books and movies, recording all their major plot points;
National Centre for Writing - FREE worksheets and writing courses. Has also paid courses;
Penguin Random House - Has some writing contests and great opportunities;
Crime Reads - Get inspired before writing a crime scene;
The Creative Academy for Writers - "Writers helping writers along every step of the path to publication." It's FREE and has ZOOM writing rooms;
Reedsy - "A trusted place to learn how to successfully publish your book" It has many tips, and tools (generators), contests, prompts lists, etc. FREE;
QueryTracker - Find agents for your books (personally, I've never used this before, but I thought I should feature it here);
Pacemaker - Track your goals (example: Write 50K words - then, everytime you write, you track the number of the words, and it will make a graphic for you with your progress). It's FREE but has a paid plan;
Save the Cat! - The blog of the most known storytelling method. You can find posts, sheets, a software (student discount - 70%), and other things;
I hope this is helpful for you!
(Also, check my gumroad store if you want to!)
73K notes
·
View notes