
Don't wanna be here? Send us removal request.
Statistics
We looked inside some of the posts by cibation and here's what we found interesting.
Average Info
Notes Per Post
14
Likes Per Post
11
Reblog Per Post
3
Reply Per Post
0
Time Between Posts
8 months
Number of Posts By Type
Text
14
Last Seen Tumblr Blogs


Fun Fact
Post activity is at the highest at 4:00 pm EDT; notes peak at 10:00 pm EDT.
Text
Buttery Overnight Thanksgiving Rolls
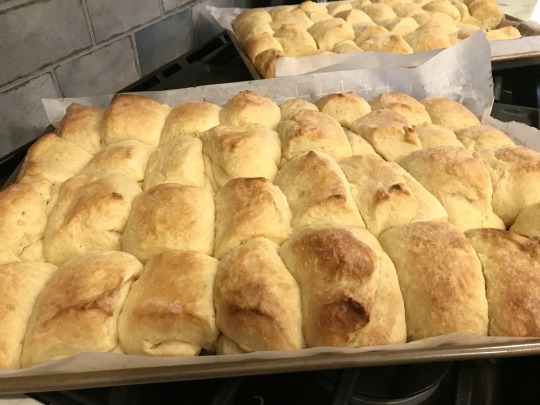
This is a cross between KAF's Parker House Rolls and Sarah Kieffer's cinnamon roll dough method. In addition to producing dinner rolls that are superlatively light, fluffy, and buttery, it doesn't require intensive kneading—useful when you're making a quadruple batch, which is bigger than a home stand mixer can comfortably handle.
Dry ingredients: 360g AP flour 50g potato flour or plain mashed potato flakes (do not substitute potato starch) 3 T sugar 1 packet dry yeast (2 1/4 teaspoons) 1.5 tsp salt
Wet ingredients: 3/4 cup whole milk, slightly warm (100-110° F) 3 eggs
Butter: 1 stick (8 T) unsalted butter, completely softened to room temperature 1/2 stick (4 T) salted butter, melted
Whisk together the dry ingredients. Separately whisk together the wet ingredients.
Add the wet to the dry and mix, in a mixer or by hand, until evenly distributed. The mixture will be sticky and, if you used potato flakes, grainy; don't worry.
Fold in the softened butter and knead lightly until the butter is completely incorporated. Place in a large bowl and cover with plastic wrap or a damp towel.
Wait 30 minutes. Then gently scoop under the dough at one edge and fold it over itself. Rotate and continue scooping and folding eight times.
Wait 30 minutes and repeat folding, then wait and repeat an additional two times—a total of 2 hours and 4 foldings.
Place the dough in the fridge overnight, or up to 3 days.
Line a 9"x13" pan with parchment paper. Divide the dough in half. Grease a smooth surface with a little melted butter, then spread the dough out on the surface so it makes an even 8"x12" rectangle. Brush the entire surface with melted butter.
Using a pizza cutter, cut the dough horizontally (into 2 rows), then cut it three times vertically (into 4 columns), for a total of eight pieces. Fold each piece over itself and place in the pan with the long side parallel to the pan's long side. Repeat with the remaining pieces, then repeat the whole process with the other half of the dough. You should have a total of 16 pieces in a 4x4 grid in the pan; they will nearly cover the pan. Cover pan with plastic wrap.
Let rise for 45–75 minutes, until very puffy. Near the end of the time, preheat the oven to 360° F.
Bake for 25-30 minutes, rotating once if necessary, until golden brown.
Remove from oven, and immediately brush the tops with the remainder of the melted butter. Serve warm.
0 notes
Text
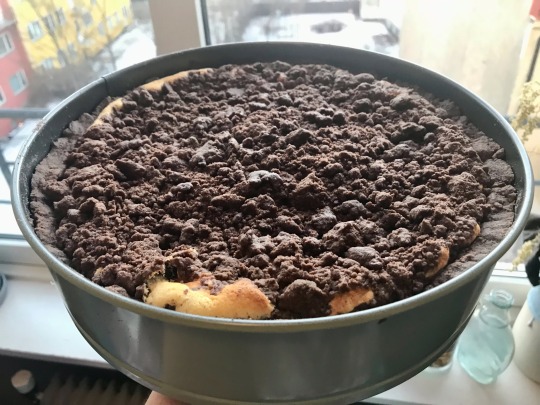
Zupfkuchen (German chocolate cheesecake)
(Serves 8-12. Adapted from this recipe.)
150g AP flour
50g cocoa powder
100g cornstarch
4 teaspoons baking powder
240g powdered sugar
100g dark chocolate (at least 80% cacao)
280g cold butter, cubed
2 eggs, beaten
140g powdered sugar
3 large eggs
500g quark (kesam)
60g melted butter
1 pinch salt
2 teaspoons vanilla extract, or the seeds from one vanilla bean
20g cornstarch
175ml heavy cream
1) Whisk or sift together the flour, cocoa, 100g cornstarch, baking powder, and 240g powdered sugar.
2) Finely grate the chocolate and stir into the dry mixture.
3) Toss the butter cubes in the dry mixture. Using a pastry cutter or fingertips, work in the butter until it resembles breadcrumbs. Work quickly to avoid melting the butter and chocolate!
4) Stir in the 2 eggs and mix only until the mixture is barely moistened. Chill for at least an hour, or overnight.
5) Preheat the oven to 150C/300F. Take a 26cm/10” springform pan and use a scant half of the chocolate mixture to line the bottom and 3/4 up the sides of the pan. Use your fingers to press the dough firmly into a smooth, even lining. Reserve over half the chocolate mixture.
6) Whisk together the eggs and 140g powdered sugar until smooth and a little foamy. Stir in the quark, then stir in the melted butter, salt, and vanilla. Sprinkle the 20g cornstarch on top and mix until totally smooth.
7) In a separate bowl, whisk the cream with electric beaters until it forms stiff peaks. Fold the whipped cream gently but completely into the mixture. Pour into the chocolate crust.
8) Gently crumble the remaining chocolate dough into streusel-like crumbs of small to medium size. Lightly sprinkle half or so of the chocolate atop the cream mixture to form a solid “crust”.
(Note: you will have leftover chocolate dough. You can roll or press it out and bake to make tasty chocolate cookies.)
9) Bake for 60 minutes or so. The cake should slightly jiggle in the center, but it should not be liquid or wobbly. Cool to room temperature before serving.
6 notes
·
View notes
Text
Pan de Muerto
This recipe is closely based on King Arthur Flour’s. (Unfortunately, they have removed theirs from their website.) I also alter the flavoring a little.
Ingredients:
1/2 cup milk
several star anise pods
zest from half a large orange
1/4 cup (4 tablespoons) butter, cut into 8 pieces; or lard (traditional)
1/4 cup sugar
1 1/4 teaspoons salt
2 teaspoons instant yeast
2 large eggs
3 cups King Arthur Unbleached All-Purpose Flour
Topping:
1/4 teaspoon ground cinnamon
2 teaspoons sugar
1 large egg white beaten with 1 tablespoon cold water
Instructions:
To make the dough:
Combine the milk and anise pods and heat to boiling. Allow to steep and cool naturally until lukewarm. Strain out the anise pods.
Combine the milk with all of the other dough ingredients, and mix and knead them—by hand, mixer, or bread machine—to make a smooth, soft dough.
Place the dough in a lightly greased bowl, and allow it to rise for 90 minutes; it may not double in size, but will become quite puffy.
Break off a piece of dough about the size of a large baseball (7 1/2 ounces or so, if you have a scale).
Divide this smaller piece into three pieces; two of them should be large, and one small (about half the size of one of the larger pieces). Place these dough pieces in a bowl, cover with plastic wrap, and refrigerate.
Shape the large piece of dough remaining into a smooth ball. Flatten it to a 6" long x 3/4" tall round.
Place the round loaf on a lightly greased or parchment-lined baking sheet, or into a lightly greased 9" round cake pan. Cover the loaf, and allow it to rise at room temperature for 90 minutes; it will become puffy, though it won't double in bulk.
Towards the end of the rising time, preheat the oven to 350°F.
Just before the loaf is fully risen, remove the smaller pieces from the fridge. Shape the smallest into a round ball. Roll the other two into 10" ropes.
To make the topping:
Mix together the cinnamon and sugar.
Brush the top of the bread with 1 large egg white beaten with 1 tablespoon water. Sprinkle with the topping.
Drape the two ropes across the loaf at right angles, so they form a cross over the bread. Use your fingers to flatten the ropes in places, and at the ends, to give them a "gnarled" appearance.
Take the ball, flatten it slightly, and set it in the very center of the loaf, atop the spot where the ropes cross. Pinch it onto the ropes to help hold it in place.
Bake the bread for 30 to 35 minutes, tenting it lightly with aluminum foil after 20 minutes to prevent over-browning. The interior of the finished loaf will register 190°F on an instant-read thermometer when it's done.
Remove the bread from the oven, and cool it on a rack. Store it at room temperature, well wrapped, for several days; freeze for longer storage.
2 notes
·
View notes
Text
Neighborhood’s Cream of Wheat
At Neighborhood Restaurant in Somerville, MA, the cream of wheat is legendary. The internet is filled with attempts to replicate it. This one is mine — simple but creamy and addictive.
Ingredients: 4 cups milk 2 cups water pinch of salt 2 cinnamon sticks (or 1 long cinnamon stick, broken in two) peel of one lemon (just peel, no pith) 2/3 cup of old-fashioned farina (see note below) 1 can of sweetened condensed milk
1. Bring the milk, water, salt, cinnamon sticks, and lemon peel to a boil. 2. While stirring constantly, very gradually add the farina to the boiling mixture. 3. Cook at a low boil for 20 minutes, stirring regularly. 4. Remove the lemon and cinnamon, and add 1/2 to 1 can of sweetened condensed milk, to taste. 5. Serve sprinkled with ground cinnamon.
Note on farina: DO NOT use the quick-cooking farina or cream of wheat from grocery stores. You want old-fashioned farina, sold in Indian grocery stores as “sooji.” If necessary, substitute semolina flour.
1 note
·
View note
Text
Brownies!
My go-to, super-easy, reliably delicious brownie recipe comes from Brooke’s Best Bombshell Brownies, with a couple of tweaks.
Ingredients
1 cup butter (2 sticks)
2 1/2 cups white sugar
1 tablespoon vanilla extract
4 eggs
1 1/2 cups all-purpose flour
1 cup unsweetened cocoa powder
1 teaspoon salt
1 cup semisweet chocolate chips and/or chopped nuts
Directions
Preheat oven to 350 degrees F (175 degrees C). Line a 9x13 baking dish with baking parchment.
In a microwave-safe bowl, melt the butter with the sugar. (If very hot, rest until it’s cool enough to touch.) Stir in the vanilla, then whisk in the eggs until thoroughly blended and smooth.
Whisk the flour, cocoa powder, and salt in a bowl. Add flour mixture into the egg mixture and gently fold them together just until blended. Stir in the chocolate morsels. Spread the batter evenly into the prepared baking dish.
Bake in preheated oven until the center no longer “jiggles” when you shake the pan, 25 to 40 minutes. Remove and cool before cutting.
0 notes
Text
A Simplified (But Still Exquisite!) Hummus
In the two years since I posted my hummus recipe, I’ve had time to tweak things and figure out what’s not necessary. This version keeps the two key tricks (removing skins and making an emulsion) while reducing the other work. It’s still some effort, but the results are worth it.
Ingredients: 1 lb dry chickpeas 1 Tbsp baking soda ¾ cup freshly squeezed lemon juice (3-4 lemons), divided into 1/2c and 1/4c 5 medium raw garlic cloves, peeled 1 tsp cumin seeds 1 tsp coriander seeds 1 Tbsp salt (Diamond Kosher; use 1/2 Tbsp if table salt) 1 cup good tahini (Whole Foods 365 Organic is a nice roasted tahini, and Sesame King makes a great product)
Method: 1. Soak chickpeas overnight in a large pot with lots of water.
2. Drain the chickpeas, then add lots of fresh water and the baking soda. Bring to a boil. Cover and simmer for 20-45 minutes, until chickpeas are fully tender and almost mushy.
3. While the chickpeas cook, combine ½ cup lemon juice, raw garlic cloves, cumin, coriander, and salt in a large food processor; process into a foamy puree, then let it sit for at least ten minutes. (Keep the remaining ¼ cup of lemon juice in the fridge so it stays cold.)
4. Once the chickpeas are soft, drain the water and remove as many detached skins as possible. (I like to do this in the pot itself. The skins are lighter than the flesh, so if you add lots of cold water and swirl your fingers through, the skins will float in a layer above the flesh. You can scoop them up using a skimmer or a spider strainer.) Once clean and drained, you should have about 3 ½ cups of chickpeas.
5. Using a fine mesh sieve, press the liquid from the lemon-garlic puree. Wipe out the food processor and return the smooth liquid; discard the solids.
6. Add tahini and process to combine. Add the remaining chilled lemon juice while the machine is running. (The tahini will clump up with each addition of liquid, then smooth out and thicken up.) Continue to process for three minutes, so it forms a thick, pale, smooth emulsion.
7. Add the chickpeas; process for a few minutes until completely smooth, scraping bottom and sides with a spatula.
8. Taste for salt, lemon, and texture; if it’s too thick, blend in ice water, 1 Tbsp at a time. Scrape the hummus into a container and let it rest for 30 minutes, refrigerating if it won’t be used straight away.
9. Serve the hummus in a shallow bowl with a generous drizzle of good extra-virgin olive oil and a sprinkle of paprika. Makes about 4 cups of hummus.
0 notes
Text
Banoffee Pie
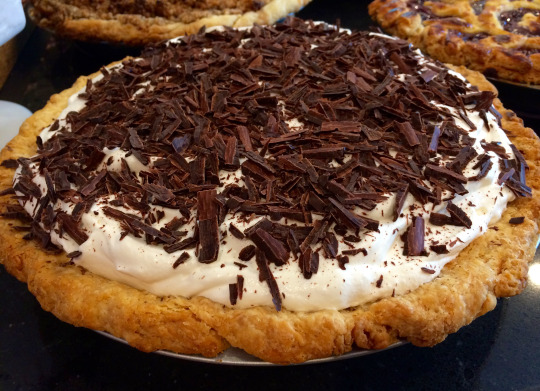
Banoffee is a fascinating contradiction: it’s a classically American pie that was actually invented in Britain and still hasn’t found widespread popularity in the States. After you try the decadent combination of sweet dulce de leche, creamy bananas and whipped cream, and bittersweet chocolate, you’ll wonder why!
Ingredients:
Single pie crust 1 egg white
1 can (14 oz) sweetened condensed milk 1 stick (1/2 cup) melted unsalted butter 1/2 cup dark brown sugar 1 tsp vanilla 1/2 tsp salt
3 large or 4 small bananas
1 1/2 cups heavy cream 1 tsp vanilla 1/4 cup powdered sugar
A block of good dark chocolate (I like Trader Joe’s Pound Plus 72% Dark)
Crust: Bake at 400 for 15 minutes with pie weights, then 10-15 without (with crust protector if necessary), until lightly browned throughout. While pie is still hot from the oven, whisk egg white until it flows smoothly, then paint the inside of the pie with the egg white. (The egg white is optional; the heat of the crust will cook it, and it will protect the crust from sogginess.) Cool completely.
Dulce de leche layer: Make a can of dulce de leche (simmer a can of sweetened condensed milk, FULLY IMMERSED IN WATER, for 2-3 hours). Once can is cool, open and combine with melted butter, dark brown sugar, vanilla, and salt. Whisk until smooth. Pour into the crust, creating a layer of about half an inch. (There will be some dulce left over, around 1/2 cup. Serve it on ice cream. Or eat it with a spoon.) Cover with plastic wrap and refrigerate until set, from a few hours to overnight.
Banana layer: Peel bananas and slice into 1/4" coins. Layer them tightly on the chilled dulce de leche; the banana coins should be about 3 deep throughout.
Whipped cream layer: Combine heavy cream, vanilla, and powdered sugar. Whip with an electric whisk, stand mixer, or immersion blender until it forms firm peaks. (Don't overwhip!) Spread the whipped cream over the bananas in a slightly domed layer.
Chocolate topping: Working over a plate or chopping board, scrape a vegetable peeler along the edge of the chocolate block to create shavings. Sprinkle the shavings over the whipped cream in a generous layer.
Serve as soon as possible; refrigerate if not serving immediately.
0 notes
Text
Classic Pie Crust

Pie crust is at least as much about technique as it is about ingredients. I’ve tried many different techniques (yes, including the vodka one), and I developed this as my favorite: flavorful, flaky-tender, and quick. You’ll need a kitchen scale, a food processor, and a bit of patience to let things chill and rest.
I resisted incorporating shortening for a long time, but at these proportions, it helps to temper the butter (more workable, more tender) without giving a greasy mouthfeel. Spectrum Organic Shortening has a single ingredient (organic palm oil), so you’re not adding a bunch of chemicals, either. Good-quality lard would be a great substitute, but it makes the crust non-vegetarian.
A food processor makes pie crusts quicker, but it also makes it dangerously easy to overwork the dough. To avoid this, only use pulses, rather than turning it on and leaving it running. Still-visible lumps of butter are your goal, since they’ll help create flaky layers in your crust.
Makes 2 crusts.
Ingredients:
2 oz organic vegetable shortening (palm oil) 8 oz unsalted butter 10 oz pastry flour (or 6 oz all-purpose flour plus 4 oz cake flour) 1 tsp salt 1 Tbsp sugar (optional) 2 oz (1/4 cup) ice water
1. Measure out shortening into a ziploc bag, seal, press flat, and freeze. Chop butter into cubes, place in bag, and freeze. Wait at least a half hour to chill.
2. In a food processor, mix flour, salt, and sugar. Add the frozen shortening (broken by hand into a few pieces) and process for 20 or more pulses, until there are no large pebbles of shortening visible.
3. Add butter and process for 20 short pulses. Check the consistency; the pebbles of butter should be pea to lima-bean sized, no larger. Process for a few more pulses if necessary.
4. Transfer mixture into a large bowl, breaking apart any remaining large chunks of butter by hand. Add ice water and toss gently with a fork until all the floury bits are moistened; use an additional 1-2oz ice water if necessary. If you take a handful of the crumbles and squeeze it, the dough should just barely hold together.
5. Dump half the crumbly mixture onto a marble countertop or other hard, clean surface. Gather together with your hands into a ball of dough, then smudge it flat with the heel of your hand. (Google “fraisage” for visual demonstration.) Use a bench scraper to scrape up the smeared pieces and gather them into a pile; press together and tightly wrap in plastic wrap, flattening it into a round disc. Repeat with other half of the dough.
6. Refrigerate the dough for at least an hour before rolling out, then refrigerate it again once it’s shaped in the pie pan, to reduce shrinkage while baking.
Tip: If you have leftover scraps of pie dough at the end of baking, simply roll them out, cut them into squares, sprinkle the squares with sparkling sugar, and bake them on parchment paper at 400 F. They make addictive, buttery cookies!
0 notes
Text
Pumpkin Pecan Praline Pie

Note: The praline method and ingredients, but not the pumpkin layer, are closely adapted from this recipe.
Pumpkin ingredients:
1 cup packed brown sugar 1 can pumpkin puree (15 oz) 3 eggs 1 cup heavy cream 1/3 c sour cream 1 Tbsp pumpkin pie spice (see below) 2 tsp vanilla 3/4 tsp salt
Praline ingredients:
1 cup (4 ounces) pecans, chopped fine 1/2 cup packed (3 1/2 ounces) dark brown sugar Pinch of salt 2 teaspoons corn syrup 1 teaspoon vanilla extract 2 teaspoons sugar
0) Optional: prepare basic pie crust. From a second batch of pie dough, cut decorative shapes (e.g. leaves or hearts) with small cookie cutters; refrigerate the crust and shapes until both are firm. Decorate the rim of the pie with the cut-outs, using cold water to help them stick. Refrigerate again until firm before baking.
1) Par-bake your crust with pie weights at 400 for 15 minutes, then without weights for five. Remove to cool and turn down oven to 325.
2) While crust bakes, make pumpkin: combine brown sugar and pumpkin in a saucepan and cook, stirring, until thickened and bubbling. Remove from heat and stir in remaining ingredients, whisking until completely smooth.
3) When the crust is just warm, add filling and return to oven. Bake 30-60 minutes.
4) While pie bakes, mix together all the praline ingredients until completely combined and moistened.
5) When the pie is jiggly in the middle, but no longer liquid, remove it and sprinkle the praline evenly over the top. Return to oven for about 10 minutes, until the topping is bubbling around the edges. Cool completely.
Pumpkin Pie Spice:
You can use a commercial spice blend, but I like the more robust flavor of mixing my own. Here’s one blend that I like; it will make much more than you need for one recipe.
3 tablespoons ground cinnamon 1 tablespoon ground ginger 1 tablespoon ground/grated nutmeg 1 teaspoon ground allspice 1 teaspoons ground cloves
1 note
·
View note
Text
Triple Cherry Amaretto Pie
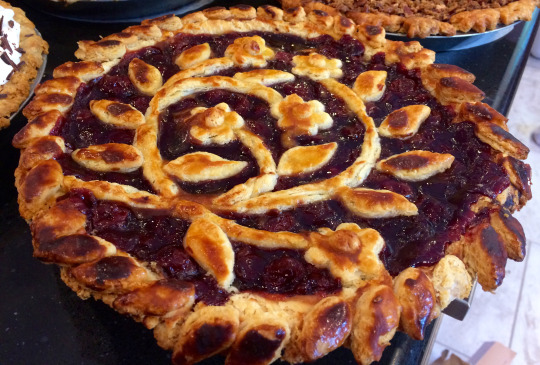
Note: This recipe is quite simple, but it relies on a few special ingredients. Jarred tart cherries can be found at Trader Joe’s, but I’ve also seen Turkish versions in Middle Eastern specialty stores. ClearJel can be purchased on Amazon or King Arthur Flour; if necessary, you could probably substitute 2 1/2 tsp cornstarch. The amaretto flavor is fairly subtle, so increase the amount if desired.
Ingredients:
1 jar Dark Morello Cherries in Light Syrup (24.7oz) 2 Tbsp amaretto 1/4 tsp almond extract 1/2 tsp vanilla 1/2c dried tart cherries (e.g. Montmorency) 3/4 cup cherry juice 3 Tbsp clearjel 1/2 cup sugar 1/2 tsp cinnamon pinch salt
a double pie crust (ideally homemade)
Method:
1) Drain cherries. Pour the drained syrup into a saucepan and add amaretto, almond extract, vanilla, cherry juice, and dried cherries. Simmer until the dried cherries are soft (five minutes or so).
2) Add drained cherries to pan and bring back up to a simmer.
3) Stir together ClearJel, sugar, cinnamon, and salt until completely blended; the ClearJel will not dissolve evenly otherwise. Stir into the simmering liquid. Continue to simmer for a couple minutes, until liquid is thick and clear.
4) Filling can be refrigerated for a couple of days in advance; at the least, allow it to cool completely before filling the pie. Decorate pie per this Instructables Triple Berry Pie. Bake at 400 F, covering the edges with a pie shield if they get too dark.
0 notes
Text
Rice cooker pilaf
This is a work in progress, since I put it together tonight for the first time and didn’t track my seasonings closely. But it came out super delicious, and it’s the kind of thing that you can make from the pantry with little effort, so I thought it’d be useful to put it here for future tweaking anyway.
Ingredients:
18 oz (2.25 cups) uncooked brown rice 18 oz (2.25 cups) uncooked lentils*
1 medium onion, diced finely a 14-oz can of roasted tomatoes with green chilis (I love Muir Glen) 1 Tbsp olive oil about 2 Tbsp (?) mixed spices: curry powder, ras al hanout, cumin, coriander, smoked paprika, hot pepper, black pepper, etc. 1-2 Tbsp of salt (you can always add more at the end)
1) Measure the rice and lentils into the rice cooker pot. Rinse them thoroughly in cool water, then add water up to the 6-cup mark on the cooker.
2) Add the remaining ingredients and stir everything well.
3) Cook on the “brown rice” setting until finished. Stir thoroughly (since the components will separate while cooking) but gently (so you don’t beat the rice into sticky mush). Taste for seasoning and add more salt or spices if necessary.
4) Serve with plenty of toasted almonds or pine nuts.
* I made it with red lentils, since that was what I had on hand; the red lentils dissolve into a mush around the rice, which was tasty but not that visually appealing. Next time I’ll try brown lentils, which might need pre-soaking/cooking to cook thoroughly?
0 notes
Text
Exquisite Hummus
Note: This recipe has gone through several iterations. I’m very pleased with the current one, but I’m also always open to new ideas! This is a lot more finicky than most “dump stuff in a food processor” hummus recipes, but I really believe the results are worth it.
For me, the perfect hummus (which bears only a light resemblance to the average grocery store hummus) has a light, creamy, extraordinarily smooth texture, combined with a dazzlingly deep flavor. The flavor is a matter of the right components (cf. my notes to the ingredients); the texture is more challenging. There are two key parts of my method that influence it:
Traditional high-quality hummus involved peeling each chickpea by hand, the way you might prepare fava beans, before pureeing them; much of the coarse mouthfeel of average hummus comes from their tough, translucent skins. But peeling chickpeas in any quantity is a tedious process, so my chickpea cooking method is designed to remove as many of the skins as possible, while speeding up the process for large hummus batches.
Another important key to good hummus is a light creaminess that distinguishes it from regular bean dip. You get this through creating a smooth, light emulsion of tahini and lemon juice before you add any chickpeas.
Ideally, you’ll rest the hummus for a half hour, then serve it one of two ways: at room temperature with good olive oil and (optionally smoked) paprika, or warm with a little melted butter. But I won’t tell anyone if you dip a spoon straight into the food processor.
Ingredients:
1 lb dry chickpeas 2 tsp baking soda
3/4 cup freshly squeezed lemon juice (~4 lemons), divided into 1/2c and 1/4c 5 medium raw garlic cloves, peeled 1/2 tsp cumin seeds 1/2 tsp coriander seeds 1 Tbsp salt (I use Diamond Kosher; adjust volume for other brands)
1 cup good tahini (if it doesn’t taste good on its own, don’t put it in hummus; Whole Foods 365 Organic is a nice roasted tahini, and Sesame King makes a great product)
4 oz (1/2 cup) of roasted garlic puree [see note at end]
Method:
1. Soak chickpeas overnight in lots of water. Drain thoroughly and rinse well.
2. In a large pot on medium-high, combine drained chickpeas with baking soda and cook for 3-4 minutes, stirring constantly and vigorously. This loosens the skins.
3. Add lots of water and bring to a boil. Cover and simmer for 20-45 minutes, until chickpeas are fully tender and just barely short of mushy. Remove the gray scum and floating skins from the top as it cooks.
4. While the chickpeas cook, combine 1/2 cup lemon juice, raw garlic cloves, cumin, coriander, and salt in a large food processor; process into a foamy puree, then let it sit for at least ten minutes. (Keep the remaining 1/4 cup of lemon juice in the fridge so it stays cold.)
5. Once the chickpeas are soft, drain the water and rinse them repeatedly in cold water, removing detached skins and muck. (I like to do this in the pot itself; if you fill it with cold water and swirl your fingers through, the translucent skins will stick to your fingers for removal.) Once clean and drained, you should have about 3 1/2 cups of chickpeas.
6. Using a fine mesh sieve, press the liquid from the lemon-garlic puree and return it to the food processor; discard the solids.
7. Add tahini and process to combine. Add about half of the remaining chilled lemon juice while the machine is running. (The tahini will clump up with each addition of liquid, then smooth out and thicken up.) Continue to process for three minutes, so it forms a thick, pale, smooth emulsion.
8. Add the chickpeas and roast garlic puree; process until completely smooth, scraping bottom and sides with a spatula. Add the remaining chilled lemon juice as it runs, and continue processing for a couple of minutes.
9. Taste for seasoning and texture; if it’s too thick, blend in ice water, 1 Tbsp at a time. Scrape the hummus into a container and let it rest for 30 minutes, refrigerating if it won't be used straight away. Makes about 4 cups of hummus.
Note on roasted garlic puree: I have yet to figure out the easiest way to produce this. You can buy 6 oz of pre-peeled garlic cloves, wrap them in an aluminum packet, and roast the packet, or you can roast two or three whole heads and remove the roast garlic from its skin afterward. The first method saves a lot of time and mess, but it means that the tough bases of the garlic get mixed in, so you have to push it through a fine-mesh sieve to get them out. Either way, you want to remove any tough bits before it goes into the hummus.
0 notes
Text
Syrian Lentil Soup for Sixty
This recipe is adapted from “Aleppo Red Lentil Soup” in Soup for Syria, an excellent new cookbook raising money to help feed Syrian refugees. It’s a cousin to the basic red lentil soup that I grew up eating with pita bread; at its simplest, the recipe is just red lentils with lemon juice and salt to taste, but it’s good enough to tempt Esau away from his birthright.
Serves 60-70. To read the original recipe (sized down for home cooking), buy Soup for Syria or scroll down this link.
8-9 lb dry red lentils (must be red/orange lentils, not green/brown; find them in the Indian/Middle Eastern section of the grocery store, or at Trader Joe’s)
1/3 cup Lebanese 7-spice powder (can substitute garam masala, sold in the Indian section of the supermarket) 1/2 cup ground cumin 1/2 cup salt 1 tablespoon Aleppo pepper (substitute smoked Spanish paprika or regular paprika) 32 oz bottle sour grape juice (verjus) (can substitute lemon juice, but lemon juice is more sour, so start with less)
4 lb onions, diced 2 large heads of garlic (separated into cloves, peeled, smashed, and chopped) 2 cups extra virgin olive oil
Strained juice from 2 lb lemons Additional Aleppo pepper for sprinkling Optional toasted croutons
1) Put the dry lentils in a large soup pot, rinse them thoroughly, and add water until the lentils come up halfway to the top of the water. Bring to a boil on the stove, removing the foam that forms on top with a shallow spoon. Continue to simmer until the lentils are completely soft, stirring regularly so they don’t stick to the bottom. If the soup gets too thick, add water as necessary.
2) In a large pan, put the diced onions and 1 cup of the olive oil. Cook, stirring regularly, until the onion begins to brown. Add the chopped garlic and continue to cook until the garlic begins to brown.
3) Add the cooked onions and garlic, 7-spice powder, cumin, salt, and verjus to the soup and stir thoroughly. Continue to simmer the soup until the lentils have completely broken down to thicken the soup.
4) Stir in the lemon juice and remaining 1 cup olive oil. Taste for seasoning and add more salt, cumin, or lemon juice as necessary. Serve hot, sprinkled with Aleppo pepper for extra spice and optional croutons for crunch.
1 note
·
View note
Text
Scones Two Ways (Chocolate Chip, Roasted Garlic Parmesan)
These scones have the exact same method; all that's different is the quantities and ingredients. They're wonderful, easy, tender scones, whether you're in the mood for sweet or savory.
Ingredients for Chocolate Chip Scones (à la Momma Coulson) (makes 9 large or 18 small scones)
1 1/2 heaping cups all-purpose flour 1/2 cup sugar 2 tsp baking powder Pinch of salt
1 cup heavy cream
1 cup of bittersweet chocolate chips
Ingredients for Roasted Garlic Parmesan Scones (makes 10 large or 20 small scones)
2 cups all-purpose flour 1 Tbsp baking powder 1 tsp salt 1 Tbsp sugar
1 1/2 cups heavy cream 2 heads garlic: roasted, peeled, mashed well, and whisked into the cream
1 cup shredded parmesan
Directions
1) Preheat oven to 375, and line a sheet pan with parchment paper.
2) Mix together dry ingredients.
3) Mix in cream.
4) Stir in mix-in (chocolate or parmesan). The dough should be light and soft, neither stiff nor liquidy; add more flour or cream if necessary for consistency.
5) Knead a few times, until dough is even.
6) Portion onto baking sheet with hands or ice cream scoop. Optionally, for a smoother appearance, roll the dough into a ball between your hands.
7) Bake 12-15 minutes, until lightly browned on top.
#scones#chocolate chip scones#garlic scones#roasted garlic#parmesan#baking#breakfast#sweet#savory#recipe
3 notes
·
View notes