
She/they/it, 40, I scratchbuild robot toys. Smol, gay, robot, critter, toy, metroidvania - combine any three and I'm into it.
Don't wanna be here? Send us removal request.
Statistics
We looked inside some of the posts by copperbezel and here's what we found interesting.
Average Info
Notes Per Post
5K
Likes Per Post
3K
Reblog Per Post
2K
Reply Per Post
24
Time Between Posts
22 days
Number of Posts By Type
Text
10
Last Seen Tumblr Blogs


Fun Fact
25% of US internet users with an annual income of $80-100K use Tumblr.
Text
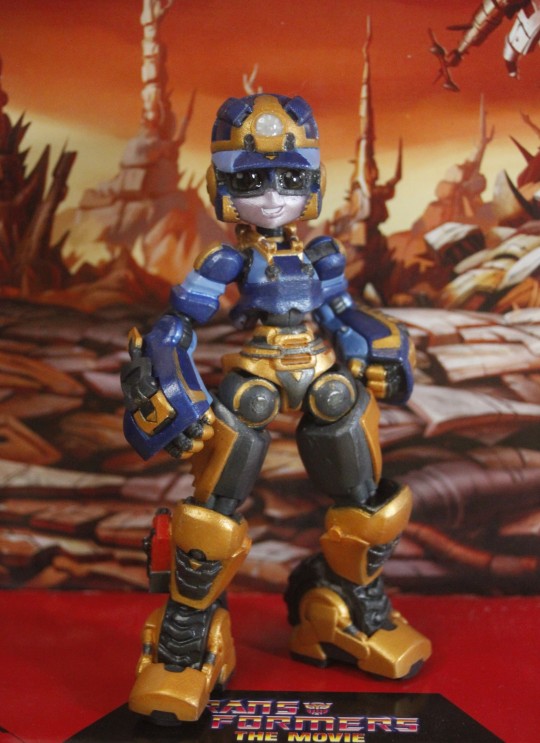
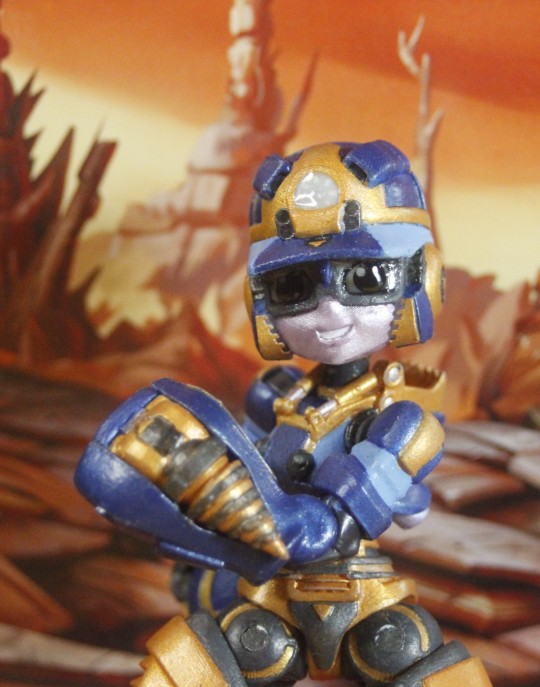
Pullback, Transformers Throttlebot OC


Pullback grew out of a suggestion from my partner April that I should create my own self-insert OC or -sona as a Transformers character. Initially I considered modding a Bumblebee figure, but all of that painting sounded like a lot of work, so I decided to make my own instead, and ended up with a pretty distinct design.
Pullback is a 1987 Throttlebot who was totally there the whole time. They're a machinist, and their alternate form is a microcar EV legally distinct from a Smart Fortwo.
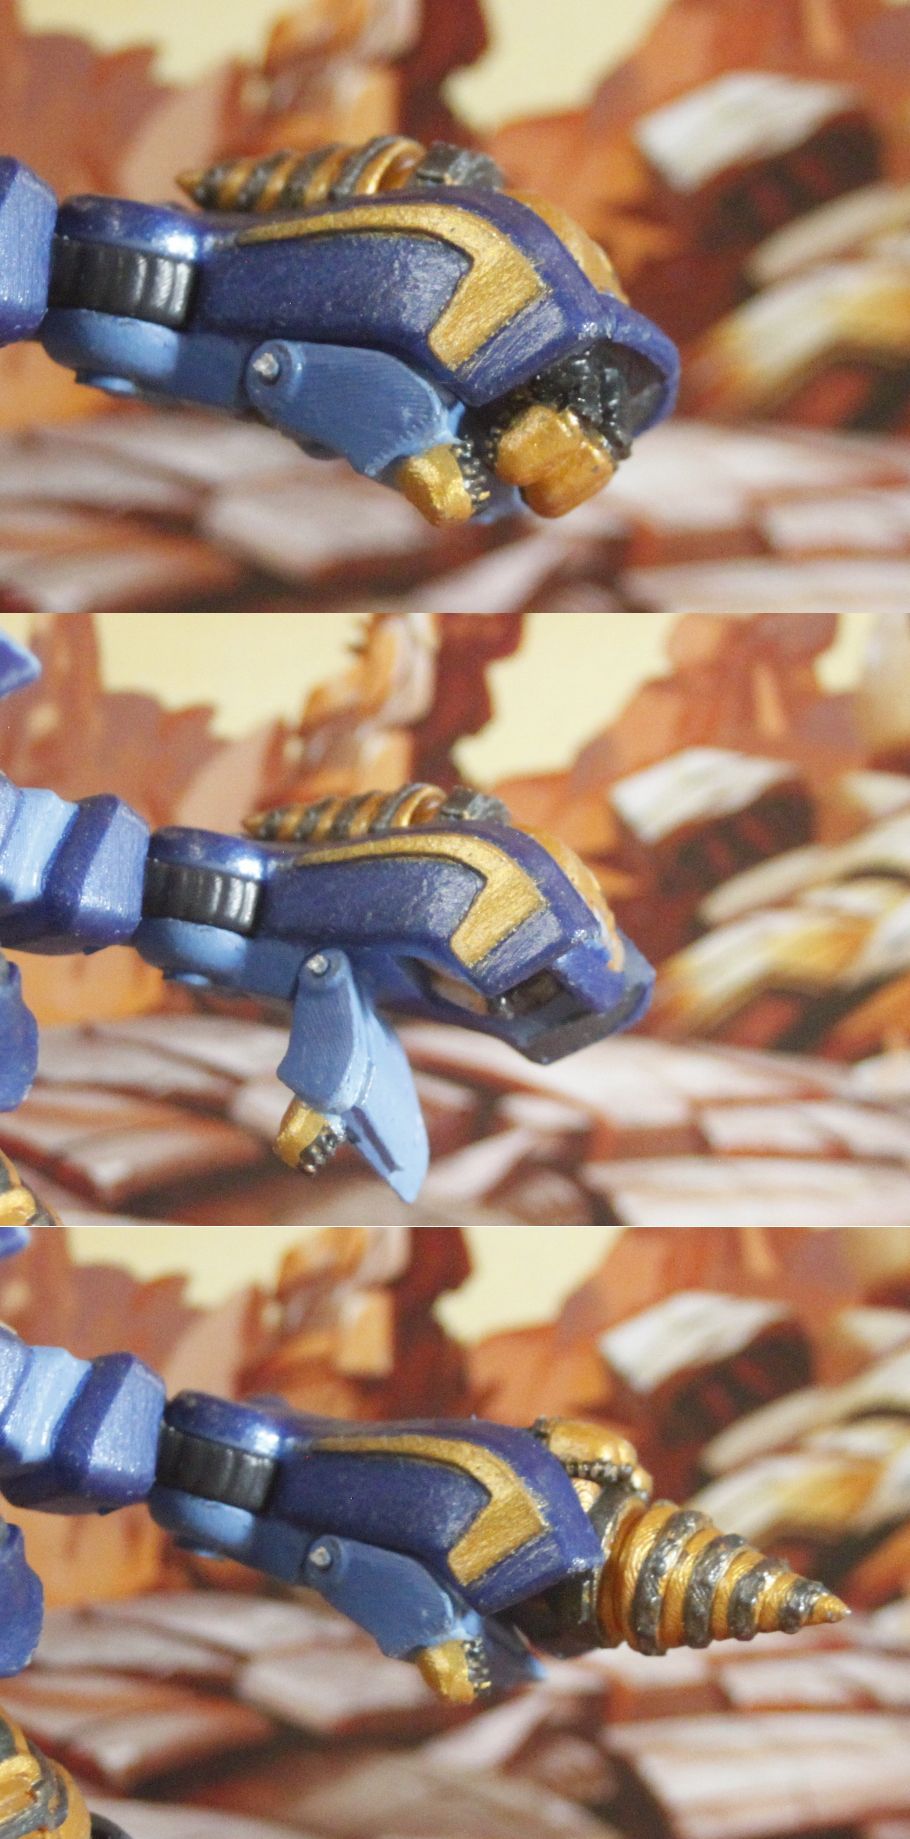
With the exception of the hollows and slots required by injection molding, I tried to keep Pullback authentic to how modern Transformers toys are constructed. Articulation is a bit limited, with no up and down movement in the foot, no waist articulation, and only a 90° bend at the elbow. But the alt mode rolls pretty well!

I'm still working out the ball and socket joints. Even with ABS-like resin, they bite and grind and lose material. I've found that inserting a bit of plastic film in between seems to firm them up and protect the interfacing surfaces.
Most of the color on this figure is ink again, including the silver. Since silver alcohol ink is really just a suspension of comparatively large particles, it doesn't bind to the resin the way others do, so there's a layer of acrylic clearcoat over those surfaces.


April has modded and repurposed a Legacy figure into her OC Parcel, so here's a couple photo!

Since Pullback is another fanart piece, the files to print a copy are on my Cults page. Note though that they require some extra materials for hinge pins.
22 notes
·
View notes
Text
Just in awe of the design and incredibly tight execution on this doll.
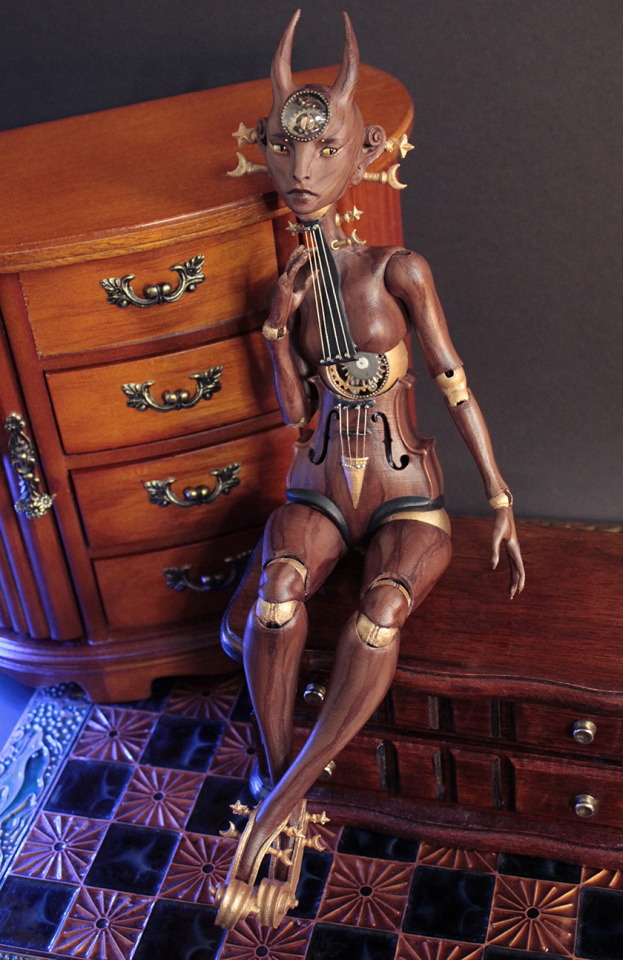
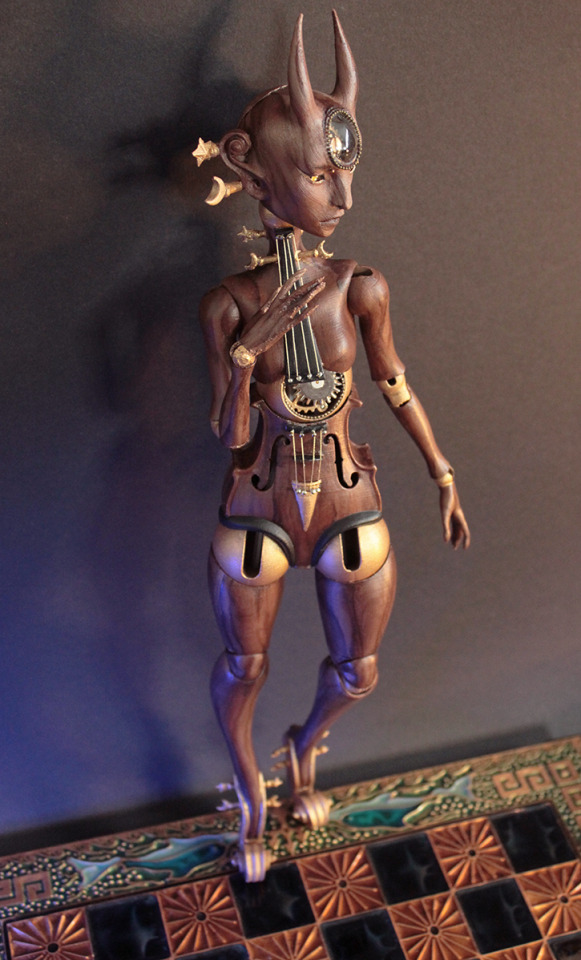


some wips of my newest project!
this one will have hair, maybe a cape of some sort, and possibly mechanical wings, but i'm not quite sure how i'll approach any of those things, so i'm posting her as she currently is. i've really enjoyed doing projects that involve both making the base sculpt and a fair bit of post-printing customization, and painting & adding details to this doll was mega fun to spend my weekend on. the sculpt itself just kind of happened; couldn't exactly tell you why she is a steampunk violin demon girl, except that it was what i found fun in the moment.
4K notes
·
View notes
Text
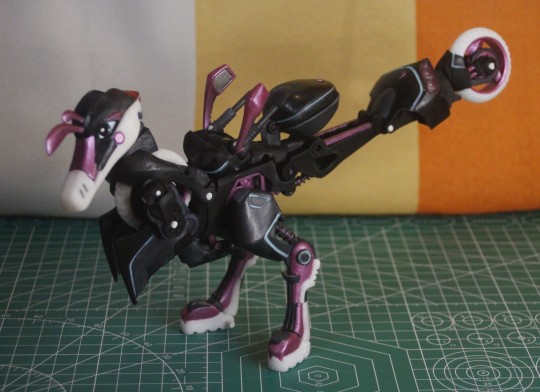
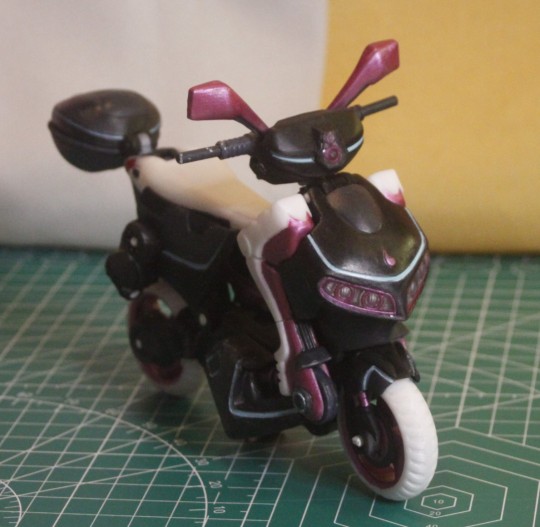
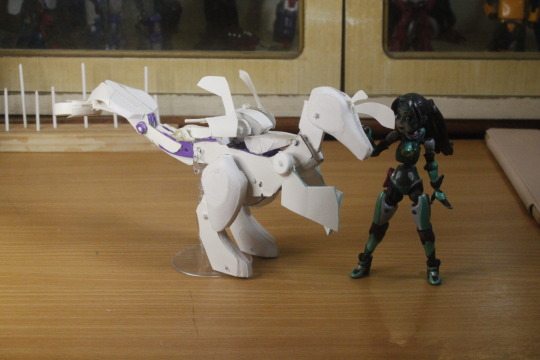
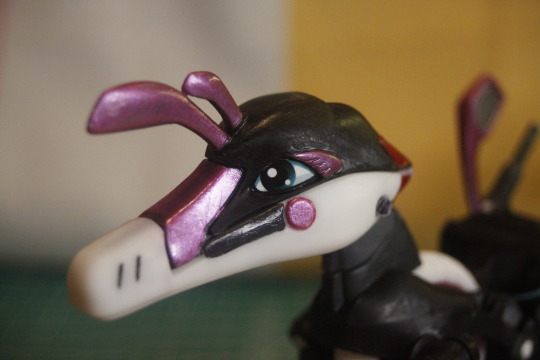
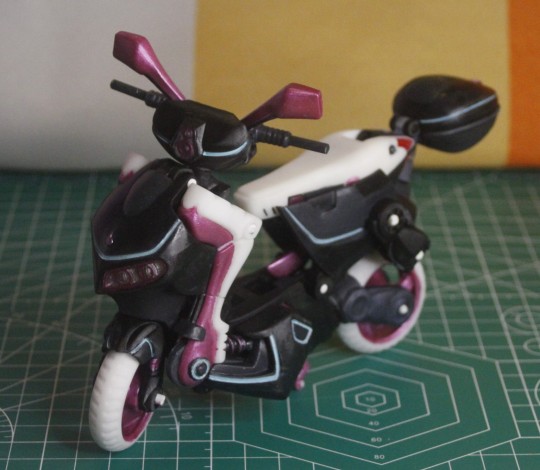
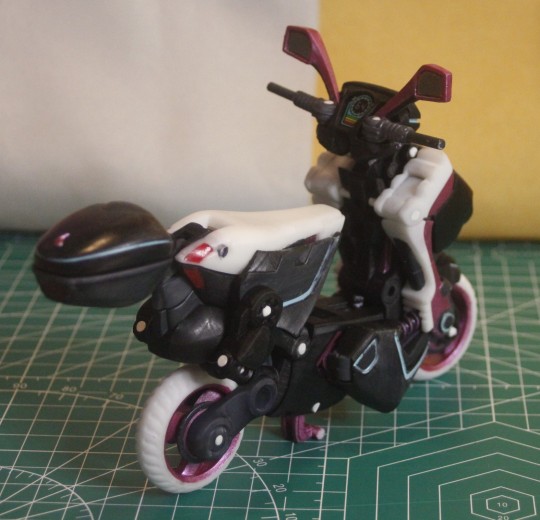
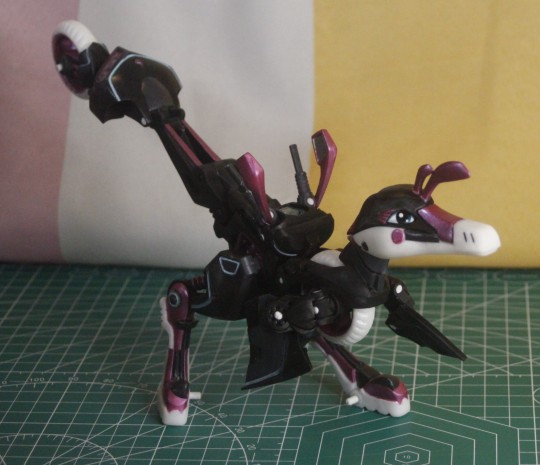
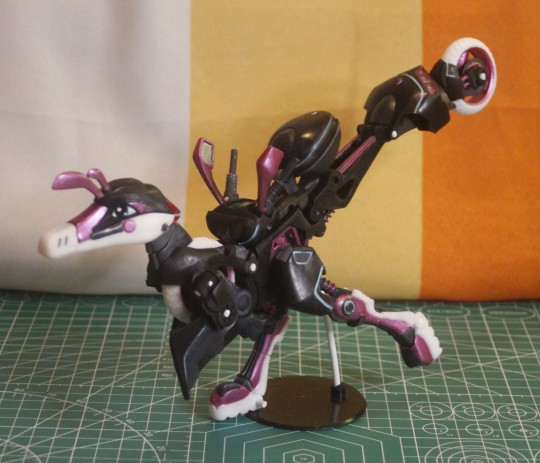
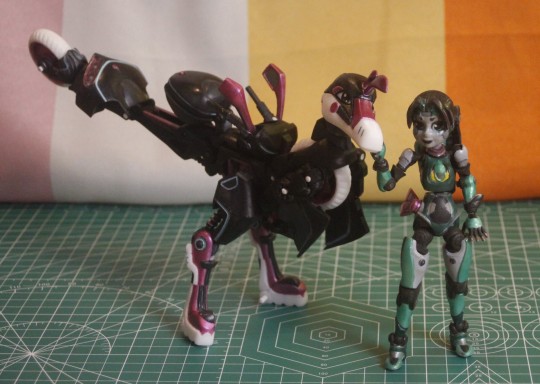
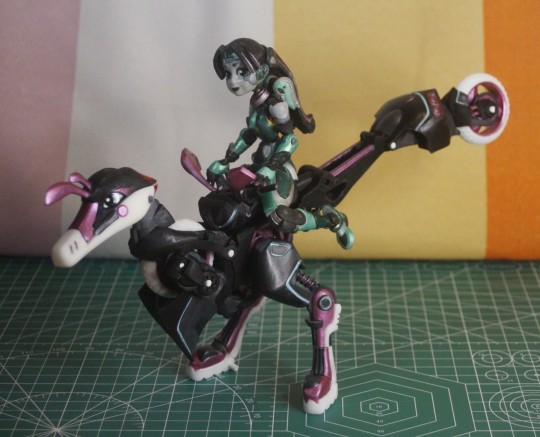
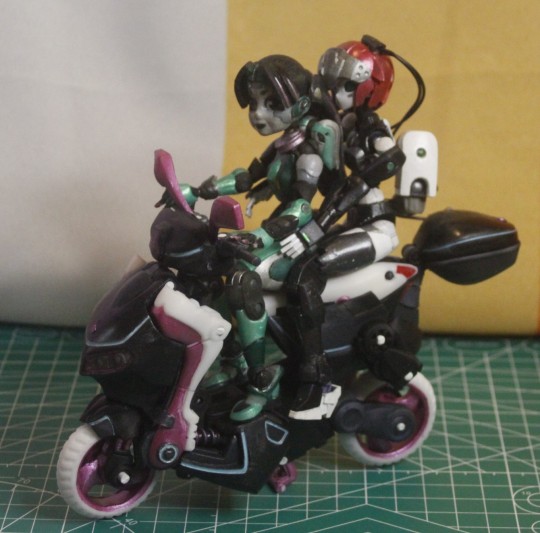
More dye adventures with Zonda Journey, Zephyr Slip alt deco


Okay, this is going to be a bit text heavy and process oriented, and there's no snazzy new design to show off, just sharing my process a bit as it develops.
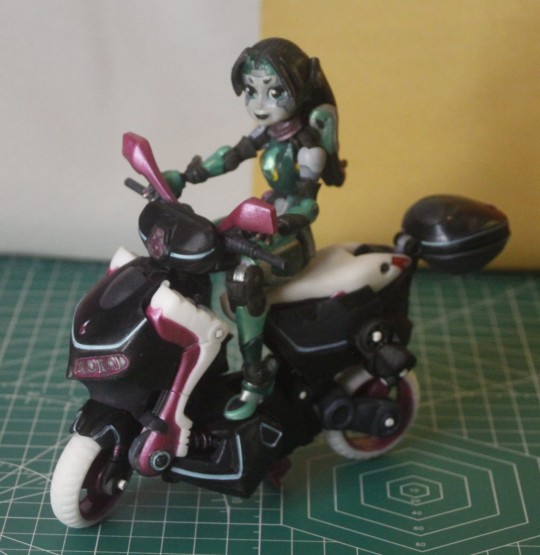
April wanted her copy of Zephyr Slip in custom colors, so following Transformers redeco tradition, Zephyr now has a sister, Zonda Journey. (The Zonda is a wind from the mountains in Argentina, though far to the west of the locale where Austroraptor was discovered.)
The build was a mixed success but a learning experience in my pursuit of a dying process that results in uniform, predictable, and durable color.
Aside from a more stable kickstand, Zonda's design didn't change much from Zephyr's. For ease of dying and painting, the scooter floor, wing insets, and nasal / maxilla area were all separate pieces this time and glued into place with two-part epoxy, but not much else has changed in the model.

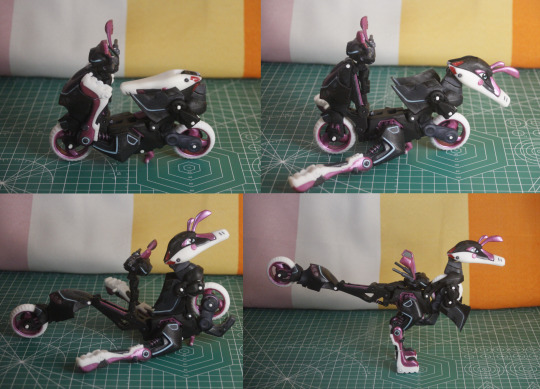
The build does differ from Zephyr Slip in that several of Zonda's joints use clear polyurethane rods in place of ABS ones, most importantly in the feet and tail. These have to be threaded into place and cut, but they're compliant, so while posing is a little spongy, they support more weight with more stability and absorb some shock, making the figure less likely to tip over from bumping the shelf.

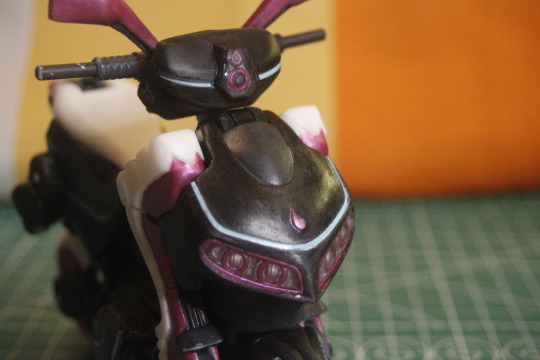
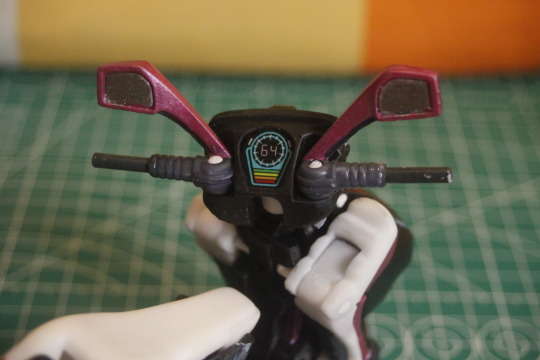
But back to the dyes. Details like the inside of Zonda's headlights and taillights, and her claw emblem, pinstripes, face details, and rims are painted, and as usual she has paper decals for her eyes and console. But the bulk of her color, everything magenta, purple, or black, is dyed. I'm going to work through those in reverse order here, black, purple, magenta.
Some of the black parts were printed in stock black resin, like the wheels, but I've had difficulty with failed prints using it, and elements like the black sections of the tail and head where I've used white resin and dyed it black end up with a uniform, more satin finish, so I think that I'm going to prefer that method from now on.

Using black ink for brushed-in details like the shoe treads works, but it's risky, because the ink can sometimes find the grain of the printed surface and wick away where I don't want it. Anywhere I intend to do this on future models will require a deep trench in the model to capture the ink, similar to the grooves used for Zonda's pinstriping seen on the part above.

Zonda's darker purple elements could have been more uniform with a couple more tries. Brushing the ink on with any color but black leaves a patchy, cloudy surface, and dying in a bath requires far too much ink. Workbenchmaniac suggested using an airbrush to apply the ink, and that seems to work very well, with a lot less waste than a bath and much more uniform results than brushing, so with a bit more practice, that might be my go-to method for dying parts, especially with a layer of clearcoat on top as here.
Zonda's magenta parts were simply printed in color, but I ran into a novel problem right away that I didn't solve at all: she was never intended to be magenta in the first place. The dyed liquid resin was lavender.


I already knew from working on Nova that dying liquid resin would really only work for pastel colors, and that the color after curing wouldn't quite match the liquid form. Nova's pink was also a little less punchy and fluorescent after printing. But I wasn't prepared for the wild swing around the color wheel this dye underwent with printing and curing.
I've read that alcohol dyes are ironically susceptible to UV photodegradation, but I'm not convinced that's what's at work here. In fact, all of Zonda's headlights and taillights have clear UV resin poured in and cured in place after painting, which means that areas of both the magenta and the surface-dyed purple have been exposed to much longer UV blasting with no visible effect.

So I've learned some things from this process. I think the most reliable tools in my kit in relation to dye are brushed black dye and airbrushed everything else. Airbrushing gives me bright and predictable colors, and with practice I can make them pretty uniform. Black dye, which is always uniform and can go over any other color, is a handy tool for detailing as long as the model is prepared with grooves to control the spread. And breaking elements down into parts that can be dyed separately continues to be a reliable and useful step that saves much more workbench time than it takes in Blender time.

As for Zonda Journey, I have a lot of things to improve on for next time, but I'm reasonably happy with the result for now, and April is happy with her, which is what counts.
7 notes
·
View notes
Text
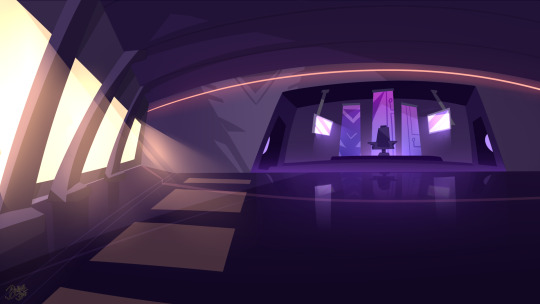
In love with this gorgeous background art from @ballpitbee, so poppy and stylish😁
Random unused backgrounds I did for a Transformers dating Sim way back when!


1K notes
·
View notes
Text
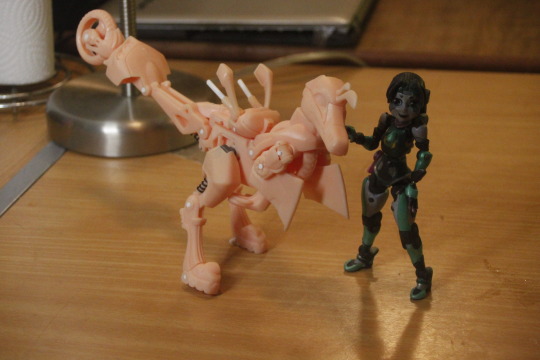
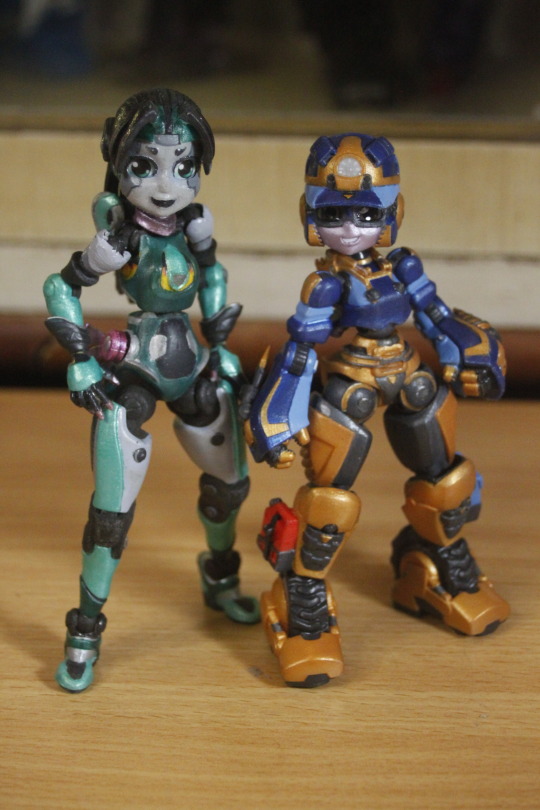
Nova Blaze, cyborg streamer


I started this project intending it to be a quick test of a few techniques, and I didn't start thinking of it as a "character" until I was already printing test parts. I think Nova Blaze nonetheless managed to take on a unique identity by the end.
Sadly, she isn't a dinosaur, and she doesn't come with any transformations or widgets, but she's going to live on my monitor stand for a while nonetheless.
There were really three technical goals for this project. First, I wanted to rely as little as possible on painted detail, using dye for the bulk of the figure's colors to greatly improve durability. Second, April convinced me to try ball and socket joints on a figure again, because their simplicity and compactness opens up a lot of options. Third, I wanted to to make a figure that was a bit sexy, with some reference to lines like Frame Arms Girl, Robot Neoanthropinae Polynian, and Busou Shinki.
So, first, those colors. The acrylic paints I used on Bit Cobalt and still use for detailing are prone to chipping and scratching. I want my figures to be durable enough to pose and play with, and dye is the natural solution.

Outside of the beige "skin" parts, Nova is mostly made with white resin dyed into color, with the dye mixed into the liquid resin for the pink parts. The yellow parts were printed white and dyed in a diluted dye bath, and the black was painted on directly undiluted. Most of the photos in this post are of a second copy of the figure made for April, and there's very little paint on it, essentially just the lipstick, the gray sections on the torso, and the cyan streak in the hair.

The second technical goal for this project was in the joints. Nova's joints include a few ball and socket joints with both sides printed in resin, which I was initially reluctant to try. I've seen very bad results from attempting ball and socket joints in "standard" resin, and the "ABS-like" resin I'm using doesn't solve all of the problems - the porous surfaces still bite and grind at first - but it made the difference between unworkable and workable results once I'd dialed in the socket geometry.
In the hips and ankles, I've used Kotobukiya Hexa Gear joints for the ball side of the pair, which seem to be working very smoothly. (April very sweetly surprised me with a small stash of the joints after handling an early form of the figure.) Nova's range of articulation is the most I've hoped to get out of a figure so far, and I'm very happy with some of the poses she can pull off, as is probably clear in the photos.


The third goal of the project, of making a figure that was a bit sexy, doesn't sound like a technical challenge, especially for a cartoon cyborg. But I've always really struggled to draw human characters that aren't uncanny and awkward, and up to now, the robot figures I've been modeling have largely been made up of chunky shapes that are very forgiving to my weak understanding of human anatomy. Nova was an opportunity to push and practice just a little in that area.
In turn, working with more organic shapes was a chance to practice a bit more with sculpting tools in Blender rather than leaning solely on the hard-surface modeling tools (constructing rather than sculpting) I'm more comfortable with.
I'm indebted to the time Workbenchmaniac has spent tutoring me in using Blender's sculpting tools, and specifically in sculpting faces. I made much more use of that tool set (and skill set) in this project than in any of my previous ones. I'm particularly happy with Nova's face sculpt, even if it took me three days to do what a real sculptor can do in thirty minutes.


I had the figure mostly modeled, still thinking of it as mostly a technical exercise, when April suggested the cyan hair streak to complete the CMYK color scheme. Things snowballed from there, and a few realizations (like "laptop stickers") and a week of work later, Nova had developed into something a bit more like a character.
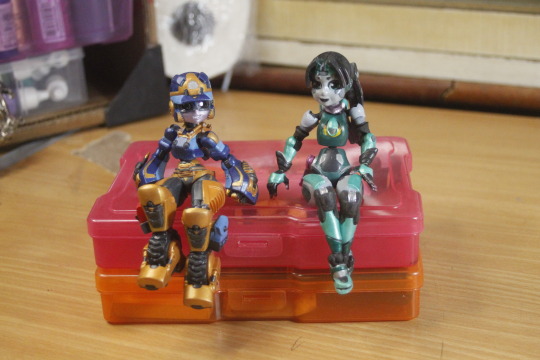
Nova's hair can be popped off to interchange her face plates using a pair of magnets. She has stands in varied heights for any of five emoji, meant to represent chat reactions to her stream, and some alternate hands.


Since I've never done any animation or sculpted posed figurines, I still have a lot to learn about modeling humans and creatures for posing, so the hand poses are simplistic and don't bend quite right. That'll be something to improve on in a future project, although I'll have to get back to something a little more crunchily mechanical for a bit for my next figure.
As always, thanks to my partner April and my mentor in all things Blender or miniature Workbenchmaniac, without either of whom none of these projects would be here.


Photo backdrops via Nendoroid More: Background Book 03.
#robotgirl#3d printing#3d modeling#action figures#robot girl#cyborg#emoji#fully automated luxury gay space communism
9 notes
·
View notes
Text
I'm absolutely jazzed to see such kind words about Zephyr, it's been a really nice surprise to see folks really seeming to enjoy her. Particularly surprised and happy to see the positivity from dinosaur connoisseurs, makes me feel like I was at least somewhat successful in capturing enough of Austroraptor to feel legit. Might need to come back to dinosaurs in a future design! 😁
Zephyr Slip
At the end of last year, before I'd begun working on Bit Cobalt, I ran into some paleoart of Austroraptor, a dromaeosaur (raptor) from Argentina. Austroraptor is one of the largest dromaeosaurs, with a long, narrow, Big Bird snoot, conical teeth that probably point to fishing, and small forelimbs, as well as leg proportions that hint at a runner. Much of the paleoart I saw depicted Austroraptor in waterbird colors, which gave it a soft and friendly appearance, immediately my new favorite dinosaur.
So I drew an Austroraptor and then a robotic one, adding a quail topknot or ahoge feather, and started to think about making a transforming figure that would change from this animal into a humanoid robot. But a transformation from cute robot girl to cute robot girl, except one of them is a dinosaur, seemed a bit redundant, and there would be compromises in both directions that would detract rather than add.

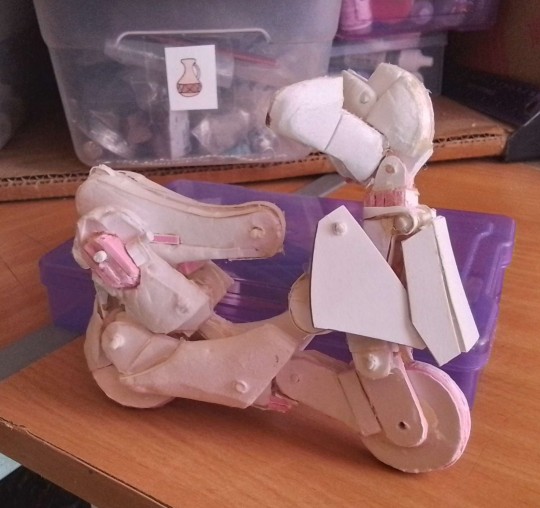
But a couple of months later, I saw a particular motor scooter and something clicked, and the game was on. I love motor scooters, and they're a fantastic accessory for other figures on the shelf. I went through two foamcore prototypes to nail down the transformation, making it as simple and sturdy as I could manage and making sure both modes would scale well with other 1/12 scale figures.

I also started collecting some reference images for details I could nab and integrate, and to nail down the scaling of the scooter.
After I had something that worked, I drew up some concept art for both modes and started modeling. I was able to streamline the design a couple of steps further in the 3D model, and then it was all carving up shapes, fine tuning, etc. Probably the longest phase of modeling was after I had my model roughed out into shape, but needed to build the joints, firm up the edges, define all the contact surfaces, and apply subdivision surfaces. I found it useful to rig the model and set a couple of animation steps in Blender for the two modes so I could simply page back and forth between them.


I had to set the design on the back burner while I worked out the kinks with my 3D printer and built my last couple of projects. Then I made a test print to identify any trouble spots, and after a couple of tweaks to get the feel right, it was time to print and finish the real thing. Zephyr Slip is the first thing I've printed in "color", and thanks to some dyes I need to experiment with more, she won't be the last. That means a much more durable finish for parts that have to slide against one another or clip into place. I did add a gloss coat to some surfaces of the black elements, but it shouldn't show chipping much. (Unlike the kickstand, thanks to my terrible decision to paint its feet.)
Like my previous figures, Zephyr's eyes (and console) are just printed gloss paper under a coat of gloss varnish, and her headlights and taillights have some clear resin poured in over the paint and cured into place for lenses. Cutting plastic windows like the ones on my Vertigo GT for the lower headlights didn't have the same effect, so they got the same clear resin treatment. The decal designs themselves were made in Blender, because I've given up on Inkscape's interface, but I think they came out okay.
The joints are almost exclusively 3mm ABS rods, although her hip joints are Kotobukiya Hexa Gear joints, which gave me a sturdy pin and hinge in a compact package and without visible pegs. I'm looking into options to make the pegs show less while being easy to remove for the construction and painting process. Despite some care with the tolerances, I did have to widen some peg holes and mush some pegs during assembly to get her pose well and snap together tight into either mode. But everything does clip solidly into place, resulting in a really playable figure.
As my first fully transforming figure and also my largest, Zephyr Slip is definitely the biggest figure project I've tackled so far, and I'm extremely happy with the results. Posability is probably her weakest area, but she can pounce and emote, and with her solid handfeel and satisfyingly snappy transformation, I'm happy with the design.
Paleontologically, I've followed most of the proportions of the real animal, although her torso should be a little bit longer, and her tail half again as long. She should also have visible first fingers, and I'm playing into the paleoart meme of bare snouts on dromaeosaurs that shouldn't have them. The proportion of thigh to shin is exaggerated, and the tail should have some left-right sway even if it's inflexible in the vertical axis. But it pleases me that she is both a roughly accurately scaled Austroraptor, and also a fairly realistically scaled scooter (if a bit chunky).
As always, due credit to @aprilpowered and Workbenchmaniac for support and feedback along the way, as well as Nemocyte (Tumblr | Twitter), whose feedback helped me to work out (among other things) the articulation needs of a theropod figure, something I'd never had to think about before.
94 notes
·
View notes
Text
Zephyr Slip
At the end of last year, before I'd begun working on Bit Cobalt, I ran into some paleoart of Austroraptor, a dromaeosaur (raptor) from Argentina. Austroraptor is one of the largest dromaeosaurs, with a long, narrow, Big Bird snoot, conical teeth that probably point to fishing, and small forelimbs, as well as leg proportions that hint at a runner. Much of the paleoart I saw depicted Austroraptor in waterbird colors, which gave it a soft and friendly appearance, immediately my new favorite dinosaur.
So I drew an Austroraptor and then a robotic one, adding a quail topknot or ahoge feather, and started to think about making a transforming figure that would change from this animal into a humanoid robot. But a transformation from cute robot girl to cute robot girl, except one of them is a dinosaur, seemed a bit redundant, and there would be compromises in both directions that would detract rather than add.
But a couple of months later, I saw a particular motor scooter and something clicked, and the game was on. I love motor scooters, and they're a fantastic accessory for other figures on the shelf. I went through two foamcore prototypes to nail down the transformation, making it as simple and sturdy as I could manage and making sure both modes would scale well with other 1/12 scale figures.
I also started collecting some reference images for details I could nab and integrate, and to nail down the scaling of the scooter.
After I had something that worked, I drew up some concept art for both modes and started modeling. I was able to streamline the design a couple of steps further in the 3D model, and then it was all carving up shapes, fine tuning, etc. Probably the longest phase of modeling was after I had my model roughed out into shape, but needed to build the joints, firm up the edges, define all the contact surfaces, and apply subdivision surfaces. I found it useful to rig the model and set a couple of animation steps in Blender for the two modes so I could simply page back and forth between them.
I had to set the design on the back burner while I worked out the kinks with my 3D printer and built my last couple of projects. Then I made a test print to identify any trouble spots, and after a couple of tweaks to get the feel right, it was time to print and finish the real thing. Zephyr Slip is the first thing I've printed in "color", and thanks to some dyes I need to experiment with more, she won't be the last. That means a much more durable finish for parts that have to slide against one another or clip into place. I did add a gloss coat to some surfaces of the black elements, but it shouldn't show chipping much. (Unlike the kickstand, thanks to my terrible decision to paint its feet.)
Like my previous figures, Zephyr's eyes (and console) are just printed gloss paper under a coat of gloss varnish, and her headlights and taillights have some clear resin poured in over the paint and cured into place for lenses. Cutting plastic windows like the ones on my Vertigo GT for the lower headlights didn't have the same effect, so they got the same clear resin treatment. The decal designs themselves were made in Blender, because I've given up on Inkscape's interface, but I think they came out okay.
The joints are almost exclusively 3mm ABS rods, although her hip joints are Kotobukiya Hexa Gear joints, which gave me a sturdy pin and hinge in a compact package and without visible pegs. I'm looking into options to make the pegs show less while being easy to remove for the construction and painting process. Despite some care with the tolerances, I did have to widen some peg holes and mush some pegs during assembly to get her pose well and snap together tight into either mode. But everything does clip solidly into place, resulting in a really playable figure.
As my first fully transforming figure and also my largest, Zephyr Slip is definitely the biggest figure project I've tackled so far, and I'm extremely happy with the results. Posability is probably her weakest area, but she can pounce and emote, and with her solid handfeel and satisfyingly snappy transformation, I'm happy with the design.
Paleontologically, I've followed most of the proportions of the real animal, although her torso should be a little bit longer, and her tail half again as long. She should also have visible first fingers, and I'm playing into the paleoart meme of bare snouts on dromaeosaurs that shouldn't have them. The proportion of thigh to shin is exaggerated, and the tail should have some left-right sway even if it's inflexible in the vertical axis. But it pleases me that she is both a roughly accurately scaled Austroraptor, and also a fairly realistically scaled scooter (if a bit chunky).
As always, due credit to @aprilpowered and Workbenchmaniac for support and feedback along the way, as well as Nemocyte (Tumblr | Twitter), whose feedback helped me to work out (among other things) the articulation needs of a theropod figure, something I'd never had to think about before.
#3d printing#3d modeling#action figures#transformers#robot girl#dinosaurs#austroraptor#dromaeosaur#1:12 scale#motor scooter
94 notes
·
View notes
Text
Vertigo GT: a Descent Pyro GX tribute


This is my Vertigo GT, a tribute to the Pyro GX from Interplay's 1995 6DoF first-person shooter, Descent. The model is 10cm or 4" long.
Here's the Pyro GX as it appeared in the opening cinematic of the second game:

I spent a lot of hours in that little ship as a child blasting angry mining robots with my sister, or building levels for us to play in with the fully featured level editor. In general the game was probably the most impactful on me of any game I ever played.
The Pyro itself is an adorable little shmup, an X-Wing with A-Wing engines jammed into a Metal Slug aspect ratio. The game UI included a cockpit view including an adorable peek over the back of the seat for a quick reverse view.
I wanted a desk toy to pay tribute to all of that, but there are plenty of models of the Pyro GX available for download online already, and I didn't want to just print an existing one or create yet another without bringing a spin to it. The thing that always stood out to me thinking back to this little ship was what a little sports coupe it was by typical sci-fi "starfighter" standards. So I leaned in.

The supercar elements are based on cars like the Chevrolet Aerovette concept and the Mercedes C111, which also provided the paint scheme.
I kept the craft armed because the weapons carried a significant part of the silhouette. The concussion missiles in particular are very close to the game design, probably because of that very memorable "whoaaaaam" sound effect and the number of times I exploded myself shooting the wall when peeking around a corner.
Because of those in-game cockpit views and to enhance the fantasy of owning a tiny space ship, I figured I needed a full interior with a seat and controls, although the latter aren't visible from any practical angle.


The cockpit glass isn't printed, but cut from packaging plastic and glazed over with varnish. Irritatingly, my paint choices made the interior harder to read than it was before painting.


The painting process itself was miserable, but at least I did the smart thing and got a can of Rustoleum for the yellow. Someday I'm going to find a way to approach painting these models that feels a little less Sisyphean.

Overall, though, I'm happy with my results; the Vertigo is definitely going to live on my desk for a while.
The printable 3D model is available at Cults.
0 notes
Text
BN-U13 Mech Droid

I finally have a 3D printer thanks to an Anycubic sale, and I started a small project to try it out and work out my calibrations and learn the process of printing a bit. The little droid in the middle is BN-U13, or Bunny, intended as 1/12 scale because I live there, and also because Star Wars Black Series uses this scale.


BN-U13 is an inexpensive little mech droid intended as a competitor's cheap but familiar alternative to the ubiquitous R-series astromech droids. (If dust farmers are buying military-grade astromech droids secondhand for maintenance work, there's clearly a market for it.) Bunny can't calculate hyperspace jump coordinates, but she is programmed with repair manuals for over 1100 models of load-lifter alone. And while she doesn't carry the wide variety of built-in tools common in astromechs, she comes complete with a retractable manipulator arm, scomp link (not articulated on my figure), and a convenient carry case sleep mode. Modeled here by Tajador for some reason.

The design draws of course from droids like the DUM pit droids, BD-1, D-O, and the R-series astromech droids in general, but also some elements of an oscilloscope, a couple of grills, and a handful of other mechanical references. I like to think that the rear legs evoke office chair casters.
Bunny's printable model is available for download at Cults 3D. If you print one yourself, I'd be overjoyed to hear about it!
Free OBJ file BN-U13 Mech Droid Star Wars fan design 🤖 ・3D printer model to download・Cults (cults3d.com)
Thanks as always to @aprilpowered and Workbenchmaniac for their help along the way with this design. April's familiarity with the Star Wars galaxy and WebM's experience with resin printing in particular averted what could have otherwise only been certain disaster. April even suggested the carry handle for that classic luggable electronics flavor.
11 notes
·
View notes
Text


Bit Cobalt, my second resin printed action figure. (The first was Caeli, the turquoise figure in the last few images.) Bit was modeled in Blender and printed with an online service. She's around 12 cm tall, intended as 1/12 scale.
Bit wears her Transformers influence on her sleeve, especially 2007's Animated line. With a little more practice, I'd like to attempt building a transforming robot figure in the future, but I needed to experiment with some joint and material tolerance details first. Another influence was Robot Neoanthropinae Polynian. I really enjoy the design sensibilities of that line, but I found the figures frustrating to handle and pose, so I made it a goal to make these figures at least pose better than my copy of Polynian Roza. I think I more or less succeeded. Bit's eyes are essentially stickers, and the clear elements are UV cured resin added after painting. Most of her joint parts use ABS or wire pegs. Her mid-torso joint is a Hobby Base spherical figure joint similar to Revoltech or Polynian, and her neck joint is a steel ball bearing and some small magnets, allowing for very smooth movement in any axis. The paint is mostly Vallejo and FolkArt acrylic. The Vallejo varnish is mostly holding up so far, but designs with more interaction and potential scraping between parts (read: any transforming robot figure) will probably need some Krylon. Aside from doing a full transforming robot figure, something else I'll work on improving for my next design is the out of the box fit. Bad clearances and tolerances led to a lot of sanding down pegs and shaving out spaces in putting Bit together. I'm deeply indebted to my partner @aprilpowered and my friend WorkbenchManiac, who are respectively far more skilled in character design and modeling, miniatures, and 3D printing than I am, and who were a huge support and a source of feedback and advice along the way.
9 notes
·
View notes