
Statistics
We looked inside some of the posts by feedurself and here's what we found interesting.
Average Info
Notes Per Post
26
Likes Per Post
17
Reblog Per Post
9
Reply Per Post
0
Time Between Posts
19 days
Number of Posts By Type
Text
17
Last Seen Tumblr Blogs


Fun Fact
In February 2021, Tumblr had 518.6 million blog accounts.
Text
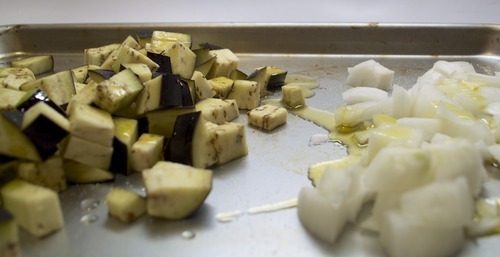
Pissaladière

Adapted from Saveur
Fact #1: The South of France is one of my favorite places on earth.
Fact #2: My vegetable crisper was full of onions.
Fact #3: I had two bottles of rosé in my fridge and no plans for the night.
Conclusion: Make pissaladière.
Pissaladière is an onion pizza from the Southern part of France, and it's delicious and makes me think of summer and long beach vacations on the Riviera, which is typically how I roll when I'm not spending the summer days adjusting the speed of the fan in my windowless office.
The recipe takes a while to cook - there's dough that needs to rise and onions that need to slow cook - so it's definitely something to make only when you have a lot of time and a bottle of wine (or whatever your drink of choice) on hand. Pissaladière, like anything summertime and beach-related, is not to be rushed.
I need to point out several ancillary facts about the making of pissaladière relating to the copious amounts of onions used in the dish.

Ancillary Fact #1: You will feel extreme pain and discomfort while cutting the onions. Your eyes will burn and sting and tear until your face feels as if it falling off. Make sure you have clean towels ready and within reach so you can dry your face and maintain good hand-eye contact. Cutting onions requires handling a sharp knife, and whatever misery you might think you are experiencing with the onions pales in comparison to that of a sharp knife cutting through your finger. I speak from experience.

Ancillary Fact #2: Eating onions - cooked or otherwise - before bed will give you strange and vivid dreams like you've never before experienced. I can't vouch for the accuracy for this for everyone (although five minutes of internet research seems to lend some validity) but I will say that after I ate a few pieces of pissaladière and went to bed, I had one dream in which my house was being surrounded and robbed by San Francisco hipsters and another in which my nephew and I were kidnapped and taken to a living doll museum where everyone dressed as if they lived in Colonial America.
Ancillary Fact #3: If, like me, you live in an apartment with subobtimal ventilation, you will wake up to a truly rank smell that will linger for an entire day. You won't notice the smell while you are actually cooking the onions. In fact, you may, like me, think the smell of slow cooking onions is absolutely fantastic. It is absolutely not fantastic the morning after.
Consider yourself warned. You should still make this dish.
Pissaladière gets its name from an anchovy paste called pissalat. I don't eat anchovies, so I went a little renegade and left them out of this recipe. It was still delicious. I used a small cookie sheet measuring 9" x 13", but the recipe can easily be doubled, and leftovers freeze well.
Ingredients (makes nine pieces):
1 1/2 cup water
1/2 cup warm water
1 teaspoon sugar
1 1/2 teaspoon salt
1 packet dried yeast
1/3 cups, plus 2 tablespoon olive oil
3 yellow onions and 6 small spring onions, or 6 yellow onions
1 tablespoon dried herbes de provence
12 black olives
Make the pissaladiere:
In a cup, add the yeast to the warm water and sugar. Stir to combine and set aside for a few minutes until the yeast starts to foam. Meanwhile, add the flour and 1/2 teaspoon of salt to a bowl. Pour in the yeast-sugar mixture and stir until combined. Knead with your hands until you form a ball. Coat with one tablespoon of olive oil, cover, and set aside.

Slice the onions.

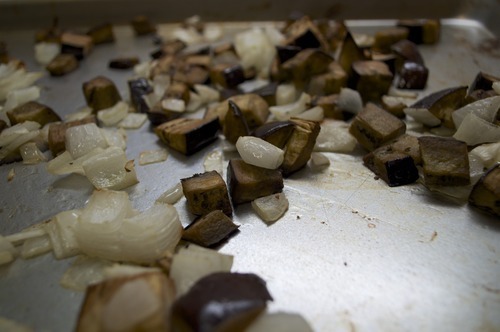
In a pot, add the 1/3 cup of olive oil and the sliced onions and cook over medium heat for half an hour. Reduce the heat to low and cook for another 45 minutes.

You don't want anything to burn, so make sure to stir the onions often, especially the longer they've been cooking. The onions will get golden and almost jam-like. Turn off the heat and set the onions aside to cool.
Add the remaining tablespoon of olive oil to a small baking sheet and spread to coat evenly. Add the dough to the sheet and press evenly. Spread the onion mixture evenly over the top, cover with plastic wrap, and let rest for another hour.

Preheat the oven to 425 degrees.
Cut the olives in half, removing the pits, and place on the top of the pizza.

Cook for half an hour, until the crust is golden brown. Let cool, and cut into squares.

3 notes
·
View notes
Text
Stinging Nettles and Dandelion Pies

Let's all just ignore the fact that it's now the end of July. Instead of summer swelter, let's take it back to budding trees. To baby birds chirping in their nests. To spring cardigans and lightweight sweaters. Let's take it back to May, when stinging nettles were in season. Because that's when I made these pies.
At the farmer's market, there was this big sign, with big, bold, red letters. DANGER. STINGING NETTLES. DO NOT TOUCH. The woman at the farmstand told me to handle them them with gloves "because they really do sting, and they will hurt you."

Earlier that week, the batteries on my keyboard at work kept dying. Always at the end of the day, always when everyone else had left the office, and always at that critical moment when I was about to finish some important deadline. I'd charge them overnight, but it didn't matter. That Low Battery message just kept popping up.
I called our IT guy, who couldn't figure out the problem. Then, he saw me picking white stuff off one of the batteries.
"What are you doing?" he asked.
"Picking this white stuff off of the batteries. It keeps getting on them. It's on the charger too"
"You should stop doing that. And you should wash your hands."
"Why?"
"Because that white stuff is battery acid. Your batteries have become corrosive."
Did I mention that it was May? And that in May, my allergies are serious? And that I'd been rubbing my watery, itchy eyes like every five seconds since this keyboard incident first started?
Were a bunch of nettles really going to scare me? I'd just spent the week rubbing battery acid into my eyes.

I didn't use gloves when handling the nettles, and I'm not going to lie. Those nettles stung. Consider yourself warned.
If you're not feeling as brave, or if you can't find nettles because they are no longer in season, any bitter green would do. I added a bunch of dandelion greens because I kind of liked the idea of pies with a filling made of weeds.
Ingredients (makes four small pies):
one bunch of stinging nettles
one bunch of dandelion greens
3 - 4 green onions
1 egg
1/4 pound of feta
1/4 cup of olive oil
black pepper to taste
phyllo dough (about four to six sheets)
Make the pies:
Chop the green onions and crumble the feta, and add them to a bowl along with the beaten egg. Remove the leaves from the nettles (carefully! use gloves!) and the dandelion greens.

Cook the greens in a pan over medium heat with the olive oil until wilted, about ten minutes. Set aside to cool.

Once the greens are cool enough to handle, wrap them in a towel and squeeze out as much liquid as you can. Chop them up and add them to the bowl along with the feta/egg/green onion mixture.
Preheat the oven to 350 degrees. Pour the remaining olive oil into a small bowl.
Remove about eight sheets of phyllo dough from the package and cover with a damp towel.

Remove one sheet of phyllo dough and brush it with the olive oil. Place a second sheet of phyllo dough on top, and brush it with olive oil as well. Make sure to keep the dough that you aren't using covered under the damp towel.
Place a quarter of the mixture on one corner of the dough. Fold the dough over to make a triangle, and then continue to repeat, turning the dough over each time, so that you maintain the triangular shape.

It may take awhile to get the hang of the folding technique. Don't worry if you end up with an irregular rectangle or some other odd polygon.
Set the pie aside on a baking sheet, and brush the top with olive oil.
Repeat three more times, so that you have four pies in total.
Bake at 350 degrees for about forty five minutes. The pies should be flaky and golden brown. They freeze really well, so if you undercook them by a few minutes, they'll be perfect when you reheat.

#stinging nettles#stinging nettle pie#stinging nettles and dandelion pie#weed pie#cooking#feedurself#recipe#vegetarian#dinner#phyllo dough#filo dough
2 notes
·
View notes
Text
Meatballs and Sunday Sauce

My mother taught me how to make meatballs, just like my grandmother taught my five aunts. However, my father swears that all of our meatballs have a slightly different taste. "Everyone's hands have a specific chemistry," he says. "It gets into the meat."
Chemistry aside, I think I make a pretty good meatball, largely because I've stolen everyone's secrets and tricks.
My mother buys ground pork and ground beef separately and then mixes them together. She says that the veal in pre-made meatball mix makes for a drier, tougher meatball. At least one of my aunts grinds her own meat, but that's a little too intense for me at this point.
My mother says its very important to crack the egg into a bowl before adding it the meat, in case it comes out rotten. My mother is the most practical person I know, and I try to follow this excellent piece of advice but usually forget.
Meatballs need some kind of bread to bind everything together. When I was a kid, my mother would soak a piece of white bread in milk until it got really soft, and then she'd mix it with the meat. At some point, she switched to regular, store-bought breadcrumbs, and I know this is kind of sacrilege, but I prefer it that way because I think it incorporates better. Also, not to gross you out, but I have clear memories of sitting at the kitchen table picking out bread chunks from my meatballs, because I thought they looked like snot.
My father's cousin said the secret to a good meatball is not to over mix the ingredients. Always use with your hands, never a spoon, and only until everything is just combined. It should take less than a minute.

A family friend said to add a bit of water to the mix if it's too dry. A bit of milk would work too.
Someone on some television cooking show said she rubs a little olive oil onto your hands before she starts shaping the meatballs because it flavors the meat. I know this doesn't make sense, because you then go and fry them in olive oil, but I do it anyway.
The most important tip comes from my father "Don't overpack them. Meatballs should be light."
I don't think he's ever made a meatball in his life, but he is nonetheless an expert on the topic. Heavy, overpacked meatballs are no good at all.
Ingredients for the meatballs (makes about five or six):
half a pound of ground meat (I like a combination of beef and pork)
one egg, cracked and beaten
1/3 cup of dried, Italian bread crumbs
three cloves of garlic, finely chopped
1/4 cup grated Pecorino cheese
half a cup of oil (I use a combination of olive and vegetable)

Ingredients for the sauce:
two 28 ounce cans of San Marzano tomatoes
three cloves of garlic, smashed with the back of your knife
two to three tablespoons of olive oil
pinch of red chili flakes, oregano, salt and sugar, to taste
Make the Meatballs:
Combine the first five meatball ingredients together in a large bowl, being careful not to over mix. It it feels dry, add a little bit of water until it's moist. Form into balls. I like mine a little bit bigger than golf balls.

Add the oil to a pan and cook over medium heat. The oil is hot when a drop of water in the pan causes it to sizzle. Carefully add the meatballs to the pan, being careful not to crowd them or burn yourself with a splash of oil.

Fry the meatballs for a few minutes on each side, and use a spoon to turn them over in the pan. When the meatballs are fried and brown on all sides, remove from the pan and place on some paper towels to drain off the excess oil.

Make the sauce:
Add a few tablespoons of olive oil to a large pot along with the remaining cloves of garlic. Fry for a minute or two on medium-low heat, and then add the chili flakes if using. Add the two cans of tomatoes, and crush them down with a wooden spoon. Cook for about ten minutes, and then add the meatballs, a pinch of oregano if using, and the basil. I usually just add the basil leaves whole.

The longer this cooks, the better it will taste, so leave it on the stove for at least an hour or two, stirring every once in awhile to make sure nothing sticks and burns to the bottom of the pot. Give the sauce a taste each time you stir to make sure it doesn't need a little bit more chili flakes or oregano. Sometimes, I add a pinch of salt or sugar, depending on how things are going.
2 notes
·
View notes
Text
Rutabaga Fries

You know that recipe for rutabaga chips that I posted last month? In my mind, I had been eating celery root chips until like literally five seconds before I hit the Post Now button.
But wait, it gets better. I actually gave one to a friend of mine as a present for coming with me to my CSA vegetable pickup that week. I put it right in the back seat of her car and said, "Here, take this celery root." I'm sure it was one of the best presents she ever got.
It just so happened that I looked up the contents of my CSA share - who even knows why - right before publishing the post and noticed the prominent absence of celery roots from the list. Instead, there were rutabagas. And plenty of them.
That's right. Until recently, I didn't know the difference between a rutabaga and a celery root. Hi. I'm Francesca, and I'm a food blogger. Can you even imagine the total, epic embarrassment if I hadn't checked?
What's so strange about all of this is that I've definitely eaten a celery root before, and now that I'm thinking about it, the two look completely different, aside from their generally big, bulbous, root vegetable-ness.
This is a rutabaga:

And this is a celery root:

Totally different. Now we all know.
Having felt like I had dodged a deadly hot bullet, I posted the rutabaga chip recipe to my Facebook page. Here was a comment from one of my friends:

The compliment was lovely. But more importantly, who knew rutabagas had fans?
So I decided to get to know them better. Over this past month, I've mashed them, and I've roasted them and I've made them into these insanely good fries, and now I'm a big fan too.
Ingredients (makes one serving):
one large rutabaga
1 tablespoon olive oil
1/2 teaspoon salt
Make the fries:
Preheat the oven to 350 degrees. Peel the rutabaga and then cut it into sticks that are about half an inch thick.

Toss with olive oil and salt, and roast in the oven for about forty minutes, until crisp and golden brown. Eat immediately.

0 notes
Text
Speculoos

Adapted from Epicurious
It's the middle of February, so I think it's safe to start talking about my New Year's resolution. Not my resolution to wake up early and go running before work every day. Not my resolution to limit my coffee and wine intake to one daily serving each. Not my resolution to get eight hours of sleep. No, those resolutions were crazy and broken in like ten seconds. Today I'm talking about the one resolution I have actually managed to keep. I'm talking about my resolution to break my habit of buying pre-made, store-bought food.
It started with hummus.
To date, I've posted three hummus recipes on this blog: roasted yellow pepper, carrot and white bean, and edamame, In each post, I go on and on about how easy it is to make and how you'll never need to buy the store-bought stuff. And yet, know what ends up in my shopping basket every week? That's right. A large container of hummus.
One day in late December, I went to the supermarket and saw that they had completely run out. I stood in front of the case for a good minute or two with an open mouth and glazed eyes as if witnessing some sort of apocalyptic tragedy. And then it hit me. I was a total fraud.
At that point, I made a hard and fast decision. Never again. I was done with the store bought hummus. My 2014 resolution was born.
I started with the things I know I can make well: some type of fruit compote and muffins for breakfast, pizza with a delicious topping or two, and obviously, hummus. If I made it once, it'd go on the list of things that I wasn't going to buy already made in the supermarket.
Since then, it's been full on. I started making veggie chips. I stopped buying canned beans and started presoaking the dried ones overnight. I now bake my own bread every week.

A few years ago, I spent New Year's in Amsterdam. It was the first time I had speculoos, which are thin, crispy spiced cookies, and I've been a fiend for them ever since. If I'm passing through that part of the world on vacation, I'd bring back boxes. My lovely friends would text me when they find a store here in New York that carries them. It was no joke.
Last night, I polished off the last cookie in the last box of my stash. Usually, I'd start panicking, but this time, I was totally calm. I'd just made a fresh batch.
I had to make a few changes to the recipe. Since nobody is here to help me with the four dozen cookies the original makes, I scaled everything down by a half. Speculoos are a lot like gingerbread, and I like mine with a bit of crushed black pepper, so I added some. Instead of the egg, I swapped out ground flax and water, which sounds strange but is actually a great substitute and prevents you from having to waste half an egg.
I started on these kind of late at night and didn't want to be bothered with rolling out dough on a messy, floured board, so I stole a tip from a comment in some other recipe that I can no longer find and molded the dough to a form before chilling it so that the cookies could be sliced. (Thank you comment-tip lady, whoever and wherever you are! You are a genius!) I used a coffee mug, and it ended up making a nice log shape.

Also, you know how cookie recipes say to wrap dough in plastic and then chill? Well, I had no plastic wrap, so I cut open a plastic bag and used that instead.
Even with all these changes, the cookies were fantastic. And the moment I pulled the pan out of the oven and that spicy cookie smell hit me in the face, I knew I had stuck to the right resolution.
Ingredients (makes about fifteen to two dozen cookies):
1 cup all purpose flour
1/2 tablespoon ground cinnamon
1 teaspoon ground ginger
1/4 teaspoon ground cloves
1/4 teaspoon ground blackpepper
1/4 teaspoon baking powder
1/4 teaspoon salt
3/4 cups (packed) dark brown sugar
1/4 cup (1/2 stick) unsalted butter, room temperature
1/2 tablespoon ground flax seed
1 and 1/2 tablespoon water
Make the speculoos:
Combine the first seven ingredients in a medium bowl.

In a small bowl, mix the ground flax seed and the water and set aside.

Beat the brown sugar and butter in large bowl using an electric mixer. Add the flax-water mixture, and then gradually add the dry ingredients. Beat slowly or mix by hand until everything is combined.
Mold the dough into a ball, wrap in plastic, and push it into a coffee mug, making sure the ends of the plastic wrap are sticking out from the top of the cup (you can also just roll it into a freeform log). Freeze for about forty minutes.

Preheat oven to 350°F. Line a baking sheet. Pull the dough up from the cup (if using) and remove the plastic wrap. Cut the dough into thin slices using a sharp knife.

Bake ten to twelve minutes at 350 degrees on a lined baking sheet, until the cookies are brown around the edges. Let cool on rack. Whatever you don't eat immediately can be stored in an airtight container for about a week.

0 notes
Text
Soba Noodles with Pickled Watermelon Radishes

Adapted from David Chang
The cold, dark nights. The quiet solitude of snow. The bone chilling sounds of Edward Gorey's damsel in distress (totally the best part of Masterpiece!). Winter is the season for solving mysteries.
Sherlock and Poirot may have their logical reasoning and superior deductive skills, but I have text messaging and a friend who knows about these things.


The clues: turnip on the outside, beet on the inside, and foul to the taste.
Intriguing, right?
Here's a picture, so you can play along.

By now, you must be riveted to the point where you are sitting on the very edge of your seat. Hold on tight, because the response is a shocker.

Who knew this was even something that existed? Not me.
And so with one mystery solved, another is revealed.

I have never pickled anything because I hate pickles. I also loathe radishes.

Which leads us to the final mystery, the be all to end all. What else could I do with them? Because it turns out, I had a lot. My winter CSA had given me tons of amazing root vegetables. Potatoes, carrots, rutabaga.

Clearly, stating the obvious.

Not feeling like I had much choice...


It did. The salt-sugar mixture made the radishes taste less radishy without being too pickled, and the soba noodles were a nice balance. Mystery solved, case closed.
Ingredients (makes two servings):
2 medium to large rainbow radishes
2 bundles of soba noodles
2 tablespoons of soy sauce
1 teaspoon of peanut butter
1 teaspoon of honey
1 teaspoon of chili garlic sauce
1 teaspoon of salt
1 teaspoon of sugar
Pickle the radishes and make the noodles:
Slice the radishes into thin strips. In a bowl, toss with the sugar and the salt, and set aside for at least ten minutes.

Meanwhile, boil a pot of water. Add two bundles of soba noodles and cook for about three minutes.

In a bowl, mix the soy sauce, peanut butter, honey and chili-garlic sauce. Drain the soba noodles and toss with the sauce. Let cool, and then top with the pickled radishes.

#watermelon radishes#pickles#pickled radishes#dinner#vegan#vegetarian#soba noodles#feedurself#Food Blog#food porn#cooking#recipe#healthy
1 note
·
View note
Text
Rutabaga Chips

Like many New Yorkers, I don't own a dishwasher. Neither do my parents. We all scrub our pots and pans the old-fashioned way. Life in the big city can be so very hard.
My mother on the subject: "If I have to pre-rinse everything before putting it into the dishwasher, then what's the point? I'd have to give up so much storage space. Plus, I heard they attract roaches."
And while I see her point completely, and have managed all of these years just fine, I got it into my head that I absolutely had to have one. So I did the logical thing and went to an appliance store.
The appliance store sales associate on the subject: "You can't just buy a dish washer. We need to send out a contractor."
Um, ok...
Two weeks later, my appointment was scheduled. I had it all worked out. I'd replace my microwave and range hood with one of those combo deals, prune the contents of a cabinet or two, and I'd be able to fit the dishwasher into a spot right by the sink without feeling like I'd lost any storage space. I even drew a picture of the whole thing. It was genius.
The contractor on the subject, two minutes after he walked into my kitchen: "The job is going to cost at least $10,000. Honestly, I say save your money. It's not worth it."
It turns out, so many New Yorkers don't own a dishwasher because we live buildings that were built when people washed dishes in a sink. I couldn't just go ahead and buy a dishwasher. I would have needed all new wiring and plumbing. For starters.
Obviously, this was really disappointing. So to cheer myself up, I bought a food dehydrator.

While it won't solve my dishwashing problems, it does make a mean bunch of rutabaga chips. Other root veggies work just as well. And if you have a working dishwasher and/or don't have a dehydrator, you can slow bake them in your oven instead.
Ingredients (makes about a two cups):
4 - 5 small rutabaga (or maybe two large ones)
1 teaspoon of olive oil
1/2 teaspoon of salt

Make the rutabaga chips:
Peel the rutabaga and slice them very thinly. Use a mandoline if you have one, but do not despair if all you have is a knife. That's what I used, and it was fine. Just make sure the slices are as thin and uniform as possible.

Place the slices on the dehydrator trays so that they are spaced evenly apart. My dehydrator has four trays, so I ended up using about one tray per rutabaga.

Turn the dehydrator on to about 135 degrees. After about ten hours, they should be done.

After you've finished dehydrating, toss the chips with the olive oil and salt and bake them at 350 degrees for about two or three minutes. Make sure to preheat the oven, and definitely, absolutely, do not walk away from the oven or get distracted while they are in the oven because keeping them in for just a bit more will cause them to burn.
Take the chips out of the oven and let them cool for a minute or two so they crisp back up before eating.

#rutabaga#rutabaga chips#veggie chips#vegan#healthy#dehydrator#feedurself#snack#food blog#food porn#cooking#recipe
1 note
·
View note
Text
Cacio e Pepe with Fennel

I went to Rome about a year and a half ago, and I ate cacio e pepe almost every day. Spaghetti, pecorino, black pepper. and maybe some butter and/or olive oil. So good, so simple, and best accompanied with several glasses of wine.
It's the kind of dish that just makes you want to sing "I'm in Rome and about to stuff my face with more deliciousness than my ever expanding stomach can handle." Or maybe quietly hum it as you slowly drift off into a semi-drunken food coma.
This is me on Day 2 of the trip, about to dig in.

I will not be showing you pictures from Day 5 of the trip for obvious reasons.
If you're on a New Year-new me, post-holiday, cleanse, detox, let's all do yoga and meditate kick, then stay away from the cacio e pepe. DO NOT READ ANY FURTHER. Consider yourself warned.
If, like me, you need something hearty and cozy on this freezing January night or wish you were sunning yourself on the Spanish steps instead of slogging through wintry frozen sludge, then please, continue.
There's a little bit of controversy out there as to what makes a proper cacio e pepe. For some people, it's butter and pecorino. For others, its olive oil instead of butter. Or it's neither. Some equate adding a vegetable or other accompaniment as an inexcusable, disgraceful travesty. I say, do what makes you happy. Especially if you are the only one eating it.
And happiness for me was using up that starting-to-wilt bulb of fennel I had lying around.

For good measure, I also used both butter and olive oil.
I'll run it off once the snow melts.
Ingredients (makes one serving):
1 small fennel bulb
2 - 4 ounces of spaghetti (depending on how hungry you are)
1 tablespoon of olive oil
1 tablespoon of butter
1 -2 tablespoons of grated pecorino cheese, or to taste
crushed black pepper, again to taste
1 teaspoon of salt
Make the cacio e pepe:
Add the teaspoon of salt to a pot of water and boil. Add the spaghetti and cook according to the package. Mine cooked for about 12 minutes.

Meanwhile, slice the fennel bulb into thin strips and cook with the olive oil in a pan until soft, about ten minutes. Watch it closely, and if the fennel starts to brown, lower the heat.

Add one to two teaspoons of water from the pasta pot and mix with the fennel. Drain the pasta and add to the pan along with the butter.

Stir to coat, add the cheese, and stir again. Add the crushed black pepper to taste, along with more cheese if you feel it needs it and give everything one last stir before happily stuffing your face.

#pasta#Rome#cacio e pepe#Food Blog#food porn#feedurself#cooking for one#cooking#vegetarian#dinner#fennel#cacio e pepe with fennel#spaghetti
8 notes
·
View notes
Text
Pumpkin Cranberry Muffins

Adapted from smitten kitchen
I know it’s already the middle of January, but I have to say that the weeks leading up to Christmas were just Grinch-like, Scrooge-like shitty, and only now am I back fully to being my normal cheery self.
It wasn’t for lack of trying to feel the spirit of the season. I had a chocolate Advent calendar but kept forgetting to open the daily boxes. I bought some branches loaded with those festive red berries, but one dropped on the floor and was eaten immediately by dog, who then threw up for two days straight. (She’s ok.)
A few days before Christmas, I splurged on this limited edition, imported, hand-crafted, papier-mâché Santa Claus.

I think he's glorious. The people at the shop? Not so much. "Look at this Santa. Who would buy this? Would you, ever?" the sales associate at the register whispered as he wrapped it in tissue. "Never," said his colleague. "It’s totally creepy and weird." Then they both turned around and looked at me with pity and disgust.
And so, having had any last bit of Christmas cheer completely destroyed, I decided to take things back to a happier time. The last time I did any kind of serious cooking. Thanksgiving.

Thanksgiving left me with a ton of leftovers, and even weeks after the fact, I still had some pumpkins and cranberries lying around, so I decided it was as good a time as any to make muffins. I ate one on Christmas Eve while surrounded by my half-opened Advent calendar, my poisonous berries, and my creepy Santa, and it was delicious.
I’m really glad the holidays are over. Happy belated New Year everyone!
Ingredients (makes about nine muffins):
1 1/2 cups flour
1 teaspoon baking powder
1/2 teaspoon baking soda
1/2 teaspoon table salt
1 tablespoon cinnamon
1 cup mashed pumpkin (canned, or from two small pumpkins)
1 cup of whole fresh cranberries
1/3 cup vegetable oil, plus about a tablespoon for the muffin tins
2 large eggs
1 cup of brown sugar
Make the muffins:
If you are using fresh pumpkins, roast them in the oven on a pan for at least an hour at 350 degrees. Let cool, cut open, scoop out and discard the seeds, and you should have about cup’s worth of pumpkin remaining. Otherwise, you can get it from a can.

If you have not already done so, preheat the oven to 350 degrees.
In a bowl, combine the flour, sugar, baking powder, baking soda, salt, cinnamon, and brown sugar.

Crack open the eggs and add them to the flour, along with the pumpkin puree and the vegetable oil.

Stir to combine, and then fold in the cranberries.

Lightly grease a muffin tin with the remaining tablespoon of vegetable oil. Scoop about half a cup of batter into each muffin tin.

Bake the muffins for about twenty five to thirty minutes at 350 degrees. You will know they are done when you can poke them with a toothpick, and it comes out clean.

You can freeze whatever muffins you don’t eat right away. I’ve been eating the leftovers over these past few weeks, and they heat up again in the oven really nicely.
#pumpkin#pumpkin cranberry muffins#muffins#cranberry#breakfast#feedurself#food blog#food porn#recipe#cooking
0 notes
Text
Thanksgiving

I don't play when it comes to Thanksgiving. My mother, my aunt and I usually split up the cooking, and we are quite serious about making sure nobody goes hungry. One year, there were five pies - one for each person sitting at the table.
I usually settle on a few recipes before I get down to cooking and then end up changing things because I've forgotten to buy some key ingredient, or things don't seem to be turning out quite right, or I get some bright idea along the way.
This year being no exception, I made:
Pumpkin pie with a gluten free pie crust, only I used roasted kabocha squash for the filling, left out the cardamom and the lemon zest, threw in the rest of the spices without measuring, and added half a cup more flour to the dough recipe.
An apple pie with a double gluten free pie crust (again adding half a cup more of flour to each). For the filling, I chopped enough apples until I filled a large bowl and then tossed them with some flour, sugar and cinnamon. It was completely unscientific. Also, the top crust fell apart when I tried to place it on the pie, so I just smushed it down on top of the apples and then glazed the whole thing over with cream and sugar. I don't think anyone noticed.
Sweet potatoes and apple casserole, only without the pecans. Also, I added some amount of cream to the sweet potatoes before mashing
Mashed butternut squash and pears, which really was supposed to be roasted butternut squash but I couldn't get them quite caramelized and time was running out, so I mashed them up instead. Also, I cooked the pears in butter separately and mixed them into them mash. Also, there were no spices. Instead, I used more cream.
Roasted brussels sprouts. No recipe, I just cut them in half and roasted them with olive oil until they were perfect.
Cranberry Pomegranate Sauce, but with a fresh pomegranate (I ruined my favorite t-shirt trying to get the seeds), the juice and zest from two clementine oranges, and an apple.
Gluten-free cornbread stuffing, which I cobbled together from maybe five different recipes that I now cannot find. It ended up being ok, but not great.
Quinoa with spaghetti squash, dried cranberries, hazelnuts and feta, which I made at the list minute because one of the pieces of pumpkin I had bought for the pie turned out to be spaghetti squash. Also, I had to use up the leftovers in my refrigerator. I'll post the recipe later.
Everyone was thankful and happy. Nobody starved. And there are leftovers for at least a week.

Hope you had a good one too.
#Thanksgiving#Thanksgiving side dishes#vegetarian thanksgiving#feedurself#recipes#food#cooking#dinner#holidays#foodporn#food blog
0 notes
Text
Cinnamon Dulce de Leche

Saturday morning was going to be amazing. I was going to make a pot of coffee with my brand new, super fancy all-in-one espresso-cappuccino-drip coffee maker, and I was going to make a big pot of apple sauce. A few minutes in, my house is starting to smell like one of those lovely fall candles. But better. I’m feeling like nobody can mess with my domestic goddess skills.
Pride cometh before the fall.
I walk into the kitchen, and there is coffee all over my countertop and dripping on the floor. Some nozzle wasn’t aligned with some opening or something. I’m not at all fazed because it’s a new machine and I’ll figure it out. I start mopping and drying and trying my best to keep my dog away because she has this annoying habit of licking the floor.
And then I smell something burning and realize that I’d forgotten to stir the applesauce. I walk to the stove, and the entire bottom of my favorite pot is coated with black, sticky nastiness.
My kitchen sink is now full of towels and coffee grinds, so I move the pot to my bathtub and start scrubbing away before deciding it’d be easier to just let it soak for awhile. My pre-war bathtub pipes are probably all clogged with burnt apple bits.
At this point, I feel like I’m about to die from caffeine deprivation, so I decide to give the machine another shot.
I grind more coffee beans. I measure out the water. I make sure everything is aligned precisely. I hit the ON button, and water starts streaming out of the espresso nozzle. Only I wasn’t making espresso. I grab a towel and change the settings. Water starts spraying out of the steamer attachment. So now, I’m wet, and I’m pretty sure I have coffee grinds in my hair.
And then my dog starts freaking out because she’d snuck back into the kitchen while I was dealing with the pot in the bathroom and clearly I hadn’t cleaned the floor as well as I had thought.
Twenty minutes later, I had it all under control and was pouring myself a giant cup of coffee.
A friend of mine went to Mexico a few months ago and brought me back a bottle of dulce de leche. I decided this was as a good a time as any to stir some of it in. And by some, I mean like half the bottle. It saved the day.
Here’s how you can make it for yourself.
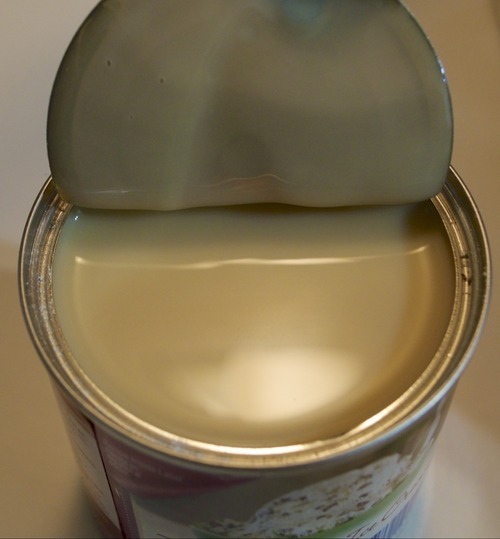
Ingredients:
One 14 ounce can of sweetened, condensed milk
One cinnamon stick
Make the dulce de leche:
Pour the condensed milk into a small pot. Add the cinnamon stick and cook over low to medium heat for at least thirty minutes, stirring continuously with a wooden spoon. The longer you cook it, the darker and thicker it will get. Remove the pot from the stove and let cool. Stir a spoonful into coffee, warm milk, hot cocoa, or just eat straight from the pot.

#dulce de leche#dulce de leche with condensed milk#condensed milk#cinnamon dulce de leche#kitchen fail#feedurself#feed yourself#food porn#cooking#recipe#feed urself#desert
0 notes
Text
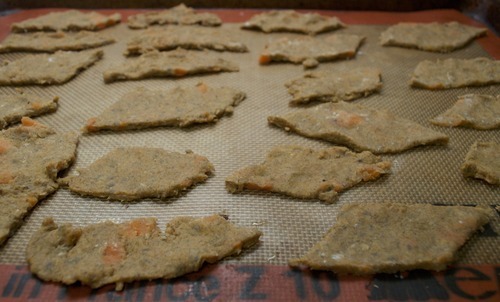
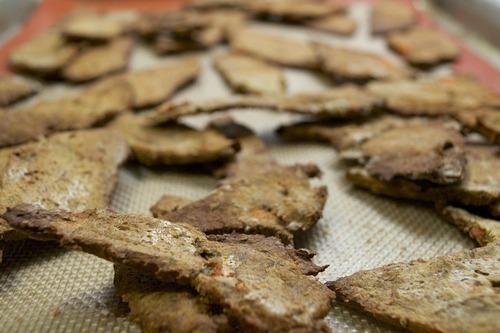
Sweet Potato Crackers

This recipe was supposed to serve three goals:
1. Get me out of the really quite sad I-live-alone-and-am-too-busy-to-cook-a-proper-meal kitchen rotation of pizza, quesadillas, and omelets. (note my prior post, which is at least three weeks old).
2. Use up some of the sweet potatoes accumulating in my refrigerator (see goal #1).
3. Replace the vegetable chips I've gotten into the habit of buying (again, see goal #1) with something more virtuous.
I came up with these vegan, gluten-free sweet potato crackers. Just a few points to note here:
1. I have never made crackers in my life and didn't follow a recipe.
2. I know nothing about gluten-free baking, so I just kept adding potato flour until everything looked kind of dough-like.
3. I started mixing ingredients at 10:30 at night. I have six meetings tomorrow, and the first one starts at 9 AM.
So clearly, I was all set for a winning success.
I'm not going to say they were the best things I've ever made, but I started snacking on a few of them straight from the oven and decided that they weren't half bad either. Actually, they were kind of addictively good. In a vegan, gluten-free, just thrown together in a half-assed sort of way.
Ingredients:
2 medium to large cooked sweet potatoes (about one cup mashed)
1/4 cup buckwheat flour
1/4 cup ground flaxseed meal
1/2 cup potato flour, plus more for board and rolling pin
2 teaspoons of chia seeds
1 teaspoon of salt
1/2 cup of water
Make the crackers:
This recipe starts with sweet potatoes that are already cooked. If you are starting with uncooked sweet potatoes, just toss them in the oven for about an hour or so at 400 - 450 degrees until soft. I like to roast a few at a time and then keep them in the refrigerator for a quick meal. Or, you can cut them up and boil them until fork tender. Either way, you should have about a cup of mashed sweet potatoes.

Preheat the oven to 350 degrees.
Add 1 teaspoon of the chia seeds to the water, stir, and set aside.

Meanwhile, in a large bowl, add the mashed sweet potatoes, the buckwheat flour, flaxseed meal, potato flour, remaining chia seeds and salt.

Pour in the chia-seed and water mixture and stir until well combined.
Coat a wooden board and rolling pin with the remaining potato flour. Dump the sweet potato cracker dough on the board.

Roll out until about half a centimeter thin.
Cut into strips lengthwise, and then slice each strip into diamonds. I wasn't so precise at this stage, but I did my best.

Place each cracker on a lined cookie pan and cook at 350 degrees for about forty minutes. Press down on any that look a little too thick.
You will need to watch them so that nothing burns. I rotated the pans after ten minutes, then flipped each cracker over ten minutes after that, and then rotated the pan again after another ten minutes. I still burned a few.
Remove from the oven and let cool before crunching away.
#sweet potato crackers#vegan sweet potato crackers#gluten free crackers#gluten free#vegan#gluten free sweet potato crackers#healthy#feedurself#near kitchen fail#feed yourself#feed urself#cooking#recipe#food blog#sweet potato#crackers
7 notes
·
View notes
Text
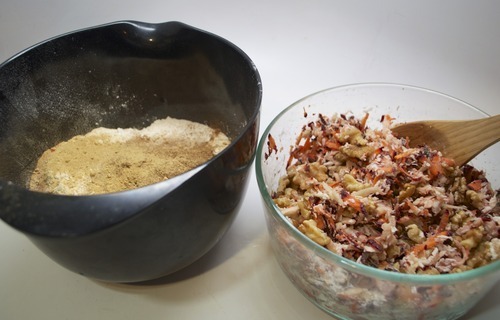
Carrot Apple Coconut Muffins

I like to be prepared for things. Amazing rainbow suddenly in the sky? Good thing I always carry my camera. Impromptu trip to the market after work? There's a cloth bag tucked away in my purse just waiting to be filled. Unscheduled meeting with the boss? It's not a problem because I've got a pair of heels and a black cardigan stashed somewhere in the office.
My friend and I took went to Baltimore for some weekend hijinks and adventure. We had to catch an early morning train, after a week of no sleep for both of us, and I knew two things. We'd be starving, and we'd need proper nourishment to get us through the long day ahead. We needed these muffins.

Apples, carrots, coconut, and walnuts. They are like a day's worth of energy packed into a delicious baked good. I ate two, got off the train, and walked ten miles. And that was just on Saturday.
I used purple carrots, which are actually orange on the inside. Other than the fact that they look cool, I really can't taste a difference.

This recipe makes ten to twelve muffins, depending on how big you make them. If you don't have muffin tins, pour the batter into a loaf pan instead. Fun weekend trip or not, you'll have morning energy to go for days.
Ingredients (makes 10 - 12 muffins):
2 carrots
1 apple
1/2 cup shredded coconut
1 cup walnuts
2 cups flour
1/2 cup sugar
3 teaspoons baking powder
2 teaspoons cinnamon
1/2 teaspoon ground ginger
1 cup of milk (I used vanilla almond milk)
1/3 cup of vegetable oil, plus a little more for the muffins tins
Make the muffins:
Preheat the oven to 350 degrees.
Shred the apple and carrots (I used a vegetable/cheese grater, but you can also use a food processor) and add to a bowl along with the coconut and walnuts.

Stir in a quarter cup of the flour to prevent the carrots, apples and coconut from sinking to the bottom of the muffins.
In a separate bowl, add the remaining flour, sugar, baking powder, cinnamon and ginger. Mix everything to combine.
Crack open the egg and beat it. Then add it to the vegetables along with the milk and the oil. Stir and then slowly add the flour-mixture. Continue to stir until everything is well mixed.

Grease the muffin tins with another tablespoon or so of oil. Scoop the batter into the muffin tins, using a spoon or a quarter cup measuring cup.

Bake the muffins at 350 degrees for about twenty minutes. You'll know they are done when you can stick a toothpick through the center of one and it comes up clean.
Let cool, remove them from the pan, and get ready for breakfast.

#mufins#breakfast#carrot#apple#carrot apple coconut muffins#carrot apple muffins#muffin#feedurself#foodporn#food blog#cooking#feed yourself#feed urself#recipe#vegetarian
0 notes
Text
Arborio Rice with Roasted Eggplant, Spinach and Black Olives

The last time I made risotto, I locked myself out of my apartment with the pot on the stove, and in a panic, I tried to break in through my fire escape. In January. In NYC. Wearing a t-shirt. It was a miracle I didn't freeze to death or burn the building down. I haven't even thought about cooking the stuff in the eight months since.
Until a few nights ago, when I got it into my head that rice would be the perfect thing to go along with the eggplant and spinach from my CSA and the last remaining black olives that have been tucked into the back of my refrigerator for who even knows how long.
All I had in the way of rice was that arborio from that fateful night. I assumed it was still okay to eat because I honestly cannot tell when rice is no longer good, I didn't want to be bothered with yet another trip to the supermarket, and I figured the risk of botulism or some other stomach nastiness was small enough that I could risk it.
(Update: a few days later, I'm still standing.)
I cooked it just like I would normal rice, and I think I liked it even better than risotto. I don't like tempting fate, so I stayed inside my apartment and very close to the kitchen, just in case.
Ingredients (makes two servings)
one small- to medium-sized eggplant (about two cups chopped)
one medium onion
two cups of spinach leaves
one lemon
one cup of arborio rice
two cups of water
1/2 cup of feta
1 tablespoon of chopped black olives
2 - 3 tablespoons of olive oil
1 teaspoon of salt, or to taste
Roast the vegetables:
While the oven is preheating at 350 degrees, chop the eggplant and onion. Toss with one tablespoon of olive oil and 1/2 teaspoon of salt and roast on a baking sheet for forty minutes.
Cook the rice:
While the vegetables are roasting, add the rice, water, one tablespoon of olive oil and 1/2 teaspoon of salt to a pot. Cook with the lid on over medium heat for about ten minutes, until the water starts to boil.

Lower heat, remove the lid, and cook for another fifteen to twenty minutes, until the rice is soft but not mushy and the water is fully absorbed.
Put everything together:
If you time things right, the vegetables should be done around the same time as the rice. Remove the vegetables from the oven and turn off the stove top.
Add one tablespoon of olive oil, the juice from one lemon and the roasted vegetables to the rice and stir to combine. Chop the spinach and stir into the rice until it has wilted slightly.

Cut the feta into cubes and add to the rice along with the chopped black olives.
Stir until all of the flavors meld together and serve warm.

#rice#risotto#healthy#vegetarian#eggplant#feta#olives#spinach#arborio#arborio rice#Arborio Rice with Roasted Eggplant Spinach and Black Olives#dinner#leftovers#feedurself#feed yourself#cooking for yourself#recipe#food blog#food porn#cooking
1 note
·
View note
Text
Watermelon Raspberry Slushie

I was at some sake bar, and I ordered roasted, salted watermelon seeds. This is such a nifty way to use up all of those annoying seeds. I'm totally making this at home! To which the waitress responded, We special order the seeds. Most watermelons come seedless now.
That's right. It has been so long since I'd eaten a watermelon that I didn't even know seedless ones existed. What a f!@$king travesty.
They were selling them at the farmer's market a few weeks ago, so I jumped at the chance to buy one. I was not going to let another watermelon-less summer pass me by.
And then I forgot all about it until yesterday, which just so happened to be the first day of fall.
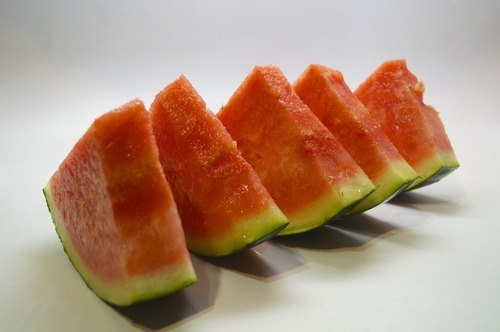
Luckily, watermelon freezes really well and makes a mean slushie, especially when paired with raspberries, so you can still enjoy a little bit of summer even after the leaves have started to turn.
Ingredients:
3 cups of watermelon chunks
1/2 cup of raspberries
1/2 lemon or lime
1 teaspoon of water (optional)
1 teaspoon of sugar (optional)
Make the slushie:
Freeze the watermelon chunks and the raspberries.

Add to a blender along with the lime juice. You might need to add a little water or sugar, depending on the power of your blender and the sweetness of the fruit. Blend until smooth and slurp away. Yes, it is that simple.

#slushie#slushy#fruit slushie#watermelon#watermelon raspberry slushie#raspberry#watermelon slushie#vegan#healthy#drink#summer#food blog#food#cooking#recipe#feedurself#feed yourself#drinks for one#feed urself
0 notes
Text
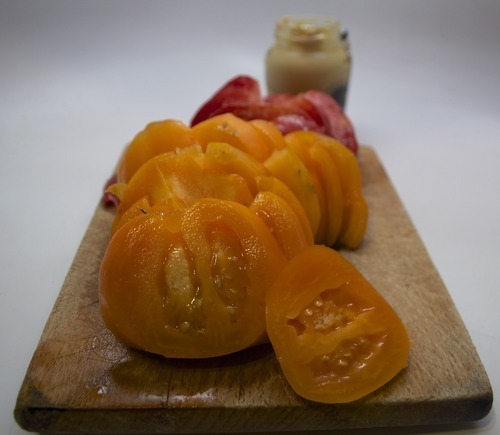
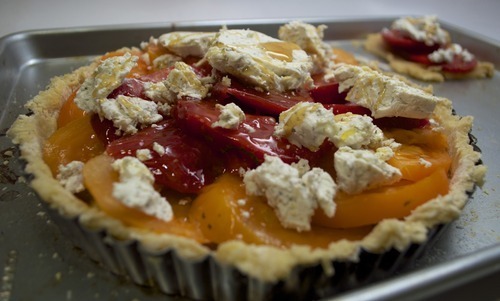
Tomato, Herbed Goat Cheese, and Honey Tart

Adapted from David Lebovitz
I broke out my rolling pin at 10 PM and started making a tomato tart. Because nobody rolls harder than me. Literally. A few minutes later, I had a fierce-looking crust, and I pressed it into a fluted pan just like a pro.
Summer's not officially over for another few days, but I wore a sweater to work today, so I know exactly what comes next. No more corn. No more peaches. And no more big, juicy, amazing tomatoes.
I had a few really good ones left on my counter, and they deserved something better than to be eaten as a salad or in a sauce. They deserved something really special. Something that would give this summer a proper send-off. They deserved to be baked into a tart with herbed goat cheese and honey.
If making dough from scratch isn't your thing, use the frozen kind or a sheet of puff pastry. It took less than ten minutes for me to make my own from scratch, and I felt pretty epic rolling it out and pressing it into the tart pan, so I recommend giving it a shot at least once. I also had no fresh herbs around, but I did have herbed goat cheese, and it worked great in a pinch.
And I know that the honey sounds weird, but it makes this tart truly stellar. Skip it if you insist, but you're really missing out.
Make the tart:
One unbaked tart dough (see above) or a sheet of puff pastry
2 teaspoons of Dijon or whole-grain mustard
2-3 large ripe tomatoes
2 tablespoons olive oil
2 3.5 ounce packages of herbed goat cheese
1 1/2 tablespoons of honey
Ingredients for the dough:
1 and 1/2 cups flour
1/2 cups of cold, unsalted cut into cubes
1/2 teaspoon salt
1 large egg
2-3 tablespoons cold water
Make the tart:
If you are not making your own dough from scratch, skip down to the "Preheat your oven…." paragraph.
Otherwise, mix the flour and salt in a bowl. Add the butter and use your hands, a knife, the edge of your measuring spoon, or a combination of these to break the butter and combine it with the flour so that the entire mixture has a course, crumbly feel. Make a well in the middle of the bowl and add the egg and 2 tablespoons of water in the center.
Beat the egg and water and mix with the dough until it starts to hold together. You may need to add the third tablespoon of water if the dough is not holding together.
Combine the dough into a ball and roll it out onto a floured surface.
If you're using a tart pan (I had a fancy fluted one), fold the dough over your rolling pin and then unroll it over the pan, pressing down firmly along the inside edges. Don't waste the dough if there's a little bit of extra. You can roll it out and make yourself a small free-form tart.

If you're not using a pan, just fold it over your rolling pin and then unroll it over a baking sheet.
Preheat your oven to 425 degrees.
Spread the mustard over the bottom of the tart and let sit for a few minutes. I used a combination of a spatula and a knife to get a thin and even layer.
Slice the tomatoes and arrange them in a single layer over the mustard. I used a combination of red and yellow tomatoes. It ended up looking really pretty. Drizzle with olive oil.
Top with the sliced goat cheese, and drizzle the honey.
If you are not using a pie pan, fold the dough around the edges over to make a crust.
Bake the tart for 30 to 40 minutes or so, until the dough is cooked, the tomatoes are tender, and the cheese is browned. You may need to lower the heat to make sure things cook evenly, so check ever fifteen or twenty minutes just to be on the safe side.

#tomato tart#tomato herbed goat cheese and honey tart#tomato#herbed goat cheese#honey#french tomato tart#feedurself#feed yourself#feed urself#vegetarian#vegetarian dinner#delicious#food#Food Blog#food porn
0 notes
Text
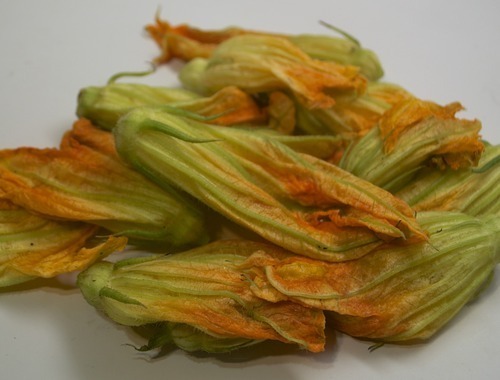
Squash Blossom Pizza Romana
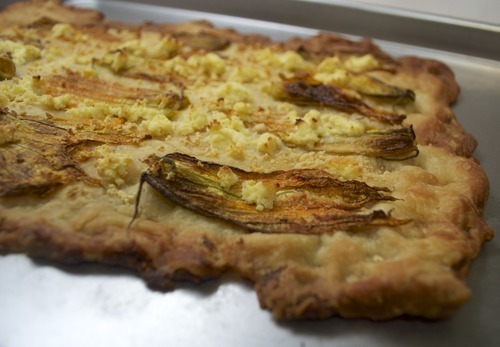
I went to Rome last year, and I ate as much pizza and squash blossoms as was physically possible to shove into my mouth in a week. They are two of my favorite foods, and once I was lucky enough to find pizza topped with squash blossoms, and trust me when I tell you that eating it was just moment after moment of pure ecstasy.
Roman pizza's different from your classic Neapolitan round. The crust is thinner and crispier, it's rectangular, and you pay for pieces by weight. I actually prefer it, and since life is devastatingly unfair and I cannot just jetset off to Rome whenever I'm hungry, I've started making it myself.
Someone was selling small containers full of squash blossoms at the farmer's market, and you cannot even begin to believe how truly hard it was to hold in the squeals of delight.
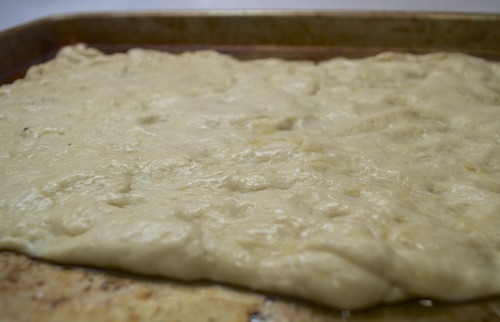
To get the thinner crust, I end up using half of a ball of pizza dough and stretching it out across the pan. I'm sure you can freeze or refrigerate the other half of the dough, but this time around I just topped it with potatoes and onions and cooked two pizzas at once.

Ingredients (makes one pizza):
half a ball of pizza dough
12 squash blossoms
1/4 cup ricotta
1 teaspoon of grated parmesan
2 tablespoons of olive oil
Make the pizza:
After the dough has risen for at least an hour or two, divide it into two balls. This recipe will only use one of them. You can top the second with something else or freeze or refrigerate it for later.
On a cookie sheet in one tablespoon of olive oil, roll out the dough into a 9-inch by 13-inch rectangle (approximately). Let sit for about twenty minutes, covered with a towel. Press out a second time.
Cut the bottom stem of each squash blossom and discard. Coat the squash blossoms in the remaining olive oil. Arrange on the pizza. Top with crumbles of ricotta and then sprinkle with the grated parmesan.

Bake at 350 degrees for about twenty minutes. Cut into squares and pretend you are on vacation.

#pizza#Roman pizza#squash blossoms#pizza alla Romana#dinner#Rome#vacation#feedurself#feed yourself#feed urself#cooking#recipe#food blog#food porn#vegetarian
1 note
·
View note