
Don't wanna be here? Send us removal request.
Statistics
We looked inside some of the posts by fullduckdev and here's what we found interesting.
Average Info
Notes Per Post
1
Likes Per Post
1
Reblog Per Post
0
Reply Per Post
0
Time Between Posts
28 days
Number of Posts By Type
Link
8
Text
2
Last Seen Tumblr Blogs


Fun Fact
The total number of visits Tumblr.com received during January 2021 is 327 million.
Link
In this article I explore the differences between the most popular pathfinding algorithms
0 notes
Link
Something nice'n'easy today, but often overlooked by developers! This tutorial shows how to manage multiple asynchronous jobs with chained continuation actions/callback methods.
1 note
·
View note
Link
Nice and easy way to publish your NuGet packages to a public feed using Azure DevOps with build-number-based automatic versioning. CI/DI friendly! https://fullduck.dev/how-to-publish-a-nuget-package-with-azure-devops-and-autoversioning/ #azure #cli #deployment #devops #dotnet #infrastructure #nuget #nugetpack #nugetpush #nupkg #package #visualstudio #vs
#azure#cli#deployment#devops#dotnet#infrastructure#nuget#nugetpack#nugetpush#nupkg#packard#visualstudio#vs
0 notes
Link
A few words on software deployment. :-) Please like and share for visibility!
#architecture #azure #ci #continuousdeployment #continuousintegration #deployment #devops #di #infrastructure #softwaredeployment
https://fullduck.dev/benefits-of-cloud-deployment-with-continuous-integration/
#architecture#azure#ci#cd#continuous deployment#continuous integration#deployment#devops#infrastructure#softwaredeployment
0 notes
Link
Unlucky, tested positive a day prior to my flight home for Christmas! On a positive note, I had plenty of time to... do absolutely nothing most of the time, but also write a little, so here it goes! This article shows how to deploy browser automation to the cloud, using Azure and Docker CLIs. We release an Azure Functions application, which will be talking to a Linux Container Instance with Selenium. We'll also lay a foundation for persisting the state of the browser (for part 3 of the article), by deploying and mounting an Azure File Share drive onto our container. #dotnet31, #architecture, #automation, #azure, #browserautomation, #container, #deployment, #docker, #functions, #selenium, #softwareengineer, #stateless, #linux
#stateless#linux#dotnet31#dotnet#software architect#automation#azure#browserautomation#container#deployment#docker#functions#selenium#softwareengineer
0 notes
Link
Selenium can be a useful testing tool, but who said you can't build a full-blown browser task automation with it? I came up with an example design of such use case.
0 notes
Link
I've been working on Azure cost management and optimization of distributed systems for some time now, so I thought I'll write up a few tips on how to maintain a reliable, yet cost-effective cloud infrastructure.
0 notes
Text
How To Release a NuGet Package Locally?

When building a library, it's useful to test it locally, before even pushing it to a test (and definitely prod) environment. The following tutorial shows all the steps necessary to perform those local tests and see exactly what an end-user will see when using your NuGet package. All this, without leaving your machine!
Table Of Contents
- Video tutorial - Setup your environment - Different ways of packing your library - Pack using Visual Studio - Pack using NuGet CLI - Pack using dotnet CLI - Release the package locally - Use your local NuGet package - Conclusion
Video tutorial
https://youtu.be/-IXCTljXayg
Setup your environment
First, we have to download NuGet executable and add it to our PATH to use NuGet CLI comfortably. This will allow you to type nuget in your Command Prompt to run any NuGet script. You can skip to the next chapter if you already have it configured. Before we attempt to set it up, check if you don't already have it ready: - Press Win + S - Type cmd and press Enter - Type nuget and press Enter If you see the following message... 'nuget' is not recognized as an internal or external command, operable program or batch file.

NuGet not found - The exe wasn't added to PATH ...Perform the steps below. Otherwise, move on to the Pack it section: - Download NuGet.exe from here (latest recommended version is okay) - Place it in a folder it will be stored in. For example: C:Usersuser_nameNuGet, remember to replace user_name with your own. Copy that folder path (remember not to include nuget.exe in the path. - Copy that path address - Press Win + S - Type Environment and press Enter on Edit the system environment variables - In Advanced tab, click on Environment variables... button - In User variables, click on Path variable and select Edit - Click New - Paste the path to your nuget.exe - Press OK - Repeat steps 7-10 for System variables Alternatively, refer to this article.
Different ways of packing your library
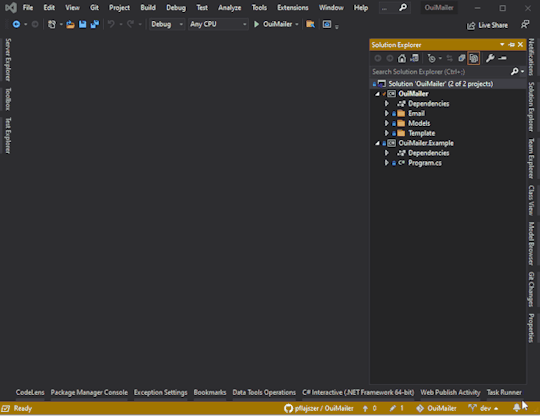
Before we release the package, we have to prepare it first. To do that, we use a pack command. I'll show you three ways to do that. Pack using Visual Studio - Open your project/solution in Visual Studio - Right-click on the library and select Properties - Navigate to the Package tab - Tick Generate NuGet package on build - this will do exactly what is says on the tin. It will automatically pack your NuGet package on build. - Insert package details in the fields below. Make sure to specify the package version. The convention I usually use is Major.Minor.Patch starting with 0.0.0. Add "-beta" suffix for the test release. - Save the file - Press Ctrl + Shift + B or select Build -> Build Solution - Right-click on your library .csproj file in Solution Explorer - Select Open folder in File Explorer - You should now see a bin folder, which contains the binary output of your compilation. Enter that folder and go to Debug/Release, whichever configuration you selected when building the project - the *.nupkg file should be there.
Project settings in Visual Studio allow generating a NuGet package on build Pack using NuGet CLI - Navigate to the folder containing your *.csproj file of the library you'd like to release - Type cmd in the File Explorer address bar and hit Enter. This will open Command Prompt - Type dotnet build and hit Enter. This will build your project. bin and obj folders should appear. - Back in Command Prompt, type nuget pack and hit Enter. This will generate *.nupkg file in the current directory.

Using NuGet CLI to pack the DLL Pack using dotnet CLI - Navigate to the folder containing your *.csproj file of the library you'd like to release - Type cmd in the File Explorer address bar and hit Enter. This will open Command Prompt. - Type dotnet build and hit Enter. This will build your project. bin and obj folders should appear. - Back in Command Prompt, type dotnet pack and hit Enter. This will generate *.nupkg file in the bin/{environment}/ directory, where enviroment is either Debug or Release, depending what you chose for your build.

Using dotnet CLI to pack the DLL
Release the package locally
We're almost there, we already have a packed library, all we want is to make it available in our Visual Studio project locally, so we can imitate using a normal NuGet package downloaded from a remote repository. To do that, follow the below steps: - Open Command Prompt as an Administrator in the location of your *.nupkg file. - Type nuget add package_filename.nupkg -Source "C:Program Files (x86)Microsoft SDKsNuGetPackages" (escape characters and quotation marks are important since the path contains spaces) - Replace package_filename (your nupkg file name) with the correct value and hit Enter. The source specifies where the package will be unpacked to - the location I provided is the default location for offline NuGet packages in Visual Studio. This will matter in a minute.

Release locally to the folder available in Visual Studio Offline
Use your local NuGet package
- Open the project you'd like to install your library to in Visual Studio - Right-click on the solution/project - wherever you'd like to install your new NuGet package and select Manage NuGet Packages... - In the top-right, you should have a dropdown menu under Package Source with a default value of nuget.org. Visual Studio normally searches there for the packages by default, but since our package is deployed locally, change it to Microsoft Visual Studio Offline Packages. (You can configure where that location is by pressing a little cog icon next to the dropdown if you'd like to change it) - Search your package name and hit Enter. It should appear on the list - You can now enjoy your package locally!
Find your new package in Visual Studio Package Manager
Conclusion
As you can see, deploying your NuGet package locally is really easy if you follow those simple steps. In the end, it's all about generating that *.nupkg file and adding it to the offline feed in the correct folder, so Visual Studio Offline Package Manager can find it. Read the full article
0 notes
Text
Motives and goals: Why am I starting a technical blog?

Me
Howdy. I'm Pawel and I'm a software engineer by trade and passion. You can find a bit more about myself in the About section, but I'd like to keep this post focused on the motives behind this technical blog and the big picture.
The blog
While Software Development is constant learning, it's also constant re-learning. How many times you catch yourself saying: "I've seen this one before", but you can't quite recall how to find a solution and end up wasting time going around the same loop over and over again? For this reason, I'd like this technical blog to be my notebook, that also serves educational purpose for others. There seem to be plenty of those online, but new solutions, updates and bugs are introduced every day, so I hope not to duplicate many existing resources and provide value to my-future-self and others! The initial idea is to cover the stack I'm the most familiar with, which is all-dot-net related stuff, but I'm not afraid to venture a little (hence that pretty versatile blog name!) and touch other technologies. Another important aspect is networking. I'm open to any new connections, so please feel free to get in touch via any channels on the About page! Read the full article
0 notes
Link
How To Turn an API Response Into a C# Class?
0 notes