
@mattkocaj builds web-apps that create clarity (and he loves Perth too!)
Don't wanna be here? Send us removal request.
Statistics
We looked inside some of the posts by hammerproject and here's what we found interesting.
Average Info
Notes Per Post
29
Likes Per Post
28
Reblog Per Post
1
Reply Per Post
0
Time Between Posts
5 months
Number of Posts By Type
Text
17
Last Seen Tumblr Blogs


Fun Fact
Kazakhstan’s Minister of Communications and Informatics has blocked the Tumblr site because it contained 60 sites of terrorism, extremism, and pornography in 2015.
Text
Effective teams: When you’re an emotionally challenged developer
I am an emotionally challenged developer!
I’m not the most socially aware person in the world. I can be abrasive, totalitarian, “direct”, antagonistic, and even a plain ol’ asshole sometimes. Am I a bad person? No! Do people like me? Apparently - they invite me to lunch, drinks after work, ask how I am and generally want to be around me. I’m just saying that I have my strengths and weaknesses as everyone does. It’s important to be honest about these and if you’re confident enough to admit it to yourself, then try sharing it with a colleague - you’ll be amazed at the strength it can add to your working environment.
So here are my three tips for being more effective in a team. These are especially useful to those who might find it harder to integrate into a team in a non-technical capacity –
Be Kind
Talk with your peers.
Join them for lunch.
Buy them coffees.
Let them buy you coffees (especially important for those of us who struggle with receiving gifts)!
Be patient during discussions, even when things are frustrating you.
Remember you don’t always need to win. Teamwork is about compromise just like every human relationship is. And for clarity: working in a software team is a collection of human relationships. Yes, you do “do ships”!
Try to participate as best you can. If you’re introverted, then it’s important to share your ideas and opinions occasionally. Others need to know you care if only a little. Please try to join in.
And always remember: don’t interrupt others! It’s so rude. Respect is a cornerstone of human interaction. If you cut others off a lot or talk over them, then please begin to listen to yourself. Listen to others first who do it if you can’t hear it from your own mouth yet. It’s important to chip away at this one. And if you do manage to bring this under control, you’re not going to have others copy you because you’ve suddenly started to be polite. But that’s ok.
Be Vulnerable
Share something about yourself with your peers. It doesn’t have to be in a group, it might be just one person you seem to trust a little. It doesn’t have to be “my marriage is failing” or “my pop just died” but it should be something that reveals a little about you and that you don’t “have it all together”.
Show others you’re not perfect. “Nice catch” - on a Pull Request; or “my goof! I’ll fix the broken build”. In other words, it’s ok to show that you make mistakes. These are somewhat unnecessary from a pure knowledge transfer point of view, but we’re not dealing with machines here. People want to know that they can identify with you, that you’re human, imperfect and fallible like they are. It helps you to be more likable, and you do want to be likable.
Ask for advice (even if you need to fake it a little). Find a way to have the junior dev help you even if you consider yourself far more experienced. It will not only boost their confidence but help them to trust you more. This is especially handy when you need an extra ally when you propose that massive refactoring you’re sure will reduce technical debt.
Give Something Back
Your time - pair with someone; offer to review more code; take more time to explain your passions, points of view and reasons for the preferences you’re so driven about.
Buy coffee or donuts (or vegan “power balls” that are free of gluten and flavor). If you don’t have money, write a post-it for a peer thanking them for their help yesterday. Just don’t make a show of it to others.
Shout folks a lift to the restaurant for lunch; pick up a colleague walking from the bus stop because you have the car today; offer to carry their gear to that meeting when you can see their hands are full. You’re a kind person remember - you can show it by giving.
A handy productivity tip, a funny link in the #random channel (everyone could do with smiling more), a kool sticker for their laptop, a new mouse pad (hahahahah! got ya! no one uses mouse pads anymore!), or just a high five at the end of the successful deployment. booya! Yes, it’s ok to touch other humans in the office if it’s appropriate. High-fives are definitely appropriate when you’ve cracked that bug, deployed into PROD or received that awesome feedback from the customer.
Most of these are easy and things you can learn. They can be taught - if you’re unsure, ask a peer for help (#bevulnerable), and they’ll probably respect you more for it. Furthermore, I’m not a master of these either. They’re a daily challenge, but one I’m willing to work at. I hope you can think of it that way too.
That’s all I have for today. I’m going to head off to a team lunch soon and try to put more of these into practice.
Good luck!
–
This was cross-posted to LinkedIn - feel free to share. Special thanks to Azella, Matt N and Ronnie for reading drafts.
10 notes
·
View notes
Text
Why you need to start a Retrospective in your team
source: Twitter
Launching an agile process in your team is hard. Agile doesn't have a great rap right now and if some of your peers have "been through" it before, then it's even less appealing.
Nothing good was ever easy.
Pretty sure some smart guy said this.
So you need to start small, build trust and deliver value quickly else it's just going to create more of a sour taste. Before you get into work tracking, velocity, story points and all that other fun stuff, you need a forum where your team can trust that there is some way for them to take ownership of a successful outcome. If it's a performance and your team is the audience, they're just likely to sit there and watch you fall on your ass. You need your team to participate and "own it" with you. This is why you need a Retrospective (Retro). You don't have to call it a "retrospective" but it should look something like this.
The core mission of a Retro is to “inspect and adapt” the agile process over time as a team. You can and should get this going even before introducing the other parts of your agile process. The Retro is the critical first step: if you don't have a forum to change the way you work, you're fundamentally not doing agile. Remember these elements:
It should be a regular meeting which is given priority by all who attend. I’m not a fan of meetings, with few exceptions - this is one. This is the single greatest asset your team has, whether using an agile process or not. Everyone should make the time and respect the time of others. You’re not going to magically have this buy-in from all team members. You need to take them on a journey. Over time they will value it and therefore respect the time slot. Shoot for once every two weeks if you can. I’ve found that works best. Weekly is hard for new teams and longer than every 4 weeks can wear away at the trust that we’re trying to create.
Invite everyone from your Dev/Build Team: testers/QA, Project Managers, leads, key users/SMEs, architects, designers, product owners, developers and other stakeholders who you can get along. Provided this list is not 50 people long, you should manage with anywhere from 3 up to 25 in a Retro no problems.
Ensure that it’s a safe place and a democratic environment. Someone will have to facilitate or drive the meeting, and it looks like it’s you again. But over time I suggest you rotate that responsibility around the group. Not everyone will want to do it, but it’s important you try. I’ve seen even the most shy personalities give the Retro facilitation “a shot” after months of meetings. The key here is to build trust. It’s building trust first in the Retro, and then the things the Retro stands for: flat hierarchy, team decision making, actionable changes, leadership/management buy-in, experimentation, testing with data, and most of all: human-centric collaboration. Until Skynet writes all the line-of-business/enterprise software, it will be humans creating these things so the emphasis should be on fostering an environment where people can work together, and if you’re really lucky, even like each other!
Ensure that actions are acted upon and a follow up is conducted each meeting. As you’ll see below in the quick playbook, each Retro should produce zero or more actions. These are usually tasks expressed as Chores (outlined later) on your backlog and generally assigned before the Retro meeting is over. Distribute the responsibility of enacting the Retro’s decisions around the group. Everyone should take part over time in carrying out the decisions of the meeting. The point is not to place blame, but for the team to support each other and find ways to clarify, assist, break up or redefine the priorities as necessary. As you mature you’ll notice sometimes you don’t have any actions: that’s fine, but try to encourage the discovery of actions, even small. Sometimes tasks will “roll over” from meeting to meeting without a resolution - this might mean it’s not really that important, or simply a hurdle the team needs to work around some other way. Remember, your agile process is about finding ways to do things better: inspect and adapt.
Try an experiment. When a challenge arises or there is some question of “is there a better way?”, invite ideas and allow members to propose solutions. Experimentation is at the heart of agile so try to identify how an idea can be tested. Can someone time-box a Spike (short investigation that uncovers more information) of a new way of doing something and report on the findings next Retro? Or perhaps, can the group alter slightly their process or workflow for a potentially better outcome? Review the experiment at the next meeting. Not everything needs qualitative data to support it. A “gut feel” is often validation enough given a quorum.
A great tool to help with structuring Retros is Retromat. Play around with this tool. It will soon become clear what you’re trying to get from a retro and how you can go about it. You may not need all of the components the tool suggests.
If you can get your first Retro meeting done you'll quickly learn how important this is. Make sure you solicit feedback from the participants. Listen carefully for understanding: What did they like? What didn't they like? Hopefully you'll see how valuable this can be.
Good luck.
This is a cross-post from my LinkedIn account and much of the content above is taken from my recently published ebook titled #agileforleads. It's available on Leanpub for FREE! Share it with your team. There's also a detailed step-by-step "How-To: Simple Playbook for a pilot Retrospective" in the same chapter which covers the above points. Use it as a reference guide for your first Retro meeting if you're unsure where to start.
0 notes
Text
I don’t wanna be a “developer” anymore
I was talking to a recruiter again today and I'm constantly finding it hard to differentiate myself. I don't want to be an "architect" because I find the perception is not one of delivery. I won't want to be a "senior dev" because I have so much more to add than that. What's in the middle? A "lead"? "tech lead"? "agile coach"? Maybe a "consultant"? Ugh! I'm happy to consult but I can't call myself a consultant! It's the driest, most dead word I can think of.
Yes, I'm trying to sell myself better but I think there is something bigger going on too.
So I'm watching @jason and @ryancarson talk about apprenticeships and it got me thinking- maybe I can define myself in terms of a "trade". Perhaps I'm actually a "tradie"?
I like this because most recently I've been thinking a lot about the principles of #leanstartup and #agile and applying them in my day job. I'm also in a particularly interesting scenario where I'm poised to pitch this notion that my particular project isn't that complicated (by design) and should be able to be developed and maintained by someone with significantly less experience than me. I'm so confident, that I think I could take someone who is not technically a "full stack" developer and (with pairing and other XP techniques) turn them into a highly successful owner of this product, effectively doing myself out of a job. In fact, I could do it many times over and build a whole team like that. It kinda sounds like what you might do with an apprentice.
Ok, so where am I on this tradesperson continuum? I'm the master now. Yes that sounds arrogant and I don't think I'm going to add that word to my LinkedIn, but that's technically what it's called. I've always romanticised my work around this idea of being a craftsperson or a software 'practitioner' rather than 'developer' or 'engineer'. I'll admit that yes, I do 'develop' things. I do 'engineer' things too. But I prefer 'make' and 'design' (certainly not 'architect' or it's devil past tense) and just.. 'build'. I build things with my hands. That's what a craftsperson does. Actually, I love building things with my hands. If you follow the Wikipedia rabbit hole you might find yourself, like me, at the word Artisan.
Artisan sounds so regal. (here I go being arrogant again..) It's true though: I really find building software to be like an art form. It's like creating music; or a sculpture on the beach. It's creative, and organic. Now lately, my creativity sits behind a heavy wall of pragmatic decision making day to day. But I also believe in constraints forcing innovation too. So I can still practise art by not extracting that code into a generic method! Can I use these words instead of "developer"? What am I trying to say about myself?
The master in the artisan or master craftsman (or Jedi) context is defined by her leadership capacity. It's not so much about how they are experienced, or very knowledgeable or simply extremely skilled. The title is entirely coupled to the notion of training others. It surfaces this idea that there are many elements of a great practitioner that can not simply be transferred by reading, or even doing. The key is the shared experience: it's the "doing with the master". The master is key - she needs to be there to observe and guide and encourage. This is why code reviews (the Pull Request kind, not the automated code quality tool in your CI stack kind) are so powerful. It's that other pair of eyes looking over your work - not as a humiliating exercise, but the group ownership one - we're all in this together and I checked my ego at the door this morning so please, tell me what you think I can improve. Once I learned how to do this, I was that much closer to mastering my craft.
So I could rant more on this but it's late and I think I'll go and play with my LinkedIn subtitle now.
Let me leave you with this-
I don't Computer Science at work. I largely build line of business applications. I craft (by hand) simple solutions to painful problems using the principals of #lean and Small Batches in order to learn where we all need to go quickly while minimising waste. As I'm doing this, I show those around me how to do it too. We all grow and learn together. I love being a software artisan. I'm not a developer any more.
--
Shameless plug: I've wrapped many of these thoughts, software development best practise, agile tips and techniques in my new #agileforleads playbook. It's e-reader compatible. If you want to make life easier for yourself and your team then invest some money in a rich source of wisdom compiled from various successful teams and projects.
--
Thanks Andrew and Dennis for reading drafts.
0 notes
Text
Optimal performance: NCrunch < Visual Studio < Parallels < 13″ MacBook Pro
It’s important to realise that there are lot of factors at play when using a continuous testing tool like NCrunch. Add to that running Visual Studio inside a VM on a Macbook Pro which doesn’t have 4 cores, and you’ll need to be pretty careful to not saturate the CPU and make life harder.
I've done the hard work for you! So if you're using a 13" Macbook Pro with Visual Studio running in Windows under Parallels then this might apply and help you (a lot!):
13" MBPs only have 2 physical cores even though it looks like there are 4 - two of them are HyperThreaded. Make sure Parallels only gets two and not the default 4. Giving the VM 4 will allow Windows to address the HyperThreaded vCPUs as though they are physical ones. This is bad and will cause contention making your performance actually worse.
Limit NCrunch to only 2 threads max. The VM has two (the physical two - Parallels will make sure it's 0, and 2 rather than 1 and 3 which are the HT ones) so NCrunch can have two also, provided that:
You allow NCrunch to use the same core as Visual Studio. This can't be done in the wizard. You need to give NCrunch core 1 and VS cores 0,1 (which are actually the host cores 0 and 2; the physical ones).
It might seem counter-intuitive to make VS share a core but in my experience VS doesn't mind too much and the performance hit is minimal. The fact is, if you don't give NCrunch access to both cores, the two threads you've said it can use will share a core and you won't get the concurrency you want anyway. So thanks to my benchmarking and results, its my way or the highway I'm afraid.
The above setup is the most optimised I've found and I've spent many more hours than I should have on this problem. Thanks to @remcomulder on the forums for helping me out many a time.
0 notes
Text
Starting with a hypothesis instead of a lean canvas
So I have [another] idea for a product.
The Lean Canvas app on my phone is my go-to when this happens since it's easy and it's been my assumption that it's a good starting point. Here's one for a previous idea I had:
But since I started listening to The Lean Startup again (instead of reading my book), I thought I should start with the hypothesis instead of a lean canvas. I'm thinking that there may even be waste in some of that canvas. Maybe even spending the mind energy on many of those aspects is futile when I haven't validated the primary value proposition.
So here is my value proposition for one of my latest ideas:
Home owners in WA who are in bushfire risk areas would get value from more advanced warning than is currently possible through checking the DFES Alerts Map. Specifically, they would get value from having a service that could push the alerts/warnings from DFES to their mobile device, when the alert is within a certain distance of their property; a distance which they can control. Thus, the home owner can control the degree of advanced warning.
Here are some of my assumptions with regard to the above (let me know if I've missed any):
Home owners are not satisfied with the ways they currently get warnings/alerts (tv, radio, twitter, friends/neighbours, checking the DFES Alerts Map manually, Emergency Alert).
Home owners want alerts on their mobile device.
Home owners want alerts pushed to them, rather than having to go and "pull" alerts themselves.
Home owners want to control the degree of advanced warning.
Out of those, the "leap of faith" assumption is probably this:
Home owners are not satisfied with the ways they currently get warnings/alerts.
Because if they are, then the whole thing falls over.
So let's start there. I need to test whether home owners in WA who are in bushfire risk areas are not satisfied with the ways they currently get bushfire warnings/alerts. It's funny how planning seems easier than testing. This time I'll try the testing first. Stay tuned.
Thanks to Cormac, Matt and Stephen for reading drafts.
0 notes
Text
NCrunch like test automation in MVC6/DNX for Visual Studio
I love NCrunch so when I realised that it wasn’t yet supporting DNX projects, I had to figure out how to get xunit with dnx-watch working easily from Visual Studio (VS).
I already use git-bash but I can’t start dnx test or dnx-watch test from that command line to give me continuously running tests.
So here's an easy way to get a shortcut key in VS to launch cmder (so I can use git too) such that the next command I fire is dnx-watch test:
Install cmder
Set up a ALT+SPACE shortcut in VS but use the $(ProjectDir) in the Arguments field
Change the cmder startup profile to {cmd} rather than {PowerShell} as PS doesn't like the $(ProjectDir) from VS
Launch cmder from VS using ALT+SPACE
Bang out dnvm list and make sure it shows an Active version in your cmder command line (* int the Active column). If it doesn't you'll need to select one using dnvm use 1.0.0-rc1-update1 -runtime clr -architecture x86 -p or similar and then remember to restart VS for the PATH changes to take effect.
Lastly, make sure you have dnx-watch installed, open up your solution and navigate to your test project: bang out ALT+SPACE to open the CLI and pump in dnx-watch test to enjoy continuously running xunit tests.
Happy days.
0 notes
Text
IoT Intro: SMS me when I leave my garage door open
tl;dr
Want to build a connected garage door in a few hours for about $30 which notifies you by SMS when you’ve left it open and forgot? - skip down to Parts.
youtube
Edit: This tutorial used to contain instructions to dispatch SMS messages via the Twilio service. However, due to an issue with the Arduino software for the esp8266 module (which has now been resolved), I re-wrote the article to use the service ifttt for SMS message sending instead. You can see the original version of this page at the Internet Archive if you’re interested.
In this post I’m going to detail how you can easily build a prototype that demonstrates a simple garage door monitor. The idea is that you’ve left your garage door open and gone back inside or out back and you really would prefer it wasn’t open, inviting your whole street to help themselves to your stuff. Well, after 10 minutes of being open, you get an SMS on your phone warning you that you’ve forgotten it and you go and remedy the situation. If you’re like me, you forget stuff like this more often than legitimately needing the garage open for ages so this is actually useful. If not, it’s at least a good excuse to build your first IoT project.
esp8266
There is a plethora of options to choose from when it comes to microcontrollers and embedded connected (IoT) electronics. Arduino seems to be the popular mainstream platform of choice these days so I wanted to find something that was “Arduino compatible” given the assumption that there would be a lot of online resources.
A requirement for IoT is that your project be “connected”, meaning it can reach the internet. Arduino has a number of “shields” (add-on boards) that have wired ethernet, and others with wifi but they’re all relatively expensive. I discovered the esp8266 (henceforth ‘esp’) some months ago and it has been receiving a lot of attention lately. You can buy the wifi MCU module for as low as $2.50 on eBay and it’s all-in-one: an Arduino-compatible controller with built in wifi - IoT magic!
Parts
This post covers building a prototype which will work and send a real sms. However it won’t attach well to the ceiling of your garage and so it’s meant as a demonstration project which lives on your desk. You don’t need a soldering iron or electronics knowledge. Stay tuned for a follow up post which shows how to install this to your garage.
The inline links are the cheapest eBay prices I could find. You can put this together for less than $30:
esp8266 module - this is the brain where your program goes and the part that can connect to your wifi. I’d order two or more since they’re only a few bucks each. You can fry/brick them easily so better to have a backup I think.
FTDI / serial / rs232 programmer - you need this to send your program over the USB to the esp
Solderless prototyping board “breadboard” kit with 3.3v power supply - this is where you build your circuit
Some push buttons - these are the type of buttons that you push with your finger
Some 10k (or similar size) resistors
You will need an ESP-01 adapter like this or this but be sure you ask when checking out for the “male headers to be soldered” unless you want to give soldering a try and build your own. I have not tried the adapter but given how easy this makes things I think it makes sense.
Mini USB cable (not micro). But look in a box of cables first - you’ll probably have one.
A multimeter - this is not essential but helps a lot!
Building your prototype
With your parts assembled, it’s about time to get going.

If you’ve never used a breadboard before, have a look over this quick primer. Basically, you want to lay things out with enough room in between so that things are not too tight-
Push in your power supply on the right-hand side. This way the positive and negative terminals (red and blue lines) on the breadboard will be connected correctly. Make sure the two sets of jumpers are selecting the “3.3″ option and not the “5v” one. esp needs 3.3v and 5v can kill it!
Straddle your esp adapter over the center track.
Push in some of your push buttons - you will need one each for program and reset. You will also need a third for test which will simulate the button that would be connected to your garage door assembly. These usually have 4 pins and are arranged in pairs. You can use your meter (multimeter) if you have one to see which pairs are shorted together and which are ‘normally open’. You want the ‘normally open’ ones on different tracks. This is a good illustration of how the pins of the push button should connect to the tracks on the breadboard.
Find a spot for the USB/serial adapter and make sure the little jumper is shorting the 3.3v and not the 5v option.

Next you want to wire up the power rails so you can use the whole length of the board:
Connect a pair of jumper wires over the vertical break between the two breadboard halves. When these breadboards are new, components and jumper wires can take quite a bit of force to insert. Sometimes a small pair of pliers can help shoving them in - don’t worry about breaking jumper wires or resistors since you have spares.
You can see that when powered, only the rails on the side of the power supply unit are energised. By bridging the gap, you can use the rails along the whole breadboard.


Now we can start wiring up the basic configuration to operate and program the esp. I’m inserting my esp with the antenna (gold ‘s’ shape track) pointing upwards.

This leaves me with the two rows of pins from my adapter having these assignments (from left to right, top row first):
GND: ground or “negative rail” (top left pin)
GPIO 2: “general purpose Input/Output” pin #2
GPIO 0
RX: serial receive
TX: serial transmit (bottom left pin)
CH_PD: enable
RST: reset
VCC: +3.3v or “positive 3.3v rail”
There are various references I used to establish a minimum wiring but two of the best are Getting Started with ESP8266 and Minimal Hardware Setup for Bootloading and Usage.
Note: Your breadboard wiring does not need to look exactly the same as mine. If you’re using a different esp adapter than mine then the pins may be in different places. The instructions below are still useful. The following images show how I did it using the adapter I have.
So with that, let’s get to wiring it up (I’m taking the esp out first):
GND: short this up to the -ve / “negative” rail (blue line on the breadboard)

(I’m using the black jumper wire for this connection in the image above)
GPIO 2: needs to be “pulled up” or “pulled high” for our test button (garage open/closed). Simplistically, when I/O are described as requiring to be “pulled high” or “pulled low”, it just means you take a resistor (1k, 10k, or similar) and use it to short that pin to the VCC “pull high” or ground “pull low” so that the MCU can determine it’s logical state. So grab a resistor and connect it between GPIO 2 and VCC.

GPIO 2 also needs to be connected to our switch which when closed will short the pin to ground (pull it ‘down’). This gives us the logical state for this pin as HIGH normally and LOW when the button is pressed.

GPIO 0: should be “pulled to ground” or “pulled low” with the program button.

(note the new blue wire in the image above from GPIO 0 to the ‘prog’ button)
RX: connect to the TX pin of the USB/serial adapter

TX: connect to RX of the USB/serial adapter.

(red wire: TX of esp to RX of USB/serial module)
CH_PD: should be “pulled up” to the VCC/+ve/3.3v rail with a resistor
RST: also needs to be “pulled up” and wired through the reset button to ground.

(CH_PD and RST pulled up)

(showing the two new pull up resistors and the wiring of RST to ground via the reset button)
VCC: connect to the +3.3v rail

And your basic esp wiring is done.
An important step now is to connect the power supply from your breadboard kit to the USB/serial adapter. The USB/serial module also can power some devices as hinted earlier: it has a 5v and a 3.3v option. Generally these modules don’t deliver enough current to power esp. It’s for this reason we need the breadboard supply. I have found however that leaving them isolated creates problems. We need to join them together.
So take two jumper wires and connect the GND and VCC from the USB/serial adapter to the GND/-ve and VCC/+ve rails of our breadboard respectively.

(GND is black and VCC is blue in the above image)
It’s at this point we can pop the esp back into the socket (antenna trace facing up of course), plug in our power and turn everything on (push button next to the power socket and green LED). You should see the tiny red power LED light up on esp.

You’ll also notice that we have the red power LED from the USB/serial adapter lighting up too since we bridged the power rails.
You should see a tiny blue LED on esp flicker for a brief moment when it powers. You can see this again by pushing the reset button you’ve now wired up. The blue LED is on the ‘transmit’ or TX line and so this is actually esp sending some data immediately as the MCU starts up.
Programming your rig
The first thing you should know about the esp8266 is that you can talk to it in a number of ways. The Arduino bootloader enables you to write Arduino code (which is basically c++) using the Arduino IDE - we’re going to do it this way. But it’s also good to know that you don’t have to. You can write programs in Lua, Python and even Basic if you like. The base instruction set is what is known as AT commands. And while we haven’t loaded anything else onto our esp, it’s a good time to try a few just to see how it works.
So you will need to install the Arduino IDE from their website. Once that’s done, start up the Arduino application. Hopefully it will start a new sketch (Arduino’s name for a "program") for you and open it up ready for editing.
Next you will want to connect your USB cable but before you do, power up your breadboard power supply. You should see the LEDs come on again. Now connect the USB cable from your computer to the FTDI adapter.
Depending on your operating system, you may not need to install the FTDI drivers. But if you do, SparkFun has a great tutorial which should help you out. You’ll know you’ve done it right when after connecting it again from the computer to the adapter, the next step works without a error message appearing.
So next, hit the Serial Monitor button:

Now you should see something like this:

Various esp8266 modules may be set to different baud rates by default so ensure that the option Both NL & CR is selected as shown in the image. But given my experience with the ESP-01 module, which is the one in all my images here and the one I suggested in the eBay link above, you are fine to start with 115200 baud.
Basic AT Commands
Now that it’s powered and the Serial Monitor is connected, reset the esp with your reset push button. If everything is working properly you should see some garbage text in the Serial Monitor window and if you’re lucky the words “ready” or otherwise perhaps “invalid”.

From Googling and my tinkering experience it doesn’t matter if you get this “invalid” message. You should still be ok. The real test is the next part.
Enter the command AT and hit the ENTER key (or click Send).

The response should be “OK”.
Now enter AT+GMR followed by ENTER

If you’re getting responses similar to this then everything is awesome!
Create an ifttt account so you can send sms
ifttt is pretty sweet. It allows you to connect all your internet thingies together to perform awesome automation. Today we’re just going to use it to listen for the web request made by our esp, and in return it will send an sms: simple right?
If you don’t have an ifttt account, go and sign up at https://ifttt.com
The next thing you’ll want to do is Connect the SMS channel which will require you to activate your mobile number with a verification pin. Remember to enter your number with the leading zeroes instead of +. For example: in AU I’d start with 00614 rather than +614 which seems more obvious.
Next, go and grab my public recipe for this project and Add it to your account. You will need to activate the Maker channel here. Just follow the on screen instructions; it’s pretty straightforward.
Enter esp_message into the first field.
Leave the Message field as it is with the Value1 placeholder there.
Hit Add. And then Done on the next page.
Now we need to go to the https://ifttt.com/maker page and click the link How to Trigger Events. This will then show a link with a placeholder {event} which you need to replace with esp_message. Once you’ve done that you can select the whole line and copy it to the clipboard. Keep this page open for the next section.
Setting up the iforgottocloseit sketch
Now that the esp appears to be alive and we have the ability to send an SMS from the internet, we need to set up the program/sketch.
Set up the esp board in the IDE by going to File > Preferences and pasting “http://arduino.esp8266.com/staging/package_esp8266com_index.json” into the Additional Boards Manager URLs, then hit OK
Select the esp board by Tools > Board > Generic ESP8266 Module
Add the SimpleTimer library by downloading the zip and then Sketch > Include Library > Add .ZIP Library... and then selecting the zip file you just downloaded
Open up https://raw.githubusercontent.com/cottsak/opensesameseed/e1e04af4dd90b6f1ad764b2014d39aa0cd9fbdda/iforgottocloseit/iforgottocloseit.ino in your browser and copy the entire text from the page
Now in your Arduino IDE, open a new sketch (File > New) and replace the whole file with the code you copied from the github link above (select all, and then paste).

Now you will want to create the keys.h file for your wifi credentials and ifttt key.
Click the arrow underneath the Serial Monitor button and select New Tab

Name it keys.h and hit OK
Now paste the this sample code into the new keys.h file
Update the wifiCreds with your wifi access point ssid and password
Update the iftttMakerUrl with the full url from the ifttt Maker page in the previous section. The link should be similar in form to https://maker.ifttt.com/trigger/esp_message/with/key/d7piVH30EgTjwftpJs9lED only the last part d7piVH30EgTjwftpJs9lED will be different for your account so make sure you don’t copy this link.
You should end up with something like this:

Switch back to the main file in your Arduino application and click the Verify button:

Hopefully if you can see “Done compiling” and something like this image, then you’re winning.

If there is an error then perhaps you have made a typo in one of the files. Start again from the Setting up the iforgottocloseit sketch section.
Uploading the sketch to the esp8266
Now it’s time to send the program to the esp. You want to do a couple of things first before clicking the Upload button:
So testing out the program doesn’t take >10 minutes, change the value of the variable openForTooLongInMins from 10 minutes to something like 0.5 minutes. This way when the program starts you should get the sms fairly quickly.
Increase the baud rate for uploads. We changed the baud rate for the Serial Monitor earlier but the one for uploading your sketch is a different setting. With your sketch selected hit Tools > Upload Speed > 115200
So we can seen the output from the program in the Serial Monitor, hit Tools > Debug Port > Serial (when you upload the sketch without debugging enabled, the blue LED flashes to indicate door open state)
Power on your breadboard power supply with the USB disconnected. Watch for LEDs coming on.
Connect your USB to the FTDI module.
Close and then re-open the Serial Monitor (Tools > Serial Monitor)
Set the esp into “programming mode” by holding the program button and then hitting the reset button. Release reset first then release program. You should see some garbage text in the monitor.
Now that we’re sure everything is working:
Hit the Upload button

The Serial Monitor should clear as the sketch builds and then sends the program over the USB to the esp. It might take about a minute. When it’s done, the program should start and you’ll start to see action in the Serial Monitor; similar to this:

Looks like the HTTP message to ifttt was received. You can also confirm that by heading over to the recipe page in ifttt and clicking the View Recipe logs link. Now just wait for the SMS to arrive on your phone.
If you don’t see this message, the response was something other than Congratulations! You've fired the esp_message event or the esp crashes (you’ll know - it will dump a lot of text to the monitor) then simply reset the esp with your reset button and let it start again. Sometimes crashes can occur immediately after programming mode. Resetting the esp puts it back into ‘run mode’ manually which is always a good isolation test when things get hairy.
Now is the time to go back and tweak the program. Change openForTooLongInMins back to 10 minutes or another duration that suits you. Or perhaps edit the string containing the message that is sent as a SMS to your phone. I’ll let you figure out that part.
Uploading your changes is easy. Just make sure you power the board first; then connect the USB; activate the serial monitor; and lastly put the esp into ‘programming mode’ before hitting the Upload button. Take another look over the section Uploading the sketch to the esp8266 above.
A little about how it works
So there you have it - working hopefully. The GPIO 2 button should normally be pressed up against your garage when it’s closed. To test the rig you want to hold down the button to indicate the garage is closed. Watch the monitor to see the debugging messages: “door is closed”. Then notice as you release your finger it says “door is open”. Now the counter starts to count to your openForTooLongInMins threshold.
I will be adding a follow up post that includes more details on the operation and the design of this simple “proof of concept” program.
Additionally, for those who want to take the breadboard prototype and actually fit it to their garage door like in my video, I will have a follow up post showing how to do that too.
Happy hacking!
Huge thanks to @iaintdoingit, @mattwillis and Gian for really useful draft feedback.
Also, if you’ve made it this far and you liked this post, feel free to vote for it over on esp8266.com.
#introduction#beginners#tutorial#esp8266#IoT#electronics#Arduino#c++#hacking#sms#api#wifi#embedded-programming
2 notes
·
View notes
Text
Flush ISession at the end of request lifecycle
So you want to Flush() at the end of every web request? Of course you do. If you don't require the complexity of Commands, etc then pulling and pushing from your database/store directly in your controllers is fine.
In this example I'm using my IoC container (Autofac) registration for my database session (ISession) to hook in a Flush() just before it's disposed. So easy:
The major value to this is getting to keep fewer persistence lines of code in your controllers. Lighter controllers are always a win in my book.
0 notes
Text
Fixing your Apple ID Security
Do you want your iPhone photos and contacts stolen too? Of course not. So you need to plug a security hole in your Apple ID account which pretty much allows anyone with a bit of easy to find knowledge on you, to take over your account and get your stuff (or buy stuff with your money, or stalk you, or brick your iPhone). It's all bad. So here's what you do-
Log into your Apple ID and set a new (fake) date of birth and then change all your security answers. Change them to what? Change them to long random strings. And don't even write them down. You don't need them. No one needs them. Apple shouldn't even have this feature. By replacing the security answers with long random answers you're effectively reducing the exploit path back to just the email reset option, which makes your Apple ID as secure as most other online services you use. The only way to reset your Apple ID password now is via the email reset - that's good for you and bad for hackers.
The backstory..
The recent iCloud hackings got me thinking about how secure all my stuff on my iPhone/iCloud is. After a bit of reading it turns out that a major player in the vulnerability of the Apple ID attacks is the alternative to the common method of resetting ones password.
You know the one: enter your email and you receive a handy link in your email inbox which allows you to select a new password. This is a standard practise and is relatively secure assuming that your email is secure (which it had better be, since once compromised, an attacker could potentially reset all of your online services passwords).
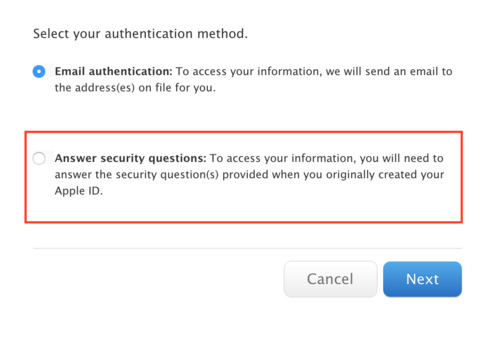
The alternative Apple provides is a set of security questions you (or an attacker) can answer. Get two of them right and you're on your way to setting a new password. This alternative is a very bad idea. Well, maybe it's not.. but Apple's implementation of it is certainly a serious weakness.
You actually need a little more info on someone than the two security question answers to reset their password and take over their Apple ID account. You'll need the email address they're using for their Apple ID, their date of birth (or the one they supplied- this will light bulb for you in a moment) and the two security answers. Now, there are actually three security questions so you're not going to know which two answers you'll need up front. But it's not a big deal since the questions are fixed (you can not create your own) and are common, general knowledge questions which means anyone with a little time on Google or Facebook could get the answers fairly easily.
I actually tried this out. I "hacked" a few accounts recently - two of my family members and a friend. For the record, I immediately informed them after I was presented with the screen which allows me to set the new password. I didn't change their passwords. Furthermore, after providing an explanation, none of them were mad at me for doing it. I think it was an eye opening experience for everybody.
So you're probably thinking "hold up, family and a friend.. that's easy info to get hold of for security answers." Well, maybe so. But it's just a proof of concept. I think I guessed the correct answers for the questions I was presented first or second try for all three of the accounts I [nearly] hacked. You only need to know a little about someone and if you don't, Facebook is a great resource. I guess that's why the NSA love it.
So what's the point of all this? Well, I wanted to fix this problem. I wanted my Apple ID to not be this weak. What could I do? It's easy - change your answers (and your date of birth).
Here's the how-to in pictures
Sign in to your Apple ID over on Apple's site.

Once logged in, click the Password and Security link.

Fill in your current security answers to continue. If you're like me and you don't know them, reset with the link at the bottom of the form.
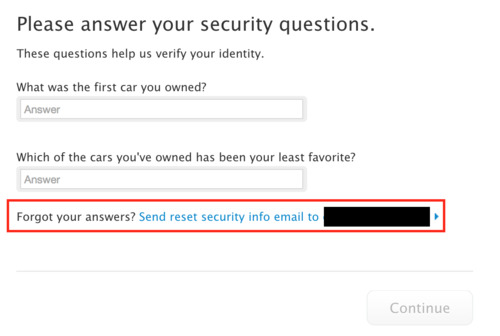
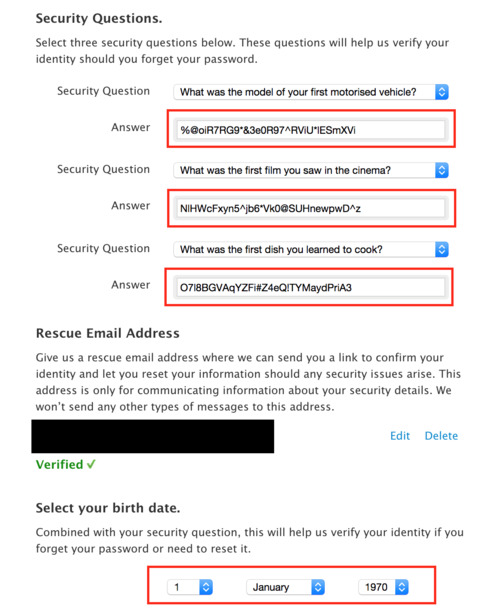
Once you've arrived at the Manage your security settings page, fill your security answers with long random strings and change your date of birth. The questions you select are not important. Choose any.
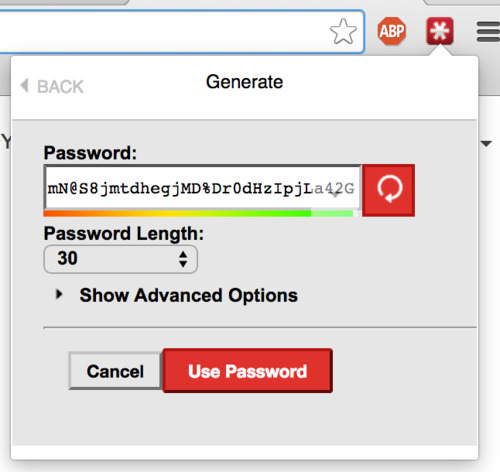
Generating secure strings of text like this is easy. I used a password manager to get mine.
You really don't need to save these. I would actually suggest you don't. The benefit of not knowing these yourself if you ever do need to get back into this part of your account (or any account really), is that you get to experience the alternative methods. Just like I did writing this post. It's worth knowing the process to reset your account if you're trying to prevent a hacker from doing it.
Once you've changed the security answers and your date of birth, hit Save and you're done.

You now have rendered the very unsafe security questions option for resetting your Apple ID moot. Neither you or an attacker will be able to easily guess your answers or date of birth, forcing resets down the email link route.
Sleep easy.
PS: I'm not the first person to think of this.
Thanks to Matt and Jono for reading drafts.
1 note
·
View note
Text
Can we fix "Women In Tech"?
So I've been following Nikki Durkin (@nikkidurkin99) lately and just today ran across her interesting post Why I’m Sick To Death Of Being A ‘Woman In Tech’. It's a great read.
What is bothering me however is how bad this "Women In Tech" problem really is.
So that got me thinking.. here are my assumptions:
Startups/entrepreneurs/small business/I'm not working for you anymore/"going it alone" are ideas that are not going to diminish in numbers - this fire is only going to burn hotter. Just you watch.
Women are going to want more of the pie. Why shouldn't they?
This "Women In Tech" problem is a really serious problem (if you don't know what I mean by this you haven't read the above article #doit)
This looks like a perfect opportunity to me. Not an opportunity to exploit women (seriously, why haven't you read this yet?), but one for innovation!
I heard a great quote recently and it goes kinda like this: "Select a problem that is really painful for a lot of people." (I'll get the reference when I can find it) This isn't a "how to" for finding startup ideas. It's simply good, common sense guidance so that you're already ahead of the game by starting with great odds of success.
Of course if you're into startups this is not news to you. But have a think: this may be one of the most text-book recipes for innovation in recent years. We have a massive market: women, ~50% of the population. And we have a really painful problem.
You might say to me "Matt, those numbers are not right. Not every woman wants to build a startup." And that's fine. But that's why I included the first assumption - this industry is going crazy. I don't need to link to all the references by, like everyone, about how cheap and easy it is to build tech these days. Sure, women aren't yet stepping up in the droves like the blokes, but with all the great work people like @jason are doing and programs like railsgirls are achieving, it's going to grow.
So; innovators: What are you going to do? Let's see if we can solve some of this pain that women should never have been subjected to in the first place and fix "Women In Tech".
-- Thanks to Tara, Rob, Bobby and Jason for reading drafts.
0 notes
Text
My First Failed Product Is Not A Failure
So I officially notified my users last week that smstolist would cease to be.
It's sad to end a product especially before it was really even a thing. The cliche is that I "learned heaps of lessons" but it is true! I have learned a lot. This is not by any stretch a failure.
I'm reading The Lean Startup and I just wish I'd read it earlier! My next project will be validated properly and I know for sure that I will certainly eliminate much more waste the second time round.
No skill is refined without practise so I'm excited. Stay tuned for the next adventure.
--
Oh.. and RavenDB is awesome btw! RIP CloudBird.
0 notes
Text
Building A Prototype
I've spent the last couple of months building a prototype in my spare time. It solves a fairly simple problem that I have a deep connection with. As to whether this app can become a product (save a business) remains to be seen. For now, I have a couple of users and the proto seems to be doing it's job.
smstolist
For now I'm calling my prototype "smstolist" - it's not an exciting name but neither is my app for the moment. Simply, smstolist enables users to push out frequent updates to a private list of subscribers via text messages (SMS) and email. Publishers (the users who wish to send the updates) send text message Updates to a certain mobile number and my app takes the Update and then emails it to all of the Subscribers (those who wish to receive the updates) on a list. The app responds to the Publisher with another text message confirming that the Updates were sent.
smstolist is designed for those of us who are perhaps a little less tech savvy. One might be thinking, "why do I need an app to do what my phone already does?" Or "why do I need this app when I can set up an email alias or distribution list?" The answer: "you don't!" The thing is, many will find setting up that sort of configuration messy and my app makes it simple, particularly for those who consider just sending a SMS message a significant accomplishment.
I used the words "frequent" and "updates" earlier because my app does not attempt to do what Twitter or Facebook does - smstolist Lists are not public or for long "campaign" style email messages. If a user subscribes to an smstolist list then they are saying they want to receive semi-frequent updates and they want them "pushed" to them, rather than having to check some site to see the updates. In the future, it might make sense to give subscribers the option to receive SMS' as well as emails for the receiving of Updates. This would help more with the "push" concept I think.
Scratching An Itch
smstolist solves a fairly specific problem for my case-in-point user at the moment. However I am interested in discovering whether this application could have value to others. It's just an idea, turned tool which works fairly well for now for a certain problem. Can it work elsewhere?
If you can think of any other applications for which this tool might be useful, please let me know in the comments. I'm really keen to know if this is a can be a thing.
Can You Help?
I'm also inviting those who are interested in trialing this idea with me to set up a list or two if you think this can be of some value. Your feedback is the only way I'm going to know if this can work. Hit me up on twitter or in the comments and I'll get you set up. It's pretty painless.
Cheers
0 notes
Text
Rebuilding the Spotlight Search index for email on iPhone
Boom! It was pretty simple to fix.
It's been frustrating me for a couple of years now how the Spotlight Search index on the iPhone seems to "hang around" much longer than one wants. The problem arises when deleted emails apear in Spotlight search results.
The fix is simple:
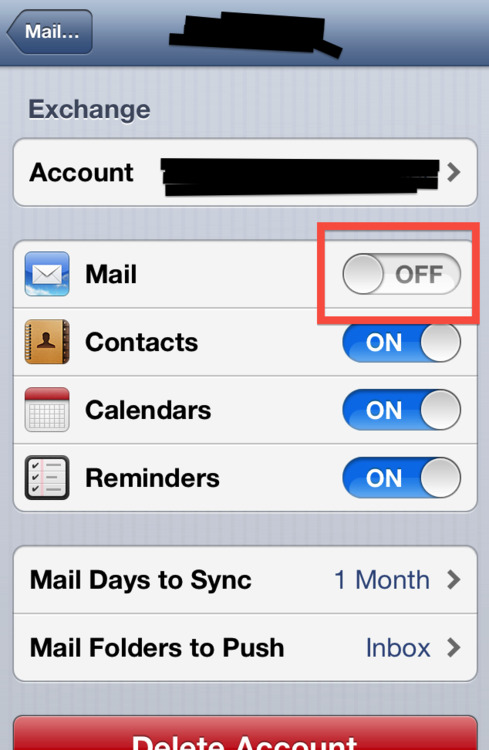
Find the mailbox for the messages which have been deleted that keep appearing in Spotlight under Settings > Mail, Contacts, Calendars > [account where email is set up] and toggle the Mail option off. It might take a few seconds.
Verify the deleted messages don't appear by running another search,
Then go back to Settings and toggle the Mail option back on. Your emails should return and the Spotlight index should be free from those rogue messages.
Happy days.
0 notes
Text
Reading Dependency Injection in .NET
So I sat down on the couch this morning with my new book Dependency Injection in .NET by Mark Seemann. I'm realy looking forward to this.
The reason for this post is more of a personal experiment. I'm interested in seeing how my expectations of the book will compare to my findings.
I certainly wouldn't call myself an expert on DI/IoC or great interface design in general. It was only recently that I learnt how bad Service Locator was. Yeh, it's ok, you can laugh. I do have what I think is a reasonable understanding of DI frameworks (I've been using StructureMap for a couple of years and more recently Autofac) but as I'm learning, that does not mean that I understand DI.
What I'm really hoping to get from this book is better design. It seems reasonable to me that DI and interface design is core to building maintainable applications; and it seems logical to infer that an application whose codebase is maintainable is designed well. Yes, I'm eager to learn more about IoC/DI but I'm much more excited to harness the underlying value or becoming a better designer [of code] rather than simply a consumer of best practises.
I plan to follow up with some "lessons learned" -style posts as I progress through this book. Readify, my employer, has kindly allowed me PD days to do this so I want to "give back" something to the wider community in the hope that some of the nuggets of wisdom I acquire will be valuable to others.
1 note
·
View note
Text
An Android phone can never have what an iPhone has
An Android phone can never have what an iPhone has. Before I explain, let's have a bit of back story.
User Experience is a term we software people use to describe, more or less, how pleasant the process of interacting with a software system is. If you hardly click or type, the information you're looking for is easy to find and you come away happy, it might be said that you had a good "user experience". However, if you end up talking screaming to a device (yes a computer is an inanimate object) or nearly destroying a keyboard, perhaps you had a bad user experience.
The thing is, user experiences are not just limited to "users" in the software sense. We humans have bad experiences all the time. There’s the experience with the stupid "tap" device in the fancy hotel room when you go to use the shower: how does it work? I mean, once you figure it out it's ok but when will these guys stop thinking up new ways to invent a tap!? There’s also the experience with the online store that might be smooth until you have to return an item. Where’s your A Class customer service now? It's easy to limit scope of an experience (to users in the software context) because then things are easy to measure. I want a good experience throughout the whole process. I want the complete experience to be good. This is what Android devices can never have.
The Android OS, by design, is multi-platform. It can be used on all manner of hardware. This means it needs to be extensible and flexible so as to accommodate the differences in feature sets of various hardware devices. An iPhone's OS does not face this challenge. It's designed for a limited hardware set and so the playing field is narrow and predictable. The experience with an iPhone is neither hardware nor software - it's both; and it's good.
Samsung can make a great (hardware) device but it has to rely on the Android OS for the rest of the experience. Likewise, the Android engineers can knock out great features, but how they're implemented on the hardware is not under their control.
An iPhone has synergy. Yes synergy. It's one of those words that's really misused by management types. I loathe the word. But it's the right word. The iPhone's experience is greater than the sum of the remarkable hardware and elegant software design. Android devices can never have that, and that's why they'll always be inferior.
Thanks to Andrew, Jason and Sam for reading drafts.
2 notes
·
View notes
Text
Killing the pain: autocomplete in emails
What bothers me about Outlook is how the autocomplete in the TO field seems only to search for addresses that are stored somewhere as a "contact". What I like about using the iPhone (and I believe gmail does this too) is how I can start typing part of a name or an email address, provided I've already sent or received a message from said party, and it will autocomplete it for me even if they are not a "contact".
I don't have time to save everyone as a "contact" and I'm especially not going to waste my life on a painful "add a contact" experience. Hotmail has tried hard with their "one click" approach where the "your email has been sent" confirmation page includes the form to add the First and Last names of the new email address. This is good but most of the time I can't be bothered with that either.
How's about more thinking in design hey? Wouldn't that be nice. Assume that, if I have sent or received a message from [email protected] that I might want to send something to him again. Allow me to search for "joe", "bloggs" or even "ggs@ex" and autocomplete for me so I don't have to think about contacts or not-a-contact complexity.
I might also like to point out that Xobni were the first to relieve my pain some years ago when I was still forced into using the horrid Windows Outlook client. Xobni drastically improved the autocomplete for the TO field. I just think it's a little sad that one needs a plugin to get this type of pain relief.
</rant>
What do you think? How do you overcome tools that force you into one way of doing things?
0 notes
Text
Stop following me!
So I like Dropbox.. Ok not true- I love Dropbox! But not enough to put up with these creepy ads that seem to be able to follow me all over the intergoog:
... yes! Everywhere!
And what bothers be more than the stalking is: how do they know I'm not a customer already? Maybe we use Dropbox for Teams at my work (soon we actually might. not kidding)?
If Google or AdChoices or whoever they are can get all this info on me, they should be able to leave me alone when I sign up for one of these products right? I mean, it's only the advertiser and the advertiser's client loosing out- they could be serving me other ads. I'm not exactly going to sign up again.. at least not on the say so of an ad who likes my smell.
13 notes
·
View notes