
A place for showcasing and linking to old software.
Last active 2 hours ago
Don't wanna be here? Send us removal request.
Statistics
We looked inside some of the posts by nostalgicsoftwarezone and here's what we found interesting.
Average Info
Notes Per Post
215
Likes Per Post
137
Reblog Per Post
74
Reply Per Post
4
Time Between Posts
3 months
Number of Posts By Type
Text
14
Photo
1
Video
1
Link
1
Last Seen Tumblr Blogs


Fun Fact
28.6 is the average number of monthly visits per US mobile user.
Text
How to Upgrade Graphics in Windows 95 & 98 on VirtualBox with BearWindows
Anyone using Windows 95 and Windows 98 on VirtualBox is bound to have, at some point, been stuck with a pitiful screen resolution of 640 x 480 and 16 colours, which is not only super ugly, especially with the programs and backgrounds you'll want to use with the OS, but you'll find that the performance is down the drain.
There are two well-known ways of upgrading the graphics in Windows 95 & 98 - SciTech and BearWindows. This tutorial will cover the BearWindows method. This will give you 24/32-bit colour and larger screen resolutions. However, you may be unable to get any widescreen resolutions.
First, you will want to download the BearWindows drivers. Here's the webpage regarding the project. And here's the download link you should use. Now, you can either put these files in an *.iso file that you can insert into your VM, or you can open the virtual hard drive and place the files in there. I chose the former (and I'm glad I did because I'm now using it in multiple VMs!).
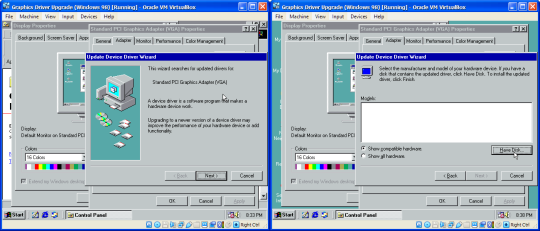
With the files now available to the VM, take a snapshot. TAKE A SNAPSHOT OF THE VM IN CASE SOMETHING GOES WRONG! Then go to Display Settings, click Advanced, go to Adapter and click Change. As you go through the wizard, select the second option (Display a list of all the drivers in a specific location...), and then select Have Disk. Now, in the file browser, go to where the display driver upgrade is. The display driver you want will be located in 032mb, 064mb or 128mb. The numbers represent how much video memory each version of the driver will be able to handle, so you're probably best off choosing the one in the 128mb folder.

In the Select Device prompt, select "Show all hardware", then select VBE Miniport - Standard PCI Graphics Adapter. The other options may not work at all. Just keep going through the rest of the wizard and return to Settings in Display Properties***. You should be able to change the colours to 32 bit and increase the display resolution without restarting. If that isn't possible, first try changing the screen resolution and colour depth on their own (screen resolution first works best for me). If it still says you have to restart, you will have to go through the entire wizard again, trying different device options until you can change the screen resolution or colour depth without restarting.
Also, while you're at it, make sure your monitor is set to the Plug and Play one. The process is similar to changing the graphics driver, but you don't have to browse for the driver:
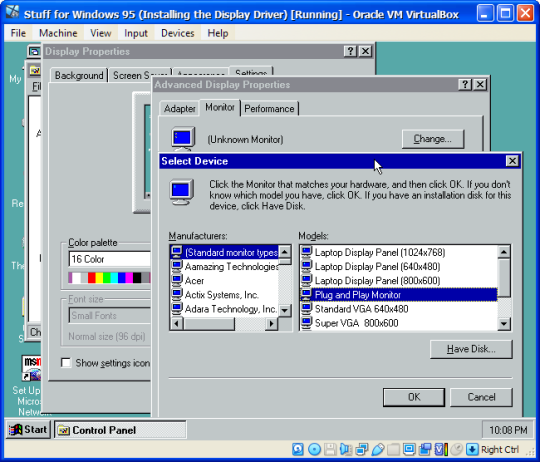
In fact, you might want to do this BEFORE upgrading your display driver, especially on Windows 95.
And that's how to upgrade your graphics on Windows 98 and possibly even Windows 95. But that's not all for this tutorial. There's still some important information to get through:
***Mostly THIS error for Windows 95 users:
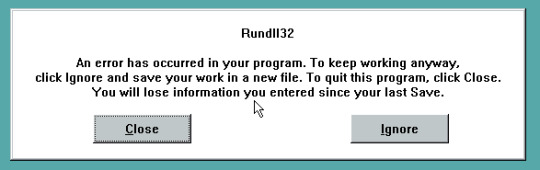
If you get this error, you will have to click Close and restart the VM, as this error prevents you from even opening the Display Settings. If you get an error upon restarting about the display settings, you will have to click Cancel when the Display Settings appears to prevent this error from happening twice in a row.
You are probably going to get this error after you've installed the display driver and left the Advanced Settings in order to set the screen resolution and colour depth. If upon restarting your computer, however, the colours look different than before (due to 256 colours), that's a good sign and you just have to change the screen resolution and colour depth without restarting the VM.
#the nostalgia zone#old windows#windows 95#windows 98#virtualbox#graphics drivers#non video tutorial#tutorial#bearwindows#gee Windows 95 was a pain to get the screenshots for#Windows 95 is also a P A I N to install in the first place
1 note
·
View note
Text

Crosswords and Word Games, a game for older versions of Windows.
This is a 16-bit game, so it will never work on modern Windows. You will need a 16-bit Windows emulator (such as OTVDM) or a Virtual Machine running Windows XP or earlier to run this game.
This game is available on MyAbandonware!
6 notes
·
View notes
Text

Drawing for Children, an art program for Windows.
This game is available on MyAbandonware!
#The Nostalgia Zone#old software#nostalgia#my childhood#Drawing for Children#old program#Abandonware
2 notes
·
View notes
Text
Holy crap I just read all this for fun and there were ERRORS EVERYWHERE! Reblogging this with the errors fixed, including the image that had a grammatical error.
How to install Windows 1.0, get the mouse to work and make the display look good (NON-VIDEO TUTORIAL)
This tutorial is for those who don't like watching videos and/or do not have a good enough internet connection to watch a video tutorial.
You will need:
Virtual Machine software. I recommend VirtualBox, as it costs nothing, has all features free to begin with, including online snapshots and is overall pretty good.
Software capable of altering the contents of floppy disks. (PowerISO seems to work best for me).
The ability to mount virtual hard drives (ImDisk may be needed).
Windows 1x installation floppies. (download)
Windows 2x installation floppies. (download)
MS-DOS 3.30 installation floppies. (download)
Instructions:
Part 1: Installing MS-DOS:
Open your Virtual Machine Software and create a new Virtual Machine. Set the OS to Windows 1.0, or if you can't do that, Windows 3.1. You can allocate a generous amount of memory and hard drive space from here. I gave my VM 86 MB RAM and 1 GB storage space.
Note: Make sure your hard drive is a *.vhd hard drive. This will make your life easier and possibly eliminate the need for ImDisk.
Run the VM. You will get a message saying it can't read from the boot medium or something to that effect.
Mount Disk 1 of MS-DOS 3.30 and restart the VM.
You will boot into MS-DOS on the floppy drive. Run the following commands:
fdisk - this allows MS-DOS to recognise your virtual hard drive as a hard drive, with a drive letter and all, allowing you to format it and copy files to it:

"format c:" without quotes). It's simple - just say yes when it asks whether you're sure you want to do so.
"sys c:" (without quotes). This command is not very necessary, but it makes the hard drive bootable. Without running this command, you would have to insert a bootable disk (such as the first MS-DOS disk) every time you booted up this VM in order to continue. So running this command saves time.
Copy all files from the mounted floppy disk to the hard drive. In other words, "copy a:\ c:\"
Insert MS-DOS Disk 2 and repeat the previous step.
Now you can install Windows.
Part 2: Installing Windows:
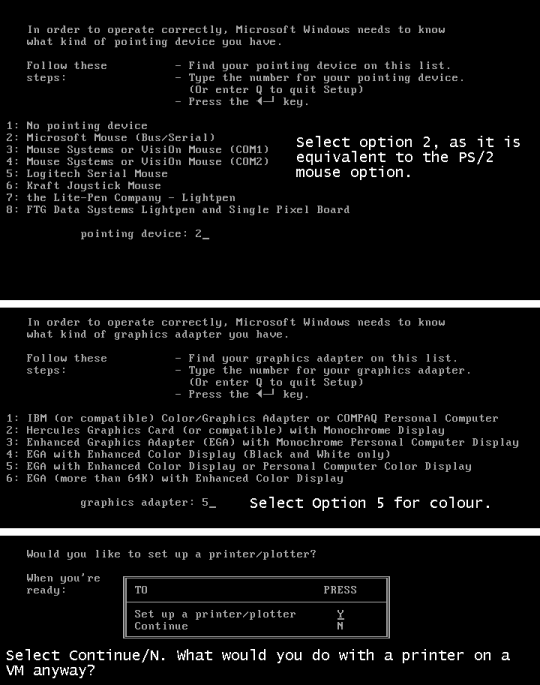
There are two ways you can install WIndows. The traditional method and the patched method. The traditional method lets you install a vanilla copy of Windows, but it is very lacking in terms of drivers. (i.e. if you try to install Windows 1.0 with the original floppies the mouse will not work). The patched method uses a driver patch that includes a better display driver, but the installation method is quite different.
Part 2a: Installing Windows the traditional way:
Windows 1x does not support PS/2 mice, which is the type of mouse most VM software, including VirtualBox, typically use. To get around this, you will need to inject the mouse driver from Windows 2x, which does have PS/2 mouse support.
To do this, first open Windows 2x's Disk 1 in a program capable of editing floppy drives and copy MOUSE.DRV to a folder of your choice.
Then open Windows 1x's Disk 1 and replace it's MOUSE.DRV with the one from Windows 2x. Save.
If you're having troubles doing this, you can download the Disk 1 I prepared earlier. It comes with the other installation disks as well, excluding the printer disk.
On your Virtual Machine, mount the first and modified Windows 1x floppy disk and run "setup". Switch to your floppy drive by running "a:" if need be.
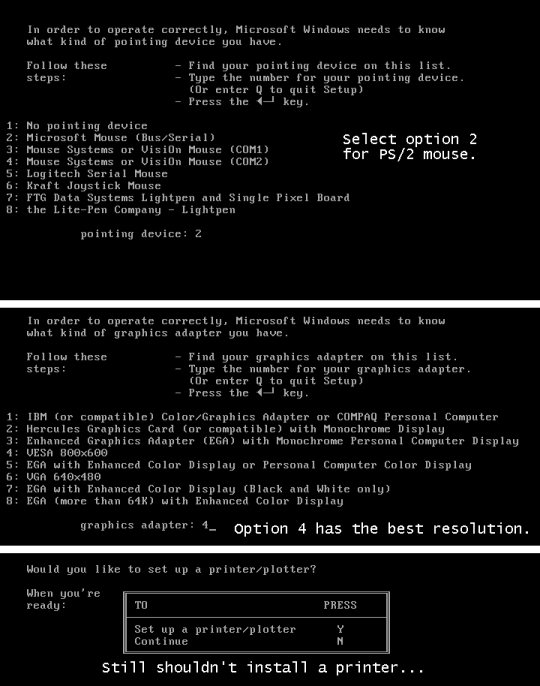
Continue through the setup, then select the following options:
After the setup is complete, you are likely to get an error saying something like "Insert disk with \COMMAND.COM in drive A and strike any key when ready" Remove any floppy drives and restart the VM.
To enter Windows you will need to change the current DOS directory to the Windows directory. To do this, run "cd c:\<windows directory>" or "chdir c:\<windows directory>"
Run "WIN" to start Windows 1.0
And you're in! You did it! But unfortunately, the screen looks quite squished. Yuck! Which leads to...
Part 2b: Installing Windows using a driver patch:
You will need the driver patch in question in order to be able to use this method. Download it from here.
Extract the VGA utility to a folder of your choice. Then open all Windows 1.0 installation floppies and copy the files over to the same folder.
I have already done this for you. Download it here if you want.
Mount the virtual hard drive for your Windows 1.0 VM (MAKE SURE THE VM IS NOT RUNNING WHEN YOU DO THIS). To make things easier, you can locate your VM's hard drive by copying the file path provided in Settings -> Storage:
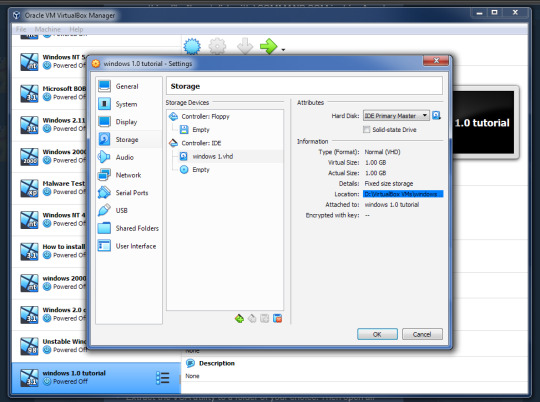
Copy the folder containing the setup files and driver patch to the virtual hard drive. Make sure that its name is eight characters or less, because yes, that was a filename restriction that existed back in those days. MAKE SURE THAT YOU HAVE NO SNAPSHOTS OF THIS VM WHEN YOU DO THIS OR IT WILL NOT WORK.
Eject the virtual drive BEFORE starting up the VM.
In the VM, run "SUBST A: C:\<setup folder>" This tricks the VM into thinking that there is a floppy drive containing all these files. Why? Because Windows 1x does not support setup from the hard drive itself.
Run "a:" to switch to the "floppy drive", then run "win1vga" (without quotes). This will cause the driver patch to install the VGA utility. WARNING: It may not patch the mouse driver, so I recommend using the modified setup disk from Part 2a.
Run "VGASETUP". This is the modified setup that accomodates for the driver patch.
The setup will be slighty different from Part 2a, so select the following options:
This time, you won't have to swap out the floppy disks, because all the files needed are on the same "floppy disk".
After the setup is complete, you can run "WIN" to win!
It looks SO MUCH better now, doesn't it? Though this setup may cause the mouse to get stuck at the edges. Again, you will have to change the directory to the Windows directory the next time you start this VM (explained in Part 2a).
Now you know how to install Windows 1.0. There's not a lot you can do on there. It is an old OS and the first of its kind after all. You can change the colours, run programs like WRITE, PAINT and REVERSI. But fortunately for you, there are actually plenty of apps that you can run on Windows 1.0.
There are two sites that I recommend getting these programs from:
WinWorld: Contains a ton of random programs. Some of these have versions that can run on Windows 1x, such as ZSoft PC Paintbrush (which lets you draw in COLOUR!).
ToastyTech: Has a page dedicated to programs for Windows 1x and 2x. This site also links the driver patch used in Part 2b of this tutorial.
PLEASE NOTE: Some of the progams here are not compatiable with Windows 1x and can only run on Windows 2x. These programs will CRASH Windows and/or even DOS and you may need to reboot the VM in order to use it again. Get a VM with Windows 2.0 or later to run these programs.
#The Nostalgia Zone#old software#old windows#nostalgia#windows#ms-dos#windows 1.0#tutorial#non-video tutorial#written tutorial#reblog#fixed some errors#wow I'm not real good at proofreading until long after posting jeez
2 notes
·
View notes
Text
How to install Windows 1.0, get the mouse to work and make the display look good (NON-VIDEO TUTORIAL)
This tutorial is for those who don't like watching videos and/or do not have a good enough internet connection to watch a video tutorial.
You will need:
Virtual Machine software. I recommend VirtualBox, as it costs nothing, has all features free to begin with, including online snapshots and is overall pretty good.
Software capable of altering the contents of floppy disks. (PowerISO seems to work best for me).
The ability to mount virtual hard drives (ImDisk may be needed).
Windows 1x installation floppies. (download)
Windows 2x installation floppies. (download)
MS-DOS 3.30 installation floppies. (download)
Instructions:
Part 1: Installing MS-DOS:
Open your Virtual Machine Software and create a new Virtual Machine. Set the OS to Windows 1.0, or if you can't do that, Windows 3.1. You can allocate a generous amount of memory and hard drive space from here. I gave my VM 86 MB RAM and 1 GB storage space.
Note: Make sure your hard drive is a *.vhd hard drive. This will make your life easier and possibly eliminate the need for ImDisk.
Run the VM. You will get a message saying it can't read from the boot medium or something to that effect.
Mount Disk 1 of MS-DOS 3.30 and restart the VM.
You will boot into MS-DOS on the floppy drive. Run the following commands:
fdisk - this allows MS-DOS to recognise your virtual hard drive as a hard drive, with a drive letter and all, allowing you to format it and copy files to it:
"format c:" without quotes). It's simple - just say yes when it asks whether you're sure you want to do so.
"sys c:" (without quotes). This command is not very necessary, but it makes the hard drive bootable. Without running this command, you would have to insert a bootable disk (such as the first MS-DOS disk) every time you booted up this VM in order to continue. So running this command saves time.
Copy all files from the mounted floppy disk to the hard drive. In other words, "copy a:\ c:\"
Insert MS-DOS Disk 2 and repeat the previous step.
Now you can install Windows.
Part 2: Installing Windows:
There are two ways you can install WIndows. The traditional method and the patched method. The traditional method lets you install a vanilla copy of Windows, but it is very lacking in terms of drivers. (i.e. if you try to install Windows 1.0 with the original floppies the mouse will not work). The patched method uses a driver patch that includes a better display driver, but the installation method is quite different.
Part 2a: Installing Windows the traditional way:
Windows 1x does not support PS/2 mice, which is the type of mouse most VM software, including VirtualBox, typically use. To get around this, you will need to inject the mouse driver from Windows 2x, which does have PS/2 mouse support.
To do this, first open Windows 2x's Disk 1 in a program capable of editing floppy drives and copy MOUSE.DRV to a folder of your choice.
Then open Windows 1x's Disk 1 and replace it's MOUSE.DRV with the one from Windows 2x. Save.
If you're having troubles doing this, you can download the Disk 1 I prepared earlier. It comes with the other installation disks as well, excluding the printer disk.
On your Virtual Machine, mount the first and modified Windows 1x floppy disk and run "setup". Switch to your floppy drive by running "a:" if need be.
Continue through the setup, then select the following options:
After the setup is complete, you are likely to get an error saying something like "Insert disk with \COMMAND.COM in drive A and strike any key when ready" Remove any floppy drives and restart the VM.
To enter Windows you will need to change the current DOS directory to the Windows directory. To do this, run "cd c:\<windows directory>" or "chdir c:\<windows directory>"
Run "WIN" to start Windows 1.0
And you're in! You did it! But unfortunately, the screen looks quite squished. Yuck! Which leads to...
Part 2b: Installing Windows using a driver patch:
You will need the driver patch in question in order to be able to use this method. Download it from here.
Extract the VGA utility to a folder of your choice. Then open all Windows 1.0 installation floppies and copy the files over to the same folder.
I have already done this for you. Download it here if you want.
Mount the virtual hard drive for your Windows 1.0 VM (MAKE SURE THE VM IS NOT RUNNING WHEN YOU DO THIS). To make things easier, you can locate your VM's hard drive by copying the file path provided in Settings -> Storage:
Copy the folder containing the setup files and driver patch to the virtual hard drive. Make sure that its name is eight characters or less, because yes, that was a filename restriction that existed back in those days. MAKE SURE THAT YOU HAVE NO SNAPSHOTS OF THIS VM WHEN YOU DO THIS OR IT WILL NOT WORK.
Eject the virtual drive BEFORE starting up the VM.
In the VM, run "SUBST A: C:\<setup folder>" This tricks the VM into thinking that there is a floppy drive containing all these files. Why? Because Windows 1x does not support setup from the hard drive itself.
Run "a:" to switch to the "floppy drive", then run "win1vga" (without quotes). This will cause the driver patch to install the VGA utility. WARNING: It may not patch the mouse driver, so I recommend using the modified setup disk from Part 2a.
Run "VGASETUP". This is the modified setup that accomodates for the driver patch.
The setup will be slighty different from Part 2a, so select the following options:
This time, you won't have to swap out the floppy disks, because all the files needed are on the same "floppy disk".
After the setup is complete, you can run "WIN" to win!
It looks SO MUCH better now, doesn't it? Though this setup may cause the mouse to get stuck at the edges. Again, you will have to change the directory to the Windows directory the next time you start this VM (explained in Part 2a).
Now you know how to install Windows 1.0. There's not a lot you can do on there. It is an old OS and the first of its kind after all. You can change the colours, run programs like WRITE, PAINT and REVERSI. But fortunately for you, there are actually plenty of apps that you can run on Windows 1.0.
There are two sites that I recommend getting these programs from:
WinWorld: Contains a ton of random programs. Some of these have versions that can run on Windows 1x, such as ZSoft PC Paintbrush (which lets you draw in COLOUR!).
ToastyTech: Has a page dedicated to programs for Windows 1x and 2x. This site also links the driver patch used in Part 2b of this tutorial.
PLEASE NOTE: Some of the progams here are not compatiable with Windows 1x and can only run on Windows 2x. These programs will CRASH Windows and/or even DOS and you may need to reboot the VM in order to use it again. Get a VM with Windows 2.0 or later to run these programs.
#The Nostalgia Zone#old software#old windows#nostalgia#windows#ms-dos#windows 1.0#tutorial#non-video tutorial#written tutorial
2 notes
·
View notes
Text
Tip for accessing installation CD files without installing Windows.
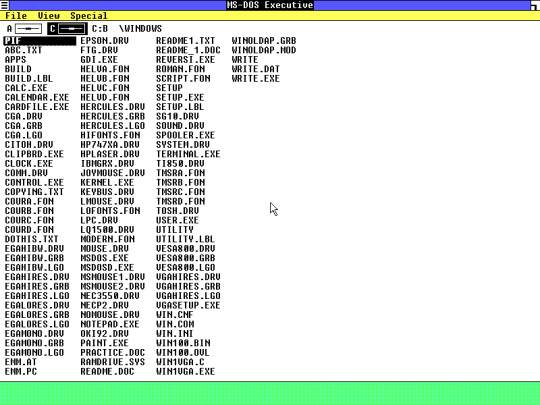
Let's say you have a Windows installation CD, and you just want to grab a few things fronm there instead of just installing Windows, whether it be a startup sound, cursor, background or scrensaver, so you mount the CD, go in and see this ugly mess:
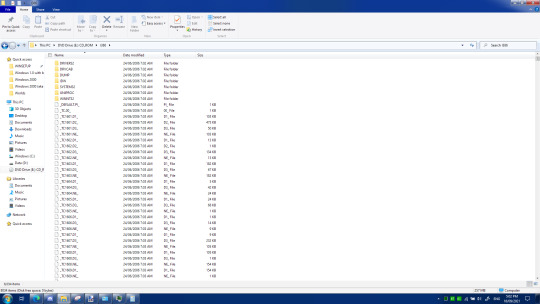
How are you meant to get anything from there? Well, it's surprisingly simple. These are all compressed files, ready to be extracted when Windows is installed. So they can be opened with 7-Zip. Once opened in 7-Zip, you can retrieve the files and use them to your heart's content.
Here's a guide to the strange file extensions so that you know which files to unzip to access nostalgic media: *.JP_, *.BM_ and *.GI - *.jpg, *.bmp and *.gif. Contains images. *.AV_ - *.avi. Contains videos, but some extracted files may have a different format, such as *.avb. *.WA_ and *.MI_ - *.wav. and *.mid Contains sounds and music. Good luck with *.MI_, though. *.CU_ and *.AN_ - *.cur and *.ani. Contains cursors. *.IC_ - *.ico. Contains icons... if you're lucky. There are other file types that can be found with this extension. *.SC_ - *.scr. Contains screensavers, if you're lucky. *.TX_ and *.RT - *.txt and *.rtf. Contains text files, rich or otherwise. *.TT_ and *.FO_ - *.ttf and *fon. Contains fonts. *.DO_ - *.doc. Contains Word Documents *.XL_ - *.xls. Contains Excel spreadsheets. *.HT_ - *.html. Contains HTML files. They will probably be very, VERY broken, especially if you only extract them. You could, however, find out what files it calls and extract them too. *.ZI_ - *.zip. Contains ZIP files. *.EX_ *.exe. Contains applications. Not recommended to open unless you know what you're doing.
Fun fact: You can open the files from the 7-Zip file manager without having to extract them first. This allows you to sample them before extracting them.
0 notes
Text

RetroBar is a free program that brings the classic taskbar to Windows 10 and Windows 11. Not only that, but it provides the old layout as well.
Setting up is pretty simple. It's a standalone program. No need to install or anything. Though you may need .NET Core 3.1. But don't worry if you don't have that, the error that appears will take you to the download page.
You configure this program using the taskbar settings (right-click the taskbar) instead of using some config file or settings app, which feels quite natural. You have several taskbars to choose from, all from earlier versions of Windows. However, you cannot choose Windows 7, which is a real shame.
This program is compatiable with other classic taskbar/start menu programs such as Classic Shell. However, due to the smaller size of the taskbar, Classic Shell's start menu floats... unless you enable small taskbar buttons in the taskbar settings (or the registry in the case of Windows 11)
This start menu replacement is overall pretty good and true to the older versions of Windows that it replicates. However, you do lose some functionality that came as a result of newer taskbars - the show desktop button and the ability to peek at apps without switching to them. Still looks much better than putting a Windows XP start button on a Windows 10 taskbar.
You can download RetroBar here
1 note
·
View note
Text
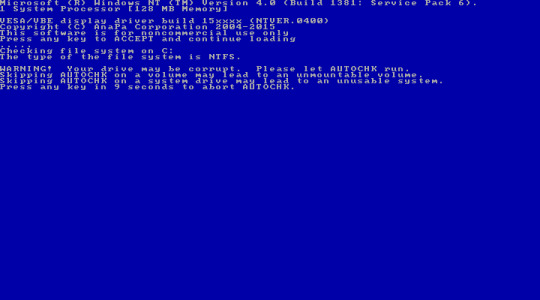

Windows NT 4 warning you not to skip AUTOCHK (aka CHKDSK).
#Windows NT 4#Windows#old windows#old software#old os#Windows NT#nostalgia#The Nostalgia Zone#CHKDSK#AUTOCHK
0 notes
Text
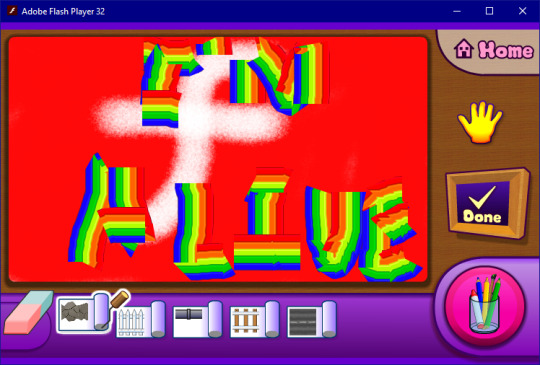
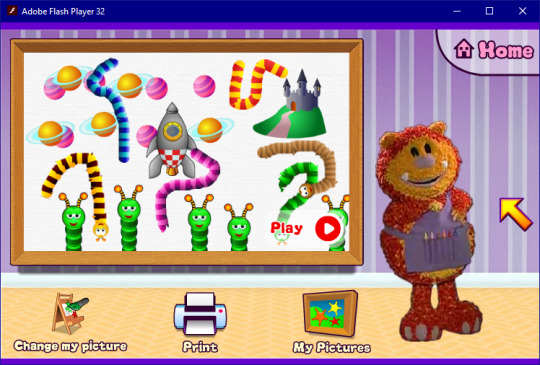
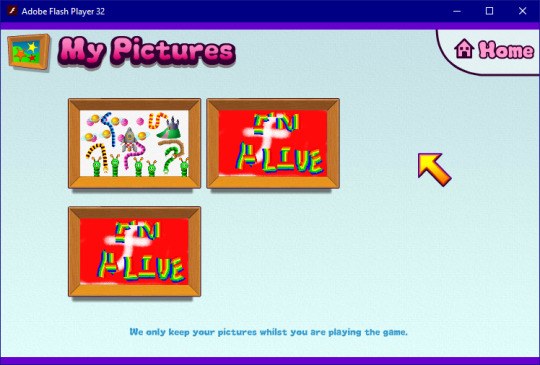
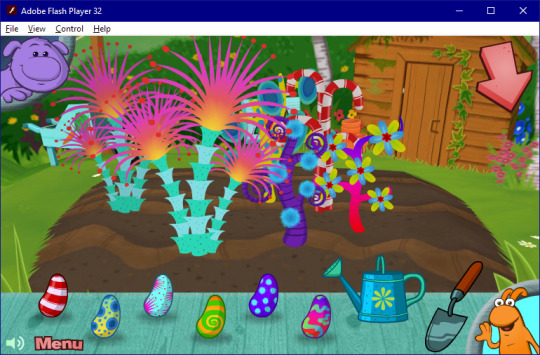
Magic Paintbox, a BBC flash game.
This game is available on the new version of Flashpoint.
#bbc#cbeebies#The Nostalgia Zone#flash#old games#old software#flash game#nostalgia#childhood#my childhood
5 notes
·
View notes
Photo


Big and Small House, a BBC Flash game
This game is available on Flashpoint.
19 notes
·
View notes
Text
PSA for ANYONE using Windows NT 4, 2000 or XP on VMware.
In VMware, Windows NT 4, 2000 and XP are vulnerable to shitty kernel timer resolutions. What does this mean? Well, as critical as “kernel timer resolution” sounds, the result is far more annoying than dangerous:
Distorted and/or laggy playback of system sounds.
This is a problem that sometimes rectifies itself in certain circumstances, but its presence is unavoidable. Every time you log in you will hear a horribly distorted startup sound that can border on earrape. The only way out is to mute it. It’s rather painful for those who enjoy their startup sounds.
But there is a solution: https://github.com/temerkhanov/SetTimerService The instructions aren’t all that clear on how to install this program. so here’s a more fleshed-out version of them: 1. Download the service and copy the files onto the virtual machine 2. Nagivate into the Release folder 3. Open command prompt, drag the SetTimerService.exe file in the Release folder onto the command prompt window, add “ /install” (without quotes) and hit Enter.
0 notes
Text
Author of discontined program Creatoon provides cracking tool.
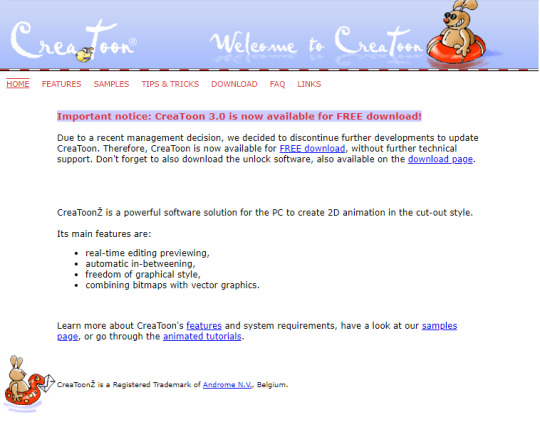
This is an AMAZING move and really helps those who came looking for an old program only to find that purchase and/or registration of this software is no longer possible due to it being discontinued.
Not only do you declare that you’re giving this software out for free, but you are also provide a tool to bypass the registration requirements. This is something that so many other software developers have failed to do, making their software difficult if not outright impossible to preserve or screwing people out of a program just because they had no idea that it existed until it was too late.
To the developers of CreaToon, thank you.
1 note
·
View note
Video
Reblogging because it belongs here. I accidentally reblogged this to my main instead of this blog.
The download links for Windows 1.0 and everything else needed are included in the video.
I do not plan on making tutorial videos for later versions of Windows because if you can install Windows 1.0 and get it working you can install any other Windows OS.
youtube
So I heard you liked Windows 1.0…
Please use this tutorial, it covers a host of important things, which other tutorials neglect to mention, and will save you precious time scouring the internet because your mouse won’t work or you have a black and white display. Thank you.
2 notes
·
View notes
Text
A quick and easy way to run 16-bit programs WITHOUT emulation or VMs.
@never-obsolete, you may actually like this.
Link: http://www.columbia.edu/~em36/otvdm.html
This installs a program that mimics NTDVM, a feature that has allowed 32-bit versions of Windows to run 16-bit programs. However, NTDVM does not run on 64-bit versions of Windows, and cannot be installed.
However, OTVDM/Winevdm can easily replace NTDVM and someone even made quite a convenient installer for it. Now you can easily run those old af games without messing around with virtual machines or whatnot. In fact, this program is SO convenient that you can now run ANY 16-bit application just like any other (as in, just double-click it and then it runs).
However, there is a bit of a catch here: - It may be detected by some antivirus programs. That is to be expected with programs of this nature. - The program’s folder should stay in the root of the C:\ drive. Like many other old af programs it struggles when placed in too many folders. Using thie program when installed in Program Files (x86) resulted in an error where the path of the 16-bit program could not be found despite being valid. - The option to copy FileOpen.exe to Command.com allows for these 16-bit programs to enter DOS mode or executing DOS commands. If you use 16-bit programs that have DOS functions this MUST be ticked. - Some 16-bit programs have the ability to print stuff. If you must take advantage of that ability, you may have to experiment with the printing drivers.
#16 bit#ntdvm#16 bit programs#otvdm#the nostalgia zone#windows#windows x64#windows 64 bit#old programs#old games#compatibility#old software
1 note
·
View note
Text
Rover’s Origins
Fun Fact: Rover, the doggo that appears in Windows XP when you search for files on your computer, actually has his origins in Microsoft BOB. He makes his appearance in a cartoon form much like everything else on that program.
Downloads so you can relive Rover and his mates: Microsoft BOB (Information and download): https://winworldpc.com/product/microsoft-bob/100 Clippy.js (Includes 3D Rover): https://www.smore.com/clippy-js
1 note
·
View note
Link
Flashpoint has had an update recently, and just in time, too!
Because most browsers no longer support Flash.
172 notes
·
View notes
Text
Welcome to the Nostalgia Zone!
Yes, @onebloodsoakedlion made ANOTHER blog! And this one is dedicated to old af software.
Here you can share and link to most old software you find nostalgic, as well as emulators that are needed to run them. However, you can only link to true abandonware or old software that has been re-released.
0 notes