#written tutorial
Explore tagged Tumblr posts
Visit Tumblr Blog
Explore Tumblr blogs with no restrictions, modern design and the best experience.
Last Seen Tumblr Blogs


Fun Fact
The average Tumblr user visits about 67 pages every month.
Text
╔.★. .═════════════════════════════╗
*Written Hogwarts Legacy Modding Tutorials *
╚═════════════════════════════. .★.╝
╰►⠀꒰ In collab with @ahriadnetv ꒱ ₊ ˚
♡ ┊꒱ It's beginner friendly
૮Ꮚ ┊ ꒱ All of the steps are broken down.
୨୧ ┊ ꒱ Images are included with the steps.
౨ৎ ┊ ꒱ Button locations within the kit are either shown or written in detail along with the order that they need to be clicked in.
☾ ┊ ꒱ Credit & links are given to the sites & people that we based it on for you to look into if needed. ໒꒰ྀི⁄ ⁄>⁄ ⁄ <⁄ ⁄꒱ྀི১
✩ ┊ ꒱ We can & will update it as new methods are tried in the kit & found to be successful on our end. ♡ ໒꒰⸝⸝´̣̣̥꒳`̣̣̥⸝⸝ ྀི꒱ა
☁️┊ ꒱ My NPC thumbnail picture making tutorial is here.
🄰 ┊ ꒱ My NPC outfit modding tutorial is here.
🄱 ┊ ꒱ My Blender & Mesh Asset Freebie Lists are located here.
🄲 ┊ ꒱ If any of the links stop working, let us know ASAP so we can fix them!
ᕬ⑅ᕬ ┊ ꒱ If you love our written tutorials, please like & share this post & if you can, support both of us on Ko-fi as well. Those are included. ♥
୨♡୧‿︵‿︵‿୨♡୧‿︵‿︵‿୨♡୧‿︵‿︵‿୨♡୧‿︵‿︵‿୨♡୧‿︵‿︵‿୨♡୧
#hogwarts legacy#hogwarts legacy modding#modding tutorial#hl mods#hogwarts legacy mods#hl modding tutorial#written modding tutorials#modding tutorials#written tutorials#written tutorial#hogwarts legacy fandom#hl written mod tutorials
9 notes
·
View notes
Text

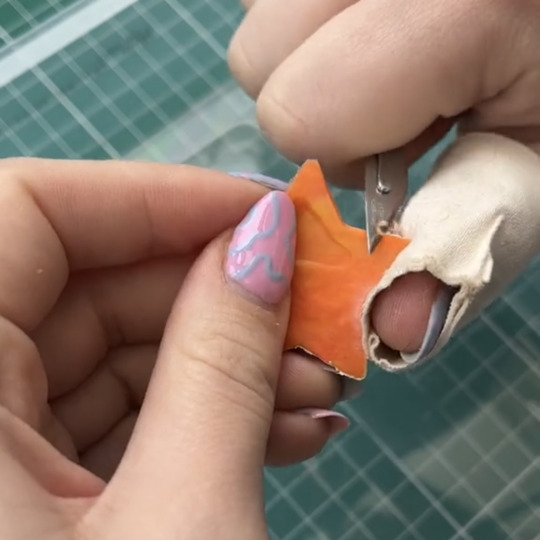
so you wanna make a spiderpunk backpack, huh? what's the profile on this guy? @/_oddlycute_ on TikTok, 25k followers, top post with 1.5M views. alright, let's get started.
Here's what you're gonna do.
First, go to the thrift store and the craft store. Pick up a small leather jacket, small backpack, red fabric, blue fabric, white fabric paint, spikes, safety pins, whatever else you need, alright? Get as close to the original as ya want, it's punk so we're not gonna be pickey.
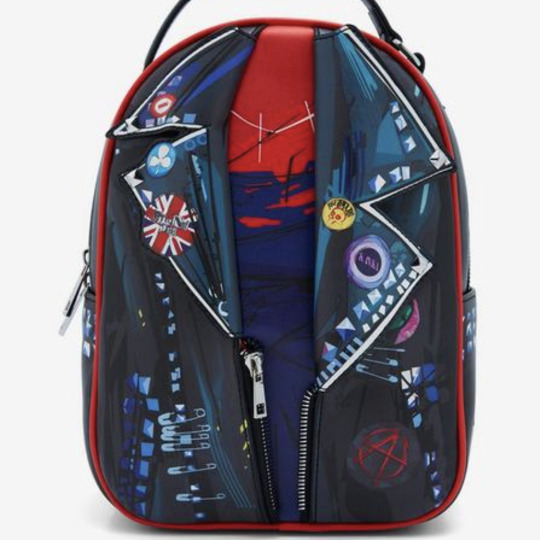
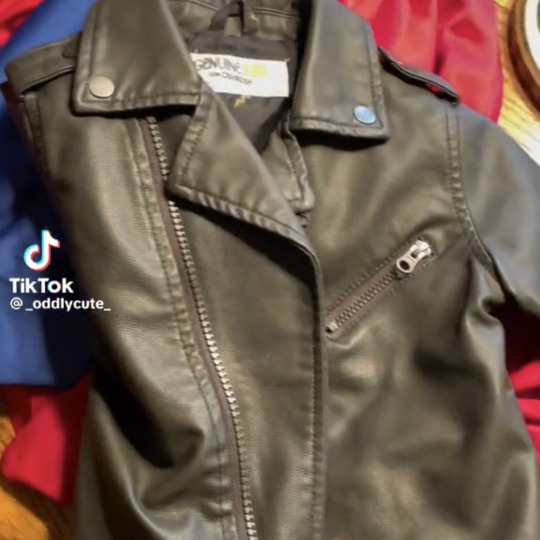
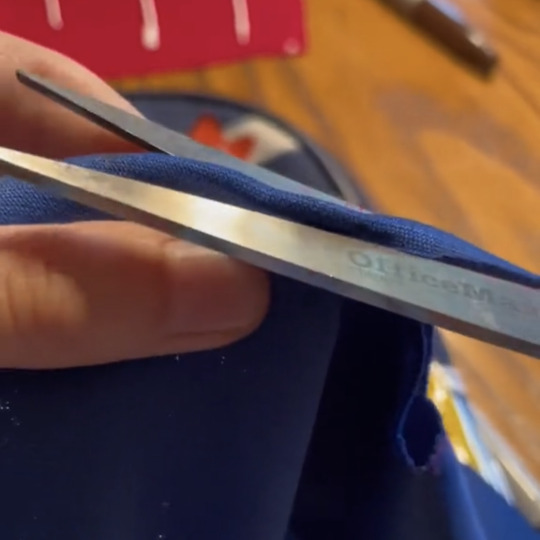
Now start cutting. Cut the jacket down to size, cut the red fabric for the base, cut the blue fabric for the shirt. You're gonna wanna cut up the blue fabric a bit more, give it some wear and tear, just like the photo. Got it?
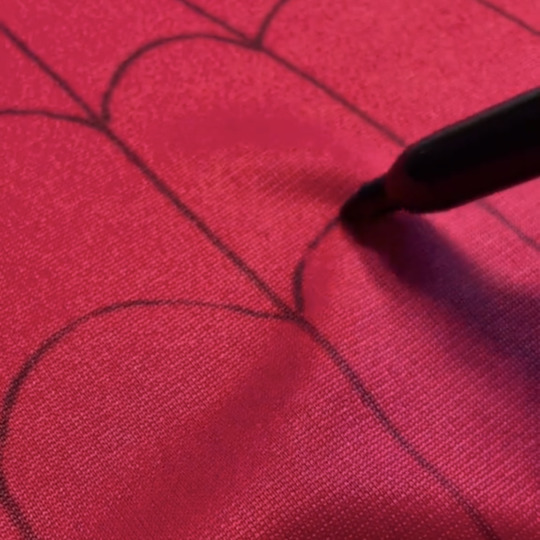
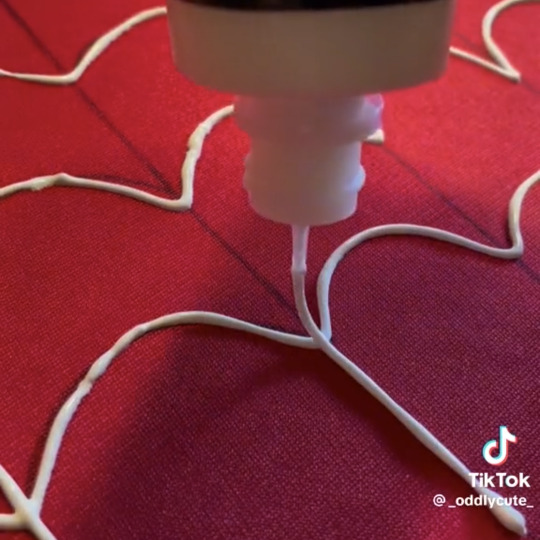
then get artsy. You want it to look like spiderman, you're gonna wanna make some webs. I suggest drawing them out first so you don't look stupid, but I'm not gonna stop ya kid, it's up to you. This is where the white fabric paint comes into play.
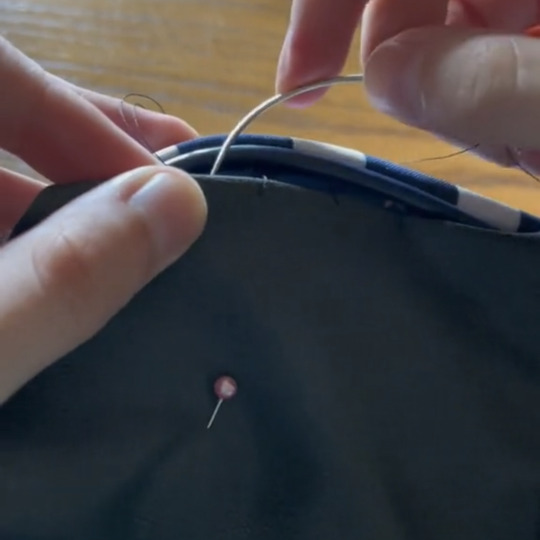
Now you're gonna have to put it all together. You can sew them, best to use a hook needle like they did, or you can glue it, like I would.
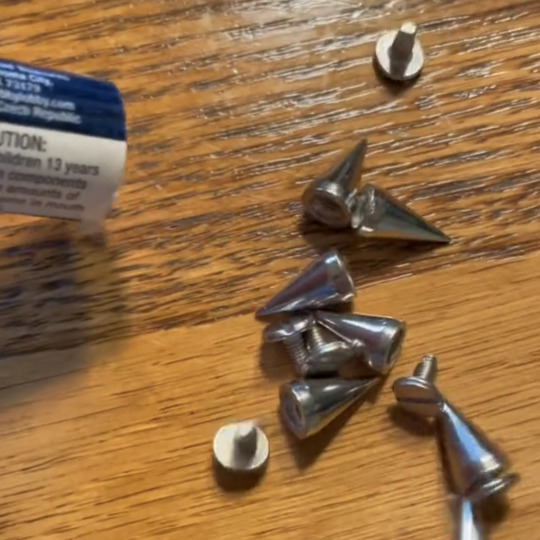

Now finish the job. You got spikes? Safety pins? Patches? Whatever you're gonna do, do it now.
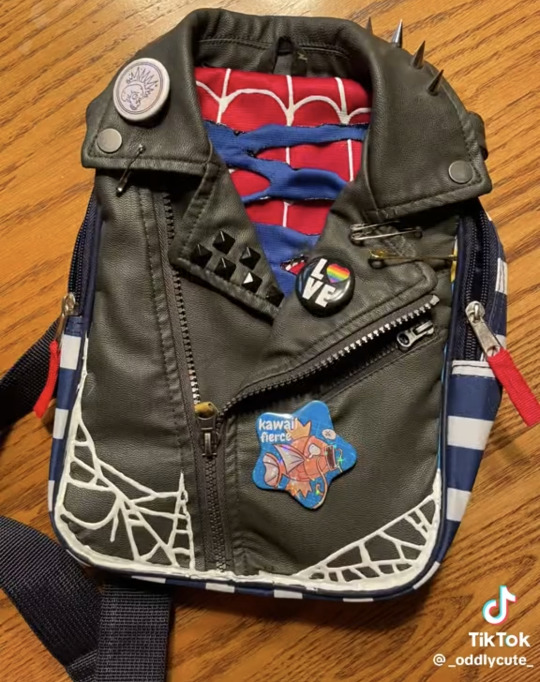
There. Jobs over, you're done.
#mike erhmantraut#mike breaking bad#mike#diy#tutorial#my tutorial#written tutorial#tiktok tutorial#how to#spiderpunk#spider punk#hobbie#hobbie brown#into the spider verse#spiderman diy#spider punk diy#backpack diy#my post#mine
90 notes
·
View notes
Text
Needle Felt Siffrin Build Log: (oct 6 - nov 20, 2024)


Credits goes wholely to @insertdisc5 for creating ISAT and siffrin's design! I am just here to attempt to make cool fanart (and get more people to play isat.. my devious plans are going great so far :3) As always, this isn't a tutorial- it is just a log about how i go about approaching a sculpture and I hope this collection of resources can help others make their own sifs!!
PSA: this has some spoilers for endgame CGs/sprites on my references image board ( also might see it in the backgrounds of my process pics). And bc this is needle felting, you will see some sharp needles! beware!
my inspiration was the intro cutscene where Sif eats the star, so my main goal was to adhere to the style of ISAT as closely as possible while transfering it to 3D space. And I knew i also wanted to try making the cloak for stopmotion purposes, so my process was tailored towards having control over the fabric with wire inlaid within the cloak (more on that later).
I ended up not sticking eyebrows on top of siffrin's bangs lol but anyways, first order of business is Gather Reference! v important. pureref is free and an awesome program. I also do some sketches to visualize the pose and important details i wanted to include in the sculpt.
behold the isat wiki gallery page! tawnysoup wrote an awesome ISAT style guide that absolutely rings true in 3d space too!! adrienne made a sif hair guide here!! (sorry i couldnt find the original link, but it's on the wiki). It says ref komaeda hair so that's what i looked at, along with other adjacent hairstyles! I also like doing drawovers on in progress photos to previs shapes n stuff to get a better idea of the end result.
Also if you're like me and struggle with translating stuff into 3D space, take a look at how people make 3d models and figurines! sketchfab is also a great resource! I looked at the link botw model by Christoph Schoch here for hair ref. (I used Maya, but there's a blender version too ! you can pose characters too if your model has been rigged!)


Face:
Started off blocking out the main shapes of eyelids and iris, and then filling in the colour details in the iris and the star highlights before moving onto adding thin black outlines and eyelashes. I didn't take many in-progress photos cause i kept ripping stuff out to redo them many many times, sorry!! This eye took about 3 hrs bc i just wasn't happy with it!! Sometimes it do be the vibe to give up, go to bed and see how it looks in the morning (more often than naught, it looks fine and it was the "dont trust yourself after 9pm" speaking)

The Mouth:
Couldn't decide if i even wanted to add a mouth as per usual with all my humanoid sculptures.. but i did some drawover tests first to see what expression i liked and to try to visualize it from multiple angles. (I was also testing the placement of stars on the hat brim here)

And then I redid the mouth like 3 times cause the angle just wasn't right (this went on for about the course of a week yay!)
Hair: woe baldfrin be upon ye


I made the hair strands individually first, and then since Sif has some of the hair at the back dyed black, i covered some of the tips with black wool (manually) (I think it would go much faster if i just took a marker to it, but hahaha i love pain and detailing!! )
And then the rest of it was positioning strands with sewing pins layer by layer, always looking at it from different multiple angles- sometimes tailoring the angle or swoop of individual hair flippies. At one point I thought the back looked too cluttered, but the hat covers a lot of it anyways!! yay for hiding mistakes! (imo this is a similar process to how cosplayers style wigs, but on a smaller scale and the same level of time consuming)
As always, look to your reference for guides, and I always do a whole bunch of drawovers over in progress photos to ascertain what was working and what wasn't.
Hat:
A trick to get a super pointy tip, make another tip seperately while keeping the connection point unfelted, and then combine the two to make super pointy hat!! (this also helps if you made the hat too short and need it to be taller. ask me how i know)

The embroidery on the hat brim was done in a hoop and then invisible stitched to the felted top portion. Technically you don't need a hoop but it helps keep the fabric tension, so you avoid puckers in your embroidery. You can also use iron-on stabilizer if your fabric is loose weave or particularly thin. this is the tutorial i used for the stars embroidery! particularly the fly stitch one, french knots, and the criss-cross stitches. highly recommend needlenthread for embroidery stitches and techniques! i learned all my embroidery from this single site alone.

For fabric, I think I used a polycotton i had in my stash,, unsure of the actual fiber content bc i bought it a long time ago. I used DMC Satin floss which was nice and subtle shiny but frayed a lot so it was kind of a pain to stitch with... but keep a short thread length and perservere through it!! After the embroidery was done, I folded up the raw edges and invisible sewed it to the top portion of the hat.
General shape:
Ok general structure of the body is this: wire armature body covered with black wool -> cloak lining & wire cage -> edge of lining is invisibly sewn to the main cloak at the hem -> head

Don't be afraid to mess around with the pattern, it's essentially a pizza with a slice taken out of it to form a steep cone shape!! Use draft paper before cutting into felt to save material! (i think i made like 3 cloaks before i was happy with the shape lol).
You can also hide the seam of the cloak and collars by gently messing up the fibers of the felt with your fingers or a felting needle btw! you can also sandpaper the seams according to Sarah Spaceman in this vid (highly recommend them for their in depth cosplay/crafting builds holy smokes), though since sif cloak is at such a smol scale, I just blended the seam with my felting needle.
For the lining wire cage section, I sewed in wire around the cloak, so the main rotation point is at the top neck area under the collar. These paddles are used to keep whatever pose I need the cloak to be in for stopmotion purposes. Then after the wire is done, I invisibly sewed the lining to the cloak at the hem (same technique as the hat brim to the lining there).
In hindsight, I should've used a thinner fabric for the lining, but i only had sheer white in my stash so had to go with double felt, thus resulting in a really bulky lining but oh well!

Heels:
started with the general boot shape, then tacking on the diamond shape heel stack and also diamond shape sole bc we're committed to the bit here. I skewer the boot onto the armature which also conveniently hides the connection point into the base to keep the whole thing upright and also I can rotate the boot to tweak the angle if needed.

Pins:
I kinda just trial and error'd jewellery wire with pliers into the pin shapes. They're itty bitty!! had a whole bunch of fails before i got two nice ones. A hot tip is to use needle nose pliers and wrap the wire around the tip to get a smooth circle shape!

Base:
I smoothed out the edge of a circular wood base with a dremel, and then used wood stainer to get the black colour. It ended up kinda looking like I took a sharpie to it, but whatever.... now i have a whole ass can of black wood stainer........ I then made a rough mountain of black wool and stuck the feet armature in. And now he's standing!!

Normally at this point when I'm done felting everything, to get a smooth finish, I'd take a small pair of scissors and carefully snip away any flyaway fibers, but this time, I just left them fluffy cause i think that's what sif would do :3c
Photoshoot:
Normally I do shoots using daylight but it was winter so the sun was nonexistent. So I broke out the home lighting setup aka dollarstore posterboard for a nice smooth background, and then hit it with the overhead Fill, side Fill 2, and Rim light, and use white paper/posterboard for bounce light if one side feels too dark. But if things are overexposed, you can move the light sources away until the harshness dims down. I'm using a Olympus mirrorless camera (handed down to me by my sibling so i dont remember the model exactly), which can connect to my phone as a remote so I can avoid shaking the camera when i take photos. Pretty nifty for stopmotion purposes! (yes my camera stand is a stack of notebooks, a tissuebox and some eva foam under the lens, don't judge me)


Stopmotion animation:
I'm still figuring stopmo out on my part, but my process was straight ahead animation ... move the cloak a cm, take a pic.... move another cm, click.... and repeat until i get a version I was happy with. My ref was the cloak animation from Gris (beautiful game btw). The 2d star animation was also done straight ahead using procreate, exported in png with a transparent background, and finally stitched together with the stopmotion footage in photoshop.

My turnarounds are also stopmotion! also secret hack, the turntable is a fidget spinner sticky tacked to a cake platter.
And i think that's all! i mainly wanted to share how I go about thinking about taking a 2d concept and moving it to 3D. I also didn't go in depth into how to actually do the needle felting bc I don't think I''d be very helpful I'm a very good teacher by telling yall to just keep stabbing until it looks right (i'm self taught for this hobby),,, if anyone wants it though, i can share a bunch of tutorials and other felters' process that helped me learn more needle felting!
Hopefully this was helpful to someone! Feel free to send asks if ya got any questions or if anything needs clarification! Or show me your works! I love seeing other people's crafts :3
here have a cookie for making it this far 🥐
#in stars and time#siffrin#isat#isat siffrin#isat fanart#needle felt#soft sculpture#know that i am devouring all the nice words yall leave in the tags/comments of my posts :holding back tears:#I hesitate to call this a tutorial bc this is just how i fumble my way through crafting anything lmao#the only reason I know how long I worked on a project are timestamps on wip photos and however long the day's video essay or letsplay is#sorry time is immaterial when i get into crafting mode#reason why this log is so late is bc after i finish a project i'm perpetually hit with the ray of 'i dont ever want to look at this again'#hence why photos never get edited#AND THIS POST SAT IN MY DRAFTS FOR 2 MONTHS DUE TO BLOODBORNE BRAINROT SORRY#done is better than perfect!!!#sorry i dont control the braincell#sorry for using a million exclaimation points! i am not good at this.. conveying my anxiety in written form!!! my toxic trait
1K notes
·
View notes
Text

As storytellers, realism and continuity are important to us, and they're sometimes hard to achieve within the confines of the game. I’m personally a big fan of posing Sims in open doorways, and unless you want to be limited to the CC options that exist, you’re stuck having to make some poor Sim walk in and out and pausing at just the right moment for the desired effect. But it’s actually very easy to edit a door in Blender to make your own open version!
I initially learned about "posing" objects from surelysims' Wicked Whims posing tutorial, which I highly recommend as a whole. However, it might be a little overwhelming to learn a whole new posing system for the sake of a screenshot or two, which is where this tutorial is meant to come in. Some of my explanations might seem overly simplistic, but I wanted it to be approachable even for beginners. I am far from an authority on using Blender or making CC, and I'm sure there are flaws in this process or easier ways to achieve certain things, but it works well enough for my purposes and I hope it will work for yours too. 💗
Now, onto the tutorial...
Figure out what door or gate you want to create an open version of. If it’s from the vanilla game, all you need to do is make note of its name. If it’s CC, find the package in your mods folder, make a copy, and paste it into My Documents > Sims 4 Studio > Mods. This will allow you to find it in S4S in the next step!
Open S4S. On the main screen, make sure “Standalone Recolor” is checked under the “Object” button, then click the button.

A new window should pop up (if it’s your first time doing this, it may take a while to load). At first, it will show every single object in the game. If you know the name of the object you’re looking for, you can use the search bar to find it. You can also use the filtering options to narrow the selection down by category, game pack, and whether it’s vanilla or custom content. Here, I’ve filtered the search to only base game doors. Once I find the door I want to adjust, I click on it and hit “Next.”

This will pop up a window prompting you to save a new file. Place it somewhere you know you’ll be able to find it easily later and name it accordingly. This file will ultimately contain your mesh edit, so you don’t want to lose it! I suggest placing it in a dedicated folder, on your desktop, or in your Mods folder directly.

On the next screen, you’ll be looking at the contents of the package itself. For this tutorial, you don’t need to worry about grabbing anything but the mesh. Click on the “Meshes” tab and then “Export Mesh.” You’ll again be prompted to save.

Open the mesh file you just saved in Blender. (If the view is funky to start, I recommend hitting 1 on your keyboard’s number pad to get a forward-facing view.) [It should also be noted I’m using Blender 3.6, so my screenshots and the location of certain settings may be different than in earlier or newer versions.]
You’ll see that there are actually multiple meshes involved (and the number can vary from object to object). Right now, we’re only concerned with the “rig.” If you’re familiar with posing, you’ll know that all Sims have a rig that is used to move different parts of their bodies around. Objects also have a rig, and objects that can open will have “bones” that control their moving parts. So click on “rig” and then change “Object Mode” in the bottom corner to “Pose Mode.”


Now, if you hit A on the keyboard, it will select all bones and you can see where they’re located. As far as I can tell, all doors have two bones that control their swinging movement. They both do essentially the same thing. I tend to stick with the top bone, which is called something like “bind_doorSwing.”

Pro-tip: If you’re having trouble seeing or selecting the rig's bones, you can change the view on the right side of the screen to “dope sheet.” Then when you save the position of the bones, just like when posing a Sim, by selecting all with A then clicking I and selecting “Location & Rotation,” the list of available bones will pop up there.


Rotate the door open using this bone or bones, if it’s a double door. On double doors, I recommend rotating each side individually rather than trying to rotate them together, as you may get unexpected results. You can use the R+Z combo on the keyboard to limit the direction of movement. (You can also use this in combo with numbers to swing them more precisely. For example, if you want a 45 degree swing, you can press R+Z+45.) Specifying the Z axis allows you to only swing the doors open and closed while restricting their movement in other directions.

Once you’ve got the doors swung open to where you want them, hit A to select all bones, then hit I and select “Location & Rotation” to save the position. (If you’re a poser, this maneuver is already familiar to you - and you know how important it is! If you skip it, the new position won’t save and the doors will revert back to closed.)

That’s it! You don’t have to do anything else to the mesh. Save your file in Blender. If you want to keep it separate from the original door mesh, save as instead and name it something different. (This is why you may want a dedicated folder, since the number of files does add up!)
Reopen the package you made earlier in S4S (or simply return to it if you’ve kept it open). From the same place you exported the mesh, you will now import the edited mesh. Hit “Import Mesh,” navigate to your edited Blender file, and you should now see your edited door replace the original. Since it’s the same mesh, all the swatches will still work perfectly with it.

You’ll notice that you’ve only replaced the “LOD 0 (High)” version of the mesh. When you click the drop-down menu, you’ll see that there are also medium and low detail versions, as well as shadow meshes at all levels of detail. If you’re only making an object for personal use, you don’t have to worry too much about LODs. You can probably just import the same mesh into LOD 1 and LOD 2 and be fine (so long as your computer isn't a potato). And if this is just for you, I honestly wouldn't even touch the shadow LODs.
The only other thing you might do is go back to the “Catalog” tab and alter the object name so you can find it easily in the game catalog. You can also edit the description, price, etc. if you so desire. Hit “Save.”

Test in game! If the package isn’t already in your Mods folder, move it there. As long as you didn’t mess with any of the tags, it should still be in the door section of build mode and work perfectly as a functional door. The door swinging animation will look different, and you could probably get rid of it if you wanted, but that’s above my current skill level and I don’t think it’s really necessary for our purposes. If all you need is an open version of a very specific door for storytelling purposes, it gets the job done.


(First screenshot: doors swung open as intended, second screenshot: doors swinging in the opposite direction as they’re walked through)
These steps can also potentially be used to create open versions of other in-game objects like gates, books, chests/boxes, etc. I’m only just beginning to experiment with minor mesh edits, but once you get the hang of it they can often be faster and easier than trying to line up the best circumstances to get the perfect shot in-game. I might make more tutorials for small edits like this that help with storytelling realism and continuity in the future!
#ts4#sims 4#ts4 storytelling#ts4 tutorial#sims 4 storytelling#sims 4 tutorial#this is the first tutorial i've written so do let me know if anything's confusing!!!#*tbw
277 notes
·
View notes
Text
Transcript:
Don't give up. Don't be a quitter, a spitter.
Follow through on what you started.
Swallow.
Audio source
#gabriel ultrakill#ultrakill#thank you for the tutorial#suggestive#hes saying this while spraying cleaning supplies at my face#putting soap in my mouth for the things ive written#sorry for the next tags#no regrets#I cant stop drinking oil. I CANT stop drinking oil..#I just can't stop I can't stop drinking crude oil#I just can't stop I can't stop drinking crude oil. You know the black stuff that comes in barrels? I can't stop drinking it.#I just cant! It's TANTALIZING#its ADDICTING! It is... A DELICACY I LOVE IT I cant stop drinking oil#<- these tags + this post = the result of gabe + v1 + me being locked in a room for 5 mins#its all over the screen. and the floor. and me. the military will be arriving soon.
305 notes
·
View notes
Text
Dear person on the bus this morning with the Dracula quote tattoo whose phone was open to my youtube channel, sorry I pretended not to notice and also was too shy to say hello
#what does one say??? 'oh! I happened to glance at your phone and I see my youtube thumbnails!'?#also I'm SO SO CLOSE to finishing the shirt video I swear it's coming soon!!#I need to finish adding the music and pictures and also do the written version of the tutorial that I've been neglecting#alas I can't post the video until I finish the blog posts because I say in the video that I have a full written tutorial#actually the tattoo Might not have been for Dracula quote reasons because it was 'Denn die Todten reiten schnell' but idk
408 notes
·
View notes
Text
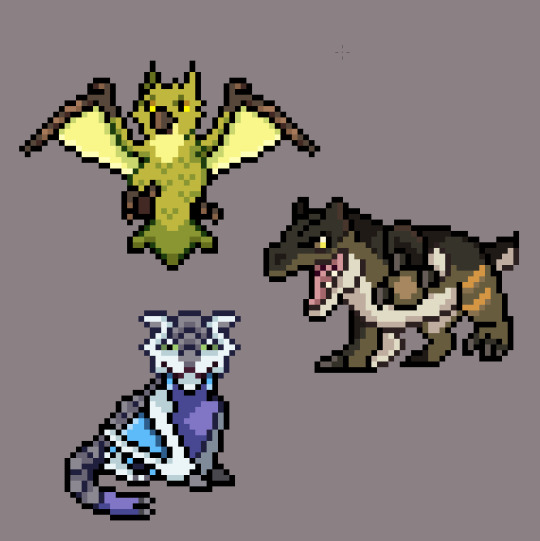
Look at my three gremlins
(Green Nargacuga - Frozen Barioth - Brute Tigrex)
#first stage ofc#pokemon#monster hunter#i also have their animations finished! idk if i will post them tho#i've had a fangame idea for the longest time and decided to draw the starters#moots feel free to tell me who you'd pick owo#also idk if that fangame will happen or not. i have a ton of it written and i've been watching tutorials of rpgmaker#but i dont have that much time rn + who knows if i will end up being lazy#doing sprites is fun tho! so whatever happens will still be fun for me :)#expect more mh x pokemon sprites lol.#monster hunter wilds#monster hunter world#mhwi#monster hunter rise#pokemon fangame#pixel art#sprite#nargacuga#tigrex#barioth
56 notes
·
View notes
Text
The thing that gets me about history and humanity is that you never know what is immortalized, and the things that will be immortalized are things you would never think.
I saw a person sharing a new tattoo, and it was one of Onfim's drawings. A boy who lived so long ago he is barely a blip now, but his drawings meant so much to people that somebody is now permanently marked in their skin with one of those drawings. Do you ever look at the things you make and just sit there and wonder if this is the thing that future people look at? Do you ever look at your art, your writing, your schoolwork, or anything that is yours and just wonder who will find it, who will fall in love with a piece of your humanity and become overwhelmed with emotion over? It's not unlikely. It's not totally unlikely that somebody will find a piece of you in the distant future and devoid of any other context of who you were will still love you because you were here. You were here, and you are still here, even hundreds or thousands of years later. Treat yourself with the same love that so many have for dear Onfim.
#positivity#gentle reminders#if anybody has ancient children's drawings beside onfim let me know they melt my heart#i have always wanted a tattoo of that kind of thing too and i want ideas#see if archeologists dig me up or whomever else they won't find significant tattoos or other things. they will see i have loss.jpeg on me#and i think that's just as important. these people must know that people are silly and weird and don't make sense and that's IMPORTANT#i'm just. so obsessed with this because it's instantly humanizing#what little child hasn't drawn humans with twelve fingers per hand#or those kids drawings where it's only a torso/head conglomerate with stick legs and hands#i just really lived seeing how their tattoo turned out because i wasn't sure if it would look good in ink and skin#i feel the same way about archiving the internet. i was looking for the written crochet pattern for something#and the person who wrote and created it passed away and their blog has been scrubbed#their blog only exists on the archives. their pattern is only accessible on youtube because somebody made a video tutorial with the pattern#it's an eerie feeling. they've been gone for two years but their blog has been tethered by the wayback machine
429 notes
·
View notes
Text

pov: it's 2008 and you just got laid off at your job for a game studio. an indie studio hires you a little too quickly, and you realize that they're in major crunch time. ...also this is a dating sim so a bunch of them fall in love with you.
(also the dating sim is fake because i can't code.)
#drillart#oc tag#Obviously eric is not dateable i feel like i shouldnt have to say this. hes your tutorial and stats oomf#Everyone else though...heh....haha...#Ive been thinking waaaayyyy too much about this idea and i even have character route ideas written out#but like. I know myslef. this is going to be an eternal wip. Its fun to think about though#Also 'are these characters based on' yes. And no one cares enough about it to notice except me so its ok
36 notes
·
View notes
Text
Look you guys, I didn't totally abandon the idea!
#blooming shells pattern tutorial filmed#border tutorial on its way#written pattern in the making#crochet
55 notes
·
View notes
Text
WIP WEEKEND;


I was tagged by @simonxriley + @crownrots to share a wip I’m working on - and for once I actually have something to share!! Thank you my lovelies🤍
Sooooo I did a thing and bought an Xbox 360 to replay all the DA games…. all because I’m making their full blown timelines and couldn’t remembered the choices I made (even with DA Keep’s help) buuutttt I also wanted to fix the mistakes I made - like… ignoring zev… but anyway this is that and it’s A LOT! Still got more to add but lynas will be done once I’ve finished dao again!
Tag list (ask to be added or removed): @carrionsflower @statichvm @risingsh0t @simonxriley @tommyarashikage @jacobseed @lasersinthejungle @unholymilf @florbelles @thedeadthree @shellibisshe @roofgeese @aezyrraesh @faerune @tekehu @jackiesarch @minaharkers @sergeiravenov @carlosoliveiraa @rosenfey @nokstella @queennymeria @heroofpenamstan @mistrias @viktorgf @d-esmond @solasan @bigbywlf @delzinrowe @fenharel @imogenkol @auricfog
#tagged*#this is gonna be a v long project#but I’ve already played 30+ hours of dao again lmao#then I’ll write up Lynas timeline#and then play 2#so on and so forth#I’ve got the like main events written down#I’m replaying for the choices I make essentially#but also to see my girlies once more#and be a bit more true to their nature#ie using the aggressive answers for willow#cus I was too scared to mess up before lmao#but I’m not ashamed to get a tutorial for the ‘best outcome’ regardless of the dialog options so win win#plus it means I’ll finally play the dlc for 2 cus I bought it and never did#ANYWAYYYYY#expect more from this soon… hopefully
20 notes
·
View notes
Text
so you wanna make plastic garbage into earrings, huh?


i see you found someone on that app of yours that does it. 85k followers, top viewed video of 2.8M, not bad. franka.uk I see. right, lets get to work.
heres what youre gonna do. look though your recycling bin for LDPE or HDPE plastic (#2 or #4) and only those two types, ya got it? that's bottle caps, laundry detergent bottles, etc.
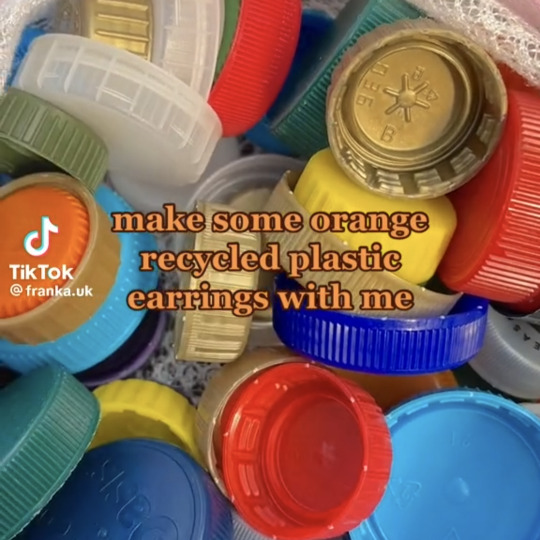
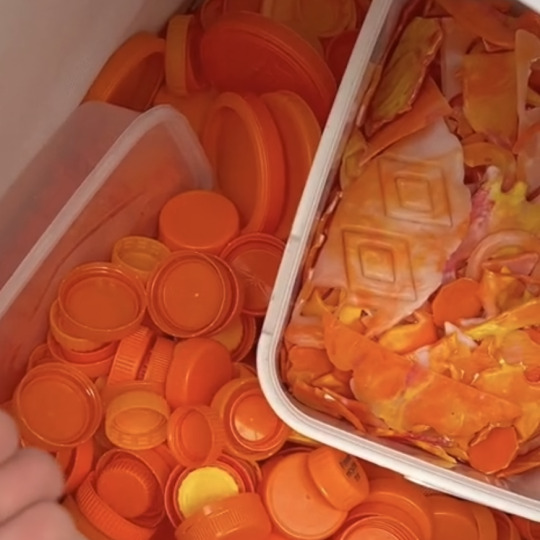
get a blender. blend. you can either do same color or multicolor, that's up to you. pick your colors, throw them in a blender you DO NOT eat out of, and blend.
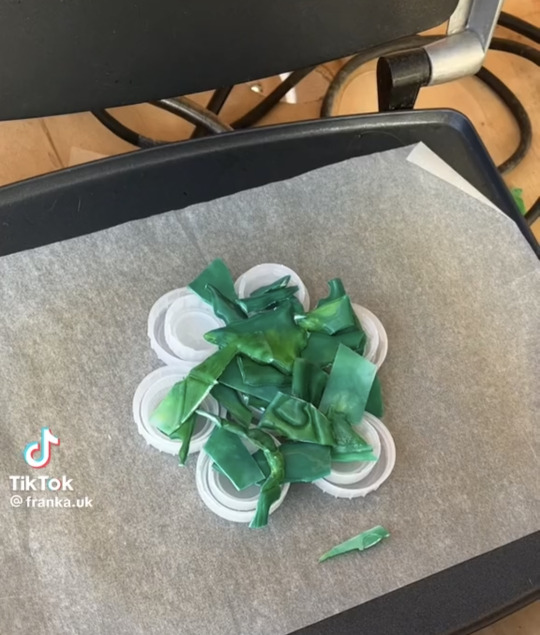
now youre gonna wanna melt it. get yourself a panini press or an iron if you're feeling brave, and two pieces of parchment paper. lay the first one down, then lay our your plastic bits, and then the second paper. its not rocket science. start at low heat and WATCH.
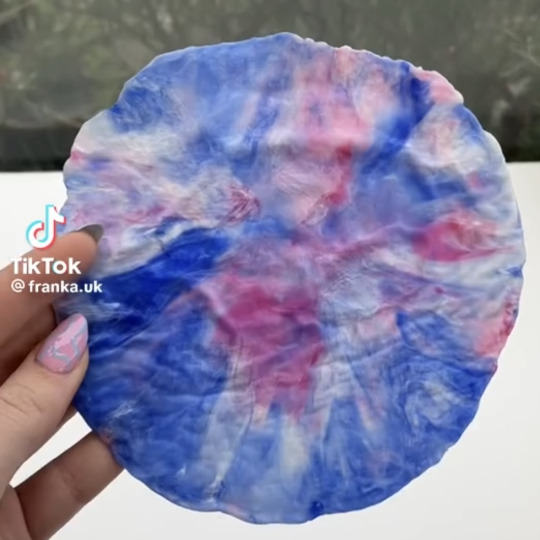
when its flat, take it off and let it cool. be careful, its gonna be hot, so dumb be stupid about this. wait for it to cool down a bit, you can press it between some books if you're feeling fancy. get your metal cookie cutters and get to work. they wont punch through, so wait for it to cool all the way and get yourself an exact knife to finish the job.
now you're gonna smooth them out. if you're using an exacto knife, you'll wanna wear a glove or some thumb protection so you don't cut yourself. you could also use sandpaper, might take longer though, or a dremel. if you don't have a dremel, don't panic, it would just be the fastest and smoothest thing, that's all.
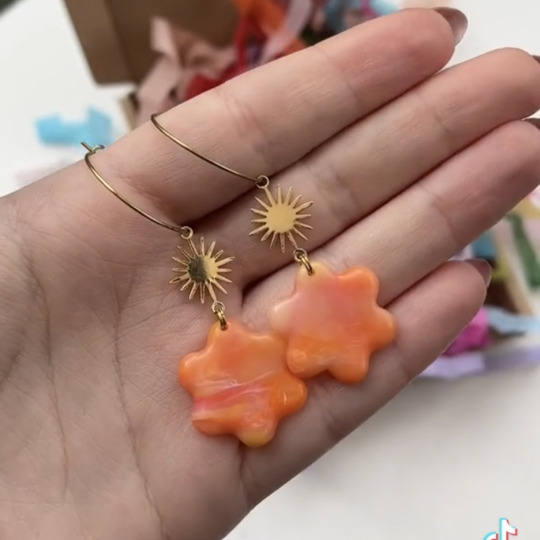
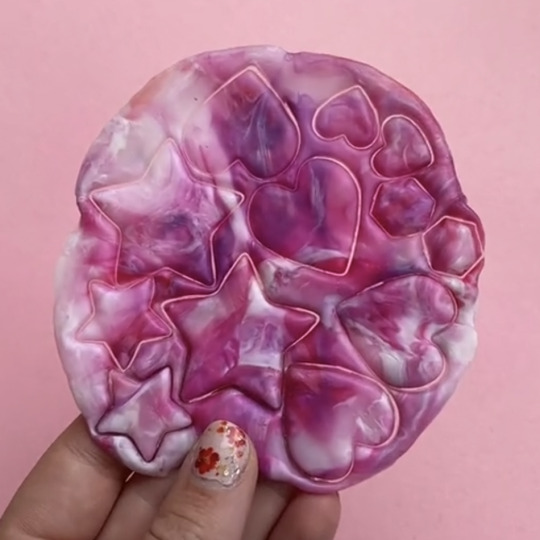
finally, youre gonna want take what you made and fashion them into earrings. you can make them into other things too, maybe a wall hanging or a sign, but our example is earrings, alright? now, get a drill bit that's the size you need for your jump ring, likely 2 or 3 mm. get a pair of needle nose or jewelry pliers, feed one ring through the hole and then a second one to connect the earring hook. if you wanna add more charms, top or bottom, drill more holes and repeat.
you're done. think you can handle that?
#breaking bad#bb#mike breaking bad#mike#mike erhmantraut#meme post#goof#ITS A GOOF#but also serious lmao#diy#tutorial#plastic earring tutorial#tiktok tutorial#written tutorial#diy earrings#recycled plastic earrings#mine#my post#new blog type#my tutorial#my tutorials#hope the girlies like these#this wont b the last#i hope#lmao
35 notes
·
View notes
Text
I dunno who the hell is paywalling sims 4 cc making tutorials now but i hope they never have a good nights sleep ever again
What is this gate keepy behavior thats disgusting
#i've been contemplating for a while to make written tutorials for everything i know simply because i struggled for so long with#shitty video Tutorials of people claiming to teach but going -#um i'll just speed through the most important step okay- I've actually cried before because of this shit#i dont know much about making cc i still have no idea how to make specific things like shoes but i want to share what i know atleast#FOR FREE
25 notes
·
View notes
Note
do you hand write text or use a certain font ⁉️ idk what the artist norm is cuz a lot of text on art is stylized so it seems hand written but it’s also suspiciously consistent and hand writing for me is jaaaaarring…
both! for example, the orv art I posted last night or most of my comics is a font (walter turncoat), the notes on my art tutorials or weird shipping charts (lol) are my handwriting... i know there's tools out there to convert your handwriting to a font if u want to make a hand-lettered look but cheat a bit lol
#ask ever#i try to write a little more neatly on tutorial posts but if anyone whos ever written me a note on a shop order has seen my daily handwritin#by which i mean scrawl where i accidentally drop or combine letters a lot. lol
52 notes
·
View notes
Text
just saw a pinterest comment that suggested learning how to crochet instead of learning how to knit because it's easier and i can't keep silent anymore i have to confess that i wrote my cass learns how to knit fic because i need people to love knitting in the same way that i need people to love cass. the crochet vs knitting metaphor argument exists because i've had that conversation (minus the metaphor and also it was jokingly silly with my friends) with me arguing the side of knitting and as much as i love projecting onto characters stephanie brown would never in her life be against crochet. she would adore crochet. i don't actually dislike crochet its good for things that knitting will never be able to do like baskets and is so much better for stuffed animals and i think it's better for things like bralettes and bags but knitting is so good for clothing it's stretchy and more flowy. crochet is so good for items that need to hold a little more structure but in my opinion knitting makes more comfortable clothing and crochet got so popular in the last couple of years but knitting did not and knitting is not more difficult!! knitting is fun and good and i love her!!!
#crochet got so popular in my generation in the past few years and left knitting in the dust. knitting is my most underrated fav#you would loooveeee knitting if you learned i promise it's not difficult i promise i promise#i mean maybe it is a little bit difficult because that's how hobbies work but you would loveeeeeeee knitting if you learned i promise#ive seen a couple of comments on tutorials and things that are like i know how to crochet but actually i think knitting looks better#and tutorial for crochet stitch that looks like knitting!!#and i'm over here foaming at the mouth#i know my dc friends will understand because its the same feeling as watching your underrated fav continue to be underrated#and objectively there's nothing wrong with this more popular character and you might even really like that more popular character#but if someone mentions they love that character because of traits that your underrated fav has then your eye will start twitching#like cass wants to kill herself so bad there should be buckets of venty angst h/c fic written by teenagers about her you know what i mean
31 notes
·
View notes
Note
it is healing to come onto this blog and see basic respect for diasbility after being in other corners of the fandom and reading the words “snowkit could never be a warrior because he wouldnt know what anything is. he wouldnt even know what a clan is because nobody could explain it to him” said in full seriousness
Im..... That statement is so ableist I cannot even imagine the worldview you'd need to have in order to come up with that.
They really think the only way anyone learns anything is through verbal-speaking-words-noises? No one has ever observed something before? Not even once?
This is beyond touching grass, this person just fell out of the fucking Jurassic Period when all they had was ferns and stegosaurs.
I just...
OH YES. I remember my first day of Society Lessons as a hearing person, where the everything was explained to me. Via Audiobook. FIRST they spoke and said, "you are standing on the ground." It was a life changing revelation, and the world began to spin.
But it did not stop.
THEN they said, "there are fingers on your hands." The sensation of flesh and bone crackling into existence is indescribable, but I did not yet know pain, until they told me, "that hurts." I began screaming immediately.
And yet... it continued.
They explained so much. Chairs. Tables. Walls. The sky. Frogs. Ionizing radiation. Breathing. I was told all of it, in one sitting, and only then did I understand. Only when my ears were bursting with normal hearing knowledges, did they begin... my final test.
A strange wall-chair-finger emerged from the sky-of-the-wall, stood on the ground several times, until it was in front of me. A second one came behind it, this one slimmer. The audiobook gave these things names;
Human. Father. Mother. Door. Walking. It was completely impossible to know what these things were until that very moment.
I watch a human dip a hook into water and produce a fish, and I recall my Society Lessons where they called that "fishing." I am decked in the face by a nefarious hooligan, and I have only the audiobook to thank when I know I have been "punched" by a "bad guy." It was only the magic of verbal-speaking-words-noise that made me understand that there are "other people" and that they "do stuff."
Sometimes, even, in "groups."
Before the Society Lessons Audiobook, I knew nothing. I was pure, innocent, uncorrupted by concepts such as "parents" and "door." I am grateful every day that there is no such concept as "being shown things" or "simple logical reasoning" or "looking."
Blessed be those amongst us who escape the horrors of the Society Lessons Audiobook. I pray that you never learn what anything is. Be free! Free as a bird, which also knows nothing and famously cannot learn. 🤗
DEAF/HOH FOLLOWERS I'm losing my mind do you want me to bump a 'Hearing Disabilities Herb Guide' to the top of my priorities? Something you can use to bludgeon whackadoodles like that. This is ridiculous
Obviously not a MEDICINE guide but like; common causes of hearing disability in clan cats. Accommodations for hearing loss vs congenital deafness. Actual difficulties of not having that sense Clan-by-Clan. Debunking of misconceptions like... not being able to learn APPARENTLY.
#bone babble#Fennelposting#Obviously the answer is 'theyre incapable of THINKING' but like... they do know snow has a line right#In the book. He figured out. A word. Through observation.#He says 's'all right' because he knows it calms ppl down#He did not need to hear the magic words 'You can make noises at others to influence them'#Like a fucking tutorial tip#Im going to start keeping a JOURNAL of ''times people have been weird about snowkit specifically''#Ableism#cw ableism#I could also link to the pawspeak thing so it's all in one place#I wrote this last night and put it in the queue and I laid awake thinking of this...#What do they think happens when someone goes to another country where things aren't written/spoken in a language they know?#Do they think they wouldn't be able to figure out anything? Do they think the tourist would just perish#Would they collapse in the streets of Berlin sobbing?#Happened to me. Went to England and they called it a Car Boot Sale instead of a Flea Market and I died to death#AND if I did make that guide please tell me if there's any other weird misconceptions you need to see in it#I know that ONE of them is going to have to be that. like. deaf people make noise.#theyre actually quite loud because they don't know they're making noise#and people with hearing loss do not suddenly forget how to speak.#and people born deaf dont talk like cavemen#cw body horror#tw body horror#EDIT: OOPS sorry I have such an astonishingly tolerance for body horror I did not realize that counted as body horror
183 notes
·
View notes