
Don't wanna be here? Send us removal request.
Statistics
We looked inside some of the posts by recipeslime and here's what we found interesting.
Average Info
Notes Per Post
2
Likes Per Post
2
Reblog Per Post
0
Reply Per Post
0
Time Between Posts
2 days
Number of Posts By Type
Text
17
Last Seen Tumblr Blogs


Fun Fact
Tumblr Inc. is using 66 technologies for its website.
Text
Vaccination Schedule for Puppies and Kittens: A Loving Pet Parent’s Guide
Raising a puppy or kitten? You need this. This full guide to the vaccination schedule for puppies and kittens includes real-life pet stories, timelines, core vs. non-core shots, and how to avoid common mistakes. 🐶🐱 It’s science-backed, written from experience, and honestly—kind of heartwarming. 🔗 Read it now → https://shorturl.at/qLuFe #puppy #kitten #petcare #petvaccines #vetapproved #cutepets #petparentlife
0 notes
Text
1 note
·
View note
Text
0 notes
Text
Crispy Chicken Wings in an Air Fryer: Timing Tips Revealed!
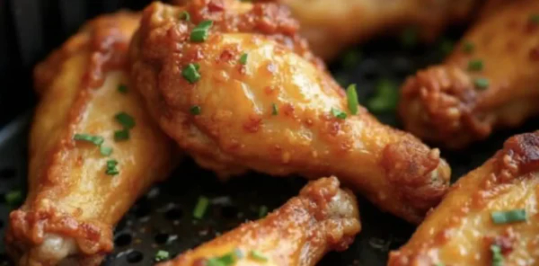
Hey there! If you're anything like me, you can't resist a plate of hot, crispy chicken wings. 🍗 Whether it's game day, a snack, or an easy dinner, chicken wings just hit the spot! But wait, how long do you really need to cook those raw wings in an air fryer for a perfect, juicy bite? Great question! Let's dive right in and uncover the secrets of air frying chicken wings.
What Are Chicken Wings?
Benefits of Cooking Chicken Wings in an Air Fryer
Preparing Raw Chicken Wings for Air Frying
Cooking Time for Raw Chicken Wings in an Air Fryer
Step-by-Step Guide: Cooking Chicken Wings in an Air Fryer
Common Problems When Cooking Chicken Wings in an Air Fryer
Serving Air-Fried Chicken Wings
Storing Leftover Chicken Wings
Reheating Tips for Leftover Chicken Wings
Conclusion
What Are Chicken Wings?
Chicken wings aren't just random parts of a chicken; they come in various styles and flavors that can elevate any meal. Typically, a chicken wing consists of three sections: the drumette, the flat (or wingette), and the tip. The drumette looks like a mini drumstick, while the flat is the slender part with two bone segments. The tips? Well, they’re often discarded, but hold on; they can be tossed into stock for added flavor! 😋
Different Cuts of Chicken Wings
When you're at the grocery store or ordering wings, you’ll notice different "cuts." There's the classic whole wing, the drumette, and flats. Each has a unique texture and flavor. If you prefer meatier bites, drumettes are the way to go. But if you enjoy a bit of crispy skin with your sauce, go for the flats. Just remember, whatever you choose, cooking time can vary!
Nutritional Value of Chicken Wings
Now, you might be wondering, "What’s in a wing?" Let’s break it down. Chicken wings can be high in protein and are typically low in carbohydrates, but their fat content can vary based on cooking methods and sauces. Check out these nutrition facts for a 100-gram serving of plain, cooked chicken wings:NutrientAmountCalories203Protein30gTotal Fat10gSaturated Fat3gCarbohydrates0gSodium82mg
Benefits of Cooking Chicken Wings in an Air Fryer
So, why choose an air fryer over traditional frying methods? Let’s break down the benefits.
Healthier Cooking Options
Air fryers are incredible because they let you achieve that golden, crispy finish without all the oil. You can cut down on fat while still enjoying your favorite crispy skin. Just imagine biting into a perfectly cooked wing with the crunch you love but without the guilt! Isn't that appealing? 🍽️
Time Efficiency
Another bonus? Cooking chicken wings in an air fryer is super fast! Unlike conventional ovens that can take ages to preheat, air fryers do their magic quickly, giving you more time to watch your favorite show while your wings cook. Want your wings crispy but not dried out? The air fryer can get you that golden texture without the worry!
Preparing Raw Chicken Wings for Air Frying
Before you toss those wings in the air fryer, there are some key prep steps that you shouldn’t skip. Trust me, they make a huge difference!
Thawing Frozen Chicken Wings
If you’re working with frozen wings, don’t just throw them in there! You need to thaw them first. The best way? Let them sit in the refrigerator overnight. But if you’re short on time, you can also put them in a sealed bag and submerge them in cold water for about an hour. 🧊 Just don’t use hot water—it can make the chicken unsafe to eat.
Marinating Chicken Wings
Want to take your wings to the next level? Marinate them! A good marinade adds flavor and tenderness. You can go for a simple mix of olive oil, garlic, salt, and pepper. Or spice things up with hot sauce and honey for a sweet heat! Let them marinate for at least 30 minutes, or overnight for an extra kick.
Seasoning Tips
If marination isn’t your thing, seasoned wings can still pack a punch! Grab your favorite dry rub—think BBQ, garlic powder, paprika, or even ranch seasoning! When you sprinkle seasoning generously over the wings, don’t forget to flip them around to coat all angles. It’s like dressing up your wings for a fancy party!
“Cooking isn’t just about feeding your stomach; it’s about feeding your soul.” 🌟
Cooking Time for Raw Chicken Wings in an Air Fryer
Now, the moment we've been waiting for: how long should those wings cook in the air fryer? Grab your stopwatch because it’s time for some juicy details! ⏳ Understanding the cooking time is vital to achieving that perfect blend of crispy on the outside and tender on the inside. Ready? Let's break it down!
Cooking Times Based on Wing Size
Not all chicken wings are created equal. Some are bigger than others, which affects cooking time. If you're using typical supermarket chicken wings, here's a general guideline:
Small Wings: 20-25 minutes
Medium Wings: 25-30 minutes
Large Wings: 30-35 minutes
Remember to check the wings halfway through cooking. This way, you can flip them. Think of it as giving them a little extra love to ensure even cooking! Isn’t that nice? ❤️
Recommended Cooking Temperature
The ideal cooking temperature for chicken wings in an air fryer is around 375°F (190°C). At this temperature, the wings cook evenly while getting that gorgeous crispy skin we're all craving. Keep in mind that every air fryer is a tad different. Some cook hotter, while others may need a bit more time.
“Cooking is just like magic; a little heat and it transforms into something wonderful.” ✨
Step-by-Step Guide: Cooking Chicken Wings in an Air Fryer

Now that you know how long to cook chicken wings, it’s time to get down to business! Below is a simple, step-by-step guide to achieving crispy and delicious air-fried chicken wings.
Preheating the Air Fryer
First things first, preheat your air fryer. This step is essential as it sets the stage for a great cook. Preheating allows for that even distribution of heat throughout the cooking process. Plus, it cuts down the overall cooking time! Most air fryers need about 3-5 minutes to warm up. So don’t skip this step!
Arranging Wings in the Basket
Next, arrange your seasoned wings in the air fryer basket. Avoid overcrowding; otherwise, they won’t get that fabulous crispiness! Think of it like a dance floor at a party—everyone needs space to shine. If necessary, cook in batches to ensure all wings get their moment in the spotlight!
Cooking Process: Timing & Flipping
Set the timer and let the air fryer do its job! After about 10-15 minutes, open it up, and give those wings a flip. This step makes sure every side gets nice and crispy. Depending on the size, you might want to flip them again halfway through the total cooking time, too. To check for doneness, it’s best to use a meat thermometer. The internal temperature should reach at least 165°F (74°C)—that’s the sweet spot! 🎯
Common Problems When Cooking Chicken Wings in an Air Fryer
Even if you follow all the steps, things can still go awry sometimes. That’s totally normal! Let’s look at a few common problems you might encounter when cooking chicken wings in an air fryer and how to spot them.
Wings Not Cooking Evenly
One of the most common issues is uneven cooking. You might end up with some wings perfectly crispy while others still look a bit pale. This often happens due to overcrowding. If you jam too many wings into the basket, the hot air can’t circulate properly. So, grab that dance floor space! Keep it organized! 💃
Overcooking or Undercooking
Another thing to watch out for is overcooked or undercooked wings. You know the feeling—biting into one and realizing it’s dry as a desert! 🏜️ To avoid this, use that meat thermometer we talked about. Always be guided by the temperature rather than just time. It’s a surefire way to ensure juicy wings every time!
Wings Sticking to the Basket
If your wings seem to stick to the basket, it can be a bit frustrating. This issue generally arises if you didn’t use enough oil or if they are too wet before cooking. A light spritz of cooking spray or using parchment paper can solve this problem. Think of this technique as giving your wings a smooth runway to take off! 🛫
Serving Air-Fried Chicken Wings
It's finally time to enjoy those perfectly cooked wings! But wait—before diving in, let’s talk about serving options and tasty dips that can elevate your air-fried wings to a whole new level. 🍽️ After all, a meal is about the full experience, right?
Presentation Matters
How you present your wings can be as exciting as how they taste! Consider serving them on a large platter, garnished with fresh parsley or celery sticks for a pop of color. You might even want to sprinkle on a few sesame seeds or drizzle some extra sauce on top. It’s like dressing up your wings for a night out! 🌟
Dips and Sauces to Pair with Chicken Wings
Ah, the classic debate: which dip reigns supreme? Here are a few crowd-pleasing options that complement your air-fried chicken wings perfectly:
Buffalo Sauce: The classic! Spicy and tangy, it’s a must-have.
Ranch Dressing: Creamy goodness that cools the heat while adding flavor.
Blue Cheese Dressing: For those who love strong flavors, blue cheese is a winner!
Honey Mustard: Sweet and tangy—a perfect contrast to hot wings.
Barbecue Sauce: Sweet and smoky, it pairs beautifully with crispy wings.
“Food is not just about filling our stomachs; it’s about creating joyful experiences.” 😍
Storing Leftover Chicken Wings
Okay, let’s be honest—sometimes we cook way more wings than we can eat. No fret! Storing leftover air-fried chicken wings is pretty simple. Just follow these steps to keep them fresh for your next snack attack!
Cooling and Packaging
First, let your leftover wings cool down for about 30 minutes. This part is crucial; it prevents sogginess. Once cooled, store them in an airtight container. A little trick? Layer them with parchment paper to keep them from sticking together. It’s like tucking them in for a good nap! 💤
Refrigerating Leftover Wings
You can put them in the refrigerator, where they’ll last for about 3-4 days. If you're smart and plan ahead, consider freezing them! Just pop them into a freezer-safe bag and remove as much air as possible. They should be fine for up to 3 months. Just remember, the sooner you eat them, the better they taste! 😉
Reheating Tips for Leftover Chicken Wings
If you thought warm wings straight out of the air fryer are good, just wait until you reheat those leftovers! Here’s how to do it right:
Using the Air Fryer Again
The best way to reheat wings is in the air fryer! Set it to 350°F (175°C) and heat for about 5-10 minutes. Keep an eye on them to ensure they retain that crispy goodness; it’s like giving them a second chance at fame! 🌟
Oven Reheating Method
If you don’t have your air fryer handy, you can also reheat them in the oven at 350°F (175°C) for about 10-15 minutes. Use a baking sheet lined with parchment paper and cover the wings with aluminum foil to prevent them from drying out. Phew! You’re all set!
Want to discover more amazing recipes? Check these links out:
How to Make Air Fryer Chicken Wings
The Best Ways to Use Unsold Rotisserie Chicken from Costco
How Long Is Leftover Rotisserie Chicken Good in the Fridge?
How to Best Use Rotisserie Chicken
Delicious Leftover Rotisserie Chicken Recipes
Conclusion
There you have it! Cooking chicken wings in an air fryer doesn’t have to be a guessing game; understanding the timing and techniques makes all the difference. Whether you’re hosting a game night or just cooking for yourself, air-fried chicken wings bring joy and flavor to the table. So, the next time you crave that crispy goodness, you’ll know the secrets to making it happen. Are you ready to unleash your inner chef and wow your friends? 🍗🥳
Let’s wrap this up with a reminder: cooking is an adventure, so enjoy every moment of it! Experiment with flavors, have fun, and don’t hesitate to get creative with your ingredients. Who knows? You might just come up with the next signature wing flavor that everyone will love! Happy cooking! 🎉
0 notes
Text
0 notes
Text
#food#drinks#food and drink#detox#recipe#healthy drinks#healthy diet#weight loss#weight loss diet#i want to lose weight#easy recipes
0 notes
Text

0 notes

Text
The Best Crème Brûlée Recipe – Simple, Elegant & Delicious

The first time I made crème brûlée, I was nervous, would I get that perfect crackly top? I carefully whisked the creamy custard, poured it into ramekins, and baked it to silky perfection. The best part? Torching the sugar until it formed a golden, glass-like crust. That first satisfying crack had me hooked! Now, I love experimenting with flavors and techniques, and I can’t wait to share everything I’ve learned. From understanding the ingredients to nailing the caramelized topping, this guide will help you master the art of crème brûlée like a pro!
Table of Contents
Understanding Crème Brûlée
The Custard’s Key Ingredients
Making the Custard Base
Baking Your Crème Brûlée
Chilling Your Crème Brûlée
Brûléeing the Sugar: Achieving the Perfect Crackly Top
Beautifully Presenting Your Crème Brûlée
Crème Brûlée Flavor Variations
Frequently Asked Questions
Enjoy Your Homemade Crème Brûlée
Understanding Crème Brûlée
What is Crème Brûlée?
Crème brûlée is a delicious dessert. It has a creamy custard base and a hard, crackly sugar topping.
Origins of Crème Brûlée
We don’t know exactly where crème brûlée comes from. Many countries claim to have created it. It’s a classic dessert enjoyed worldwide.
The Custard’s Key Ingredients
The custard is the heart of crème brûlée. It uses eggs and cream. The eggs give it a rich texture. The cream makes it smooth and creamy. Getting the right amount of each is important for a perfect custard. The ratio of eggs to cream affects how thick the custard becomes.
Achieving the Perfect Consistency
The perfect crème brûlée has a smooth, creamy custard. It’s not too runny, and not too firm. This depends on how long you cook it and the type of cream used. The sugar topping adds a delightful crunch.
The Custard’s Key Ingredients

Cream: Heavy Cream vs. Half-and-Half
Crème brûlée uses cream to make the custard smooth and rich. Heavy cream is thicker than half-and-half. Heavy cream makes a richer, thicker custard. Half-and-half makes a lighter custard. The choice depends on your preference.
Eggs: Size Matters
Use large eggs for the best results. Fresh eggs create a smoother custard. Older eggs might make the custard slightly watery.
Sweetening the Custard
Granulated sugar adds sweetness. For the brûléed topping, use the same type of sugar. You’ll sprinkle it on top and melt it with a torch.
Vanilla and Other Flavors
Vanilla extract adds a wonderful flavor. You can also experiment! Add a little lemon zest, orange zest, or other extracts for different flavors. A tiny bit of cinnamon or nutmeg can also be tasty. Remember, a little goes a long way.
Ingredient Combinations
Different cream and egg combinations change the final product’s texture and taste. More cream makes it richer. More eggs create a firmer custard. Experiment to find your perfect balance!
Making the Custard Base

Preventing Lumps
Whisk your eggs lightly before adding other ingredients. This breaks up the yolks and helps prevent lumps. Slowly pour the warm cream mixture into the eggs while constantly whisking. This gentle mixing keeps the eggs from scrambling.
Achieving the Right Texture
The amount of cream and eggs changes the custard’s thickness. More cream makes it smoother; more eggs make it firmer. Use the recipe’s measurements as a starting point, then experiment.
Cooking the Custard Evenly
Two methods work well:
Stovetop Method
Heat the cream mixture gently in a saucepan. Constantly stir to prevent scorching. Pour the warmed cream into the whisked eggs. Stir constantly as it thickens. Remove from heat before it boils.
Double Boiler Method
Place the egg and cream mixture in a heatproof bowl set over a pan of simmering water. Stir constantly until thickened. The gentle heat prevents curdling.
Custard Ingredients
IngredientsQuantityNoteHeavy Cream2 cupsUse heavy cream for a richer custard.Large Eggs4Fresh eggs work best.Granulated Sugar¾ cupAdjust to your sweetness preference.Vanilla Extract1 teaspoonOr experiment with other flavors.
Avoiding Curdling
Curdling happens when the eggs cook too quickly. Use low heat and stir constantly. If it starts to curdle, remove it from heat immediately. Strain it through a fine-mesh sieve to remove any lumps.
Baking Your Crème Brûlée

The Water Bath
Use a water bath, also called a bain-marie, for even baking. This prevents the custard from cooking too fast and becoming lumpy. Fill a larger pan with hot water. Place your ramekins (small oven-safe dishes) in the pan. The water should come about halfway up the sides of the ramekins.
Even Baking
Even baking makes a smooth custard. The water bath helps with even heat distribution. This prevents hot spots that can cause cracks or a grainy texture.
Checking for Doneness
Bake until the custard is just set. It should still jiggle slightly in the center. Overbaking makes a rubbery custard. A toothpick inserted near the center should come out with a few moist spots. Baking times vary; check it early.
Cooling the Custard
Carefully remove the ramekins from the water bath. Let them cool completely. The custard will firm up as it cools. Then, refrigerate for at least 4 hours, or preferably overnight. This allows the custard to set fully and get very cold.
Sugar and the Finishing Touch
Once cold, sprinkle a thin layer of granulated sugar on top of each custard. Use a kitchen torch to caramelize the sugar. This creates the signature hard, crackly top of your crème brûlée. Watch closely; the sugar burns easily.
Chilling Your Crème Brûlée
The Right Chill Time
Chill your crème brûlée for at least four hours. Overnight is even better! This gives the custard time to set completely. A fully set custard is smoother and tastes better.
Temperature Matters
Keep your crème brûlée in the refrigerator. This keeps the custard cold and prevents it from getting too soft. A cold custard holds its shape and prevents cracks.
Preventing Cracks
Cracks can happen if the custard cools too quickly or unevenly. A water bath helps stop this during baking, but chilling slowly also helps. Let the ramekins cool down to room temperature before you put them in the fridge. This helps them cool evenly.
Brûléeing the Sugar: Achieving the Perfect Crackly Top

Using a Kitchen Torch
A kitchen torch lets you control how much heat the sugar gets. Hold the torch a few inches above the sugar. Move it constantly to melt the sugar evenly. You want a rich brown color, not black. A lightly browned sugar will be crisp.
Using a Broiler
If you don’t have a kitchen torch, you can use your oven’s broiler. Place the ramekins (small oven-safe dishes) on a baking sheet. Broil on low for 1-2 minutes, watching carefully. The sugar will melt and brown. Turn the ramekins as needed for even browning. The broiler method is less precise than a torch.
Getting the Right Color and Crispness
The ideal color is a rich amber. Darker means it might be burnt. Burnt sugar tastes bitter. The sugar should be hard and crackly, not soft or sticky. If it’s not quite hard enough, you can broil it again for a short time.
Avoiding Burnt Sugar
Keep a close eye on the sugar. It burns quickly! Use short bursts of heat from the torch, or short broiling times. If you see any dark spots, stop immediately. A slightly lighter brown is better than burnt sugar.
Beautifully Presenting Your Crème Brûlée
Garnish Ideas
Fresh berries add a burst of color and juicy sweetness. Try raspberries, blueberries, or strawberries. Chocolate shavings offer a sophisticated touch and complement the creamy custard. A light dusting of cocoa powder provides a simple, elegant finish.
Arrangement Tips
Place your crème brûlée ramekins on a pretty plate or serving platter. Arrange garnishes artfully. A few berries beside each ramekin look nice. You can also create a small pattern with the chocolate shavings. A sprinkle of cocoa powder can be dusted evenly across the entire plate.
Creative Presentation
Get creative! Consider using mint sprigs for a refreshing contrast. A small cookie or a piece of candied fruit can add another layer of flavor and visual interest. A simple, clean presentation lets the crème brûlée shine. Remember to keep it simple and elegant.
Crème Brûlée Flavor Variations
Spice Combinations
Adding spices gives your crème brûlée new tastes. Cinnamon and nutmeg are good choices. A tiny bit goes a long way. Too much spice can overpower the custard’s creamy flavor.
Extract Options
Vanilla is common, but you can use other extracts. Almond, lemon, or orange extracts add different tastes. Remember to use a small amount; a few drops are often enough.
Flavored Creams
Try flavored creams for an easy way to change the taste. Coffee-flavored cream, for example, makes a coffee crème brûlée. Chocolate cream is another popular option. Look for creams that fit your desired flavor profile.
Frequently Asked Questions
What is crème brûlée?
Crème brûlée is a dessert with a creamy custard base and a hard, crunchy sugar topping.
What kind of cream is best?
Heavy cream makes a richer custard than half-and-half. The choice depends on your taste.
How do I prevent lumps in the custard?
Whisk the eggs lightly before adding the cream. Slowly pour the warm cream into the eggs while constantly whisking.
How do I get the perfect crackly top?
Use a kitchen torch to melt the sugar evenly until it’s a rich brown color. A broiler can also be used, but a torch gives more control.
How long should I chill the crème brûlée?
Chill it for at least four hours, or preferably overnight, to let the custard set completely.
Enjoy Your Homemade Crème Brûlée
Your Delicious Reward
This guide showed you how to make crème brûlée. You learned about the ingredients, how to make the custard, and how to get that perfect crackly top. Remember the key steps: gentle mixing to avoid lumps, even baking in a water bath, and careful caramelization of the sugar.
Tips for Success
Practice makes perfect! Don’t be afraid to experiment with different flavors. Each batch will help you improve your technique. Pay attention to the custard’s texture as it cooks. A little patience goes a long way.
Next Steps
Now, go make your own delicious crème brûlée! Use this guide as your recipe, and don’t hesitate to try variations. Enjoy the process and the tasty results. This guide will help you make a delicious crème brûlée. Remember to pay attention to detail and enjoy the process!
0 notes
Text
Unicorn Cake Recipe: A Magical Dessert

A Recipe from the Heart
I left my homeland with a heart full of memories and the flavors of my mom’s kitchen tucked into my soul. One dish that always sparkled was her unicorn cake, a vibrant, whimsical creation that turned every celebration into magic. Recreating it in my new home was like painting with colors and love, blending her tradition with my own twists. Through Recipeslime.com, I share this unicorn cake to bring joy to your table, just as it did to mine.
A Recipe from the Heart
Why Unicorn Cakes Captivate Us
Recipe Overview
Ingredients
Step-by-Step Instructions
Tips & Tricks
Serving Suggestions
FAQs About Unicorn Cake
A Culinary Journey
Why Unicorn Cakes Captivate Us
Unicorn cakes enchant with their vibrant colors and whimsical designs, featuring rainbow layers, sparkling decorations, and playful fondant shapes like horns and ears. Their popularity soars at celebrations like birthdays and baby showers, amplified by social media platforms where bakers showcase stunning creations. The versatility in flavors, vanilla, chocolate, or even fruity, and decorations, from glitter to piped manes, allows endless creativity.
Recipe Overview
Servings: 12
Prep Time: 1 hour
Cook Time: 30 minutes
Chill Time: 1 hour
Total Time: 2 hours 30 minutes
Ingredients
Cake Layers
3 cups all-purpose flour
2 cups granulated sugar
1 tbsp baking powder
1/2 tsp salt
1 cup unsalted butter, softened
4 large eggs
2 tsp vanilla extract
1 cup whole milk
Food coloring (pink, blue, purple)
Buttercream Frosting
2 cups unsalted butter, softened
6 cups powdered sugar
2 tsp vanilla extract
1/4 cup heavy cream
Food coloring (pink, blue, purple)
Decorations
1 lb white fondant
Gold edible paint
Edible glitter
Piping bags and tips (star and round)
Step-by-Step Instructions
Prepare the Cake Batter
Preheat oven to 350°F (175°C). Grease and line three 8-inch round cake pans.
Cream butter and sugar in a large bowl until light and fluffy, about 3 minutes.
Add eggs one at a time, beating well after each. Mix in vanilla.
Whisk flour, baking powder, and salt in a separate bowl. Alternate adding dry ingredients and milk to the butter mixture, starting and ending with dry. Mix until just combined.
Divide batter into three bowls. Tint each with pink, blue, and purple food coloring.
Bake the Layers
Pour each colored batter into a prepared pan.
Bake for 25-30 minutes, or until a toothpick inserted in the center comes out clean.
Cool in pans for 10 minutes, then transfer to wire racks to cool completely.
Prepare the Buttercream
Beat butter until creamy, about 2 minutes.
Gradually add powdered sugar, mixing until smooth.
Add vanilla and heavy cream, beating until light and fluffy. Adjust consistency with more cream if needed.
Divide buttercream into three portions and tint to match cake layers.
Assemble the Cake
Level cake layers with a serrated knife if needed.
Place the purple layer on a cake board; spread a layer of purple buttercream on top.
Stack the blue layer and spread blue buttercream, then add the pink layer with pink buttercream.
Apply a thin crumb coat of buttercream over the entire cake. Chill for 30 minutes.
Frost the cake smoothly with remaining buttercream, blending colors for a gradient effect if desired.
Decorate
Fill piping bags with tinted buttercream and use star and round tips to pipe a rainbow mane on top.
Shape fondant into a horn and ears. Paint the horn with gold edible paint and let dry.
Attach fondant pieces to the cake using a dab of buttercream.
Sprinkle edible glitter over the cake for a magical sparkle.
Tips & Tricks
Make Ahead: Bake cake layers a day in advance; wrap tightly in plastic wrap and refrigerate.
Buttercream Storage: Store in an airtight container in the fridge for up to a week. Re-whip before use.
Fondant Handling: Dust work surface with cornstarch to prevent sticking while shaping.
Serving Suggestions
Pair with vanilla ice cream or a glass of milk for a delightful treat.
Perfect for birthdays, baby showers, or themed parties.
FAQs About Unicorn Cake
Can I use a different cake flavor?
Yes! You can substitute the vanilla cake with chocolate, lemon, or any preferred flavor. Adjust food coloring to complement the flavor if needed.
How do I prevent the cake layers from sticking to the pans?
Grease the pans thoroughly and line the bottoms with parchment paper. Dusting with flour can also help
Can I make the buttercream dairy-free?
Yes, use vegan butter and a non-dairy cream alternative, like coconut cream, for a dairy-free buttercream.
How long will the decorated cake stay fresh?
The cake stays fresh for up to 3 days at room temperature in a cool, dry place or up to a week refrigerated. Cover to prevent drying.
Can I freeze the cake layers?
Absolutely. Wrap cooled layers tightly in plastic wrap and foil, then freeze for up to 3 months. Thaw in the fridge before assembling.
A Culinary Journey
Creating this unicorn cake is more than just baking; it's a celebration of memories, colors, and joy. Each layer tells a story, and I hope it brings as much happiness to your table as it does to mine.
0 notes
Text
Homemade Strawberry Shortcake Ice Cream Recipe

Strawberry shortcake ice cream brings back summer memories of creamy, strawberry-swirled treats with crunchy cookie crumbs. Here, I’ve crafted a homemade version that’s easy, nostalgic, and perfect for sharing. Let’s dive into this delicious recipe that’s sure to bring people together!
A Sweet History of Strawberry Shortcake Ice Cream
Why You’ll Love This Strawberry Shortcake Ice Cream
Equipment Needed
How to Make Strawberry Shortcake Ice Cream
Recipe Variations
Tips for Success
FAQs About Strawberry shortcake ice cream
Bring People Together with Recipeslime
A Sweet History of Strawberry Shortcake Ice Cream
Strawberry shortcake, a 19th-century American classic, combined fluffy biscuits, fresh strawberries, and whipped cream. In the 20th century, brands like Good Humor transformed it into frozen strawberry shortcake ice cream bars, blending creamy strawberry and vanilla ice cream with a cake-like coating. Today, this treat evokes nostalgia and summer joy, and my homemade version adds a personal twist to this timeless dessert.
Why You’ll Love This Strawberry Shortcake Ice Cream
Nostalgic: Relive childhood with creamy strawberry swirls and crunchy crumbs.
Easy: No-churn option makes it beginner-friendly.
Versatile: Make bars, scoopable ice cream, or adapt for dietary needs.
Perfect for Sharing: Ideal for picnics, parties, or family gatherings.
Ingredients
For the Ice Cream Base:
2 cups heavy cream (or coconut cream for dairy-free)
1 can (14 oz) sweetened condensed milk (or vegan alternative)
1 tsp vanilla extract
For the Strawberry Swirl:
1 ½ cups fresh strawberries, hulled and chopped
¼ cup granulated sugar
1 tbsp lemon juice
For the Coating:
1 ½ cups shortcake or vanilla cookie crumbs (use gluten-free if needed)
2 tbsp melted butter (or vegan butter)
Substitutions:
Swap strawberries for raspberries or peaches.
Use coconut milk for a vegan version.
Try graham crackers for a different crunch.
Equipment Needed
Popsicle molds (for bars) or a loaf pan (for scoopable ice cream)
Blender or food processor
Mixing bowls and whisk
How to Make Strawberry Shortcake Ice Cream
Step 1: Prepare the Strawberry Swirl
In a saucepan, combine strawberries, sugar, and lemon juice.
Cook over medium heat for 5-7 minutes until thickened, stirring occasionally.
Mash or blend for a smoother texture, then cool completely.
Step 2: Make the Ice Cream Base
Whip heavy cream to soft peaks in a large bowl.
Gently fold in condensed milk and vanilla extract until smooth.
Swirl in half the cooled strawberry mixture, leaving visible streaks.
Step 3: Assemble
For Ice Cream Bars:
Spoon the ice cream mixture into popsicle molds, layering with strawberry swirl.
Insert sticks and freeze for 6-8 hours.
Mix cookie crumbs with melted butter. Dip or sprinkle frozen bars with crumbs before serving.
For Scoopable Ice Cream:
Pour half the ice cream mixture into a loaf pan.
Add dollops of strawberry swirl, then top with remaining ice cream.
Swirl with a knife, sprinkle cookie crumbs on top, and freeze for 6-8 hours.
No-Churn Option: Follow the scoopable method, skipping the molds for simplicity.
Step 4: Serve
For bars, run molds under warm water to release.
For scoopable, let soften for 5 minutes before scooping.
Garnish with fresh strawberries or extra crumbs for flair.
Recipe Variations
Dairy-Free: Use coconut cream and vegan condensed milk.
Gluten-Free: Opt for gluten-free cookie crumbs.
Flavor Twists: Try raspberry swirl or add lemon zest for a zingy topping.
Mini Bites: Freeze in silicone mini-muffin trays for bite-sized treats.
Tips for Success
Storage: Store in an airtight container or wrap bars individually; freeze up to 2 weeks.
Texture: Don’t overmix the swirl to keep distinct strawberry streaks.
Serving Ideas: Perfect for summer picnics, kids’ parties, or nostalgic date nights.
FAQs About Strawberry shortcake ice cream
Can I make this without popsicle molds?
Yes! Use a loaf pan for scoopable ice cream or silicone mini-muffin trays for bite-sized portions.
How do I store leftovers?
Wrap bars individually or store scoopable ice cream in an airtight container in the freezer for up to 2 weeks.
Can I use frozen strawberries?
Yes, thaw and drain them first to avoid excess liquid.
Is there a vegan version?
Absolutely! Use coconut cream, vegan condensed milk, and vegan butter for the coating.
Bring People Together with Recipeslime
This strawberry shortcake ice cream recipe is more than a dessert, it’s a memory-maker. I hope it brings joy to your table as it does to mine. Try it, share your creations with us, and explore more recipes on recipeslime.com to keep the culinary adventure going!
0 notes
Text
Big Mac Casserole: A Comforting Twist on a Fast-Food Classic
Omarjana
4 min read

Growing up, cooking was my way to hold onto home, especially after moving far away as a teen. Those dishes I recreated weren’t just food, they were love and connection. This Big Mac Casserole brings that same warmth to the table, turning a fast-food favorite into a cozy, home-cooked meal. Ready in 30 minutes, it’s a fun, family-friendly dish that sparks joy and togetherness. Let’s get cooking!
Why You’ll Love This Recipe
Ingredients
Instructions
Tips for Success
Serving Suggestions
Frequently Asked Questions
Join the Culinary Journey
Why You’ll Love This Recipe
This Big Mac Casserole captures the iconic burger’s flavors, juicy beef, melty cheese, tangy sauce, and crisp toppings, in a comforting, baked dish. It’s quick, kid-approved, and feels like a treat without the drive-thru. Crispy russet potatoes stand in for fries, and a special sauce with a hint of smoked paprika adds a personal touch inspired by my heritage. Perfect for busy weeknights or gatherings, it’s a crowd-pleaser that brings everyone together.
Ingredients
For the Casserole:
1 lb lean ground beef (or plant-based meat for vegetarian)
2 medium russet potatoes, diced (or cauliflower rice for keto)
1 cup shredded cheddar cheese (full-fat or reduced-fat)
1 small onion, diced
1 tsp garlic powder
1 tsp onion powder
1 tsp yellow mustard
1 tbsp Worcestershire sauce (or coconut aminos for gluten-free)
Salt and pepper to taste
1 tbsp olive oil
For the Big Mac Sauce:
½ cup mayonnaise (or Greek yogurt for a lighter option)
2 tbsp ketchup
2 tbsp finely chopped dill pickles
1 tbsp pickle juice
1 tsp yellow mustard
½ tsp smoked paprika (my signature touch)
For Toppings:
1 cup shredded lettuce
½ cup cherry tomatoes, halved
¼ cup diced dill pickles
¼ cup diced onions
Optional: 1 tsp sesame seeds for a bun-like nod
Instructions
Preheat and Prep Potatoes: Preheat oven to 375°F (190°C). In a large skillet, heat 1 tbsp olive oil over medium heat. Add diced potatoes, season with salt and pepper, and sauté for 8–10 minutes until soft and slightly golden. Set aside.
Cook the Beef: In the same skillet, add ground beef, diced onion, garlic powder, onion powder, mustard, and Worcestershire sauce. Cook over medium heat, breaking up the beef, until browned (5–7 minutes). Drain excess fat.
Assemble the Casserole: In a 9x13 baking dish, spread potatoes evenly. Layer beef mixture over potatoes, then sprinkle cheddar cheese on top.
Bake: Bake for 15–20 minutes, until cheese is melted and bubbly.
Make the Sauce: Mix mayonnaise, ketchup, chopped pickles, pickle juice, mustard, and smoked paprika in a small bowl until smooth.
Add Toppings: Remove casserole from oven. Drizzle Big Mac sauce over the top. Scatter lettuce, cherry tomatoes, pickles, and onions. Sprinkle sesame seeds for a burger-like touch.
Serve: Serve hot with a side salad or air fryer carrot fries for a complete meal.
Tips for Success
Cultural Twist: Smoked paprika adds a warm, unique flavor inspired by my heritage. Adjust for a bolder kick!
Meal Prep: Assemble beef and potato layers up to 2 days ahead and refrigerate. Bake when ready, adding sauce Dietary Swaps:
Keto: Use cauliflower rice instead of potatoes.
Vegetarian: Swap beef for plant-based meat or lentils.
Gluten-Free: Use gluten-free Worcestershire or coconut aminos.
Kid-Friendly: Create a toppings bar for kids to customize their portions, making dinner fun.
Storage: Store leftovers in an airtight container in the fridge for 3 days. Reheat at 350°F for 10 minutes, adding fresh toppings.
Serving Suggestions
This casserole is a star on its own but pairs well with a crisp side salad or air fryer carrot fries to keep the fast-food vibe. Serve with iced tea or sparkling lemonade for a casual, joyful meal. Share it with loved ones and let it spark stories around your table, just like cooking does for me.
Frequently Asked Questions
Can I make this Big Mac Casserole ahead of time?
Yes! Assemble the beef and potato layers up to 2 days in advance and store in the fridge. Bake when ready, adding the sauce and fresh toppings just before serving to keep them crisp.
Is this recipe suitable for a keto diet?
Absolutely. Swap the potatoes for cauliflower rice and use full-fat cheese and mayonnaise. The recipe is naturally low-carb with this substitution.
Can I use a different protein instead of ground beef?
Definitely! Try ground turkey, chicken, or plant-based meat for a vegetarian option. Lentils also work well for a hearty, meat-free version.
How can I make the Big Mac sauce lighter?
Substitute mayonnaise with Greek yogurt or a mix of half mayo, half yogurt for a lower-calorie, tangy sauce that still tastes delicious.
How can I make the Big Mac sauce lighter?
Yes, freeze in an airtight container for up to 2 months. Reheat in the oven at 350°F for 15–20 minutes, adding fresh toppings after reheating to maintain their texture.
Join the Culinary Journey
This Big Mac Casserole is my way of sharing comfort and connection through food. It’s a dish that brings people together, one bite at a time. Try it, add your own twists, and share your creations! Explore more recipes on the website for your next culinary adventure. How do you remix your favorite classics? Let’s inspire each other!
0 notes
Text
Pickle Pie Pizza: Your Guide to the Recipe Everyone’s Talking About!

Hey there, pizza lovers! Have you ever thought about what would happen if you mixed two totally different worlds, savory pies and zesty pickles? Well, let me introduce you to the quirky yet fabulous pickle pie pizza! Imagine a warm, cheesy pizza topped with crispy pickles, bursting with flavor and texture. Sounds wild, right? But it’s a dish that’s gaining so much popularity! Buckle up as we embark on a delicious journey into the world of pickle pie pizza, including its history, why it’s trending, and how you can whip it up in your own kitchen.
Table of contents
What is Pickle Pie Pizza?
Why Pickle Pie Pizza is Gaining Popularity
How to Make the Perfect Pickle Pie Pizza
Fun Variations on the Classic Recipe
Perfectly Pairing Your Pizza
Hosting the Ultimate Pickle Pie Pizza Party
Final Thoughts: The Future of Pickle Pie Pizza
Join the Pickle Pie Pizza Revolution!
Take the Leap!
What is Pickle Pie Pizza?
So, what exactly is this strange yet exciting dish? Picture your classic pizza base, topped with tangy pickle slices, gooey cheese, and a medley of spices that add just the right amount of kick. It’s like the lovechild of a pizza and a pickle pie! 🌟 While it may sound like an odd combination, fans of this dish swear by it, claiming that the acidity of pickles cuts through the richness of cheese perfectly. Let’s dive into its delicious roots!
The Origins of Pickle Pie Pizza
Believe it or not, pickle pie pizza isn’t just a fad! Its origins can be traced back to various cultural mixes where pickles feature prominently in dishes. The combination of pickles and dough goes way back, showing up in various forms around the world, like those famous deli sandwiches that often include pickles for that crunchy zing. The idea of slapping those tangy morsels onto pizza crust? Well, that’s truly Americana! Imagine munching on that comfort food while having fun with friends, creating lasting memories with every bite!
A Flavor Profile: What to Expect
Okay, let’s get to the good stuff, the flavor! When you take a bite of pickle pie pizza, you’re welcomed with a burst of savory flavors from the cheese, balanced by the sharpness of pickles. Ever tried chomping on a slice, only to be surprised by the explosion of flavors dancing on your palate? You know the feeling! 😋 The pickles add a crunch that you wouldn’t typically find in your regular pizza, and whether you like dill, sweet, or spicy pickles can really influence your flavor experience. It’s a game-changer!
Why Pickle Pie Pizza is Gaining Popularity
You might be wondering why this seemingly bizarre dish has garnered such a loyal following. Well, let’s dig deeper!
The Rise of Pickle-Inspired Dishes
Over the past few years, the food world has seen a massive surge in pickle-centric dishes. From pickle-flavored chips to pickle cocktails, these vibrant green delights have taken social media by storm. Would you believe that social media plays a big role in this trend? The visual appeal of a bright pickle pie pizza popping up on your feed can make anyone curious. Who wouldn’t click to see what the fuss is all about? 😍
Social Media and the Pickle Trend
Let’s face it: social media is like the magic wand of food trends! Platforms like Instagram and TikTok have made it super easy for strange and wonderful culinary creations to go viral. Every now and then, a home chef creates a mouthwatering pickle pie pizza and captures the attention of thousands. Imagine scrolling and stumbling upon a slice of cheesy goodness topped with pickles. You just can’t help but want to recreate that magic in your own kitchen!
How to Make the Perfect Pickle Pie Pizza

Alright, my friends! Are you ready to get chef-y? Making pickle pie pizza at home is easier than you think. Let’s break it down step by step!
Essential Ingredients for Pickle Pie Pizza
First things first, let’s gather our ingredients. Here’s a handy table with what you’ll need:
IngredientsQuantitiesPizza dough1 poundSliced pickles1–1.5 cupsShredded cheese (mozzarella works best)2 cupsGarlic powder1 tspOregano1 tspOlive oil1 tbsp
Dough Options: From Traditional to Gluten-Free
While many pizza lovers swear by traditional dough, if you’re gluten-sensitive, don’t worry! There are plenty of gluten-free pizza bases available nowadays that still achieve that crave-worthy pizza crust texture. 🍕 Just make sure to read the labels! You want something with that classic crunch, right?
Choosing the Right Pickles
When it comes to pickles, you’ll want to get those that suit your palate. Do you have a penchant for dill, or are you more into sweet bread-and-butter-style pickles? Each will alter the taste of your pizza significantly. Honestly, picking out the right pickles is like choosing the perfect movie to watch, it can make or break your experience! 🎥🍿
Creative Toppings and Flavor Combinations
Feeling adventurous? Don’t hesitate to mix it up! Consider adding crumbled bacon, caramelized onions, or even a drizzle of ranch dressing to elevate your dish. It’s all about customizing it to your taste buds. What wouldn’t you put on a pizza? A little experimentation goes a long way. Just like a painter with a canvas — your pizza is a reflection of your creativity!
Step-by-Step Recipe for Homemade Pickle Pie Pizza
Alright, let’s get our hands dirty! Here’s a simple step-by-step guide for making your own pickle pie pizza:
Preheat your oven: Set it to 475°F (245°C). We want it nice and hot!
Prep your dough: Roll it out on a floured surface to your desired thickness. Remember, thinner crust equals extra crunch!
Transfer to a pizza stone or baking sheet: Lightly grease it to prevent sticking.
Add your goodies: Top the dough with shredded cheese, followed by a generous layer of sliced pickles. Shake some garlic powder and oregano on top for flavor.
Drizzle with olive oil: This will help with that beautiful golden color!
Bake: Pop that pie in the oven for about 12–15 minutes, or until the cheese is bubbly and the edges are golden.
Cool and serve: Let it cool for a few minutes, slice it up, and enjoy!
Easy-peasy, right? Now you have a delightful dish to impress your friends and family!
“Cooking is like love. It should be entered into with abandon or not at all.”Harriet Van Horne ✨
Now that you’ve mastered the basic pickle pie pizza, let’s dive into the fun world of variations and serving suggestions! Why stick with just one version when you can unleash your creativity? Let’s explore how you can mix things up and take your pickle pie pizza game to the next level, ensuring that every slice is a delightful surprise! 🎉
Fun Variations on the Classic Recipe
When it comes to pickle pie pizza, the possibilities are nearly endless! Imagine customizing your pizza to match seasonal flavors, personal dietary restrictions, or even mood. Let’s look at some exciting variations that you can try to keep things fresh!
1. BBQ Pickle Pie Pizza
Who says pizza can’t borrow flavors from barbecue? Imagine slathering your dough with a smoky barbecue sauce instead of traditional tomato sauce, then piling on cheese, pickles, and maybe even some shredded chicken or pulled pork. The combination of sweet, tangy, and smoky flavors makes each bite an adventure. It’s like a summer backyard cookout on a pizza, which is just about the best combo ever! 🌭🍕
2. Veggie Delight Pickle Pie Pizza
If you’re looking for a vegetarian option, we’ve got you covered! Load up your pizza with fresh veggies like bell peppers, onions, and mushrooms alongside pickles. This vibrant mixture not only adds color but also an explosion of flavors that will keep your taste buds happy. Plus, it’s a great way to sneak in those veggies without compromising on taste! Who said healthy couldn’t be delicious? 🥦🍕
3. Spicy Pickle Pie Pizza
For those who love a little kick, how about adding jalapeños or banana peppers to your pickle pie pizza? A sprinkle of red pepper flakes or a drizzle of hot sauce can really elevate the experience by adding heat. Just like that one friend who always adds spice to your life, just a little can make all the difference! 🔥🥒
4. Dessert Pickle Pie Pizza?
Wait, what? Yes, you heard me right! Enter the realm of dessert pizza, think chocolate sauce, marshmallows, and mini pickles for a uniquely sweet twist. Imagine the surprise from your friends when they take a bite and discover the sweetness paired with the pickle crunch. It’s a wild combination, but you might just find yourself creating a new trend! 🍫🍬
Perfectly Pairing Your Pizza

Now that you’ve crafted the ultimate pickle pie pizza, it’s time to consider what to serve alongside it. After all, every great meal calls for the perfect accompaniments! Here are some suggestions to ensure your dining experience is nothing short of fabulous.
1. Dipping Sauces Galore
Dipping sauces can take your pizza experience from tasty to sublime! Consider offering choices like ranch dressing, garlic aioli, or even a tangy dill sauce that complements the pickles. Picture this: you take a slice, dip it in your favorite sauce, and savor the contrasting flavors. What’s your go-to dipping sauce? Dip away and let the flavor fest begin! 🍯
2. Fresh Salads
Another great option is to serve a refreshing salad on the side. A crisp cucumber and tomato salad with a zesty vinaigrette pairs perfectly with the rich flavors of pickle pie pizza. Think of it as having a cool breeze on a hot day — everything just balances out beautifully! 🥗
3. Light Beverages
When it comes to drinks, less is often more. A cool sparkling lemonade or iced tea can cleanse the palate and keep the meal light. Perhaps even a fizzy soda to match that delightful zing of the pickles? Imagine sipping a tangy drink while biting into that savory slice! 🍹
Hosting the Ultimate Pickle Pie Pizza Party
So, you’ve mastered the art of making pickle pie pizza, but what if you took it a step further and hosted a pizza night? Imagine the laughter, bonding, and of course, deliciousness that ensues when friends gather for this culinary adventure! Here are some easy steps to create a memorable evening.
1. DIY Pizza Stations
Set up a pizza-making station where everyone can create their versions of pickle pie pizza. Have all the ingredients prepped and ready, from dough to toppings! It’s like bringing a little slice of Italy into your home, allowing everyone to express their creativity. Who knows — you might discover a flavor combo that becomes a household favorite! 🥳🍕
2. Pickle-themed Decorations
Get into the spirit of things with some fun, pickle-themed decorations! Think green tablecloths, humorous pickle signs, and playful pickle-themed napkins. It sets the mood and get everyone excited about the quirky theme. Just imagine the Instagram-worthy moments that await! 📸🥒
3. Games and Activities
To keep the fun rolling, you can incorporate games. How about a pickle trivia game? You can challenge your friends to tell who loves pickles the most or share tasty pickle facts. After all, laughter is the secret ingredient that makes any meal memorable! 😂
Final Thoughts: The Future of Pickle Pie Pizza
As we wrap up this delicious journey, it’s clear that pickle pie pizza is more than just a meal; it’s a symbol of culinary adventure and creativity. It represents the beautiful collision of flavors and innovation in the kitchen. Just like art, cooking is about experimenting with different elements and discovering what works! So, don’t hesitate to put your own twist on this delightful dish.
“Food is like a love affair. It should be approached with abandon or not at all.” — Julia Child ❤️😋
Join the Pickle Pie Pizza Revolution!
Are you ready to dive into the whimsical world of pickle pie pizza? With its quirky combination of flavors, this dish offers not just a culinary experience but also a chance to channel your inner chef. As food trends continuously evolve, pickle pie pizza stands out as a fun and bold creation that encourages kitchen creativity and experimentation. So, gather your friends, roll up your sleeves, and get ready to embark on a delicious adventure!
Engage with the Community
As you begin your pickle pie pizza journey, don’t forget that cooking is best enjoyed with others. Join social media groups, follow food bloggers, and share your creations with the world. Use hashtags like #PicklePiePizza or #PizzaAdventure to connect with fellow food enthusiasts. Who knows? You might spark the next culinary trend! Let’s get this party started by sharing your delicious photos and unique twists on pickle pie pizza; we can all inspire each other! 🌍❤️
Feedback and Ideas
We’d love to hear about your experiences with pickle pie pizza! What variations have you tried? What toppings do you swear by? Did you stumble upon an unexpected flavor combo that left you craving more? Whether it was a massive success or a hilarious kitchen fails, sharing stories adds to the charm of cooking together. Let’s create a community where we uplift and inspire each other! 💬📣
Take the Leap!
So, are you ready to take the leap into the world of pickle pie pizza? With its playful combinations and endless possibilities, this dish is perfect for gatherings, family dinners, or even a cozy night in. As you venture into uncharted culinary territory, remember: the most important ingredient is your love for food and fun!
Happy cooking, and may your kitchen be filled with joy and laughter as you embrace the wonderful, zesty thrill of pickle pie pizza. Here’s to culinary adventures and endless deliciousness ahead! 🥳🍕🥒
“Cooking is a form of art, and the kitchen is your studio. Don’t be afraid to create!” Anonymous 🎨👩🍳
Thank you for joining us on this exciting culinary journey! Until next time, keep experimenting, stay creative, and enjoy every bite of your pickle pie pizza. Cheers! 🍽️🥳
Pizza
Pizza Delivery
Pickles
0 notes