
Currently a first year Architecture student at the University of Kent
Don't wanna be here? Send us removal request.
Statistics
We looked inside some of the posts by sgreendesign and here's what we found interesting.
Average Info
Notes Per Post
20
Likes Per Post
18
Reblog Per Post
2
Reply Per Post
0
Time Between Posts
1 day
Number of Posts By Type
Photo
9
Text
8
Last Seen Tumblr Blogs


Fun Fact
12.7% of mobile users access Tumblr.
Photo


Bricks on Sticks Report
Module: Light and Structure
Week 6
8 notes
·
View notes
Photo


Bricks on Sticks Design Development
Module: Light and Structure
I focused on developing my arched truss design. The arching would focus the material in the centre of the span to resist the main force of the load. To connect the parallel planes I initially considered cross bracing, however I reflected on the success of the pyramid truss formation we had made in the seminar and developed the structure into a series of connected pyramids. The pyramids were particularly effective at redistributing the load yet still be efficient material usage.
To create a platform for the bricks to sit upon I needed to adapt the structure to have some members parallel to the base of the brick in addition to the pyramid points. I felt that the pyramid forms would be more efficient in redistributing the load so I alternated the structures design between pyramids and triangular prisms. Due to the prisms’ square faces they would require further cross-bracing (and thus more material) to triangulate the face.
I experimented with the proposed materials, sticks and floss, which I decided to use for the ties and joints due to its tensile strength. However the floss did pose potentially problematic as the surface of the material made it susceptible to slipping. I will compensate for this with a extra material to avoid the knots coming undone. This mostly posed a problem on the joints where lots of connections were being made as it became floss-on-floss for many of the later added components.
The shorter the “affected length” of the member, the more resistant to buckling. I I needed to balance this concept with the need to be efficient with the material and for the structure to be wide enough for the brick to sit upon it. I began to consider parallel rows of the pyramid forms, however when drawing the plan and considering the complexity of the nodes and members it seemed full of redundant components and unlikely for me to achieve with only 40 sticks. I felt as thought, when reducing most of my designs down to the essential members most of them became basic truss formations which was incredibly frustrating.
#architecture#design#sketchbook#structure#lightandstructure#bricksonsticks#development#student#uni#designanalysis
0 notes
Photo


Bricks on Sticks Seminar 2
Module: Light and Structure
Week 4
In this seminar everyone’s designs were analysed. I found it particularly useful seeing other’s thoughts and responses to the brief. Most people had design various truss structures, adapting upon basic principals to produce “unique” and interesting designs. However when these were broken down into components, many were full of redundant members. It is important to treat this project as a structural exercise rather than focusing on elaborate design. Theoretically the more basic structures were likely to be successful. However I think due to the limitations of the material, particularly the thin sticks, it is likely that some designs will need to be reinforced, whether by glue, additional members or thickening members with multiple sticks.
Key points:
- Build up centre of span with material and structure
- Arches will need to be tied with a tension member to create horizontal force at base
- Higher arches will redirect the load more vertically which would be more successful considering the limitations of the horizontal forces in this scenario
- Reduce members to basic triangles! Don’t over-engineer
- Pre-camber: counteract displacement in advanced structural design
Of my designs it was anticipated that the most successful ones were the tied and triangulated arches so I intend to develop along these lines. I think I shall also explore the effect of my design as a beam, and consider a truss formation as it already plays on the border between arch and beam due to the triangulation of the planar sides.
0 notes
Text
Bricks and Sticks Lecture 4
Module: Light and Structure
Week 4 - Materials
3 things can control: Forces, Material, Shapes
Different geometry means different internal forces:

Definitions:
Stiffness: Extent resists deformation in response to an applied force
Brittle: Easy to snap
Ductile: Can be drawn into wires
Tough: Resists scratching
Elasticity: Returns to original shape when deformed
Plasticity: Remains in deformed shape
Considering two structural elements (objects), differentiate properties of MATERIAL and GEOMETRY:
Hard Gums vs. strawberry laces - materially similar, geometrically different
“Homogeneous” Material: consistent all the way through
“ Composite” Material: different materials and qualities
Structural materials:
Cost
Availability
Weight
Electrical/ Thermal conductivity
Thermal expansivity
Durability
Embodied CO2 - (CO2/energy consumed in producing material)
Eco-toxicity - (extent material damaging environment)
Hooke’s Law: F=-kX
Strain (visible): ∑= Δ L/original L
Stress (invisible): σ=F/A (cross-sectional area)
Young’s Modulus: E= Δσ/ Δ∑
Measures stiffness of material
Removes affect of geometry
Stiffer materials have steeper gradient (higher E)

Yield point: elastic to plastic
“strength quantified”
Concrete - weak in tension, ok in compression (reinforce with steel at points of tension ie. bottom of beam) (E sudden decrease after yield)
Steel - somewhat still usable in the “plastic” range (E slowly increases still after yield point)
4 notes
·
View notes
Photo


Bricks on Sticks Design
Module: Light and Structure
I started with some research into the basic structures which are likely to form the foundation of my design solution for holding the load of a house brick over a span of 450mm with just sticks and ties. I think the most successful potential ideas would come from trusses, beams, or arches, although a suspension span combined with a beam support is also feasible.
My initial ideas were to design a combined beam and arch structure, or at least something which would allow me to focus most of the material in the centre of the span to resist the main load. Triangulating the planar structure of the elevations would be the most efficient use of the sticks, with cross bracing to lock the parallel planes together.
A series of parallel truss formations which connect with a similar triangulated pattern on the top would create a solidly supported platform for the brick to sit upon. Initially I was considering three of the parallel trusses with the central one being tallest, however I thought that the force of the brick may focus too much on the central truss and cause the structure to collapse inwards under compression. With this design I had also intended to consider each of its vertical elevations as trusses, with the extra width of the three planes creating another truss perpendicular to the span, however I think this idea is not particularly efficient and perhaps, if it were to work, verging on over-engineered.
I reflected upon the success of the prism formations we had made in our seminar using sweets and cocktail sticks, so began to develop my design into a series of connected pyramids which, from a side elevation, would arch in the centre as the height of the pyramids increased and then decreased. However the problem then was adapting the design to allow a platform for the brick to sit upon and for the load to be effectively redistributed from...
Evaluation:
Focus material in centre (perhaps as solid arch?)
Triangulate elements
Need platform for brick
Don’t over-engineer with unnecessary components
0 notes
Text
Bricks and Sticks Lecture 3
Module: Light and Structure
Week 3 - Internal forces
Simply supported beams always have “rollers” beneath one support.
Suspension forces are the reciprocal of arches (demonstrated by Gaudi)
Problem with tension spans:
Cant join it to the desk
Cant get horizontal forces


(Royal Albert Bridge - Brunel)
Beams: subject to tension, compression, sheer, torsion

“UDL” - uniformly distributed load
Everything DISPLACES under a load
Strain: measured because can be “seen”
Stress: cannot be measured

How do you transfer vertical forces to the supports? Diagonal forces?

Just going to sag and move, unsuccessful, “not a structure” just a mechanism

Compression members need to be shorter and stockier

Think about the SHAPES the panels would be under a force...
Square > Parallelogram
Deflected shapes identify tension/ compression members
Symmetrical structures: members on opposing sides do the same thing

0 notes
Photo


Bricks on Sticks Seminar 1
Week 2 - Trusses
In this seminar we were exploring the structure and forces in a truss, and how to analyse the success or failure of a structure.
Truss: “Beam with holes in” (still functions as a solid beam)
Task 1: Make a planar (flat) Warren truss from cocktail sticks and hard gums


Failure under compression as top displaced more than bottom, which was under tension.
Compression failure: BUCKLE

Maximum flexural stresses are at MID-SPAN
Build up with more material

Mode of failure tells us the stress forces:
Planar: failed at top of truss (compression)
Prism: failed at bottom (tension)

Sticks are compression members, but only withstands limited compression

Big displacement on top chord, top under torsion (twisted)
“Lateral torsion and buckling��:

Key points:
More materials, more strength (but more expensive)
The shorter the “affected length” of the member, the more resistant to buckling!
Focus material where the main load acts (mid-span)
Redistributing forces reduces deformation
1 note
·
View note
Text
Bricks on Sticks Lecture 2
Module: Light and Structure
Week 2 - Shapes and Geometry
3 Things you can control (structures):
Forces
Shapes (geometry)
Materials
Constrains of this project:
Forces given: Brick load
Shapes: limited as length > 450mm
Materials given: Ties and sticks
3 Different ways to achieve span:
Arch
Beam (simple, cantilever, truss)
Suspension
“Flex” - (with reference to a limb or joint) bend or become bent

(Felix Candela - L'Oceanogràfic)
Arches:
Compression
Extruded sideways creates vaults/ tunnels
Rotated 180 creates domes

Suspension:
Tension
eg. spiders web
Watch “Man on a Wire”
Beams:
Tension and Compression
Cantilever: Beam on a support but it projects
Shapes have consequences! Must understand the fundamental differences between these three to be able to identify the forces for the task.
Newton’s 3rd law: Stationary object, every action must have equal and opp force
Arches: (C.) STICKS!
Suspension: (T) TIES!
Beam: (C & T) STICKS AND TIES!

0 notes
Photo


Module: Folio
Week 2: Orthographic Drawings (Barcelona Pavilion)
As a practical introduction to orthographic drawing we had to adapt and re-scale some plans of Mies van der Rohe’s Barcelona Pavilion.
- Don’t trust the drawing: things missing
- Don’t shade principal cut lines
- Change North point symbol
- Change scale 1:200 to 1:100
- Change line thicknesses (adapt clarity)
- Change section line
Comparing the given plans with photographs of the real building, it is clear that perhaps the diagrams are not the clearest at communicating its true elegance and texture. In my drawing I still included the tile grids, however as a very light feature so it gives an impression of detail without confusing it with the solid elements such as walls. I think I could have planned better with the translation of the composition, as my images are slightly cramped, particularly at the bottom. I could have pushed the graphic quality even further with denser lines or even some textural markings to define features and distinguish spaces.
Edit: Feedback
(The current photograph is after I worked to improve on these comments)
- Good writing, nice scale, good lightness for tile detail
- Continue section line all the way across the plan
- Thicker lines on the elevation
- Include numbers on the scale to clarify
- Could add shading to the elevation
- Distinguish “cut” surfaces on elevation
2 notes
·
View notes
Photo


Module: Folio
Week 2: Observational studies (Marlowe Theatre)
It took me a few attempts to get back into the flow of drawing from observation. I felt slightly out of practice, and was encouraged to use more gestural materials, particularly charcoal due its speed and the diversity of mark making. I feel the foyer interior was particularly successful, although more practice at conveying light and shadow is needed. The use of figures really grounds the image and emphasises the effect of depth, inviting the viewer to inhabit the space.
0 notes
Text
Folio Lecture 2
Module: Folio
Week 2

Ability to describe a building without having to be there...
Orthographic drawings: 2D
Plan, section, elevation
Cuts building, never whole thing
Describes physicality (not good experience of space)
Only communicate finite information
Isonometric/ Axonometric drawing: 3D
See ‘whole’ building
Scale, structure, construction
Perspective drawing:
Materiality, senses, experience
Puts you in the space (most realistic)
Proportion:
Scale and body
Designing for people
Hybrid: (combo) eg. collage
Model Making: 3D
Card/ sketch modelling
Photography: Portfolio friendly!

Plans:
Easy to carry
Communicate with clients/ designers
Hand drawing:
Fast
Easy to express yourself
Enjoyed by competition panels, RIBA, ARB
Invaluable design tool
Invaluable tool for learning to observe, what to add, mistakes

(Gordon Matta Clarke - cutting up buildings)
Plan:
Horizontal cut (1m - 1.5m standard)
Show north! (sun considered)
Show section cuts (arrow and line)
Section:
Only do whats needed, pick interesting views
Highlight details - interior, structure, joints etc
Every drawing must have a scale!
<1:20 detail plan
1:50 - 1:100 layout description
1:200 schematics
1:500 streetscape
Paper sizes: A1, A2 portfolio sizes
Line weights: proximity=thickness, gives focus and life
“Running dimension”: keep same reference point (less accumulative error)
A1 drawing presentation:
Convention drawings
Sketches
Photos
Context in space
0 notes
Text
Bricks on Sticks Lecture 1
Module: Light and structure
Week 1
Bricks on sticks is our first project for Light and Structure and concludes in week 5 with everyone’s designs being tested and evaluated. The challenge: to create a spanning structure from just 40 15cm applicator sticks and ties to support a standard house brick. The structure can’t be fixed to the supports.
Report:
chart “costing” device: sticks = 500 units/m, cable = 100 units/m, glue = 0
drawings
how to develop and improve
Differentiate tension and compression members! Don’t over-engineer.

Structural engineering: materials, shapes, forces
Compression: shorter and fatter
Tension: longer and thinner
Sheer: parallel (eg. friction)
Torsion: twisting
0 notes
Text
Modern House Lecture 1
Module: Modern House
Week 1
“Shelter is a fundamental and universal human need. The more adventurous architectural expressions of which can reveal a culture’s dreams, desires and means in response to this inescapable requirement.”
Plan:
Describe house
Analyse style, layout, form of construction, palette of materials
How did the lifestyle, technology, culture, time affect design?
Discuss other works of the Architect?
Relevant to context:
Time (other works)
(Wider world - politics, history, economics)
Architect
Contemporary (works today)
Design analysis:
How each house is composed: plan, section,elevation, spatial experience
Sensual, haptic qualities engendered by materials used
Imagined experience: light, sound, smell, temperature, where can relax? dwell?

0 notes
Text
Environment Lecture 1
Module: Light and Structure
Week 1
Designing environmentally friendly:
Building physics - heat, light, energy
Consider natural alternatives to electricity (eg. sun)
Warning: Depleting resources and polluting waste!
eg. Food miles (Logistics, expenses & bad for environment)

Ecological footprint: Amount of productive land (materials, resources, services, technology) to produce a product.
e.g Traditional house - local materials, affects country
e.g Modern house - global materials, world wide footprint
Ethics: what are your responsibilities as a designer?
Site (logistics, near station to avoid employees driving? etc.)
Orientation (sun, landscape, country, ground)
Materials (paint finishes? chemicals?)
Characteristics of an environmentally friendly building:
Self sufficient/ sustainable
Local materials
Natural materials
Generates own energy/ water etc.
Light
High insulation
Relative to climate/ heat
Passive design: Form of the building (shape, depth of rooms/ internal spaces), orientation, materials, and openings, create comfortable conditions inside WITHOUT the need for mechanical/ electrical systems.
Natural light (consider level/ positions of openings), (contact with outside changes mood)
Passive solar heating
Natural ventilation (position of openings)
Passive cooling
Energy: Joules (E per sec)
Average person generates 100J energy (heat)
Sustainable buildings:
Passive
Materials
Durable
Social - user involved in design, community
Natural renewable energy
High density - creating critical mass
Construction - easy to dismantle, prefabrication
Water - recovered, recycled
Waste water - processed on site
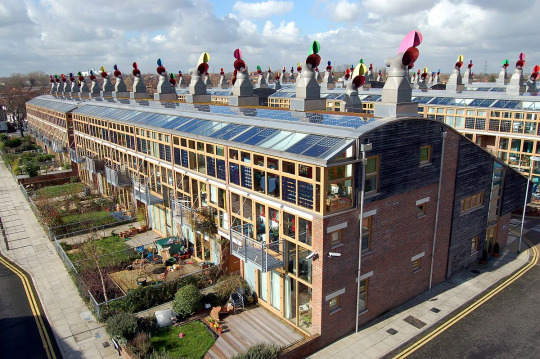
(BedZED: Beddington zero energy development)
High density (100 dwellings per hectare)
Good eco footprint (ideal theoretical lifestyle - cars, electricity, recycling etc.)
Urban form (building spacing allows sufficient sunlight for each building)
Consideration of air flow
Summary:
Key concepts: ecological footprints, food miles, cycles
Design process: every design decision has an environmental consequence
Passive design: the key to sustainable design
Other characteristics of sustainable buildings: materials, water, construction
To achieve sustainable buildings: involved teamwork and challenging targets
1 note
·
View note
Photo


Module: Folio
Observation studies
#studies#art#Architecture#drawing#illustration#student#hands#buildings#library#canterbury#observation
1 note
·
View note
Text
Technology and Environment Lecture 1
Module: Light and Structure
Week 1
Beam thickness approx 1/20th of length.
Think about efficiency of material, cost, weight

(Piano-Rogers - Pompidou Centre Paris)
Structure is the aesthetic
Exposed tech/ structure (external)
Hide or expose? Think about whats going on underneath (e.g. plumbing, heating etc.)

Buildings create a micro climate - relevant to activity (e.g. workshop - filter, office -warm, gym - cool)
Damp rises by capillary action...solution?
- Water proof plastic layer
- Dense bricks/ engineering bricks

(A.Gaudi - Parabolic Arch)
Interior walkway with parabolic arches (design is the structure)
Think about real life (weighted necklace > tension)
Arch supports weigh and forces... same upside down!
“Form finding” rather than giving
Understands forces!
Intricate detailing means design lasts time
Communicate to builders (in designs)
Must understand materials and limits
“The building envelope”:
Foundations - weight & surface area, density of earth compact enough to hold
Walls
Intermediate floors
Ground floors
Roofs
Openings
Think about weights and loads - must be grounded

1 note
·
View note
Photo


Module: Form Finding
Week 1 - Shelter Maquette Development
To continue from the initial models made in the seminar, we had to design individual proposals which would then be critiqued and presented to our groups. I also had to make 1:10 scale model of myself as I am going to be making a 1:10 model of my groups chosen final design.
I worked in my sketchbook to explore how the structures of the models I had made could work and responded to the following questions:
- What kind of structures can be made considering the materials?
- How can the materials be joined? (end to end, corners etc)
- How does the structure engage with the ground?
- How can you keep the water out? (all directions!)
I explored various orientations of the people inside to work out the most efficient position for the limited material we will have. I used triangular panels as structurally this is a strong shape. These also help redirect rain to the ground to avoid the roof sagging (which would be likely if it was flatter). The small protruding pyramids act to further stabilise the form and prevent possible movement from wind from any direction. In order to prevent water entering the shelter there is an inner ground compartment made of polythene sheeting, raised at the edges with the polythene tube to act as protection from the wet ground. The joints of the panels are located between the people to avoid leakage directly onto anybody, though this could be developed with a polythene layer on the roof too. The small raised ventilation roof would help reduce discomfort and moisture from internal condensation, yet no water could enter as it is sufficiently sheltered from all sides.
I think my design has great potential and meets the requirements: waterproof, material efficient, sturdy, and breathable.
2 notes
·
View notes