#/ but now i want to write lol
Text
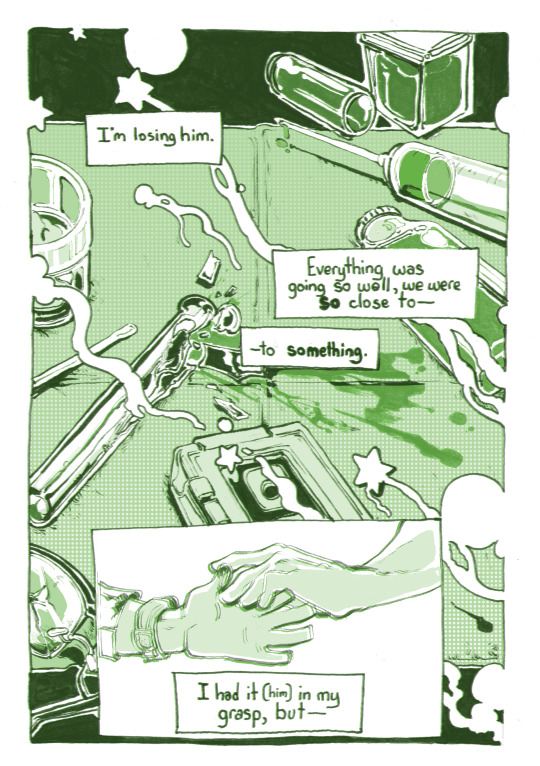


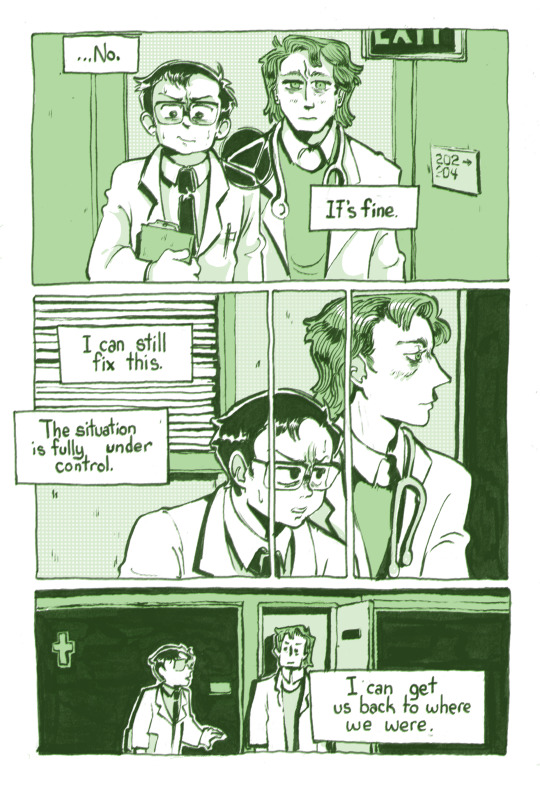
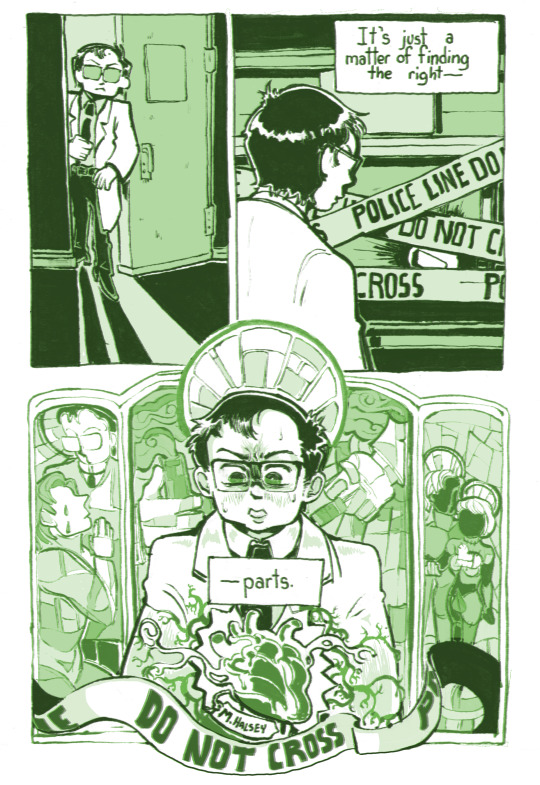
Persecution Complex, or: "Just You, Me, And The Weight Of Your Dead Girlfriend Between Us"
#reanimator#reanimator 1985#herbert west#dan cain#danbert#bride of reanimator#my art#this is the only comic piece from my zine im gonna post here i think. im trying to show SOME self restraint.#but im too geeked abt how this one turned out... want to share The Vision#i may get scared and delete. im shy abt my comic writing. but.#have an early installation in the Gay Herbert West Character Study ive been drawing all year.#shoutout to tumblr auto cropping longer posts now. so i at least dont feel inconsiderate formatting this vertically lol.
2K notes
·
View notes
Text

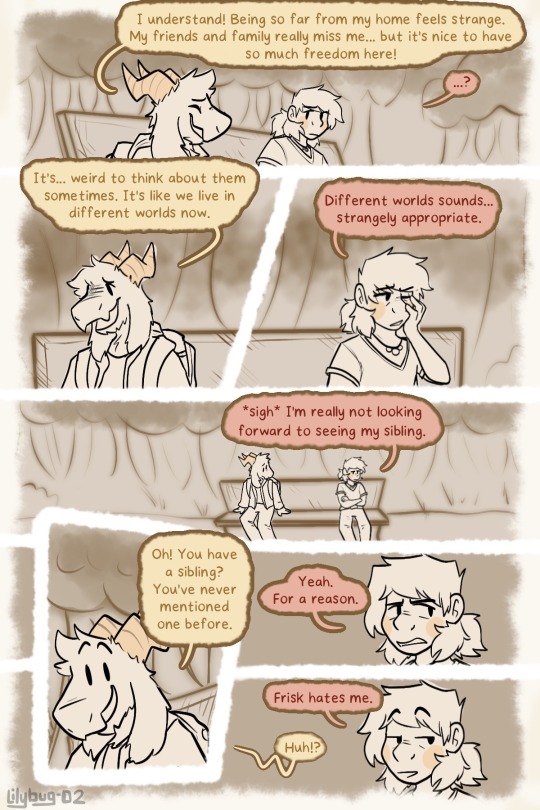
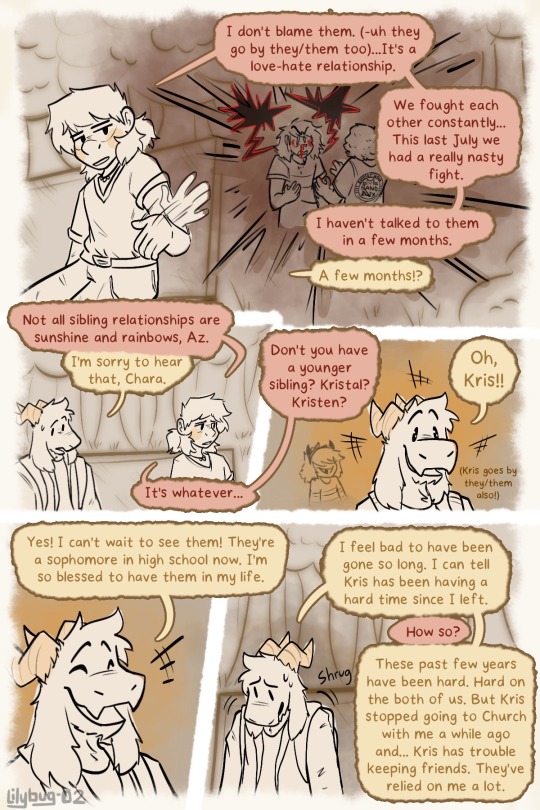

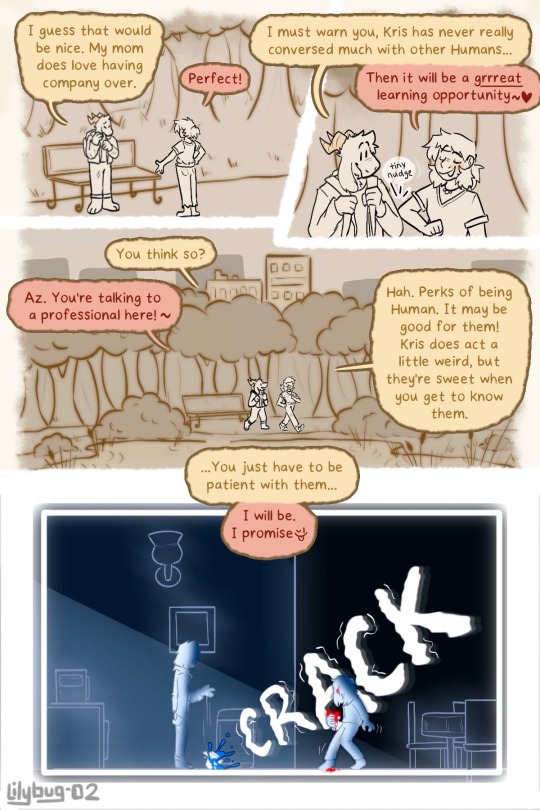
You’re making a lot of promises there Chara…
Part 24 || First || Previous || Next
—Full Series—
I enjoyed doing this little Flashback scene. We’ll be back to our regularly scheduled freakout session soon. Having monochrome color is very nice.
Here is a gif of Chara spilling their water because YES. And I spent way too long on it :)
Wow technology is so cool.

#Frisk is finally name dropped!! WOOHOOO#Az and Chara are my Little Lily bugs and I love writing their interactions#they still have a lot to learn about each other though. it’s only been a few months!#the tiny nudge made me happy#untitled goose game is just chillin in the corner#if you want lol. I ain’t cannonizing anything there#gif#I’m really happy with all this. I was planning on making almost 7 pages but with some help from friends I decided to cut it down a lot#i’ve also really been wanting to solidify all of their pronouns for a while now but couldn’t find a suitable time#anyways…I still have some vacation time planned so the next update will also be somewhat delayed#thanks to all those who are still loving the story#much love#bread#art#deltarune#deltarune chara timeline#chara#Asriel#Kris#my art
2K notes
·
View notes
Text
desperate!Hannie complaining to his roommate that when him and his girlfriend have sex, he gets too into it and always cums before her
closeted dom!Minho who agrees to help them out and wastes no time in setting rules, and all but orders them to have sex in front of him a couple of hours later
desperate!Reader who grinds down sloppily onto Han when she rides him and desperate!Hannie who has no set rhythm as he fucks into her
dom!Minho who wastes no time in taking control, putting his hands on your and Han's hips and showing you both the right way to move when each of you are the ones on top
desperate!Hannie who doesn't listen and loses his pace not long after Minho's hands are removed
dom!Minho who takes it upon himself to prep the younger man with some of your wetness and slides himself into his ass while he's still balls deep in you
dom!Minho who slides a hand into Han's hair and holds it tightly as his hips move at the same pace he explained earlier, fucking into Han roughly and causing a domino effect as Han's hips fuck into yours
desperate!Hannie who almost cums before you again, though for more valid reasoning this time, until Minho slides a pretty pink ring around the base of his cock, stopping him from cumming all together
dom!Minho who edges the both of you to the point where youre both crying and begging him to cum. and once he finally allows it, you get to cum first and squeeze all nicely around Han while the cock ring is still tight around him
dom!Minho who pulls Han out of you and then fucks him into the mattress until he deems him ready to cum. then pulls the cock ring off and lets him cum all over the sheets, Han’s cock red and angry as it spurts out more cum than usual
& none of this was part of the agreement but you'll all be damned if you dont go for a round two with a promise for this to happen again soon
sigh.
#i wanted to write something longer about this but i have too many wips so im leaving it as a thoughts post for now lol#mxm#minho hard thoughts <3#hard hannie thoughts <3#minsung smut#minsung x reader#minsung x reader smut#mxm hard thoughts <3#han x reader smut#han smut#han jisung x reader smut#han jisung smut#lee know x reader lee know#lee know smut
475 notes
·
View notes
Text
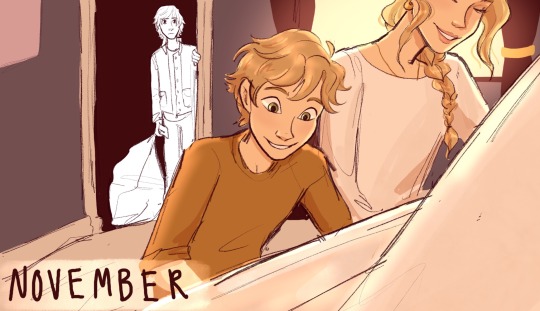
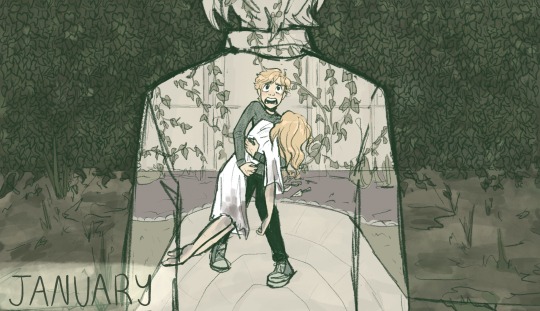
chapter cards for thirteen: november - april

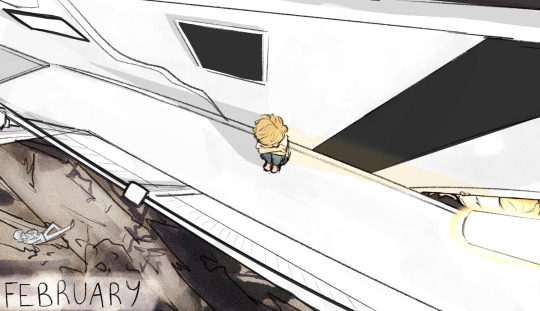
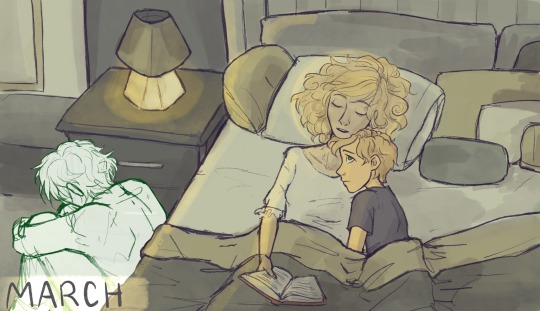
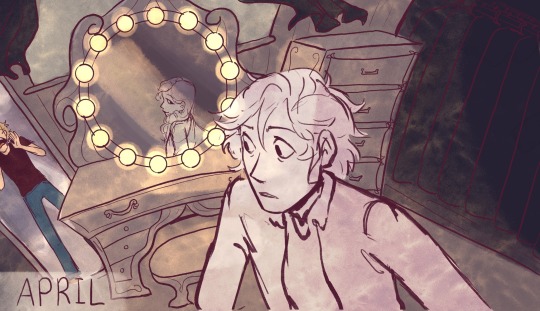
read on ao3
#I did want to post this bc it's been in my drafts for a while and I do like these#it's fun seeing them all together like this#like my metamorphosis covers master post that was so fun#it does feel a little bit like. I dont know.#meta or ironic or something#that I had to stick a hiatus right down the middle of the chapters#and right at the moment where [redacted] happened#it feels a little bit poetic for there to be a chasm there#watch me like get really inspired next week and write all of may and then none of this means anything lol#who knows#but anyway I like these#april in particular feels so fun and spooky#I love emilie agreste she scares me#autumn asukiess I know you now what im talking about#ml#miraculous ladybug#miraculous#my art#adrien agreste#emilie agreste#ml fic
804 notes
·
View notes
Text
drawstuck #4: june edition


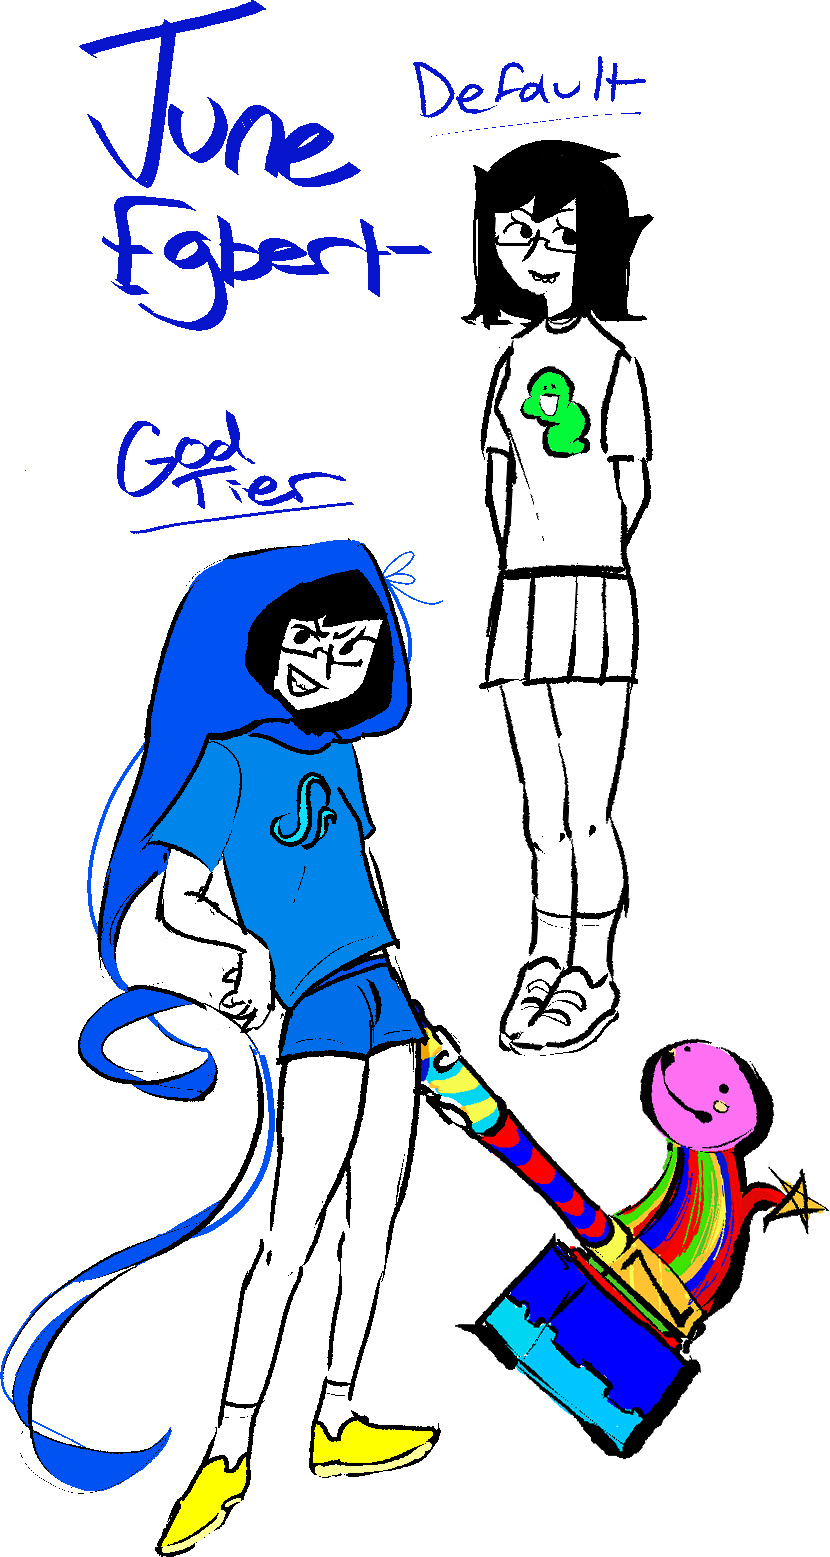
alt june shirt under cut
i jst thought it would be cute
#homestuck#june egbert#dave strider#junedave#srry to the cargo shorts june enjoyers lol#img 2 is post meteorstuck if it wasb't clear#idk abt you but if I had access to a magic machine that could make anything i wanted i WOULD try to synthesise hormones#while i also believe in t4t junedave i love writing oblivious cis ppl#if dave isn';t trans he's probably never heard of a tran outside of anime#june egbert is wish fulfilment for me (<- unfortunately no nerdy gf)#not to be straight but god im straight straight as hell straight as an arrow straight as a mf skyscraper#haha jk enough thirsting for now#john egbert#johndave#pepsicola#mayb ill do junekats next IDK depends on my mood#art stuff
3K notes
·
View notes
Text
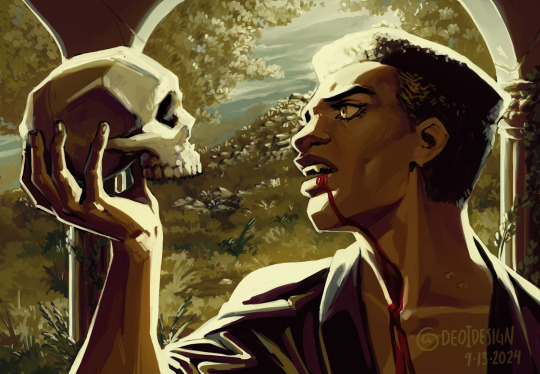
Thinking about vampires, death, life, and the space they occupy in between
#to be or not to be. that is the question#ty adam for being my model for dramatic vampire moment#musings on the thinkings about:#when to live you are required to hurt others. you must repeatedly ask yourself what the value of your life is#To sleep... perchance to dream...#ah. THERES THE RUB.#ok I actually couldnt come up with too many thoughts. I had a lot more while I was drawing this but I guess I put them in the painting LOL#reading that soliloquy and being like damn this is just like vampires#the reality of course is that the soliloquy is a debate over suicide and ultimately making the choice to live#even if just out of fear of the unknown#and vampires are about dying and then in undeath choosing to continue to live#despite the fear of eternity and loneliness and hurting others#theyre not the same. but like let me thiiink come onnnn I'm allowed to thiiink and have incomplete thoughts#I would have to write like a proper essay about this to organize my thoughts. this is the tags on a tumblr post.#anyways finished episode 79#working on patreon stickers for this month (and next month soon)#and working on book 4. taking a pause from episodes cause I've got 3 weeks of buffer now... UGH#I'm so mad that they changed it. it would have been 5 weeks before but it's fine it's whatever#anyways yeah taking a break from episodes to make my book now!#its good stuff.#and this painting is good stuff#banger after banger from me tbh#this was a little relaxing giving myself a couple hours to muse#it's necessary for my health and I always forget that til I do a painting...#I loved doing the little landscape in the background too I should do that more! I love how plants are just like whatever shape you want#like you can make up any plant you want and not only does that plant PROBABLY exist somewhere#a weirder plant exists somewhere too. so. literally whatever you want#ok bye again for a few days while I get back to work
245 notes
·
View notes
Text


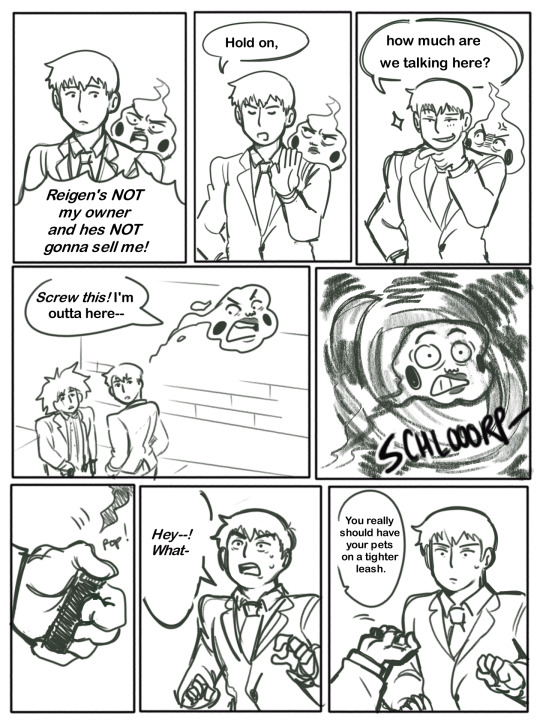
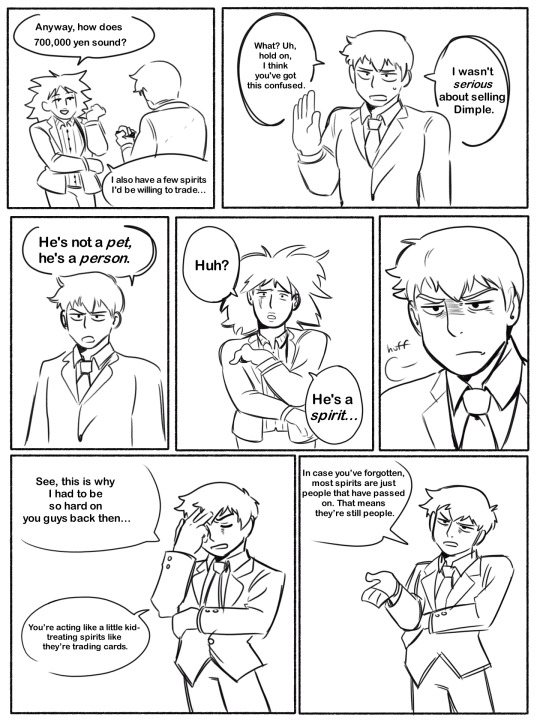


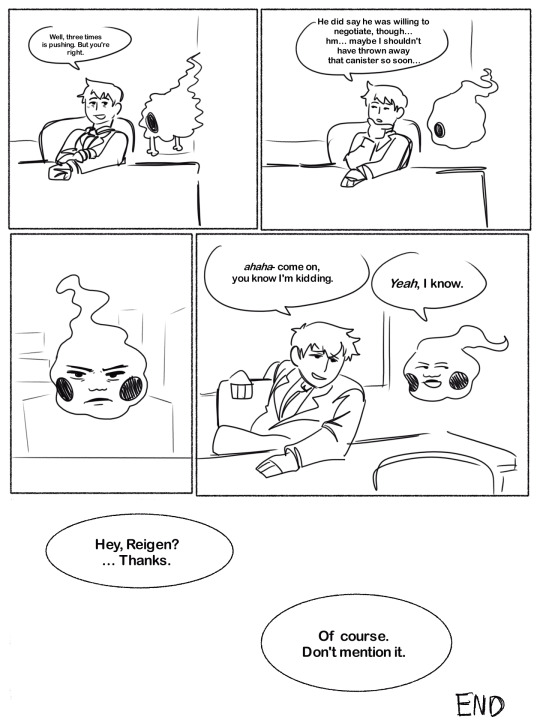
found an old ekurei comic rotting in my files, decided to finish it. upon my rewatch of mp100 i kept noticing how many times dimple was referred to as a pet- but he's not ! ! ! he's a friend :)
#not too happy w the writing but whatevs#sorry matsuo likers if hes ooc i used him as plot device#ekurei#mp100#mob psycho 100#reigen arataka#dimple mp100#comic#op art#ok continuing my thoughts here bc i dont want a whole essay up there#ik reigen calls him a pet as well but its more joking imo and also#this comic is after s3 when they r sort of friends#in my ekurei timeline tho they aint fusing yet. just pals#maybe have fused a few times but nothin srs yet#for those who dont follow me that will not make any sense lol#but even mob calls him a pet sometimes! or dehumanizes him. like. mob. you are the ghost seer. you should know better#now i could be misremembering that but still#everybody treats him like a mosquito or something which is funny but hes a person#he just looks different :(#long post
492 notes
·
View notes
Text
MY FLASH FICTION IS GETTING PUBLISHED IN AN ONLINE LITERARY MAGAZINE
#i am PSYCHED baby's first big girl publication??#they sent me a rejection email two days ago and now sent a follow-up like “sorry that was a mistake we still want it”#AAAAAAAH#writing#lol
259 notes
·
View notes
Text
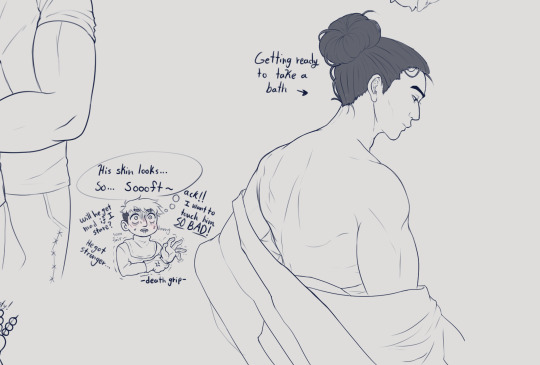
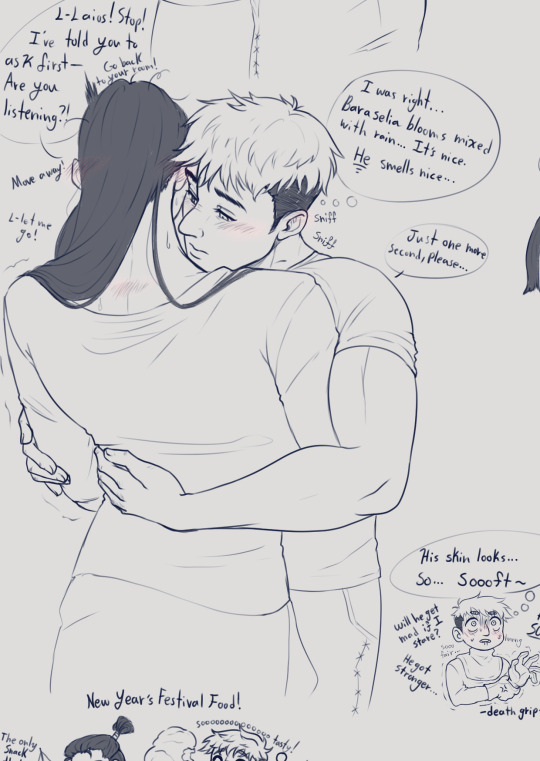

What are you looking for here? Scroll back up.
Just kidding, here’s a treat:

#laishuro#laios touden#nakamoto toshiro#dungeon meshi#delicious in dungeon#Fic writing takes time but at least my wife is helping m#e proof read#for now.. i can at least draw the possible scenes that i wANT TO WRITE SO BAD but don't know how to go about em yet lol#STILL!!! As you can see i refuse not to let these dudes feel themselves a lil bit :)#Laios wants to feel all of those textures and toshiro's heart will explode with all the intimacy#also Laios' getting into the intricacies of the East culture that he starts to notice and enjoy things about Toshiro#also both of these guys have dad issues#that alone gives me TOO MUCH to work with >:)#But I must admit 70% of these are self-indulgent and I will not stop <3#Sam's doodles of the day#shuro
520 notes
·
View notes
Text
no one asked but this is the post that inspired this! thank u immensely for the luv <3 number 1 comment was wondering what steve’s bids were & from his pov, so without further ado...enjoy — part one here!
—
Begrudgingly, Eddie has to admit that Robin might be right.
It’s impossible not to be looking for the bids since he brought them up to her. Even though Eddie was fully expecting to tell Robin to suck it, maybe even wager what little money he had against this working out, Eddie can’t help but watch for them in every interaction. And fuck, she’s right.
They’re little, but they’re there.
The first one Eddie would’ve missed if he wasn’t looking for it. Actually, that’s a lie; Eddie does miss it, until Robin points it out, the nosy bitch. It’s minuscule and honestly, it just seems like Steve asking his opinion — which friends do all the time! It’s why Eddie brushes right over it.
“Okay, be honest,“ Steve had said, walking and talking as he entered the living room where Robin and Eddie were sprawled across the couches. They were both waiting on him, the three of them set on heading out to the drive-in to catch a film.
Eddie can’t fathom why Steve felt the need to change his outfit for it, but when he returns, he gets it. It’s not quite the usual polo Eddie had grown to like on Steve, this one hanging a little looser, the colour a bit darker than Steve’s usual choice, the sleeves a little shorter — almost midway to a muscle tee.
Steve’s fingers fiddle with the distressed collar of the shirt, smoothing invisible wrinkles and fussing over nothing. He swishes back his floppy hair with a flick of his head. “It’s a new shirt, I know it’s a little different - but what do we think?”
He says we but he’s looking at Eddie.
Eddie, who has taken to trying to reel in his gawp because what the fuck Steve? It’s like he’s well aware of what drives Eddie insane and has specifically leaned into it. Some evil goblin in Eddie’s brain whispers think how good he’d look in your shirt and he squashes it, giving a visible twitch to shut down that train of thought.
From the other couch, Robin clears her throat loudly and smiles sweetly at her best friend. “It looks great, Steve.”
It’s sincere and Steve’s mouth tugs up, nearly a smile but his gaze fast-tracks back to Eddie. Eddie nods in agreement, a bit sluggish from his distracting thoughts and god dammit, the extra exposed skin of Steve’s arms are so not helping. “Yeah, looks... looks good, man.”
Steve smiles, lips pressed together but his shoulders curl in just a bit, deflating just a tad. From where Steve can’t see her, Robin waves her hands wildly and catches Eddie’s attention. He watches as she gestures wildly and it takes a moment to realise what’s she mouthing — ‘A bid! That’s a bid, you idiot!’
Oh fuck, Eddie thinks. Cos it totally was; the question, the focus on Eddie. He doesn’t even think about the logistics of it, of the fact Robin was right, just jumps right into picking up the bid.
“You trying a new style?” Eddie asks and then thanks whatever god invented the whole fake-it-to-you-make-it schtick because he’s feeling so far from casual or confident. “Going metal on me, big boy?”
Eddie just manages to catch the grin that breaks across Steve’s face as he turns away, giving a scoff — it comes out too soft though, giving away his complete lack of annoyance. He pulls that usual Steve Harrington pose, hands sliding onto his hips, and screws his face into some melted smiley-grimace. “Shut up, Munson.”
Eddie grins and goads on the blush that’s beginning on Steve’s neck, a glorious tinged pink colour. “If this shirt is any indication, you’d pull it off just fine.”
Eddie watches the blush climb higher as Steve ignores the comment, his smile still giving him away. He grabs his coat and pats down his jeans — ridiculous tight acid wash jeans that Eddie hates he’s somehow become attracted to — ensuring he has his keys and wallet. Once assured, he looks up at his two friends again, brows raised, and says, “Ready to rock and roll?”
That comment alone has Eddie seriously reconsidering his type in men.
There’s only a brief moment to talk about it when Eddie and Robin cajole Steve into going and getting them both popcorn to get a moment alone. Steve had scoffed, face twitching in the way it did whenever he tried to hold back a bitchy comment, but he still stomped off in the direction of the snack stand.
The moment he’s out of earshot, both voices explode in the back of Eddie’s van.
“What did I say—”
“Jesus H Christ, you were right—”
“Literally how many times do I have—”
“Oh my god, you were right—”
“ —before you realise I’m always—”
“Robin.” He cuts her off, hands landing on her shoulders. Robin eyes them warily, lips still parted from how her rant had been cut off. “Robin, I’m gonna kill you.”
“What?” Robin’s nose scrunches up. “What the hell are you—”
“Oh Christ, I can’t believe- how long have you noticed those bids?” Eddie’s aware he sounds a bit estranged, eyes probably wide and it doesn’t help when he softly shakes Robin back and forth. She lets herself be shaken, hair flying back in forth. “I can’t believe you didn’t tell me! You are such a bad gay friend!”
Robin smacks his hands off her shoulders with a frown, her freckly face perturbed at Eddie’s outburst. “Dude, it’s not my fault! May I remind you that until very very recently you were seeing someone else? What difference would it have made?”
Eddie waves his hand, disregarding the point with a shake of his head. His unkempt curls cover his face and Eddie sweeps them back in one motion, “What difference would it have made? Oh my, Jesus—“
Whatever long-winded sentence Eddie was about to spit out is lost by the sound of Steve’s approaching footsteps, effectively shutting both of them up.
Eddie flings himself to the other side of the van, putting an unusual amount of distance between Robin and him like they were being caught doing something they shouldn’t.
Robin frowns at him and gestures wildly with her hands in a way that means what the fuck man? Eddie gestures back, though he’s not entirely sure what his fast hand motions are supposed to mean when Steve rounds the door.
He’s got two buckets of popcorn tucked under each arm and Eddie quickly crosses his arms, tucking his hands into his armpits like his stupid hand motions will somehow give him away.
Steve looks up, stopping just a way from the edge of the van, and looks at the pair of them. His eyes track from Robin still sitting on one of the old cushions and looking two seconds from burying her face in her hands, across to Eddie. He huffs a laugh and kneels on the edge of the van.
“I know he’s gross Robin,” He begins, tone light, as he holds out one of the buckets for Robin to take. “But c’mon, is the distance really necessary?”
Robin snickers as Eddie makes an appalled noise, both of which make Steve smirk. He holds out the other for Eddie to take and Eddie snatches it, glaring at him over the buttery rim for his comment. Then takes a handful and shovels it in because he can’t think of a witty comment to retaliate. Steve crawls into the van and plops himself between them with a content sigh.
“See? Gross.” He teases, shoving his hand into Eddie’s popcorn bucket to grab a handful. Eddie scowls and chews a little faster when the flavour on his tongue seems to register in his brain.
His eyes stare at the popcorn bucket as he chews, then swallows — up the front of the van, the radio that’s tuned into the correct frequency begins playing the opening credits song as the screen changes. Silence sweeps across the drive-in but despite the sudden hush, Eddie has no qualms about breaking it.
“Sweet n’ salty flavour?” He asks Steve, only half attempting a whisper. Robin shushes him instantly, her focus already on the movie that’s beginning. Steve smiles, looking a bit sheepish beneath the glow of the drive-in screen, but he nods.
“I know you like it.” He whispers with a small shrug of his shoulders. Like it wasn’t a big deal. Fuck, Eddie thinks again and hastily feeds himself another handful of popcorn before he says anything majorly stupid in response to that, like: Oh, amazing- have you noticed the big fat crush I have on you as well?
He doesn’t even need to look at Robin to know she’s smiling, smug as ever.
—
Steve, God bless his oblivious little heart, doesn’t even realise he’s doing it.
Steve likes Eddie. Eddie is— god, Eddie is different but he’s good.
He’s this strange amalgamation of traits that Steve can’t comprehend how they fit together in one body or how Eddie manages to pull it all off completely charmingly.
He’s loud, he says rude things, he’s fucking dorky, and far too sweet on the kids — he likes to tease Steve, and yet somehow, when Eddie calls him ‘pretty boy’, Steve knows he’s not actually making fun of him.
Steve likes Eddie, likes his boyishly endearing charm, likes his touchiness towards Steve that no other boy his age is like, likes his messy curls and his ‘holier than thou’ attitude about metal music even though Steve doesn’t get it, like at all. And fuck, Steve really wants Eddie to like him.
It reminds him faintly of when he first started working alongside Robin at Scoops. That thought tickles in the back of his mind, something along the lines of how he had wanted Robin to like him for other reasons, but he doesn’t delve into it.
To Steve, it’s simple: he just wants Eddie to like him.
After the night at the drive-in, between Eddie acting strangely skittish and Robin giving more amused snorts than usual, Steve knows something is up.
He knows they must have discussed something when they sent him on popcorn duty, the bastards. He tries his best to not feel left out; god knows Robin and he have more than a dozen secrets they’ve sworn not to tell anyone but each other.
Besides, Steve trusts Robin to come and tell him if he really needs to know, even if it does worry him a bit. He bites down his anxious thoughts, even trying for a moment to see if there’s a pattern he’s been missing.
That train of thought gets derailed when Steve recalls instead Eddie’s delightful reaction to his new shirt — that Steve definitely hadn’t bought for that specific reason.
Even though Robin had given him that look when he’d first shown it to her — her bright eyes had narrowed, her smile turning a little more coy, and Steve had felt his ears get a little hotter. She hadn’t said anything though, just suggested that he should wear it tomorrow night when they were going out with Eddie.
God, he was glad she suggested it.
Rewinding over Eddie’s parted lips, the way his brown eyes had drank in the details as they trailed up his body and lingered on his arms— Steve had the sudden thought to flex the muscle, just to elicit some reaction, but it had gone out the window at Eddie’s original dismal reaction.
‘Yeah, looks... looks good, man’. Said all aloof, like he hadn’t really thought it. It was like bursting a balloon hidden behind Steve’s ribs, one he wasn’t even aware was there until it was deflating pathetically, making his shoulders sag.
Then— ‘You trying a new style? Going metal on me, big boy?’ And dammit, it’s like Eddie had clocked exactly what calling him ‘big boy’ had done the first time in the Winnebago.
Eddie had then grinned, done another once over of the new shirt, even as Steve pretended to search for his keys and wallet while saying something snarky to try to cover up the heat crawling up his neck. Yet, Steve found himself smiling too because, fuck yes, Eddie liked it too.
But, apparently, whatever Eddie and Robin had discussed wasn’t considered important enough because Robin never brought it up.
The thought and worry about it melt away in Steve’s mind until the memory of that night is about Eddie’s compliment, about his cat-like grin over the popcorn bucket, and how he had leaned over to whisper every bad joke into Steve’s ear all through the movie.
Some of them had been down-right filthy jokes which Eddie only seemed to enjoy more when Steve screwed his face up and nudged Eddie in the ribs, yet unable to hide his smile.
After the third vulgar joke and subsequent nudge, Steve had chided ‘dude’ with a poorly hidden grin. Eddie, smile all cheeky, had nudged him back with a ‘dude’ of his own.
Which, of course, ensued a nudge competition til Robin had given a shush that librarians all over the world would be jealous of. But Steve didn’t even care because he and Eddie were arm to arm, pressed close together and Eddie…didn’t move. Stayed close, like he wanted the closeness the same way Steve did.
Steve only remembers the strange drive-in moment when Robin brings it up finally, on one interesting Saturday night.
It’s not the usual routine; it’s not very often that the whole group gets together to share drinks and get rowdy.
But it was for Robin’s birthday and she’d been persuasive enough to get even the introverts, like Jonathan, to come along. Though, she was aware he’d probably spend the night on a pool lounger, stoned to high heaven. Whatever floats your boat, she’d said, happy for the company in any form.
There’s enough of them there that it almost resembles some sort of party— and makes Steve try not to think about the last small party he threw here. He can tell Nancy notices it too, eyeing the pool a bit too long in a way he’s very familiar with, then taking a swig of beer.
So, Steve heckles them inside — doing a fantastic mothering impression as he waves the group indoors with a promise of pizza, and that has both Jonathan and Argyle perking up and beginning a fast discussion on the best pizza toppings.
Eddie makes a fuss, because of course he does, and moans terribly when Steve tries to roll him off the pool lounger he’s on. He’s had a bit of a joint and some beer, and Steve’s learned that he gets adorably stubborn after some substances.
“Stevie, this is mean,” he had pouted, gripping the edges of the lounger and staring up at Steve with those big brown eyes. “You telling me I did all that bonding with you for nothing? Can’t even lounge by the pool! I’ve got a couch at homeeeee.”
Steve had sent him an amused look of disbelief, hands on his hips after his first round of flicks against Eddie’s arm were apparently fruitless to get him to move. “Really? Didn’t peg you for a gold-digger, Eds.”
Eddie had snorted at that, one hand coming to slap over his mouth. Steve couldn’t quite hear what he had said but the words pegging and anytime slipped through and Steve thinks he could get the gist of that.
“Oh for Christ’s sake,” Steve muttered, feeling the tips of his ears turn warm. He didn’t know how Eddie could be such a menace— or why he enjoyed it so much when he was. Steve waved a hand in the direction of the doors, ignoring Eddie’s delighted snickering. “If you go inside now, you can be on music, alright?”
And that had finally got them all indoors, Eddie whooping and skedaddling through the doors in an instant, with a call of ‘no take backsies!’ echoing behind him.
Inside was much cozier, the whole group a little more connected when squished up on the couches together. Eddie had taken Steve’s word and was jamming a cassette into one of the speakers when Steve made it back inside after scouting around the pool for leftover cans and butts to throw out.
He’s just been thinking about what playful jab he could make at Eddie’s music, like Eddie always did to him when Robin hollered at him from the kitchen.
“Steve!” She’d yelled excitedly and he come to find her quick, brows raised as he entered the kitchen. She was grinning, already a bit jumpy as she got when she had a bit of liquor — but apparently not enough because when Steve saw what she’d called him in for, she’d announced, “Tequila shots!”
Which lead to now. A hazy combination of beer, tequila, and a bit of weed, and Steve is feeling good. Robin had managed to hijack the music not too long ago, with a hiccup of ‘it’s my birthday’ that had Eddie surrendering with a pout.
She’d since put on a bit of everything: some Blondie for Nance, Talking Heads for Jonathan, and some Bowie, just so she and Steve could dance along to ‘Magic Dance’ and she could do all the silly little goblin voices that made them both cackle.
Steve realised at some point that Robin was playing their mixtape, the one she’d made for driving in the morning, and nearly tripped stumbling over to her in his excitement. He grabbed her shoulders, not too hard, and squeezed.
“Is it- is this our mixtape?” Steve asked, words slurring only a bit. Robin gleamed, hair bouncing with her excited nod.
“Yes!” She was already dancing, even though the tape was between songs — because she knew what song was coming. “It’s Springsteen time, Steve!”
Right as the drums to Born to Run filtered out the speaker.
And oh, Steve loves Robin so much. He loves having a best friend that knows his favourite song and gets jittery and excited because she knows it’s about to play— that she put it on this mix for him.
“You’re my best friend!” Steve says, the words bursting out like he can’t control them. He doesn’t even feel embarrassed, just happy, just drunk, and overwhelming happy to be able to have this.
And even though Robin knows this, she still beams, feet dancing along and just begins to sing along with the song, “In the days, we sweat it out on the streets of a runaway American dream…”
It’s a brazen drunken performance from the both of them. Steve’s chest is heaving after just one chorus that he’s pretty sure he put his whole soul into and he’s so fucking happy —and it feels like pure instinct to seek out Eddie, his eyes scouring the room for him.
Eddie’s leaned up against the wall, hiding his smile behind a can and Steve doesn’t think twice about it— doesn’t think about why he’s so drawn to Eddie, why he wants to include him in this happiness — just extends his hand out and grins.
Eddie sees the bid coming this time.
Part Three.
—
yes i saw all ur lovely tags and MAYBE cried about it. but thats none of ur business.
@orangeandthefairroadkill @swimmingbirdrunningrock @sadcanadianwinter @phantypurple @omg-elledubs-things @henderdads @farfaras @mixsethaddams @prismandblue @kerlypride @bushbees @legitcookie @temporalcoffin @callmesirkay @beautifully-useless @millyditty @cinnamon-mushroomabomination @ninjapirateunicorns @darkwitchoferie @vi-the-best-you-can @psychosnowfox @desert-fern @scarletzgo @cr0w-culture @softpink-candlelight @livingforfictionalcharacters @makewavesandwar @kozuuji @rhapsodyinalto @eddiethesexy @cassaloopa @lightwoodbanethings @qu33rcommunist @moonlitkilljoy @starkdusk @theysherobinbuckley @sanguineterrain @loganwright @sillysparrow @hotcocoaharrington @eddie-munson-is-my-wife @she-is-tim @steddiehearts @sideblogofthcentury @sidebarre @corrodedcoughin @stevieclaus
#OBLIVIOUS STEVE IS MY FAVOURITE!!!!#idiots in love#they're so important to me ur honour#on god am i gonna make them KISS#but steve's gotta figure it out first lol#ruby writes steddie#steddie#steddie ficlet#i think i can call it a fic now lol each part is 3k+ i think#steddie fic#IF U WANTED TO BE TAGGED AND I DIDNT IM SORRY#lest i come off terribly egotistical i need direct instructions to tag lmao#even then i tagged sum people that just said 'can't wait for part 2!' which? isn't?#I DUNNO#i went off vibes someone said they were vibrating so i was like get over here the next part is here#one of these tags is just a steddie blog i love.... and they reblogged part 1#corrodedcoughin <3 i love u hehe#the stobin bestie love SHINES in this#i love them so much they are BEST FRIENDS!!!#if u have any ideas... i do love reading the tags and seeing what people want to see next ! im fuckin making it up as i go lol
4K notes
·
View notes
Text
#i'm feeling nosy#i was team captain#shortstop#setter and ace server#okay at basketball as a wing#genuinely good at soccer as a striker/forward - i could dribble but i could not shoot goals to save my life i always overshot#i was dangerous in elementary school i.e. i wasn't allowed to play cause i played too rough and hit the balls too hard#i think it was cause i was used to playing against my brother and his friends....#alas now i can't walk so much so the only sport i'm good at is competitive crawling#i wanted to be a ballerina but was very bad at acting and dancing and singing#my singing voice is so bad it'd wobble glassssssss#very very very bad#i wanted to be good at the arts though#i was artsty only in that i could draw#and i liked to write things...like i wrote horoscopes for the yearbook and school papers lol
347 notes
·
View notes
Text
having thoughts about mutual masturbation with sam and dean.. them being so casual about it because it's not sex, they're just doing something fun together, sharing another part of their lives. it's not like they're touching each other or anything.
they start late one night at a motel, sam thinks dean's asleep, hears his shallow, even breaths. he doesn't want to get up and go to the bathroom to take care of his little issue in fear of dean hearing and waking up and questioning him. so, he stays on his side facing the wall, keeping his movements as slow as possible to prevent himself from making too much noise.
he doesn't even bother slipping his cock out of his boxers, just shoves his hand in and starts with tentative strokes, swiping his thumb over his slit on every other pass.
he doesn't even mean to, but his thoughts begin to wander to dean in the bed next to his, what his hand would feel like on his own dick, what kind of sounds he'd make, how his hot mouth would make him feel. he tried to push them down, down into that dark space in the back of his brain, where they could never surface. he thought of pretty girls he'd seen on tv, all smooth skin and long hair, he thought of the women in the skin mags he used to have as a teen, hidden away at the bottom of his duffel, he even thought of jess,, anything to keep his mind away from the sleeping body in the bed adjacent to his own.
sam speeds up his pace, using his thumb to pick up the bead of precum forming on his tip to drag down his length. soon, against his efforts, his mind wandered back to his big brother, what it would be like to have dean on top of him, grinding down, kissing down his neck, whispering sweet nothings into his ear.
before he knew it, sam was climbing closer to the edge, having to turn his face into the pillow to muffle his heavy breaths and stop himself from letting out a whine. he began pulling harder and faster on his cock, desperate to reach the edge and release himself.
sam heard himself inhale sharply. only he didn't feel it. and it sounded like it came from somewhere else in the room, not his own mouth. oh. oh god. he ceased his movements and held his breath, then turned his head around to face the rest of the room.
his eyes met another pair, glistening in the dark from the bed opposite. dean is facing him, unmoving but very clearly understands what sam is doing.
"sammy."
"dean. o-oh my god, dean. i-i'm so sorry, i didn't-" sam panics. this can't be happening right now. he pulls his hand out of his boxers as he sits up, his cheeks burning with humiliation and the remnants of lust.
"sammy." dean follows sams movements and sits up as well, the duvet falling down to his waist from where it was previously hiked up over his shoulders, revealing his bare chest.
"sammy, it's okay, man. stop freaking out."
sam can't even meet deans eyes. his own are beginning to glisten over with unshed tears as he twists his fingers in his lap. this turns out to be a mistake, as when sam looks down at deans lap, he notices that he's sporting a hard-on of his own.
sam's eyes widen, and he looks back up at dean's. dean shifts back until he's leaned up against the headboard, sliding out from under the duvet, exposing his boxer-clad thighs. thighs that sam was thinking unholy thoughts about moments before.
"s' okay, sammy. this doesn't have to be weird." dean's hand reaches down his toned belly to his boxers, resting his hand upon the bulge residing there.
"what-" sam's still stunned, things moving too fast for him to comprehend.
"s' okay sammy. there's nothin' wrong. 's just us."
dean's eyes are on sam's the entire time, and when he reaches into his boxers to cup himself, something inside sam snaps into place.
"fuck." sam sharply inhales as his brain catches up with the occurring events. he leans himself back against his own headboard, his head tilted toward dean and his eyes never leaving the older's.
"dean."
's just us, sammy." dean's hand is moving now, sam can see it through the darkness of the room, the faint moonlight from the window illuminating dean's form.
"god, dean." sam's own hand once again reaches back down into his boxers, his cock back to almost full hardness. he gasps, already way too close to the edge.
his eyes meet dean's, and sam whispers, "just us."
dean's pumping his cock faster now, breathing picking up into soft huffs as he gets himself closer to release.
sam isn't going to last much longer, already strung up from his earlier activities, and his senses are heightened with dean right next to him, watching. he swipes his thumb across his head again, and he's a goner.
"fuck, dean, i-" sam whines.
"you gonna come, sammy?" dean's almost there too, just needs a little more to push him over the edge. "you're so close, aren't you, baby? c'mon, sammy, do it for me, huh? come for your big brother, sammy."
dean's words ring through sam's ears and his grip tightens on his dick. sam's body tenses, he see's stars as he spasms and whines through his climax. his load shoots into his boxers and make his hand slippery for his last few strokes.
"oh, dean, oh my-fuck."
sam's release triggers dean's, and he comes with a shout, stringing together words that sound like, "that's it sammy, that's a good boy. fuck, sammy, my good boy." sam is still experiencing aftershocks and dean shoots streaks of come into his own boxers.
the only sound that can be heard in the room is heavy panting from both of the brothers.
"shit, sam. we need to do that more often." dean shoots sam a lopsided grin through the darkness, and sam sends one back, his breath beginning to even out.
"agreed."
the pair sleeps soundly that night, sated and genuinely relaxed for the first time in what feels like forever. in the morning, they don't talk about it, but share a look of understanding as they step outside for breakfast. no words need to be shared between the two.
the following night, dean sends sam one look and he's shoving his jeans down his hips, already at an agreement.
it's never weird and i think sam and dean do this every night.
#longest drabble so far?#ive been writing this all day and now its past midnight so sorry if the end is rushed#i just wanted to get this out there#hope you guys enjoy#goodnight#samdean#wincest#gencest#weirdcest#spn#supernatural#sam winchester#dean winchester#not proofread ofc lol
348 notes
·
View notes
Text

carefully attempted to draw (still sick);
wanted to give Shargon another redesign, this is an older version of him but the basics should also go for his younger self
(idk yet about his lung replacement design; arms are posed weird to make anatomy clearer)
(wip, oc art, Shargon, he/they)
#ganondoodles#art#oc#oc art#wip#character design#im really liking this one ngl#posted this on twitter but didnt here bc its just a wip but .. idk how far i will get with this lol#i know barely anyone is interested in oc art#especially when its not my usual big buff type i love so much#everything needs a lil variety tho!#and this build just fits shargon more than the typical#if anyone can make sense of it-#the extra arms he gets (red ones) are bc he gains another heart from Eadrya so he has two hearts and two elements now thus changed#(dw Eadrya is fine .... it makes sense in lore but its alot to explain and i dont think anyone would care anyway)#not trying to be dismissive- just realistic to save myself the time writing it and disappointment when no one reads it :U#i need to put more effort into oc art if i want anyone to care#at least i know Eadrya has always at least one fan (thank you calamity <3)
154 notes
·
View notes
Note
hii could i req an soft dom arlecchino x sub/fem reader?? something w a really needy whiny reader n maybe like a mommy kink or thigh riding IDK tysm for ur time !

{☆} characters arlecchino
{☆} notes drabble, fem reader, sub reader
{☆} warnings 18+ content
"Slowly, doll. We're not in a rush." Arlecchino reprimands lightly, squeezing your hips with just enough force to keep you unmoving on her thigh– she was still being gentle, but the subtle warning in her tone spoke to how easily she could push you against the desk and turn you into such a mess that you couldn't even remember your own name..just that you were hers.
But the barest hint of stimulation from her slacks pressed against your throbbing cunt had you twitching, barely able to form words. All you could think about was the scorching, twisting need building in your stomach, desperation for relief slowly climbing until you'd think she was doing this on purpose to drive you mad.
"Please– 'm a good girl, right? I've been good.." You choked out, only to be met with the rough, husky laugh echoing in your ear that made you feel dizzy with a rush of need, her nails gliding along the skin of your hips as she pressed you down even more firmly– you couldn't see her face but it was easy to imagine the crooked smile twisting her lips at the way you inhaled sharply and tried to buck against her thigh.
"Shh. I know, doll. I've got you, just relax." She murmured in that sickly sweet tone that always had your knees buckling, the raspiness of her voice sending shivers down your spine. It was almost impossible to relax with her so close, the notes of metal lingering on her skin despite how well she presents herself– but you trusted her, despite how you know you shouldn't.
"There we go. Good girl." Arlecchino's grip on your hips loosened just enough for you to move if you so wished, and oh did it take every ounce of restraint to not do just that..she hadn't said you were allowed to, and you weren't about to spoil her good mood by being a brat. Not tonight, anyway. "Do you want to cum, doll?"
The fervent nod you offer in place of words draws a laugh from her lips, one that is almost mocking, making your face flush in embarrassment– but the sudden tap against your hip makes your mind go blank to the point you forget it all together, focused only on the feeling of her thigh rubbing against your cunt as you bucked against her thigh, the fabric slick and wet against your inner thighs. You'd have half the heart to be embarrassed about that, too, if not for the sudden brush of her thumb against your aching, neglected clit. Just that small touch has you speeding up your movements, practically drooling as you whimpered like a dog in heat.
"That's more like it, doll. Such a pretty girl." Arlecchino hummed, her other hand trailing up your stomach, between the valley of your breasts and ghosting across your throat before settling on grabbing your jaw in a firm, yet almost tender touch as she tilted your head to the side just enough for her to pull you into a burning kiss. It left you lightheaded, grinding down against her thigh as she claimed your mouth as her own, her thumb still ghosting over your clit sporadically.
She'd spent so long teasing you, constantly touching you but never where you needed her, that you already felt like you were going to snap like a wire. She must've been in a really good mood, then, when she pulled away from the kiss with an almost predatory lick of her lips, yet she settled on pressing kisses to your skin rather then the usual sharp bite of her teeth as they sunk into the curve of your shoulder.
"Are you close? Go on. I want to see your face when you cum– you look the prettiest when you finally break apart, doll." Arlecchino mused idly– as if she wasn't talking to you while you continued to rub your aching cunt against her thigh, chasing your own release through shaky, strained breaths. Her thumb swiped over your lips, brushing strands of hair stuck to your skin from your face– at the same time as she swiped her thumb more firmly against your clit, creating a vicious contrast that had you both melting at the barest hint of almost softness from her and the touch of her hand between your legs, dragging you into an orgasm that leaves you trembling and, had she not shoved her fingers into your mouth, screaming, tears pooling in the corners of your eyes.
"All done, little doll. Take it easy." She murmured, voice so quiet you almost didn't hear it, thumb swiping across your cheek to wipe away the stray tear, her hands pulling away to settle on your sides. "You did well– good girl. Let me take it from here."
#genshin impact smut#genshin smut#genshin x reader#genshin impact x reader#minors dni#writing tag#arlecchino x reader#arlecchino smut#i considered the mommy part for half a second but i see arle as the biggest butch and i didnt want 2 swap it on the fly looks around#the projection is just a little too hard my bad. i am obnoxiously annoying abt butch arle...#n e way ough soft arle...........not done enough......arle being rough is a given bc shes Like That but like#soft.......#i am weak for a woman who can do both and switch on a dime#arle imo leans like. 80-90% towards rough but shes got a soft spot if shes in a good mood yknow..#i wrote this at 1 am on like uhhh 2 hrs of sleep if it isnt good uhhhhh blame it on that lol#im just feeling it out rn anyway tryna get into writing proper smut again its been a hot minute oop#passes out and dies ough......................#also did NOT spellcheck i just wrote it all in one sitting and called it a day i am gonna pass out now so if u see a typo....#no u didnt#im not done yet wait a minute okay now just. soft arle got me okay. its rlly rare but shes good at playing nice okay#the appeal of arle is fucked up little creature but sometimes u want 2 be pampered i get it#OKAY im actually shutting up now passes out in the middle of the road
481 notes
·
View notes
Text
learning to spin on a drop spindle: a beginner’s lengthy yet comprehensive guide
I put this monograph together for a friend, but many other people wanted to read it as well, so here it is !
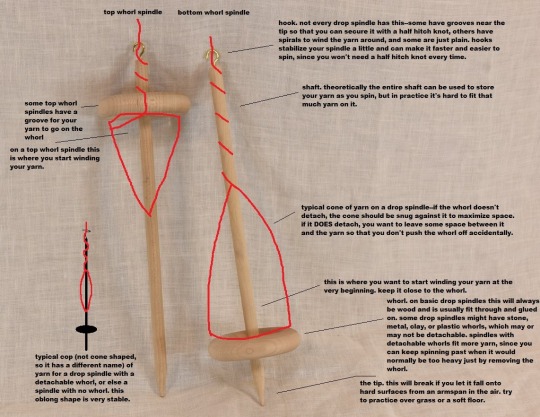
Fig A: Parts of a Drop Spindle. (image source. notes are mine. Click for higher res !). Apologies in advance for the lack of image descriptions--for the most part I use images because I can’t figure out how to describe the thing in words, so describing the images is kinda the whole issue. If anyone wanted to write them for me I’d add them to the original post in a heartbeat !
How to Get Started Drafting and Spinning
So, you have your fiber and your spindle--now what ?


Friendly pre-tutorial reminder that radfems can fuck right off if they think I’m writing any of this for their benefit. I’m not. I hope they all choke on their spindles <3. This is a safe space for trans people first and foremost.
(Check out this post that goes into picking a spindle and your first fiber, if you don’t have one yet)
First, you might wish to practice drafting a little. Drafting is the process of drawing the fibers out from, for example, a strand of roving or a rolag, into a thinner, airy length. To draft, loosely hold your fiber in your dominant hand, and pinch the very tip of the fiber with your thumb and forefinger of your non dominant hand. Then gently pull. If you pull all the way, you should notice that your fiber detaches from the fiber source eventually. For yarn, we want very very long lengths, so we don’t want that to happen. To get a continuous length of drafted fiber, simply change where you’re pulling from as you go. For example, you can draft out 2 centimeters/1 inch of fiber, and then move your fingers 2 cm/1 in back toward your fiber supply, and draft again.
The thinner you draft (or pre-draft*), the thinner that fiber will spin up. Once we start spinning, you’ll see how adding twist immediately compacts the fiber quite a bit, so you need to draft much thicker than you actually want your yarn to be. When pre-drafting specifically, if in doubt--draft thicker. You can always draft it out a little more as you’re spinning.
Figuring out how to draft smoothly can be one of the harder parts of learning to spin, but even before knowing how to do it perfectly you can still create good yarn.
Check out The Joy of Handspinning website to see drafting in action, as well as several different types of drafting.
Also check out this video explaining pre-drafting roving. 1:00-2:30 is especially helpful. If it’s not clicking from this video, search youtube for “pre drafting fiber for spinning” and watch til you have a better understanding.
*pre-drafting just means drafting before spinning--so it’s the same type of thing as drafting while spinning, but without having to wrangle your spindle at the same time. I’d recommend pre-drafting at least a bit of your fiber until you feel comfortable doing it. Then you can spin with your pre-drafted fiber, and it’ll be easier than if you hadn’t pre-drafted.
Tips: If you have a bottom whorl spindle, you may also want to practice spinning the spindle before it has any fiber on it, just to get a feel for how it moves. You could do this with the bottom point in a bowl or on a flat surface like a book or table. Try rolling the top of the shaft between your thumb and index finger. Don’t worry about it toppling over frequently--your spindle will be suspended by the yarn that you’re spinning, so it won’t topple !
If you have a top whorl spindle, you might have a harder time getting it to spin without being suspended, because the center of gravity is so high. Instead, try tying a piece of thread or scrap yarn to the hook (if it has one) or below the whorl (look for figure B below) and secure it with a half hitch knot. Then try spinning it like that, and let it hang freely to unwind itself whenever it has too much twist before you try again.
You can also try spinning a bottom whorl suspended by scrap yarn or thread. The advantage of trying it while it’s suspended is it can allow you to watch twist being added and see what it does without messing with your handspun, as well as letting you get a feel for how it moves while suspended. If you have a bottom whorl, I’d give both a try !
---
Now that you can draft, you’re gonna want to attach your fiber to your spindle. Some people use a leader to do this--it’s a pre-spun loop of yarn that you tie to your spindle. Then you loop some pre-drafted fiber through the loop of the leader, add twist til it holds, and off you go.
Another way to do it is without a leader. I’m much more familiar with this method, and I find it way easier, so I’ll go into more depth on this one:
1. Take the end of your pre-drafted fiber (you will need enough pre-drafted fiber to go from the underside of the whorl to the very top of the spindle, and then back again. If you’ve pre-drafted way more, don’t worry. We’re just working with this short amount for now, but it can stay attached). Make a slip knot at the end. You can roll the fiber between your fingers to add some twist if you’re having trouble making a slip knot with it. (Tip: if you’re having trouble getting the fibers to roll, wet them slightly with water or spit and it will be much easier)
2. Put the slip knot on the bottom point of your spindle, and slide it up so that it’s at the whorl.
3. Gently wind the pre-drafted fiber up the spindle shaft, until you are at the hook or top. Wind it over the hook (or do a half-hitch knot at the top--if there’s a groove near the top your half hitch should sit in there, otherwise it should sit as close to the top as possible while still being secure. You may drop it a few times while learning where the perfect spot is--such is life). Be careful with pre-drafted fiber--depending on staple length and fiber type, it can pull apart quite easily. The trick to keeping that from happening is to keep it a little slack and loose until you have added twist to it.
4. Pinch your pre-drafted fiber between your thumb and forefinger on your dominant hand, about 1 hand’s width from the top of your spindle. Turn the spindle in the direction you intend to spin your yarn (usually this will be clockwise, or to the right). Spin the spindle until you have the desired amount of twist. You should notice that all the fiber above the hook/half-hitch has twist, while the fiber below it has none. You need all of it to have twist, so let’s even it out--pop the half-hitch off with your thumb/unwind the yarn from the hook, unwind the yarn from the shaft so that the entire length you’ve worked with so far is stretched out. This will allow the twist to equalize. Now wind it all back up and put the half-hitch back/wind around the hook again. You may need to repeat this a couple times to get your starting fiber fully twisted (don’t worry though--you only need to do this at the very start. From here on you shouldn’t need to equalize twist like that until the next time you start from an empty spindle).
You’re done attaching the fiber--now you can spin !
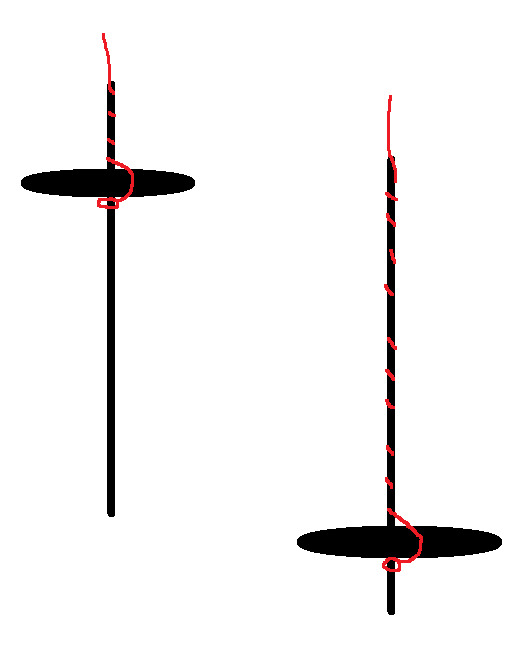
Fig B: How your yarn should sit on a spindle, both top and bottom whorl
If that doesn’t make sense, here’s a video showing how to attach it with and without a leader. If that doesn’t help either, search youtube for “how to attach leader to drop spindle” and keep looking until you have a better understanding.
---
So you know how to draft and your fiber is attached to your spindle--now it’s time to spin ! There are 3 different parts to spinning a singles on a drop spindle.
1. Adding twist. This can be done with just your hands, but the spindle makes it a whole lot faster. This is the purpose of a spindle--to add twist very quickly (and as a bonus, it’s a handy place to store the yarn as you spin it !). All you have to do is spin the spindle, and the only trick is to make sure you always spin in a consistent direction--don’t start a project spinning clockwise and end it spinning counterclockwise ! You’ll have an impossible time plying it then. There are a lot of different ways to spin a spindle--you’ll see a few watching the videos here, and more if you search out videos of drop spindling yourself. Whatever method is comfortable and practical for you is what you should do.
2. Drafting the fiber. You already know how to do this part !
3. Winding the yarn on. When your yarn is long enough that adding more length will make it hard to work with, you’ll want to wind it onto the spindle so that you can get back to spinning. To do this, pop the half hitch knot off the top/unwind from the hook, unwind along the shaft, and wind it near or at the base of the whorl, in the orientation seen in the very first picture. Always wind in the same direction that you’re spinning, to stop your yarn from flying off.
I would highly recommend starting with the method known as “park and draft” while you learn. In this method, you first add a ton of extra twist (usually as much as you can) and then put the spindle down and draft until that extra twist is used up. Then you wind on, and repeat. This isolates the actions of spinning so that you are only doing one at a time, which makes it a lot easier. Most people move on from this technique once they’ve figured it out, but you don’t have to--the drawback is that it’s typically slower, but hey, spinning is a slow craft anyway. There is no wrong way to spin, and everyone’s hands and bodies have different needs and work in different ways.
How to Park And Draft
First, use your dominant hand to pinch your pre-drafted fiber a few inches/6 cm above the top of the spindle.
Now just spin the spindle clockwise, until it won’t really spin any more. (Don’t try to get ~the most twist ever achieved~ or anything like that--your yarn can potentially snap from too much twist. Take your cue from the spindle--when it stops wanting to spin, you’ve got enough twist.) Don’t let the twist advance beyond where you’re pinching it off.
This is important--if the twist gets into your fiber, it becomes much harder to draft it. But don’t worry, you can undo this by pinching just above where the twist has entered your fiber, and with the other hand just below (pinching the actual yarn here). Now (with the hand that’s pinching the yarn) roll in the opposite direction that you’re spinning in. This will move the twist down into the rest of your yarn. Let go of where you’re pinching the fiber, slide your yarn-pinching hand to where it usually is as you’re spinning, and get back to it.
Your leader/yarn should be very kinked up and wiry. Now put the spindle between your thighs (or between your knees, under one knee, or under something heavy that won’t damage your spindle. Thighs are convenient, but if it’s uncomfortable, try putting the spindle somewhere else. It needs to be held firmly in place and not move around). This is the “park” part of “park and draft”.
Now, you want to be pinching the twist off at the same spot, but using your other hand instead. I usually pinch right above where I’m already pinching and let go with the lower hand.
First we’re going to just bring the twist up the pre-drafted fiber by sliding your pinching hand up the fiber, slowly and gently. You should see the twist follow behind your hand as it enters the fiber. If you have lots of pre-drafted fiber, you might wind on, add more twist, wind on again, etc. You could also draft out your pre-drafted fiber (this is what the majority of more experienced spinners who pre-draft do) while you go.
The “draft” part of “park and draft” is just like pre-drafting, but one end is attached to a spindle. This gives you something to lightly pull against, if you want. Draft slowly and with purpose.
At a certain point, you will run out of excess twist. At this point, wind on. If you’ve only done a short length, you can also add more twist, park it again, and go back to drafting.
If you’ve run out of armspan but still have lots of excess twist, unpark your spindle (let it hang free) and allow it to untwist a little, monitoring it closely. If this happens often, try to put less energy into twisting your spindle, or allow it to twist for less time.
The amount of twist that your yarn has matters a lot--it will impact your finished yarn hugely. A yarn without enough twist will be very limp and might even fall apart as you handle it. A yarn with too much twist will be wiry and inelastic. You want to find a middle ground where it’s got just the right amount for what you intend to use it for--a hard, inelastic wool yarn can make a good bag, but not a very good hat.
To see how much twist you’ve added to your singles as you spin, try a plyback test ! This is really quick to do on spindles--just relax the distance between your fiber supply and the top of the spindle. When the yarn is no longer taut, the live twist will cause it to twist back on itself. With too little twist, you may just get a few sad loops (or no loops, if it’s super undertwisted). With too much twist, you may get tons of tight little curls of yarn. With a good amount of twist, you should have a few good curls (just one if it’s a short length of yarn, or several if it’s your armspan) that aren’t too tight. Those curls are what your yarn will look like once 2 plied, so it’s a great litmus test for whether you’re adding the correct amount of twist or not.
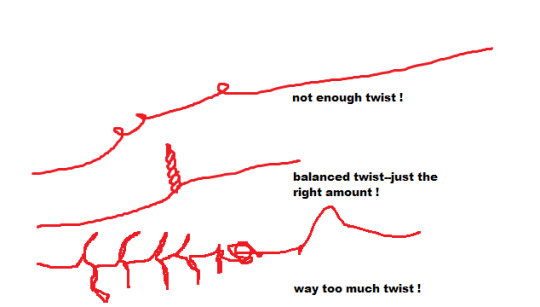
Fig C: What different amounts of twist looks like in your singles.
To fix too little twist, just spin the spindle a little extra until it looks right. To fix too much twist, either draft more fiber or else let the spindle untwist a little.
You can and should do this before winding each new length on, at least while you’re still learning the motions.
Check out this video of how to spin with the park and draft method ! 0:00-4:45 is intro and attaching the leader. 4:46-9:00 is the method itself (note to friend: don’t watch past 9 mins). If this video doesn’t work for you, search “drop spindle park and draft” on youtube.
A few interim tips
1. It’s critical to hold your fiber supply loosely. If you find that you have put a lot of force into drafting, then you are either holding your fiber way too tight or your hands are too close together (or potentially both). Drafting should not require force. If it is requiring force, adjust your grip and your hand placement continually until it gets better, and refine from there.
2. Try to put some tension on the yarn as you wind it on. This will make it sit a little neater and flatter, so that you have a more stable cone of yarn and can fit more on it.
3. If you draft out your fiber so much that it runs thin and just sort of disintegrates, just pull off the most wispy parts from your yarn and the fiber supply, then hold the two together again, making sure to overlap by several inches/6-10cm. Gently draft out a little and add twist before putting that join under the weight of your spindle, or it will fail again. You can join from one fiber source to the next one (necessary with rolags, hand combed top, and strips off of batts) in a similar way; make sure to leave a little unspun fiber for a good join, and overlap the end of the first fiber source with the beginning of the second by about an inch/2.5 cm.
4. If your yarn snaps (rather than your fiber running thin as you draft), it’s because it was A) twisted way too much B) spun too fine for the drop spindle you’re using C) both A and B or D) your spindle has become heavy enough that it can no longer spin as fine as you were spinning.
For A, B, and C: remove as much twist as you can from either end of the snapped yarn, then put both ends in your upturned palm, overlapping them over the whole width of your palm. Add enough either water or spit to get them good and wet (not dripping, but they do need to be wet). Now place your other palm down on top, and rub vigorously for about 30 seconds until the ends have joined together. If necessary, you can also just tie the ends in a knot, although it’s not invisible and you can usually feel it in the finished yarn.
For D: is your whorl removable ? If so, remove the whorl and continue spinning. If not (and for the vast majority of beginner’s drop spindles it won’t be), your spindle is full ! Even if there’s still room, it’s too heavy to continue spinning on for that project. You could keep going spinning a thicker yarn, but that means your yarn will randomly get thicker somewhere near the end, which works for very few projects. If this happens to you when there’s still tons and tons of room on your spindle, that means in general you ought to spin thicker yarn on that particular spindle if you want to fill it up all the way.
Okay, I spun yarn, now what ?
So at the moment, you have what we call a singles (some people just say “single”). That can be used as is, or it can be plied--that is, held together with more strands of singles and twisted in the opposite direction. But either way, you need to get it off your spindle !
If you’re going to leave it as a singles, then you’ll be winding it into a skein (we’ll get into that later). If you want to ply it though, you’ve got a lot of options. (I’ll get to how to actually ply later, this is just discussing those options.)
Many Methods of Plying
Plying Straight Off The Spindles
First, if you’ve got multiple spindles capable of spinning the same weight of yarn, you could just set your full spindle aside and spin another one. You’d need at least 3 spindles (the third, ideally, a bigger plying spindle) to get a 2 ply yarn, and 4 spindles to get a 3 ply with this sort of setup. This is what I do with supported spindles, since I have many, and I can attest that it saves a lot of winding time and is terribly convenient.
But it’s also probably not doable for many people, and it’s ridiculous to buy 3 drop spindles when you’re just getting into it !
Wind And Store
Second, you can wind your singles onto something for storage, and then use your now-empty spindle to spin another singles. Two great things to store yarn on are small rocks and empty toilet paper (loo) rolls.
Winding it around a small rock is better than just winding it into a ball for plying, since the rock will weight it and stop it from flying up in the air once you start plying. A big pebble works great. With this setup, you’d want to put all your balls of singles in a bowl or container of some kind, hold the ends of each, attach it to your spindle, and let them roll around as you ply.
They can tangle (mine usually don’t, but it can happen), so the toilet paper rolls might be an upgrade--these can be put on a stick, and the stick can be put on something (or you can poke two holes in a cardboard box, put the stick through one hole, load the rolls onto it, then put it through the other hole as well) to keep it stationary so that the rolls... well, roll. This requires some storage space (usually if you do this often, you don’t wanna make a new one every time, so keeping it is preferable) and is honestly not a huge upgrade... unless you have a ball winder that can wind the yarn onto the TP rolls for you, in which case this is a big time saver. If you don’t have one and don’t have issues with tangling, the rocks will probably work just as well and take up a lot less space.
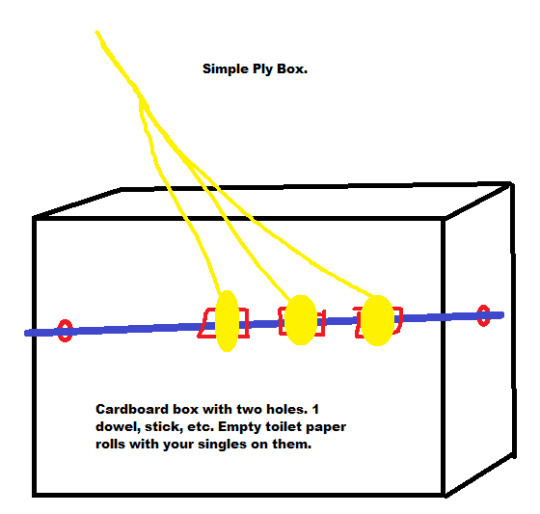
Fig D: Diagram of a Simple Ply Box
Ply Bracelet
Thirdly, if you want a 2 ply yarn specifically, you could wind it onto your hand and make something called an Andean Plying Bracelet. Here’s a link to a page that goes into it in detail. I highly, highly recommend learning how to do these. They look a little complex, and I couldn’t tell you the motions if my life depended on it, but I can do them with my eyes closed while not paying a whit of attention. They rely entirely on muscle memory, so once you learn them, they’re easy as pie.
The whole point of a plying bracelet is to get 2 strands of yarn out of 1 singles. You could of course wind a singles into a ball, then wind half of it onto another ball, and then ply from there. But a plying bracelet is a lot faster, and will always match up exactly.
One downside of a plying bracelet is that, as the name implies, it goes on your wrist. So if you keep needing to put your spindle down to take care of other things, you’ll need to pull off the plying bracelet as well (or carry the whole thing with you). They can be stored on a cylindrical object that’s smaller than your wrist, or sometimes also draped on hooks or put on the spindle shaft itself. I don’t usually encounter problems when pulling on or off my plying bracelets--it doesn’t seem to tangle them--but if you’re plying while cooking or watching a child or something else that might require you to stop immediately and hurry over to whatever needs tending, then you might want to save the ply bracelet for another day.
Chain Plying
Fourth, you could wind your singles into one ball, and then chain ply it. Chain plying is a way to turn one singles into a 3 plied yarn. It also preserves stripes in your singles (we’ll talk about this in more detail later), so it can be perfect for a very colorful singles.
Chain plying is simple. Do you know how to tie a slip knot ? Of course, because you needed one to start spinning ! (Although here’s the link to how to tie a slip knot again, if you need it.) So that means you basically know how to chain ply as well.
Step one: tie a slip knot at the end of your singles (you want a very short tail, since that’s basically waste). Make the resulting loop nice and big, and lay it over your singles. Pull the singles through the loop--now you have a new loop ! Make it nice and big as well. Lay it over your singles. Pull the singles through. Repeat until you’re at the end of your singles (try to have your last loop be a very small one). To finish, place the end through the loop, and then just pull on it until it tightens the loop. Note that you typically are adding ply twist and winding on as you do this, but you can also just chain ply an entire single and wind it into a ball as you go, then add twist once you’re done. That can be a lot easier to wrangle, if you’re having difficulties.
You might notice that this is basically a really open crochet chain. Yep ! It needs to be open so that the twist can enter the yarn, but you can do very big or somewhat smaller loops--although no matter what, you need to keep the loops large enough to at least hook a couple fingers through them so that you can make the next loop. Note that sometimes, the bump at the start of each loop can be felt and/or seen. Also note that chain plying is best done with smooth singles that can slide against each other. It can be done with a bumpy, lumpy yarn that sticks to itself, but bumps and lumps will catch as you try to chain, and if the yarn sticks to itself then it won’t slide nicely, which can really slow you down.
You may find that you prefer holding the ball of singles as you chain, or you may want it in a container on your lap/on the floor. You could also make a little wrist pouch to hold it, although take friction into account--if you make it out of wool yarn, choose a smooth one.
Ply Ball
Fifth is a sort of hybrid of a few of the others I’ve already mentioned, called a ply ball. To make a ply ball, simply wind two or more singles together into a ball (I’d suggest winding them around a small rock for a ply ball, too). The number of singles you wind in your ply ball will be the number of plies your yarn will have. A chain plied single wound into a ball is also functionally a ply ball.
Ply balls are extremely portable--you only ever need to work with one at a time, so you can just keep it in your pocket without worry of tangling, and it’s not attached to you or a box or another spindle. The downside is that it generally requires you to either have multiple spindles (ex: fill up two spindles, wind both off into one ply ball) or do extra winding (ex: fill up your spindle, wind it off to a rock for storage, fill up your spindle again, now wind from the spindle and the rock to get your ply ball. Add more winding for more plies).
However, you can also wind a ply ball from plying bracelet (yes, that’s more winding--but now it’s portable, and you’ve just turned one singles into a 2 strand ply ball) or even chain a singles, but wind it into a ply ball instead of plying it then and there to get a 3 strand ply ball (this also might let you play around with really long or really short chains without having to think about ergonomics as much, since your spindle isn’t involved).
Ply balls can also be helpful if you’re having issues wrangling your singles while you try to ply, since they’re laid together already--so they’re worth an attempt if you are having trouble keeping your yarn in line while plying.
There’s a short (but full of tips) article on ply balls here.
There’s even more ways to ply--look into "plying from a center pull ball” (similar to a plying bracelet, but requires a ball winder or a nostepinne) and “ply on the fly” (chain plying at the same time as spinning the singles--highly portable instant gratification). There may also be others that I’ve forgotten or not heard of, hopefully mentioned by others in the notes !
So Many Ways to Ply--How to Choose ?
So, every plying method and every number of plies has its own effects on the finished yarn, and you can use those effects to get the yarn you’re after.
By the way, if you’re not familiar with yarn weights such as lace weight and worsted weight, you should read this first !
A singles is great for your soft, fluffy, luxury stuff--cowls, hats, mittens that won't get a lot of wear, or shawls. It also preserves the colors that you spun exactly--so if you spun a beautiful perfect rainbow singles and the most important thing to you is that it stays a rainbow, you could leave it as a singles ! You can knit, crochet, weave, and nalbind with them like normal (I actually really prefer them for nalbinding--they felt easier so the joining is quicker), although because they haven’t been plied, they’re a lot weaker to abrasion and snapping. So they’re not ideal for things that need to be durable, and if you’re spinning short and/or fine fibers, you may find that even with some care they still don’t last very long, so keep in mind that stuff made from singles probably won’t be passed down or anything like that. But still, I’ve knit several small pouches from singles that have held up just fine being tossed around my room. One advantage to note is that you have the most yardage and the least spinning time this way, so it’s a very ‘time cheap’ yarn--you spin 100 yards/90 meters of singles, and you get 100 yards/90 meters of yarn. No time spent plying. However, it is as thin or thick as you spun it, and however consistent or inconsistent your spinning is, that’s your end result ! A lot of spinners (me) balk at this.
2 ply is next. I use 2 ply for almost everything besides socks--it’s quick, it’s fairly durable, and it looks very pretty (and an error correction: is ideal for lace). A 2 ply halves the amount of yarn you end up with--if you spin 100 yards/90 meters and 2 ply it, you’ll end up with 50 yards/45 meters. It also has a distinct ‘handspun’ look--2 ply knits up to a messier fabric. I really love that effect, but if you want a neat, uniform fabric, don’t do a 2 ply ! I’m not sure how it affects crochet or weaving, unfortunately, but do I suspect it’s similar with crochet. It also bulks up your yarn--it’ll be a little bit less than double the thickness of your singles, usually. 2 ply holds up alright to gentle/moderate daily wear, and is great for hats, gloves that don’t need to be hard wearing, scarves, and bags that won’t need to bear a huge amount of weight. It’s a workhorse yarn--you can use it for almost anything, and it’ll probably be okay. The only thing I would never use it for is socks--that’s a 3 or 4 ply project.
Let’s talk 3 ply ! 3 ply can be achieved either through chain plying or else as a traditional 3 ply--meaning 3 separate singles all plied together. You’ll get very different effects from these two methods in terms of both color and even-ness. If your singles had any stripes of color, with chain ply they will remain as stripes (this could be an alternative to your rainbow singles !). With a traditional 3 ply, your stripes will all blur together, and you’ll get a varied and multicolored yarn. You will get 1/3 of the yardage/meterage of your original singles, so a 3 ply yarn takes longer to make than a singles or a 2 ply. But it is also about 3 times thicker than your singles, so if you’re struggling to spin thick singles but want a thick yarn, 3 ply is a great option.
If your singles are very even, you’ll see no real different between chain ply and traditional 3 ply (except for the bumps at the start of each loop--they are usually visible as well). However, if your singles are kind of all over the place, chain plying magnifies this. On the other hand, a traditional 3 ply really evens out any inconsistencies. Even though I’ve got a few years under my belt, I am not a very consistent spinner, simply because I can neither visualize nor remember the weight I ought to be spinning, so it’s always a total guess (damn aphantasia). Beginners are also often inconsistent spinners, just due to lack of muscle memory. Either way, a traditional 3 ply can be really helpful in creating a fairly smooth, even yarn from really wild, inconsistent singles.

Fig E: comparisons of chain ply and traditional 3 ply, in terms of consistency
Lastly, 4 ply. 4 ply will turn your heavy laceweight singles into a light worsted, if it puffs up in blocking enough. I love 4 ply for my supported spindles mostly, since those spin very fine yarn and I don’t have a use for anything finer than sock weight yarn. It’s also very durable, and a laid 4 ply (like a traditional 3 ply--just 4 strands held together) make good socks. A cabled 4 ply (take two 2 ply yarns and ply them again) makes terrible socks, but is still very durable and has an interesting rope like appearance and texture. 4 ply in general is great for socks, bags, blankets, and especially sweaters, as it doesn’t pill much and will stand up to heavy wear. However, you have to spin 4 times the singles to get your finished yarn--a 100 yard/90 meter 4 ply skein requires 400 yards/360 meters of singles, and then more time for plying. So these are rather slow. They’re an awesome option for a fiber that refuses to spin up to anything other than the finest lace, and they will make great objects and garments that will last for a good long while.
Past 4 ply, you kind of just get rope. I haven’t ventured past 4 ply much--give it a shot if you’re curious !
The Why of Ply is a great article on the different aspects of different plies, and touches on some stuff I don’t mention (like stitch definition and cables) if you want to know more ! Highly recommend it.
How to Ply
So... you know at least a few methods of plying now, know how many plies you want your finished yarn to have, and you may have even already wound a ply ball or filled all of your spindles. Which means it’s finally time to ply everything.
To start, you need to attach all your plies to your spindle. For the methods that I’ve discussed (with the exception of chain plying), you’re going to do the following: gather the ends of your plies together, and make one slipknot with all of them. Then put the slipknot on your spindle below the whorl, the same way you would when spinning singles (and when not using a leader).
For chain plying: chain your singles until you’ve got about a foot or a third of a meter. Now you want to attach it to your spindle. Take the very first slip knot loop and slip it onto the spindle, below the whorl.
Now, secure your yarn by wrapping it around the hook or else with a half hitch knot, and spin the spindle counterclockwise (anticlockwise). You should immediately see the plies twisting together to form plied yarn.
From here, you will proceed basically the same way as you did when spinning singles--you’ll add twist to your plies, then wind on. This can be a really great opportunity to practice doing things while the spindle is in motion; you won’t be drafting, but depending on the type of plying you’re doing, you may be chaining, pulling from a ply bracelet, or simply letting the plies slide through your fingers (you do want to tension them and keep the twist from getting past your hand). If that requires too much coordination, feel free to park and ply--that is, spin the spindle to add excess twist, park it and let it into your yarn, then wind on.
If you try to ply your yarn the same direction that you spun it, you’ll notice that it doesn’t really turn into a cohesive yarn, and instead becomes wiry and the plies don’t slot neatly together. If you notice this happening, turn your spindle in the other direction. A yarn that is both spun and plied in the same direction won’t be stable or strong, and will tangle the second you try to work with it.
This is why it’s helpful to be consistent in which direction you choose to spin your singles, by the way--if you always spin wool clockwise, then you can know with certainty that it will be plied counterclockwise.
We refer to yarn as having either Z twist or S twist (this refers to whatever the finished twist is, so a singles that you’re never going to ply, or a 3 ply yarn, for example). This just makes it a little easier to talk about and recognize what we’re doing.
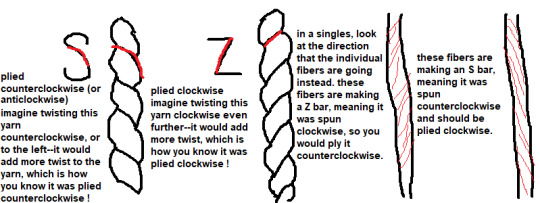
Fig F: S and Z Twist in plied and singles yarn
It’s essentially a mnemonic device that allows you to glance at your yarn and go “Oh! I spun these three singles counterclockwise, so I should ply them all together clockwise.” I often have to draw an S or Z in the air (just like I sometimes have to draw an L in the air to pretend I can reliably tell left from right), but it is pretty foolproof and will prevent you from, for example, trying to ply an S twist singles with a Z twist singles and then wondering what on earth went wrong.
By the way, this page has a really helpful chart on what direction you might want to spin in based on what you intend to do with the finished yarn. For example, crocheting (right handed style) with S twisted yarn will remove the twist as you work, but knitting in continental or English style (or crocheting left handed style) with that same yarn will add twist. Most spinners spin their singles to have Z twist and ply them with S twist--but if you’re a crocheter or knit Eastern style this will unply your yarn as you work, and you are encouraged to try reversing things to have better results with your handspun projects. The more you know !
Now, back to your plying. You may be wondering how you’re supposed to know how much ply twist to add, which is a great question, because plyback tests don’t work when you’re actually plying. Those are for when you’re spinning your singles. Instead, I do what I call a “hanging test”. Just hold out a length of plied yarn between your hands and let it hang (not pulling it taut--the yarn should have a nice downturned curve). A balanced yarn--that is, a yarn that has equal and correct amounts of spin and ply twist--will just hang nicely. An underplied (or underspun) yarn will usually also hang nicely, but you will see gaps inbetween the plies. This is no good at all. Gaps won’t just make your yarn look bad, they'll also make it split when you work with it, and will be less durable and more prone to pilling, felting, and eventual disintegration after much use.
On the other end of the spectrum, an overplied yarn (which may have both too much spin and ply twist, or may be underspun and then overplied in an attempt to fix ones mistake--which won’t work, by the way. You need to go back and add more spin twist to your singles) will twist in the middle instead of hanging. If it only twists a tiny bit, you’re fine. But if it twists a lot, there’s problems. Overtwisted 2 ply yarns tend to be aggressively smooth--this is only relevant for 2 ply, since those have a sort of pearled silhouette. If your 2 ply is smooth, then you’ve most certainly overplied it. 3 and 4 ply are always smooth, however, so a smooth profile for one of those is to be expected.
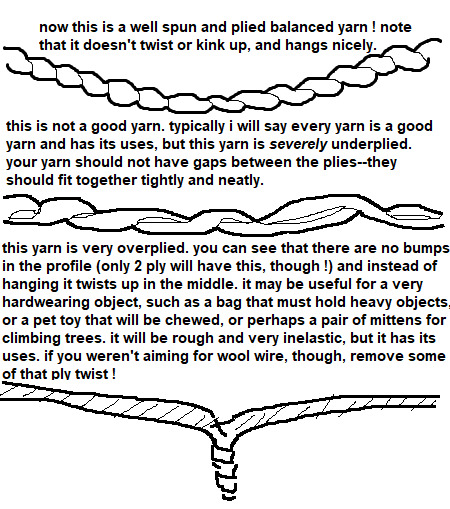
Fig G: Ply twist in 2 ply yarns. Do these yarns have S or Z twist ?
Don’t worry if your first yarns aren’t perfectly spun or plied (really--they won’t be). Every spinner is striving for something different with their yarn. Some are aiming for total technical perfection, some aim for exquisite fineness, some aim for beautiful colorways and for finding the softest and most lovely breed of sheep. Some just want to spin, some just want usable yarn, some just want a pair of socks that last on their feet and find commercial sock yarn to be about as durable as wet paper (that would be me). You certainly don’t have to know what you want to get out of spinning right away, but the point is that every single spinner has their own standards that they hold themself to, and you don’t need to (and shouldn’t !) try to meet others standards. Especially when still learning, but also just all the time and forever.
I’ve Plied My Yarn, Now What ? OR I Just Want Singles, Now What ?
Now your yarn needs to come off the spindle ! But not the way we’ve been taking singles to ply off the spindle--we need to make what’s called a hank. A hank is basically a loop of yarn that’s been tied so that it’s nice and secure. These loops can be pretty big (mine are all 2 yards/1.8 meters) or as small as the distance around your hand--it all comes down to what you wind your yarn onto.
I have already made a tutorial that goes into quite a bit of depth (and has pictures, even), so I’m gonna speed through this part a little bit.
1. Find something to wind your yarn around. A Niddy noddy is the preferred tool for the job here, and will make it much faster to wind and thoughtlessly simple to calculate the yardage/meterage of your yarn (I’ve seen people use yarn swifts as well, and they certainly look very speedy), but they are by no means required. Substitutes include: a large hardcover book, the back of one or two chairs, your hand (ideal for very small amounts of yarn), your forearm (for smallish amounts of yarn--wrap between the thumb and forefinger and go down to the elbow, then back up), or anything else that won’t deform with pressure and is holding relatively still.
2. Wind your yarn around that thing. You may need to start with a slipknot to attach it to whatever it is you’re winding on, or else a piece of tape. If you’re using your forearm or hand, you can simply pinch the end to hold it in place. Unlike when winding your yarn onto your spindle, when winding your yarn into a hank, you want to use as little tension as possible so that you can get a more accurate measurement of length later on. Also try to keep your winding tidy--in an ideal world, the yarn should be traveling almost the same path every time, not a few inches to the left one time, then wildly skewed to the right the next time.
3. Tie off your hank. Once you’ve finished winding, you need to secure your hank so that it doesn’t tangle. You can use either scrap yarn or else the ends of the yarn you just made (I prefer the latter, since the ends tend not to be very good anyway, so at least they don’t go to waste. In this case, snap off or cut both ends--the length you should cut depends on how thick your hank is). Find where both ends are--you will need to tie knots near the ends so that you can attach the ends to them. Tie an overhand knot a few inches/5cm below the first end, and then hold that end alongside one of your strands of knot-tying yarn, and tie another overhand knot. Repeat this with the other end. Make sure you haven’t overlooked any strands of yarn and left them out of the tie--that’s a very easy way to get tangles.
4. Remove your hank. Gently push your hank off of whatever you wound it on. Put it to the side--now we want to measure. Use soft measuring tape (or a piece of inelastic string or yarn, if you don’t have one--you will then need to measure that against a rigid measuring tape) to span the entire path that your yarn traveled. Write down that number, and now count the number of strands in your hank. Multiply the two numbers together. Now convert your inches or centimeters into yards or meters, and you have your yardage or meterage !
Ex: You wrapped your yarn around your palm, which measures 10 inches. There are 41 strands. 10x41=410. 410 inches is roughly 11 yards. Or: You wrapped your yarn around a small book, which measured 21 cm. There are 50 strands. 21x50=1050. 1050 cm is of course 10.5 meters.
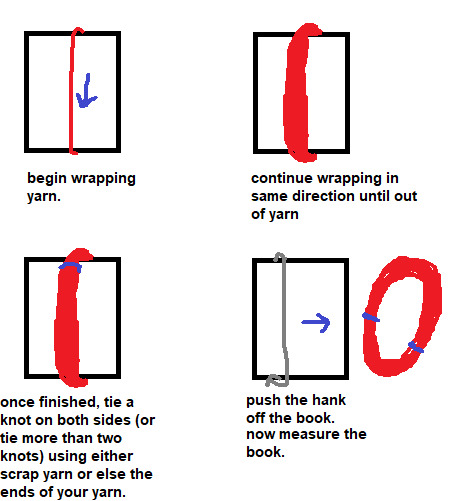
Fig H: Winding a hank on a hardcover book.
It can be very helpful to label your handspun yarn. The yardage/meterage is critical information when it comes to using patterns, less so if you don’t use patterns. But there’s other info that you might still find handy to know later on, such as what the fiber is, where and when you got it, when you spun it, how you plied it, any info on the dye job, what the yarn weight is, what spindle you spun it on, whether it is part of a set, how much it weighs, etc.
Some of my really verbose labels might look like this:
Avocado dye and copper mordant hand dyed in the fleece 2020
Cormo
Bought 2019
Spun for 2020 TDF
2 plied on wheel
210 yards
3.4 oz
light worsted weight
But most of my labels just have the yardage and breed, if I label them at all. I tend to document things online and also remember spinning my yarn better than I remember anything else going on in my life, so I’m a little lazy about labeling. Your labels should include the information that you think you’ll find helpful in the future, or that you know you won’t have another way to recover if you end up forgetting.
Blocking your yarn
Don’t attach that label just yet--we aren’t totally done with our yarn. It has one or two more steps before it’s ready to be used, and that first step is called blocking. There’s a few ways to block yarn--wet blocking, steam blocking, and resting.
Wet blocking: Get your hank of yarn wet, using anything other than very hot water (this could start felting your yarn). You could run it under the tap for a minute or else let it sit in a bowl of water with a little hair conditioner for about half an hour, if you wanted your yarn to be a little softer, then rinse the yarn. Squeeze as much water out as you can, then hang it to dry. You can (and should) also snap or thwack it--but I've gone into detail on that in a link below.
Steam blocking: Get a source of steam going--like a pot of water simmering or a very hot tap running. Using tongs or a long wooden spoon, hold your yarn over the steam and slowly rotate it until the whole skein has been steamed. Don’t let the yarn touch the water.
Resting: If neither option above is possible, you can also just let your yarn sit for at least a week. This lets the twist settle down, so it’ll be a lot easier to work with. However, it doesn’t do anything else that blocking does, so it won’t really show you your “finished” yarn, and may lead to problems down the road.
So--why did we just do that stuff ? Well, we blocked our yarn to reset the fibers, basically. During the spinning, we put the fibers under tension, and they more or less stay in that slightly stretched state. But it’s not really stable--the next time they get wet, they’ll spring back into the natural crimp that the wool wants to have (this changes drastically depending on breed and even individual sheep), and will often puff up. The hank might lose a little length and your yarn’s weight (not as in ounces or grams, but as in lace, dk, or bulky weight) often increases some. So if you’ve made your yarn into something before blocking it, with the perfect gauge and nice drape, the first time you wash it you’ll find that it’s thicker and a little smaller and has less drape. It might not fit anymore, or the seams might be messed up.
This is all entirely avoidable if you just block it before you do anything with it, so I highly recommend that you do.
The other thing that blocking does is set the twist, so your yarn won’t kink up as you work with it--even a perfect, balanced yarn can kink up as you work if the twist is live--which makes it a lot more pleasant. Resting sets the twist as well, as mentioned above.
I’ve gone into blocking in more detail in this post here, if you’d like to know more--I’d especially recommend reading the last section about snapping and thwacking your yarn.
Once it’s fully dry (and remember--wool can hold a lot of water and still feel dry, so give it a little extra drying time just to be sure) it only needs to be wound into a ball before you can use it ! Congratulations on your handspun yarn--that’s a real achievement.
Storing your yarn
If you don’t plan on using it right away, you may want to skein your hanks up to keep them compact and tidy. To do this, put your thumbs on the inside of your hank, and pull it taut. Then, one thumb at a time, twist in the opposite direction that you plied in. Your hank should start to kind of look like rope. Once it has a lot of twist (enough that you’re struggling to add more), find the center point of the hank, and fold it. With 2 yard hanks I tend to fold it over my knee, but a doorknob or something else would work just as well. It should immediately look like an oversized piece of yarn--that’s because we just twisted it one direction, and then folded it in two and let the excess twist twist it in the other direction, which is the same way you ply yarn ! There should be a loop at each end where your thumb was--take your thumbs out and put one loop through the other. Now you can attach your label and you’re good to go !
If it’s a very small hank (one that’s been wound around the palm, especially) you’ll probably just want to wind it into a ball instead. You could do this with any length of yarn--it’s not an ideal way to store wool yarn ultra long term, since staying wound into a ball can stretch out the fibers again, which means you’d need to wind it into a hank and re-block it if you wanted to make an accurate gauge swatch or something. Short term (a year or less) it’s just fine.
If you’re wondering how to wind up a big hank into a ball without tangling, just sit down with your knees up, and put your knees inside the hank, then move your knees apart until the hank is taut. Now you can wind in relative peace, free from tangles. You can also use a yarn swift, if you’ve got one.
I would recommend, by the way, using up some of your first skeins as soon as possible (you might want to keep your very first skein so that later you can see how far you’ve come--I really wish I kept mine). You won’t know how your spinning is until you’ve used it, so to prevent you from getting to skein #40 thinking you’ve been doing great, only to discover that your yarn is actually unusable... use your early yarn ! Evaluate it, make judgements, and learn from it. Does it need more twist ? Is it very lumpy ? Are there lots of spots where it went thin ? Do you like how the colors turned out with the plying method you chose ? These are all good questions to ask yourself as you use your yarn.
Moving On From Park and Draft
Once you’re comfortable with the park and draft method, you might want to try moving on to true suspended spinning. As I said earlier--it may not be for you, and that’s fine, but you won’t know if you don’t try. True suspended is quite a bit faster than park and draft, so if you want to speed up a little, you should give it a shot.
In park and draft, you first add twist, then park the spindle to draft your fibers into yarn. In true suspended spinning, you set the spindle going and draft while the twist is being added. This eliminates the whole ‘standing/sitting there with your arm outstretched, waiting for your yarn to accumulate twist’ section.
The easiest way to get into true suspended spinning is to work your way up to it--try drafting just a little bit while your spindle is building up twist during park and draft. To give yourself more time, set the spindle spinning slower. Then try drafting a bit more. The goal is to draft at the same rate that twist is added, meaning that you can wind on pretty much as soon as the yarn is too long to keep spinning.
The trick here is to adjust the speed at which your spindle spins rather than the speed at which you draft. You can only draft so fast before your technique gets sloppy, and past that you’ll be focused far more on keeping pace with the twist being added than on drafting evenly.
So if I find that I spun my spindle too aggressively, I still it immediately and try again, but slower this time.
I answered an ask about this a while ago where I went into a little bit more depth, if you’re interested.
And if you haven’t seen it, the pinned post on my blog is a lot of stuff like that all collected into one post for easier perusal. Some of them I’ve already linked to earlier in this post, but others I haven’t.
Small Projects, Scrap Projects, and Big Projects: Tips for All
You may be wondering, What the hell am I supposed to do with this yarn ? This isn’t even enough for a pair of fingerless gloves !
Which is a fair concern--endlessly accumulating small skeins of yarn can be frustrating if you don’t know how to use them up.
Drop spindles are limited in how much yarn you can make on them, and while you can make huge skeins by joining smaller skeins together, they may not all be the same weight ! Or they may not match. Or it may just be really boring.
You may also be doing a lot of experimenting, and ending up with 30 yard/meter skeins that you can’t even make something tiny with.
Small Skeins: For single skeins that are too small for gloves, hats, etc, you may still be able to make things like pouches (for yarn, crochet hooks, dice, coins, etc), baby socks or hats, coasters, or other small items. My spinning wheel oil holder is a little basket crocheted out of some handspun, and I have a mini tape measurer on my keys with a cover crocheted over it from handspun as well. You might have to invent things to do with your handspun, but using items that you made enriches your life--I promise.
Scrap Projects: What about tiny skeins ? Or maybe you’ve already made all the coasters and baby socks and spinning oil holders that you could possibly need, and now the small skeins are piling up again. I humbly submit the Scrap Yarn Project--my favorite type of project by far. I’ve been slowly working on a handspun scrap blanket for about 2.5 years, using tiny scraps, small skeins, and leftovers from projects alike. I knit 5x5 inch stockinette squares (some have colorwork, some have different stitch patterns, but mostly I let the yarn be the star) and for the most part just try make squares that are thick enough to stay warm but thin enough to have a little drape. It’s an incredibly satisfying project.
Fig I: An older image of the author’s handspun scrap blanket in progress. The yarns used range from fingering weight to super bulky, and are spun in all sorts of different ways. But it still feels very cohesive.
I like the square approach (and of course if you wanted to crochet granny squares, that would work perfectly too) because it’s modular, so you can decide halfway through that you don’t want a sweater, you want a bag--and then just sew the squares into a bag, instead. But it doesn’t need to be squares by any means--you could also make scrap yarn sweaters, hats, socks, scarves, etc., that are constructed normally.
The only thing to look out for is yarn weight--in some cases, you might want the weights to all be very similar. Socks, for instance, won’t do well if you have parts that are bulky weight and parts that are light fingering weight. You could hold yarns together to get similar weights if necessary, or just only add to the project when you’ve got another scrap skein of worsted weight or whatever. For squares you can use any weight of yarn if you want, but you should change your hook or needle size to get a fabric that’s a similar density, so your stitch count will change from square to square.
Big Projects: These can be difficult even for experienced spinners, because consistency is key to ending up with an even fabric. Not from armspan of yarn to armspan, but from skein to skein--if the weight changes, things can suddenly get much more complicated while you try to correct for the skeins that are too thick or too thin.
One way to try and mitigate that is to not ply anything until you’ve finished spinning all the singles--that is, if you need 10 skeins of 2 ply, spin 20 spindles worth, then go through and pair off your stored singles, thin with thick and average with average. It can definitely be more tedious to do it this way, but if you’re worried about consistency, it might be a good idea.
It also might not be necessary. Try to let your mind stretch back over the whole course of human history--as a species, we’ve been spinning yarns for pretty much all of it, and until very recently, what you spun was what clothed you. If the skeins you spun for your new cloak were all different weights, well... you probably either repurposed those skeins (IF you could, and that’s a pretty sketchy IF) or you shrugged, wore a lumpy cloak, and got on with life. Perfection isn’t everything, my friend. Either way, do what’s going to make you happy. For me, I’d be just fine with a lumpy cloak.
Out Of The Basics: A Few Further Pushes Into The World of Spinning
There’s many, many techniques out there, and an infinite variety of yarns to be spun. Some require tools, some don’t. Some are very advanced, and some quite simple. There are many other tools to spin on besides drop spindles. There’s also processes related to spinning--such as dyeing, fiber prepping, and wool washing--which can greatly enhance your spinning enjoyment and variety. I can’t teach them to you today, but I can certainly tell you about them so that you can look into them yourself !
Changing Up Your Fiber or Techniques to Get Different Effects
We touched on this earlier in the section about the number of plies--a 2 ply yarn will knit up into a bumpy, slightly irregular fabric, and a 3 or 4 ply will be very regular and neat. But that’s not the extent of what you can do to change your yarn up (without buying anything new). I’m going to throw some terms around now--you’ll need to google them, because this is already absurdly long.
For one thing, if you have roving, you can try splitting it lengthwise and fractal plying your yarn for a very beautiful self-striping but marled effect. You can also try spinning it from the fold on multicolored roving, which keeps the colors separate instead of muddied, which can happen otherwise.
With any fiber, you can always mix and match, or add pops of color ! If you’re spinning a bunch of gray rolags, for instance, you can occasionally detach the rolag, spin a tiny bit of blue roving, reattach the rolag, and go back to spinning. Depending on how you ply it, this could produce almost specks of blue or else slips and streaks.
Speaking of plying, the way you make a 2 ply can really change the colorway of the yarn if your fiber is a gradient or multicolored. Say you’ve got roving that’s a gradient from white to purple--if you do a plying bracelet, your yarn will be part barberpole, part gradient: a purple ply with a white ply at one end, and then gradually transition to the midpoint of lavender-pink in the middle, with both plies the same color. But if you plied it the other way, by wrapping your singles onto storage rocks and then plying from those, you’d get a yarn that’s got one pink ply and one white ply at one end, and one pink ply and purple ply at the other.
Chained 3 ply versus traditional 3 ply will make a huge difference as well. If your fiber has stripes, chain plying it will preserve them perfectly (as long as you’re careful to start a loop at the color change--or if you wanted it to fade in a little, you could start partway through a color change), whereas a traditional 3 ply will always marl them, no matter how careful you are about evenly splitting your fiber into 3 sections.
If you like really colorful and bright yarns, you might enjoy cabled 4 ply (where you ply two 2 plied yarns together). If your starting 2 plies are already colorful, you’ll get super colorful yarn with a cabled 4 ply--to me it always looks like dashed lines in different colors.
A laid 4 ply can also make some interesting color combinations, and is perhaps the ideal candidate for mixing random singles together, since it has 3 other plies each singles can hopefully be tempered by. And a yarn that has 3 plies of one color and 1 ply of another color can be interesting indeed !
It’s not just color that you makes an exciting new yarn, though--you can also try making boucle, or thread plying or autowrapping, or spinning beehives, spinning beads into your yarn, spinning thick and thin yarn... the possibilities are almost endless. I’d highly recommend giving “The Spinner’s Book of Yarn Designs” by Sarah Anderson a read if you can--she discusses all of these and many more, and shows how to do them. Other good books that’ll show you how to make lots of different kinds of yarn, or how to tailor your yarn to your needs, are: “Yarnitecture”, by Jillian Moreno, “Spin Art” by Jacey Boggs, and “Yarn Spinning With A Modern Twist”, by Vanessa Kroening. Your library may well have copies, and if not you could likely request they buy it.
You Don’t Have to Drop Your Spindles
...Because there’s other kinds of spindles ! And things that aren’t spindles, but on which you can also spin !
There are Turkish Spindles, which are functionally almost identical to drop spindles (and you can drop them, to be fair), but you wrap your yarn around two detachable interlocked arms that also function as the whorl. When you remove the arms and spindle shaft from the turtle (not cone) of singles, you can then 2 ply with it immediately using both ends. Turkish spindles are great if you love 2 ply and hate winding.
There are Supported Spindles, which come in many forms but are essentially fancy sticks with pointy tips that you spin in bowls. These have more winding than drop spindles because you spin in very short lengths at a time and wind onto a temporary cop that’s just below the tip (it’s much faster than if you wound all the way down to the cop near the bottom). However, you use them while sitting or even (with a bit of wrangling) laying down, and your arms stay in a comfortable, much more relaxed position while spinning. It also spins, as a default, finer yarn than your average drop spindle (I can achieve a very fine and consistent laceweight on any supported spindle, but have only managed that on my tiniest and lightest drop spindle). And they are very fast tools--with proficiency, they can be much faster than drop spindles. Supported spindles are great if you find drop spindles painful, if you have low energy, if you’re mobility impaired, or if you want to spin finer yarn.
There are Spinning Wheels, which come in many shapes and sizes but are the fastest way to make yarn by hand. There are a few objects which could fall under the umbrella of a spinning wheel (namely Walking Wheels, Charkah Wheels, and Electric Wheels) which do not have treadles, but the majority of spinning wheels are powered by foot treadles and can spin faster than you can spin a drop spindle. They also remove winding from your list of duties (for the most part), since the flyer will wrap your newly spun yarn onto the bobbin as you go. New spinning wheels can be prohibitively expensive, but you can also find used ones for ludicrously cheap on craigslist, at estate or garage sales, at antique shops, or other places where old items might be sold. (You can also often find them at affordable but not cheap prices at fiber festivals). Be sure to research the parts of a spinning wheel before you try to buy a used one from a non-spinner--there are many SWSO’s (Spinning Wheel Shaped Objects) out there that will fool you. Spinning wheels are great if you want to make larger amounts of yarn, or want to make yarn faster.
There are Electric Wheels, which are small machines that will add twist and wind the yarn onto the bobbin for you, so all you have to do is draft. New low end models are much cheaper than new spinning wheels, and they take up far less space. They also remove the element of treadling, so if you are intrigued by spinning wheels but have weak legs in any capacity, these can save you a lot of pain. I have a spinning wheel and can’t spin on it much anymore, because my knees and hips dislocate almost immediately. I switched to supported spinning primarily, but an electric wheel would be a good substitute as well. Electric wheels are great if you want to make more yarn faster, but can’t afford a spinning wheel or don’t have the space for them. They are also one of the more accessible tools for those with severe mobility impairments.
And there’s still more, although I can’t do a pitch for all of them xD. There’s Tahkli Spindles for spinning cotton, Navajo Spindles that are long thigh-spinning tools, Medieval Spindles that are easy to whittle replacements for if you break your spindle a lot, and even more beyond that. Many cultures have their own traditional spinning tool, each with their own techniques and strengths, and if drop spindles aren’t doing it for you but you still want to spin, I implore you to check out other kinds of spindles !
From Sheep To Sweater (Washing and Processing A Raw Fleece)
Most people learn to spin from roving (even if it might not be a very good beginner’s preparation), although there’s also rolags, batts, top (both commercial and hand combed), sliver, and cloud. But what if you could start with a raw fleece (unwashed, with vegetable matter and lanolin and who knows what else) and make things out of that ?
There’s some immediate advantages to starting with a raw fleece (even over a washed fleece). For one, raw fleeces tend to sell very cheap. This will depend on where you live, but the vast majority of fiber that I buy these days is raw fleece, and I’ve never spent less on fiber. At a fiber festival, I once paid $10 USD for 2 pounds (slightly under 1 kilo) of raw Shetland fleece. So--they’re cheap. As soon as someone starts putting work into a fleece, like washing it or dyeing it, the price immediately jumps.
Second, if you’re looking for the most bang for your buck, starting from a raw fleece is the way to go. You need to wash it, skirt it (take out the really terrible or gross bits), perhaps sort or grade it if it’s multicolored or there’s clear variation in fiber quality, dye it (if desired--I only dye my white fleeces, as I quite like brown and gray and black), process it into spinnable fiber, spin it, ply it, and then knit/crochet/nalbind/weave/do whatever else your heart desires with it. A single raw fleece can last me a month even if I work on it tirelessly, and I might have paid $20 USD--a little over an hour of wages for me.
It also brings you a lot closer to your work. I can’t say I felt very attached to my fiber when I worked exclusively with roving, but sorting through a pile of hand washed Southdown Babydoll locks while I comb them into top to spin into sock yarn on supported spindles that I whittled myself--I can tell you, I feel pretty damn connected to my work, to the ridiculous little sheep whose wool I have, to my socks, and to the wool itself. It adds a lot of depth, both to the experience, and to my understanding.
It’s also honestly pretty easy. To wash a fleece, you need a dedicated wool pot (as in, don’t cook in it again), a bit of dish soap, and some time. Put the fleece in--don’t crowd it, just work in batches if your pot can’t easily fit all of the fleece--add cold water and a squirt of dish soap, and let it cook on the stove for about 45 minutes, without a lid. Don’t let it boil--ideally it should be steaming but not quite simmering. You can use a dedicated wool spoon/tongs to gently and infrequently stir the wool. The water should get pretty gross. After 45 minutes, start the tap running (you need to rinse the wool in very hot water--if you let temperature shock happen, it could felt), drain the water, and rinse the fleece. Then repeat--filling up the pot with hot water now--until the water stops looking dirty at the end of the 45 minute cooking time. Rinse it one more time, and then let your wool dry, ideally on a clothesline but over a vent/spread out flat on a towel is fine too.
Yes, it really is that easy. If you’re worried about felting or otherwise ruining the entire fleece, you can always start by washing just a handful, so that way if you ruin it there’s not much waste. But I’ve washed at least a couple dozen fleeces that exact way, and I’ve never ruined one.
After washing and drying your fleece, you need to prepare it. I typically prepare enough to spin for a day at a time, but you could also do it all at once if that’s more your style. There’s many ways to prepare wool, and I’ll discuss most of them at least in brief, but we’ll start with teasing. This is where you take a lock in your hands, and tease it open. Let any VM (vegetable matter) fall out or pick it out yourself, and open the lock up to the point that you can no longer see any lock structure. It’s now spinnable, just like that ! This is a pretty slow method, but if you start out your raw fleece journey buying just a few ounces/50ish grams of fleece, it’s perfectly doable to tease it all open by hand.
If you have money to put into the endeavor, a humble pair of hand cards (70 TPI will card most wools), or you can kind of make do with two pet brushes like these (although at that point, spend $10 USD more and you have a pair of hand cards, so idk what the point of that is, unless you already have them) is a very good place to start. Load the fiber onto one card, card it until it’s uniform, roll it into a rolag, and it’s spinnable !
You also have hand combs, which are a lot more expensive than hand cards, but which can process very long fibers and can get out all the vm. Cards don’t remove a lot of vm, so combs is the way to go for super vm-y fleeces. They also produce hand combed top, which spins up into a very compact, strong, and abrasion resistant yarn--great for socks.
Past that are drum carders, which are machines in the way that spinning wheels are machines--manual, but they certainly automate the processing of fiber for you. These can be expensive indeed, but process fiber very quickly and are a great choice if you plan to sell the fiber, if you want to start with raw fleece but haven’t the dexterity to do it by hand (and there are electric drum carders as well--otherwise, you are turning a hand crank), or if you want to process high volumes of fiber because you just go through it that fast.
Honorable mentions include flick carding (both cheaper and slower than hand cards--you work with a couple locks at a time and open them up by flicking them with a tined brush), blending boards (these don’t process raw fiber, but they turn already processed fiber into batts--so you can blend many wools very easily for different textures or colors. These are like painting with wool--so fun !), and willowing (I haven’t tried this one yet, but you lay out your wool and repeatedly hit it with willow branches or other bendy sticks, which opens the fiber and also sends it flying all over the place. It looks very fun, and rather slow, and is also free as long as you can find a willow tree).
This website describes some of those methods (and one I didn’t get to) if you’d like to check it out.
Colors to Dye For
Wool takes dye very readily, and you probably come into contact with several natural dye materials every day--onion skins, avocado pit and peel, daffodils, coffee, black tea, thyme, even grass ! You don’t have to be working with fleece to dye it (although dyeing fleece gives you so much color variation and is very fun)--you can also dye roving very easily. Batts, rolags, and top less easily, although it’s possible with a lot of care.
For most natural dyes, you need to collect quite a lot of it, and then let it cook overnight on low heat. Boiling (sometimes even simmering) can kill the color, so you’ve got to be patient. Crock pots on low or medium are great for this. If you can cook it two days, all the better. Let it sit and cool for at least 12 hours, then strain it. (Tip: you can store natural dyes in jars in cool, dark places for at least a year without any ill effects--so you don’t need to use the dye immediately)
The majority of dyes need something called a mordant (I go into more detail about mordants in this post if you’re interested). There are many mordants, but some easy household ones are alum, baking soda (bicarb), copper (put a few bits of copper pipe in a jug of white wine vinegar, let sit for a few weeks at least before using), or iron (same as copper, but with rusty nails. Use a plastic jug !!! Metal will rust and glass can break). Most people mordant their wool by putting it in their dedicated wool pot with some water, adding the mordant, and letting it cook on low for an hour. Then drain the water and add the dye.
Natural dyes need to cook for a while to set--I usually let them cook overnight at least.
For batts, rolags, and top, you can do something called solar dyeing--carefully mordant your wool as usual, then place it in a jar with the dye, and put the dye outside in the sun. Over time (at least a week--often months, especially if you don’t live somewhere warm and sunny) the heat from the sun will warm the water and dye the wool. You could also try storing the jar somewhere you know will be warm, such as near the stove or fireplace.
You don’t have to use natural dyes either--there are also acid dyes, or food coloring, kool-aid (sugar-free), etc. I’m a lot less familiar with those, so I can’t go on at length. They can be a good choice if you don’t have the time for natural dyes, or if you want to get specific colors and not guess what your wool will turn out as. Look into them if you have any interest !
Dyeing your own wool is immensely satisfying, and can be a very cheap (or free, in the case of many natural dyes if you’ve collected or grown them yourself) way of obtaining more color, if you find that you keep ending up with a lot of white wool.
Endless Breeds of Sheep
There are many breeds of sheep on there (not endless, sorry--although there will always be new breeds being developed, so endless in a way !), and they all have different qualities, both in terms of the sheep themselves, and the wool they produce.
Do you want your wool to be very hard wearing ? Down breeds such as Southdown (one of my absolute favorites), Shropshire, or Dorset can be quite durable, and are resistant to felting. You could also go for stronger, coarser wools such as Jacob or Romney--coarser means stronger with wool, and softer tends to mean weaker.
Do you yearn for a softer wool ? Cormo is fantastically soft, as are Rambouillet, Debouillet, and Merino. Many lambswools (meaning the fleece from a lamb--the older a sheep gets, the coarser its wool tends to be) can be softer than their breed standard, so seeking out lambswools even from breeds like Jacob or Rya (both usually strong wools) can lead to soft fleeces.
Of course, there are more considerations than just soft and hard wearing, but there’s pretty much a breed for everything. If you’re interested, “The Fleece & Fiber Sourcebook” by Carol Ekarius and Deborah Robson is an incredible resource, and covers just about every breed under the sun (with pictures, samples, notes, recommendations, and interesting bits of history), as well as most non-sheep fiber producing animals as well ! Speaking of...
There’s Not Just Wool
There’s also many non-sheep fibers, and plant fibers too !
Animals with easily usable fiber include: alpaca, llama, angora rabbits, goats, camels, musk ox, and more ! Their properties are usually different from wool--all of the fibers from the animals above have little to no crimp in their fiber, meaning that they aren’t elastic like wool is. They’re also varying degrees of warm (cashmere--the undercoat fibers that come from many different breeds of goats--are extremely warm, but still not as warm as musk ox down), and some are unbelievably soft. If you can, I highly recommend getting a little cashmere, a little camel down, or whatever other exotic fiber strikes your fancy. They’re very fun to experiment with, and small amounts can easily be worked into projects to add warmth, drape, or softness.
We can’t forget about silk, either--produced mainly by certain species of silkworms, although most insects undergoing complete metamorphosis produce silk of varying quality as well. Silk is a very interested fiber to spin--but it can also be reeled instead of spun, which is how you can get extremely thin silk pieces without even needing to spin thread-weight yarn.
But in early human history, before we domesticated sheep and bred them to have better wool than they started out with, we spun things like inner tree bark, flax, nettle, and cotton. These all require very different techniques than wool, but most of them can be spun on the same tools (and all but cotton can be hand twisted into cordage instead, if that’s more up your alley). They are also inherently cooling--fabrics made from linen will keep you very cool indeed--so if you live somewhere hot where having wool objects is mostly pointless, don’t despair ! There’s still stuff for you to spin.
Connect With Others !
I’m about done with this monograph, but there’s a few last things I want to share.
First is the existence of Fiber Festivals--you may or may not have some in your area. They’re extremely fun, and you can meet many spinners there. They’re also usually a very cheap source of fiber, as prices are often a lot lower at festivals.
Second is the existence of Spinning Guilds--again, you may or may not have one locally, but if you do, you might want to join ! There are also spinning clubs and groups, which might be a little lower-key and more welcoming to beginners.
Then there’s TDF, or Tour De Fleece. You may have heard of the biking tournament called Tour de France which happens in July--well, every year a lot of us spinners do a tournament ourselves, but it’s generally not competitive (except on Ravelry--there are teams and points and everything). For the most part, participating in TDF just means setting a spinning goal for yourself from July 1st to July 23rd (the end of the race) and then trying to achieve it. For a lot of people, this means spinning every day. Some set goals like “get through this whole fleece I bought 10 years ago” or “spin a sweater’s worth of yarn” or “learn how to spin flax, finally” (that’s what I did last year). Or maybe it is just spinning every day--even if just for 20 minutes. On tumblr you can see other’s work and post your own under the tag #TourDeFleece2023, or #TDF2023 (there’s many variants as well)--we’d love to have you !
Lastly, there’s International Spin In Public Day ! To be honest, nobody can really agree on what day that is--allegedly, it’s the 3rd Saturday of September. (For me, it’s literally every day that I leave my house, but I digress). But I’ve also seen posters for October, for September 10th or earlier, and just generally lots of different dates. I’d say play it safe--if you see someone say it’s International Spin in Public Day, go spin in public just in case :D. The purpose of a day like this is to bring spinning back into public knowledge--let’s face it, most people in the western world have zero clue how yarn is made, and couldn’t differentiate a spindle from a spatula. This sucks ! Spinning is such a great activity--it can be meditative, calming, fun, exciting, or a background motion to other activities that allows you to actually pay attention (if you have ADHD). And I think a lot more people would spin, and would enjoy it, if only they were exposed to the idea. You certainly don’t have to act as Spinning’s public outreach officer, or anything like that... but when people ask what you’re doing, explaining it patiently and encouraging them to look into it does everyone a favor.
In Conclusion
I hope this has been helpful and not too confusing ! It’s really important to note that I’m just one guy--I don’t know everything, and I might not always have the best techniques. Looking for information on spinning from multiple sources is a good way to get a well-rounded understanding, and to correct common misconceptions that you might have already learned. Perhaps more importantly, there’s pretty much an infinite number of ways to do almost every single step I’ve described here, and if the way I showed you--or the video I linked to showed you--isn’t working, don’t despair ! There’s nothing wrong with you, you probably just need to do it a different way. I must have watched 3 dozen videos of people drop spindling before it finally clicked with me.
I hope I’ve opened up the world of spinning to you at least somewhat ! There are many things I didn’t touch on, and lots of stuff I wish I could talk more about, but at the end of the day I mostly wanted to 1) show you how to make yarn and 2) pique your curiosity about the whole rest of it. If you have questions, I’ll try to answer them (Purple, I will of course answer all your questions and also attempt to mind read your questions before you’ve even asked them so that I have a 10 million slide power point done by the time the question is out of your mouth), but check the comments and replies first ! Someone else might have answered it already.
Thanks for reading, and happy spinning !
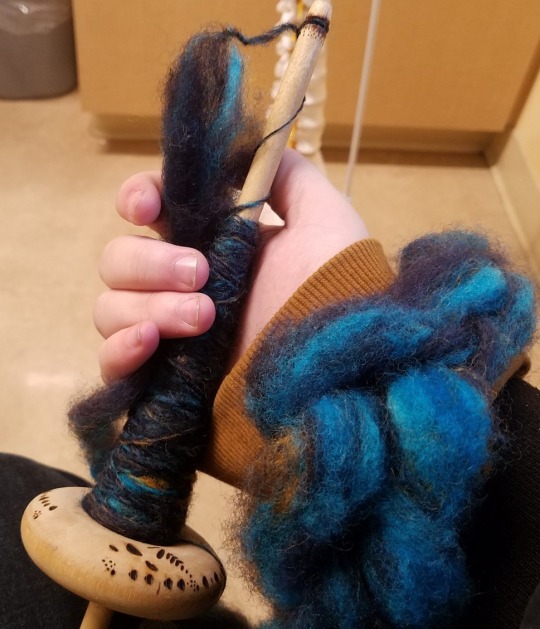
Fig J: The author holding his old drop spindle, spinning at a doctor’s appointment. The spindle now belongs to the friend for which this monstrosity of a tutorial was written ! :D
#spinning#drop spindle#beginner spinning#tutorial#handspinning#handspun yarn#fiber arts#i truly have no idea how to tag this#its over 13k im so sorry#swords i did end up adding tipping to this blog bc of your recommendation thank you !#i cant seem to add tips to posts that i made after tipping was enabled tho. which is very annoying. so its just on all my posts for now#hopefully will fix that later#this did take about a week of writing ! so if anyone#(BESIDES PURPLE FOR SEVERAL OBVIOUS REASONS THIS WAS A GIFT FOR YOU <3)#wants to show some appreciation if it helped you at all#i would be very thankful as i am so goddamn broke lol
2K notes
·
View notes
Text
For my birthday... read my webcomic! It's literally free! (Unless you want books. Those are not free)
It's beautiful, it's gentle, it's funny, they're canonically t4t and gay... And it's about time traveling vampires solving supernatural mysteries!
I've spent thousands of hours writing and drawing it, and it's really good! I'm not biased!


It's on hiatus right now and coming back in 2 months, so it's the perfect time to get caught up
#i felt weird putting this in there so I didnt but I've also received recognition for excellence in writing#and was nominated as a fan favorite on webtoon canvas...#so like not only do i work super hard but its just really good!#im not ashamed of claiming that i think my work is well done. if i didn't think i was doing a good job why would i do it#buuuut. something about being like please read my comic im literally so good at comics feels weird to me#even though i think that. in my brain#i dont want to imply that there is some objective or tangible goodness to my work simply for receiving some accolades#its nothing other than some accolades. whether or not someone likes it is up to them#so i guess to me it just feels superfluous#but genuinely I love my comics...#i re read them all the time. and i enjoy them!#theres things i would change and probably will change when i go to print#but i did what I could with the time and energy I had#and when it comes back... oh boy.#my friends have agreed its the best stuff ive ever written. it's literally so good...#im so excited to share.#still not fully ready to officially commit to the return date#but i am gunning for it!#webcomics#webtoon#time and time again#its my birthday!#idk wtf to tag this as. im 27 now...#read my comic#LOL
268 notes
·
View notes
Last Seen Blogs

sydneypearlman-blog
Hello

snaptaekook
only taekook

g30zgvtz
G30™️

karamel-ships
Supergirl fanpage

sirenasfr
Sirenas| Boutique Sirène