#2 cut seed beads
Text
A Basic Guide to Seed Beads

Seed Beads are an essential part of human history. They can be dated back up to 700 years. Initially, seed beads had a different purpose. They were used for trade, and as a symbol of status. Later they were crafted into jewelry, purses, clothes and even curtains and rugs.
Nowadays seed beads are available in a variety of colors and shapes. Moreover, advancements in the field of bead production have resulted in the production of layered beads that have a unique shine and can last for years to come.
How to choose the best-shaped seed bead?
Shaped beads are primarily available in 5 shapes. Each of these bead shapes can provide your jewelry with a unique finished look.
1. Cube- Shaped Beads: - These bead shapes are available in three main sizes that are 1.5mm,3mm, and 4mm. They are preferred for designing bracelets and necklaces that have a mosaic appearance.
2. Bugle- Shaped Beads: - These beads have a long tube-like appearance and are available in a variety of sizes. They are commonly stitched to fabric or leather. For jewelry making quite often a round bead is placed around these beads as this bead type is equipped with sharp edges.
3. Fringe or drop-shaped beads: - These beads are water drop or rain drop shaped. It is equipped with one hole at the top so that it can be strung with a thread. It is commonly used for making bracelets, pendants and earrings.
4. Two Hole Seed Beads:- These seed beads are equipped with unique placement of holes that is one on each end of the bead. They are commonly known as 2 cut seed beads. These seed beads can create completely different designs or can be strung using the regular method.
5. Two Hole Tile Shaped beads: - These beads are similar to the two-hole seed beads the primary difference lies in the structure of the beads. The structure of the beads is tile shaped and the holes of the beads run parallel to each other. This bead type is commonly used for designing bracelets.
How to choose the best quality seed beads?
1. Specifications: - Make sure to thoroughly check aspects such as the performance, functionality, and price of the bead before buying. It is also essential to thoroughly check the technical specification to ensure that the bead is right for your project.
2. Brand: -Choose a well-known brand that offers high-quality products and offers outstanding customer service.
3. Rating: - Customer ratings can help you immensely in understanding whether your preferred bead is of good quality. Overall customer satisfaction is an essential parameter to be considered.
4. Durability: - Look through the product description to understand whether your preferred seed bead is durable or not. Durability plays an important part in determining whether your jewelry will last for a prolonged period or not.
Thus, knowing the details of various seed bead types will give you the confidence to choose the right kind of seed beads.
Source: https://www.finestbeads.com/51700.html
2 notes
·
View notes
Text
How To: Bead Trees With Resin Base


You Will Need:
Tools:
Mini Pin Vice ($8.99 on Amazon)
Basic Jewelry Making Tool Set
Silicone Soap Mold
Helping Hands Rigid Arm Station ($25.99 on Amazon, if your craft store has a rigid-arm version, it would be with the modeling kits. You want those big chonky arms, the thinner ones are useable, but frustrating)
Clear Epoxy Resin (NOT UV RESIN) PLEASE BE AWARE THAT WHEN WORKING WITH EPOXY RESIN, YOU MAY ALSO NEED A FILTRATION MASK FOR SAFETY!


Wire
There are a couple of options to choose from for wire, I keep both in stock. You'll notice they have the exact same specs, but the AliExpress wire is much thinner.
0.3mm (28 gauge) wire ($15.49 on Amazon, enough wire to make 7-8 trees) || Suitable for 3-bead branches or metal bead branches.
FAIR WARNING: If you use the Amazon wire, prepare to bleed a bit. It is wicked sharp at the ends and will scratch or poke through skin easily.
0.3mm (28 gauge) wire from AliExpress ($0.99 - $3.00 per roll, enough wire to make ~5 trees per roll) || Suitable for 5-bead branches using seed beads with occasional inclusions.
If you're new to tree making, honestly I'd recommend ordering the AliExpress wire. The Amazon wire is brutal on the fingertips at first, the AliExpress wire is more like thread.
The wire in the image below is the AliExpress wire. It doesn't come with the nifty holder, I made that myself.

Beads
You can really go nuts with the beads, there are very few guidelines:
If you're doing a 5 bead branch, you'll want 4mm (6/0) seed beads.
Chip beads are great for 3 bead branches.
You want a bead with some flat side, pure spheres are kind of a pain in the ass to twist on the wire. Absolutely do-able, but annoying.
I'll also get novelty bead shapes (flowers, ribbons, butterflies, etc.) and mix those into 5-bead trees as fun little inclusions (you can see examples further down)

--- Step by Step below the cut ---
Step 0: Mix up 20 mL of epoxy resin and pour it into the bottom of the mold you're using.
Resin can take 24 hours to set, so you'll want this done before you get to Step 10.
You don't need a lot, just a thin thin layer right at the bottom, colored or not.
In the image below, you can see that there is 2-3mm of just clear resin as the base. You can add inclusions (like glitter) or whatever you want, you're just making a protective base for the mold for later.

Step 1: Cut a length of wire just a bit longer than your keyboard.
It's a bit more than you probably need, but you'll get a feel for the right length.

Step 2: Wrap your beads, either 3 or 5 per wire. If you're using the AliExpress wire, be a bit careful, that wire can break if you twist too hard.
Again, if you're using the Amazon wire, do not attempt the 5-bead branch. More often than not, it will snap.
FAIR WARNING x2: If you use the Amazon wire, prepare to bleed a bit. It is wicked sharp at the ends and will scratch or poke through skin easily.
In my experience, the AliExpress wire is too thin to manage that easily.


Step 3: Trim both ends of the wire so they're the same length, then make a little loop to connect them.

Step 4: Put that loop into the Pin Vice (the little pen-like tool) and tighten it as much as you can. In my experience, the Pin Vice was really stiff at first, and it can really chafe your fingers getting it to tighten or release. It's a clunky tool, but worth it.
**You will have to twist it down harder for the AliExpress wire, that has a tendency to pop out. The loop you made is to give the clamp more to grab on to.
If you ordered the Pin Vices linked, be aware that each of the 2 “Pens” has 4 clamps within it (each end unscrews, you can pull out the middle, and flip it.
You need the second smallest option. It took some time for me to find the right one...

Step 5: Twist for Eternity.
This is the part where you have to be a little weary of your wrist, it's a lot of repetitive motion. You can lay the pen tool flat on a desk and push it with your hand to spin it that way and spare your fingertips, but it doesn't really save you anything overall.
You only use the Pin Vice for this step, do not use it for any later step that twists wires!
If you're using the Amazon wire, you won't get as fine of a twist as you see in the photo, the wire will break first.
When you take the wire out of the vice, the clamp might stick in place when you loosen it. Pinch your wire right at the base where it goes into the vice and shove that metal back in. It will pop and you can easily pull the wire out.

Step 6: Repeat Steps 1-5. A Lot.
I make 36 branches per tree.
If you're using 3 beads, that's 108 beads.
If you're using 5 beads, that's 180 beads.
What I usually do is bead sets of 9 branches, then twist the wires. Or I'll do all the beading, then all the twisting.

Step 7: Create stacks of 3 branches and twist them together with the pliers
It can look nice to stagger the branches a little, but only 1-2mm.
Put the pliers close to the base of the branches, maybe 1cm down max.
Only twist for 1cm or less. You'll get a feel for how much to twist here to get the density of branches you want.
Fan out the beads a little when you're done to puff it out.


Step 7b: IF YOU ARE USING AN INCLUSION BEAD
With 5-bead branches, I like to do inclusions. Bells, flowers, etc.
For an inclusion branch, for the first bead (the one at the very top middle), use whatever inclusion bead you want. In the photo below, I added flowers.
Sandwich that strand between two "normal" strands, and twist together.

Step 8: Repeat until you have 12 bundles of 3 branches each.
Take 3 bundles of wire and combine them the same way you did the individual branches.
Only twist 2-3 times around, you really barely need them connected.


Step 9: Once you have 4 of these bundles of branches, start combining them to form a tree!
You'll get a feel for how to do this, but what I usually do is combine 2, then feed in one more, then feed in one more, each time barely twisting. Just enough to create a staggered branch look.
At some point, it will become easier to use your hands instead of the pliers.
Using your hands will create a smoother trunk, using the pliers will add harsh ridges and give it more of a bark look.

Step 10: Go nuts with the "roots"
If you did not do Step 0 (a thin layer of resin in the base of your mold, DO THAT FIRST) otherwise, the roots will poke holes through your mold.
Just grab random bits and start twisting, randomly drop wires as you're twisting.
FAIR WARNING x3: If you use the Amazon wire, prepare to bleed a bit. It is wicked sharp at the ends and will scratch or poke through skin easily.
Bend wires after twisting, tree roots don't run straight.
Basically do whatever the hell you want, just be mindful of the size of your silicone mold.
You really cannot set the tree down once you start making the roots. I tend to hold it while I do the roots, but you can also use the Helping Hands at this stage.


Step 11: Use the Helping Hands to hold your tree in the mold, then fill with epoxy resin.
For a thinner base, you'll need to keep the roots pretty flat. I do that by gently curving the roots down as I'm making them, so when I press the tree into the base, they're more inclined to flatten out.
Thicker bases, you can add more lateral movement to the roots, making them stand up more.
Add inclusions to the resin (color, glitter, beads, etc.), and pour it until it covers the roots.
Minimum, I like to add a little teeny bit of opal mica powder, just to give the base a hint of shimmer.
Let resin cure for 24 hours.


Why do I use resin instead of attaching the tree roots to a geode or other object? Because I have a curse on me where any glue that I touch will not dry.
So I have to use resin until the curse is lifted.
25 notes
·
View notes
Text
Moth pin/brooch
A couple people asked me how I made this so I figured I’d just make a little post explaining it.
Before I start I WOULD like to disclose that the pin I’ve made is hugely inspired by the one by TheClosetHistorian (on YouTube) and you should definitely consider checking out her video if you want more instruction or like that format better.
I made a little graphic showing some work in progress pictures as well as materials and techniques used in the different areas. I will type it out in more detail below.
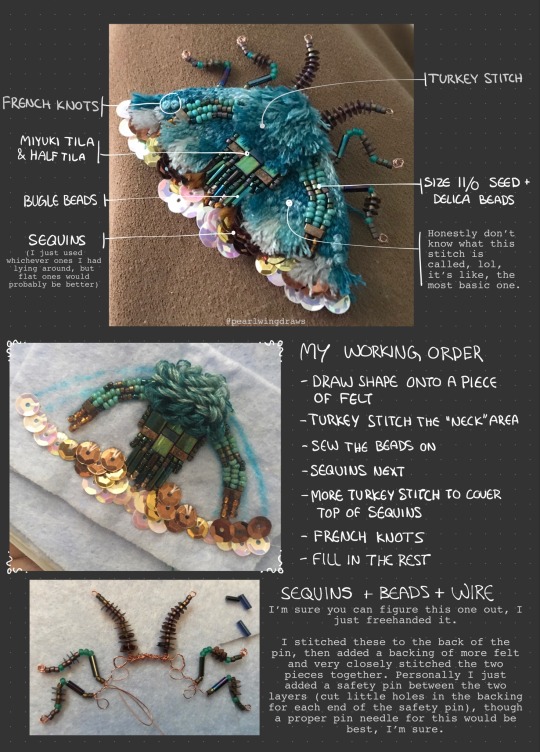
1. First draw out the shape I want on a piece of felt. Add some guide lines for different parts of the design. I layered mine double because it’s quite thin. I used an (unused) dish rag, so don’t worry about the quality of your felt.
2. I start off embroidering the “neck area”, using turkey stitch. Starting from the bottom up, I use a dark turquoise floss, then later mix in a lighter shade.
3. Next I sew on the beads. String on 5-6 at a time and then go back and tack them down with small stitches. I don’t know much about embroidering with beads, so this may not be the “correct” way to do it. The types of beads I used are size 11/0 seed beads and delica beads, as well as bugle beads and Miyuki’s Tila and half Tila.
4. Sequins. I recommend using flat ones instead of the ones I used. I work from the bottom up, trying to get a nice silhouette with the bottom layer, as this will form the outline of the finished piece.
5. After finishing with the sequins, I do some more turkey stitch around the top, so it covers up that edge where you can see the tread. Optionally you can do the whole thing with sequins if you want.
6. Next thing I did was some French knots, just above the turkey stitch in a contrasting color. This is just for some textural variety and decoration, as little “spots”. You can really add them wherever you’d like, or not at all.
7. Then I just finished embroidering the thing. Don’t know what the stitch is called, it’s just making little stitches beside each other until it’s all filled in. I did a little gradient because I felt like it.
For the legs and antennae, i also just winged it. The legs and antennae got layered double in wire and twisted before adding the beads and sequins, then I just used the very tip of my round plier to curl the remaining ends into round little “feet”. Then stitch them securely to the backside of the pin.
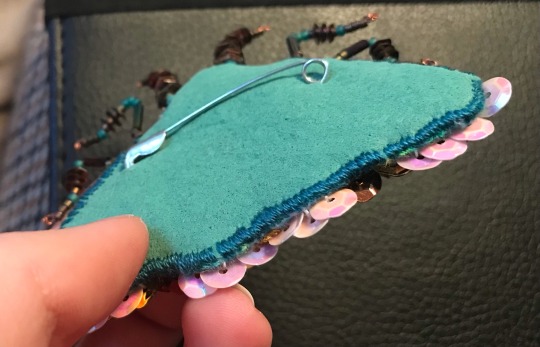
I finish it off with another layer of felt, this one painted with a fabric paint I happened to have lying around, both for some extra strength and to match the color scheme better. I cut little slits to fit in a regular safety pin (I recommend get a proper pin/brooch needle) and stitched the backing on with very dense stitches. Pictures below.

Extra suggestions:
If you don’t have sequins, or want a different look, you can embroider the whole thing. Alternatively you can fill the whole space with sequins if you don’t want to embroider it all. You can of course do any shape, size and color scheme, whether based on real life moths or just fantasy!
Lastly I just want to thank everyone for the love you’ve shown for this silly little bug 💖 it means the world to me, and it has really inspired me. I wish I could sell these, but I don’t think that’s really an option for me right now. I’ll let you know if that changes in the future, but until then, I hope those of you who have the interest to make your own find this helpful.
#my art#art tag#embroidery#jewelry#accessories#embroidered pin#embroidered brooch#fabric art#textile art#tutorial#art tutorial#i guess??#moth#moths#insects#bugs
146 notes
·
View notes
Text
Yo dawg, I heard you like dollhouses, so I made a dollhouse to put in your dollhouse...

It's 1:288, so if you're the size of my 1:48 figures (the size I usually work in) it's about Barbie size. Penny for scale, but it's about 18mm square. Just shy of 3/4", but I had to work in mm.
(Bragging and more pics under the cut)
Not everything is exactly to scale. I did the math, using real dimensions, but when it's that small and your hands shake like I do, things do not come out exact. Regardless, me and my tremor-y hands are pretty happy with it.


I made one many moons ago, and it was not great. It's cool to see the difference. 😳 Do not be discouraged, buds. You will get better at what you do. And this one took multiple tries, btw. So if your project does too, it's just free practice. 😊


Anyways, it's mostly cardstock and paper, paint, a little colored pencil, a bit of wire, 2 seed beads, aluminum foil for the mirror, ink, nail polish, glue, and many, many curse words. 😂
165 notes
·
View notes
Text
Kay this is why you don’t post things at 1am, I realized the diagram and instructions required a lot of edits so I’m just taking down that post for now. I’ll make up for it by giving y’all a materials list for the Sea Guard Cadet Tunic:
So. You want to make the Sea Guard Tunic. You will need:
2 yards of teal medium-weight linen or wool. All pattern pieces, excluding the cuff interlining, will be cut from this. I used linen from fabrics-store.com in the color “Sphinx.” For a fully screen-accurate wool tunic, use this wool from renaissancefabrics.net (currently sold out, but will probably be restocked)
1”x22” of a lightweight but stable fabric for interlining the cuffs. I used a different linen I had lying around. A plain cotton or something similar will work just as well. Silk organza is bizarrely good as an interlining but it is also ass to work with, so I don’t recommend it for this project.
Sewing thread. I used 50wt Kinkame silk thread from britexfabrics.com, color 47. You can use whatever regular sewing thread you have on hand, but you will have to wax your thread if hand-sewing with something other than a high-quality silk thread. Treat Gutermann silk sewing thread like it’s cotton.
4 small buttons (2 on each cuff). Mine were 1/4” diameter vintage shell buttons. You can also substitute these for 2 larger 1/2” diameter buttons, 1 for each cuff.
Size 8 or 9 quilting “betweens” (or whatever you prefer). These are shorter than regular sharps. Nicole Rudolph, who is an excellent historical costumer, uses embroidery needles, which are thicker and longer than sharps. This all comes down to personal preference and comfort. Betweens work for me, but they may not work fo you. Test out different needle types and invest in them when you find a good fit. I used the size 9 betweens from Clover.
Size 28 tapestry needles, if sewing linen. Just trust me on this. The blunt point will make all the seams so much less annoying, and you will need them if you want to do any embroidery. You may still find it necessary to fell the seam allowances using a smaller sharp needle. I use the ones from Piecemaker’s. Note: you can find these at a cheaper price from other online shops, and I can’t vouch for their shipping because I didn’t order mine from them, but I want to link to their shop directly.
Fabric scissors. I used embroidery scissors for everything. This is stupid. Do not do that, it takes forever and is deeply unnecessary. Use regular fabric sheers unless you’re a masochist like me and need everything to be perfectly on grain or you’ll go bonkers.
Beeswax, for waxing your thread. You don’t need this if you are using a smooth silk thread like Kinkame or Tire silk threads. You can get it from Burnley and Trowbridge. One thing of wax will last you forever and is a good investment even if you use silk for this project. I got mine many years ago from Whole Foods, in the…health and beauty aisle? The one with all the essential oils. It is also sold by various Indigenous-owned small businesses!
Optional:
Embroidery thread of your choice. I used a size 12 perle cotton from Valdani in shade 152, and a size 16 perle cotton from Finca in shade 4074. Valdani perle cottons can be found on etsy, and I got my Finca perle cotton from roseground.com, a UK-based lacemaking supplier.
Beads, if you want some sparkle. Size 11 and 8 seed beads would work well, especially if trying to emulate the show’s aesthetic. I get beads from direct.auntiesbeads.com which sells them in little bulk-quantity baggies. I didn’t bead my tunic, but I may bead future TROP cosplays.
You may want to have a 0.65mm (very small!) crochet hook, if sewing with silk thread. Instead of using a seam ripper, I pull my stitches out and reuse the thread. You can do this with other threads but they will start to fray and fall apart very quickly. Kinkame and similar silks will not. The crochet hook helps speed up the process. Always remove stitches in reverse of the direction you put them in, on the chance you pierced your thread on the backside. This allows you to maintain the longest possible usable length of thread.
48 notes
·
View notes
Text
Salem version 2.0 updates
I posted about my orb prop for Salem but now I’m going to a big info dump on the updates for the dress remake. (Reference pic below)

The dress is about 10 yards of fabric for each layer (matte satin outer layer, red taffeta lining). I combined two different commercial patterns and then did about 3 different mock-ups and some draping to get the shapes. I had to bulk order fabric for this project and it was absurd to see how much fabric there was when I went to cut my pieces. Cutting took me 4.5 hours and then ironing out all the wrinkles took me another 2 hours.

I made a questionable decision and decided to make piping out of some stretch vinyl in my stash and some random rope cord I had. I made over 200 inches worth of this so that I could add it to the edges of the collar, boob window/cut-out, and sleeve openings. This was such a struggle. I honestly don’t know if I would recommend doing this.
I spent a day or two just sewing everything together, pressing the seams flat, and adding a zipper to the main dress. Then, it was shenanigans time (aka: detailing).
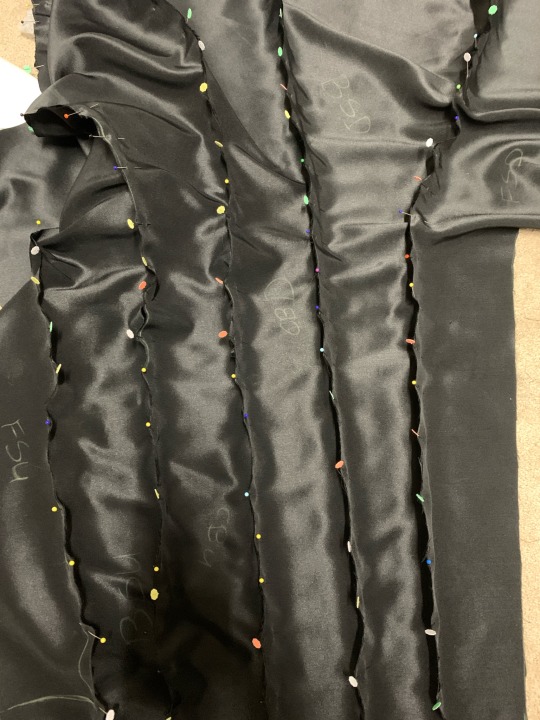
For the red designs on the cape sleeve and bodice, I wanted to use those to add technical difficulty since I will be competing in Salem 2.0. I decided to do a mix of satin stitching and beading appliqué techniques.
I cut out the designs from taffeta and also heat n bond (two-sided adhesive for fabrics). I used my iron the get the taffeta in place and then fiddled with the zig-zag stitch on my machine until it was very dense. I went around the edges of all the shapes with the makeshift satin-stitch and had tear-away stabilizer underneath the fabric. After I finished that purgatory, I broke out silver-lined glass beads and started hand-beading. I did that part over Thanksgiving when I had time off work so I was able to finish the beading in a week. I used over 2,200 beads (seed beads and bugle beads) for both the bodice and the cape.


Now, I’m having to actually attach all the pieces and get the lining installed since all the detailing is done. It’s just a matter of getting the dress together, pressing my seams, and making fit adjustments. I’m also adding pockets to the sleeves so I can have somewhere to put my phone and emergency snacks.
2 notes
·
View notes
Text
rolling some tag memes into one post for the sake of consolidation. tagged by @socially-awkward-skeleton and @harmonyowl to do both an oc nature vibes meme and an oc speech mannerisms meme -- thank you two so much for the tags!
tagging (to do one, the other, or both, whichever y’all want/applies): @natesofrellis, @thomrainer, @aceghosts, @confidentandgood, @poeti-kat, @schoute, @funkypoacher, and anyone else who wants to do them!
italics sometimes apply
bolds always apply
strikethroughs never applies

Types of People Naturecore Edition:
COTTAGECORE: homemade bread, throwing seeds out for the chickens, a tabby cat, patchwork quilts, puffy skirts, ceramic dishes, fresh flowers in a glass jar, herbs hanging from the ceiling, freckles, grey eyes, Athena, old recipe books, a cookie tin filled with recipe cards from grandma, home-sewn pillows, a plate of cookies, the smell of rosemary cooking in a pot of water on the stove, a floral tea pot, salt and pepper shakers, pansies, bartering with neighbors, biking to town, stained glass windows
ZEN GARDENCORE: rocks raked with precision, bonsai trees, holy temples, moss covering statues of gods and godesses, reading ancient texts, being blessed by your ancestors, trusting and family devotion, watercolors on paper, ink on skin, poetry and art, hot springs, cherry blossoms, little flames flickering behind paper curtains, the smell of incense burning, figurines carved from jade and gold from centuries ago, rain, a mist seeping around your ankles as you make your way to school, a chalkboard, scraps of cloth made into art, origami, your father’s heirloom sword you long to one day pick up like your favorite Disney Princess, tranquility and peace, stubborn and proud
JUNGLECORE: exotic animals, tree house, waterfalls, learning the calls of native birds, bright colors and natural materials, bracelets made from wooden beads and bones and feathers, collecting mushrooms, shirts with the sleeves cut off, leaving plastic bottle caps out full of water for frogs to soak in, cutting jeans to make them into shorts, wading in the river, cutting your own hair, bamboo wind chimes, upcycled art, fish in plastic jugs, air plants, climbing up trees using the vines, harvesting your own fruit
FORESTCORE: deep silences of the oldest trees, darkness, log cabins, deer antlers mounted on the wall, rearticulated skeletons, hand-dried pelts, pots of stew cooking over a fire, pancakes in a cast iron pan, brown boots worn from hiking, an old walking stick, bonfires at night, roasting marshmallows and making s’mores, strange markings carved into the bark of trees, ferns that curl up when touched, hearing animals dart here and there but never being able to catch more than a quick glimpse of them out of the corner of your eye, finding half-eaten acorns and mushrooms, large tracks from something you can’t identify, bow hunting
BEACHCORE: seashell collection, model boats, jars of sand, windswept hair, the feel of the wooden boardwalk on your bare feet, big sunglasses, light blue walls, rope hammock, pillows with anchors embroidered on them, flip flops, shining sun, fish tank, sea animal plushies, a steering wheel from a boat on your wall, plates and mugs with seahorses on them, bracelets with plastic shell and dolphin and turtle beads on them, postcards from the ocean, wind chimes made of sea glass
MOUNTAIN/MEADOWCORE: watching the rabbits down in the valley, reading a book in a window seat, checking the sky for storms, knitting heavy quilts for the winter, many layers of clothing, waking up to see the sunrise and sitting outside for the sunset, enjoying the company of ones-self, mountain goats, clovers, laying in the tall grass underneath the sun, field mice, crystal and gemstone collection, a tin filled with buttons and sewing needles and thread, fresh-brewed coffee in the morning, scones
SPEECH MANNERISMS
NO. OF SPOKEN LANGUAGES: 1 / 2 / 3+ (english and cajun french)
TONE OF VOICE: high / average / deep
ACCENT: yes / no (she normally tones it down, but she has a pretty thick southern accent)
DEMEANOR: confident / shy / approachable / hostile / intimidating
POSTURE: slumped / straight / stiff / relaxed
HABITS - head tilting / swaying / fidgeting / stuttering / gesturing / arm crossing / strokes chin / er, um, or other interjections / plays with hair or clothing / hands at hips / inconsistent eye contact / maintains eye contact / frequent pausing / stands close / stands at a distance
COMPLEXITY:
VOCABULARY: ◼️◼️◼️◼️◻️
EMOTION: ◼️◼️◼️◻️◻️
SENTENCE STRUCTURE: ◼️◼️◼️◼️◻️
PROFANITY:
FREQUENCY: ◼️◼️◼️◻️◻️
CREATIVITY (in regards to profanity): ◼️◼️◼️◼️◻️ (most of her creativeness comes when she slips into cajun french)
BOLD ALL THAT APPLY - arse. ass. asshole. bastard. bitch. bloody. bugger. bollocks. chicken shit. crap. cunt. dick. frick. fuck. horseshit. motherfucker. piss. prick. screw. shit. shitass. son of a bitch. twat. wanker. pussy.
THIS OR THAT - straightforward or cryptic? / finding the right word or using the first word that comes to mind? / masculinity / neutrality / or femininity? / formalities or with abrasiveness? (the more polite she is, the more she hates you) / praise or equivocation? (depends on whether she likes someone and what she’s responding to)/ frankness or lies? / excessive or minimal hand gestures? / name-calling or magnanimity? / friendly or blunt? (she’s both!)
IMPORTANT QUESTIONS:
DO PEOPLE HAVE A HARD TIME HEARING OR UNDERSTANDING YOUR CHARACTER? - almost always / frequently / sometimes / rarely / never. (mostly due to her accent)
DOES YOUR CHARACTER’S POINT COME ACROSS EASILY WHEN THEY SPEAK? - almost always / frequently / sometimes / rarely / never.
WOULD YOUR CHARACTER INITIATE CONVERSATIONS? - almost always / frequently / sometimes / never.
WOULD YOUR CHARACTER BE THE ONE TO END CONVERSATIONS? - almost always / frequently / sometimes / rarely / never.
WOULD YOUR CHARACTER USE ‘WHOM’ IN A SENTENCE? yes / no / only ironically
YOUR CHARACTER WANTS TO MAKE A COUNTERPOINT. WHAT WORD DO THEY USE? - but / though / although / however / perhaps / mayhaps.
HOW DOES YOUR CHARACTER END CONVERSATIONS? - walk away / ask if that’s everything / say that’s everything / give a proper goodbye / tell their company they’re done here / remain quiet / they don’t.
WHAT SOCIAL CLASS WOULD OTHERS ASSUME YOUR CHARACTER BELONGS TO, HEARING THEM SPEAK? - upper / middle / lower. (she actually confuses people: her accent suggest lower class her vocabulary suggests she’s well educated/well-read)
IN WHAT WAYS DOES THE WAY YOUR CHARACTER SPEAK STAND OUT TO OTHERS? - accent / vocabulary / tone / level / politeness / brusqueness / it doesn’t.
#oc: deputy sybille la roux#i realize that the speech mannerism meme has been going around and most have done it#but ahhhh here's some good syb content
12 notes
·
View notes
Text
Day 4
Although I can clearly hear the hurricane roaring outside, the effects are not seen in my general area. My little pepper plants are perfectly fine on my balcony and have not been taken by the winds. Even the box of perlite that I left out there hasn't budged.
-------

I baked two things: banana bread and purple sweet potato pie. The banana bread is...not too good. I don't know what it could be. Is it the homemade butter? It is the addition of vanilla paste? I don't know, but I need to figure it out for next time. On the other hand, the purple sweet potato pie is nice in the sense that it is an interesting floral and buttery flavour. I know I'll want to make the pie again, so I'll type the recipe here for safe keeping:
Pie Crust
Ingredients
113g chilled cubed butter
150g flour
2tsp sugar
pinch of salt
1/4c buttermilk
set aside grated ginger node
set aside orange zest
Directions
In a food processor blend butter, flour, sugar, salt, ginger, and zest until butter becomes small beads.
Continue to blend while slowly adding the buttermilk.
Pour onto the counter and knead until it stays together.
Wrap in wax paper and set in the fridge until needed.
adapted from [link]
Purple Sweet Potato Pie
Ingredients
1lb purple sweet potato
little bit of oil
pinch of salt
113g butter
150g sugar
113g buttermilk
6 green cardamom pods
1 grated ginger node
half the zest from a naval orange
2 eggs
another pinch of salt
cold pie crust
Directions
Preheat oven to 375 degrees F.
Cut potato(es) in quarters and rub them with oil and salt. Wrap them in aluminum foil and bake for 50min.
In the meantime, break open the cardamom pods. Pour the seeds into a mortar and the empty pods into the buttermilk. Finely crush the seeds.
Add the salt, cardamom, most of the ginger, and most of the zest to the sugar. Mix until well incorporated. Set the leftover ginger and zest for the pie crust.
Once the potato is soft, peel off the skin, and mash. Add the butter, mash. Add the sugar mixture, mash. Add an egg, mash. Add the other egg, mash. Fish out and discard the pods from the buttermilk, add the buttermilk, mash.
Roll out the pie crust, crimp the edges, poke small holes in the bottom. Pour in the filling. Bake for 45 to 50 min or until visibly set.
Turn off and open the oven to let the pie cool until you can easily take it out with your bare hands.
adapted from [link]
-------
Sweet! My library card came in the mail. I've decided to get into audiobooks, and I think the best place to get them is from Libby. Seeing that I can check out 20 books at a time, I decided to do just that! Here is my audiobook haul:
Overkill by Sandra Brown (10hrs)
It by Steven King (45hrs)
Miss Peregrine's Home for Peculiar Children by Ransom Riggs (10hrs)
Cemetery Boys by Aiden Thomas (14hrs)
A Series of Unfortunate Events: The Bad Beginning by Lemony Snicket (3hrs)
Daughter of the Deep by Rick Riordan (11hrs)
The Tale of Despereaux by Kate DiCamillo (4hrs)
Pax by Sara Pennypacker (6hrs)
Artemis Fowl by Eoin Colfer (6hrs)
Holes by Louis Sachar (4hrs) (Finished)
Ali Cross by James Patterson (5hrs)
The Hunger Games by Suzanne Collins (11hrs)
Aristotle and Dante Discover the Secrets of the Universe by Benjamin Alire Saenz (8hrs)
Aurora Rising by Amie Kaufman & Jay Kristoff (14hrs)
The Gentleman's Guide to Vice and Virtue by Mackenzi Lee (11hrs)
Beautiful Creatures by Kami Garcia & Margaret Stone (18hrs)
The Librarian of Auschwitz by Antonio Iturbe (14hrs)
Fahrenheit 451 by Ray Bradbury (5hrs)
Dry by Neal & Jarrod Shusterman (11hrs)
A Snake Falls to Earth by Darcie Little Badger (11hrs)
Pet by Akwaeke Emezi (6hrs)
Now, I understand that people could be waiting for these books, so I've told myself to work on any book that is being waited for. At the moment there is one person waiting for Overkill, Daughter of the Deep, The Tale of Despereaux, Pax, and Aristotle and Dante Discover the Secrets of the Universe. Woo, that is more than yesterday where is was just two. I'll start working on the shortest book, which should take more like 3hrs instead of 4hrs being that I listen at a comfortable 1.5 speed.
I already finished Holes while playing Sonic Adventure 2. It is a good book, just as good as the movie. I recommend both, they're basically the same, just a few changes for the main actor's health.
For the future, I want to try and be more productive during my time listening to these audiobooks. Maybe I'll draw...I do have a bunch of art supplies I need to use.
-------
I actually wrote a little scene yesterday! I'm proud of the almost 1500 words. I don't see myself as much of a writer, but I want to get some sort of grasp in the skill. They say practice equals progress, so...more writing to come.
#dear dairy#daily diary#diary#recipes#baking#pie#sweet potato pie#library#library haul#reading#currently reading#writing#picture#audiobook#daily writing#journaling
8 notes
·
View notes
Text
Find Out the Different Finishes of Seed Beads

Seed beads are quite popular and used in different beaded jewelry projects. The size, shape, and easy availability make it a prominent choice among jewelry markers. It is also available in a wide array of finishes and colors. Are you planning to use the Czech seeds beads in your next project? If yes, here are some of the popular finishes you must know about.
Let's dive in!
· Transparent
One of the most common finishes of seed beads is transparent beads. The transparent seed beads are usually tinted and clear. That means you can easily see through the beads. Even if they are made up of colored glass, you can see through them. Moreover, these beads allow light to pass through them.
· Opaque
The opaque 2 cut seed beads have a solid color. Such beads do not allow light to pass through them. Opaque seed beads are generally used by jewelry makers for designing attractive beaded necklaces and bracelets.
· Metallic
If you want a shining look for your beaded jewelry, then it is best to use metallic finish seed beads. The finish has an appearance of metals. You can find metallic finish beads in different colors, such as gold, copper, bronze, and silver tones. In comparison to other finishes, the metallic finish offers an extra shiny coating to the jewelry pieces.
· Silk
The Czech seed beads with a silk finish have a silky whiteness. They have a satin finish and a smooth surface. The silk finish seed beads can be used regularly without any problem. The color will not change even with regular use.
· Iris
Iris is one of the unique finishes of the seed beads. It is an iridescent finish that is applied to the darker-colored beads. When you see the seed beads with an Iris finish, it will appear as if it has multiple hues. For instance, the orange iris beads will have some yellow and some red hues. Similarly, the blue iris beads will have some purple and some green hues.
· Galvanized
In the seed beads of galvanized finish, a metal coating is provided for a very shiny finish. These beads are quite attractive to the eyes owing to their shine and appealing look. However, a point to remember is that the coating is likely to wear away with the passage of time.
· Dyed
Dyed seed beads are the ones that are coated with a specific colored dye. You can use these beads for your beading project to ensure a colorful look. But the color might fade away over time.
· Matte
The matte finish seed beads have a frosted and velvety appearance. They are usually not too shiny. However, they offer an elegant look to the jewelry pieces.
Conclusion
By now, you must be aware of all the prominent types of finishes of seed beads. Based on your preference and requirement, you can select the right one for your beading project. If you are in search of a bead store for 2 cut seed beads or Czech beads, Finest Beads is the perfect option for you. Explore the wide collection of beads and place your order right away!
Source: https://www.finestbeads.com/49874.html
1 note
·
View note
Text
5/31/23
Yep, it's late again. XD
What happened this time? I don't know... I kinda panic-rushed to start working on those prototype beads at... 2 fucking 30 in the morning. You know... as one does... And here I am, starting my journal at 4:44 AM, the birds filling the air with their cheerful song, the midnight blue of dawn slowly warming the sky.
The good news? I got a really cool design done on one of the beads. The bad news? My goal was to do 4 of them, and to Mod Podge at least one of them. And I clearly didn't. So... yeah.
The day just got away from me again. Like... ugh. It's just frustrating me. I seriously don't even sit down to have my coffee until like 5 PM, and I'm rarely done drinking coffee before 7. Where do the fucking hours go?!
Like... I barely spent any time in bed! I got up, I did yoga - the lower back and hip one I like - then I did a bit of a workout after, because I hadn't been doing them. I have this ritual of opening the window and then doing the coffee before yoga, so it steeps while I'm doing that. And then, after the workout, I go and make cereal and I sit down and... it's like 4:30. At least.
I mean... I did play Risk of Rain a bit... but just one run to go for an achievement, I don't think it took longer than an hour... Hmm... maybe that did take longer than I remember. Maybe that's the X factor. Hmm...
Welp... after all that, I went and showered. I put a clothes iron and a glass bowl to make another plant terrarium thing with in a cart on Amazon and never ordered it. I made dinner. I played music for a long time. I got really sucked into it too. I even opened Cubase and got ready to record and everything. But... I never pulled the trigger on it. Not until too late.
What's getting in the way? Twitch. I guarantee it. I'm just getting distracted. It's too fucking easy for me, it's so damn tempting. It's improv, it's comedy, it's drama, it's character-driven stories. How can I say no? I don't know, maybe I'm being a bit hard on myself.
I did an intense workout today, I snuck in some work hours late at night and I'm still kicking my own ass about not "being productive". <eyeroll> I need to chill with that shit.
The flowers really didn't have the same level of aroma tonight as they did yesterday... I wonder why that is?
Anywho, since it's so late, I'm just going to move along to tarot. And I'm counting this as work, because I honestly think I could give some good readings for people, and I plan to try in the near future on stream. I would offer in-person, but... I don't even have a table in my apartment. We'll see.
Past - Ace of Wands, inverted
(Inspiration, creativity, fresh ideas. The seed of confidence you need to embark on a new creative journey.)
Present - Six of Cups, inverted
(Nostalgia, memories, past relationships. Learning from and reconciling with the past, to create a better future.)
Future - IV: The Emperor
(A powerful, dominant, strategic and protective figure of great influence and reach. Symbolically, important changes, a shift in power, new responsibilities or authority. Adjacently symbolizes stability.)
I swear I shuffle and cut these every time. I even looked through the top of the deck to see if there were any other familiar cards from last night there. I guess these symbols are important!
So... last night we explored my connection between the Emperor in Past... and an inverted Ace of Wands in Present. Now we're looking at that inverted Ace of Wands as the catalyst. My inability to access my creativity: having creative block, me restricting or censoring myself, whatever the reason... That leads to a dysfunction in my ability to reflect on the past. Something gets fucked up there. Or... my nostalgia turns dark... That was the first thing I felt when I learned what the card meant. Like... how I struggle with nostalgia because... it's rarely good memories. It's like a minefield of trauma and painful emotions. So... I'm guessing my lack of confidence in my creative self can be a direct route to that. And... if that's out of whack? The Emperor comes out. I mean, why wouldn't he. He's the father figure, the protective guardian, the lord. And, in essence, that's not necessarily a bad thing... but... if we put that in the context of the reading last night about the Emperor having a strong tendency to cause inverted Ace of Wands to happen... That's a feedback loop right there.
When I struggle to connect with my creative spark, or lack the confidence to engage with it, I end up looking back to the Past in ways that are... not helping. Hopeless longing, or dreading, even spite. "I didn't used to be like this." "I never used to struggle like this." "I used to have friends to help with this." Shit like that, which just sends me spiraling into all the shit that comes with those memories, all the attached nightmares, all the ghosts haunting those houses. And the reaction to this? The Emperor comes out to keep order. The "alright, what's going on here, we're supposed to be working, right? How productive have we been today? What's on the whiteboard? You can think about that stuff later if it's important" voice. And he's good at keeping emotions at bay... for the moment... But what last night said was... when he comes out... it tends to actually either reinforce or even cause a blockage between me and my creative spark. Or, at very least, my confidence to take creative risks. And this can result in a great outpouring of emotion. Ironic, eh? XD
Welp... that's a bit of a cluster fuck, isn't it? Hmm... so... if there's anything I've learned this week. I gotta work on my inner parent. I need to let myself wander a bit more, and be okay with a few days of meandering. I need my inner parent to focus more on... constructing larger scale plans. Like... some form of day structure... like developing strategies to get to bed earlier, constructing hypothetical scenarios where I'm working and enjoying myself, finding ways to get me outside more. Shit like that. And less... self-policing. If I had a good foundation, a healthier framework, I wouldn't need to self-police at all. So... that's my solution. Instead of going "oh no, don't ever listen to the Emperor" or whatever... to give little tweaks customized to how I know my personality works. Something that seems doable.
But for now, I'm off to bed.
2 notes
·
View notes
Text
CHARACTER NATURE AESTHETICS
tagged by: @aartyom who requested the lads, but its a triple play. a buy 2 get 1 free. ur delivery is here.
tagging: @sunflcwyr @suncesus @lunarlegend @shipmastered & you !

MELCHIOR;
COTTAGECORE
homemade bread, throwing seeds out for the chickens, a tabby cat, patchwork quilts, puffy skirts, ceramic dishes, fresh flowers in a glass jar, herbs hanging from the ceiling, freckles, grey eyes, Athena, old recipe books, a cookie tin filled with recipe cards from grandma, home-sewn pillows, a plate of cookies, the smell of rosemary cooking in a pot of water on the stove, a floral tea pot, salt and pepper shakers, pansies, bartering with neighbors, biking to town, stained glass windows
ZEN GARDENCORE
rocks raked with precision, bonsai trees, holy temples, moss covering statues of gods and godesses, reading ancient texts, being blessed by your ancestors, trusting and family devotion, watercolors on paper, ink on skin, poetry and art, hot springs, cherry blossoms, little flames flickering behind paper curtains, the smell of incense burning, figurines carved from jade and gold from centuries ago, rain, a mist seeping around your ankles as you make your way to school, a chalkboard, scraps of cloth made into art, origami, your father’s heirloom sword you long to one day pick up like your favorite Disney Princess, tranquility and peace, stubborn and proud
JUNGLECORE
exotic animals, tree house, waterfalls, learning the calls of native birds, bright colors and natural materials, bracelets made from wooden beads and bones and feathers, collecting mushrooms, shirts with the sleeves cut off, leaving plastic bottle caps out full of water for frogs to soak in, cutting jeans to make them into shorts, wading in the river, cutting your own hair, bamboo wind chimes, upcycled art, fish in plastic jugs, air plants, climbing up trees using the vines, harvesting your own fruit
FORESTCORE
deep silences of the oldest trees, darkness, log cabins, deer antlers mounted on the wall, rearticulated skeletons, hand-dried pelts, pots of stew cooking over a fire, pancakes in a cast iron pan, brown boots worn from hiking, an old walking stick, bonfires at night, roasting marshmallows and making s’mores, strange markings carved into the bark of trees, ferns that curl up when touched, hearing animals dart here and there but never being able to catch more than a quick glimpse of them out of the corner of your eye, finding half-eaten acorns and mushrooms, large tracks from something you can’t identify, bow hunting
BEACHCORE
seashell collection, model boats, jars of sand, windswept hair, the feel of the wooden boardwalk on your bare feet, big sunglasses, light blue walls, rope hammock, pillows with anchors embroidered on them, flip flops, shining sun, fish tank, sea animal plushies, a steering wheel from a boat on your wall, plates and mugs with seahorses on them, bracelets with plastic shell and dolphin and turtle beads on them, postcards from the ocean, wind chimes made of sea glass
MOUNTAIN / MEADOWCORE
watching the rabbits down in the valley, reading a book in a window seat, checking the sky for storms, knitting heavy quilts for the winter, many layers of clothing, waking up to see the sunrise and sitting outside for the sunset, enjoying the company of ones-self, mountain goats, clovers, laying in the tall grass underneath the sun, field mice, crystal and gemstone collection, a tin filled with buttons and sewing needles and thread, fresh-brewed coffee in the morning, scones

NADESH;
COTTAGECORE
homemade bread, throwing seeds out for the chickens, a tabby cat, patchwork quilts, puffy skirts, ceramic dishes, fresh flowers in a glass jar, herbs hanging from the ceiling, freckles, grey eyes, Athena, old recipe books, a cookie tin filled with recipe cards from grandma, home-sewn pillows, a plate of cookies, the smell of rosemary cooking in a pot of water on the stove, a floral tea pot, salt and pepper shakers, pansies, bartering with neighbors, biking to town, stained glass windows
ZEN GARDENCORE
rocks raked with precision, bonsai trees, holy temples, moss covering statues of gods and godesses, reading ancient texts, being blessed by your ancestors, trusting and family devotion, watercolors on paper, ink on skin, poetry and art, hot springs, cherry blossoms, little flames flickering behind paper curtains, the smell of incense burning, figurines carved from jade and gold from centuries ago, rain, a mist seeping around your ankles as you make your way to school, a chalkboard, scraps of cloth made into art, origami, your father’s heirloom sword you long to one day pick up like your favorite Disney Princess, tranquility and peace, stubborn and proud
JUNGLECORE
exotic animals, tree house, waterfalls, learning the calls of native birds, bright colors and natural materials, bracelets made from wooden beads and bones and feathers, collecting mushrooms, shirts with the sleeves cut off, leaving plastic bottle caps out full of water for frogs to soak in, cutting jeans to make them into shorts, wading in the river, cutting your own hair, bamboo wind chimes, upcycled art, fish in plastic jugs, air plants, climbing up trees using the vines, harvesting your own fruit
FORESTCORE
deep silences of the oldest trees, darkness, log cabins, deer antlers mounted on the wall, rearticulated skeletons, hand-dried pelts, pots of stew cooking over a fire, pancakes in a cast iron pan, brown boots worn from hiking, an old walking stick, bonfires at night, roasting marshmallows and making s’mores, strange markings carved into the bark of trees, ferns that curl up when touched, hearing animals dart here and there but never being able to catch more than a quick glimpse of them out of the corner of your eye, finding half-eaten acorns and mushrooms, large tracks from something you can’t identify, bow hunting
BEACHCORE
seashell collection, model boats, jars of sand, windswept hair, the feel of the wooden boardwalk on your bare feet, big sunglasses, light blue walls, rope hammock, pillows with anchors embroidered on them, flip flops, shining sun, fish tank, sea animal plushies, a steering wheel from a boat on your wall, plates and mugs with seahorses on them, bracelets with plastic shell and dolphin and turtle beads on them, postcards from the ocean, wind chimes made of sea glass
MOUNTAIN / MEADOWCORE
watching the rabbits down in the valley, reading a book in a window seat, checking the sky for storms, knitting heavy quilts for the winter, many layers of clothing, waking up to see the sunrise and sitting outside for the sunset, enjoying the company of ones-self, mountain goats, clovers, laying in the tall grass underneath the sun, field mice, crystal and gemstone collection, a tin filled with buttons and sewing needles and thread, fresh-brewed coffee in the morning, scones

VERONICA;
COTTAGECORE
homemade bread, throwing seeds out for the chickens, a tabby cat, patchwork quilts, puffy skirts, ceramic dishes, fresh flowers in a glass jar, herbs hanging from the ceiling, freckles, grey eyes, Athena, old recipe books, a cookie tin filled with recipe cards from grandma, home-sewn pillows, a plate of cookies, the smell of rosemary cooking in a pot of water on the stove, a floral tea pot, salt and pepper shakers, pansies, bartering with neighbors, biking to town, stained glass windows
ZEN GARDENCORE
rocks raked with precision, bonsai trees, holy temples, moss covering statues of gods and godesses, reading ancient texts, being blessed by your ancestors, trusting and family devotion, watercolors on paper, ink on skin, poetry and art, hot springs, cherry blossoms, little flames flickering behind paper curtains, the smell of incense burning, figurines carved from jade and gold from centuries ago, rain, a mist seeping around your ankles as you make your way to school, a chalkboard, scraps of cloth made into art, origami, your father’s heirloom sword you long to one day pick up like your favorite Disney Princess, tranquility and peace, stubborn and proud
JUNGLECORE
exotic animals, tree house, waterfalls, learning the calls of native birds, bright colors and natural materials, bracelets made from wooden beads and bones and feathers, collecting mushrooms, shirts with the sleeves cut off, leaving plastic bottle caps out full of water for frogs to soak in, cutting jeans to make them into shorts, wading in the river, cutting your own hair, bamboo wind chimes, upcycled art, fish in plastic jugs, air plants, climbing up trees using the vines, harvesting your own fruit
FORESTCORE
deep silences of the oldest trees, darkness, log cabins, deer antlers mounted on the wall, rearticulated skeletons, hand-dried pelts, pots of stew cooking over a fire, pancakes in a cast iron pan, brown boots worn from hiking, an old walking stick, bonfires at night, roasting marshmallows and making s’mores, strange markings carved into the bark of trees, ferns that curl up when touched, hearing animals dart here and there but never being able to catch more than a quick glimpse of them out of the corner of your eye, finding half-eaten acorns and mushrooms, large tracks from something you can’t identify, bow hunting
BEACHCORE
seashell collection, model boats, jars of sand, windswept hair, the feel of the wooden boardwalk on your bare feet, big sunglasses, light blue walls, rope hammock, pillows with anchors embroidered on them, flip flops, shining sun, fish tank, sea animal plushies, a steering wheel from a boat on your wall, plates and mugs with seahorses on them, bracelets with plastic shell and dolphin and turtle beads on them, postcards from the ocean, wind chimes made of sea glass
MOUNTAIN / MEADOWCORE
watching the rabbits down in the valley, reading a book in a window seat, checking the sky for storms, knitting heavy quilts for the winter, many layers of clothing, waking up to see the sunrise and sitting outside for the sunset, enjoying the company of ones-self, mountain goats, clovers, laying in the tall grass underneath the sun, field mice, crystal and gemstone collection, a tin filled with buttons and sewing needles and thread, fresh-brewed coffee in the morning, scones

6 notes
·
View notes
Text
Nifty Beaded Anklet
Or bracelet, or whatever. But I learned this pattern for anklets, and that's how I wear them.


They're relatively quick to make, pretty much infinitely customizable, the materials can make a lot for the quantities you buy them in (at least they were at my local craft store, ymmv), and they're just plain fun.
You Will Need:
Size 20 cord. My mom uses hemp cord, I prefer bamboo. The bamboo is a bit slipperier and a little thinner, so it might not be the best choice for a beginner, but I like the ease of movement.
Seed beads, size 6. These come in a wide variety of colors, so go nuts. The label will have the size on it- the ones I used had 6/0, though they also come in 8/0 and smaller sizes. 6 will fit on the size 20 cord.
Clipboard or another way to secure the top of your braid
Craft glue (only a small amount) and a scrap piece of paper
Scissors
Instructions:
Begin by picking your length of cord. I usually measure with one end held in my fingertips and cutting at the shoulder joint, though you may have a different length to suit your ankles or wherever you're wearing this. If in doubt, go a little long- you can trim ends, but it's very hard to make things longer. You want three cords of the same length.
Tie the cords together to make a knot. If you want to be fancy and use a button to secure it, then make a loop on the other side of your knot, otherwise just tie it securely.
Pour a tiny puddle of craft glue onto a scrap piece of paper. Dip the end of each cord in the glue and twist, going along with the way the cord is already twisted. You want 1/2 to a full inch covered, to aid in sliding the beads on. Let the ends dry (and get the glue off of your fingers).
Slide beads onto each cord. I use about 25 beads per strand- I've used 20 and 28 for other anklets, though my younger sister uses closer to 20 or even fewer for the size of her ankle. When each cord has the right number of beads, tie a knot in the end so your beads do not fall off. Keep the same number of beads per strand.
Braid the cord TIGHTLY for about two inches- or longer if you prefer- to give yourself a good foundation. The tightness is important- you want a snug, unmoving braid.
When you are ready to add the beads, slide up the bead and then cross the strand over. You will need to pinch the braid to keep it in place as you slide the next bead up so that things do not come unravelled, however, it is hardly the end of the world if they do. Once again, you will want to braid tightly, though this will be easier with the beads.
Once you run out of beads, continue braiding tightly till you either run out of cord or decide that your braid is long enough. Tie a knot in the end- including a button if you are being fancy- and cut your excess.
Tie the braid LOOSELY around your ankle- firstly, it will be less comfortable than you think it will be, secondly, it shrinks when it gets wet, so provide space for that.
When the anklet falls off, it is said that your wish will come true. Until then, enjoy!
#anklet#tutorial#craft#seed beads#anklet making#instructions#fun craft project#the orange-and-metallic is technically replacing a blue-and-green that fell off already#they also make good bracelets but i don't do bracelets#the one downside is they don't always layer well and they're so quick to make that you think you can make more#especially if you have good beads and fun cord
0 notes
Text

✨️🌛 Available in my Etsy shop! 🌛✨️
★•°♡°•Beautifully handcrafted piece filled w/Czech glass beads & fun dangly charms, featuring a convertible design which allows you to wear it as a wrapped bracelet, long necklace or anklet. Completely designed & handmade by me & all beads are strung/wire wrapped w/extra care & attention to detail•°♡°•★
★•°♡°• ~JEWELRY DETAILS~ •°♡°•★
▪︎FIT SIZE: Wraps five times comfortably around a 6.75" wrist & features an extension chain if a longer length is needed.
▪︎TOTAL LENGTH: Approx 37"
▪︎EXTENSION CHAIN LENGTH: 2"
▪︎CHARM LENGTH: 30mm
▪︎BEAD SIZE: 4mm to 10mm
▪︎SEED BEAD SIZE: 1-2mm
▪︎BRACELET CLOSURE: Textured lobster clasp
▪︎METAL COMPONENTS: Silver Plated Brass components & silver metal alloy beads & charms
❊Nickel & Lead Free❊
▪︎BEADS: Czech glass translucent blue moon face beads, translucent blue table cut squares, sky blue hurricane cubes, satin grey pinched rounds & milky white Druk rounds. Seed beads are opaque white & clear/silver lined
🪷•°LINK°•🪷
✦ETSY✦
https://sparkledlotus.etsy.com/listing/1739091008
🪷•°Enjoy 10% OFF your order as a TY for following!°•🪷
╰┈➤Coupon Code: FBTHANX10 •◌ೄ◌ྀ
★Spend $35 & get FREE shipping!
★Spend $60 & get 25% OFF!
✨️🪷✨️🪷✨️🪷✨️🪷✨️🪷✨️🪷✨️🪷✨️
🪷•°SOCIAL MEDIA LINKS°•🪷
Follow me @SparkledLotus on my socials!
✦Facebook✦
https://www.facebook.com/profile.php?id=100094758376667&mibextid=ZbWKwL
✦Instagram✦
http://instagram.com/sparkledlotus
✦X "Twitter"✦
http://x.com/sparkledlotus
✦Pinterest✦
http://pinterest.com/sparkledlotus
✦Tumblr✦
http://tumblr.com/sparkledlotus
✦Blogger✦
http://sparkledlotus.blogspot.com
Thanks for stopping by!
🪷•°Sparkled Lotus°•🪷
#beading #beadwork #zipperpulls #charms #beadednecklace #wrapbracelet #beadedbookmarks #keychains #jewelrymaking #earrings #jewelrycrafts #artisanjewelry #crafts #bracelets #beadedbracelets #jewelry #etsy #ebay #giftsforher #handmade #gifts #handmadewithlove #artisan #handcrafted #fashion #shopsmall #women #womenownedbusiness #smallbusiness #moon
#etsyfinds#etsygifts#etsyhandmade#etsyseller#etsyshop#etsysmallbusiness#etsystore#artists on etsy#etsysale#etsy#etsylove#etsy owner#etsy product#etsyartist#etsyjewelry#etsyusa#beading#beadwork#beaded bookmark#beaded bracelet#seed bead jewelry#seed bead bracelet#bracelet#necklace#handmade jewelry#handmade bracelets#handmade necklace#follow for follow#follow back#follow me
0 notes
Text
Unveiling the Versatility: A World of Possibilities with Paper Egg Cartons
Egg cartons, those unassuming containers designed to cradle delicate eggs, are much more than meets the eye. From new and recycled to upcycled creations, and even incorporating egg flats/trays, these paper wonders have a multitude of uses beyond their original purpose. Let’s explore the versatile world of paper egg cartons and discover the innovative ways they can be integrated into our daily lives.
1. Seed Starters and Planters:
Embrace sustainability by repurposing paper egg cartons as seed starters or small planters. The individual cups make perfect containers for germinating seeds, creating a green oasis from what was once an egg haven.
2. Organizers for Small Items:
Transform old egg cartons into practical organizers for small items like buttons, beads, or office supplies. Each cup serves as a neat compartment, making it easy to categorize and access your little treasures.
3. Paint Palettes for Creativity:
Allow recycled egg cartons to become makeshift paint palettes. The cups can hold various paint colors, making it convenient for artists, especially kids, to mix and experiment without the need for expensive art supplies.
4. Easter Egg Decorations:
Elevate your Easter festivities by using egg cartons to create decorative Easter eggs. Cut out individual cups, paint or decorate them, and fill with candies or small surprises for a unique twist on traditional Easter egg hunts.
5. Crafting Supplies Holder:
Keep your crafting area tidy by using egg cartons as holders for scissors, glue, and other crafting supplies. The cups provide an organized and easily accessible solution for various materials.
6. Fire Starters for Bonfires:
Utilize paper egg cartons as the base for DIY fire starters. Fill each cup with dried leaves, cardboard, or other flammable materials, and dip in melted wax. These homemade fire starters are perfect for kindling bonfires or fireplaces.
7. Pet Treat Dispenser:
Make an entertaining and interactive treat dispenser for pets using egg cartons. Fill each cup with pet treats, close the lid, and let your furry friend figure out how to access the tasty rewards.
8. Customized Gift Boxes:
Turn egg cartons into personalized gift boxes. Decorate the exterior, add a bow or ribbon, and use them to present small gifts or treats for birthdays, holidays, or special occasions.
9. Organic Waste Composting:
Paper egg cartons can be used as compostable containers for organic waste. Once filled, they can be added to your compost pile, providing a sustainable alternative to plastic bags.
10. Miniature Plant Labels:
Cut sections of egg cartons and use them as miniature plant labels in your garden. Write the names of herbs or flowers on each cup, creating a charming and eco-friendly labeling solution.
11. Jewelry Organizer:
Organize your jewelry by repurposing egg cartons. Use each cup to store earrings, rings, or small accessories, preventing them from getting tangled and making your morning routine more efficient.
12. Muffin Tin Substitute:
In a pinch, egg cartons can serve as makeshift muffin tins. Simply place cupcake liners in each cup, fill with batter, and bake. They’re a quick solution for impromptu baking sessions.
13. Soundproofing Material:
For a unique use, consider using recycled egg cartons as soundproofing material. When cut into panels, they can be attached to walls to help reduce noise and echo in certain spaces.
14. Hobby Storage:
Keep your hobby supplies organized by repurposing egg cartons for storing items like beads, small craft pieces, or even fishing tackle. The individual cups provide a practical and compartmentalized solution.
15. DIY Advent Calendar:
Craft a charming advent calendar using egg cartons. Decorate each cup, fill them with small treats, and arrange them into a festive calendar for the holiday season.
16. Packaging for Fragile Items:
Use paper egg cartons as cushioning material for delicate items when packaging. The cups provide protection and ensure that fragile objects reach their destination unharmed.
17. Storage for Spare Change:
Transform egg cartons into quirky coin holders. Each cup can be designated for different denominations, making it a fun and visual way to save spare change.
18. Natural Fire starters for Grilling:
For outdoor enthusiasts, egg cartons can be repurposed as natural firestarters for grilling. Fill each cup with charcoal and a small amount of cooking oil for a sustainable and efficient grilling solution.
19. Crafty Pincushion:
Create a simple yet effective pincushion using egg cartons. Fill the cups with batting or cotton, and use them to store sewing pins and needles.
20. DIY Adventurous Game:
Cut egg cartons into cups and use them as containers for an adventurous scavenger hunt or sorting game for kids. Hide clues or objects inside each cup, adding an element of excitement to the activity.
Conclusion: Unleashing Creativity with Paper Egg Cartons
In conclusion, the humble paper egg carton proves to be a versatile resource, whether new, old, recycled, or upcycled. From simple and practical uses to imaginative crafting endeavors, these cartons and egg flats/trays offer a world of possibilities waiting to be explored. So, before you dispose of that egg carton, consider the creative potential it holds and embark on a journey of ingenuity and sustainability.
0 notes
Text
TUNA TATAKI RECIPE

Recipe courtesy of Chef Johnathan Rodriguez
Serves: 3 people
Prep time: 1 hour
cook time: 5 minutes
Ingredients:
3 ounces of Ahi grade #1 Tuna cut into small perfect dice
2 ounces Sweet Thai chili sauce
1/2 ounce Tuxedo sesame seeds
3 fried wontons (2-inch cylinder recommended)
1 1/2 ounces Wakame seaweed
1 pinch of pickled ginger (finely chopped)
3 drops of wasabi mayo (1 ounce mayo mixed with 1 tsp. of wasabi powder/ whisk well until incorporated)
1 teaspoon of soy caviar
Toss Tuna, Thai Chili sauce, and Sesame Seeds, in a bowl and toss until evenly coated. Place wonton down and take 1/2 ounce of Wakame and place on each wonton. Then place 1 ounce of tuna mix on Wakame seaweed in a neat ball on top. Top with a small pinch of pickled ginger and 3 drops of wasabi aioli.
Garnish with soy caviar
Soy Sauce Caviar
3/4 cup soy sauce
2 grams agar powder
At least 3 cups vegetable oil
In a tall container, pour the oil in and place it in your freezer for 30 minutes to an hour. When your oil is almost ready, combine the soy sauce and agar powder in a small saucepan. Bring to a boil, whisking continuously. Once boiling, turn the heat off on the saucepan and let sit for 2-3 minutes. Take the oil out of the freezer and drop the soy sauce-agar mixture into it one drop at a time. You can either use a plastic dropper to do this (easily purchased online) or a small spoon. Work rather quickly here as the longer the mixture sits, the more it will begin to solidify in your saucepan. Don’t worry if some of the first drops sit at the top. They will begin to sink as you add more. When you have created all of the desired beads, or when you have used all of the agar mixture, you are ready to collect your beads. Over a large bowl (do not just dump the oil down the sink!), pour the oil mixture out so that it is running through a fine-mesh strainer. The beads will be at the bottom of the container and collect in your strainer as you pour them out. Set the bowl of oil aside and rinse the soy sauce beads with cold water over your sink. Store the beads in the fridge until you are ready to use them or put them on your dish immediately. As for the oil, pour it into a sealable container and throw it away or reuse it as you see fit.
0 notes
Link
Check out this listing I just added to my Poshmark closet: NEW One Heart OOAK hand felted pouch necklace by Susan A Ray, jewelry designer.
0 notes
Last Seen Blogs

geneaffirmgenetics-blog
GeneAffirm Genetics is a DNA Testing Center in Raleigh, NC

macolegacy
help me obi juan...

thevoidiliketoshoutinto
The Void

mmavverickk
maverickk

sarafangirlart
Sara Fangirl Art