#Android Custom ListView with Images tutorial
Explore tagged Tumblr posts
Visit Tumblr Blog
Explore Tumblr blogs with no restrictions, modern design and the best experience.
Last Seen Tumblr Blogs


Fun Fact
Tumblr has 16.74 million mobile monthly users in the US.
Text
Android Custom ListView with Images
Android Custom List View with Images
What will you learn in Android Custom ListView with Images tutorial? In the last tutorial by Buzzmycode, you had learned about Listview, the basic way of using listview in android. Now in this tutorial, I will explain how to use images and text data in the listview, the data will be static. Here static means the data will not be fetched from the server (MySql /JSON). To know the crude of android…

View On WordPress
#android#android app develop#android app development ide#Android Apps#android apps list view#Android Custom ListView App Layout#Android Custom ListView with Images#Android Custom ListView with Images tutorial#android listview#Android Studio#android studio listview example#how to create custom listview in android#listview example in android#listview in android example
0 notes
Text
kotlin android 개발 날씨앱 만들기 과정 요약
original source : https://www.youtube.com/playlist?list=PLEPZdzLLJH94Jk_Jz-cTUXYFoObPBH7KB
시애틀에 있는 수염난 안경낀 백인 청년 설명
.

.

.
.
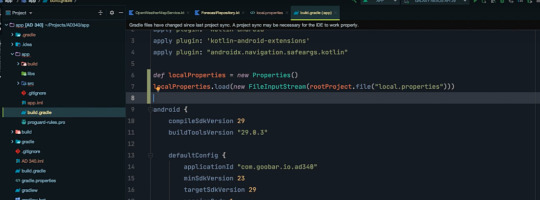
data binding을 위해서 gradle에서 해야할 작업
.
data binding의 장점
.

.
.
3rd party image loading library들 이 강의에서는 coil을 사용

.
toolbar를 app bar로 사용하면서 navigation component를 사용하는 경우

.
tool bar를 app bar로 사용하는 경우 약간의 material 느낌을 주기위해 AppBarLayout를 이용한 경우

.
coil를 사용해 image loading한경우
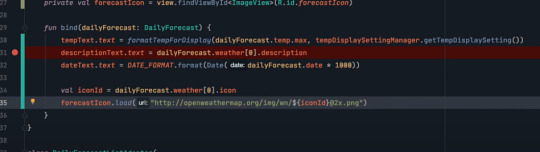
.
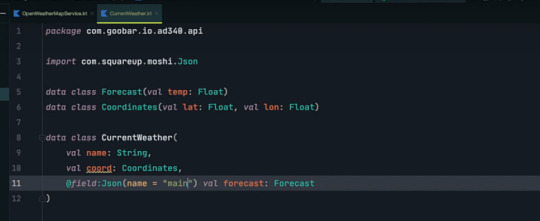
json converting을 위해 moshi를 사용한 경우
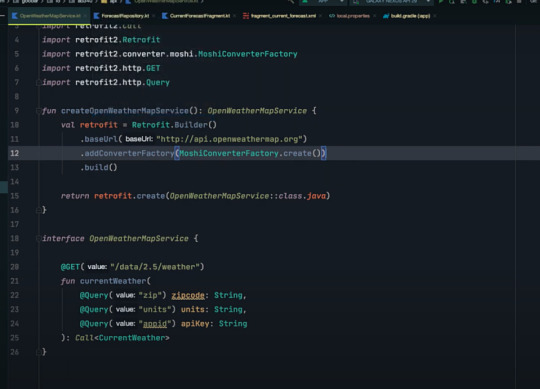
.
retrofit

.
.
.
민감한 data를 외부에 놓고 사용하는 방법
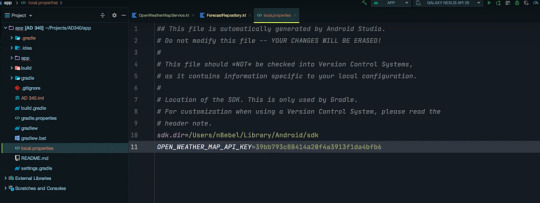

.
.
.
외부에서 전달되는 json data의 키와는 다른 field명을 쓰고 싶을때
.
외부와 data 통신시에 보안을 위해 usesCleartextTraffic을 사용한다.

.
.
.
.
1강
0:01 - Week 0 Review
1:22 - Syllabus Review
2:40 - Class Announcements
6:14 - Why Learn App Development?
9:26 - Challenges of App Development
15:34 - Types of Mobile Development
22:36 - Why Android Development?
27:42 - Setting Up Our Android Development Environment
28:34 - Installing Android Studio
36:12 - Creating Your First Android Studio Project
39:17 - Creating An Android Emulator
41:52 - Installing Your First Android App
45:14 - Sharing An Android Studio Project to GitHub
50:06 - Building An Android APK
- What are the unique benefits and challenges of Android app development?
- What are some different ways of building mobile apps?
- What makes Android the most popular mobile operating system?
- What is Android Studio?
- What is the Android Emulator?
- What is Kotlin?
- How do you create a new Android project?
- How do you share code from Android Studio to GitHub?
- How do you add a README to your GitHub repo?
.
.
.
.
2강
0:36 - Outline
1:57 - Android Framework Components
14:07 - What is generated when you create a new Android Studio project?
40:26 - Working with Android Activities
41:20 - Android Activity lifecycle
50:12 - Using the Android Studio debugger // How to set a breakpoint in Android Studio?
59:38 - Creating Interactive User Interfaces
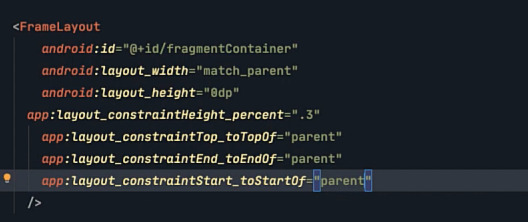
1:01:46 - What is FrameLayout?
1:05:09 - What is LinearLayout?
1:08:34 - What is RelativeLayout?
1:14:22 - What is ConstraintLayout?
1:28:09 - Responding To User Interaction
1:29:00 - ConstraintLayout simple tutorial
1:29:37 - How to create a new Vector Asset in Android Studio?
1:38:46 - How to respond to a Button click in Android
1:40:04 - Android Button setOnClickHandler
1:45:40 - Receiving user input using an EditText
1:54:00 - Customize Material Design theme in Android Studio
- What are the Android app components?
- What is an Android Activity?
- What is generated when we create a new Android Studio project?
- What is the Android Activity lifecycle?
- What is the difference between an Android ViewGroup and a View?
- What is a FrameLayout? LinearLayout? Relative Layout? ConstraintLayout?
- How to build a simple UI using ConstraintLayout?
- How do define an Android click listener?
- How to show a Toast message in an Android Activity?
- How to enable Android developer options?
- How to use an EditText to receive user input?
.
.
.
.
3강
- How to display dynamic content in an app?
- How to display large collections of data?
- How to architect your app to provide data to your Activity?
- What is MVVM?
- What is LiveData?
- How to model data with Kotlin data classes?
- How to create a RecyclerView Adapter?
- How to bind data using a RecyclerView ViewHolder?
- How to define an onClickHandler for your RecyclerView?
- How to format String resources?
.
0:25 - Outline
2:17 - Project Demo
3:56 - Displaying Dynamic Data
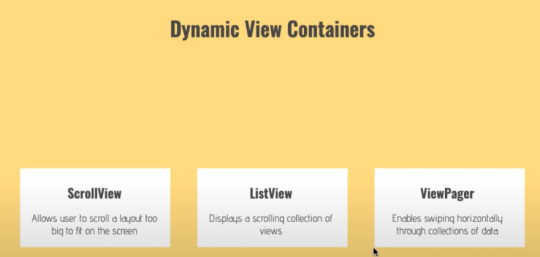
5:05 - Dynamic view containers // ScrollView, ListView, ViewPager
6:57 - RecyclerView
7:50 - Why RecyclerView?
16:47 - Defining A Data Model
20:00 - Modeling data with Kotlin data classes
24:25 - What is LiveData?
28:08 - Implementing A RecyclerView
29:23 - Creating a data class to model daily weather forecasts
31:50 - Creating a data repository
32:04 - Using LiveData to expose data from a repository
49:54 - Adding a RecyclerView to your layout xml file
52:37 - How to use Logcat to understand why your app crashed
54:58 - Add RecyclerView dependency to your build.gradle file
57:52 - How to add margin to your RecyclerView using ConstraintLayout design view?
1:01:57 - How to implement a RecyclerView Adapter using Kotlin?
1:30:38 - Add touch feedback to RecyclerView list items
1:40:00 - How to format String resources?
.
.
.
.
4강
- How to create a new Android Activity?
- How to use an Intent to open a new Activity when a button is clicked?
- How to display an options Menu
- How to respond to a Menu item click?
- How to display an AlertDialog?
- How to save a value using SharedPreferences?
.
.
.
.
5강
- How to create a new Fragment
- How to migrate UI/logic from an Activity to a Fragment
- How to communicate between a Fragment and an Activity
- How to add a FloatingActionButton to your UI
.
.
.
.
6강
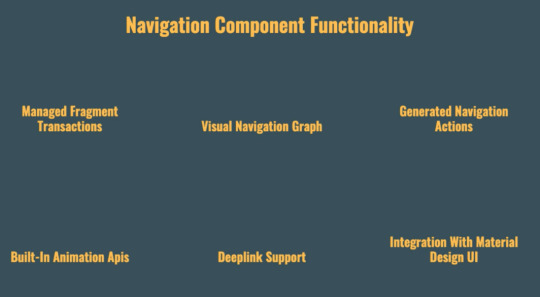
- What is the Android Navigation Architecture Component?
- What problems is it trying to solve?
- How to create a navigation graph?
- How to add new destinations and actions to your navigation graph?
- How to navigate to a new Fragment using the NavController?
- How to update your AppBar based on navigation changes?
- How to implement a BottomNavigationView?
.
.
.
.
7강
- How to load data from a remote api using Retrofit; an HTTP client library for Android/JVM?
- How to listen to changes in SharedPreferences values?
- How to load and display remote images using the Coil image loading library
.
.
.
.
0 notes
Text
New Post has been published on Simplified Coding
New Post has been published on https://www.simplifiedcoding.net/android-sync-sqlite-database-with-server/
Android Sync SQLite Database with Server using PHP and MySQL

Lets learn Android Sync SQLite Database with Server. Assume we have to send some information from the application to our webserver and internet is not available on the device at a particular time. So instead of giving error to the user that internet is not available we can store the data to SQLite and send it later automatically when the internet is available. And this is what we are going to learn in this Android Sync SQLite Database with Server Tutorial.
Contents
1 Android Sync Sqlite Database with Server Demo
2 Creating Web Service and MySQL Database
2.1 Creating Database
2.2 Creating Web Service
2.2.1 Creating Script
2.2.2 Testing Script
3 Android Sync SQLite Database with Server
3.1 Creating Android Project
3.2 Adding Permissions
3.3 Adding Dependencies
3.4 Handling SQLite Operations
3.5 Handling Volley RequestQueue
3.6 Building Interface
3.6.1 MainActivity
3.6.2 ListView
3.7 Building ListView
3.7.1 Model Class
3.7.2 Adapter
3.8 Coding MainActivity
3.9 Detecting Network State
3.9.1 Creating Broadcast Receiver
3.9.2 Adding Receiver in Manifest
3.9.3 Registering Receiver
4 Testing the Application
5 Download Source Code
Android Sync Sqlite Database with Server Demo
You can first see what we are going to learn in this video where I am showing the application.
youtube
Now lets move ahead and start Android Sync Sqlite Database with Server.
Creating Web Service and MySQL Database
Creating Database
I have the following database. I am using XAMPP you can use anything you want.

So we have the database table. Now we will create a php script that will handle the insertion to the database.
Creating Web Service
Creating Script
Create folder in your root directory (in my case it is htdocs).
Now create a php file inside the folder, I have created saveName.php. And write the following code.
<?php /* * Database Constants * Make sure you are putting the values according to your database here */ define('DB_HOST','localhost'); define('DB_USERNAME','root'); define('DB_PASSWORD',''); define('DB_NAME', 'android'); //Connecting to the database $conn = new mysqli(DB_HOST, DB_USERNAME, DB_PASSWORD, DB_NAME); //checking the successful connection if($conn->connect_error) die("Connection failed: " . $conn->connect_error); //making an array to store the response $response = array(); //if there is a post request move ahead if($_SERVER['REQUEST_METHOD']=='POST') //getting the name from request $name = $_POST['name']; //creating a statement to insert to database $stmt = $conn->prepare("INSERT INTO names (name) VALUES (?)"); //binding the parameter to statement $stmt->bind_param("s", $name); //if data inserts successfully if($stmt->execute()) //making success response $response['error'] = false; $response['message'] = 'Name saved successfully'; else //if not making failure response $response['error'] = true; $response['message'] = 'Please try later'; else $response['error'] = true; $response['message'] = "Invalid request"; //displaying the data in json format echo json_encode($response);
Testing Script
Now its time to test the script we created. So in my case the URL is http://localhost/SqliteSync/saveName.php
I am using POSTMAN to test the script and you can see it in below screenshot.
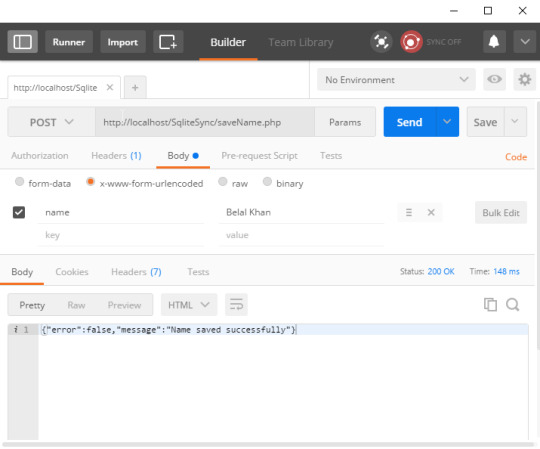
As you can see the script is working fine. Now lets move ahead in android project.
Android Sync SQLite Database with Server
Creating Android Project
Create a new project.
I have created AndroidMySQLSync with an Empty Activity.
Adding Permissions
We need the following permissions so first add these to AndroidManifest.xml.
<uses-permission android:name="android.permission.INTERNET" /> <uses-permission android:name="android.permission.ACCESS_NETWORK_STATE" />
Adding Dependencies
For network requests I am going to use Volley. So add the following line inside dependencies block of your app level build.gradle file.
dependencies compile fileTree(dir: 'libs', include: ['*.jar']) androidTestCompile('com.android.support.test.espresso:espresso-core:2.2.2', exclude group: 'com.android.support', module: 'support-annotations' ) compile 'com.android.support:appcompat-v7:25.0.1' //add this line compile 'com.android.volley:volley:1.0.0' testCompile 'junit:junit:4.12'
Handling SQLite Operations
In this case we have to use both SQLite and MySQL. So a class named DatabaseHelper.java and write the following code.
package net.simplifiedcoding.androidmysqlsync; import android.content.ContentValues; import android.content.Context; import android.database.Cursor; import android.database.sqlite.SQLiteDatabase; import android.database.sqlite.SQLiteOpenHelper; /** * Created by Belal on 1/27/2017. */ public class DatabaseHelper extends SQLiteOpenHelper //Constants for Database name, table name, and column names public static final String DB_NAME = "NamesDB"; public static final String TABLE_NAME = "names"; public static final String COLUMN_ID = "id"; public static final String COLUMN_NAME = "name"; public static final String COLUMN_STATUS = "status"; //database version private static final int DB_VERSION = 1; //Constructor public DatabaseHelper(Context context) super(context, DB_NAME, null, DB_VERSION); //creating the database @Override public void onCreate(SQLiteDatabase db) String sql = "CREATE TABLE " + TABLE_NAME + "(" + COLUMN_ID + " INTEGER PRIMARY KEY AUTOINCREMENT, " + COLUMN_NAME + " VARCHAR, " + COLUMN_STATUS + " TINYINT);"; db.execSQL(sql); //upgrading the database @Override public void onUpgrade(SQLiteDatabase db, int oldVersion, int newVersion) String sql = "DROP TABLE IF EXISTS Persons"; db.execSQL(sql); onCreate(db); /* * This method is taking two arguments * first one is the name that is to be saved * second one is the status * 0 means the name is synced with the server * 1 means the name is not synced with the server * */ public boolean addName(String name, int status) SQLiteDatabase db = this.getWritableDatabase(); ContentValues contentValues = new ContentValues(); contentValues.put(COLUMN_NAME, name); contentValues.put(COLUMN_STATUS, status); db.insert(TABLE_NAME, null, contentValues); db.close(); return true; /* * This method taking two arguments * first one is the id of the name for which * we have to update the sync status * and the second one is the status that will be changed * */ public boolean updateNameStatus(int id, int status) SQLiteDatabase db = this.getWritableDatabase(); ContentValues contentValues = new ContentValues(); contentValues.put(COLUMN_STATUS, status); db.update(TABLE_NAME, contentValues, COLUMN_ID + "=" + id, null); db.close(); return true; /* * this method will give us all the name stored in sqlite * */ public Cursor getNames() SQLiteDatabase db = this.getReadableDatabase(); String sql = "SELECT * FROM " + TABLE_NAME + " ORDER BY " + COLUMN_ID + " ASC;"; Cursor c = db.rawQuery(sql, null); return c; /* * this method is for getting all the unsynced name * so that we can sync it with database * */ public Cursor getUnsyncedNames() SQLiteDatabase db = this.getReadableDatabase(); String sql = "SELECT * FROM " + TABLE_NAME + " WHERE " + COLUMN_STATUS + " = 0;"; Cursor c = db.rawQuery(sql, null); return c;
Handling Volley RequestQueue
We are going to use Volley for http request. So for this we will create a singleton class.
Create a class named VolleySingleton and write the following code.
package net.simplifiedcoding.androidmysqlsync; import android.content.Context; import android.graphics.Bitmap; import android.support.v4.util.LruCache; import com.android.volley.Request; import com.android.volley.RequestQueue; import com.android.volley.toolbox.ImageLoader; import com.android.volley.toolbox.Volley; /** * Created by Belal on 21/09/16. */ public class VolleySingleton private static VolleySingleton mInstance; private RequestQueue mRequestQueue; private static Context mCtx; private VolleySingleton(Context context) mCtx = context; mRequestQueue = getRequestQueue(); public static synchronized VolleySingleton getInstance(Context context) if (mInstance == null) mInstance = new VolleySingleton(context); return mInstance; public RequestQueue getRequestQueue() if (mRequestQueue == null) // getApplicationContext() is key, it keeps you from leaking the // Activity or BroadcastReceiver if someone passes one in. mRequestQueue = Volley.newRequestQueue(mCtx.getApplicationContext()); return mRequestQueue; public <T> void addToRequestQueue(Request<T> req) getRequestQueue().add(req);
Building Interface
MainActivity
Now inside activity_main.xml write the following code.
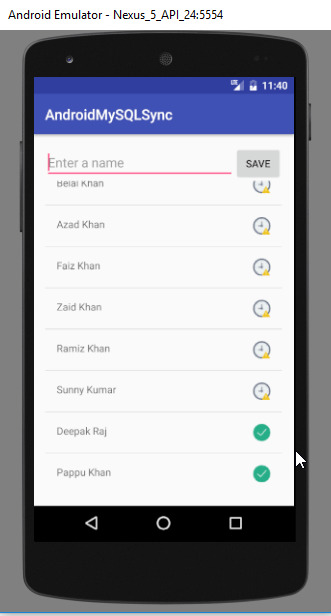
<?xml version="1.0" encoding="utf-8"?> <LinearLayout xmlns:android="http://schemas.android.com/apk/res/android" xmlns:tools="http://schemas.android.com/tools" android:id="@+id/activity_main" android:layout_width="match_parent" android:layout_height="match_parent" android:orientation="vertical" android:paddingBottom="@dimen/activity_vertical_margin" android:paddingLeft="@dimen/activity_horizontal_margin" android:paddingRight="@dimen/activity_horizontal_margin" android:paddingTop="@dimen/activity_vertical_margin" tools:context="net.simplifiedcoding.androidmysqlsync.MainActivity"> <LinearLayout android:layout_width="match_parent" android:layout_height="wrap_content" android:orientation="horizontal"> <EditText android:id="@+id/editTextName" android:layout_width="match_parent" android:layout_height="wrap_content" android:layout_weight="3" android:hint="Enter a name" /> <Button android:id="@+id/buttonSave" android:layout_width="wrap_content" android:layout_height="wrap_content" android:layout_weight="1" android:text="Save" /> </LinearLayout> <ListView android:id="@+id/listViewNames" android:layout_width="match_parent" android:layout_height="wrap_content"></ListView> </LinearLayout>
The above code will generate the following output.
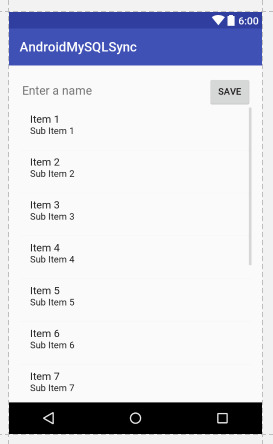
Android Sync SQLite Database with Server
As you can see we have an EditText, a Button and a ListView.
Now let me tell you what we are going to do. We will save the Name from EditText and we will also display the saved name in ListView with the Sync Status. So the next part is designing a layout for our Custom ListView.
ListView
Create an xml file inside layout directory. I have created names.xml.
<?xml version="1.0" encoding="utf-8"?> <RelativeLayout xmlns:android="http://schemas.android.com/apk/res/android" android:padding="@dimen/activity_horizontal_margin" android:layout_width="match_parent" android:layout_height="match_parent"> <TextView android:text="Name" android:layout_alignParentLeft="true" android:id="@+id/textViewName" android:layout_width="wrap_content" android:layout_height="wrap_content" /> <ImageView android:background="@drawable/success" android:layout_alignParentRight="true" android:id="@+id/imageViewStatus" android:layout_width="wrap_content" android:layout_height="wrap_content" /> </RelativeLayout>
As you can see we have a TextView to display the name and an ImageView to display the status.
Download the icons from the below link, we have two images to display queued or synced.
Icons Download (Android Sync SQLite Database with Server) (0 downloads)
(adsbygoogle = window.adsbygoogle || []).push();
You have to copy the downloaded icons inside drawable folder.
Building ListView
Model Class
Now create a class Name.java and write the following code.
package net.simplifiedcoding.androidmysqlsync; /** * Created by Belal on 1/27/2017. */ public class Name private String name; private int status; public Name(String name, int status) this.name = name; this.status = status; public String getName() return name; public int getStatus() return status;
Now we will create an Adapter for our ListView.
Adapter
Create a class NameAdapter.java and write the following code.
package net.simplifiedcoding.androidmysqlsync; import android.content.Context; import android.view.LayoutInflater; import android.view.View; import android.view.ViewGroup; import android.widget.ArrayAdapter; import android.widget.ImageView; import android.widget.TextView; import java.util.List; /** * Created by Belal on 1/27/2017. */ public class NameAdapter extends ArrayAdapter<Name> //storing all the names in the list private List<Name> names; //context object private Context context; //constructor public NameAdapter(Context context, int resource, List<Name> names) super(context, resource, names); this.context = context; this.names = names; @Override public View getView(int position, View convertView, ViewGroup parent) //getting the layoutinflater LayoutInflater inflater = (LayoutInflater) context.getSystemService(Context.LAYOUT_INFLATER_SERVICE); //getting listview itmes View listViewItem = inflater.inflate(R.layout.names, null, true); TextView textViewName = (TextView) listViewItem.findViewById(R.id.textViewName); ImageView imageViewStatus = (ImageView) listViewItem.findViewById(R.id.imageViewStatus); //getting the current name Name name = names.get(position); //setting the name to textview textViewName.setText(name.getName()); //if the synced status is 0 displaying //queued icon //else displaying synced icon if (name.getStatus() == 0) imageViewStatus.setBackgroundResource(R.drawable.stopwatch); else imageViewStatus.setBackgroundResource(R.drawable.success); return listViewItem;
Coding MainActivity
Now lets come inside MainActivity.java and write the following code.
package net.simplifiedcoding.androidmysqlsync; import android.Manifest; import android.app.ProgressDialog; import android.content.BroadcastReceiver; import android.content.Context; import android.content.Intent; import android.content.IntentFilter; import android.content.pm.PackageManager; import android.database.Cursor; import android.net.ConnectivityManager; import android.support.v4.content.ContextCompat; import android.support.v7.app.AppCompatActivity; import android.os.Bundle; import android.view.View; import android.widget.Button; import android.widget.EditText; import android.widget.ListView; import android.widget.Toast; import com.android.volley.AuthFailureError; import com.android.volley.Request; import com.android.volley.RequestQueue; import com.android.volley.Response; import com.android.volley.VolleyError; import com.android.volley.toolbox.StringRequest; import com.android.volley.toolbox.Volley; import org.json.JSONException; import org.json.JSONObject; import java.util.ArrayList; import java.util.HashMap; import java.util.List; import java.util.Map; public class MainActivity extends AppCompatActivity implements View.OnClickListener /* * this is the url to our webservice * make sure you are using the ip instead of localhost * it will not work if you are using localhost * */ public static final String URL_SAVE_NAME = "http://192.168.1.107/SqliteSync/saveName.php"; //database helper object private DatabaseHelper db; //View objects private Button buttonSave; private EditText editTextName; private ListView listViewNames; //List to store all the names private List<Name> names; //1 means data is synced and 0 means data is not synced public static final int NAME_SYNCED_WITH_SERVER = 1; public static final int NAME_NOT_SYNCED_WITH_SERVER = 0; //a broadcast to know weather the data is synced or not public static final String DATA_SAVED_BROADCAST = "net.simplifiedcoding.datasaved"; //Broadcast receiver to know the sync status private BroadcastReceiver broadcastReceiver; //adapterobject for list view private NameAdapter nameAdapter; @Override protected void onCreate(Bundle savedInstanceState) super.onCreate(savedInstanceState); setContentView(R.layout.activity_main); //initializing views and objects db = new DatabaseHelper(this); names = new ArrayList<>(); buttonSave = (Button) findViewById(R.id.buttonSave); editTextName = (EditText) findViewById(R.id.editTextName); listViewNames = (ListView) findViewById(R.id.listViewNames); //adding click listener to button buttonSave.setOnClickListener(this); //calling the method to load all the stored names loadNames(); //the broadcast receiver to update sync status broadcastReceiver = new BroadcastReceiver() @Override public void onReceive(Context context, Intent intent) //loading the names again loadNames(); ; //registering the broadcast receiver to update sync status registerReceiver(broadcastReceiver, new IntentFilter(DATA_SAVED_BROADCAST)); /* * this method will * load the names from the database * with updated sync status * */ private void loadNames() names.clear(); Cursor cursor = db.getNames(); if (cursor.moveToFirst()) do Name name = new Name( cursor.getString(cursor.getColumnIndex(DatabaseHelper.COLUMN_NAME)), cursor.getInt(cursor.getColumnIndex(DatabaseHelper.COLUMN_STATUS)) ); names.add(name); while (cursor.moveToNext()); nameAdapter = new NameAdapter(this, R.layout.names, names); listViewNames.setAdapter(nameAdapter); /* * this method will simply refresh the list * */ private void refreshList() nameAdapter.notifyDataSetChanged(); /* * this method is saving the name to ther server * */ private void saveNameToServer() final ProgressDialog progressDialog = new ProgressDialog(this); progressDialog.setMessage("Saving Name..."); progressDialog.show(); final String name = editTextName.getText().toString().trim(); StringRequest stringRequest = new StringRequest(Request.Method.POST, URL_SAVE_NAME, new Response.Listener<String>() @Override public void onResponse(String response) progressDialog.dismiss(); try JSONObject obj = new JSONObject(response); if (!obj.getBoolean("error")) //if there is a success //storing the name to sqlite with status synced saveNameToLocalStorage(name, NAME_SYNCED_WITH_SERVER); else //if there is some error //saving the name to sqlite with status unsynced saveNameToLocalStorage(name, NAME_NOT_SYNCED_WITH_SERVER); catch (JSONException e) e.printStackTrace(); , new Response.ErrorListener() @Override public void onErrorResponse(VolleyError error) progressDialog.dismiss(); //on error storing the name to sqlite with status unsynced saveNameToLocalStorage(name, NAME_NOT_SYNCED_WITH_SERVER); ) @Override protected Map<String, String> getParams() throws AuthFailureError Map<String, String> params = new HashMap<>(); params.put("name", name); return params; ; VolleySingleton.getInstance(this).addToRequestQueue(stringRequest); //saving the name to local storage private void saveNameToLocalStorage(String name, int status) editTextName.setText(""); db.addName(name, status); Name n = new Name(name, status); names.add(n); refreshList(); @Override public void onClick(View view) saveNameToServer();
Now if you will run the application it will save the name to MySQL and SQLite with the sync or unsynced status.
But to send the unsynced names to the server automatically we have to detect the Network Status of the phone. For this we need one more broadcast receiver.
Detecting Network State
Creating Broadcast Receiver
Create a class named NetworkStateChecker.java and write the following code.
package net.simplifiedcoding.androidmysqlsync; import android.content.BroadcastReceiver; import android.content.Context; import android.content.Intent; import android.database.Cursor; import android.net.ConnectivityManager; import android.net.NetworkInfo; import com.android.volley.AuthFailureError; import com.android.volley.Request; import com.android.volley.Response; import com.android.volley.VolleyError; import com.android.volley.toolbox.StringRequest; import org.json.JSONException; import org.json.JSONObject; import java.util.HashMap; import java.util.Map; /** * Created by Belal on 1/27/2017. */ public class NetworkStateChecker extends BroadcastReceiver //context and database helper object private Context context; private DatabaseHelper db; @Override public void onReceive(Context context, Intent intent) this.context = context; db = new DatabaseHelper(context); ConnectivityManager cm = (ConnectivityManager) context.getSystemService(Context.CONNECTIVITY_SERVICE); NetworkInfo activeNetwork = cm.getActiveNetworkInfo(); //if there is a network if (activeNetwork != null) activeNetwork.getType() == ConnectivityManager.TYPE_MOBILE) //getting all the unsynced names Cursor cursor = db.getUnsyncedNames(); if (cursor.moveToFirst()) do //calling the method to save the unsynced name to MySQL saveName( cursor.getInt(cursor.getColumnIndex(DatabaseHelper.COLUMN_ID)), cursor.getString(cursor.getColumnIndex(DatabaseHelper.COLUMN_NAME)) ); while (cursor.moveToNext()); /* * method taking two arguments * name that is to be saved and id of the name from SQLite * if the name is successfully sent * we will update the status as synced in SQLite * */ private void saveName(final int id, final String name) StringRequest stringRequest = new StringRequest(Request.Method.POST, MainActivity.URL_SAVE_NAME, new Response.Listener<String>() @Override public void onResponse(String response) try JSONObject obj = new JSONObject(response); if (!obj.getBoolean("error")) //updating the status in sqlite db.updateNameStatus(id, MainActivity.NAME_SYNCED_WITH_SERVER); //sending the broadcast to refresh the list context.sendBroadcast(new Intent(MainActivity.DATA_SAVED_BROADCAST)); catch (JSONException e) e.printStackTrace(); , new Response.ErrorListener() @Override public void onErrorResponse(VolleyError error) ) @Override protected Map<String, String> getParams() throws AuthFailureError Map<String, String> params = new HashMap<>(); params.put("name", name); return params; ; VolleySingleton.getInstance(context).addToRequestQueue(stringRequest);
Adding Receiver in Manifest
Add the following code in your AndroidManifest.xml file inside application tag.
<receiver android:name=".NetworkStateChecker"> <intent-filter> <action android:name="android.net.conn.CONNECTIVITY_CHANGE" /> </intent-filter> </receiver>
Registering Receiver
You also need to register the receiver. So add the following line inside onCreate() method of your MainActivity.java file.
registerReceiver(new NetworkStateChecker(), new IntentFilter(ConnectivityManager.CONNECTIVITY_ACTION));
Now you can run your application.
Testing the Application
Run your application. And try saving the name when internet is available also turn off the internet and again try saving your name.
Android Sync SQLite Database with Server
When the internet will be available again the data will be automatically sent to MySQL.
Download Source Code
You can get the source code from the following GitHub repository.
Android Sync SQlite Database with Server Source Code
So thats it for this android sync sqlite database with server tutorial friends. Feel free to leave your comments if you are having any troubles making the project. Also follow the steps carefully as the post is very long. And if you found this helpful please favor us by sharing this post in your social network. Thank You 🙂
0 notes
Text
Top 10 Most Common Mistakes That Android Developers Make: A Programming Tutorial
Common Mistake #1: Developing for iOS To my great pleasure, this Android mistake is far less common nowadays (partially because clients are beginning to realize that the days when Apple was setting all the design standards are long gone). But still, every now and then, we see an app that is an iOS clone.
Don’t get me wrong, I’m not an Android programming evangelist! I respect every platform that moves the mobile world a step forward. But, it’s 2014 and users have been using Android for quite a while now, and they’ve grown accustomed to the platform. Pushing iOS design standards to them is a terrible strategy!
Unless there is a super good reason for breaking the guidelines, don’t do it. (Google does this all the time, but never by copy-pasting.)
Here are some of the most common examples of this Android mistake:
You should not be making static tabs, and they don’t belong on the bottom (I’m pointing at you Instagram). System notification icons should not have color. App icons should not be placed inside a rounded rectangle (unless that’s your actual logo ex. facebook). Splash screens are redundant beyond the initial setup/introduction. Do not use them in other scenarios. Lists should not have carets. These are just a few of the many other small things that can ruin the user experience.
Common Mistake #2: Developing for Your Android Device Unless you are building a kiosk/promo app for a single tablet, chances are your Android app won’t look good on every device. Here are a few Android programming tips to remember:
Density-independent pixels (dp) are different than normal pixels (px). Resources are included multiple times to account for different densities and orientations. 9-patch drawables are stretched to fit the screen. There are literally thousands of possible scenarios, but after a while you develop a sense for covering them all with a handful of cases.
You don’t own thousands of devices? Not a problem. The Android Emulator is super good in replicating physical devices. Even better, try out Genymotion, it’s lightning fast and comes with a lot of different popular preset devices.
Also, have you tried rotating your device? All hell can break loose…
Common Mistake #3: Not Using Intents Intents are one of Android’s key components. It’s a way of passing data between different parts of the app or, even better, different apps on the system.
Let’s say you have a gallery app that can share a download link to some images via SMS. Which of the two options seems more logical?
Option 1:
Request the SEND_SMS permission.
<uses-permission android:name="android.permission.SEND_SMS" /> Write your own code for sending SMS using the SmsManager. Explain to your users why your gallery app needs access to services that can cost money, and why they have to grant this permission to use your app. Option 2:
Start an SMS Intent and let an app designed for SMS do the work
Intent sendIntent = new Intent(Intent.ACTION_VIEW); sendIntent.setData(Uri.parse("sms:" + telephoneNumber)); sendIntent.putExtra("sms_body", x); startActivity(sendIntent); In case that you have any doubts, best solution is option 2!
This approach can be applied to almost anything. Sharing content, taking pictures, recording video, picking contacts, adding events, opening links with native apps, etc.
Unless there is a good reason to make a custom implementation (ex., a camera that applies filters), always use Intents for these scenarios. It will save you a lot of programming time, and strip the AndroidManifest.xml of unnecessary permissions.
Common Mistake #4: Not Using Fragments A while ago in Honeycomb, Android introduced the concept of fragments. Think of them as separate building blocks with their own (rather complex) life cycles that exist inside an Activity. They help a lot with optimizing for various screens, they are easily managed by their parent activity, can be reused, combined and positioned at will.
Launching a separate activity for each app screen is terribly inefficient, since the system will try to keep them in memory as long as it can. Killing one won’t free the resources used by the others.
This Android programming tutorial recommends the proper use of fragments to make your app more efficient.
Unless you want to dig deep into the Android core and read this article, advocating against fragment usage, you should use fragments whenever possible. It basically says that fragments and cursor loaders have good intended purpose, but poor implementation.
Common Mistake #5: Blocking the Main Thread The main thread has a single purpose: keeping the user interface responsive.
Although the science behind measuring the frame rate our eyes/brain can perceive is complex and influenced by a lot of factors, a general rule is that anything below 24 fps with delay greater than 100 ms won’t be perceived as smooth.
This means that the user’s actions will have a delayed feedback, and the Android app you have programmed will stop responding. Stripping the user of his control over the app leads to frustration, frustrated users tend to give very negative feedback.
Even worse, if the main thread is blocked for a while (5 seconds for Activities, 10 for Broadcast Receivers), ANR will happen.
As you learn Android programming, you will come to know and fear this message. Follow these Android programming tips to minimize this occurrence.
This was so common in Android 2.x, that on newer versions the system won’t let you make network calls in the main thread.
To avoid blocking the main thread, always use worker/background threads for: 1. network calls 2. bitmap loading 3. image processing 4. database querying 5. SD reading / writing
Common Mistake #6: Reinventing the Wheel “OK, I won’t use the main thread. I’ll write my own code that communicates with my server in a background thread.”
No! Please don’t do that! Network calls, image loading, database access, JSON parsing, and social login are the most common things you do in your app. Not just yours, every app out there. There is a better way. Remember how Android has matured and grown as a platform? Here’s a quick list of examples:
Use gradle as a build system. Use Retrofit / Volley for network calls. Use Picasso for image loading. Use Gson / Jackson for JSON parsing. Use common implementations for social login. If you need something implemented, chances are it’s already written, tested and used widely. Do some basic research and read some Android programming tutorials before writing your own code!
Common Mistake #7: Not Assuming Success Great. We have learned that there is a better way for handling long running tasks, and we are using well documented libraries for that purpose. But the user will still have to wait. It’s inevitable. Packages are not sent, processed and received instantly. There is a round trip delay, there are network failures, packages get lost, and dreams get destroyed.
But all this is measurable. Successful network calls are far more likely than unsuccessful ones. So why wait for server response before handling the successful request? It’s infinitely better to assume success and handle failure. So, when a user likes a post the like count is immediately increased, and in unlikely event that the call failed, the user is notified.
In this modern world immediate feedback is expected. People don’t like to wait. Kids don’t want to sit in a classroom obtaining knowledge that has uncertain future payoff. Apps must accommodate to the user’s psychology.
Common Mistake #8: Not Understanding Bitmaps Users love content! Especially when the content is well formatted and looks nice. Images, for instance, are extremely nice content, mainly due to their property of conveying a thousand words per image. They also consume a lot of memory. A lot of memory!
Before an image is displayed on the screen, it has to be loaded into the memory. Since bitmaps are the most common way to do this, we’re going to provide an Android programming guide for the whole process:
Let’s say you want to display an image on your screen that you just took with your camera. The total memory needed for this is calculated with the following formula: memory_needed_in_bytes = 4 * image_width * image_height;
Why 4? Well, the most common / recommended bitmap configuration is ARGB_8888. That means that for each pixel we draw, we need to keep 8 bits (1 byte) for the alpha, the red, the greed and the blue channel in memory, in order to properly display it. There are alternatives, like the RGB_565 configuration that requires half the memory than ARGB_8888, but loses the transparency and the color precision (while maybe adding a green tint).
Let’s assume you have a brand new device with full HD screen and 12 MP camera. The picture you just took is 4000x3000 pixels large and the total memory needed to display it is: 4 bytes * 4000 * 3000 = 48 MB
48 megabytes of your RAM just for a single image!? That’s a lot!
Now let’s take the screen resolution into consideration. You are trying to show a 4000x3000 image on a screen that has 1920x1080 pixels, in worst case scenario (displaying the image full screen) you shouldn’t allocate more than 4 * 1920 * 1080 = 8.3 MB of memory.
Always follow the Android programming tips for displaying bitmaps efficiently:
Measure the view you’re showing your images in. Scale / crop the large image accordingly. Show only what can be displayed. Common Mistake #9: Using Deep View Hierarchy Layouts have an XML presentation in Android. In order to draw content, the XML needs to be parsed, the screen needs to be measured, and all the elements need to be placed accordingly. It’s a resource- and time-consuming process that needs to be optimized.
This is how the ListView (and more recently the RecyclerView) works.
If a layout has been inflated once, the system reuses it. But still, inflating the layout must happen at some point.
Let’s say you want to make a 3x3 grid with images. One way of doing this is a vertical LinearLayout containing 3 LinearLayouts with equal weight, each of them containing 3 ImageViews with equal weight.
Some Android programming beginners don’t always make the best use of LinearLayouts.
What do we get with this approach? A warning that “nested weights are bad for performance”.
There is a saying in the Android programming world, that I just made up: “With little effort all hierarchy can be flattened”.
In this case RelativeLayout or GridLayout will efficiently replace the nested
Common Mistake #10: Not Setting the minSdkVersion to 14 Well, this is not a mistake, but it is bad practice.
Android 2.x was a huge milestone in developing this platform, but some things should be left behind. Supporting older devices adds more complexity for code maintenance and limits the development process.
The numbers are clear, the users have moved on, the developers shouldn’t stay behind.
I’m aware that this doesn’t apply for some big markets with old devices (ex. India), and setting the minSdkVersion to 14, on the Facebook App, means leaving couple of million users without their favorite social network. But, if you are starting fresh and trying to create a beautiful experience for your users, do consider eliminating the past. Users that don’t have the resources, or feel the need to upgrade their device/OS, won’t have the incentive to try out a superior version of your Android app and ultimately spend money on it.[Source]-https://www.toptal.com/android/top-10-most-common-android-development-mistakes
0 notes
Text
Android App Widgets Tutorial
The most successful applications are often the simplest to use. This means that users want to see the information they need “at-a-glance” without unlocking their phone or launching the related app. On the Android platform you can achieve this in two different ways. The first, and most recent, is Android Wear, and you can learn more about in Getting Started with Android Wear with Kotlin. The second, the topic of this tutorial, is through the implementation of App Widgets. App Widgets have been available in the Android ecosystem since version Android 1.6 (Donut).
In this tutorial you’ll create an App Widget for a Coffee Log application that will allow you to control your daily usage of caffeine right from your home screen. :]
Note: Most developers love coffee, but we also know that health is very important, so I advise you to read the interesting article Health and Fitness for Developers
You’ll follow the typical process for Widget development and learn how to:
Create the Widget user interface
Get up-to-date information in the Widget
Interact with the Widget
If you’re new to Android Development, I recommended that you read Beginning Android Development with Kotlin before you start, as well as Kotlin for Android. For this tutorial you’ll also need Android Studio 3.1.2 or later.
Getting started
The first thing you should do is to download the sample project for this tutorial using the download button at the top or bottom of the tutorial. The zip file contains Android Studio projects for the starter and final versions of the Coffee Log application.
Unzip the file in a folder of your choice, go to File/Open or choose “Open an existing Android Studio project” from the Welcome to Android Studio window, and select the build.gradle file in the root folder of the starter project.
Once the project finishes loading and performing a Gradle build, you can have a look at the file structure, which should be like this:
Now that you are in the project, take a look around, especially in MainActivity, where all the logging happens. CoffeeTypes is a simple enum class with all the coffee types and their caffeine quantity in grams, while the CoffeeLoggerPersistence class is managing persistence using SharedPreferences.
It’s time to start tracking our caffeine consumption! Build and run the app by going to the Build\Make Project or using the green “play” button from the toolbar. The app will appear in your emulator or device, looking like this:
The app allows you to see how many grams of coffee you drank so far today and select new drinks to update your consumption count. Each selection leads to an update of the total displayed.
To use the app to log your coffee consumption, you have to launch the full application. As always, we can do better. What about making your user’s life simpler with an App Widget like this one?
With a Widget, you can access the same information as the application, and display a powerful motivational quote, just by using your device home screen. As you can see the layout is different because the list is now a set of 3 buttons.
There’s a lot to cover to create an App Widegt, so let’s dig in!
App widget anatomy
As the Android documentation says, an App Widget is a component that can be embedded in other applications, typically the Home screen. Security and performance are very important, so the Android platform has defined a very clear protocol that describes how an App Widget communicates with its own app and interacts with the hosting one. This is why the developer has to provide a configuration file with the following information:
The Widget layout
The Widget screen space
Whether the Widget can resize and how
A preview image that users will see when dragging the Widget on the screen
How often refreshing data can happen
An optional Configuration screen
As you’ll see, the Android system uses this information in different stages of the Widget lifecycle. The layout information is useful when the Widget is running and interacting with the user. Resize, preview and screen space required are useful when the user decides to select the Widget and drag it into the Home screen.
User interface
As you’ve seen in the previous images, apps and Widgets have different UIs. This is because the available space is different, as well as the user interaction modes. For both apps and Widgets, you can define the layout using a resource file.
You have to remember that a Widget is running in a different application and so some restrictions are in place for security and performance reasons. This means that you can only use a subset of the standard components, with which you can then interact only using a specific object of type RemoteViews. In particular, you can use only:
AnalogClock
Button
Chronometer
ImageButton
ImageView
ProgressBar
TextView
ViewFlipper
ListView
GridView
StackView
AdapterViewFlipper
Along with ViewStub, which allows a lazy inflation of a layout, you can only use the following containers:
FrameLayout
LinearLayout
RelativeLayout
GridLayout
Extensions of these classes are not allowed.
The check on these constraints is strong. Because of these restrinctions, a Widget layout has to be very simple and only use simple components like TextView, Button or ImageView.
Resizability and preview
The configuration file is the mechanism used to describe your Widget to the Android system. You can use this for setting the supported Widget sizes, telling the system whether the Widget is resizable or not, and providing an image to display when the user decides to add a Widget to their Home screen. You’ll see all of these when you insert your Widget for the first time.
Refreshing the widget
The data the Widget displays must always be up to date without wasting system resources. This means that the UI should be updated only when the data changes, and this can happen for different reasons. If the user interacts with the Widget, you need a way to update the UI and then send the event to the main app. If something is happening in the main app, you need a way to tell the Widget to refresh.
The Android platform also provides a third way, an automatic refresh of the Widget at an interval that can be set using the configuration file. Performance limitations don’t allow an update frequency greater than 30 minutes.
Widget customisation
In the case of Coffee Log, there are just three different type of coffees. But what if the user is not interested in Long coffee or they just want a different drink instead, or what if they want to simply change the quantity of grams. Or maybe the user wants to customise the background color of the Widget. As you’ll see, it’s possible to provide a configuration screen to allow all the needed customisation.
Create your Widget
Enough theory, now you can start creating your Widget. Creating a Widget requires the definition of some code and configuration files according to the specification defined by the Android platform.
Android Studio makes this process very easy, through the usage of a simple wizard, which you can access by selecting New\Widget\App widget from the File menu. You’ll see the following window:
Add the following input to the window:
Class name: CoffeeLoggerWidget
Minimum Width (cells): 3
Minimum Height (cells): 2
Here you can also see how it’s possible to define whether the Widget is resizable and what its possible destinations are. A Widget is usually part of the Home screen, but it could also part of the Keyguard, which is the screen that appears when the phone is locked.
Select Finish, and Android Studio will create three files for you:
CoffeeLoggerWidget.kt: this is a Kotlin class with the same name used in the wizard, and acts as the controller for the Widget. You’ll learn how to change this code in order to access the UI component through the RemoteViews class and how to receive and manage events from the Widget itself.
coffee_logger_widget_info.xml: this is the configuration file we described earlier with information about the refresh rate, resizability, dimensions, etc. This is the file you’re going to edit in order to provide a configuration Activity for the Widget.
coffee_logger_widget.xml: this file contains the widget’s user interface layout.
It’s important to note where all these files are in the project structure:
In particular, you see how the configuration file has been created as an XML resource file.
As you’ll see later, the wizard also made some changes to the app AndroidManifest.xml file.
Customizing the User Interface
In order to customize the UI for the Widget, open coffee_logger_widget.xml in the app\res\layout folder. The Android Studio wizard generated the following layout that you need to update:
<RelativeLayout xmlns:android="http://schemas.android.com/apk/res/android" android:layout_width="match_parent" android:layout_height="match_parent" android:background="#09C" android:padding="@dimen/widget_margin"> <TextView android:id="@+id/appwidget_text" android:layout_width="wrap_content" android:layout_height="wrap_content" android:layout_centerHorizontal="true" android:layout_centerVertical="true" android:layout_margin="8dp" android:background="#09C" android:contentDescription="@string/appwidget_text" android:text="@string/appwidget_text" android:textColor="#ffffff" android:textSize="24sp" android:textStyle="bold|italic" /> </RelativeLayout>
Remove the TextView and replace the RelativeLayout with a LinearLayout. In Android Studio, you can do this by double-clicking on the old name and typing the new name in its place. After this change you should have this:
<LinearLayout xmlns:android="http://schemas.android.com/apk/res/android" android:layout_width="match_parent" android:layout_height="match_parent" android:background="#09C" android:padding="@dimen/widget_margin"> </LinearLayout>
Note: You’re going to use styles that are already defined in the sample project. They contain text sizes and colors, heights, widths, alignments, and other style values. If you are curious about them, check out styles.xml in the res/values folder.
Next, add three more attributes to the LinearLayout:
... android:id="@+id/widget_layout" android:orientation="vertical" android:gravity="center" ...
The android:orientation and android:gravity attributes give the LinearLayout information about how to align its content. Providing an id is also important in case we need to get a reference to the layout in the Kotlin code.
To achieve rounded corners, change the android:background attribute to @drawable/background, a drawable available in the starter project. Now the root element of the layout looks like this:
<LinearLayout xmlns:android="http://schemas.android.com/apk/res/android" android:id="@+id/widget_layout" android:layout_width="match_parent" android:layout_height="match_parent" android:background="@drawable/background" android:gravity="center" android:orientation="vertical" android:padding="@dimen/widget_margin"> </LinearLayout>
Thinking vertically
For the sake of aesthetics, the user interface should look good regardless of the Widget size. It’s best to have the Widget elements spread over the available space. There are many ways to achieve that, but you should go for the simplest which consists of adding some TextView components that will expand in the remaining space between the rest of the elements.
Here’s a schematic of the layout you’ll create:
The green pattern will be a TextView that expands vertically and the blue pattern will be a TextView that expands horizontally. Keep this schematic in mind as you build the layout to understand why you add each element.
Note:If you’re tempted to fill the empty spaces using a Space instead of TextView, remember that a Widget has some UI restrictions and that a Space is not one of the allowed components.
The first element in the LinearLayout is a vertical space that you can define by adding this code as the first child:
<TextView style="@style/WidgetButtonVerticalSpace" />
Now you can add the TextView components for the amout of coffee:
<TextView android:id="@+id/appwidget_text" style="@style/WidgetTextView.Big" /> <TextView style="@style/WidgetTextView" android:text="@string/grams" />
Then add another TextView for the next vertical space before the buttons:
<TextView style="@style/WidgetButtonVerticalSpace" />
Notice that the first text view needs to have an id because you will need to change the text later on from the Kotlin code. The second one is fixed text. You’re using the predefined styles on the text views.
Next, add a container for the buttons as a LinearLayout with horizontal orientation:
<LinearLayout android:layout_width="match_parent" android:layout_height="wrap_content" android:orientation="horizontal"> <!-- Buttons go here --> </LinearLayout>
Then a TextView for the quote after the last vertical space.
<TextView style="@style/WidgetButtonVerticalSpace" /> <TextView android:id="@+id/coffee_quote" style="@style/WidgetQuote" />
Adding buttons
Now the green part of the layout is fnished and you have to deal with the blue part for the buttons following this schematic:
You’ve already created a container for them so you just need to start with a TextView that expands horizontally and will keep the first button at a distance from the left margin:
<TextView style="@style/WidgetButtonHorizontalSpace" />
Then you can add the first button for smallest coffee in the world:
<LinearLayout android:id="@+id/ristretto_button" style="@style/WidgetBeverageButton" > <ImageView style="@style/WidgetButtonImage" android:src="@drawable/ic_ristretto" /> <TextView style="@style/WidgetButtonText" android:text="@string/ristretto_short" /> </LinearLayout> <TextView style="@style/WidgetButtonHorizontalSpace" />
Each button has a LinearLayout that contains an ImageView and a TextView. After the button, you added another horizontally expanding TextView to help the buttons spread.
Add the next button for Espresso:
<LinearLayout android:id="@+id/espresso_button" style="@style/WidgetBeverageButton"> <ImageView style="@style/WidgetButtonImage" android:src="@drawable/ic_espresso" /> <TextView style="@style/WidgetButtonText" android:text="@string/espresso_short" /> </LinearLayout> <TextView style="@style/WidgetButtonHorizontalSpace" />
And the final button for the Long:
<LinearLayout android:id="@+id/long_button" style="@style/WidgetBeverageButton" > <ImageView style="@style/WidgetButtonImage" android:src="@drawable/ic_long_coffee" /> <TextView style="@style/WidgetButtonText" android:text="@string/long_coffee_short" /> </LinearLayout> <TextView style="@style/WidgetButtonHorizontalSpace" />
Phew! That was long but you’re done with the layout for the widget. :]
Run your Widget
The Widget you’ve created is beautiful, but it’s not doing anything quite yet. Build and run your app to make sure there’s no error in the XML. Just to be sure everything is fine, add the widget to the screen. If you’ve never added a widget to your Home screen before, here are the steps:
Go to the Home screen
Long press on an empty space
Select “Widgets”
Long press on the Coffee Log Widget
Drop it wherever you like on the screen
Your widget looks like this:
Notice how the autogenerated code populated the first TextView with “EXAMPLE”. Later in this tutorial, you will update it with the right number of coffee grams.
Performing actions
Now it’s time to add some interactivity to the Widget. When the user selects a button, you’ll have to open MainActivity, passing information about the selected coffee in order to update the total number of grams in today’s record.
Unfortunately, launching a simple Intent is not enough, because we have to remember that our Widget is running in an application that is different from ours and runs in another Android process. The Android platform has a solution for this called PendingIntent that is basically a way to ask another application to launch an Intent for you.
Open then the CoffeeLoggerWidget.kt file and add this utility function at the end of the companion object:
private fun getPendingIntent(context: Context, value: Int): PendingIntent { //1 val intent = Intent(context, MainActivity::class.java) //2 intent.action = Constants.ADD_COFFEE_INTENT //3 intent.putExtra(Constants.GRAMS_EXTRA, value) //4 return PendingIntent.getActivity(context, value, intent, 0) }
This Kotlin function has the responsibility of creating a PendingIntent for a given coffee:
First you define the Intent to launch as usual using the destination class as argument; in your case it’s the MainActivity class.
The MainActivity can be launched in different ways, and you need something that identifies how much to vary the coffee content. To do this you use an action MainActivity can recognise.
You also need to put into the Intent the quantity to add. Remember, MainActivity doesn’t know what button was pressed on the Widget!
Create the PendingIntent and return it to the caller of the function
Since you now have the action prepared, attach them to the buttons. Go to the updateAppWidget() function in the companion object and add the following code just before its last instruction appWidgetManager.updateAppWidget(...):
views.setOnClickPendingIntent(R.id.ristretto_button, getPendingIntent(context, CoffeeTypes.RISTRETTO.grams)) views.setOnClickPendingIntent(R.id.espresso_button, getPendingIntent(context, CoffeeTypes.ESPRESSO.grams)) views.setOnClickPendingIntent(R.id.long_button, getPendingIntent(context, CoffeeTypes.LONG.grams))
It is worth noting that updateAppWidget() is a convenience method the Android Studio wizard created in order to encapsulate the update logic for a given Widget. Looking at the same Kotlin class, you see that it’s invoked in the onUpdate() method for each Widget that requires an update. This call also happens when the Widget appears in the hosting application for the first time.
override fun onUpdate(context: Context, appWidgetManager: AppWidgetManager, appWidgetIds: IntArray) { // There may be multiple widgets active, so update all of them for (appWidgetId in appWidgetIds) { updateAppWidget(context, appWidgetManager, appWidgetId) } }
The RemoteViews class
Now your code should look like this:
internal fun updateAppWidget(context: Context, appWidgetManager: AppWidgetManager, appWidgetId: Int) { //1 val widgetText = context.getString(R.string.appwidget_text) //2 val views = RemoteViews(context.packageName, R.layout.coffee_logger_widget) //3 views.setTextViewText(R.id.appwidget_text, widgetText) //4 views.setOnClickPendingIntent(R.id.ristretto_button, getPendingIntent(context, CoffeeTypes.RISTRETTO.grams)) views.setOnClickPendingIntent(R.id.espresso_button, getPendingIntent(context, CoffeeTypes.ESPRESSO.grams)) views.setOnClickPendingIntent(R.id.long_button, getPendingIntent(context, CoffeeTypes.LONG.grams)) // 5 appWidgetManager.updateAppWidget(appWidgetId, views) }
Here’s what’s going on:
You’re using the Context in order to access a string resource.
An instance of the RemoteViews class is created and given the widget’s layout id. A RemoteViews is basically a mirror image of what you’re going to display in the Widget.
You set the previous string as content of the TextView with id R.id.appwidget_text. It’s very important to note that you can’t access the TextView directly and that only some operations are allowed using the RemoteViews; in this case you’re setting a text.
Using the RemoteViews instance, you register a PendingIntent to use when the user clicks on a each Widget button.
The last instruction binds the specific instance of RemoteViews to the specific instance of the Widget.
Build and run now. You won’t see any difference in the widget, but clicking the Widget buttons will open the app with an updated value of grams. Great job!
Updating the Widget
Widgets should always display the lastest available information, and the update frequency depends on the specific type of data. A Weather Widget doesn’t need a very frequent update, unlike the score of a football match or the price of a specific stock.
You need a way to invoke the previous onUpdate() method at a specific time interval in order to create the new RemoteViews with the new data.
The following drawing gives you an idea of the process:
The problem is how to send the “I need a refresh!” message to the Widget.
Widget configuration
When the update frequency you need is longer than 30 minutes, you don’t need to write any code and you can simply rely on the configuration file coffee_logger_widget_info.xml Android Studio generated in the res\xml folder.
<?xml version="1.0" encoding="utf-8"?> <appwidget-provider xmlns:android="http://schemas.android.com/apk/res/android" android:initialKeyguardLayout="@layout/coffee_logger_widget" android:initialLayout="@layout/coffee_logger_widget" android:minHeight="110dp" android:minWidth="180dp" android:previewImage="@drawable/example_appwidget_preview" android:resizeMode="horizontal|vertical" android:updatePeriodMillis="86400000" android:widgetCategory="home_screen"> </appwidget-provider>
The Widget refresh rate is the one defined in the attribute android:updatePeriodMillis. The default value is one day in milliseconds.
Managing updates requests
If you understand how the Android platform manages updates to your Widget, you can replicate the same thing at will. The Android Studio wizard created the CoffeeLoggerWidget class that extends AppWidgetProvider, but we didn’t realize that this was a particular implementation of a BroadcastReceiver.
You can see that by looking at the updates the wizard made to the AndroidManifest.xml file:
<?xml version="1.0" encoding="utf-8"?> <manifest xmlns:android="http://schemas.android.com/apk/res/android" package="com.raywenderlich.android.coffeelogs"> - - - - <receiver android:name=".CoffeeLoggerWidget"> <intent-filter> <action android:name="android.appwidget.action.APPWIDGET_UPDATE" /> </intent-filter> <meta-data android:name="android.appwidget.provider" android:resource="@xml/coffee_logger_widget_info" /> </receiver> - - - - </manifest>
Based on the specific Intent‘s action, the AppWidgetProvider dispatches the call to a different methods. Launching an Intent with the android.appwidget.action.APPWIDGET_UPDATE action results in the invocation of the onUpdate() function.
This is exactly what the Android system does at the interval set in the coffee_logger_widget_info.xml configuration file. This means that the updateAppWidget() function is the perfect place for the code to execute on every update.
So add the following line to the beginning of the function:
val coffeeLoggerPersistence = CoffeeLoggerPersistence(context)
and change widgetText to take the value from there:
val widgetText = coffeeLoggerPersistence.loadTitlePref().toString()
Good! Build and run and you’ll see that the widget is periodically updating the “grams” value. Seems like someone had a little too much coffee:
Update the widget manually
If your app needs to update the data in the Widget more frequently, you already have the solution: you can simply periodically launch the same Intent the Android system does. In the case of the Coffee Log application this happens every time the user selects a coffee in the app.
Open MainActivity and add the following code at the end of refreshTodayLabel:
// Send a broadcast so that the Operating system updates the widget // 1 val man = AppWidgetManager.getInstance(this) // 2 val ids = man.getAppWidgetIds( ComponentName(this, CoffeeLoggerWidget::class.java)) // 3 val updateIntent = Intent(AppWidgetManager.ACTION_APPWIDGET_UPDATE) // 4 updateIntent.putExtra(AppWidgetManager.EXTRA_APPWIDGET_IDS, ids) // 5 sendBroadcast(updateIntent)
Since this code has some new elements, let me walk you through it:
Get the AppWidgetManager instance, which is responsible for all the installed Widgets.
Ask for the identifiers of all the instances of your widget (you could add more than one to your homescreen).
Create an Intent with the android.appwidget.action.APPWIDGET_UPDATE action asking for an update.
Add the ids of the widgets you are sending the Intent to as extras of the Intent for the AppWidgetManager.EXTRA_APPWIDGET_IDS key.
Finally, send the broadcast message.
Build and run tha app to check that everytime you add some coffee, the widget also updates.
Communicating via Service
Not all the updates needed for Widgets are a consequence of an action from the user. Typical cases are data from a server through periodic polling and push notification events. In cases like these, the request has to come from a different component, which you usually implement as an Android Service.
Choose File\New\Service\Service and change the name to CoffeeQuotesService.
When you click Finish, Android studio generates a Kotlin file for you for the Service.
In CoffeeQuotesService, replace the current implementation of onBind() with:
return null
Change the return type of onBind to be the nullable IBinder?.
Then add this function, which is the one the Android system invokes at every launch of the service Service:
override fun onStartCommand(intent: Intent?, flags: Int, startId: Int): Int { val appWidgetManager = AppWidgetManager.getInstance(this) val allWidgetIds = intent?.getIntArrayExtra(AppWidgetManager.EXTRA_APPWIDGET_IDS) //1 if (allWidgetIds != null) { //2 for (appWidgetId in allWidgetIds) { //3 CoffeeLoggerWidget.updateAppWidget(this, appWidgetManager, appWidgetId) } } return super.onStartCommand(intent, flags, startId) }
You’ve seen the first two lines before. The others do the following:
Check that the array of allWidgetIds was in the Intent.
Loop through the allWidgetIds list.
Update each widget.
Now, you need to call this service instead of directly updating the widget. Open CoffeeLoggerWidget and replace the content of onUpdate() with the following in order to start the Service:
val intent = Intent(context.applicationContext, CoffeeQuotesService::class.java) intent.putExtra(AppWidgetManager.EXTRA_APPWIDGET_IDS, appWidgetIds) context.startService(intent)
This creates an Intent, puts the Widget ids in the intent, and starts the Service.
In the companion object, add the following function:
private fun getRandomQuote(context: Context): String { //1 val quotes = context.resources.getStringArray(R.array.coffee_texts) //2 val rand = Math.random() * quotes.size //3 return quotes[rand.toInt()].toString() }
This function generates a random coffee quote:
It takes a quote array from the strings file
It picks a random number
Finally, it returns the string at the random position
After you have the string, update the widget. In updateAppWidget() add this before the last call:
views.setTextViewText(R.id.coffee_quote, getRandomQuote(context))
That’s it. Every time the widget updates, you get a new quote!
Making it personal
People like to personalize the look and functionality of their Home screens, and Widgets are no exception. You have to take into account that a general purpose Widget won’t bring much value to a user. To make it personal you need to let the users set up preferences and configurations.
Earlier, when covering the configuration of a Widget, you learned that it can have a Configuration screen. This is an Activity that is automatically launched when the user adds a Widget on the home screen. Note that the preferences are set up per Widget because users can add more than one instance of a Widget. It’s better to think about saving this preferences with the id of the Widget.
In this project, the configuration screen could contain a coffee amount limit. If the user logs more coffee than the limit, the Widget will turn into a soft but alarming pink.
Creating a preferences screen
The preference screen for a Widget is an Activity. Choose New\Activity\Empty activity from the File menu and edit the fields to be
Activity name: CoffeeLoggerWidgetConfigureActivity
Layout Name: activity_coffee_logger_widget_configure
Make sure the Launcher Activity checkbox is unchecked and the Source Language is Kotlin.
When you click Finish, Android Studio will generate the code for the new Activity and a template for the layout file, along with adding the registration of the Activity in the AndroidManifest.xml file.
Now create the layout for the configuration screen. Open activity_coffee_logger_widget_configure.xml and add the following:
<?xml version="1.0" encoding="utf-8"?> <LinearLayout xmlns:android="http://schemas.android.com/apk/res/android" android:layout_width="match_parent" android:layout_height="wrap_content" android:orientation="vertical" android:padding="16dp"> <TextView android:layout_width="match_parent" android:layout_height="wrap_content" android:layout_marginBottom="8dp" android:labelFor="@+id/appwidget_text" android:text="@string/coffee_amount_limit" /> <EditText android:id="@id/appwidget_text" android:layout_width="match_parent" android:layout_height="wrap_content" android:inputType="number" /> <Button android:id="@+id/add_button" android:layout_width="wrap_content" android:layout_height="wrap_content" android:layout_marginTop="8dp" android:text="@string/save_configuration" /> </LinearLayout>
The layout is nothing complicated: a TextView that represents a label to the EditText, and a Button for the user to save the preferences.
Know your limits
Open CoffeeLoggerWidgetConfigureActivity and add these fields above onCreate() (developers usually put fields at the beginning of the class):
private lateinit var appWidgetText: EditText private var appWidgetId = AppWidgetManager.INVALID_APPWIDGET_ID private val coffeeLoggerPersistence = CoffeeLoggerPersistence(this)
You will need to use these fields later to save the limit value for each widget.
In onCreate(), add the following code at the end:
//1 appWidgetText = findViewById(R.id.appwidget_text) //2 val extras = intent.extras //3 appWidgetId = extras.getInt( AppWidgetManager.EXTRA_APPWIDGET_ID, AppWidgetManager.INVALID_APPWIDGET_ID) //4 setResult(Activity.RESULT_CANCELED)
Here’s what the code does:
Find the EditText in the layout.
Get the extras from the Intent that launched the Activity.
Extract the appWidgetId of the widget.
Make sure that if the user doesn’t press the “Save Configuration” button, the widget is not added.
Finally, you need to save the configuration when the user presses the “Save Configuration” button. Below onCreate(), declare the following OnClickListener implementation:
private var onClickListener: View.OnClickListener = View.OnClickListener { // 1 val widgetText = appWidgetText.text.toString() // 2 coffeeLoggerPersistence.saveLimitPref(widgetText.toInt(), appWidgetId) // 3 val resultValue = Intent() resultValue.putExtra(AppWidgetManager.EXTRA_APPWIDGET_ID, appWidgetId) // 4 setResult(RESULT_OK, resultValue) // 5 finish() }
Here you:
Get the text input – the coffee limit.
Save the limit to local storage (using the Widget id).
Create a new Intent to return to the caller of the Activity and add the id of the Widget you’re configuring.
Tell the operating system that the configuration is OK. Do this by passing an Intent that contains the widget id.
Close the configuration screen
Attach this listener to the button by adding the following line below setContentView() in onCreate():
findViewById<View>(R.id.add_button).setOnClickListener(onClickListener)
This is a chained instruction that finds the Button object and sets its listener.
Linking preferences to the widget
It is a good idea to refresh the widget after the user saves the preferences. That’s because the limit might already be exceeded at the moment of adding a new widget. For this reason, write another method at the end of CoffeeLoggerWidgetConfigureActivity to trigger the refresh:
private fun updateWidget() { val appWidgetManager = AppWidgetManager.getInstance(this) CoffeeLoggerWidget.updateAppWidget(this, appWidgetManager, appWidgetId) }
The function retrieves the AppWidgetManager and triggers an update to the corresponding widget. Call this function in the OnClickListener after saving the coffee limit to coffeeLoggerPersistence. It should be before creating the Intent:
updateWidget()
To launch the configuration screen whenever the user adds a widget, you need to add it to the widget configuration file. With this in mind, open coffee_logger_widget_info.xml and add the following attribute to appwidget-provider:
android:configure="com.raywenderlich.android.coffeelogs.CoffeeLoggerWidgetConfigureActivity"
Build and run, then go to the home screen. Long press the widget and drag it to the “Remove” area. Add another widget as before and check that the configuration screen appears. It should look like this:
Enter a value in the field like 10 and press “Save configuration” to add the widget.
To make the widget react to the limit, add this in CoffeeLoggerWidget inside updateAppWidget*(, before the last line:
// 1 val limit = coffeeLoggerPersistence.getLimitPref(appWidgetId) // 2 val background = if (limit <= widgetText.toInt()) R.drawable.background_overlimit else R.drawable.background // 3 views.setInt(R.id.widget_layout, "setBackgroundResource", background)
Step by step:
First, get the limit saved by the user for that widget.
Decide if the user exceeds the limit of coffee and establish one of the two possible backgrounds: pink or blue.
Set the background to the widget's root element.
Finally, build and run. After the app opens log more coffees than the limit you set. Let's say your limit was 10: log three Espresso and go back to the home screen. As a result, your widget is now pink:
Best practices
Some final advice before you start adventuring into the world of Widgets:
Design the smallest Widget size you can. Don't take up screen real-estate if you don't need it. Be aware that the user might resize it into a bigger area.
Don't refresh the Widget too often because it will drain the battery. On the other hand, don't refresh it too rarely because it won't be useful on the screen.
Make sure you read the official guidelines for Widget design and follow the recommendations. Revisit them from time to time because things change and things get added.
Think of Widgets as a shortcut window into your app. Provide the most important information and actions in it.
Where to go from here
Congratulations, you've finished your App Widget! Download the final project using the button at the top or bottom of the tutorial.
You learned how to develop an App widget to track your coffee intake. In summary, some of your new skills are:
Create a widget layout
Link a configuration screen
Communicate via a Service
... and tie them all together. This is impressive!
You can learn more about App Widgets by checking out the official docs.
For a better understanding of Intents, have a look at the Android Intents Tutorial.
You can create a better user interface for your apps and widgets with more Material Design. Get a little knowledge boost from Android: An Introduction to Material Design.
If you have any questions or comments about Android App Widgets, please join the forum discussion below!
The post Android App Widgets Tutorial appeared first on Ray Wenderlich.
Android App Widgets Tutorial published first on https://medium.com/@koresol
0 notes
Photo

Tools for React Native Development
Tools, libraries, and services are an important part of every developer’s life, no matter which environment you’re developing for. And React Native is no exception. In this article, I’ll walk you through some of the best UI frameworks, libraries, components, development tools, and web services which will make you a happier and more productive React Native developer.
Text Editors and IDEs
Visual Studio Code is a text editor which has built-in IntelliSense, debugging, and Git integration capabilities. What makes it really good for React Native development is its React Native tools extension. This allows you to execute React Native commands from the command palette, add IntelliSense for React Native APIs, and debug code within the editor itself.
For more information regarding how to set up Visual Studio Code for React Native, check out this blog post: VSCode for React Native.
If you’re using Atom, you can install the Nuclide plugin. This plugin was specifically created for working with React Native, Flow, and Hack projects. It has a built-in debugger and element inspector with all the features you’re used to in Chrome Developer Tools. Flow support means that you get autocomplete, type-hinting, and code diagnostics out of the box.
If you want to explore more IDE and editor options, check out this blog post on the Top 10 Editors for React Native.
Development Tools
Development tools have a wide scope, so I’ll be grouping each tool based on its focus:
SDK
code quality
testing
debugging
SDK
When it comes to SDKs for React Native, nothing beats Expo. Expo allows you to easily prototype an app without the need for Android Studio or Xcode. It includes a set of components and libraries to help you speed up your development.
The Expo workflow consists of the following:
Create a new project using create-react-native-app.
Write the code in your favorite text editor.
Run the app using the Expo client app.
There’s no need to connect your phone to your computer. Simply scan the QR code on your terminal using the Expo client app, and it will automatically run your app. If you’re using Genymotion, Expo supports that too.
The only disadvantage when using Expo is that you cannot include any custom package which uses the device’s native functionality. Expo already includes a number of commonly used native packages such as the Camera, Facebook, and Map. But if you need to use a package that they don’t already support, then you’ll have to "eject" your app. At that point your app will be as if it was created with react-native init, and you’ll also lose the ability to run it using the Expo client app.
Code Quality
Checking the quality of your code is important, and that is why tools like ESLint exist. In a nutshell, a linting tool allows you to be more consistent with your code by checking it against a style guide. An example of such a style guide is Airbnb’s JavaScript Style Guide which specifies rules on how JavaScript code should be written. The linting tool then checks your code against those rules to ensure that they've been followed. There’s also a style guide for React projects.
If you’re using Sublime Text, here’s a good tutorial on how you can configure it so that you can have real-time feedback on the quality of your code while you’re coding: Sublime Linting for React and ES6. If you’re using another editor or IDE, be sure to look for a corresponding plugin which uses ESLint.
If you want to add static typing to your project, you can use Flow. Flow adds static-typing on top of JavaScript without you having to make any changes to your existing codebase. This is because Flow tries to infer the type whenever possible. For new projects, though, it's recommended that you explicitly specify the type to reap the full benefits of using Flow.
To get started using Flow, here’s a tutorial on how you can set up Flow for your React Native projects.
Testing
Enzyme is a testing utility for React which allows you to assert, manipulate, and traverse your component’s output. It provides methods such as shallow() to "shallowly" render your components, find() to traverse the rendered component, and expect() to assert the props or the content rendered within the component.
You can follow this guide to Using enzyme to Test Components in React Native to make your React Native app testable with enzyme. If you’re new to enzyme, you can read this tutorial on Testing React Components with Enzyme and Mocha.
Debugging
Reactotron is a desktop app that allows you to debug React and React Native apps. Some of its key features include inspecting, modifying, and subscribing to the app state, tracking HTTP requests made through the app, benchmarking the app performance, and tracking errors. If you’re using Redux, you can even dispatch actions and track sagas from within Reactotron.
Boilerplates and UI Frameworks
Snowflake is a boilerplate for full-stack React Native development. It includes everything from the front-end to the back-end of the app. So if you just want a tool that can help you quickly get started then you might find Snowflake useful. You can read the notes for more information on what packages and tools are used to put it up.
Alternatively, you can use Ignite. It's a command-line tool which also includes a boilerplate, generators, style guide for UI components, API Testing Tool, and more.
React Native already comes with UI components which you can use for user interaction. The problem is that they only have the most basic styling in order for each component to be distinguished for what it is (e.g. button, checkbox). If you want to add custom styles, you have to write your own CSS code.
This is where NativeBase comes in. It allows your app to have a truly native look and feel by implementing the same design used in native Android (Material Design) and iOS (Human Interface Guidelines) apps. Out of the box, you get custom components such as Floating Action Buttons, Spinners, and best of all, form components.
Libraries and Components
React Native has a huge community behind it, so there are lots of libraries and components that you can use. We could spend all day talking about these, so to keep things brief, I’ll focus on the following areas:
navigation
state management
animations
commonly used components and libraries
Navigation
React Navigation allows you to easily implement navigation in your React Native apps through the use of its built-in navigators such as the Stack Navigator, Tab Navigator, and Drawer Navigator. That's not all, though: in addition to in-app navigation, it also includes deep linking, Redux integration, and web integration. This makes it a really robust library for implementing navigation.
State Management
MobX provides the functionality to update and manage the app state used by React. What makes it a good candidate for state management in React is its simplicity and testability. It also has a short learning curve, so things like async functions and computed values are already handled behind the scenes.
For bigger and more complex applications, Redux is still recommended. This is because MobX is very liberal, not unlike Redux, which provides strict guidelines on how the state should be managed. So it's a wiser choice for bigger projects with more people working on them.
Animations
React Native already has an animation API built into it. In fact, there’s not just one, but two APIs for working with animation: Animated API and LayoutAnimation. Those two are very powerful but can be cumbersome, especially if all you want to do is apply basic animations such as moving an object up and down or making it bounce. In such cases, components like Animatable come in handy.
Commonly Used Components and Libraries
Here’s a list of components and libraries that are commonly used in React Native projects. These are compatible with both Android and iOS devices:
styled-components: allows you to write CSS code to style your React components.
react-native-calendar: for showing a calendar that users can interact with.
react-native-datepicker: for picking dates and times.
react-native-progress: for creating progress bars and spinners.
react-native-spinkit: a collection of loading indicators.
Vector Icons: allows you to use icons from your favorite icon font sources such as Font Awesome and Material Icons.
react-native-swiper: turns a collection of images or containers into swiping components.
react-native-scrollable-tab-view: tabbed navigation that you can swipe between.
react-native-lightbox: for viewing images in fullscreen pop-overs.
react-native-maps: allows you to integrate Google Maps into your apps. Not all features available in the Google Maps API are available, but the functionality it provides should be enough in most cases.
SGListView: a memory-friendly implementation of React Native’s built-in ListView component. If you need to show huge lists in your app, use this instead of ListView.
Formik: makes dealing with forms in React Native less painful. It allows you to get values in and out of form state, validate your forms, and handle their submission.
react-native-i18n: for implementing internationalization in your apps.
react-native-push-notification: implements local and remote push notifications.
InstantSearch: a collection of components for implementing search.
react-native-fs: allows you to access the device’s native filesystem.
react-native-camera: a camera component which allows you to take photos and videos from your app.
react-native-video: for playing videos from your filesystem or from a URL.
react-native-sqlite-storage: for storing and manipulating data from an SQLite database.
react-native-store: a key-value store based on AsyncStorage.
react-native-webrtc: for implementing WebRTC.
Web Services
You can build serverless apps and ease the deployment of your React Native apps by using web services. There are a plethora of web services out there, but I’ll focus on the following areas:
database
analytics
push notifications
code updates
continuous integration
Database
Realm is a real-time database with a focus on mobile apps. It includes features such as two-way data sync, offline-first capabilities, and data push. The Realm Mobile Database is open-source and cross-platform, which means that you can host the Realm Object Server on your own server and then use the Realm JavaScript library for free.
Not all features are available in the developer edition, but in most use cases you should be fine with just the developer edition because it includes the core features such as the Object Database, Realtime Synchronization, and Authentication. Here's a comparison of what you get for each edition: Realm Products and Pricing.
If Realm is too much for your needs, you can always stick with the AsyncStorage API that comes with React Native.
Analytics
Fabric is an all-in-one service that allows you, among other things, to add analytics in your app. There’s Answers, which gives you real-time statistics on how your app is being used. This includes the number of active users, the session length, and retention rate. There’s also Crashlytics, which gives you powerful crash reporting capabilities. All of it happens in real time, and you can view it in Fabric’s real-time dashboard. You can use the Fabric library to easily set up Fabric for your React Native app.
If you’d rather stick with a tried and tested solution like Google Analytics, there’s also a library that allows you to do that.
Push Notifications
There’s really no competition when it comes to implementing push notifications in apps. Firebase Cloud Messaging (previously known as Google Cloud Messaging) allows you to send push notifications to both Android and iOS apps. You can use the react-native-fcm package to communicate with FCM from your app.
Code Updates
CodePush allows you to deploy code updates to mobile apps directly to the users’ devices. CodePush acts as a central repository where you can deploy changes to HTML, CSS, JavaScript, and assets such as images. The corresponding CodePush code in the app would then pull these changes. This is great for pushing bug fixes to the app without the need for uploading it in the app store and waiting for users to update the app. You can use this package to pull updates from CodePush within your React Native app.
Continuous Integration
Bitrise is a Continuous Delivery Service for mobile app development. It allows you to run your tests, build the app, and automatically push it to your users’ devices every time you deploy your code.
Bitrise integrates with a bunch of services in every step of your development workflow. For example, when you push to your release branches on GitHub, Bitrise is notified of that push through webhooks. It will then begin running the tests. Once the tests pass, the build process begins. If it’s just a "soft release" (e.g. changes to the JavaScript code) then the changes can be deployed to the users through CodePush. But if there are changes to the native code (e.g. you added a Camera plugin), then Bitrise can also build an APK or IPA file and deploy it to Google Play or iTunes Connect.
Fastlane is a collection of tools that automate the build and release process for Android and iOS apps. For iOS, it handles tasks such as running your tests, generating screenshots, code signing, and releasing the app to the app store. It also includes beta testing tools such as Pilot and Boarding. Pilot allows you to upload your app to iTunes Connect and manage your TestFlight beta testers right from the command line. Boarding creates a signup page for TestFlight beta testers.
The tools are more geared towards iOS deployment, but you can also benefit if you’re deploying Android apps. Currently, there are only two tools available for Android deployment: Supply and Screengrab.
Supply allows you to automate the uploading of assets such as the app icon, promo graphics, and screenshots of your app. It also allows you to update your existing apps on the Google Play Store.
Screengrab, on the other hand, automates the generation of screenshots for multiple devices. Each screenshot can also be localized if your app supports multiple languages.
Conclusion
That’s it! In this article, you’ve learned about some of the tools, libraries, and services that you can use when developing React Native apps. What about you? What are your go-to tools when it comes to developing apps in React Native?
And while you're here, check out some of our other posts on React Native app development!
Mobile App
10 Best React Native App Templates of 2017
Nona Blackman
React Native
Practical Animation Examples in React Native
Wernher-Bel Ancheta
React
10 React Native Applications for You to Use, Study, and Apply
Eric Dye
React Native
Get Started With React Native Layouts
Wernher-Bel Ancheta
by Wernher-Bel Ancheta via Envato Tuts+ Code http://ift.tt/2zCYbPO
0 notes
Text
50+Best articles and videos guide step by step of React Native
React Native brings the React paradigm to mobile app development. It’s goal isn’t to write the code once and run it on any platform. The goal is to learn-once (the React way) and write-anywhere. An important distinction to make. In this React Native tutorial you’ll learn how to build native apps through 50+ articles and videos guide step by step of React Native.
1. How to build a basic application with React Native
These articles below will show you how to do that:
React Native Tutorial: Building Apps with JavaScript
In this React Native tutorial you’ll learn about a framework for building native iOS and Android applications from Facebook, based on the same principals behind their hugely popular React Javascript Framework for building declarative user interfaces.
>>> Learn more: Here
Getting Started with React Native in 20 Minutes
Nearly every type of app you’ll want to build will involve a login screen with cookies- this app will therefore serve as a perfect foundation for whatever you want to create. We’ll also take a tour of the basics of React Native, building basic views and components and getting familiar with React Native’s baked-in routing solution, the Navigator. If you’re familiar with React, you’ll have an easy time reading the code- but by the end of this tutorial, you should be comfortable enough with React Native’s structure to move on to more advanced topics.
>>> learn more: Here
Cold Dive into React Native: A Beginner’s Tutorial
In this tutorial, we will take a look at React Native’s architecture, the philosophy behind React Native, and how it differs from other solutions in the same space. By the end of the article, we will have transformed a React “Hello World” application into a React Native one.
>>> Learn more: Here
React Native Tutorial Part 1: Hello, React ; Part 2: Designing a Calculator ; Part 3: Developing a Calculator
The following tutorial will guide you through developing your first React Native application for both Android and iOS. It’s written using React Native version 0.31, the latest at time of writing, and is broken into three parts:
Part 1 of the tutorial will demonstrate project setup, writing a traditional “Hello World” application, and organizing the code prior to heading into Part 2. In Part 2, I’ll be guiding you through the process of designing a calculator app that runs on both platforms, using the latest and greatest that React Native has to offer. The goal is to get you up to speed on the basics of React Native, including flexbox and style sheets, and to give you a starting point from which we can continue to actually develop the calculator’s functionality. In Part 3, we’ll develop the actual calculator implementation, including listening to touch events, performing the arithmetic, and updating the UI using React Native’s state.
Movie Fetcher
In this tutorial we’ll be building a simple version of a Movies app that fetches 25 movies that are in theaters and displays them in a ListView.
>>> Learn more: Here
Free React Native components/apps to build your first mobile app
Instead of wasting your time trying to build completely a React native mobile app, you killed time on your commute learning how to build a mobile app? Well, getting the five best free React native apps for your first mobile app, and you’ll be on your way to develop mobile apps.
>>> Learn more: Here
2. React Native Navigation examples for your learning
React Native navigation very important you must to know about it. these articles below will help you know React Native navigation.
Routing and Navigation in React Native
In this tutorial we will show you the basic knowledge about React Native navigation.
>>> Learn more: Here
React Native Example App: Navigation
The app itself is vaguely like twitter and/or tumblr. There are users that make posts. They follow other users. You can look at users they follow follows and those users’ posts. And on and on! The features (or styling) isn’t the main point. At this time, we’re mostly demonstrating architectural concepts.
>>> Learn more: Here
React Native Navigation
React Native Navigation provides 100% native platform navigation on both iOS and Android for React Native apps. The JavaScript API is simple and cross-platform – just install it in your app and give your users the native feel they deserve. Using redux? No problem: React Native Navigation comes with optional redux support out of the box. Ready to get started?
>>> Learn more: Here
3. React Native layout system flexbox
React Native Layout System
The layout system is a fundamental concept that needs to be mastered in order to create great layouts and UIs. React Native uses Flexbox to create the layouts, which is great when we need to accommodate our components and views in different screen sizes or even different devices.
>>> Learn more: Here
Understanding React Native flexbox layout
Working with flexbox layout can be tricky, especially in React Native. But there is nothing to scare. It’s easy to understand, just take a closer look not just on how it works but on why it works this way.
>>> Learn more: Here
Layout with Flexbox
A component can specify the layout of its children using the flexbox algorithm. Flexbox is designed to provide a consistent layout on different screen sizes.
You will normally use a combination of flexDirection, alignItems, and justifyContent to achieve the right layout.
>>> Learn more: Here
4. React Native networking
Make HTTP Requests In iOS With React Native
The Facebook documentation for React Native has (or had at the time of writing this) a tutorial for getting movie data from a remote API. However, it hardly explained how to customize the HTTP request. In fact, I found that a lot of the internet was missing clear cut documentation for RESTful requests with React.
This article should clear things up!
>>> Learn more: Here
Lets fetch some fresh data for our React Native apps
One of the basic concept for any modern App is Networking. In your React Native Apps you’re going to be provided with some alternatives, but here we’ll boil them down to a single one, let’s go through them.
>>> Learn more: Here
How to Create a News Reader With React Native: Setup and News Item Component
In this tutorial, we’ll be creating a news reader app with React Native. In this two-part series, I’m going to assume that this isn’t your first React Native app and I won’t go too much into detail regarding setting up your machine and running the app on a device. That said, I explain the actual development process in detail.
>>> Learn more: Here
Networking
Many mobile apps need to load resources from a remote URL. You may want to make a POST request to a REST API, or you may simply need to fetch a chunk of static content from another server.
>>> Learn more: Here
5. React native Animated
React Native Animations Using the Animated API
Getting up and running with React Native Animations. The recommended way to animate in React Native for most cases is by using the Animated API.
>>> Learn more: Here
React Native’s LayoutAnimation is Awesome
For n number of layout changes in your view, one line does it all. Set your state, allow your view to re-render, and LayoutAnimation handles all interpolation for you. For large and complex views, this is POWERFUL. In this example, I have a complex view with three possible states. Heights, widths, and item counts are rendered based on the state `index`, determined by which button is selected.
>>> Learn more: Here
Dynamic Animated Lists in React Native
Every time you want to add or remove something from your list to have the option to apply an animation transition to your elements.
>>> Learn more: Here
6. Real app tutorial
Build a Messaging App Using React Native
React and React Native is gaining a lot of momentum these days. For this tutorial, we’ll quickly build a messaging app using React Native with SendBird’s JavaScript SDK.
>>> Learn more: Here
How to make facebook reactions in React Native
Do you think you can keep up the pace with React Native and its community? We just recently talked about react-native-emoji and today we’re learning that we’re getting inline image support in React Native. We also mentioned Facebook’s Reactions, and a couple of days after we have a great tutorial straight from the man who animates all the things: Jason Brown!
>>> Learn more: Here
React Native – How to create Twitter exploding hearts
So we’re going to build this exploding heart, except just know Twitter kind of cheated. Not really but they used an image and played each frame adjusting background-position so it looked animated. Okay not cheated they used a really smart technique but what’s the fun in doing that when we can build it for real!
>>> Learn more: Here
The essential boilerplate to authenticate users on your React-Native app
It’s essential to many apps, and I myself have been wondering how I could provide a secure way for my users to register and authenticate to my apps without third-party strategies. Finding working examples online has been tough, so I have decided to implement my own based on the few examples I could find. The main goal of this article is to show you how to create and setup a few useful services to improve the life cycle of your app, to authenticate a user and access protected resources.
>>> Learn more: Here
7. Tools for tracking React Native
Native Directory
Native Directory is a curated list of 254 React Native libraries to help you build your projects.
Native Directory lets developers order the list of libraries by last update, most recommended, compatibility, health, downloads, issues and GitHub stars. Each listed item provides bar graphs for platform compatibility and health, platform targets, screenshots, last update, issues and more, pulling much of its data from GitHub repositories and the npm site for Node.js. Along the right-hand side, many different “topics” of the libraries are listed, ranging from actionbutton to webgl.
Awesome React Native
An awesome style list that curates the best React Native libraries, tools, tutorials, articles and more.
JS.coach
This is an opinionated catalog of open source JS packages.
Libraries come and go. The ecosystem evolves rapidly, and that’s a good thing. But it means you can’t rely on your bookmarks. Google may not be your best friend either, since it focuses on popular results — established solutions that may not be the best fit for your project.
This website indexes new packages and is updated roughly once per day, by using both automated scripts and manual curation. It is a complete rewrite and grown-up version of React.parts, a tiny project that started 2 years ago. Even if you are implementing your own solution for your particular problem, this can be a good place to find interesting code to learn from.
8. React native videos for learning react native
Introduction to React Native – Building a React Native app from scratch
https://youtu.be/r5OPRhelEIU
Navigating React Native Navigation – Kurtis Kemple
https://youtu.be/42ogpJVwtw0
React Native Crash Course
https://youtu.be/mkualZPRZCs
React.js Conf 2015 Keynote – Introducing React Native
https://youtu.be/KVZ-P-ZI6W4
How to Create An App in React Native and Use React Native Navigation
https://youtu.be/GdnZIs3kDNg
Eric Vicenti – Native Navigation for Every Platform at ReactEurope 2016
https://youtu.be/dOSwHABLvdM
Compilation by Atom ID @Reactsharing.com
Via https://reactsharing.com/50best-articles-and-videos-guide-step-by-step-of-react-native.html
0 notes
Text
Android: An Introduction to Material Design with Kotlin
Update Note: This tutorial has been updated to Kotlin by Joe Howard. The original tutorial was written by Megha Bambra.
Material Design with Kotlin!
Google’s material design brings with it exciting ways to delight your users with a visually appealing Android app. But wait—what is material design?
Google has described it as an interface that incorporates “tactile surfaces, bold graphic design and fluid motion to create beautiful, intuitive experiences.” Material design is the “user experience philosophy” for Android apps!
In this tutorial, you’ll integrate material design into an app called Travel Wishlist. Along the way, you’ll learn how to:
Implement the material theme;
Build dynamic views using widgets like RecyclerView and CardView;
Use the Palette API to generate color schemes that you can use for text or background views;
Create delightful interactions using Android animation APIs.
This tutorial assumes you have a basic familiarity with Android programming including Kotlin, XML, Android Studio and Gradle. If you’re completely new to Android, you might want to go through our Beginning Android Development series and Kotlin Introduction first.
To follow along with this tutorial, you’ll need to use Android Studio 3.0 Beta 2 or later and Kotlin 1.1.4-2 or later.
Let’s get started!
Getting Started
Download the starter project, then fire up Android Studio.
To import the starter project, first select Open an existing Android Studio project from the Welcome to Android Studio window:
Then select the downloaded project and click Open:
Travel Wishlist will be a very simple app. Users will see a grid of pictures from locations around the world, and be able to tap each picture to add notes about what to do and see.
Build and run the starter project, and you should see a screen with the most basic of interfaces:
Right now, the world is empty! You’re going to add material components to this existing project, including dynamic views, color schemes and animations that will truly complement the beauty of the photos in your dataset.
Open build.gradle for the app module and add RecyclerView, CardView, Palette, and Picasso to your dependencies:
dependencies { implementation fileTree(dir: 'libs', include: ['*.jar']) implementation "org.jetbrains.kotlin:kotlin-stdlib-jre7:$kotlin_version" implementation 'com.android.support:appcompat-v7:26.0.1' implementation 'com.android.support:recyclerview-v7:26.0.1' implementation 'com.android.support:cardview-v7:26.0.1' implementation 'com.android.support:palette-v7:26.0.1' implementation 'com.squareup.picasso:picasso:2.5.2' testImplementation 'junit:junit:4.12' androidTestImplementation 'com.android.support.test:runner:1.0.0' androidTestImplementation 'com.android.support.test.espresso:espresso-core:3.0.0' }
Here you’re simply declaring the dependencies that you’ll use throughout the rest of the tutorial. The first few of the added dependencies are Google-provided APIs, but the final one, Picasso, is a fantastic image downloading and caching library provided by the good folks at Square.
With the dependencies declared, it’s time to begin incorporating Material Design into your app!
Setting Up the Theme
Before doing anything else, you will update the theme. Open style.xml under the res/values directory. By default, the theme selected is Theme.AppCompat.Light.DarkActionBar. Add the following items inside the theme tag:
<item name="android:navigationBarColor">@color/primary_dark</item> <item name="android:displayOptions">disableHome</item>
Android automatically applies colorPrimary to the action bar, colorPrimaryDark to status bar and colorAccent to UI widgets like text fields and checkboxes.
In the code above, you also alter the color of the navigation bar. For android:displayOptions, you pass disableHome to accommodate the screen layouts in this sample app.
Build and run, and you’ll see the new color scheme in the app.
It’s a subtle change, but like every trip on your travel wishlist, upgrading this design begins with a single step!
Using RecyclerView and CardView
To give your users a window into all the cool places they might go, you need a view. You can use RecyclerView as a replacement for ListView, but it’s much more versatile than that. Google describes RecyclerView as “a flexible view for providing a limited window into a large data set.” In this section, you’re going to demonstrate this by switching the view from a list to a custom grid that uses the same data source which supplies the the users locations.
Implementing a Recycler View in XML
First, open activity_main.xml and add the following inside the LinearLayout tag:
<android.support.v7.widget.RecyclerView android:id="@+id/list" android:layout_width="match_parent" android:layout_height="match_parent" android:background="@color/light_gray"/>
Here you’re adding a RecyclerView to the activity’s layout, and specifying it should match the entire size of the parent view.
Initializing a Recycler View and Applying a Layout Manager
Before adding Kotlin code, configure Android Studio so that it automatically inserts import statements to save you having to add each one manually.
Go to Preferences\Editor\General\Auto Import and select the Add unambiguous imports on the fly checkbox. In MainActivity.kt, add the following to the top of the class:
lateinit private var staggeredLayoutManager: StaggeredGridLayoutManager
Here you’re simply declaring a property to hold a reference to the LayoutManager.
Next, add the following to the bottom of onCreate():
staggeredLayoutManager = StaggeredGridLayoutManager(1, StaggeredGridLayoutManager.VERTICAL) list.layoutManager = staggeredLayoutManager
In the code above, you set the layout manager of the RecyclerView to a StaggeredGridLayoutManager, which you’ll use to create two types of vertically staggered grids. Here you start with the first type, passing 1 for the span count and StaggeredGridLayoutManager.VERTICAL for the orientation. A span count of 1 makes this a list rather than a grid, as you’ll soon see. Later, you’ll add a compact grid formation with two columns.
Note that you’re using Kotlin Android Extensions to find list, so there is no need for a call to findViewById(). Make sure that the following line is present in your import statements, as it should be automatically added when you type in list:
import kotlinx.android.synthetic.main.activity_main.*
Creating Rows and Cells Using a Card View
CardView provides a consistent backdrop for your views, including rounded corners and a drop shadow. You’re going to implement it for the row/cell layout of your RecyclerView. By default, CardView extends FrameLayout and therefore includes the ability to host other child views.
From the res\layout directory, create a new Layout resource file and call it row_places.xml. Press OK to create it.
To create your desired cell layout, replace all the contents of this file with the code below:
<?xml version="1.0" encoding="utf-8"?> <android.support.v7.widget.CardView xmlns:android="http://ift.tt/1bfIhL2; xmlns:card_view="http://ift.tt/2xtPeai; android:id="@+id/placeCard" android:layout_width="match_parent" android:layout_height="wrap_content" android:layout_margin="8dp" card_view:cardCornerRadius="@dimen/card_corner_radius" card_view:cardElevation="@dimen/card_elevation"> <ImageView android:id="@+id/placeImage" android:layout_width="match_parent" android:layout_height="200dp" android:scaleType="centerCrop" /> <!-- Used for the ripple effect on touch --> <LinearLayout android:id="@+id/placeHolder" android:layout_width="match_parent" android:layout_height="match_parent" android:background="?android:selectableItemBackground" android:orientation="horizontal" /> <LinearLayout android:id="@+id/placeNameHolder" android:layout_width="match_parent" android:layout_height="45dp" android:layout_gravity="bottom" android:orientation="horizontal"> <TextView android:id="@+id/placeName" android:layout_width="match_parent" android:layout_height="wrap_content" android:layout_gravity="center_vertical" android:gravity="start" android:paddingStart="10dp" android:paddingEnd="10dp" android:textAppearance="?android:attr/textAppearanceLarge" android:textColor="@android:color/white" /> </LinearLayout> </android.support.v7.widget.CardView>
By adding xmlns:card_view="http://ift.tt/GEGVYd", you can define attributes like card_view:cardCornerRadius and card_view:cardElevation that are responsible for giving Material Design enabled Android apps their signature card-like look.
Notice that for mainHolder, you’ve added ?android:selectableItemBackground as the background. This enables the ripple effect animation when the user touches a cell, as seen in many Android apps now. You’ll get to see it in action soon.
Implementing an Adapter for a Recycler View
You’re going to use an adapter for the RecyclerView to bind data to the view. In the main/java folder, right-click on the package com.raywenderlich.android.travelwishlist package and select New\Kotline File/Class. Call the class TravelListAdapter.
Add the following code to the class, taking care to preserve the package statement at the top of the file:
// 1 class TravelListAdapter(private var context: Context) : RecyclerView.Adapter<TravelListAdapter.ViewHolder>() { override fun getItemCount(): Int { } override fun onCreateViewHolder(parent: ViewGroup?, viewType: Int): ViewHolder { } override fun onBindViewHolder(holder: ViewHolder?, position: Int) { } // 2 inner class ViewHolder(itemView: View) : RecyclerView.ViewHolder(itemView) { } }
A couple of things are happening above:
You make TravelListAdapter extend Recycler.Adapter so that you can implement logic for the override methods you’ll add soon. You also setup the constructor with a Context that will be passed in when you create an instance of TravelListAdapter in MainActivity, which you’ll do a bit later in the tutorial.
You create the ViewHolder class. Whereas the use of the ViewHolder pattern is optional in ListView, RecyclerView enforces it. This improves scrolling and performance by avoiding findViewById() for each cell.
Update the RecyclerView.Adapter methods in TravelListAdapter to the following:
// 1 override fun getItemCount() = PlaceData.placeList().size // 2 override fun onCreateViewHolder(parent: ViewGroup, viewType: Int): ViewHolder { val itemView = LayoutInflater.from(parent.context).inflate(R.layout.row_places, parent, false) return ViewHolder(itemView) } // 3 override fun onBindViewHolder(holder: ViewHolder, position: Int) { val place = PlaceData.placeList()[position] holder.itemView.placeName.text = place.name Picasso.with(context).load(place.getImageResourceId(context)).into(holder.itemView.placeImage) }
Here’s what’s happening:
getItemCount() returns the number of items from your data array. In this case, you’re using the size of the PlaceData.placeList().
onCreateViewHolder(...) returns a new instance of your ViewHolder by passing an inflated view of row_places.
onBindViewHolder(...) binds the Place object to the UI elements in ViewHolder. You’ll use Picasso to cache the images for the list.
Add a field in MainActivity that will hold a reference to your adapter:
lateinit private var adapter: TravelListAdapter
And then create an instance of your adapter and pass it to the RecyclerView at the bottom of onCreate(), just after you configure the layout manager:
adapter = TravelListAdapter(this) list.adapter = adapter
Now build and run the app, and you’ll see a populated list of places.
Which place is calling your name? I like the look of that turquoise water. But wherever you want to go, you’ll want to cultivate your dream by taking notes about what to do there. First, you need to make the cells respond to a user’s touch.
Implementing a Click Interface for Each Cell
Unlike ListView, RecyclerView doesn’t come with an onItemClick interface, so you have to implement one in the adapter. In TravelListAdapter, create a property to hold an instance of OnItemClickListener. Add the following to the top of TravelListAdapter:
lateinit var itemClickListener: OnItemClickListener
Now implement View.OnClickListener by adding the interface to the ViewHolder inner class definition like this:
inner class ViewHolder(itemView: View) : RecyclerView.ViewHolder(itemView), View.OnClickListener {
Then add the following method stub to the inner ViewHolder class:
override fun onClick(view: View) { }
Hook the two up by adding the following init block to the top of ViewHolder:
init { itemView.placeHolder.setOnClickListener(this) }
Above, you initiate setOnClickListener for placeHolder and implement the onClick override method.
You need to do a few more things to implement the onClick interface for the RecyclerView. First, after the inner ViewHolder class definition add the following:
interface OnItemClickListener { fun onItemClick(view: View, position: Int) }
Next, add the setter method of the onClickListener to TravelListAdapter:
fun setOnItemClickListener(itemClickListener: OnItemClickListener) { this.itemClickListener = itemClickListener }
Now implement the logic in the empty onClick() stub within the inner ViewHolder class:
override fun onClick(view: View) = itemClickListener.onItemClick(itemView, adapterPosition)
In MainActivity, create an instance of OnItemClickListener above onCreate():
private val onItemClickListener = object : TravelListAdapter.OnItemClickListener { override fun onItemClick(view: View, position: Int) { Toast.makeText(this@MainActivity, "Clicked " + position, Toast.LENGTH_SHORT).show() } }
Finally, set the listener to the adapter by adding the following code to the bottom of onCreate(), just after where you set the adapter:
adapter.setOnItemClickListener(onItemClickListener)
Build and run. Now when you tap a cell you’ll see ripple effect every time you touch a row, and a Toast notification displaying the position of the cell in the list.
From List to Grid and Back
StaggeredLayoutManager lets you add versatility to your layouts. To change your existing list to a more compact two-column grid, you simply have to change the spanCount of the StaggeredLayoutManager in MainActivity.
In toggle(), add the following to the top of the showGridView():
staggeredLayoutManager.spanCount = 2
And now add the following to the top of showListView():
staggeredLayoutManager.spanCount = 1
Here you’re simply switching between single and double span counts, which displays single and double columns respectively.
Build and run and use the action bar button to toggle between list and grid views.
Using the Palette API in the List
Now you can add some interesting Material Design features into the mix, starting with the Palette API. Head back to TravelListAdapter, where you’ll define a background color for placeNameHolder that will be determined dynamically using the colors in the image.
Add the following to the bottom of onBindViewHolder(...):
val photo = BitmapFactory.decodeResource(context.resources, place.getImageResourceId(context)) Palette.from(photo).generate { palette -> val bgColor = palette.getMutedColor(ContextCompat.getColor(context, android.R.color.black)) holder.itemView.placeNameHolder.setBackgroundColor(bgColor) }
The generate(...) method creates a color palette in the background, and is passed a lambda that is called when the palette has been generated. Here you can access the generated color palette and set the background color of holder.itemView.placeNameHolder. If the color doesn’t exist, the method will apply a fallback color — in this case, android.R.color.black.
Build and run to see the Palette API in action!
Note: The Palette API can extract the following color profiles from an image:
Vibrant
Dark Vibrant
Light Vibrant
Muted
Dark Muted
Light Muted
I encourage you to experiment with these. Instead of palette.getMutedColor(...), try palette.getVibrantColor(...), palette.getDarkVibrantColor(...) and so on.
Using the New Material APIs
In this section, you’ll use DetailActivity and its corresponding activity_detail layout, and make them cooler by infusing some of the new Material Design APIs.
First, you’ll want to see how the detail view currently looks in the starter project. To see this, first add the following to the companion object of DetailActivity:
fun newIntent(context: Context, position: Int): Intent { val intent = Intent(context, DetailActivity::class.java) intent.putExtra(EXTRA_PARAM_ID, position) return intent }
Then, go to MainActivity and replace the Toast in onItemClick(...) of onItemClickListener with the following:
startActivity(DetailActivity.newIntent(this@MainActivity, position))
You can pass the position of the place object via the intent so that DetailActivity can retrieve the information and use it to layout the interface. That’s what you’re doing here.
Build and run.
There isn’t anything crazy going on here (yet!), but you’ve got a nice foundation on which to start adding those highly anticipated Material Design APIs. You also see a cool FloatingActionButton, one of the widgets introduced by Material Design.
Adding a Reveal Animation
Now you want to give your users the ability to add notes about what they’d like to do in each of these stunning places. For this, activity_detail.xml already has an edittext that is hidden by default. When a user taps the FAB, it reveals itself with a cool animation like below:
Open DetailActivity. There are two methods you have yet to implement:
revealEditText()
hideEditText()
First, add the following lines inside revealEditText():
val cx = view.right - 30 val cy = view.bottom - 60 val finalRadius = Math.max(view.width, view.height) val anim = ViewAnimationUtils.createCircularReveal(view, cx, cy, 0f, finalRadius.toFloat()) view.visibility = View.VISIBLE isEditTextVisible = true anim.start()
The two int values are getting the x and y positions of the view with a slight offset. This offset gives the illusion that the reveal is happening from the direction of your FAB.
Next, the radius gives the reveal the circular outline that you can see in the GIF above. All of these values — the x-position, y-position and the radius — you pass into the animation instance. This animation is using ViewAnimationUtils, which gives you the ability to create this circular reveal.
Since the EditText view is initially hidden, you set the view’s visibility to VISIBLE and set your boolean check isEditTextVisible to true. Finally, you can call start() on the animation.
To dismiss the view, add the following to hideEditText():
val cx = view.right - 30 val cy = view.bottom - 60 val initialRadius = view.width val anim = ViewAnimationUtils.createCircularReveal(view, cx, cy, initialRadius.toFloat(), 0f) anim.addListener(object : AnimatorListenerAdapter() { override fun onAnimationEnd(animation: Animator) { super.onAnimationEnd(animation) view.visibility = View.INVISIBLE } }) isEditTextVisible = false anim.start()
Here your goal is to hide the view and show the circular animation in the opposite direction. Therefore, you make the initial radius the width of the view and the ending radius 0, which shrinks the circle.
You want to show the animation first and then hide the view. To do this, you implement an animation listener and hide the view when the animation ends.
Now build and run and see this animation in action!
Note: If the keyboard presents itself, you’ll need to dismiss it explicitly to see the effect without obstruction. Comment out the call to inputManager.showSoftInput(...) in DetailActivity, but don’t forget to uncomment it. Oh, and don’t worry that your button doesn’t show the plus icon yet, you’ll fix that soon.
Morphing a Bezier Path for a Floating Action Button
Now that you have your reveal animation hiding and showing the edit text field, you can coordinate the icon on your FAB to look and respond just like the one shown below:
The starter project includes the vector paths for the plus and checkmark icons. You’ll learn how to animate – or morph – the paths from the plus to the checkmark, and vice versa.
Under the res/drawables directory, create a new resource file by going to New\Drawable resource file. Call it icn_morph and define animated-vector as the root element:
<?xml version="1.0" encoding="utf-8"?> <animated-vector xmlns:android="http://ift.tt/1bfIhL2; android:drawable="@drawable/icn_add"> </animated-vector>
animated-vector requires an existing android:drawable. In this case, the animated vector will start with a plus sign and morph into a checkmark, so you’ll set the drawable to icn_add.
Now for the actual morphing, add the following inside the animated-vector tag:
<target android:animation="@anim/path_morph" android:name="sm_vertical_line" /> <target android:animation="@anim/path_morph_lg" android:name="lg_vertical_line" /> <target android:animation="@anim/fade_out" android:name="horizontal_line" />
With the code above, you are essentially transforming the vertical line of the plus icon into a checkmark while fading out the horizontal line, as the diagram below illustrates:
Furthermore, the vertical line is comprised of two paths, a smaller vertical line and a larger one:
You can see from the diagram above that you can transform the first two targets, sm_vertical_line and lg_vertical_line, into a checkmark by drawing their paths at different angles, which is exactly what you do in the previous code block, along with fading out horizontal_line.
Next, you need to reverse this animation to transform the checkmark back into a plus sign. Create another drawable resource file, this time calling it icn_morph_reverse, and replace it’s contents with the following:
<?xml version="1.0" encoding="utf-8"?> <animated-vector xmlns:android="http://ift.tt/1bfIhL2; android:drawable="@drawable/icn_add"> <target android:animation="@anim/path_morph_reverse" android:name="sm_vertical_line"/> <target android:animation="@anim/path_morph_lg_reverse" android:name="lg_vertical_line" /> <target android:animation="@anim/fade_in" android:name="horizontal_line" /> </animated-vector>
The two lines that make up the final vertical line in the plus icon will now morph back into their original states and the horizontal line will fade into view, creating a smooth effect.
Now, to complete the animation. Open DetailActivity.kt and add the following to onClick(), at the end of the if branch before the else:
addButton.setImageResource(R.drawable.icn_morph) val animatable = addButton.drawable as Animatable animatable.start()
Here you set the image resource of the button to the icn_morph drawable you created earlier, extract the animatable from it, and then kick-off the animation.
Finally, add the following to the very bottom of the else branch:
addButton.setImageResource(R.drawable.icn_morph_reverse) val animatable = addButton.drawable as Animatable animatable.start()
Here you’re doing almost exactly the same as the previous step, except you assign icn_morph_reverse as the image resource so the animation plays out in the opposite direction.
Along with morphing the icon, the user’s click also adds the text from todoText to the toDoAdapter and refreshes the place activity list. This is not yet visible because of the white text, but in the next section, you’ll add vibrant color to your views so that the text stands out.
Build and run, and watch the magic unfold before your eyes! The FAB icon now morphs between a checkmark and a plus sign when it’s tapped.
Adding Dynamic Colors to Views Using Palette API
It’s time to add colors to this view using the Palette API. And not just any colors—as before, they will be dynamic colors!
In DetailActivity, flesh out colorize() by adding the following:
val palette = Palette.from(photo).generate() applyPalette(palette)
Just like you did previously, you generate a palette from a photo – although this time you do it synchronously – and then pass that palette onto applyPalette(). Replace the existing method stub for applyPalette() with this code:
private fun applyPalette(palette: Palette) { window.setBackgroundDrawable(ColorDrawable(palette.getDarkMutedColor(defaultColor))) placeNameHolder.setBackgroundColor(palette.getMutedColor(defaultColor)) revealView.setBackgroundColor(palette.getLightVibrantColor(defaultColor)) }
Here you’re you’re using the dark muted color, the muted color, and the light vibrant color as the background colors of the window, title holder, and reveal view respectively.
Finally, to kick-off this chain of events add the following line to the bottom of getPhoto():
colorize(photo)
It’s that time again… build and run your app! You can see the detail activity is now using a color scheme derived from the palette of the associated image.
Activity Transitions With Shared Elements
We’ve all seen and wondered about those nice image and text transitions in Google’s app which have been updated to use Material Design. Well, wait no more—you’re about to learn the intricacies of achieving smooth animation.
Note: Activity transitions, together with shared elements, allow your app to transition between two activities that share common views. For example, you can transition a thumbnail on a list into a larger image on a detail activity, providing continuity of the content.
Between the places list view, MainActivity, and the places detail view, DetailActivity, you’re going to transition the following elements:
The image of the place;
The title of the place;
The background area of the title.
Open row_places.xml and add the following to the declaration of the ImageView tag with an id of placeImage:
android:transitionName="tImage"
And then add this to the LinearLayout tag with an id of placeNameHolder:
android:transitionName="tNameHolder"
Notice that placeName doesn’t have a transition name. This is because it is the child of placeNameHolder, which will transition all of its child views.
In activity_detail.xml, add a transitionName to the ImageView tag with the id placeImage:
android:transitionName="tImage"
And, in a similar fashion, add a transitionName to the LinearLayout tag that has an id of placeNameHolder:
android:transitionName="tNameHolder"
Shared elements between activities that you want to transition should have the same android:transitionName, which is what you’re setting up here. Also, notice that the size of the image, as well as the height of the placeNameHolder are much larger in this activity. You’re going to animate all of these layout changes during the activity transition to provide some nice visual continuity.
In onItemClickListener() found in MainActivity, update the method to the following:
override fun onItemClick(view: View, position: Int) { val intent = DetailActivity.newIntent(this@MainActivity, position) // 1 val placeImage = view.findViewById<ImageView>(R.id.placeImage) val placeNameHolder = view.findViewById<LinearLayout>(R.id.placeNameHolder) // 2 val imagePair = Pair.create(placeImage as View, "tImage") val holderPair = Pair.create(placeNameHolder as View, "tNameHolder") // 3 val options = ActivityOptionsCompat.makeSceneTransitionAnimation(this@MainActivity, imagePair, holderPair) ActivityCompat.startActivity(this@MainActivity, intent, options.toBundle()) }
After adding this code, you will need to manually add the following import statement to the top of the file as Android Studio cannot automatically determine that this is the intended package.
import android.support.v4.util.Pair
There are a couple of things to highlight here:
You get an instance of both placeImage and placeNameHolder for the given position of the RecyclerView. You’re not relying on Kotlin Android Extensions here since you need the placeImage and placeNameHolder from the specific view.
You create a Pair containing the view and the transitionName for both the image and the text holder view. Note that you will once again have to manually add the import statement to the top of the file: android.support.v4.util.Pair.
To make the activity scene transition with shared views, you pass in your Pair instances and start the activity with your options bundle.
Build and run to see the image transition from the main activity to the detail activity:
However, the animation is a bit jumpy in two areas:
The FAB button suddenly appears in DetailActivity.
If you tap on a row under the action or navigation bar, that row appears to jump a bit before it transitions.
You’ll solve the FAB button issue first. Open DetailActivity.kt and add the following to windowTransition():
window.enterTransition.addListener(object : Transition.TransitionListener { override fun onTransitionEnd(transition: Transition) { addButton.animate().alpha(1.0f) window.enterTransition.removeListener(this) } override fun onTransitionResume(transition: Transition) { } override fun onTransitionPause(transition: Transition) { } override fun onTransitionCancel(transition: Transition) { } override fun onTransitionStart(transition: Transition) { } })
The listener you add to the enter transition is triggered when the window transition ends, which you use to fade in the FAB button. For this to be effective, set the alpha to 0 for the FAB in activity_detail.xml:
android:alpha="0.0"
Build and run! You’ll notice the FAB transition is much smoother!:
As for the action bar and navigation bar issues, begin by updating styles.xml, to set the parent theme to Theme.AppCompat.Light.NoActionBar:
<style name="AppTheme" parent="Theme.AppCompat.Light.NoActionBar">
Since there is no action bar defined in styles.xml, you’ll have to add it using individual XML views.
Open activity_main.xml and add the following inside LinearLayout, just above the RecyclerView tag:
<include layout="@layout/toolbar" />
This simply includes a toolbar layout that's provided as part of the starter project into the current layout. Now you need to make a similar change to the detail activity's layout.
Open activity_detail.xml and add the following at the very bottom of the first FrameLayout, just below the closing tag of the inner LinearLayout:
<include layout="@layout/toolbar_detail"/>
Next in MainActivity, you need to initialize the toolbar. Add the following to the bottom of the onCreate() method:
setUpActionBar()
Here you assign the result of the findViewById call to the new field, and then call setUpActionBar(). At the moment it's just an empty method stub. Fix that now by adding the following to setUpActionBar():
setSupportActionBar(toolbar) supportActionBar?.setDisplayHomeAsUpEnabled(false) supportActionBar?.setDisplayShowTitleEnabled(true) supportActionBar?.elevation = 7.0f
Here you set the action bar to be an instance of your custom toolbar, set the visibility of the title, disable the home button, and add a subtle drop shadow by setting the elevation.
Build and run. You'll notice that nothing much has changed, but these changes have laid the foundations of properly being able to transition the toolbar.
Open MainActivity and replace the existing onItemClickListener with this one:
private val onItemClickListener = object : TravelListAdapter.OnItemClickListener { override fun onItemClick(view: View, position: Int) { // 1 val transitionIntent = DetailActivity.newIntent(this@MainActivity, position) val placeImage = view.findViewById<ImageView>(R.id.placeImage) val placeNameHolder = view.findViewById<LinearLayout>(R.id.placeNameHolder) // 2 val navigationBar = findViewById<View>(android.R.id.navigationBarBackground) val statusBar = findViewById<View>(android.R.id.statusBarBackground) val imagePair = Pair.create(placeImage as View, "tImage") val holderPair = Pair.create(placeNameHolder as View, "tNameHolder") // 3 val navPair = Pair.create(navigationBar, Window.NAVIGATION_BAR_BACKGROUND_TRANSITION_NAME) val statusPair = Pair.create(statusBar, Window.STATUS_BAR_BACKGROUND_TRANSITION_NAME) val toolbarPair = Pair.create(toolbar as View, "tActionBar") // 4 val pairs = mutableListOf(imagePair, holderPair, statusPair, toolbarPair) if (navigationBar != null && navPair != null) { pairs += navPair } // 5 val options = ActivityOptionsCompat.makeSceneTransitionAnimation(this@MainActivity, *pairs.toTypedArray()) ActivityCompat.startActivity(this@MainActivity, transitionIntent, options.toBundle()) } }
The differences between the original implementation and this one are thus:
You've renamed the intent to provide more context;
You get references to both the navigation bar and status bar;
You've created three new instances of Pair - one for the navigation bar, one for the status bar, and one for the toolbar;
You've protected against an IllegalArgumentException that occurs on certain devices, such as the Galaxy Tab S2, on which navPair is null.
And finally you've updated the options that are passed to the new activity to include the references to the new views. You've used the Kotlin spread operator * on pairs, after changing it to a typed array.
Great! Build and run, and you’ll see a much smoother animation:
Now if you tap on a row under the action/toolbar or navigation bar, it doesn't jump before the transition; it transitions with the rest of the shared elements, which is much more pleasing to the eye. Switch to the grid view and you'll notice that the transitions work very nicely with that layout as well.
Ta-da! Here is a video of the final app in action:
http://ift.tt/2vYVWHm
Where to Go From Here?
Be proud of yourself: You’ve created a full-blown Android material app! To challenge yourself, try the following:
Use StaggeredLayoutManager to make a grid with three columns instead of two.
Experiment with the Palette API in both MainActivity and DetailActivity using different palette options.
Add a button on the place list and transition it to the detail view as a shared element—perhaps a favorite button.
Make those transitioning animations even cooler—check out Android's Newsstand app and see how it transitions from a grid to a detail view with the reveal animation. You have all the code here to replicate that.
Try to create all the morphing animations you did here, but using animated-vectors.
And of course, apply this knowledge to your apps so that they can be as cool as this one. :]
To find out more about Material Design then be sure to check out Google's recently redesigned Google Design website.
You can get the completed project here.
Feel free to share your feedback or ask any questions in the comments below or in the forums.
The post Android: An Introduction to Material Design with Kotlin appeared first on Ray Wenderlich.
Android: An Introduction to Material Design with Kotlin published first on http://ift.tt/2fA8nUr
0 notes