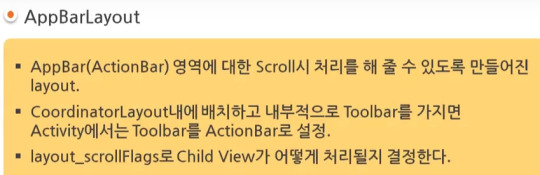
#AppBarLayout
Explore tagged Tumblr posts
Visit Tumblr Blog
Explore Tumblr blogs with no restrictions, modern design and the best experience.
Last Seen Tumblr Blogs


Fun Fact
The “We are the 99%” Tumblr blog became the slogan for the Occupy Wall Street movement.
Text
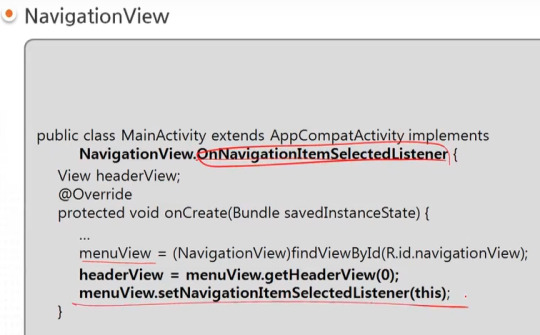
android 중급 11강 material design 2 tacademy
original source : https://youtu.be/7ep4effngGc
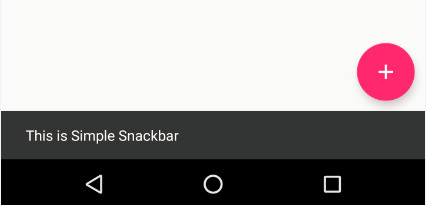
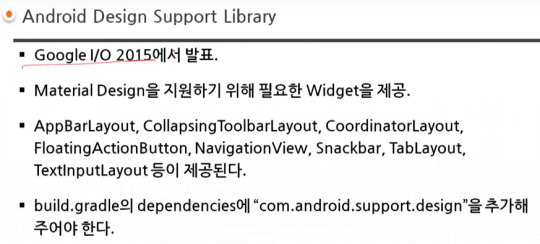
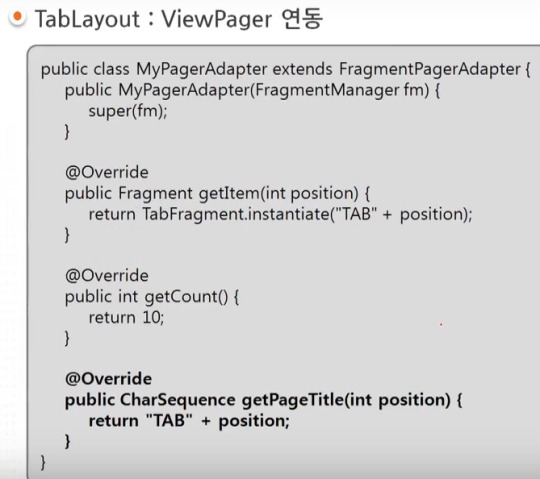
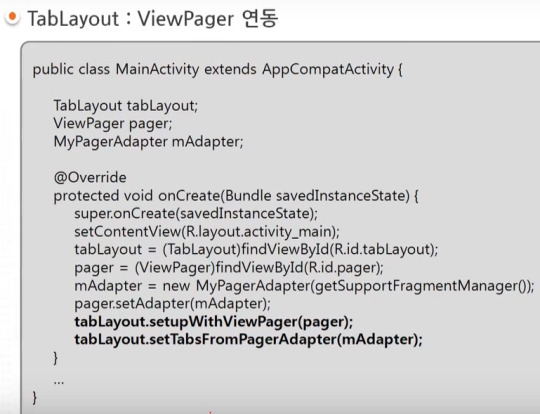
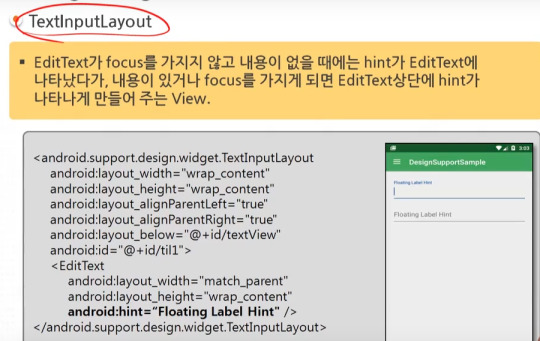
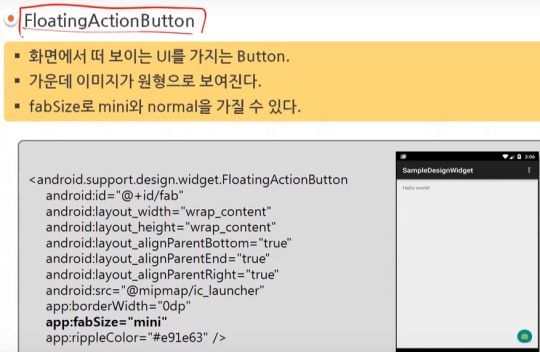
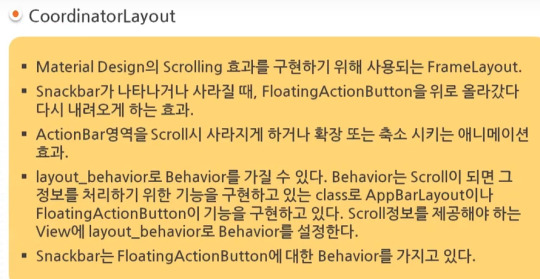
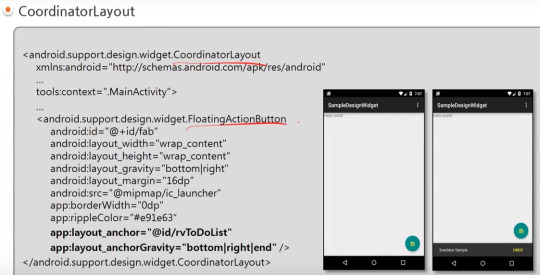
material design이 도입되면서 제공되는 새로운 widgets의 예를 보여주고 있다.
AppBarLayout 부터 TextInputLayout까지 모두 새로운 widgets에 해당한다.

=========================================================
.
.
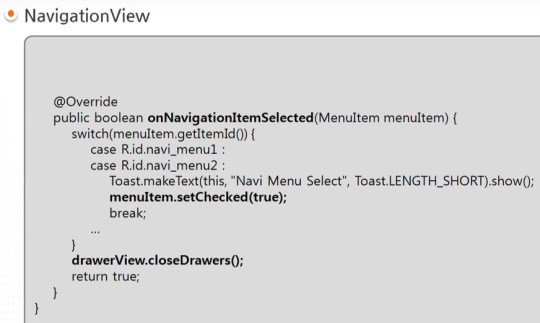
drawer layout 과 navigation view , navigation drawer 비교
https://stackoverflow.com/questions/44176576/navigation-drawer-vs-navigation-view-which-is-best-and-what-is-the-diffrence

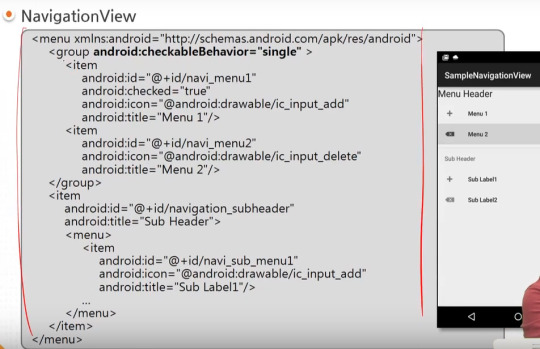
NavigationView를 DrawerLayout과 함께 사용한 방법을 아래서 보여주고 있다.

=========================================================
.
.


=========================================================
.
.

=========================================================
.
.
=========================================================
.
.
=========================================================
.
.

=========================================================
.
.
=========================================================
.
.
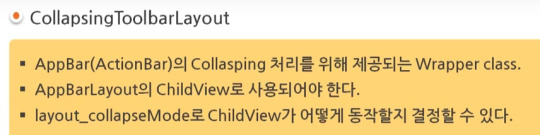
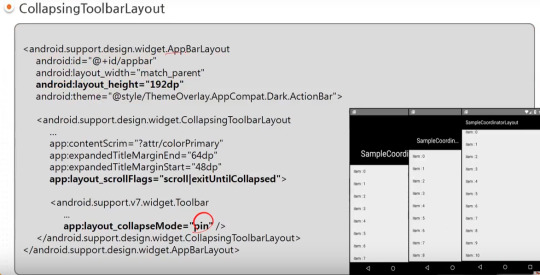
AppBarLayout과 CollapsingToolbarLayout 참고) 실제 예시 https://youtu.be/wCuM_di5M9Y?t=50

=========================================================
.
.
=========================================================
.
.


=========================================================
.
.
android studio 에서 blank activity template을 선택하는 경우 기본적으로 material design widgets이 어느 정도 설정되어서 시작된다.

#android#중급#11강#11#material#material design#tacademy#view#widget#navigationview#tablayout#textinputlayout#toast#snackbar#CollapsingToolbarLayout#AppBarLayout#CoordinatorLayout#tab
0 notes
Text
What you'll learn Implementing Material Design Feature at the end of this course will be a piece of cake for studentsThe concept of this awesome feature provided for Android App Development will be crystal clear.Material design is a comprehensive guide for visual, motion, and interaction design across platforms and devices. This course talks about all the important material design specifications, colors, design guidelines, and also using material widgets along with material themes and concepts. Curious about Android Material Design? This is the your final stop where you will get information regarding material design specifications and the related widgets being used with material design themes. The best part of this course is that you will learn to make several complete android demo apps from scratch - two major apps and several small apps - based on material design guidelines. Enhance your application user interface designing skills by implementing all new materialistic features introduced in Android Lollipop 5.0. Styling of Android Application is very important and one of the most critical feature in designing the app. To make this difficult task easy, I have come up with this course of Android Material Design, which begins with the basics of the material design and proceeds with covering some really complicated and most interesting stuffs like Android Material Design Animation. We will also dive into the material design support library and implement it in our demo applications. The topics we will be covering includes: 1. Material Design Themes and Colors Color PaletteMaterial Design ThemesMaintaining Backward CompatibilityExploring Tinting of Widgets 2. Material Design Toolbar Popup Menu or Overflow MenuContextual MenuToolbar Theme Customisation 3. Basic components of Android Material Design Floating Action ButtonSnackbarCoordinator Layout 4. Android Material Design Animation Ripple Effect: Touch FeedbackSlide Activity TransitionShared Element TransitionExplode Activity TransitionFade TransitionActivity Transition Overlaps 5. EditText with Floating Label Implementing Floating HintsValidation of TextFieldsValidation Error Resolution 6. AppbarLayout and CollapsingToolbarLayout Using AppBarLayout with Scroll FlagsHow to collapse Image along with CollapsingToolbarLayoutExploring various pin modes 7. RecyclerView and CardView Implementing RecyclerView in various orientationsUsing CardView to create list itemsAdding and Deleting an Item from RecyclerViewRecyclerView AnimationGrid, Staggered Grid Implementations 8. Navigation Drawer using NavigationView Inflate menu items in the Navigation Drawer using NavigationViewAdding dividers between the menu itemsGrouping the menu items under one category By the end of this series, you will be mastering the implementation of this features in your android app.Who this course is for:Students should have basic knowledge of Android Application Development. What are the basic components of an Android Application and the basic Hello World Program.
0 notes
Text
TabLayout With ViewPager2, AppBarLayout and Toolbar
TabLayout With ViewPager2, AppBarLayout and Toolbar
In this article, we will learn to implement Android TabLayout With ViewPager2 AppBarLayout and Toolbar in Kotlin. We will see how to design scrollable ui using those widgets in android application. Let’s have a quick demo of things we want to cover in this tutorial – Output Getting Started We have already seen how to design ui using TabLayout and ViewPager2. We have also noticed that we can n’t…

View On WordPress
0 notes
Photo

<com.google.android.material.appbar.AppBarLayout> Wrap your Toolbars in AppBarLayout for a polished look. This #AppExcellence pro tip from @bentrengrove helps when upgrading to Material You! → https://t.co/spu6MPJIy3 </com.google.android.material.appbar.AppBarLayout> https://t.co/UtuASxXaDR
0 notes
Text
SpringFabMenu
A menu of FloatingActionButton items, designed to be anchored on an AppBarLayout.
from The Android Arsenal http://ift.tt/2idSBwg
3 notes
·
View notes
Text
Android Navigation Drawer Tutorial
In this tutorial you will learn about android navigation drawer.
There are so little possibilities when it comes to choosing the main menu of an android application. If we start enlisting, we have TabLayout (used by the very famous WhatsApp), Bottom navigation drawer (used again by a facebook product Instagram) and then we have the most common form of menu ui and i.e. Navigation Drawer. Using a navigation drawer really adds a professional cover sort of thing to an android application and as an android developer, once you learn to implement it, trust me when I tell you this, it makes you feel as if you can now implement anything in an android application. I have been through that feeling and I wish you to experience the same. So, without any further delay, let’s get started on how to implement an Android Navigation Drawer.
Android Navigation Drawer Tutorial
Creating a New Activity
To begin with, hit the create a new project button in Android Studio and follow the steps below:-
Step 1: Assign a good name to your project.
Step 2: Select the minimum android version that you want your app to support to.
Step 3: This is most important step in which you need to select the navigation drawer activity in order to implement the navigation drawer. So, go ahead and select the navigation drawer activity from list and hit next and then hit finish.
Now let the project load and gradle be built and then we shall start configuring Navigation Drawer Activity.
The project is all set by now to get started with code. Before doing so, let me give you a quick walk through of the file structure of this activity.
In the XML
In the first folder of res, we have directory by the name drawable and it simply contains all the xml icons for the drawer menu items.
In the next directory called layout, we have the all the layout files required for this activity. On the top of the list, we have the activity_main.xml which looks as shown below:-
activity_main.xml
<?xml version="1.0" encoding="utf-8"?> <android.support.v4.widget.DrawerLayout xmlns:android="http://schemas.android.com/apk/res/android" xmlns:app="http://schemas.android.com/apk/res-auto" xmlns:tools="http://schemas.android.com/tools" android:id="@+id/drawer_layout" android:layout_width="match_parent" android:layout_height="match_parent" android:fitsSystemWindows="true" tools:openDrawer="start"> <include layout="@layout/app_bar_main" android:layout_width="match_parent" android:layout_height="match_parent" /> <android.support.design.widget.NavigationView android:id="@+id/nav_view" android:layout_width="wrap_content" android:layout_height="match_parent" android:layout_gravity="start" android:fitsSystemWindows="true" app:headerLayout="@layout/nav_header_main" app:menu="@menu/activity_main_drawer" /> </android.support.v4.widget.DrawerLayout>
In the above xml code, we have an include envelope and then we have the NavigationView. This include envelope is being used here to render the code in the app_bar_main.xml layout file. The purpose of using include here is to maintain the cleanliness and readability of the code. The Parent layout for activity_main.xml is DrawerLayout.
The next layout file in the list is app_bar_main.xml and it looks something like below:-
app_bar_main.xml
<?xml version="1.0" encoding="utf-8"?> <android.support.design.widget.CoordinatorLayout xmlns:android="http://schemas.android.com/apk/res/android" xmlns:app="http://schemas.android.com/apk/res-auto" xmlns:tools="http://schemas.android.com/tools" android:layout_width="match_parent" android:layout_height="match_parent" tools:context="dev.android.manish.navdrawertutorial.MainActivity"> <android.support.design.widget.AppBarLayout android:layout_width="match_parent" android:layout_height="wrap_content" android:theme="@style/AppTheme.AppBarOverlay"> <android.support.v7.widget.Toolbar android:id="@+id/toolbar" android:layout_width="match_parent" android:layout_height="?attr/actionBarSize" android:background="?attr/colorPrimary" app:popupTheme="@style/AppTheme.PopupOverlay" /> </android.support.design.widget.AppBarLayout> <include layout="@layout/content_main" /> <android.support.design.widget.FloatingActionButton android:id="@+id/fab" android:layout_width="wrap_content" android:layout_height="wrap_content" android:layout_gravity="bottom|end" android:layout_margin="@dimen/fab_margin" app:srcCompat="@android:drawable/ic_dialog_email" /> </android.support.design.widget.CoordinatorLayout>
It simply has the Toolbar layout enclosed by the AppBarLayout which adds a shadow underneath the toolbar. Again here also we have a include envelope which refers to content_main.xml. So, content_main would be the place to display the different drawer screens. It also has a FloatinActionButton just as we have the YouTube App as the upload button. Well, it’s got nothing to do with navigation drawer activity so, we’ll just remove it once we start working on the navigation drawer.
The next layout file is content_main.xml and it looks as shown below:-
content_main.xml
<?xml version="1.0" encoding="utf-8"?> <android.support.constraint.ConstraintLayout xmlns:android="http://schemas.android.com/apk/res/android" xmlns:app="http://schemas.android.com/apk/res-auto" xmlns:tools="http://schemas.android.com/tools" android:layout_width="match_parent" android:layout_height="match_parent" app:layout_behavior="@string/appbar_scrolling_view_behavior" tools:context="dev.android.manish.navdrawertutorial.MainActivity" tools:showIn="@layout/app_bar_main"> <TextView android:layout_width="wrap_content" android:layout_height="wrap_content" android:text="Hello World!" app:layout_constraintBottom_toBottomOf="parent" app:layout_constraintLeft_toLeftOf="parent" app:layout_constraintRight_toRightOf="parent" app:layout_constraintTop_toTopOf="parent" /> </android.support.constraint.ConstraintLayout>
The above code is where the content of the drawer screens is configured. Presently, it has nothing but a TextView saying Hello World but it’ll once we’re done configuring the Navigation Drawer.
The next layout file is nav_header_main.xml and it occupies the header of the drawer layout as shown below:-
Now you might wonder how has it been included in the main layout file i.e activity_main.xml. Well, it’s pretty simple. In the activity_main.xml, in the code for NavigationView, it has been included as the app:headerLayout to the drawer.
The next directory is menu in the res folder and it has activity_main_drawer.xml which looks something like as shown below:-
activity_main_drawer.xml
<?xml version="1.0" encoding="utf-8"?> <menu xmlns:android="http://schemas.android.com/apk/res/android"> <group android:checkableBehavior="single"> <item android:id="@+id/nav_camera" android:icon="@drawable/ic_menu_camera" android:title="Import" /> <item android:id="@+id/nav_gallery" android:icon="@drawable/ic_menu_gallery" android:title="Gallery" /> <item android:id="@+id/nav_slideshow" android:icon="@drawable/ic_menu_slideshow" android:title="Slideshow" /> <item android:id="@+id/nav_manage" android:icon="@drawable/ic_menu_manage" android:title="Tools" /> </group> <item android:title="Communicate"> <menu> <item android:id="@+id/nav_share" android:icon="@drawable/ic_menu_share" android:title="Share" /> <item android:id="@+id/nav_send" android:icon="@drawable/ic_menu_send" android:title="Send" /> </menu> </item> </menu>
This file accounts for the all menu items which show up in the drawer, their titles, icons other behaviours. It has been set as menu to the NavgiationView in the activity_main.xml as app:menu.
That’s all for xml. Now we shall look into the java section and understand it’s flow.
In the Java
In the java part, we have just one class and i.e. MainActivity.java. It’s code looks as shown below:-
MainActivity.java
package dev.android.manish.navdrawertutorial; import android.os.Bundle; import android.support.design.widget.FloatingActionButton; import android.support.design.widget.Snackbar; import android.view.View; import android.support.design.widget.NavigationView; import android.support.v4.view.GravityCompat; import android.support.v4.widget.DrawerLayout; import android.support.v7.app.ActionBarDrawerToggle; import android.support.v7.app.AppCompatActivity; import android.support.v7.widget.Toolbar; import android.view.Menu; import android.view.MenuItem; public class MainActivity extends AppCompatActivity implements NavigationView.OnNavigationItemSelectedListener { @Override protected void onCreate(Bundle savedInstanceState) { super.onCreate(savedInstanceState); setContentView(R.layout.activity_main); Toolbar toolbar = (Toolbar) findViewById(R.id.toolbar); setSupportActionBar(toolbar); FloatingActionButton fab = (FloatingActionButton) findViewById(R.id.fab); fab.setOnClickListener(new View.OnClickListener() { @Override public void onClick(View view) { Snackbar.make(view, "Replace with your own action", Snackbar.LENGTH_LONG) .setAction("Action", null).show(); } }); DrawerLayout drawer = (DrawerLayout) findViewById(R.id.drawer_layout); ActionBarDrawerToggle toggle = new ActionBarDrawerToggle( this, drawer, toolbar, R.string.navigation_drawer_open, R.string.navigation_drawer_close); drawer.setDrawerListener(toggle); toggle.syncState(); NavigationView navigationView = (NavigationView) findViewById(R.id.nav_view); navigationView.setNavigationItemSelectedListener(this); } @Override public void onBackPressed() { DrawerLayout drawer = (DrawerLayout) findViewById(R.id.drawer_layout); if (drawer.isDrawerOpen(GravityCompat.START)) { drawer.closeDrawer(GravityCompat.START); } else { super.onBackPressed(); } } @Override public boolean onCreateOptionsMenu(Menu menu) { // Inflate the menu; this adds items to the action bar if it is present. getMenuInflater().inflate(R.menu.main, menu); return true; } @Override public boolean onOptionsItemSelected(MenuItem item) { // Handle action bar item clicks here. The action bar will // automatically handle clicks on the Home/Up button, so long // as you specify a parent activity in AndroidManifest.xml. int id = item.getItemId(); //noinspection SimplifiableIfStatement if (id == R.id.action_settings) { return true; } return super.onOptionsItemSelected(item); } @SuppressWarnings("StatementWithEmptyBody") @Override public boolean onNavigationItemSelected(MenuItem item) { // Handle navigation view item clicks here. int id = item.getItemId(); if (id == R.id.nav_camera) { // Handle the camera action } else if (id == R.id.nav_gallery) { } else if (id == R.id.nav_slideshow) { } else if (id == R.id.nav_manage) { } else if (id == R.id.nav_share) { } else if (id == R.id.nav_send) { } DrawerLayout drawer = (DrawerLayout) findViewById(R.id.drawer_layout); drawer.closeDrawer(GravityCompat.START); return true; } }
In the onCreate method of this class, we have Floatingactionbutton and the DrawerLayout initialized and configured. Also, we have the NavigationView initialized and the onItemClick listener has been set to display the screen as per the menu item selected.
The options menu has been rendered and their actions have been defined in the onCreateOptionMenu and onOptionsItemSelected methods respectively.
Then, we have the OnNavigationItemSelected method where we’d handle the different menu item when clicked to render different screens as per the menu items.
That’s all you needed to understand the flow of the code for the NavigationDrawerActivity.
Let’s start setting the NavigationDrawerActivity.
Removing the FloatingActionButton:-
Alright, we shall begin with removing the FloatingActionButton from the navigation drawer. To do so, remove the xml code for FloatingActionButton in the app_bar_main.xml. After removing it, the app_bar_main.xml would look something as shown below:-
app_bar_main.xml
<?xml version="1.0" encoding="utf-8"?> <android.support.design.widget.CoordinatorLayout xmlns:android="http://schemas.android.com/apk/res/android" xmlns:app="http://schemas.android.com/apk/res-auto" xmlns:tools="http://schemas.android.com/tools" android:layout_width="match_parent" android:layout_height="match_parent" tools:context="dev.android.manish.navdrawertutorial.MainActivity"> <android.support.design.widget.AppBarLayout android:layout_width="match_parent" android:layout_height="wrap_content" android:theme="@style/AppTheme.AppBarOverlay"> <android.support.v7.widget.Toolbar android:id="@+id/toolbar" android:layout_width="match_parent" android:layout_height="?attr/actionBarSize" android:background="?attr/colorPrimary" app:popupTheme="@style/AppTheme.PopupOverlay" /> </android.support.design.widget.AppBarLayout> <include layout="@layout/content_main" /> </android.support.design.widget.CoordinatorLayout>
Next in the MainActivity.java, we need to remove to code relating to FloatingActionButton. To do so, go ahead and delete the following lines from the onCreate method of MainActivity.java:-
FloatingActionButton fab = (FloatingActionButton) findViewById(R.id.fab); fab.setOnClickListener(new View.OnClickListener() { @Override public void onClick(View view) { Snackbar.make(view, "Replace with your own action", Snackbar.LENGTH_LONG) .setAction("Action", null).show(); } });
After deletion of the above lines, the MainActivity.java would look something as shown below:-
MainActivity.java
package dev.android.manish.navdrawertutorial; import android.os.Bundle; import android.support.design.widget.FloatingActionButton; import android.support.design.widget.Snackbar; import android.view.View; import android.support.design.widget.NavigationView; import android.support.v4.view.GravityCompat; import android.support.v4.widget.DrawerLayout; import android.support.v7.app.ActionBarDrawerToggle; import android.support.v7.app.AppCompatActivity; import android.support.v7.widget.Toolbar; import android.view.Menu; import android.view.MenuItem; public class MainActivity extends AppCompatActivity implements NavigationView.OnNavigationItemSelectedListener { @Override protected void onCreate(Bundle savedInstanceState) { super.onCreate(savedInstanceState); setContentView(R.layout.activity_main); Toolbar toolbar = (Toolbar) findViewById(R.id.toolbar); setSupportActionBar(toolbar); DrawerLayout drawer = (DrawerLayout) findViewById(R.id.drawer_layout); ActionBarDrawerToggle toggle = new ActionBarDrawerToggle( this, drawer, toolbar, R.string.navigation_drawer_open, R.string.navigation_drawer_close); drawer.setDrawerListener(toggle); toggle.syncState(); NavigationView navigationView = (NavigationView) findViewById(R.id.nav_view); navigationView.setNavigationItemSelectedListener(this); } @Override public void onBackPressed() { DrawerLayout drawer = (DrawerLayout) findViewById(R.id.drawer_layout); if (drawer.isDrawerOpen(GravityCompat.START)) { drawer.closeDrawer(GravityCompat.START); } else { super.onBackPressed(); } } @Override public boolean onCreateOptionsMenu(Menu menu) { // Inflate the menu; this adds items to the action bar if it is present. getMenuInflater().inflate(R.menu.main, menu); return true; } @Override public boolean onOptionsItemSelected(MenuItem item) { // Handle action bar item clicks here. The action bar will // automatically handle clicks on the Home/Up button, so long // as you specify a parent activity in AndroidManifest.xml. int id = item.getItemId(); //noinspection SimplifiableIfStatement if (id == R.id.action_settings) { return true; } return super.onOptionsItemSelected(item); } @SuppressWarnings("StatementWithEmptyBody") @Override public boolean onNavigationItemSelected(MenuItem item) { // Handle navigation view item clicks here. int id = item.getItemId(); if (id == R.id.nav_camera) { // Handle the camera action } else if (id == R.id.nav_gallery) { } else if (id == R.id.nav_slideshow) { } else if (id == R.id.nav_manage) { } else if (id == R.id.nav_share) { } else if (id == R.id.nav_send) { } DrawerLayout drawer = (DrawerLayout) findViewById(R.id.drawer_layout); drawer.closeDrawer(GravityCompat.START); return true; } }
Now, Run the app and you shall find the FloatingActionButton gone.
Configuring Drawer Menu Items
Now, we need to configure the menu items in the activity_main_drawer.xml file. To do so, open the aforementioned xml file and overwrite it with the code shown below:-
activity_main_drawer.xml
<?xml version="1.0" encoding="utf-8"?> <menu xmlns:android="http://schemas.android.com/apk/res/android"> <group android:checkableBehavior="single"> <item android:id="@+id/nav_one" android:icon="@drawable/ic_menu_camera" android:title="One" /> <item android:id="@+id/nav_two" android:icon="@drawable/ic_menu_gallery" android:title="Two" /> <item android:id="@+id/nav_three" android:icon="@drawable/ic_menu_slideshow" android:title="Three" /> </group> </menu>
Each menu item has three basic attributes viz. id, title and icon. In the above code, we replaced the previous menu items with 3 menu items having titles One, Two and Three with item ids as nav_one, nav_two and nav_three respectively. The icons of these menu items have been left unchanged to avoid unnecessary imports. You can import the icons and change it later.
Now change the OnNavigationItemSelected method of the MainActivity.java class with the code as shown below:-
@SuppressWarnings("StatementWithEmptyBody") @Override public boolean onNavigationItemSelected(MenuItem item) { int id = item.getItemId(); if (id == R.id.nav_one) { // Handle the camera action } else if (id == R.id.nav_two) { } else if (id == R.id.nav_three) { } DrawerLayout drawer = (DrawerLayout) findViewById(R.id.drawer_layout); drawer.closeDrawer(GravityCompat.START); return true; }
In the above code, we just updated the ids of menu_items through which their actions were defined in this method. Like earlier you had, ids such as nav_camera, nav_gallery, etc here, but now we have ids such as nav_one, nav_two and nav_three and this is because we just updated the menu in the last step.
Now run the app and you shall find the drawer menu changed as shown below:-
Setting Up the Screen Contents
To set up the screen content, begin with changing the content_main.xml. Overwrite content_main.xml with the code shown below:-
content_main.xml
<?xml version="1.0" encoding="utf-8"?> <FrameLayout xmlns:android="http://schemas.android.com/apk/res/android" xmlns:tools="http://schemas.android.com/tools" android:layout_width="match_parent" android:layout_height="match_parent" tools:context="dev.android.manish.navdrawertutorial.MainActivity" android:id="@+id/container" />
In the above code, we replaced the constraint layout with a FrameLayout which is used to block an area of the screen to display a certain content. You’ll realize later how it is being used exactly. So, keep moving.
We’re going to have three Fragments here in this project each having it’s class and a layout resource file. If you don’t have any idea of fragments, don’t worry. Consider fragments just as parts of an activity. i.e An activity can contain multiple fragments.
Next, for the three fragments, create three java classes by the names of the drawer menu items viz One.class, Two.class and Three.class.
Next, make each of them extend them to Fragment v4.
Next, override the onCreateView method in each of these classes. This is the method where we’d specify the layout files for each of these fragments.
After the steps mentioned above, the One.java class would look something like shown below:-
One.java
package dev.android.manish.navdrawertutorial; import android.os.Bundle; import android.support.annotation.Nullable; import android.support.v4.app.Fragment; import android.view.LayoutInflater; import android.view.View; import android.view.ViewGroup; /** * Created by Manish on 9/27/2017. */ public class One extends Fragment { @Nullable @Override public View onCreateView(LayoutInflater inflater, @Nullable ViewGroup container, @Nullable Bundle savedInstanceState) { return super.onCreateView(inflater, container, savedInstanceState); } }
Next, create three xml layout resource files by the names viz. fragment_one, fragment_two and fragment_three.
Each of these layout files would simply have a textView saying the name of the fragment.
fragment_one.xml would look something like shown below:-
fragment_one.xml
<?xml version="1.0" encoding="utf-8"?> <RelativeLayout xmlns:android="http://schemas.android.com/apk/res/android" android:orientation="vertical" android:layout_width="match_parent" android:layout_height="match_parent"> <TextView android:layout_width="wrap_content" android:layout_height="wrap_content" android:text="One" android:textSize="25sp" android:textColor="@android:color/black" android:layout_centerInParent="true" /> </RelativeLayout>
Now, we have three Fragment classes namely One, Two and Three and we have three layout files for these fragment classes. To hook them up together, just update the onCreateView method in the three classes as shown below:-
For One.java, do it as shown below:-
One.java
@Override public View onCreateView(LayoutInflater inflater, @Nullable ViewGroup container, @Nullable Bundle savedInstanceState) { View view = inflater.inflate(R.layout.fragment_one, container, false); return view; }
For Two.java, do it as shown below:-
Two.java
@Override public View onCreateView(LayoutInflater inflater, @Nullable ViewGroup container, @Nullable Bundle savedInstanceState) { View view = inflater.inflate(R.layout.fragment_two, container, false); return view; }
For Three.java, do it as shown below:-
Three.java
@Override public View onCreateView(LayoutInflater inflater, @Nullable ViewGroup container, @Nullable Bundle savedInstanceState) { View view = inflater.inflate(R.layout.fragment_three, container, false); return view; }
Now, we have the three fragments all set.
Hooking the Fragments to the Drawer Menu Items
To set the fragments up with the drawer menu items, we need to add a new method to the MainActivity.java and i.e. displaySelectedFragment(). The code for this method is given below. Just copy it and paste it in your MainActivity.java class.
public void displaySelectedFragment(int item_id){ Fragment fragment = null; switch (item_id){ case R.id.nav_one: fragment = new One(); break; case R.id.nav_two: fragment = new Two(); break; case R.id.nav_three: fragment = new Three(); break; } if( fragment!=null ){ FragmentTransaction ft = getSupportFragmentManager().beginTransaction(); //this is where the id(R.id.container) of the FrameLayout in content_main.xml is being mentioned. Hence the fragment would be loaded into the framelayout ft.replace(R.id.container, fragment); ft.commit(); } }
In the above method, according to the menu items of the drawer, different fragments are being loaded into the FrameLayout in the content_main.xml file.
Now, update the OnNavigationitemSelected method in the MainActivity.java class with the code given below:-
@Override public boolean onNavigationItemSelected(@NonNull MenuItem item) { // item id is being passed into the method here displaySelectedFragment(item.getItemId()); DrawerLayout drawer = (DrawerLayout) findViewById(R.id.drawer_layout); drawer.closeDrawer(GravityCompat.START); return true; }
In the above code, the displaySelectedFragment method which we just created has been called. We’re just passing the selected item_id in this method so as to display the fragment as per the item id.
That’s it. You just linked all the fragments with drawer menu items successfully.
Run the app now and you shall find the fragment showing as per menu item selected as shown below:-
Setting up Home Screen
If you wish to have Fragment One as default fragment i.e. it appears as home screen, then just call the displaySelectedFragment() method at the end of onCreate method in MainActivity.java and pass the item id for the Fragment One i.e. R.id.nav_one just as shown below:-
Setting Screen Titles
If you wish to change the toolbar title as per the selected drawer menu item, then first of all you need to make a reference global and that is navigationView.
Mention the navigationView reference at the top of the MainActivity.java class as shown below:-
Next, initialize it in the onCreate method as shown below:-
Next, we need to add a method to the class MainActivity which would change the title of the screen as per the selected menu item. So, create a method by the name setScreenTitle() in MainActivity.java and copy the code given below into it’s body.
public void setScreenTitle(int item_id){ String title = ""; switch (item_id){ case R.id.nav_one: title = "One"; break; case R.id.nav_two: title = "Two"; break; case R.id.nav_three: title = "Three"; break; } getSupportActionBar().setTitle(title); }
Now, just call this method in the displaySelectedFragment method as shown below:-
And you have done it. You have successfully learnt the implementation of Android Navigation Drawer.
Run the app now and you shall see your drawer running well as shown below.
To help you even further, we have the source code available here for this project.
Project Source Code
Comment below if you have any queries related to above android navigation drawer tutorial.
The post Android Navigation Drawer Tutorial appeared first on The Crazy Programmer.
0 notes
Text
Android AppBarLayout With ViewPager and Toolbar
Android AppBarLayout With ViewPager and Toolbar
In this article, we will use android appBarLayout With ViewPager and Toolbar in Kotlin. We will design a ui that can be scrolled up and down to show or hide toolBar. Let’s have a quick demo of things we want to cover in this tutorial – Output Getting Started We have already seen how to covered basics of AppBarLayout, ViewPager or Toolbar. In this article, we are going to create an application…

View On WordPress
0 notes
Text
Android AppBarLayout Using Kotlin With Example
Android AppBarLayout Using Kotlin With Example
In this article, we will learn about android AppBarLayout using Kotlin. We will go through various example that demonstrates how to use different attributes of AppBarLayout. For example, In this article, we will get answer to questions like – What is AppBarLayout? Why should we consider AppBarLayout while designing ui for any app? What are possibilities using AppBarLayout while designing ui?…

View On WordPress
0 notes
Text
AppBarTranslateScaleBehavior
A CoordinatorLayout.Behavior<View> which interacts with an AppBarLayout as a dependency for translating and scaling a specific View of your choice.
from The Android Arsenal http://ift.tt/2iN3ZTM
0 notes
Text
PowerRefresh
This library support nested scroll for refresh and load more, so you can use it with CoordinatorLayout and AppBarLayout and so no..
from The Android Arsenal http://ift.tt/2oXYSO5
0 notes