#textinputlayout
Explore tagged Tumblr posts
Visit Tumblr Blog
Explore Tumblr blogs with no restrictions, modern design and the best experience.
Last Seen Tumblr Blogs


Fun Fact
The KCSC sent more than 20K requests to delete posts related to prostitution and porn to Tumblr from January to June 2017.
Text
android 중급 11강 material design 2 tacademy
original source : https://youtu.be/7ep4effngGc
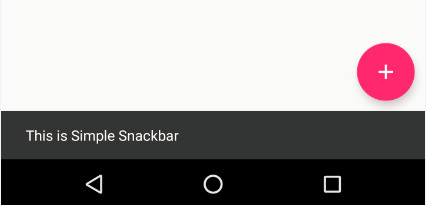
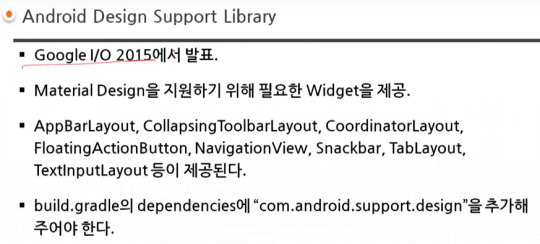
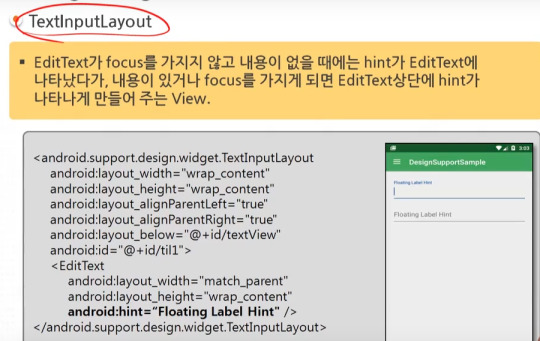
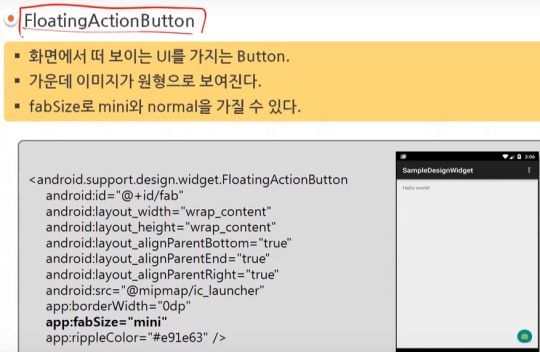
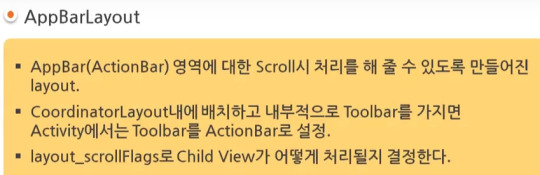
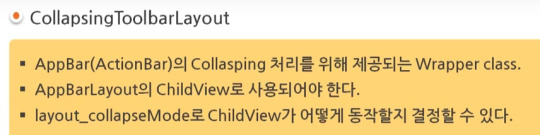
material design이 도입되면서 제공되는 새로운 widgets의 예를 보여주고 있다.
AppBarLayout 부터 TextInputLayout까지 모두 새로운 widgets에 해당한다.

=========================================================
.
.
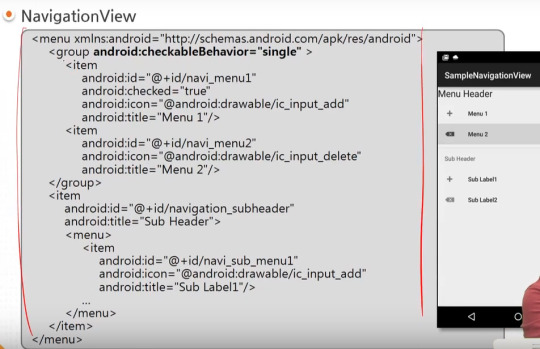
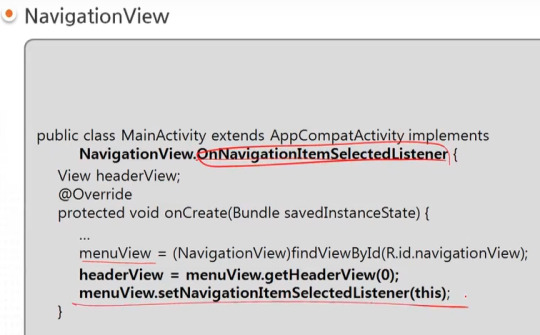
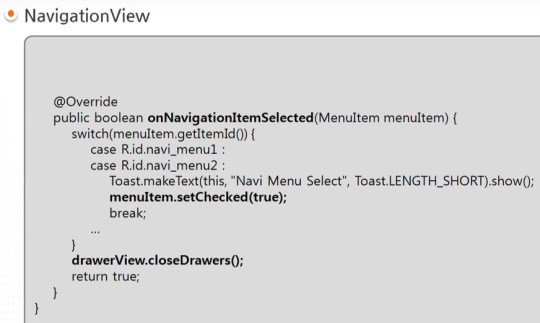
drawer layout 과 navigation view , navigation drawer 비교
https://stackoverflow.com/questions/44176576/navigation-drawer-vs-navigation-view-which-is-best-and-what-is-the-diffrence

NavigationView를 DrawerLayout과 함께 사용한 방법을 아래서 보여주고 있다.

=========================================================
.
.


=========================================================
.
.

=========================================================
.
.
=========================================================
.
.
=========================================================
.
.

=========================================================
.
.
=========================================================
.
.
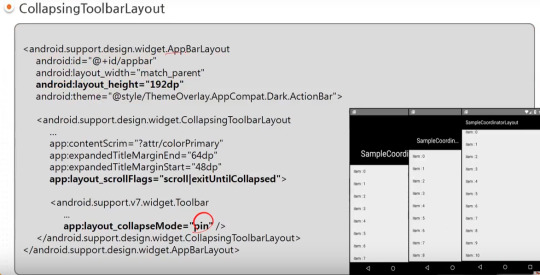
AppBarLayout과 CollapsingToolbarLayout 참고) 실제 예시 https://youtu.be/wCuM_di5M9Y?t=50

=========================================================
.
.
=========================================================
.
.


=========================================================
.
.
android studio 에서 blank activity template을 선택하는 경우 기본적으로 material design widgets이 어느 정도 설정되어서 시작된다.

#android#중급#11강#11#material#material design#tacademy#view#widget#navigationview#tablayout#textinputlayout#toast#snackbar#CollapsingToolbarLayout#AppBarLayout#CoordinatorLayout#tab
0 notes
Text
ValidationEditText
This is a simple library that facilitates text validation and error handling in a user-friendly way on EditText with (TextInputLayout support). For MVVM + data binding stack.
from The Android Arsenal https://ift.tt/2NB81KP
2 notes
·
View notes
Text
Get android app source code


Recommended sources to freeload Android app source codesĪs always, we can look up to Wikipedia for the best websites to freeload open source android app codes. That’s the best way to stand against competition.
Saves time: Finally, using free open source code saves a lot of time and allows you to focus all resources on the unique offerings of the apps.
For the source code developers, the number of downloads acts as a calculator in their portfolio, while end users of the source code can have the basic structure of their script readily available and at a minimal price.
Cost: Most open source codes are available either for free or at a minimal price.
It is the customization that allows the developer to come up with a completely new platform. For example, the source codes for most ecommerce apps remain the same. They don’t want to spend time of the basic scripting but focus more on the unique features and designs that they are supposed to develop.
Customization: Customization is among the base reasons why app developers are looking for source codes.
If you have been following a reputed/popular platform (examples come later in this article), you are most likely at an advantageous position. However, it does depend on where you borrow your source codes from.
Quality: Again, the higher standards put forward by the Android community ensures that only the highest quality of source codes is made available.
For free open source code developers, it is both money and credibility at stake and they give in their best. When a community of developers has accesses to lines of codes, there are more chances of any flaws to be detected, reported and addressed quickly.
Security: Free open source codes are highly scrutinized for their standards and a basic advantage is the high level of security you get.
The popular reasons behind the growing use of free Android open source codes by developers includes: Further, free and open source codes have the compelling advantage of pricing, apart from reducing the monotony of the job. For the individual developer, the community has been increasingly providing with source code that match new product features and design efficacy. They have been the minds behind most complicated bug fixes and other enhancements that bring about a stark difference in the quality and usability of an app. On internet you will find many mobile apps market place where developers can buy & sell their source code online and later re-skin the application based on requirements.Īndroid’s free open source community has always attracted highly motivated and bright professionals, who in-spite of being rather unpaid/underpaid, maintain the standards and discipline of the community. If you are an AR or VR developers, you can also find various AR SDKs available in market to start with.

Open source software developers have always been motivated by several factors, but quality stands as the noticeable point of focus. The SDK inherently provides a wide variety of materials, including tutorials, extensive documentation, samples, best practices and a continuously growing array of tools. The primary advantage of free android app source code (open source codes) is the high level of coordination and collaboration developers can achieve while developing new apps on android platform. Package import import import .TextInputLayout import 7.app.AppCompatActivity import android.os.Bundle import import import import import you beginners in android application development? learning development from Android books? Looking for FREE android app source code to test and built sample application? you are at right place! here we have manually review and tested various android application source code and listed for your reference.Īndroid’s SDK (Software Development Kit) has been helping several developers, brands and organizations come up with unique apps and achieve high quality results and tremendous efficiency.
0 notes
Text
Create Android TextInputLayout Programmatically in Kotlin
Create Android TextInputLayout Programmatically in Kotlin
In this article, we will learn how to create android TextInputLayout programmatically in Kotlin. We will go through various steps that explains how to create TextInputLayout and add it in kotlin file, use different attributes to customise it etc. in any android application. For example, how to set text in TextInputLayout programmatically, how to set id of TextInputLayout, how to capitalise text…
View On WordPress
0 notes
Link
Edit text with hover in box [ TextInputLayout New Design ] in android studio
<com.google.android.material.textfield.TextInputLayout
android:layout_width="match_parent"
android:layout_height="wrap_content"
style="@style/Widget.MaterialComponents.TextInputLayout.OutlinedBox">
<com.google.android.material.textfield.TextInputEditText
android:hint="Number"
android:id="@+id/edt_Values"
android:layout_width="match_parent"
android:layout_height="wrap_content"/>
</com.google.android.material.textfield.TextInputLayout>
note:- implement Material lib
In Java
implementation 'com.android.support:design:28.0.0-alpha1'
In Kotlin
implementation "com.google.android.material:material:1.0.0"
0 notes
Text
Tempo (Silver Edition) Great templates for incredible projects (Templates)
Tempo’s a mobile app templates built on top of material design that’s suitable for Android app developers. It Includes all the default screens with many elements that you would need and it is ready to use, just put your logo, change the colors and call your APIs.
Please note this is the Silver Edition, and you will get just the List Views section, if you want all the Package go to the Gold Edition. Tempo (Gold Edition)


Material Design: following Android Design Guidelines.
Many widgets: Toolbar, CollapsingToolbarLayout, SlidingPaneLayout, DrawerLayout, RecyclerView, SwipeRefreshLayout, FloatingActionButton, TextInputLayout, TabLayout, ViewPager, CardView.
Icons: A wide range of free Google icons and Fontello (Icon fonts).
Activity Transitions: Beautiful transition between Activities (For the list views and details).
Beautiful Animation for RecyclerView: Using Android Animations.
Supporting Tablets and Handsets: Multi-pane layouts on tablets and single-pane layouts on handsets.
Flexible Layout Design: Allows application to adapt to all variations of screen sizes.
Orientation change: Both landscape and portrait orientation supported. (except User login and registration and welcome screen interfaces).
High performance: Optimized for high performance and high-resolution displays.
Caching images: Using Universal Image Loader for displaying and caching images.
Sources and Credits
a wide range of free Material Google icons.
All the dummy graphics from freepik.com.
Material Ripple Effect library.
Universal Image Loader library.
Circle Indicator library.
Circular Image View library.
Merriweather Fonts from fontsquirrel.com.
What you Get:
Full source code in Android Studio.
Documentation.
All screenshots in PDF and PNG types.
Adobe Illustrator app design file organized and layered.
APK file
from CodeCanyon new items http://ift.tt/2Fi7aZL via IFTTT https://goo.gl/zxKHwc
0 notes
Text
2017年終了!今年は何があったか?
概要
今年何をやったのかを振り返る。努力していないわけではないが、あまり成長のない1年だった。何かやったという実感も特になかった。
今年始めたこと
公開用の Android アプリ開発
Kotlin
GitHub 緑化活動
転職ドラフト
ノー残業……4月から9か月連続でゼロだった。なお年収は
Tumblr
インプット
読書
今年は IPA の情報処理技術者試験を受けなかったので、それだけ多く本を読むことができた。 国立国会図書館に行くことを覚えて、そこで本を無料で読むようになったのも良かった。
『レガシーソフトウェア改善ガイド』
『ケント・ベックのSmallTalkベストプラクティス・パターン』
『オブジェクト指向ワークブック』
『リファクタリング』
『Javaパフォーマンス』
『Java本格入門』
『Android Pattern Cookbook』
『Androidアプリ開発の極意』
『Effective Debugging』
『Kotlinスタートブック』
『RxJavaリアクティブプログラミング』
『情熱プログラマー』
"Reactive Java Programming"
『コーディングを支える技術』
『Androidアプリ開発 74のアンチパターン』
『Androidを支える技術(II)』
『実装パターン』
『ThoughtWorksアンソロジー』
『Javaによる関数型プログラミング』
特に『リファクタリング』には感銘を受けた。もっと早く読むべきだった。旧版でも十分な価値がある。 『Androidアプリ開発の極意』『Androidアプリ開発 74のアンチパターン』『Androidを支える技術(II)』 の3冊は私の Android 観を再構成するのに非常に有益だった。『ThoughtWorksアンソロジー』はさすがに今となっては���い本だが、 オブジェクト指向エクササイズやファーストクラスコレクション、StringUtilsがなぜ微妙なのか、などまだまだ役立つ内容が載っていた。 当時の ThoughtWorks が Groovy/JRuby/Jaskell をやたらと推していたのを再確認するのにも役立った。
カンファレンス聴講
自費(約60万円)&有給休暇5日を使って海外カンファレンスに行くという経験をして、海外カンファレンスは会社の金で行くものだという認識を強めることができた。
DroidKaigi 2017
Devoxx US 2017
Droidcon Vietnam 2017
JavaOne 2017
レポート
Devoxx US 2017
https://reminiscencesoftoastkid.tumblr.com/post/160693403713/devoxx-us-2017-short-report
Droidcon Vietnam 2018
https://reminiscencesoftoastkid.tumblr.com/post/159716738388/droidcon-vietnam-2017-flash-report
なお2018も開催予定とのこと
JavaOne 2017
JavaOne 2017 Day1 Flash Report
JavaOne 2017 Day2 Flash Report
JavaOne 2017 Day3 Flash Report
JavaOne 2017 Day4 Flash Report
JavaOne 2017 Day5 Flash Report
アウトプット
書いた記事
今年は Qiita に 24 の記事を投稿した。 NIO2 の初歩的な内容の記事だけはいいねが30を超えたが、あとはどれも1桁だった。仕事で知見を溜められるようにならないとダメだと痛感した。
Date Title 2017/01/03(Tue) Gradle プロジェクトで静的解析ツールを使う 2017/01/17(Tue) TestFX で JavaFX アプリケーションのテストを書く 2017/01/31(Tue) java.io.File のコードを java.nio.Path と java.nio.Files を使って書き直す 2017/02/16(Thu) JavaFX でスライドショーツールを作る 2017/02/20(Mon) Googleの入社試験(非公式)にGroovyでチャレンジしてみる 2017/04/03(Mon) minimal-json で JSON を扱う 2017/04/05(Wed) 正式リリース前に Eclipse で JUnit 5を愉しむ 2017/04/08(Sat) Optional の7つのルールについて考える 2017/06/02(Fri) JavaFX の Clipboard API を使う 2017/06/13(Tue) Android の AppWidget で Snackbar を使う 2017/07/17(Mon) 特定の Fragment でだけ使うメニュー項目を共用の Toolbar に inflate する 2017/07/30(Sun) RecyclerView の要素を循環させる 2017/08/12(Sat) Moshi を使って Java オブジェクトと JSON を相互変換する 2017/08/14(Mon) enum の定数値ごとに振る舞いを変えるのを Kotlin でやってみる 2017/08/21(Mon) Android ���プリの Java ソースコードを Kotlin に変換して躓いた点をまとめる 2017/09/15(Fri) android.text.TextUtils のメソッドを調べる 2017/09/23(Sat) Android 用の ColorPicker を探す 2017/10/09(Mon) Android プロジェクトで JUnit5 を使う 2017/10/31(Tue) Kotlin の sealed クラスを使う 2017/11/05(Sun) Android Studio のメニュー文字サイズを変える 2017/12/01(Fri) RxPermissions で Runtime Permission の処理をする 2017/12/03(Sun) RxJava を非同期処理を書きやすくするライブラリとして考える 2017/12/19(Tue) プログラムで生成した TextInputLayout に EditText をセットする 2017/12/30(Sat) TextView の CompoundDrawable に ColorFilter をかける
曜日で見ると半分を月曜と火曜に投稿している。休日はいいねをもらいにくいというイメージがあるのと、 休み中に完成しなかった記事を月・火に投稿していたのとでこうなったのかと思う。
Day of week Count Mon 6 Tue 6 Wed 1 Thu 1 Fri 3 Sat 4 Sun 3
Tumblr
春くらいにQiitaの規約改正があって、それを機に勉強会のメモをQiitaに投稿するのを止め、完全にプログラミングのネタだけを投稿することにした。 そして別に Tumblr を始めてみたところ、本当に誰も読んでいなくて草も生えない。Tumblr は画像を投稿したり、 気になった記事のメモをちょっと書いておくという使い方なら適しているのだが、ブログを書くサービスとしては微妙なところがあり、 特にコードブロ���クが標準だと全然ダメなのが本当に困る。 たまに Qiita に書くほどでもないなと思ったネタを Tumblr に書いていたが、すぐにやめてしまった。 今ではお昼の画像をアップするのと、気になったWeb記事のクリッピング程度にしか使っていない。
Android アプリ
趣味のプログラミングでも Android アプリの開発をやらないと学習量が全然足らないと感じ、今年の6月からやり始めた。 学習効果が高まったのと、流用できるコード群をストックできるようになったのとで、仕事にプラスになったのは大きかった。
なお公開については、いくつか作ってはみたが全然ダメだった。唯一、Wi-Fi の状態を切り替えるウィジェットはちょっとだけ受けていた。 一番力を入れているWeb検索アプリが全然インストールされなくて、 その前に作っていたしょぼいアプリの方が3倍インストールされている。 よくわからない。
https://play.google.com/store/apps/developer?id=toastkidjp
ちなみにいくら稼いだか書いておくと、4か月で14円である。ティッシュも買えない。
Kotlin
これまで情報収集しかしてこなかったが、Google I/O 以降一気に世間が傾き始めた。 転職ドラフト等でも 「Kotlin やってます」という企業ばかりになってきて、いい加減やらないとまずいと感じ、 趣味のプログラミングで使い始めた。
最初は違和感が強かったが、すべてのコードを一括で Kotlin 変換する、というスパルタ式学習法により2週間程度で逆転した。 JavaOne では Kotlin のセッションを中心に聞きまくって、やや物足りなさを感じるくらいにはなっていた (当然だが JavaOne では Kotlin を知らない人向けのセッションが多いためである)。
もう Kotlin しか使っていない企業でもやっていけるという根拠のない自信ができた。
GitHub 緑化活動
転職で有利だというので、軽薄な気持ちで始めたところ100日以上続いた。 commit数が会社の GitHub Enterprise のアカウントより多かったという。
これをやることで日常的にコードを改善する習慣が身についた。が、一方で、1日で終わらないような大掛かりな修正を(心理的に) しにくくなったと感じる。
買ったもの
ThinkPad X1 Carbon
高性能だが、無難で面白いところはなく、ThinkPad X1 Tablet とかに比べると情熱は感じないマシンだった。
Covia L7
Android アプリ開発を趣味で始めるのに実機が必要だったので購入した。
長所
1万円程度で入手可能
非常に軽い
短所
安っぽい
性能が貧弱
解像度が��め……逆に狭い画面の確認には使える
OS 6.0、Runtime Permission の検証がギリギリできる程度
Galaxy Feel
ましな検証端末が欲しいと思って探したところ、某キャリアの販売戦略により在庫がダブついているらしく、Amazon のマーケットプレイスで25,000円程度で購入できた。
調書
OSが7.0
そこそこいいスペック
そこそこ軽い
有機ELディスプレイ
短所
OSが7.0(AppShortcutsが使えない)
ホームキーがハードウェア
バックキーとタスクキーが通常と逆
Activity のアニメーションが独自実装されている
ClipboardManager の実装がおかしいのか、 LeakCanary で誤検知されまくる
他の端末と同じコードでフラッシュを制御できない
……なんか書いてみたら有機ELディスプレイ以外の長所がないような気がする。
507SH
13,000円と非常に安かったので購入したところ、液晶保護フィルムを貼ったところで満足して箱にしまってある。
仕事
モチベーショングラフを書くと山から谷まであった。基本、谷の方が多かった。同期や後輩のAndroid 開発者が次々と転職していて、 会社から評価されない仕事をしていることへの焦りが募る年だった。まあ、どの仕事に割り当てられるかなど私が決められるものではないから、 運が悪いと思って諦めるよりほかになく、それが残業ゼロ運動と草につながっているという。
内容で言うと、完全にサーバサイドの仕事がなくなってAndroid アプリ開発ばかりをやるようになり、 夜中に電話がかかってくることがなくなったり休日にPCを持って帰ったりしなくてよくなったのが非常によかった。 ……よかったのだが、来年からまたサーバサイドの開発と運用をやらないといけなくなりそうで困っている。
来年の抱負
まず DroidKaigi 2018 で発表する機会をいただいた。そこできちんと喋れるように準備をする。
Android アプリを開発する……1つくらい収益の柱になるアプリを作りたい
Qiita の 100記事 & 1,000 Contribution を目指す……達成するとは一言も言っていない
GitHub の緑化を継続する
0 notes
Text
React Native navigate Specific View of ScrollView on Button Click Android iOS
This tutorial explains how can we navigate specific view of full width ScrollView component on button click by providing view number. We will try to make this example as simple as possible. In our last tutorial we have discussed React Native Full Width Horizontal ScrollView example right, so this example will be using to navigate specific view on button click. For your information react native ScrollView component doesn’t support any predefined method to navigate specific view of full width ScrollView component by just providing view number. So, you have to make it custom. Yes, this tutorial explains how we can make it custom from scratch with complete source code.
React Native navigate Specific View On Button click
Lets follow the below steps that helps to navigate specific view of full width ScrollView component on button click by providing view number. Project Structure :
Step 1: Create a new react native project, if you don’t know how to create a new project in react native just follow this tutorial. Step 2: Lets create a new component named as CustomScrollView. This component helps user to navigate between different user screen, when user provides valid page number in textinput component and click on "Go To View" button.
The most important statement is this.props.children . This statement is a special type of prop which is passed to components automatically. Basically, this.props.children can hold any simple text value, a Single element or Multiple elements. Using React.Children.count(this.props.children) we can get length of child elements. You will know the reason behind to use this property when we will create our second custom component.
scrollTo method is used to scroll the CustomScrollView component programatically in both horizontal and vertical directions. In our case, we have Horizontal ScrollView so we have to scroll the CustomScrollView component in horizontal direction.
this.state.getTextInput is a state variable which is used to hold the TextInput value. We have to multiply the device width with this.state.getTextInput - 1 value and then assign the resultant value to the X parameter of the scrollTo method to scroll the ScrollView on desired View.
Lets see the complete source code for CustomScrollView.js file.
CustomScrollView
import React, { Component } from 'react'; import { AppRegistry, Text, View, ScrollView, Dimensions, TouchableOpacity, TextInput, StyleSheet, Platform } from 'react-native'; var deviceWidth = Dimensions.get('window').width; export default class CustomScrollView extends Component { constructor() { super(); this.state = { getTextInput: '' } } moveToPage() { if( this.state.getTextInput === '' ) { alert('Please enter some text'); } else if(( this.state.getTextInput > React.Children.count( this.props.children )) || ( this.state.getTextInput <= 0 )) { alert('View not found...'); } else { this.refs.scrollView.scrollTo({ x: (( this.state.getTextInput - 1 ) * deviceWidth ), y: 0, animated: true }); } } render() { return( <View style = { styles.container }> <ScrollView ref = "scrollView" showsHorizontalScrollIndicator = { false } horizontal = { true } pagingEnabled = { true }> { this.props.children } </ScrollView> { (React.Children.count( this.props.children ) <= 1) ? null : (<View style = { styles.secondLayoutContainer }> <View style = { styles.textInutHolder }> <TextInput onChangeText = {(text) => this.setState({ getTextInput: text })} style = { styles.textInputLayout } underlineColorAndroid = "transparent"/> <TouchableOpacity activeOpacity = { 0.8 } onPress = { this.moveToPage.bind(this) } style = { styles.buttonLayout }> <Text style = { styles.textColor }>GoTo View</Text> </TouchableOpacity> </View> </View>) } </View> ); } } const styles = StyleSheet.create( { container: { flex: 1, position: 'relative', marginTop: (Platform.OS === 'ios') ? 20 : 0 }, secondLayoutContainer:{ width: '100%', }, textInutHolder: { position: 'relative', margin: 15 }, textInputLayout: { borderWidth: 1, borderColor: 'rgba(0,0,0,0.5)', width: '100%', height: 40, paddingHorizontal: 15, backgroundColor: 'white', }, buttonLayout : { backgroundColor: '#2196f3', height: 39, position: 'absolute', justifyContent: 'center', alignItems: 'center', paddingHorizontal: 10, right: 0, top: 0, }, });
Step 3: Open App.js File in your favorite code editor and erase all code and follow this tutorial.Step 4: Through react , react-native packages import all required components.
import React, { Component } from 'react'; import { AppRegistry, Text, View, ScrollView, Dimensions, TouchableOpacity, TextInput, StyleSheet, Platform } from 'react-native'; import CustomScrollView from "./src/components/CustomScrollView.js";
Step 5: Create a global variable above the class named as deviceWidth. This variable is used store the current device width, So the current view expand all over the screen. We would retrieve the device width using Dimensions.get(‘window’).width inbuilt method.
var deviceWidth = Dimensions.get('window').width;
Step 6: Implement render method inside the App class and wrapped the below layout design inside the root View component.
export default class App extends Component { constructor() { super(); } render() { return ( <CustomScrollView> <View style={styles.firstView}> <Text style={styles.headerText}>First View</Text> </View> <View style={styles.secondView}> <Text style={styles.headerText}>Second View</Text> </View> <View style={styles.thirdView}> <Text style={styles.headerText}>Third View</Text> </View> <View style={styles.forthView}> <Text style={styles.headerText}>Forth View</Text> </View> </CustomScrollView> ); } }
Step 7 : Apply the below style sheet design.
const styles = StyleSheet.create( { container: { flex: 1, justifyContent: "center", alignItems: "center", }, headerText: { fontSize: 30, textAlign: "center", margin: 10, color: 'white', fontWeight: "bold" }, firstView: { width: deviceWidth, backgroundColor: '#F44336', justifyContent: 'center', alignItems: 'center', flexDirection: 'row' }, secondView: { width: deviceWidth, backgroundColor: '#9C27B0', justifyContent: 'center', alignItems: 'center', flexDirection: 'row' }, thirdView: { width: deviceWidth, backgroundColor: '#3F51B5', justifyContent: 'center', alignItems: 'center', flexDirection: 'row' }, forthView: { width: deviceWidth, backgroundColor: '#009688', justifyContent: 'center', alignItems: 'center', flexDirection: 'row' }, });
Lets see the complete source code for App.js component.
App.js
import React, { Component } from 'react'; import { AppRegistry, Text, View, ScrollView, Dimensions, TouchableOpacity, TextInput, StyleSheet, Platform } from 'react-native'; import CustomScrollView from "./src/components/CustomScrollView.js"; var deviceWidth = Dimensions.get('window').width; export default class App extends Component { constructor() { super(); } render() { return ( <CustomScrollView> <View style={styles.firstView}> <Text style={styles.headerText}>First View</Text> </View> <View style={styles.secondView}> <Text style={styles.headerText}>Second View</Text> </View> <View style={styles.thirdView}> <Text style={styles.headerText}>Third View</Text> </View> <View style={styles.forthView}> <Text style={styles.headerText}>Forth View</Text> </View> </CustomScrollView> ); } } const styles = StyleSheet.create( { container: { flex: 1, justifyContent: "center", alignItems: "center", }, headerText: { fontSize: 30, textAlign: "center", margin: 10, color: 'white', fontWeight: "bold" }, firstView: { width: deviceWidth, backgroundColor: '#F44336', justifyContent: 'center', alignItems: 'center', flexDirection: 'row' }, secondView: { width: deviceWidth, backgroundColor: '#9C27B0', justifyContent: 'center', alignItems: 'center', flexDirection: 'row' }, thirdView: { width: deviceWidth, backgroundColor: '#3F51B5', justifyContent: 'center', alignItems: 'center', flexDirection: 'row' }, forthView: { width: deviceWidth, backgroundColor: '#009688', justifyContent: 'center', alignItems: 'center', flexDirection: 'row' }, });
Screenshot :
This is all about React Native navigate Specific View of ScrollView on Button Click Android iOS. Thank you for reading this article, and if you have any problem, have a another better useful solution about this article, please write message in the comment section.
via Blogger http://bit.ly/2HsGI38
0 notes
Link
Nettuts+ http://j.mp/2qjVJcF
Auto form fill, often shortened to just autofill, is a feature browsers have supported for years now. Most of us use it all the time. I, for one, find it indispensable during tasks such as filling out a registration form or completing a checkout process.
The latest release of Android, Android O, brings similar functionality to Android apps. In other words, Android can now help users fill out forms that belong to all the apps they have installed on their devices. This was a much-awaited feature because typing with a virtual keyboard on a small screen tends to be quite a hassle.
As an app developer, you can use the new Autofill Framework to create your own custom autofill service, a service that decides how to populate an app's input fields. In this tutorial, I'll show you how.
Prerequisites
To be able to follow this tutorial, you'll need:
Android Studio 2.4 Preview 7 or higher
An emulator or device running Android O or higher
1. Create a New Project
Fire up Android Studio and create a new project with an empty activity. You must, of course, remember to choose Android 7+ in the Target Android Devices dialog.
This project will need a few widgets that belong to the Design Support Library, so open the app module's build.gradle file and add the following compile dependency to it:
compile 'com.android.support:design:26.+'
Lastly, press the Sync Now button to update the project.
2. Create a Settings Activity
In this tutorial, we'll be creating an app containing a very simple autofill service that targets only those input fields where the user is expected to type in an email address. Because almost every other app on Google Play today asks for an email address, this service will be quite useful.
Our service obviously needs to know what the user's email addresses are. Therefore, let us now build an activity where the user can type in and save two email addresses.
Step 1: Define the Layout
As you might expect, the layout of the activity will contain two EditText widgets where the user can type in his or her email addresses. If you want it to adhere to the guidelines of Material Design, placing the EditText widgets inside TextInputLayout containers is a good idea.
Additionally, the layout must have a Button widget the user can press to save the email addresses.
You are free to place the widgets anywhere you want. Nevertheless, for now, I suggest you place them all inside a LinearLayout whose orientation is vertical.
<?xml version="1.0" encoding="utf-8"?> <LinearLayout xmlns:android="http://j.mp/2bNEKNS; android:layout_width="match_parent" android:layout_height="match_parent" android:orientation="vertical" android:padding="16dp"> <android.support.design.widget.TextInputLayout android:layout_width="match_parent" android:layout_height="wrap_content"> <EditText android:layout_width="match_parent" android:layout_height="wrap_content" android:id="@+id/primary" android:hint="Your primary email address" android:inputType="textEmailAddress"/> </android.support.design.widget.TextInputLayout> <android.support.design.widget.TextInputLayout android:layout_width="match_parent" android:layout_height="wrap_content"> <EditText android:layout_width="match_parent" android:layout_height="wrap_content" android:id="@+id/secondary" android:hint="Your other email address" android:inputType="textEmailAddress"/> </android.support.design.widget.TextInputLayout> <Button android:layout_width="match_parent" android:layout_height="wrap_content" android:id="@+id/save_button" style="@style/Widget.AppCompat.Button.Colored" android:text="Save" android:onClick="saveEmailAddresses"/> </LinearLayout>
In the above code, you can see that the Button widget has an onClick attribute pointing to a method. Click on the yellow light bulb beside this attribute in Android Studio to generate a stub for it in the associated Activity class.
public void saveEmailAddresses(View view) { // More code will be added here }
Step 2: Save the Email Addresses
We'll be using a shared preferences file called EMAIL_STORAGE to save our data. You can use the getSharedPreferences() method of your Activity class to access the file. Additionally, to be able to write to the file, you must call its edit() method, which generates a SharedPreferences.Editor object.
Accordingly, add the following code inside the saveEmailAddresses() method:
SharedPreferences.Editor editor = getSharedPreferences("EMAIL_STORAGE", MODE_PRIVATE).edit();
To fetch the email addresses the user has typed into the EditText widgets, you'll have to first get references to them using the findViewById() method, and then call their getText() methods.
String primaryEmailAddress = ((EditText)findViewById(R.id.primary)) .getText().toString(); String secondaryEmailAddress = ((EditText)findViewById(R.id.secondary)) .getText().toString();
At this point, you can call the putString() method of the editor to add the email addresses to the preferences file as two key value pairs. After you do so, don't forget to call the commit() method to make your changes permanent.
editor.putString("PRIMARY_EMAIL", primaryEmailAddress); editor.putString("SECONDARY_EMAIL", secondaryEmailAddress); editor.commit();
Step 3: Create a Meta-Data File
The settings activity we created in the previous step is currently just an ordinary activity. To let the Android platform know that it is a settings activity for an autofill service, we must create a meta-data XML file saying so.
Create a new XML file called email_address_filler.xml in the project's res/xml folder. Inside it, add an <autofill-service> tag and set the value of its settingsActivity attribute to the name of your Activity class.
<?xml version="1.0" encoding="utf-8"?> <autofill-service xmlns:android="http://j.mp/2bNEKNS; android:settingsActivity="com.tutsplus.simplefill.MainActivity"/>
You can now run the app, type in two email addresses, and press the Save button to save them.
3. Create an Autofill Service
Any class that extends the abstract AutoFillService class can serve as an autofill service. So start by creating a new Java class with File > New > Java Class. In the dialog that pops up, name the class EmailAddressFiller and make sure that you set the value of the Superclass field to AutoFillService.
Android Studio will now prompt you to generate stubs for two abstract methods: onSaveRequest() and onFillRequest(). In this tutorial, we'll be focusing only the onFillRequest() method, which is automatically called whenever the user opens an activity—of any app—containing input fields.
@Override public void onFillRequest(AssistStructure assistStructure, Bundle bundle, CancellationSignal cancellationSignal, FillCallback fillCallback) { // More code goes here }
Step 1: Analyze View Hierarchies
An autofill service needs to analyze an app's user interface and identify input fields it can fill. That's why the onFillRequest() method receives an AssistStructure object, which contains details about all the widgets that are currently visible on the screen. More precisely, it contains a tree of ViewNode objects.
If you've never seen such a tree, I suggest you use the uiautomatorviewer tool, which is part of the Android SDK, to analyze the layout hierarchies of a few apps. For example, here's what the layout hierarchy of Android's default mail app looks like:
Naturally, to analyze all nodes of a tree, you need a recursive method. Let's create one now:
void identifyEmailFields(AssistStructure.ViewNode node, List<AssistStructure.ViewNode> emailFields) { // More code goes here }
As you can see, this method has a ViewNode and a List as its parameters. We'll be using the List to store all the input fields that expect email addresses.
You might now be wondering how you can programmatically tell if an input field expects an email address. Well, there's really no foolproof approach you can follow. For now, we're going to assume that all app developers always give meaningful resource IDs to their input fields. Based on that assumption, we can simply pick all input fields whose resource IDs contain strings such as "email" and "username".
Accordingly, add the following code to the method:
if(node.getClassName().contains("EditText")) { String viewId = node.getIdEntry(); if(viewId!=null && (viewId.contains("email") || viewId.contains("username"))) { emailFields.add(node); return; } }
Next, whenever we encounter a ViewNode object that contains more ViewNode objects, we must recursively call the identifyEmailFields() method to analyze all its children. The following code shows you how:
for(int i=0; i<node.getChildCount();i++) { identifyEmailFields(node.getChildAt(i), emailFields); }
At this point, we can call the identifyEmailFields() method inside the onFillRequest() method and pass the root node of the view hierarchy to it.
// Create an empty list List<AssistStructure.ViewNode> emailFields = new ArrayList<>(); // Populate the list identifyEmailFields(assistStructure .getWindowNodeAt(0) .getRootViewNode(), emailFields);
If our service is unable to identify any input fields for emails, it should do nothing. Therefore, add the following code to it:
if(emailFields.size() == 0) return;
Step 2: Create and Populate Remote Views
If our service does identify an input field it can fill, it must populate a drop-down list that will be shown below the input field. Doing so, however, is not straightforward because neither the input field nor the drop-down list belongs to our app.
To populate the drop-down list, we must use RemoteViews objects. As its name suggests, a RemoteViews object is a collection of views that can be displayed in another app.
To initialize a RemoteViews object, you'll need a layout XML file. Let's create one now called email_suggestion.xml. For now, it can contain just one TextView widget to display an email address.
Accordingly, add the following code to email_suggestion.xml:
<?xml version="1.0" encoding="utf-8"?> <TextView xmlns:android="http://j.mp/2bNEKNS; android:layout_width="wrap_content" android:layout_height="wrap_content" android:id="@+id/email_suggestion_item" android:textSize="18sp" android:textStyle="bold" android:padding="5dp"> </TextView>
You can now go back to the onFillRequest() method and create two RemoteViews objects: one for the primary email, and another for the secondary.
RemoteViews rvPrimaryEmail = new RemoteViews(getPackageName(), R.layout.email_suggestion); RemoteViews rvSecondaryEmail = new RemoteViews(getPackageName(), R.layout.email_suggestion);
The TextView widgets inside the RemoteViews objects must display the two email addresses we stored in a shared preferences file earlier. To open the file, use the getSharedPreferences() method again. Once it's opened, you can use its getString() method to fetch both the email addresses.
Finally, to set the contents of the remote TextView widgets, you must use the setTextViewText() method.
// Load the email addresses from preferences SharedPreferences sharedPreferences = getSharedPreferences("EMAIL_STORAGE", MODE_PRIVATE); String primaryEmail = sharedPreferences.getString("PRIMARY_EMAIL", ""); String secondaryEmail = sharedPreferences.getString("SECONDARY_EMAIL", ""); // Update remote TextViews rvPrimaryEmail.setTextViewText(R.id.email_suggestion_item, primaryEmail); rvSecondaryEmail.setTextViewText(R.id.email_suggestion_item, secondaryEmail);
Step 3: Create Data Sets
We can now use the remote views to create autofill data sets that can be sent to any app. To keep this tutorial from getting too long, we'll be creating data sets only for the first email input field we encounter. The following code shows how to pick only the first email input field:
AssistStructure.ViewNode emailField = emailFields.get(0);
An autofill data set is nothing but an instance of the Dataset class, and can be built using the Dataset.Builder class.
When the user selects one of the email addresses our service shows in the drop-down list, it must set the contents of the associated input field using the setValue() method of the Dataset.Builder class. However, you cannot pass a ViewNode object to the setValue() method. It actually expects an autofill identifier, which must be obtained by calling the getAutoFillId() method of the ViewNode object.
Additionally, to specify the text that must be written into the input field, you must use the AutoFillValue.forText() method. The following code shows you how:
Dataset primaryEmailDataSet = new Dataset.Builder(rvPrimaryEmail) .setValue( emailField.getAutoFillId(), AutoFillValue.forText(primaryEmail) ).build(); Dataset secondaryEmailDataSet = new Dataset.Builder(rvSecondaryEmail) .setValue( emailField.getAutoFillId(), AutoFillValue.forText(secondaryEmail) ).build();
Before you send the data sets to an app, you must add them to a FillResponse object, which can be built using the FillResponse.Builder class. Call its addDataset() method twice to add both the data sets.
Once the FillResponse object is ready, pass it as an argument to the onSuccess() method of the FillCallback object, which is one of the parameters of the onFillRequest() method.
FillResponse response = new FillResponse.Builder() .addDataset(primaryEmailDataSet) .addDataset(secondaryEmailDataSet) .build(); fillCallback.onSuccess(response);
Step 4: Update the Manifest
Like all services, the autofill service too must be declared in the project's AndroidManifest.xml file. While doing so, you must make sure that it is protected by the android.permission.BIND_AUTO_FILL permission.
This service also needs an <intent-filter> tag that allows it to respond to the android.service.autofill.AutoFillService action, and a <meta-data> tag that points to the meta-data XML file we created in an earlier step.
Accordingly, add the following lines to your manifest file:
<service android:name=".EmailAddressFiller" android:permission="android.permission.BIND_AUTO_FILL"> <meta-data android:name="android.autofill" android:resource="@xml/email_address_filler"/> <intent-filter> <action android:name="android.service.autofill.AutoFillService"/> </intent-filter> </service>
Our autofill service and app are now ready. Build the project and install the app on your device.
4. Activate and Use the Autofill Service
To activate the autofill service, open your device's Settings app and navigate to Apps & Notifications > Advanced > Default apps > Autofill app. In the next screen, select your app from the list of available autofill apps.
You can now open any app that asks for an email address to see your autofill service in action. For example, here's what you'd see on the login screens of Instagram and Pinterest:
Conclusion
You now know how to create and use a custom autofill service for Android. Feel free to extend it to support other common fields, such as first name or phone number. You can also try identifying input fields using other attributes, such as labels and hints.
To learn more about the Autofill Framework, do refer to its official documentation. And in the meantime, check out some of our other posts about Android O and Android app development!
Android SDK
Get Started With RxJava 2 for Android
Jessica Thornsby
Android SDK
Quick Tip: Working With Custom Fonts in Android O
Jessica Thornsby
Android Things
Android Things and Machine Learning
Paul Trebilcox-Ruiz
http://j.mp/2qkhFV8 via Nettuts+ URL : http://j.mp/2etecmc
0 notes
Text
FormValidator
This library allows you to validate Huge Forms containing Fields in android just by a single line, It saves you from the hassle of checking individual edit text boxes one by one then setting the error. This library supports edit texts view and no custom view is required. it also supports error validation for TextInputLayouts. The library is written in kotlin and is build on top of RX Java and it provides methods for error handling as well.

from The Android Arsenal http://bit.ly/2PMdjDO
2 notes
·
View notes
Text
DynamicAmountEditText
Customizable EditText with runtime amount formatting. There's nothing extra. Supports different separator's types.
Features
Extended from EditText, so you can use it like regular EditText f.e. with TextInputLayout
Formatting occurs in runtime
You can change decimal separator, decimal part length, grouping separator
Cases with insert from clipboard was processed, as a result, you can't paste incorrect values. From pasted data will be select correct parts only

from The Android Arsenal https://ift.tt/2EwTfE0
0 notes
Text
FloatingEditText
TextInputLayout and TextInputEditText merged into one class. Just for convenience and for removing some boilerplate code.
from The Android Arsenal http://ift.tt/2q5OzvQ
1 note
·
View note
Text
android-form-validation
UI form validation library for Android. It is highly customizable and easy to use. This library will works with TextView, EditText, AppCompatEditText, TextInputEditText, TextInputLayout and CheckBox. This library is designed in such a way that Its easy to add support for new widgets and add new rules.
from The Android Arsenal https://ift.tt/34lJwcc
0 notes
Text
edit text with hover in box [ TextInputLayout New Design ] in android studio
https://ift.tt/31W2ch3
Edit text with hover in box [ TextInputLayout New Design ] in android studio
<com.google.android.material.textfield.TextInputLayout
android:layout_width="match_parent"
android:layout_height="wrap_content"
style="@style/Widget.MaterialComponents.TextInputLayout.OutlinedBox">
<com.google.android.material.textfield.TextInputEditText
android:hint="Number"
android:id="@+id/edt_Values"
android:layout_width="match_parent"
android:layout_height="wrap_content"/>
</com.google.android.material.textfield.TextInputLayout>
note:- implement Material lib
In Java
implementation 'com.android.support:design:28.0.0-alpha1'
In Kotlin
implementation "com.google.android.material:material:1.0.0"
via Blogger https://ift.tt/2RC9LVp
0 notes
Text
MaterialSpinner
Implementation of a Material Spinner for Android wich supports TextInputLayout functionalities.
from The Android Arsenal http://bit.ly/2wZ1bqt
0 notes
Text
Validator
An utilities class to validate text inside TextInputLayout.
from The Android Arsenal http://ift.tt/2B4BwgP
0 notes