#Applicaiton Development
Explore tagged Tumblr posts
Visit Tumblr Blog
Explore Tumblr blogs with no restrictions, modern design and the best experience.
Last Seen Tumblr Blogs


Fun Fact
In 2020, 27% of US Tumblr users had an annual household income of over $100,000.
Text
WordPress Eklenti Geliştirme: Kendi Eklentini Oluşturmaya Başla!
WordPress için kendi eklentini geliştirmek, hem siteni özelleştirmenin hem de başkalarına fayda sağlayacak çözümler üretmenin harika bir yolu. Bu yazıda, sıfırdan bir WordPress eklentisi oluşturmanın temellerini, en iyi uygulamaları ve dikkat etmen gereken püf noktalarını paylaşıyorum. Eğer sen de WordPress ekosisteminde kendi izini bırakmak istiyorsan, detaylar blogda! 🚀

👉 Okumak için tıkla: Wordpress Danışmanı
#wordpress#woocommerce#webandmob#ecommerce#business#mobile applicaiton#software development#website#ai#shopify
0 notes
Text

Features of the MHRS Clone Script
Appointment Booking: Users can easily schedule appointments with doctors or specialists based on their availability and preferences. The app provides a user-friendly interface that simplifies the booking process, saving time for both patients and medical professionals.
Virtual Doctor Support: The MHRS clone app facilitates virtual consultations, allowing patients to connect with doctors remotely. Users can discuss their health concerns, receive medical advice, and even get prescriptions through secure and confidential video calls or messaging.
Medical Records Access: The app enables patients to access their medical records, including test results, diagnoses, medications, and treatment history. Having this information readily available empowers patients to make informed decisions and facilitates effective communication with healthcare providers.
Prescription Refill Requests: Users can conveniently request prescription refills directly through the app, eliminating the need for phone calls or visits to the clinic. This feature ensures a seamless experience for patients, saving them time and effort.
Health Tips and Reminders: The MHRS clone Script can provide users with personalized health tips, reminders for medication intake, exercise routines, and more. These features promote proactive self-care and contribute to overall well-being.
#mhrs clone#mhrs clone applicaiton#mhrs clone script#mhrs application development#mhrs#mhrs app script development company
0 notes
Photo

Stark Digital Media Services Pvt. Ltd. is a professional Web and Mobile app development company providing services in India, the USA, the UK, AustraliaCanada, and across Middle East countries. Best mobile app development company, It will change your entire mobile vision into compelling mobile apps for iOS and Android. We have the best mobile app developers to provide interactive mobile app design and development services. Contact with us +91 9607 34 6676
0 notes
Text
How B2B Travel Portal Development Benefits Travel Business

#travel portal development#business#development#travel agency#applicaiton development#b2b#b2b travel portal development#software developement
1 note
·
View note
Text
Advantech Global Distribution Software License Product Guide -- Visual Studio Magazine
Advantech Global Distribution Software License Product Guide — Visual Studio Magazine
Advantech Global Distribution Software License Product Guide Advantech, a global leader in embedded computing and Internet of Things (IoT) technology, is recognized as a Microsoft Global IoT Valued Partner and Authorized Embedded Distributor. We provide complete IoT solutions to customers who integrate Advantech hardware products and software for distribution. Also, we support the most popular…

View On WordPress
#.NET#.NET Development#AJAX#Applicaiton Development#ASP.NET#C#Classic VB#Enterprise Development#LINQ#Microsoft#SQL#SQL Server#VB.NET#Visual Studio#Visual Studio 2010#Visual Studio Magazine#VSM#Web Development#WPF#xml
0 notes
Link
Duolingo is one of the best language learning apps. It provides users with modest exercises and takes a gamified approach. These exercises focus on summarizing words, sentences, and phrases from the language users are learning into their aboriginal language, & vice versa.
Do you wish to build an app like Duolingo, and do you want to hire a top mobile app development company in Los Angeles, then read our latest blog about How To Develop A Language Learning App Like Duolingo!
#Duolingo#language learning app#language#language learning software#development#E-Learning App#e-learning#learning apps#app development#application development#android app development#ios app development#flutter app development#applicaiton#developers#android#ios#programming#software#software development company#los angeles#california#USA
13 notes
·
View notes
Photo

Advanced Technology and Services for all your Industrial Needs
We Come up with Upgraded Software for Small and Large Scale Industries.
In the Technological Development, we come up with our Upgraded Products, we have our own Hardware, Software and Support Team. For all the Industrial Needs,
such as, - Industrial data Aquisition for Energy Saving and Production line. - Human Resource Management System & Employee In/Out Tracking. - Canteen Food Token system with QR and Bar Code(Bio / RFID). - Web App Dashboard for Data Analytics with Backend API.
For More details visit: https://www.cloudimax.com
#information technology#hrms#Human Resource Management#Security Patrol Management#Data Aquisition#Firmware Development#Electronic Circuit Design#PCB Design#Web Applicaiton Development#Mobile App Development#Graphic Design#internet of things
1 note
·
View note
Link
Like a lot of things that gained traction owing to the wave of digitization, E-learning is here to stay. Here is a technical checklist for you to create a successful e-learning application
#E-learning Application#E-learning application development company#E-learning App Development#Building successful e-learning applicaiton#Build successful e-learning application
0 notes
Text
How To Make Your Own Website and Monetize it?

By following up with me in less than twenty-four hours, you will be ready to launch a Website that will undoubtedly earn you thousands of dollars every month! How to generate the money? Well, the website that we make will be offering SAAS service.
What is a SAAS service?
A SAAS (Software As A Service) service is essentially an online software or service that you pay to use.
For example, Mailchimp.com, which is a SAAS service, provides email marketing services that you pay for.
A SAAS service is anything you pay for to get an online service.
Now you can be the owner of a SAAS service, you will have your own Website, and people will subscribe to your service and pay you monthly recurring payments.
Let’s say you have 100 customers who use your SAAS service, and your service costs about $10 a month; you’d make $1000 per month!
All you have to do is sit at home and watch your passive income develop on your computer screen. It’s a fantastic and easy way to earn money.
How to get a SAAS service?

“How can I get my own SAAS service or software?” you might be wondering. The good news is that you don’t have to create one, learn to program, or even employ a programmer to do so.
You can simply buy it Online for $40–$60. You can buy software from a website called codecanyon
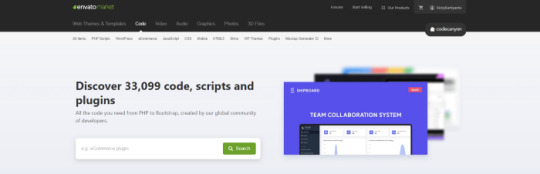
You can simply visit the website, click on the php scripts and search for SAAS and choose what kind of SAAS service that you preferred.
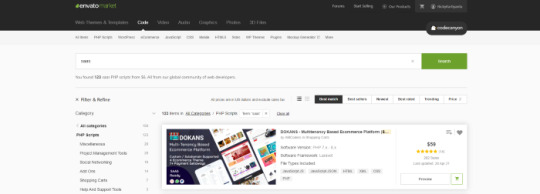
There are several types of SAAS applications available for purchase. Discount networks, accounting and billing software, email marketing systems, and employee management software are only a few examples. Take your time browsing the services and choose the one you like best, the one that fits you and you feel that you can be successful with.
Hosting Your Service
After you’ve created your SAAS service, the next move is to host it and make it public. To host it online, you’ll need a domain name and a server.
Now it is sounds hard since you don’t have any technical background in this term. Don’t worry, it is actually a simple and easy steps.
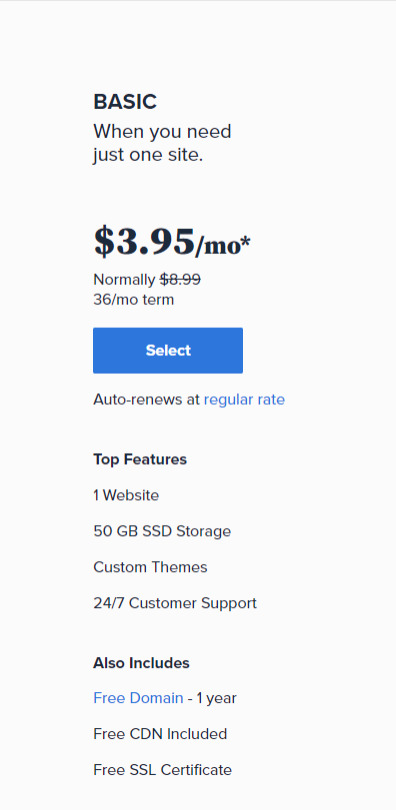
First you need a VPS server, you can visit and buy a cheap one from Bluehost. its only $3,95 permonth with and they give you free domain for 1 year! Check the price below. Buy the “LAMP” administration.
So What is VPS server? We do what we call “online hosting” when we want to publish a PHP page, script, or some other web application. This basically means uploading the files and database to a public server so that it can be accessed over the internet. On simple word, the place where you put the file is from VPS server.
In this tutorial we will used the shared server from Bluehost. Shared server only means that your server will be host with others website.
Now everything is ready, the only things that matter is how to install it. Let get to it.
Getting Started
After having your own server and domain on Bluehost, you need to connect them. Your VPS Server can be accessed now your Bluehost profile, but of course, we don’t want to access our website though an IP! we want to use our domain name. So simply, we are going to map the domain name to our VPS IP, so then we access the VPS and the WordPress website through both the domain and the IP.
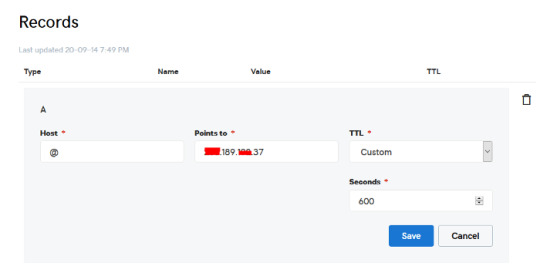
Configure your DNS Records
Simply open DNS management zone in your Domain Provider and edit the main A record.
Than we need to create MySQL database for the application. So Let’s Create one. Connect to your VPS server using any SSH client like putty. and Let’s start!
Just open Putty and enter the Server IP or Name, and Press Open. It will ask you to login, just enter “root” as the user, then enter your password which is sent to you by email.
Note: while typing the password, putty will now show it for security reasons, but It’s there, just type it!
What’s nice, is that we have MySQL installed already as part of the LAMP Stack, but we need to create a database and a user for out application.
Note: Every MySQL statement must end in a semi-colon (;)
To get started, log into the MySQL root (administrative) account by issuing this command:
mysql -u root -p
You will be prompted for the root password, just write or paste it and press Enter.
First, create a separate database that your PHP application will use. You can call this whatever you want, but we will be using TestDb in this guide to keep it simple. Create the database by running this command:
CREATE DATABASE TestDb DEFAULT CHARACTER SET utf8 COLLATE utf8_unicode_ci;
Next, we are going to create a separate MySQL user account that we will use exclusively to operate on our new database. Creating one-function databases and accounts is a good idea from a management and security standpoint. We will use the name DbUser in this guide. Feel free to change this if you’d like.
We are going to create this account, set a password, and grant access to the database we created. We can do this by typing the following command. Remember to choose a strong password here for your database user:
CREATE USER 'DbUser'@'localhost' IDENTIFIED BY 'enter_a_custom_password_here';GRANT ALL ON TestDb.* TO 'DbUser'@'localhost';
You now have a database and user account, each made specifically for Your PHP application. We need to flush the privileges so that the current instance of MySQL knows about the recent changes we’ve made:
FLUSH PRIVILEGES;
Exit from it by typing :
EXIT;
Upload The Script Files To The Server.
To upload the files, you need an application called WinSCP.
It is a free tool and you can download it from here.
Connect to Your VPS Server using WinSCP, and Update the PHP Files to the server to this path: “/var/www/html”
In most cases, the files would be zipped, so we need to extract them.
Again to Putty SSH CLient and Let’s install the unzip utility using the following command:
sudo apt-get install unzip
Clear putty screen to make in clean using the following command:
clear
Change directory to /var/www/html using the following command:
cd /var/www/html
Unzip the “.zip” file using the following command:
unzip YOURFILENAME*.zip
*Note: the file name may be different in your case, so replace YOURFILENAME with your file name.
Now, Move the latest folder content to the upper directory so it can be accessed directly -> use WinSCP Just copy all the files inside “YOURFILENAME” folder and paste them directly in html folder.
Configure Apache to Publish PHP Website
Well Done, Now your files are uploaded and placed in the html folder, we just need to configure apache so we can our Publish PHP Website and access our script using our domain name. To do so, open WinSCP again and navigate to this directory: /etc/apache2/sites-available/
Now, create a new empty file and name it “yourdomain.conf” . You can replace “Scriptname” with any name you want
Open yourdomain.conf Then copy and paste the content below into the file and save.
<VirtualHost *:80> ServerAdmin admin@YOUDOMAINNAME DocumentRoot /var/www/html ServerName YOUDOMAINNAME ServerAlias YOUDOMAINNAME <Directory /var/www/html/> Options +FollowSymlinks AllowOverride All Require all granted </Directory> ErrorLog ${APACHE_LOG_DIR}/error.log CustomLog ${APACHE_LOG_DIR}/access.log combined </VirtualHost>
Replace with your own domain, in my case its “YOURDOMAINNAME”
Enable your script configuration in apache and restart the service.
Now simply, run the following commands to finish the setup:
sudo a2ensite yourdomain.conf sudo a2enmod rewrite sudo systemctl restart apache2.service
ALMOST DONE!
Connect to MySQL Database.
Open your web browser now and navigate to your server name.
Continue the setup by entering the database info and your admin login information. In our example, the database name is TestDb and the user is DBUser with the password set.
That simple!
Setup cronjobs.What are cronjobs?
cron is a Linux utility which schedules a command or script on your server to run automatically at a specified time and date. A cron job is the scheduled task itself. Cron jobs can be very useful to automate repetitive tasks.
For example, you can set a cron job to delete temporary files every week to conserve your disk space. Some PHP web applicaitons, may require you to set up a cron job to perform certain functions.
Setup cronjobs.
To setup cronjobs, you need to add all required jobs to the server. This depends on your script, so if you bought a script from code canyon, the script owner should provide the cronjobs.
To do this, open WinSCP and got to /etc Open crontab file using the editor And paste all the jobs from your script to this folder. (cronjobs are listed in the app documentation)
Make sure each job is on a line and an empty line in the end.
Secure with a Free SSL.
SSL certificates are used within web servers to encrypt the traffic between the server and client, providing extra security for users accessing your application. Let’s Encrypt provides an easy way to obtain and install trusted certificates for free.
Connect to your Server using Putty SSH client. and Let’s Start!
Install the Let’s Encrypt Client
Let’s Encrypt certificates are fetched via client software running on your server. The official client is called Certbot.
First, add the repository to install Certbot:
sudo add-apt-repository ppa:certbot/certbot
You’ll need to press ENTER to accept.
Then, Update the package list to pick up the new repository’s package information:
sudo apt-get update
Install Certbot’s Apache package:
sudo apt install python-certbot-apache
Certbot is now ready to be used.
Set Up the SSL Certificate
Generating the SSL certificate for Apache using Certbot is quite straightforward. The client will automatically obtain and install a new SSL certificate that is valid for the domains provided as parameters.
Simply run the following command: (change the domain)
sudo certbot --apache -d YOUR_DOMAIN_NAME
You will be asked to provide an email address for lost key recovery and notices, and you will be able to choose between enabling both http and https access or forcing all requests to redirect to https. It is usually safest to require https, unless you have a specific need for unencrypted http traffic.
That’s it!
Test your website now and it should be SSL encrypted.
This tutorial I used are originated and made by Hasan By H-educate, you can check his link Here : https://h-educate.com/ or check his youtube on H-educate.
Other tips to make money online, check here : https://ricky-kartiyanta.medium.com/
Cheers!!
#website#saas solutions#saas#monetize#passive income#business#workfromanywhere#easy money#gettingrichfromhome
2 notes
·
View notes
Text
MHRS Clone Script
Introduction: In the era of technology, the healthcare industry is also embracing digital advancements to enhance patient care and streamline processes. One such innovation is the MHRS (Medical Health Record System) clone app. This medical app provides a range of features like appointment booking, virtual doctor support, access to medical records, and more. If you're looking to develop your own MHRS clone app, Omninos Solutions is the ideal partner to turn your vision into reality. With their expertise and experience in app development, Omninos Solutions offers a comprehensive and reliable solution tailored to your specific needs.
Features of the MHRS Clone App:
Appointment Booking: Users can easily schedule appointments with doctors or specialists based on their availability and preferences. The app provides a user-friendly interface that simplifies the booking process, saving time for both patients and medical professionals.
Virtual Doctor Support: The Mmhfacilitates virtual consultations, allowing patients to connect with doctors remotely. Users can discuss their health concerns, receive medical advice, and even get prescriptions through secure and confidential video calls or messaging.
Medical Records Access: The app enables patients to access their medical records, including test results, diagnoses, medications, and treatment history. Having this information readily available empowers patients to make informed decisions and facilitates effective communication with healthcare providers.
Prescription Refill Requests: Users can conveniently request prescription refills directly through the app, eliminating the need for phone calls or visits to the clinic. This feature ensures a seamless experience for patients, saving them time and effort.
Health Tips and Reminders: The MHRS clone Script can provide users with personalized health tips, reminders for medication intake, exercise routines, and more. These features promote proactive self-care and contribute to overall well-being.
#MHRS Clone#mhrs clone#mhrs clone applicaiton#mhrs application development#mhrs applicaiton development company
0 notes
Text
Trusted Web Applicaiton Development Service Provider | iTech
Leading web application development firm iTech has offices in India and the USA. We concentrate on offering clients in a variety of industries, including healthcare, banking, insurance, manufacturing, and technology, high-quality, bespoke online applications. With our extensive technological knowledge, we guarantee the success of your company.
Source URL: - https://itechindia.co/us/web-application-development/
0 notes
Text
Smartreporter review

#Smartreporter review mac os#
#Smartreporter review update#
Questions? Comments? Post them below or email us!īe sure to check us out on Twitter and the CNET Mac forums. Warns of ATA drive failure before it happens. Monitor the transfer rates in and out of a AirPort basestation. Powerful file, photo, and MP3 batch renamer with advanced features. Recover disk space & maintain your system (was MacDust).
#Smartreporter review mac os#
Install various open-source software packages on Mac OS X. It is basically a network monitoring tool that shows input and output rates, but takes the data from the AirPort base station (or other router with SNMP enabled) instead of only showing the current computer.ĭisplay various information in the menubar. For network usage, MiniUsage only reports data in and out of the current system, but if you would like a view of your entire AirPort network, the utility "AirPort Flow" may be useful. It gives a subset of the features available in Activity Monitor, but is easily accessible and out of the way. Lastly, if you like to monitor system and network statistics, the small menu extra "MiniUsage" is an independently developed project that provides easy access to system information. The per-application options are not something I've seen in other cleaning utilities. Clearing out temporary files is an easy way to takle system and application slowdowns, and Purity does this by presenting temporary file options for the system or installed applications, and allows you to select which ones to clear. It is one of many disk maintenance utilities like OnyX, MacCleanse, and Leopard Cache Cleaner which has a slightly unique approach to performing system maintenance tasks. The maintenance utility "MacDust" was also updated, and has been renamed to "Purity".
#Smartreporter review update#
This update is a small bugfix release but should be applied by those who use the program. Like Fink, MacPorts provides easy access to new and updated software, but it also comes with GUI applicaitons for managing the software that may be helpful to people who do not like the Terminal. It is easy to carry and ergonomically designed. Rest Remedies SmartSleeper is a snoring solution that is both effective & easy to use. Your mouth and nose are free of any mask or tubes. I have covered the use of the alternative source package manager "Fink", which I've preferred to use in the past for obtaining open source software though MacPorts has a large user base as well. With Rest Remedies SmartSleeper, you can stop snoring gradually. If you are a MacPorts user, the developers have released a small bugfix update for that program. While utilities can be any tool that helps you perform a routine task (including image manipulation and synchronization), our main focus in this column is to bring you those that help in troubleshooting Mac hardware and software problems. Our Weekly Utilities Update report is a list of all the updates for many Mac utilities that have been released in the past week. Ssd monitor download - SMARTReporter 3.1.
0 notes
Text
Mobile App Development Maintenance Support

Our web design and development solutions can deliver the results your company deserves. We are expert in CMS development, Custom web applicaiton, Mobile App development etc. for more details fill free to visit our website: https://tinyurl.com/yk4z4cdm
0 notes
Text
Fulbright-Nehru Master’s Fellowships 2022-2023
New Post has been published on https://biotechtimes.org/2021/02/23/fulbright-nehru-masters-fellowships-2022-2023/
Fulbright-Nehru Master’s Fellowships 2022-2023

Fulbright-Nehru Master’s Fellowships 2022-2023
Fulbright-Nehru Master’s Fellowships 2022-2023. Fulbright-Nehru Master’s Fellowships 2022-2023 for Indians. Interested candidates can check out the complete details below:
2022-2023 Fulbright-Nehru Master’s Fellowships
The Fulbright-Nehru Master’s Fellowships are designed for outstanding Indians to pursue a master’s degree program at select U.S. colleges and universities in the areas of Arts and Culture Management including Heritage Conservation and Museum Studies; Economics; Environmental Science/Studies; Higher Education Administration; International Affairs; International Legal Studies; Journalism and Mass Communication; Public Administration; Public Health; Urban and Regional Planning; and Women’s Studies/Gender Studies.
These fellowships are for highly motivated individuals who demonstrate leadership qualities, have completed the equivalent of a U.S. bachelor’s degree, have at least three years of professional work experience, and are committed to return and contribute to their communities. The fellowships are for one to two years.
Grant Benefits
The fellowship will provide the following benefits:
J-1 visa support;
Round-trip economy class air travel from fellow’s home city to the host institution in the U.S.;
Funding for tuition and fees,* living and related costs; and
Accident and sickness coverage per U.S. Government guidelines.
The Fulbright-Nehru Master’s Fellowships provide no financial support for dependents.
* USIEF funding may not cover all costs and the fellow may need to supplement grant benefits with other resources.
Eligibility Requirements
In addition to the General Prerequisites, the applicants:
– must have completed an equivalent of a U.S. bachelor’s degree from a recognized Indian university with at least 55% marks. Applicants must either possess a four-year bachelor’s degree or a completed master’s degree; or a full-time postgraduate diploma from a recognized Indian institution if the bachelor’s degree is of less than four years’ duration;
– must have at least three years’ full-time (paid) professional work experience relevant to the proposed field of study by the application deadline;
– should demonstrate experience in leadership and community service;
– must not have another degree from a U.S. university or be enrolled in a U.S. degree program; and
– if employed, should follow the instructions carefully regarding employer’s endorsement. If applicable, obtain the endorsement from the appropriate administrative authority on the FNMasters Employer’s Endorsement Form. The employer must indicate that leave will be granted for the fellowship period. The applicant can download the FNMasters Employer’s Endorsement Form from the USIEF website.
Fields of Study
Each applicant must choose one field of study that matches his/her chief area of interest. The following field descriptions are illustrative, and applicants should note that individual academic host institution programs of study may differ in course offerings, subspecialties, and academic requirements.
Applications are invited on the following fields only:
– Arts and Culture Management including Heritage Conservation and Museum Studies: The study of all aspects of art and culture management, including arts administration, heritage conservation and museum studies, management of profit and not-for-profit art institutions, among others. These fellowships are not for pursuing graduate degrees in fine or applied art and design or art history, but for the management of the arts.
– Economics: The study of production, demand and allocation of resources in society, economic trends, effects of government economic policy on the economy. Subspecialties include: development economics, international economics, macroeconomics, microeconomics, labor economics, agricultural economics, and public finance, among others.
– Environmental Science/Studies: The study of the environment in all its complexities. Subspecialties include: environmental toxicology, natural resource management, pollution prevention, environmental law, environmental engineering and environmental policy analysis, among others.
– Higher Education Administration: The study of all aspects of higher education administration including policy planning and management, student affairs, academic affairs, admissions and enrollment management, curriculum design, learning assessment, financial management, alumni and community relations, internationalization of higher education, quality assurance, and use of technology in higher education, among others.
– International Affairs: The study of international relations with reference to foreign policy, conflict resolution, international security and strategic issues, international economic policy, environmental and energy policy, refugee and migration issues, human rights, and gender policy, among others.
– International Legal Studies: The study of all aspects of international legal studies including business law, commercial and trade law, employment and labor law, environmental law, global health law, human rights, intellectual property rights and law, international organizations, securities and financial regulations, litigation law, and tax law, among others.
– Journalism and Mass Communication: The study of all aspects of journalism and mass communication, including individual and convergent media platforms such as print, broadcast, and new media. Subspecialties include: media management, print journalism, online journalism, broadcast (radio, television, internet) journalism, and communications research and strategy among others.
– Public Administration: The study of management as it relates to the government sector (local, state, federal) or organizations serving the public. Subspecialties include policy analysis, non-profit management, international development, public sector management, public finance, healthcare management, and city/urban development, among others.
– Public Health: The study of all aspects of public health including biostatistics, environmental and occupational health, epidemiology, health law, bioethics and human rights, health policy and management, public health delivery systems, international health, and reproductive, maternal and child health, among others.
– Urban and Regional Planning: The study of all aspects of urban and regional planning, including sustainable infrastructure, transportation policy, planning and improvements, water and sanitation, town and rural planning, equitability, public space programing and governance, land use, community visioning, urban resilience, housing and real estate development, and waste management, among others.
– Women’s Studies/Gender Studies: The study of issues relevant to women, feminism, and gender including development, health, history, education, sexuality, law, and policy, among others.
How to Apply
Applications must be submitted online at: https://apply.iie.org/ffsp2022
Please carefully review the FNMaster’s Applicant Instructions before starting your online application
Please refer to FNMaster’s Applicant Checklist before submitting the application
In addition, you must complete and upload the following documents on your online applicaiton: FNMaster’s Applicant Annexure FNMaster’s Employer’s Endorsement Form (if applicable)
Application Deadline: May 17, 2021, 23:59:59 hrs (IST)
Timeline and Placement Process
May 17, 2021 Application due date for 2022-2023 awards End June 2021 Field-specific experts review applications Late July 2021 USIEF informs the applicants about the review outcome Mid-August 2021 National interviews of short-listed candidates End August 2021 USIEF notifies principal and alternate nominees. Nominees take tests (such as TOEFL and GRE) October 2021 USIEF forwards applications of recommended candidates to the U.S. for J. William Fulbright Foreign Scholarship Board (FFSB) approval and placement March/April 2022 USIEF notifies finalists August/September 2022 Degree program begins
Placement of successful candidates is done by the Institute of International Education (IIE), New York. Recommended applicants are not required to apply to U.S. institutions on their own. IIE/Fulbright Program will apply to four different institutions on their behalf, taking into consideration the candidates’ preferred institutions and the candidates’ competitiveness. If a recommended candidate has previously applied to U.S. institutions and has requested a deferral from the institution, the candidate must notify USIEF immediately.
For any queries contact: [email protected]
Important:
You can apply for only ONE Fulbright-Nehru fellowship category during a competition cycle.
Candidates cannot apply for Fulbright-Nehru and Fulbright-Kalam grants in the same academic year.
Plagiarism in the application will lead to disqualification.
Unless otherwise specified, Fulbright-Nehru applications are to be submitted online.
Applications received after the deadline will NOT be considered.
Extensions and Transfer of visa sponsorship will not be permitted.
Prospective Fulbright participants should be aware that public health conditions, availability of consular services and travel, as well as U.S. institutional operating status and policies may affect their ability to travel to the U.S. and participate in academic programs.
View Notification
0 notes
Text
Integrating AdminLTE with ASP.NET Core
In this article, we will learn about Integrating AdminLTE with ASP.NET Core 3.1 MVC or really any other Bootstrap based UI Frameworks completely from scratch. We will also go through about integrating Identity Server to our MVC Applicaiton. Also, you will gain quite a lot of practical knowledge on Views, Layouts, Partial Views, Conditional Rendering, Navigation Indicator and much more.
What we will learn and build?
Here is a small demonstration of what we would have built by the end of this tutorial.
Integration with a Third-Party Bootstrap Template.
Clean usage and separation of Layouts, Views and Partial Views.
Integration of Identity Authentication
Scaffolded Identity
Conditional Rendering
Login / Register / Logout and more
The need to Integrate Third-Party Bootstrap UI
If you are back-end developer like me with just OKayish skills with recreating an entire HTML / CSS / JS Template from scratch, you would want to investigate other options that make your application look one hundred times more Professional. Now, there are quite a lot of options, including paid templates as well.
For this article, we will use an Open-Sourced Dashboard Template that is quite popular.
Here are the advantages of integrating an already built template.
Professional UI
Already Tested.
Responsive.
Would have a bunch of reusable components like datatables, forms, and more so that you don’t have to re-invent the wheel.
What’s AdminLTE?
AdminLTE is an open-sourced Admin Dashboard Template that is built over Bootstrap. It is packed with quite a lot of responsive and commonly used components that are very easily integrated with your webapplications.
To get a better picture, click here to see a demo of AdminLTE in action.
You may notice how premium it already looks. For now, these pages are not bound to any server-side applications. They are just plain old HTML files. In this article we will integrate this UI with our ASP.NET Core MVC Application with some clean practices.
Downloading AdminLTE
AdminLTE is completely FREE to use. Follow this link to start downloading. At the time of writing this article, 3.0.5 is the latest version available. Click on the link to Source Code to download the zipped file on to your machine. Also, on GitHub you have an update version of the final project.
AdminLTE on GitHub – version 3.0.5
The version 3.0.5 is the stable version we can use for your project. At the time I’m writing this post, there is a pre-release and I’m using this one for the project.
AdminLTE 3.1.0 Release Candidate
Exploring the Folder Structure
Once downloaded, extract the zipped file. Here you will find a bunch of folders and files. We will not have to touch each file, just a few. I will give you a brief overview on what each folder contains.
dist – This is the distribution folder that contains all the css and js files, mostly all the static files of the application. We will need to copy this folder over to wwroot folder of our MVC Project later.
pages – Here you get a list of all pre-made HTML files to refer to. This is quite an important section as it uses all the available components and can be helpful to check out how components are being utilized.
plugins – third party JS plugins like select2, jQuery, datatables, etc are contained here. We will need this folder too.
starter.html – Here we get a minimal setup of the HTML file. We will be using this page to generate the _Layout.cshml for our ASP.NET Core MVC Application. I have attached a screenshot below.
AdminLTE first start from starter.html
Setting up ASP.NET Core MVC Project
Let’s create a new ASP.NET Core Application with the Model-View-Controller (MVC) Template. Make sure you select the authentication mode to Individual User Accounts. This enables us to use the built in Authentication (using Microsoft Identity). I will be using Visual Studio 2019 Community.
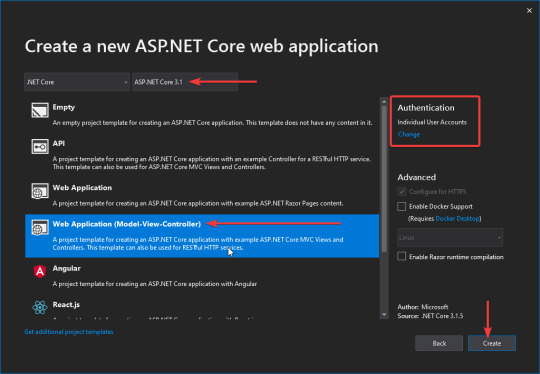
Create a new ASP.NET Core web application with Visual Studio 2019
Now that we have our AdminLTE files and ASP.NET Core Application ready, let’s start integrating them. Before getting started, let’s see how the default layout of ASP.NET Core work.
Understanding Layouts and Partial Views
Build and run the Application. This is the default layout that comes out of the box with ASP.NET Core 3.1 Web Applications.
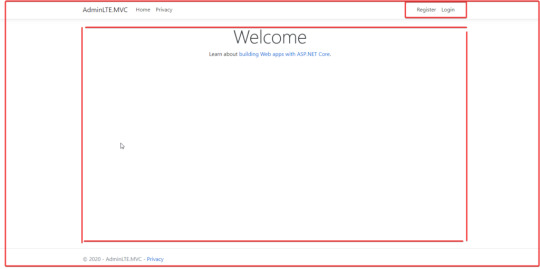
ASP.NET Core project out of the box from Visual Studio 2019
This is how the page is split into.
Main Layout Page – This is the master layout defined at /Views/Shared/_Layout.cshtml
Navigate Panel – Within the master layout,a partial view reference is defined that calls the _LoginPartial.cshtml page.
Content Body – Here is where the actual content goes.
PS, ASP.NET Core uses .cshtml (Razor markup files) extension for its pages.
Now why this kind of seperation?
In ASP.NET Core MVC, you can generate Views (CHTML) via controllers. Imagine a real-life application having multiple controllers and views. You really don’t want to define the entire HTML for each view, do you? Because we already know that we will be having a site-wide common template.
So, what this Layout concept does is that you define the layout cshtml just once and add the content of each other pages dynamically within the layout page.
So, you define the entire HTML Part that would be common throughout the application, and you separate the dynamic content in another cshtml page. This way, we can make the application much more maintainable and reduce the size of the entire application. Get the point?
Let’s examine the file where the default layout is defined. Since we created a MVC templated application, we can find this file at ../Views/Shared/_Layout.cshtml in the solution structure. You can see that this page starts with a HTML tag. This suggests that this is an entire HTML page with all the body and head tags.
Now somewhere at line 33 or so, you would see the following.
<div class="container"> <main role="main" class="pb-3"> @RenderBody() </main> </div>
@RenderBody is used to render the content of the child page. When you run the ASP.NET Core application, it navigates to the root of the application, that is, localhost:XXXX/Home and invokes the Index Method in the HomeController (as it is set as the default route). Let’s see what this method contains.
public IActionResult Index() { return View(); }
It just returns a view (.cshtml). Right click on the View and click Go to View. This will take us to associated CSHTML File.
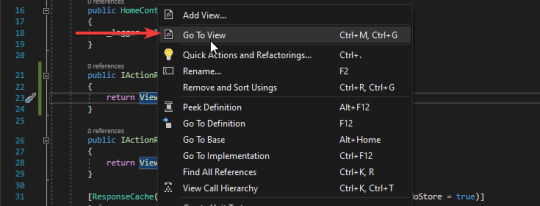
Create a new View with Visual Studio 2019
You will be navigated to Views/Home/Index.cshtml. Here is the content of the page. This is exactly what we saw on the page when we ran the application.
@{ ViewData["Title"] = "Home Page"; } <div class="text-center"> <h1 class="display-4">Welcome</h1> <p>Learn about <a href="https://docs.microsoft.com/aspnet/core">building Web apps with ASP.NET Core</a>.</p> </div>
This content is loaded by the @RenderBody tag, so that on runtime you get the complete web page (including the static HTML content and the dynamic code generated by C#). Now, let’s talk a bit on partial views. In your _Layout.cshtml page, you may find this somewhere in 20th line or so.
<partial name="_LoginPartial" />
Unlike Views, Partial Views in ASP.NET Core renders the HTML output within another View’s rendered output. There can be cases where your applications have components that can be reused anywhere within the application. In our case we have the top Navigation bar that is quite common through the application. You can find the _LoginPartial.cshtml in the shared folder as well.
Integrating AdminLTE with ASP.NET Core
With the basic concepts of Layouts, View and partial Views clear, it will be easier to integrate any 3rd Party HTML Layout to our ASP.NET Core Applications. Let’s proceed.
Copying the Required Resources
As mentioned earlier, AdminLTE is built over Bootstrap. Hence it contains quite a lot of jQuery and is integrations as well. We would not be just copying the HTML content, but also the related resources, like CSS, images, libraries, js files, etc.
In our AdminLTE Folder, navigate to \dist\css and copy the content over to the wwwroot\css folder in our Visual Studio. Do the same for the is folder as well.
PS, to copy the contents over, just copy the selected folder/file and go the Visual Studio. Here you may find a wwwroot folder. This is the folder meant to hold the static files of ASP.NET Core applications. Just paste the copied file here with a simple CTRL+V command.
Next copy the entire img folder to the wwwroot folder. Navigate back to the root of the AdminLTE folder and copy the plugins folder to the wwwroot folder as well.
Note that we will not be using all the plugins in the plugins folder for now. You may need to remove the unused files once you are done with the application to save small space. For now, let’s keep them.
This is how your wwwroot folder would look like after we are done copying the content.
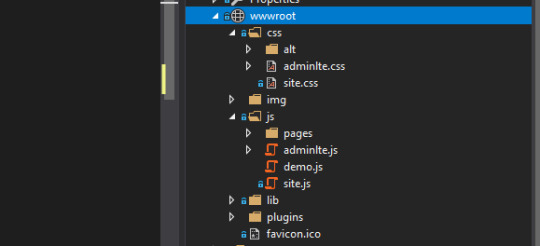
Result wwwroot folders
Now that we have all the required resources moved to our application. Let’s wire up the Layout Page.
Adding Layout pages & Partial Views
An Application can have multiple Layout pages. For this tutorial, let’s not disturb the existing _Layout.cshtml page. Rather, let’s build one specifically for AdminLTE.
In the Shared Folder, create a new folder named AdminLTE. Here is where you would want to put all the .cshtml related to AdminLTE.
Before building the layout pages and partial views, let’s decide on how we will separate the HTML content. Note that we will be using the starter.html page to build the Layout. Open the starter.html page on your browser.
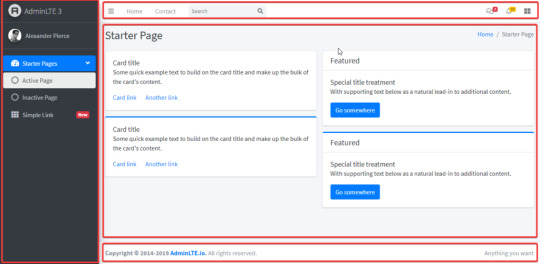
AdminLTE sections
Here is how we could split up the page into.
Side Navigation
Top Navigation
Body
Footer
Additionaly we will want to add 2 more partial views that will hold the references to the CSS and js files, respectively. This makes it easier to sort and manage your resource references.
Under the AdminLTE Folder create a new View and name it _Layout.cshtml. Make sure to uncheck the partial view and layout page options.
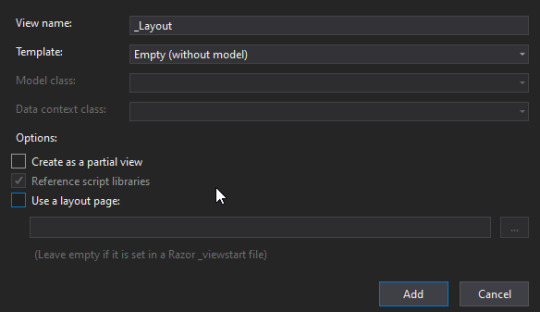
Create a new _Layout for AdminLTE
Next, let’s start adding the partial view files. In the same AdminLTE folder, add a new view and name it _MainNavigation.cshtml. This time, check the “create as a partial view” option.
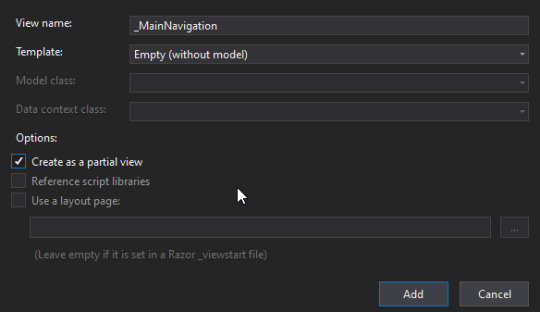
Create a new partial view
Similarly, add other partial views with the following file names.
_TopNavigation
_Footer
_Scripts
_Styles
This way, you can neatly structure you Layouts.
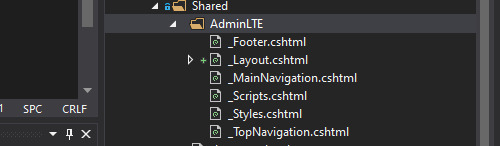
New files in the Shared folder
Let’s start adding content to each file. So, now we have the idea of how we will split the HTML. Open starter.html in a code editor. I use VS Code. The starter.html has over 330 lines of HTML. Let’s move the code one by one.
Scripts
Go to the end of the file. Above the body tag, you can find few of the script reference there. Cut it and Paste it over to _Scripts.cshml. Replace in the starter.html with the following.
<partial name="AdminLTE/_Scripts" />
Footer
Just above where the scripts were defined, you can find the footer container. Cut this and move to _Footer.cshtml. Add the following instead in the starter.html. We will move the codes from here to the _Layout.cshtml once we are done with the partial views.
<partial name="AdminLTE/_Footer" />
Body
You can find a div class “content”. Delete the entire child div which has a class named “row” This is where we would want to put our @RenderBody tag.
Main Navigation
Search for a class “main-sidebar”. Cut it and move it to _MainNavigation.cshtml. Here you have all the sidebar items at once place for you to extend.
<partial name="AdminLTE/_MainNavigation" />
Top Navigation
Search for the class “main-header” and move the content over to _TopNavigation.cshtml.
<partial name="AdminLTE/_TopNavigation" />
Styles
Below the title tag, you can see a bunch of stylesheet references. Cut and paste to _Scripts.cshtml and Replace with the following instead.
<partial name="AdminLTE/_Styles" />
Now, we have moved all the possible components to partial views. What remains in our code editor would look something like this. Move this to the _Layout.cshtml
<!DOCTYPE html> <html lang="en"> <head> <meta charset="utf-8" /> <meta name="viewport" content="width=device-width, initial-scale=1" /> <meta http-equiv="x-ua-compatible" content="ie=edge" /> <title>AdminLTE 3 | Starter</title> <partial name="AdminLTE/_Styles" /> </head> <body class="hold-transition sidebar-mini"> <div class="wrapper"> <partial name="AdminLTE/_TopNavigation" /> <partial name="AdminLTE/_MainNavigation" /> <div class="content-wrapper"> <div class="content-header"> <div class="container-fluid"> <div class="row mb-2"> <div class="col-sm-6"> <h1 class="m-0 text-dark">Starter Page</h1> </div> <div class="col-sm-6"> <ol class="breadcrumb float-sm-right"> <li class="breadcrumb-item"><a href="#">Home</a></li> <li class="breadcrumb-item active">Starter Page</li> </ol> </div> </div> </div> </div> <div class="content"> <div class="container-fluid"> @RenderBody() </div> </div> </div> <aside class="control-sidebar control-sidebar-dark"> <div class="p-3"> <h5>Title</h5> <p>Sidebar content</p> </div> </aside> <partial name="AdminLTE/_Footer" /> </div> <partial name="AdminLTE/_Scripts" /> </body> </html>
We have separated the HTMLs to layouts and partial views. Now build and run the application. You would see absolutely no change. Why? Because we have not mentioned anywhere to use our new layout, have we?
For this, Navigate to Views/Home/Index.cshtml and mention the layout manually.
@{ ViewData["Title"] = "Home Page"; Layout = "~/Views/Shared/AdminLTE/_Layout.cshtml"; }
After this, run the application again. You would see quite of lot of changes. The entire page would be broken. However, you can see that we are able to display the content we passed from the View. Now let’s the fix the page.
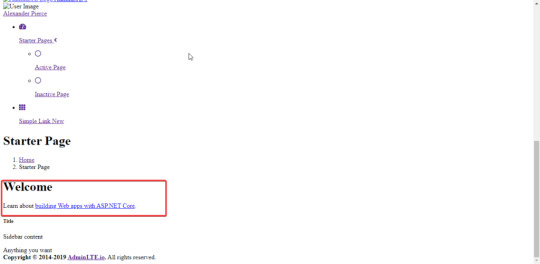
Wrong visualization of the pages after moving to partial views
Any guesses on why this page is broken? It’s quite simple if you already have experiences with HTML pages. This is commonly because the page cannot find the stylesheets that contains the styles defined. We copied the styles and scripts to the Partial Views, but we did not change the references. Let’s change the paths to point to the specific files in the wwwroot folder.
Open _Styles.cshtml and modify as below
<link rel="stylesheet" href="~/plugins/fontawesome-free/css/all.min.css"> <link rel="stylesheet" href="~/css/adminlte.min.css"> <link href="https://fonts.googleapis.com/css?family=Source+Sans+Pro:300,400,400i,700" rel="stylesheet">
Open up _Scripts.cshtml and modify as below
<script src="~/plugins/jquery/jquery.min.js"></script> <script src="~/plugins/bootstrap/js/bootstrap.bundle.min.js"></script> <script src="~/js/adminlte.min.js"></script>
That’s it. Run the application again.
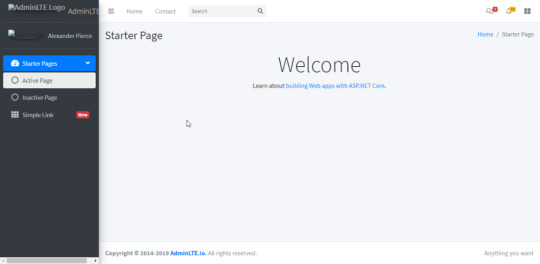
AdminLTE with ASP.NET Core
There you go! You can see that the page starts looking great. The only issue is a broken image reference. You can fix it similarly by going to _MainNavigation.cshtml and fixing the reference issue like we did earlier.
Now, let’s add this layout to the Privacy Page too! Go to Views/Home/Privacy.cshtml add in the following line.
@{ ViewData["Title"] = "Privacy Policy"; Layout = "~/Views/Shared/AdminLTE/_Layout.cshtml"; }
Run the application and navigate to localhost:xxx/home/privacy. This is what we get. We are all setup now.
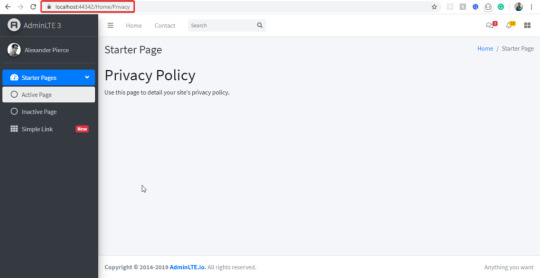
Privacy page with AdminLTE and ASP.NET Core
The post Integrating AdminLTE with ASP.NET Core appeared first on PureSourceCode.
from WordPress https://www.puresourcecode.com/dotnet/net-core/integrating-adminlte-with-asp-net-core/
0 notes
Link
2018/1/27 Feed Summary
The Morning Paper
One Model to Learn Them All: In this post, the author summarize a paper which introduces a MultiModel general deep learning framework which will train 8 tasks at the same time (Image recognition, Image caption generation, Speech recognition, Parsing, German/French to English Translation and their reverse English to German/French translation). MultiModel consists an encoder / decoder architecture which would share a common learning unit. It also consists of a mixture-of-expert layer to dispatch the learning efforts. The article referred in this post shows that training such mixed model doesn't pose any performance degradation problem and sometimes help the task with less data available (parsing). This might imply a much larger scale or cross-domain transfer or multi-tasking learning experiment could be done in the future. This article also points out even though the computational building blocks need to be present for some specific domain (convolution neural network for image and attention / mixture-of-expert for language model), their presence does not interfere the cability of learning other tasks in different domains.
(RW: From the first glimpse of this short summary, the article referred in this post doesn't show any convincing result that cross-domain training does work by showing how much different these domains are. It just iterate similar conclusion from past experiments. Does Image caption take on the role to bridge image and language domain? How about choosing tasks randomly to break the MultiModel in order to know the degree of correlaiton shared among models? Would a sub-model which is trained insufficiently take the whole unified model down? I think those questions might shed some light about cross-domain learning)
KDNuggets
Kogentix Automated Machine Learning Platform: Another MLaaS targets bussiness data (pipeline in the figure below) and features the only one platform running Spark natively.
Data Enginner Introduction Part 1: In the following figure borrowed from The AI Heirarchy of Needs, AirFlow (monitoring tool used by Airbnb) locates at second layer of AI Needs Pyramid
The Democratization of Artificial Intelligence and Deep Learning: Free e-Book give-away. The Democratization of Artificial Intelligence is an idea to make Artificial Intelligence applicaiton is accessible to everyone.
Data Science Job Market Trends: automatino, data enpowerment, mass cleanup, ethnics & influence and blockchain app
O'Reilly Media / AI
tensoflow + mobile device: introduce Tensoflow Lite
using Apache MXNet for anomalty detection: Tutorial for using MXNet. Tranditional methods used to detect anomalty including: Kalm filter, KNN, K-Means and autoencoder with DL. Using IoT time-series data for demonstration. The author will train a encoder-decoder and detect anomalty as any data point outside 3rd standard deviation.
LSTM introduction with Tensorflow: using LSTM to classify Stock Tweets
2018 trends in AI O'Reilly version: And Include
Bayesian methods into Deep Learning and optimize training through neuro-evoluation on gradient-based deep learning.
Low cost hardware to improve computation efficiency.
Fast evolve AI tools including simulators (including reinforcement learning to automate deep learning training such as AutoML), AI develop toolbox handling more complicated / multimodal inputs and finally tools that not for data scientist or AI enginner for use such as friendly UI / UX etc or Intelligent wearables alike
Replace low-skilled tasks with automation
Other ethnics or issues about AI application
Convolution NN for language modeling: tutorial using 1D kernel and Tensorflow > Written with StackEdit.
2 notes
·
View notes