#Arduino-based projects
Explore tagged Tumblr posts
Visit Tumblr Blog
Explore Tumblr blogs with no restrictions, modern design and the best experience.
Last Seen Tumblr Blogs


Fun Fact
Post activity is at the highest at 4:00 pm EDT; notes peak at 10:00 pm EDT.
Text
Best Arduino Projects for Engineering Students – Takeoff Projects
Arduino is a popular microcontroller that helps students create innovative electronic projects. It is easy to use and perfect for beginners and advanced learners. Engineering students can develop various projects using Arduino, such as home automation, robotics, IoT applications, and sensor-based systems.

At Takeoff Projects, we offer a wide range of Arduino projects for students to learn and implement in real-time applications. These projects help students improve their technical skills and understand how hardware and software work together.
One of the best Arduino projects is home automation, where students can control lights, fans, and appliances using a smartphone or voice commands. Another interesting project is automatic street lights, which turn on and off based on the surrounding light conditions. These projects help students learn about automation and energy efficiency.
IoT-based Arduino projects are also very popular among engineering students. For example, a smart irrigation system uses Arduino to control water supply based on soil moisture levels. This project helps in water conservation and is useful for agriculture. Health monitoring systems are another great project idea, where students can build devices to measure heart rate, temperature, and oxygen levels.
#Arduinoprojects#engineeringstudents#Arduinominiprojects#TakeoffProjects#electronicsprojects#IoT projects#Arduino-based projects#simple Arduino projects#final year projects
0 notes
Video
youtube
IOT Based Smart Agriculture Monitoring System Using Arduino With GPRS Modem Projecthttps://www.youtube.com/watch?v=ivYRwOur6kE
#youtube#IOT Based Smart Agriculture Monitoring System Using Arduino With GPRS Modem Project https://www.youtube.com/watch?v=ivYRwOur6kE
0 notes
Text
notes on my edgar lineup (spoilers ahead + long post!)
OVEdgar and Base Edgar are wearing mikey's jacket <3


OVEdgar is wearing black (the same color mikey wears when he sneaks into Tier 2) while Base Edgar wears red (easy to hide blood stains)
Base Edgar and Edman wear pastel nail polish; OVEdgar wears black (really, who is Mustardseed if not the emo iteration?)
the background is a blurred and flipped version of the IHBTTF cover
Edman's bracelet matches his and mdawgs eye colors (idea from @/savoureux on discord)
Edman loses most of his jewelry in OI, but he keeps one necklace—you can see it tucked into his waistband
i played stardew valley for the first time last saturday, which inspired me to make the inventory using pixel art
i have no clue what a bug looks like. i kept googling "bug surveillance" but photos of cameras on bugs kept appearing?? what i drew honestly just looks like an arduino circuit speaker. sorry Mustardseed


i started this project the saturday before finals and finished the following monday. i did not shut my desktop off for this entire period of time.
originally, the edgars were going to rotate! i scrapped this idea because it added a lot of in between frames.


BONUS FACT: the jacket you see in this post has the OVER logo on the sleeve, but i draw the 101 timeline jacket with the OVER logo on the front: an askew patch for an askew timeline.
#ive been so delighted seeing everyone notice little references#so i wanted to make a post pointing out some details + stuff from while i was making it#long post#woe.begone
35 notes
·
View notes
Note
Hi, I'm a junior in university right now working towards my bachelor's in electrical engineering and I've since realized I have no idea wtf I'm doing. Do you have some resources on how to begin designing electric circuits and programming in C? You seem like you know what you're doing
So I've thought about this a good bit and what helped me learn both times was hands on practice so I'd see about getting a cheap breadboard kit like this:
But probably not this one exactly, you can get something similar for way cheaper.
As for specific literature for circuitry I don't have a recommendation but I can recommend picking varying difficulties of diy projects that require circuitry at the beginning to get comfortable and bringing that comfortability to your school projects.
For using C with circuitry I'll say the best path is definitely buying a cheap esp32 board, something based on the c3 would probably be cheapest. There is tons of documentation on how to use these boards and I've found that PlatformIO + VS code/vscodium is a very good setup for programming these boards.
19 notes
·
View notes
Text
The Übersaw build breakdown, Part 1: (enjoy!)
Note: I'm more than happy to answer any and all questions about this build. Want me to breakdown a specific step or detail, please ask!
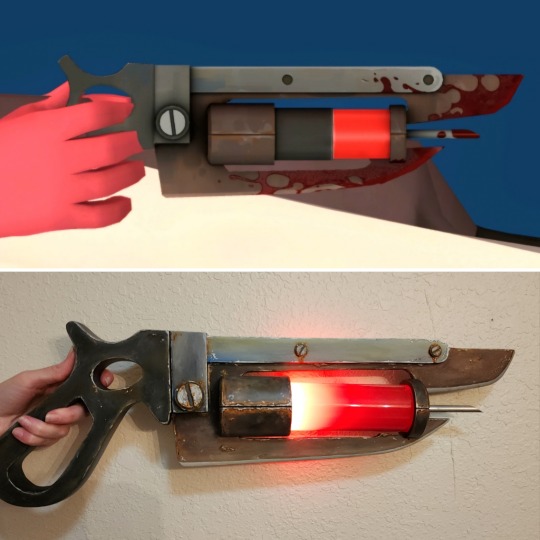
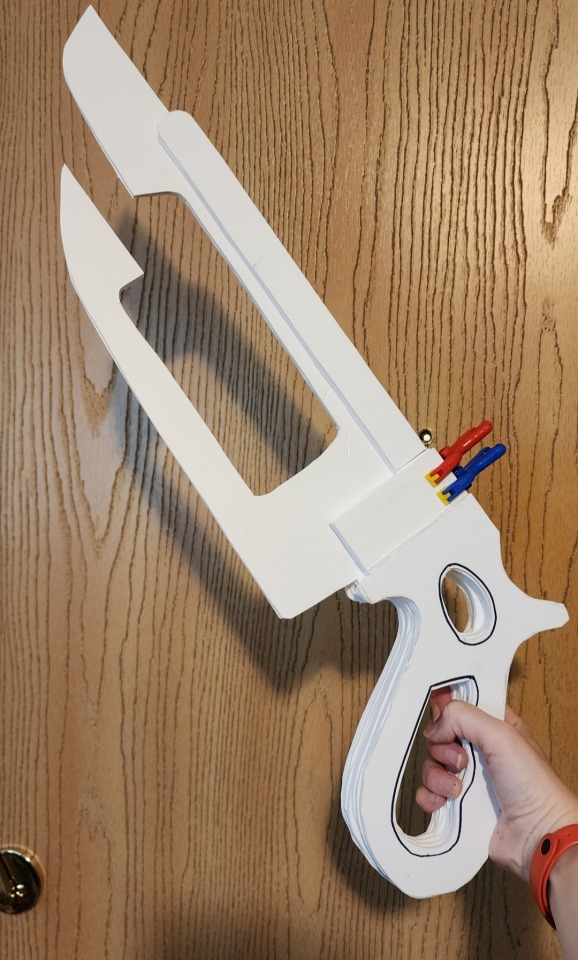
From top reference, to bottom complete, this build was a challenge from start to finish and required me to learn a ton of new skills, and reach out to a variety of people for help/advice/brainstorming! But when I decided I was finally going to make my dream cosplay of Medic, I knew this is the saw I wanted to make along with it.
Every piece was made from scratch, and includes sintra, pla 3d printing, resin printing, acrylic tubes, a straw, bondo, E6000, hex bolts, led ring light, arduino trinket, metal switch, aaa battery pack, misc. wiring, spray paint, acrylic paint, and a whole lot of sanding sanding sanding!

I always wanted to stay as true to the original design as possible, but knew adjustments would have to be made, moving a model from a game to real life. Some details I wanted to keep a true as possible, such as the base shape and size. Some aspects were modified deliberately to fit better with the overall aesthetic of the specific version of Medic I was creating; such as smoothing out the edges of the handle, rather than keeping them sharp like in the game. (Something that would make it more realistic overall, a goal I kept in mind through every piece of the costume.)
One such change was adding liquid to the Übersaw core and an led light that pulses red. Looking at the base design, and the color palette the original creators used, they intrinsically translated in my mind to "liquid" and "light" rather than just a flat color. Thinking about Medic and his designs, I figured an ominous, pulsing red would be perfect for when the Übersaw was fully charged. (Plus it would look really cool, so... that definitely influenced my decisions!)
I mixed up a concoction of distilled water, red and silver mica powder, and filled an acrylic tube with the mixture. There's actually two tubes, the smaller inside one helps reduce water weight on this already hefty prop.

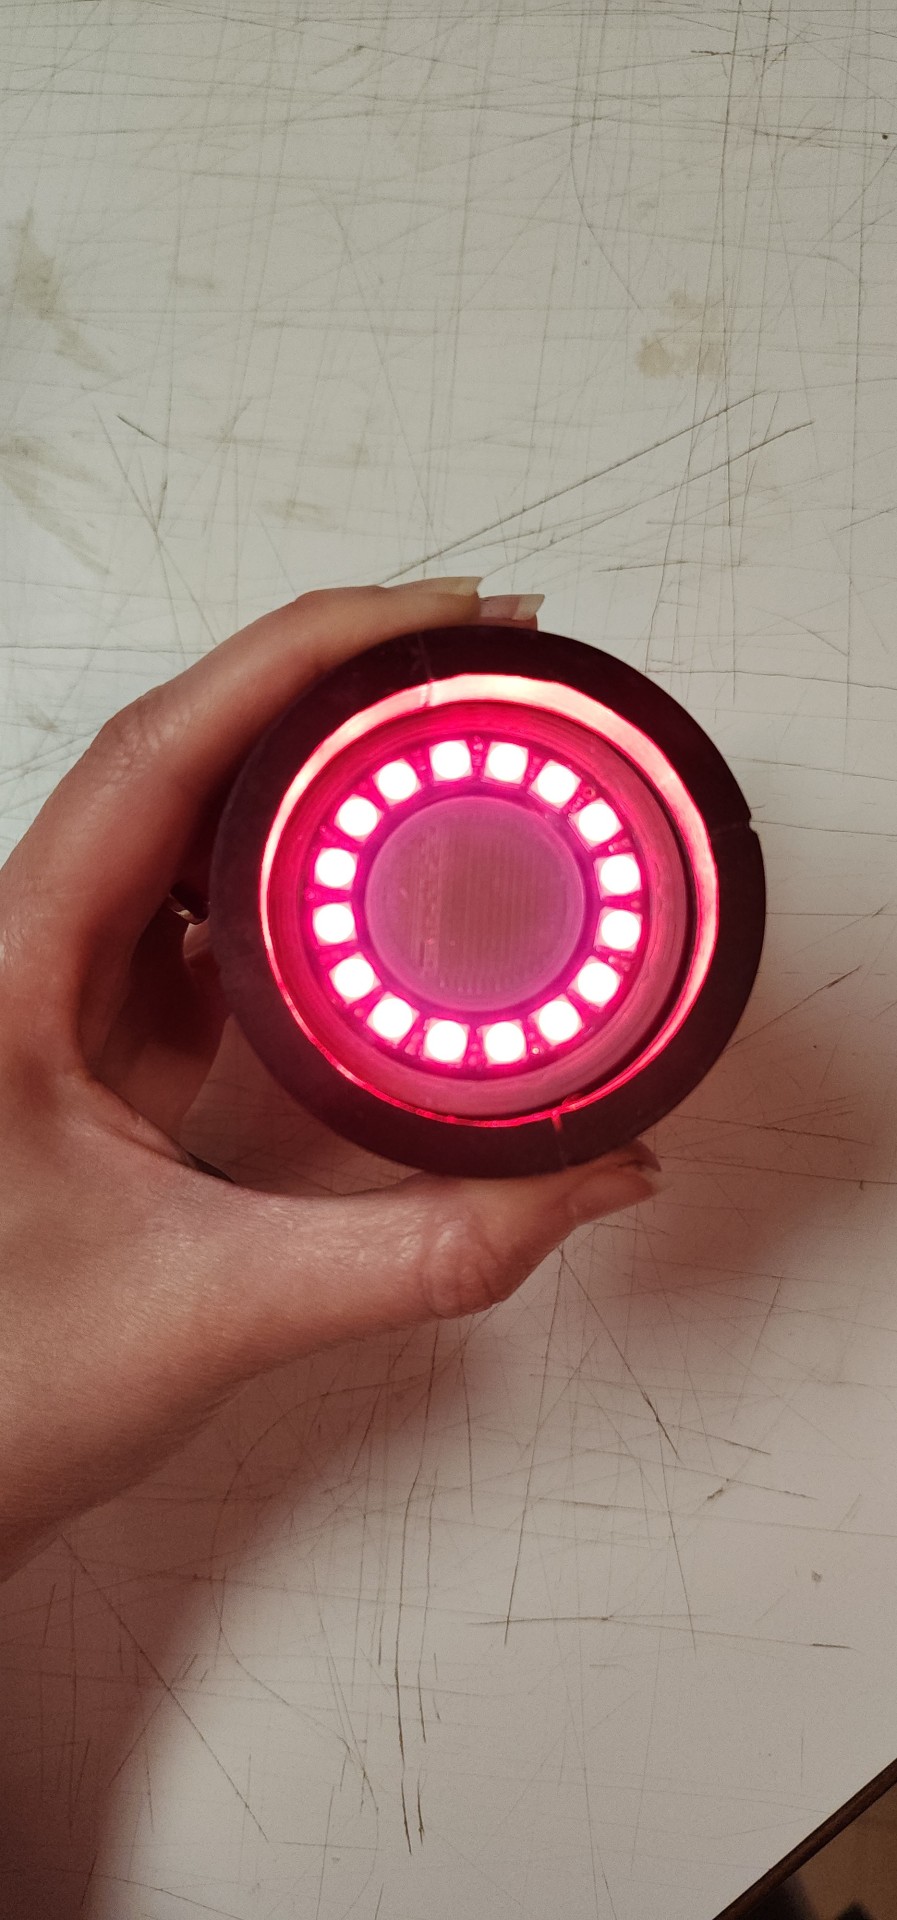
Of course, these changes also meant I needed to learning how to code an arduino trinket (which ended up being a lot of fun!), and create a special holder at the base of the Übersaw to hold the ring light, trinket, switch, battery pack and wiring. Not to mention it had to be accessible so I could change the batteries out when needed. That's when it was time to ask for help from some talented friends!
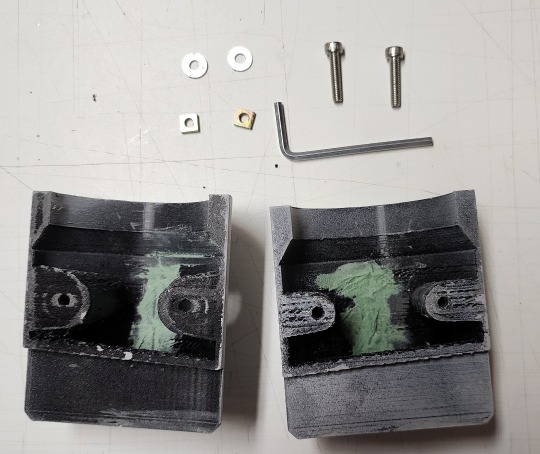
Here's what the resulting holder ended up looking like! (Not pictured is the ring the light sits on) It was 3d modeled and printed in PLA by my friend with some imput by me, but he knows so much more about this stuff I was happy to let him take the lead! The design includes hex bolts to secure the light holder to the Übersaw like a clamp, but also allows it to be opened in half for easy access to the batteries/any electronics that are having issues.
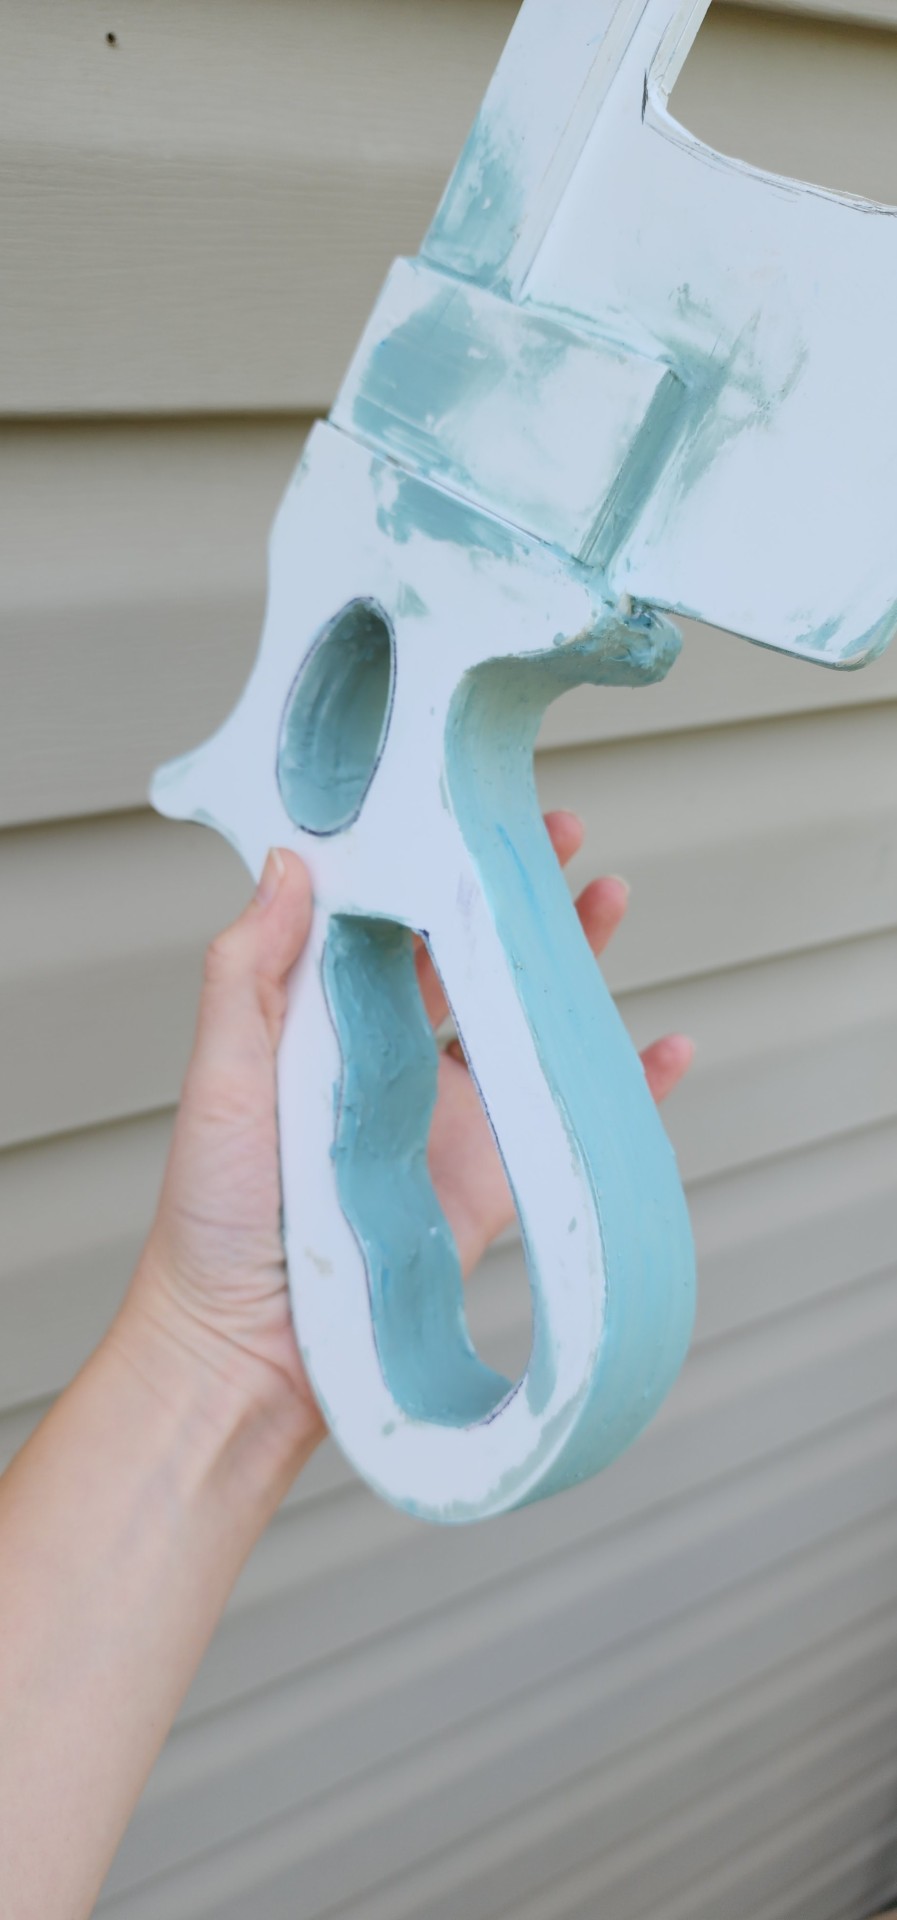

The base of the whole saw is sintra (pvc board), in many layers. The layers were then blended with Bondo and SO MUCH SANDING. After the piece looked like a cohesive whole, rather than 8 layers of plastic board, it was base coated with spraypaint and detail painted with acrylics. (I say this as though it was a simple task, but the spraypaint fought me every step of the way, had to be constantly re-sanded, and some layers refused to dry at all and had to be varnished to remove the tackiness. It was a trial to be sure!)

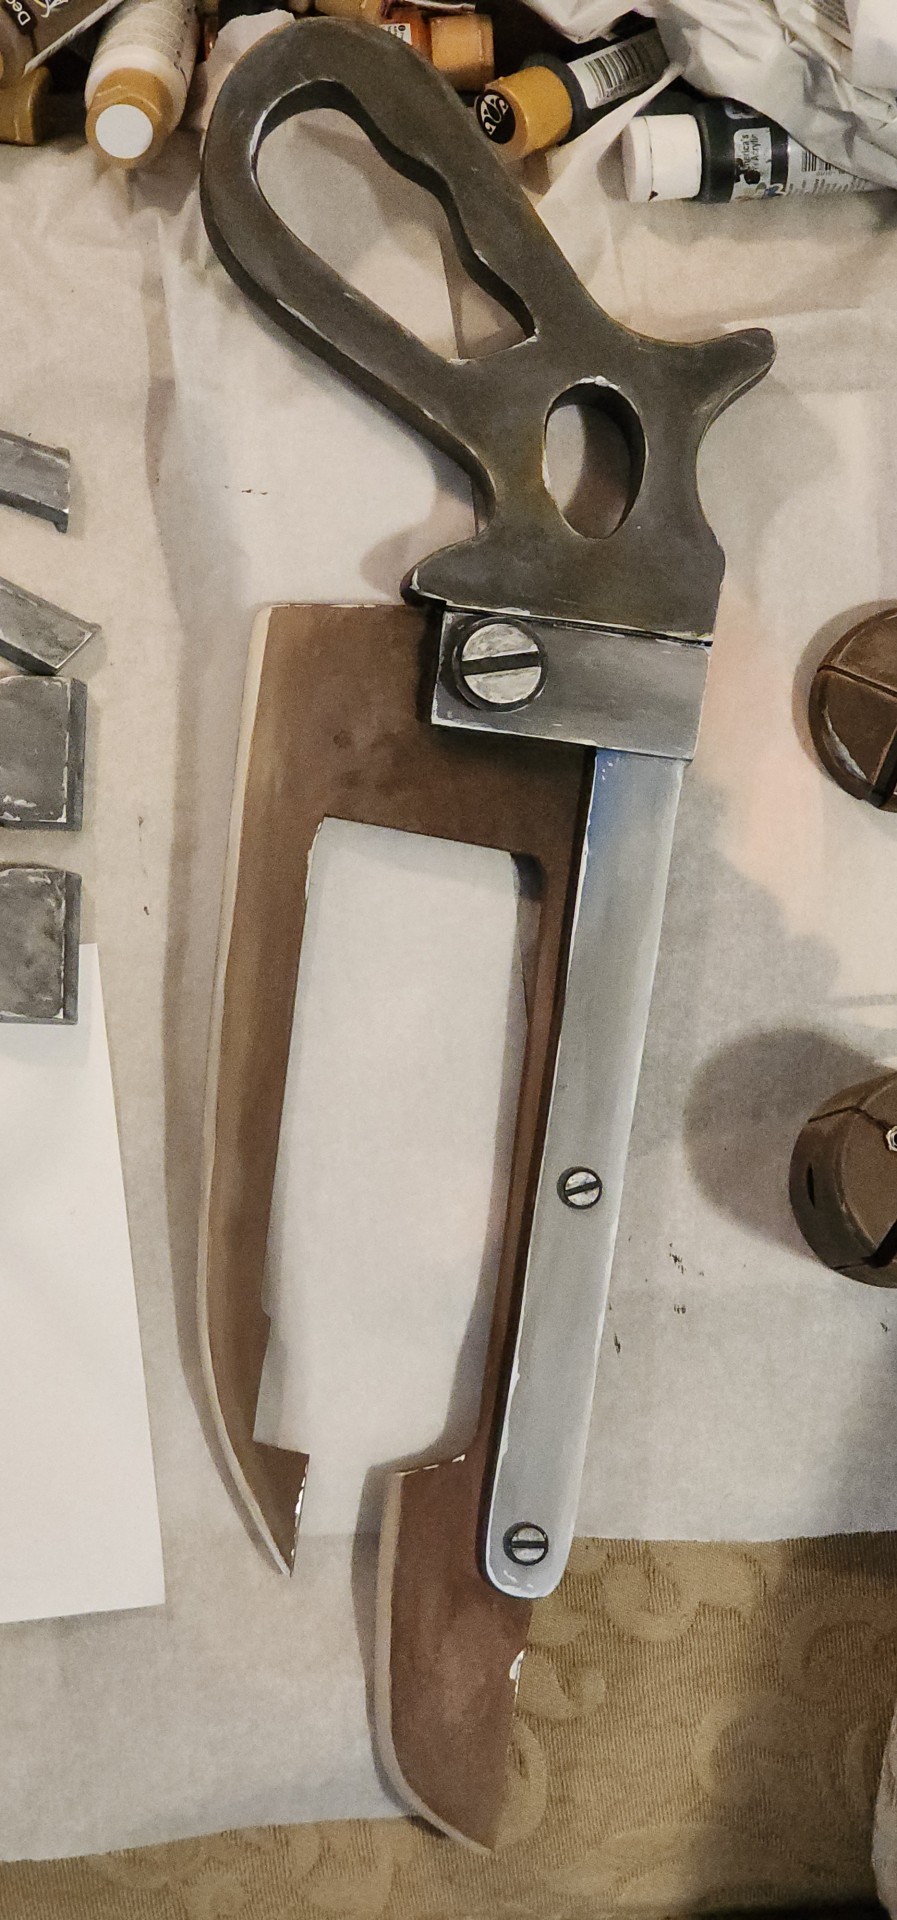
But after all was said and done, it was finally time for detail painting: My favorite part of any project! (Continued in part 2)
#cosplay#team fortress 2#tf2#tf2 medic#medic#ubersaw#cosplay wip#sisu squid stuff#tf2 cosplay#tutorial
47 notes
·
View notes
Text
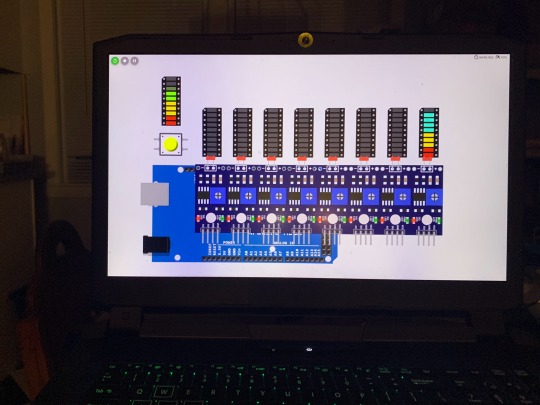
SERVO DISTANCE INDICATOR USING ARDUINO UNO
INTRODUCTION
Distance measurement is a fundamental concept in various fields, including robotics, automation, and security systems. One common and efficient way to by emitting sound waves and calculating the time it takes for the waves to reflect back from an object, allowing accurate measurement of distance without physical contact.
In this project, we will use an HC-SR04 Ultrasonic Sensor in conjunction with an Arduino microcontroller to measure the distance between the sensor and an object. The sensor emits ultrasonic waves and measures the time it takes for the waves to return after reflecting off the object. By using the speed of sound and the time measured, the distance is calculated. This simple yet powerful setup can be applied in a variety of real-world applications such as obstacle detection in robots, parking assistance systems, and automatic door operations.

WORKING PRINCIPLE
1. Servo Movement: The servo motor rotates to different angles (0° to 180°). The ultrasonic sensor is mounted on top of the servo and moves with it.
2. Distance Measurement: At each position, the ultrasonic sensor sends out an ultrasonic pulse and waits for the echo to return after hitting an object. The Arduino records the time taken for the echo to return.
3. Distance Calculation: The Arduino calculates the distance to the object based on the time recorded and the speed of sound (0.0343 cm/µs).
4. Servo as Indicator: The servo motor's position provides a physical indication of the direction of the detected object. As the servo moves across a range of Image map out objects in different directions based on distance.
5. Visual Output: The Arduino can also send the distance and angle data to the serial monitor, creating a real-time visual representation of the detected object positions.
APPLICATIONS
1. Autonomous Robots and Vehicles
2. Radar Systems
3. Parking Assistance
4. Security Systems
5. Environmental Scanning in Drones
6. Warehouse Management and Automation
7. Industrial Automation
8. Robotic Arm Guidance
9. Collision Avoidance in UAVs/Robots
10.Interactive Displays or Art Installations
11.Smart Doors and Gates
CONCLUSION
The Servo Distance Indicator Project successfully demonstrates the integration of an ultrasonic sensor and a servo motor to create an effective distance measurement an object, the project provides real-time feedback through the movement of a servo motor, which indicates the measured distance via a visual representation.
7 notes
·
View notes
Text
On one hand, I hate my robotics teacher for teaching us the same lesson on python loops we've been learning for half the damn school year, then expecting us to make an innovative robot in 3 weeks when arduino is based on C++.
I was gonna counter that with something else, but as I wrote it I realized just how stupid it actually is. Fuck it. Venting time.
NO CUZ I CAN'T UNDERSTAND THIS GUY. WDYM "Programming's easy! You learn the basics, and from there you make your own solutions." ??? That's not verbatim but. STILL.
I'll give him a bit of credit, he taught us the basics of arduino. The proper syntax, loops, variables, functions, motor control, sensors, etc. But for god's sake, that limited pool of knowledge can only get you enough to make a mini car! It would've been nice to learn about fading LEDs, integer overflow, pointers vs the actual value in a variable, OR EVEN WHAT DOCUMENTATION IS. YEAH. DOCUMENTATION. THE LITERAL OFFICIAL EXPLANATION FOR KEY FEATURES IN PROGRAMMING LANGUAGES.
But suddenly its OUR fault our code doesn't work because "I taught you the basics. If you don't understand, that means you're not listening during my classes." MAYBE IF YOU STOPPED TEACHING US WHAT A FUCKING FOR LOOP IS, WE'D HAVE A REASON TO LISTEN. Majority of my understanding of robotics are a product of self study and receiving help from my family and their long list of IT contacts.
Not only that, HE is the one that approves of our robotics projects. If YOUR students can't complete the project YOU personally approved of, isn't that an error on your part? You should know what your students are capable of making. You should know because they should only know WHAT YOU TEACH THEM. So surprise surprise when your students feel like they're forced to hire people to do their projects, all because of your failure to teach them the skills they needed to do it themselves.
The only people getting a passing grade in this class are gonna be those that are either rich or have a lot of contacts. What a fucking joke.
And don't be mistaken, this is NOT the complaint of someone who doesn't understand programming. I consistently get 90% and above on his exams and do coding for fun. I'm complaining on behalf of my classmates who weren't as lucky as me, in that I have way more people to ask help from.
"100% working by this week" my ass. Actually teach us something relevant for once.
#dumb ramblings#vent post#ough#for the record i do like coding in python#i prefer it over C++ actually#But none of our projects use python#so I don't know what's going on in my teacher's head...
4 notes
·
View notes
Text
youtube
Desk of Ladyada - It's a RISC-V kinda weekend https://youtu.be/aC3vGKHRCBA
MMade progress on two RISC-V projects to finalize PCBs. We optimized the CH32v203g6 chip-based QT Py board by reducing it from a 4-layer to a 2-layer to cut costs, and integrated TinyUSB support for better Arduino IDE compatibility. We also advanced the Feather ESP32-C6 project, enhancing its deep sleep power efficiency and finalizing the USB Key 'Trinkey' for standalone gateways or sensors. Plus, we picked out a clear USB enclosure from Digi-Key for it.
9 notes
·
View notes
Note
THANK YOU so much for that detailed explanation. I have taken and had to pass/fail 😅 1 CS class (python) in undergrad and am hopeless so the details were very needed. I’m curious: are u software engineers or in the CS field?? Anyways thanks again i’ll try and play around with it and follow ur guide when work is being less insane :)) <3 Also got around to actually reading your fic and it’s sooo good eager for more whenever u post ! Have a blessed day.
aw I'm glad it was helpful! you can always ask more questions if anything is unclear.
I study industrial design, I took a few python classes a few years ago (mainly for data analysis). but I had a real long-term special interest in tech and computers (and video games lol) when I was a teenager, so that's when I first got into programming. I feel most comfortable in python, but I've learned a bit of c# for making games in unity, and obviously I've dipped my toes into CSS as well. oh and I've done some robotics projects with an Arduino (based on c++). i did consider studying CS but couldn't cope with a 100% stem degree without any "creative"/artsy elements lmao I don't have what it takes to be a phannie in stem
I'm really glad you're enjoying my fic!! thank you for checking it out. hope you have a great day too <3
#i used to work for a tech magazine when i was a teenager to buy parts for my first pc#those were the days#ask#anon#im gonna have to get back into the unity mines soon for the project im currently working on oof#ive made visual novels in renpy before as well and i was thinking about doing something similar for a phanfic#but that would be a pretty big undertaking for me#to do all by myself lol#purpurussy lore
4 notes
·
View notes
Text
How to Use AHT10 High Precision Digital Temperature & Humidity Sensor with Arduino
Looking to measure temperature and humidity with high accuracy using Arduino? The AHT10 sensor is a compact, I2C-based module that provides reliable data, making it perfect for IoT projects, weather stations, and smart home automation.
What You’ll Learn: ✔️ How the AHT10 sensor works ✔️ Wiring it to an Arduino board ✔️ Writing & uploading the code to get readings ✔️ Tips for stable and accurate measurements
What You Need:
AHT10 Temperature and Humidity Sensor Module
Arduino Nano
0.96 inch SSD1306 OLED Display (128x64, I2C)
Breadboard
Connecting/Jumper Wires
Arduino Nano Cable
Download the Code & Library Arduino AHT10 Temperature and Humidity Sensor Module
Watch the full tutorial on YouTube:
youtube
Follow for more DIY electronics tutorials & Arduino projects!
3 notes
·
View notes
Text
ghostie arduino chanukiah
for xanuka this year, i made a little electronic chanukiah that i want to share! i know i’m not the only person who can’t do flame-based candles for some reason or another.
this chanukiah is an online simulation that you can run in any web browser, and it is, in my grandiose and objectively correct opinion, better than any other electric chanukiah out there right now.

lots of electric chanukiot do a decent job at emulating the visual appearance of a flame-based chanukiah. the goal with this project was to emulate not only the 🕎visual appearance🕎 of a chanukiah, but also the 🔥ritual experience🔥 of lighting the candles and watching them burn.
some neat features of the ghostie arduino chanukiah:
- candle representation: each candle is represented by a stack of LED lights, and you can make the candles any color you want! if you can express it with a hex code, it’s a valid candle color. there’s also two bonus gradient patterns.
- lighting the candles: you press a button to light the shamash, then you light each candle that you want by moving a slider that lights up its light sensor.
- watching the candles burn: after a candle is lit, the top LED begins to flicker like a flame! and after that, the candle slowly and semi-randomly begins to burn down- the top LED goes dark, and the next one in the stack begins to flicker, and so on, until the light goes out at the bottom of the stack.
- clean up: all the candles will burn out on their own over the course of 30-ish minutes(plus or minus like, 20. i should really optimize the burn pattern a little, lol). after that, you can stop the simulation and reset it for the next night.
it works great on both mobile and desktop, so put it on whatever device you want. a note for mobile users: instructions for use are in the “code” tab, on the top right!
check it out at: https://wokwi.com/projects/353600148292695041
#i realize this post is several days late but OOPS and WHATEVER#please enjoy it!!!#jumblr#menorah#my art#jewish art#judaica#hanukkah#chanukiah#ghostie chanukiah 2023#arduino
18 notes
·
View notes
Text
Hopefully by March, we will be living in London, near to a lovely queer community. But we also find myself during this current social isolation we suffer, exiled from our tools, we miss taking on projects. This needs to change. Unfortunately said tools are currently packed up, awaiting out move.
So, after we have migrated from this dreary town, we will setup our little "lab" again and intend to work on various projects, including:
- A Raspberry Pi Compute Module 4 powered Linux phone with 4G connectivity (initially)
- A Steampunk meets Atompunk desk, based on a nuclear reactor console
- Setting up Home Assistant powered smart tech in the new home, from lights to temperature control, etc
Have any ideas? Let me know! My specialism is Python, though I'm always up for learning something new. Challenges inspire me.
2 notes
·
View notes
Video
youtube
Solar Panel Data Monitoring using Arduino and LCD Displayhttps://www.youtube.com/watch?v=rp0dqpU4Si4
#youtube#solar panel monitoring system project | rotating solar panel using arduino project | iot based solar power monitoring system using arduino |
0 notes
Text
5 Arduino Courses for Beginners
Robotics, automation, and do-it-yourself electronics projects have all been transformed by Arduino, an open-source electronics platform. Entering the world of Arduino may seem intimidating to novices, but the correct course may make learning easier and more fun.
Arduino Step-by-Step: Getting Started (Udemy)
This extensive Udemy course is designed for complete novices. It provides an overview of Arduino's fundamentals, describing how the platform functions and assisting students with easy tasks like using sensors and manipulating LEDs.
Key Highlights:
thorough explanations for novices.
practical projects with practical uses.
instructions for configuring and debugging your Arduino board.
Introduction to Arduino (Coursera)
The main objective of this course is to introduce Arduino programming with the Arduino IDE. It goes over the fundamentals of circuits, programming, and connecting various parts, such as motors and sensors.
Key Highlights:
instructed by academics from universities.
access to a certificate of completion and graded assignments.
Concepts are explained in length but in a beginner-friendly manner.
Arduino for Absolute Beginners (Skillshare)
For those who want a quick introduction to Arduino, this brief project-based course is perfect. You'll discover how to configure and program your Arduino board to produce interactive projects.
Key Highlights:
teachings in bite-sized chunks for speedy learning.
simple projects for beginners, such as sound sensors and traffic light simulations.
Peer support and community conversations.
Exploring Arduino: Tools and Techniques for Engineering Wizardry (LinkedIn Learning)
This course delves deeply into Arduino programming and hardware integration, drawing inspiration from Jeremy Blum's well-known book. It is intended to provide you with the skills and resources you need to produce complex projects.
Key Highlights:
advice on creating unique circuits.
combining displays, motors, and sensors.
Code optimization and debugging best practices.
Arduino Programming and Hardware Fundamentals with Hackster (EdX)
This course, which is being offered in partnership with Hackster.io, covers the basics of Arduino hardware and programming. You may experiment with real-world applications because it is project-based.
Key Highlights:
Course materials are freely accessible (certification is optional).
extensive robotics and Internet of Things projects.
interaction with teachers and other students in the community.
Arduino is a great place to start if you want to construct a robot, make a smart home gadget, or just pick up a new skill. The aforementioned courses accommodate a variety of learning preferences and speeds, so every novice can discover the ideal fit. Select a course, acquire an Arduino starter kit, and set out on an exciting adventure into programming and electronics!
To know more, click here.
2 notes
·
View notes
Text
Top 10 Projects for BE Electrical Engineering Students
Embarking on a Bachelor of Engineering (BE) in Electrical Engineering opens up a world of innovation and creativity. One of the best ways to apply theoretical knowledge is through practical projects that not only enhance your skills but also boost your resume. Here are the top 10 projects for BE Electrical Engineering students, designed to challenge you and showcase your talents.
1. Smart Home Automation System
Overview: Develop a system that allows users to control home appliances remotely using a smartphone app or voice commands.
Key Components:
Microcontroller (Arduino or Raspberry Pi)
Wi-Fi or Bluetooth module
Sensors (temperature, motion, light)
Learning Outcome: Understand IoT concepts and the integration of hardware and software.
2. Solar Power Generation System
Overview: Create a solar panel system that converts sunlight into electricity, suitable for powering small devices or homes.
Key Components:
Solar panels
Charge controller
Inverter
Battery storage
Learning Outcome: Gain insights into renewable energy sources and energy conversion.
3. Automated Irrigation System
Overview: Design a system that automates the watering of plants based on soil moisture levels.
Key Components:
Soil moisture sensor
Water pump
Microcontroller
Relay module
Learning Outcome: Learn about sensor integration and automation in agriculture.
4. Electric Vehicle Charging Station
Overview: Build a prototype for an electric vehicle (EV) charging station that monitors and controls charging processes.
Key Components:
Power electronics (rectifier, inverter)
Microcontroller
LCD display
Safety features (fuses, circuit breakers)
Learning Outcome: Explore the fundamentals of electric vehicles and charging technologies.
5. Gesture-Controlled Robot
Overview: Develop a robot that can be controlled using hand gestures via sensors or cameras.
Key Components:
Microcontroller (Arduino)
Motors and wheels
Ultrasonic or infrared sensors
Gesture recognition module
Learning Outcome: Understand robotics, programming, and sensor technologies.
6. Power Factor Correction System
Overview: Create a system that improves the power factor in electrical circuits to enhance efficiency.
Key Components:
Capacitors
Microcontroller
Current and voltage sensors
Relay for switching
Learning Outcome: Learn about power quality and its importance in electrical systems.
7. Wireless Power Transmission
Overview: Experiment with transmitting power wirelessly over short distances.
Key Components:
Resonant inductive coupling setup
Power source
Load (LED, small motor)
Learning Outcome: Explore concepts of electromagnetic fields and energy transfer.
8. Voice-Controlled Home Assistant
Overview: Build a home assistant that can respond to voice commands to control devices or provide information.
Key Components:
Microcontroller (Raspberry Pi preferred)
Voice recognition module
Wi-Fi module
Connected devices (lights, speakers)
Learning Outcome: Gain experience in natural language processing and AI integration.
9. Traffic Light Control System Using Microcontroller
Overview: Design a smart traffic light system that optimizes traffic flow based on real-time data.
Key Components:
Microcontroller (Arduino)
LED lights
Sensors (for vehicle detection)
Timer module
Learning Outcome: Understand traffic management systems and embedded programming.
10. Data Acquisition System
Overview: Develop a system that collects and analyzes data from various sensors (temperature, humidity, etc.).
Key Components:
Microcontroller (Arduino or Raspberry Pi)
Multiple sensors
Data logging software
Display (LCD or web interface)
Learning Outcome: Learn about data collection, processing, and analysis.
Conclusion
Engaging in these projects not only enhances your practical skills but also reinforces your theoretical knowledge. Whether you aim to develop sustainable technologies, innovate in robotics, or contribute to smart cities, these projects can serve as stepping stones in your journey as an electrical engineer. Choose a project that aligns with your interests, and don’t hesitate to seek guidance from your professors and peers. Happy engineering!
5 notes
·
View notes
Text
Arduino Nano Board R3 with CH340 chip

Based on the Arduino platform, the Nano R3 Board CH340 Chip without USB Cable does all the functions of the Uno, but has a smaller footprint.
Using Nano CH340 Soldered Board R3 Chip without USB cable is essential for your small project where you don’t need many pins, but the small size is very important to make it look nice.
In comparison to older versions of Arduino Nano with FTDI USB-Serial Chip, the Nano uses a low-cost USB-Serial Chip.
With the ATmega328 (Arduino Nano R3), the Nano is small, complete, and breadboard-friendly. It has more or less the same functionality as the Arduino Uno but in a different package. In addition to lacking a DC power jack, it uses a Mini-B USB cable instead of a standard one.
This device can be powered by a mini-USB cable, a 6-20V unregulated external power supply (pin 30), or a 5V regulated external power supply (pin 27).
Six PWM I/O are included from a total of 14 digital I/O, eight analog inputs, 16Mhz clock speed, and 32kB flash memory.
Please note:
The CH340 chip might not work directly with some PCs/laptops. You will need some drivers for the CH340 chip.
Arduino nano features :
TTL level serial transceiver ports (RX / TX)
Atmel Atmega328P-AU MCU used
It has a bootloader installed
Supports USB download and power supply
Provides support for external DC power supplies of 5V and 12V
2 notes
·
View notes