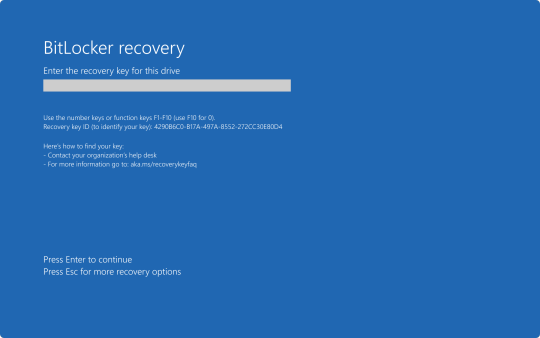
#BitLocker Recovery Mode prompted
Explore tagged Tumblr posts
Visit Tumblr Blog
Explore Tumblr blogs with no restrictions, modern design and the best experience.
Last Seen Tumblr Blogs


Fun Fact
There are dozens of funny blogs to kill time on Tumblr.
Text
BitLocker Windows Update Shutdown or Reboot option behavior
BitLocker is a Windows security feature that provides encryption for entire volumes. It addresses the threats of data theft or exposure from lost, stolen, or inappropriately decommissioned devices. In this article, we shall discuss the following topic “understanding BitLocker Windows Update Shutdown or Reboot option behavior”. This is important for maintaining system security and functionality.…

View On WordPress
#Bitlocker#bitlocker key#BitLocker Recovery Keys#BitLocker Recovery Mode prompted#Microsoft Windows#Windows#Windows 10#Windows 11#Windows Server#Windows Server 2012#Windows Server 2016#Windows Server 2022#Windows Server 2025
0 notes
Text
CrowdStrike'd and BitLocker'd
With yesterday's CrowdStrike outage. I'm sure a number of you are probably wondering "what does BitLocker have to do with any of this?" Well, it all has to do with an added layer of security many organizations use to keep data from being stolen if a computers ends up in the hands of an "unauthorized user."
To start, let me briefly explain what the CrowdStrike driver issue did and what the fix for it is.
After the update was automatically installed to computers running the CrowdStrike Falcon Sensor, a faulty driver file caused the Windows kernel on those computers to crash and display a Blue Screen of Death. How Windows typically handles a crash like this is to create a crash log file, then perform a reboot. Since this driver would launch shortly after Windows finished booting, it would cause the operating system to crash and reboot again. When two crashes have occurred in sequence, Windows will automatically boot into Recovery Mode. Hence why we say several pictures of the Recovery Mode screen across social media yesterday.

Unfortunately, this update was automatically pushed out to around 8.5 million computers across several organizations, causing widespread chaos within the matter of a few hours. And the fix for this issue had to be performed by physically accessing each computer, which required those of us working in I.T. to have to run around several facilities, locate each affected computer, and apply the fix one by one.
The short and simple of the fix is either one of two options. You can either use the Recovery Mode that Windows was already booted into to navigate to Start-Up Setting, and launch Safe Mode. Once Windows boots into Safe Mode, the technician can navigate to C:\Windows\System32\Drivers\CrowdStrike, and delete the file C00000291-*.sys. After that the computer can be rebooted as normal, and the crashing will stop.
Or the technician can open System Restore from Recovery Mode. And, assuming there is a recovery point, restore the computer back to a good known working state.
Now, this may all seem simple enough. So why were so many organizations having trouble running this fix? That all has to do with BitLocker. As an added security measure, many organizations use BitLocker on their computers to perform a full hard disk encryption. This is done so that if a computer ends up being lost or stolen, and ends up in the hands of an "unauthorized user" they will not be able to access any of the data stored on the computer without a password to log into the computer, or the computer's BitLocker recovery key.
This presented a problem when trying to restore all of these affected computers, because when either trying to launch Safe Mode or System Restore, the user would be prompted for the BitLocker recovery key.
In my organization's case, we found we could save time by providing our end user the steps to perform one of the two fixes on their own to save time. But the problem we still continue to run into is the need for these BitLocker recovery keys. In my case, I've been fielding several calls where I've had end users walking from one computer to another while I provide them with the key as they walk through reverting back to a previous restore point.
Again, a pretty long story, but hopefully that can provide some context as to what's been happening over the past 48 hours.
30 notes
·
View notes
Text
Supporting and Troubleshooting Windows 11 Course in Australia: A Complete Guide
Windows 11 has become the operating system of choice for businesses and individuals, offering advanced security, enhanced performance, and a modern interface. However, managing and troubleshooting Windows 11 in a professional environment requires specialized skills. The Supporting and Troubleshooting Windows 11 Course in Australia is designed to equip IT professionals with the knowledge and hands-on experience needed to support and resolve issues in Windows 11 systems efficiently.
Why Enroll in a Supporting and Troubleshooting Windows 11 Course?
With the transition from older Windows versions to Windows 11, IT support teams must adapt to new technologies, security features, and system configurations. Here’s why taking this course is beneficial:
1. Stay Updated with Windows 11 Technology
Learn about the latest Windows 11 features and enhancements.
Understand changes in system architecture and security protocols.
Gain insights into compatibility issues and best practices for troubleshooting.
2. Enhance Your IT Support Skills
Develop expertise in diagnosing and resolving Windows 11 issues.
Master tools like Windows Recovery, Event Viewer, and Command Prompt.
Improve efficiency in handling system crashes, performance issues, and network problems.
3. Increase Job Opportunities and Career Growth
IT professionals with Windows 11 troubleshooting skills are in high demand.
Employers prefer certified experts for desktop support, system administration, and IT helpdesk roles.
The course prepares you for industry-recognized certifications that boost your resume.
Key Topics Covered in the Course
The Supporting and Troubleshooting Windows 11 Course is comprehensive and designed for IT professionals, covering the following crucial areas:
1. Windows 11 Installation and Configuration
Setting up and customizing Windows 11.
Managing user accounts and permissions.
Understanding Windows Update and Feature Management.
2. Troubleshooting Boot and Startup Issues
Identifying and resolving boot failures and startup delays.
Using Advanced Startup Options and Safe Mode.
Repairing the Windows bootloader and system files.
3. Performance Optimization and System Monitoring
Using Task Manager, Resource Monitor, and Performance Monitor.
Troubleshooting slow performance and high CPU/RAM usage.
Managing background applications and startup processes.
4. Network Connectivity and Troubleshooting
Configuring and troubleshooting Wi-Fi, VPN, and Ethernet connections.
Understanding TCP/IP, DNS, and Firewall settings.
Resolving common connectivity issues and IP conflicts.
5. Security and Access Management
Implementing BitLocker encryption and Windows Defender policies.
Managing user authentication and account recovery.
Preventing and troubleshooting malware and ransomware attacks.
6. Hardware and Peripheral Troubleshooting
Diagnosing driver and compatibility issues.
Troubleshooting printer, scanner, and peripheral device failures.
Using Device Manager and Windows Troubleshooters.
7. Data Recovery and Backup Solutions
Configuring OneDrive and local backup solutions.
Recovering lost data using Windows File History and Recovery Tools.
Preventing data loss through effective backup strategies.
Who Should Take This Course?
The Supporting and Troubleshooting Windows 11 Course is ideal for:
IT Support Specialists – Handling user support and troubleshooting requests.
System Administrators – Managing enterprise Windows 11 environments.
Helpdesk Technicians – Assisting with hardware, software, and network issues.
Technical Consultants – Offering Windows 11 support for business clients.
Benefits of Certification in Windows 11 Troubleshooting
Earning a certification after completing this course offers several advantages:
Better Job Prospects: Companies prefer certified IT professionals.
Higher Salary Potential: Skilled troubleshooting experts earn more.
Enhanced Problem-Solving Skills: Learn real-world troubleshooting techniques.
Industry Recognition: Gain credibility as a Windows 11 support specialist.
Choosing the Right Training Provider in Australia
When selecting a training provider for the Supporting and Troubleshooting Windows 11 Course in Australia, consider these factors:
Accreditation: Ensure the provider is recognized by Microsoft.
Hands-on Labs: Look for courses offering real-world troubleshooting scenarios.
Flexible Learning Options: Online, classroom, or hybrid training formats.
Certification Preparation: Providers offering exam support and practice tests.
Student Reviews: Check ratings and testimonials for course quality.
Final Thoughts
The Supporting and Troubleshooting Windows 11 Course in Australia is an essential step for IT professionals looking to expand their expertise in Windows 11 support. With a structured curriculum covering installation, performance tuning, security, and network troubleshooting, this course provides the necessary skills to manage and resolve issues efficiently.
0 notes
Text
sadly this doesnt work with many enterprise devices as you need the BitLocker recovery key to access the command prompt in the troubleshooting mode
I love being in IT
#also depending on how things are set up you can't even access the filesystem from the troubleshooting command prompt#i ended up basically forgoing it all together and boot into safemode with network so I can login to the domain w/ admin creds
28K notes
·
View notes
Text
How to introduce and actuate BitLocker on my gadget?
In the domain of network safety, safeguarding delicate information has become fundamental. BitLocker, a powerful encryption instrument created by Microsoft, fills in as a defend against unapproved admittance to your gadget and guarantees the classification of your information. In this thorough aide, we will walk you through the bit by bit course of introducing and enacting BitLocker on your gadget, normally alluded to as aka.ms/yourpc.
I. Figuring out BitLocker:
Prior to digging into the establishment cycle, it's critical to comprehend what BitLocker is and why it's a fundamental apparatus for getting your information. BitLocker is a full-plate encryption highlight included with Microsoft Windows working frameworks aka ms yourpc. It scrambles the whole plate to safeguard the information put away on it from unapproved access.
II. Framework Prerequisites:
Prior to continuing with the establishment, guarantee that your gadget meets the essential framework necessities. BitLocker is available on Windows 10 Pro, Enterprise, and Education editions, among others. Moreover, your gadget ought to have a Confided in Stage Module (TPM) rendition 1.2 or later for improved security.
III. Bit by bit Establishment Guide:
Presently, we should go through the bit by bit course of introducing BitLocker on your gadget.
Getting to the BitLocker Setup:
Open the Beginning menu and select "Settings."
Explore to "Update and Security" and snap on "Gadget encryption."
Really take a look at BitLocker Similarity:
Guarantee that your gadget meets the important prerequisites for BitLocker encryption.
Check to see if your device supports TPM versions earlier than 1.2.
Activate TPM (if required):
In the event that your gadget's TPM isn't empowered, access the Profiles/UEFI aka ms mfasetup firmware settings during the framework boot.
Enable the TPM settings wherever you find them. After making changes, exit.
Make use of BitLocker:
Get back to the "Gadget encryption" segment in the "Update and Security" settings.
On the off chance that your gadget is qualified, you'll track down the choice to "Turn on BitLocker." Click on it to start the establishment interaction.
Pick Encryption Technique:
Select by the same token "TPM as it were" or "TPM and PIN" in light of your inclination and security necessities.
Pick a Method for Unlocking Your Drive:
Choose whether to utilize a secret key, a savvy card, or both to open your drive.
Take a Backup of Your Recovery Key:
Save your BitLocker recuperation key in a solid area. In the event that you forget your password or run into other problems, you will need this key to unlock your drive.
Pick Encryption Mode:
Select the encryption mode - by the same token "Scramble utilized plate space as it were" or "Encode whole drive." The last option gives more complete assurance.
Start the encryption procedure:
To begin the BitLocker encryption process, select "Start encrypting" and then "Next."
IV. BitLocker activation with MS YourPC:
Since you have effectively introduced BitLocker, how about we investigate how to initiate it utilizing Otherwise known as MS YourPC.
Getting into AKA MS YourPC:
Navigate to the AKA MS YourPC portal using your browser.
Signing In:
Use the credentials from your Microsoft account to log in.
Gadget Approval:
Find the part for BitLocker gadget approval.
Follow the on-screen prompts to interface your gadget to your Microsoft account.
Two-Element Validation (2FA):
Add an extra layer of protection by enabling two-factor authentication.
Evaluating Gadget Status:
Actually look at the Also known as MS YourPC dashboard to guarantee that your gadget is effectively connected and approved.
Far off Administration:
Exploit Otherwise known as MS YourPC's distant administration highlights for BitLocker, permitting you to screen and deal with your gadget's encryption status from the entryway.
V. Best Practices and Investigating:
To expand the viability of BitLocker and aka ms myrecoverykey, think about the accompanying accepted procedures:
Make regular backups of your BitLocker recovery key in a number of safe places.
Update your operating system and device with the most recent security patches.
Test your recuperation key to guarantee it fills in true to form.
In the event that you experience any issues, allude to the BitLocker investigating documentation given by Microsoft or look for help from Otherwise known as MS YourPC support.
Conclusion:
Getting your gadget and information is a basic part of mindful registering. By introducing and initiating BitLocker on your gadget and utilizing the capacities of Also known as MS YourPC, you can essentially upgrade the security of your delicate data. Follow the bit by bit guide gave in this article to guarantee a smooth and secure establishment process. Make sure to remain informed about the most recent security practices and updates to keep up with the honesty of your scrambled information.
0 notes
Text
The Most Popular Enable Bitlocker
If your PC doesn't have TPM, then console indicates that Compatible may not be found (see screenshot). Then you will have to manually restart your PC. When you restart your PC, you might observe a warning your system was changed. You're able to keep working on your computer during the encryption phase, but things could be running a bit more slowly than normal. If you've got an older PC with a couple more miles on the difficult drive, you should decide to encrypt the whole drive.
If you're using Windows 10, you will observe an extra screen allowing you to pick an encryption procedure. Windows 10 has an extra feature named Device Encryption. Following that, your computer should reboot and when you log in again you'll observe the BitLocker window. Windows 10 gives you the ability to allow a Night Light mode (previously referred to as Blue Light) to decrease eye strain. After the window is shaken again, all of them are restored, very similar to desktop preview. Windows 7 also uses the TRIM command. You'll be presented a dialog window to enter new information regarding the image. Want to Know More About Enable Bitlocker Windows 7?
The bitlocker tool demands a reboot after producing the partition anyway. The Repair-bde command-line tool is designed for use once the operating system doesn't start or when you can't begin the BitLocker Recovery Console. There are several full disc encryption software to encrypt your drive or you may use inbuilt Windows option called Bitlocker. In the event your computer doesn't have a Trusted Platform Module (TPM) or the TPM isn't supported, you are going to get a warning. You'll be prompted to restart your computer to begin the encryption procedure. Some computers, particularly on the consumer line, don't have them. It is possible to get rid of a password only once you configure a new procedure of authentication. For instance, the user can enter a PIN or offer a USB drive that has a key. Please note that anybody may use the recovery key to access the drive, even in case they do not know the password entered in the prior step, so please don't disclose it to others.
Sensible option in my opinion and if you wish to finish the encryption quickly, go with first choice. BitLocker drive encryption is a somewhat advanced and useful quality of Windows and with the most current Windows 10, it's far better than ever. When the BitLocker drive encryption is done, you will observe the BitLocker On. Two factor authentication takes the basic passwords or simple to guess passwords from the equation so they are no longer a risk. Encryption is increasingly essential as organizations decide to guard their sensitive data. Briefly, it is basically the process of making any type of data unreadable by anyone without proper authorization. There is an additional way to Enable whole disk encryption on Windows 10.

You will have to copy or write the files to a partition readily available to the neighborhood device so as to modify them. It is possible to save a number of keys of different kinds into a single file. After the VHD file is made, it is going to want to get initialized. Employing BitLocker-encrypted VHD files is one particular possibility.
Placing the enable command at the beginning will significantly boost the deployment time. When there is a simpler way please allow me to know. There's no need to decrypt the entire drive simply to access the files. When it's already being used, select the second option Encrypt entire drive.
There's a choice to save your data when it get steals or you're giving it to someone for quite a while. There's an alternative though and you don't need to have a TPM to enjoy BitLocker in Windows. Additional options are also supplied for the login UI, for example, ability to customize the look of interface lighting and shadows. After you click Applysome additional options should appear. Web-based remote help alternatives are available.
When the initialization procedure is finished, BitLocker To Go will ask you to establish a password which you will utilize to unlock the drive, as shown in Figure C. The procedure is nondestructive, and therefore you don't need to be worried about any data that's already on the drive. The encryption procedure starts when the computer reboots. It will repartition the disk as necessary.
It's possible to select several various ways of unlocking the drive. It is possible to also encrypt different drives than only the system drive. If you wish to decrypt your hard disk, all you have to do is turn off BitLocker. With BitLocker, you make a digital hard disk, and encrypt it. Make certain you have a USB flash drive readily available to store the startup key.
youtube
1 note
·
View note
Text
No fixed disks to show windows 10

8 Fixes for External Hard Drive Not Showing Up in Windows 10.
Hard Drive Not Showing Up In Windows 10: Solved (10 Fixes).
How to Repair DiskPart “No fixed disks to show” Error.
Fixed: SSD Not Showing Up in Windows 11/10/8/7 (6 Solutions).
Windows in recovery mode: No fixed disks to show.
There are no fixed disks to show sysadmin.
How to Fix Hard Drive Not Showing up on Windows 10/11.
Internal SATA Drives show up as removeable media.
How to Fix 100% Disk Usage issue on Windows 10 or 11 (18 Ways).
How to Unlock BitLocker Drives in Windows 10 - iSunshare.
SCCM OSD Error Unable to find system disk for machine.
How to Fix 100% Disk Usage on Windows 10 - Help Desk Geek.
FIX: There are no fixed disks to show in Diskpart.
8 Fixes for External Hard Drive Not Showing Up in Windows 10.
Here's how to do so: Press Win+R to bring up the RUN box, type in "; and hit Enter. In the "System Properties" window, go to the Advanced tab. Then, under "Performance", click Settings. This will bring up the "Performance Options" window. Under the Advanced tab, click on Change.
Hard Drive Not Showing Up In Windows 10: Solved (10 Fixes).
Select the disk you want to install Windows 10 system, click Next, wait for the installation process to complete. Finally, follow the prompts to set up to see if it can start properly. Finally, follow the prompts to set up to see if it can start properly. To force recovery for a remote computer: On the Start screen, type , and then select Run as administrator. At the command prompt, type the following command and then press ENTER: manage-bde -ComputerName <RemoteComputerName> -forcerecovery <BitLockerVolume>. I have a brand new Windows 10 laptop that has two drives, a 512 SSD and a 1 TB hard drive. I would like to use the entire 1 TB drive to install Ubuntu on. I am new to Linux (just re-purposed an old Windows laptop to be all Linux two weeks ago and love it, but it is limiting because it is a 32-bit system.).
How to Repair DiskPart “No fixed disks to show” Error.
STEP 1: Press WIN+R keys together to launch RUN dialog box. Now type in RUN dialog box and press Enter key. It'll open Disk Management program window. STEP 2: Now you'll see your existing partitions/drives along with some extra partitions in this program. Actually when you create new partitions at the time of Windows. Step 1 Press "Windows" and "X" keys together, then locate the Disk Management window. Step 2 Find a hard drive named as "unknown" or "unallocated" under the "Volume" category. Step 3 Choose "Initialize Disk" from its right-click menu. Step 4 Set the disk partition style as GPT or MBR. Step 5 Go back to the main Window.
Fixed: SSD Not Showing Up in Windows 11/10/8/7 (6 Solutions).
I have 3 Hyper-V VM's running on my server. I'm getting slow disk speeds. I tried moving 2 of the VHDX files to a SSD and it only marginally made it faster. I've tested with both Fixed Disks and Dynamic Disks and didn't see a major difference. Based on my reading, I think I might have a mismatch between the cluster sizes of the physical disk.
Windows in recovery mode: No fixed disks to show.
Follow the steps below to add a drive letter: Step 1. Right click "My Computer" and select "Disk Management". Step 2. In Disk Management, your SD card will appear as a removable disk. Check if it has a drive letter like D or E. Step 3. If not, right click the SD card and select "Change Drive Letter and Paths". Step 4. It will say "There are no fixed disks to show." Now when I first install Windows, I had to add another USB that contain the driver to find the disk. So, do I need to properly install the drivers inside the Window OS for the disk to show up outside of Window OS. Last, how do you fix your boot loader after removing GNU Grub. Thanks for y'all time!. Right-click on the Start button and click on Run. In Run command window, type and click on OK. On the next screen, right-click on Windows Search and click on Properties. On Windows Search Properties screen, set Startup Type to Disabled. Click on Apply and OK to save these changes on your computer.
There are no fixed disks to show sysadmin.
Perform a PXE boot, and before you select the Task Sequence, hit F8 key. From the command window that opens perform the following commands-. diskpart. select disk 0 (0 being the disk to setup) clean (wipe the disk) create partition primary (Create Windows partition) assign letter=c. Just to verify that no disks are existent before: X:\windows\system32>diskpart (...) DISKPART> list disk There are no fixed disks to show. Now head over to the vSphere client, right-click on the VM and click. There Are No Fixed Disks to Show FAQ Run Command Prompt as Administrator. Type diskpart in the pop-out interface and press Enter. Type.
How to Fix Hard Drive Not Showing up on Windows 10/11.
When you clean boot your Windows 10 PC it only loads selected programs and services. This helps identify particular apps that may be causing the disk usage to reach 100%. Disable the identified apps to see if the issue gets fixed. In Windows 10, use the built-in System Configuration app to perform a clean boot. We have a dedicated guide on how. Tool with list disks command can be used to see the list of available fixed disks on the system". My computer is an Asus K50I with Intel164 family6 model 23 stepping 10 genuineintel, level 6, revision 170a. When I use diskpart and then "list disk", it shows "there are no fixed disks to show".
Internal SATA Drives show up as removeable media.
Search for Device Manager and click the top result to open the experience. Expand the Disk drives branch. Right-click the external drive with the problem and click the Update driver option. Click. Follow these steps to reset your virtual memory: In your computer's " System Properties " you need to click on " Advanced system settings ". Click " Settings " in the Performance section. Select the " Advanced " tab and click the " Change " button. Make sure the box titled " Automatically manage paging file size " is. Run to load Disk Management from the Windows Start menu. Step 2. Right-click on the USB flash drive which shows no media there and select Change Drive Letter and Paths... Step 3. Click Change in the next pop-up window to set a new drive letter to the USB flash drive. Step 4.
How to Fix 100% Disk Usage issue on Windows 10 or 11 (18 Ways).
Step 4: Confirm your decision, and click OK. Step 5: Shut down your PC and reconnect the hard drive again. Step 6: Finally, restart your PC. Following the procedure shall fix your trouble and the second hard drive would show up in the disk management. Fix 3. Check and Fix Bad Sectors on the Second Hard Drive. Fix 1. Check the Hardware Connection. You can check if the external hard drive is properly connected, try to plug the USB cable into another USB port, or plug it in another PC to see if it can be recognized. If it is still not showing up in your system, then try other fixes below. Fix 2.
How to Unlock BitLocker Drives in Windows 10 - iSunshare.
Open a command prompt with administrator privileges. In the command prompt window, type the following command in hit Enter: Under Disk Drives, identify the SATA device you would like the inbox driver to consider internal and open properties for this device by right-clicking and selecting Properties. ISCSI Target Server stores each SCSI Logical Unit (LU) as a file in the Windows native file system - either NTFS or ReFS. The iSCSI stack uses the VHD (virtual hard disk) format for these files, which is why we call them 'iSCSI Virtual Disks'. The VHD format provides good portability across target servers, and across the Hyper-V and iSCSI. If the network is not completely up when Windows tries to resolve the mappings, it will report them as disconnected. Once the network is fully up on domain, the mapped drives should reconnect. On occasion, the big red X will remain. Sometimes, hitting F5 will make the X's go away. Spice (9) flag Report.
SCCM OSD Error Unable to find system disk for machine.
IT AN TRIAD TO FORMAT IT BUT IT COME UP WITH NO FIXED DISK PRESENT CAN SOMEONE HELP.I AM LOST. winbob. Joined Aug 2, 2004 Messages 3,370. Oct 25, 2005... Use FDISK once again and display any Partition info on the drive. I think there will be none.... (Windows 10) (1 Viewer) Latest: Couriant; Today at 12:21 PM; Hardware. Staff online.
How to Fix 100% Disk Usage on Windows 10 - Help Desk Geek.
Once the command is successfully processed, run the following command and press Enter to see if you can use the Diskpart utility without encountering the ‘There Are No Fixed Disks to Show’ error: X:\windows\system32>diskpart. Note: Keep in mind that X is only a placeholder. Replace it with the letter of your OS drive. Step 2. Locate and select the MBR disk to be converted to GPT in DiskGenius Free and click Disk menu to choose Convert To GUID Partition Table. Step 3. Click OK button on the message box. Step 4. Click Save All button to save changes to partition table and the conversion takes effect.
FIX: There are no fixed disks to show in Diskpart.
Disconnect all your hard drives (except the system disk with Windows), optical/floppy drives, all cooling fans (other than the ones connected to your motherboard). (Remove both power cables and datacables from the additional addons) Power on your PC with this minimum configuration and give a verbatim report what exactly happens when you power.
See also:
Lego Star Wars Games Free Download Full Version
Windows 10 Keeps Restarting On Its Own
Igi 3 Free Download Full Version For Windows Xp
0 notes
Text
Bitlocker recovery & its recovery key - waredot
What is bitlocker recovery ?
Bitlocker recovery is a procedure of recovering the access of bitlocker during when it’s impossible to unlock it in a normal way. It is a default attribute of complete encryption that is drawn in order to provide protection & security to your data. This attributes utilizes the AES Encryption algorithms in CBC/XTS modes with 128 or 256 bit key.
The options of restoration of drive is stated below
Using recovery password which is of 48 digits. This password can only be saved in your Microsoft account if your device is protected by bitlocker which is a non-member of domain.
The credential of data recovery agents can be used to recover the access of your drive. In case of operating-system drives, it needs to be plugged to https://www.waredot.com/rescuedata some other device for starting the process of unlocking of your drive.
This password can be recovered from AD DS by domain administrators or IT professionals.
What is bitlocker recovery key ?
Bitlocker recovery key is a numerical number containing 48 digits that can be utilized to recover the access to your drive. It is usually stocked in the Microsoft Account, printed, set aside as files, or is kept with firm who runs your devices.
How to get bitlocker recovery key from cmd ?
Follow the step below:
Open administrator: command prompt and type the commands & press on “enter”. Replace the “C” with the bitlocker encrypted drive letter. manage-bde -protectors C: -get
Right at the end, will flourish you with your bitlocker recovery key of 48 digits. Save it for your use.
How to get bitlocker recovery key with key id ?
Open the recovery wizard by looking into the safeguard management center and selecting tools and then recovery.
In this page, choose bitlocker recovery key id and press on next.
Click on the dots (..) to look for the id
On this page, look for search name & type first few digits of your id and click “find now”
Choose the desire key and press ok. Here the key information is displayed.
Click on “next”. You’ll get to see your bitlocker recovery key.
#What is bitlocker recovery ?#Bitlocker recovery#Bitlocker recovery key#How to get bitlocker recovery key from cmd ?#How to get bitlocker recovery key with key id ?
0 notes
Text
How to fix BitLocker always prompting for Recovery Key
In this article, we will discuss how to fix BitLocker always prompting for Recovery Key. Please see “How to fix you are not allowed to view this folder on SSRS: MBAM reports cannot be accessed because it could not load folder contents“, and How to Change the Lock Screen Wallpaper in Windows 11. BitLocker is an encryption function of the Windows Operating System. Encrypted drives can only be…

View On WordPress
#Bitlocker#BitLocker Backup#bitlocker key#BitLocker Key Recovery#BitLocker Keys in AD#BitLocker Network Unlock#BitLocker Recovery Key Request#BitLocker Recovery Keys#BitLocker Recovery Mode prompted#BitLocker Recovery Password Viewer#Bitlocker Recovery Prompt#Windows#Windows 10#Windows 11
0 notes
Text
#Data recovery software and tools
Free Data Recovery Software
Recover up to 1 GB lost or deleted data on Windows, absolutely free
Recovers lost or deleted documents, email data files, videos, photos, etc.
Retrieve data from PC, laptop, hard drive, and USB stick
Recover files lost due to drive formatting or corruption
More Awesome Features
Recover your data in 3-steps
Stellar free data recovery software is the best if you’re looking for an easy way to get back your data from any Windows device or storage media. After you launch the software, select the storage drive & file type (if you wish), scan the drive, and save the recovered files.
Preview the files before saving them
The tool displays an augmented preview of the recoverable files, including Office documents, PDF, images, videos, Zip, RAR, HTML and PHP files, etc. The Preview feature also allows playing the recoverable video files in Full-Screen mode. It helps in ascertaining the recoverability of the files before selecting them.
Retrieve any kind of data
Stellar data recovery software allows you to do free recovery of digital photo and video, audio library, PowerPoint deck, PDF and Word document, Excel workbook, email file, and more. It saves you from spending on multiple software by offering a universal solution, free of cost.
Recover from BitLocker® encrypted drive
The tool can retrieve the data lost or deleted data from BitLocker encrypted drive. All you have to do is enter BitLocker decryption key and then run the software to scan the decrypted media. It will get back your lost data from encrypted drive just like with any ordinary drive.
Recover data from formatted media
Have you lost data after formatting a USB drive, an SD card or a partition on your Windows PC? Get back your data from formatted drives! Install our free data recovery tool on your PC, scan the formatted drive or partition, and save the data. Nothing could be easier.
Restore files from corrupted volume
Unable to access a drive or partition on Windows, & getting message prompt asking you to format the drive? Don’t format it yet! The drive has turned ‘RAW’, likely due to a damaged or corrupted file system. First, install the software & recover the data. Only then proceed with formatting to avoid data loss from such damaged partitions.
Do Even More with Paid Software
Recover data from lost partition
Professional, Premium & other paid variants of the software can recover data from missing or deleted partition. Using advanced Deep Scan capability, these variants can scan and locate all lost partitions previously present on the hard drive & thus retrieve the data from such partitions.
Recover data from crashed system
The software can also recover data stored on a crashed or unbootable Windows PC. It offers to create bootable USB recovery media to access crashed systems and allow data recovery. This capability is available in Professional, Premium, Technician, and Toolkit variants of the software.
Repair corrupt videos
Premium edition of the software can repair corrupt video files of various formats. It can fix blurry, choppy, grainy, flickering, stuttering, unplayable, and out-of-sync videos. The tool repairs videos shot with cameras of Canon®, Sony®, Go Pro®, Olympus®, Nikon®, Fuji®, Samsung®, & other leading brands.
Repair corrupt photos
The Premium edition also repairs corrupt JPEG & RAW image files captured by using DSLR, digi-cam, drones, Android phones, action cameras, etc. It can fix distorted, grainy, blurry, pixelated, & greyed-out images, and restores the images like new.
Advanced RAID recovery capability
Technician and Toolkit editions of Stellar Data Recovery software offer class-leading technology for retrieving data from failed or broken RAID arrays. The software detects unknown RAID parameters to allow construction of virtual RAID for performing data recovery procedure.
Virtual Drive recovery
Toolkit variant of Stellar Data Recovery software can recover data from Linux and Mac drives having HFS, HFS+, ext2, ext3, ext4 file systems. It also gets back your data from Virtual Drives bringing native support for recovery from VMDK, VDI, VHD and VHDX files.
Data Recovery from 4K Hard Drives
The software recovers data from 4K hard drives that store the data on large-sized sectors of 4096 bytes. As a user, you get a more robust and advanced data recovery tool for conventional and modern 4K hard drives. In addition, Stellar data recovery software supports the 4K drives formatted with FAT32, ExFAT, and NTFS file systems.
Tool with Dual Monitor Support
Stellar Data Recovery software offers dual monitor support, allowing you to multitask on dual monitor displays without the need to minimize or toggle the screens. The feature helps you focus on the data recovery tasks and verify the results through the dual screens.
Video Converter Ultimate
As the professional ultimate video converter software, which can convert homemade DVD and video files including 4K videos to all popular videos and audio such as MPG, MP4, FLV, VOB, MOD, M4V, MP3, AAC, WAV, along with HD videos. It also converts homemade DVD and 2D video to 3D video with high quality
Convert DVD, Video and Audio Over 1000 Formats (4K/5K/8K Supported)
Video Converter Ultimate is the professional video converting software, which supports over 1000 formats. Whether you want to convert DVD or the mainstream video/audio formats (MP4, MKV, AVI, MOV, MXF, WebM, 3GP, MPEG, TOD, GIF, ASF, FLV, WMV, MP3, AAC, AIFF, ALAC, M4A, CUE, AU, WAV, WMA, etc.,) in the market. Even the 4K/5K/8K files (8K to HD, 5K to HD, 4K to HD, HD to HD, HD to SD, etc.), it can complete the conversion successfully
Convert Media Files at 30X Faster with GPU Acceleration
Video Converter Ultimate is really easy to use. The whole process of conversion can be finished in just a few of clicks. It adopts the world’s leading Blu-Hyper technology to process Graphics card image, and video decoding/encoding based on CPU level with the fastest conversion speed (30X faster). Even if you process the 4K/5K/8K videos, Video Converter Ultimate can provide you with the rocket-conversion speed because it completely supports multi-core CPUs.
Split Screen with Video and Photo Collage Feature
Want to put two videos side by side? Video Converter Ultimate helps create a video collage from videos, GIFs or photos. You can drag each video and make it the right place in the frame, or edit video like rotate, crop, clip video, add effect and filter, add watermark, adjust audio and add subtitles. You can select the template aspect ration from 16:9, 1:1, 9:16, 4:3, 21:9 or customize it yourself. You can also preview the split-screen effects in real time for YouTube, Instagram, Facebook or more.
Add External Subtitles to Video/DVD (New)
Video Converter Ultimate is designed with another new feature, which enables you to add external subtitles to your video or DVD. You can search for the proper subtitles and then use this subtitle adding tool to load them to videos. The supported subtitle formats are *.srt, *.ssa and *.ass. With this software, you can better enjoy your favorite movies with subtitles synchronized.
Versatile Editing Functions (Crop, Rotate, Filter, Watermark, Clip, Merge)
Crop: Zoom in/out video to get rid of the black edges, and change the aspect ratio to get the perfect playing effect.
Rotate & Flip: Rotate your videos with 90 clockwise or counterclockwise, and flip horizontally/vertically.
Clip: It has the clip function, which helps you get any time-length video or audio clips from your video sources.
Merge: Combine your selected DVD chapters/titles or video sources into one long file in new order.
Watermark: Personalize your video by putting a watermark in the form of text or image.
Filters & Effect: Add your favorite filter effects like whirpool, orange dots, purple, plain, coordinates, warm, sketch, modern, gray, pixelate, etc., and modify the video hue, saturation, brightness and contrast to create a new style video.
Customize Output Parameters for Devices
Before outputting the file, you can also choose the output file settings like video encoder, resolution, frame rate, video bitrate, sample rate, channels, etc.
It can be used to convert video for iPad Air, iPad Mini, iPad Mini 2, iPhone 12 Pro Max/12 Pro/12/12 mini, iPhone 11 Pro Max/11 Pro/11, iPhone XS, iPhone XS Max, iPhone XR, iPhone X, iPhone 8/8 Plus, iPhone 7/7 Plus, iPhone 6/6 Plus, iPhone 5s/5c, iRiver, PSP and other portable devices.
Convert 3D Videos
If you want to play a video on your VR devices, this 3D converter can help you exactly.
Choose the 3D setting modes – Anaglyph (Red/Cyan, full color, and more.) or Split Screen (Side by Side, Top and Bottom, etc.) according to your device. And you can adjust the 3D depth from 1 to 50.
After that, you can adjust the output 3D files quality and format to output the 3D video you need
Create Animated GIFs from Videos
Still use the traditional software to create the animated emojis? Come on. Video Converter Ultimate can create the animated GIF images from any videos you possess. You can snap the animated emojis for any salutations and send them in any situations like interesting, surprising, happy, embarrassing, and more.
Compress Large Files and Edit Video Metadata Info
Before you upload a video online or send a video within app to share with others, the large size may make you set back. Do not worry, and take Video Converter Ultimate to compress the large file from MBs into KBS. It lets you adjust the video size as you like. Moreover, do not forget to add the IDs tag information like title, date, genre, year, track, album, cover, etc., to complete the music and video information.
You can easily create MV collections with photos, videos, and music like a pro. It offers ready-made themes for your travel, romantic, sport, wedding, fashion, simple, business and other styles’ MVs. You can make an MV quickly without any skills. The timeline editing feature will let you adjust every picture and video conveniently. You can add your favorite title, and background audio into the MV you created to refine it.
4Videosoft DVD Ripper is the best DVD ripping software to rip DVD to AVI, rip DVD to MP4, rip DVD to MPEG, MOV, 3GP, HD videos, etc. with super fast DVD ripping speed for you to play on your portable iPad, iPad mini 3, iPad Air 2, iPhone 12 Pro Max/12 Pro/12/12 mini, iPhone 11 Pro Max/11 Pro/11, iPhone XS/XS Max/XR/X/8/8 Plus/7/7 Plus/6/6 Plus, iPod, PSP, BlackBerry, etc. You can also use this DVD Ripper to extract audio from DVD
Professional Converting Function
4Videosoft DVD Ripper can rip DVD to AVI, MP4, MPEG, WMV, 3GP, and HD videos like HD WMV, HD MKV, HD MOV, etc.
It has the function of extracting audio from DVD to AAC, AC3, AIFF, MP3, M4A, MP2, WAV, WMA audio formats.
After converting, it will be much easier to enjoy DVD movies on your personal players.

Before converting the DVD to the formats you want, this DVD Ripper has another great function which allows you to turn 2D DVD to 3D video. It provides almost any 3D modes you need, like Red/cyan anaglyph, Amber/blue anaglyph, split screen, etc. You can choose the right one according to your 3D TV and 3D glass type. After converting 2D to 3D, you will get real home-theater effect.

Versatile Editing Functions
The DVD Ripper allows you to change video effect, such as Brightness, Contrast, Saturation, Hue and Volume. You also can check "Deinterlacing" to get the progressive video.
Get any time-length video clips by setting the exact start and end time or just dragging the slider bar.
The DVD Ripper software allows you to cut off black region of video and adjust video aspect ratio.
It is available for you to join several video chapters together. You also can add text and picture watermark for the video.
Different Output Settings

Different audio tracks and subtitles of the source DVD are provided for you to choose.
You can choose Video Settings and Audio Settings for the converted video. All settings can be saved as user-defined profile.
You can enjoy the converted videos and audios can be put into iPhone, iPad, iPod, Google Phone and other main stream devices
Convenient and Efficient

With the DVD Ripper, you can take snapshot when you preview. The pictures can be saved in a default folder.
4Videosoft DVD Ripper provides you with clear-cut and intuitive interface, which makes your conversion much easier.
With newly adopted NVIDIA® CUDA™ and AMD APP technology, the DVD ripping speed is 6X faster than ever.
0 notes
Text
Windows 10 Insider Preview Build 18995 released

Windows 10 Insider Preview Build 18995 released in Fast Ring.
What’s new
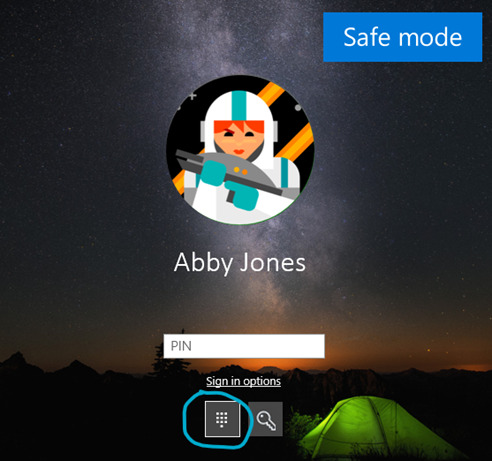
Windows Hello PIN in Safe mode Safe mode starts Windows in a basic state, using a limited set of files and drivers to help you troubleshoot problems on your PC. If a problem doesn’t happen in Safe mode, this means that default settings and basic device drivers aren’t causing the issue. With the latest flight, we’re taking another step forward in our Passwordless journey by adding Windows Hello PIN sign-in support to Safe mode, so that you no longer have rely on your password when troubleshooting your device. Try it out with the instructions below and let us know what you think! Set up Windows Hello in Settings > Accounts > Sign-in optionsBoot your device into Safe mode: Settings > Update and Security > RecoveryUnder Advanced startup select Restart nowAfter your PC restarts to the Choose an option screen, select Troubleshoot > Advanced options > Startup Settings > Restart. You may be asked to enter your BitLocker recovery key.After your PC restarts, you’ll see a list of options. Select 4 or press F4 to start your PC in Safe Mode. You can also select 5 or press F5 to use Safe Mode with Networking. Sign in to your device with your Windows Hello PIN
Windows Subsystem for Linux (WSL) Improvements Fix an issue where DrvFs mounts stopped working after an operation was interrupted (e.g. ctrl-c) Fix handling of very large hvsocket messages Fix issue with interop when stdin is a file Fix service crash when unexpected network state is encountered Query the distro name from the interop server if the current process does not have the environment variable Fix issue with interop whe stdin is a file Update Linux kernel version to 4.19.72 Add ability to specify additional kernel command line parameters via .wslconfig kernelCommandLine = # Additional kernel command line arguments
Other updates for Insiders
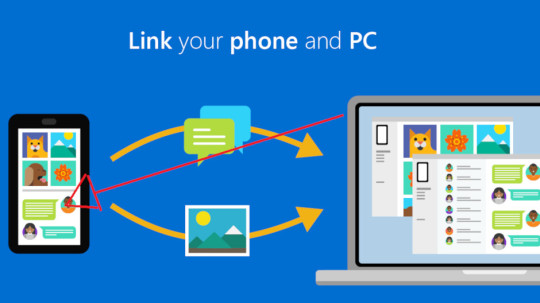
Your Phone app–multiple new features rolling out to all users We’re pleased to announce that Link to Windows feature, which seamlessly connects your phone to your Windows 10 PC, is rolling out to Samsung Galaxy S10, S10+, S10e, S10 5G, and Fold devices in select global markets. With Link to Windows natively integrated into your device, it’s simple and convenient to send messages, manage notifications, sync photos, and mirror your phone on your PC. Phone screen, which allows you to access your Android phone’s apps right from your PC while using your keyboard and mouse or touch screen, is also rolling out to Samsung Galaxy S10, S10+, S10e, S10 5G, and Fold devices in select global markets. You can try out multi-touch gestures such as pinch to zoom, rotate, or swipe from your PC’s touchscreen while using Phone screen. If you have one of these devices, give it a try. This is a gradual rollout, so stay tuned for more to come on additional markets and devices. Battery level indicator & phone’s home screen wallpaper In addition to Phone screen and Link to Windows expansion, two additional features are rolling out to all users–battery indicator, which will provide quick access to your phone’s battery levels right in the app without needing to check your device, and Your Phone icon within the app, which will show your current static home screen wallpaper for a personal touch. All of these features are gradually rolling out to users, so they may take a few days to be available inside the Your Phone app. Please make sure you have the latest versions of Your Phone Companion and the Your Phone app. We value your feedback, so give it a try and let us know what you think. You can report any issues under Your Phone > Settings > Send feedback.
General changes, improvements, and fixes
We’ve made some improvements to address an issue resulting in some users frequently seeing a notification saying their account needed to be fixed, but the Settings page that opened showed no action was necessary.We fixed an issue resulting in some Insiders seeing error 0x80242016 when trying to upgrade.We fixed an issue where you might be prompted to fix something before you could update, but the dialog with what to fix didn’t display the issue that needed fixing.We fixed an issue resulting in the mouse cursor unexpectedly showing up in screenshots in recent builds.We fixed an issue impacting reliability of taking screenshots with WIN+Shift+S / Snip & Sketch.We fixed an issue where, if you started a snip from Snip & Sketch by pressing New and had “automatically copy to clipboard” enabled, the first initial copy might be blank.We fixed an issue where the Action Center might be visible in screenshots recently if you started them by pressing the Screen Snip quick action.We fixed an issue for multi-mon devices that could cause random crashes in UWP apps when switching focus between monitors.We fixed a high hitting DWM crash from the last few flights.We fixed an issue in recent flights that resulted in Skype unexpectedly closing the first time it was launched and you tried to sign in.We’ve updated our File Explorer context menu logic, so if you right-click on a .HEIC image file, you’ll now have the option to Print or Set as Desktop Background, as you can with other image file types.We fixed an issue where you might need to invoke the File Explorer context menu twice before the option to create a new Text Document would appear.We’ve made some improvements to help address an issue where search may appear blank.We fixed an issue resulting in some users seeing a 0x000007D1 when trying to print.We fixed an issue where the publisher information was unexpectedly blank for some apps in App Settings.We fixed an issue where the Windows Update information in the Settings header could be out of date.We fixed an issue where turning Bluetooth off then back on while a Bluetooth audio device was paired could take an unexpectedly long time.We fixed a crash when adding devices in Devices Settings.We fixed an issue where the ImmGetVirtualKey function wasn’t returning VK_PROCESSKEY even if an IME was enabled.We fixed an issue where pressing space to enter selected word with the Changjie IME when using the touch keyboard might not work.We fixed a ctfmon.exe crash when using the Japanese IME if reconversion was triggered with a partial selection.We fixed an issue where ctfmon.exe would crash if you attempted to use dictation from the touch keyboard in certain apps.We fixed an issue impacting Windows Ink Workspace reliability.We fixed an issue that could result in pinned websites icons in the taskbar sometimes unexpectedly switching from their actual icon to the default browser icon.We fixed an issue where calendar events created from the taskbar clock and calendar flyout wouldn’t have a default 15min reminder set.We fixed an issue where if the taskbar changed scale enough times while an IME was active, it would lead to the input indicator disappearing from the taskbar.We fixed an issue resulting in transparent/invisible app thumbnails in snap assist when snapping an app to the side when in tablet mode.We fixed an issue where Task View would display that the navigation pane of certain apps was expanded, even if it was actually collapsed.We’ve improved Magnifier performance when using touch.We’ve updated our logic, Magnifier UI will now show properly when alt-tabbing if Magnifier was minimized originally.We’ve fixed a few small issues with the Text cursor indicator page in Settings.We fixed an issue where, when using the text cursor indicator, you might unexpectedly see a focusable Eoaexperiences.exe app running in the taskbar.We’ve improved the reading of email when objects such as images are embedded in the message while using Narrator to remove the repeating of information while moving through the content.We fixed a bug in Narrator where the link sound did not play in certain scenarios.We fixed an issue with older drivers showing as available for download. If you continue to see older drivers in the Option updates section of Windows Update, please let us know.
Known issues
There has been an issue with older versions of anti-cheat software used with games where after updating to the latest 19H1 Insider Preview builds may cause PCs to experience crashes. We are working with partners on getting their software updated with a fix, and most games have released patches to prevent PCs from experiencing this issue. To minimize the chance of running into this issue, please make sure you are running the latest version of your games before attempting to update the operating system. We are also working with anti-cheat and game developers to resolve similar issues that may arise with the 20H1 Insider Preview builds and will work to minimize the likelihood of these issues in the future.Certain 2D apps (like Feedback Hub, Microsoft Store, 3D Viewer) are incorrectly being treated as having protected content within Windows Mixed Reality. During video capture, these 2D apps block their content from being recorded.When capturing a repro video while filing a bug via Feedback Hub in Windows Mixed Reality, you won’t be able to select Stop video, due to the protected content issue noted above. If you want to submit a repro video, you will need to wait 5 minutes for the recording to time out. If you’d like to file the bug without a repro video, you can close the Feedback Hub window to end the recording and resume filing your bug when you reopen the app in Feedback > Drafts.When using the Search bar in either Control Panel or File Explorer, the box becomes grey and prevents input. We’ve identified the cause, and we’re working on a fix for a future flight.Devices configured for dual scan (WSUS and Windows Update) for updates may not be offered new builds in the Fast ring. Selecting Check online for updates from Microsoft Update will scan for updates, but may return with the message, “Your device is up to date.” We’re working on a fix for a future flight.Some devices configured to Use HDR may experience a bluish tint on their HDR displays after using Night Light. We have identified the cause, and we are working on a fix for an upcoming build.Theme packs downloaded from the Microsoft Store fail to apply.Starting with the previous flight, some Insiders may find that Settings doesn’t launch from the button in Start, isn’t listed in the All apps list, or as a search result. If you are impacted, pressing WIN+R and inputting “ms-settings:” (without the quotes) will launch Settings if you need it.After successfully updating to a new build, the Windows Update Settings page may show the same build needs to install. You can verify the build was successfully installed by checking the build number in the corner of the screen or going to Win+R, typing winver, and confirming the build number. We have identified the cause of this issue, and we’re working on a fix for a future flight. Read the full article
0 notes
Text
AOMEI Partition Assistant - Review and Test Drive

As you most likely already know, disk partitioning (also known as disk slicing) is the process of creating of one or more regions within a disk storage (such a HDD or SSD drive) so that each region can be managed separately. The disk stores the information about the partitions' locations and sizes in an area known as partition table, which is read by the system before any other part of the disk and - depending on what is found there - will determine what your PC will actually load on each boot: the operating system also reads the partition table before anything else, giving the user the chance to access the various regions (if they are formatted with a supported filesystem standard) to read and/or write stuff. The various "partitions" can be created using the operating system built-in tools or via third-party software - usually called partition editors, partition managers and so on: these tools can be used to create, resize, delete, and otherwise manipulate the partitions. The most widespread partition editor tools available in the past years are EaseUS Partition Master, Paragon Partition Manager and AOMEI Partition Assistant, which we'll be testing and reviewing in this article.
Standard and Professional
AOMEI Partition Assistant comes in two different versions: Standard (freeware) and Professional (trialware). Standard Features The standard version, which is free for personal use, comes with the following features: Basic Partition Management: Create, Format, Delete, Label, Check, Hide, Unhide Partitions, Set Active Partition, Change Drive Letter. Disk Partition Utilities: Rebuild MBR, Wipe Disk or Partition, Change Partition Type ID, Check Bad Sector. Change Partition Size: Extend, Shrink and Move Partitions, Merge Partitions or Unallocated Space Copy Data Disk & Partition Migrate OS from MBR Disk to MBR SSD or HDD Convert Data Disk between MBR and GPT Styles Convert File System between NTFS and FAT32 Create Windows PE Bootable CD/USB Professional Features The professional version covers all the standard stuff plus the following advanced features: Recover Lost or Deleted Partitions Copy System Disk from MBR to GPT, GPT to MBR and GPT to GPT Advanced Data Migration features: OS from GPT Disk to GPT/MBR SSD or HDD Advanced Convert features: System Disk between MBR and GPT; Dynamic Disk to Basic Disk (and Vice Versa); Partition Type between Primary and Logical Align Partition to Optimize SSD Performance Allocate Free Space from one Partition to another Extend Partition Wizard to Enlarge NTFS System Partition without the need of a reboot Advanced Partition Split features, such as spliting one large Partition into two or more smaller ones Command-Prompt mode, to be used within batch files and scripts Dynamic Disk Management: Resize, Move, Create, Format Dynamic Volumes SSD Secure Erase Wizard 24/7 VIP Technical Support Sector-level Data Protection AOMEI Partition Assistant embeds a proprietary sector-level data protection technology to ensure safer partitioning operations even with large drives (> 2 TB).
Supported OS, FS and Storage Devices
Both Standard and Professional versions supports the following: Operating Systems Windows 10 Windows 8.1/8 Windows 7 Windows Vista Windows XP Windows 2000 Pro SP4 File Systems NTFS FAT32/FAT16/FAT12 exFAT/ReFS * Ext2/Ext3/Ext4 * Bitlocker and other encrypted file systems * * These file system cannot be resized, but you can still move and clone them. Supported Storage Devices Traditional hard disk drives, solid-state drives (SSD) and SSHD, etc. (MBR disk and GPT disks) of any size External hard drives (USB drives), PC cards, all Flash Drives and Thumb Drives and other removable media All storage devices recognized by Windows, such as RAID, etc As for the maximum supported size, there seems to be no limit: we tested the Standard version against a 16 TB HDD and we got no issues.
Installation and EULA
The Standard Edition has an installer file of just 22 Megabytes with a typical installation wizard, which briefly mentions the Professional edition, giving you the chance to Try it now! but doesn't suggest or force anything else (no third-party software sponsored advices). Before running the program, you get the choice to Join the User Experience (UX) Improvement Program, which is the usual anonymous info-collecting feature used by most modern softwares to gather info regarding their end-users - hardware, usage, and so on. The Program is also briefly mentioned in the End-User Licence Agreement, which is indeed a good thing because they let you know what will be going on before accepting. Here's the relevant excerpt: In order to understand our user's needs, and deliver better products and services to our user, we invite you to join our User Experience Improvement Program. If you choose to join the program, you will not be interrupted by additional messages when using your computer, and the operation of the program will not decrease the performance of your computer. AOMEI collects anonymous information about your computer hardware configuration, how you use our products and problems you might have with our products. We respect your privacy. No personally identifiable information will be collected, like your name, address, phone number, or keyboard input. The program is voluntary. You can opt in/out the program at any time by checking/unchecking Menu » Settings » Other » Join the User Experience Improvement Program.
User Interface
The software comes with a easy-to-use interface, much similar to other AOMEI products. You are immediately prompted for the preferred language (we chose English among the 20+ supported ones) and then the main control screen will load:

As we can see, there's no introductory dashboard - we're immediately brought into action thansk to a full-featured control panel which already contains everything we can do. With a single click we can start to work on our partitions, migrate OS to SSD, start the recovery wizard, and so on. This is a great approach for practical people such as the vast majority of System Administrators - which are the ones that will actually use the product anyway. As you can see, some of the available Disk Operations do have an orange "Pro" label on them: it goes without saying that those will require the Professional version. Similarily, there are other features (such as the "Disk Backup") that do require other AOMEI products, such as AOMEI Backupper:

That's nice to know, but maybe it would've been better to place a label on them as well.
Overall Performances
During our test-drive we performed the following activities: Disk Partition on a 16 TB Hard-Disk Drive (create, split, merge and delete) Disk Copy from a 256GB SSD Drive to another identical 256GB SSD Drive. Wipe Hard Drive on that same 16 TB Hard-Disk Drive that we partitioned early on. Rebuild MBR from a damaged HDD with Windows 7 Home Premium. The software performed really well on each task, with no nag screen, no delays and better performances compared to the aforementioned competitors. We found nothing to complain about, therefore we can only praise the overall results. We also checked our Task Manager to analyze the impact on system resources during the various tasks, and we found no significant issues there as well: needless to say, the software will ask you to reboot to ensure that your Operating System will reckognize the changes, but it's not mandatory - as long as you can live with the partition misalingments.
Conclusion
AOMEI Partition Assistant is definitely a great free partition manager tool which we can recommend it for any personal use. If you plan to use it on your company or business activity, the fair price of the Professional version ($49.95 at the time of writing, with lifetime free upgrades included) makes it a highly affordable choice for every business size. Read the full article
0 notes
Text
Installing BitLocker with a Self-encrypting SSD in Windows 💾🔒 DIY in 5 Ep 95
We will show you how to use BitLocker, Microsoft’s proprietary encryption program. We briefly discussed BitLocker in our video on securing an external USB but this time we will discuss using internal SSDs with eDrive. What is BitLocker BitLocker is a simple-to-use Windows encryption tool that works with your operating system and protects your data from being seen and used by ne’er-do-wells should it be lost. It comes with Windows 7 Ultimate or Enterprise, Windows 8.1 Pro or Enterprise or Windows 10 Pro and you will need to create multiple partitions to use it. eDrive is Microsoft’s premier encryption system which works with BitLocker and allows most of the encryption to be done on the drive itself via hardware encryption vs. software encryption. This can speed up both encryption and decryption dramatically. Another stipulation you’ll need to run BitLocker is a Trusted Platform Module, also called Security Processor or TPM. If all of this sounds like way too much information to register, no worries, BitLocker runs a system check when you start it up to see if your PC has all the necessary requirements. It is compatible with our upcoming KC2000 NVMe PCIe SSD. How to encrypt Once you are given the seal of approval by BitLocker, you can get to encrypting! You may have to completely shut down your computer and manually turn it back on in order to activate your TPM security hardware. BitLocker will prompt you if that’s the case. Once you log back in you will see a window prompting you to encrypt the drive, to which you click Next. You will choose a password that your computer will ask for every time you turn on your PC, even before logging in. You can choose between entering the password manually or inserting a USB key. You’ll then be asked to save a recovery key just in case of any problems and you can do this via Microsoft account, file, flash drive or printing it out. I usually do two of these backup methods because I’m paranoid but use your best judgement and follow your gut. After that you’ll choose to encrypt only the used disk space - the process is faster and better for new PCs and drives - or encrypt the entire drive which takes longer but is great for drives that have some miles on them. Then, if you have Windows 10, you’ll choose between new and compatible encryption modes, meaning compatible with older versions of windows, so if this is a drive that travels back and forth, that’s worth considering. Then check Run BitLocker system check and encrypt. This ensures that BitLocker will check the system before encrypting your drive, which is always preferred. On this final restart, you’ll be asked for that shiny new password and you’ll see the drive encryption progress once you fully log in. It can take a bit of time, but it’s totally worth it to protect your most sensitive files. http://bit.ly/2HYN9MU Kingston Technology April 05, 2019 at 04:11PM http://bit.ly/2VrmdZs https://ift.tt/eA8V8J Marken
0 notes
Text
Installing BitLocker with a Self-encrypting SSD in Windows 💾🔒 DIY in 5 Ep 95
We will show you how to use BitLocker, Microsoft’s proprietary encryption program. We briefly discussed BitLocker in our video on securing an external USB but this time we will discuss using internal SSDs with eDrive. What is BitLocker BitLocker is a simple-to-use Windows encryption tool that works with your operating system and protects your data from being seen and used by ne’er-do-wells should it be lost. It comes with Windows 7 Ultimate or Enterprise, Windows 8.1 Pro or Enterprise or Windows 10 Pro and you will need to create multiple partitions to use it. eDrive is Microsoft’s premier encryption system which works with BitLocker and allows most of the encryption to be done on the drive itself via hardware encryption vs. software encryption. This can speed up both encryption and decryption dramatically. Another stipulation you’ll need to run BitLocker is a Trusted Platform Module, also called Security Processor or TPM. If all of this sounds like way too much information to register, no worries, BitLocker runs a system check when you start it up to see if your PC has all the necessary requirements. It is compatible with our upcoming KC2000 NVMe PCIe SSD. How to encrypt Once you are given the seal of approval by BitLocker, you can get to encrypting! You may have to completely shut down your computer and manually turn it back on in order to activate your TPM security hardware. BitLocker will prompt you if that’s the case. Once you log back in you will see a window prompting you to encrypt the drive, to which you click Next. You will choose a password that your computer will ask for every time you turn on your PC, even before logging in. You can choose between entering the password manually or inserting a USB key. You’ll then be asked to save a recovery key just in case of any problems and you can do this via Microsoft account, file, flash drive or printing it out. I usually do two of these backup methods because I’m paranoid but use your best judgement and follow your gut. After that you’ll choose to encrypt only the used disk space - the process is faster and better for new PCs and drives - or encrypt the entire drive which takes longer but is great for drives that have some miles on them. Then, if you have Windows 10, you’ll choose between new and compatible encryption modes, meaning compatible with older versions of windows, so if this is a drive that travels back and forth, that’s worth considering. Then check Run BitLocker system check and encrypt. This ensures that BitLocker will check the system before encrypting your drive, which is always preferred. On this final restart, you’ll be asked for that shiny new password and you’ll see the drive encryption progress once you fully log in. It can take a bit of time, but it’s totally worth it to protect your most sensitive files. http://bit.ly/2WLvwU9 Kingston Technology April 05, 2019 at 03:16PM http://bit.ly/2FUcBjn https://ift.tt/eA8V8J Marcas
0 notes
Text
Installing BitLocker with a Self-encrypting SSD in Windows 💾🔒 DIY in 5 Ep 95
We will show you how to use BitLocker, Microsoft’s proprietary encryption program. We briefly discussed BitLocker in our video on securing an external USB but this time we will discuss using internal SSDs with eDrive. What is BitLocker BitLocker is a simple-to-use Windows encryption tool that works with your operating system and protects your data from being seen and used by ne’er-do-wells should it be lost. It comes with Windows 7 Ultimate or Enterprise, Windows 8.1 Pro or Enterprise or Windows 10 Pro and you will need to create multiple partitions to use it. eDrive is Microsoft’s premier encryption system which works with BitLocker and allows most of the encryption to be done on the drive itself via hardware encryption vs. software encryption. This can speed up both encryption and decryption dramatically. Another stipulation you’ll need to run BitLocker is a Trusted Platform Module, also called Security Processor or TPM. If all of this sounds like way too much information to register, no worries, BitLocker runs a system check when you start it up to see if your PC has all the necessary requirements. It is compatible with our upcoming KC2000 NVMe PCIe SSD. How to encrypt Once you are given the seal of approval by BitLocker, you can get to encrypting! You may have to completely shut down your computer and manually turn it back on in order to activate your TPM security hardware. BitLocker will prompt you if that’s the case. Once you log back in you will see a window prompting you to encrypt the drive, to which you click Next. You will choose a password that your computer will ask for every time you turn on your PC, even before logging in. You can choose between entering the password manually or inserting a USB key. You’ll then be asked to save a recovery key just in case of any problems and you can do this via Microsoft account, file, flash drive or printing it out. I usually do two of these backup methods because I’m paranoid but use your best judgement and follow your gut. After that you’ll choose to encrypt only the used disk space - the process is faster and better for new PCs and drives - or encrypt the entire drive which takes longer but is great for drives that have some miles on them. Then, if you have Windows 10, you’ll choose between new and compatible encryption modes, meaning compatible with older versions of windows, so if this is a drive that travels back and forth, that’s worth considering. Then check Run BitLocker system check and encrypt. This ensures that BitLocker will check the system before encrypting your drive, which is always preferred. On this final restart, you’ll be asked for that shiny new password and you’ll see the drive encryption progress once you fully log in. It can take a bit of time, but it’s totally worth it to protect your most sensitive files. http://bit.ly/2OUNEbt Kingston Technologyhttp://ifttt.com/images/no_image_card.pngApril 05, 2019 at 03:35PM https://ift.tt/eA8V8J http://bit.ly/2KcCmk7 https://ift.tt/eA8V8J Marken
0 notes
Text
Installing BitLocker with a Self-encrypting SSD in Windows 💾🔒 DIY in 5 Ep 95
We will show you how to use BitLocker, Microsoft’s proprietary encryption program. We briefly discussed BitLocker in our video on securing an external USB but this time we will discuss using internal SSDs with eDrive. What is BitLocker BitLocker is a simple-to-use Windows encryption tool that works with your operating system and protects your data from being seen and used by ne’er-do-wells should it be lost. It comes with Windows 7 Ultimate or Enterprise, Windows 8.1 Pro or Enterprise or Windows 10 Pro and you will need to create multiple partitions to use it. eDrive is Microsoft’s premier encryption system which works with BitLocker and allows most of the encryption to be done on the drive itself via hardware encryption vs. software encryption. This can speed up both encryption and decryption dramatically. Another stipulation you’ll need to run BitLocker is a Trusted Platform Module, also called Security Processor or TPM. If all of this sounds like way too much information to register, no worries, BitLocker runs a system check when you start it up to see if your PC has all the necessary requirements. It is compatible with our upcoming KC2000 NVMe PCIe SSD. How to encrypt Once you are given the seal of approval by BitLocker, you can get to encrypting! You may have to completely shut down your computer and manually turn it back on in order to activate your TPM security hardware. BitLocker will prompt you if that’s the case. Once you log back in you will see a window prompting you to encrypt the drive, to which you click Next. You will choose a password that your computer will ask for every time you turn on your PC, even before logging in. You can choose between entering the password manually or inserting a USB key. You’ll then be asked to save a recovery key just in case of any problems and you can do this via Microsoft account, file, flash drive or printing it out. I usually do two of these backup methods because I’m paranoid but use your best judgement and follow your gut. After that you’ll choose to encrypt only the used disk space - the process is faster and better for new PCs and drives - or encrypt the entire drive which takes longer but is great for drives that have some miles on them. Then, if you have Windows 10, you’ll choose between new and compatible encryption modes, meaning compatible with older versions of windows, so if this is a drive that travels back and forth, that’s worth considering. Then check Run BitLocker system check and encrypt. This ensures that BitLocker will check the system before encrypting your drive, which is always preferred. On this final restart, you’ll be asked for that shiny new password and you’ll see the drive encryption progress once you fully log in. It can take a bit of time, but it’s totally worth it to protect your most sensitive files. http://bit.ly/2YPjMBT Kingston Technology April 05, 2019 at 03:16PM https://ift.tt/eA8V8J
0 notes