#Bulk jar storage
Explore tagged Tumblr posts
Visit Tumblr Blog
Explore Tumblr blogs with no restrictions, modern design and the best experience.
Last Seen Tumblr Blogs


Fun Fact
Post activity is at the highest at 4:00 pm EDT; notes peak at 10:00 pm EDT.
Text
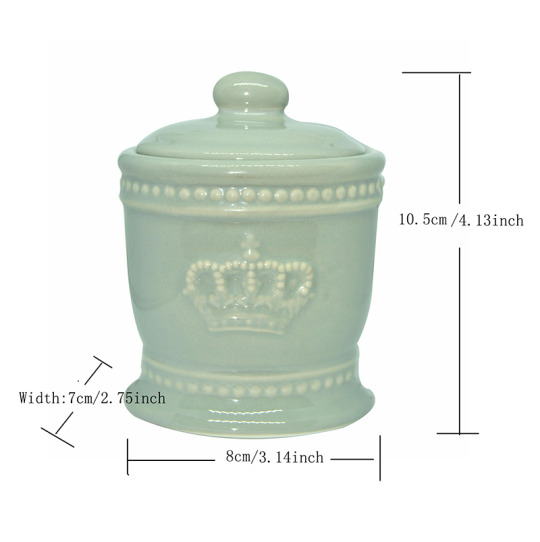


3D Imperial Royal crown Cotton Ear Bud Pad Jar Ceramic Bathroom Storage Holder
#Jar storage solutions#Glass jar organization#Mason jar storage ideas#Pantry jar storage#Kitchen jar storage#Jar storage containers#Clear jar storage#Airtight jar storage#Creative jar storage#DIY jar storage#Jar storage hacks#Labelled jar storage#Stackable jar storage#Spice jar storage#Bulk jar storage
0 notes
Text
Magical Oil Recipes - Baneful Blends Edition

For anyone looking to brew up a potion with a less-than-friendly bent, here are some recipes I've created that you might find useful.
To prepare them, blend the ingredients in such proportions as feels correct for your purposes (or as supplies allow). Use dried material except where indicated. Place a few spoonfuls in a mason jar with a screwtop lid and fill the jar with a bland oil of your choice. (Vegetable oil of the sort you would buy for cooking works fine.) Screw the lid on tightly and shake well to combine, then leave the jar in a dark dry place for 2-4 weeks to steep.
Once steeped, prepare a clean storage bottle (also with a secure lid) and label with the type of oil and the bottling date. Strain the oil through paper towels or cheesecloth to remove the plant material, then bottle immediately. Store away from sunlight and heat for up to one year. Use for spellwork as you see fit.
(Please note that NONE of these potions are meant to be taken internally by any means. Observe all proper safety measures related to glass, fire, and potentially harmful plants as necessary during preparation.)
*- Ingredient is potentially harmful if inhaled or ingested. **- Ingredient should not be used or handled if you are pregnant or nursing.
All-Purpose Hexing Oil For general hexing, cursing, and baneful magic.
Dried Chili Pepper
Fresh Lime Peel
Lemongrass (dried or fresh)
Rusted Nail (place in bottle with finished oil)
All-Purpose Hexbreaking Oil For general negation of baneful spells cast by oneself or others.
Agrimony**
Cinquefoil
Fennel
Vervain
Solomon's Seal Root (place in bottle with finished oil)
Backhanded Blessing Oil For blessings that are anything but benevolent.
Burnt Cinquefoil
Bay Leaf
Pine Needles
Bayberry Root NOTE: Prepare as you would a blessing oil, then twist the blessing into a curse, i.e. May You Get Everything You Deserve.
Done in the Dark Concealment Oil For secrecy, confidentiality, and general deception.
Juniper Berries
Licorice Root
Black Hemp (Dogbane)
Ferns or Dried Seaweed Note: For the final ingredient, use whichever is easier to obtain. Both bracken and seaweed work well for basic concealment spells.
Eye of Newt Disruption Oil For disrupting and confounding magical efforts against you.
Black Mustard Seeds
Bloodroot**
Nettle Leaf
Garlic (1 clove, bruised)
No Rest For The Wicked Hexing Oil For punishing one's enemies.
Chili Pepper (any)
Horseradish Root
Cramp Bark
Bayberry Root
On Your Own Head Retribution Oil For counter magic and revenge hexes.
Elderberries*
Bloodroot**
Devil's Shoestring**
Vetiver
Tangled Shoelaces Binding Oil To impede someone's ability to move or act against you.
Pine Needles
Devil's Shoestring**
Scullcap**
Coffee Grounds
Iron Nail in master bottle
Wicked Witch Heavy-Duty Cursing Oil For occasions when a regular-strength hex just won't do.
Wormwood* **
Ghost Chili Pepper (or the hottest chili you can get)
Lemon Seeds
Lobelia* Note: Use With Extreme Caution And Cover Your Ass.
Witchbane Warding Oil For repelling and countering harmful spells.
Bay Leaves
Elderflower
Star Anise
Birch Bark
Should the reader require supplies, I recommend the following:
Penn Herb Company
Starwest Botanicals
Bulk Apothecary
Mountain Rose Herbs
Specialty Bottle
Image Credit - Shaiith
All recipes are (c) 2017 Bree NicGarran, published in Pestlework: A Book of Magical Powders & Oils. Please check out the book if you would like more recipes.
If you’re enjoying my content, please feel free to drop a little something in the tip jar, tune in to my podcast Hex Positive, or check out my published works on Amazon or in the Willow Wings Witch Shop.
#witchblr#witchcraft#curses#baneful magic#potions#potion recipes#witchy things#I'll see your Threefold Law and raise you an I'm Not Wiccan And I Don't Give A Fuck
693 notes
·
View notes
Text
Into the Old Keep

Returning to the Liftside Chamber, there was this one stubborn door that refused to open. Which was frustrating because it led right down into that mystery abyss.

I tried dropping down from the ledge right outside the chamber, but only got a sprained ankle for my troubles and the realization that, while I could keep going down, I could not get back up to unlock that door.

So, time to go up. I took the lift to the top of the tower, and found a very peculiar sight. Miniature jars, like Alexander but much smaller. Seemed almost cute.

....until the mother jar showed up. It tried to smash me with its bulk while the little ones pounded me with their tiny fists. Once I shattered them, the big one dropped a Living Jar Shard and a.... a.... a meat dumpling.

Oh gods those are teeth.
A pungent raw meatball, made succulent by virtue of being on the verge of turning. Heals, but also poisons the user. Not recommended for those who prefer to know the origin of their meats.
Thanks, voice. If I run out of Crimson Tears, I'll just die instead.
This confirms what I suspected about Alexander. He is definitely filled with actual people, mashed into a pulp. The though turned my stomach even more than the "dumpling" did.

The jars actually were alive. Not just animated. The meat had turned into some sort of...tissue.
A fragment of a living jar, hardened after its death. Such fragments command a high price due to the magical power locked within. This leaves the living jars unfortunate targets for poachers.
So why were there so many of these broken around the Weeping Peninsula Minor Erdtree?
Another thing I found in the jar nest was a Cracked Pot, like the kind I use for holy water or fire. Are these jar eggs or something? If I put human meat in it, would it grow into one of those smaller jars and attack me? Curiosity and disgust warred in me, but disgust won. I would not be investigating that.

Past that was a very strange collapsed part of the floor. It looked less like a collapse and more like an impact. Like something landed here and dug a furrow, collapsing several floors before coming to a stop. It was hard to even envision what this place was before the collapse, and the only way I could make sense of it was that this is a place where construction stopped. Whatever renovations Godrick was making had completely petered out at this spot. Even if the rest of it was sometimes a confusing patchwork, the construction here did not match up at all.

I climbed up some scaffolding to a ledge, then across to a window. When I stepped out, I saw another one of those red Banished Knights. She was kneeling over the corpse of one of those fire-breathing Warhawks, with a regular Stormhawk joining her.
Had she killed it? If so, she still clearly held great respect for the beast. The feeling was mutual, as the other hawk was docile and joining her mourning. This all but confirmed for me that the hawks were intelligent. Perhaps the Banished Knights were once kin to the hawks of Stormveil, but the Warhawk hadn't recognized her due to its far more invasive prosthetics.

I continued on my path through a storage room, across more scaffolding, up to an even worse collapsed floor, and into what seemed like an even older part of the castle.

Here, the construction was completely different. It felt even more familiar. The only inhabitants were long-neck commoners, who didn't appreciate my intrusion. Under the stairs, someone had stashed a Manor Towershield

An iron greatshield large enough to cover the entire body. Depicts the Roundtable Hold, gathering place of champions.
God. It just hit me. I finally figured it out. Why the older parts of the castle seemed so familiar. The arms, the armor, the whole thing. I'd been looking at it for so long without seeing the significance, I didn't even notice it anymore.

The Roundtable Hold. This castle was exactly like the Roundtable Hold. At least, originally. The same arms and armor that decorate Stormveil could be found there.
Before the gaudy facades. Before the curse of pox and thorns.
At one time, Stormveil and the Roundtable Hold had been twin castles.

I stepped out on the battlement, and a rune message greeted me. Far more articulate than your typical runes, and with Rogier's visage. I knew that if I followed his instructions, I'd finally reach the secret of Stormveil Castle.
Were the knights banished from the Roundtable Hold?
What kinship do they have with the hawks?
What impacted this area of the castle?
Do Living Jars grow from the Cracked Pots?
What awaits me down below?
#elden ring#elden ring lore#in character#in character blog#in character post#let's play#rogier#sorcerer rogier#living jar#stormveil#banished knights#roundtable hold#fortified manor#stormhawks#dragon communion
12 notes
·
View notes
Text


Brinefathom Caves Level 1, Week 7
1.62: The Embalming Room: 15’ stairs down. Thick layer of dust, sharp chemical smell. Long stone tables. Embalming tools on racks. Broken pottery. Walls carved with twisting serpents. Jar carved into door to 1.63, Eye carved into door to 1.65. Empty.
1.63: The Hall of Jars
1.64: The Bridge of Faith
1.65: The Obelisk Puzzle
1.66: The Prophecy Storage: Walls, floor, and ceiling covered in Auran writing (using Draconic script) which records the prophecies of the serpent in 1.67. Much is smudged, damaged, or otherwise illegible. Remainder contains repeated references to being driven into darkness. Empty.
1.67: The Serpent's Ossuary
1.68: The "Bloody" Chamber: Walls secrete viscous, sticky dark red liquid. Tracked liquid leading in all directions. Liquid can be collected over 3 dungeon turns and further distilled over the course of a week into a potion of healing. Empty.
1.69: Big Nogret's Crypt
1.70: The Trapped Burial Hall
(Non-key rambling under cut)
I don't usually do multiple pictures, even if the result is kinda weird sometimes, but the bulk of this week's rooms are a lil sublevel branching off of the false stairs from last week. I just drew it in a corner of the page for convenience; it's not supposed to represent that sublevel's actual physical location (which is below the main level).
Speaking of the false stairs, I gotta go back and add some links to old rooms; I've been slacking off on that recently.
#brinefathom caves#brinefathom caves level 1#megadungeon#dungeon23#dungeon24#dungeons and dragons#listen up me hearties
15 notes
·
View notes
Text
Buying and Using Coconut Butter in Bulk in India
Coconut butter, a creamy and versatile product made from pureed coconut flesh, has been gaining traction worldwide for its rich flavor and nutritional benefits. In India, where coconuts are a staple in many households, buying coconut butter in bulk is an economical and practical choice for both individuals and businesses. Here’s a detailed guide on why and how to embrace coconut butter in bulk, along with tips for sourcing it in India.
Why Buy Coconut Butter in Bulk?
Cost-Effective: Purchasing coconut butter in large quantities often reduces the cost per unit, making it a budget-friendly option for frequent users.
Eco-Friendly: Buying in bulk minimizes packaging waste, aligning with sustainable and environmentally-conscious practices.
Versatility: Coconut butter can be used in numerous ways—from cooking and baking to skincare and DIY projects—making it a multipurpose investment.
Convenience: Having a ready supply of coconut butter ensures you’re always stocked for your culinary and cosmetic needs.
Culinary Uses of Coconut Butter
Cooking: Use coconut butter as a flavorful substitute for dairy butter or oil in sautéing vegetables, making curries, or drizzling over roasted vegetables.
Baking: Its creamy texture adds richness to cakes, cookies, and energy bars, while its natural sweetness enhances flavor profiles.
Spreads and Toppings: Spread it over toast, pancakes, or waffles for a nutrient-rich alternative to regular spreads.
Smoothies: Add a spoonful to smoothies for a creamy texture and a boost of healthy fats.
Non-Culinary Uses of Coconut Butter
Skincare: Coconut butter’s moisturizing properties make it ideal for use as a natural lotion or lip balm.
Hair Care: It can be used as a nourishing hair mask to combat dryness and add shine.
DIY Products: Coconut butter is a popular ingredient in homemade soaps, scrubs, and candles.
Sourcing Coconut Butter in Bulk in India
Local Manufacturers: Many local producers, especially in coconut-rich states like Kerala and Tamil Nadu, offer high-quality coconut butter at wholesale prices.
Online Retailers: Platforms like Amazon India, Flipkart, and specialized health food websites often list bulk packages of coconut butter.
Wholesale Markets: Visit local wholesale markets or health food stores that cater to bulk buyers. These often provide fresh products at competitive rates.
Organic Stores: Organic outlets and co-operatives frequently stock coconut butter made from organically grown coconuts.
What to Look for When Buying in Bulk
Purity: Ensure the product is free from additives, preservatives, or artificial flavors.
Quality Certification: Look for certifications such as FSSAI, USDA Organic, or India Organic to guarantee quality.
Packaging: Opt for airtight, food-grade containers to maintain freshness and prevent contamination.
Shelf Life: Check the expiration date and storage recommendations to ensure long-term usability.
Storing Bulk Coconut Butter
Cool and Dry Place: Store coconut butter in a cool, dry place away from direct sunlight to prevent spoilage.
Refrigeration: In hot and humid climates, refrigeration can help extend its shelf life.
Airtight Containers: Transfer large quantities into smaller, airtight jars for daily use to minimize exposure and maintain freshness.
Embracing Coconut Butter as a Lifestyle Staple
Incorporating coconut butter into your daily routine—whether for its culinary delights or its skincare benefits—can be a game-changer. Buying in bulk not only saves money but also ensures you always have this versatile, nutrient-rich product at your fingertips.
Natures Natural India, where the coconut is revered as a ‘tree of life,’ coconut butter represents a natural treasure that supports health, sustainability, and tradition. By sourcing it wisely and using it creatively, you can unlock its full potential for yourself and your family.
2 notes
·
View notes
Text
Fermentation tips for vegetables
Green tomatoes can be an excellent main ingredient for kimchi or preserved in a vinegar-based brine! Here are details on both methods:
Green Tomatoes as the Main Ingredient in Kimchi
Kimchi is highly adaptable, and green tomatoes can replace or complement cabbage or radish. Here's a recipe idea:
Ingredients
- 1 kg (2.2 lbs) green tomatoes (cut into wedges or slices).
- 1–2 tablespoons salt (non-iodized, like sea or kosher salt).
- 1 tablespoon sugar (optional, for balancing tartness).
- 2–3 garlic cloves (minced).
- 1 tablespoon ginger (grated).
- 3–4 green onions (chopped).
- 2 tablespoons Korean red chili flakes gochugaru, or adjust to your spice preference.
- 1–2 tablespoons fish sauce or soy sauce (optional for umami).
Steps
1. Salting the Tomatoes:
- Toss the sliced green tomatoes with salt in a bowl. Let sit for 30–60 minutes until they release water.
- Drain and lightly rinse if they are too salty.
Adding seaweed to sauerkraut is a fantastic idea! It boosts the nutrient content, enhances the umami flavor, and supports fermentation. Here's how to incorporate it and additional tips for your vegetable mix.
Adding Seaweed to Sauerkraut
Seaweed complements the tangy flavor of sauerkraut and pairs beautifully with grated carrots, beets, and Jerusalem artichokes.
Ideal Seaweed Percentage
- Aim for 2–5% of the total weight of your cabbage and vegetables.
- For every 1 kg (2.2 lbs) of vegetables, use 20–50 g (0.7–1.7 oz) of dried seaweed or about 1/4 to 1/2 cup rehydrated seaweed.
2. Prepare the Kimchi Paste:
- Mix garlic, ginger, chili flakes, fish sauce (if using), and sugar into a paste. Add water if needed to achieve a spreadable consistency.
3. Combine and Pack:
- Mix the drained tomatoes, green onions, and paste thoroughly. Ensure all pieces are coated. - Pack into a sterilized jar, pressing down to remove air pockets. Leave some space at the top for fermentation gases.
4. Fermentation:
- Seal the jar loosely or use a fermenting lid. Place at room temperature (18–22°C or 65–72°F) for 3–7 days, depending on your desired tanginess.
- Check daily, pressing the mixture down to keep it submerged in its juices.
5. Storage:
- Once fermented to your liking, store in the fridge, where it will keep for several months.
Types of Seaweed to Use
1. Wakame or Alaria: Mild flavor and soft texture, great for incorporating directly.
2. Kelp (Kombu): Adds deeper umami and trace minerals; chop finely if rehydrated.
3. Dulse: A slightly salty and smoky seaweed that works well shredded into the mix.
4. Nori: Crumble it in small amounts for a subtle addition.
How to Add Seaweed
1. Rehydrate (if dried): Soak seaweed in water for 5–10 minutes, drain, and chop finely.
2. Mix with Vegetables: Add the seaweed during the salting and massaging process for even distribution.
Your Sauerkraut Mix: Cabbage, Carrots, Beets, and Jerusalem Artichokes
Proportions for a Balanced Mix
- Cabbage: 70–80% (main bulk for texture and fermentation).
- Carrots: 10–15% (sweetness and crunch).
- Beets: 5–10% (earthy sweetness and color).
- Jerusalem Artichokes: 5–10% (mild nutty flavor, prebiotic boost).
- Seaweed: 2–5% (nutritional enhancement).
Spices and Add-Ins That Pair Well
1. Garlic and Ginger: Classic fermentation boosters with tangy, aromatic notes.
2. Caraway Seeds: Traditional for sauerkraut; adds a warm, anise-like flavor.
3. Coriander Seeds: Bright and citrusy, complements beets and carrots.
4. Bay Leaves: Mild herbal note; place whole leaves on top of the ferment.
5. Turmeric Root (grated): Adds an earthy flavor and anti-inflammatory benefits.
6. Chili Flakes: A bit of heat pairs beautifully with the sweet and earthy vegetables.
Method for Fermentation
1. Prepare the Vegetables:
- Shred or finely grate the cabbage, carrots, beets, and Jerusalem artichokes. Mix with chopped seaweed.
2. Salt:
- Add 2% salt by weight of the total vegetables (e.g., 20 g salt per 1 kg vegetables). Massage until they release juices.
3. Pack the Jar:
- Tightly pack the mixture into sterilized jars. Ensure the brine covers the vegetables entirely.
4. Ferment:
- Cover with a weight to keep vegetables submerged.
- Ferment at room temperature (18–22°C/65–72°F) for 1–2 weeks or longer for a tangier result.
Why This Mix Works
- Cabbage: Provides a strong base for fermentation.
- Carrots and Beets: Add sweetness and a pop of color.
- Jerusalem Artichokes: Offer prebiotic inulin, feeding beneficial gut bacteria.
- Seaweed: Boosts umami and supplies trace minerals like iodine.
Here are additional tips for fermenting your sauerkraut with seaweed and veggies, along with storage ideas and suggestions to optimize flavor and nutrition.
Fermentation Tips
1. Maintain the Right Salt Level:
- Stick to 2% salt by weight of the vegetables. Too little salt can encourage spoilage; too much slows fermentation.
- If in doubt, use a kitchen scale to weigh your veggies and calculate the salt.
2. Packing the Jar:
- Use a fermentation weight (a glass disk, ceramic weight, or even a clean, small jar) to keep the vegetables submerged.
- If you don’t have enough brine, make extra by dissolving 2 teaspoons of salt in 1 cup of water.
3. Fermentation Temperature:
- Ideal range: 18–22°C (65–72°F). Lower temperatures will slow the process; higher may encourage mold or over-fermentation.
4. Check Daily:
- Press the vegetables down if they float above the brine.
- Remove any scum (kahm yeast) that might form—it’s harmless but can alter flavor if left too long.
5. Taste Regularly:
- Start tasting after 5–7 days. Once it reaches your desired tanginess, transfer to the fridge to slow fermentation.
Storage Suggestions
1. Refrigeration:
- After fermentation, sauerkraut can be stored in the fridge for 3–6 months. The cold temperature slows down microbial activity, preserving flavor and texture.
2.Keep It Submerged:
- Even in storage, ensure the kraut stays under the brine to prevent spoilage. Top off with salted water if necessary.
3. Check for Mold:
- If stored properly, mold is rare. If mold does appear, remove it along with the affected kraut. The rest is usually safe.
Additional Flavor Combinations
Expand your recipe with these spice and vegetable additions for unique twists:
1. **Citrus Peel (Lemon or Orange): Adds brightness that pairs beautifully with beets and carrots.
2. Fresh Herbs (Dill, Parsley, or Cilantro): Add just before refrigeration for a fresh herbal flavor.
3. Onion or Shallots (Thinly Sliced): For a sharp, savory note.
4. Horseradish Root (Grated): Adds a zesty kick and acts as a natural preservative.
5. Apple Slices: Balances the tartness with natural sweetness.
Enhancing Nutrition
1. Seaweed Benefits:
- Provides iodine, calcium, and magnesium. It also improves gut health by feeding beneficial bacteria during fermentation.
- Avoid overusing if iodine-sensitive (especially with kelp).
2. Jerusalem Artichokes as Prebiotics:
- These are rich in inulin, which supports healthy gut flora. They’re an excellent addition to enhance the probiotic effects of sauerkraut.
3. Carrots and Beets:
- Their natural sugars feed lactic acid bacteria, ensuring a healthy fermentation process.
Troubleshooting Common Issues
1. Brine Level Drops:
- Add more salted water to keep vegetables submerged.
2. Too Salty:
- Rinse before eating or dilute with fresh shredded vegetables.
3. Fermentation Smells Odd:
- A sour smell is normal, but strong rotting odors suggest contamination. Always use clean tools and jars.
4. Soft Texture:
- Softer kraut can result from using older vegetables or fermenting too long at high temperatures. Use fresh produce and monitor fermentation time.
Adding Seaweed to Kimchi
Seaweed pairs well with the spicy and tangy flavors of kimchi. It adds depth and additional probiotics as it ferments.
It can be a fantastic addition to either recipe, providing extra nutrients, umami flavor, and health benefits! Here's how to incorporate it:
Types of Seaweed to Use:
- Wakame: Soft and mild; rehydrate before use.
- Kelp (Kombu): Rich in umami; slice thinly after rehydrating.
- Nori: Crumbled or shredded, it’s less common but adds a mild flavor.
How to Incorporate Seaweed:
1. Rehydrate (if needed): Soak dried seaweed in water for 5–10 minutes until soft. Drain and chop into bite-sized pieces.
2. Mix with Ingredients: Add the seaweed to the salted green tomatoes during the mixing step. Ensure it’s evenly coated with the kimchi paste.
3. Fermentation Tip: Seaweed softens during fermentation, so use sparingly if you want a firmer texture in your kimchi.
Proportions: For every 1 kg (2.2 lbs) of tomatoes, use about 1/4 to 1/2 cup of rehydrated seaweed. Adjust based on your taste preferences.
Adding Seaweed to Vinegar-Brined Green Tomatoes
Seaweed can infuse the brine with minerals and subtle umami.
How to Use Seaweed in Brining:
1. Dried Strips: Add a strip of dried kombu (5–10 cm) directly to the jar with the tomatoes. It will hydrate in the brine and release flavor.
2. Shredded or Chopped: Rehydrate seaweed and layer it with the tomatoes for even distribution.
Proportions:
- 1 small strip (5 cm) of kombu or 2 tablespoons of shredded rehydrated seaweed per quart (liter) jar.
Flavor Tip:
- Seaweed will impart a mild savory note. If you prefer a more intense flavor, leave the kombu in the brine for the first week, then remove it to avoid overpowering.
Nutritional and Flavor Benefits of Seaweed
- Minerals: Seaweed is rich in iodine, calcium, magnesium, and potassium, enhancing the nutritional value of your fermented or brined food.
- Umami: Adds depth to both kimchi and pickles, making them more savory and satisfying.
- Probiotic-Friendly: Seaweed provides polysaccharides that feed beneficial microbes during fermentation, boosting their activity.
Making Green Tomatoes in a Big Jar and Transferring Later
You also can make your green tomato ferment in a big jar and transfer it to smaller jars after two weeks. This method works well if you want to manage space or distribute your batch. Additionally, using olive oil as a barrier can be an effective preservation method, especially when refrigeration isn't available. Here are detailed steps and considerations:
1. Primary Fermentation in the Big Jar:
- Use a fermentation weight or press to keep the green tomatoes submerged under the brine.
- Ferment at a consistent, cool temperature (around 10–18°C or 50–65°F is ideal).
2. Transfer After Two Weeks:
- After the initial fermentation (1–2 weeks), transfer the tomatoes to smaller sterilized jars.
- Ensure all contents, including brine, are packed tightly with no air gaps.
3. Avoid Cross-Contamination:
- Use clean utensils for transferring and avoid handling the tomatoes directly with your hands.
Using Olive Oil as a Preservation Layer
Olive oil can act as a barrier to oxygen, reducing the risk of spoilage and extending shelf life. However, it has some considerations:
1. How to Add Olive Oil:
- After transferring to smaller jars, pour a layer of 1–2 cm (about 1 inch) of olive oil on top of the tomatoes or kimchi.
- The oil should completely cover the brine and vegetables to block oxygen.
2. Key Considerations:
- Prevent Mixing: Do not stir or shake the jars after adding the oil, as this may introduce oxygen.
- Monitor the Oil Layer: Over time, some brine may seep through the oil, reducing its effectiveness. If this happens, carefully add more oil to maintain the seal.
3. Preservation Benefits:
- The olive oil layer helps prevent mold and slows down the oxidation process.
- It’s particularly effective for long-term storage in cool, stable conditions.
Storage Without Refrigeration
1. Cool Winter Temperatures:
- Store the jars in a consistently cool and dark place, such as a cellar, pantry, or unheated room.
- Ideal temperature: 5–10°C (40–50°F).
2. Inspect Regularly:
- Check the jars weekly for any signs of spoilage, such as mold or an off smell.
- Ensure that the vegetables remain submerged under the brine and oil.
Tips for Better Preservation
1. Use a High-Salt Brine:
- Salt not only aids fermentation but also helps preserve the ferment. Use 2–3% salt by weight of water for brining.
- Example: For 1 liter of water, dissolve 20–30 g of salt.
2. Avoid Introducing Contaminants:
- Use sterilized jars, clean utensils, and keep the ferment covered at all times.
3. Label Your Jars:
- Note the date of fermentation and transfer to track their progress.
4. Taste Before Use:
- Before consuming, check for flavor and texture. A tangy and slightly fizzy taste is normal, but an off-putting smell or slimy texture indicates spoilage.
Preserving Green Tomatoes in a Vinegar Brine
A vinegar-based method offers a tangy, shelf-stable alternative.
Ingredients
- 1 kg (2.2 lbs) green tomatoes (quartered or sliced).
- 1 cup vinegar (white, apple cider, or your preference).
- 1 cup water.
- 1–2 tablespoons salt.
- 2–3 garlic cloves (smashed).
- 1 teaspoon black peppercorns.
- 1–2 teaspoons mustard seeds, dill seeds, or your favorite pickling spices.
Steps
1. Prepare the Tomatoes:
- Pack the green tomatoes tightly into sterilized jars. Add garlic and spices to each jar.
2. Make the Brine:
- Combine vinegar, water, and salt in a saucepan. Heat until the salt dissolves.
3. Pour and Seal:
- Pour the hot brine over the tomatoes, leaving about 1 cm (1/2 inch) of headspace. Ensure tomatoes are fully submerged.
- Seal jars with sterilized lids.
4. Storage:
- Allow to cool to room temperature, then refrigerate. For longer shelf life, process jars in a water bath for 10 minutes.
5. Flavor Development:
- Let the tomatoes sit for at least a week before eating to allow the flavors to meld.
Key Considerations
- For Kimchi: The tanginess and spice will develop over time. Adjust seasonings like chili and garlic to suit your taste.
- For Vinegar Brine: A mix of 50% vinegar and 50% water gives a balanced tangy flavor while being safe for preservation.
Preservation with Dry Salting
Using 2% salt based on the weight of the tomatoes (dry salting) will result in a saltier ferment compared to a brine-based method. Here's how this affects preservation and flavor:
1. Higher Salt Content = Longer Preservation:
- Using 2% salt directly on the tomatoes draws out their water, creating a natural brine.
- The higher overall salt concentration inhibits unwanted microbial growth, extending the ferment's shelf life.
2. Less Risk of Spoilage:
- Dry salting is especially useful in warmer climates or when refrigeration isn’t available because it creates an environment less hospitable to harmful bacteria and mold.
Flavor and Texture Considerations
1. Saltiness:
- The final product will likely taste saltier, which may be less appealing if you're consuming the tomatoes directly.
- This saltiness can be reduced by rinsing the tomatoes before eating, but this also removes some of the beneficial lactic acid and brine flavor.
2. Texture:
- Tomatoes fermented with dry salting may retain a firmer texture since the salt directly draws moisture from the tomatoes.
When to Use Dry Salting vs. Brine
- Dry Salting (2% of Tomato Weight):
- Best for small batches, quick fermenting, or if you’re okay with a saltier product.
- Ideal for climates where preserving longer is critical due to unreliable storage conditions.
- Brining (2–3% Salt by Water Weight):
- Better for larger batches and more balanced flavor.
- Allows for more consistent fermentation and a milder, tangier final product.
Tips for Longer Preservation
1. Add Olive Oil Layer:
- Regardless of the method, topping your jar with olive oil after fermentation can further extend preservation.
2. Store in a Cool Environment:
- Without refrigeration, keep the jars in a stable, cool place like a cellar or shaded outdoor spot (5–10°C or 40–50°F).
Recommendation
If long-term preservation is your priority, dry salting (2% salt of the tomato weight) is more reliable. However, if you're aiming for a milder flavor and plan to consume the tomatoes within a few months, brining with 2–3% salt by water weight is a better choice.
Here’s a step-by-step comparison of the dry salting method vs. the brine method for fermenting green tomatoes, so you can choose the one that best suits your needs:
Dry Salting Method
1. Ingredients Needed:
- Green tomatoes
- Salt (2% of the tomato weight)
- Optional: spices, garlic, herbs, and seaweed
2. Steps:
1. Weigh your tomatoes (e.g., 2 kg of tomatoes = 40 g of salt).
2. Wash and dry the tomatoes. Cut into slices or quarters if desired for faster brine formation.
3. Sprinkle the measured salt evenly over the tomatoes. Add any spices or herbs.
4. Massage the salt gently into the tomatoes to help draw out their natural juices.
5. Pack the salted tomatoes tightly into a sterilized jar, pressing down to release more liquid.
6. Use a weight to keep the tomatoes submerged in their own brine (formed from the drawn-out moisture).
7. Seal loosely to allow gases to escape or use an airlock lid.
8. Ferment for 7–14 days in a cool, dark spot (18–22°C/65–72°F).
9. Transfer to smaller jars for storage if needed, and optionally top with olive oil for preservation.
3. Pros:
- No need to calculate brine water.
- Creates a concentrated flavor and firmer texture.
- Effective for long-term preservation.
4. Cons:
- Saltier flavor; may require rinsing before eating.
- Slower fermentation compared to brining.
Brine Method
1. Ingredients Needed:
- Green tomatoes
- Salt (2–3% of the water weight)
- Water
- Optional: spices, garlic, herbs, and seaweed
2. Steps:
1. Estimate the amount of water needed to cover your tomatoes (e.g., 1 liter of water for about 2 kg of tomatoes).
2. Dissolve 20–30 g of salt per liter of water to make the brine.
3. Wash and dry the tomatoes. Cut into slices or quarters if desired.
4. Pack the tomatoes tightly into a sterilized jar, layering with spices or herbs.
5. Pour the brine over the tomatoes, ensuring they’re fully submerged.
6. Use a fermentation weight or a small jar to keep the tomatoes under the brine.
7. Seal loosely to allow gases to escape or use an airlock lid.
8. Ferment for 5–14 days in a cool, dark spot (18–22°C/65–72°F).
9. Transfer to smaller jars for storage if needed, and optionally top with olive oil for preservation.
3. Pros:
- Milder flavor with balanced saltiness.
- Faster fermentation due to the salt-water environment.
- Easier to adjust salt levels by adding or diluting brine.
4. Cons:
- Requires pre-measuring water and salt for the brine.
- Slightly less effective for long-term preservation in warm conditions.
Key Differences
| Feature | Dry Salting | Brining |
|-----------------------------|----------------------------------------|----------------------------------------|
| Salt Level | 2% of tomato weight | 2–3% of water weight |
| Flavor | Saltier, more intense | Milder, tangy |
| Texture | Firmer | Slightly softer |
| Preparation Complexity | Simpler (no brine calculation) | Requires making brine |
| Preservation Duration | Longer without refrigeration | Requires cooler conditions for storage|
| Ease of Adjustments| Harder to fix if too salty | Easy to dilute or add brine if needed |
Which Method Should You Use?
- Dry Salting:
Use if long-term preservation and firmer texture are your priorities, or if you’re in a warm climate without refrigeration.
- Brining:
Use if you prefer a milder flavor, want faster fermentation, or have cooler conditions for storage.
2 notes
·
View notes
Text
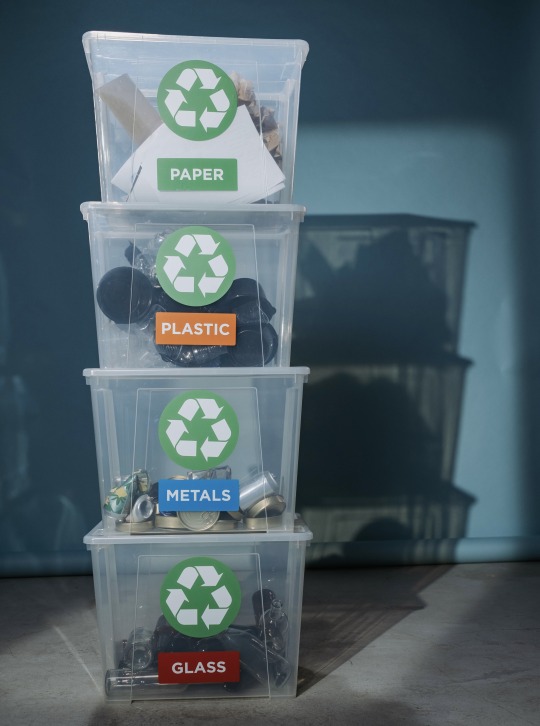
The 3 R's of Waste Management
Reduce, reuse, and recycle.

The 3 R's are the necessary foundations of conservation and waste management techniques for a more sustainable lifestyle.
Sustainability, in its environmental definition, is the ability to maintain conditions supporting biological life on Earth by preserving natural resources. The continued prevalence of diminished natural resources due to the rise in greenhouse gas emissions, such as carbon dioxide and methane, from human activity over the past decades has impacted our course of sustainability on planet Earth. However, reducing, reusing, and recycling materials will lessen energy consumption instead of mining, extracting, and producing new goods with raw materials. These forms of waste management will allow trees to be planted in areas to lessen the carbon dioxide in the atmosphere that would otherwise be used as landfills for trash.
Reduce
Overconsumption of products that yield mass amounts of trash can contribute to the problem that waste management is trying to fix. Being aware of the issue at its roots and diminishing the need to throw away items can better sustain and handle the waste output that one is producing. Reducing the amount of discarded waste can also lessen the need to reuse or recycle items constantly.
Some ways to reduce and use preventative measures are to:
use reusable forms of everyday daily items such as reusable beeswax food wraps, washable utensils, electric lighters, metal razors, and recycled grocery bags
compost compostable foods at compost centers in your state
shop at zero-waste grocery stores in your state
avoid throwaway items such as single-use cutlery and dishes
replace paper items with fabric or cloth options such as fabric napkins, dishcloths, and cotton paper towels
buy products in bulk as opposed to small, single-use containers
Reuse
Often, it can be easy to discard packaging or items that no longer work or have a use for them. Instead, one should put creativity into practice when thinking of ways to reuse an object instead of throwing it out entirely and increasing waste output.
Some ways to reuse common thrown-away items are to:
turn used milk, coffee, juice, and water cartons into birdhouses
grow seedlings in empty egg cartons
use empty plastic milk jugs for your garden in creative ways
clean out glass jars or containers and repurpose them as a storage component
sell or donate old clothes, furniture, appliances, etc., to those who can use it
reuse grocery bags to cover small trashcans or on your next trip to the store
utilize newspaper as a way to cushion fragile items for storage
use leftover wood as fuel for bonfires
donate old notebooks and books for children who are in need of them

Recycle ♻️
At times, it can be easier to throw away used goods rather than recycle them and allow them to redirect potential waste from landfills, conserve energy, and reduce the need to extract new materials for new products. According to the EPA, "recycling one ton of paper would save enough energy to power the average American home for six months, save 7,000 gallons of water, save 3.3 cubic yards of landfill space, and reduce greenhouse gas emissions by one metric ton of carbon equivalent (MTCE)."
Some ways to get started with recycling items can be to:
buy items that are made with recycled materials so that once it is used up, you can recycle them and restart the process
educate yourself on the plastic recycling symbols and learn what they mean and if they can be recycled
be aware of the fact that not all plastics can be recycled at certain facilities
clean out hazardous/unrecyclable contents before recycling items
choose to buy things that are made with water-soluble solutions instead of chemical-based solvents
look out for materials that local recycling facilities are accepting, and start collecting recyclable items
use public blue bins that indicate if they accept paper, glass, or plastic for an easy-access recycling system
Efforts to start being sustainable might seem to make a slight difference amongst the tons of trash thrown away daily, but having one person reuse, reduce, and recycle, can make a big difference in a healthier Earth.
Sources
“3rs - Reduce, Reuse & Recycle.” SustainableSA.Com, 2 Aug. 2016, www.sustainablesanantonio.com/practices-technology/reduce-reuse-recycle/.
“Basic Information Details | Paper Recycling.” United States Environmental Protection Agency, 21 Feb. 2016, archive.epa.gov/wastes/conserve/materials/paper/web/html/index-2.html.
“Climate Change Indicators.” United States Environmental Protection Agency, 1 Aug. 2022, www.epa.gov/climate-indicators/greenhouse-gases.
“Climate Change, Recycling, and Waste Prevention.” Climate Change, Recycling and Waste Prevention from King County’s Solid Waste Division - King County, kingcounty.gov/depts/dnrp/solid-waste/programs/climate/climate-change-recycling.aspx. Accessed 1 July 2023.
Fahad. “3 R’s of Environment - Reduce, Reuse, Recycle.” Earth Reminder, 4 Jan. 2020, www.earthreminder.com/3rs-of-environment-reduce-reuse-recycle/.
#environment#recycle#reduce#earth#epa#environmentalism#climate change#climate justice#recycle reuse renew rethink#reusedmaterials#reduce reuse recycle#ecofriendly#sustainability#sustainable#recycled#environmetalists
8 notes
·
View notes
Text

A little thrift store haul. Need more storage for all my baking goods so that's good. We use bulk powdered laundry soap now too so I'll use a canister for that. Finally have a cappuccino cup in my mug collection. A basket to store onions and garlic. The glass jar has a tight seal and I think I'm gonna use it as a nightstand water jug! Especially for guests that way they don't have to get up at night, idk. Some more all cotton placemats for our table. They're beige and sage which matches the gardening theme dining set we scored last month. An odd shaped mason jar. And last, a white porcelain bowl to maybe use as a baked-goods servingware or a gift. $16 for everything.
5 notes
·
View notes
Text


-->However, by the time Victor got his Snapbucha and put it into the drinks fridge, everyone was pretty worn out and the hour was getting late. So I sent everyone back home to start recuperating. Victor headed inside and grabbed some choripán for dinner; Smiler started fixing busted wind turbines --
And I suddenly remembered, "Oh yeah, Alice has some books in her inventory she needs to publish! Let's get those out into the world!" So she dropped her latest two novels, "The Corruption of Wonderland" and "Vorpal Rhymes," into the mailbox. Hopefully the Sim community at large likes them!
-->With her books on the way to the publisher, a hungry Alice decided it was time to "find" some meat and transformed into her beast form for a hunt -- followed by Kelly, who desired a night on the town. XD Victor, having finished his dinner, headed to the greenhouse to tend his bees and grab some honey, and hit a plant with some Floralorial to spare himself having to weed it. XD He then headed off to bed while Smiler finished up their turbine repairs and raided the resultant junk piles for parts --
-->And then, I spotted some catchable fireflies near the side of the house! :D I've been waiting for these to spawn for AGES! I promptly had Smiler grab them, which put three of the little glowy buggers in their inventory. Nice -- finally, Smiler can start making Sadness Alleviation Lotions to add to their stores of herbalism potions in the store! Always good to have more product. :) With that sorted, Smiler proceeded to the robot workbench to make chatterbots, because need more product THERE too. Alice returned from her hunt and went to hang out with them for a while as she ate her steak...
-->But uh-oh, what's this on the front porch? Seems a visiting old lady (who I suspected of being a sneaky vampire) was being menaced by a particularly angry specter! Fortunately, Alice had a nice painting in her inventory that she could present to the angry blob. . .and even more fortunately, said angry blob liked it, departing from the premises and paying Alice back in another forbidden candy jar! I know you don't usually like sweets, Alice, but I think you'd better accept these ones. XD
-->With that, all that remained was for Alice to head upstairs, lick herself clean, change back to herself, and head to bed to join Victor while Smiler continued making bots and mechanisms (watched over by Shadow)...but the amazing bed meant that the pair were soon up again. Spotting that the phonograph in the living room was broken, I had Victor repair it (the traditional way -- I clicked on the option by accident, but then was like, "Well, he DOES like Handiness") while Alice emptied out the storage in the litter boxes, then both of them joined Smiler in the crafting barn -- Victor to experiment with potion brewing, Alice to use the bulk processor at home to make some sugar for future canning purposes. Keeping busy, as they always do!
And with that, this episode comes to an end! Next time -- it's the day before Harvestfest, and Victor has a magical trip to make...
#sims 4#the lazy save#victor van dort#alice liddell#smiler always#yeah I almost forgot to publish those novels!#gotta make sure Alice keeps making the moolah from her books#and I found Kelly 'following' Alice out on the hunt to be very cute indeed :)#they're going hunting together!#and yes finally fireflies#they need so many things for their damn potions that they don't have#and fireflies were one of them#so cross THAT off the list for a change yay#and I don't know where that old lady or that red specter came from#but I'm kind of amused by the idea that the lady was a vampire getting ready to creep on Victor#only to discover the house is very very haunted#and also contains a werewolf XD#welp not gonna hit THIS place again for a midnight snack! XD#queued
2 notes
·
View notes
Text
Magical Oil Recipes - Glamour Edition

For anyone looking to brew up some magic related to glamours, confidence, physical appearance, or eloquence, here are some recipes I’ve created that you might find useful.
To prepare them, blend the ingredients in such proportions as feels correct for your purposes (or as supplies allow). Use dried material except where indicated. Place a few spoonfuls in a mason jar with a screwtop lid and fill the jar with a bland oil of your choice. (Vegetable oil of the sort you would buy for cooking works fine.) Screw the lid on tightly and shake well to combine, then leave the jar in a dark dry place for 2-4 weeks to steep.
Once steeped, prepare a clean storage bottle (also with a secure lid) and label with the type of oil and the bottling date. Strain the oil through paper towels or cheesecloth to remove the plant material, then bottle immediately. Store away from sunlight and heat for up to one year. Use for spellwork as you see fit.
(Please note that NONE of these potions are meant to be taken internally by any means. Observe all proper safety measures related to glass, fire, and potentially harmful plants as necessary during preparation.)
*- Ingredient is potentially harmful if inhaled or ingested. **- Ingredient should not be used or handled if you are pregnant or nursing.
Belle of the Ball Beauty Oil For beauty glamours.
Orange Peel
Magnolia Petal
Maidenhair Fern
Primrose Blossoms**
Brand New Me Transformation Oil For self-improvement, physical changes, or personal growth.
Fennel
Lady's Mantle**
Pine Needles
Geranium Essential Oil Note: If your personal journey includes adjusting to a change in gender or sexuality, add a few Persimmon seeds to the mix.
Honeytongue Eloquence Oil For verbal persuasion and effective speech.
Honeysuckle
Orris Root
Licorice Root
Marshmallow Root** Note: Do not consume.
Increase the Thing Empowerment Oil For self-empowerment and glamours pertaining thereto.
Petunia Petals
Bergamot
Lemon Verbena
Sunflower Petals
It Wasn't Me Diversion Oil For diverting suspicion from yourself or your actions.
Dogbane (Black Hemp)
Cherry Bark
Blueberry Leaves
Marshmallow Root**
Lionheart Courage Oil For bravery and confidence spells.
Black Tea Leaves
Bay Leaf
Cedar Tips
Thyme Sprigs
Own the Runway Confidence Oil For supreme confidence.
Yarrow**
Sumac Berries
Ginger Root, Fresh
Pass Unseen Stealth Oil For perceived invisibility glamours.
Cherry Bark or Blossoms
Poppy Seeds**
Devil's Shoestring**
Dogwood Blossoms (if available)
Tearoom Forbearance Oil For when you need to keep your temper…no matter what.
Tea Leaves
Meadowsweet**
Echinacea**
Fir Balsam Essential Oil
Should the reader require supplies, I recommend the following:
Penn Herb Company
Starwest Botanicals
Bulk Apothecary
Mountain Rose Herbs
Specialty Bottle
Photo Credit - VeraPetruk
All recipes are © 2017 Bree NicGarran, published in Pestlework: A Book of Magical Powders & Oils. Please check out the book if you would like more recipes.
If you’re enjoying my content, please feel free to drop a little something in the tip jar, tune in to my podcast Hex Positive, or check out my published works on Amazon or in the Willow Wings Witch Shop.
410 notes
·
View notes
Text
How Much Does 1kg Buffalo Desi Ghee Cost? Full Price List
In today’s health-conscious world, traditional food products like desi ghee are making a massive comeback in Indian kitchens and health routines. Among the many varieties, buffalo desi ghee holds a special place for its rich texture, high nutritional value, and deeper flavor profile. Whether you're a homemaker looking for everyday cooking essentials, a fitness enthusiast choosing healthy fats, or a gourmet chef aiming for authenticity, understanding the buffalo desi ghee price 1kg can help you make better buying decisions.
Ghee has been a part of Indian culinary traditions for centuries. While cow ghee is widely popular, buffalo ghee offers a unique set of benefits that make it equally desirable. It is known for its thicker consistency, stronger aroma, and higher fat content, making it ideal for frying, deep-cooking, and long-term storage. With more consumers shifting toward traditional and nutrient-rich options, the demand for pure desi buffalo ghee is on the rise.
Why Choose Buffalo Desi Ghee Over Other Variants?
Buffalo desi ghee is derived from the milk of domesticated buffaloes. Its distinctive composition offers not just taste but also health benefits. Higher in fat and with a whiter, creamier look, buffalo ghee has been praised for its ability to provide sustained energy and boost immunity. This ghee is especially preferred in Indian households for preparing festive sweets and elaborate dishes that require a bold and hearty flavor.
At DCGhee, we prioritize purity and tradition in our ghee production process. Our buffalo cow ghee is made using traditional bilona methods, ensuring that every spoonful carries authentic aroma and nutritional goodness. When you're evaluating options in the market, knowing the buffalo ghee price 1kg and the associated value is essential. Price can vary significantly depending on the quality, sourcing, and brand reputation.
What Affects the Price of 1kg Buffalo Desi Ghee?
The cost of 1kg buffalo desi ghee varies across India due to several influencing factors. Firstly, the quality of milk used in ghee production plays a significant role. Buffalo milk with a higher fat content yields more ghee, but also demands more careful processing. This naturally affects the overall cost. Brands that use organic, hormone-free milk or traditional methods tend to price their products higher, but also offer unmatched purity.
Secondly, packaging and branding are essential contributors. A premium brand like DCGhee, for instance, invests in hygienic packaging, quality testing, and certified organic processes. All these efforts ensure a top-tier product, which justifies a slightly higher buffalo desi ghee price 1kg compared to generic alternatives available in the market.
Also, regional factors influence pricing. Rural or local markets may offer slightly lower rates, but buyers need to verify the authenticity of the ghee. In contrast, online platforms offer convenience, genuine reviews, and certified products — albeit with a minor markup due to shipping and branding.
DCGhee’s Full Price List for Buffalo Desi Ghee
When looking at buffalo ghee price 1kg, it’s important to understand the variation in rates between local dairies, retail stores, and trusted brands like DCGhee. On average, a quality 1kg jar of pure desi buffalo ghee can range between ₹600 to ₹1200, depending on its origin and preparation process.
DCGhee offers premium-grade buffalo desi ghee that falls within this range. We maintain full transparency in sourcing and production. Every 1kg jar of DCGhee ghee comes from carefully selected farms and is tested for purity before it reaches your kitchen. Customers prefer our ghee not just for its flavor, but for the peace of mind that comes with a trusted brand name. With DCGhee, the price you pay ensures you're getting authentic buffalo cow ghee, free from additives and chemicals.
We also offer seasonal discounts and bulk purchase offers, making it easier for families and small businesses to stock up on quality ghee without compromising on affordability. Our subscription-based models also provide cost benefits to regular customers, keeping the buffalo desi ghee price 1kg consistent throughout the year.
How to Identify Quality in Buffalo Ghee?
Given the wide range of pricing and brands, it’s crucial to understand what makes a ghee premium or ordinary. Authentic buffalo ghee will have a dense texture, a pleasing white to off-white color, and a bold aroma. Unlike processed or mixed ghee, it will not leave a sticky residue or have artificial fragrance. DCGhee is committed to helping customers identify and access the purest form of ghee.
The bilona method we use is time-intensive but yields the highest quality pure desi buffalo ghee, rich in healthy fats and antioxidants. Moreover, every batch is lab-tested and adheres to FSSAI standards, ensuring that what you consume is as natural as possible.
Comparing the buffalo ghee price 1kg across brands often reveals the truth about their quality. While some may offer suspiciously low prices, they usually compromise on purity or add vegetable oils. This is why informed consumers always trust reputed brands like DCGhee to maintain both quality and transparency.
Buying Options: Online vs. Offline
With changing consumer preferences, more people are shifting to online platforms to purchase ghee. This shift brings advantages like product reviews, return policies, and doorstep delivery. DCGhee has a robust online presence that enables customers to buy their favorite buffalo cow ghee from the comfort of their homes. Our official website offers a complete catalog, including price breakdowns for different sizes and bulk packaging.
However, offline availability still exists for those who prefer checking products physically before purchasing. DCGhee is expanding its retail presence in select cities to make sure that even local buyers can enjoy our premium ghee. Whether you shop online or offline, the buffalo desi ghee price 1kg remains consistent, maintaining value and trust.
Conclusion
Understanding the buffalo desi ghee price 1kg is not just about comparing numbers — it’s about recognizing the quality and effort that go into every jar. With a growing focus on traditional food and wellness, choosing the right brand becomes essential. DCGhee proudly stands at the intersection of purity, tradition, and affordability, delivering authentic buffalo ghee to every Indian home.
Whether you're seeking everyday nutrition, rich festive cooking, or a supplement to your balanced diet, our ghee offers exceptional value. As you explore your options, remember that true quality reflects in both taste and health — and DCGhee promises both. For the most accurate and transparent pricing on buffalo cow ghee, always choose a brand that values its customers as much as its product. DCGhee invites you to discover the difference in every spoonful.
0 notes
Text
Ezeepack’s Plastic Jars for Dry Fruits: The Smart Storage Solution
Storing dry fruits isn’t just about placing them in a box; it’s about keeping them fresh and easily accessible. For bakers and home bakers who require top-quality ingredients, Ezeepack’s plastic jars for dry fruits are a game changer. These jars are strong, stylish, and practical, making them perfect for professional bakers.
Ezeepack: Your Partner in Smart Storage
Ezeepack: Your Storage Partner Ezeepack knows how important it is for bakers to keep their ingredients fresh and ready to use. That’s why their plastic jars are designed to make storage practical and pretty. These jars lock in freshness, keep moisture out and make your workspace look neat and tidy. With Ezeepack you get storage that’s as reliable as it is beautiful.
Here is how Ezeepack stands out:

Strong and airtight Design
Ezeepack jars are designed to last longer for your dry fruits. The airtight seal does not allow moisture from the environment, thus keeping your ingredients fresher and flavorful. Food-grade materials, so long-lasting in use and hence ideal for commercial purposes.
Clear Transparent Appearance Ezeepack plastic jars for dry fruits come in a clear design, so it's easy to see what's inside, giving your space a tidy and professional look. Their sleek and simple design keeps your workspace clean and organized.


Sizes to Suit Every Need
All bakers have their special needs and Ezeepack is there to serve all of them. Whether the small jar size for cookies or large-sized jars for bulk dry fruits, the size will certainly be met here. The quality will not compromise with flexibility by the customized options.
Why to Choose Ezeepack Plastic Jars?
High-Quality Materials
Ezeepack jars are made from BPA-free, food-safe plastics. This is to ensure that your ingredients are safe and hygienic. They are also break-resistant and can provide long-lasting service even under the most demanding handling conditions.
Lightweight and Portable
The lightweight design of Ezeepack's jars makes them easy to handle, transport and store. Whether you’re stocking up on cookies or storing raisins for cupcakes, these jars make the process seamless and hassle-free.
Professional Appeal
As a baker or home baker, your packaging is a reflection of your brand. Ezeepack plastic jars for dry fruits will enhance the general look of your setup while ensuring functionality. Impress your clients with neatly stored, high-quality ingredients every time.
Elevate Your Baking Business with Ezeepack
To the baker and home bakers, dry fruits are much more than an ingredient-it defines the taste and quality. The Ezeepack jars store ingredients reliably to protect them from spoilage, but at the same time display the contents with style.
Imagine this: A customer walks into your workspace and sees that your ingredients are stored in professional-grade jars. The aesthetic appeal, coupled with the smell of freshly baked goods, is a lasting impression. This detail shows your commitment to quality and raises your brand in the eyes of your customers.
How Ezeepack Assists Bakers
The dry fruits plastic jars of Ezeepack can be more than a storage facility. They become an aid for maintaining the quality of your product. Air and moisture are what it will prevent you from exposing the ingredients to so that you can hold on to all that flavor and texture in your baked goods.
· Preserving Precious Ingredients
Ezeepack jars retain all the natural oils and crunch of nuts for bakers using high-quality almonds, walnuts, or cashews in their recipes.
Ezeepack's Quality Commitment
As a leader in packaging solutions, Ezeepack is committed to offering products of the highest quality and safety standards. Each jar undergoes a series of tests to ensure that it would serve the needs of professionals. With Ezeepack, you also get professional advice to help you select the best solutions for your storage requirements.
Why Packaging Matters for Bakers
In the baking industry, proper storage is a factor so important that it has a direct bearing on the taste and quality of your creations. Professional-grade plastic jars for dry fruits mean your ingredients will stay fresh and flavorful so you can deliver fantastic results every time.
Consclusion
Ezeepack plastic jars for dry fruits are to be considered by any serious baker or homemaker with a nagging concern on quality, convenience and style. Innovative in designs, material quality and to the upmost commitment to excellence, Ezeepack is to help bring your baking business to that next level.
0 notes
Text
4 oz Tall Flint Glass CRC Jar with Black Child-Resistant Lids – Pack of 100

Secure and stylish, these 4 oz tall flint glass jars are ideal for packaging cannabis, herbs, edibles, and concentrates. Made from durable, clear flint glass, each jar includes a black child-resistant cap that meets compliance standards while maintaining a sleek look. The tall design maximizes shelf presence and provides ample space for labeling. This bulk pack of 100 offers a reliable storage solution for dispensaries, processors, and brands focused on both safety and presentation. Designed to preserve freshness and aroma, these jars deliver dependable product containment for commercial use.
Order now from: www.innovativesourcing.com to keep your products fresh, and professionally packaged.
0 notes
Text
Vacuum Canisters: Transforming Kitchen Storage with SealVax
In the quest for fresher, longer-lasting food, vacuum canisters have emerged as a game-changer for modern kitchens. These innovative storage solutions, exemplified by SealVax’s VOYD Vacuum Canisters (www.sealvax.com), use advanced vacuum-seal technology to preserve dry goods like coffee, nuts, and pasta up to five times longer than traditional containers. By removing air and preventing oxidation, vacuum canisters maintain flavor, texture, and nutrients, reducing food waste and enhancing pantry organization. This article delves into the features, benefits, applications, and sustainability of SealVax VOYD Vacuum Canisters, showcasing why they’re a must-have for eco-conscious, organized households.

What Are Vacuum Canisters?
Vacuum canisters are airtight containers that use a vacuum-sealing mechanism to remove air, creating an oxygen-free environment that slows spoilage. Unlike standard jars or plastic containers, SealVax VOYD Vacuum Canisters combine durable borosilicate glass with specially designed lids featuring an indicator button and silicone release valve. Paired with the VOYD Vacuum Device, these canisters seal in just 20 seconds, making them ideal for storing dry foods like cereal, tea, or snacks. SealVax’s commitment to toxin-free, BPA-free materials ensures safety, while their elegant design elevates kitchen aesthetics.
Key Features of SealVax VOYD Vacuum Canisters
SealVax VOYD Vacuum Canisters are engineered for performance and ease, with features that set them apart:
Rapid Vacuum Sealing: The battery-powered VOYD Vacuum Device seals canisters in 20 seconds, with a magnetic alignment for precise operation.
Indicator Button: A visual button sinks when the vacuum is complete, confirming a secure seal for freshness.
Durable Glass Construction: Made from food-grade borosilicate glass, canisters are dishwasher-safe (jars only), non-toxic, and resistant to thermal shock.
Easy-Access Lids: A silicone release valve allows quick opening with a “hiss” sound, ensuring user-friendly access.
Small and Large Sizes: Available in small (for nuts or tea) and large (for pasta or cereal), they suit various storage needs.
Protective Sponge: A washable sponge in the lid prevents debris from clogging the vacuum mechanism, enhancing durability.
Benefits of Vacuum Canisters
SealVax VOYD Vacuum Canisters offer compelling advantages for home cooks, bulk shoppers, and sustainability enthusiasts:
Extended Freshness: By removing air, these canisters keep dry goods fresh up to five times longer, preserving coffee’s aroma or cereal’s crunch for weeks.
Nutrient and Flavor Retention: Vacuum sealing locks in nutrients and flavors, ensuring snacks and ingredients taste as good as day one.
Reduced Food Waste: Longer shelf life means less spoilage, saving money and aligning with SealVax’s eco-friendly mission to minimize waste.
Space-Saving Organization: Stackable glass designs optimize pantry or counter space, transforming storage into a decorative feature.
Eco-Conscious Storage: Reusable, BPA-free, and Global Recycle Standard-certified, these canisters reduce reliance on single-use plastics.
High Perceived Value: Their sleek design and advanced technology make them ideal gifts or premium additions to any kitchen, enhancing user satisfaction.
How to Use SealVax VOYD Vacuum Canisters
Using SealVax VOYD Vacuum Canisters is straightforward and efficient:
Fill the Canister: Add dry goods like coffee, nuts, or pasta, leaving space for the lid to seal properly.
Secure the Lid: Place the lid on, ensuring proper alignment for the vacuum process.
Vacuum Seal: Attach the VOYD Vacuum Device (USB-C rechargeable) and press the power button. Watch the indicator button sink, signaling a complete seal in 20 seconds.
Store: Place in the pantry or on the counter. Canisters are not suited for refrigeration but excel for shelf-stable items.
Open: Press the silicone release valve to break the vacuum, then lift the lid to access contents.
Clean: Wash the glass jar in the dishwasher and hand-wash the lid to protect the vacuum mechanism.
Note: Avoid storing raw mushrooms, garlic, onions, soft cheeses, or freshly cooked vegetables, as they release gases that disrupt the vacuum.
Applications of Vacuum Canisters
SealVax VOYD Vacuum Canisters are versatile, catering to a range of storage needs:
Pantry Organization: Store cereals, grains, snacks, or baking ingredients, keeping them fresh and visually appealing on countertops.
Coffee and Tea Preservation: Maintain the aroma and flavor of coffee beans or loose-leaf tea, as praised by users for keeping coffee “fresher longer.”
Snack Storage: Protect nuts, marshmallows, or chips from going stale, ideal for bulk shoppers or frequent entertainers.
Gift Giving: Their elegant design and practicality make them perfect for holiday gifts, housewarmings, or corporate giveaways.
Travel Storage: Small canisters are portable for camping or picnics, keeping snacks fresh without bulky packaging.
Specialty Ingredients: Store supplement powders or dried herbs, ensuring potency and flavor for health-conscious cooks.
Why Choose SealVax VOYD Vacuum Canisters?
SealVax VOYD Vacuum Canisters outperform traditional storage due to their advanced vacuum technology and sustainable design. The one-touch VOYD Vacuum Device, with its 20-second sealing and indicator button, ensures ease and reliability, unlike manual pump systems that require effort. Borosilicate glass is safer and more durable than plastic alternatives, avoiding harmful chemicals like PTFE, PFOA, or PFAS, which SealVax explicitly avoids. Customer feedback highlights their effectiveness, with one user noting, “The lid is so tight after vacuuming, it’s much better than any other brand I used before.” However, some users find the large canister smaller than expected, holding only half a bag of coffee beans, so checking dimensions is advised.
SealVax’s commitment to sustainability sets it apart. The reusable, recyclable materials and eco-friendly production align with modern environmental values, reducing the 40% of food wasted annually in the U.S. due to spoilage. The 30-day return policy and responsive customer support further enhance trust, addressing issues like occasional vacuum device durability concerns.
Tips for Maximizing Vacuum Canisters
Check Capacity: Verify canister sizes (small or large) to match storage needs, especially for bulk items like pasta.
Use for Dry Goods Only: Avoid wet or gas-releasing foods to maintain the vacuum seal.

Keep Sponge Intact: Retain the lid’s sponge to protect the vacuum mechanism, washing and drying it carefully.
Re-Vacuum After Opening: Reseal after each use to maintain freshness, especially for frequently accessed items like snacks.
Comparison to Traditional Canisters
Traditional canisters, like those from OXO or Rubbermaid, use airtight lids but don’t remove air, allowing oxidation to degrade food over time. SealVax VOYD Vacuum Canisters, with their vacuum-seal technology, extend shelf life significantly, as confirmed by users storing marshmallows and oats for weeks without staleness. While glass competitors like Pyrex are durable, they lack vacuum capabilities, and plastic options may leach chemicals. SealVax’s GRS certification and toxin-free materials offer a safer, greener alternative.
Conclusion: Elevate Your Pantry with SealVax VOYD Vacuum Canisters
SealVax VOYD Vacuum Canisters redefine pantry storage with their vacuum-seal technology, eco-friendly glass, and user-friendly design. Keeping dry goods fresh up to five times longer, they save money, reduce waste, and enhance kitchen aesthetics. From coffee to cereal, these canisters preserve flavor and nutrients, making them ideal for bulk shoppers, gift-givers, or anyone seeking sustainable storage. With the VOYD Vacuum Device’s rapid sealing and SealVax’s commitment to quality, they’re a smart investment for modern kitchens. Visit www.sealvax.com to explore VOYD Canister sets and transform your food storage today.
#vacuum canisters#vacuum container#vacuum seal canister#vacuum storage canister#storage vacuum container
0 notes
Text
How to Store Kratom for Maximum Freshness and Potency
Proper Storage Conditions
Kratom should be stored in a cool, dry place, away from heat, humidity, and direct sunlight. Excessive kratom near me closest exposure to light and moisture can degrade the alkaloids that give Kratom its potency. A dark cupboard or a drawer works well to protect the powder from environmental damage.
Use Airtight Containers
Airtight containers are essential for keeping Kratom fresh. Once the package is opened, store it in a sealed, airtight jar or bag to prevent air from getting in. This prevents oxidation, which can reduce potency and cause the product to lose its effectiveness over time.
Avoid Refrigeration
While it may seem like refrigeration could prolong freshness, it’s actually not ideal for Kratom. The cold can cause moisture to accumulate, especially when taken in and out of the fridge. Instead, keep Kratom at room temperature, in a dry area, to avoid condensation that could spoil the powder.
Limit Exposure to Air
Kratom powder is sensitive to air, and extended exposure can lead to loss of quality. When using Kratom, always seal the container immediately after taking out the amount needed. Avoid leaving the container open for long periods to preserve its potency and prevent contamination from dust or bacteria.
Keep Away from Strong Odors
Kratom can absorb odors from its environment, which can affect the flavor and overall experience. Store Kratom away from strong-smelling substances like cleaning supplies, perfumes, or foods. Keeping it in a neutral-smelling location helps maintain the pure, natural aroma and flavor of the Kratom powder.
Seal Packaging After Use
If you purchase Kratom in bulk or a large package, reseal the packaging tightly after use. Even if the bag seems sealed, the opening can allow air to enter and affect freshness. Use clips or airtight containers to ensure the product is securely stored after every use.
Storage for Capsules and Tablets
Kratom capsules and tablets should also be stored in airtight containers. They’re less susceptible to moisture than powder but can still degrade in quality if exposed to humidity. Keep them in their original packaging or use a small jar to maintain freshness, avoiding heat and sunlight.
Keep Kratom Away from Children and Pets
Like any supplement, Kratom should be stored out of reach of children and pets. Accidental ingestion can be harmful. Store Kratom in a secure, high place or in a locked container to ensure it stays safe from unauthorized access and reduces the risk of ingestion.
Don’t Store Kratom in the Bathroom
While it may seem convenient, storing Kratom in the bathroom is not recommended. Bathrooms are high-humidity environments, and this moisture can affect the quality of the Kratom. The fluctuation in temperature due to showers and baths can also cause condensation, leading to mold growth or potency loss.
Use Smaller Portions for Frequent Users
If you’re a frequent Kratom user, consider splitting your larger bulk supply into smaller portions. Storing smaller portions in individual bags or containers helps reduce the frequency of exposure to air and light. This ensures that the rest of your supply remains fresher for longer periods.
0 notes
Text
Kitchen Remodeling Tips from a Trusted General Contractor in Orange, CA
A kitchen isn’t just a place where meals are prepared—it’s the heart of the home, a space where family and friends gather, memories are made, and functionality meets design. If you're considering a kitchen remodel in Orange, CA, you want to ensure it's done right. As a trusted name in home renovation, Orange General Contractors brings years of experience and insight into what makes a kitchen remodel successful.
Whether you're aiming for a modern upgrade, a more efficient layout, or simply looking to increase your home's value, here are expert kitchen remodeling tips from one of the most reliable general contractors in Orange CA.
1. Plan for Functionality First
Before choosing backsplash tiles or faucet finishes, start with the layout. Think about how you use your kitchen: Do you cook often? Need space for entertaining? Want an island for casual dining or extra storage?
Our experts at Orange General Contractors always emphasize the importance of the “kitchen work triangle”—the efficient positioning of the stove, sink, and refrigerator. A well-designed triangle minimizes steps and makes your kitchen easier to use.
Pro tip: Create clear zones for prepping, cooking, and cleaning to avoid clutter and streamline tasks.
2. Set a Realistic Budget
Kitchen remodels are one of the most valuable home upgrades, but costs can add up quickly. Establishing a budget early helps you prioritize features without overextending.
At Orange General Contractors, we help clients balance quality and cost, recommending materials and solutions that fit their budget while maintaining durability and style. We also help you anticipate hidden expenses like plumbing updates or structural fixes.
3. Invest in Quality Cabinets
Cabinetry often takes up the bulk of your kitchen renovation budget—and for good reason. Cheap cabinets can warp or deteriorate over time, while high-quality cabinetry improves both function and aesthetics.
Opt for hardwood frames, soft-close hinges, and full-extension drawers. Custom cabinetry is a great way to maximize storage in unusual spaces and achieve a tailored look.
As general contractors in Orange CA, we’ve worked with a variety of cabinet manufacturers and can help you select the best option for your needs.
4. Don’t Skimp on Lighting
Lighting can make or break a kitchen design. Ideally, you should have a mix of ambient, task, and accent lighting. Recessed ceiling lights provide overall brightness, pendant lights add personality and focus, while under-cabinet lighting makes food prep safer and more efficient.
Orange General Contractors recommends LED lighting for its energy efficiency and longevity. We also help clients choose lighting styles that complement their overall design, from sleek and modern to rustic and warm.
5. Go for Durable, Low-Maintenance Surfaces
Kitchen surfaces need to handle heat, spills, and heavy use. When it comes to countertops, quartz is a top choice—it’s non-porous, scratch-resistant, and available in a wide variety of colors and patterns.
For flooring, consider materials like luxury vinyl plank (LVP), tile, or engineered hardwood. These offer durability and style without the upkeep of traditional wood floors.
Our team ensures every material is installed to perfection, creating a cohesive and long-lasting kitchen environment.
6. Maximize Storage Smartly
Even a small kitchen can feel spacious with the right storage solutions. Pull-out pantry shelves, lazy Susans, vertical dividers, and toe-kick drawers can help you use every inch wisely.
As experienced general contractors in Orange CA, we’ve helped countless homeowners create smart storage solutions that enhance their daily routines.
Pro tip: Consider ceiling-height cabinets for extra storage and a more dramatic, finished look.
7. Stay True to Your Home’s Style
A modern kitchen in a Spanish-style home can feel jarring. We advise clients to blend modern functionality with design elements that complement their home’s existing architecture.
Whether it’s using warm wood tones, rustic tile, or traditional shaker cabinets, Orange General Contractors helps you create a cohesive look that adds value and style.
8. Hire a Licensed Local Contractor
Perhaps the most important tip: don’t DIY your kitchen remodel unless you’re highly experienced. Mistakes in electrical, plumbing, or structural work can be dangerous and costly.
Hiring a licensed local contractor ensures that your project meets local building codes and runs smoothly. At Orange General Contractors, we’re not just builders—we’re your remodeling partners. We work with you from initial design to final inspection, ensuring your kitchen transformation is seamless and stress-free.
Need proof of our dedication to quality? Just check out Voice of OC and other local platforms where the Orange business community is thriving with trusted names like ours.
9. Think Long-Term Resale Value
While personalization is important, don’t forget the resale factor. Classic finishes like white or neutral cabinetry, stainless steel appliances, and timeless tile patterns tend to attract more buyers if you decide to sell.
Our team advises you on design choices that enhance both your enjoyment and your home’s market appeal.
10. Keep Communication Open
Effective communication with your contractor is essential for a successful remodel. At Orange General Contractors, we prioritize transparency and collaboration. We provide regular updates, clear timelines, and are always available to answer your questions.
We also offer 3D design renderings and mockups, so you can visualize your space before construction even begins. Our goal is to eliminate guesswork and deliver results you’ll love for years to come.
Why Choose Orange General Contractors?
When you’re searching for trusted general contractors in Orange CA, look no further than Orange General Contractors. We’re known for our craftsmanship, customer service, and dedication to excellence.
Whether it’s a complete kitchen overhaul or a simple layout improvement, we approach every project with the same passion and professionalism. Let us help you transform your kitchen into a space that’s beautiful, functional, and truly yours.
Ready to start your dream kitchen remodel? Contact
Orange General Contractors
1100 Town and Country Rd Suite 1125, Orange, CA 92868
(657) 441-0332
https://orangegeneralcontractors.com/

1 note
·
View note