#Cloud Computing Tutorial for Beginners
Explore tagged Tumblr posts
Visit Tumblr Blog
Explore Tumblr blogs with no restrictions, modern design and the best experience.
Last Seen Tumblr Blogs


Fun Fact
Mobile US users spent an average of 115.8 minutes on Tumblr app monthly.
Text
Cloud Computing Tutorial for Newbies: Learn the Fundamentals in Easy Steps

In today's digital era, cloud computing has become an essential part of technology. But what exactly is cloud computing? Simply put, cloud computing is the delivery of computing services like storage, servers, databases, and software over the internet, commonly known as "the cloud." It allows users to access and manage data anytime and anywhere without needing physical storage devices.
Why Learn Cloud Computing?
Cloud computing is transforming how businesses operate, offering flexibility, cost savings, and scalability. For beginners, understanding cloud computing opens up opportunities in IT and beyond. Whether you're a student, a professional, or an entrepreneur, learning the basics of cloud computing can help you stay ahead in a competitive world.
Key Concepts in Cloud Computing
Types of Cloud Services: The primary services include Infrastructure as a Service (IaaS), Platform as a Service (PaaS), and Software as a Service (SaaS).
Deployment Models: Cloud computing can be public, private, or hybrid, depending on how resources are shared.
Benefits: Cloud computing reduces costs, ensures data security, supports collaboration, and offers seamless scalability.
How to Get Started
To begin your cloud computing journey, start by learning the fundamentals. Focus on understanding basic terms, benefits, and real-world applications. There are many online resources and tutorials available to guide you through this process.
For a detailed guide on cloud computing, check out this Cloud Computing Tutorial. This resource provides in-depth knowledge to help you master cloud computing step by step.
0 notes
Text

Looking to understand cloud computing? This beginner-friendly tutorial covers the basics, benefits, and essential concepts in simple terms. Perfect for learners starting their cloud journey, it provides clear guidance to build your foundational knowledge step by step.
0 notes
Video
youtube
Introduction to Linux for DevOps: Why It’s Essential
Linux serves as the backbone of most DevOps workflows and cloud infrastructures. Its open-source nature, robust performance, and extensive compatibility make it the go-to operating system for modern IT environments. Whether you're deploying applications, managing containers, or orchestrating large-scale systems, mastering Linux is non-negotiable for every DevOps professional.
Why Linux is Critical in DevOps
1. Ubiquity in Cloud Environments - Most cloud platforms, such as AWS, Azure, and Google Cloud, use Linux-based environments for their services. - Tools like Kubernetes and Docker are designed to run seamlessly on Linux systems.
2. Command-Line Mastery - Linux empowers DevOps professionals with powerful command-line tools to manage servers, automate processes, and troubleshoot issues efficiently.
3. Flexibility and Automation - The ability to script and automate tasks in Linux reduces manual effort, enabling faster and more reliable deployments.
4. Open-Source Ecosystem - Linux integrates with numerous open-source DevOps tools like Jenkins, Ansible, and Terraform, making it an essential skill for streamlined workflows.
Key Topics for Beginners
- Linux Basics - What is Linux? - Understanding Linux file structures and permissions. - Common Linux distributions (Ubuntu, CentOS, Red Hat Enterprise Linux).
- Core Linux Commands - File and directory management: `ls`, `cd`, `cp`, `mv`. - System monitoring: `top`, `df`, `free`. - Networking basics: `ping`, `ifconfig`, `netstat`.
- Scripting and Automation - Writing basic shell scripts. - Automating tasks with `cron` and `at`.
- Linux Security - Managing user permissions and roles. - Introduction to firewalls and secure file transfers.
Why You Should Learn Linux for DevOps
- Cost-Efficiency: Linux is free and open-source, making it a cost-effective solution for both enterprises and individual learners. - Career Opportunities: Proficiency in Linux is a must-have skill for DevOps roles, enhancing your employability. - Scalability: Whether managing a single server or a complex cluster, Linux provides the tools and stability to scale effortlessly.
Hands-On Learning - Set up a Linux virtual machine or cloud instance. - Practice essential commands and file operations. - Write and execute your first shell script.
Who Should Learn Linux for DevOps? - Aspiring DevOps engineers starting their career journey. - System administrators transitioning into cloud and DevOps roles. - Developers aiming to improve their understanding of server environments.
***************************** *Follow Me* https://www.facebook.com/cloudolus/ | https://www.facebook.com/groups/cloudolus | https://www.linkedin.com/groups/14347089/ | https://www.instagram.com/cloudolus/ | https://twitter.com/cloudolus | https://www.pinterest.com/cloudolus/ | https://www.youtube.com/@cloudolus | https://www.youtube.com/@ClouDolusPro | https://discord.gg/GBMt4PDK | https://www.tumblr.com/cloudolus | https://cloudolus.blogspot.com/ | https://t.me/cloudolus | https://www.whatsapp.com/channel/0029VadSJdv9hXFAu3acAu0r | https://chat.whatsapp.com/D6I4JafCUVhGihV7wpryP2 *****************************
*🔔Subscribe & Stay Updated:* Don't forget to subscribe and hit the bell icon to receive notifications and stay updated on our latest videos, tutorials & playlists! *ClouDolus:* https://www.youtube.com/@cloudolus *ClouDolus AWS DevOps:* https://www.youtube.com/@ClouDolusPro *THANKS FOR BEING A PART OF ClouDolus! 🙌✨*
#youtube#Linux Linux for DevOps Linux basics Linux commands DevOps basics DevOps skills cloud computing Linux for beginners Linux tutorial Linux for#LinuxLinux for DevOpsLinux basicslinux commandsDevOps basicsDevOps skillscloud computingLinux for beginnersLinux tutorialLinux scriptingLinu#aws course#aws devops#aws#devpos#linux
1 note
·
View note
Text
in wake of yet another wave of people being turned off by windows, here's a guide on how to dual boot windows and 🐧 linux 🐧 (useful for when you're not sure if you wanna make the switch and just wanna experiment with the OS for a bit!)
if you look up followup guides online you're gonna see that people are telling you to use ubuntu but i am gonna show you how to do this using kubuntu instead because fuck GNOME. all my homies hate GNOME.
i'm just kidding, use whatever distro you like. my favorite's kubuntu (for a beginner home environment). read up on the others if you're curious. and don't let some rando on reddit tell you that you need pop! OS for gaming. gaming on linux is possible without it.
why kubuntu?
- it's very user friendly
- it comes with applications people might already be familiar with (VLC player and firefox for example)
- libreoffice already preinstalled
- no GNOME (sorry GNOME enthusiasts, let me old man yell at the clouds) (also i'm playing this up for the laughs. wholesome kde/gnome meme at the bottom of this post.)
for people who are interested in this beyond my tl;dr: read this
(if you're a linux user, don't expect any tech wizardry here. i know there's a billion other and arguably better ways to do x y and/or z. what i'm trying to do here is to keep these instructions previous windows user friendly. point and click. no CLI bro, it'll scare the less tech savvy hoes. no vim supremacy talk (although hell yeah vim supremacy). if they like the OS they'll figure out bash all by themselves in no time.)
first of all, there'll be a GUI. you don't need to type lines of code to get this all running. we're not going for the ✨hackerman aesthetics✨ today. grab a mouse and a keyboard and you're good to go.
what you need is a computer/laptop/etc with enough disk space to install both windows and linux on it. i'm recommending to reserve at least a 100gb for the both of them. in the process of this you'll learn how to re-allocate disk space either way and you'll learn how to give and take some, we'll do a bit of disk partitioning to fit them both on a single disk.
and that's enough babbling for now, let's get to the actual tutorial:
🚨IMPORTANT. DO NOT ATTEMPT THIS ON A 32BIT SYSTEM. ONLY DO THIS IF YOU'RE WORKING WITH A 64BIT SYSTEM. 🚨 (win10 and win11: settings -> system -> about -> device specifications -> system type ) it should say 64bit operating system, x64-based processor.
step 1: install windows on your computer FIRST. my favorite way of doing this is by creating an installation media with rufus. you can either grab and prepare two usb sticks for each OS, or you can prepare them one after the other. (pro tip: get two usb sticks, that way you can label them and store them away in case you need to reinstall windows/linux or want to install it somewhere else)
in order to do this, you need to download three things:
rufus
win10 (listen. i know switching to win11 is difficult. not much of a fan of it either. but support's gonna end for good. you will run into hiccups. it'll be frustrating for everyone involved. hate to say it, but in this case i'd opt for installing its dreadful successor over there ->) or win11
kubuntu (the download at the top is always the latest, most up-to-date one)
when grabbing your windows installation of choice pick this option here, not the media creation tool option at the top of the page:

side note: there's also very legit key sellers out there who can hook you up with cheap keys. you're allowed to do that if you use those keys privately. don't do this in an enterprise environment though. and don't waste money on it if your ultimate goal is to switch to linux entirely at one point.
from here it's very easy sailing. plug your usb drive into your computer and fire up rufus (just double click it).

🚨two very important things though!!!!!!:🚨
triple check your usb device. whatever one you selected will get wiped entirely in order to make space for your installation media. if you want to be on the safe side only plug in the ONE usb stick you want to use. and back up any music, pictures or whatever else you had on there before or it'll be gone forever.
you can only install ONE OS on ONE usb drive. so you need to do this twice, once with your kubuntu iso and once with your windows iso, on a different drive each.
done. now you can dispense windows and linux left and right, whenever and wherever you feel like it. you could, for example, start with your designated dual boot device. installing windows is now as simple as plugging the usb device into your computer and booting it up. from there, click your way through the installation process and come back to this tutorial when you're ready.
step 2: preparing the disks for a dual boot setup
on your fresh install, find your disk partitions. in your search bar enter either "diskmgr" and hit enter or just type "partitions". the former opens your disk manager right away, the latter serves you up with this "create and format hard disk partitions" search result and that's what you're gonna be clicking.

you'll end up on a screen that looks more or less like in the screenshot below. depending on how many disks you've installed this might look different, but the basic gist is the same. we're going to snip a little bit off Disk 0 and make space for kubuntu on it. my screenshot isn't the best example because i'm using the whole disk and in order to practice what i preach i'd have to go against my own advice. that piece of advice is: if this screen intimidates you and you're not sure what you're doing here, hands off your (C:) drive, EFI system, and recovery partition. however, if you're feeling particularly fearless, go check out the amount of "free space" to the right. is there more than 30gb left available? if so, you're free to right click your (C:) drive and click "shrink volume"

this screen will pop up:

the minimum disk space required for kubuntu is 25gb. the recommended one is 50gb. for an installation like this, about 30gb are enough. in order to do that, simply change the value at
Enter the amount of space to shrink in MB: to 30000
and hit Shrink.
once that's done your partitions will have changed and unallocated space at about the size of 30gb should be visible under Disk 0 at the bottom like in the bottom left of this screenshot (courtesy of microsoft.com):

this is gonna be kubuntu's new home on your disk.
step 3: boot order, BIOS/UEFI changes
all you need to do now is plug the kubuntu-usb drive you prepared earlier with rufus into your computer again and reboot that bad boy.
the next step has no screenshots. we're heading into your UEFI/BIOS (by hitting a specific key (like ESC, F10, Enter) while your computer boots up) and that'll look different for everyone reading this. if this section has you completely lost, google how to do these steps for your machine.
a good search term would be: "[YOUR DEVICE (i.e Lenovo, your mainboard's name, etc.)] change boot order"
what you need to do is to tell your computer to boot your USB before it tries to boot up windows. otherwise you won't be able to install kubuntu.
this can be done by entering your BIOS/UEFI and navigating to a point called something along the lines of "boot". from "boot order" to "booting devices" to "startup configuration", it could be called anything.
what'll be a common point though is that it'll list all your bootable devices. the topmost one is usually the one that boots up first, so if your usb is anywhere below that, make sure to drag and drop or otherwise move it to the top.
when you're done navigate to Save & Exit. your computer will then boot up kubuntu's install wizard. you'll be greeted with this:

shocker, i know, but click "Install Kubuntu" on the right.
step 4: kubuntu installation
this is a guided installation. just like when you're installing windows you'll be prompted when you need to make changes. if i remember correctly it's going to ask you for your preferred keyboard layout, a network connection, additional software you might want to install, and all of that is up to you.
but once you reach the point where it asks you where you want to install kubuntu we'll have to make a couple of important choices.

🚨 another important note 🚨
do NOT pick any of the top three options. they will overwrite your already existing windows installation.
click manual instead. we're going to point it to our unallocated disk space. hit continue. you will be shown another disk partition screen.
what you're looking for are your 30gb of free space. just like with the USB drive when we were working with rufus, make sure you're picking the right one. triple check at the very least. the chosen disk will get wiped.

click it until the screen "create a new partition" pops up.
change the following settings to:
New partition size in megabytes: 512
Use as: EFI System Partition
hit OK.
click your free space again. same procedure.
change the following settings to:
New partition size in megabytes: 8000 (*this might be different in your case, read on.)
Use As: Swap Area
hit OK
click your free space a third time. we need one more partition.
change the following settings to:
don't change anything about the partition size this time. we're letting it use up the rest of the resources.
Use as: Ext4 journaling system
Mount Point: /
you're done here as well.
*about the 8000 megabytes in the second step: this is about your RAM size. if you have 4gb instead type 4000, and so on.
once you're sure your configuration is good and ready to go, hit "Install Now". up until here you can go back and make changes to your settings. once you've clicked the button, there's no going back.
finally, select your timezone and create a user account. then hit continue. the installation should finish up... and you'll be good to go.
you'll be told to remove the USB drive from your computer and reboot your machine.
now when your computer boots up, you should end up on a black screen with a little bit of text in the top left corner. ubuntu and windows boot manager should be mentioned there. naturally, when you click ubuntu you will boot into your kubuntu. likewise if you hit windows boot manager your windows login screen will come up.
and that's that folks. go ham on messing around with your linux distro. customize it to your liking. make yourself familiar with the shell (on kubuntu, when you're on your desktop, hit CTRL+ALT+T).
for starters, you could feed it the first commands i always punch into fresh Linux installs:
sudo apt-get update
sudo apt-get upgrade
sudo apt-get install vim
(you'll thank me for the vim one later)
turn your back on windows. taste freedom. nothing sexier than open source, baby.
sources (mainly for the pictures): 1, 2
further reading for the curious: 1, 2
linux basics (includes CLI commands)
kubuntu documentation (this is your new best friend. it'll tell you everything about kubuntu that you need to know.
and finally the promised kde/gnome meme:

#windows#linuxposting#had a long day at work and i had to type this twice and i'm struggling to keep my eyes open#not guaranteeing that i didn't skip a step or something in there#so if someone linux savvy spots them feel free to point them out so i can make fixes to this post accordingly#opensource posting
122 notes
·
View notes
Note
hi! i was wondering if you have any advice/certain programs or anything you use for making gifs, because there’s something i really want to make but i have zero experience 💔💔
hello hello!
ah, yes, I have a TON, let's hope this ADHD girlie can give a somewhat concise description lmao. I will answer this publicly, in case it's useful for anyone else.
Software I use:
To make the screenshots: - for single scenes: KMPlayer 12.22.30 (the newer versions are trash) - for shorter videos, or something you want to get all the screenshots out of Free Video to JPG converter is awesome.
To make the gifs: - Adobe Photoshop 2021 (I don't recommend much later versions, because of the Cloud connection they have)
General gif-maker wisdom: "we spend more time on making sure that something looks serviceable, not pixelated, and good quality, than to get it moving and shit" - Confucius, probably
Useful stuff to make your life easy:
- Squishmoon's action pack for sharpening your screenshots. You can also find their detailed use explained here. - If you are planning to gif Wicked, some scenes are a bit tricky, ngl. But I have two PSDs that you can use, while you're perecting your own craft, and you can edit and update them to make them more "you".

A neutral PSD for mostly indoors and lighter scenes | download

A blue-enhancing PSD for darker scenes | download
Some info on videos to use: - always, always (ALWAYS) use at least HD videos. Otherwise your gif will look like shit. This should be ideally at least 720p in resolution, but go with 1080p for the best results. Coloring gifs in 1080p is easy, but... - if you want to go pro *rolls eyes*, you could go for HDR (2160p) quality. However HDR is a mf to color properly and I would not recommend it for a beginner. When you extract frames from an HDR video, the image colors will end up being washed out and muddy so you will always have to balance those colors out for it to look decent, however, the quality and number of pixels will be larger. If you ar okay with making small/medium sized images, then stick with 1080p. (Storytime, I spent a lot of time making HDR screenshots, only for me to realize that I really hate working with them, so I'm actually considering going back to 1080p, despite that not being "industry standard" on Tumblr lmao. I'm not sure yet But they take up so much space, and if you have a laptop that is on the slower side, you will suffer.)
See the below example of the image differences, without any effects. You will probably notice, that HDR has some more juicy detail and is a LOT sharper, but well... the color is just a lot different and that's something you will have to calculate in and correct for.

The ✨Process✨
Screencaptures
I like to have all screenshots/frames ready for use. So as step one, you need to get the movie file from somewhere. This should definitely be a legal source, and nothing else (jk).
Once I have the movie. I spend a lot of time making and sorting screencaps. Since I mostly work in the Wicked fandom only atm, that means I will only need to make the frames once, and thats awesome, cause this is the most boring part.
For this, I let the Video to JPG Converter run the whole movie while I was aleep, and by morning, it created gorgeous screenshots for me and my laptop almost went up in flames.
You need to make sure you capture every single frame, so my settings looked like this:
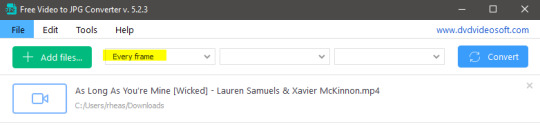
Screenshots do take up a lot of space, so unless your computer has a huge brain, I suggest storing the images in an external drive. For Wicked, the entire movie was I think around 200k frames total. I reduced that to about 120k that I will actually use.
And then I spend some time looking through them, deleting the scenes I know I won't do ever (goodbye Boq, I will never gif you, I'm so sorry :((( ) and also, I like to put them into folders by scene. My Wicked folder looks like this:

If you don't want this struggle and you only need a few specific scenes, there is this great tutorial on how to make frames from KMPlayer. Note that some of the info in this tutorial on gif quality requirements and Tumblr's max allowance of size and # of frames are outdated. You are allowed to post a gif that is a maximum of 10 Mb and 120 frames (maybe it can be even more, idk, said the expert) on Tumblr. But the process of screencapturing is accurate. Also ignore the gifmaking process in this tutorial, we have a lot easier process now as well!
Prepping the images
I have a folder called "captures", where I put all of the specific screenshots for a set I want to use. Inside this folder I paste all the shots/scenes I want to work on for my current gifset, and then I create subfolders. I name them 1, 2, 3, etc, I make one folder for each gif file I want to make. Its important that only the frames you want to be in the gif are in the folder. I usually limit the number of images to 100, I don't really like to go above it, and usually aim to go lower, 50-70 frames, but sometimes you just need the 100.
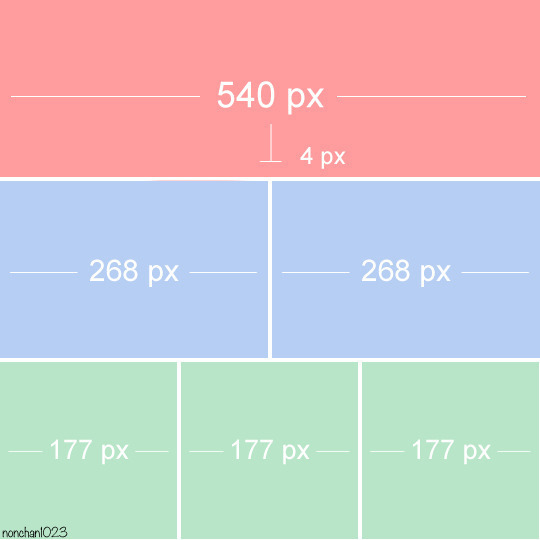
Sidetrack, but: Keep in mind that Tumblr gifs also need to be a specific width, so that they don't get resized, and blurry. (Source) Height is not that important, but witdth is VERY. But since there is a limit on Mb as well, for full width (540px) gifs you will want to go with less frames, than for smaller ones.
Once you have the frames in folders, you will open Photoshop, and go to: File > Scripts > Load files into stack.
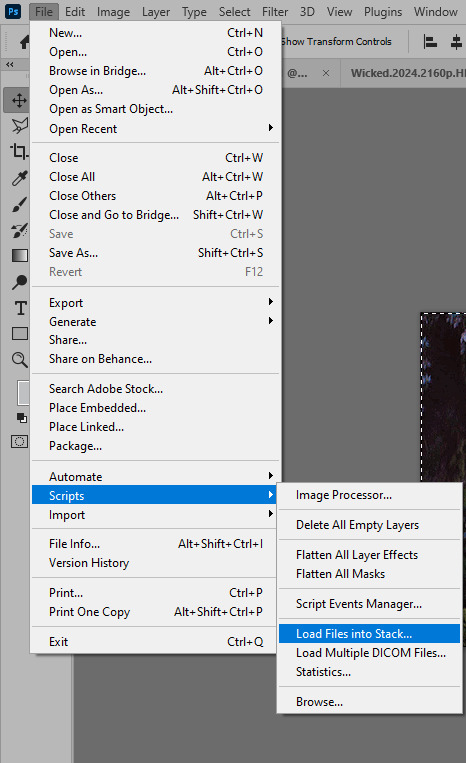
Here you select Folder from the dropdown menu, and then navigate to the folder where you put the frames for your first gif. It will take a moment to load the frames into the window you have open, but it will look like this:

You click "OK" and then it will take anther few moments for Photoshop to load all the frames into a file.
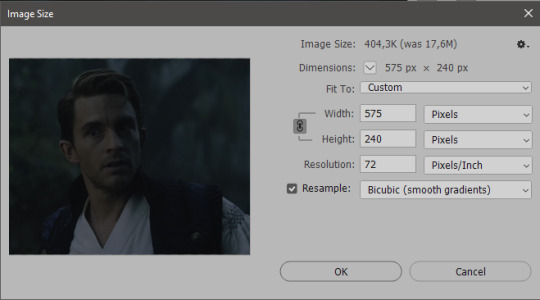
But once that's done, and you have the frames, you next have to resize the image. Go to Image > Image size... When you resize in Photoshop, and save as gif, sometimes you do end up with a light transparent border on the edge that looks bad, so, when you resize, you have to calculate in that you will be cutting off a few pixels at the end. In this example, I want to make a 268px width gif. I usually look at heights first, so lets say I want it to be a close-up, and I will cut off the sides, and it will be more square-ish. So I set height to 240px. Always double check that your width doesn1t run over your desired px numbers, but since 575 is larger than 268 (can you tell I'm awesome at math?), I should be good. I click OK.
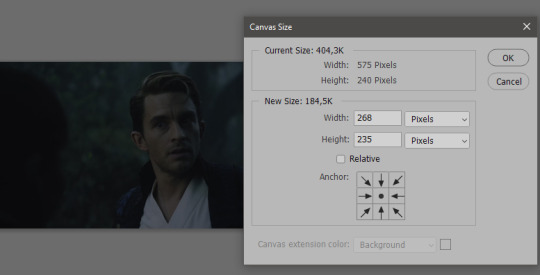
Next, you have to crop the image. Go to Image > Canvas size... At this point we can get rid of those extra pixels we wanted to drop from the bottom as well, so we will make it drop from the height and the width as well. I set the width to 268px, and the height to 235px, because I have OCD, and numbers need to end with 0 or 5, okay?
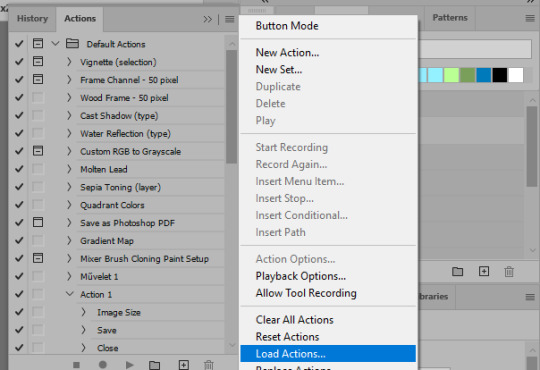
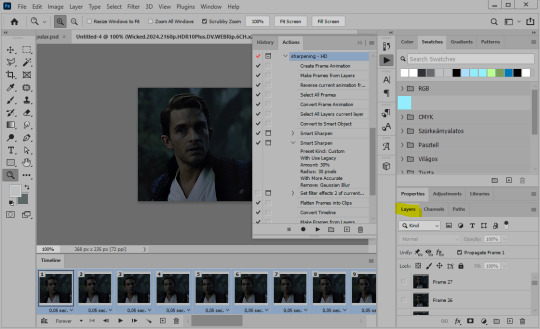
And now, the magic happens! First, go to Window > Actions to have the actions window show up. While you're at it, in the Window menu also select Timeline (this will be your animation timeline at the button) and also Layers. Once you have the Actions window showing up, on the menu in the upper right corner click the three lines menu button, and from the list select "Load Actions". I hope you downloaded the Squishmoon action pack from the start of this post, if not, do it now! So you save that file, and then after you clicked Load, you... well, load it. It will show up in your list like so:
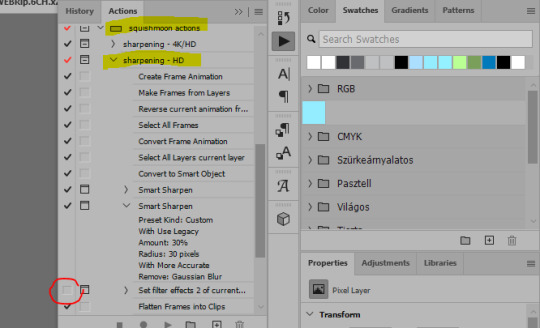
You will want to use the sharpening - HD one, BUT I personally like to go, and remove the tick from the spot I circled above, so leave that empty. This will result in the image having more contrast, which is very much needed for these darker scenes.
When you have that, you select the action itself like so, and click the play button at the bottom. The action will do everything for you, sharpen, increase contrast and also, create the gif and set the frame speed. You won't need to edit anything, just whatever window pops up, click "OK"

Now it should all look like something like this:
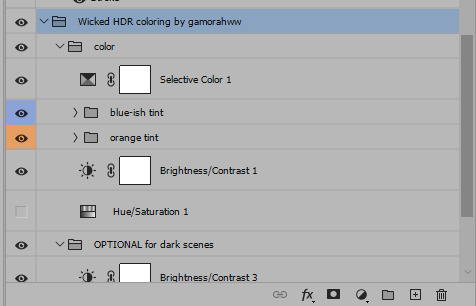
In the Layers window on the side, scroll all the way up to the top. The frame on the top is your last frame. Every effect you want to add to the gif should go to here, otherwise it won't apply to all frames. So at this point I open my PSD for darker scenes, and pull the window of it down, above the gif I'm working on like so:

And then I grab the folder I marked with yellow, left click, hold the click down, and drag that folder over to my current gif. And bamm, it will have the nice effect I wanted! You can click the little play button at the button to see a preview.

Once you have it sorted, now its time to extract it, but first, here's our before and after view:


Now, if you are happy with this, you can just save and close.
If you want to add subtitles, you can do that as well either manually with the text tool (remember, to add as the TOP layer as we did with the coloring) or you can use a pre-set PSD for that as well, here's mine.
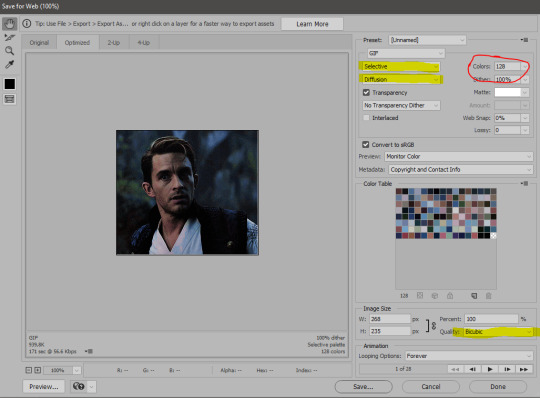
Now, we just need to export it. Go to File > Export > Save for Web (Legacy) and copy my settings here. Others may use other settings, but these are mine, so! I hope you are happy with them :3
In this case, for colors, I picked 128 colors, because on dark sscenes you can get away with using less colors, and the larger that number is, the bigger the filesize. If you use lighter images, you will need to bump that shit up to 256, but that will make your file larger. You can see at the bottom of the screen, how large your file will end up being. So long as you are under 9 Mb, you should be good :3
Conclusion
Look, Gif making and Photoshop in general is a bit scary at first. There are a lot of settings you can mess around on your own, a lot to play with, and also a lot can go wrong. This is a very basic tutorial, and also my current process and preferred coloring. However if you look at "gif psd" or "gif tutorial" or similar tags on Tumblr, you can find a LOT of great resources and steps, for many-many things. Usually people are not too antsy about sharing their methods either. You make 4-5 gifs, and you will have the steps locked down, and then it's all about experimenting.
After you have some muscle memory, your next step should be to explore what is inside a PSD coloring folder that you use. Open them up, try clicking around, click the little eye, to see what happens if they are turned off, and double click them, and play around with the sliders, to see what each does. Most people on Tumblr don't really know what each one does, we all just pressed a few buttons and got really lucky with the results, lol.
If anything is unclear, don't hesitate to ask, I'll gladly help!
Good luck <3
45 notes
·
View notes
Note
Hey, can I ask you how do you make your gifs?
It took a lot of trial and error, but here is what I have learned(so far cause I'm very much still going through it):
1. Photoshop vs Photopea
To make your gifs you can either use Photoshop or Photopea. I started off with Photpea because it’s cloud-based and doesn’t take up any space on your computer, but I've since moved onto Photoshop. Most of the tutorials you’ll find will use photoshop. So if you need help or want to learn a new skill it will be much easier to find that help if you are using Photoshop.
Photoshop
👆🏽They have ones out there for mac if you search for them on here, but I happen to have a Windows PC so this is the one I use🤷🏽♀️
Photopea
2. Downloading videos
I get most of my videos from either YouTube or torrent sites which have a wide selection of shows and movies for you to download.
Watch So Much
👆🏽Is my favorite torrent site. You can also stream shows and movies on their site well.
YTS
👆🏽Is another torrent site I use, but they only have movies on there.
Qbittorrent
👆🏽Lets you download torrents. I should note that If you torrent you'll need a VPN. Literally do not try and download any content from HBO or Disney without a VPN, because at least here in America, they will email you threatening to disconnect your internet😅
For VPN’s do not use the free ones. They don’t work. I’ve personally used NordVPN, but there are other ones out there like Surfshark, or ProtonVPN.
4k downloader
👆🏽Lets you download most things off of YouTube(as well as a couple other sites like TikTok). I say most things because they will not let you download those free movies(ex. Twilight) YouTube itself uploads onto its platform.
Occasionally someone will upload an old movie onto a private channel which you can download with no problems, but anything new or recent you won’t find on there.
You do not have to use a VPN to download videos from YouTube.
3. Resources:
Whatever you're trying to gif will probably be on the long side. So you're either going to need to trim it down to make a 2-3 second clip that you can then use to make your gif, or you can screencap your video.
Screencaping allows you to take a shot of each individual frame* which you can then use to make your gifs out of.
*I like to use anywhere between 40-90 frames per gif.
VLC
👆🏽This is a video player that lets you play your videos and create screencaps from them.
👆🏽This is a great post on how to screencap using VLC.
KMPlayer
👆🏽Is another video player/screencapping software, but I found their interface to be overly complicated
Clipchamp
👆🏽This lets you trim down your videos to create those 2-3-second clips. There are better video editing tools out there(like DaVinci Resolve), but if you have Windows for what it's worth, it’s simple and gets the job done 🤷🏽♀️
rPiracy
👆🏽Has links for torrents and things of that nature.
👆🏽This is a great post on how to make a basic gif using Photoshop.
👆🏽This is a great post on how to make a basic gif using Photopea.
👆🏽This user has a lot of tutorials so when you're ready to move onto more complicated gif making, use them as a resource.
4. Lastly, have patience with yourself.
GIF making is time-consuming and as I stated it takes practice. So don't sweat it too much and have fun🎉

6 notes
·
View notes
Text
Charting Your Tech Odyssey: The Compelling Case for AWS Mastery as a Beginner
Embarking on a journey into the tech realm as a beginner? Look no further than Amazon Web Services (AWS), a powerhouse in cloud computing that promises a multitude of advantages for those starting their technological adventure.
1. Navigating the Cloud Giants: AWS Industry Prowess: Dive into the expansive universe of AWS, the unrivaled leader in cloud services. With a commanding market share, AWS is the go-to choice for businesses of all sizes. For beginners, aligning with AWS means stepping into a realm with vast opportunities.
2. A Toolkit for Every Tech Explorer: AWS Versatility Unleashed: AWS isn't just a platform; it's a versatile toolkit. Covering computing, storage, databases, machine learning, and beyond, AWS equips beginners with a dynamic skill set applicable across various domains and roles.
3. Job Horizons and Career Ascents: AWS as the Gateway: The widespread adoption of AWS translates into a burgeoning demand for skilled professionals. Learning AWS isn't merely a skill; it's a gateway to diverse job opportunities, from foundational roles to specialized positions. The trajectory for career growth becomes promising in the ever-expanding cloud-centric landscape.
4. Resources Galore and Community Kinship: The AWS Learning Ecosystem: AWS provides a nourishing environment for learners. Extensive documentation, tutorials, and an engaged community create an ecosystem that caters to diverse learning styles. Whether you prefer solo exploration or community interaction, AWS has you covered.
5. Pioneering Exploration without Cost Concerns: AWS Free Tier Advantage: Hands-on experience is crucial, and AWS acknowledges this by offering a free tier. Beginners can explore and experiment with various services without worrying about costs. This practical exposure becomes invaluable in understanding how AWS services operate in real-world scenarios.

6. Certifications as Badges of Proficiency: AWS Recognition and Credibility: AWS certifications stand as globally recognized badges of proficiency. Earning these certifications enhances credibility in the job market, signaling expertise in designing, deploying, and managing cloud infrastructure. For beginners, this recognition can be a game-changer in securing sought-after roles.
7. Future-Proofing Skills in the Cloud Galaxy: AWS and Technology's Tomorrow: Cloud computing isn't just a trend; it's the beating heart of IT infrastructure. Learning AWS ensures that beginners' skills remain relevant and aligned with the unfolding technological landscape. AWS isn't just about today; it's a strategic investment for continuous learning and adaptability to emerging technologies.
In summary, the decision to delve into AWS as a beginner isn't just a choice; it's a strategic move. AWS unfolds a world of opportunities, from skill development to future-proofing. As technology evolves, AWS stands as a beacon, making it an essential investment for beginners venturing into the tech industry.
2 notes
·
View notes
Text
Actually heck it I have to add some resources here that aren't just in the tags LMAO
1.
Free 7 day trial! And pretty cheap paid version as well.
Lots and LOTS of videos and practice for many different coding types!
2.
When I'm having troubles figuring out a function (or I forgot how basic stuff works LMAO), this is my go-to.
Expert documentation on so many details of so many coding languages, and examples as well!
3.
When it comes to more specific problems, I usually look here. They've got allll kinds of things here, and very good explanations!
4.
Where I go for so many questions LMAO
Remember, if you have a coding question, someone else has already had that same question and gotten an answer on StackOverflow somewhere XD
5.
This is THE Coding IDE we use in my classes. It's free. It's good. It works with Github and has a billion plugins for different coding languages and other neat things.
6.
Speaking of github
Here is THE code sharing website!
9.
This place has really good docs as well
10.
Another coding learning website!
Even beyond all of this: just going to Youtube and looking up something like "javascript tutorial for beginners" brings up a billion videos that you can watch. There are SO many resources out there!! You can just learn! Right now!
There are a lot of very good resources and tutorials for making video games as well! Many engines don't require too too much coding knowledge, and you can absolutely start messing around with things without having any background in it!
Some more resources for game dev (that I got from PirateSoftware's discord server LMAO):
Read this if you've ever wanted to make a game. Hugely inspirational
A database of video game engines!
it would appear I hit the link limit but there are so many resources out there!!
For video games, I have to mention there being a ton of resources for visual novels in particular
If anyone else wants to add more coding resources I would love that 👀
There's always more to learn, after all XD
please learn how to code
like, if you're bored today, and not doing anything,
learn a little bit of coding please
#sorry if some of this isn't worded the best I got sleepy but still wanted to finish it LMAO#also sorry I have no idea how tumblr formatting works I am but a mobile user LMAO
34K notes
·
View notes
Text
AWS Tutorial – Learn Cloud Computing with Amazon Web Services
Get started with cloud computing using AWS! This AWS tutorial covers key services like EC2, S3, Lambda, and more. Perfect for beginners and IT professionals aiming to build, deploy, and manage scalable applications in the cloud.
For more information, visit here: https://www.tpointtech.com/aws-tutorial
0 notes
Text
What Is Best for Graphic Design

Graphic design is everywhere — from the logos on your favorite apps to the posters you see on the street. It’s the art of visually communicating ideas, stories, and messages in a way that grabs attention and connects with people. But if you’re new to graphic design or thinking about diving deeper, you might wonder: What is the best for graphic design? Whether it’s tools, skills, or learning paths, let’s break it down in a simple and human way.
1. The Right Tools for Your Creative Journey
First things first — the tools you choose can make a huge difference, but don’t stress about having the most expensive software. It’s more about what feels comfortable and lets your creativity flow.
Adobe Creative Cloud (Photoshop, Illustrator, InDesign): These are the go-to tools in the design world. Photoshop shines when it comes to editing photos and working with pixel-based images. Illustrator is your best friend for creating sharp logos and vector graphics that scale perfectly. InDesign is ideal for putting together layouts for magazines, brochures, or any multi-page projects. If you're aiming to work professionally or freelance, getting comfortable with these tools can seriously boost your opportunities.
Canva: Perfect for beginners or anyone who wants quick, hassle-free design. It’s easy to use, web-based, and packed with ready-made templates—ideal for social posts, flyers, and fast creative projects without any complicated learning.
Affinity Designer & Photo:
A solid alternative to Adobe, these tools offer pro-level features with a one-time payment—no monthly fees. Perfect for creatives who want quality design software without the hefty price tag.
2. Skills That Matter More Than Fancy Software
While tools are important, skills and mindset matter way more. Here’s what you should focus on:
Basic Design Principles: Things like balance, contrast, alignment, and hierarchy are the backbone of any good design. Understanding these helps you create designs that look polished and professional.
Fonts aren’t just about letters — they set the mood, tone, and personality of your design. The right font pairing can make your work shine, while the wrong one can create confusion. Learning how to use type thoughtfully is one of the most powerful tools in a designer’s toolkit.
Color Theory:
Colors aren’t just pretty—they speak. They trigger emotions, tell stories, and set the tone of your design. Learning how to mix the right shades or play with contrast can completely change how your work feels and connects with people.
Creativity & Problem Solving:
Graphic design is really about finding smart, visual solutions to communication challenges. It’s about thinking outside the box, trying new ideas, and turning problems into eye-catching stories.
3. Learning Resources That Match Your Style
Not everyone learns the same—and that’s okay. Find what keeps you curious.
YouTube Channels: Check out creators like The Future, Satori Graphics, and Yes I’m a Designer for practical tips and easy-to-follow tutorials.
Online Courses: Websites like Udemy, Skillshare, and Coursera have courses ranging from beginner to advanced. Some are free, some paid — a mix works best.
Procreate:
If you love sketching or digital painting, Procreating on the iPad is a dream. It’s super intuitive, feels like real drawing, and gives artists a smooth, creative flow right at their fingertips
4. Hardware: What You Actually Need
You don’t need the latest, priciest computer to get started, but a decent setup helps.
Laptop or Desktop: A mid-range laptop or desktop with at least 8GB RAM and a good graphics card is enough for most design work. Macs are popular among designers but PCs work just as well.
Drawing Tablet: If you enjoy digital art, a tablet like Wacom or XP-Pen can boost your workflow.
Monitor: A good quality monitor with accurate colors is valuable if you want your designs to look their best.
5. Staying Inspired and Growing
Graphic design is a constantly evolving field. Trends change, tools update, and new techniques emerge. Here’s how to keep growing:
Follow Design Communities: Platforms like Behance, Dribbble, and Instagram are full of inspiration and can help you connect with other creatives.
Keep Learning: Always be curious. Explore new styles, try different software, and never stop experimenting.
Feedback: Share your work and ask for honest opinions. Constructive criticism helps you improve faster.
6.What Works Best for You?
At the end of the day, the “best” approach to graphic design is the one that fits your style, goals, and what excites you the most.
Want to work for big companies or agencies? Learn Adobe tools, master fundamentals, and build a strong portfolio.
Looking for quick social media graphics? Canva and some basic design knowledge might be all you need.
Passionate about digital illustration? Dive into Procreate or Illustrator, and make daily drawing a fun habit to sharpen your skills.
Budget-conscious? Affinity Designer and free online tutorials can take you far.
Final Thoughts
Graphic design is where creativity meets strategy in the most exciting way. The secret? Start small, master the basics, and pick tools that feel right for you and your budget. Above all, let your passion drive you and stay open to learning — the skills and tools will naturally come along the way.
0 notes
Text
Kubernetes Tutorials | Waytoeasylearn
Learn how to become a Certified Kubernetes Administrator (CKA) with this all-in-one Kubernetes course. It is suitable for complete beginners as well as experienced DevOps engineers. This practical, hands-on class will teach you how to understand Kubernetes architecture, deploy and manage applications, scale services, troubleshoot issues, and perform admin tasks. It covers everything you need to confidently pass the CKA exam and run containerized apps in production.
Learn Kubernetes the easy way! 🚀 Best tutorials at Waytoeasylearn for mastering Kubernetes and cloud computing efficiently.➡️ Learn Now

Whether you are studying for the CKA exam or want to become a Kubernetes expert, this course offers step-by-step lessons, real-life examples, and labs focused on exam topics. You will learn from Kubernetes professionals and gain skills that employers are looking for.
Key Learning Outcomes: Understand Kubernetes architecture, components, and key ideas. Deploy, scale, and manage containerized apps on Kubernetes clusters. Learn to use kubectl, YAML files, and troubleshoot clusters. Get familiar with pods, services, deployments, volumes, namespaces, and RBAC. Set up and run production-ready Kubernetes clusters using kubeadm. Explore advanced topics like rolling updates, autoscaling, and networking. Build confidence with real-world labs and practice exams. Prepare for the CKA exam with helpful tips, checklists, and practice scenarios.
Who Should Take This Course: Aspiring CKA candidates. DevOps engineers, cloud engineers, and system admins. Software developers moving into cloud-native work. Anyone who wants to master Kubernetes for real jobs.
1 note
·
View note
Text
Python for Data Science: The Only Guide You Need to Get Started in 2025
Data is the lifeblood of modern business, powering decisions in healthcare, finance, marketing, sports, and more. And at the core of it all lies a powerful and beginner-friendly programming language — Python.
Whether you’re an aspiring data scientist, analyst, or tech enthusiast, learning Python for data science is one of the smartest career moves you can make in 2025.
In this guide, you’ll learn:
Why Python is the preferred language for data science
The libraries and tools you must master
A beginner-friendly roadmap
How to get started with a free full course on YouTube
Why Python is the #1 Language for Data Science
Python has earned its reputation as the go-to language for data science and here's why:
1. Easy to Learn, Easy to Use
Python’s syntax is clean, simple, and intuitive. You can focus on solving problems rather than struggling with the language itself.
2. Rich Ecosystem of Libraries
Python offers thousands of specialized libraries for data analysis, machine learning, and visualization.
3. Community and Resources
With a vibrant global community, you’ll never run out of tutorials, forums, or project ideas to help you grow.
4. Integration with Tools & Platforms
From Jupyter notebooks to cloud platforms like AWS and Google Colab, Python works seamlessly everywhere.
What You Can Do with Python in Data Science
Let’s look at real tasks you can perform using Python: TaskPython ToolsData cleaning & manipulationPandas, NumPyData visualizationMatplotlib, Seaborn, PlotlyMachine learningScikit-learn, XGBoostDeep learningTensorFlow, PyTorchStatistical analysisStatsmodels, SciPyBig data integrationPySpark, Dask
Python lets you go from raw data to actionable insight — all within a single ecosystem.
A Beginner's Roadmap to Learn Python for Data Science
If you're starting from scratch, follow this step-by-step learning path:
✅ Step 1: Learn Python Basics
Variables, data types, loops, conditionals
Functions, file handling, error handling
✅ Step 2: Explore NumPy
Arrays, broadcasting, numerical computations
✅ Step 3: Master Pandas
DataFrames, filtering, grouping, merging datasets
✅ Step 4: Visualize with Matplotlib & Seaborn
Create charts, plots, and visual dashboards
✅ Step 5: Intro to Machine Learning
Use Scikit-learn for classification, regression, clustering
✅ Step 6: Work on Real Projects
Apply your knowledge to real-world datasets (Kaggle, UCI, etc.)
Who Should Learn Python for Data Science?
Python is incredibly beginner-friendly and widely used, making it ideal for:
Students looking to future-proof their careers
Working professionals planning a transition to data
Analysts who want to automate and scale insights
Researchers working with data-driven models
Developers diving into AI, ML, or automation
How Long Does It Take to Learn?
You can grasp Python fundamentals in 2–3 weeks with consistent daily practice. To become proficient in data science using Python, expect to spend 3–6 months, depending on your pace and project experience.
The good news? You don’t need to do it alone.
🎓 Learn Python for Data Science – Full Free Course on YouTube
We’ve put together a FREE, beginner-friendly YouTube course that covers everything you need to start your data science journey using Python.
📘 What You’ll Learn:
Python programming basics
NumPy and Pandas for data handling
Matplotlib for visualization
Scikit-learn for machine learning
Real-life datasets and projects
Step-by-step explanations
📺 Watch the full course now → 👉 Python for Data Science Full Course
You’ll walk away with job-ready skills and project experience — at zero cost.
🧭 Final Thoughts
Python isn’t just a programming language — it’s your gateway to the future.
By learning Python for data science, you unlock opportunities across industries, roles, and technologies. The demand is high, the tools are ready, and the learning path is clearer than ever.
Don’t let analysis paralysis hold you back.
Click here to start learning now → https://youtu.be/6rYVt_2q_BM
#PythonForDataScience #LearnPython #FreeCourse #DataScience2025 #MachineLearning #NumPy #Pandas #DataAnalysis #AI #ScikitLearn #UpskillNow
1 note
·
View note
Text
Exploring the Tech Frontier with Techsslaash com

In today’s fast-evolving digital world, technology websites play a critical role in shaping user understanding and engagement. One such rising star in the tech landscape is Techsslaash com, an emerging platform dedicated to sharing insights, reviews, guides, and trends across various tech domains. Whether you're a tech enthusiast, a developer, or a casual browser, Techsslaash com promises a rich experience packed with useful information and expert commentary.
What is Techsslaash com?
Techsslaash com is a multifaceted technology-focused website offering readers the latest updates on gadgets, AI developments, software tools, gaming reviews, cybersecurity tips, and how-to tutorials. What sets it apart is its user-centric approach—content is written with clarity, accuracy, and a sense of purpose, ensuring that readers of all backgrounds can benefit from the knowledge shared. In an era dominated by misinformation and cluttered online resources, Techsslaash com stands out as a trustworthy voice. Its editorial strategy blends in-depth research with practical application, making it a go-to portal for people wanting genuine, well-researched information.
Key Features of Techsslaash com
Technology News and Trends: The site frequently updates its content to reflect the newest trends in AI, cloud computing, blockchain, and other tech domains.
Device and Software Reviews: From smartphones to laptops and SaaS platforms, Techsslaash com provides comprehensive reviews with honest pros and cons.
Tutorials and How-Tos: There’s a strong emphasis on actionable content—step-by-step guides help users solve everyday tech problems.
Cybersecurity Insights: With rising concerns about online safety, Techsslaash com devotes ample space to educating users about threats and prevention methods.
Community and Interaction: User comments, forums, and polls help build an engaged tech-savvy community.
Why Choose Techsslaash com Over Other Platforms?
Unlike many generalized tech sites, Techsslaash com doesn’t just copy-paste trending news. Its content creation team dives deep into each topic, offering expert opinions and clear value. The platform is free from overbearing ads, which creates a clean reading environment. Furthermore, the mobile and desktop interfaces are sleek, fast, and easy to navigate. Another major draw is the accessibility of content. Whether you're a beginner trying to learn Python or an experienced user evaluating the best productivity tools, Techsslaash com tailors its material to your needs.
The Growing Popularity of Techsslaash com
Since its launch, Techsslaash com has witnessed a surge in organic traffic. This growth is largely attributed to its SEO-optimized content, high editorial standards, and consistency in publishing. Additionally, its social media presence has helped it tap into various tech communities on platforms like Reddit, X (formerly Twitter), and LinkedIn. Influencers and industry professionals often cite Techsslaash com as a reference point, increasing its authority in the tech blogging space. Educational institutions and startups also recommend the site for its balanced, informative style.
Navigating Tech Categories on Techsslaash com
The site is divided into user-friendly categories:
Gadgets & Reviews: Compare the latest smartphones, wearables, and smart home devices.
AI & Data Science: Read about machine learning trends and tools.
Gaming Zone: Get performance reviews and news on upcoming games.
Programming Tutorials: Step-by-step coding tutorials for Python, JavaScript, and more.
Productivity Hacks: Learn how to optimize your tech tools for work and study.
Each section is frequently updated to ensure relevancy, making Techsslaash com an ideal bookmark for regular readers.
Expert Contributors and Collaborations
A key strength of Techsslaash com is its contributor base. The blog regularly features guest posts from IT professionals, startup founders, data analysts, and cybersecurity experts. These collaborations enrich the content and provide multiple perspectives on current tech issues. Some notable contributors have experience at Microsoft, Google, and top universities. This enhances the credibility and depth of the content published on Techsslaash com.
Techsslaash com and the Future of Digital Learning
With the rise of e-learning, digital tools, and online certifications, platforms like Techsslaash com are crucial in democratizing knowledge. The site not only informs but also educates, helping users develop tech skills through curated resources and toolkits. Their upcoming initiatives include free tech webinars, coding bootcamps, and newsletter-based courses. Such projects are expected to boost engagement and make Techsslaash com a central hub for skill development.
FAQs about Techsslaash com
Q1: Is Techsslaash com free to use? Ans. Yes, Techsslaash com is completely free. Users can browse articles, tutorials, and reviews without any subscription fees.
Q2: How often is the content on Techsslaash com updated? Ans. The website updates its content weekly, and sometimes daily during peak tech seasons like CES or product launches.
Q3: Can I contribute to Techsslaash com? Ans. Yes, the site welcomes guest posts. You can apply through the "Write for Us" section available on the site.
Q4: Is Techsslaash com reliable for tech advice? Ans. Absolutely. The content is curated and reviewed by experts, ensuring reliability and authenticity.
Q5: What types of tutorials are available on Techsslaash com? Ans. From coding and app usage to data analysis and AI concepts, the tutorials cater to a wide variety of tech topics.
0 notes
Text
Best Blockchain Cloud Miner quidminer.com
Best Blockchain Cloud Miner quidminer.com is your gateway to the world of profitable cryptocurrency mining. In an era where digital assets are gaining unprecedented traction, cloud mining has emerged as a convenient and efficient method for individuals to participate in the blockchain revolution without the need for expensive hardware or technical expertise.
Quidminer.com offers a user-friendly platform that allows users to harness the power of remote data centers to mine various cryptocurrencies. This approach not only reduces the initial investment but also minimizes the operational costs associated with traditional mining setups. By leveraging advanced algorithms and high-performance computing resources, Quidminer.com ensures optimal mining efficiency and maximum returns on investment.
One of the standout features of Quidminer.com is its transparency and reliability. The platform provides real-time updates on mining activities, allowing users to monitor their progress and earnings effortlessly. Additionally, the robust security measures implemented by Quidminer.com safeguard users' investments and personal information from potential threats.
For those looking to delve deeper into the world of cryptocurrency mining, visiting https://paladinmining.com can provide valuable insights and resources. Paladin Mining is a trusted authority in the field, offering comprehensive guides, tutorials, and expert advice to help both beginners and seasoned miners navigate the complexities of the crypto landscape.
In conclusion, Best Blockchain Cloud Miner quidminer.com presents an unparalleled opportunity for individuals to engage in cryptocurrency mining with ease and confidence. Whether you're a tech-savvy enthusiast or a newcomer to the blockchain space, Quidminer.com equips you with the tools and support needed to succeed in this exciting and lucrative endeavor.
quidminer.com

PaladinMining
Paladin Mining
0 notes
Text
Docker Tutorial for Beginners: Learn Docker Step by Step
What is Docker?
Docker is an open-source platform that enables developers to automate the deployment of applications inside lightweight, portable containers. These containers include everything the application needs to run—code, runtime, system tools, libraries, and settings—so that it can work reliably in any environment.
Before Docker, developers faced the age-old problem: “It works on my machine!” Docker solves this by providing a consistent runtime environment across development, testing, and production.
Why Learn Docker?
Docker is used by organizations of all sizes to simplify software delivery and improve scalability. As more companies shift to microservices, cloud computing, and DevOps practices, Docker has become a must-have skill. Learning Docker helps you:
Package applications quickly and consistently
Deploy apps across different environments with confidence
Reduce system conflicts and configuration issues
Improve collaboration between development and operations teams
Work more effectively with modern cloud platforms like AWS, Azure, and GCP
Who Is This Docker Tutorial For?
This Docker tutorial is designed for absolute beginners. Whether you're a developer, system administrator, QA engineer, or DevOps enthusiast, you’ll find step-by-step instructions to help you:
Understand the basics of Docker
Install Docker on your machine
Create and manage Docker containers
Build custom Docker images
Use Docker commands and best practices
No prior knowledge of containers is required, but basic familiarity with the command line and a programming language (like Python, Java, or Node.js) will be helpful.
What You Will Learn: Step-by-Step Breakdown
1. Introduction to Docker
We start with the fundamentals. You’ll learn:
What Docker is and why it’s useful
The difference between containers and virtual machines
Key Docker components: Docker Engine, Docker Hub, Dockerfile, Docker Compose
2. Installing Docker
Next, we guide you through installing Docker on:
Windows
macOS
Linux
You’ll set up Docker Desktop or Docker CLI and run your first container using the hello-world image.
3. Working with Docker Images and Containers
You’ll explore:
How to pull images from Docker Hub
How to run containers using docker run
Inspecting containers with docker ps, docker inspect, and docker logs
Stopping and removing containers
4. Building Custom Docker Images
You’ll learn how to:
Write a Dockerfile
Use docker build to create a custom image
Add dependencies and environment variables
Optimize Docker images for performance
5. Docker Volumes and Networking
Understand how to:
Use volumes to persist data outside containers
Create custom networks for container communication
Link multiple containers (e.g., a Node.js app with a MongoDB container)
6. Docker Compose (Bonus Section)
Docker Compose lets you define multi-container applications. You’ll learn how to:
Write a docker-compose.yml file
Start multiple services with a single command
Manage application stacks easily
Real-World Examples Included
Throughout the tutorial, we use real-world examples to reinforce each concept. You’ll deploy a simple web application using Docker, connect it to a database, and scale services with Docker Compose.
Example Projects:
Dockerizing a static HTML website
Creating a REST API with Node.js and Express inside a container
Running a MySQL or MongoDB database container
Building a full-stack web app with Docker Compose
Best Practices and Tips
As you progress, you’ll also learn:
Naming conventions for containers and images
How to clean up unused images and containers
Tagging and pushing images to Docker Hub
Security basics when using Docker in production
What’s Next After This Tutorial?
After completing this Docker tutorial, you’ll be well-equipped to:
Use Docker in personal or professional projects
Learn Kubernetes and container orchestration
Apply Docker in CI/CD pipelines
Deploy containers to cloud platforms
Conclusion
Docker is an essential tool in the modern developer's toolbox. By learning Docker step by step in this beginner-friendly tutorial, you’ll gain the skills and confidence to build, deploy, and manage applications efficiently and consistently across different environments.
Whether you’re building simple web apps or complex microservices, Docker provides the flexibility, speed, and scalability needed for success. So dive in, follow along with the hands-on examples, and start your journey to mastering containerization with Docker tpoint-tech!
0 notes
Text
Want to learn PHP programming? You can come to the biggest resource page on the Internet for PHP learning. PHP has become one of the most widely used programming languages which can easily be used with different platforms, such as, Linux, Windows, and Unix. Regardless of whether you are working on a big official project or are into internet marketing, PHP is used everywhere. This language is easy to understand and work with, dynamic in nature and can merge with different kinds of RDMS. Experienced PHP programmers may want to also check out the most common libraries in PHP that can make you supercharged PHP developer. If you wish to learn the PHP programming language, you can do so with the help of the following web resources: Best Free Beginners Tutorials On PHP First thing first, these are the best beginners tutorials for learning PHP. PHP 5 Tutorial PHP Tutorial PHP: A simple tutorial - Manual Introduction to PHP | Codecademy PHP Tutorial for Beginners | WIRED PHP 101: PHP For the Absolute Beginner - Zend Developer Zone PHP Tutorials: Beginners PHP Tutorials PHP Tutorial - Introduction PHP Tutorial - Part 1 PHP Tutorials for beginners - w3resource Learn PHP - Free Interactive PHP Tutorial Step-by-Step PHP Tutorials for Beginners - Creating your PHP program FROM SCRATCH: Basic Authentication, Membership and CRUD functionalities - CodeProject Object Oriented PHP for Beginners – KillerPHP.com PHP Tutorial for the Absolute Beginner Best Free Websites About PHP Tutorials One of the best ways to get started with PHP programming language us through an online website which you can access for free. There are free websites for both beginners as well as advanced users and explain all the concepts in great details. The complete PHP 5 tutorial - PHP5 tutorial PHP 5 Tutorial - An Ultimate Guide for Beginners PHP Tutorials : Learn in 7 Days PHP Tutorial | SoloLearn: Learn to code for FREE! PHP Tutorial - javatpoint PHP Tutorial Tutorials | PHP | Google Cloud Platform PHP Tutorials - Tutorialized PHP Tutorial - Table of contentsentutorial - HTML.net PHP Tutorial - PHP programming Reference Free PHP tutorials. Learn PHP, JavaScript, MySQL and how to use phpDesigner 8 MySQL PHP tutorial - MySQL programming with PHP Getting Started with PHP Regular Expressions - noupe Simple Banner Rotator With PHP, jQuery & MySQL | Tutorialzine Build a CMS in an Afternoon with PHP and MySQL PHP and HTML5 Learning Trail - NetBeans IDE Tutorials, Guides and Articles PHP | Tutorials | Webucator PHP Devs Center | Jelastic Dev Docs PHP tutorials, scripts and features from HTMLGoodiesPHP tutorials, scripts and features from HTMLGoodiesPHP tutorials, scripts and features from HTMLGoodiesPHP tutorials, scripts and features from HTMLGoodies PHP Tutorial – Learn PHP for beginners and advanced level | Tutorials Collection php pdf tutorial Convert HTML To PDF in PHP The Easy Way PHP MySQL Tutorial List files and directories in PHP Best Free PHP Video Tutorials The free video tutorials are the best way to get abreast with the language if you are more of a visual learner. You will get to learn from PHP experts and professionals, who will take you through a visual presentation and working of the language. PHP Programming Tutorials For Beginners - YouTube PHP Tutorials - Free Computer-Science Video Lectures PHP Tutorials Playlist - YouTube PHP - YouTube OOP PHP - YouTube PHP Tutorial - YouTube PHP Video Tutorial - YouTube PHP Security - YouTube PHP Tutorial for Beginners (For Absolute Beginners) - YouTube PHP Tutorials - YouTube PHP Tutorials - YouTube PHP Complete Series - YouTube PHP GD Image Processing Video Textbook Programming Tutorials - YouTube Ecommerce Website Tutorial PHP MySQL Tutorial PayPal IPN - YouTube How to Build Custom CMS Website Software Using PHP and MySQL - YouTube PHP Beginner Complete Tutorials - YouTube Bucky's Beginner PHP Programming Tutorial Series - YouTube
PHP MYSQL tutorials In Hindi for beginners (Core PHP) - YouTube PHP Tutorial for Beginners - 01 - Introduction - YouTube PHP Tutorial in Filipino - YouTube PHP Fundamentals Tutorial (Bangla) - YouTube Tutorial PHP MySQL Web Development - YouTube Curso de PHP - YouTube PHP & MySQL tutorials in Urdu/Hindi - YouTube PHP Tutorial In Tamil - YouTube Advanced OOP PHP tutorial - YouTube Core PHP complete/full tutorial series for beginners - YouTube PHP OOP Tutorials - YouTube WebDevlopment|PHP by Manideep - YouTube Best Free PHP ebooks and PDF Tutorials There are many free ebooks which will help you learn the language in the most appropriate manner and can be easily downloaded from the internet. Some of the books require you to have some programming background but most of them explain everything from scratch. PHP Tutorial PDF - Phptpoint.com ePub ebook PHP Reference: Beginner to Intermediate PHP5 PHP-Tutorial(w3schools).pdf Php Http Cookie PDF format tutorial for PHP MySQL PHP Api documentation PHP Tutorial From beginner to master Learn Object Oriented Programming (OOP) in PHP Programming PHP by Oreilly PHP Beginners Guide PHP Reference: Beginner to Intermediate PHP PHP Introduction to Server-Side Programming Creating dynamic Web sites with PHP and MySQL : IBM PHP 5 Power Programming PHP Manual CakePHP Cookbook Documentation Linux, Apache, MySQL, Perl/PHP/Python (LAMP) How To Build a LAMP Server Best PHP Blogs From Expert PHP Programmers and More PHP has a vibrant community of highly skilled programmers. This is the reason you will find many excellent blogs on PHP and related technology. PHP: Hypertext Preprocessor Tutorials | PHP | HTML | CSS | JavaScript | PHPJabbers PHP Tutorials for Beginners and Programmers | Codementor nikic's Blog blog.phpdev David Walsh Blog - JavaScript Consultant Roshan Bhattarai's Blog - A blog about PHP, Ajax, JavaScript, CSS, Web 2.0 and Web Development Chris Shiflett Paul M. Jones | There are no solutions, only tradeoffs. PHP – There and Back Again Stuart on PHP - Web Development Blog Programming, Books, Tutorials | FromDev: Search results for php PHP Tutorials Blog on Sitepoint Schlitt Blog About Tutorials on PHP Best Free PHP Forums and Massage Boards to Ask Questions The PHP web forums allow you to gain easy access to free and open source communities. These will help you become a part of the online virtual community wherein you can interact, share items and discuss. phpBB - Free and Open Source Forum Software Newest 'php' Questions - Stack Overflow PHPBuilder.com PHP Freaks PHP forum, your PHP coding community - Index page PHP PHP- Webdeveloper.com PHP - The SitePoint Forums Best Free Cheat Sheets for PHP Quick Reference These PHP cheat sheets enable you to take a quick look at the various important concepts of the language, without undertaking any in-depth study. PHP is used in almost all the popular platforms like Facebook, WordPress, Wikipedia, Joomla and Drupal. So, even if you are not looking forward to develop a similar platform, you will still require to learn the language if you wish to customize or integrate with any of the applications. BlueShoes: PHP Cheat Sheet PHP 5.4 - Dzone Refcardz PHP Refcard Available - Download Now - DZone PHP Cheat Sheet | OverAPI.com PHP Cheatsheets PHP Cheat Sheet by DaveChild PHP Cheatsheet By Expression Engine PHP Cheatsheet by Digilife PHP Cheatsheet by DreaminCode PHP Ref Card PHP Cheatsheet
0 notes