#Configuring GPU Tensorflow on Ubuntu
Explore tagged Tumblr posts
Visit Tumblr Blog
Explore Tumblr blogs with no restrictions, modern design and the best experience.
Last Seen Tumblr Blogs


Fun Fact
Tumblr has a low social media market share in South America.
Text
What Are The Hardware Requirements For RStudio?
Here are the hardware requirements for running RStudio, categorized into minimum and recommended levels for smooth performance:
🔧 Minimum Hardware Requirements (for basic usage):
CPU: Dual-core processor (Intel or AMD)
RAM: 2 GB
Disk Space: 200 MB for RStudio + space for R packages/data
Display: 1024×768 resolution
Operating System:
Windows 10 or higher (64-bit)
macOS 11 (Big Sur) or higher
Ubuntu 18.04+ / CentOS 7+ / Debian 10+ (64-bit)
⚙️ Recommended Hardware Requirements (for development, large datasets, or Shiny apps):
CPU: Quad-core or higher (e.g., Intel i5/i7, AMD Ryzen 5/7)
RAM: 8 GB or more (16 GB+ for heavy data science workloads)
Disk Space: SSD with at least 500 GB for faster data access and R package management
GPU: Not required for RStudio itself, but optional if using deep learning libraries in R (e.g., TensorFlow)
Network: Required if using RStudio Server or syncing with Git/GitHub
💻 Additional Notes:
RStudio Server (Pro or Open Source) may need more memory/CPU based on number of concurrent users.
Integration with R packages like dplyr, ggplot2, shiny, or caret can impact RAM and CPU needs.
For machine learning or big data, using tools like sparklyr or data.table, invest in at least 16 GB RAM and a modern CPU.
Would you like a configuration suggestion for a workstation optimized for RStudio and data science workloads?

0 notes
Text
Exeton Launches Vector One, A New Single-GPU Desktop PC

The Exeton Vector One is now available for order. The new single-GPU desktop PC is built to tackle demanding AI/ML tasks, from fine-tuning Stable Diffusion to handling the complexities of Llama 2 7B. Exeton customers can now benefit from a more compact, quieter desktop PC at a price point of less than $5,500.
Vector One Specs
GPU: 1x NVIDIA GeForce RTX 4090, 24 GB, liquid-cooled
PROCESSOR: AMD Ryzen™ 9 7950X 16-core, 32-thread
SYSTEM RAM: 64 GB or 128 GB DDR5
STORAGE: OS — Up to 3.84 TB M.2 (NVMe) | Data — Up to 3 x 3.84 TB M.2 (NVMe)
NETWORK INTERFACE: 10Gb Ethernet
Key benefits of the Vector One
The Vector One offers Exeton customers a powerful deep learning solution to train neural networks right from their desktops.
Sleek Power that doesn’t Disturb
The Vector One has been meticulously designed with liquid cooling for both the CPU and GPU, ensuring optimal performance without the noise. Even under typical high workloads, it only emits a mere 39 dB SPL of sound, making it perfect for maintaining a quiet workspace.
Next-gen Graphics for Advanced AI/ML Tasks
Equipped with the cutting-edge NVIDIA GeForce RTX 4090 graphics card boasting 24 GB of VRAM, the Vector One stands ready to tackle demanding tasks. From fine-tuning Stable Diffusion to handling the complexities of Llama 2 7B, this machine ensures that high-intensity computations are a breeze.
Experience the Power of future-ready Architecture
At the heart of Vector One lies the state-of-the-art AMD Ryzen 9 7950X CPU, hosted on the advanced X670E chipset. This powerhouse supports both PCIe Gen 5 and DDR5 and offers up to twice the memory bandwidth of its predecessors. Dive into the future of computing with unrivaled speed and efficiency.
Delivering the Optimal Experience for AI/ML
Through rigorous research and experience, our engineers have crafted the ultimate system configuration tailored for AI/ML tasks. No more guesswork or configurations needed: the Vector One is fine-tuned to deliver unparalleled performance right out of the box. Additionally, every Vector One comes with a one-year warranty on hardware, with an option to extend to three years. For added peace of mind, choose to include dedicated technical support for Ubuntu and all ML frameworks and drivers that come pre-installed with your machine.
Pre-installed with the Software you Need

How to get started with Vector One
The Vector One is now available to purchase. Equipped with a single NVIDIA GeForce RTX 4090 graphics card boasting 24 GB of VRAM and pre-installed with Ubuntu, TensorFlow, PyTorch®, NVIDIA CUDA, and NVIDIA cuDNN, the Vector One is the optimal single-GPU desktop PC for deep learning. At less than $5,500, the desktop solution meets tighter budget requirements without sacrificing performance.
Muhammad Hussnain Facebook | Instagram | Twitter | Linkedin | Youtube
0 notes
Link
In this tutorial, you will learn about Install TensorFlow GPU on Ubuntu - Configuring GPU Tensorflow on Ubuntu and Guideline for installation cuda 9.0 Toolkit for Ubuntu.
Ubuntu comes with opensource ubuntu NVIDIA driver called nouveau. So first step would be disabling it. This tutorial is divided into following parts
Disabling nouveau
Install cuda 9.0 Toolkit for ubuntu 18.04 LTS
Install Cudnn 7.0
Install libcupti
Adding path of cuda toolkit
Installing Tensorflow-GPU on virtual environment.
#ai#Install TensorFlow GPU on Ubuntu#cuda installation guideline#Configuring GPU Tensorflow on Ubuntu
0 notes
Text
Introduction to RK3588
What is RK3588?
RK3588 is a universal SoC with ARM architecture, which integrates quad-core Cortex-A76 (large core) and quad-core Cortex-A55(small core). Equipped with G610 MP4 GPU, which can run complex graphics processing smoothly. Embedded 3D GPU makes RK3588 fully compatible with OpenGLES 1.1, 2.0 and 3.2, OpenCL up to 2.2 and Vulkan1.2. A special 2D hardware engine with MMU will maximize display performance and provide smooth operation. And a 6 TOPs NPU empowers various AI scenarios, providing possibilities for local offline AI computing in complex scenarios, complex video stream analysis, and other applications. Built-in a variety of powerful embedded hardware engines, support 8K@60fps H.265 and VP9 decoders, 8K@30fps H.264 decoders and 4K@60fps AV1 decoders; support 8K@30fps H.264 and H.265 encoder, high-quality JPEG encoder/decoder, dedicated image pre-processor and post-processor.
RK3588 also introduces a new generation of fully hardware-based ISP (Image Signal Processor) with a maximum of 48 million pixels, implementing many algorithm accelerators, such as HDR, 3A, LSC, 3DNR, 2DNR, sharpening, dehaze, fisheye correction, gamma Correction, etc., have a wide range of applications in graphics post-processing. RK3588 integrates Rockchip's new generation NPU, which can support INT4/INT8/INT16/FP16 hybrid computing. Its strong compatibility can easily convert network models based on a series of frameworks such as TensorFlow / MXNet / PyTorch / Caffe. RK3588 has a high-performance 4-channel external memory interface (LPDDR4/LPDDR4X/LPDDR5), capable of supporting demanding memory bandwidth.
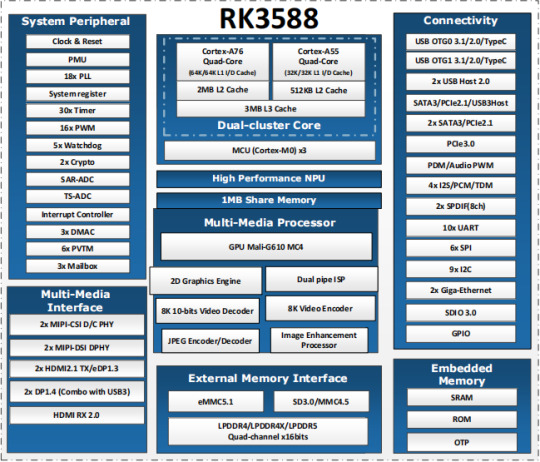
RK3588 Block Diagram
Advantages of RK3588?
Computing: RK3588 integrates quad-core Cortex-A76 and quad-core Cortex-A55, G610 MP4 graphics processor, and a separate NEON coprocessor. Integrating the third-generation NPU self-developed by Rockchip, computing power 6TOPS, which can meet the computing power requirements of most artificial intelligence models.
Vision: support multi-camera input, ISP3.0, high-quality audio;
Display: support multi-screen display, 8K high-quality, 3D display, etc.;
Video processing: support 8k video and multiple 4k codecs;
Communication: support multiple high-speed interfaces such as PCIe2.0 and PCIe3.0, USB3.0, and Gigabit Ethernet;
Operating system: Android 12 is supported. Linux and Ubuntu will be developed in succession;

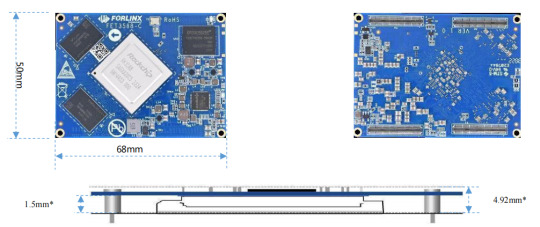
FET3588-C SoM based on Rockchip RK3588
Forlinx FET3588-C SoM inherits all advantages of RK3588. The following introduces it from structure and hardware design.
1. Structure:
The SoM size is 50mm x 68mm, smaller than most RK3588 SoMs on market;
100pin ultra-thin connector is used to connect SoM and carrier board. The combined height of connectors is 1.5mm, which greatly reduces the thickness of SoM; four mounting holes with a diameter of 2.2mm are reserved at the four corners of SoM. The product is used in a vibration environment can install fixing screws to improve the reliability of product connections.
2. Hardware Design:
FET3568-C SoM uses 12V power supply. A higher power supply voltage can increase the upper limit of power supply and reduce line loss. Ensure that the Forlinx’s SoM can run stably for a long time at full load. The power supply adopts RK single PMIC solution, which supports dynamic frequency modulation.
FET3568-C SoM uses 4 pieces of 100pin connectors, with a total of 400 pins; all the functions that can be extracted from processor are all extracted, and ground loop pins of high-speed signal are sufficient, and power supply and loop pins are sufficient to ensure signal integrity and power integrity.
The default memory configuration of FET3568-C SoM supports 4GB/8GB (up to 32GB) LPDDR4/LPDDR4X-4266; default storage configuration supports 32GB/64GB (larger storage is optional) eMMC; Each interface signal and power supply of SoM and carrier board have been strictly tested to ensure that the signal quality is good and the power wave is within specified range.
PCB layout: Forlinx uses top layer-GND-POWER-bottom layer to ensure the continuity and stability of signals.
RK3588 SoM hardware design Guide
FET3588-C SoM has integrated power supply and storage circuit in a small module. The required external circuit is very simple. A minimal system only needs power supply and startup configuration to run, as shown in the figure below:
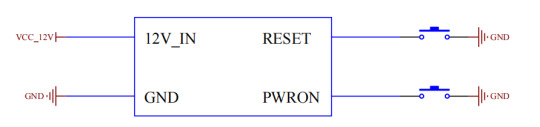
The minimum system includes SoM power supply, system flashing circuit, and debugging serial port circuit. The minimum system schematic diagram can be found in "OK3588-C_Hardware Manual". However, in general, it is recommended to connect some external devices, such as debugging serial port, otherwise user cannot judge whether system is started. After completing these, on this basis, add the functions required by user according to default interface definition of RK3588 SoM provided by Forlinx.
RK3588 Carrier Board Hardware Design Guide
The interface resources derived from Forlinx embedded OK3588-C development board are very rich, which provides great convenience for customers' development and testing. Moreover, OK3588-C development board has passed rigorous tests and can provide stable performance support for customers' high-end applications.

In order to facilitate user's secondary development, Forlinx provides RK3588 hardware design guidelines to annotate the problems that may be encountered during design process of RK3588. We want to help users make the research and development process simpler and more efficient, and make customers' products smarter and more stable. Due to the large amount of content, only a few guidelines for interface design are listed here. For details, you can contact us online to obtain "OK3588-C_Hardware Manual" (Click to Inquiry)
1 note
·
View note
Link
via thenewstack.io
Last week at the Amazon Web Services’ re:Invent conference, AWS and Intel introduced a new video camera, AWS DeepLens, that acts as an intelligent device that can run deep learning algorithms on captured images in real-time. The key difference between DeepLens and any other AI-powered camera lies in the horsepower that makes it possible to run machine learning inference models locally without ever sending the video frames to the cloud.
Developers and non-developers rushed to attend the AWS workshop on DeepLens to walk away with a device. There, they were enticed with a hot dog to perform the infamous “Hot Dog OR Not Hot Dog” experiment. I managed to attend one of the repeat sessions, and carefully ferried the device back home. Despite the jet lag setting in after a 22-hour flight, I managed to power up DeepLens, and configured it to count the number of people sitting in the living room.
This new device managed to get the attention in the midst of the myriad announcements made at AWS re:Invent, and I am confident that DeepLens will grow its fanfare to build a vibrant ecosystem of developers and ISVs — just like how Amazon Alexa did it.
As an IoT, Edge, and AI enthusiast, my imagination was captured by DeepLens almost instantly. It gave shape to many hypotheses and theories on how edge computing can become intelligent. DeepLens becomes an amazing playground to test how some of the emerging technologies such as IoT, edge computing, machine learning, and serverless computing come together to address powerful scenarios.
Based on my initial experiments, I am attempting to demystify the architecture of DeepLens. As I continue to explore the depth of DeepLens, I promise to share my findings.
Configuration
DeepLens is more of a PC than a camera. It is essentially a powerful computer with an attached camera that’s only marginally better than an average webcam. The device instantly reminded me of Intel NUC, a server-grade computer with a handy form-factor, which formed the foundation of my edge computing experiments.
The PC powering DeepLens is based on an Intel Atom X5 Processor that comes with four cores and four threads. With 8GB RAM and 16GB storage, it delivers just enough juice to run machine learning (ML) algorithms. But the most fascinating part of DeepLens is the embedded GPU in the form of Intel Gen9 Graphics Engine. While this is certainly not the best of the breed hardware, it is sufficient to run local ML inferences.
The PC runs Ubuntu 16.04 LTS that can be connected to a standard keyboard, mouse and a HDMI display. You can fire a terminal window and treat the device like any other Linux machine. Beyond the OS, there are other software components that make DeepLens an intelligent device. We will explore them in the later sections.
The camera is just another 4 megapixel webcam that barely manages to deliver 1080p resolution. Instead of connecting it to one of the available USB slots, Intel embedded it in the same PC cabinet.
Once AWS exposes the software layer, anyone would be able to emulate DeepLens on their desktops and even Raspberry Pis. The key takeaway is that the hardware in itself is not the exciting part of DeepLens.
The Secret Sauce
What’s fascinating about DeepLens is the way AWS managed to connect the dots. It is an elegantly designed software stack that spans the device and the cloud. Amazon exploited many services to make DeepLens a powerful edge computing platform.
Since developing a convolutional neural network (CNN) is hard, and also requires access to tens of thousands of images to train the model, AWS has made a few projects available out of the box. Once a DeepLens device is registered with your AWS account, you can easily push any of these projects to the device within minutes.
To appreciate the architecture of DeepLens, you need to have a basic understanding of AWS IoT, AWS Greengrass, AWS Lambda, and Amazon SageMaker.
AWS IoT is a platform that manages machine-to-machine communication (M2M) and supports ingesting device telemetry. Developers can easily connect sensors and actuators to AWS IoT and orchestrate the workflow based on a simple rules engine. For advanced scenarios, the telemetry is sent to AWS Lambda for further processing.
AWS Greengrass is an extension of AWS IoT that’s designed to run on gateways and hubs that can aggregate telemetry in offline modes. The software can be easily configured on x64 or ARM devices that are deployed within the local environments. Greengrass exposes the same M2M capabilities along with a local Lambda engine for programmability. Developers can push Node.js or Python functions to run within Greengrass. AWS Greengrass can also run ML inference models locally without relying on the cloud. So, Greengrass is an edge computing platform from AWS.
The support for Python functions in Lambda opens up doors to bring sophisticated machine learning algorithms to the edge. Greengrass can run ML models based on MXNet and TensorFlow.
Amazon SageMaker is the new ML platform to build, train, and deploy ML models in the cloud. Developers can use Jupyter notebooks to write the models and use GPU-based EC2 infrastructure to train those models. The final model can be published as a web service or can be pushed to Greengrass for local inference.
DeepLens effectively exploits all these services to perform deep learning on the images. Essentially, data scientists use SageMaker to build and train a CNN in the cloud, and then deploy it to DeepLens for offline inference.
DeepLens Architecture
Ultimately, DeepLens is an edge computing device powered by AWS Greengrass. The camera connected to it is treated like any other sensor that can ingest telemetry. In this case, the camera is sending video frames instead of time-series data.
Each video frame is sent to an AWS Lambda function that runs the ML inference model written in Python. This function takes advantage of the locally available GPU to run the convolutional neural network on each frame. The model then emits a score which is formatted in JSON.
The output of the Lambda function, which is a JSON payload with the score, will also have additional annotations. This JSON payload is published to an AWS IoT MQTT topic like any other sensor telemetry payload.
Once the payload is published to the topic, it can be passed through AWS IoT rules engine that can invoke a Lambda function to evaluate each message. Once the message lands in Lambda, it is upto the developer on what he wants to do with it.
Roadmap
Technically speaking, you don’t need a $249 device to run an offline convolutional neural network model. If you are a maker with an appetite to build things from the scratch, consider getting the Google Vision Kit. It is a cheaper, DIY version of DeepLens.
Amazon must be appreciated for visualizing and designing a product like DeepLens. It acts as a reference architecture for many edge computing use cases. The whole integration of DeepLens with AWS Management Console, the workflow involved in importing a SageMaker model as a project, and finally pushing the inference model with one click, makes DeepLens a rich edge computing platform.
The device will have to go through multiple iterations before it becomes polished and sophisticated. Once the DeepLens platform becomes stable, original device manufacturers will start embedding that in their cameras. Amazon might even ship an Android and iOS version of DeepLens SDK to enable mobile developers to build intelligent computer vision applications.
DeepLens is a proof that edge computing is here and it is real. We are certainly living in exciting times.
Google is a sponsor of The New Stack.
The post A Deep Dive on AWS DeepLens appeared first on The New Stack.
0 notes
Link
In this tutorial, you will learn about GPU Computing - Configuring GPU Tensorflow on Ubuntu and cuda installation guideline 9.0 Toolkit for Ubuntu. Nouveau is the community/organization that makes the open source drivers for nvidia graphic card. It provides open source drivers. Developers performs reverse enginerring of nvidia proprietary drivers. As we need to build the proprietary drivers for the nvidia, open source ubuntu drivers needs to be disabled. So please type the below code to disable it.
0 notes
Link
In this tutorial, you will learn about GPU Computing - Configuring GPU Tensorflow on Ubuntu and CUDA Installation Guideline 9.0 Toolkit for Ubuntu. cuda is the programming language develped by Nvidia and is only meant for nvidia.GPU processes the tensors or arrays using the GPU cores (cuda cores), where CPU are having only limited cores whereas GPU has a lot of cores and hence the processing capability of GPU is far far better than CPU. It is pci-e which connects CPU with GPU. When task come to the CPU, it transfers it to GPU memory. GPU again transfer it to the CUDA Cores. Result is transfered back to the CPU memory which we see it. To install cuda toolkit for ubuntu 18.04, please remember that official toolkit has come for ubuntu 17.04. But it will also support ubuntu 18.04.
#ai#CUDA Installation Guideline#Install TensorFlow GPU on Ubuntu#Configuring GPU Tensorflow on Ubuntu
0 notes
Link
In this tutorial, you will learn about GPU Computing - Configuring GPU Tensorflow on Ubuntu and Guideline for installation cuda 9.0 Toolkit for Ubuntu. Ubuntu comes with opensource ubuntu NVIDIA driver called nouveau. So first step would be disabling it. This tutorial is divided into following parts
Disabling nouveau Install cuda 9.0 Toolkit for ubuntu 18.04 LTS Install Cudnn 7.0 Install libcupti Adding path of cuda toolkit Installing Tensorflow-GPU on virtual environment.
#ai#Configuring GPU Tensorflow on Ubuntu#cuda installation guideline#Install TensorFlow GPU on Ubuntu
0 notes
Link
In this tutorial, you will learn about GPU Computing - Configuring GPU install tensorflow gpu on ubuntu and Guideline for installation cuda 9.0 Toolkit for Ubuntu. CUDA is the programming language develped by Nvidia and is only meant for nvidia.GPU processes the tensors or arrays using the GPU cores (cuda cores), where CPU are having only limited cores whereas GPU has a lot of cores and hence the processing capability of GPU is far far better than CPU. It is pci-e which connects CPU with GPU. When task come to the CPU, it transfers it to GPU memory. GPU again transfer it to the CUDA Cores. Result is transfered back to the CPU memory which we see it.
#ai#cuda installation guideline#Install TensorFlow GPU on Ubuntu#Configuring GPU Tensorflow on Ubuntu
0 notes
Photo
you will learn about GPU Computing - Configuring GPU Tensorflow on Ubuntu and Guideline for installation Cuda 9.0 Toolkit for Ubuntu.
0 notes
Photo
you will learn about GPU Computing - Configuring GPU Tensorflow on Ubuntu and Guideline for installation Cuda 9.0 Toolkit for Ubuntu.
0 notes
Photo
you will learn about GPU Computing - Configuring GPU Tensorflow on Ubuntu and Guideline for installation Cuda 9.0 Toolkit for Ubuntu.
0 notes
Photo

In this tutorial, you will learn about GPU Computing - Configuring GPU Tensorflow on Ubuntu and Guideline for installation Cuda 9.0 Toolkit for Ubuntu.
0 notes
Photo

In this tutorial, you will learn about GPU Computing - Configuring GPU Tensorflow on Ubuntu and Guideline for installation Cuda 9.0 Toolkit for Ubuntu.
0 notes
Photo

Custom-Object-Detection with Tensorflow Api
Introduction
Artificial intelligence is developed to make the task automated. Keeping this vision, I am writing this post to automate the detection of flower and cat using Google TensorFlow Object Detection api. Broadly speaking, this post is about Custom-Object-Detection with Tensorflow API. Google provides an Object Detection API which already had some models were trained on the COCO dataset . You can look for the trained models from Tensorflow detection model zoo. First of all before proceeding further, one need to clone the TensorFlow object detection repository using the below command
#deep learning tutorial for beginners#Machine Learning with Python Tutorial#python machine learning#tensorflow api#tensorflow#configure GPU-Tensorflow-Ubuntu
0 notes
Text
Configuring-GPU-Tensorflow-Ubuntu-18.04
Ubuntu comes with opensource ubuntu NVIDIA driver called nouveau. Read Our Blog & Learn How to configure GPU-Tensorflow-Ubuntu-18.04

0 notes