#Install TensorFlow GPU on Ubuntu
Explore tagged Tumblr posts
Visit Tumblr Blog
Explore Tumblr blogs with no restrictions, modern design and the best experience.
Last Seen Tumblr Blogs


Fun Fact
Tumblr was created by web developers David Karp and Marco Arment.
Text
Setting Up a Training, Fine-Tuning, and Inferencing of LLMs with NVIDIA GPUs and CUDA
New Post has been published on https://thedigitalinsider.com/setting-up-a-training-fine-tuning-and-inferencing-of-llms-with-nvidia-gpus-and-cuda/
Setting Up a Training, Fine-Tuning, and Inferencing of LLMs with NVIDIA GPUs and CUDA
The field of artificial intelligence (AI) has witnessed remarkable advancements in recent years, and at the heart of it lies the powerful combination of graphics processing units (GPUs) and parallel computing platform.
Models such as GPT, BERT, and more recently Llama, Mistral are capable of understanding and generating human-like text with unprecedented fluency and coherence. However, training these models requires vast amounts of data and computational resources, making GPUs and CUDA indispensable tools in this endeavor.
This comprehensive guide will walk you through the process of setting up an NVIDIA GPU on Ubuntu, covering the installation of essential software components such as the NVIDIA driver, CUDA Toolkit, cuDNN, PyTorch, and more.
The Rise of CUDA-Accelerated AI Frameworks
GPU-accelerated deep learning has been fueled by the development of popular AI frameworks that leverage CUDA for efficient computation. Frameworks such as TensorFlow, PyTorch, and MXNet have built-in support for CUDA, enabling seamless integration of GPU acceleration into deep learning pipelines.
According to the NVIDIA Data Center Deep Learning Product Performance Study, CUDA-accelerated deep learning models can achieve up to 100s times faster performance compared to CPU-based implementations.
NVIDIA’s Multi-Instance GPU (MIG) technology, introduced with the Ampere architecture, allows a single GPU to be partitioned into multiple secure instances, each with its own dedicated resources. This feature enables efficient sharing of GPU resources among multiple users or workloads, maximizing utilization and reducing overall costs.
Accelerating LLM Inference with NVIDIA TensorRT
While GPUs have been instrumental in training LLMs, efficient inference is equally crucial for deploying these models in production environments. NVIDIA TensorRT, a high-performance deep learning inference optimizer and runtime, plays a vital role in accelerating LLM inference on CUDA-enabled GPUs.
According to NVIDIA’s benchmarks, TensorRT can provide up to 8x faster inference performance and 5x lower total cost of ownership compared to CPU-based inference for large language models like GPT-3.
NVIDIA’s commitment to open-source initiatives has been a driving force behind the widespread adoption of CUDA in the AI research community. Projects like cuDNN, cuBLAS, and NCCL are available as open-source libraries, enabling researchers and developers to leverage the full potential of CUDA for their deep learning.
Installation
When setting AI development, using the latest drivers and libraries may not always be the best choice. For instance, while the latest NVIDIA driver (545.xx) supports CUDA 12.3, PyTorch and other libraries might not yet support this version. Therefore, we will use driver version 535.146.02 with CUDA 12.2 to ensure compatibility.
Installation Steps
1. Install NVIDIA Driver
First, identify your GPU model. For this guide, we use the NVIDIA GPU. Visit the NVIDIA Driver Download page, select the appropriate driver for your GPU, and note the driver version.
To check for prebuilt GPU packages on Ubuntu, run:
sudo ubuntu-drivers list --gpgpu
Reboot your computer and verify the installation:
nvidia-smi
2. Install CUDA Toolkit
The CUDA Toolkit provides the development environment for creating high-performance GPU-accelerated applications.
For a non-LLM/deep learning setup, you can use:
sudo apt install nvidia-cuda-toolkit However, to ensure compatibility with BitsAndBytes, we will follow these steps: [code language="BASH"] git clone https://github.com/TimDettmers/bitsandbytes.git cd bitsandbytes/ bash install_cuda.sh 122 ~/local 1
Verify the installation:
~/local/cuda-12.2/bin/nvcc --version
Set the environment variables:
export CUDA_HOME=/home/roguser/local/cuda-12.2/ export LD_LIBRARY_PATH=/home/roguser/local/cuda-12.2/lib64 export BNB_CUDA_VERSION=122 export CUDA_VERSION=122
3. Install cuDNN
Download the cuDNN package from the NVIDIA Developer website. Install it with:
sudo apt install ./cudnn-local-repo-ubuntu2204-8.9.7.29_1.0-1_amd64.deb
Follow the instructions to add the keyring:
sudo cp /var/cudnn-local-repo-ubuntu2204-8.9.7.29/cudnn-local-08A7D361-keyring.gpg /usr/share/keyrings/
Install the cuDNN libraries:
sudo apt update sudo apt install libcudnn8 libcudnn8-dev libcudnn8-samples
4. Setup Python Virtual Environment
Ubuntu 22.04 comes with Python 3.10. Install venv:
sudo apt-get install python3-pip sudo apt install python3.10-venv
Create and activate the virtual environment:
cd mkdir test-gpu cd test-gpu python3 -m venv venv source venv/bin/activate
5. Install BitsAndBytes from Source
Navigate to the BitsAndBytes directory and build from source:
cd ~/bitsandbytes CUDA_HOME=/home/roguser/local/cuda-12.2/ LD_LIBRARY_PATH=/home/roguser/local/cuda-12.2/lib64 BNB_CUDA_VERSION=122 CUDA_VERSION=122 make cuda12x CUDA_HOME=/home/roguser/local/cuda-12.2/ LD_LIBRARY_PATH=/home/roguser/local/cuda-12.2/lib64 BNB_CUDA_VERSION=122 CUDA_VERSION=122 python setup.py install
6. Install PyTorch
Install PyTorch with the following command:
pip install torch torchvision torchaudio --index-url https://download.pytorch.org/whl/cu121
7. Install Hugging Face and Transformers
Install the transformers and accelerate libraries:
pip install transformers pip install accelerate
The Power of Parallel Processing
At their core, GPUs are highly parallel processors designed to handle thousands of concurrent threads efficiently. This architecture makes them well-suited for the computationally intensive tasks involved in training deep learning models, including LLMs. The CUDA platform, developed by NVIDIA, provides a software environment that allows developers to harness the full potential of these GPUs, enabling them to write code that can leverage the parallel processing capabilities of the hardware. Accelerating LLM Training with GPUs and CUDA.
Training large language models is a computationally demanding task that requires processing vast amounts of text data and performing numerous matrix operations. GPUs, with their thousands of cores and high memory bandwidth, are ideally suited for these tasks. By leveraging CUDA, developers can optimize their code to take advantage of the parallel processing capabilities of GPUs, significantly reducing the time required to train LLMs.
For example, the training of GPT-3, one of the largest language models to date, was made possible through the use of thousands of NVIDIA GPUs running CUDA-optimized code. This allowed the model to be trained on an unprecedented amount of data, leading to its impressive performance in natural language tasks.
import torch import torch.nn as nn import torch.optim as optim from transformers import GPT2LMHeadModel, GPT2Tokenizer # Load pre-trained GPT-2 model and tokenizer model = GPT2LMHeadModel.from_pretrained('gpt2') tokenizer = GPT2Tokenizer.from_pretrained('gpt2') # Move model to GPU if available device = torch.device("cuda" if torch.cuda.is_available() else "cpu") model = model.to(device) # Define training data and hyperparameters train_data = [...] # Your training data batch_size = 32 num_epochs = 10 learning_rate = 5e-5 # Define loss function and optimizer criterion = nn.CrossEntropyLoss() optimizer = optim.Adam(model.parameters(), lr=learning_rate) # Training loop for epoch in range(num_epochs): for i in range(0, len(train_data), batch_size): # Prepare input and target sequences inputs, targets = train_data[i:i+batch_size] inputs = tokenizer(inputs, return_tensors="pt", padding=True) inputs = inputs.to(device) targets = targets.to(device) # Forward pass outputs = model(**inputs, labels=targets) loss = outputs.loss # Backward pass and optimization optimizer.zero_grad() loss.backward() optimizer.step() print(f'Epoch epoch+1/num_epochs, Loss: loss.item()')
In this example code snippet, we demonstrate the training of a GPT-2 language model using PyTorch and the CUDA-enabled GPUs. The model is loaded onto the GPU (if available), and the training loop leverages the parallelism of GPUs to perform efficient forward and backward passes, accelerating the training process.
CUDA-Accelerated Libraries for Deep Learning
In addition to the CUDA platform itself, NVIDIA and the open-source community have developed a range of CUDA-accelerated libraries that enable efficient implementation of deep learning models, including LLMs. These libraries provide optimized implementations of common operations, such as matrix multiplications, convolutions, and activation functions, allowing developers to focus on the model architecture and training process rather than low-level optimization.
One such library is cuDNN (CUDA Deep Neural Network library), which provides highly tuned implementations of standard routines used in deep neural networks. By leveraging cuDNN, developers can significantly accelerate the training and inference of their models, achieving performance gains of up to several orders of magnitude compared to CPU-based implementations.
import torch import torch.nn as nn import torch.nn.functional as F from torch.cuda.amp import autocast class ResidualBlock(nn.Module): def __init__(self, in_channels, out_channels, stride=1): super().__init__() self.conv1 = nn.Conv2d(in_channels, out_channels, kernel_size=3, stride=stride, padding=1, bias=False) self.bn1 = nn.BatchNorm2d(out_channels) self.conv2 = nn.Conv2d(out_channels, out_channels, kernel_size=3, stride=1, padding=1, bias=False) self.bn2 = nn.BatchNorm2d(out_channels) self.shortcut = nn.Sequential() if stride != 1 or in_channels != out_channels: self.shortcut = nn.Sequential( nn.Conv2d(in_channels, out_channels, kernel_size=1, stride=stride, bias=False), nn.BatchNorm2d(out_channels)) def forward(self, x): with autocast(): out = F.relu(self.bn1(self.conv1(x))) out = self.bn2(self.conv2(out)) out += self.shortcut(x) out = F.relu(out) return out
In this code snippet, we define a residual block for a convolutional neural network (CNN) using PyTorch. The autocast context manager from PyTorch’s Automatic Mixed Precision (AMP) is used to enable mixed-precision training, which can provide significant performance gains on CUDA-enabled GPUs while maintaining high accuracy. The F.relu function is optimized by cuDNN, ensuring efficient execution on GPUs.
Multi-GPU and Distributed Training for Scalability
As LLMs and deep learning models continue to grow in size and complexity, the computational requirements for training these models also increase. To address this challenge, researchers and developers have turned to multi-GPU and distributed training techniques, which allow them to leverage the combined processing power of multiple GPUs across multiple machines.
CUDA and associated libraries, such as NCCL (NVIDIA Collective Communications Library), provide efficient communication primitives that enable seamless data transfer and synchronization across multiple GPUs, enabling distributed training at an unprecedented scale.
</pre> import torch.distributed as dist from torch.nn.parallel import DistributedDataParallel as DDP # Initialize distributed training dist.init_process_group(backend='nccl', init_method='...') local_rank = dist.get_rank() torch.cuda.set_device(local_rank) # Create model and move to GPU model = MyModel().cuda() # Wrap model with DDP model = DDP(model, device_ids=[local_rank]) # Training loop (distributed) for epoch in range(num_epochs): for data in train_loader: inputs, targets = data inputs = inputs.cuda(non_blocking=True) targets = targets.cuda(non_blocking=True) outputs = model(inputs) loss = criterion(outputs, targets) optimizer.zero_grad() loss.backward() optimizer.step()
In this example, we demonstrate distributed training using PyTorch’s DistributedDataParallel (DDP) module. The model is wrapped in DDP, which automatically handles data parallelism, gradient synchronization, and communication across multiple GPUs using NCCL. This approach enables efficient scaling of the training process across multiple machines, allowing researchers and developers to train larger and more complex models in a reasonable amount of time.
Deploying Deep Learning Models with CUDA
While GPUs and CUDA have primarily been used for training deep learning models, they are also crucial for efficient deployment and inference. As deep learning models become increasingly complex and resource-intensive, GPU acceleration is essential for achieving real-time performance in production environments.
NVIDIA’s TensorRT is a high-performance deep learning inference optimizer and runtime that provides low-latency and high-throughput inference on CUDA-enabled GPUs. TensorRT can optimize and accelerate models trained in frameworks like TensorFlow, PyTorch, and MXNet, enabling efficient deployment on various platforms, from embedded systems to data centers.
import tensorrt as trt # Load pre-trained model model = load_model(...) # Create TensorRT engine logger = trt.Logger(trt.Logger.INFO) builder = trt.Builder(logger) network = builder.create_network() parser = trt.OnnxParser(network, logger) # Parse and optimize model success = parser.parse_from_file(model_path) engine = builder.build_cuda_engine(network) # Run inference on GPU context = engine.create_execution_context() inputs, outputs, bindings, stream = allocate_buffers(engine) # Set input data and run inference set_input_data(inputs, input_data) context.execute_async_v2(bindings=bindings, stream_handle=stream.ptr) # Process output # ...
In this example, we demonstrate the use of TensorRT for deploying a pre-trained deep learning model on a CUDA-enabled GPU. The model is first parsed and optimized by TensorRT, which generates a highly optimized inference engine tailored for the specific model and hardware. This engine can then be used to perform efficient inference on the GPU, leveraging CUDA for accelerated computation.
Conclusion
The combination of GPUs and CUDA has been instrumental in driving the advancements in large language models, computer vision, speech recognition, and various other domains of deep learning. By harnessing the parallel processing capabilities of GPUs and the optimized libraries provided by CUDA, researchers and developers can train and deploy increasingly complex models with high efficiency.
As the field of AI continues to evolve, the importance of GPUs and CUDA will only grow. With even more powerful hardware and software optimizations, we can expect to see further breakthroughs in the development and deployment of AI systems, pushing the boundaries of what is possible.
#ai#AI development#AI research#AI systems#AI Tools 101#amp#applications#approach#apt#architecture#artificial#Artificial Intelligence#benchmarks#BERT#Bias#challenge#clone#CNN#code#Code Snippet#Collective#command#communication#communications#Community#complexity#comprehensive#computation#computer#Computer vision
0 notes
Text
Exeton Launches Vector One, A New Single-GPU Desktop PC

The Exeton Vector One is now available for order. The new single-GPU desktop PC is built to tackle demanding AI/ML tasks, from fine-tuning Stable Diffusion to handling the complexities of Llama 2 7B. Exeton customers can now benefit from a more compact, quieter desktop PC at a price point of less than $5,500.
Vector One Specs
GPU: 1x NVIDIA GeForce RTX 4090, 24 GB, liquid-cooled
PROCESSOR: AMD Ryzen™ 9 7950X 16-core, 32-thread
SYSTEM RAM: 64 GB or 128 GB DDR5
STORAGE: OS — Up to 3.84 TB M.2 (NVMe) | Data — Up to 3 x 3.84 TB M.2 (NVMe)
NETWORK INTERFACE: 10Gb Ethernet
Key benefits of the Vector One
The Vector One offers Exeton customers a powerful deep learning solution to train neural networks right from their desktops.
Sleek Power that doesn’t Disturb
The Vector One has been meticulously designed with liquid cooling for both the CPU and GPU, ensuring optimal performance without the noise. Even under typical high workloads, it only emits a mere 39 dB SPL of sound, making it perfect for maintaining a quiet workspace.
Next-gen Graphics for Advanced AI/ML Tasks
Equipped with the cutting-edge NVIDIA GeForce RTX 4090 graphics card boasting 24 GB of VRAM, the Vector One stands ready to tackle demanding tasks. From fine-tuning Stable Diffusion to handling the complexities of Llama 2 7B, this machine ensures that high-intensity computations are a breeze.
Experience the Power of future-ready Architecture
At the heart of Vector One lies the state-of-the-art AMD Ryzen 9 7950X CPU, hosted on the advanced X670E chipset. This powerhouse supports both PCIe Gen 5 and DDR5 and offers up to twice the memory bandwidth of its predecessors. Dive into the future of computing with unrivaled speed and efficiency.
Delivering the Optimal Experience for AI/ML
Through rigorous research and experience, our engineers have crafted the ultimate system configuration tailored for AI/ML tasks. No more guesswork or configurations needed: the Vector One is fine-tuned to deliver unparalleled performance right out of the box. Additionally, every Vector One comes with a one-year warranty on hardware, with an option to extend to three years. For added peace of mind, choose to include dedicated technical support for Ubuntu and all ML frameworks and drivers that come pre-installed with your machine.
Pre-installed with the Software you Need

How to get started with Vector One
The Vector One is now available to purchase. Equipped with a single NVIDIA GeForce RTX 4090 graphics card boasting 24 GB of VRAM and pre-installed with Ubuntu, TensorFlow, PyTorch®, NVIDIA CUDA, and NVIDIA cuDNN, the Vector One is the optimal single-GPU desktop PC for deep learning. At less than $5,500, the desktop solution meets tighter budget requirements without sacrificing performance.
Muhammad Hussnain Facebook | Instagram | Twitter | Linkedin | Youtube
0 notes
Link
In this tutorial, you will learn about Install TensorFlow GPU on Ubuntu - Configuring GPU Tensorflow on Ubuntu and Guideline for installation cuda 9.0 Toolkit for Ubuntu.
Ubuntu comes with opensource ubuntu NVIDIA driver called nouveau. So first step would be disabling it. This tutorial is divided into following parts
Disabling nouveau
Install cuda 9.0 Toolkit for ubuntu 18.04 LTS
Install Cudnn 7.0
Install libcupti
Adding path of cuda toolkit
Installing Tensorflow-GPU on virtual environment.
#ai#Install TensorFlow GPU on Ubuntu#cuda installation guideline#Configuring GPU Tensorflow on Ubuntu
0 notes
Text
Introduction to RK3588
What is RK3588?
RK3588 is a universal SoC with ARM architecture, which integrates quad-core Cortex-A76 (large core) and quad-core Cortex-A55(small core). Equipped with G610 MP4 GPU, which can run complex graphics processing smoothly. Embedded 3D GPU makes RK3588 fully compatible with OpenGLES 1.1, 2.0 and 3.2, OpenCL up to 2.2 and Vulkan1.2. A special 2D hardware engine with MMU will maximize display performance and provide smooth operation. And a 6 TOPs NPU empowers various AI scenarios, providing possibilities for local offline AI computing in complex scenarios, complex video stream analysis, and other applications. Built-in a variety of powerful embedded hardware engines, support 8K@60fps H.265 and VP9 decoders, 8K@30fps H.264 decoders and 4K@60fps AV1 decoders; support 8K@30fps H.264 and H.265 encoder, high-quality JPEG encoder/decoder, dedicated image pre-processor and post-processor.
RK3588 also introduces a new generation of fully hardware-based ISP (Image Signal Processor) with a maximum of 48 million pixels, implementing many algorithm accelerators, such as HDR, 3A, LSC, 3DNR, 2DNR, sharpening, dehaze, fisheye correction, gamma Correction, etc., have a wide range of applications in graphics post-processing. RK3588 integrates Rockchip's new generation NPU, which can support INT4/INT8/INT16/FP16 hybrid computing. Its strong compatibility can easily convert network models based on a series of frameworks such as TensorFlow / MXNet / PyTorch / Caffe. RK3588 has a high-performance 4-channel external memory interface (LPDDR4/LPDDR4X/LPDDR5), capable of supporting demanding memory bandwidth.
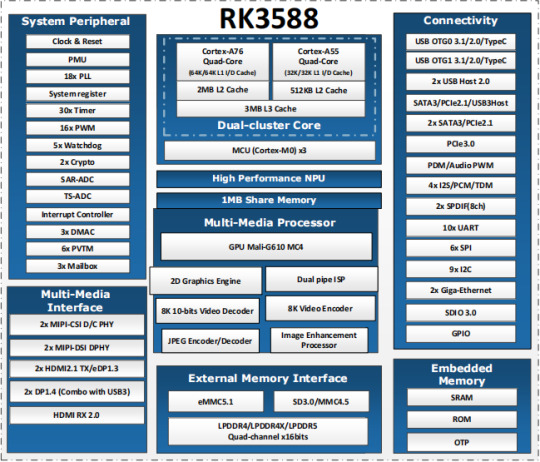
RK3588 Block Diagram
Advantages of RK3588?
Computing: RK3588 integrates quad-core Cortex-A76 and quad-core Cortex-A55, G610 MP4 graphics processor, and a separate NEON coprocessor. Integrating the third-generation NPU self-developed by Rockchip, computing power 6TOPS, which can meet the computing power requirements of most artificial intelligence models.
Vision: support multi-camera input, ISP3.0, high-quality audio;
Display: support multi-screen display, 8K high-quality, 3D display, etc.;
Video processing: support 8k video and multiple 4k codecs;
Communication: support multiple high-speed interfaces such as PCIe2.0 and PCIe3.0, USB3.0, and Gigabit Ethernet;
Operating system: Android 12 is supported. Linux and Ubuntu will be developed in succession;

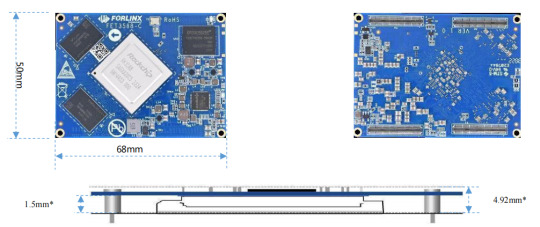
FET3588-C SoM based on Rockchip RK3588
Forlinx FET3588-C SoM inherits all advantages of RK3588. The following introduces it from structure and hardware design.
1. Structure:
The SoM size is 50mm x 68mm, smaller than most RK3588 SoMs on market;
100pin ultra-thin connector is used to connect SoM and carrier board. The combined height of connectors is 1.5mm, which greatly reduces the thickness of SoM; four mounting holes with a diameter of 2.2mm are reserved at the four corners of SoM. The product is used in a vibration environment can install fixing screws to improve the reliability of product connections.
2. Hardware Design:
FET3568-C SoM uses 12V power supply. A higher power supply voltage can increase the upper limit of power supply and reduce line loss. Ensure that the Forlinx’s SoM can run stably for a long time at full load. The power supply adopts RK single PMIC solution, which supports dynamic frequency modulation.
FET3568-C SoM uses 4 pieces of 100pin connectors, with a total of 400 pins; all the functions that can be extracted from processor are all extracted, and ground loop pins of high-speed signal are sufficient, and power supply and loop pins are sufficient to ensure signal integrity and power integrity.
The default memory configuration of FET3568-C SoM supports 4GB/8GB (up to 32GB) LPDDR4/LPDDR4X-4266; default storage configuration supports 32GB/64GB (larger storage is optional) eMMC; Each interface signal and power supply of SoM and carrier board have been strictly tested to ensure that the signal quality is good and the power wave is within specified range.
PCB layout: Forlinx uses top layer-GND-POWER-bottom layer to ensure the continuity and stability of signals.
RK3588 SoM hardware design Guide
FET3588-C SoM has integrated power supply and storage circuit in a small module. The required external circuit is very simple. A minimal system only needs power supply and startup configuration to run, as shown in the figure below:
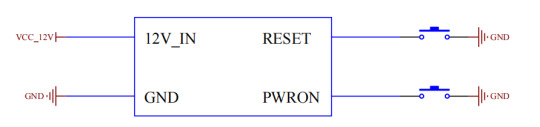
The minimum system includes SoM power supply, system flashing circuit, and debugging serial port circuit. The minimum system schematic diagram can be found in "OK3588-C_Hardware Manual". However, in general, it is recommended to connect some external devices, such as debugging serial port, otherwise user cannot judge whether system is started. After completing these, on this basis, add the functions required by user according to default interface definition of RK3588 SoM provided by Forlinx.
RK3588 Carrier Board Hardware Design Guide
The interface resources derived from Forlinx embedded OK3588-C development board are very rich, which provides great convenience for customers' development and testing. Moreover, OK3588-C development board has passed rigorous tests and can provide stable performance support for customers' high-end applications.

In order to facilitate user's secondary development, Forlinx provides RK3588 hardware design guidelines to annotate the problems that may be encountered during design process of RK3588. We want to help users make the research and development process simpler and more efficient, and make customers' products smarter and more stable. Due to the large amount of content, only a few guidelines for interface design are listed here. For details, you can contact us online to obtain "OK3588-C_Hardware Manual" (Click to Inquiry)
1 note
·
View note
Photo

Install Tensorflow 2.* on Ubuntu 19.10 with GPU support ☞ https://medium.com/@Oysiyl/install-tensorflow-2-with-gpu-support-on-ubuntu-19-10-f502ae85593c #ai #tensorflow
2 notes
·
View notes
Text
Theme Updates, Offline Upgrades Headline New Additions to Pop!_OS 19.10

Halloween came early this year with our latest release of Pop!_OS. Fill your treat bag with theme updates, Tensorman, easy upgrading, and more as we unwrap the details of Pop!_OS 19.10:
Theme Updates
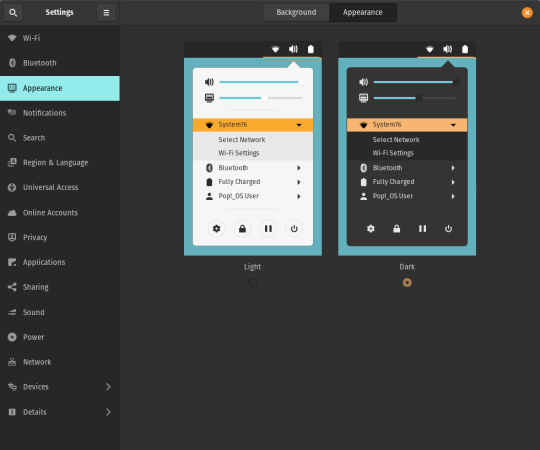
A new Dark Mode for Pop!_OS is available in the operating system’s Appearance Settings. Both the Light and Dark modes feature higher contrast colors using a neutral color palette that’s easy on the eyes.
The functionality of Dark Mode has been expanded to include the shell, providing a more consistently dark aesthetic across your desktop. If you’re using the User Themes extension to set the shell theme, disable it to use the new integrated Light and Dark mode switcher.
The default theme on Pop!_OS has been rebuilt based on Adwaita. Though users may only notice a slight difference in their widgets, the new OS theme provides significant measures to prevent application themes from experiencing UI breakage. This breakage manifests in the application as missing or misaligned text, broken widgets, and scaling errors, and should not occur with the new theme in place.
The updated theme includes a new set of modernized sound effects. Users will now hear a sound effect when plugging and unplugging a USB or charging cable. The sound effect for adjusting the volume has been removed.
Tensorman
Tensorman is a new tool that we’ve developed to serve as a toolchain manager for Tensorflow, using the official Docker builds of Tensorflow. For example, executing a python script inside of a Tensorflow Docker container with CUDA GPU and Python 3 support will now be as simple as running:
tensorman run --gpu python -- ./script.py
Tensorman allows users to define a default version of Tensorflow user-wide, project-wide, and per run. This will enable all releases of Pop!_OS to gain equal support for all versions of Tensorflow, including pre-releases, without needing to install Tensorflow or the CUDA SDK in the system. Likewise, new releases of Tensorflow upstream will be made immediately available to install with Tensorman.
Examples of how to use Tensorman are in the tool’s support page. Tensorman is now available on Pop!_OS 19.10, and will be coming to Pop!_OS 18.04 LTS soon.
To install Tensorman, enter this command into the Terminal:
sudo apt install tensorman
GNOME 3.34
In addition to theming improvements, the GNOME 3.34 release brings some new updates to the fold. From GNOME’s 3.34 Release Notes:
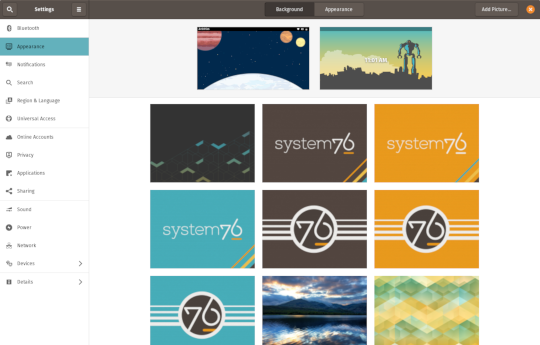
A redesigned Background panel landed in the Appearance settings. Now when you select a background, you will see a preview of it under the desktop panel and lock screen. Custom backgrounds can now be added via the Add Picture… button.
Performance improvements bring smoother animations and a more responsive desktop experience.
Icons in the application overview can be grouped together into folders. To do this, drag an icon on top of another to create a group. Removing all icons from a group will automatically remove the group, too. This makes organizing applications much easier and keeps the application overview clutter-free.
The visual style for the Activities overview was refined as well, including the search entry field, the login password field, and the border that highlights windows. All these changes give the GNOME desktop an improved overall experience.
Some animations in the Activities overview have been refactored, resulting in faster icon loading and caching.
The Terminal application now supports right-to-left and bi-directional languages.
The Files application now warns users when attempting to paste a file into a read-only folder.
Search settings for the Activities overview can now be reordered in the Settings application by dragging them in the settings list. The Night Light section has been moved to the Display panel.
New Upgrade Process

Offline upgrades are now live on Pop!_OS 19.04, bringing faster, more reliable upgrades. When an upgrade becomes available, it is downloaded to your computer. Then, when you decide to upgrade to the newest version of your OS, the upgrade will overwrite the current version of your software. However, this is not to be confused with an automatic update; your OS will remain on the current version until you yourself decide to upgrade.
To upgrade to 19.10 from a fully updated version of Pop!_OS 19.04, open the Settings application and scroll down on the sidebar menu to the Details tab. In the About panel of the Details tab, you will see a button to download the upgrade. Once the download is complete, hit the button again to upgrade your OS. This will be the standard method of upgrading between Pop!_OS releases going forward.
Alternatively, a notification will appear when your system is ready to upgrade. This notification appears on your next login on your fully updated version of Pop!_OS 19.10. Clicking it will take you to the About panel in the Settings application.
In early November, Pop!_OS 18.04 LTS users will be notified to update to Pop!_OS 19.10 or remain on 18.04 until the next LTS version is available.
New to Pop!_OS:
Visit the official Pop!_OS page to download Pop!_OS 19.10.
Upgrade Ubuntu to 19.10
See our support article on upgrading Ubuntu for information on how to upgrade Ubuntu 19.04 to 19.10.
17 notes
·
View notes
Photo

Install Tensorflow 1.13 on Ubuntu 18.04 with GPU support ☞ https://medium.com/better-programming/install-tensorflow-1-13-on-ubuntu-18-04-with-gpu-support-239b36d29070 #linux #ubuntu
5 notes
·
View notes
Photo

Install Tensorflow 1.13 on Ubuntu 18.04 with GPU support ☞ https://medium.com/better-programming/install-tensorflow-1-13-on-ubuntu-18-04-with-gpu-support-239b36d29070 #ai #TensorFlow
1 note
·
View note
Text
Running TensorFlow 2 with GPU support on Ubuntu 18.04
This is for most of you out there who have spent many hours trying to setup things and screwing up every possible setting out there.
Let’s do this quick and dirty!
But before that a few assumptions:
Make sure you have a NVIDIA compatible graphics board. If you don't just stop reading this and go order one on Amazon or the shop of you preference. Be back after you have it in your PC.
Make sure you have python 3 installed
Installing CUDA
I'm also going to assume you already have the NVIDIA repositories installed in your machine. If you don't, check it out here.
Now add the repositories for CUDA, following the instruction here.
Important:
From the TensorFlow developers:
Official tensorflow-gpu binaries (the one downloaded by pip or conda) are built with cuda 9.0, cudnn 7 since TF 1.5, and cuda 10.0, cudnn 7 since TF 1.13. These > are written in the release notes. You have to use the matching version of cuda if > using the official binaries.
In my case I'm using the latest TensorFlow 2.0 as of now (2.0.0-beta1) and it is linked to CUDA 10.0 As I can't tell which version of TensorFlow you will be installing, check the release notes for more information and add the proper version of the repository.
Now install the necessary CUDA libraries by running:
sudo apt install cuda-toolkit-10-0
Next you'll have to install cuDNN. To add the repository run:
sudo echo "deb https://developer.download.nvidia.com/compute/machine-learning/repos/ubuntu1804/x86_64 /" | sudo tee /etc/apt/sources.list.d/nvidia-ml.list sudo apt update sudo apt install libcudnn7=7.6.1.34-1+cuda10.0 sudo apt install libcudnn7-dev=7.6.1.34-1+cuda10.0
Install TensorFlow
To install TensorFlow with GPU support just run:
pip3 install tensorflow-gpu==2.0.0beta1
You're done!
Let me know if you have any problems in the comments
2 notes
·
View notes
Text
In this blog post, we will install Tenso... https://www.computingpost.com/install-tensorflow-cpu-only-on-ubuntu-20-0418-04-debian-109/?feed_id=20354&_unique_id=637b0e0158d47
0 notes
Text
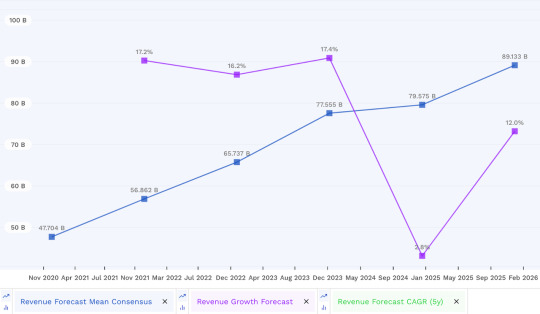
Devices , and Intel said its second-quarter performance was driven by high-performance computing and automotive demand. Revenue in both areas increased sequentially. Sales to all of the company’s end markets grew by double-digit percentages.
Smartphones amounted to about 42% of total revenue, and high-performance computing contributed about 39% of revenue.
Though Taiwan Semi continues to add capacity at a breakneck pace across its chip-manufacturing portfolio—ranging from the most advanced processors, to less sophisticated chips destined for uses such as automotive parts—executives said that the global shortage will persist into 2022. There was some good news for auto makers, as the company said it had increased capacity for such chips by 60%, which will help ease shortages in the third quarter.
But for the first time since 2019’s second quarter, Taiwan Semi’s operating income fell short of expectations, coming in at NT$145.7 billion, when analysts expected NT$150 billion. Operating income—also known as operating profit—is sometimes viewed by investors as a more accurate measure of a business’s performance because it gauges the profitability of core operations, excluding items such as interest and taxes, among other things.This is a list of the top AWS competitors. 2021 р. 7. It has over 175 fully-featured services from data centers globally. AWS Trainium will be available in 2021. By Kurt Marko December 11, 2018. c. Congratulations! You created an AWS IoT Greengrass group that is ready for use on your edge based IoT project. GPU4. AWS is offering access to its EC2 Inf1 instances, which are based on 16 Inferentia chips, available immediately. . sql. I hope this guide helped you to install the Nvidia display driver in Ubuntu Linux. . We will periodically update the list to reflect the ongoing changes across all three platforms. AMD GPUs: How do they measure up? A straight comparison between Nvidia and AMD's GPU performance figures gives AMD an apparent edge over Nvidia, with up to 11. 2020 р. An Open Source Alternative to AWS SageMaker. Megaport enables access to Hosted, Hosted VIF, and Dedicated Connections to AWS cloud through the AWS Direct Connect Service Delivery Program. “Supporting Trainium, Gaudi and Nvidia GPUs is a smart move,” Freund wrote for Forbes , “and it is consistent with AWS’s strategy of offering customers . AWS Trainium shares the same AWS Neuron SDK as AWS Inferentia, so it’s integrated with TensorFlow, PyTorch, and MXNet. 24xlarge have 32 GB GPU memory. Q: Why am I not getting NVIDIA GRID features on G3 instances using the driver downloaded from NVIDIA website in Amazon EC2? May 26, 2020 in Amazon Elastic Compute Cloud EC2 #ec2 AWS ditches Nvidia for in-house 'Inferentia' silicon. Another major announcement from AWS at re:Invent 2018 was the news that Amazon will introduce their own machine learning chip to compete with Google & IBM in TPU development. Amazon's so-called “Inferentia” chip announced on Wednesday wil. The 1650 has 896 NVIDIA CUDA Cores, a base/boost clock of 1485/1665 MHz and 4GB of GDDR5 memory running at up to 8Gbps. 14 груд. Compute wise, Amazon EC2 Inf1 instances featuring AWS Inferentia chips are now available in additional AWS regions and EC2Launch is now at v2 with a range of new features, including renaming of the administrator account. It’s the fastest way to get rolling with machine learning. Whether you're on a budget, learning about deep learning, or just want to run a prediction service, you have many affordable options in the CPU category. 2021 р. AWS has compared performance of AWS Inferentia vs. The AWS Cloud is an ideal platform to provide an agile compute environment for Artificial Intelligence and technical compute workloads that require high-performance computing (HPC) methods to accelerate discovery. Each AWS Inferentia chip contains four NeuronCores . Azure Stack vs. 0. Performance and The Edge. The cloud giant. To use the noise removal effects in Streamlabs OBS, add an “Audio Input Capture” source. . Oracle Dedicated Region is a fully managed cloud region that brings all of our cloud services into customers’ data centers in a self-contained model.


0 notes
Text
Como instalar o Deepkit, um pacote de treinamento colaborativo, no Ubuntu, Linux Mint, Fedora, Debian
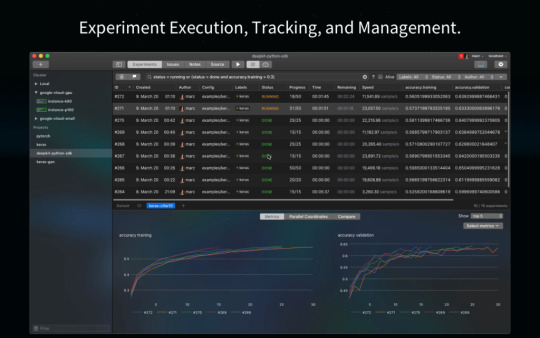
O Deepkit é um pacote de treinamento colaborativo e analítico para aprendizado de máquina moderno perspicaz, rápido e reproduzível. Tudo em um único aplicativo de plataforma cruzada para você sozinho, equipes corporativas ou de código aberto. Neste tutorial, saiba como instalar o pacote Deepkit no Linux.
Rastreie seus experimentos, depure seus modelos de aprendizado de máquina e gerencie seus servidores de computação. É feito para você como um único desenvolvedor que trabalha completamente offline e equipes com ferramentas de colaboração em tempo real prontas para usar. Abaixo, você confere os recursos desse poderoso aplicativo:
Execução de experimento em sua estação de trabalho diretamente ou no Docker;
Definição de experimento unificado usando YAML;
Controle de versão automático de seu experimento: configurações, arquivos, saídas e muito mais;
Dados analíticos de seu experimento em tempo real;
Monitoramento de hardware de CPUs, memória, GPUs e muito mais;
Tensorflow e depurador Pytorch;
Execute seus experimentos em qualquer servidor Linux;
Rastreador de problemas;
Notas.
Recursos explicados:
Execute experimentos em sua estação de trabalho no Docker, provisionados automaticamente;
Rastreie automaticamente cada execução;
Anexe dados analíticos personalizados (m��tricas, arquivos, imagens, logs, matrizes numpy) a experimentos usando o SDK Python gratuito;
Depurador de modelo Tensorflow e Pytorch, para depurar o gráfico do modelo + visualizar a saída de cada camada, incluindo histogramas de ativações, pesos e vieses;
Conecte qualquer máquina Linux por meio de credenciais ssh e execute seus experimentos em equipe com um simples clique ou argumento CLI;
Gerencie seu projeto usando o rastreador de problemas integrado.
Siga o tutorial abaixo e instale o Deepkit agora mesmo em seu Linux.
Instalando o pacote Deepkit no Ubuntu, Kubuntu, Xubuntu e derivados!
Para instalar o Deepkit no Ubuntu Linux. Inclusive você também pode instalar o Deepkit no Linux Mint sem nenhum problema execute o comando abaixo:
sudo snap install deepkit –edge
Instalando o Deepkit no Fedora e derivados!
Para instalar o Deepkit no Fedora, execute os comandos abaixo. Lembrando que caso você já tenha o suporte ao Snap habilitado no Fedora, pule para o passo 3, o de instalação do pacote:
Passo 1 – Instalar o Snapd:
sudo dnf install snapd
Após executar o comando acima, lembre-se encerrar a sessão ou reiniciar o computador! Em seguida, vamos criar um link simbólico para ativar o suporte ao Snap clássico:
Passo 2 – Criar link simbólico:
sudo ln -s /var/lib/snapd/snap /snap
E agora, vamos executar o comando para instalar o Deepkit no Fedora ou derivados:
Passo 3 – Agora vamos executar o comando para instalar o Deepkit no Fedora ou derivados:
sudo snap install deepkit –edge
Instalando o Deepkit no Debian e derivados!
Para instalar o Deepkit no Debian, execute os comandos abaixo. Caso você já tenha Snap ativado e habilitado no seu Debian, pule para o passo 2, que seria da instalação:
Passo 1 – Atualizar os repositório e instalar o Snapd:
apt update
apt install snapd
E agora, vamos executar o comando para instalar o Deepkit no Debian ou derivados. Observe que o comando abaixo está com o sudo, caso você não o tenha habilitado, remova o sudo e instalar usando o ROOT mesmo:
Passo 2 – Agora vamos executar o comando para instalar o Deepkit no Debian e derivados:
sudo snap install deepkit –edge
É isso, esperamos ter ajudado você a instalar o Deepkit no Linux!
O post Como instalar o Deepkit, um pacote de treinamento colaborativo, no Ubuntu, Linux Mint, Fedora, Debian apareceu primeiro em SempreUpdate.
source https://sempreupdate.com.br/como-instalar-o-deepkit-um-pacote-de-treinamento-colaborativo-no-ubuntu-linux-mint-fedora-debian/
0 notes
Link
In this tutorial, you will learn about GPU Computing - Configuring GPU Tensorflow on Ubuntu and CUDA Installation Guideline 9.0 Toolkit for Ubuntu. cuda is the programming language develped by Nvidia and is only meant for nvidia.GPU processes the tensors or arrays using the GPU cores (cuda cores), where CPU are having only limited cores whereas GPU has a lot of cores and hence the processing capability of GPU is far far better than CPU. It is pci-e which connects CPU with GPU. When task come to the CPU, it transfers it to GPU memory. GPU again transfer it to the CUDA Cores. Result is transfered back to the CPU memory which we see it. To install cuda toolkit for ubuntu 18.04, please remember that official toolkit has come for ubuntu 17.04. But it will also support ubuntu 18.04.
#ai#CUDA Installation Guideline#Install TensorFlow GPU on Ubuntu#Configuring GPU Tensorflow on Ubuntu
0 notes
Text
[Linux] Install CUDA and CuDNN on Ubuntu 18.04
[Linux] Install CUDA and CuDNN on Ubuntu 18.04
If we want to use GPU for deep learning (for example, through Tensorflow or Keras), the installation environment is not really complicated, and it usually only takes a few hours to complete the environment in the first time. (more…)

View On WordPress
0 notes
Photo

3 linux distros, 8 os reinstalls, 14 driver installations, 21 holes in the wall and I finally managed to get tensorflow working on my gpu. I have never had so much trouble. It seems that the only linux os that can install the old cuda 10.0 instead of cuda 10.2/10.1 is ubuntu...
0 notes
Text
1時間で試す!さくらの高火力コンピューティングで深層学習(前編:環境セットアップ)
from http://knowledge.sakura.ad.jp/knowledge/8363/
さくらインターネット 技術本部アプリケーショングループ アルバイトの伊東道明です。
ここ数年、人工知能や機械学習というワードが流行していて、興味のある方が増えてきています。 特に、機械学習の中でも深層学習(ディープラーニング)と呼ばれる技術がここ数年で爆発的に成長し、様々な大学や企業が特に力を入れています。 深層学習が利用されるようになったのは、GPUの普及による学習の超高速化が可能になったためです。しかし、性能のいいGPUは高価なため、なかなか手を出しづらい方も多いと思います。
さくらの高火力コンピューティングでは、GPUを積んだマシンを1時間単位でレンタルすることができます。1時間あたりの金額はなんとワンコイン以下です。そのため、比較的気軽に、そして簡単にGPUを使用でき、深層学習を始めたいけどリソース面で踏みとどまっていた方にはちょうど良い環境になるでしょう。
この連載では、さくらの高火力コンピューティングの申し込みから比較的単純なネットワーク構成で深層学習を行うプログラムを実行するところまでを分かりやすく説明します。 連載を最後まで読むと、実際にGPUを用いて深層学習を始めることができるようになります。
まず、今回はGPUを用いた深層学習を行うための基本的なセットアップを行います。
高火力コンピューティングの申し込み
まずは、高火力コンピューティングのサービスサイト(https://www.sakura.ad.jp/koukaryoku/)から右上「新規お申し込み」ボタンをクリック。
課金プランの選択画面から「時間課金のお申し込み」をクリック。
まず、高火力コンピューティングの申し込み画面に行き、ユーザ名とパスワードを入力しログインします。以下のような画面が出てくるので、利用開始ボタンをクリックします。
申し込みプランの一覧が表示されます。今回は、Nvidia Pascal アーキテクチャ 4枚モデルを選択します。
次に、お支払い方法を確認し、利用規約・約款に同意して申し込みをします。
これで申し込みは完了です。
完了すると、以下の画面が表示されるので、登録メールアドレスに案内メールが届くまでお待ちください。
メールが届いたら、案内に記載されているコントロールパネルのURLをクリックし、ログインします。コントロールパネルログインアカウントを作成していない方は、メールの案内にした��って作成してログインしてください。
ログインすると「さくらの専用サーバ」のコントロールパネルが開きます。(高火力コンピューティングは、さくらの専用サーバシリーズです。)
ログインをし、上にあるバーのサーバをクリックすると、サーバ一覧が表示されるのでメールに記載されているIPアドレスのサーバをクリックします。
サーバの詳細ページが表示されるので、右上の起動ボタンをクリックしてください。
しばらくしたら、リモートからssh接続ができるようになります。
デフォルトのユーザ名はメールアドレスに記載されています。パスワードは、以下をクリックすると表示されます。
次からssh接続をしてマシンの設定をします。 以下の操作は、全てホームディレクトリで行っています。
CUDAをインストールする
GPUを使用するためには、CUDA Toolkitと呼ばれるソフトウェアがインストールされている必要があります。
まず、以下のコマンドでwgetを入れます。
$ sudo apt-get install wget
その後、CUDAダウンロードサイトにて、以下のように選択します。
Operating System…Linux
Architecture…x86_64
Distribution…Ubuntu
Version…14.04
Installer Type…dev(network)
その後、ダウンロードボタンが現れるので、右クリックしリンクのアドレスをコピーします。
その後、コピーしたリンクをwgetし、画像の赤枠にあるコマンドを実行します。
$ wget {コピーしたリンク先} $ sudo dpkg -i cuda-repo-ubuntu1404_8.0.61-1_amd64.deb $ sudo apt-get update $ sudo apt-get install cuda
以上でCUDAのインストールは完了です。
pyenv環境を整える
python環境を簡単に切り替えられるよう、pyenv環境を整えます。
以下の手順でコマンドを実行すると、pyenv環境が簡単に作れます。
$ sudo apt-get install python-dev python-pip $ sudo apt-get install git gcc make openssl libssl-dev libbz2-dev libreadline-dev libsqlite3-dev $ sudo apt-get install python3-tk tk-dev python-tk libfreetype6-dev $ git clone https://github.com/yyuu/pyenv.git ~/.pyenv
次に、~/.bashrcに以下の内容を書き加えます。
export PYENV_ROOT=$HOME/.pyenv export PATH=$PYENV_ROOT/bin:$PATH eval "$(pyenv init -)"
その後、$ source ~/.bashrcを実行します。
以上で、pyenv環境の設定は完了です。
続いて、pyenv環境でpython2.7.11を使用するようにします。
$ pyenv install 2.7.11 $ pyenv local 2.7.11
以上でpython2.7.11環境を使用する環境が整いました。
深層学習ライブラリのインストール
深層学習をするためのライブラリとして、ここではKerasを用います。
Kerasとは
機械学習ライブラリであるTensorflowかTheanoをバックエンドにして動作する、深層学習をするためのライブラリです。Tensorflowなどはとても有名なライブラリですが、多機能すぎて実験でコードを素早く実装したい時にはやや書きづらく不便と感じることがあります。そのため、より書きやすく、かつバックエンドの機能も必要な時は使えるライブラリであるKerasを今回は使います。また、バックエンドにはよりユーザ数の多いTensorflowを用います。
Kerasのインストール
以下の順にコマンドを実行してください。
$ pip install --upgrade pip $ pip install keras $ pip install tensorflow-gpu
これで、インストールは完了しました。
最後に、パスを通して実行できる状態にし、バックエンドをtensorflowにします。
export CUDA_HOME=/usr/local/cuda export LD_LIBRARY_PATH=${CUDA_HOME}/lib64 export PATH=${CUDA_HOME}/bin:${PATH} export KERAS_BACKEND=tensorflow
以上でセットアップは終了です。
後編では、実際にサンプルプログラムを実行し、手書き文字認識を行います。
http://knowledge.sakura.ad.jp/wordpress/wp-content/uploads/2017/04/88f37e7c1943e6bb911903ddc9d6f09e.png
0 notes