#Cosplay Help
Explore tagged Tumblr posts
Visit Tumblr Blog
Explore Tumblr blogs with no restrictions, modern design and the best experience.
Last Seen Tumblr Blogs


Fun Fact
The total number of visits Tumblr.com received during January 2021 is 327 million.
Text
Cosplay help!
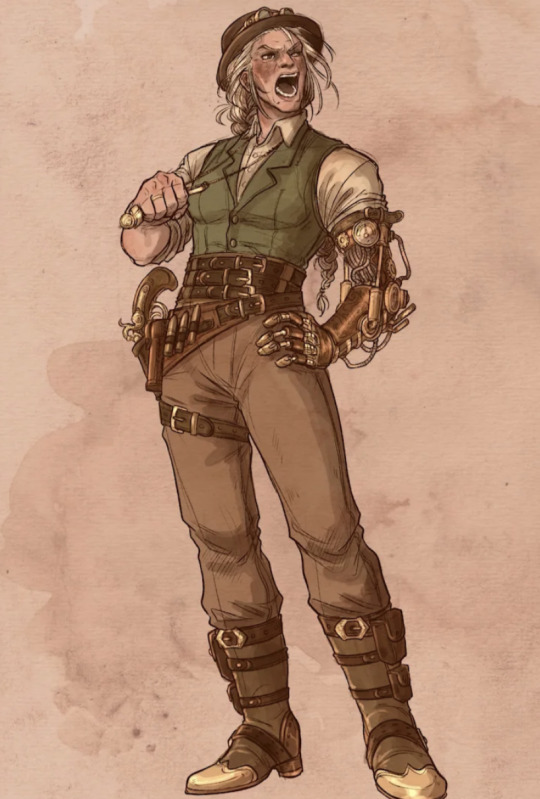
So obviously Cloudward, Ho! has taken ahold of me and is demanding a cosplay. I’ll be going to a renfaire sometime this fall and would love to cosplay Van Chapman. The problem is that I’m not partially skilled at making things. Does anyone know where I can potentially buy parts of her outfit? More specifically I’m having trouble with the prosthetic arm and how to go about that. Any advice even if it’s not for the arm would help!
#dimension 20#cloudward ho#van chapman#vanellope chapman#cosplay help#cosplay#van Chapman cosplay#vanellope Chapman cosplay#siobhan thompson#d20
21 notes
·
View notes
Text
Hey y'all okay so, in august I'm gonna go cosplaying as sans to this convention, and i need some recommendations for cosplay makeup brands and sealants. Ive never cosplayed before and haven't really done makeup, so I need help lol
22 notes
·
View notes
Text
i need to cosplay as dark world Kris Dreemurr how do i even begin??
#deltarune#deltarune chapter 3#deltarune chapter four#kris dreemurr#deltarune spoilers#undertale#kris deltarune#deltarune chapter two#deltarune chapter one#cosplay#cosplay help
27 notes
·
View notes
Text
Genuine question: as a cisgender (ace) girl, can I potentially cosplay Olethra MacLeod? I have extremely long brown hair and there's not a lot of female characters with my length and shade of hair so when I saw the illustration, I thought that I could potentially add Olethra to my arsenal. I just don't want to offend!
26 notes
·
View notes
Text
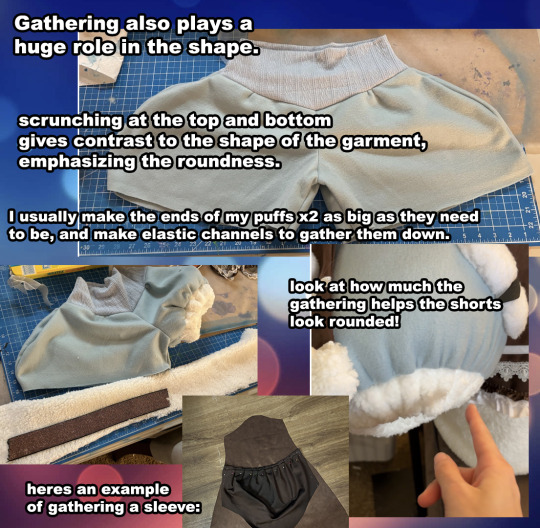
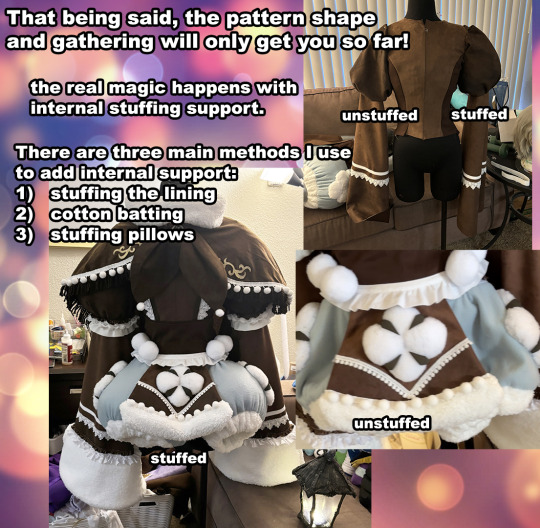
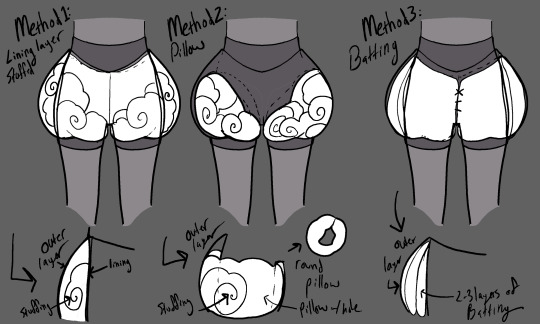
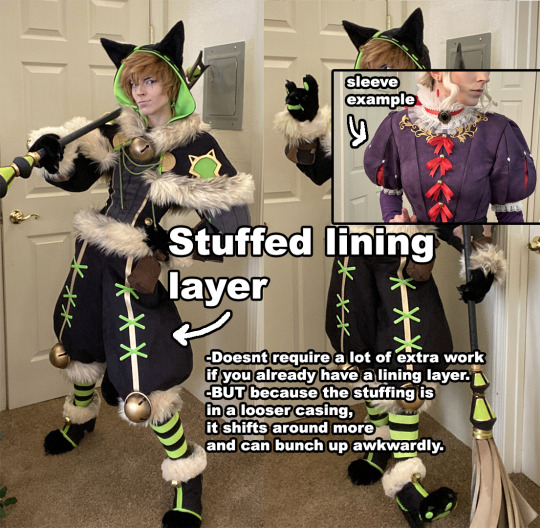
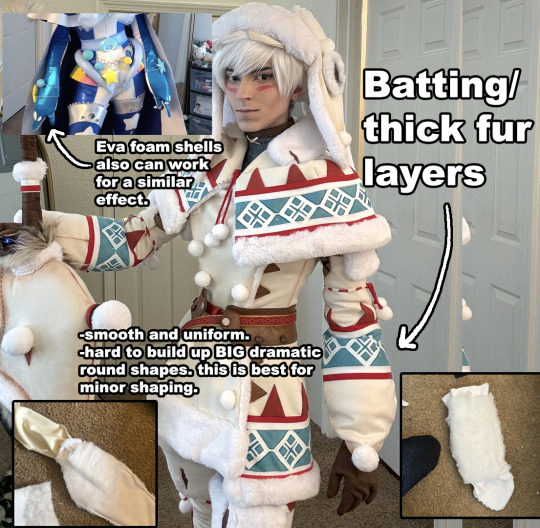
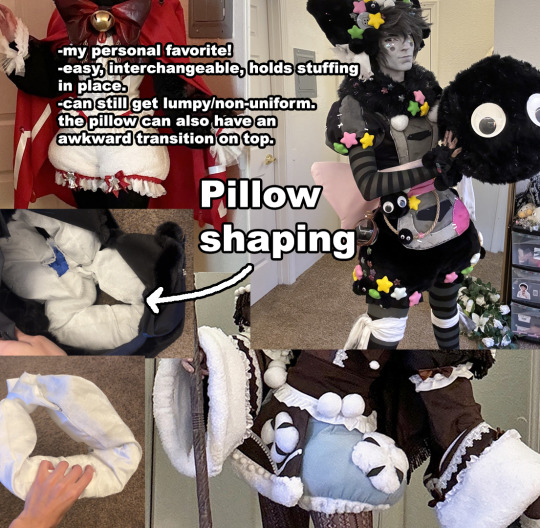
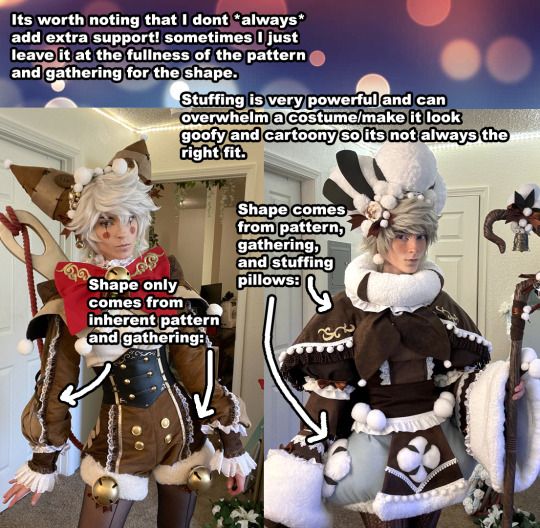
some information about how I shape my cosplays!!!
582 notes
·
View notes
Text
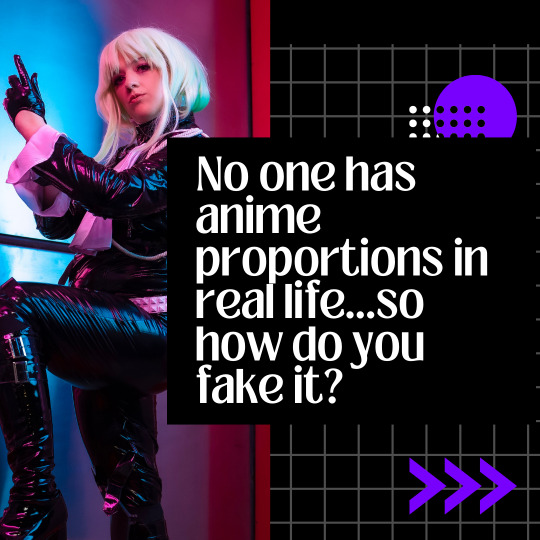
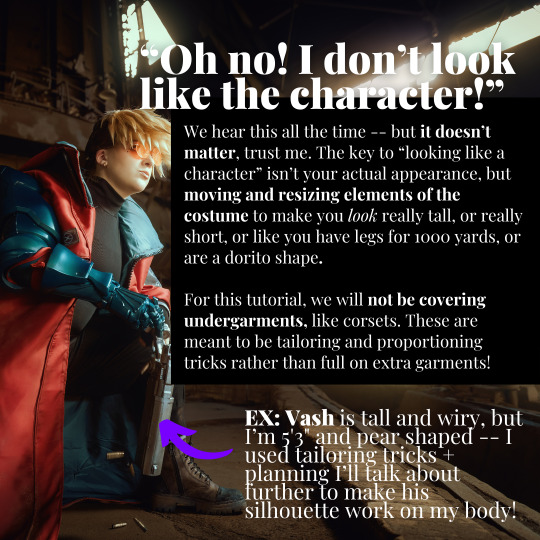
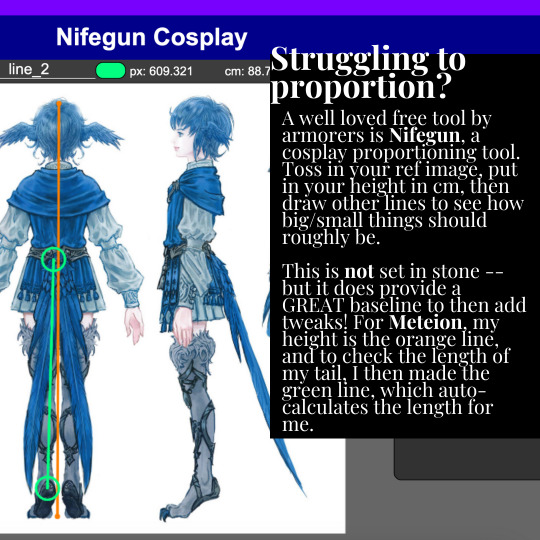

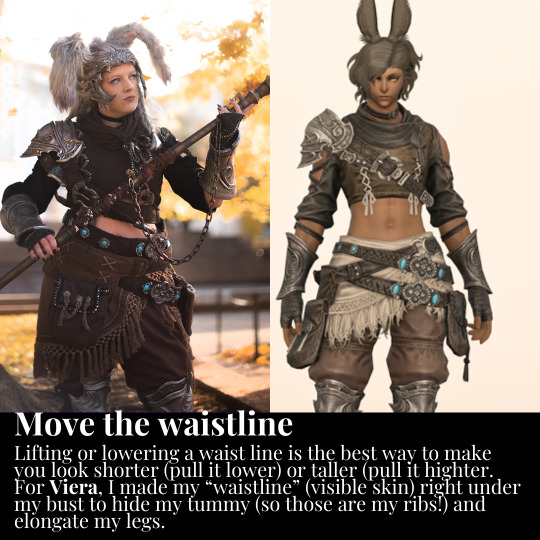


Tutorial on how I proportion cosplays on my very short body!
2K notes
·
View notes
Text
Where the hell do I purchase sewing patterns now
270 notes
·
View notes
Note
HI!! Do you have any tips for beginners who want to try their hand at making a Stex cosplay?
So, StEx cosplays can be really intimidating when you first start looking at them, but I’ve found that breaking the costume down into what you can recognise really helps! :D
Like as follows:
- What does the base garment look like to me?
- What shapes of clothing can I see
- What are the main feature pieces?
- What Materials might replicate the textures?
And in an example, using my Rusty cosplay as a reference, the answers would be:
- Base garment looks like dungarees with a main feature t-shirt piece and long sleeves underneath that. (This kind of answers the two first questions!)
- The main feature pieces would then be the chest plate, coal box, hat, belt & panels
After that you can start to put in more research for what clothing or sewing patterns would work for the elements you need to have!
Always remember that buying pre-made garments to use as a base is 100% valid in the cosplay making process!! It can be so useful and definitely the best way to start if you’re just beginning in your cosplay journey!
- For the more complex feature pieces, Craft Foam will always be your best friend! Not only is it the easiest to work with, it’s also fairly easy to get ahold in terms of availability and pricing!
- Worbla is also a really great option for making pieces, but it can be a bit more on the expensive side and tricky to work with!
- I also recommend using UHU glue as it creates a good strong bond on most materials!
Acrylic paints can be used on loads of different materials and will also work on fabrics, just remember to use your iron/heat gun after painting to heat seal the acrylic paint if you do use it on clothing/fabric! Fabric paints are also great!
Always remember that cosplay is for everyone, it doesn’t matter whether you’re just starting out or have been doing it for a long time, if you love a character enough to want to dress up as them it’s always going to be incredible!! Just enjoy the process and never be afraid to ask for advice or help if you need it!! The cosplay community is for skillsharing and having a great time!
I really hope this helps!!
Let me know if you need anything else, I’m always here if you ever need advice or help with your cosplay! :D
I’ve also pictured below how I draw out a cosplay before I make it!!


#starlight express#stex#cosplay#musical fandom#costume making#cosplay tips#cosplay advice#cosplayer#cosplay help
85 notes
·
View notes
Text
hey tumblr people do any of you know where i can get clear vials with heart shaped caps??? i wanna make an ink cos but whenever i search them up online i only get heart shaped vials 🥀
#utmv#undertale#undertale au#ink sans#sans undertale#underverse#cosplay#help#cosplay help#PLEASE dawg i saw someone on tiktok with them once#and my dumbass didn't save the video#but they weren't selling them anyway so idk if it would have mattered
58 notes
·
View notes
Text
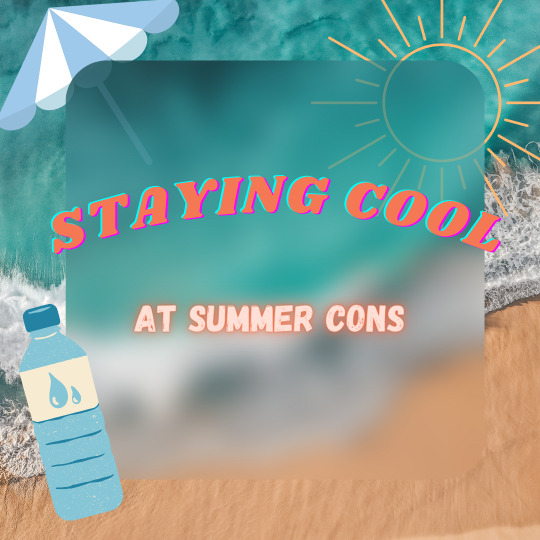


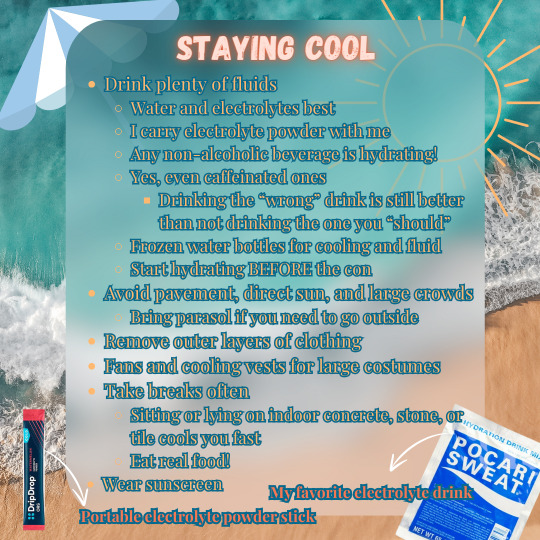
It's coming up to summer con season in the Northern Hemisphere, so I want to post this little infographic I made about staying cool at summer cons!
Don't mess around with heat, since heat stroke can be deadly. Heat exhaustion will make you miserable. Just don't.
Stay cool and hydrated out there, and don't forget to pregame water so you're well hydrated before the con even starts. ;]
#helpful things#cosplay tutorial#cosplay help#cosplay advice#cosplay#anime cons#comic cons#cosplay safety#thinking of the time i got heat exhaustion at a con#and then said “I don't want this to happen again”#so i made bikini armor for my next con lmao
35 notes
·
View notes
Text

Does anyone here cosplay? Or have tips?
I was planning on doing a…not exactly one on one cosplay of lilia pajamas next month. And was wondering how to do the black stripe on his arms of the hoodie? 🤔🤔
Should I try and use black tape? 👀👀
The pants are easy enough to find and I’ll put a bat sticker on it. But wondering about the hoodie 🤔🤔
I mean I can just leave it that way too if need be since I’m not doing the exact cosplay. (Can’t do wigs, so I might just wear a headband or maybe temporary color of some strands of hair. I don’t trust the con floor with those dragon shoes either lol they won’t last.)
Any help or advice would be appreciated 💞💞🙏🙏 my second time cosplaying and I know almost nothing when it comes to these things. Last year I bought a cosplay and this year I’m trying to make one but more comfy style ☺️☺️💞💞
#this seems the easiest one to do for Lilia too#and for the heat as well#at least I can take off the hoodie when it gets too hot#what do I tag this?#hanas thoughts#cosplay ask#cosplay help
22 notes
·
View notes
Text

I REALLY wanna be skull kid for Halloween this year and I wanna make the eyes glow but I have zero fucking idea how I would accomplish such a feat
#I bought this mask off Etsy five years ago#I was mostly painted. All I had to do was paint the small white & black & orange details as well as paint and glue on the spikes#I also need to attach a strap or something so I can actually wear it lol#smolldust#smolldust rambles#Cosplay#cosplay help#irl photo#zelda#the legend of zelda#legend of zelda#tloz#loz#majora’s mask#loz majoras mask#majoras mask#skull kid#zelda cosplay#skull kid cosplay
36 notes
·
View notes
Text
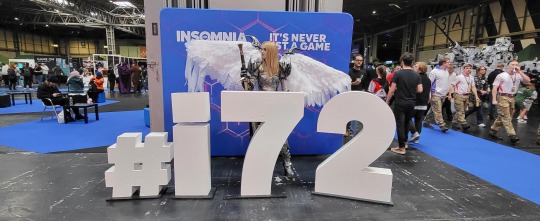
How to Make: Electronic Wings for Cosplay
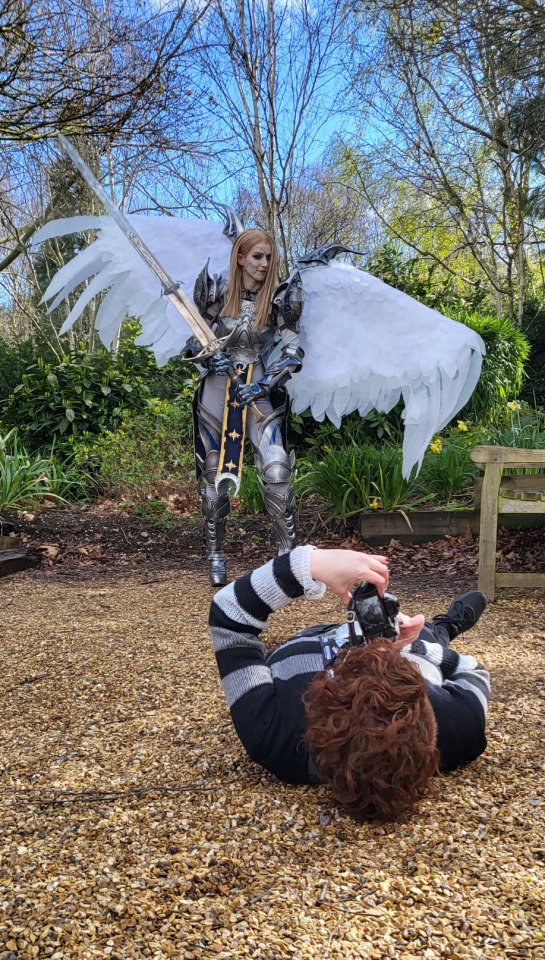
Hello Everyone! It's been a while since I last uploaded a written tutorial on here and since I just finished and wore my Dame Aylin cosplay this last weekend it seemed appropriate to jump back in with a tutorial on one of the costume pieces!
Her wings were the star of the show this weekend and I know a lot of people were curious about how I made them! A huge source of knowledge and inspiration behind these wings was this video by Axceleration, I made a few changes to the frame shape and electrical circuitry for mine but her tutorial was a huge stepping stone to give me the confidence to tackle them myself!
Health and Safety:
When working with Sintraboard (as well as other thermoplastics) it is incredibly important you wear a respirator as well as goggles when heating, moulding and cutting it. The fumes this plastic will give off when heated up are no joke! Make sure you're in a well-ventilated space!
Basic tool safety knowledge is also really important! wearing gloves when using power tools can be more dangerous in most situations, so always be aware of where your hands are vs where the tools are. Always cut away from yourself and take things slowly, don't panic.
Electrical safety! You're working with live wires and circuitry! make sure your hands are dry, you aren't touching the bare wires at any point when they are connected to a power source, and if you choose to solder anything, make sure you're wearing heat-proof gloves and a mask in a ventilated space!
Tools
Wire stripper
Screwdriver and wrench
Dremel - I recommend the Dremel 3000 rotary tool personally! Some essential Dremel bits you'll need for this include, a sanding bit, drill bit (smaller or same size as your screws/bolts), and a small/narrow cutting bit. These will usually come with the Dremel!
Heat Gun (A hairdryer will not get hot enough to heat the Sintraboard!!)
Pipe cutter (alternatively you can use a hacksaw for this!)
Hacksaw
Ruler
Scissors (for cutting fabric straps)
Materials
Heat shrink Tubing
2 core electrical wire
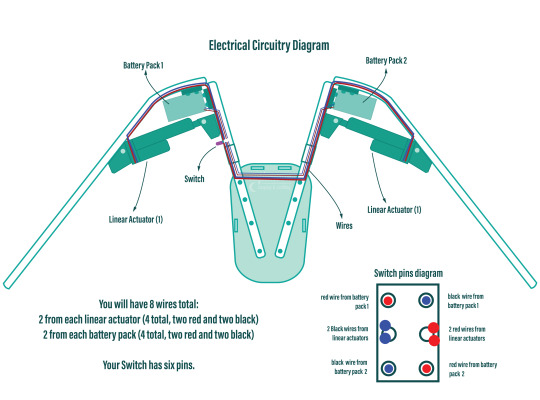
switch (you want a three position, six pin switch, like this one, even better if it has the Screws on the pins! otherwise you'll need a soldering kits to solder the wires to the pins.
2x 8AA 12v Battery Holders
2x 12v Linear Actuators (Mine had a stroke length of 100mm)
21.5mm PVC Pipes (I got 2x 3m Lengths)
2x 21.5mm PVC Pipe straight couplers
6mm 8"x12" Sintraboard
Nuts/Bolts/Screws (I used M5 bolts for the base & Actuator connectors and M6 screws to attach the hinges to the pipes! You'll need Washers for every Nut & Bolt!)
Hinges (I used 2.5cm wide hinges that were skinny but long so they would just about fit along the PVC pipe! 3" gate hinges would work!)
50 metre Polythene Jiffy foam roll (in retrospect this was ALOT of foam, you could definitely get away with maybe a 20-30 metre roll! I now have a load leftover XD)
16 AA Batteries (I used 16 and had enough for the whole day with them on, I think They'd probably be enough for another half a day-full day too! but have spares just in case!)
Webbing strap ( I went for grey to match my base suit colour!)
Buckle - as wide as the webbing strap you use!
3 metres of white cotton fabric (or whatever colour wings youre going for!)
Optional
Zipties (for cleaning up the wires)
Lets Go!
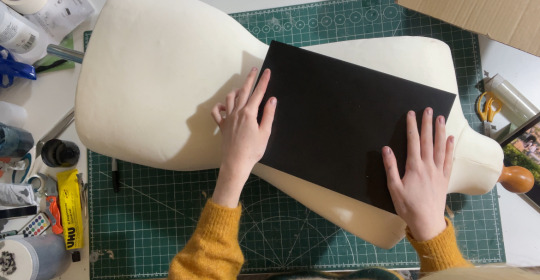
Sintraboard is this wonderfully stable thermoplastic that is relatively easy to cut into (with the right tools) and when heated allows you to mould its shape! I started by using a mannequin and heating the Sintraboard with a heat gun for a few minutes to make it pliable, I recommend using gloves for this part as the materials gets VERY HOT! Press the board into the shape of the mannequin's back, taking note of the edges especially! you want this board to sit as comfortably to your body shape as possible as it makes a huge difference to how long you can wearing the wings for in this backplate is comfy!
Once shaped, I placed it against my back to make sure it was a good fit, heating again and making any alterations I needed (again don't place bright hot plastic to your bare skin! wear protective clothes and wait till its slightly cooler to do this, with the help of a friend!). I then took a hacksaw and rounded the corners, before sanding the edges with my Dremel! Try to avoid cutting off loads, just enough to make things less likely to snag.
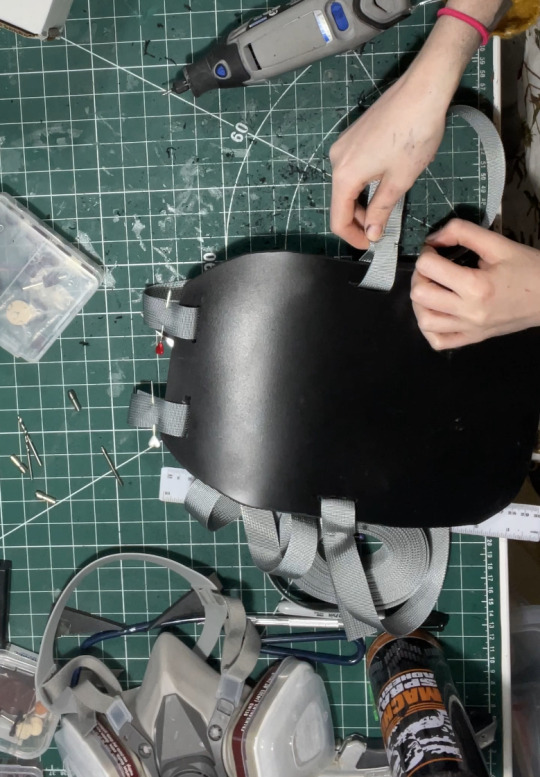
3. I then cut in four holes, wide enough to feed my webbing strap through, two at the top and one on either side below where my arms would sit! I measured the webbing strap by firstly feeding them through the top holes and pinning them, and then bring the strap over my should to everything sits where it should and seeing where the strap hits the side hole and cutting the length there! you'll also want a strap that attaches across the chest, meeting in the centre with a buckle!
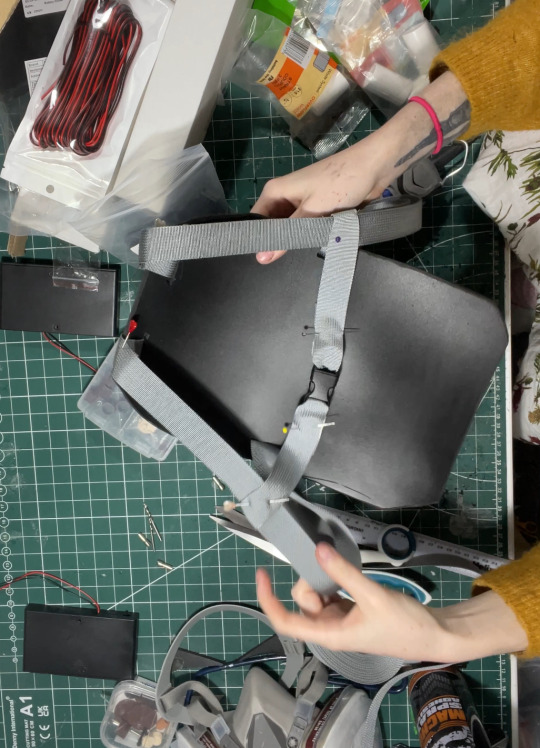
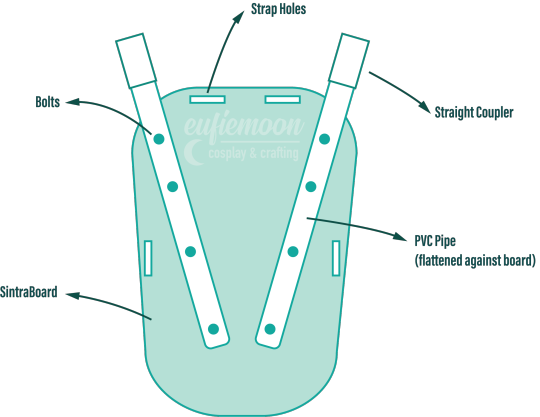
4. After sewing the straps closed I was able to move onto the PVC pipe structure! This may change slightly depending on the finished shape you want but I needed the PVC pipes to come out from inside a breastplate so had a particularly angle as well as character references to work with! I began by heating the pipe over my heat gun and flattening a portion of it under a heavy object so it would sit much more flush against the backboard and sit better underneath my breastplate before moving onto securing the first portion of the structure to the backplate. This mainly involved lots of try-ons and measuring to make sure the angles were correct and symmetrical and was quite fiddly but well-worth the effort! I'll include a diagram of the general shape I went with below:
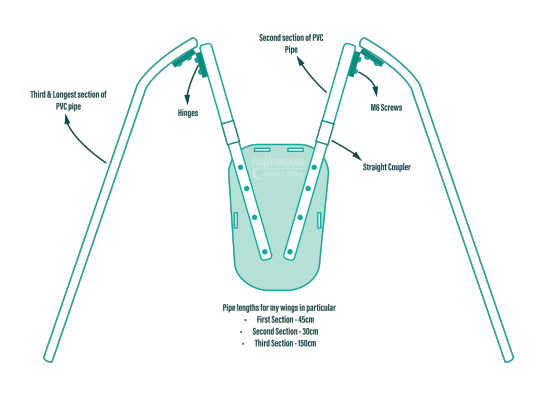
5. I wanted my wings to be relatively modular for ease of travel so I needed to make sure certain portions of them could come away from other parts easily, so I popped a straight coupler on the top of the pipes that were attach to the breastplate, this also meant I could slot the breastplate over these shorter pipes and wear everything correctly! Then these second pipes slot on and at the other end they are attached via hinges to the longest portion of the pipe 'skeleton', Diagram below:
6. Now that the skeleton was put together, it's time for the electrical stuff! It's a good idea to figure out where your circuit is going to lay on the skeleton - consider if you want the battery packs mounted the the backplate or, like me, put them inside the actual wings in removeable pockets for easy access and removal for battery changes. all your wires will go through the switch so deciding where you want to place that is very important! Mine was placed just over my shoulder on the front side, mounted to the PVC pipe with a metal cover I drilled a hole into to slip the switch through and then drill through the pipe.
I've included another diagram below that explains all the electrical circuitry, including which wires go on which pins on the switch!
Important to note: The linear actuators need to be placed and bolted into the PVC pipes at *exactly* the same angle on each side, any slight deviation will lead to the wings going up wonkily! So take your time and make as many adjustments as necessary.
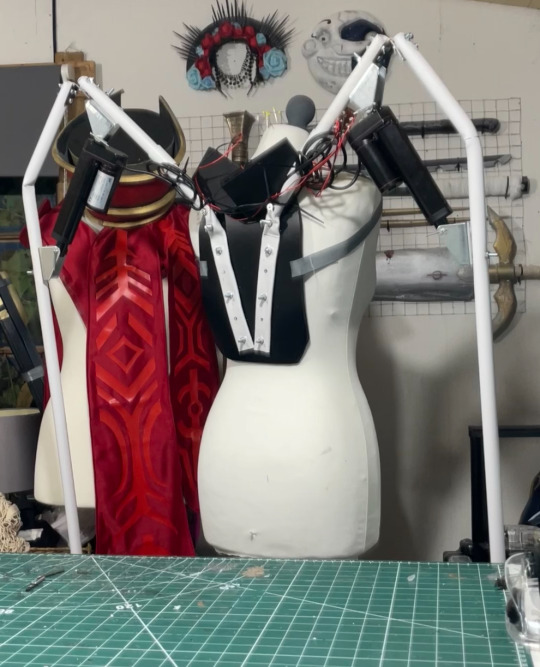
7. You can extend your wires by adding on the electrical wire, just match the colours, and put heat shrink tubing over the connections to hide the live wires! I ended up zip-tying the wires into organised bundles once the wings were done to help keep everything safe from snags.
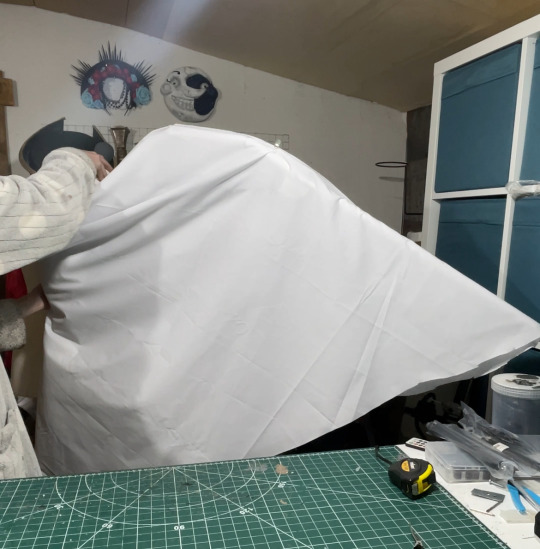
8. Now its time for the Wings themselves! I drafted my base pattern by just draping the white cotton fabric I had over the wing when it was fully extended. I then pinned the wings to the shape I wanted them to be along the bottom before cutting along the pins. I ran the fabric through my sewing machine to close the bottom edge, leaving a gap wide enough by the wing base so I could slip the wing on and off, closing it with velcro. I also added little fabric pockets inside of these to hold my battery packs, which also connected via velcro for easy removal!
9. Now that I had a wing base I was able to begin making feathers! I cut out a total of 800 feathers out of polythene jiffy roll for these wings, in 6 different styles and using real life bird wings to dictate the shapes I used and where I placed them. I ended up hot gluing every individual feather onto the white fabric base, going row by row until every side was covered, the wing covers themselves are super light because of the foam feathers and they shine light through them in a really magical way!
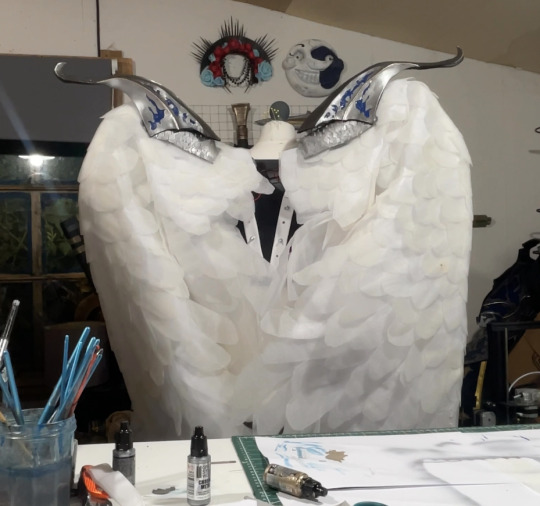
Optional: I also ended up going over these feathers with my airbrush and some super light beige paint to help darken the shadows, this is entirely optional and may change depending on the wings you're looking to make!
When in neutral position and in extended position the wings looks like this:

Mine had a wingspan of about 7ft total when fully extended but when in neutral position they were fairly close to my own proportions! mainly staying behind me and weren't much of a problem in a packed con hall!
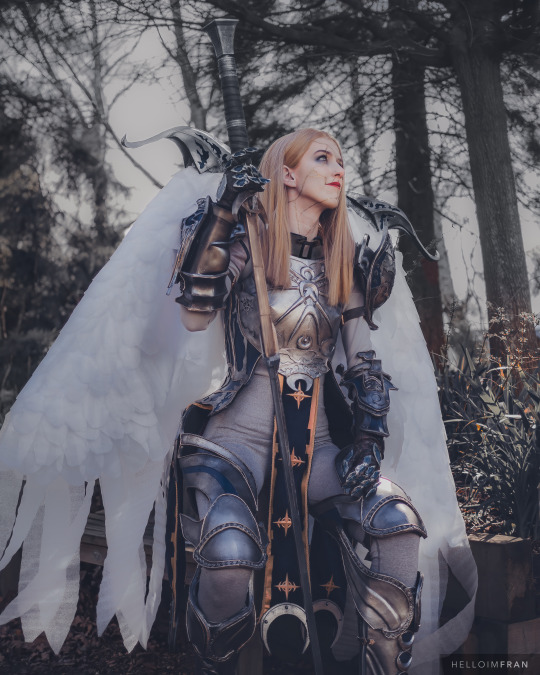
Photo by: Helloimfran (on Instagram and Twitter)
I hope this tutorial helped and if there are any questions about anything in specific don't hesitate to reach out at [email protected] or on my instagram or twitter (@eufiemoon)
Happy Crafting!

#cosplay#cosplayer#cosplaying#baldurs gate iii#baldur’s gate 3#baldurs gate 3#bg3#dame aylin#aylin x isobel#bg3 aylin#cosplay tutorial#Wings#fantasy#tutorial#cosplay help#cosplay tips
166 notes
·
View notes
Text
does anyone know how to dye clothes? or has a link to any good tutorial? absolute beginner here, i’m trying to dye a short and a hoodie for a gwenpool cosplay lol
#cosplay help#cosplay#gwenpool#gwen poole#i know i can just google it but i was wondering if anyone here has any tips#or can recommend a good tutorial so i just don’t click the first thing i find haha
27 notes
·
View notes
Text
Has anybody seen the back of perpetua's purple and black robes (the ones from the satanized reveal/rolling stones uk shoot? I need it for cosplay reasons, even an artistic rendition helps me lol, the closest I've gotten is the wip (where you can't see how the decorative ribbons lay 😭)

#Like does he even move around in it during the rituals?#Turn around babygirl#ghost#The band ghost#ghost band#skeleta#Skeletour#papa v perpetua#perpetua#papa v#cosplay help
32 notes
·
View notes
Text
hello jekyll and hyde fandom
i really want a jekyll/hyde cosplay so any help WILL be appreciated! i have images of what ive sent my mother and then i’ll put a photo of me on here just for an idea - last photo is me in an Orpheus cosplay


#jekyll and hyde#henry jekyll#dr jekyll#jekyll and hyde cosplay#edward hyde#mr hyde#cosplay#cosplay help#help needed#tgs jekyll#tgs hyde#tgs#the glass scientists
34 notes
·
View notes