#costume tutorial
Explore tagged Tumblr posts
Visit Tumblr Blog
Explore Tumblr blogs with no restrictions, modern design and the best experience.
Last Seen Tumblr Blogs


Fun Fact
Average visit duration of Tumblr.com is 10 mins and 25 secs.
Text
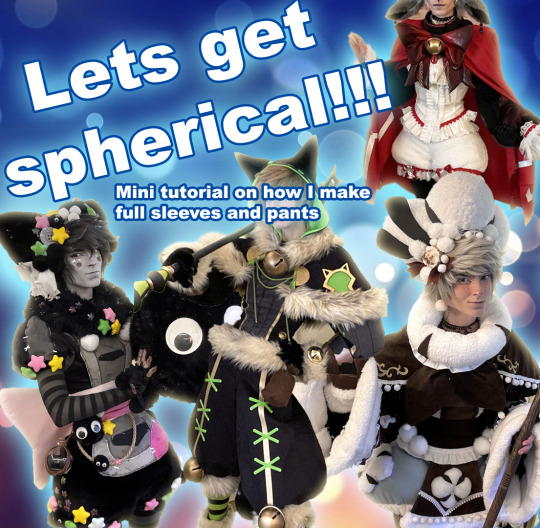
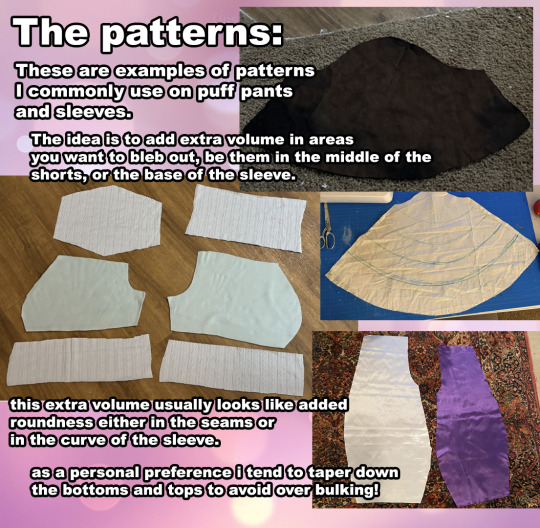
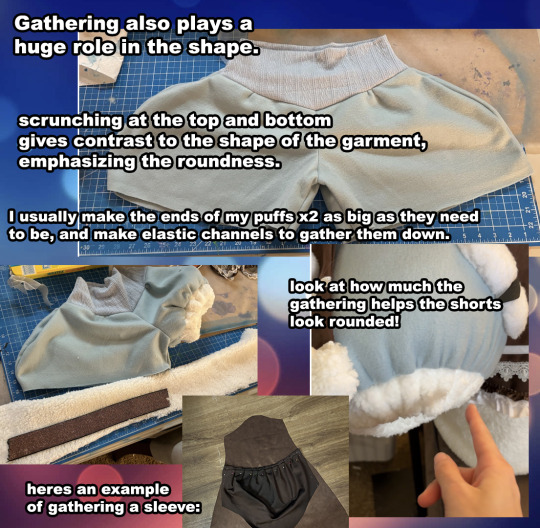
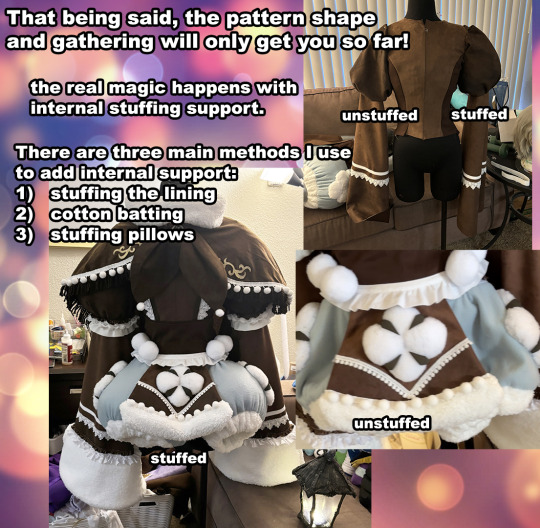
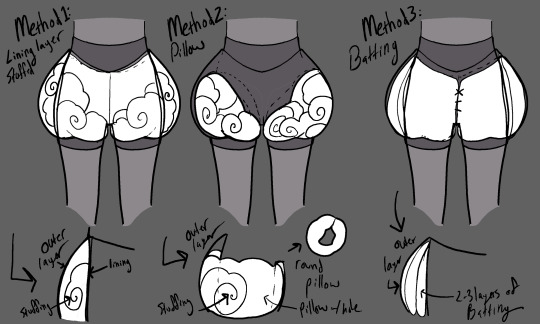
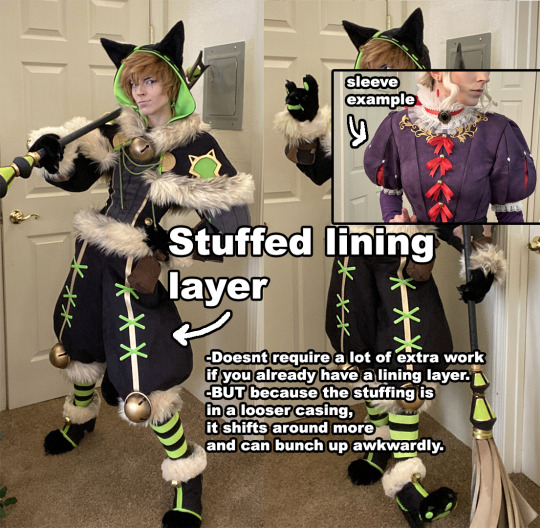
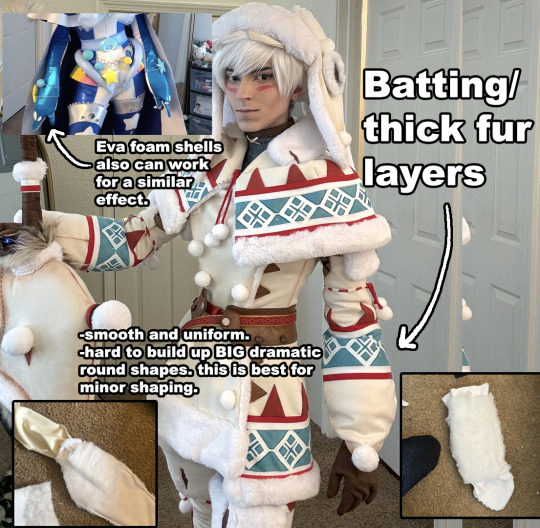
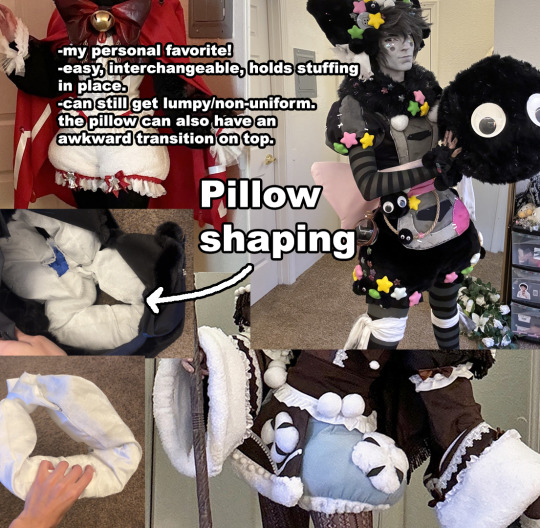
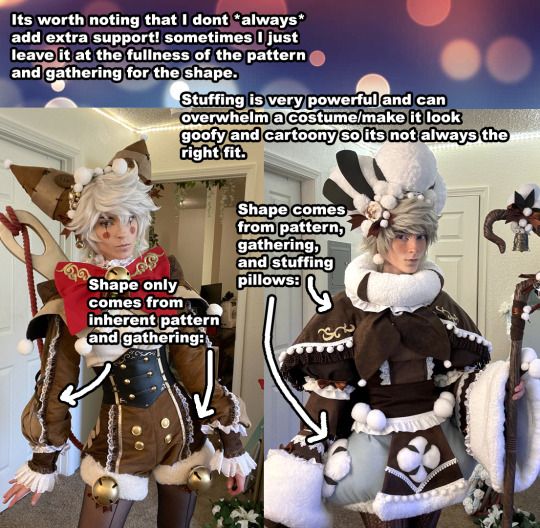
some information about how I shape my cosplays!!!
583 notes
·
View notes
Text
I present to you Lady Caterina de Savona's classes on patterning a tunic or gown, which I just used
youtube
youtube
youtube
And then the fun mash-it-up part with layers and accessories!
youtube
youtube
464 notes
·
View notes
Text
How to "Wash" your cat
#tutorial#humor#firefly#cat cosplay#cosplay#cats#kitty#cats in costumes#cat#cats of tumblr#aww#cat costume#hoban washburne#serenity#nerd#pun#dad jokes#funny
1K notes
·
View notes
Note
How did you go about redesigning the clothes in you remaster?
Ooh great question! I'll go into more detail below, but the gist is that I broke down each character into their vibes and general aesthetic and tried fitting it to my design biases.


I tend towards more grounded designs than the original JRPG-inspired armour and clothes, so I referenced a lot of medieval fashion for the setting. You'll usually see me covering bared skin in battle outfits or toning down extra details I struggle to draw

Then, using those references, I'd try to thumbnail basic shapes and colours to figure out which works best


(More specific character notes below)

For some characters like Iseul, I didn't feel much need to change his outfit so I mostly toned down the detail to suit my style. I shifted the colour scheme to something warmer and removed the fur and extra armour to serve his image as animal-loving and battle-avoidant. This serves as great contrast to his timeskip outfit where he then commits to being both a warrior and a prince, with more ornamentation and practical armour


I designed Helena and Alain as contrasts. They have very similar themes and designs, so I decided to smooth Alain down into the picture-perfect metal knight while Helena's wilder and asymmetric. I referenced more realistic armour for Alain but overall I wanted to keep his clothes similar.
For Helena, my design style is more practical and thematically I want to avoid Helena baring skin and vulnerability so I extended her corset into more of a chest armour and covered her other thigh. To add to her duality of magic and metal, I gave one arm armour and bared the other to show off magical scars.


August and Altea's designs are where I start to venture off into more vibes-based outfits. August is humble and traditional, a knight with proud loyalty to his Lord and family, so I gave him medieval colours to represent both on his tabard. The armour is still there, but it's less focus on metal and more on "cheaper" materials to serve as a contrast to his timeskip where he becomes a proper knight in shining armour. For that reason, I took away the cape and other unnecessary decoration.
Then Altea is flashy, wealthy, and bright. I kept the focus on light armour, with scalemail as the only obvious protection. I've mentioned before but I took inspiration from south east asian fashion (mostly cambodia and malaysia) as a grounded but ornate basis for her magical girl theme. Here the colour scheme and fabrics are what mostly connects it to the original

Similarly, Lennox is where vibes rule and the overal aesthetic changes quite a bit. He's often described with "choir boy" hair, so I wanted to combine choir robes with ornate priestly outfits to sell him as a vain cult-leader. I kept the symmetry, long coat, and lack of obvious armour, but I wanted him to look less modern and stick with less structured outfits.

One thing specific to the generals, is that I wanted to give them more of a variety to colour palettes to sell that while they're working together, they're not exactly happy about it. While they all have a focus of blue and silver to keep them cohesive, they each have a motif: Alain - silver, Helena - pale blue, Jinhai - brown, Lennox - dark blue, Magnus - turquoise
#love and legends#character design#costume design#whyyy did the image orientation all fuck up??#art#art ref#tutorial#ish#i love doing redesigns#or well converting designs to fit my biases :P
237 notes
·
View notes
Text


History reimagined at its finest. Chef's kiss
Oh, Mary Broadway September 2024 Broadway - $10
Cast: Cole Escola (Mary Todd Lincoln), Conrad Ricamora (Mary's Husband), James Scully (Mary's Teacher), Bianca Leigh (Mary's Chaperone), Tony Macht (Mary's Husband's Assistant)
Notes: MP4 format. Filmed from side front mezzanine. Mix of wide shots and zooms. Pretty damn good filming here. Only flaws are the couch/lounge on the left being almost completely obscured, a head on the right at moments, and the longer (2 min) blackout to change my battery. If you are in the area during the duration of this show… RUN TO THE LYCEUM. Includes bows. NFS forever except through master and NFT through October 24, 2029.
Screenshots: https://flic.kr/s/aHBqjBJYSa
#i filmed this#broadway#theatreedit#slime tutorial#plays#broadway play#cole escola#conrad ricamora#lincoln#mary todd#mary todd lincoln#abe lincoln#abraham lincoln#oh mary#play gifs#john wilkes booth#us presidents#president lincoln#first lady#flotus#2025 tony awards#2025 best new play#2025 best lead actor in a play nominee#2025 best featured actor in a play nominee#2025 best costume design of a play nominee#2025 best direction of a play nominee
73 notes
·
View notes
Text


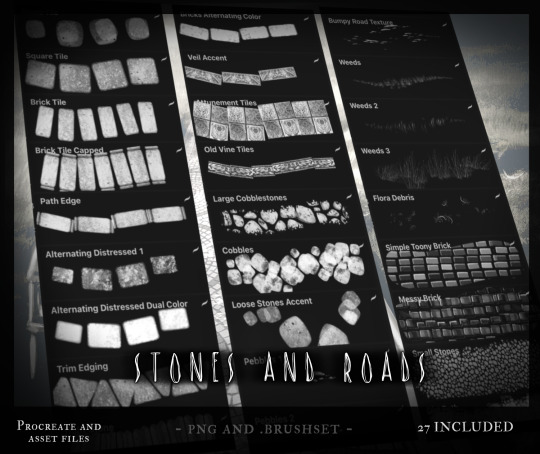


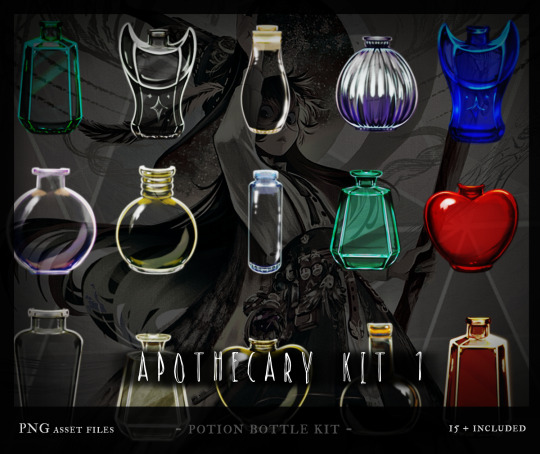

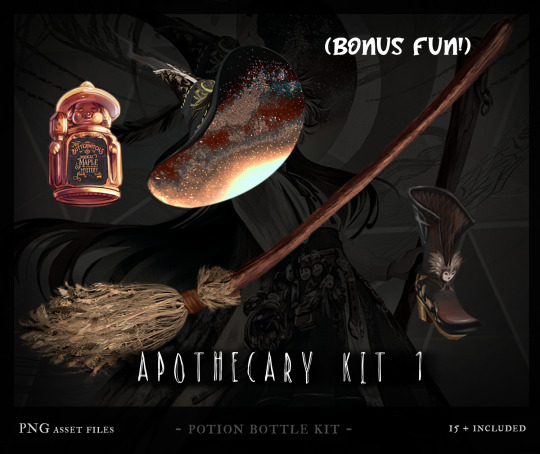
Also, hey, if you're in need of some fun and useful digital brushes, assets and tools, here's a bunch of recent packs made for my Patreon All of my brushes and assets are hand made (and the assets I made are made *with* these hand made brushes) and are available for use to make your own art go by quicker or to bring in some new elements!

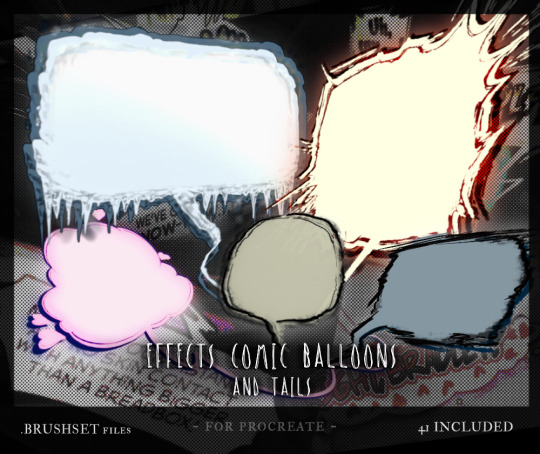
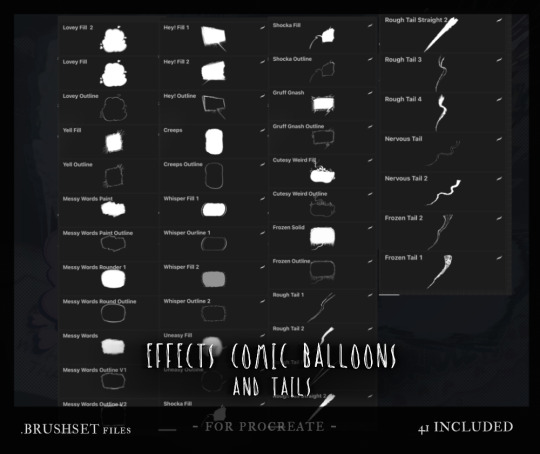


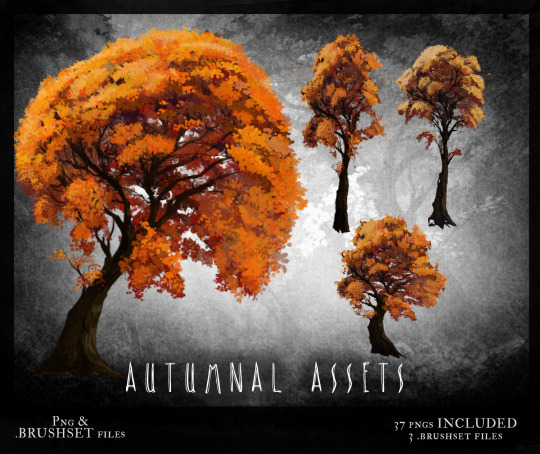

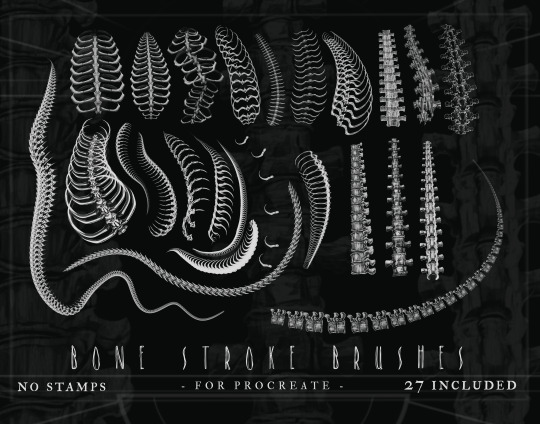
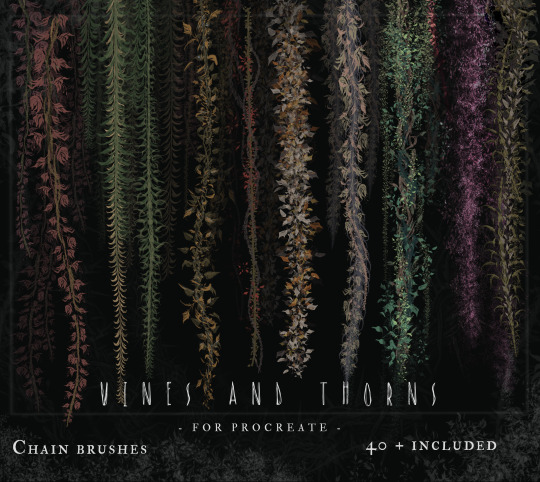
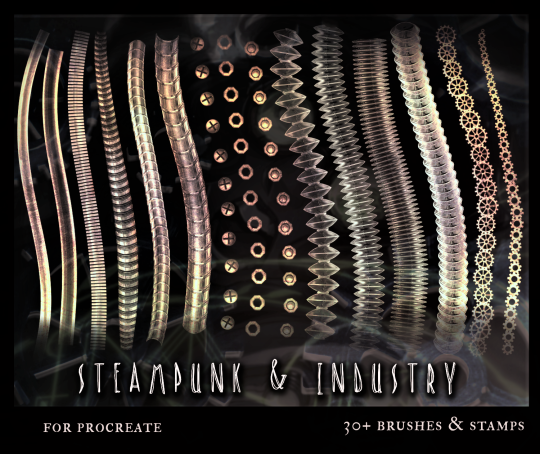

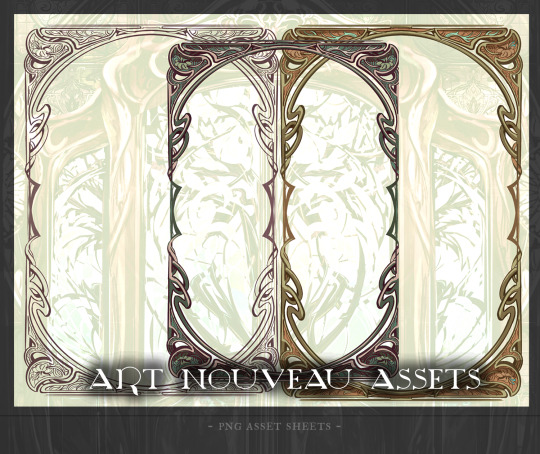

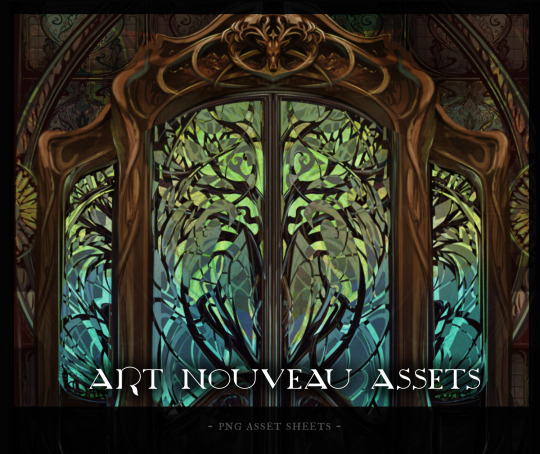
All of these and more are up there. You can grab them and support my art, the production of Solivaga, and the feeding of food here at my✨ Patreon ✨ !
#art resources#artwork#resources#tutorials#useful stuff#autumn#fall#art nouveau#brushes#digital brushes#procreate#png assets#every time I get someone asking how i make the backgrounds in Soli so quickly#I point to these tools and assets I make for myself#make them for me but share them with you#all brushes and assets are fair use without any license except for the costume brushes and assets for my characters
136 notes
·
View notes
Note
Am i allowed to ask how did you make such a majestic Gabriel helmet
Hi, sorry for the late answer, but thank you, and of course!

Disclaimer: most of the times when making cosplays, I just fuck around and find out. Meaning: I won't have templates for most things, exact pictures of the process, or measurements. I included everything I could, and explained everything I can.
Making costumes for me is lots of trial and error, and it still is to this day, as I am by any means NOT a professional. Obviously it'd be easier if I'd invest in sketching things out more and measuring, but that's completely on me.
I hope that nonetheless this somewhat helped, even though it's not a very good "tutorial"...
Please do check out the "Notes:" section at the end of the post for more thoughts, further help, and other stuff!
Tutorial below the line:
𓂃𓂃𓂃𓂃𓂃𓂃𓂃𓂃𓂃𓂃𓂃𓂃𓂃𓂃𓂃𓂃𓂃𓂃𓂃𓂃𓂃𓂃𓂃𓂃𓂃𓂃𓂃𓂃𓂃𓂃𓂃𓂃𓂃𓂃𓂃𓂃𓂃𓂃𓂃
Materials used: ● Paper ● EVA foam ● Pins ● Modeling paste ● Water based prime ● K100 & K40 sandpaper (probably better if you use a mini sander/polisher) ● Hot glue, super glue, white glue ● White and gold acrylic paint ● And of course: scissors, razor blade,

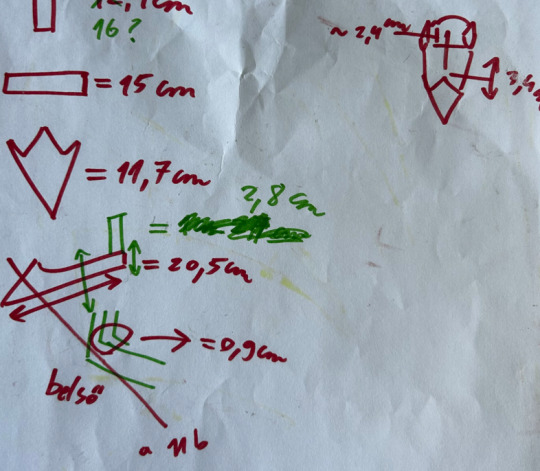
1. Sketching and measuring: One of the first things that is advised to do for anything and everything is to sketch your ideas out. It doesn't have to make sense to other people, if you yourself understand what you're trying to depict. Also make lots of notes, brainstorm, just generally put ideas out so things are more clear for you as you progress. This also includes measuring your head from front, side, and around. When you did, you can then use this very helpful and free template, which you can print out with the measures of your head. Seriously, shoutout to this template, it saved so much time whenever I made most of my masks.
𓂃𓂃𓂃𓂃𓂃𓂃𓂃𓂃𓂃𓂃𓂃𓂃𓂃𓂃𓂃𓂃𓂃𓂃𓂃𓂃𓂃𓂃𓂃𓂃𓂃𓂃𓂃𓂃𓂃𓂃𓂃𓂃𓂃𓂃𓂃𓂃𓂃𓂃
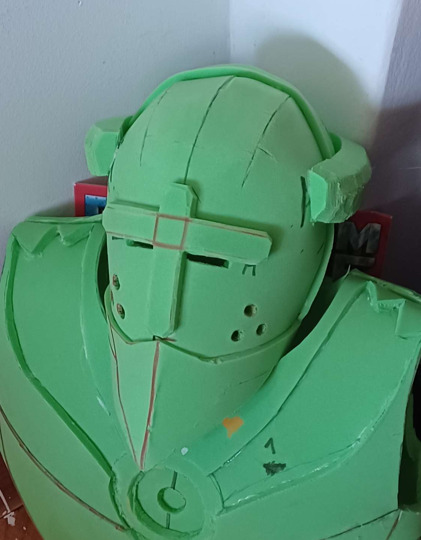
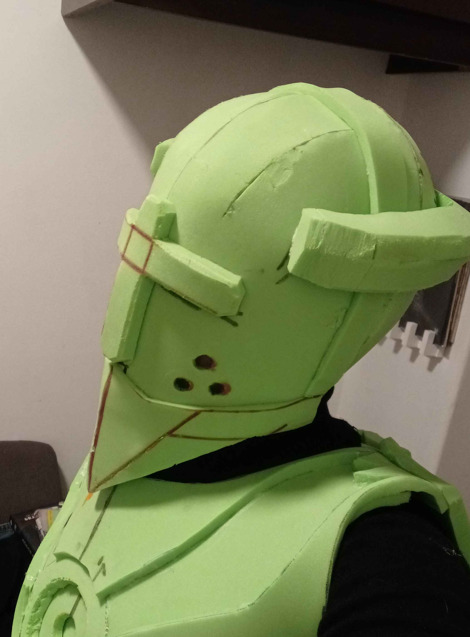
2. Applying the features: The way I put his features on the base template is by using the previous sketches and measurements. But what I do, is I cut them out in paper first, to see if they look good on the base by attaching them on the foam with pins. If it does, I trace it onto the foam, then cut it out a bit longer, to see if by any chance it looks better longer, if not, you can just cut the foam again.
The cross and halo were pretty easy: ● You can just draw a cross and cut it out (if you want to make it "pop out/3D", glue a layer under the shape like how I did in the picture). ● For the halo, it depends on how thick your foam is; ¹you could just cut out three long lines, which are then glued together to make a half circle, then apply it on the head, but I had to do it a bit tricky. Not sure how to explain it exactly, but when I cut a line for the halo, I also had to cut the end a bit "tilted", so I can glue a mini foam triangle shape to it, then cut a line with a tilted cut at the end again, then glued it to the other end of the triangle, and I continued this process as needed. With this, I made a half-circle for the halo. The "beak" is a bit tricky: I had a bit of trouble with this for the first time too, but here is how I did it: ● As you can see on the picture, it's in three seperate parts. The front is a triangle-ish shape with a 'peak' at the bottom of the cross. Under that is another triangle, and then it connects to the part that wraps around the head. ¹: This is because if you just cut out the entire shape of his "beak", and glue it together like that, it'd look like as if he got stung by a bee, because the foam is dense, and it'd pop-out a little. At least for me, it was a reoccuring issue with other parts as well. But again, this depends on the thickness and stretchiness. So tl;dr, you need to make sure that the foam is not "tense", you need to make it "relaxed" by placing multiple parts together to make the desired shape (same case with the base head, halo, etc.). For the cracks in the foam: I used modeling paste to fill those gaps in as much as I could, then used sandpaper to smooth out the edges and excess. For the holes on his cheeks: This is not a recommended idea, as it ruins the foam, but: I literally just grabbed my hot glue gun, and stabbed where the holes would be with the hot tip of it. Not advised, because the foam becomes dense and sticky at that area. It'll also be hard to paint. Mask's vision?: Quote the disclaimer: My peripherial is absolutely terrible in this mask. The front view is okay-ish. What I did for the vision is I cut two thicker lines out of the foam right under the cross, so it's somewhat hidden as well.
𓂃𓂃𓂃𓂃𓂃𓂃𓂃𓂃𓂃𓂃𓂃𓂃𓂃𓂃𓂃𓂃𓂃𓂃𓂃𓂃𓂃𓂃𓂃𓂃𓂃𓂃𓂃𓂃𓂃𓂃𓂃𓂃𓂃𓂃𓂃𓂃𓂃𓂃𓂃
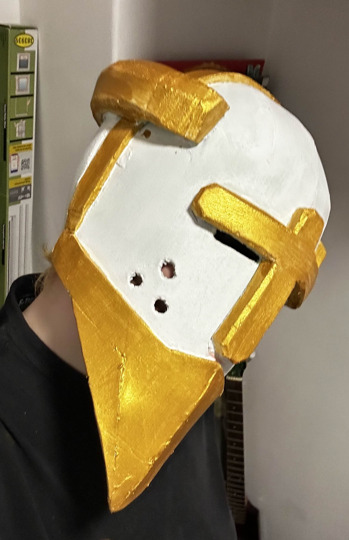

3. Painting and coating: My biggest enemy is the combination of paint and foam. Seriously, I can not begin to explain how much money I have spent on just paint and glue, in attempt for the paint to not chip off, but it still does. (if anyone has better advice for this please let me know!!) Here's what I did so the paint kind of sticks there: Firstly, an advice that I wish I had gotten much, much sooner before starting this project: Coat the area that you want to paint with white glue! This helps so that the paint can stick there longer, and it won't pop-off more easily. You can also try primer, but white glue is better in my opinion, primer just makes it a bit more dense. Then I used a lot of white acrylic paint. If you can just buy white foam, please do so. It'll save so much time and money (and insanity too). I think I had at least 10-15 coats so it looks fully white (the picture is not even the finished one). Note: I don't recommend using spray paint. It dries and chips down faster, also not very stretchy. It's cheaper, easier, but it won't last for long. I unfortunately stumbled into this issue, and it was not a cool thing to see.
I also recommend using a vivid gold color. Previously, I used a more realistic one, but it just looked washed and sad. Give Gabriel some life with that shiny, glittery gold!
𓂃𓂃𓂃𓂃𓂃𓂃𓂃𓂃𓂃𓂃𓂃𓂃𓂃𓂃𓂃𓂃𓂃𓂃𓂃𓂃𓂃𓂃𓂃𓂃𓂃𓂃𓂃𓂃𓂃𓂃𓂃𓂃𓂃𓂃𓂃𓂃𓂃𓂃𓂃

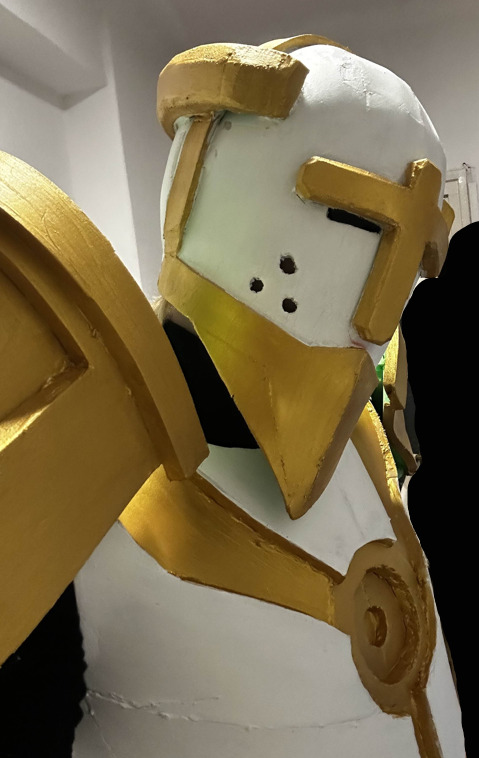
4. After refining edges and making sure that the painting looks nice and sharp, you're done! Again, I hope this somewhat helped. It's a shame that I don't really keep my templates and progress photographed, since it's more just for myself and for fun. I don't really post online anyways.
But, if you have any further questions, or if there's still some confusion, or if something is not exactly clear, let me know!
𓂃𓂃𓂃𓂃𓂃𓂃𓂃𓂃𓂃𓂃𓂃𓂃𓂃𓂃𓂃𓂃𓂃𓂃𓂃𓂃𓂃𓂃𓂃𓂃𓂃𓂃𓂃𓂃𓂃𓂃𓂃𓂃𓂃𓂃𓂃𓂃𓂃𓂃𓂃
Notes: ● I had really thick foam, so I had to manually make it thinner at times. I think foam around 4-5mm. thickness is good for a helmet. The thicker the sturdier; keep that in mind. ○ Again, if you can, please buy foam in the desired colors, so you wouldn't have to deal with a lot of painting. ○ On this topic, breathing is a little hard if the foam is thick, and it also gets warm very quickly. I use a balaclava so my skin doesn't stick to the foam when using it for a long time. If you can endure warmth for a long time, this project especially for you! ● I usually make my helmets smaller in size, so it looks more "accurate". Basically, it's just good for my head, therefore it's not very comfortable. I advise making it a little bigger than your actual head size for comfort. ● The helmet itself took me about 4-8 days max. all-in-all. Unsure about this exactly, because I don't usually look at the time when I make costumes. ● Please be careful with using darker colored sharpies!! It took me a while to hide them with the white paint especially. ● Don't be afraid to put personal creativity into the mask! My previous masked had horns instead of halo, but I just wanted to make this one more accurate. It depends on you! ○ Huge inspiration for the costume was dotflare's Gabriel model, especially for the smaller details. Please check them out, the model is free as well and very beautiful. If you can run blender, it'll help you so much with making the cosplay. ● As mentioned, I usually cut foam a bit longer to see how it'd look. Sometimes, it's actually better than the original measurement, but also, it could save mistakes if the size is not good after-all. ● As mentioned², no spray paints!! It chipped off for me and I thought I was going to cry. However, I'm unsure how spray paint works with white glue covered foam. It could be tried out on a piece of foam, maybe it works. ● Last thought: For the vision: you could try hiding the hole for your eyes with white mesh. ● This post kind of reads like a certain book from Mark Z. Danielewski, which was really not on purpose when I started making this post.
#cosplay#gabriel ultrakill#ultrakill#ultrakill gabriel#gabriel#costume#mask#helmet#help#“tutorial”#my cosplay
30 notes
·
View notes
Text
I'm going to make a cosplay of Jia's ceremonial robe from GxK: The New Empire!

This might be a little difficult, but I have a hand-sewing experiences back from my elementary and high school subject. With little expenses I have, maybe I will start on summer time. Plus, drawings as well.
If you have any suggestions of the designs, you should ask me. I'm all free to answer it.
@gorillageek27 @lionpatriot13 @amethyst-raptor06 @gojigojigojira @geminanvaju @jadewolf-writes @miss-couch-potato @godzillajuniorreborn @kia-ko @mossizi @astraerystarr
#probably it's a little difficult to make#but i watch some tutorials on how to make capes and robes in a hand sewn style#i will try my best#godzilla#jia andrews#kaylee hottle#cosplay#design#costume design#monsterverse#kaiju#godzilla x kong: the new empire#gxk#gxk: the new empire#legendary pictures
24 notes
·
View notes
Text
My lovely fellow cosplay freaks, help a bloke out
I've never dyed shite apart from my hair before (and even so, I pay someone else to do it) so I'm in need of some assistance
To dye the following denim jacket black with RIT black dye

Is one bottle enough, or would I be safer with two bottles?
Kisses on the forehead, and may the Metatron not bite
#good omens cosplay#cosplay#diy craft#diy projects#dyeing#rit dye#send help#cosplay help#good omens#(kinda)#(you will see)#fashion#crowley cosplay#-ish#cosplay tutorial#denim jacket#diy#crafts#costume#spencer speaks#spencer begs for help#spencer has too many projects
14 notes
·
View notes
Text
youtube
Medieval pants!
20 notes
·
View notes
Text


Hi everyone!
Thought I’d share my pirate costume for a ren faire I went to last year!!
(How I made it below the cut)
I thrifted the white undershirt, which I added some string to at the neckline, to get that lace up look.

The skirt is also thrifted, many sizes too big, so I brought it in at the waist and added pleats to get that volume. I also pinned up one side, and added some other skirts underneath to give it some volume.

The lace up vest is entirely handmade and reversible (quite possibly the best item I’ve ever made, I’m insanely proud of it).

To make it, I altered a pattern for a vintage vest, adding a lining and cropping the front pieces to make space for the ribbon details. I used soda tabs to hold the ribbon. I used five per side, but this can be different depending on how you want the ribbon to sit.
I wrapped a scrap of fabric around my waist and added a thrifted belt with a crochet bag handmade by my best friend. I also added a set of dice in a matching colour, as well as some strings of beads I made from thrifted necklaces and charms from past projects.
To make the hat, I found a cheap costume hat and pinned it to the shape I wanted, then covered it in a nicer fabric, using a lot of pleats to emphasise the shape. I sewed lace around the edges, and tucked some feathers behind a thrifted pin on the side.

The final details were *a lot* of gold jewellery for those pirate vibes, and some dagger earrings I bought at an artist market.
This is a very easy costume to thrift, with the details mostly in the layering and colour scheme. And of course, all that gold jewellery!
As always, feel free to ask questions, and hopefully this helped!!
#cosplay#ren faire#ren faire costume#pirate#pirate cosplay#cosplay tutorial#pirate cosplay tutorial#my cosplay
26 notes
·
View notes
Text
bill cipher deconstructed, a cosplay
#gravity falls#bill cipher#so i changed my mind and im now entering alexs costume contest#aka im making my SISTER enter the contest for me#i already bought the final pieces for my greed cosplay so i dont wanna change my plans now#but i asked my sister and she agreed to wear whatever i make. she will regret those words.#this is a combination of two of my favorite runway looks and is exceedingly derivative jfkldsa#but hey i aint a fashion designer! it doesnt matter if i steal runway designs bc this aint for a runway!! its for nycc babeyyyy!!!#i cannot take too long on this tho bc i NEEEEEED to get a semi functional version of my ford marionette done#and thats gonna be taking most of my time#so this will be a 2 day project at MOST#ive got it all worked out. worlds most slapdash stolen runway look. i can do this.#i just need to buy the craft supplies and then get to work#maybe i can contract my dad to lacquer and spraypaint the eyeball for me....#my sister is so going to regret agreeing to this lol#unless we win in which case neither of us can regret anything#also i did not draw the pose base. i googled 'fashion design base' and chose one from a tutorial. for claritys sake.#fluffle... something#fluffle art#i guess
43 notes
·
View notes
Text


It's like a Pixar Movie. But on stage!
Maybe Happy Ending Broadway December 2024 - $17.75
Cast: Darren Criss (Oliver), Helen J. Shen (Claire), Marcus Choi (James), Dez Duron (Gil Brentley)
Notes: MP4 format. Filmed in 4K from the left orchestra. Mix of wide shots and zooms. Obstruction on the right and sometimes bottom with downward camera wandering. Occasional breathing noise picked up by the mic due to my shit sinuses. Includes partial bows. NFS forever except through master and NFT through January 24, 2030.
Screenshots: https://flic.kr/s/aHBqjBWXUu
#i filmed this#musicals#broadway#musical bootlegs#musical gifs#theatreedit#slime tutorial#mhe#maybe happy ending#darren criss#helen j shen#hwaboon#helperbot#robots#glee#a very potter musical#starkid#a very potter sequel#a very potter senior year#a very potter trilogy#2025 tony awards#2025 best new musical nominee#2025 best scenic design of a musical nominee#2025 best lead actor in a musical nominee#2025 best book of a musical nominee#2025 best costume design of a musical nominee#2025 best lighting design of a musical nominee#2025 best sound design of a musical nominee#2025 best direction of a musical nominee#2025 best orchestrations nominee
50 notes
·
View notes
Text
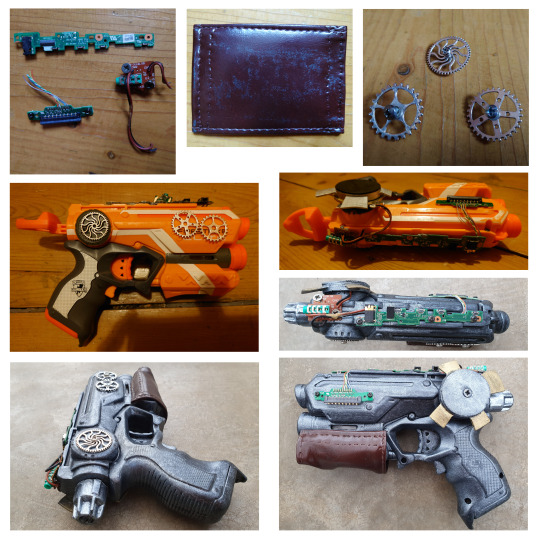
I was going to post a cosplay photo today, but decided to do another of my tutorial type things instead👩🏫. This time it’s for the steampunk handgun I used in my recent Typhoid Mary shoot and also seen in a few of my earlier pics. I’ve found it super useful to have, as it suits a bunch of different characters. If you want to rustle one up yourself, you’ll need these ingredients…
1 x Nerf gun or similar – Choose your gun carefully, as it will dictate what your finished weapon looks like. I went for something small, but chunky, which I picked up cheap in a thrift store (💜 my bargains).
Sandpaper for prepping the gun.
1 x can of black spray paint (or possibly more depending on the size of your gun – tbh I regularly misjudge how much paint I’ll need for stuff and end up having to make extra trips to the craft store to stock up 🚶♀️😩
Silver acrylic paint and 🖌️🖌️ to give the gun a metallic look (or gold if you want to bling out).
Assorted fixtures for decorations – I used some gears left over from another project, a bit of an old speaker and some circuitry from a broken tablet, but loads of other stuff will work. Btw, if you haven’t tried it, it’s super therapeutic pulling bits out of an old tablet, especially if it’s one that used to crash on you a lot like mine😈😈😈
Plastic knob – Replacement for the cocking thingy at the back of the Nerf gun, as this totally gave away that it was a toy. My piece was stripped off a toy gun I used in another project, but you can use whatever’s available.
A piece of leather – Trim for the barrel to add to the steampunk vibe and (hopefully) make the gun look a bit more realistic.
Needle and thread 🪡 – Most of my projects involve sewing in some way, as it’s something I like doing. Here it was used for finishing the edges of the piece of leather.
Fixative spray – Used to try and ensure I don’t accidentally scratch off any paint when I’m using the gun in a typical display of klutziness 🥴
Normally when I do these tutorials, I start rambling on at this point about whatever bits of the project pop into my head, but this time, I’m totally going to be structured about it, so here’s a step-by-step guide…
Sand off any logos and stuff on your gun, as these always make them look toy like. If the gun you’ve chosen has any smooth surfaces, you might want to sand these as well, as the paint will go on better that way. Top tip here is not to use really rough sandpiper or you’ll end up with nasty scratches.
Strip off any fittings on the gun which don’t look realistic and replace if necessary. In my case, this included replacing the thing for getting the gun ready to fire (I’m sure there’s a technical term for this, but it beats me what it is). I screwed the new bit into the end of the mechanism, so it still works, which is pretty cool.
⛫💨 Spray the gun matt black to prime it, plus any of your fittings which need to match. Usually this has to be done in a couple of stages, as if you’re working on a table or something you won’t be able to turn anything over until it’s dry. Also, no matter how good a surface looks at the time, you often come back to find the paint hasn’t covered something properly 😠😠. Here’s another tip… go off and do something else between coats rather than waiting around for however many hours it takes the paint to dry 💡
🎨 Add the metallic distressed look with the arcylic paint. For this to work, you need to dust the paint on super lightly. I usually wipe my brush on a bit of paper each time I dip it in the paint to get rid of the excess.
Once the paint is dry, attach your fittings. The trick here is to try to make them look like they have some kind of purpose and aren’t just window-dressing. Glue is the easiest way to stick things on, but I use bolts and screws when possible 🪛🔧, as these are more secure and allow gears and stuff to spin around if you want them to. If you’re using leather like me (or any other material), you’ll probably want to sew in a folded overedge before attaching it to stop it fraying 🪡.
Touch up any damage you did to your paintwork when working on step 5. Maybe you’ll be luckier than me, but no matter how careful I am, there always seems to be some.
⛫💨 Spray on your fixative for protection. This should be done in steady lines with the can about 30 cms away from the gun. It’s best to do a few coats, sometimes working from side to side and sometimes from top to bottom, so you get good coverage. My tip for this stage is to shake the can well before use and do a quick test spray first to make sure the fixative is coming out evenly.
Pick up the finished gun and start rocking it /̵͇̿̿/’̿’̿ ̿ ̿̿ ̿̿ ̿̿💥
So there you have it. Hopefully if you’re new to projects like this, it will give you a good starting point. I think you get good results for some pretty easy steps. Let me know if you found it useful or if you have any questions 💬, and stay tuned for more cosplay stuff.
Luv your friendly neighborhood cosplayer, Christabel ❤️🧡💛💚💙💜
ko-fi.com/christabelq instagram.com/christabel.simpson/ deviantart.com/christabelq
#steampunk gun tutorial#cosplay tutorial#steampunk gun#costume design#prop design#cosplay gun#hand guns#steampunk#cosplaygirl#cosplayers#ukcosplayer#cosplaygirls#follow for follow#follow back#followback#followforfollow#like for like#likeforlike#typhoid mary cosplay#typhoid mary
50 notes
·
View notes
Text
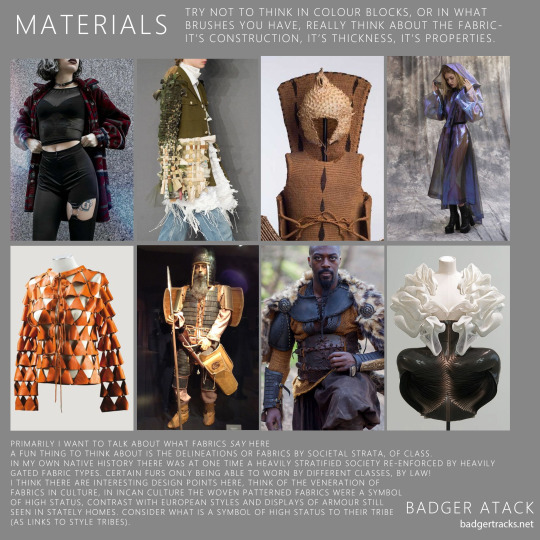

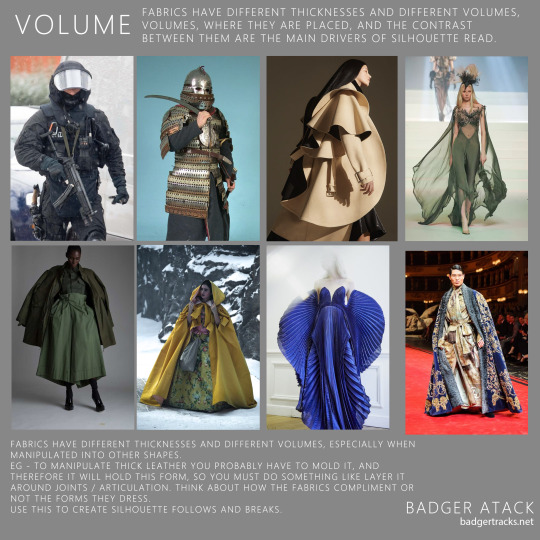
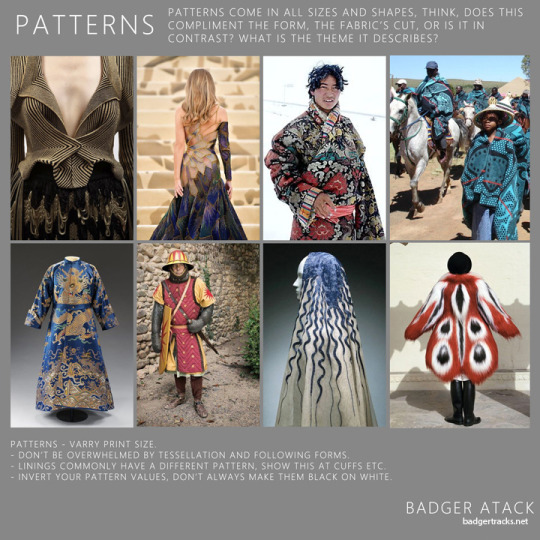
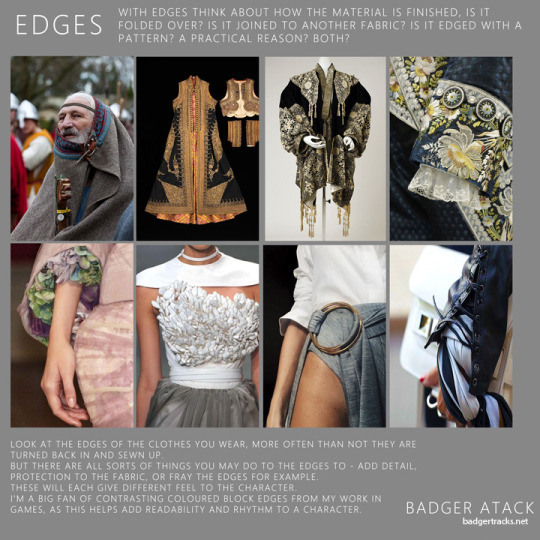
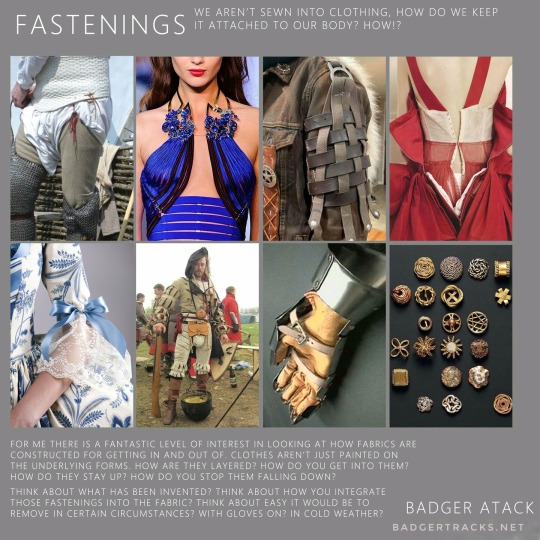
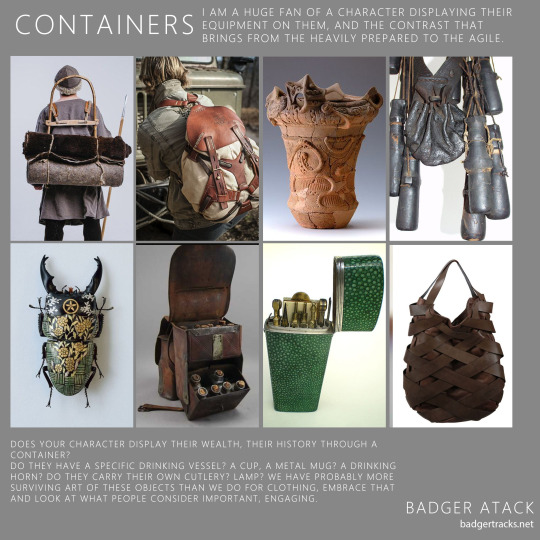
Here's an overview of how I think about Character Clothing Concepts.
I'm not an expert in any of these areas, I just use them to drive my design decisions, researching further into choosen areas to better understand them.
Anyway, people kept asking, here it is!
272 notes
·
View notes
Video
youtube
Halloween is upon us! And I have created this theatrical Dracula Vampire makeup tutorial that is easy to recreate.
Covering the brows is the most complicated element of this look, however, my method is easy to follow! That being said, you can also cover your eyebrows with Elmer’s glue, wax, concealer/foundation or you could simply enhance your own brows for a sinister finish.
Enjoy trying this look for yourself. Shonagh 🎃
#Shonagh Scott#showmemakeup#Halloween#halloween makeup#halloween costume#halloween ideas#makeup tutorials#makeup tutorial#vampire#vampire makeup#dracula#dracula makeup#makeup artist#sfx makeup#face paint#youtuber#youtube#halloween inspiration
25 notes
·
View notes