#DIY permanent hair removal
Text
The best product for permanent hair removal / Ulike
The Benefits of Ulike Laser Hair Removal System for Men and Women
Introduction
Introducing Ulike Laser Hair Removal System
The Ulike Laser Hair Removal System is revolutionizing the way we think about at-home hair removal. Designed to be both effective and gentle, this innovative device uses IPL (Intense Pulsed Light) technology to help users achieve smooth, hair-free skin without the pain and…

View On WordPress
#Affordable permanent hair removal#At-home laser hair removal#AtHomeHairRemoval#BeautyBlog#Best permanent hair removal product#Best permanent hair removal solution for sensitive skin#DIY permanent hair removal#Electrolysis hair removal at home#Home permanent hair removal#IPL permanent hair removal review#LED light permanent hair removal#Long-term hair removal products#LongLastingResults#Painless permanent hair removal#PainlessHairRemoval#Permanent facial hair removal for women#Permanent hair reduction products#Permanent hair removal cream#Permanent hair removal device#Permanent hair removal for men#Permanent hair removal machine for home use#Permanent hair removal serum#Professional permanent hair removal#Side effects of permanent hair removal.#Top-rated permanent hair removal devices#UlikeLaserHairRemoval
0 notes
Text
The Complete List of Sissy Milestones
link

Categories
Panties [/20]
Bras [/13]
Hosiery [/14]
Lingerie [/15]
Shoes [/15]
Body Accessories [/16]
Cosmetics [/18]
Toys [/17]
Lifestyle [/23]
Outfits [/16]
Training [/14]
Masturbation [/15]
Sex [/23]
Mental [/4]
Cyber [/9]
Public [/14]
Social [/6]
Permanent [/11]
Total [/256]
Panties [20]
Wear a pair of panties.
Own a pair of panties
Own 10 pairs of panties.
Own 10 unique colors of panties.
Own 10 unique styles of panties.
Own a thong.
Own a g-string.
Own a bikini.
Own boyshorts.
Own ruffled panties.
Own hipsters.
Own cheeky panties.
Own pantaloons.
Own lacy panties.
Own panties with words on the bottom.
Own crotchless panties.
Own backless panties.
Own panties with a zipper.
Own pouch panties.
Own latex panties.
Bras [13]
Wear a bra.
Own a bra.
Own 5 bras.
Own a training bra.
Own a pushup bra.
Own a strapless bra.
Own a sports bra.
Own a bralette.
Own a T-shirt bra.
Own a lace cup bra.
Own a stick-on bra.
Own a bullet bra.
Own a matching bra set.
Hosiery [14]
Wear pantyhose.
Own a pair of pantyhose.
Own a pair of stockings.
Own a pair of knee highs.
Own a pair of ankle socks.
Own a pair of thigh highs.
Own fishnet stockings.
Own opaque tights.
Own white stockings.
Own patterned stockings.
Own leggings.
Own animal-print stockings.
Own lace-trimmed stockings.
Own 3 different deniers of hosiery.
Lingerie [15]
Own a garterbelt.
Own a fashion corset.
Own a steel-boned corset.
Own a petticoat.
Own a babydoll.
Own a panty-girdle.
Own a bodystocking.
Own a nightgown.
Own a teddy.
Own a chemise.
Own a bustier.
Own a camisole.
Own a peignoir.
Own a negligee.
Own a crinoline.
Shoes [15]
Wear a pair of heels.
Own a pair of women's shoes.
Own 5 pairs of women's shoes.
Own shoes with at least 3 inch heel.
Own shoes with at least 5 inch heel.
Own women's sandals.
Own women's booties.
Own high heeled wedges.
Own stilletos.
Own women's flats.
Own platform heels.
Own Mary Janes.
Own women's sneakers.
Own thigh-high boots.
Own lockeable heels.
Body Accessories [16]
Make a pair of DIY breastforms.
Own breast forms.
Own a breast plate.
Own a chastity cage.
Own clip-on earrings.
Own earrings.
Own dangling earrings.
Own hoop earrings.
Pierce ears.
Pierce tongue.
Pierce nipples.
Pierce belly button.
Own fake nails.
Own hip pads.
Own a wig.
Own temporary tattoos.
Cosmetics [18]
Own Foundation.
Own Blush.
Own Lipstick.
Own Lipliner.
Own Eyeliner.
Own Mascara.
Own Eyeshadow.
Own Makeup remover.
Own Concealer.
Own Eyelash curlers.
Own Fake eyelashes.
Own Highlighter.
Own Bronzer.
Own makeup sponges.
Own makeup brushes.
Own eyebrow pencil.
Own a makeup holder.
Own setting spray.
Toys [17]
Own a butt plug.
Own butt plug training set.
Own vibrating plug.
Own a dildo.
Own a squirting dildo.
Own a ball gag.
Own a penis gag.
Own nipple clamps.
Own hobble chains.
Own arm/leg binders.
Own ballet heels.
Own fleshlight.
Own prostate massager.
Own a blindfold.
Own anal beads.
Own an anal hook.
Own a tail plug.
Lifestyle [23]
Own women's soap.
Own women's shampoo.
Own women's deodorant.
Own women's perfume.
Know women's clothing size (shoes, waist, hip, bust)
Shave pubic hair.
Shave leg hair.
Shave arm hair.
Remove all body hair.
Reshape eyebrows.
Wear hair extensions.
Use home IPL hair removal.
Wear clear nail polish.
Wear colored finger nail polish.
Own colored toe nail polish.
Subscribe to a women's magazine.
Lose weight to become more feminine.
Grow out hair.
Pretend to have a menstrual cycle.
Throw out all male underwear.
Wear panties everyday.
Wear a bra everyday.
Wear women's hosiery everyday.
Outfits [16]
Own a maid outfit.
Own a sissy dress.
Own a school girl outfit.
Own a cheerleader outfit.
Own a secretary outfit.
Own a wedding dress.
Own a prom dress.
Own a little black dress.
Own a clubbing dress.
Own a bodycon dress.
Own a playboy bunny outfit.
Own a women's workout outfit.
Own a princess costume.
Own a gimp suit.
Own a women's cosplay costume.
Own a stepford wife costume.
Training [14]
Remain in chastity for 1 week.
Remain in chastity for 1 month.
Remain in chastity for 1 year.
Wear a corset for 1-4 hours a day.
Wear a corset for 6-10 hours a day.
Wear butt plug for 1-4 hours.
Wear a butt plug for 4-8 hours.
Fit a small dildo anally.
Fit a medium dildo anally.
Fit a large dildo anally.
Fit a small dildo orally.
Fit a medium dildo orally.
Fit a large dildo orally.
Practice applying makeup.
Masturbation [15]
Masturbate in chastity.
Have a ruined orgasm.
Have a self-facial.
Eat your own cum.
Use a vibrator to masturbate.
Have a protate orgasm.
Use a mechanical sex machine.
Watch sissy/feminization hypno.
Finger your anus.
Moan while masturbating.
Use an anal douche.
Have an anal enema.
Gape your ass.
Masturbate by stimulating your nipples.
Perform auto-fellatio.
Sex [23]
Experience a facial.
Get pegged.
Have a threesome.
Have anal sex.
Receive a creampie.
Give a blowjob.
Swallow someone else's cum.
Respond to a booty call.
Have anal sex immediately in the morning.
Have anal sex more than 4 times in one day.
Have anal sex while in chastity.
Have sex while dressed as a woman.
Get spitroasted.
Service a gloryhole.
Have an orgasm from anal sex.
Have anal sex without orgasming.
Experience a bukakke.
Participate in an orgy.
Participate in a gangbang as the center.
Have anal sex in 4 unique positions.
Deepthroat a penis.
Get spanked during sex.
Have anal sex without a condom.
Mental [4]
Give yourself a feminine name.
Write humiliating phrases on your body.
Keep a feminine diary.
Commit to a self-hypnosis schedule.
Cyber [9]
Have an online profile for your female persona.
Use a videochat service (Omegle/Chatroulette) as a woman.
Post pictures of yourself online dressed as a woman.
Post videos of yourself online dressed as a woman.
Have a female image of yourself captioned.
Receive a cum tribute toward your female persona.
Participate in online feminization training.
Complete online feminization tasks.
Receive a feminizing gift from someone.
Public [14]
public tasks can be done twice, once while with female underwear and once while fully dressed as a woman.
Go for a walk in public.
Go to a shopping mall.
Go to a beauty/hair/nail salon.
Go to a restaurant.
Go out on a date.
Go to a lingerie shop.
Go to a movie theatre.
Social [6]
Tell a friend you are interested in feminization.
Tell your significant other you are interested in feminization.
Be in a relationship where you spend a majority of your time in your female persona.
Book a session with a professional dominant.
Have a circle of friends where they primarily know you as your female persona.
Live as your female persona for 2 weeks.
Permanent [11]
Receive breast implants.
Receive butt implants.
Get a feminization themed tattoo.
Microblade your eyebrows.
Get lip brushing surgery.
Get a prince albert piercing.
Get tattooed eyeliner.
Get collage injections.
Take female hormones.
Have facial feminization surgery.
Have an orchiectomy.
Two people with the same score may have very different point breakdowns. That makes it very difficult to accurately describe what kind of sissy a person might be based on their point totals. But I did it anyway just for fun.
Scoring
0-30 : Beginner.
30-60 : Feeling Girly.
60-90 : Exploring Femininity.
90-120 : Crossdresser.
120-150 : Getting Kinky With it.
150-180 : Loud and Proud.
180-210 : Full-Blown Female Persona.
210-240 : Practically Female.
256 - Permanent Sissy
Bonus Achievements
Completionist : Complete all tasks in any category.
Lingerie Lover : Own all items in Panties, Bras, and Lingerie categories.
Fashionista : Own all items in Outfits and Shoes categories.
Female Training : Complete all tasks in Lifestyle and Training categories.
Sex Positive : Complete all tasks in Masturbation and Sex categories.
Experimentalist : Have at least one task completed in every single category.
Attention Whore : Complete all tasks in Cyber, Public, and Social categories.
14 notes
·
View notes
Text
I put this in an ask for @five-and-dimes but Tumblr ate it so I’m typing what I remember it saying: Instead of faking his death especially in the current years, Hob could’ve used makeup, or hair dye (or bleach and also a razor/scissors) to look like he’s aging or to look different (beards too). It kinda looks like he has grey at his temples at the new inn (hopefully he isn’t just aging slowly) he (as most disaster bi beings could also switch gender?) he could adapt different accents or use semi permanent plastic surgery (Botox injections don’t last I believe) or use diy temporary hacks like face lift tape 😂 also moles/beauty marks, scars, birthmarks, freckles, age spots…
Either dream doesn’t recognize him or does.
Options of what dream walks into the new inn seeing:
Drag queen hob
Street performer mime
Old lady hob
Hob with personality change and like different ticks and accents and mannerisms
Lumberjack hob
Hob as dream 😂 /goth hob
I’m on the run as a fugitive buzzcut hob
Middle aged woman version of hob
Bleached ramen noodle Justin Timberlake hair hob
Dyed grey hair (this scares dream because maybe he’s chosen that this is his last life and is dying but isn’t)
DIY lip fillers gone wrong New Jersey accent hob
(Crack but also tiny angst if dream thinks he’s choosing to die soon) Meticulously shaving (wax/cream hair removal things) and planning bald spots and receding hairline that gets progressively worse (hob makes sure it looks real every morn before he goes out and has anxiety that if he stays out too long someone will notice the stubble (that most certainly isn’t thinning) growing back in) (after dream finds him and they relocate together hob jokes about how bad it will be to grow it back out and that he can’t just shape-shift like the shaper of forms)
Punk metal hob
Biker hob
Pirate eyepatch hob
#sandman neil gaiman#dreamling#sandman netflix#the sandman#dream x hob#centennial husbands#hob gadling#morphob#morpheus dream of the endless#I’m bi and genderqueer so I’m projecting
44 notes
·
View notes
Text
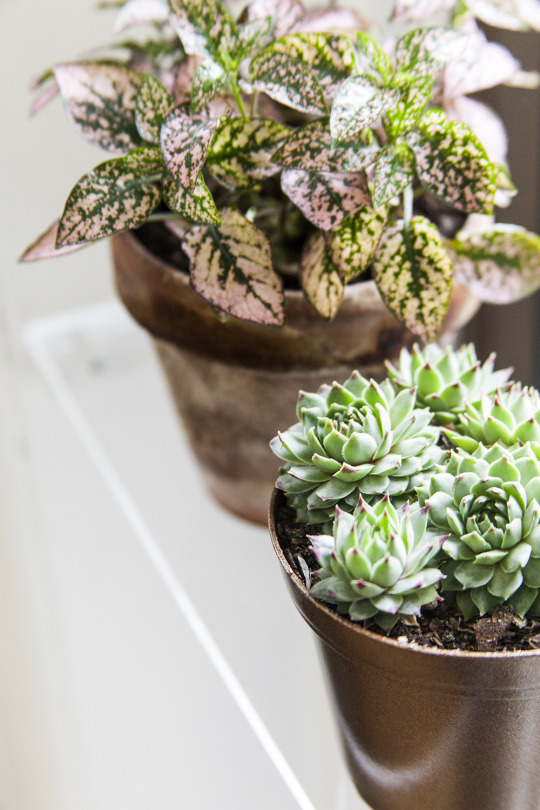
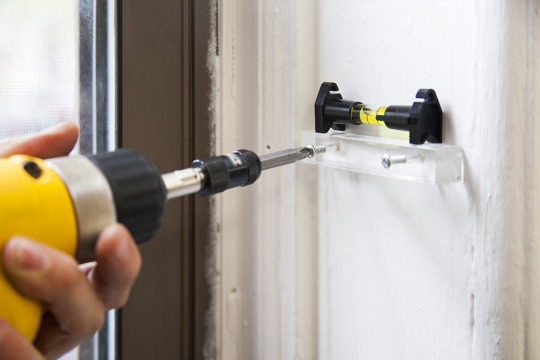
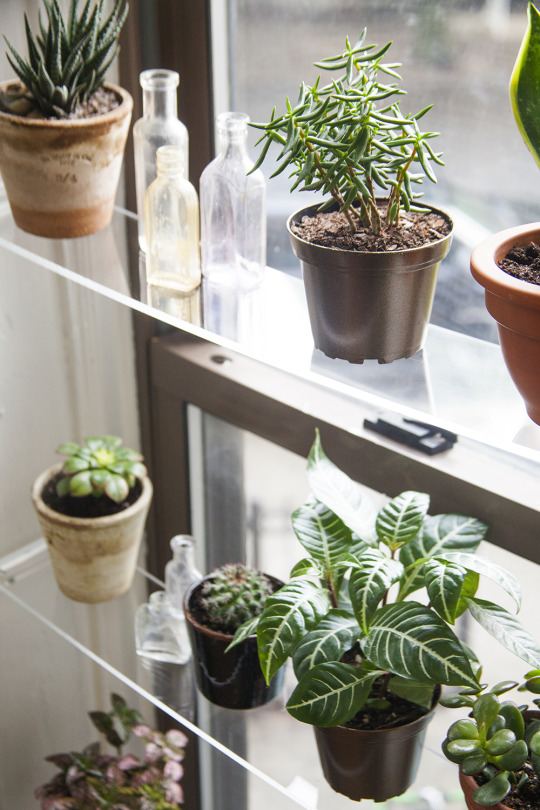
DIY Window Floating Shelves
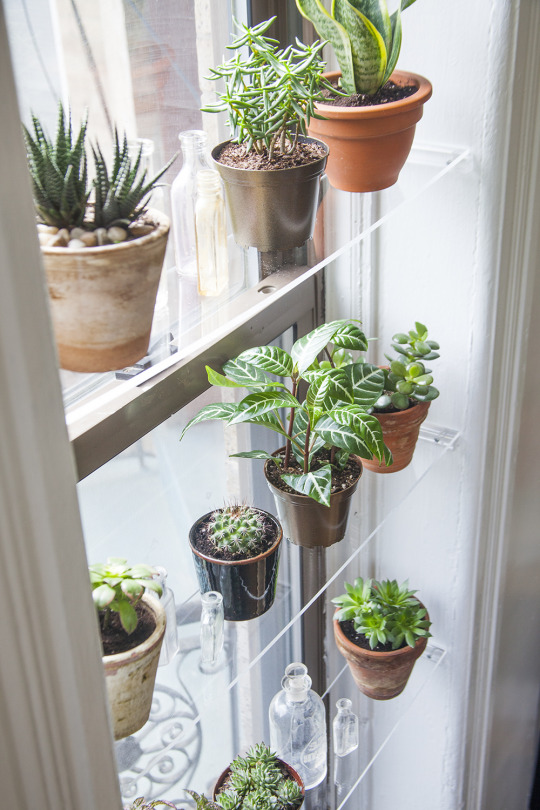
Project by Jessica Marquez:
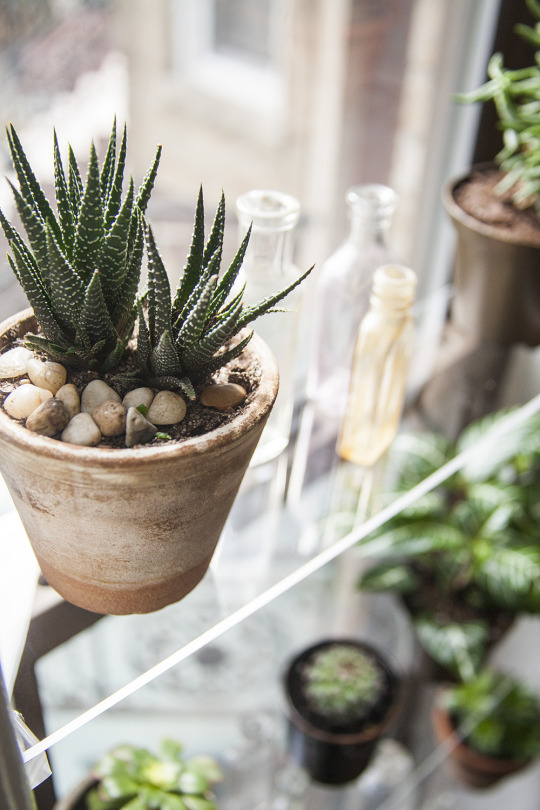
Black thumb be damned, I love filling my home with plants. Prickly cactus, chubby-leaved succulents and sprawling ivy are my favorite types of greenery. Mainly because they are the easiest to care for, and I don’t have the best track record. In spite of my plant-murdering ways, I clearly see the benefits of houseplants. They are beautiful, they clean the air, and they can even improve your mood.
It seems like every other day I’m vacuuming soil and nursing a broken plant back into a tipped pot. Thanks, cats! I created these built-in clear shelves to get my plants off my windowsill and, bonus, I was able to add a lot more color and greenery into my life. These minimal shelves provide lots of direct light, so they’re great for cacti, succulents and herbs. And while they don’t block too much light, they provide a bit of privacy, too.
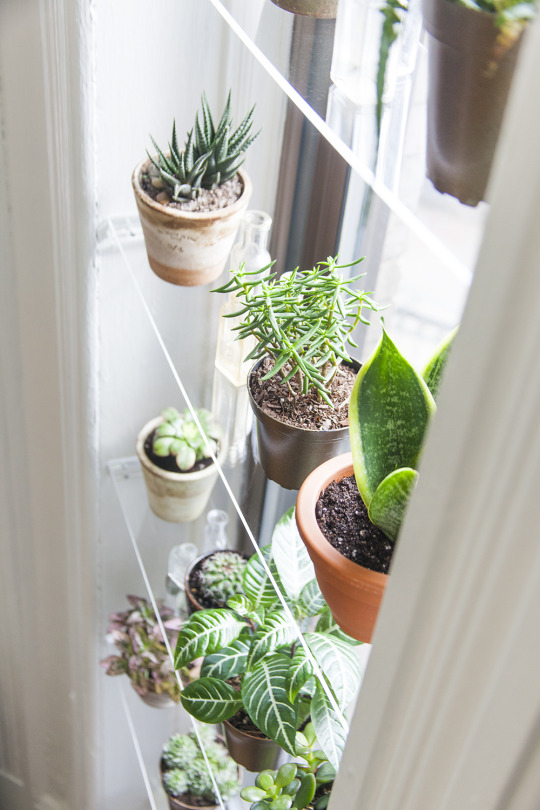
These shelves work great for smaller windows. This one is about 24 inches wide. I chose to use acrylic for my shelves because it’s lightweight, safer than glass (since these are not screwed in), and easy to remove to clean. You could easily substitute wood for the brackets — painted to match your window — and glass for the shelves. The acrylic does bow a bit with the weight of the plants. If you’d like to display heavier objects or if you have wider windows I’d suggest using tempered glass, which you can easily get cut to size with finished edges at a professional glass shop. —Jessica Marquez

Materials
– Measuring tape
– Painter’s tape
– Acrylic shelf (you can get acrylic sheets cut and brackets cut to size here)
– Acrylic square rod “brackets” (These are not traditional brackets, but are easy to install and support the shelf like a traditional bracket would.)
– 9/64 drill bit
– Ruler
– Pencil
– Level
– Sheet Metal Screws, size 6 x 1 1/4
Instructions

Step 1
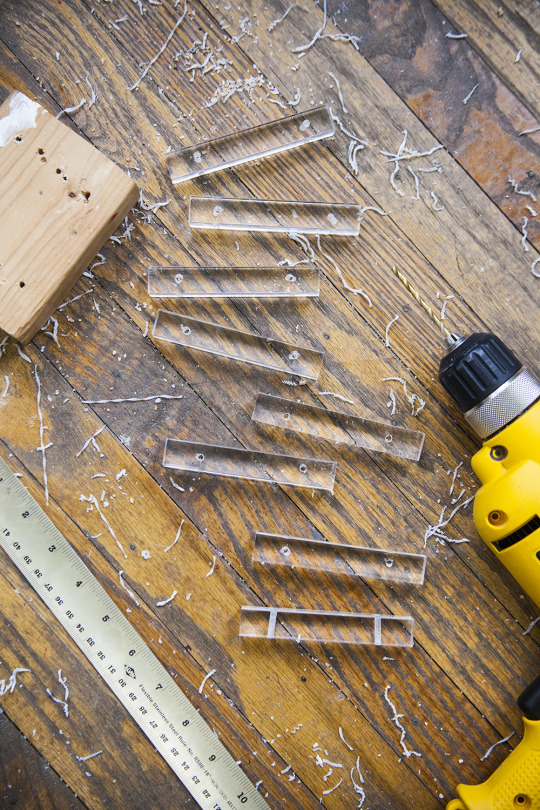
Using a measuring tape, measure the width and depth of your window. My window was 24 5/8 x 4.5″. I wanted the shelves to fit flush into the window, so I made sure the measurement was just a hair shy of the full width. To save a bit on the cost of materials, I got 4″ deep shelves, instead of 4.5″. In total, I got four 1/4″ thick acrylic shelves cut at Canal Plastic Center along with nine 5/8″ x 4″ square acrylic rods.
Step 2
Using painter’s tape, plan the layout of your shelves. Allow for some room for your plants to grow.
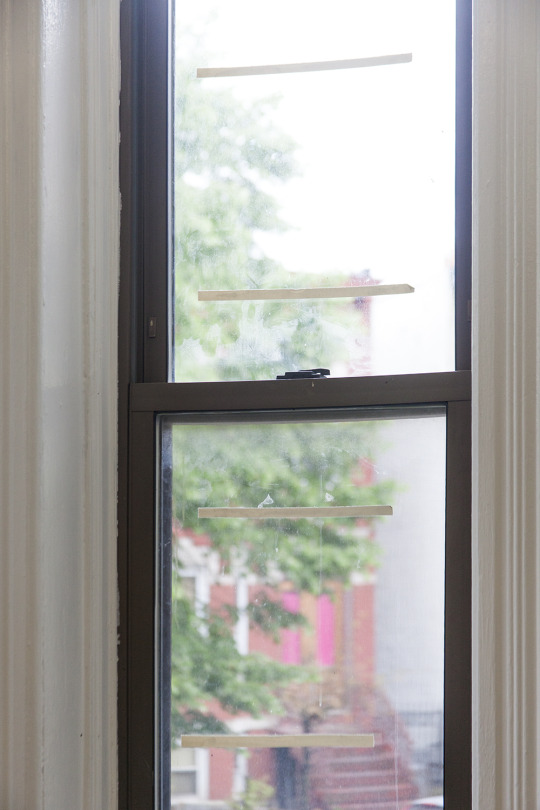
Step 3
Drill two holes in support brackets. To speed up the drill process, I taped the bracket pieces side by side onto a piece of scrap wood and marked on the tape the center point where the holes would be drilled.
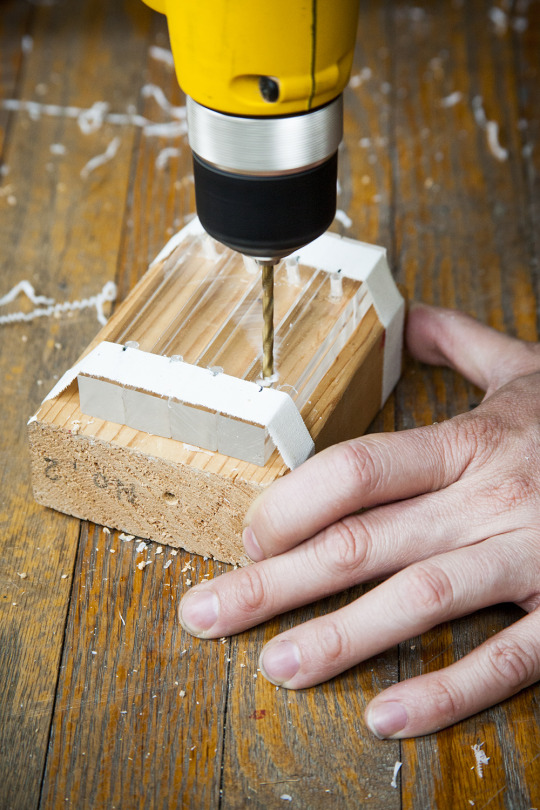
NOTE: If you are using acrylic brackets drill very slowly! As you’re drilling, pull the drill bit out every few seconds. The drill bit heats up as you drill and can melt the acrylic if you drill too fast without breaks. I had a craft fail with my first drill bit, which got permanently stuck in the acrylic. Glad I ordered one extra bracket piece.

Step 4
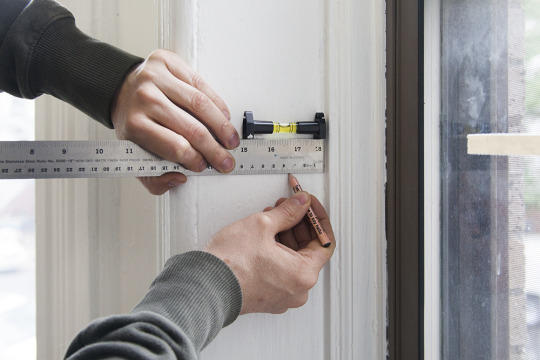
Mark where your brackets will be installed on one side of the windowsill. With a ruler and level, mark a level line along the depth of the window sill. Measure from the bottom up using your taped window guide as a reference point. Once you have your level measurement for the first bottom shelf, you can measure up from there. Each of my shelves were 13″ apart.
Step 5
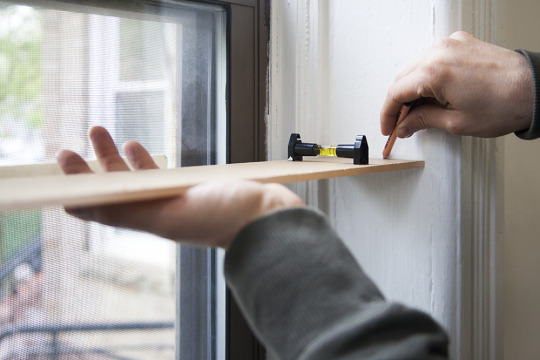
Mark the opposite side of the windowsill where the brackets will be installed. Start with the bottom shelf. Use a leveled shelf lined up with your previous marks on the opposite side of the windowsill to create a level line along the depth of the windowsill. Once you have the level mark for the bottom shelf, you can measure up from there using the same distance between shelves as you did on the opposite side. Remember to level each shelf.
Step 6
Drill in screws. It helps to screw in one side halfway, level the bracket, and screw in the other side. Then you can completely drill in both screws. Repeat this step for all of your brackets. Now you’re ready to drop in your shelves, which rest right on the brackets and decorate.
7 notes
·
View notes
Text
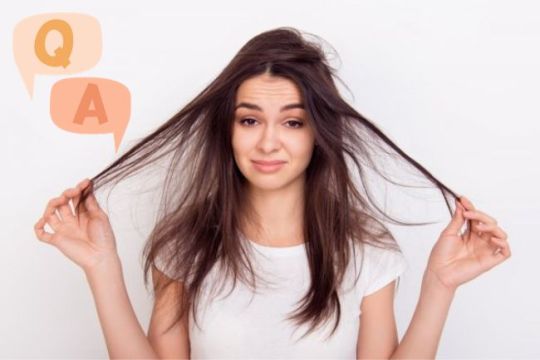
DIY hair colour: Reading instructions for optimal results
Embracing a fresh hair colour can be an exciting change, but the costs and maintenance often dim the allure. Fear not, because the solution lies in the realm of home hair colouring—a budget-friendly alternative with the added convenience of being on your own schedule. While the prospect might seem daunting for newcomers, armed with the right at-home colouring kit, the process becomes not only convenient and affordable but also remarkably successful.
Navigate through the journey of transforming your hair colour with our step-by-step guide, and you'll soon master the art of DIY hair colouring.

Selecting the Perfect Hair Colour Kit
The key to a seamless home hair colouring experience lies in choosing the right kit. For an all-over, permanent colour, consider L’Oréal Paris Superior Preference Fade-Defying Shine Permanent Hair Color, known for its liquid formula that effortlessly spreads across the hair. If you're seeking multi-dimensional effects and preventing flatness, opt for L’Oréal Paris Feria Multi-Faceted Shimmering Permanent Hair Color in trendy shades like Chocolate Cherry.
Concealing grey hairs? Look no further than L’Oréal Paris Excellence Créme Permanent Triple Protection Hair Color, offering mess-free application with a non-drip cream formula. For dimensional highlights, explore L’Oréal Paris Superior Preference Balayage At-Home Highlighting Kit, complete with an expert touch applicator for that hand-painted balayage effect.
Pro Tip: If your hair is long and thick, consider grabbing two boxes of colour to avoid running out mid-process.
Brushing and Sectioning Like a Pro
Before delving into the colouring process, ensure your dry hair is tangle-free by brushing. Sectioning your hair makes the application more manageable. Part your hair down the middle, creating left and right sides. Further divide each side into sections, ensuring four even parts, or more if your hair is particularly long or thick.
Colouring with Precision
Start by applying colour to your hairline, blending gently with gloved fingers. Work systematically through each section, ensuring thorough coverage. Pay special attention to your hairline, revisiting it after colouring the front sections to catch any missed spots.
Crafting Your Unique Style
Continue the process, creating sections along your part and saturating the roots. Move towards the ear, flipping your hair back over and repeating on the other side. For the back, over-saturate by taking larger sections and pay extra attention to the nape of your neck.
Finishing Touches and Timely Rinsing
Once your hair is saturated, follow the instructions provided in your kit for the recommended processing time. Set a timer to avoid over-processing. After the allotted time, rinse out the colour until the water runs clear. Use the conditioner included, leaving it on for five minutes before rinsing. Dry and style your hair as usual.
The Journey Continues: Expert Advice on At-Home Hair Color
If you're stepping into the world of at-home hair colour for the first time or looking to enhance your DIY skills, expert colorists Millie Morales and Nikki Lee share valuable insights. From choosing the right shade to maximising colour longevity, their tips simplify the process for a seamless at-home colouring experience.
Insider Tips and Hacks
Embarking on the at-home hair colouring adventure might seem daunting, but with the right tips, it becomes surprisingly straightforward. Prepare for success with practical advice:
Wear a button-down or zip-up shirt for easy removal.
Keep a damp paper towel nearby for quick clean-ups.
Create a clear and organised workspace with necessary tools.
Apply conditioner from your kit along your hairline and ears as a skin barrier.
Section your hair into four neat parts for better control and coverage.
Rescue Mission: Removing Hair Dye from Skin
Stains on your face or hands from the colouring process? Fear not! Simple tricks using household items can come to your rescue:
Dabbing rubbing alcohol on the stained areas.
Creating a mixture of warm water and dishwashing soap for stain removal.
Applying a rich body cream or ointment, followed by thorough washing.
Using olive oil or micellar water for gentle stain lifting.
Decoding the Art of Choosing the Right Hair Color Online
Selecting a hair colour online may seem tricky, but these tricks can help you make an informed choice:
Avoid Ash tones for mostly grey or white hair.
Understand the tones: Natural, Warm/Gold, Auburn/Copper, Cool/Ash.
Err on the lighter side if unsure of your natural colour.
Match your colour-treated hair, avoiding overlapping on previously coloured sections.
Check the side panel for your natural colour reference.
Common Mistakes to Avoid While Colouring
Even seasoned DIY hair colorists can slip up. Be aware of these common mistakes:
Using the entire bottle for root touch-ups—focus on the roots only.
Leaving colour on for too long, leading to darker and ashy results.
Removing colour too soon, resulting in brassiness and insufficient lightening.
Attempting to stretch one bottle for long, thick hair—opt for two boxes.
Shaking the colour bottle before being ready to apply—mix and use immediately.
Hair Care Rituals for Colored Tresses
Maintaining healthy, coloured hair is achievable with the right approach. Keep your strands vibrant and strong with these tips:
Establish a regular cycle of shampooing, conditioning, and treatments.
Stay consistent with trims to eliminate split ends.
Make small adjustments to your hair colour, avoiding radical changes.
Limit the use of hot tools to prevent drying out your hair.
Adhere to a consistent hair colour application schedule.
FAQs: How Often to Shampoo and Color Treated Hair
Shampooing colour-treated hair requires strategic planning:
Wait 24 hours after colour application before washing.
Aim to wash your hair every other day, using dry shampoo when necessary.
Utilise sulphate-free, colour-safe shampoos like L’Oréal Paris EverPure Sulfate Free Bond Repair Shampoo.
Stick to a colour application schedule of 4-6 weeks to maintain consistency.
Choosing Colours for Blondes and Brunettes
The variety of blondes and brunettes is vast, so choose wisely based on your desired shade:
Explore the extensive range of blondes in Nutrisse for a diverse selection.
Olia offers rich brunettes and intense red shades.
Consider Nutrisse PL1 and PL2 for a platinum blonde transformation.
Crafting Your Colored Hair Journey
Maintaining vibrancy and health with coloured hair is a delicate balance. Adopt these practices for a flourishing coloured hair journey:
Stick to a consistent hair colour schedule of 4-6 weeks.
Choose colours that match your colour-treated hair for a seamless blend.
Embrace the journey with confidence, knowing that a well-maintained routine ensures the best results.
Conclusion:
In the world of DIY hair colour, you're now armed with expert tips and tricks. Whether you're a novice or a seasoned pro, the key is in the details—choosing the right kit, applying with precision, and avoiding common pitfalls. As you embark on your at-home colouring journey, remember it's not just about changing your hair colour; it's an expression of creativity. So, enjoy the process, embrace the vibrancy, and let your unique style shine through. Happy colouring!
2 notes
·
View notes
Text
Home Remedies for Oily Dandruff: Effective Solutions for a Healthy Scalp
Seborrheic dermatitis, another name for oily dandruff, is a common condition that can be brought on by inflammation, excess oil production, or an excessive amount of yeast on the scalp. Since there is no permanent cure for dandruff, there are a few home remedies for oily dandruff that can help control and lessen the oily scalp thinning hair.
Pay attention that each person may respond differently to these treatments, so if you have any concerns about the health of your itchy oily scalp with hair loss, it is always a good idea to speak with a doctor for advice.

Home Remedies for Oily Dandruff
Here are some natural remedies for oily dandruff you can try,
1. Tea Tree Oil
How to prepare:
Tea tree oil may help lessen dandruff due to its antifungal and antibacterial qualities. Apply a small amount of tea tree oil to your scalp by combining it with a carrier oil, such as coconut oil. Try not to wash your hair for around fifteen minutes after applying it.
2. Aloe Vera
How to prepare:
Another home remedies for oily dandruff is Aloe vera. It has calming and anti-inflammatory qualities. On your scalp, apply fresh aloe vera gel directly. Rinse it off after 15 to 20 minutes. Aloe vera shampoos are another option.
3. Apple Cider Vinegar
How to prepare:
After shampooing, use a scalp rinse made of equal parts water and apple cider vinegar. It might lessen dandruff and help your scalp's pH balance.
4. Coconut Oil
How to prepare:
Coconut oil diy for dandruff and oily scalp has antibacterial qualities and can hydrate the scalp. After applying warm coconut oil to your scalp and letting it sit for at least half an hour, wash your hair.
5. Baking Soda
How to prepare:
For oily dandruff hair, mix water and baking soda to make a paste, then gently massage the mixture into your scalp. Give it a good rinse. Baking soda might help in reducing oiliness and cleansing the scalp.
6. Omega-3 Fatty Acids
How to prepare:
Incorporate into your diet foods high in omega-3 fatty acids, like fatty fish, chia seeds, and flaxseeds. These can improve the general health of the scalp along with oily dandruff treatment.
7. Select Best Shampoo for Oily Hair and Dandruff
How to prepare:
Do regularly shampoo for oily dandruff hair with a gentle anti-dandruff shampoo. Take care not to overwash your scalp because this might remove its natural oils and cause it to produce more oil.
8. Manage Stress
How to prepare:
Oily hair dandruff and hair loss can be worsened by stress. Engage in stress-relieving activities such as yoga, meditation, or deep breathing techniques.
9. Probiotics
How to prepare:
Taking probiotics could help keep the microbes on your scalp in balance. Think about including foods high in probiotics, such as yogurt, in your diet.
10. Avoid Harsh Hair Products
How to prepare:
Keep clear of hair products that contain harsh chemicals that could irritate the scalp and use gentle best shampoo for oily dandruff hair and conditioners instead.
Read: How to Make Vitamin E Oil for Hair Growth?

11. Lemon Juice
How to prepare:
Try this oily dandruff scalp treatment, your scalp's pH can be balanced by the acidity of lemon juice. Apply a mixture of lemon juice and water to your scalp. Before washing your hair, let it sit for five to ten minutes.
12. Neem (Indian Lilac)
How to prepare:
Neem has antibacterial and antifungal qualities for oily dandruff and hair loss. Neem oil or a paste made from neem leaves can be applied directly to the scalp. Before washing, leave it on for about 30 minutes.
13. Honey
How to prepare:
Honey has related antifungal and antibacterial qualities. Apply a mixture of honey and warm water to your scalp. Before washing your hair, leave it on for 20 to 30 minutes.
14. Fenugreek (Methi) Seeds
How to prepare:
Fenugreek seeds should be soaked in water for a whole night, then ground into a paste and applied to the scalp. Before washing your hair, let it sit for approximately half an hour. Fenugreek is time tested home remedies for dandruff and oily scalp. It has antifungal and anti-inflammatory qualities.
15. Green Tea Rinse
How to prepare:
After brewing, let the green tea cool. After shampooing your hair, use it as a last rinse. In addition to its antioxidant content, green tea can be calming for the scalp.
16. Onion Juice
How to prepare:
Opt for this kitchen dandruff home remedy for oily scalp; onion juice has antimicrobial qualities despite its powerful smell. Juice an onion and rub it onto your scalp. Before washing, leave it on for approximately 30 minutes.
17. Epsom Salt
How to prepare:
Shampoo and Epsom salt should be combined before washing your hair. Epsom salts can minimize oily dandruff hair loss and exfoliate the scalp.
18. Jojoba Oil
How to prepare:
Jojoba oil is very similar to the sebum that the scalp naturally produces. Oil production can be regulated with the use of jojoba oil. Before washing, massage a small amount into your scalp and let it sit there for a few hours. Be assured with this dandruff oily hair home remedies idea.
19. Curd (Yogurt) Mask
How to prepare:
Before washing, apply plain yogurt to your scalp and let it sit there for 30 minutes. Yogurt's probiotics may help in recovering the microbiome balance on the scalp.
20. Essential Oils
How to prepare:
Essential oils with oily scalp dandruff treatment have anti-dandruff qualities include peppermint, lavender, and rosemary. Apply a few drops to your scalp after mixing them with carrier oil.
Read: What Really Makes the Hair Grow - The Simple Science

21. Garlic
How to prepare:
Garlic possesses related antifungal qualities. Juice from a few crushed garlic cloves should be combined with carrier oil. After applying the mixture to your scalp and letting it sit for half an hour, wash your hair.
22. Burdock Root
How to prepare:
Burdock root contains antioxidant and anti-inflammatory qualities. Burdock root tea can be prepared and used as a scalp rinse. Burdock root extract can also be found in some best shampoos for oily hair with dandruff.
23. Cucumber
How to prepare:
Juice from a mashed cucumber should be applied to your scalp. Before rinsing, leave it on for about 30 minutes. Cucumber soothes irritated scalps and has a cooling effect.
24. Chamomile Tea Rinse
How to prepare:
There are anti-inflammatory qualities to chamomile. After making chamomile tea, allow it to cool before using it as a last hair rinse. The scalp may find chamomile to be calming.
25. Turmeric
How to prepare:
Turmeric has antifungal and anti-inflammatory oily hair dandruff hair loss qualities. Use oil or water and turmeric powder to make a paste that you can apply to your scalp. Before washing, let it sit for 10 to 15 minutes.
26. Salt Scalp Scrub
How to prepare:
Gently massage your scalp with a mixture of coarse sea salt and your usual shampoo. These can helpful dandruff and oily scalp home remedies in removing extra oil and exfoliating.
27. Almond Oil
How to prepare:
Nutrient-rich almond oil has the potential to hydrate the scalp. Before washing, massage a tiny bit of almond oil into your scalp and let it sit there for a few hours.
28. Tomato Juice
How to prepare:
On your scalp, apply fresh tomato juice, and let it remain for 15 to 20 minutes before rinsing. The acidic nature of tomatoes may help bring the pH of the scalp into balance. Consider this home remedies for oily dandruff solution too.
29. Walnut Scrub
How to prepare:
To make a scrub, carefully powder walnuts and combine them with water. To remove extra oil and exfoliate your scalp, gently massage this in.
30. Lifestyle Changes
How to prepare:
Think about changing your way of life to avoid overusing heat styling, control your stress, and eat a balanced diet. Each of these factors may have an impact on scalp health.
Frequently Asked Questions
1. Why is my hair so oily?
Sebum, the natural oil produced by the scalp, may be produced in large quantities, making your hair oily.
This too much oiliness can be caused by several factors, including hormonal fluctuations, genetics, and an imbalance in oil production. Certain hair care habits, such as overwashing or using many products, may also be important.
2. What is oily dandruff called?
Seborrheic dermatitis is a common term used to describe oily dandruff. Excessive sebum production is the indicator of this condition, resulting in a greasy scalp and the formation of yellowish, oily flakes. On the scalp, seborrheic dermatitis can also cause redness and inflammation.
3. Should I oil my hair if I have oily scalp?
Applying oil to an oily scalp should be done with caution. While heavy oils or excessive application can worsen the problem, some oils can help balance the scalp's natural oil production.
If you decide to use oil or home remedies for oily dandruff, use light varieties like jojoba or tea tree oil and apply carefully to prevent further greasiness.
4. Is naturally oily hair good?
The management of naturally oily hair and personal preferences are the main factors that determine whether oily hair is good or bad. Naturally oily hair has several advantages, such as increased shine and hair shaft protection.
But too much oiliness can cause problems like greasiness and require more frequent washing. Maintaining healthy and manageable hair requires striking a balance with a treatment that fits your preferences and hair type.
5. Which oil is best for oily dandruff?
One of the greatest home remedies for oily dandruff is frequently thought to be tea tree oil. It is essential antifungal and antibacterial qualities may help in treating the root causes of dandruff. Further, tea tree oil has a drying effect that is advantageous for controlling oily scalps.
To make sure you are not experiencing any negative side effects, it is essential to dilute tea tree oil with carrier oil and conduct a patch test before using it.
more >>>
2 notes
·
View notes
Text
How Do I Remove Human Hair Extensions Safely?
Removing human hair extensions safely is just as important as applying them properly to avoid damage to your natural hair.
Whether you have clip-ins, tape-ins, sew-ins, or fusion extensions, each method requires a different removal technique.
In this article, we’ll cover the best practices for safely removing human hair extensions without causing breakage or discomfort.

1. How to Safely Remove Clip-In Hair Extensions
Clip-in extensions are the easiest type of extensions to remove and require minimal effort.
To safely remove clip-ins:
Step 1: Start from the bottom wefts near the nape of your neck.
Step 2: Gently unclip the extensions by pressing on the clips to release them.
Step 3: Work your way up, carefully unclipping each weft and avoiding any tugging or pulling.
Step 4: Brush through your natural hair to remove any tangles after all the wefts are out.
Read more:
How do I prevent tangling and matting with hair extensions?
How do you wash and condition natural hair extensions?
2. How to Remove Tape-In Hair Extensions
Tape-in extensions require a bit more care to remove, as adhesive is used to secure the extensions to your natural hair.
Here’s how to safely remove tape-in extensions:
Step 1: Apply a tape-in extension remover solution, which is designed to break down the adhesive.
Step 2: Gently rub the solution into the adhesive strip, letting it sit for a few minutes to loosen the bond.
Step 3: Slowly peel apart the tape strips without pulling on your natural hair.
Step 4: Use a fine-tooth comb to remove any leftover adhesive from your hair.
Step 5: Wash and condition your hair thoroughly to remove any residue.
3. How to Remove Sew-In Hair Extensions
Sew-in extensions, or weaves, are attached to braids or cornrows using a needle and thread, so they require careful removal to avoid damaging your natural hair.
To safely remove sew-ins:
Step 1: Use a pair of sharp scissors to cut the thread that holds the wefts in place, being very careful not to cut your natural hair or the braids.
Step 2: Once all the thread is cut, gently pull the wefts away from the braids.
Step 3: After removing the extensions, carefully unravel the braids to avoid any knots or tangles.
Step 4: Detangle your hair with a wide-tooth comb and wash it to remove buildup.
See more: https://www.merchantcircle.com/mynaturalhairextensions-orlando-fl
4. How to Remove Fusion (Keratin Bond) Extensions
Fusion or keratin bond extensions are attached to your natural hair using keratin adhesive, which requires a special removal technique to avoid damage.
Follow these steps to remove fusion extensions:
Step 1: Apply a bond remover solution to each keratin bond to break down the adhesive.
Step 2: Use a pair of extension pliers to gently squeeze the bond, softening it enough to slide the extension off.
Step 3: After removing the extension, comb through your hair to eliminate any adhesive residue.
Step 4: Continue this process for all bonds, and then wash and condition your hair thoroughly.
5. How to Remove Micro-Link (I-Tip) Extensions
Micro-link or I-tip extensions are attached using small metal beads or rings, which need to be carefully opened for safe removal.
Here’s how to safely remove micro-link extensions:
Step 1: Use extension pliers to gently squeeze each bead, opening it enough to release the extension.
Step 2: Once the bead is open, slide the extension out of your natural hair.
Step 3: Comb through your hair to remove any tangles or debris left behind.
Step 4: Repeat the process for each bead until all extensions are removed.
6. Why It’s Important to Avoid DIY Removal for Some Extensions
While clip-in extensions can easily be removed at home, more permanent methods like tape-ins, sew-ins, fusion, and micro-link extensions should ideally be removed by a professional.
Attempting to remove these extensions yourself without the proper tools or technique can lead to hair damage, breakage, or pulling on the scalp.
A professional stylist has the right products and experience to ensure the extensions are removed gently and safely.
7. Best Products for Removing Hair Extensions
To safely remove hair extensions, it’s important to use products specifically designed for the task.
Here are some key products to have on hand:
Extension remover solution: A remover designed for tape-ins or fusion bonds will break down the adhesive without damaging your hair.
Extension pliers: These are essential for removing fusion or micro-link extensions, allowing you to open the bonds or beads easily.
Fine-tooth comb: This is helpful for removing adhesive residue and detangling your natural hair after the extensions are removed.
8. How to Care for Your Hair After Extension Removal
After removing your extensions, it’s important to give your natural hair some extra TLC.
Here are some tips for post-extension hair care:
Deep conditioning: Use a deep conditioning treatment to replenish moisture and restore your hair’s health.
Trim your ends: Extensions can sometimes cause split ends, so it’s a good idea to get a trim after removal.
Scalp massage: Gently massage your scalp to stimulate circulation and promote healthy hair growth.
Avoid immediate reinstallation: Give your hair a break from extensions for at least a few weeks before reinstalling new ones.
9. Common Mistakes to Avoid When Removing Extensions
Here are some common mistakes to avoid during the extension removal process:
Pulling or yanking: Never pull extensions out forcefully, as this can lead to breakage and hair loss.
Skipping remover products: Always use the correct remover solution for adhesive-based extensions to ensure safe removal.
Not detangling properly: Failing to detangle your hair after removing extensions can lead to knots, breakage, and frustration.
10. How Often Should You Remove Hair Extensions?
The frequency of removing and reinstalling hair extensions depends on the type of extensions and how well they are maintained.
Clip-ins: Can be removed daily.
Tape-ins: Should be removed and replaced every 6 to 8 weeks.
Sew-ins: Should be removed after 6 to 8 weeks to avoid buildup and tension.
Fusion and micro-link: Should be removed and replaced every 3 to 4 months.
11. How Long Does It Take to Remove Hair Extensions?
The time required to remove hair extensions varies based on the type of extension and the method of removal:
Clip-ins: 5 to 10 minutes.
Tape-ins: 30 minutes to 1 hour.
Sew-ins: 1 to 2 hours.
Fusion and micro-link: 2 to 3 hours, depending on the number of bonds.
12. Can Hair Extensions Damage Your Hair if Removed Incorrectly?
Improper removal of hair extensions can cause significant damage to your natural hair.
If extensions are yanked out or removed without the proper tools, they can lead to hair breakage, thinning, and even hair loss.
Always follow the correct removal process or seek help from a professional to avoid damaging your hair.
13. Signs You Need to Remove Your Hair Extensions
Here are some signs it’s time to remove your extensions:
Slippage: If your extensions are starting to slip or feel loose, it’s time for removal and reinstallation.
Tangles: Excessive tangling or matting near the roots can indicate it’s time to remove the extensions.
Itching or discomfort: If your scalp feels irritated, it could be a sign that the extensions need to be removed or adjusted.
14. How to Prevent Damage During Removal
To prevent damage during the extension removal process, always:
Be gentle: Take your time and avoid pulling or tugging on your natural hair.
Use proper products: Use a remover designed for the specific type of extension to break down adhesives safely.
Get professional help: For more permanent extensions, consult a stylist to ensure safe removal.
15. Can You Reuse Extensions After Removal?
If your extensions are in good condition after removal, they can often be reused.
Clip-ins, tape-ins, and sew-ins are the most commonly reused extensions, while fusion extensions typically need to be replaced.
Proper removal and maintenance can help extend the lifespan of your hair extensions for multiple uses.
Conclusion
Removing human hair extensions safely is essential to protecting your natural hair from damage.
Whether you’re working with clip-ins, tape-ins, sew-ins, or fusion extensions, following the correct removal process and using the right products will ensure a smooth and damage-free experience.
By taking proper care of your natural hair and extensions, you can enjoy beautiful, healthy hair every time you install and remove your extensions.
0 notes
Text
House Cleaning for Pet Owners in Tampa: A Complete Guide
Pet ownership is one of life's greatest joys, but it comes with its own set of challenges—especially when it comes to keeping your home clean. Whether you have a furry friend who sheds all over the house or a pet that occasionally has accidents, maintaining a clean and healthy living environment can be tough. For pet owners in Tampa, this guide provides valuable tips on how to keep your home spotless, and when you need professional help, Poche Services LLC is here to provide top-notch house cleaning services.

House Cleaning for Pet Owners
Pets bring immense joy, but they can also introduce allergens, dirt, and odors into your home. This is especially true in a city like Tampa, where the warm weather can exacerbate pet-related cleanliness issues. Regular house cleaning is essential for several reasons:
Health and Safety: Pets can carry germs and allergens, which can affect your health. Regular cleaning reduces the risk of infections and respiratory issues.
Odor Control: Pets can leave behind unpleasant odors. Thorough cleaning helps to keep your home smelling fresh.
Comfort and Aesthetics: A clean home is more comfortable and inviting. Regular cleaning prevents the buildup of fur, dander, and stains.
Longevity of Furnishings: Pet hair and dander can wear down furniture and flooring. Cleaning helps preserve the life of your furnishings.
DIY Cleaning Tips for Pet Owners in Tampa
While professional cleaning services like Poche Services LLC can make a significant difference, there are several steps you can take to maintain a clean home on your own:
1. Regular Vacuuming
Pet hair can quickly accumulate on floors, furniture, and upholstery. Regular vacuuming is essential to keep your home free from pet hair and dander. Use a vacuum with a HEPA filter to trap allergens effectively. For carpets and upholstery, consider using a vacuum cleaner designed for pet hair.
2. Use Pet-Friendly Cleaning Products
Some cleaning products contain harsh chemicals that can be harmful to pets. Always opt for pet-friendly, non-toxic cleaning products. Look for cleaners that are specifically formulated to be safe for pets while still being effective at removing stains and odors.
3. Frequent Washing of Pet Bedding and Toys
Pet bedding and toys can harbor dirt, dander, and bacteria. Make it a habit to wash these items frequently in hot water to kill germs and keep your pet's space clean. For items that can't be machine-washed, use a pet-safe disinfectant spray.
4. Address Stains and Odors Immediately
Accidents happen, especially with young or elderly pets. Address stains and odors as soon as they occur to prevent them from setting in. Use an enzyme-based cleaner to break down organic matter and eliminate odors. Avoid using ammonia-based cleaners, as they can attract pets back to the same spot.
5. Maintain Your Pet's Hygiene
One of the best ways to keep your home clean is by maintaining your pet's hygiene. Regular grooming, such as brushing and bathing, reduces shedding and dander. Cleaning your pet's paws after walks can also help minimize the dirt they bring into the house.
Common Cleaning Challenges for Pet Owners
Pets bring joy, but they also introduce specific cleaning challenges that require extra attention. Here are some common issues pet owners face:
1. Shedding
Pets, especially dogs and cats, shed fur throughout the year. During peak shedding seasons, the amount of fur can be overwhelming. Regular brushing and vacuuming can help control shedding, but fur can still find its way into nooks and crannies.
2. Accidents and Stains
Even well-trained pets can have accidents. Urine, vomit, and other messes can leave stains and odors if not addressed promptly. Cleaning up accidents quickly with an enzyme-based cleaner is crucial to prevent permanent damage to your flooring and furnishings.
3. Odor Control
Pets can leave behind a distinctive odor, especially if they spend a lot of time indoors. Regular cleaning, washing pet bedding, and using odor-neutralizing products can help keep your home smelling fresh.
4. Allergens and Dander
Pet dander consists of tiny flecks of skin that can trigger allergies in sensitive individuals. Frequent cleaning and the use of air purifiers can help reduce allergens in the home.
Professional House Cleaning Services for Pet Owners in Tampa
While regular cleaning can help maintain a tidy home, pet owners in Tampa may find that professional cleaning services provide the deep cleaning necessary to keep their homes truly fresh and allergen-free. Poche Services LLC specializes in house cleaning tailored for pet owners, ensuring your home is clean, healthy, and inviting.
Why Choose Poche Services LLC?
Pet-Friendly Cleaning Products: We use cleaning products that are safe for your pets, avoiding harsh chemicals that could harm them.
Thorough Cleaning: Our team tackles all areas of your home, including those hard-to-reach places where pet hair and dander can accumulate.
Odor Removal: We use specialized techniques to remove pet odors, leaving your home smelling fresh.
Stain Removal: Our professionals are skilled at removing stubborn stains caused by pet accidents, ensuring your floors and furnishings look their best.
Customized Cleaning Plans: We understand that every home and pet is different. We offer customized cleaning plans to meet your specific needs.
Services We Offer
Deep Cleaning: A comprehensive cleaning of your home, including floors, carpets, upholstery, and hard-to-reach areas.
Odor Elimination: We use advanced techniques to neutralize pet odors and leave your home smelling fresh.
Stain Removal: Expert removal of stains from carpets, upholstery, and hard surfaces.
Routine Cleaning: Regular cleaning services to keep your home consistently clean and free from pet-related messes.
Tips for Maintaining a Clean Home Between Professional Cleanings
To keep your home in top condition between visits from Poche Services LLC, here are some tips:
Brush Your Pet Regularly: Regular brushing reduces shedding and helps keep fur from accumulating around your home.
Keep a Cleaning Kit Handy: Have a cleaning kit with pet-friendly products readily available to tackle messes as they occur.
Designate Pet-Free Zones: Create pet-free zones in your home, such as bedrooms, to reduce the spread of fur and dander.
Use Doormats: Place doormats at entryways to catch dirt and debris from your pet's paws before they enter the house.
Choosing the Right Cleaning Schedule
The frequency of professional cleaning services depends on several factors, including the number of pets, their size, and their grooming habits. Here are some general guidelines:
Weekly Cleaning: For homes with multiple pets or pets that shed heavily, weekly professional cleaning can help keep your home in top condition.
Bi-Weekly Cleaning: For single-pet households or pets with minimal shedding, bi-weekly cleaning is often sufficient.
Monthly Cleaning: If your pet spends a lot of time outdoors or has minimal impact on your home's cleanliness, monthly professional cleaning may be adequate.
The Benefits of a Clean Home for You and Your Pet
A clean home is not only more comfortable for you, but it's also healthier for your pet. Regular cleaning reduces allergens, minimizes the risk of infections, and creates a safer living environment. Additionally, a clean home can reduce stress and improve the overall quality of life for both you and your furry friend.
Conclusion
Keeping a clean home as a pet owner in Tampa can be challenging, but it's essential for a healthy and comfortable living environment. By following the tips outlined in this guide and enlisting the help of professional cleaning services like Poche Services LLC, you can enjoy the company of your pets without sacrificing cleanliness.
Poche Services LLC offers house cleaning services specifically tailored for pet owners in Tampa. Our team of professionals uses pet-friendly cleaning products and techniques to ensure your home is spotless, odor-free, and safe for your furry friends. If you need house cleaning services in Tampa, don't hesitate to contact Poche Services LLC for a customized cleaning plan that meets your needs.
Call us today to schedule your cleaning and experience the joy of a clean and pet-friendly home!
This content provides a comprehensive guide for pet owners in Tampa who are looking to maintain a clean home. It promotes Poche Services LLC as a reliable and pet-friendly cleaning service, making it an excellent choice for your Tumblr post.
Company Name: Poche Services LLC Areas Served: Tampa and nearby areas
Phone: +1813 793 5753
Website: https://poche-cleaning.com/
Find Us On Map: https://maps.app.goo.gl/XEyBmdhRfoDxqk88A More Details: https://www.google.com/maps?cid=17449341657509466558 View More: https://mCompany Name: Poche Services LLC aps.app.goo.gl/7Mq7uVXwCHCEtg898
0 notes
Text
A Comprehensive Guide to Transform Your Look with Light Ash Brown Clip-In Hair Extensions:

If you’re looking to transform your look quickly and effortlessly. Light ash brown clip-in hair extensions might be the perfect solution for you. These extensions offer a seamless way to add length, volume, and a touch of color to your hair. Without any permanent changes. In this guide, we’ll explore everything you need to know about clip-in hair extensions. Including their benefits, how to choose the right ones, and tips for caring for them.
What Are Light Ash Brown Clip-In Hair Extensions?
Light ash brown clip-in hair extensions are a type of hair extension. That you can easily clip into your natural hair. They come in a light ash brown shade. Which is perfect for those who have a lighter hair color or want a subtle change. These extensions are made from high-quality synthetic or natural hair and are designed. To blend seamlessly with your own hair.
Benefits of Light Ash Brown Clip-In Hair Extensions:
Instant Transformation: One of the biggest benefits is how quickly they can change your look. Whether you want longer hair for a special occasion or just want to try a new style. Clip-ins are a fast and easy option.
Versatility: Clip-in hair extensions offer versatility. You can use them to add volume, length, or even a touch of color. They are ideal for experimenting with different hairstyles and looks. Without making a permanent commitment.
Ease of Use: Unlike other types of hair extensions, clip-ins are incredibly easy to use. They come with small clips that attach securely to your natural hair. Making them perfect for DIY styling at home.
No Damage: Since light ash brown clip-in hair extensions do not require any glue or heat. They are less damaging to your natural hair compared to other extension methods. You can enjoy the benefits of longer, fuller hair. Without worrying about causing damage.
Affordable: Clip-in extensions are generally more affordable than other types of hair extensions. This makes them a great option if you want to experiment with your look. Without spending a lot of money.
How to Choose the Right Light Ash Brown Clip-In Hair Extensions:
When selecting light ash brown clip-in hair extensions, there are several factors to consider:
Hair Type: Decide whether you want natural or synthetic hair extensions. Natural hair extensions offer a more realistic look and can be styled just like your own hair. While synthetic options are often more affordable and low-maintenance.
Length: Consider the length you want. Clip-in hair extensions come in various lengths, from short to long. Choose a length that suits your desired style and blends well with your natural hair.
Texture: Match the texture of the extensions to your own hair. If you have straight hair, choose straight extensions. For curly or wavy hair, opt for extensions that match your natural texture.
Clip Type: Look for extensions with secure clips that won’t slip or cause discomfort. Quality clips ensure that the extensions stay in place throughout the day.
Color Match: Make sure the clip-in hair extensions you choose match your natural hair color. Many extensions come in a range of shades. So you can find the perfect match for a seamless look.
How to Apply Light Ash Brown Clip-In Hair Extensions:
Applying light ash brown clip-in hair extensions is simple and can be done in just a few steps:
Prepare Your Hair: Start with clean, dry hair. Brush your hair thoroughly to remove any tangles. Create a smooth base for the extensions.
Section Your Hair: Divide your hair into sections using hair clips or ties. This will make it easier to attach the extensions evenly.
Attach the Extensions: Take a section of the light ash brown clip-in hair extensions and open the clip. Position the clip close to your roots and press it down to secure it. Repeat this process for each section. Ensuring that the extensions are evenly distributed.
Blend and Style: After attaching the extensions. Gently blend them with your natural hair using a brush or comb. Style your hair as desired, and you’re ready to go!
Light ash brown clip-in hair extensions are a fantastic option. For anyone looking to enhance their hairstyle with minimal effort. They offer a quick, versatile, and affordable way to achieve longer. Fuller hair without committing to a permanent change. By choosing the right extensions and taking good care of them. You can enjoy beautiful, natural-looking hair that compliments your style.
0 notes
Text
DIY Sink Repair - A Guide to Repairing Your Sink
New Post has been published on https://thekitchnpro.com/diy%e2%80%8c-%e2%80%8csink%e2%80%8c-%e2%80%8crepair%e2%80%8c-%e2%80%8c-%e2%80%8c-%e2%80%8ca%e2%80%8c-%e2%80%8cguide%e2%80%8c-%e2%80%8cto%e2%80%8c-%e2%80%8crepairing-your-sink/
DIY Sink Repair - A Guide to Repairing Your Sink

Here’s how to do sink repair and get it back in good working order in no time. The following steps will show you how to take apart your sink, clean it out, fix any broken parts, and get it back in place without having to call the plumber. After you’ve completed this DIY sink repair, you can rest assured that your sink will be functioning properly once again!
How to Fix Leaky Faucets
Faucets are a common point of failure and are usually pretty easy to repair. Here’s how. First, turn off your water supply at its source (the main shutoff valve under your sink). Then, remove your faucet’s cap (some faucets will have an adjustable screw instead), being careful not to let any water spill out—most faucet caps unscrew counterclockwise. Underneath you should see three parts: a rubber washer-like gasket, a metal or plastic disc called a flange, and underneath that, another gasket with holes in it called an escutcheon. Grab hold of each part from above and give it a hard tug in opposite directions. If they don’t budge, try loosening them with a pair of channel lock pliers. If all else fails, you may need to call a plumber.
Once you have removed these pieces from your faucet, rinse them thoroughly with warm water and put them aside for now so that they don’t get lost down the drain. Take out whatever might be stuck in there by putting on thick dishwashing gloves and pouring hot water into the sink bowl until it runs clean; once that’s done insert your tub stopper back into place again since we’ll be turning on our hot water later.
How to Fix Slow Drain of Sink
There are two things that commonly cause a sink to drain slowly: clogs or siphoning. Clogs are typically caused by hair, soap scum, and food remnants. Over time, these blockages build up inside your pipes and often cause water from other drains in your home (such as showers) to empty into your sink’s drain. Fortunately, slow-draining sinks can be fixed with just a few tools and about 15 minutes of your time. If you find that your sink repair is continuing to drop after you’ve cleaned it, there may be an issue with siphoning taking place in your piping system.
When a sink doesn’t have good pipe support underneath it—or when it is installed too close to another plumbing fixture—siphoning may occur. Essentially, gravity pulls water out of your other sinks’ drains until they’re dry. Then, it’ll send them down into your drain so they’ll refill and repeat. While your sink will seem as if it’s draining slowly, in reality, it may just need better drainage so that any leaks don’t empty back into its pipes. To fix slow draining sinks due to siphoning.
How Do I Get Rid Of Ugly Mildew In My Sink?
Vinegar is a great natural cleaner for mildew stains because its acetic acid can break down mold and kill off mildew-causing organisms. Apply white vinegar to your stain using either paper towels or a soft cloth for the sink repair. Allow it to sit for 10 minutes or more (the longer you wait, the greater effect), then wipe clean with a clean towel or cloth. You may have to repeat these steps several times if there are multiple layers of mildew on your sink. Be sure to give each layer time to absorb before applying additional doses of vinegar.
Most importantly, don’t forget that maintenance is key: You can treat a mildewed sink stain once—or twice. If you like—but in order for permanent removal, regular cleaning of your sink will be needed. Mildew thrives in moist environments where soap scum has been allowed to accumulate over long periods of time. So always make sure you’re washing away soap as soon as possible and thoroughly drying out sinks after each use by blotting them dry with a dry towel rather than allowing them to sit overnight with water left inside them. Mildew will be much less likely when good habits are followed!
How to Fix Clogged Drains
There are two kinds of clogged drains: those that you can fix yourself, and those that you need to call a plumber for. If your sink is only partially clogged, or if you can clear it using a plunger, then your sink is probably on its way out of warranty anyway—and in these cases, there’s no reason other than sink repair. The same goes for things like drippy faucets and leaks around pipes. While they’re typically a bit more serious than sinks though much less so than toilet issues. They aren’t all that complicated when it comes right down to it. Again, though: don’t take any chances with anything involving electricity or gas lines. These types of issues should always be handled by professionals. And even then, maybe don’t go as far as trying to repair them yourself. Stay safe!
How to Remove Mold From Pipes
All sinks have small cracks and imperfections in their porcelain surface, some more than others. Because of these imperfections and places for debris to get stuck, it’s not uncommon for mold to grow on your sink over time. Fortunately, most forms of mold are easy enough to remove with a little elbow grease—if you know where it’s hiding. That’s where we come in: we are going to show you how to remove mold from your sink so that it doesn’t ever come back. In addition to removing your sink’s existing mold growth, we’ll also give you tips for preventing future mold growth.
How to Fix Loose Pipes and Leaks
Loose pipes and leaks are a sign of a faulty pipe. The best way to fix loose pipes is to repair them and prevent leakage. However, many people do not know how to go about repairing their sinks. Fixing sink pipes can be quite difficult but there are some simple steps you can follow that will help you fix your own pipe. Take a look at these six steps:
1. Turn off water supply;
2. Remove old material;
3. Cut new PVC;
4. Insert and glue PVC;
5. Clean up;
6. Test sink pipes Fix loose Pipes with these simple instructions in no time at all!
All sinks have small cracks and imperfections in their porcelain surface, some more than others. Because of these imperfections and places for debris to get stuck. It’s not uncommon for mold to grow on your sink over time. Fortunately, most forms of mold are easy enough to remove with a little elbow grease—if you know where it’s hiding. That’s where we come in: we are going to show you how to remove mold from your sink so that it doesn’t ever come back. In addition to removing your sink’s existing mold growth, we’ll also give you tips for preventing future mold growth.
How To Flush Out Loose Debris in Pipes
DIY plumbing is not hard, but it requires you to do some preparation before you begin. If your sink or shower drain is clogged, then it’s likely because there are bits of food or other debris in your pipes. To get rid of loose debris in pipes: Remove all detritus from your sink. Fill your sink with hot water and let it sit for five minutes; after that time has passed, turn off your faucet and drain out as much water as possible. Make sure to empty any excess water down your toilet or through a floor drain so you don’t create an indoor flood.
0 notes
Text
How to Get Rid of Dandruff Forever
How to Get Rid of Dandruff Forever: A Comprehensive Guide
Dandruff is a common scalp condition that affects millions of people worldwide. Those annoying white flakes can cause embarrassment, discomfort, and even itching. If you’re tired of dealing with dandruff and want to get rid of it forever, this guide is for you. We’ll explore what dandruff is, its causes, and the most effective ways to eliminate it permanently.
Understanding Dandruff: What Is It?
Dandruff is essentially the shedding of dead skin cells from the scalp. It’s normal for our skin to shed cells as part of the natural renewal process, but when this shedding becomes excessive, it leads to the visible flakes we know as dandruff. The severity of dandruff can vary from mild, where it’s just an occasional nuisance, to severe, where it becomes a chronic problem.
What Causes Dandruff?
Before we dive into the solutions, it’s important to understand the underlying causes of dandruff. Here are the main factors:
Dry Skin: Dry skin is one of the most common causes of dandruff. When your scalp is dry, it sheds more skin cells, leading to flakes.
Oily Scalp (Seborrheic Dermatitis): On the other end of the spectrum, an oily scalp can also cause dandruff. This condition, known as seborrheic dermatitis, leads to the production of yellow, greasy flakes.
Fungal Infection (Malassezia): Malassezia is a type of fungus that naturally lives on the scalp. In some people, it can grow excessively, leading to irritation and an increase in skin cell turnover, causing dandruff.
Sensitivity to Hair Products: Some people are sensitive to certain ingredients in shampoos, conditioners, and other hair products. This sensitivity can cause an itchy, flaky scalp.
Poor Hygiene: Not washing your hair regularly can lead to a build-up of oils and dead skin cells, contributing to dandruff.
Stress and Diet: Stress can affect your overall health, including your scalp. A poor diet lacking in essential nutrients can also contribute to dandruff.
How to Get Rid of Dandruff Forever
Now that we know what causes dandruff, let’s look at the best ways to get rid of it for good.
1. Use the Right Shampoo
Choosing the right shampoo is crucial in controlling and eliminating dandruff. Here’s what to look for:
Anti-Dandruff Shampoos: These contain active ingredients like zinc pyrithione, ketoconazole, selenium sulfide, or salicylic acid that target the root causes of dandruff.
Mild Shampoos: If you have a sensitive scalp, opt for mild, sulfate-free shampoos that won’t irritate your skin.
How to Use:
Daily Washing: If your dandruff is severe, you might need to wash your hair daily with an anti-dandruff shampoo until the condition is under control.
Consistency: Even after your dandruff improves, continue using the shampoo once or twice a week to keep the problem at bay.
2. Moisturize Your Scalp
Keeping your scalp moisturized can help prevent the dryness that often leads to dandruff. Here are some ways to do that:
Coconut Oil: This natural remedy has moisturizing properties that can help soothe a dry scalp. Massage it into your scalp and leave it on for at least 30 minutes before washing it out.
Aloe Vera: Aloe vera is known for its soothing and hydrating properties. Apply aloe vera gel directly to your scalp, leave it on for 20 minutes, and then rinse.
3. Exfoliate Your Scalp
Just like your skin, your scalp can benefit from regular exfoliation. This helps remove dead skin cells and prevent build-up.
Scalp Scrubs: There are specialized scalp scrubs available that are designed to gently exfoliate without causing irritation.
DIY Scrub: You can make a simple scrub at home using brown sugar and olive oil. Mix them together, gently massage into your scalp, and then rinse thoroughly.
4. Maintain a Healthy Diet
Your diet plays a significant role in the health of your scalp and hair. A balanced diet can help reduce dandruff. Focus on these nutrients:
Zinc: Found in foods like nuts, seeds, and whole grains, zinc is essential for skin health.
B Vitamins: Foods like eggs, meat, and dairy products are rich in B vitamins, which help regulate the production of sebum (oil) on the scalp.
Omega-3 Fatty Acids: These are found in fish like salmon and walnuts. Omega-3s help keep your scalp hydrated and reduce inflammation.
5. Manage Stress
Stress can trigger or worsen dandruff. Managing stress is not only good for your overall well-being but also for keeping dandruff under control.
Relaxation Techniques: Practices like yoga, meditation, and deep breathing can help reduce stress levels.
Regular Exercise: Physical activity is a great way to relieve stress and promote overall health.
6. Avoid Harsh Hair Products
Some hair products contain harsh chemicals that can irritate your scalp and worsen dandruff. Here’s what to avoid:
Alcohol-Based Products: These can dry out your scalp, leading to more flaking.
Sulfates: Found in many shampoos, sulfates can strip the scalp of natural oils, causing irritation.
Fragrances and Dyes: These can also irritate sensitive skin. Opt for fragrance-free and dye-free products if possible.
7. Seek Professional Help If Needed
If your dandruff persists despite trying these remedies, it might be time to see a dermatologist. Persistent dandruff could be a sign of a more serious condition like psoriasis or eczema, which require professional treatment.
Prescription Shampoos: A dermatologist can prescribe stronger anti-dandruff shampoos or treatments.
Medical Treatments: In some cases, you might need medicated creams or ointments to treat underlying skin conditions.
Myths About Dandruff: Debunking Common Misconceptions
There are several myths surrounding dandruff that can lead to confusion. Let’s clear up a few of them:
Dandruff Is Caused by Poor Hygiene: While not washing your hair regularly can contribute to dandruff, it’s not the primary cause. Even people who wash their hair daily can suffer from dandruff.
Dandruff Is Contagious: Dandruff is not caused by bacteria or viruses, so it’s not something you can "catch" from someone else.
You Should Avoid Washing Your Hair: On the contrary, regular washing with the right shampoo can help control dandruff.
Conclusion: Say Goodbye to Dandruff for Good
Getting rid of dandruff forever is possible with the right approach. By understanding the causes and using the appropriate treatments, you can keep your scalp healthy and flake-free. Remember to be consistent with your care routine, make healthy lifestyle choices, and don’t hesitate to seek professional help if needed. With patience and the right strategy, you can say goodbye to dandruff for good.
This guide offers a comprehensive approach, from using the right products to making lifestyle changes, ensuring that you tackle dandruff from all angles. Stick to these tips, and you’ll be well on your way to enjoying a healthy, dandruff-free scalp forever.
1 note
·
View note
Text
Radiant Confidence: Exploring Hair Removal Services in Singapore

Introduction: Radiant confidence begins with smooth, hair-free skin. In the vibrant city-state of Singapore, a multitude of hair removal services awaits, promising to unveil your most radiant self. Join us as we delve into the world of hair removal services in Singapore, exploring the options available to help you achieve silky-smooth skin and embrace a newfound sense of confidence.
Laser Hair Removal: Precision and Perfection
Laser hair removal offers a precise and effective solution for long-term hair reduction. In Singapore's leading aesthetic clinics, advanced laser technology targets unwanted hair follicles, delivering smooth and flawless results. Explore the benefits of laser hair removal and unlock a new level of confidence in your skin.
IPL Therapy: Illuminating Your Path to Radiance
Intense Pulsed Light (IPL) therapy provides a non-invasive approach to hair removal, harnessing the power of light to target hair follicles. Experience the radiance of smooth skin with IPL therapy at Singapore's premier beauty centers, where customized treatments ensure optimal results for every skin type.
Waxing: Timeless Elegance in Hair Removal
Waxing remains a timeless choice for achieving smoothness and elegance in hair removal. Visit Singapore's top beauty salons for professional waxing services, where skilled aestheticians use high-quality products and techniques to deliver flawless results. Embrace the luxury of waxing and radiate confidence with silky-smooth skin.
Sugaring: Embracing Natural Beauty
Discover the natural beauty of sugaring, an ancient hair removal technique that leaves skin smooth and radiant. Made from simple ingredients like sugar, lemon, and water, sugaring offers a gentle and effective alternative to traditional waxing. Experience the magic of sugaring at Singapore's premier spas and embrace your radiant self.
Threading: Precision and Sophistication
Achieve precision and sophistication with threading, an artful technique for removing unwanted hair. In Singapore's top beauty parlors, skilled technicians use a twisted thread to shape eyebrows and define facial contours with unparalleled precision. Explore the elegance of threading and enhance your confidence with perfectly groomed brows.
Electrolysis: The Gold Standard in Permanent Hair Removal
Seek perfection with electrolysis, the gold standard in permanent hair removal. Certified professionals at Singapore's premier dermatology clinics use advanced techniques to target individual hair follicles, delivering long-lasting results with precision and care. Say goodbye to unwanted hair and embrace a lifetime of confidence with electrolysis.
Depilatory Creams: Convenience and Comfort
Experience the convenience and comfort of depilatory creams for at-home hair removal. Available at Singapore's leading beauty stores, depilatory creams offer a quick and easy solution to unwanted hair. Discover the simplicity of depilatory creams and radiate confidence with smooth, silky skin.
Epilation Devices: Effortless Beauty at Your Fingertips
Achieve effortless beauty with epilation devices such as electric shavers and epilators. Explore the latest innovations in hair removal technology at Singapore's premier electronics retailers, where top-of-the-line devices deliver salon-quality results in the comfort of your own home. Embrace the convenience of epilation devices and radiate confidence with every touch.
DIY Hair Removal Kits: Empowerment in Your Hands
Take control of your hair removal journey with DIY hair removal kits. From waxing strips to sugaring kits, Singapore's top beauty stores offer a variety of options to suit your needs. Explore the empowerment of DIY hair removal and embrace your radiant self with smooth, hair-free skin.
Professional Consultation: Expert Guidance for Your Journey
Before embarking on your hair removal journey, consider seeking expert guidance from a skincare professional. Schedule a consultation at one of the hair removal services in Singapore premier beauty clinics to assess your unique needs and explore the most suitable hair removal solution for you. Embrace the expertise of skincare professionals and radiate confidence with flawless, hair-free skin.
0 notes
Text
Removing Ink Stains from Plastic: Effective Techniques

To remove ink stains from plastic, try wiping the affected area with a powerful household solvent like acetone, rubbing alcohol, hydrogen peroxide, or diluted bleach. Ink stains can be difficult to clean off plastic surfaces, but using these household solvents can effectively remove the stains without damaging the plastic.
Ink stains on plastic surfaces can be a pesky problem, but with the right approach, they can be effectively removed. Whether it's a pen mishap on a plastic container or a marker stain on a plastic bottle, knowing how to tackle these stains can save the item from being discarded.
In this guide, we'll explore different methods and household solvents that can help remove ink stains from plastic surfaces. From hair spray to white vinegar solutions, we'll cover various techniques to effectively tackle and eliminate ink stains from plastic materials. So, let's dive into the world of ink stain removal from plastic and learn how to restore your plastic items to their former stain-free glory.
Effective Techniques
When it comes to removing ink stains from plastic, there are several effective techniques that can help you tackle the stubborn marks. Whether it's a ballpoint pen, marker, or printer ink, these methods can help you restore your plastic items to their former glory. Let's explore some powerful solutions for removing ink stains from plastic.
Using Acetone For Ink Stain Removal
Acetone is a potent solvent that can effectively break down ink stains on plastic surfaces. You can use acetone-based nail polish remover to dab onto a cotton ball and gently rub the stained area. Be cautious when using acetone, as it can potentially damage certain types of plastics. Always test on a small, inconspicuous area first to ensure compatibility.
Rubbing Alcohol As A Powerful Solvent
Rubbing alcohol, also known as isopropyl alcohol, is another excellent solvent for removing ink stains from plastic. Simply dampen a cotton ball or cloth with rubbing alcohol and gently dab at the ink stain. The alcohol will help dissolve the ink, making it easier to wipe away. It's important to note that rubbing alcohol should be used in a well-ventilated area and kept away from open flames due to its flammable nature.
Hydrogen Peroxide And Diluted Bleach Solutions
Hydrogen peroxide and diluted bleach solutions can also be effective at removing ink stains from plastic. For hydrogen peroxide, apply it directly to the stain and allow it to sit for a few minutes before wiping it away. As for diluted bleach solutions, mix a small amount of bleach with water and use a cloth to gently blot the stained area. However, exercise caution when using bleach, as it can discolor or damage certain types of plastic. Always test on a small area first and wear protective gloves when handling bleach.
Specialized Products
When it comes to stubborn ink stains on plastic, specialized products can be a game-changer. These products are formulated to effectively remove ink without damaging the plastic surface.
Amodex Ink & Stain Remover
Amodex Ink & Stain Remover is a popular choice for tackling ink stains on plastic. This specialized solution is designed to break down ink particles, making it easier to wipe away the stain.
Permanent Marker Remover Kits
Permanent Marker Remover Kits are specifically crafted to target tough permanent marker stains on plastic surfaces. These kits usually come with a combination of products that work together to dissolve and lift the ink stain.
DIY Solutions
Removing Ballpoint Pen Ink Stains from Plastic Surface
Ink stains on plastic surfaces can be tough to remove, but with some DIY solutions, you can effectively tackle the problem without hassle.
Removing Ballpoint Pen Ink Stains From Plastic Surface
To remove ballpoint pen ink stains from plastic, you can use household items like rubbing alcohol or white vinegar.
- Apply rubbing alcohol on a cotton ball and gently dab the ink stain.
- Alternatively, mix white vinegar with water and use a cloth to scrub the stained area.
Cleaning Ink Stains With Household Items
Household items like baking soda, toothpaste, or dish soap can also be effective in removing ink stains from plastic.
- Create a paste using baking soda and water, apply it to the stain, and let it sit for a few minutes before scrubbing.
- Use toothpaste directly on the stain and rub gently in circular motions to lift the ink.
- Dish soap can be mixed with warm water to create a solution for cleaning ink stains off plastic surfaces.
By utilizing these simple DIY solutions, you can easily get rid of ink stains on plastic items without the need for harsh chemicals or professional cleaning services.

Expert Advice
In the quest for keeping plastic surfaces pristine, removing ink stains can be quite a challenge. Expert advice from housekeeping professionals and cleaning tutorial videos offer valuable insights and techniques for tackling this common issue. Let's explore the guidance provided by professionals and the tips shared in tutorial videos to effectively eliminate ink stains from plastic surfaces.
Guidance From Housekeeping Professionals
Housekeeping professionals emphasize the use of specialized cleaning products and techniques for effective ink stain removal from plastic surfaces. They recommend the following:
- Utilize ink and stain remover products specifically designed for plastic surfaces.
- Apply rubbing alcohol or acetone to the stained area and gently scrub with a soft cloth.
- For stubborn stains, create a paste using baking soda and water, then gently rub it onto the affected area.
Tips From Cleaning Tutorial Videos
Cleaning tutorial videos offer practical demonstrations and DIY solutions for removing ink stains from plastic. These videos provide insightful tips, such as:
- Placing the stained plastic item in a glass container and applying rubbing alcohol or specialized ink remover.
- Gently rubbing the surface of the plastic container with a soft cloth or sponge to lift the ink stain.
- Using gentle laundry detergent or dry cleaning methods for treating ink stains on plastic surfaces.
https://www.youtube.com/watch?v=Q5-Uul1u4c4
Preventive Measures
When it comes to preventing ink stains on plastic items, taking proactive measures is key. By following these preventive tips, you can avoid the hassle of dealing with stubborn stains later on.
Storing Pens And Markers Properly
Store pens and markers in an upright position to prevent leaks and spills that can lead to ink stains on plastic surfaces.
Using Protective Covers For Plastic Items
Consider using protective covers or sleeves for plastic items that frequently come in contact with pens or markers to create a barrier and prevent direct staining.
Faqs
How To Remove Dried Ink Stains?
When dealing with dried ink stains on plastic, it's essential to act quickly. Start by mixing equal parts of baking soda and water to create a paste. Apply the paste to the stained area and gently scrub it with a soft-bristled brush. Rinse with warm water and repeat if necessary. If the stain persists, consider using a commercial ink remover specifically formulated for plastic surfaces.
Can Alcohol Effectively Remove Ink From Plastic?
Yes, rubbing alcohol can effectively remove ink from plastic surfaces. Simply soak a cotton ball or pad in rubbing alcohol and gently dab the stained area. Avoid rubbing vigorously, as this can spread the ink. Once the ink begins to dissolve, wipe the area clean with a damp cloth. Repeat the process until the stain is fully removed.

Frequently Asked Questions
What Removes Pen Ink From Plastic?
To remove pen ink from plastic, use acetone, rubbing alcohol, hydrogen peroxide, or diluted bleach as powerful solvents.
How Do You Remove Dried Ink Stains?
To remove dried ink stains, try wiping the affected area with a powerful household solvent like acetone, rubbing alcohol, hydrogen peroxide, or diluted bleach. Alternatively, lightly spray the stain with hairspray to loosen it, then soak for half an hour in a solution of ½ a teaspoon of clear dish soap, one tablespoon of white vinegar, and a quart of warm water.
Rinse with clean water and repeat the process if the stain persists.
How To Remove Printed Text From Plastic?
To remove printed text from plastic, use a powerful household solvent like acetone, rubbing alcohol, hydrogen peroxide, or diluted bleach. Alternatively, try hair spray or a solution of dish soap, white vinegar, and warm water. Rinse with clean water and repeat if needed.
Does Alcohol Remove Ink From Plastic?
Yes, rubbing alcohol can remove ink from plastic surfaces. It's a powerful household solvent that can effectively clean ink stains.
Conclusion
Removing ink stains from plastic can seem like a daunting task, but it doesn't have to be. By using common household items such as rubbing alcohol, acetone, or even diluted bleach, you can easily remove stubborn ink stains from plastic surfaces.
Remember to always test a small area first and handle these solutions with care. With these tips and tricks, you can keep your plastic items looking clean and new.
Read the full article
0 notes
Text
How to Do a Brow Lamination A Step-by-Step Guide

Are you tired of unruly eyebrows that refuse to stay in place? Brow lamination might just be the solution you've been searching for. This innovative beauty treatment has gained popularity for its ability to transform sparse or overgrown brows into perfectly groomed, feathery arches. If you're curious about how to achieve flawless brows through lamination, you're in the right place. In this guide, we'll walk you through the process step by step, ensuring you're equipped with the knowledge to master this technique like a pro.
What is Brow Lamination?
Before we dive into the step-by-step process, let's briefly discuss what brow lamination entails. Brow lamination is a semi-permanent treatment that involves restructuring the brow hairs to create a sleek, uniform look. By applying a series of gentle solutions, the brow hairs are lifted and set in place, resulting in a fuller, more defined appearance. This procedure is ideal for individuals with sparse, thin, or unruly brows who desire a more polished look without the need for daily maintenance.
Step-by-Step Guide to Brow Lamination
Step 1: Consultation and Preparation
Begin by conducting a thorough consultation with your client to understand their desired brow shape and address any concerns or preferences. Once you've established clear communication, prepare the client's brows by cleansing them to remove any makeup or oils.
Step 2: Brow Mapping
Using a brow pencil or thread, map out the desired shape of the brows, taking into account the client's natural brow structure and facial features. This step is crucial for achieving symmetrical and well-defined brows.
Step 3: Application of Lamination Solution
Apply the first lamination solution to the brows, ensuring thorough coverage of each hair. This solution softens the brow hairs, making them more pliable for shaping and styling.
Step 4: Brow Shaping and Sculpting
Using a brow brush or comb, sculpt the brows into the desired shape, lifting the hairs upward to create volume and definition. You can also use a brow wax or gel to further sculpt and set the brows in place.
Step 5: Neutralization
Once the desired shape is achieved, apply the neutralizing solution to lock the brow hairs in place and restore their natural pH balance. Allow the solution to set for the recommended time before gently removing it with a damp cotton pad.
Step 6: Nourishment and Hydration
Finish the lamination process by applying a nourishing brow serum or oil to hydrate and condition the brows, promoting healthy growth and preventing dryness.
Brow Lamination in Elsternwick and Beyond
If you're considering brow lamination in Elsternwick or elsewhere in Melbourne, rest assured that you're in good hands. Many reputable salons and beauty professionals offer expert brow lamination services, ensuring exceptional results that enhance your natural beauty.
Conclusion
Mastering the art of brow lamination requires practice, patience, and attention to detail. By following this step-by-step guide and honing your technique, you can achieve stunning, salon-worthy brows that elevate your entire look. Whether you're a seasoned beauty professional or a DIY enthusiast, brow lamination offers a simple yet effective solution for achieving flawless brows that frame your face beautifully. So, why wait? Embrace the power of brow lamination and unlock the secret to picture-perfect brows today!
Know more https://ibrowandlashesau.medium.com/how-to-do-a-brow-lamination-a-step-by-step-guide-0f92e538ea47
0 notes
Text
How To Keep Your Hair Healthy After Dying It: 9 Best Tips!

Flaunting your newly felt hair, especially when it's felt a shocking, bright, or pastel color, can give you a natural high. However, it can take so much work to maintain the color and overall health of your locks. You must use special products for them and go to the salon regularly for color touch-ups. It can be pretty overwhelming, particularly if the hair is your first time. Do you know how to keep your hair healthy after dying it?
How Hair Dye Damages Hair

Most assume that hair dye just washes on hair, leaving behind a colored stain. This is not what happens, however. To permanently set the color, it must pass through the natural hair defenses.
Commercial hair dyes use ammonia to raise the cuticle's layers so that color enters. This leaves the hair shaft with an open gap. Your natural color is removed from the peroxide (or bleach) in the coloring so that your hair feels like straw. Try Kintsugi Haircare natural formula to keep your hair healthy.
The new color links to the inner core of your hair and should remain in your hair, even after shampooing. The problem is this: you lose your hair dye every time you expose your artificial hair to shampoo and water.
The type of shampoo you use doesn't matter; getting your hair moist and applying any shampoo will remove the artificial hair color. You must, therefore, keep your hair colored in order to maintain an artificial color.
How To Keep Your Hair Healthy After Dying It

The easiest way to repair damaged dyed hair is to cut it off and begin. If you don't want to go for a while with an extreme bob, wigs, and extensions could be considered as an alluring alternative.
If that doesn't work for you, the first thing you can do is to get rid of hot styling instruments. Resign yourself for a while to do without hair color and other hair chemicals.
Conditioners and DIY treatments like olive oil or hot avocado oil, can provide temporary relief. Apply to the hair, cover 30-40 minutes with a shower cap, and then rinse thoroughly. You can also put in your hands ten drops of tea tree oil and apply it to your hair with a towel. Leave the style and style.
Regardless of the remedy, you try, remember it's just temporary. Once the damage is done, nothing will repair your hair completely.
How To Keep Your Hair Healthy After Dying It: Washing Process

Your hair is usually washed as part of the tinting process, so don't wash it again as soon as possible as soon as you get home. However, if you have to jump into the ASAP shower, it will not affect your color's vibration. Phew! Phew!
So when we wash our hair after teasing it, doesn't it really matter? "No time, after getting it colored, you should wait to wash your hair," confirms Francesca.
How many times should your colored hair be washed?
If you have felt your locks for the first time, you might need to adjust your weekly washing routine. This is to ensure that you don't wash your hair over. The more you wash the hair that is teased with a lot of pigment, the more faded you can look. Try washing it every other day, at most, or ideally every two to three days, if possible.
So, should you wash your hair before you color? The answer is no if you bleach your roots. The natural oils in your hair can protect the skirt during the process of tinting. However, in general, you should always follow the instructions of any particular coloring you use.
Whatever color you chose, when creating a washing schedule, it's important to think about your hair texture. Natural hair tends to be drier than other types, so it is best to wash it once a week if you've dyed your natural hair.
On the other hand, fine hair may have to be washed every other day. This is because the sebum and oils in the hair naturally build up, which can weigh it down and make it look flat.
Do hot showers make your hair less colorful?
They can. Hot water opens the cuticle of the hair, perhaps leaching more color. Coldwater, by contrast, tends to 'screen' the cuticle. This might be the case, but we won't all swap our warm showers for an ice bath in the near future, let's be honest.
It is better to be aware that the more colorful hair you rinse under warm water, the more it can lose its vibration. Therefore, it is easier (and less chilling) to provide hair with a quick burst of cold water or to put a shower cap on your hair after washing.
How To Keep Your Hair Healthy After Dying It: Effective Tips

Here are the best tips on how to keep your hair healthy after dying it!
1. Wash the hair less often.
The more you wash, the faster your color fades – it's just as simple. So buy back some time in your daily routine and skip washing frequently. The best way to care about your color is to wash it only twice or thrice a week – then drink oil with dry shampoo from those roots if needed.
2. Skip to the conditioner directly.
So, you have trouble weaning yourself away from daily washing – for years. You will add softness, shine, and careful care – all without washing away that crazy color.
3. Choose the right shampoo.
There is a reason for inventing color protective shampoo. While some regular shampoos can wash away your color and speed the color up, formulas protect your color and help keep your pastel, vivid or metallic shade beautiful and vibrant. Whatever you do, choose a "low sulfate" shampoo because it helps to wash your hair with less color.
4. Condition.
When we color our hair, it becomes more fragile – it helps the color to come out and thus fade away. Allow oils, butter, conditioning polymers, and other moisturizing agents, which are often used to form a protective barrier and prevent your color from bidding for freedom.
5. Heat protection.
They work – the ingredients in heat protecting sprays, in particular, reduce heat damage, most likely in the evening, as the hair heats up. However, they can't insulate your hair from most damage, so you still have to minimize your hair's thermal exposure!
6. Make time for masks.
If you have been on a color break and are slack about masking, now is the time to return to the car. A super dose of healing nutrition that helps repair damage increase brightness-and naturally keep this color longer-can only be added five to ten minutes of masking twice a week.

7. Air dry.
Among the set styles is a blow-dry backlash – and we think we know why. They know that not only can all the heat from blow-dryers, straightening irons and curling tongs harm the hair, but also pressing to make moisture lose more and compromise this radiant color.
8. Use filters.
One of the long-lasting, super bold enemies is UV light from the sun. Even when the days appear dark in winter, light loves havoc with your hair. Add a UV spray filter to your morning routine and show the sun who is the boss.
9. Smart swimming.
Do you remember the stories of chlorine turning green-colored hair? Chlorine can not only change your color (not color green, of course), but it can quickly fade. So prepare your hair and condition if you go to the pool. Apply a layer of conditioner to your hair and drag it in a bun to form a chemical protection barrier.
How To Keep Your Hair Healthy After Dying It: Softening The Hair

Finally, you have the color that you wanted, but now your hair's texture feels more like straw. Fortunately, you can have both world's best. Your perfectly colored hair can become perfectly soft with the right products, the right habits, and maybe a few timely trips to the fridge.
Condition your hair right after you have dyed.
Usually, some kind of conditioner is included in the coloring product to be applied. If not, condition your entire head using your usual conditioning device, leave in and rinse it with cool water for at least three minutes.
After dyeing, wait 48-72 hours and do not even get it wet again before you wash your hair. This gives you time to recover your hair.
Use deep conditioning.
Use a deep conditioner once a week in addition to your regular conditioning routine. If you get oily roots, just rub the conditioner into your hair's tips. It can be rinsed out after a few minutes.
Begin with warm water every time you shower and finish in the cold. Warm water opens your hair follicle, and it backs up with cold water. That is, warm water allows your hair to absorb moisture, and cold water keeps it inside. So resist the urge to take a hot shower, thank you for your tresses later!
Final Words
You can easily damage your hair if you want to try different hairstyles and colors, which are fun, fantastic, insane, and cute. Condition – like beauty – begins from inside, so feed your hair inside out. An omega-3 fatty acid diet that contains oily fish such as salmon and mackerel will nourish your hair, making it shiny and strong. Add walnuts and get a hit of vitamin E to help fight dry hair after color.
Read the full article
0 notes
Text
The 2024 Eyebrow Tinting Complete Guide: Everything You Need to Know
In recent years, eyebrow tinting has become a popular beauty trend, transforming the way we enhance and define our brows. As we step into 2024, the art of eyebrow tinting continues to evolve, offering individuals the opportunity to achieve flawless, well-defined brows with minimal effort. If you're curious about eyebrow tinting or looking to master the technique, this complete guide will provide you with everything you need to know. Read more about brow tinting Elsternwick
What is Eyebrow Tinting?
Eyebrow tinting involves using a semi-permanent dye to enhance, shape, and define the eyebrows. The tint is carefully applied to the brows to darken them, create a more defined shape, or fill in sparse areas. This procedure is particularly beneficial for those with naturally light or sparse brows, as it adds depth and dimension without the need for daily makeup application.
Benefits of Eyebrow Tinting
The benefits of eyebrow tinting are numerous:
Enhanced Definition: Tinting adds depth and definition to the eyebrows, making them appear fuller and more prominent.
Time-Saving: Tinted eyebrows eliminate the need for daily brow makeup application, saving time during your beauty routine.
Natural Look: When done correctly, tinted eyebrows look natural and can be customized to complement your skin tone and hair color.
Long-Lasting Results: Depending on the type of dye used, eyebrow tinting can last anywhere from 4 to 6 weeks, providing long-lasting results.

The Tinting Process
Professional eyebrow tinting is typically done at a salon or spa, although there are also at-home kits available for those who prefer a DIY approach. During the procedure:
Consultation: Your brow specialist will discuss your desired brow color and shape to ensure the tint complements your features.
Preparation: The area around your eyebrows will be cleaned and prepped to remove any makeup or oils.
Tint Application: The tint is carefully applied to the eyebrows using a brush or applicator. The dye is left on for a few minutes to allow it to develop.
Removal and Final Touches: The tint is gently wiped away, revealing beautifully tinted eyebrows. Your specialist may then shape and groom your brows to perfection.
For those opting for at-home kits, it's essential to carefully follow the instructions provided to achieve optimal results and avoid any mishaps.
Aftercare Tips
To maintain your tinted eyebrows and ensure longevity, follow these aftercare tips:
Avoid Excessive Moisture: Refrain from getting your eyebrows wet immediately after tinting to allow the dye to set.
Skip Oil-Based Products: Oil-based skincare products can cause the tint to fade faster, so use water-based alternatives around the eyebrow area.
Avoid Sun Exposure: Prolonged sun exposure can cause the tint to fade prematurely, so wear sunscreen or a hat when outdoors.
Safety and Considerations
While eyebrow tinting is generally safe, it's essential to consider the following:
Patch Test: Always perform a patch test before tinting to check for allergic reactions.
Professional Service: If opting for professional tinting, ensure your technician is trained and reputable.
Final Thoughts
Eyebrow tinting is a fantastic way to achieve beautifully defined eyebrows with minimal effort. Whether you're aiming for a natural look or prefer a more dramatic effect, eyebrow tinting offers versatility and convenience. By following this complete guide, you'll be well-equipped to explore the world of eyebrow tinting and achieve flawless brows that frame your face perfectly in 2024 and beyond.
Source: https://ibrowandlashesaus.blogspot.com/2024/05/the-2024-eyebrow-tinting-complete-guide.html
1 note
·
View note
Last Seen Blogs

fluffebliss
fluffebliss

filmingifs
film in gifs

mint-pepper
Grassy Duck

adrianwolfson
Adrian Wolfson

alexis-53
single