#DIYFix
Explore tagged Tumblr posts
Visit Tumblr Blog
Explore Tumblr blogs with no restrictions, modern design and the best experience.
Last Seen Tumblr Blogs


Fun Fact
In Q3 of 2020, 31% of US users access the Tumblr app daily.
Text
youtube
Desk of Ladyada - Sparkle Motion Tester Troubles & Samples Sunday 🤖🧠✨🦖📦
Sparkle Motion Mini testers. The Mini came together fast, but classic testers had cascading issues. We used Claude for firmware and got cool samples, including filament letters and enclosures for Sparkle Motion Stick. And our dinosaur tissue holder fell, disassembling an arm! Time to find strong foam tape for reattachment.
#deskofladyada#sparklemotion#hardwaretesting#diyprojects#adafruit#firmwaredevelopment#electronicsdesign#producttesting#makerspace#electronics#sparklemotionstick#vhbtape#greatsearch#dinosaurrepair#diyfix#engineeringlife#techprojects#claudeai#prototyping#hardwarehacks#filament#plasticenclosure#doublesidedtape#3mvhbtape#mechanicalfailure#diyadhesive#repairtips#makercommunity#productdevelopment#innovation
3 notes
·
View notes
Text
My Ness Alarm Will Not Reset and There is No Lights — What’s Wrong?

🔒 So your Ness alarm system does not reset, and to make it worse, there is no light wherever there is a panel?
We’ve all been there. It’s annoying, and if we’re completely honest, it’s a little alarming (pun intended). When your system has no response at all, it generally can come down to power, battery, or internal fault. Here is a list of all possible scenarios and how to get your system back online.
⚡ 1. First, check power 🔋 2. Could backup battery be dead? 🔄 3. Try manual reset 🧰 4. Could be faulty board or fuse
Have a Ness system that is not working? Share your experience in the replies or reblog to help someone else. Stay safe! 🔐
#NessAlarm#AlarmNotWorking#HomeSecurity#SmartHome#DIYFix#AlarmResetIssue#NoPowerAlarm#SecuritySystem#HomeSafety#Troubleshooting#ElectronicsTips#NessSecurity#HomeSetup
0 notes
Text

Silence the squeak and hit the road smoothly! 🚲 Learn the tricks to fix those pesky squeaky brakes on your bike and enjoy a quiet ride.
Get Inspired, visit www.outsideace.com
#BikeMaintenance#SmoothRide#DIYFix#Outsideace#outdoors#travel#hiking#backyard#travel blog#travel photography#camping#hikingtips#traveling
0 notes
Text
Fix Your Gaze: A Comprehensive Guide to Resolving Laptop Screen Flickering

Screen flickering in laptops can be a persistent and troubling issue for users, disrupting both productivity and leisure activities. Understanding the reasons behind this flickering and knowing how to address them can greatly enhance your laptop's functionality and lifespan.
The flickering of a laptop screen might stem from several causes ranging from simple software glitches to more severe hardware malfunctions. At the core, it could be related to issues with display settings, driver malfunctions, or even hardware failures.
Adjusting Display Settings: One of the first checks should be the display settings on your laptop. Screen resolution and refresh rate are often culprits of screen flicker. Ensuring these settings are compatible with your display can sometimes resolve the issue immediately. For Windows users, navigating to 'Display Settings' through the Control Panel allows you to adjust these settings and test various configurations.
Updating or Reinstalling Drivers: Outdated or corrupt drivers can lead to screen flickering. Particularly, the graphics driver plays a crucial role in the display functionality. Updating your graphics driver via the Device Manager or directly from the manufacturer’s website can resolve this issue. If updates don’t help, sometimes reinstalling the driver from scratch will.
Hardware Issues: If software solutions don’t stop the flicker, hardware might be the cause. This can include loose or damaged cables, issues with the screen itself, or problems with the motherboard. In such cases, professional help is recommended. Sometimes, simply reseating a loose cable can fix the issue, but other times, parts may need replacement.
Interference from External Factors: External lights or devices can also cause flickering. Adjusting the laptop's surroundings or removing these interferences can help diagnose if the external factors are to blame.
For detailed guidance on how to diagnose and fix each potential cause of screen flickering, further information can be found at the original article on Mobiblip. Whether you are a tech novice or an experienced user, the step-by-step solutions provided can be invaluable in restoring your laptop's display to optimal performance.
For more detailed instructions and additional tips on how to effectively manage laptop screen flickering, follow this URL: Fix Laptop Screen Flickering.
0 notes
Text
#SolarLights#GardenLighting#OutdoorDecor#EcoFriendly#SolarPower#DIYFixes#HomeImprovement#LightingTips#GreenEnergy#BuyEpicGifts
0 notes
Text
youtube
Looking for the best way to secure your rearview mirror or wall-mounted items?
Acrylic mounting tape for rear view mirror, adhesive mirror mounting strips, and high-strength adhesive mounting strip solutions are your go-to. Reliable grip, clean look, no tools needed. Explore more: 🔗 https://doublesealtape.com/tag/eva-black-foam-tape/ 🔗 https://doublesealtape.com/tag/eva-foam-tape-suppliers/
#DIYFixes#CarHacks#HomeImprovement#AdhesiveSolutions#MirrorMounting#NoDrillMounting#AcrylicTape#DoubleSidedTape#HomeHacks#MountingTape#Youtube
0 notes
Text
plumbersdiary.com – A great domain for a plumbing blog, tutorial site, or industry resource. Secure it today! https://www.godaddy.com/en-uk/domainsearch/find?domainToCheck=plumbersdiary.com
0 notes
Text
Fix Loose Handles & Hinges in Seconds! Try these 3 quick and easy DIY fixes to make them sturdy again! ✅ Apply thread locker to keep screws in place ✅ Replace short screws with longer or thicker ones for a better grip ✅ Add a washer or rubber spacer for extra stability No more loose hardware—problem solved! Save this reel for later & follow TAG Hardware for more such tips!
#DIYFixes#HomeHacks#EasyFixes#Tips#ArchitecturalHardware#HomeImprovement#DIYProjects#QuickFix#TAGHardware#Follow
0 notes
Text
Kitchen Common Problems and How to Fix Them
Kitchens often have common issues like insufficient storage, poor lighting, or a layout that doesn’t work well. We know how to solve these problems with smart and practical solutions. If your kitchen feels cluttered, our modular storage options can help you organize everything better. Turn your kitchen into a space that’s easy to use and looks great with Novella Kitchens.
#KitchenProblems#HomeImprovement#DIYFixes#NovellaKitchens#KitchenHacks#CookingTips#HomeRenovation#KitchenSolutions#InteriorDesign#HomeMaintenance
0 notes
Video
Proven Solutions to Fix Your Water Damage Wall! #SoakingWallChallenge #H...
#youtube#Let’s dive in and get those walls dry and secure! SoakingWallChallenge HomeRepairTips WaterDamageSolutions DIYFixes HomeMaintenance LeakRepa
0 notes
Text
Common Problems with Hot Air Generators and Solutions: A Guide for Efficient Maintenance

Hot air generators are vital in industrial and commercial settings, ensuring comfortable temperatures and efficient operations. Despite their reliability, these devices can face issues over time. Identifying and resolving common problems is key to maintaining their efficiency. This comprehensive guide outlines frequent issues and provides practical solutions to keep your hot air generator running smoothly.
1. Uneven Heat Distribution
Problem: Uneven heat distribution can lead to cold spots and inefficient heating, affecting comfort and energy use. This issue can arise from several factors, including blocked air ducts, dirty filters, or incorrect blower settings.
Solution:
Check Air Distribution System: Start by inspecting vents, ducts, and registers for obstructions. Ensure that all openings are free from blockages and that furniture or other objects are not impeding airflow. Even small obstructions can significantly impact heat distribution.
Clean Filters: Dirty or clogged filters can severely restrict airflow, leading to uneven heat distribution. Regularly clean or replace filters according to the manufacturer's recommendations. This simple maintenance step can greatly enhance the efficiency of your heating system.
Inspect Ductwork: Examine the ductwork for leaks, cracks, or damage. Leaks can cause warm air to escape before it reaches its intended destination, resulting in uneven heating. Use duct tape or other sealing materials to fix any leaks and ensure that all connections are secure.
Adjust Blower Settings: If your hot air generator has adjustable blower settings, experiment with different speeds to see if it improves heat distribution. Higher blower speeds can help push warm air further and more evenly throughout the space.
2. Insufficient Heating
Problem: Insufficient heating can be frustrating and uncomfortable. This problem can stem from various causes such as a malfunctioning thermostat, inadequate fuel supply, or issues with heating elements.
Solution:
Check Thermostat Settings: Ensure that the thermostat is set to the desired temperature and is functioning correctly. Sometimes, thermostats can become incorrectly adjusted, leading to inaccurate temperature readings and insufficient heating. Consider upgrading to a programmable thermostat for better control and efficiency.
Inspect Fuel Supply: Verify that the fuel supply (whether gas, oil, or another type) is adequate and that there are no blockages in the fuel lines. Check for any signs of leaks or issues with the fuel delivery system. Ensuring a consistent and sufficient fuel supply is crucial for optimal heating performance.
Clean Burners and Heat Exchangers: Dust and debris can accumulate on burners and heat exchangers, reducing their efficiency. Regularly clean these components to maintain optimal performance. A clean heating system not only works more efficiently but also lasts longer.
Examine Heat Exchanger: Inspect the heat exchanger for any signs of damage or clogging. A damaged or clogged heat exchanger can impede heat transfer, resulting in insufficient heating. If necessary, replace or repair the heat exchanger to restore proper function.
3. Strange Noises
Problem: Unusual noises such as banging, rattling, or squealing can indicate mechanical issues within the hot air generator. These noises often suggest loose components, debris, or internal damage.
Solution:
Inspect Fan Blades and Motor: Check the fan blades for any debris, damage, or imbalance. Ensure that they are securely attached and free from obstructions. Examine the motor for any signs of wear, loose parts, or other issues that could cause noise.
Tighten Screws and Bolts: Over time, vibrations can cause screws and bolts to become loose. Tighten any loose components to reduce noise and improve stability. Regularly checking and securing these parts can prevent minor issues from becoming major problems.
Check for Debris: Foreign objects or debris within the system can cause rattling or other noises. Carefully inspect the interior of the generator and remove any debris that may have accumulated. This step can help eliminate noise and prevent potential damage to the system.
4. Frequent Cycling
Problem: Frequent cycling, where the hot air generator turns on and off more often than usual, can be an indication of several potential problems, including issues with the thermostat, airflow obstructions, or improper sizing of the unit.
Solution:
Check Thermostat Accuracy: Ensure that the thermostat is properly calibrated and functioning correctly. A faulty thermostat can cause the generator to cycle more frequently. Consider recalibrating or replacing the thermostat if it appears to be malfunctioning.
Inspect Airflow: Obstructions in the airflow, such as blocked vents or dirty filters, can cause the system to cycle on and off. Check for any blockages or issues with the ductwork and vents, and clear any obstructions to allow for proper airflow.
Ensure Proper Sizing: Make sure that the hot air generator is appropriately sized for the space it’s heating. An oversized or undersized unit can lead to frequent cycling as the system struggles to maintain the desired temperature. Consult with a professional to determine if your unit is the correct size for your needs.
5. High Energy Bills
Problem: A significant increase in energy bills can indicate that your hot air generator is not operating efficiently. High energy consumption often results from poor maintenance or system issues.
Solution:
Perform Regular Maintenance: Regularly clean and replace filters, inspect and seal ducts, and ensure that the system is properly insulated. Routine maintenance tasks can greatly improve efficiency and reduce energy consumption. Schedule annual professional inspections to keep your system in top condition.
Check for Leaks: Inspect the system for any leaks or gaps that may be causing energy loss. Seal any leaks in the ducts or around the unit to improve efficiency. Leaks can waste a significant amount of energy, so addressing them promptly is important.
Upgrade Components: Consider upgrading components such as thermostats or controls to more energy-efficient models. Newer technologies can help reduce energy consumption and improve the overall efficiency of your heating system. Look for smart thermostats that offer advanced features like learning your schedule and optimizing heating patterns.
Conclusion
Proper maintenance of your hot air generator involves recognizing common problems and taking proactive steps to address them. Regular maintenance ensures efficient and effective operation, extending the lifespan of your equipment and saving on energy costs. For persistent problems or expert assistance, consult a reputable hot air generator manufacturer in Abu Dhabi for support and solutions to keep your system in optimal condition. Their expertise can provide you with the necessary guidance and repairs to ensure your hot air generator runs smoothly for years to come.
#HotAirGenerators#HVACMaintenance#HeatingSolutions#EnergyEfficiency#HomeHeating#DIYFixes#Troubleshooting#HeatProblems#RepairTips#HomeImprovement
0 notes
Text

Troubleshooting mode activated! 🚰 Discover the steps to fix black water issues from your faucet and restore crystal-clear flow.
Get Inspired, visit www.kitchenov.com
#PlumbingProblems#WaterQuality#DIYFixes#Kitchenov#kitchen sink#kitchen#appliances#kitchen cabinets#dining room#homeimprovement#kitchen decor#diyplumbing#kitchen appliances
0 notes
Text
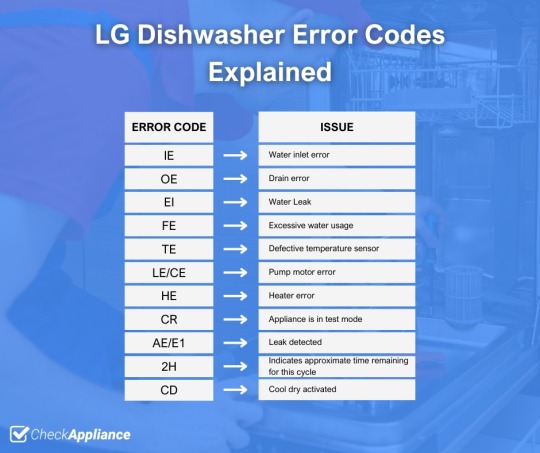
LG dishwasher error codes generally indicate issues with water inlet, drainage, leaks, faulty components like pumps, valves, or the control board itself. The IE code signifies insufficient water intake due to kinked hoses, closed taps, or a faulty inlet valve. Not being level can also trigger this.
The OE code means improper draining caused by clogged hoses or pipes or a defective drain solenoid. EI implies a washing tub leak detected by the pump's overspeed. FE indicates excessive water entry, usually from an inlet valve failure overworking the drain pump.
TE relates to a faulty thermistor or temperature sensor, while LE/CE points to issues with the wash pump motor itself. HE indicates heater or associated wiring problems. Encountering CR likely means the dishwasher is stuck in test mode used by technicians.
Codes like AE/E1 suggest a suspected leak, often from improper installation, wrong detergent usage, obstructed doors, or defective seals. Seeing "2H" is not an error - it's just the remaining cycle time in hours. Likewise, CD indicates the "Cool Dry" cycle is running.
For many issues, checking hose positioning, connections, obstructions, and replacing faulty components is recommended. Consulting experts is advised for complex faults involving control boards or inaccessible parts.
0 notes
Text
Uncover the seriousness of a garage door off its tracks and why a DIY fix might not be the safest choice. Learn the necessary steps to take and the importance of prioritizing safety in this episode. Read more: https://dengaragedoors.wordpress.com/2024/01/24/diy-solutions-for-5-frequent-garage-door-issues/
For more info visit: https://dengaragedoorscom/
#den garage doors#garage door installation#GarageDoorMaintenance#HomeImprovement#DIYFixes#GarageDoorTroubleshooting#DENGarageDoors#SafetyFirst#PodcastHomeTips#WeatherDamage#SensitivitySettings#CustomGarageDoors#FixingItRight#ProfessionalInstallation#HomeownerGuide#GarageDoorSafety#PodcastInsights
0 notes
Text
How do I fix a kitchen sink sprayer?
🔧 Exciting News! Just discovered the ultimate solution to fix your kitchen sink sprayer hiccup. Say goodbye to leaks and inefficiency! 🚰✨
Ready to transform your kitchen experience? Here's a sneak peek into the magic:
💦 Quick Fixes: Learn instant remedies for common sink sprayer issues.
🔄 DIY Solutions: Empower yourself with easy-to-follow, do-it-yourself steps.
🛠️ Tools of the Trade: Discover the essential tools every kitchen wizard needs.
Have your own tips or tricks? Drop them in the comments below and let's read full article! 🤓💬
#KitchenHacks#HomeImprovement#DIYFixes#KitchenMagic#LifeHacks#SinkSprayerFix#DIYProjects#HomeRepairs#KitchenRenovation#ExpertTips#HandymanHacks#FixItYourself#InnovationInHome#SmartLiving#HomeMaintenance
0 notes