#Desktop Accounting Solution
Explore tagged Tumblr posts
Visit Tumblr Blog
Explore Tumblr blogs with no restrictions, modern design and the best experience.
Last Seen Tumblr Blogs


Fun Fact
Tumblr’s website traffic is steadily declining.
Text
Hey does anyone know WHY i can access all my files on my PCs 1 TERABYTE DRIVE on my laptop. And alos how to make it so my poor mini baby laptop doesnt have access to all of that
#i have a bunch of ghost games and shit on my laptops home that i dont want there and access to a bunch of stuff on my desktop like 10000#pictures. i would like to keep thwm seperate but idk howwww#the only solution i can think of is hard resetting my laptop and making a new microsoft account#talk tag
1 note
·
View note
Text
I have a lot of feelings about the use of AI in Everything These Days, but they're not particularly strong feelings, like I've got other shit going on. That said, when I use a desktop computer, every single file I use in Google Drive now has a constant irritating popup on the right-hand side asking me how Gemini AI Can Help Me. You can't, Gemini. You are in the way. I'm not even mad there's an AI there, I'm mad there's a constantly recurring popup taking up space and attention on my screen.
Here's the problem, however: even Gemini doesn't know how to disable Gemini. I did my own research and then finally, with a deep appreciation of the irony of this, I asked it how to turn it off. It said in any google drive file go to Help > Gemini and there will be an option to turn it off. Guess what isn't a menu item under Help?
I've had a look around at web tutorials for removing or blocking it, but they are either out of date or for the Gemini personal assistant, which I already don't have, and thus cannot turn off. Gemini for Drive is an integrated "service" within Google Drive, which I guess means I'm going to have to look into moving off Google Drive.
So, does anyone have references for a service as seamless and accessible as Google Drive? I need document, spreadsheet, slideshow, and storage, but I don't have any fancy widgets installed or anything. I do technically own Microsoft Office so I suppose I could use that but I've never found its cloud function to actually, uh, function. I could use OneNote for documents if things get desperate but OneNote is very limited overall. I want to be able to open and edit files, including on an Android phone, and I'd prefer if I didn't have to receive a security code in my text messages every time I log in. I also will likely need to be able to give non-users access, but I suppose I could kludge that in Drive as long as I only have to deal with it short-term.
Any thoughts, friends? If I find a good functional replacement I'm happy to post about it once I've tested it.
Also, saying this because I love you guys but if I don't spell it out I will get a bunch of comments about it: If you yourself have managed to banish Gemini from your Drive account including from popping up in individual files, I'm interested! Please share. If you have not actually implemented a solution yourself, rest assured, anything you find I have already tried and it does not work.
1K notes
·
View notes
Text
CREVH - GOLD

QuickBooks is a renowned accounting software that offers a seamless solution for small businesses to manage their financial tasks efficiently. With features designed to streamline accounting processes, QuickBooks simplifies tasks such as tracking receipts, income, bank transactions, and more. This software is available in both online and desktop versions, catering to the diverse needs of businesses of all sizes. QuickBooks Online, for instance, allows users to easily track mileage, expenses, payroll, send invoices, and receive payments online, making it a comprehensive tool for financial management. Moreover, QuickBooks Desktop provides accountants with exclusive features to save time and enhance productivity. Whether it's managing income and expenses, staying tax-ready, invoicing, paying bills, managing inventory, or running reports, QuickBooks offers a range of functionalities to support businesses in their accounting needs.
Utilizing qb accounting software purposes comes with a myriad of benefits that can significantly enhance business operations. Some key advantages of using QuickBooks include:
- Efficient tracking of income and expenses
- Simplified tax preparation and compliance
- Streamlined invoicing and payment processes
- Effective management of inventory
- Generation of insightful financial reports
- Integration with payroll and HR functions
These benefits not only save time and effort but also contribute to better financial decision-making and overall business growth. QuickBooks is designed to meet the diverse needs of businesses, offering tailored solutions for various industries and sizes.
When considering accounting qb software options, QuickBooks stands out as a versatile and comprehensive choice. To provide a holistic view, let's compare QuickBooks with two other popular accounting software options - Xero and FreshBooks. quick book accounting package and offers robust features for small businesses, including advanced accounting capabilities, invoicing, payment processing, and payroll management. Xero, on the other hand, is known for its user-friendly interface and strong collaboration features, making it a popular choice among startups and small businesses. FreshBooks excels in invoicing and time tracking functionalities, catering to freelancers and service-based businesses. By evaluating the features, pricing, and user experience of these accounting software options, businesses can make an informed decision based on their specific needs and preferences.
555 notes
·
View notes
Note
So these computers will be mostly be used for CAD but also video editing. The time we are looking for is in the next few months. It will be running autodesk fusion which at minimum needs 2 cores, recommends 8 for cpu, needs 8gb of ram recommends 32gb, and needs aleast some sort of gpu and something like a nvidia quadro is recommended though I am mostly sure we would do fine with a 40s or 50s series GPU.
This is very funny to me because this is actually quite similar to the conundrum I had buying computers earlier today. Workstations are currently a bitch to get (and also that means that $1500 per device is somewhat unrealistic in the opposite direction of what I was initially thinking, especially given the graphics card)
------------------------------------
Hi Anon!
Thanks for the details! We're beginning to see some stock availability issues with hardware so I'm not finding anything that's a perfect match out-of-box for your needs but I believe I've found a solution that should be comfortably within budget as long as you've got in-house IT or an affordable contractor to help with the build.
What I've found is a Lenovo ThinkStation P3 Tiny that comes with a 20-Core, 14th gen i7 processor, 16GB DDR5 5600 MHz RAM (SoDIMM), and an Nvidia T400 4GB graphics card. The workstation includes an upgraded Lenovo Premiere warranty with next-day onsite service. The ThinkStation has one RAM module soldered to the motherboard but two free slots and can handle a max of 96GB, so I'd recommend purchasing this device and adding 16GB Crucial modules.
Just to be sure, I did verify that the graphics card with this device is on the list of compatible cards from Autodesk.
I'm finding the workstation available from a number of vendors at about $1200, and the RAM is available for around $50. With tax, that brings your per-unit cost to around $1400, leaving just under $100 per machine to account for the labor cost of installing the RAM.
Let me know if this sounds like a solution that works for you, or if you have any further questions.
Given your timeline, you could choose to place orders from vendors who are not carrying the full 30 machines right now, but considering the possibility of scarcity I'd recommend making a decision sooner rather than later.
Thanks! Ms-D
--------------------------------
Part of what I was struggling with on my quote today is that my employer doesn't want our techs mucking around with desktop hardware; we're not supposed to be ordering and upgrading before we send things out the door but that is not a limitation that an end purchaser has to live with so you (reader or anon) have more options and more flexibility when looking for computers than I do *IF* you make sure to check that you can do upgrades. It's not hard to add RAM to a desktop unless the RAM is soldered to the motherboard with no free slots, in which case it's impossible.
You can save a ridiculous amount of money on buying machines and have a LOT of options for dealing with scarcity if you know what kind of hardware is easy to fuck with.
In this instance, I wouldn't upgrade the GPU or by a card separate from the workstation (this computer has a 300W power supply and the computer itself is the size of most power supplies, so I wouldn't want to try to find something teeny tiny to work together), especially because there's a budget-friendly option that will allow the necessary programs to run available pre-built, but literally it would cost like five hundred dollars more to get something with more RAM. So save yourself a few hundred dollars by getting a fifty dollar RAM module and paying someone to install that in the machine or doing it yourself.
I don't think we're going to get to a point of completely empty shelves, but I do think we're likely to see fewer options that exactly match what we're looking for without doing some extra work. Large Bastard has been vaguely making noises about getting a new computer for the last two or three years and he's still on the fence and my comment to him was that I'm sure there's always going to be something available at a high enough cost, but there are going to be fewer choices if he has to replace a computer quickly (which, given the age of his desktop, he might have to at some point).
101 notes
·
View notes
Text
have you just followed someone new? are their posts taking over your following feed? are the posts from weeks ago? alternatively, have you unfollowed someone and now your entire feed is every single thing you've posted in the past two weeks?
do i have the solution for you!!! (wow nice job achilles you should go into marketing)
ON DESKTOP:
1. go to settings


2. click dashboard on the side bar with the options

3. scroll down to preferences > uncheck the 'BEST STUFF FIRST' button!

ON MOBILE: (im using ios, hopefully other platforms work the same! my phone is in french, the general locations for everything should be the same)
1. click the profile button on the bottom row

2. click the gear icon in the top right hand corner of your page

3. go to basic settings (under account settings at the top)

4. go to dashboard preferences (should be between confidentiality and mentions)

5. uncheck the 'BEST STUFF FIRST' button!

#blastz babbles .ᐟ#this could either help#or reveal how stupid i am and that everyone has already discovered this button before me#either way.#the intro was so cheesy but i fear i am nothing if not too much and over the top
20 notes
·
View notes
Text
Chromebook Tech Literacy Masterpost
I've seen a lot of posts about the systemic death of tech literacy in schools with the advent of ChromeOS, and instead of responding to them one by one, I want to create a masterpost to destroy the system. First: FUCK CIPA. The Children's Internet Protection Act is a United States FCC act that standardizes internet safety across the country. Public schools are not required to comply with this act, but they will lose discounts offered for the E-rate program. In short, if you don't want to put up web filters, then you don't get government grants for technology and Internet. Fuck that. Many of these workarounds bank on my personal experiences, so some solutions may not work with your web filters, but they definitely are a step in the right direction. For talking with friends: chat rooms are your friend. Many chat rooms for professional use act just like Discord, and many are just a single text channel. Several I've used include: Google Messages, Rumbletalk, Slack, Element, ClickUp, Pumble, and... in a pinch, Google Docs can give you a shared document that's practically impossible to block. For watching videos: some chat rooms, especially Rumbletalk, allow you to directly embed a YouTube video. This is rare, however, so we found some workarounds. Canva has a video search and embed function that allows you to play YouTube videos straight from the editing page of their slideshows. For anime, a website that I don't think is maintained as well but should still work is AnimeTribes. It is a .ru site but it is perfectly safe, as long as you don't click on ads. I've never seen it redirect you otherwise, and the owner used to be commonly found on the chat page. Another piracy site is 9Anime, which doesn't work on Chromebooks but is an infinitely better source in general. A non-anime video piracy site is Arc018, which is my favorite. It does redirect you decently commonly, but just take care to avoid those redirects and follow piracy suggestions that I will lay out further down. For adblocking: the easiest method is to use uBlock Origin. Though, with all the stuff that Google has been doing, I'm not entirely sure if it works anymore. I gave up on Chrome the second I could get away from it and I suggest you all do the same. For playing games: so. I'm a nerd. I play Pokemon games. SO if you do too you're in luck. The only thing I could come up with was to download GPemu, a ChromeOS based emulator. Unfortunately it's pretty bad, but apparently there's an alternative called EmulatorJS. I never used it myself, but if someone wants to try it and let me know how it goes, that would be appreciated. HOWEVER, none of these work without the games to play them with. I'm going to detail piracy safety later, but for now: Vimm's Lair recently got axed by Nintendo's DMCA, but some ROMs may still be available. Another source (which is admittedly undergoing some major changes) is The Internet Archive. I haven't done a lot of searching on the Archive, and I don't know if it works on Chromebooks, but try it and let me know :).
Circumventing the web filter: While those solutions work for specific things you can do online, these present a general solution, capable of multitasking and providing you much more extended freedom. The first is CroxyProxy, a completely free proxy service that can be added through the Chrome Web Store. If the Web Store is blocked, it can be accessed via the direct website or through specific IP addresses. These change frequently, and I’m absolutely positive the ones that I have access to are blocked or simply go nowhere useful. The other option, assuming you have a home computer connected to the Internet at all times, is Chrome Remote Desktop. It will work as long as both computers are signed in to one shared Google account and both are connected to the Internet.
But Ty... none of this works for me: Oh boy. I guess it's time for my trump card. The pinnacle of my Chromebook workaround career has culminated in this. The ultimate destruction of ChromeOS, all without jailbreaking the computer and getting in a LOT of trouble (don't do that please). My magnum opus came from my blossoming understanding of emulation and, specifically, Windows images. During my senior year, I successfully used a trusted and necessary source (unblockable) to emulate a Windows computer entirely through a single Chrome tab. This source… Microsoft Azure. This cloud computing service allows the creation of a remote desktop that will save data when offline. The biggest hurdle with Azure is that… it costs money. However, when I did it, I got 200 hours of emulation FREE, and I would highly recommend you find the same deal, if it still works. Things to note: you can make multiple accounts, but you will need to also have separate payment cards, as multiple accounts with the same card will flag and not be usable. The frame rate is decently shit, and there is no physical graphics card, so the vast majority of games will not run. I mostly used it for Discord. However, feel free to experiment and make it your own. Use this knowledge wisely, and run free, my friends. Fuck CIPA, and fuck ChromeOS!
Please feel free to reblog or comment with more suggestions, because I would love to add them!
#boost this post so it reaches as many eyes as possible!#i want people to know about the ways they can fight against their schools!#tech literacy#chromebook#chromeos#school system#united states#masterpost#tech tag
19 notes
·
View notes
Text
So if you want to know how "functional" Windows 11 is, I just got a new laptop, and while I was tearing its guts out to make Windows 11 less obtrusive and ad-ridden, I discovered a problem.
Modern versions of Windows have a built-in system for transferring files to other Windows computers on the same network -- you mark certain folders as "shared", and then you can just open them on another computer from the "Network" window after entering a password.
Well, I could connect from my desktop to my laptop just fine; however, I had a devil of a time connecting from my laptop to my desktop. Didn't matter what username or password I used; just "your credentials are incorrect."
Then something occurred to me.
See, I'd wanted a specific home directory name. This entailed 1. logging into my Microsoft account the first time I started my laptop, thus creating an account on the laptop with an automatically-selected name; 2. creating a second administrator account with the username/home-directory-name I wanted, without an associated Microsoft account; 3. deleting the first account, 4. connecting the second account with my Microsoft account. I did this on my laptop, and I'd done this on the desktop.
Thing is, in step 2 there, I'd given the second account the same password as my Microsoft account, because I knew I was just going to overwrite it. See where this is going? The correct password was not the password for my Microsoft account, but rather, the password which I'd used to create the Windows account without the Microsoft account. And I've changed my Microsoft password multiple times since getting the current desktop computer.
Solution:
Remove the Microsoft account from my desktop. This entails setting a new password.
Have the laptop connect to the desktop with that new password.
Add the Microsoft account back to the desktop.
Anyway this might be the straw that makes the camel start looking into Linux.
7 notes
·
View notes
Text
A free image hosting solution for AO3 and elsewhere - A Tutorial (mobile-friendly!)
See the demo site made from this template IN ACTION: https://hotlink-archive-template.pages.dev/
This guide is for an easy, mobile-friendly way to host files for hotlinking on AO3 or elsewhere, using github and cloudflare pages.
I've encountered far too many dead links in fanfics and forums simply because a hosting service decided to dump older files, or they decided to change their TOS to no longer allow hotlinking or certain kinds of content (nsfw, fictional graphic content). See Optional Steps for even more options.
This is an easy, barebones way to permanently host images that you don't want deleted unexpectedly or that you can't host elsewhere. (Emphasis on barebones. This will not be a nice portfolio style site. Unless you decide to code that yourself!) You can follow the link above for an example of this type of site.
It is also EASY to upload and use on mobile devices after initial setup!
Tools you will need:
Cloudflare Pages/Workers is a free to use static site hosting service. This will publish your files and make them available online. This will publish your files and make them available online. There is a limit to the amount of data you can upload for free, but you can pay for proper hosting if you want to exceed it.
Github is a code sharing/storage platform. Your files will go here first before being published on Pages. You can edit and upload files through your browser at github.com, or through Github Desktop, a program you install on your computer. There are limits to Github repositories, but they are also generous (suggested 1GB to 5GB per repo).
Basic Setup
1. Create a github account
2. Copy this template repository hotlink-archive-template
Your website will be contained in a repository, a place where all the files and the revision history for your project are stored.
This template repository uses an "Action" (using python) to automatically create a "home" page with an Index of all the files in your repository every time it is updated.
NOTE: I recommend you set your repository to Private. Github's history feature is extensive, so if you have sensitive content or think you might want to delete something later, it will be hard to get rid of it completely once it's been committed and publicly available.
3. Enable Action permissions
In order for the Action script to work, you need to give Actions permission to read and write in your repository.
Within your repository, go to the tab Settings > Actions > General > Workflow Permissions

4. Create a Cloudflare account
5. Create a Pages (or Workers) project and link it to your Github repository
Your Pages project will create the front end of the site where the images will be displayed. You will be able to link those images to other platforms like AO3.
You can create either a Workers or Pages project by going to Add > Pages (or Workers). Name your project WISELY! This name will be your site's URL.
Workers vs. Pages
Workers is subsuming Pages on Cloudflare and now has all the same static hosting capabilities, in addition to its original server-side processing services. If you'd like to, read more about this.
While Workers has similar capabilities, I recommend Pages for this project. Pages has the added bonus of a cleaner URL if you do not have your own domain: “MySite.pages.dev” in Pages vs Workers' “MySite.username.workers.dev”
You will be prompted to import an existing Git repository. You will need to give it access to your Github to do this.

Select the repository on your Github you made for your project, then hit "Begin Setup".
Name your project WISELY! This name will be your site's URL.
You do not need to change any settings on the next page, so hit "Save and Deploy". Your image hosting site will now be live!
The URL will be "https://ProjectName.pages.dev". It may take a few minutes to become accessible.
Now you're done with the basic setup!
How to Add files
You can add any files you want to link to on AO3/elsewhere through mobile, desktop browser, or the Github desktop program!
Here is how to do it on Github.com:
Open up the repository that you made (it can be found at github.com/username/repositoryname). You will see a list of folders and files that are in that repository.
Click into the folder "fan-stuff".
In the top right, go Add file > Upload files and drag in the images you want added. You will need to name the images BEFORE you upload them, as there is not an easy renaming feature within Github's browser interface.
In the Commit changes box, choose a title for what action you are doing. This will help you backtrack uploads if needed.
For example, it could be "Uploaded Batman Art". Make sure it's set to "commit directly to the main branch", then commit those changes. This will upload the files.
Now, if you visit your site, you will see your uploaded image under the "fan-stuff" folder!
To embed/link your image, navigate to your file on your Pages site and copy the URL in the address bar. This URL is what you will use to embed your photo (using HTML or "add image as URL" tools some sites have).
Continue onto More Setup to customize your site and implement more advanced settings. See Tips/Troubleshooting if you're running into problems.
More Setup
Perform site customization/advanced setup with Github Desktop on your PC
Github’s web UI is great, but it has major limitations. I highly recommend that you use Github Desktop during the initial setup, as well as when you want to make major organizational changes to your files/site. Once you have everything set, though, you can use Github in your browser to upload whatever files you want to hotlink at the moment.
Download Github Desktop and “clone” (download a copy of) the repository you made.
This is the best time to rename/rearrange folders + files, etc.
There are other methods in the Troubleshooting section if you need, but Github Desktop is by far the easiest way
see Adding/Renaming Folders for important info on how to properly rename/add folders
see About the Index Page for how to customize your Index pages
Once you’re done editing, “push” (upload) all the changes you made to your online Github repository.
Having some sort of text editor like Notepad++ is useful for editing any code, the automatic color-coding is very helpful. You can edit in plain old Notepad as well, it just won’t look as nice.
About the Index Page
The template repository uses a python Action to automatically create an HTML "home" page with an Index of ALL the files in the folder every time it is updated.
This is particularly convenient for mobile use, as you can upload a file, and the python action automatically updates the Index page.
If you don’t want this, just disable the “create-index” Action and delete the .py files. You can just type in the file locations to get to each file, or you can manually maintain an home/Index page yourself, which isn't hard if you know some basic HTML and can remember to do it consistently.
Also note that if you wish to change any of the content on your Index pages, you must edit the "index.py" file, not the "index.html" file. The "index.html" file gets re-written every time the "create-index" Action is run in order to keep the file index up to date.
Adding/Renaming/Deleting Folders
Disclaimer: This is a bit convoluted because I am extremely unqualified to be working with python OR HTML. There’s probably an easy way to do this, but I don’t have the skill to do it, and most of the stuff here is copied from stuff I found around. If you know a better way to do things, please let me know, it’d make my life easier too!
Adding or renaming folders involves some extra steps.
1. The "index.py" file inside the folder needs to be edited to match the parent folder name.
The place you need to do this is found near the top of the file (highlighted below)

2. Then the outer-most "create-index.py" file needs to be updated to match the new name as well. If you’ve added a new folder, duplicate and adjust the code to match.
The place you need to do this is found at the bottom (highlighted below)

If you don’t need any folders at all, great! Just delete them and their contents! No need to edit any files. (Don’t delete “index.html” or “create-index.py” or “.github/workflows”!)
If you would like to have these folders for later use, leave them as-is and simply edit the index files.
The relevant lines of code at the bottom of "create-index.py" like in the previous step for renaming folders. You may delete this code, or comment it out (using # at the beginning of a line will make it “invisible” to the computer)
Then, add the folder’s name to the “exclusions” list at the top of the "create-index.py" file so that it doesn’t show up on your Index page (highlighted below)

You can also use this same concept to create "invisible" files/folders. Any files/folders included in the "exclusions" list in "(create-)index.py" will not be listed on the Index page, however they can still be found through the direct URL to the file.
On the flipside, this means simply hiding the file/folder from the Index page does not get rid of the file from your site. Anyone who has the URL will be able to find that file unless you remove it, or move its location to change the URL
Tips/Troubleshooting
(Re)name your files before uploading
It’s not possible to rename image/media files on Github’s web UI (it is possible with the local Git program). The "create-index" Action lists out the names of your files exactly, so you will end up with ugly strings of numbers and letters on your Index page if you don't rename them, which is terrible to look at and also plain old CONFUSING to navigate.
So if you're uploading on mobile or through Github on browser, name your files with easy to remember and distinctive filenames before you go ahead and upload them. This makes everything much easier, and it makes your Index page look nice :)
My website isn’t updating when I edit my Github repository!
Check to see if your Pages is retrieving from the correct branch, and if it has automatic deployments enabled.

Can’t see your Github repository when trying to link it on Cloudflare?
Check your Github applications Repository Access settings. Go to your ACCOUNT Settings > Integrations - Applications > Cloudflare > Repository Access

Index action is failing!
Go back to step 3 in Basic Setup and check if you’ve given Actions permission to read and write. If that’s not the issue, check to see if you’ve set up your "index.py" files correctly. The folder names should correspond to the parent folders, and the "create-index.py" file in the outer-most folder should have the correct folder names at the VERY BOTTOM.
How do I rename a folder (or move a file) in Github’s web UI?
It isn’t possible to directly rename a folder in Github’s web UI, doing it using Git on your computer is the most foolproof way to do it. But there is a way (except for media files).
Go into the folder you want to rename and select a file such as “index.html” and enter the “edit” mode.
Go to the file name and backspace until you can edit the parent folder name as well. This will create a new folder with the new name.
You’ll have to do this to every file in the folder until they’re all in the new folder.
Unfortunately, you can’t do this with media files like png/jpg/etc, because entering the “edit” mode on a photo “breaks” it somehow, and bye-bye image :’) (Don’t worry if this happens, just don’t commit the change or roll it back in your history).
Optional Steps
Make deployment (semi-)Manual
You can play with cloudflare and github to make deployment of your site a manual step you have to trigger, instead of automatic with each commit (default setting). This is a safeguard in case you accidentally make a change or delete something from your github, it won't affect your website.
Deploy w/ Branches
You could do a semi-automatic deployment with a "Production" branch on your github that is separate from the branch you edit. This creates an extra step before anything is published on Cloudflare. A safeguard against accidental changes/deletion of sorts :)

Go to Settings > Build tab > Branch Control
Choose your Production Branch (MAIN or CLOUDFLARE) and enable (or disable) automatic deployments
If you choose MAIN, every change you commit to MAIN will be published to Pages
If you choose CLOUDFLARE, any changes you make to MAIN will not show up on your Pages site until you Pull from MAIN to CLOUDFLARE
To Pull changes from MAIN to CLOUDFLARE, go to your github repository
Above your files on the Left, you will see a toggle to choose which branch you are on.
Choose Cloudflare. There will be a message like "This branch is 7 commits ahead of, 2 commits behind main." Click "2 commits behind"
Click "Create a Pull Request". Then click "Merge Pull Request". If everything is correct, this should trigger a build on your Cloudflare
Deploy w/ Github Actions
Or you can create a manual command that you have to enter on github to trigger a deployment on cloudflare. If you're paranoid about anything happening to your site due to a mishap on the Github side, this is a safe choice. Unless you manually trigger the command, your Pages site will be completely untouched no matter if something happens to your repo.
This can be done in many ways, I think the most straightforward is with Deploy Hooks (maybe in conjunction with Actions if you want to make it mobile-friendly), and might be a bit complicated, but not too hard to figure out with some Google-fu.
Here’s some links I think will be useful (note: I don’t use this method, so these haven’t been tested)
Manual trigger action tutorial
How to configure Github webooks
Storing Locally instead of on Github
Although this guide is written with Cloudflare's Github integration in mind, particularly for easy online/mobile access, you can also keep your files locally on your PC and directly upload your assets onto your Pages project. This gives you full control over what happens to your files. (Keeping backups is a good idea. You can still use Github Desktop to do this, just keep your repository on your PC.)
Simply clone/download the repository as it is, customize it as you like, and create a NEW Pages project on Cloudflare, using "Direct Upload" to upload your files
Once you have connected a Pages project with Github, there is no way to change the deployment method to Direct Upload or vice versa. Direct Upload is also not available for Workers.
One thing that will NOT work the same is the "create-index" Action that only works on Github.
I have made a "create-index.exe" that will execute the "create-index.py" files in the exact same way as they would work with the Action. You do not have to install python for this to work (if I did everything right). Simply run "create-index.exe" whenever you make a change and want to update the "index.html" files
Remember, this is EXACTLY THE SAME as the "create-index" Action, meaning you have to edit each "index.py" file when you rename folders, add a folder, want to exclude a file from the Index page, etc. (See Adding/Renaming Folders for how to do this)
Find me on Bluesky. Or if you have a problem, open an Issue on this project :)
I'll try to answer your questions as best I can! But really, I am the most amateur of amateurs and figured this all out using Google, so I might not be of much help ^^;
I also recommend Squidge Images (an offshoot of Squidge.org) as a fairly trustworthy alternative. However, Squidge Images does have some additional rules that Squidge does not, and what crosses the line is at their discretion.
I also posted this over on AO3!
4 notes
·
View notes
Text
I am so done with all of this for tonight. Time to take out some frustration in games, and/or try to just chill and watch some videos. Preferably not tech-related.
But, I did find it darkly funny in a way that the best solution I have found so far to actually keep useful access to several years' worth of Diabox data, is to finally get a Nightscout instance up and running properly. Which I have kept meaning to do anyway. Should be able to import that data, and keep some continuity with the current xDrip+ install. (Which was kinda developed for use with Nigjtscout.)
That would of course also make it easier to, like, put a handy CGM display widget on my computer desktop or feed it to a variety of other displays. Which was my original draw.
Looking into it again, I am sorely tempted to just use a hosting service like NS10BE and have done with it. It's well worth €50 a year for me not to have to fuck around with that anymore, and they do seem to have a good reputation.
But! But! With my hobbled filthy foreign devil bank account and its debit card, I cannot pay the nice tech company! 🤣 I am blocked from any repeating subscriptions, and Maestro doesn't work with some payment processors anyway.
So yeah, either I am going to have to ask Mr. C to pony up for that--OR I am going to have to eat my pride and ask him to please help get the existing middling-DIY attempt up and running properly. I mean, it probably wouldn't be a major problem for him to set up something completely self-hosted in house, never mind sort out whatever the hell OTHER error I started getting trying to access that database once the one I mentioned there was out of the way.
But, my "just knowledgeable enough to break shit in interesting ways" tinkerer ass really avoids asking for any technical help from the Household IT Professional on his own time. I feel like a dumbass, and he spends MORE than enough time and energy on frustrating tech problems as it is.
Anyway, I did find it darkly hilarious in the context of some ongoing frustrations which are currently really flaring up here, that I cannot even reasonably bail myself out of this little cluster of aggravations for €50 on my own.
14 notes
·
View notes
Text
I've seen some Reddit refugee PSAs going around, so I thought I'd contribute a few tips of my own that I haven't seen covered:
If you go to the original iteration of your post (not any subsequent reblogs, your ORIGINAL post) you can delete any comments you don't like. This does not apply to text added by reblog, only to the message bubble section.
Ublock Origin has trouble figuring out which parts of desktop to get rid of. If you want to delete a certain element (for example, the store widget), and your usual method isn't working, what you want to do is: - Right-click - Inspect Element/Inspect (Q) - Look at the thing that's highlighted, then go all the way up until you hit the nearest "div = class" marker - Right-click - Hover over "Copy," then pick "CSS Selector" - Click your Ublock extension icon - Click the gears - Find a blank space on the list that pops up and type "www.tumblr.com##" without the quotes - Paste whatever you copied with CSS Selector after that, with no space between it and the ## - Click "Apply changes"
You can hide your follower lists and liked lists. This is actively encouraged. Desktop solution: - Account (the person icon in the corner) - Scroll down until you find your blog name and click "Blog Settings" - Scroll through the page that pops up until you find "Share posts you like" and "Share the Tumblrs you're following" and toggle them off. This is the 3rd and 4th section of that page for me, respectively Mobile solution: - Your blog (the person icon in the bottom right corner) - Settings (gear in the top right corner) - Scroll down to "Pages" - Toggle "Likes" and "Following"
Desktop only: Left your Tumblr logged in on someone else's phone/computer? Worried about account security? No problem! - Account (the person icon in the corner) - Settings (NOT Blog Settings. Just Settings. It has a gear icon) - Scroll all the way to the bottom - You have a list of any logins that have happened on your account. They come with the IP addresses used to access it. It tells you where it happened, and from what operating system. Deleting those with the X next to the listing logs that iteration out. If you have any on that list that you DON'T recognize, I recommend logging them out and changing your password. Note: It says the list is only for the past 30 days. This is a lie. I have some that date back over a year.
Desktop only: You can make gradient text in your posts by following these instructions.
If your post has been blowing up and you're sick of the notifications, deleting the original post will delete its notes from your activity. THIS CANNOT BE UNDONE. If you would still like to check on the post, just not have it in your activity, reblog it before deleting it. You can continue to check the notes tab from the reblog while the original is gone.
It is common etiquette to tag spoilers for new games/shows/etc (ie, released in the last two months) as #[insert fandom here] spoilers, sensitive subjects as #[insert sensitive topic] tw, and long posts as #long post. Yes, even if you have a readmore (which you can add by clicking the weird squiggly line when you start a new block).
There is a bug on desktop involving readmore lines. Whenever you go back to edit a post that has a readmore in it, it moves the readmore down by one block. Make sure you move it back into its proper place each time by clicking and dragging.
You can click and drag different blocks of text to reorder them. Only regular blocks, though; not lists like this one. You can also do this with images you've inserted.
Desktop only: You can delete/remove tags/add tags en masse to posts using the Mass Post Editor. - Account (person icon in the corner) - Scroll down to your blog - Mass Post Editor - Select any posts in the grid you want. "Edit tags" is only for removing tags, you need "Add tags" to add more
Desktop only: You can see any blog's history of posts by typing in [blogname].tumblr.com/archive. The page that pops up looks very similar to the Mass Post Editor. You can filter posts on that blog by any of their most used tags, by month, or by post type. This is especially useful for locating pornbots. Some pornbots will try to legitimize their place by picking a random popular tag (for example, #horror) and reblogging the top 10-100 posts in that tag without commentary. See if they've been active for more than week with the archive month filter. Granted, the person may also be a new user, like yourself. It takes some deduction. But it's much easier to use the archive than it is to scroll through all of their posts until you hit the bottom.
Desktop only shortcuts: J = move down one post. Useful for scrolling fast or getting past a notoriously long post (as in "Do you like the color of the sky" and all its cousins) K = move up one post Shift + R = reblog a post. Does not add tags L = like a post C = create a new post (brings up options on what kind of post) . (period) = return to the top of the page Shift + Q = add a post to your queue. Does not add tags Shift + P = cycle through the color palette
116 notes
·
View notes
Text
Self Hosting
I haven't posted here in quite a while, but the last year+ for me has been a journey of learning a lot of new things. This is a kind of 'state-of-things' post about what I've been up to for the last year.
I put together a small home lab with 3 HP EliteDesk SFF PCs, an old gaming desktop running an i7-6700k, and my new gaming desktop running an i7-11700k and an RTX-3080 Ti.
"Using your gaming desktop as a server?" Yep, sure am! It's running Unraid with ~7TB of storage, and I'm passing the GPU through to a Windows VM for gaming. I use Sunshine/Moonlight to stream from the VM to my laptop in order to play games, though I've definitely been playing games a lot less...
On to the good stuff: I have 3 Proxmox nodes in a cluster, running the majority of my services. Jellyfin, Audiobookshelf, Calibre Web Automated, etc. are all running on Unraid to have direct access to the media library on the array. All told there's 23 docker containers running on Unraid, most of which are media management and streaming services. Across my lab, I have a whopping 57 containers running. Some of them are for things like monitoring which I wouldn't really count, but hey I'm not going to bother taking an effort to count properly.
The Proxmox nodes each have a VM for docker which I'm managing with Portainer, though that may change at some point as Komodo has caught my eye as a potential replacement.
All the VMs and LXC containers on Proxmox get backed up daily and stored on the array, and physical hosts are backed up with Kopia and also stored on the array. I haven't quite figured out backups for the main storage array yet (redundancy != backups), because cloud solutions are kind of expensive.
You might be wondering what I'm doing with all this, and the answer is not a whole lot. I make some things available for my private discord server to take advantage of, the main thing being game servers for Minecraft, Valheim, and a few others. For all that stuff I have to try and do things mostly the right way, so I have users managed in Authentik and all my other stuff connects to that. I've also written some small things here and there to automate tasks around the lab, like SSL certs which I might make a separate post on, and custom dashboard to view and start the various game servers I host. Otherwise it's really just a few things here and there to make my life a bit nicer, like RSSHub to collect all my favorite art accounts in one place (fuck you Instagram, piece of shit).
It's hard to go into detail on a whim like this so I may break it down better in the future, but assuming I keep posting here everything will probably be related to my lab. As it's grown it's definitely forced me to be more organized, and I promise I'm thinking about considering maybe working on documentation for everything. Bookstack is nice for that, I'm just lazy. One day I might even make a network map...
4 notes
·
View notes
Note
stupid question, but I like your art so much that I want to reblog it, but for some reason I can’t do it, why:<?
It’s not a stupid question, don’t worry, glad you enjoy my art ❤️
Hm, I personally never had a problem like that, but found other ppl having a similar issue
Didn’t find the exact solution for it, but you can try rebloging from tumblr desktop version (or tumblr mobile app if you’re already using a desktop version)
If that’s doesn’t work maybe try reinstalling the app?
From my part:
- reblogs on my posts are enabled (+ see other ppl rebloging my stuff)
- I did not block your account, bc I got your ask
Hope it was helpful 👍
If anyone has similar problem let me know 🫡
#bear answers#tumblr#first time hearing about this#I also know you can be shadowbanned on tumblr#but it’s not the case here bc again I received your ask
12 notes
·
View notes
Text
how to remove the live tab (and other annoying marketing ploys) from the desktop tab menu using ublock origin
i'm not good at html, so there's probably an infinitely easier way to do this, but here's what i did if anyone finds it useful!
note: i'm using ublock origin and firefox, so if you're using a different browser or adblock program, your process may look slightly different, but the html stuff should be the same!
step 1: right-click on the tab you want to remove, and select "block element..." from the drop-down menu.
this will open a dialogue box on the lower-right corner of your screen, which looks like this:
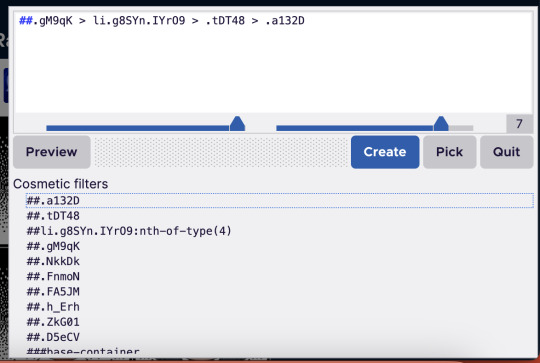
[image id: a dialogue box for ublock origin. the top half of the box contains a white text field with black text, with a menu of buttons underneath: a grey button reading "preview," a blue one reading "create," a grey one reading "pick," and another grey button reading "quit." below this is a light-grey menu labelled "cosmetic filters," which contains several line html line items notated with hashtags. end id]
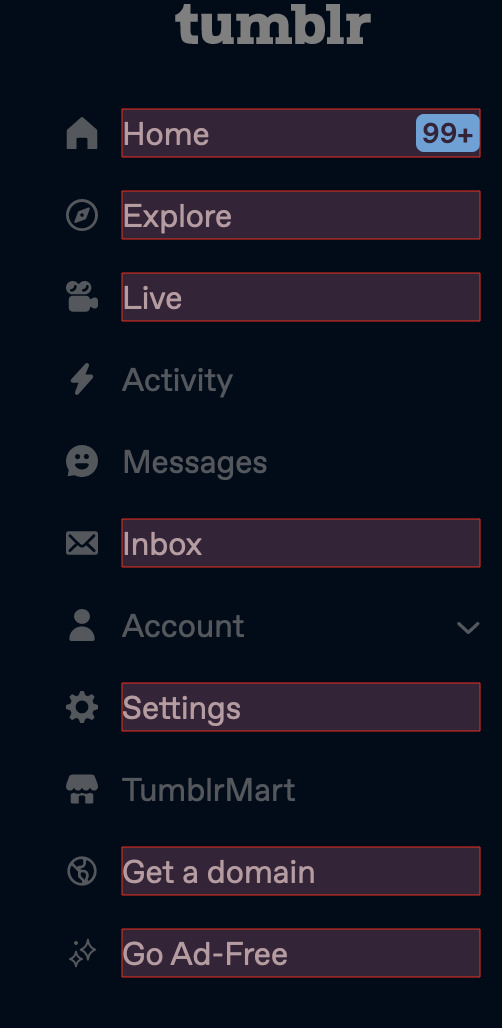
right now, there will probably be red boxes around both the live tab and other tabs on the side menu, like the home and inbox tabs and other things you probably want to keep.
[image id: the tumblr sidebar menu. the menu is dimmed, with a slightly darkened background and text. red borders exist around the home, explore, live, inbox, settings, get a domain, and go ad-free tabs. end id]
if you click "create" on the ublock window right now, this will remove all tabs that have that red box around them, so don't click "create" just yet.
step 2: select the "pick" tool from the ublock window, and click on the live tab.
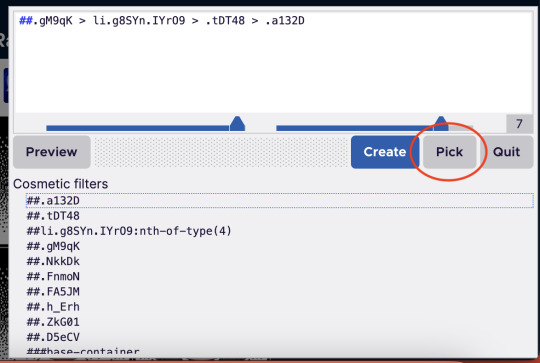
[image id: the same ublock dialogue box from before. this time, the grey "pick" button has a red circle around it. end id]
step 3: once you've got the live tab selected, in the "cosmetic filters" menu, scroll until you find a line of text that contains the words "nth-of-type" and click that.
it'll be preceded by hashtags and will have a number in parentheses after the "nth-of-type" section. when you hover over this line of code in the menu, the live tab should be the only one with a red box around it. looks like this:

[image id: the "cosmetic filters" section of the ublock box. several items are listed, but one of them is highlighted in a slightly darker shade of grey. this highlighted section contains the words "nth-of-type(4)." end id]
[image id: the tumblr dashboard with the ublock box open. the cosmetic filter containing the "nth-of-type" string is highlighted, and the live tab in the sidebar is contained in a red box. no other tabs have red boxes this time. a draft of this post is visible in the background. end id]
step 4: click "create."
this should remove the live tab from the menu. if you do what i did the first time and click the text and not the actual button, there will still be an empty space where the tab used to be, which will link you to the live landing page. to remove that, follow steps 1-4 again, this time selecting the empty space where the live tab used to be (it'll still highlight like a button would when you're using the pick tool).
here is what selecting the text vs. the button looks like:

[image id: the "go ad-free" button on the tumblr sidebar menu. the text "go ad-free" is contained in a red box, but the sparkle icon beside it is not. end id]
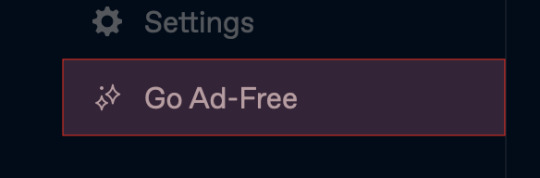
[image id: the "go ad-free" button again. this time, both the text and the sparkle icon are contained within the red box; there is also a wider margin of space around the text. end id]
i did this for the live, explore, tumblrmart, domain, and ad-free tabs, and now my sidebar looks like this:
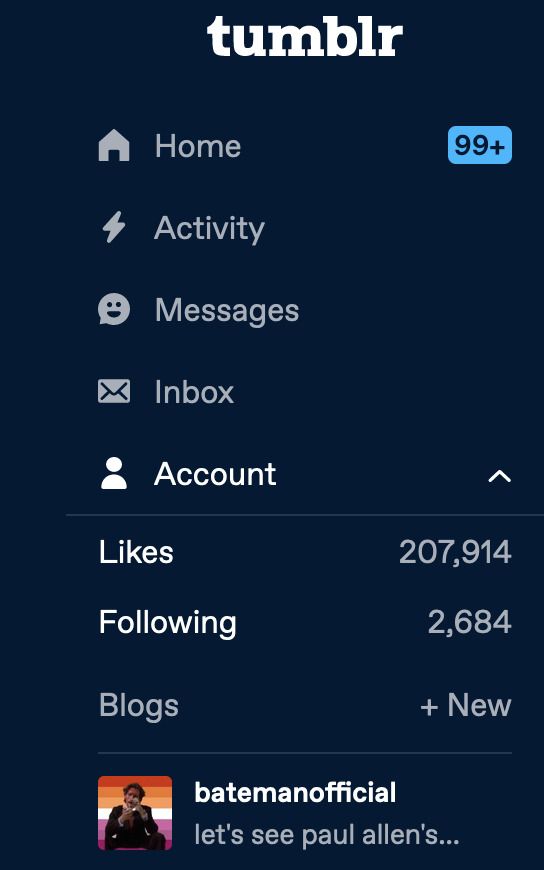
[image id: tumblr user batemanofficial's sidebar menu. the home, activity, messages, inbox, and account tabs are visible. the account drop-down menu is open, and batemanofficial's url and icon are visible at the bottom of the menu. end id]
like i said, there's probably an easier, more efficient way to do this, but this solution (if done with ublock) will stay in place even if you refresh the page.
anyway that's the tutorial, please lmk if anybody has any suggestions for improvement lol!
21 notes
·
View notes
Text
Audacity for Debian-based Linux
So, some time around 2020/2021, Audacity for Linux from the repositories of Debian-based distros (including Ubuntu, Mint, etc.) no longer had access to high quality stretch (change tempo, change pitch, shifting slider). This appears to be due to a combination of Debian no longer updating Audacity at all past 2.4.2 (as Audacity's new owners from 3.0.0 on have had...issues, to put it lightly), but also the fact that 2.4.2 specifically was requiring a version of the SBSMS library past what Debian had. It's still the case that the apt version of Audacity on Linux Mint still lacks the high quality stretch functions.
The workaround for this is to compile from source. HOWEVER. Be apprised that if you specifically go for version 2.4.2, there is still a bug around SBSMS, which causes Audacity to crash when attempting high quality stretching. Apparently, if you go for versions afterwards (3.0+, new Audacity owners), or the version before (2.3.3), you will not run into this issue.
I am stubborn, so I have verified that I can now open Audacity 2.4.2 and do a high quality pitch change without crashing. Here are the solution options. Know that both are still compiling from source.
Option 1: Do it manually command by command on the terminal
You will, however, notice that the important download link for the patch is broken. You must get it from here.
Note that you should preface all of the commands listed in that post with "sudo", or they will likely throw an error. (Or do whatever you need to for terminal to continuously recognize root access.) In addition, note that the "pre-installation test" section is not optional. Audacity will not run if the "Portable Settings" folder is not created, and furthermore, the "Portable Settings" folder and all containing files need to have write permissions enabled to the relevant non-root group/owner.
Whether you installed manually or used the script, you will need to go to "/usr/local/share/audacity/audacity-minsrc-2.4.2/build/bin/Release" to launch Audacity. In the file explorer window, you can click the button to the left of the magnifying glass to switch to text input where you can copy and paste the above path. Or, from /home, go up one level, and then navigate through manually.
Change the launcher's icon and add it to the start menu/desktop, per your specific distro and desktop environment.
Option 2: Modify and run a bash script
I found a helpful Youtube video stepping through the process, before they link to a bash script automating the whole thing. However, the script does not include the 2.4.2 patch. There are also a few modifications that need to be done to the script.
Modifications to make (right click the .sh file, open with, pick some text editor):
Line 35: change the dl_directory to match your own system. (Specifically, you probably need to replace "piuser" with your own account name.)
This change also needs be done on lines 115, 116, and 120 (or replace the hard coded parts with "${DL_DIRECTORY}").
Line 77 (optional): add "patch" as a dependent package to check. Like Python, it's mostly likely already installed, so you could leave this commented out.
Lines 139-142: Not a modification, but a note that I didn't end up using this (left it commented out), so I did have to download the 2.4.2 source code from fosshub manually and put it in the location specified by dl_directory. I also put the patch there. If you do want to try to automate the download, you'll not only have to add another line to also download the patch file, but both the source code for 2.4.2 and the patch have hyphens in their urls, so you need to either add backslashes to escape them, or enclose the entire url in quotation marks. But I also can't guarantee that either of those things will work, since I ended up doing the downloads manually.
Line 150: Per the manual installation above, the patch needs to be applied before the build. Add this code block at line 150 (after the script checks to see if the "Build" folder exists):
#SBSMS patch required for 2.4.2 if [ -f "${DL_DIRECTORY}/changepitch.patch" ]; then sudo cp "${DL_DIRECTORY}/changepitch.patch" "${DIRECTORY}/${VERSION}" fi sudo patch -p 1 < changepitch.patch
That's it for changing the script. Save it, close out of the text editor. (If you decided not to try letting the script do the downloads, then make sure you download the source code and the patch and put them in the dl_directory location at this point.)
Enable the script to be executable. (Right click the .sh file, Properties. On the Permissions tab, check that "Allow executing file as a program" is checked.)
Double click the .sh file. I suggest doing the "Run In Terminal" option so you can see the progress. (And if it's really short, probably something went wrong. The build section takes 20 minutes.)
This script does not include installing the offline manual for Audacity. That is covered in the guide posted in Option 1. Sorry, you'll have to do some terminal typing after all.
Whether you installed manually or used the script, you will need to go to "/usr/local/share/audacity/audacity-minsrc-2.4.2/build/bin/Release" to launch Audacity. In the file explorer window, you can click the button to the left of the magnifying glass to switch to text input where you can copy and paste the above path. Or, from /home, go up one level, and then navigate through manually.
Change the launcher's icon and add it to the start menu/desktop, per your specific distro and desktop environment.
#linux#linux mint#ubuntu#debian#audacity#category: other#vibrating at the mashups now once again at my fingertips
9 notes
·
View notes
Text
E-commerce solutions | Sunshine Coast Web Design
In today’s digital landscape, having a robust online presence is essential for businesses looking to thrive. E-commerce solutions play a pivotal role in this transformation, offering tools and strategies that can help you reach new customers, streamline operations, and boost sales. At Sunshine Coast Web Design, we specialize in crafting tailored e-commerce solutions that empower businesses to succeed in the competitive online marketplace.
Why E-Commerce is Essential
As consumer behavior shifts towards online shopping, businesses must adapt to meet these demands. E-commerce solutions provide several key advantages:
Wider Reach: With an online store, you can tap into a global market, reaching customers beyond your local area.
24/7 Availability: An online store never sleeps, allowing customers to shop at their convenience, increasing sales potential.
Cost-Effectiveness: Running an online store often involves lower overhead costs compared to traditional brick-and-mortar shops.
Customer Insights: E-commerce platforms provide valuable analytics that can help you understand your customers’ behavior and preferences.
Tailored Solutions for Your Business
At Sunshine Coast Web Design, we understand that every business is unique. Our approach involves creating customized e-commerce solutions that align with your specific needs and goals. Here’s how we do it:
1. User-Friendly Design
A well-designed e-commerce site is crucial for attracting and retaining customers. We focus on creating intuitive, aesthetically pleasing interfaces that enhance user experience. Our designs are responsive, ensuring that your site looks great on any device, whether it's a desktop, tablet, or smartphone.
2. Robust Functionality
Our e-commerce solutions come equipped with essential features such as:
Secure Payment Gateways: We integrate reliable payment solutions to ensure secure transactions.
Inventory Management: Keep track of your stock effortlessly with our easy-to-use management tools.
Customer Accounts: Allow customers to create accounts for faster checkouts and personalized shopping experiences.
3. SEO Optimization
Building a beautiful website is just the beginning. We implement SEO best practices to improve your site's visibility on search engines. This helps drive organic traffic to your store, attracting more potential customers.
4. Ongoing Support and Maintenance
E-commerce is an ever-evolving landscape. Our commitment doesn’t end with the launch of your site. We offer ongoing support and maintenance services to ensure your platform remains up-to-date, secure, and optimized for performance.
The Sunshine Coast Advantage
Choosing Sunshine Coast Web Design for your e-commerce solutions means you’re partnering with a team of experienced professionals dedicated to your success. Here’s what sets us apart:
Local Expertise: We understand the Sunshine Coast market and can tailor solutions that resonate with local customers.
Custom Solutions: We don’t believe in one-size-fits-all; we create personalized strategies that suit your business needs.
Focus on Results: Our primary goal is to help you achieve measurable results, whether it’s increasing sales, improving customer engagement, or expanding your brand presence.
Contact Us Today! 🌐 : https://sunshinecoastwebdesign.com.au/
☎: +61 418501122
🏡: 32 Warrego Drive Pelican Waters Sunshine Coast QLD, 4551 Australia
Getting Started
Are you ready to take your business to the next level with a powerful e-commerce solution? Contact Sunshine Coast Web Design today for a free consultation. Let’s discuss how we can help you create an online store that not only meets your needs but exceeds your expectations.
In the world of e-commerce, the right tools and strategies can make all the difference. With Sunshine Coast Web Design by your side, you can navigate the digital marketplace with confidence and achieve lasting success.
2 notes
·
View notes
Text
FAQ
Where are the links? I wanted to have hyperlinks but I have tried to find a solution with no luck. To be taken directly to the fic the link is underneath the title and in this format, “https://fit.ttt/{#}” and can be copy pasted redirecting you to AO3! Only the unique ift.ttt link at the top of the post will take you to the individual fic.
How often do fics post?
Fics are automatically put into the queue upon being posted to AO3, they post every hour, on the hour.
Can you help me find a fic?
Sometimes, but I recommend visiting @rwrbficrecs with those questions!
Are there fics in other languages?
Yes! I try and tag them but have to do so manually so i don't catch them all, but you should also be able to search as it appears on AO3, usually as it is spelled in it's native alphabet.
What does it mean when a link leads to an "error 404"?
It unfortunately most likely means that the fic has been deleted. To my knowledge AO3 links are static upon being published so even if between being published and the posting the author orphans or anonymizes the work, the link in the post should work unless the work has been completely removed by the author.
Can I support the blog in other ways?
if you feel so inclined I do have a personal ko-fi
Info
Reminder that “need help finding this fic” type of works to AO3 are against TOS, any post of this type made via the RSS feed will be deleted! if you see one I missed please dm or send an ask with the link so it can be removed and reported.
Reminders
Despite this being an automated feed, at the end of the day, there is a human behind this blog, so please be kind when using the askbox and messages!
If you are reporting an issue with posts, ex: stopped posting, duplicates, please DM this account as notifications for asks get lost in the activity since I check from mobile more often than desktop.
update 10/19/23 #1: blog restored!
update 10/19/23 #2: code updated
update 2/14/24: IFTTT has implemented a fix and is monitoring the issue!
update 12/2/24: RSS feed updated to include works that are tagged with the movie individually
Happy reading!
22 notes
·
View notes