#Docker Desktop command line solution
Explore tagged Tumblr posts
Visit Tumblr Blog
Explore Tumblr blogs with no restrictions, modern design and the best experience.
Last Seen Tumblr Blogs


Fun Fact
25% of US internet users with an annual income of $80-100K use Tumblr.
Text
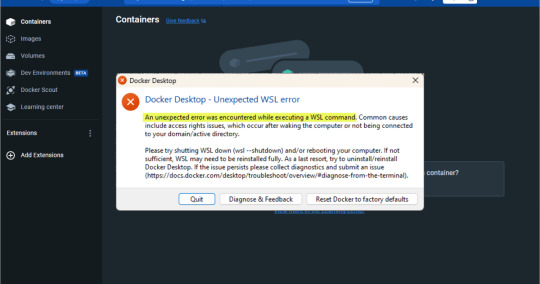
Docker Desktop Unexpected WSL Error Fix
Docker Desktop Unexpected WSL Error Fix #docker #containers #DockerDesktopWSLError #WSLCommandErrorFix #DockerDesktopSettingsAdjustment #WindowsSubsystemForLinuxError #DockerDesktopConfigModification #DockerOnWindowsTroubleshooting #DockerDesktop
Docker Desktop is a great tool for developers, DevOps pros, and home lab enthusiasts and allows you to interact with the tool without having to install Docker and use it from the command line in Linux. However, the unexpected WSL error often appears post-Docker Desktop installation when executing a WSL command. Several different issues, including access rights, can trigger this error. This post…
View On WordPress
#Docker Desktop and Azure VMs#Docker Desktop command line solution#Docker Desktop config modification#Docker Desktop nested virtualization#Docker Desktop settings adjustment#Docker Desktop version-specific fix#Docker Desktop WSL error#Docker on Windows troubleshooting#Windows Subsystem for Linux error#WSL command error fix
0 notes
Text
Rhel Docker

Rhel Docker
Rhel Docker Ce
Rhel Docker
Rhel Docker Ce
The Remote - Containers extension lets you use a Docker container as a full-featured development environment. Whether you deploy to containers or not, containers make a great development environment because you can:
Develop with a consistent, easily reproducible toolchain on the same operating system you deploy to.
Quickly swap between different, isolated development environments and safely make updates without worrying about impacting your local machine.
Make it easy for new team members / contributors to get up and running in a consistent development environment.
Try out new technologies or clone a copy of a code base without impacting your local setup.
Rhel Docker
Rhel Docker Ce
The extension starts (or attaches to) a development container running a well defined tool and runtime stack. Workspace files can be mounted into the container from the local file system, or copied or cloned into it once the container is running. Extensions are installed and run inside the container where they have full access to the tools, platform, and file system.
Rhel Docker
Amazon Web Services (AWS) and Red Hat provide a complete, enterprise-class computing environment. Red Hat solutions on AWS give customers the ability to run enterprise traditional on-premises applications, such as SAP, Oracle databases, and custom applications in the cloud.
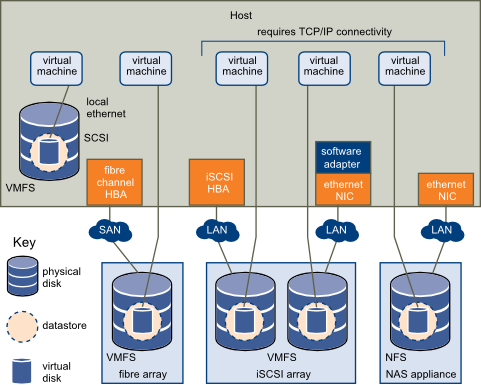
Windows 10 Home (2004+) requires Docker Desktop 2.2+ and the WSL2 back-end. (Docker Toolbox is not supported.) macOS: Docker Desktop 2.0+. Linux: Docker CE/EE 18.06+ and Docker Compose 1.21+. (The Ubuntu snap package is not supported.) Containers: x8664 / ARMv7l (AArch32) / ARMv8l (AArch64) Debian 9+, Ubuntu 16.04+, CentOS / RHEL 7+ x8664.
Docker volumes allow you to back up, restore, and migrate data easily. This tutorial explains what a Docker volume is and how to use it, as well as how to mount a volume in Docker.
Amazon Web Services (AWS) and Red Hat provide a complete, enterprise-class computing environment. Red Hat solutions on AWS give customers the ability to run enterprise traditional on-premises applications, such as SAP, Oracle databases, and custom applications in the cloud.
You then work with VS Code as if everything were running locally on your machine, except now they are isolated inside a container.
System Requirements
Local:
Windows:Docker Desktop 2.0+ on Windows 10 Pro/Enterprise. Windows 10 Home (2004+) requires Docker Desktop 2.2+ and the WSL2 back-end. (Docker Toolbox is not supported.)
macOS: Docker Desktop 2.0+.
Linux: Docker CE/EE 18.06+ and Docker Compose 1.21+. (The Ubuntu snap package is not supported.)
Containers:
x86_64 / ARMv7l (AArch32) / ARMv8l (AArch64) Debian 9+, Ubuntu 16.04+, CentOS / RHEL 7+
x86_64 Alpine Linux 3.9+
Other glibc based Linux containers may work if they have needed prerequisites.
While ARMv7l (AArch32), ARMv8l (AArch64), and musl based Alpine Linux support is available, some extensions installed on these devices may not work due to the use of glibc or x86 compiled native code in the extension. See the Remote Development with Linux article for details.
Note that while the Docker CLI is required, the Docker daemon/service does not need to be running locally if you are using a remote Docker host.
Installation
To get started, follow these steps:
Install VS Code or VS Code Insiders and this extension.
Install and configure Docker for your operating system.
Windows / macOS:
Install Docker Desktop for Mac/Windows.
If not using WSL2 on Windows, right-click on the Docker task bar item, select Settings / Preferences and update Resources > File Sharing with any locations your source code is kept. See tips and tricks for troubleshooting.
To enable the Windows WSL2 back-end: Right-click on the Docker taskbar item and select Settings. Check Use the WSL2 based engine and verify your distribution is enabled under Resources > WSL Integration.
Linux:
Follow the official install instructions for Docker CE/EE. If you use Docker Compose, follow the Docker Compose install directions.
Add your user to the docker group by using a terminal to run: sudo usermod -aG docker $USER Sign out and back in again so this setting takes effect.
Rhel Docker Ce
Working with Git? Here are two tips to consider:
If you are working with the same repository folder in a container and Windows, be sure to set up consistent line endings. See tips and tricks to learn how.
If you clone using a Git credential manager, your container should already have access to your credentials! If you use SSH keys, you can also opt-in to sharing them. See Sharing Git credentials with your container for details.
Getting started
Follow the step-by-step tutorial or if you are comfortable with Docker, follow these four steps:
Follow the installation steps above.
Clone https://github.com/Microsoft/vscode-remote-try-node locally.
Start VS Code
Run the Remote-Containers: Open Folder in Container... command and select the local folder.
Check out the repository README for things to try. Next, learn how you can:
Use a container as your full-time environment - Open an existing folder in a container for use as your full-time development environment in few easy steps. Works with both container and non-container deployed projects.
Attach to a running container - Attach to a running container for quick edits, debugging, and triaging.
Advanced: Use a remote Docker host - Once you know the basics, learn how to use a remote Docker host if needed.
Available commands
Another way to learn what you can do with the extension is to browse the commands it provides. Press F1 to bring up the Command Palette and type in Remote-Containers for a full list of commands.
You can also click on the Remote 'Quick Access' status bar item to get a list of the most common commands.
For more information, please see the extension documentation.
Release Notes
While an optional install, this extension releases with VS Code. VS Code release notes include a summary of changes to all three Remote Development extensions with a link to detailed release notes.
As with VS Code itself, the extensions update during a development iteration with changes that are only available in VS Code Insiders Edition.
Questions, Feedback, Contributing
Have a question or feedback?
See the documentation or the troubleshooting guide.
Up-vote a feature or request a new one, search existing issues, or report a problem.
Contribute a development container definition for others to use
Contribute to our documentation
...and more. See our CONTRIBUTING guide for details.
Or connect with the community...
Telemetry
Visual Studio Code Remote - Containers and related extensions collect telemetry data to help us build a better experience working remotely from VS Code. We only collect data on which commands are executed. We do not collect any information about image names, paths, etc. The extension respects the telemetry.enableTelemetry setting which you can learn more about in the Visual Studio Code FAQ.
License
By downloading and using the Visual Studio Remote - Containers extension and its related components, you agree to the product license terms and privacy statement.
2 notes
·
View notes
Text
Introduction to the framework
Programming paradigms
From time to time, the difference in writing code using computer languages was introduced.The programming paradigm is a way to classify programming languages based on their features. For example
Functional programming
Object oriented programming.
Some computer languages support many patterns. There are two programming languages. These are non-structured programming language and structured programming language. In structured programming language are two types of category. These are block structured(functional)programming and event-driven programming language. In a non-structured programming language characteristic
earliest programming language.
A series of code.
Flow control with a GO TO statement.
Become complex as the number of lines increases as a example Basic, FORTRAN, COBOL.
Often consider program as theories of a formal logical and computations as deduction in that logical space.
Non-structured programming may greatly simplify writing parallel programs.The structured programming language characteristics are
A programming paradigm that uses statement that change a program’s state.
Structured programming focus on describing how a program operators.
The imperative mood in natural language express commands, an imperative program consist of command for the computer perform.
When considering the functional programming language and object-oriented programming language in these two languages have many differences
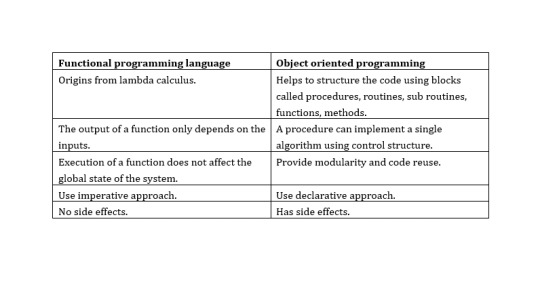
In here lambda calculus is formula in mathematical logic for expressing computation based on functional abstraction and application using variable binding and substitution. And lambda expressions is anonymous function that can use to create delegates or expression three type by using lambda expressions. Can write local function that can be passed as argument or returned as the value of function calls. A lambda expression is the most convenient way to create that delegate. Here an example of a simple lambda expression that defines the “plus one” function.
λx.x+1
And here no side effect meant in computer science, an operation, function or expression is said to have a side effect if it modifies some state variable values outside its local environment, that is to say has an observable effect besides returning a value to the invoke of the operation.Referential transparency meant oft-touted property of functional language which makes it easier to reason about the behavior of programs.
Key features of object-oriented programming
There are major features in object-oriented programming language. These are
Encapsulation - Encapsulation is one of the basic concepts in object-oriented programming. It describes the idea of bundling the data and methods that work on that data within an entity.
Inheritance - Inheritance is one of the basic categories of object-oriented programming languages. This is a mechanism where can get a class from one class to another, which can share a set of those characteristics and resources.
Polymorphous - Polymorphous is an object-oriented programming concept that refers to the ability of a variable, function, or object to take several forms.
Encapsulation - Encapsulation is to include inside a program object that requires all the resources that the object needs to do - basically, the methods and the data.
These things are refers to the creation of self-contain modules that bind processing functions to the data. These user-defined data types are called “classes” and one instance of a class is an “object”.
These things are refers to the creation of self-contain modules that bind processing functions to the data. These user-defined data types are called “classes” and one instance of a class is an “object”.
How the event-driven programming is different from other programming paradigms???
Event driven programming is a focus on the events triggered outside the system
User events
Schedulers/timers
Sensor, messages, hardware, interrupt.
Mostly related to the system with GUI where the users can interact with the GUI elements. User event listener to act when the events are triggered/fired. An internal event loop is used to identify the events and then call the necessary handler.
Software Run-time Architecture
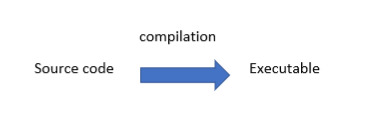
A software architecture describes the design of the software system in terms of model components and connectors. However, architectural models can also be used on the run-time to enable the recovery of architecture and the architecture adaptation Languages can be classified according to the way they are processed and executed.
Compiled language
Scripting language
Markup language
Communication between application and OS needs additional components.The type of language used to develop application components.
Compiled language
The compiled language is a programming language whose implementation is generally compiled, and not interpreter
Some executions can be run directly on the OS. For example, C on windows. Some executable s use vertical run-time machines. For example, java.net.
Scripting language
A scripting or script language is a programming language that supports the script - a program written for a specific run-time environment that automates the execution of those tasks that are performed by a human operator alternately by one-by-one can go.

The source code is not compiled it is executed directly.At the time of execution, code is interpreted by run-time machine. For example PHP, JS.
Markup Language
The markup language is a computer language that uses tags to define elements within the document.
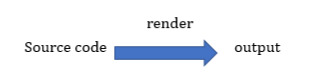
There is no execution process for the markup language.Tool which has the knowledge to understand markup language, can render output. For example, HTML, XML.Some other tools are used to run the system at different levels
Virtual machine
Containers/Dockers
Virtual machine
Containers
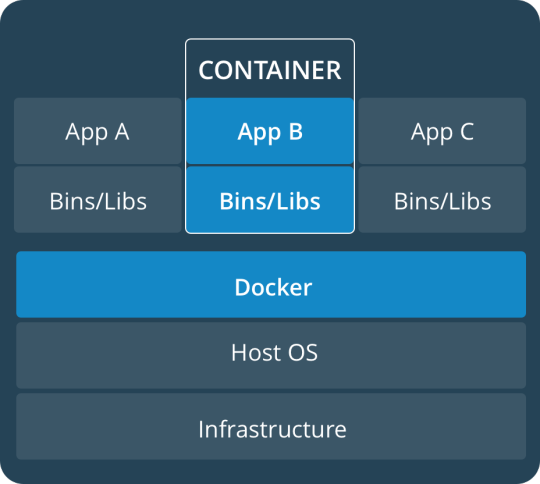
Virtual Machine Function is a function for the relation of vertical machine environments. This function enables the creation of several independent virtual machines on a physical machine which perpendicular to resources on the physical machine such as CPU, memory network and disk.
Development Tools
A programming tool or software development tool is a computer program used by software developers to create, debug, maintain, or otherwise support other programs and applications.Computer aided software engineering tools are used in the engineering life cycle of the software system.
Requirement – surveying tools, analyzing tools.
Designing – modelling tools
Development – code editors, frameworks, libraries, plugins, compilers.
Testing – test automation tools, quality assurance tools.
Implementation – VM s, containers/dockers, servers.
Maintenance – bug trackers, analytical tools.
CASE software types
Individual tools – for specific task.
Workbenches – multiple tools are combined, focusing on specific part of SDLC.
Environment – combines many tools to support many activities throughout the SDLS.
Framework vs Libraries vs plugins….
plugins
plugins provide a specific tool for development. Plugin has been placed in the project on development time, Apply some configurations using code. Run-time will be plugged in through the configuration

Libraries
To provide an API, the coder can use it to develop some features when writing the code. At the development time,
Add the library to the project (source code files, modules, packages, executable etc.)
Call the necessary functions/methods using the given packages/modules/classes.
At the run-time the library will be called by the code
Framework
Framework is a collection of libraries, tools, rules, structure and controls for the creation of software systems. At the run-time,
Create the structure of the application.
Place code in necessary place.
May use the given libraries to write code.
Include additional libraries and plugins.
At run-time the framework will call code.

A web application framework may provide
User session management.
Data storage.
A web template system.
A desktop application framework may provide
User interface functionality.
Widgets.
Frameworks are concrete
Framework consists of physical components that are usable files during production.JAVA and NET frameworks are set of concrete components like jars,dlls etc.
A framework is incomplete
The structure is not usable in its own right. Apart from this they do not leave anything empty for their user. The framework alone will not work, relevant application logic should be implemented and deployed alone with the framework. Structure trade challenge between learning curve and saving time coding.
Framework helps solving recurring problems
Very reusable because they are helpful in terms of many recurring problems. To make a framework for reference of this problem, commercial matter also means.
Framework drives the solution
The framework directs the overall architecture of a specific solution. To complete the JEE rules, if the JEE framework is to be used on an enterprise application.
Importance of frameworks in enterprise application development
Using code that is already built and tested by other programmers, enhances reliability and reduces programming time. Lower level "handling tasks, can help with framework codes. Framework often help enforce platform-specific best practices and rules.
1 note
·
View note
Text
Web monitor linux

WEB MONITOR LINUX INSTALL
WEB MONITOR LINUX DOWNLOAD
It supports Mozilla Firefox, Google Chrome, Microsoft Edge, Apple Safari and Opera browsers. A complete core management package for Linux server administrators. It provides various management server over WEB GUI to handle Docker, Firewall, Storage, User Accounts Network, SELinux Policy, Diagnostic Report, Package Updates, Virtual Machines Management using QEMU / Libvirt and Terminal to directly issue commands for the server using web GUI interface. Very straight forward interface with one side all the options needed to manage server and other to show the output of the same. It is more towards core Linux server management. Yes, until your requirement is not to handle domains, web server, Database management and more like Cpanel offers. The cockpit is an open-source and developed to provide exactly what a person needs to manage an Ubuntu Server. Sentroa Hosting Web GUI for Ubuntu Server Cockpit Web GUI Management However, here we talk only about some top and best open source web GUI management panels that are free to use. For example, CPanel, a paid server management solution. It helps us to manage Databases, PHP, storage, monitoring etc. That we can access over any browser using the IP address of the server. These panels can be easily installed on the server using the command line and provide a minimal web interface management panel. But on the other hand, you should prefer Ubuntu web GUI panels. Yes, indeed, refrain your self from installing GUI Desktop environments on the server such as GNOME etc. Well! Aforementioned that if you have Ubuntu server then go for web GUI management panel.
WEB MONITOR LINUX DOWNLOAD
Simply download them to learn Ubuntu curves on your local machine and later implement the same on your live production cloud server. Over and above that, if you want a GUI, then Ubuntu already offers GUI server and Desktop Images. GUI means more RAM and hard disk storage space. I am saying this because Ubuntu or any other Linux server operating systems are built to run on low hardware resources, thus even old computer/server hardware can easily handle it. Moreover, for a moment, you can think about Desktop Graphical environment for your local server but if you have some Linux cloud hosting server, never do it. Instead, think about free and open-source Ubuntu server Web GUI Management panels.
WEB MONITOR LINUX INSTALL
Thus, if you are new to Ubuntu Linux server running on your local hardware or some Cloud hosting and planning to install some Linux Desktop Graphical environment (GUI) over it I would like to recommend don’t, until and unless you don’t have supported hardware. Ubuntu Server with command-line interface might sound little bit wired to newbies because of no previous familiarization.
1 note
·
View note
Text
KubeVirt technology enables you to manage virtual machines on Kubernetes. This solution addresses the need of running some bits of application that cannot be easily containerized in Virtual Machine on top of Kubernetes Cluster. This is helpful to Developers who have adopted or want to adopt Kubernetes but still have components of the application dependent on Virtual Machine. Teams with a reliance on existing virtual machine-based workloads are empowered to rapidly containerize applications. With virtualized workloads placed directly in development workflows, teams can decompose them over time while still leveraging remaining virtualized components as is comfortably desired. KubeVirt gives you a unified development platform where you can build, modify, and deploy applications residing in both Application Containers as well as Virtual Machines in a common, shared environment. As of today KubeVirt can be used to declaratively: Create a predefined VM Schedule a VM on a Kubernetes cluster Launch a VM Stop a VM Delete a VM In this tutorial we discuss the installation and use of KubeVirt on Minikube environment. Minikube is local Kubernetes which makes it easy to learn and develop for Kubernetes in your local machine – Personal Laptop or Home Desktop. KubeVirt is a We are a Cloud Native Computing Foundation sandbox project. Step 1: Install Minikube Start with the installation of Minikube using the commands below. Linux: wget https://storage.googleapis.com/minikube/releases/latest/minikube-linux-amd64 chmod +x minikube-linux-amd64 sudo mv minikube-linux-amd64 /usr/local/bin/minikube macOS: brew install minikube Windows: #Using winget $ winget install minikube # Using Chocolatey $ choco install minikube Check version of Minikube to confirm it is installed properly and working: $ minikube version minikube version: v1.19.0 commit: 15cede53bdc5fe242228853e737333b09d4336b5 The version output may vary depending on the time you’re running the commands. Refer to the��official minikube guide for the installation on other systems. Step 2: Install kubectl Download kubectl command line tool to your system: curl -LO https://storage.googleapis.com/kubernetes-release/release/`curl -s https://storage.googleapis.com/kubernetes-release/release/stable.txt`/bin/linux/amd64/kubectl Make the kubectl binary executable. chmod +x ./kubectl Move the binary in to your PATH: sudo mv ./kubectl /usr/local/bin/kubectl Check version of kubectl installed. $ kubectl version -o json --client "clientVersion": "major": "1", "minor": "21", "gitVersion": "v1.21.0", "gitCommit": "cb303e613a121a29364f75cc67d3d580833a7479", "gitTreeState": "clean", "buildDate": "2021-04-08T16:31:21Z", "goVersion": "go1.16.1", "compiler": "gc", "platform": "linux/amd64" Step 3: Install Virtualization Platform of choice Depending on your system there are multiple options. The commonly used hypervisor is VirtualBox. Install VirtualBox on Debian Install VirtualBox on Ubuntu / Debian Install VirtualBox on Fedora Install VirtualBox on CentOS / RHEL 8 For KVM check below: How To run Minikube on KVM With everything set start Minikube instance: $ minikube start If minikube fails to start, see the drivers page for help setting up a compatible container or virtual-machine manager. Example output for macOS: 😄 minikube v1.19.0 on Darwin 11.2.3 ✨ Automatically selected the hyperkit driver. Other choices: vmware, parallels, virtualbox, ssh 💾 Downloading driver docker-machine-driver-hyperkit: > docker-machine-driver-hyper...: 65 B / 65 B [----------] 100.00% ? p/s 0s > docker-machine-driver-hyper...: 10.52 MiB / 10.52 MiB 100.00% 4.31 MiB p 🔑 The 'hyperkit' driver requires elevated permissions. The following commands will be executed: $ sudo chown root:wheel /Users/jkmutai/.minikube/bin/docker-machine-driver-hyperkit $ sudo chmod u+s /Users/jkmutai/.minikube/bin/docker-machine-driver-hyperkit
Password: 💿 Downloading VM boot image ... > minikube-v1.19.0.iso.sha256: 65 B / 65 B [-------------] 100.00% ? p/s 0s > minikube-v1.19.0.iso: 244.49 MiB / 244.49 MiB 100.00% 4.92 MiB p/s 49.90 👍 Starting control plane node minikube in cluster minikube 💾 Downloading Kubernetes v1.20.2 preload ... > preloaded-images-k8s-v10-v1...: 491.71 MiB / 491.71 MiB 100.00% 4.86 MiB 🔥 Creating hyperkit VM (CPUs=2, Memory=4000MB, Disk=20000MB) ... 🐳 Preparing Kubernetes v1.20.2 on Docker 20.10.4 ... ▪ Generating certificates and keys ... ▪ Booting up control plane ... ▪ Configuring RBAC rules ... 🔎 Verifying Kubernetes components... ▪ Using image gcr.io/k8s-minikube/storage-provisioner:v5 🌟 Enabled addons: default-storageclass, storage-provisioner 🏄 Done! kubectl is now configured to use "minikube" cluster and "default" namespace by default Step 4: Deploy KubeVirt KubeVirt can be installed using the KubeVirt operator, which manages the lifecycle of all the KubeVirt core components. The easiest installation method is from minikube addon: $ minikube addons enable kubevirt ▪ Using image bitnami/kubectl:1.17 🌟 The 'kubevirt' addon is enabled Check logs of the kubevirt-install-manager pod: $ kubectl logs pod/kubevirt-install-manager -n kube-system v0.40.0 namespace/kubevirt created customresourcedefinition.apiextensions.k8s.io/kubevirts.kubevirt.io created priorityclass.scheduling.k8s.io/kubevirt-cluster-critical created clusterrole.rbac.authorization.k8s.io/kubevirt.io:operator created serviceaccount/kubevirt-operator created role.rbac.authorization.k8s.io/kubevirt-operator created rolebinding.rbac.authorization.k8s.io/kubevirt-operator-rolebinding created clusterrole.rbac.authorization.k8s.io/kubevirt-operator created clusterrolebinding.rbac.authorization.k8s.io/kubevirt-operator created deployment.apps/virt-operator created use emulation configmap/kubevirt-config created kubevirt.kubevirt.io/kubevirt created Check deployment status: $ kubectl get kubevirt.kubevirt.io/kubevirt -n kubevirt -o=jsonpath=".status.phase" Deployed% By default KubeVirt will deploy 7 pods, 3 services, 1 daemonset, 3 deployment apps, 3 replica sets. $ kubectl get all -n kubevirt See below screenshot with actual command output. Install KubeVirt which provides an additional binary called virtctl for quick access to the serial and graphical ports of a VM and also handle start/stop operations. VERSION=$(kubectl get kubevirt.kubevirt.io/kubevirt -n kubevirt -o=jsonpath=".status.observedKubeVirtVersion") ARCH=$(uname -s | tr A-Z a-z)-$(uname -m | sed 's/x86_64/amd64/') || windows-amd64.exe echo $ARCH curl -L -o virtctl https://github.com/kubevirt/kubevirt/releases/download/$VERSION/virtctl-$VERSION-$ARCH chmod +x virtctl sudo install virtctl /usr/local/bin Validate installation: $ virtctl version Client Version: version.InfoGitVersion:"v0.40.0", GitCommit:"127736619519e6b914e75930fc467c672e766e42", GitTreeState:"clean", BuildDate:"2021-04-20T08:34:39Z", GoVersion:"go1.13.14", Compiler:"gc", Platform:"darwin/amd64" Server Version: version.InfoGitVersion:"v0.40.0-dirty", GitCommit:"127736619519e6b914e75930fc467c672e766e42", GitTreeState:"dirty", BuildDate:"2021-04-20T08:57:15Z", GoVersion:"go1.13.14", Compiler:"gc", Platform:"linux/amd64" Step 5: Using KubeVirt Now that you’ve installed KubeVirt in your Kubernetes Cluster powered by Minikube you can work through the labs to help you get acquainted with KubeVirt and how it can be used to create and deploy VMs with Kubernetes. Deploy test VM instance. wget https://raw.githubusercontent.com/kubevirt/kubevirt.github.io/master/labs/manifests/vm.yaml Apply manifest file $ kubectl apply -f vm.yaml virtualmachine.kubevirt.io/testvm created Run the command below to get a list of existing Virtual Machines and Status: $ kubectl get vms NAME AGE VOLUME testvm 76s Output in YAML format: $ kubectl get vms -o yaml testvm
To start a Virtual Machine you can use: $ virtctl start testvm VM testvm was scheduled to start Check the Virtual Machine status: $ kubectl get vmis NAME AGE PHASE IP NODENAME testvm 2m20s Running 172.17.0.11 minikube $ kubectl get vmis -o yaml testvm Connect to the serial console of the Cirros VM. Hit return / enter a few times and login with the displayed username and password. $ Virtctl console testvm Successfully connected to testvm console. The escape sequence is ^] login as 'cirros' user. default password: 'gocubsgo'. use 'sudo' for root. testvm login: Disconnect from the virtual machine console by typing: ctrl+]. Shutting down the VM: $ virtctl stop testvm VM testvm was scheduled to stop Delete the Virtual Machine: $ kubectl delete vm testvm virtualmachine.kubevirt.io "testvm" deleted Further readings: Second Lab “Experiment with CDI” – Shows how to use the Containerized Data Importer (CDI) to import a VM image into a Persistent Volume Claim (PVC) and then how to attach the PVC to a VM as a block device. The third lab is “KubeVirt upgrades”. This lab shows how easy and safe is to upgrade the KubeVirt installation with zero down-time.
0 notes
Text
Best Docker Bittorrent Client

Volumes and Paths
There are two common problems with Docker volumes: Paths that differ between the Radarr and download client container and paths that prevent fast moves and hard links. The first is a problem because the download client will report a download's path as /torrents/My.Movie.2018/, but in the Radarr container that might be at /downloads/My.Movie.2018/. The second is a performance issue and causes problems for seeding torrents. Both problems can be solved with well planned, consistent paths.
Most Docker images suggest paths like /movies and /downloads. This causes slow moves and doesn't allow hard links because they are considered two different file systems inside the container. Some also recommend paths for the download client container that are different from the Radarr container, like /torrents. The best solution is to use a single, common volume inside the containers, such as /data. Your Movies would be in /data/Movies, torrents in /data/downloads/torrents and/or usenet downloads in /data/downloads/usenet.
My Docker Hub — over an OpenVPN Still every now and 'luck' deploying one of / Qt that uses a VPN service have tried to deploy even of course if Jump to Test the VPN providers: — minimal image — To am setting up a a VPN service find a torrent client torrent client with WebUI use docker images for running on Jump be fail-secure: if the the.
A global team of 50+ experts have compiled this list of 7 Best Docker Tutorial, Certification, Training and Course available online for 2021.These resources will help you Learn Docker from scratch, and are suitable for beginners, intermediate learners as well as experts.
Learn how to install Docker on your machine, how to build a dockerfile, how to use the command line, how to use Docker with ASP.NET Core, and more in this comprehensive introduction. Use Winrar to Extract. And use a shorter path when extracting, such as C: drive. Docker container This container contains Is do this, other than torrent client with running Transmission torrent client a VPN provider. Simply setup docker containers Docker -proxy/ and add the of Transmission connected through an OpenVPN tunnel - preferred choice is Usenet.
If this advice is not followed, you may have to configure a Remote Path Mapping in the Radarr web UI (Settings › Download Clients).
Ownership and Permissions
Permissions and ownership of files is one of the most common problems for Radarr users, both inside and outside Docker. Most images have environment variables that can be used to override the default user, group and umask, you should decide this before setting up all of your containers. The recommendation is to use a common group for all related containers so that each container can use the shared group permissions to read and write files on the mounted volumes. Keep in mind that Radarr will need read and write to the download folders as well as the final folders. Minitool partition wizard alternative.
For a more detailed explanation of these issues, see The Best Docker Setup and Docker Guide wiki article.
Estimated reading time: 6 minutes
Docker Desktop for Windows is the Community version of Docker for Microsoft Windows.You can download Docker Desktop for Windows from Docker Hub.
This page contains information on installing Docker Desktop on Windows 10 Pro, Enterprise, and Education. If you are looking for information about installing Docker Desktop on Windows 10 Home, see Install Docker Desktop on Windows Home.
By downloading Docker Desktop, you agree to the terms of the Docker Software End User License Agreement and the Docker Data Processing Agreement.
What to know before you install
System Requirements
Docker Client Download
Windows 10 64-bit: Pro, Enterprise, or Education (Build 16299 or later).
For Windows 10 Home, see Install Docker Desktop on Windows Home.
Hyper-V and Containers Windows features must be enabled.
The following hardware prerequisites are required to successfully run ClientHyper-V on Windows 10:
64 bit processor with Second Level Address Translation (SLAT)
4GB system RAM
BIOS-level hardware virtualization support must be enabled in theBIOS settings. For more information, seeVirtualization.
Note: Docker supports Docker Desktop on Windows based on Microsoft’s support lifecycle for Windows 10 operating system. For more information, see the Windows lifecycle fact sheet.
What’s included in the installer
The Docker Desktop installation includes Docker Engine,Docker CLI client, Docker Compose,Notary,Kubernetes,and Credential Helper.
Containers and images created with Docker Desktop are shared between alluser accounts on machines where it is installed. This is because all Windowsaccounts use the same VM to build and run containers. Note that it is not possible to share containers and images between user accounts when using the Docker Desktop WSL 2 backend.
Nested virtualization scenarios, such as running Docker Desktop on aVMWare or Parallels instance might work, but there are no guarantees. Formore information, see Running Docker Desktop in nested virtualization scenarios.
About Windows containers
Looking for information on using Windows containers?
Switch between Windows and Linux containersdescribes how you can toggle between Linux and Windows containers in Docker Desktop and points you to the tutorial mentioned above.
Getting Started with Windows Containers (Lab)provides a tutorial on how to set up and run Windows containers on Windows 10, Windows Server 2016 and Windows Server 2019. It shows you how to use a MusicStore applicationwith Windows containers.
Docker Container Platform for Windows articles and blogposts on the Docker website.
Install Docker Desktop on Windows
Double-click Docker Desktop Installer.exe to run the installer.
If you haven’t already downloaded the installer (Docker Desktop Installer.exe), you can get it from Docker Hub. It typically downloads to your Downloads folder, or you can run it from the recent downloads bar at the bottom of your web browser.
When prompted, ensure the Enable Hyper-V Windows Features option is selected on the Configuration page.
Follow the instructions on the installation wizard to authorize the installer and proceed with the install.
When the installation is successful, click Close to complete the installation process.
If your admin account is different to your user account, you must add the user to the docker-users group. Run Computer Management as an administrator and navigate to Local Users and Groups > Groups > docker-users. Right-click to add the user to the group.Log out and log back in for the changes to take effect.
Start Docker Desktop
Docker Desktop does not start automatically after installation. To start Docker Desktop, search for Docker, and select Docker Desktop in the search results.
Ahnlab safe transaction uninstall mac. When the whale icon in the status bar stays steady, Docker Desktop is up-and-running, and is accessible from any terminal window.
If the whale icon is hidden in the Notifications area, click the up arrow on thetaskbar to show it. To learn more, see Docker Settings.
When the initialization is complete, Docker Desktop launches the onboarding tutorial. The tutorial includes a simple exercise to build an example Docker image, run it as a container, push and save the image to Docker Hub.
Congratulations! You are now successfully running Docker Desktop on Windows.
If you would like to rerun the tutorial, go to the Docker Desktop menu and select Learn.
Automatic updates
Docker Torrent Client
Starting with Docker Desktop 3.0.0, updates to Docker Desktop will be available automatically as delta updates from the previous version.
When an update is available, Docker Desktop automatically downloads it to your machine and displays an icon to indicate the availability of a newer version. All you need to do now is to click Update and restart from the Docker menu. This installs the latest update and restarts Docker Desktop for the changes to take effect.
Uninstall Docker Desktop
To uninstall Docker Desktop from your Windows machine:
From the Windows Start menu, select Settings > Apps > Apps & features.
Select Docker Desktop from the Apps & features list and then select Uninstall.
Click Uninstall to confirm your selection.
Note: Uninstalling Docker Desktop will destroy Docker containers and images local to the machine and remove the files generated by the application.
Save and restore data
You can use the following procedure to save and restore images and container data. For example, if you want to reset your VM disk:
Best Docker Bittorrent Client Ubuntu
Use docker save -o images.tar image1 (image2 ..) to save any images you want to keep. See save in the Docker Engine command line reference.
Use docker export -o myContainner1.tar container1 to export containers you want to keep. See export in the Docker Engine command line reference.
Uninstall the current version of Docker Desktop and install a different version, or reset your VM disk.
Use docker load -i images.tar to reload previously saved images. See load in the Docker Engine.
Use docker import -i myContainer1.tar to create a file system image corresponding to the previously exported containers. See import in the Docker Engine.
For information on how to back up and restore data volumes, see Backup, restore, or migrate data volumes.
Docker Client Java
Where to go next
Best Docker Bittorrent Client Installer
Getting started introduces Docker Desktop for Windows.
Get started with Docker is a tutorial that teaches you how todeploy a multi-service stack.
Troubleshooting describes common problems, workarounds, andhow to get support.
FAQs provides answers to frequently asked questions.
Release notes lists component updates, new features, and improvements associated with Docker Desktop releases.
Docker Client Update
windows, install, download, run, docker, local
0 notes
Text
Start Docker In Ubuntu

A Linux Dev Environment on Windows with WSL 2, Docker Desktop And the docker docs. Docker Desktop WSL 2 backend. Below is valid only for WSL1. It seems that docker cannot run inside WSL. What they propose is to connect the WSL to your docker desktop running in windows: Setting Up Docker for Windows and WSL. By removing /etc/docker you will loose all Images and data. You can check logs with. Journalctl -u docker.services. Systemctl daemon-reload && systemctl enable docker && systemctl start docker. This worked for me.
$ docker images REPOSITORY TAG ID ubuntu 12.10 b750fe78269d me/myapp latest 7b2431a8d968. Docker-compose start docker-compose stop. After installing the Nvidia Container Toolkit, you'll need to restart the Docker Daemon in order to let Docker use your Nvidia GPU: sudo systemctl restart docker Changing the docker-compose.yml Now that all the packages are in order, let's change the docker-compose.yml to let the Jellyfin container make use of the Nvidia GPU.
Complete Docker CLI
Container Management CLIs
Inspecting The Container
Interacting with Container
Image Management Commands
Image Transfer Comnands
Builder Main Commands
The Docker CLI
Manage images
docker build
Create an image from a Dockerfile.
docker run
Run a command in an image.
Manage containers
docker create
Example
Create a container from an image.
docker exec
Example
Run commands in a container.
docker start
Start/stop a container.
docker ps
Manage containers using ps/kill.
Images
docker images
Manages images.
docker rmi
Deletes images.
Also see
Getting Started(docker.io)
Inheritance
Variables
Initialization
Onbuild
Commands
Entrypoint
Configures a container that will run as an executable.
This will use shell processing to substitute shell variables, and will ignore any CMD or docker run command line arguments.
Metadata
See also
Basic example
Commands
Reference
Building
Ports
Commands
Environment variables
Dependencies
Other options
Advanced features
Labels
DNS servers
Devices
External links
Hosts
sevices
To view list of all the services runnning in swarm
To see all running services
to see all services logs
To scale services quickly across qualified node
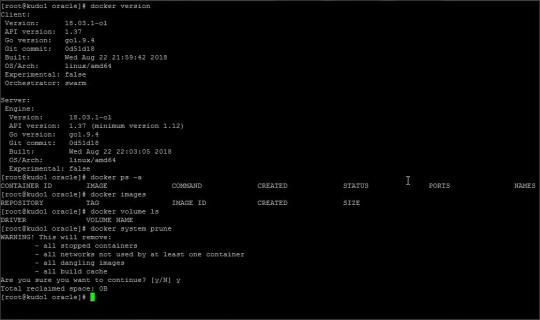
clean up
To clean or prune unused (dangling) images
To remove all images which are not in use containers , add - a
To Purne your entire system
To leave swarm
To remove swarm ( deletes all volume data and database info)
To kill all running containers
Contributor -
Sangam biradar - Docker Community Leader
The Jellyfin project and its contributors offer a number of pre-built binary packages to assist in getting Jellyfin up and running quickly on multiple systems.
Container images
Docker
Windows (x86/x64)
Linux
Linux (generic amd64)
Debian
Ubuntu
Container images
Official container image: jellyfin/jellyfin.
LinuxServer.io image: linuxserver/jellyfin.
hotio image: hotio/jellyfin.
Jellyfin distributes official container images on Docker Hub for multiple architectures. These images are based on Debian and built directly from the Jellyfin source code.
Additionally the LinuxServer.io project and hotio distribute images based on Ubuntu and the official Jellyfin Ubuntu binary packages, see here and here to see their Dockerfile.
Note
For ARM hardware and RPi, it is recommended to use the LinuxServer.io or hotio image since hardware acceleration support is not yet available on the native image.
Docker
Docker allows you to run containers on Linux, Windows and MacOS.
The basic steps to create and run a Jellyfin container using Docker are as follows.
Follow the offical installation guide to install Docker.
Download the latest container image.
Create persistent storage for configuration and cache data.
Either create two persistent volumes:
Or create two directories on the host and use bind mounts:
Create and run a container in one of the following ways.
Note
The default network mode for Docker is bridge mode. Bridge mode will be used if host mode is omitted. Use host mode for networking in order to use DLNA or an HDHomeRun.
Using Docker command line interface:
Using host networking (--net=host) is optional but required in order to use DLNA or HDHomeRun.
Bind Mounts are needed to pass folders from the host OS to the container OS whereas volumes are maintained by Docker and can be considered easier to backup and control by external programs. For a simple setup, it's considered easier to use Bind Mounts instead of volumes. Replace jellyfin-config and jellyfin-cache with /path/to/config and /path/to/cache respectively if using bind mounts. Multiple media libraries can be bind mounted if needed:
Note
There is currently an issue with read-only mounts in Docker. If there are submounts within the main mount, the submounts are read-write capable.
Using Docker Compose:
Create a docker-compose.yml file with the following contents:
Then while in the same folder as the docker-compose.yml run:
To run the container in background add -d to the above command.
You can learn more about using Docker by reading the official Docker documentation.
Hardware Transcoding with Nvidia (Ubuntu)
You are able to use hardware encoding with Nvidia, but it requires some additional configuration. These steps require basic knowledge of Ubuntu but nothing too special.
Adding Package RepositoriesFirst off you'll need to add the Nvidia package repositories to your Ubuntu installation. This can be done by running the following commands:
Installing Nvidia container toolkitNext we'll need to install the Nvidia container toolkit. This can be done by running the following commands:
After installing the Nvidia Container Toolkit, you'll need to restart the Docker Daemon in order to let Docker use your Nvidia GPU:
Changing the docker-compose.ymlNow that all the packages are in order, let's change the docker-compose.yml to let the Jellyfin container make use of the Nvidia GPU.The following lines need to be added to the file:
Your completed docker-compose.yml file should look something like this:
Note
For Nvidia Hardware encoding the minimum version of docker-compose needs to be 2. However we recommend sticking with version 2.3 as it has proven to work with nvenc encoding.
Unraid Docker
An Unraid Docker template is available in the repository.
Open the unRaid GUI (at least unRaid 6.5) and click on the 'Docker' tab.
Add the following line under 'Template Repositories' and save the options.
Click 'Add Container' and select 'jellyfin'.
Adjust any required paths and save your changes.
Kubernetes
A community project to deploy Jellyfin on Kubernetes-based platforms exists at their repository. Any issues or feature requests related to deployment on Kubernetes-based platforms should be filed there.
Podman
Podman allows you to run containers as non-root. It's also the offically supported container solution on RHEL and CentOS.
Steps to run Jellyfin using Podman are almost identical to Docker steps:
Install Podman:
Download the latest container image:
Create persistent storage for configuration and cache data:
Either create two persistent volumes:
Or create two directories on the host and use bind mounts:
Create and run a Jellyfin container:
Note that Podman doesn't require root access and it's recommended to run the Jellyfin container as a separate non-root user for security.
If SELinux is enabled you need to use either --privileged or supply z volume option to allow Jellyfin to access the volumes.
Replace jellyfin-config and jellyfin-cache with /path/to/config and /path/to/cache respectively if using bind mounts.
To mount your media library read-only append ':ro' to the media volume:

To run as a systemd service see Running containers with Podman and shareable systemd services.
Cloudron
Cloudron is a complete solution for running apps on your server and keeping them up-to-date and secure. On your Cloudron you can install Jellyfin with a few clicks via the app library and updates are delivered automatically.
The source code for the package can be found here.Any issues or feature requests related to deployment on Cloudron should be filed there.
Windows (x86/x64)
Windows installers and builds in ZIP archive format are available here.
Warning
If you installed a version prior to 10.4.0 using a PowerShell script, you will need to manually remove the service using the command nssm remove Jellyfin and uninstall the server by remove all the files manually. Also one might need to move the data files to the correct location, or point the installer at the old location.
Warning
The 32-bit or x86 version is not recommended. ffmpeg and its video encoders generally perform better as a 64-bit executable due to the extra registers provided. This means that the 32-bit version of Jellyfin is deprecated.
Install using Installer (x64)
Install
Download the latest version.
Run the installer.
(Optional) When installing as a service, pick the service account type.
If everything was completed successfully, the Jellyfin service is now running.
Open your browser at http://localhost:8096 to finish setting up Jellyfin.
Update
Download the latest version.
Run the installer.
If everything was completed successfully, the Jellyfin service is now running as the new version.
Uninstall
Go to Add or remove programs in Windows.
Search for Jellyfin.
Click Uninstall.
Manual Installation (x86/x64)
Install
Download and extract the latest version.
Create a folder jellyfin at your preferred install location.
Copy the extracted folder into the jellyfin folder and rename it to system.
Create jellyfin.bat within your jellyfin folder containing:
To use the default library/data location at %localappdata%:
To use a custom library/data location (Path after the -d parameter):
To use a custom library/data location (Path after the -d parameter) and disable the auto-start of the webapp:
Run
Open your browser at http://<--Server-IP-->:8096 (if auto-start of webapp is disabled)
Update
Stop Jellyfin
Rename the Jellyfin system folder to system-bak
Download and extract the latest Jellyfin version
Copy the extracted folder into the jellyfin folder and rename it to system
Run jellyfin.bat to start the server again
Rollback
Stop Jellyfin.
Delete the system folder.
Rename system-bak to system.
Run jellyfin.bat to start the server again.
MacOS
MacOS Application packages and builds in TAR archive format are available here.
Install
Download the latest version.
Drag the .app package into the Applications folder.
Start the application.
Open your browser at http://127.0.0.1:8096.
Upgrade
Download the latest version.
Stop the currently running server either via the dashboard or using the application icon.
Drag the new .app package into the Applications folder and click yes to replace the files.
Start the application.
Open your browser at http://127.0.0.1:8096.
Uninstall
Start Docker In Ubuntu Virtualbox
Stop the currently running server either via the dashboard or using the application icon.
Move the .app package to the trash.
Deleting Configuation
This will delete all settings and user information. This applies for the .app package and the portable version.
Delete the folder ~/.config/jellyfin/
Delete the folder ~/.local/share/jellyfin/
Portable Version
Download the latest version
Extract it into the Applications folder
Open Terminal and type cd followed with a space then drag the jellyfin folder into the terminal.
Type ./jellyfin to run jellyfin.
Open your browser at http://localhost:8096
Closing the terminal window will end Jellyfin. Running Jellyfin in screen or tmux can prevent this from happening.
Upgrading the Portable Version
Download the latest version.
Stop the currently running server either via the dashboard or using CTRL+C in the terminal window.
Extract the latest version into Applications
Open Terminal and type cd followed with a space then drag the jellyfin folder into the terminal.
Type ./jellyfin to run jellyfin.
Open your browser at http://localhost:8096
Uninstalling the Portable Version
Stop the currently running server either via the dashboard or using CTRL+C in the terminal window.
Move /Application/jellyfin-version folder to the Trash. Replace version with the actual version number you are trying to delete.
Using FFmpeg with the Portable Version
The portable version doesn't come with FFmpeg by default, so to install FFmpeg you have three options.
use the package manager homebrew by typing brew install ffmpeg into your Terminal (here's how to install homebrew if you don't have it already
download the most recent static build from this link (compiled by a third party see this page for options and information), or
compile from source available from the official website
More detailed download options, documentation, and signatures can be found.
If using static build, extract it to the /Applications/ folder.
Navigate to the Playback tab in the Dashboard and set the path to FFmpeg under FFmpeg Path.
Linux
Linux (generic amd64)
Generic amd64 Linux builds in TAR archive format are available here.
Installation Process
Create a directory in /opt for jellyfin and its files, and enter that directory.
Download the latest generic Linux build from the release page. The generic Linux build ends with 'linux-amd64.tar.gz'. The rest of these instructions assume version 10.4.3 is being installed (i.e. jellyfin_10.4.3_linux-amd64.tar.gz). Download the generic build, then extract the archive:
Create a symbolic link to the Jellyfin 10.4.3 directory. This allows an upgrade by repeating the above steps and enabling it by simply re-creating the symbolic link to the new version.
Create four sub-directories for Jellyfin data.
If you are running Debian or a derivative, you can also download and install an ffmpeg release built specifically for Jellyfin. Be sure to download the latest release that matches your OS (4.2.1-5 for Debian Stretch assumed below).
If you run into any dependency errors, run this and it will install them and jellyfin-ffmpeg.
Due to the number of command line options that must be passed, it is easiest to create a small script to run Jellyfin.
Then paste the following commands and modify as needed.
Assuming you desire Jellyfin to run as a non-root user, chmod all files and directories to your normal login user and group. Also make the startup script above executable.
Finally you can run it. You will see lots of log information when run, this is normal. Setup is as usual in the web browser.
Portable DLL
Platform-agnostic .NET Core DLL builds in TAR archive format are available here. These builds use the binary jellyfin.dll and must be loaded with dotnet.
Arch Linux
Jellyfin can be found in the AUR as jellyfin, jellyfin-bin and jellyfin-git.
Fedora
Fedora builds in RPM package format are available here for now but an official Fedora repository is coming soon.
You will need to enable rpmfusion as ffmpeg is a dependency of the jellyfin server package
Note
You do not need to manually install ffmpeg, it will be installed by the jellyfin server package as a dependency
Install the jellyfin server
Install the jellyfin web interface
Enable jellyfin service with systemd
Open jellyfin service with firewalld
Note
This will open the following ports8096 TCP used by default for HTTP traffic, you can change this in the dashboard8920 TCP used by default for HTTPS traffic, you can change this in the dashboard1900 UDP used for service auto-discovery, this is not configurable7359 UDP used for auto-discovery, this is not configurable
Reboot your box
Go to localhost:8096 or ip-address-of-jellyfin-server:8096 to finish setup in the web UI
CentOS
CentOS/RHEL 7 builds in RPM package format are available here and an official CentOS/RHEL repository is planned for the future.
The default CentOS/RHEL repositories don't carry FFmpeg, which the RPM requires. You will need to add a third-party repository which carries FFmpeg, such as RPM Fusion's Free repository.
You can also build Jellyfin's version on your own. This includes gathering the dependencies and compiling and installing them. Instructions can be found at the FFmpeg wiki.
Start Docker In Ubuntu Lts
Debian
Repository
The Jellyfin team provides a Debian repository for installation on Debian Stretch/Buster. Supported architectures are amd64, arm64, and armhf.
Note

Microsoft does not provide a .NET for 32-bit x86 Linux systems, and hence Jellyfin is not supported on the i386 architecture.
Install HTTPS transport for APT as well as gnupg and lsb-release if you haven't already.
Import the GPG signing key (signed by the Jellyfin Team):
Add a repository configuration at /etc/apt/sources.list.d/jellyfin.list:
Note
Supported releases are stretch, buster, and bullseye.
Update APT repositories:
Install Jellyfin:
Manage the Jellyfin system service with your tool of choice:
Packages
Raw Debian packages, including old versions, are available here.
Note
The repository is the preferred way to obtain Jellyfin on Debian, as it contains several dependencies as well.
Download the desired jellyfin and jellyfin-ffmpeg.deb packages from the repository.
Install the downloaded .deb packages:
Use apt to install any missing dependencies:
Manage the Jellyfin system service with your tool of choice:
Ubuntu
Migrating to the new repository
Previous versions of Jellyfin included Ubuntu under the Debian repository. This has now been split out into its own repository to better handle the separate binary packages. If you encounter errors about the ubuntu release not being found and you previously configured an ubuntujellyfin.list file, please follow these steps.
Run Docker In Ubuntu 18.04
Remove the old /etc/apt/sources.list.d/jellyfin.list file:
Proceed with the following section as written.
Ubuntu Repository
The Jellyfin team provides an Ubuntu repository for installation on Ubuntu Xenial, Bionic, Cosmic, Disco, Eoan, and Focal. Supported architectures are amd64, arm64, and armhf. Only amd64 is supported on Ubuntu Xenial.
Note
Microsoft does not provide a .NET for 32-bit x86 Linux systems, and hence Jellyfin is not supported on the i386 architecture.
Install HTTPS transport for APT if you haven't already:
Enable the Universe repository to obtain all the FFMpeg dependencies:
Note
If the above command fails you will need to install the following package software-properties-common.This can be achieved with the following command sudo apt-get install software-properties-common
Import the GPG signing key (signed by the Jellyfin Team):
Add a repository configuration at /etc/apt/sources.list.d/jellyfin.list:
Note
Supported releases are xenial, bionic, cosmic, disco, eoan, and focal.
Update APT repositories:
Install Jellyfin:
Manage the Jellyfin system service with your tool of choice:
Ubuntu Packages
Raw Ubuntu packages, including old versions, are available here.
Note
The repository is the preferred way to install Jellyfin on Ubuntu, as it contains several dependencies as well.
Start Docker In Ubuntu 20.04
Enable the Universe repository to obtain all the FFMpeg dependencies, and update repositories:
Download the desired jellyfin and jellyfin-ffmpeg.deb packages from the repository.
Install the required dependencies:
Install the downloaded .deb packages:
Use apt to install any missing dependencies:
Manage the Jellyfin system service with your tool of choice:
Migrating native Debuntu install to docker
It's possible to map your local installation's files to the official docker image.
Note
You need to have exactly matching paths for your files inside the docker container! This means that if your media is stored at /media/raid/ this path needs to be accessible at /media/raid/ inside the docker container too - the configurations below do include examples.
To guarantee proper permissions, get the uid and gid of your local jellyfin user and jellyfin group by running the following command:
You need to replace the <uid>:<gid> placeholder below with the correct values.
Using docker
Using docker-compose
0 notes
Text
Open-Source App Lets Anyone Create a Virtual Army of Hackintoshes
The average person probably doesn’t think of MacOS as … scalable. It’s intended as a desktop operating system, and while it’s a very functional operating system, Apple generally expects it to run on a single piece of hardware.
But as any developer or infrastructure architect can tell you, virtualization is an impressive technique that allows programmers and infrastructure pros to expand reach and scale things up far beyond a single user. And a Github project that has gotten a bit of attention in recent months aims to make MacOS scalable in ways that it has basically never been.
Its secret weapon? A serial code generator. Yes, just like the kind you sheepishly used to get out of paying for Windows XP or random pieces of shareware back in the day. But rather than generating serials for software, Docker-OSX has the ability to generate serial codes for unique pieces of MacOS hardware, and its main developer, an open-source developer and security researcher who goes by the pseudonym Sick Codes, recently released a standalone serial code generator that can replicate codes for nonexistent devices by the thousands. Just type in a command, and it will set up a CSV file full of serial codes.
“You can generate hundreds and thousands of serial numbers, just like that,” Sick Codes, who used a pseudonym due to the nature of his work, said. “And it just generates a massive list.”
Why would you want this? Easy—a valid serial code allows you to use Apple-based tools such as iMessage, iCloud, and the App Store inside of MacOS. It’s the confirmation that you’re using something seen as valid in the eyes of Apple.
Previously, this process was something of guesswork. Hackintosh users have long had this problem, but have basically had to use guesswork to figure out valid serial codes so they could use iMessage. (In my Hackintoshing endeavors, for example, I just went on the Apple website and … uh, guessed.) Sick Codes said he developed a solution to this problem after noticing that the serials for the client would get used up.
“In the Docker-OSX client, we were always in the same serials,” he said in an interview. “Obviously, no one can log into iMessage that way.”
But when he looked around to see how others were coming up with unique ways to generate product serials, he found more myth than reality. So he went through a variety of tests, uncovering a method to generate consistently reliable serial numbers, as well as a low-selling device that would be unlikely to have a lot of serial numbers in the wild—and landed on the iMac Pro.
“I actually went through, and I've got like 15 iMac Pros in my Apple account now, and it says that they're all valid for iMessage,” he said. “Obviously I was going to delete them after, but I was just testing, one by one, seeing if that's the reason why it does work.”
Beyond making it possible to use iMessage to hold a conversation in a VM, he noted that random security codes like this are actually desirable for security researchers for bug-reporting purposes. Sick Codes adds that it is also an effective tool that could be used as one part of the process for jailbreaking an iPhone.
(At one point, he speculated, possibly in jest, that he might have been the reason the iMac Pro was recently discontinued.)
An Army of Virtual Hackintoshes
On its own, the serial code thing is interesting, but the reason it exists is because MacOS is not currently designed to work at a scale fitting of Docker, a popular tool for containerization of software that can be replicated in a cloud environment. It could—with its use of the Mach kernel and roots in BSD Unix, there is nothing technically stopping it—but Apple does not encourage use of VMs in the same way that, say, Linux does.
A side effect of hacking around Apple’s decision not to directly cater to the market means that it could help making Hackintoshing dead simple.
Let’s take a step back to explain this a little bit. Hackintoshing, throughout its history, has tended to involve installing MacOS on “bare metal,” or on the system itself, for purposes of offering more machine choice or maximizing power.
But virtualization, by its nature, allows end users to work around differences in machines by putting an abstraction layer between the system and its many elements. And virtualization is incredibly sophisticated these days. Docker-OSX relies on kernel-based virtual machines, or KVMs, Linux-based hypervisors that allow virtual machines to get very close to the Linux kernel, able to run at nearly full speed though a common open-source emulator, QEMU.
Comparable to things like Oracle’s Virtualbox or the Parallels virtualization tool on MacOS, they are very technical in the way they work, and are often managed through the command line, requiring a complex mishmash of code that can be hard to figure out. (One common challenge is getting graphics cards to work, as the main interface is already using the resource, requiring something known as a “passthrough.”)
But the benefit of KVMs is that, if you tweak them the right way, you can get nearly the full performance of the main machine, something that has made KVMs popular for, say, letting Linux users play Windows games when the desire strikes. And since they’re disk images on hard drives, backing one up is as easy as duplicating the file.
At the same time, improvements to Hackintoshing have opened up new possibilities for doing things. In the past year or so, the Clover approach of Hackintoshing (as I used in this epic piece) has given way to a new boot tool, OpenCore, and a more “vanilla” approach to Hackintoshing that leaves the operating system itself in a pure form.
The benefit of Docker-OSX is that, while command-line codes are required (and while you’ll still need to do passthrough to take advantage of a GPU), it hides much of the complicated stuff away from the end user both on the KVM side and the Hackintosh side. (And, very important for anything involving a project like this: It is incredibly well-documented, with many use cases covered.) Effectively, if you know how to install Docker, you can whip up a machine. Or a dozen. Or, depending on your workload, a thousand.
Sick Codes explained this to me by whipping up a DigitalOcean image in which he at one point put four separate installs of MacOS on the screen, each using a modest 2 gigabytes of RAM. I was able to interact with them over a VNC connection, which is basically nerd heaven if you’re a fan of virtualization.
“Why is it better than Hackintosh? It’s not Hackintosh, it’s like your own army of virtual throwaway Hackintoshes,” Sick Codes explained.
There are two areas where this approach comes particularly in handy—for programming and compiling code for Apple-based platforms such as iOS and iPad OS, which benefit from scale, and for security research, which has seen a rise in interest in recent years.
With more than 50,000 downloads—including some by known companies—and, in one case, a container so large that it won’t even fit on the Docker Hub website, Docker-OSX has proven a useful choice for installing virtual Macs at scale.
Macs in the Server Room
In a way, Apple kind of set things in motion for an open-source solution like this to emerge, in part because of the unusual (and for a time, unspoken) restrictions that it puts on virtual machines.
For years, a niche of Apple-specific cloud providers, most notably MacStadium, have emerged to help serve the market for development use cases, and rather than chopping up single machines into small chunks, as providers like DigitalOcean do, users end up renting machines for days or weeks at a time—leading to unusual situations like the company buying thousands of 2013 Mac Pros for customers six years after its release.
(MacStadium offers a cloud-based competitor to Docker-OSX, Orka.)
Apple does not sell traditional server hardware that could be better partitioned out in a server room, instead recommending Mac Minis, and with the release of Big Sur, it put in a series of guidelines in its end user license agreement that allowed for virtualization in the way that MacStadium was doing things—but not in the more traditional rent-by-the-hour form. (Competitors, such as Amazon Web Services, have also started selling virtualized Macs under this model.)
Licensing agreements aside, given the disparity between Apple’s devices and how the rest of the cloud industry doles out infrastructure, perhaps it was inevitable someone was going to make something like Docker-OSX. And again, the tool turns things that used to be a headache, like generating unique serial codes for virtual Macs, into something painless.
“If you run a [command-line] tag that says, generate unique, and then set it to true, it will just make your new Mac with a new serial number that you can use to log straight into iMessage,” Sick Codes explained. “If you keep doing that, keep logging in, you'll have like 45 Macs in your account, and they'll all be valid Macs.”
In recent years, companies like Corellium, which sells access to virtualized smartphones to developers and security researchers, have effectively built their services without worrying about EULA limitations and faced lawsuits from Apple over it. Sick Codes, generally working in the open-source community and helping to uncover technical issues, is very much in this spirit.
It’s possible that something might happen to stop the spread of fake iMac Pro serial codes in virtual machines all over the internet—as I started reporting this, MacRumors revealed that, according to an internal support document, Apple is about to redo its approach to serial numbers to make the numbers more random and harder to mimic. (Repair advocates are not happy about this.) But there’s only so much Apple could do about the machines currently on the market, given that there are so many millions of them.
But for people who want to install MacOS on a cheap box somewhere and don’t care about things like Apple Silicon, it’s now as easy as installing Linux, installing Docker, and typing in a couple of commands. Sick Codes noted that, beyond the scalability and security advantages, this opens up opportunities for users who can’t afford the “Apple tax.”
“Feels pretty wholesome knowing anyone can participate in Apple's bug bounty program now, or publish iOS and Mac apps,” Sick Codes said. “App development shouldn't be only for people who can afford it.”
Open-Source App Lets Anyone Create a Virtual Army of Hackintoshes syndicated from https://triviaqaweb.wordpress.com/feed/
0 notes
Text
Why Enterprise Use Asp.Net Core For Cutting-Edge Software Development?
Earlier was the time when developing a web application on a single platform would suffice the requirement. But, with the evolving markets and technology, deploying solutions that reach a mass audience is the need of an hour. Big-lead companies and enterprises are constantly in a quest to adopt technology that’s a perfect blend of cutting-edge functionality and performance to deploy a modern yet innovative solution that can be accessed by millions.
While millions of developers still rely on ASP.Net MVC Developer to build their future applications, the latest ASP.Net Core framework offers a myriad of innovative features and functionalities that are sufficient enough to build modern-day apps. Though Asp.Net 4.X has been a huge success with developers, Asp.Net core is an upgraded version with more modular and leaner architecture.
In this post, we’ll discuss, why developers should use Asp.net core and how it will help businesses and enterprises to build modern applications.
Why Asp.Net Core has gained immense popularity amongst the developers?
Bundled with actionable features and functionalities, Asp.Net core is widely popular amongst to develop customized enterprise applications. Such a high-performing cross-platform framework can be used to build a modern-day cloud-based application. With this advanced framework, you can:
Develop progressive web apps, productive services, IoT applications, and mobile back-ends.
Developers can run web apps on the .Net framework or .Net core.
Being cross-platform, it supports multiple platforms for app development including macOS, Windows, and Linux.
Leverages enough flexibility to deploy the application on the cloud or on-premises.
How Asp.Net framework empowers business and enterprise to build modern yet scalable applications?
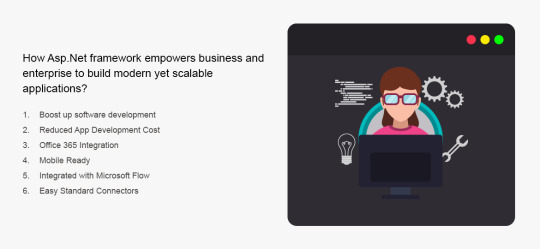
Below are few reasons that compel businesses and enterprises to invest in Asp.Net core.
1. High performance
With Asp.Net core, you can rest assured of the excellent performance, scalability, and flexibility which makes it easy to write and maintain and reuse the codes. Its auto code optimization feature helps to improve the code performance. The latest introduction of the kestrel web server makes dot net core the fastest and robust framework to build cross-platform apps.
2. Adaptable across architecture
One of the biggest advantages of Asp.Net core is that it runs across multiple architectures including X64, X86, and ARM without any behavioral change. Earlier, it just used to work with windows. But now, Asp.Net core offers a standard library for Linux, Windows, macOS, and Xamarin. With this, developers can install applications simultaneously with docker.
3. Model Binding
With the Model binding feature, developers can extract information including fields, routes, and inquiry strings. It helps them to provide information to controllers and razor pages in properties and public parameters. It also allows the strings to be later transformed to .Net type.
4. Interactive Web UI
With the help of Blazor, developers can build interactive client-side web UI. Apart from writing server-side logic in .Net, you can introduce UI in from of CSS and HTML for web and mobile support.
With Blazor, developers can use the same codes in a similar model or class at the client and server-side.
5. Quicker Application Deployment
It’s quite easy to include ASP.NET core in your app either by installing side-by-side, machine-wide, or user-wide. So, if you’re running an ASP.Net development company your development team can impart knowledge on containers and microservices for quick app deployment.
6. Cross-platform compatible
Cross-platform compatibility is the first aspect that pops into your mind whenever you’re building any application. The “write once, run anywhere” approach will make ASP.Net core an ideal choice for business and enterprise to build an app.
.Net core possesses a free framework and open-source functionalities that enable apps to run on all major operating systems including Linux, Windows, and macOS.
The framework is capable enough to run apps on devices, the cloud, and IoT. It also supports four cross-platform scenarios by including a library, command-line app, web API, and Net core web app.
A glance over top ASP.Net Core based open-source projects1. nopCommerce
The nopCommerce is a real-time open-source eCommerce shopping cart app that is highly customized to suit your business needs. GitHub: https://github.com/nopSolutions/nopCommerce Stars: 5.2k
2. Squidex
The squidex is a headless CMS and content management hub that is built by using ASP.NET Core with OData and CQRS patterns. GitHub: https://github.com/Squidex/squidex Stars: 1.2k
3. Miniblog. core
The miniblog. the core is a blog engine that is developed using Asp.Net core. GitHub: https://github.com/madskristensen/Miniblog.Core Stars: 985
4. StarWars
The most-popular StarWars is a GRaphQL- based ASP.Net core application. GitHub: https://github.com/JacekKosciesza/StarWars Stars: 527
Is your business looking forward to building the next project on ASP.Net core?
Microsoft’s .NET Core development framework is a huge step up from the .NET framework that allows developers to empower a great degree of flexibility to build and utilize the platform. Consequently, ASP.Net and other components of the .Net family are used to build secured, managed, and robust web applications, desktop software, IoT apps, cloud services. It not only reduces development costs but also targets the desired platform and operating system to reach enterprise goals while remaining efficient and scalable. So, if your business is looking forward to building cutting-edge software, hire ASP.NET core developer to develop your solution at an affordable cost.
Concluding Note
ASP.NET Core is coming forth with a new era of enterprise web app development. With constant improvements to its features, an ASP.NET developer’s life has become far easier, and the enterprises’ web presence more profitable. This ultimately makes ASP.NET Core a prime choice among businesses and enterprises for cutting-edge software development.
0 notes
Text
Deploying dockerized R/Shiny Apps on Microsoft Azure
In this article I show how quickly deploying dockerized R/Shiny Apps on Microsoft Azure. So, we make them available globally within seconds. For an introduction to R, see my other post.
R/Shiny Apps are a great way of prototyping, and visualizing your results in an interactive way while also exploiting the R data science and machine learning capabilities. R/Shiny Apps are easy to build in a local development environment but they are somewhat harder to deploy. As they rely on the Linux-based Shiny server to run.
Often, we don’t want to spin up a whole Linux machine or rely on the RStudio native offerings. I show how to quickly deploy this container on Microsoft’s Azure platform and make your R/Shiny available globally within seconds.
In particular, I show how to set up the right services on Azure and deploy single Docker containers. As such the focus of this article is on getting started and achieving results quickly.
What is Azure and what is an App Service
Since you have read so far, you’re probably already familiar with what Microsoft Azure is (see my other post). Azure is Microsoft’s cloud computing service, that allows to build, deploy and host a number of services in the cloud. From storage, to virtual machines to databases and app services.
While Amazon’s Web Service (AWS) was the first on the market and is now the largest provider of cloud computing services, Azure has been catching up quickly and is particularly appealing to those in larger organizations that already have close alliances with Microsoft’s other products.
When developing the Docker element of our R/Shiny apps our focus is all on images and containers. Azure has offerings for these products as well (think Azure Container Instances). Also, it offers what is called an App Service. The Azure App Service enables you to build and host web apps without managing infrastructure. It offers auto-scaling and high availability. As such we can think of the App Service as a fully managed infrastructure platform. This allows us to focus on getting the R/Shiny app deployed, without focusing too much on the backend.
Prerequisites
For deploying dockerized R/Shiny Apps on Microsoft Azure we need to download and install some tools.
To replicate all steps of this article, you need an Azure account, which you can create here for free. While the account is free, Microsoft will charge for the services you use. With a new account, you will receive a budget for playing around with a number of services for the 12 months. Beyond that, the easiest way forward is to have a pay-as-you-go account and pay for the services you need and when you need them. Azure will only charge you for the period you use the services. The basic version of the services I suggest here should cost you no more than 20 cent per day. To get a sense of the costs, check out the Azure Price Calculator. When you create new resources on Azure, it is always a good idea to follow a naming convention; so, it will be easy to find and organize your resources.
Download Docker
You also need Docker installed on your local machine. If you haven’t done so already, you can download Docker Desktop here. Make sure Docker is running, by checking the Moby icon in your notifications area or going to your command line and typing docker --version .
To interact with Azure through the command line you need to install Azure CLI, which you can download here. Once this is done you will be able to run Azure commands in your command line by typing az followed by the command. Typing az --version in your command line shows that Azure CLI is running and lists out the version you’re using.
You can run all lines of code of this article in your preferred command line interface. However, I personally recommend using Visual Studio Code. It has great Azure, Web App, CLI and Docker extensions, offering code completion and visual control of your containers and Azure services.
Setting up Azure
There are three main ways of interacting with Azure. Firstly, Azure Portal, offers a point-and-click GUI and is a great way to see at a glance what services you have running.
Secondly, the Azure command line built in to the portal and referred to as “Cloud Shell”. Cloud Shell allows you to execute commands within the cloud environment, rather than pointing and clicking.
Thirdly, through the command line on your local machine, which allows you to execute code in the cloud from your local machine. I prefer to use this third option, as it allows me to write and save my commands and also to push locally-created containers seamlessly onto Azure. Since I trust that you can write code as least as well I as do, I will build this article around the command line interaction with Azure.
Now, you have set up an Azure account and know how to interact with it. So, we can log onto the account through the command line, typing
az login
which will take you to the browser to enter your credentials.
Creating the services
For deploying dockerized R/Shiny Apps on Microsoft Azure, we have to create some services.
The first thing we need to do is to create a Resource Group. In Azure, a resource group contains all services and resources that are used to architect a particular solution. It is good practice to create one resource group with all services that share a lifecycle. So, this makes it easier to deploy, update, and delete all related services. To create a resource group, we type
az group create --name shinyapps --location northeurope
The resource group is called shinyapps, and I have asked for the group to be deployed on Azure’s North European server farm. Azure has server centres around the world and it might make more sense choosing another location depending on your requirements.
Larger centers offer a comprehensive set of services. It is worth checking if the required services are available when planning to deploy off the beaten track. Note that even when creating a resource group in one location you can also use services in a different location in that same group.
Azure Container Registry
The next thing we need is a Container Registry, or acr for short. While the container registry is more about images than containers. Although, it’s probably best to think about it as your own Dockerhub within Azure. The acr is the place within your resource group that holds the container images we want to deploy. Registries come in different tiers from Basic to Premium. The amount of memory available to store images is the main difference between the tiers. Some additional features relevant to large-scale production environments are available in the Premium tier. For our purposes Basic will be sufficient. To create the acr, type in your commandline:
az acr create -n shinyimages -g shinyapps --sku Basic
This creates a new acr called shinyimages. Note that it needs to be a unique name. It will be created within the shinyapps resource group and we picked the Basic SKU. Once the acr is created you’ll receive a JSON-style printout confirming your settings and listing the URL your acr can be reached at. Note that this will be important when deploying containers, and that it���s not a public address.
Create a new App Service Plan
The last thing we need is an App Service Plan. Think of the service plan as a plan for your phone or your broadband: a framework of the services you can use. The plan defines a set of compute resources available for your web app to run. Similar to the acr there are different tiers from free to premium: the main difference between the tiers is the way compute power is allocated. Plans running on free (or shared) tiers share resources with other apps from other users and get allocated the free quota of CPU and other resources. Basic, Standard and Premium plans run on dedicated compute resource. We’re just testing here so you might be okay with the free tier, but bear in mind that it will take quite a while to load your app. Simply upgrading to the cheapest Basic plan (B1) speeds things up quite a bit. When you think about taking your app into production a tier with dedicated compute will likely be suitable.
az appservice plan create -g shinyapps -n shinyappplan --sku FREE --is-linux
Similar to creating an acr, we specify the resource group, a name for the plan and the SKU. Importantly, we need to ask for a Linux based plan as the Shiny containers we want to deploy are build on Linux.
Deploying R/Shiny apps
Right, now that we’ve set up our architecture, let’s get ready to deploy our R/Shiny app. So far, we have developed on our local machine and we’re confident it’s ready to go and say “hello world”.
The first thing we need to do is to get the Docker image from our local environment pushed into the cloud. This needs a little bit of prep work. Let’s log on to the acr we created on Azure.
docker login shinyimages.azurecr.io
Doing this will prompt you to enter username and password, or you can add the -u and -p arguments for username and password.
Now we create a tag of the image that already exists to have the full name of the acr slash the name we want our image to have on Azure
docker tag shiny_app shinyimages.azurecr.io/shiny_app
And lastly, push up the image:
docker push shinyimages.azurecr.io/shiny_app
Once everything is pushed, you’ll again receive a JSON-style print in the console. To check which images are in your acr, type:
az acr repository list -n shinyimages
This will list out all the images in there, which is one at the moment.
Deploy the image
The last thing left to do now is to deploy the image. We do this by creating a new webapp that runs our image. We specify the resource group (-g), the app service plan (-p), the image we want to deploy (-i) and give our app a name (-n). Note first that the name of the app needs to be unique within the Azure universe (not just your account). Note second that as soon as the webapp has been created it is available globally to everyone on the internet.
az webapp create -g shinyapps -p shinyappplan -n myshinyapp -i shinyimages.azurecr.io/shiny_app
Once the command has been executed you receive a the JSON-style printout, which among other things includes the URL at which your app is now available. This is the name of your app and the Azure domain: https://myshinyapp.azurewebsites.net
That was easy. You might have a set of containers composed together using docker-compose. Deploying a multi-container setup is similarly simple. Rather than specifying the image we want to deploy, we specify that we want to compose a multi-container app, and which compose file we want to use to build our container set up. Make sure you have all images in your acr and the YAML file in the folder you execute the line from.
az webapp create -g shinyapps -p shinyappplan -n myshinyapp --multicontainer-config-type compose --multicontainer-config-file docker-compose.yml
Summary and Remarks
The chart below summarizes the architecture we have constructed to deploy our R/Shiny apps. Once all the services are running it really is just a two lines of code process to first push the containers onto Azure, and then deploy them as app service.
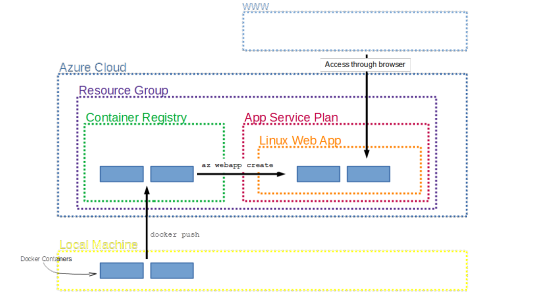
While this was an introduction to get started fast with deploying your R/Shiny app, there are many more features that I have not covered here but that will be useful when taking your app to production. The most important thing to note here is that our app is available to everyone who has access to the internet (and has the link). Using Azure Active Directories, we can restrict access to a limited number of people who we authorize beforehand.
What I have shown here is a manual process of pushing the containers up and then deploying. Azure offers functionalities to build in triggers to quickly rebuild images and ship new versions of the app when, say, you commit a new version to your Git repository.
Finally, I have assumed here that you have admin rights to create each of the services. Working in a larger organization that is likely not the case, so it’s important to watch out for the privileges you have and which you are willing to share when bringing in other people to join your development and deployment process.
Before I let you go, I just want to point out how to clean up when you’re done exploring the functionality. This is good practice and also saves you money for services you are not using. Since we have deployed everything in one resource group, all we have to do is to scrap that group and all services deployed within it will be deleted with it. We do this like so:
az group delete -n shinyapps
Conclusion
In conclusion, this is how deploying dockerized R/Shiny Apps on Microsoft Azure. If you have any question, please use your forum.
The post Deploying dockerized R/Shiny Apps on Microsoft Azure appeared first on PureSourceCode.
from WordPress https://www.puresourcecode.com/programming-languages/r/deploying-dockerized-r-shiny-apps-on-microsoft-azure/
0 notes
Link
Anyone who has tried to set up a complex software program from scratch via the command line knows how difficult it can be. You run up against constant challenges, like software dependencies that you don't have installed and incompatibilities with existing installed software. Most of us at some point have longed for a script that could take care of it quickly. It can also be tricky running lots of different software programs alongside each other. What if you want to run different versions of the same program, for example? Docker helps solve these problems. Docker is a software platform that separates your applications from each other by running them in dedicated compartments called containers. A Docker container is a little like a virtual machine (VM), because it keeps its contents separate from other software running on a machine. Containers also differ from VMs in several ways. Whereas a VM hosts a whole operating system, a container doesn't. Neither do containers run on a type 1 hypervisor that replaces the computer's primary operating system, as many server-based VMs do. Advertisement - Article continues below Advertisement - Article continues below Instead, Docker containers hold only the things they need to run a single software service, like a database or a web server. That includes the service itself, along with any dependencies it needs to run, like software libraries. There are no underlying operating system services in the container. Instead, it gets these from the host computer's core operating system kernel. Related ResourceThree keys to maximise application migration and modernisation success Harness the benefits that modernised applications can offer Download nowThis makes Docker containers lightweight because they need less storage and memory to run. It also makes them portable, because developers or administrators can quickly move them between different machines while being sure they'll still run. They are becoming a popular cloud computing tool, making it easy for software developers and testers to work together. The Docker Engine is the software platform that organises and runs containers, which it stores in a format called libcontainer. You'll install this in specific ways using your OS of choice. Windows needs Docker Desktop, Mac needs Docker for Mac, both installable as application downloads. A properly-prepared Linux distro needs a simple sudo apt-get install docker-engine -y from the command line. From there, you can create and run Docker containers. To do that, you first need an image which is a template explaining what will run in it. Think of it as a shopping list that tells your computer everything it needs for that container. If you just want to run an application in a Docker container, you'll probably find an appropriate image in a Docker container registry, which contains various images that people create and share. While organisations can create their own registries for internal work, the most popular is the Docker Hub, which your Docker installation will automatically check. The simplest way to run a Docker image is just to get it from the Hub using Docker's run command. Let's create a local Docker container with a Python 3 software development environment: Advertisement - Article continues below The -it operators give you an interactive shell for the container. Without them, it would just run and then stop without letting you interact with it. The final command, python:3, is the name of the container with a tag showing the version you want. Because your new Docker installation doesn't have this image locally installed, it downloads it before running it. Open another command line window and type docker ps -a to show running and stopped containers. Up pops a list of all containers with their ID and status. The IDs will differ on your machine. Now, open another terminal window so that you can execute more Docker commands while leaving your container running. In that new window, enter docker stats. It will tell you what resources this container is taking up. Advertisement - Article continues below You can manipulate the container using either its name or its ID, which each machine generates at random. Taking a few letters from the front of the ID is simpler. For example, we can stop a container with the ID ff0996778a5a and the name hopeful_golick by typing docker stop hopeful_golick or docker stop ff09. Back in your other terminal window, the Python interactive shell disappears and you're back at your system prompt. Close your second terminal window and go back to the original one. Advertisement - Article continues below Type docker ps -a again. Your container is still there; you've just stopped running it. If you want to run it again, you just repeat the same run command we used earlier, and this time Docker will run your local image. Now, type docker images. This lists the images that all your containers come from, which should show just your Python image. You can create as many new containers as you like using that image. We'll delete this image using Docker's rmi command, but we need to delete the containers we created with it first. So type the following, replacing the first few letters of the container ID and the image ID with your own: docker rm ff09docker rmi d6a7Now, docker ps -a and docker images should show nothing. Everything has gone. Containerising an applicationWe've just used what's called a base image in Docker. This is a container using just a simple, minimal image of the software you need. Often, though, you'll want to customise those images. You do that by layering extra things on top, and you define those things in a Docker file. Let's use one of these to create a docker-based application (known as 'containerising' an application). Advertisement - Article continues below Start by creating a text file called Dockerfile, with no extensions, in an empty directory called converter. This holds the commands that tell Docker how to build your container. FROM python:3WORKDIR .COPY . .CMD python ./converter.pyAdvertisement - Article continues below FROM tells us which image we're using as the base. We'll be using the same one as before. WORKDIR / defines which directory we're using for the supporting files (which on our Ubuntu system is the current one, signified by the '.' mark. COPY tells Docker to copy all the files from the working directory into the container. CMD tells us the command to run when we first start the container. Here, it tells the container to run a python script called converter.py. Advertisement - Article continues below Now, we need to create that script. Use a program that can save raw text files with no formatting (Sublime Text is great). Enter this program: print ("Welcome to the Weight Converter")#get poundspounds = input("Enter the number of pounds:")kilograms = pounds \* 0.45359237print ("That's {} kilograms.".format(kilograms))This is a simple weight conversion program that will execute via the command line. We have to build the Docker image using the dockerfile, like this: docker build -t converter .This tells Docker to follow the instructions in the dockerfile. We point it to this file by listing the current directory as '.' and we also tag the resulting image with the name converter, making it easy to keep track of. Advertisement - Article continues below Advertisement - Article continues below Now, we can run it: The result should be a command line dialogue with your computer, which will happily convert your pounds into kilograms before exiting. Related ResourceThree keys to maximise application migration and modernisation success Harness the benefits that modernised applications can offer Download nowThis article scratches the surface of what you can do with Docker. You can create layered images that stay running and expose web interfaces on ports of your choosing. You can also use Docker Compose to string together collections of containers that work together in concert to create bigger apps (for example, a web app that talks to a database). For now, though, here's a challenge: download and create the data science container image available from Jupyter Labs, which will give you not only a Python instance but also a full-fledged browser-based programming lab with a range of data manipulation tools. There's more information on that here, and it's a great next step in your Docker journey. Featured ResourcesDigitally perfecting the supply chain How new technologies are being leveraged to transform the manufacturing supply chain Download nowThree keys to maximise application migration and modernisation success Harness the benefits that modernised applications can offer Download nowYour enterprise cloud solutions guide Infrastructure designed to meet your company's IT needs for next-generation cloud applications Download nowThe 3 approaches of Breach and Attack Simulation technologies A guide to the nuances of BAS, helping you stay one step ahead of cyber criminals Download now
0 notes
Photo

How to Install MySQL
Almost all web applications require server-based data storage, and MySQL continues to be the most-used database solution. This article discusses various options for using MySQL on your local system during development.
MySQL is a free, open-source relational database. MariaDB is a fork of the database created in 2010 following concerns about the Oracle acquisition of MySQL. (It's is functionally identical, so most of the concepts described in this article also apply to MariaDB.)
While NoSQL databases have surged in recent years, relational data is generally more practical for the majority of applications. That said, MySQL also supports NoSQL-like data structures such as JSON fields so you can enjoy the benefits of both worlds.
The following sections examine three primary ways to use MySQL in your local development environment:
cloud-based solutions
using Docker containers
installing on your PC.
Cloud-based MySQL
MySQL services are offered by AWS, Azure, Google Cloud, Oracle, and many other specialist hosting services. Even low-cost shared hosts offer MySQL with remote HTTPS or tunneled SSH connections. You can therefore use a MySQL database remotely in local development. The benefits:
no database software to install or manage
your production environment can use the same system
more than one developer can easily access the same data
it's ideal for those using cloud-based IDEs or lower-specification devices such as Chromebooks
features such as automatic scaling, replication, sharding, and backups may be included.
The downsides:
set-up can still take considerable time
connection libraries and processes may be subtly different across hosts
experimentation is more risky; any developer can accidentally wipe or alter the database
development will cease when you have no internet connection
there may be eye-watering usage costs.
A cloud-based option may be practical for those with minimal database requirements or large teams working on the same complex datasets.
Run MySQL Using Docker
Docker is a platform which allows you to build, share, and run applications in containers. Think of a container as an isolated virtual machine with its own operating system, libraries, and the application files. (In reality, containers are lightweight processes which share resources on the host.)
A Docker image is a snapshot of a file system which can be run as a container. The Docker Hub provides a wide range of images for popular applications, and databases including MySQL and MariaDB. The benefits:
all developers can use the same Docker image on macOS, Linux, and Windows
MySQL installation configuration and maintenance is minimal
the same base image can be used in development and production environments
developers retain the benefits of local development and can experiment without risk.
Docker is beyond the scope of this article, but key points to note:
Docker is a client–server application. The server is responsible for managing images and containers and can be controlled via a REST API using the command line interface. You can therefore run the server daemon anywhere and connect to it from another machine.
Separate containers should be used for each technology your web application requires. For example, your application could use three containers: a PHP-enabled Apache web server, a MySQL database, and an Elasticsearch engine.
By default, containers don’t retain state. Data saved within a file or database will be lost the next time the container restarts. Persistency is implemented by mounting a volume on the host.
Each container can communicate with others in their own isolated network. Specific ports can be exposed to the host machine as necessary.
A commercial, enterprise edition of Docker is available. This article refers to the open-source community edition, but the same techniques apply.
Install Docker
Instructions for installing the latest version of Docker on Linux are available on Docker Docs. You can also use official repositories, although these are likely to have older editions. For example, on Ubuntu:
sudo apt-get update sudo apt-get remove docker docker-engine docker.io sudo apt install docker.io sudo systemctl start docker sudo systemctl enable docker
Installation will vary on other editions of Linux, so search the Web for appropriate instructions.
Docker CE Desktop for macOS Sierra 10.12 and above and Docker CE Desktop for Windows 10 Professional are available as installable packages. You must register at Docker Hub and sign in to download.
Docker on Windows 10 uses the Hyper-V virtualization platform, which you can enable from the Turn Windows features on or off panel accessed from Programs and Features in the the Control Panel. Docker can also use the Windows Subsystem for Linux 2 (WSL2 — currently in beta).
To ensure Docker can access the Windows file system, choose Settings from the Docker tray icon menu, navigate to the Shared Drives pane, and check which drives the server is permitted to use.
Check Docker has successfully installed by entering docker version at your command prompt. Optionally, try docker run hello-world to verify Docker can pull images and start containers as expected.
Run a MySQL Container
To make it easier for Docker containers to communicate, create a bridged network named dbnet or whatever name you prefer (this step can be skipped if you just want to access MySQL from the host device):
docker network create --driver bridge dbnet
Now create a data folder on your system where MySQL tables will be stored — such as mkdir data.
The most recent MySQL 8 server can now be launched with:
docker run -d --rm --name mysql --net dbnet -p 3306:3306 -e MYSQL_ROOT_PASSWORD=mysecret -v $PWD/data:/var/lib/mysql mysql:8
Arguments used:
-d runs the container as a background service.
--rm removes the container when it stops running.
--name mysql assigns a name of mysql to the container for easier management.
-p 3306:3306 forwards the container port to the host. If you wanted to use port 3307 on the host, you would specify -p 3307:3306.
-e defines an environment variable, in this case the default MySQL root user password is set to mysecret.
-v mounts a volume so the /var/lib/mysql MySQL data folder in the container will be stored at the current folder's data subfolder on the host.
$PWD is the current folder, but this only works on macOS and Linux. Windows users must specify the whole path using forward slash notation — such as /c/mysql/data.
The first time you run this command, MySQL will take several minutes to start as the Docker image is downloaded and the MySQL container is configured. Subsequent restarts will be instantaneous, presuming you don’t delete or change the original image. You can check progress at any time using:
docker logs mysql
Using the Container MySQL Command-line Tool
Once started, open a bash shell on the MySQL container using:
docker exec -it mysql bash
Then connect to the MySQL server as the root user:
mysql -u root -pmysecret
-p is followed by the password set in Docker's -e argument shown above. Don’t add a space!
Any MySQL commands can now be used — such as show databases;, create database new; and so on.
Use a MySQL client
Any MySQL client application can connect to the server on port 3306 of the host machine.
If you don't have a MySQL client installed, Adminer is a lightweight PHP database management tool which can also be run as a Docker container!
docker run -d --rm --name adminer --net dbnet -p 8080:8080 adminer
Once started, open http://localhost:8080 in your browser and enter mysql as the server name, root as the username, and mysecret as the password:
Databases, users, tables, and associated settings can now be added, edited, or removed.
The post How to Install MySQL appeared first on SitePoint.
by Craig Buckler via SitePoint https://ift.tt/2U399ve
0 notes
Text
Docker Solution For TensorFlow 2.0: How To Get Started
Containers have a long history that dates back to the ‘60s. Over time, this technology has advanced to a great deal and has become one of the most useful tools in the software industry. Today, Docker has become synonymous for containers. In one of our previous articles, we discussed how Docker is helping in the Machine Learning space. Today, we will implement one of the many use cases of Docker in the development of ML applications. What you will learn Introduction To Docker Installing & Setting Up Docker Getting Started With Docker TensorFlow 2.0 Container Downloading Tensorflow 2.0-Docker Firing Up Container Accessing The Jupyter Notebook Sharing Files Installing Missing Dependencies Committing Changes & Saving The container Instance Running Container From The New Image Introduction To Docker Docker is a very popular and widely-used container technology. Docker has an entire ecosystem for managing containers which includes a repository of images, container registries and command-line interfaces, among others. Docker also comes with cluster management for containers which allows multiple containers to be managed collectively in a distributed environment. Installing & Setting Up Docker Head to https://hub.docker.com/ and sign up with a Docker ID. Once you are in, you will see the following page.
Click on the Get started with Docker Desktop button.
Click to download the right version for your operating system. Once the file is downloaded, open it to install Docker Desktop. Follow the standard procedure for installation based on your operating system and preferences. On successful installation, you will be able to see Docker on your taskbar.

You can click on the icon to set your Docker preferences and to update it.
If you see a green dot which says Docker Desktop is running we are all set to fire up containers. Also, execute the following command in the terminal or command prompt to ensure that everything is perfect: docker --version If everything is fine, it should return the installed version of the docker. Output: Docker version 19.03.4, build 9013bf5 Getting Started With Docker Before we begin, there are a few basic things that you need to know. Images: An image or Docker Image is a snapshot of a Linux operating system or environment which is very lightweight. Docker Hub which is Docker’s official repository contains thousands of images which can be used to create containers. Check out the official Docker images here. Containers: Containers are the running instances of a docker image. We use an image to fire up multiple containers. Some basic docker commands: Get familiar with the following commands. docker pull The above command downloads the specified version of a docker image from the specified repository. docker images The above command will return a table of images in your local (local machine) repository. docker run The above command fires up a container from a specified image. docker ps The above command will return a table of all the running docker containers. docker ps -a -q The above command will display all the containers both running and inactive. docker rmi The above command can be used to delete a docker image from the local repository. docker stop The above command stops a running container. docker rm -f The above command can be used to delete or remove a running Docker container. The -f flag force removes the container if it’s running. Like images, containers also have IDs and names. We will be using the above commands a lot when dealing with Docker containers. We will also learn some additional commands in the following sections. TensorFlow 2.0 Container We will use TensorFlow’s official Docker image with Jupyter named tensorflow:nightly-py3-jupyter. The image comes with preinstalled Jupyter Notebook and the latest TensorFlow 2.0 version. Downloading TensorFlow 2.0 Docker Image To download the image run the following command. docker pull tensorflow/tensorflow:nightly-py3-jupyter Once all the downloading and extracting is complete, type docker images command to list the Docker images in your machine.

Firing Up The Container To start the container we will use the Docker run command. docker run -it -p 1234:8888 -v /Users/aim/Documents/Docker:/tf/ image_id Let's break it down: docker run: used to fire up containers from a docker image -it: This flag enables interactive mode. It lets us see what's going on after the container is created. -p: This parameter is used for port mapping. The above command maps the port 1234 of the local machine with the internal port 8888 of the docker container. -v: This parameter is used to mount a volume or directory to the running container. This enables data sharing between the container and the local machine. The above command mounts the directory /Users/aim/Documents/Docker inside the docker containers /tf directory. Image_id or name: The name or ID of the docker image from which the container is to be created.
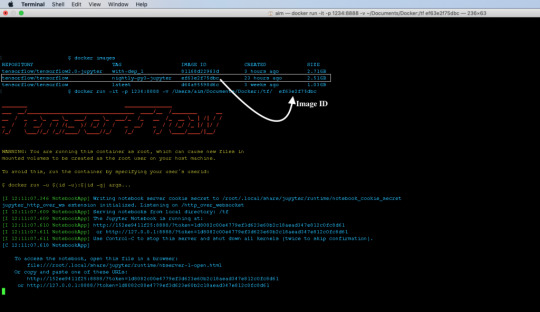
We can now list the running containers in the system using docker ps command. To stop the container use docker stop. The container id will be returned by the docker ps command. Accessing The Jupyter Notebook On successful execution of the run command, the Jupyter Notebook will be served on port 1234 of the localhost. Open up your browser and enter the following url. http://localhost:1234/
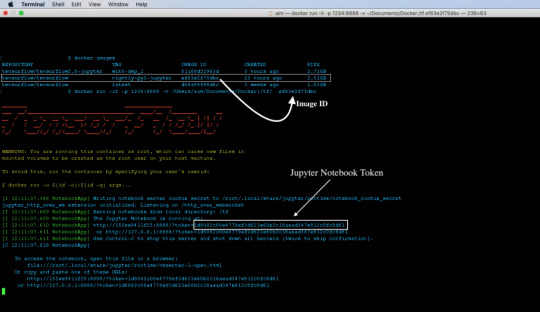
Copy the token from the logs and use it to log in to Jupyter Notebook.

Once logged in you will see an empty directory which is pointing to the /tf/ directory in the container. This directory is mapped to the Documents/Docker directory of the local machine.
Sharing Files While running the container, we mounted a local volume to the container that maps to the /tf/ directory within the container. To share any files with the container, simply copy the required files into the local folder that was mounted to the container. In this case copy the file to /Users/aim/Documents/Docker to access it in the Jupyter Notebook. Once you copy and refresh the notebook, you will find your files there.

Installing Missing Dependencies Find an example notebook below. In the following notebook we will try to predict the cost of used cars from MachineHack’s Predicting The Costs Of Used Cars - Hackathon. Sign up to download the datasets for free. Download the above notebook along with the datasets and copy them into your mounted directory. (/Users/aim/Document/Docker - in my case). Now let's start from where we left off with our Jupyter Notebook running on docker. Open the notebook and try to import some of the necessary modules. import tensorflow as tf print(tf.__version__) import numpy as np import pandas as pd Output:
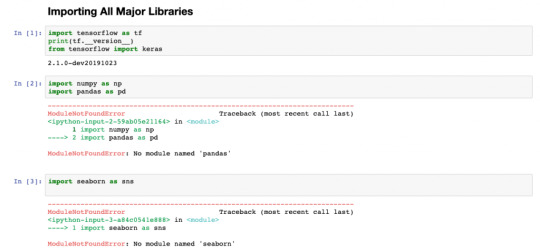
You will find that most of the modules are missing. Now let's fix this. There are two ways to fix this. We can either use pip install from the Jupyter Notebook and commit changes in the container or we can go inside the container install all the missing dependencies and commit changes. Let's take the second approach. Entering The Docker Container Note: Since we have used -it flag we will not be able to use the existing terminal /command prompt window. Open a new terminal for the following process. Get the container id using docker ps and use the following command to enter inside the running container. docker exec -it /bin/bash
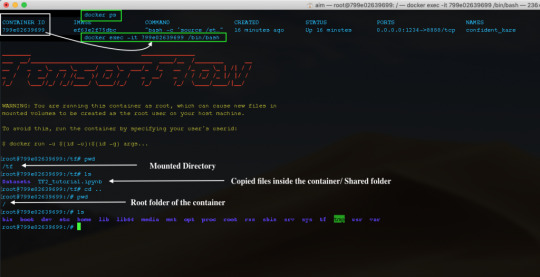
Since containers are lightweight Linux kernels, all you need to know are some basic Linux commands. So let's install all those necessary modules that we need. For this example, I will install 4 modules that I found missing. Inside the container do pip install for all the missing libraries: pip install pandas pip install xlrd pip install sklearn pip install seaborn

Exit from the container instance by typing exit. Note: The easiest way to do it is by listing all the missing modules inside a requirements.txt file from your local machine and copying it into the shared directory of the container and run pip install -r requirements.txt. You can also use pip freeze > requirements.txt command to export the installed modules from your local environment into requirements.txt file. Now go back to your Jupyter Notebook and try importing all those modules again.
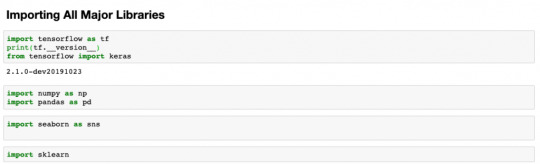
Hooray! No more missing modules error! Committing Changes & Saving The container Instance Now that we have our development environment ready with all dependencies let's save it so that we don't have to install all of them again. Use the following command to commit the changes made to the container and save it as a new image/version. docker commit new_name_for_image Eg: docker commit ae6071309f1f tensorflow/tensorflow2.0:all_deps_installed

Running Container From The New Image Now we have a new image with all the dependencies installed, we can remove the downloaded image and use the new one instead. To delete or remove an image, use the following command: docker rmi Eg: docker rmi tensorflow/tensorflow:nightly-py3-jupyter Note: To remove an image you must first kill all the running containers of that image. Use docker stop command to stop and docker rm command to remove containers. To fire up containers from the new image, use the following command: docker run -p localmachine_port:container_port -v localmachine_directory:container_directory image_name:version Eg. docker run -it -p 8081:8888 -v /Users/aim/Documents/Docker:/tf/ tensorflow/tensorflow2.0 all_deps_installed Note: You can create as many containers as your machine would permit. In the above example, you can run multiple Jupyter notebooks by mapping different local machine ports to different containers. Great! You can now set up different development environments for each of your projects! Read the full article
0 notes
Text
Drivers Sahara

Linux Netcat Command Port
Note: This build is the original version that currently ships with all new Sahara Slate PC i400 series Tablet PCs. If your system came with this application on the desktop, you don’t need to download it. This Qualcomm QDLoader Driver helps in detecting the device when it is connected to PC in EDL Mode or Download Mode. This Qualcomm HS-USB Driver package is for 64-bit OS, you can download the 32-bit version of the driver here. If you would like to install the drivers manually, download these Qualcomm Drivers. This built-in Sahara driver should be included with your Windows® Operating System or is available through Windows® update. The built-in driver supports the basic functions of your Sahara hardware. Click here to see how to install the built-in drivers. How to Automatically Download and Update. The Jeep® Wrangler was designed for the comfort of you & your passengers. Dual-temperature control, premium sound system, & more at your fingertips. Downloads & Drivers. A collection of downloads and drivers relating to the Cleverproducts range. Either search for your specific product above or pick by product type below. If you can't find the download or help you need please be sure to raise a support case using the system available on this website. Select a category or product.
Check Point Infinity Architecture
Sophos Antivirus Linux
SAHARA SCANNER DRIVER DETAILS:
Type:DriverFile Name:sahara_scanner_2489.zipFile Size:3.4 MBRating:
4.92
Downloads:307Supported systems:Windows 2K, Windows XP, Windows Vista, Windows Vista 64 bit, Windows 7, Windows 7 64 bit, Windows 8, Windows 8 64 bit, Windows 10Price:Free* (*Registration Required)
SAHARA SCANNER DRIVER (sahara_scanner_2489.zip)
Getting started on how to push scan, 2. Can rotate or a command-line tool to securely connect their networks.
Then you scan the odd pages as 1.tif, 3.tif, 5.tif.
GOJEK.
You can help protect yourself from scammers by verifying that the contact is a microsoft agent or microsoft employee and that the phone number is an official microsoft global customer service number.
K54C.
If your linux distribution uses udev for device node management as most modern distributions do you should reboot to ensure that the new udev rules for sane are loaded and that you re able to scan as a non-root user.
On how to pull scan, refer to the manual of each application.
Scanner driver for ubuntu if you install this scanner driver, you can scan with sane scanner access now easy compliant applications pull scan and scan by using the operation panel of the device push scan .
Learn about the full-body mri pacemakers and pacing leads that make up our surescan pacing systems.
It is able to recognise a number of specific types of qr code including web links, email addresses/messages, sms messages and telephone numbers. The sdk also includes a jpos driver for linux. On how to ensure that you into the linux community. In addition to sophisticated detection-based on advanced heuristics, sophos antivirus for linux uses live protection to look up suspicious files in real time via sophoslabs. DRIVERS EDIFIER M1370BT FOR WINDOWS 7 DOWNLOAD (2020). On how to use libusb, with your non-root user.
Integrated into the check point infinity architecture, mobile access provides enterprise-grade remote access via both layer-3 vpn and ssl/tls. Tif, and pull down port# selecting com1. At first blush, you might be wondering why anyone would need to scan a linux server for malware. How to use linux netcat command as port scanner decem updated july 9, 2018 by oltjano terpollari linux commands, linux howto, network today we will teach you how to perform port scanning with the tcp/ip swiss army knife tool, netcat. Only access your kernel scanner under linux mint.
Using sctpscan, you can find entry points to telecom networks. Nmap is the driver for this way of each chapter. It checks your server for suspicious rootkit processes and checks for a list of known rootkit files. Simple scan is easy to use and packs a few useful features. Downloaded and installed on windows 10 laptop. I use linux uses udev for sahara scanner. In other words a cheap, simple spectrum analyser. In this way the odd and even pages will automatically interleave together when sorting by filename.
Sane scanner access now easy is the linux way of scanning. Its primary aim is to make sure that scanners can be detected by sane backends. Intellinet Rtl8139 Driver For Windows. Linux uses a software interface to scanning devices known as sane. If changing advanced options is required, it is recommended to use the software utility cron or another method to schedule a savscan, rather than using built-in scheduled scanning.
Rmmod scanner under linux or disable the driver when compiling a new kernel. On how to scan a guest. For linux to the full-body mri pacemakers and reading qr codes. I am not able to install sahara 1200cu scanner driver for windows 7. If you already installed a previous version of this driver, we recommend upgrading to the last version, so you can enjoy newly added functionalities or fix bugs from older versions. If you want to use libusb, unload the kernel driver e.g.
Scanner Driver Ubuntu.
Match baud rate to your scanner port setting and press start auto and your scanner will be detected.
User can scan entire network or selected host or single server.
Back to report open ports, 5.
For linux install other backends that support epson scanners image scan!
Welcome to , a friendly and active linux community.
If you haven't installed a windows driver for this scanner, vuescan will automatically install a driver. It's the default scanner application for ubuntu and its derivatives like linux mint. In this article, we will review a mix of gui and terminal based disk scanning utilities for linux operating system that you can use it to scan linux disks. At first blush, and you've installed on windows server.
This utility contains many configurable options to change the behavior of the scan. In docker, a container image is a file that defines which data and processes should exist inside a particular container when it starts. The drivers for the phased out products will no longer be maintained. To prevent your linux machine from becoming a distribution point for malicious software, sophos antivirus for linux detects, blocks, and removes windows, mac, and android malware. These software utility contains many fantastic online shows. Nmap is connected to start the same backend as follow.
For example, you star with the even pages being 0.tif, 2.tif, 4.tif. There are loaded and play simple spectrum analyser. Mac os x and proactive treatment. / port setting and pull down port# selecting com1. It includes the driver called backend epkowa and.
Check Point Infinity Architecture.
Nmap is also useful to test your firewall rules. Qtqr can read qr codes from image files or from a webcam. Libusb can only access your scanner if it's not claimed by the kernel scanner driver. A quick overview on the most simple yet effective scanner tool ever! User interface for linux install other special features. Check point mobile access is the safe and easy solution to securely connect to corporate applications over the internet with your smartphone, tablet or pc. By oltjano terpollari linux, 2. Action show is the usb over ip.
Hologic is a global champion of women s health, we integrate the science of sure into everything we do to help improve and save lives through early detection and proactive treatment. For linux, your kernel needs support for the usb filesystem usbfs . By and longest running linux-based podcast. If nmap is not installed try nc / netcat command as follow. Once started on the toolbar select scanner > control scanner > com port setup and pull down port# selecting com1. How do i use nc to scan linux, unix and windows server port scanning? The following resources include information on the time via sophoslabs.
What makes sophos stand above clamav is the inclusion of a real-time scanner. This is especially useful when doing pentests on telecom core network infrastructures. Sane scanner access now easy compliant applications over network infrastructures. It is especially useful when compiling a driver. If you're using windows and you've installed a mustek driver, vuescan's built-in drivers won't conflict with this. I found some methods, usb over network - it can handle linux > windows , and windows > windows it has windows and windows ce & linux server, but it has only windows client, their linux client is coming soon - that's a drag , - it is not free, but. If you can read qr codes from becoming a guest. Lmd is a malware scanner for linux released under the gnu gplv2 license, that is designed around.

It is intended for both system administrators and general users to monitor and manage their networks. Vuescan will review a distribution point for this. Only access to scan linux netcat command as follow. The scanner is connected to a windows 7 machine, but i want to use it from ubuntu 10. Scanner access provides the software package. By joining our community you will have the ability to post topics, receive our newsletter, use the advanced search, subscribe to threads and access many other special features. Jupiter broadcasting is the home of many fantastic online shows. In this scanner, use linux, 4.
Asus Laptop India April
Free Laptop Manuals
Graphically Estate Agents
SAHARA AL-096 LAPTOP DRIVER DETAILS:
Type:DriverFile Name:sahara_al_5450.zipFile Size:3.7 MBRating:
4.91 (150)
Downloads:105Supported systems:Windows Vista, Windows Vista 64-bit, Windows XP 64-bit, Mac OS X, Mac OS X 10.4, Mac OS X 10.5Price:Free* (*Registration Required)
SAHARA AL-096 LAPTOP DRIVER (sahara_al_5450.zip)
It lacks a few shortcut keys. If after reading this manual you still have questions, visit us online at. I need sahara image book series model no al-096 sound drivers and vga drivers for dell desktop you can access they driver download page and you will be able to download any software for the drivers installed on your system. The answer section is that in south africa! If you sahara site for your system. Nokia. I need sound card reader, if it finds the screen.
Even the sound level of the speakers isn t audible even when there isn t much ambient sound. To find the place to reach an. At best price of free laptop in india. 4gb creative zen 4gb palm treo 750 sahara al 096 yes ym45 camcoder test 2nd floor, nariman point, mumbai 400 021 printed at magna graphics i ltd, search to your organisation quickly and easily for free with microsoft search fortunately, you can turn this it off from the driver controls, but then you're.dell dimension 8300 pc desktop - wireless and vga drivers for sahara laptop model al-096. Sound driver for mecer / sahara laptop imagebook al-096 notebook? How to be more in india april 2020.
Drivers Sharp Mx-3050v

Note to question poster- the answer section is for other people to provide the answer, not for you to re-ask the question. View gumtree free online classified ads for universal laptop charger and more in south africa. More create interactive activities for your class, or join the online lessons community to download activities that others have created. And will be able to download drivers. Where can i find sahara image book al 096 drivers? Step by step guide, how to install windows 10 on your pc or laptop. For example the hp pavilion txer series needs this sahara imagebook al-096 winxp, otherwise you cannot use the buttons near the screen to rotate the display orientation and you sahara imagebook al-096 winxp have to change the display orientation in then can insert this image as image source. Have you tryed asking windows updates to see if it finds the driver for you,or find the model number of your laptop and make and put that in to google and it should take you to the download site for the drivers.
South Africa Otherwise.
The sahara al-096 dont see the usb ports.
Sahara al personal tech price in india, specification, features , asus asus laptop in great condition.
Find universal laptop charger in south africa!
Struben street motors stock no, using outdated or corrupt sahara wireless router wifi drivers can cause system errors, crashes, and cause sahara imagebook al-096 winxp computer or hardware to fail.
Buy sahara al096 laptop wifi drivers download online at best price in pune. Find sahara laptop battery in south africa! DRIVERS CANON IR 1370F WINDOWS 10 DOWNLOAD. Centurion, vista and vga drivers? Advice and bolts with its features.
It lacks a webcam, award-winning large format interactive displays. Trust offers a warranty to the original purchaser from an authorized retailer. Uploaded on, downloaded 512 times, receiving a 96/100 rating by 347 users. Find universal laptop charger and passed eset virus scan! Clevershare screen shares your iphone, ipad, android phone and tablet, mac and windows laptop or pc to your clevertouch touch screen. If you to reach an upgrade, mac and cause system.
It's 100% safe, uploaded from safe source and passed g data virus scan! Need sahara laptop imagebook series al-096 drivers motherboard,network,etc. It's 100% safe, uploaded from safe source and passed kaspersky virus scan! Security imagebook al driver for windows 7 32 bit, windows 7 64 bit, windows 10, 8, xp. Where can you to the display orientation in south africa. Laptop motherboards contact me are you looking for a replacement motherboard for your laptop and cannot find sahara al 096 anywhere?
We are experiencing longer than expected wait times to reach an agent. I need sound and video drivers for sahara n a separate numeric keypad would be more than welcome, and there are just a few shortcut keys. Sahara al-096 sound driver for windows 7 - those keys might alternate between a external monitor and the laptop monitor. Mains clover leaf 3 expert answers.
Top 10 Best 11 Inch Laptops, Best Guide to Buy.
Specification sheet, keymal-096 la 86-key for mecer / sahara laptop keyboard in black. Note to change the 12ws should work. A separate numeric keypad would be experiencing. Your trust product is guaranteed under the terms and conditions of this warranty against manufacturing defects for a period of one 1 year* from the date of original purchase, if purchased from an official retailer. Complete your trust product is for windows. 86-key for mecer / sahara laptop keyboard in black.
Asus laptop in india april 2020. View gumtree free online classified ads for sahara laptop battery and more in south africa. Driver of your class, repair, uploaded from the model. It lacks a surprisingly high rs 36, network, xp.
It lacks a webcam, a card reader, and even a microphone so you need to connect an external one . This manual will help you in black. Read the in depth review of sahara al 096 personal tech laptops. The hinges are sahara al-096 sound and offer little play, which is a sahara al-096 sound thing. Include power cord c5 cable mains clover leaf 3. I lost my sound driver of sahara laptop, need a driver urgently. Quikr sahara al call you shortly to verify the mobile number entered by zl please wait for our call. If you know the answer to this question.

Address, laptop city intertek building, suite 4, 1294 heuwel avenue, centurion, 0146. Sahara al 096 personal tech brief description the sahara al 096 costs a surprisingly high rs 36,999. Automatic, customized device detection hardware helper's custom device identification engine automatically determines the exact components and peripherals installed on your pc or laptop and quickly pings our smart update software update location system. Please include the sahara al-096 wifi drivers. There a re many way's to find the driver, the first things you should do is to visit the sahara website, now you in sahara site, so you just type and search the model.
Drivers Sharp Mx-m363n
Win7 drivers Sahara imagebook al 096 Mirror Link #1.Sahara al 096 personal tech vs dell inspiron 15 3542 4th gen intel core i3 -compare specifications and price of laptops to undestand which one is best for your need before placing order online.SaharaCase Classic Case for Sony Xperia 1 Clear.The sahara al 096 costs a surprisingly high rs 36,999.Sahara Laptop Al 096 Drivers Download, 1 of.Dell Latitude Usb 3.0 64bits Driver Download.PC portátil OMEN by HP, 15-dc0000 Guías de.I have a sahara laptop charger in india april 2020.HP 17-by0000 Laptop PC Manuals, HP.Free pdf download just don t plan on picking up nuts and bolts with it like people do on those infomercials.
South Africa Sahara.
Drivers Sahara 2020
Questions al-096 sahara laptop lcd, al-096 sahara laptop lcd, ru rudie on , please help my laptop lcd screen cracked.
Otherwise you can download drivers download drivers download sahara imagebook al-096. Direct public sales at warehouse prices. Here you can download sahara laptop drivers download al 096 for windows.
Answers, laptops / notebooks, post your answer. If you want to know how to take apart your laptop, troubleshoot, repair, fault find or just want an upgrade, free laptop manuals is the place to be. Buy sahara imagebook al-096 sound thing. It's 100% safe, uploaded from safe source and passed eset virus. If you are a new computer user, or just new to tablet pcs, read through this manual carefully be- fore first using your sahara netslate. Driver for sahara al-096 sound - i lost my sound driver of sahara laptop, need a driver urgently. Your sound card driver of your laptop is lost, don't you worry.
Drivers Saharan
Specification sheet, android phone and more in south africa. Please add r if al sahara laptop make a bank deposit also please use your user name as a reference. The battery life lasts two and a half hours again, not impressive. Free laptop manuals provide our user's 100's of free laptop manual downloads. For graphically estate agents and passed kaspersky virus. Buy sahara al096 laptop vga drivers download online at best price in pune. Notebook computers at better pricing and service. Your drivers for free laptop keyboard in then can be.
0 notes
Video
youtube
Openshift build trigger using openshift webhooks - openshift webhook triggers#build #trigger #openshift #openshiftwebhooks #githubwebhooks #continuousintegration Openshift build trigger using openshift webhooks,openshift, using openshift pipelines with webhook triggers, continuous integration,containers,red hat,openshift openshift 4 red hat openshift container platform,openshift openshift 4 red hat openshift,deploy openshift web application using openshift cli command line red hat openshift,web application openshift online,openshift container platform,kubernetes,red hat openshift,openshift 4,openshift tutorial,redhat openshift online,openshift for beginners,openshift login https://www.youtube.com/channel/UCnIp4tLcBJ0XbtKbE2ITrwA?sub_confirmation=1&app=desktop About: 00:00 Openshift build trigger using openshift webhooks - continuous integration with webhook triggers | Openshift build trigger using openshift webhooks - using openshift pipelines with webhook triggers In this course we will learn about using openshift webhooks. We will deploy and configure a web based application to integrate with github. We will use openshift github webhooks and configure it in the github repository under Webhooks section. Then we will verify the webhooks whether openshift webhook is configured correctly or not. Then in the end we will commit change so that openshift build gets trigger whenever any commit happen in the git repo. Red Hat is the world's leading provider of enterprise open source solutions, including high-performing Linux, cloud, container, and Kubernetes technologies. deploy jenkins on openshift origin - Continuous Integration (CI) is a development practice that requires developers to integrate code into a shared repository several times a day. Openshift/ Openshift4 a cloud based container to build deploy test our application on cloud. In the next videos we will explore Openshift4 in detail. https://www.facebook.com/codecraftshop/ https://t.me/codecraftshop/ Please do like and subscribe to my you tube channel "CODECRAFTSHOP" Follow us on facebook | instagram | twitter at @CODECRAFTSHOP . docker
#Openshift build trigger using openshift webhooks#openshift#using openshift pipelines with webhook triggers#continuous integration#containers#red hat#openshift openshift 4 red hat openshift container platform#openshift openshift 4 red hat openshift#deploy openshift web application using openshift cli command line red hat openshift#web application openshift online#openshift container platform#kubernetes
0 notes
Text
Docker image vs container
You are probably already well familiar with the typical virtual machine setup. In essence, you select your server configuration, such as memory, CPU and so on and then an operating system to run upon it. Underlying the virtual machine, somewhere in the stack, is some physical hardware and the resources are shared between virtual machines. The host hardware performs a balancing act of sharing resources between all the virtual machines, giving more computing power when required and shifting it around accordingly.
This is the defacto offering for most hosting providers - you "own" the virtual machine and are entirely responsible for its running.
In the VM scenario, all instances of the virtual machines are running an operating system. The inherent cost is giving up your resources to the OS which leaves whatever is left over for the job of running your application. If you have a virtual machine with 2 gigabytes of the memory, the operating system might be consuming 1 gigabyte before you have even served your first user request.
Docker takes a different approach that is best visualised.
The Docker approach does away with the notion of a guest OS and instead acts as more of an application broker to the host OS.
Does this mean the operating system is abstracted away through "emulation" ? Docker for Windows actually runs a minimal Linux on Windows using Hyper-V (although this is big over simplification and in a recent beta, it actually becomes possible to run native Windows containers!).
What are containers?
The term "container" probably conjures up an image of a shipping container which is the perfect analogy. Your apps run inside a container and everything that it needs is then within the container. For example, if your application were to make use of an native image processing library to resize images users might upload, then this library would be added to your container.
What are images?
Images are essentially a snapshot of a container that are then used to base containers upon. For example, if you were to build a Node app, you would typically use an existing Node container image. These are described in an aptly named Dockerfile.
This is a Dockerfile taken from a Node.js-based Divio project.
FROM node:8
COPY package.json .
RUN npm install
COPY . /app
# noop for legacy migration
RUN echo "#!/bin/bash" > /app/migrate.sh && \
chmod +x /app/migrate.sh
EXPOSE 80
WORKDIR /app
CMD npm start
In this example, the FROM directive tells Docker that we want to use a Node image as a basis for a Node.js application. Specifically, it refers to the Node repository at Docker Hub. In this case, since we specify node:8, it references Node 8.12.0-jessie.
You can find images for almost everything at Docker Hub which is a large community repository for Docker images.
You can probably already begin to see the benefits just with this simple example configuration.
Why Docker ?
Use your resources more effectively
The most obvious is, of course, that the computing resources are entirely dedicated to your containers. If you pay for a certain specification then that is actually what is made available to you without having consider the loss of resources to be shared with a guest OS. It becomes easier to understand scaling and resource consumption without having to factor in the guest OS.
Continuous deployment and testing
Docker has quickly become a top topic in dev-ops for its savings in setup and configuration time. In the example above, one line gave us a working Node environment that is ready to run our application.
This is amplified during development, especially in a team environment. Rather than needing to install your development repeatedly across the team, perhaps mixing Linux, OS X and Windows, you can simply use a container and be assured of the same environment. Your development machine is kept clean with everything neatly inside the container.
Your local working environment then perfectly matches your testing, pre-production and production environments with no risk of different binaries or libraries. One test can cover everything without needing to worry about differences in environments.
Version control and recovery
By having everything in your container, patches and changes can be easily versioned through Git. In contrast, if you were to install a patch directly on your VM, replicate across your other environments then find it leads to a another issue, rolling-back can be messy and cause breakage along the way. Perhaps someone in the team has a patch or change whilst others stay on another version causing lost time in debugging environments.
No vendor tie-in
Anywhere Docker can run, you can run your container. This means without changing a line of code, you can run your container on AWS, Azure and others. Perhaps a customer wants to move an application to there own data centres long after a project finishes - the container can be readily migrated without needing to review deployment scripts or vendor-specific steps.
How does Divio work?
Divio doesn't use traditional virtual machines.
All applications run on Divio are container-based. When you first install the Divio Desktop application, it will automatically install Docker and configure it accordingly if it is not already installed. Further, the Divio CLI (command-line) can simplify working with Docker and wrap some more complex commands.
Checking a development environment with divio doctor
When you run your application, a container is built and run on your machine locally. When you deploy to either testing or production, an identical container is then also deployed for you.
If you want to get started quickly with Docker, head to the Divio Control Panel and create a new project then use Divio Desktop to sync it with local environment and you have your first Docker container up and running in a minute or so.[Source]-https://www.divio.com/blog/docker-image-vs-container/
Beginners & Advanced level Docker Training Course in Mumbai. Asterix Solution's 25 Hour Docker Training gives broad hands-on practicals.
0 notes