#Dowell Moulds
Text
WILL 3D PRINTING SPELL THE END OF PLASTIC INJECTION MOULDING?
What if you could create anything you wanted with just a click of a button? Imagine a world where plastic waste is reduced to a minimum and products are customized to your needs. This is the vision of 3D printing, a technology that allows you to create physical objects from digital models by adding layers of material on top of each other.
To leran more about 3D printing visit:https://www.dowellmoulds.com/blog/3d-printing-spell-the-end-of-injection-moulding
#Dowell Moulds#3D printing revolution#pros and cons of 3D printing#environmental impact of 3D printing#3D printing vs. plastic injection molding#mould manufacturers#plastic mould manufacturers in India.
0 notes
Text
Extremely Strong Shower Bench
I've gotten feedback from the community asking me to share my plans, so here it is. If you want to build your own shower bench, this is how you do it. Make sure to ask a thinno for help, this will not be easy to do!
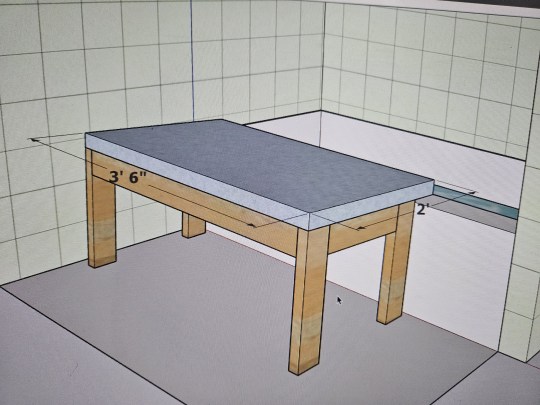
This is an extremely strong shower bench with a 1000+lb capacity. The floor under you will fail before the bench does! This shower bench is designed to remove you from the shower and basically have you sit on the ledge. You will need a couple feet of clearance away from your tub's ledge for it to work.
The top of my tub's ledge is about 1' 3⅜" up from the ground. If yours is taller/shorter by more than ¼" or so, you will need to make some adjustments to measurements down below.
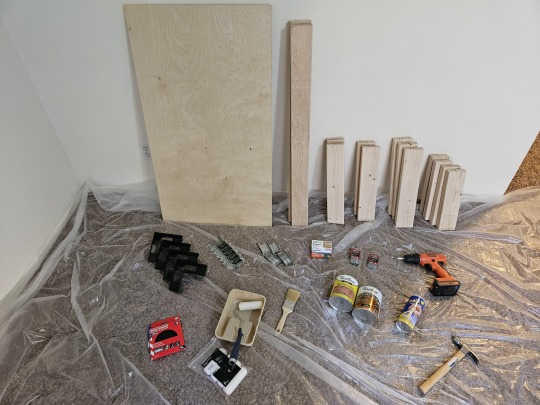
This is a photo of the materials I used to make this build. I got everything I needed at my local hardware store. My build wasn't perfect though. I would suggest you learn from my mistakes and acquire a slightly different material list though:
1x 2'×4' plywood sheet. Get something pre-sanded and rated for outdoor use. I recommend ¾" thick.
2x 8' 2×4s. Most any wood type will work, so get what you like most. I just got some normal 2×4s and made sure they looked pretty. If you don't want to bother with staining or weatherproofing the structure of your bench, get pressure-treated 2×4s.
4x 2' ½"×½" square dowel.
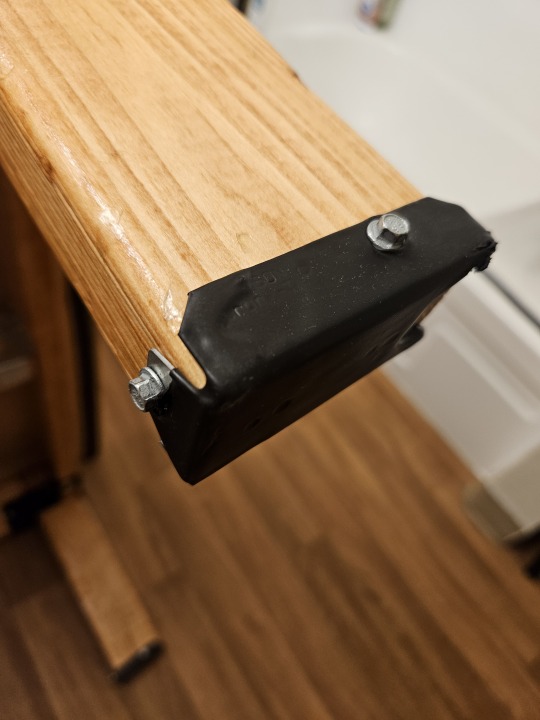
4x Simpson Strong-Tie RTC2Z. Get the black-powder-coated ones if you can.
2x Simpson Strong-Tie LUS24Z. These will be used for the cross beam.
4x Simpson Strong-Tie FB24Z. These will be the feet.
1x Simpson Strong-Drive SD9112R100 #9×1½" 100ct Connector Screws. You won't use the whole box. It comes with a bit.
4x 3" common nails.
32x 1½" common nails.
35x 1" brad/finish nails.
200-220 grit sandpaper.
Oil-based high-gloss polyurethane.
Small dense-foam roller & roller pan.
If you're applying stain, oil stain & staining brush for oil stain.
Liquid rubber. Get something that will provide grip.
Rubber-foam weather stripping. The thicker and wider, the better. I got 20' of 1¼"×7⁄16" and it worked great for me.
4x paper clips, hair ties, or something to hang the feet from.
A plastic tarp, thickness is more important than size.
As for tools, you really only need two things:
Hammer
Drill, ratchet, or socket screwdriver
OPTIONAL: File or knife
I also highly recommend some PPE. Get some cheap/disposable cleaning gloves, a mask of some type, hair ties for your hair, and an old change of clothes.
If you don't have access to a table saw at home, *don't leave the store yet!* You need to cut your wood at the store. Many home improvement stores will cut your lumber for you, either for free or for a low price.
Ask an employee to cut the two 2×4s like this:
2×4 #1: 38", 38", 17"
2×4 #2: 33½", 33½", 13", 13"
NOTE: If your tub ledge was taller/shorter than mine, then for every 1" difference, lengthen/shorten each 33½" cut by TWO inches.
Then ask them to cut two dowels down to 20½", and two down to 24".
You should also ask them to take 6" off the short side of the plywood, so it's 2'×3½' instead of 2'×4'.
You're not ready to leave yet! You need to make two more cuts, and the store employees will not help you with these. Many home improvement stores will have a DIY handsaw table where you can cut moulding down to length. You'll need to use this to make the last two cuts yourself.
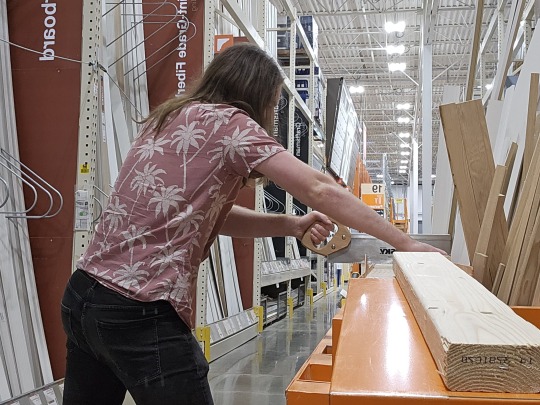
You need to make an ANGLED cut into the 33½" boards. Lay the first 33½" board down flat as shown. On the edge closest to you, mark a point 1' 5⅛" away from the left end of the board. Then on the edge farthest from you, mark a point 1' 5¼" away from the same left end of the board. Position your saw across both points, and cut through the board. You may need to roll the board over to finish the cut.
NOTE: If your tub ledge was taller/shorter than mine, then for every 1" of difference, add/remove 1" from the 1' 5⅛" / 1' 5¼" measurements above.
For the second board, *do not measure!* It is more important that the cuts in the boards be identical than it is for any one cut to have exact dimensions. Lay the second board down, then set one of the cut pieces on top so the ends of the two boards are aligned, then use the existing angle in the cut piece to start the cut in the second board.

When you are done, you will have four boards, two slightly taller than the others, with the exact same angle cut in all of them. In the above photo, the boards are resting on their angled ends. These pieces will be your long and short legs.
NOW you can bring everything home.
First, lay down your tarp somewhere. Ideally you'll have access to a 5'×10' flat area outside.
Then you need to sand *everything* (except the big faces of the plywood, and the pressure-treated wood if you went that route). Pay special attention to the corners and cuts in the wood.
Now you need to attach the square dowels to the outside of the plywood board. Choose a face of the board to be the "up" face, the one you'll sit on. Put the 24" dowels on top, right along the short edges. Choose a long edge to be the back, and squeeze the two shorter dowels in along it between the side dowels. Nail everything down with the finish nails.
Next is staining, if you chose to stain. Apply according to the directions on the tin. You will likely have to do multiple coats.
Now the truly hard part, applying polyeurethane. I recommend using the foam roller for this and applying many coats. You can prop up the plywood sheet using the 2×4s if you like so you can get all the way around the edges in one pass. You'll still need to flip it over and do three more passes when done with the top, so you can protect the underside from warping.
While waiting for your polyethylene to dry, you may as well make the rubber feet. Grab your four FB24Zs and tie something through one of the holes in the end. Open your can of liquid rubber and follow the instructions to fully submerge each one before leaving it out to dry. One coat should be enough. Once dry, try to remove excess rubber from the inside using a file or knife.
When everything's had a good long dry (at least a day after final coat), it's time for assembly.
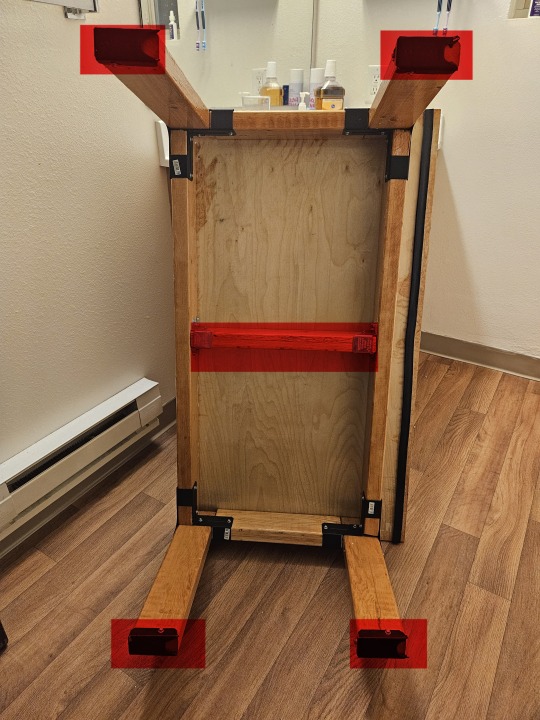
Grab your two 38" boards, your two 13" boards, all four of your legs, and your four RTC2Zs — everything except what's highlighted red in the first photo above. Set the 38" boards down on their narrow side along the long edges of the board, and the 13" boards down on their narrow side along the short edges of the board. Bring them together to form a rectangle, then set the RTC2Zs upside-down on the corners. Each RTC2Z has an L-shaped hole in its bottom; the top/bottom of each L-shaped hole will be filled by the ends of the 38" boards, while the center and left/right of each hole will be filled by the legs. The ends of each 38" board will butt against the wide side of the legs, while the ends of each 13" board will butt against the narrow side of the legs. Now make sure everything is pressed firmly together as you use the Strong-Drive screws to attach the RTC2Zs to the 38" & 13" boards. For each corner, four screws go into the 38" board and two screws go into the 13" board. *DO NOT ATTACH THE LEGS YET!* The legs are just here for spacing right now. Remove the legs when everything is attached.
Grab your 17" board and your LUS24Zs. The 17" board should squeeze in nicely right in the middle, turning your blocky 0 into a blocky 8. Straighten out your LUS24Zs if needed (mine were bowed outwards too much), set them down over the ends of the 17" board, and use 4 screws each to attach them to the sides of the 38" boards. Now grab your long 3" nails and use two on each LUS24Z, installing them at a 45° angle into the remaining holes. They'll nail at an angle into the 17" board and go straight through into the 38" board.
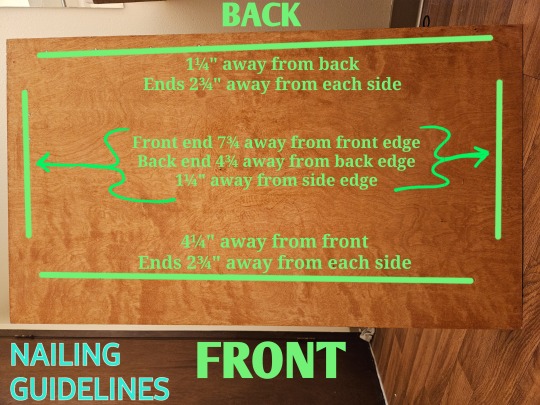
Flip everything over such that the plywood board is now resting good-side-up on top of the mostly-complete frame, with the whole thing resting on the rounded bottoms of the RTC2Zs. Center the frame between the left and right sides of the plywood (should be ½" overhang on each side); let the plywood's back overhang ½" off the back of the frame, and its front overhang 3½" off the front. Now use the 1½" common nails to nail in the plywood into the frame. I used four lines of nails, one for each outer board; measurements are in the second photo above.
OPTIONAL: Apply a final polyurethane coat over the nail heads. This will need a day or two to dry.
Screw the feet into the ends of the legs. See the third photo above for a reference. Try to make the feet as straight and snug as you can get them.
Insert the legs into the holes left from step 1. The short legs go in on the front side, and the long legs go in on the back side. You should have a bench that tilts slightly forward, to allow for water to drain into the tub. Use some sort of material as a spacer as necessary to adjust each leg to level out the bench. Don't be afraid to introduce gaps between the legs and the plywood; the metal connectors are what hold the weight. Once everything is nice and level, use six screws on each leg to attach then to the RTC2Zs.
Apply your rubber-foam stripping. I applied stripping all along the length of my tub's ledge AND along the underside of my bench.

And you're done! Your bench will look different than the photo above, I hadn't yet added the stripping, the wooden dowel siding, or the feet. And perhaps you chose a different stain color, or made your legs out of pressure-treated wood! In any case, this thing is built like a tank (made with actual home framing materials) and shouldn't break easily. I hope it serves you well!
16 notes
·
View notes
Text
We Backyard Foundry

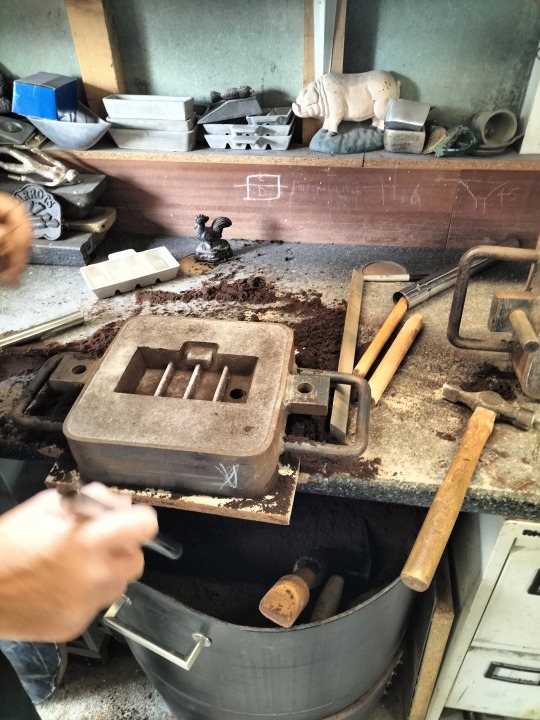
August, Tuesday, 23rd, 2022 the Museum of Making workshop team travelled to Artisan Foundry, Liverpool for a one-day course in greensand foundry practice, patternmaking and casting.
The course was taken by Art, an experienced foundry trainer and practitioner. The comprehensive course taught everything from sand moisture content and pre-moulding preparation, setting new and old patterns for moulding, ramming sand techniques, correct mould venting, sprue cutting, chemical additions to metal, heating and pouring hot aluminium and other metals such as bronze and gun metal.
Undertaking the course was preparation for commissioning the Museum of Making workshop crucible -- the final piece of equipment to be brought to life in the newly-opened museum workshop space. Post course, with the critical H&S and casting PPE regimes poured into our minds (aluminium melts at extremely high temperature) - the workshop is preparing to design courses and demonstrations in patternmaking, greensand moulding and metal casting.
Below is a selection of images in a quasi non-linear order featuring Steve, Arthur, Andy, and, of course, the mighty Art.

The green foundry student checking the ‘greensand’ which isn’t green but red. Green denotes it is damp and sticky with natural moisture and clay. Art left, Andy right.
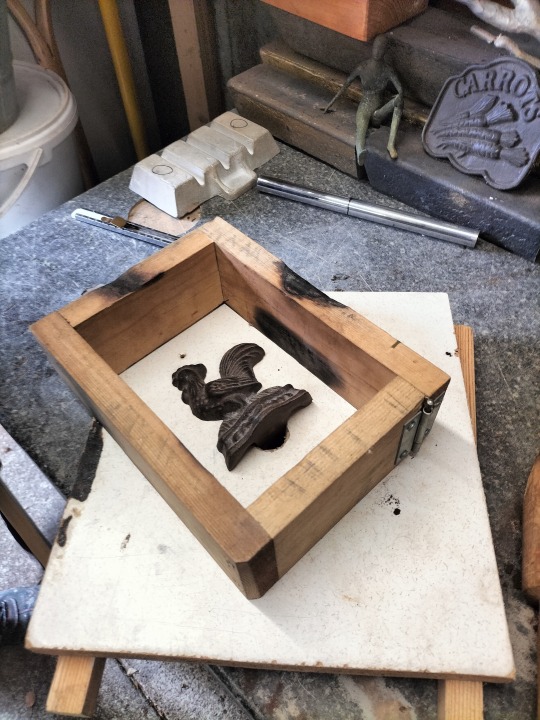
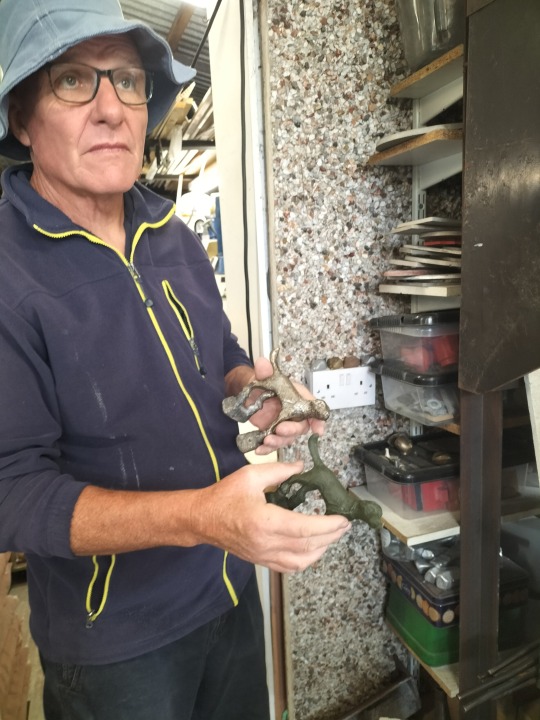
A chicken doorstop casting repurposed as a ready-made pattern, moulded to make another slightly smaller chicken doorstop in aluminium - (all cast metal shrinks after casting, aluminium about 1mm for every 70mm 1/70 -- patternmakers use special calibrated ‘expanded’ contraction rules). Using the casting from an original pattern as the next pattern and then that cooled casting as the next pattern the chicken casting would, of course, eventually stop being there. Don’t copy copies then.
Art also runs a day course in lost wax casting. Lost wax casting as everyone knows is the oldest industrial casting process known to man. As a workshop, we will at some point be lost wax casting.

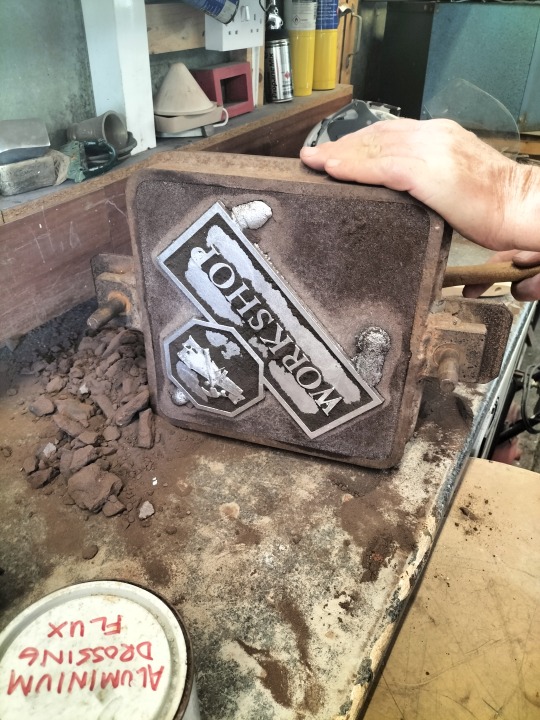
The Museum of Making is the keeper of hundreds of cast metal plaques, mostly railway related, which carry information in the form of cast text. With a crucible in workshop and the greensand training in place we intend to run courses wherein makers can create their own word signs using handmade or off-the-shelf white-metal or plastic letters, 3D text simply applied to a flat backboard.
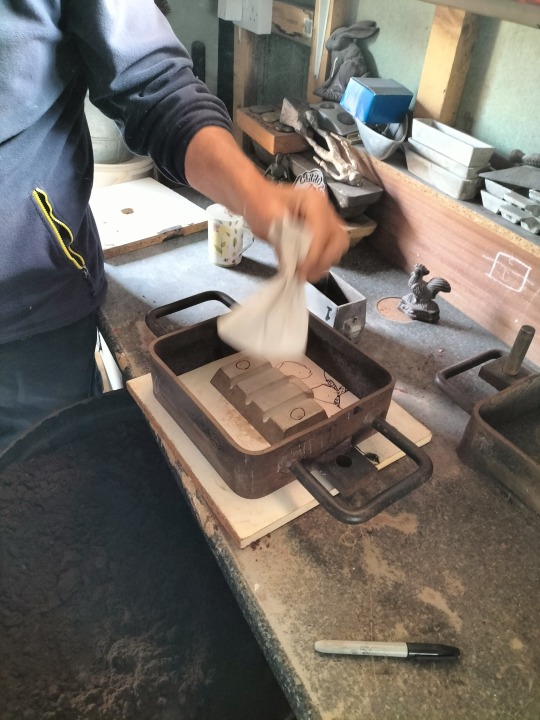
Art is here applying a parting powder to a metal ingot pattern. A bit like talcum powder, it is kept in a traditional permeable muslin ‘pounce bag’ and the trick is to dust the pattern as if with icing sugar evenly. Parting powder stops the wet greensand sticking to the pattern and the mould sand tearing when the pattern is withdrawn after ramming. the sharpie circles denote where we are to cut riser and runner system.

We decided to cast a sign for Museum of Making workshop. The aluminium plaque pattern in the picture is ready-made and different sized letters and fonts and logos can be placed on the pattern to make varying bespoke castings. Bit Jamie Reid meets Fawlty Towers going on at this stage. The letters and logo are attached using Copydex latex glue which holds objects in place for moulding but can be pinged off - and glue residue piggled off - to clean up base pattern and let letters be used again.

Parting Powder mist

Art closing the two parts of a mould - known as ‘cope’ and ‘drag’. Cope is the upper box and has locating pins, drag the lower with accepting negative dowel holes or ‘eyes’. A mnemonic to use the moulding boxes in correct sequence is “eyes down”. You can see the down sprue and riser cut into the cope like two eyes in a strange Bruno Munari abstract face design. (Design as Art, Bruno Mari, 1966)

From this image you can see that the the ingot pattern is placed in the drag first, which is common. The pattern has no core box and is known as a shell pattern. The pattern makes its own cores which are extensions of the sand rammed up in the cope after the drag has been processed and turned over for the second-stage of sand moulding process. This ingot piece is also a good example of a ‘flat back pattern’, i.e., the pattern is placed flat on its back on a moulding board before sand is rammed (compacted) around it. * For a fuller description of different types of pattern equipment see Patternmaking Explained to Children - Steve Smith Museum of Making Tumblr).

Once a mould is completed and ‘closed up’ on its pins - and pattern of course withdrawn - the paired boxes are set on the floor ready for casting in the hot metal needed to make the required casting: iron, bronze, gunmetal or aluminium. The sprue and riser holes are then covered to prevent debris entering the mould before casting - usually a piece of wood is used. The ‘sprue’ is where the metal is poured in and the riser is usually diametrically opposite the pouring gate. The riser is there because the air within sealed mould must escape pushed out by the incoming stream of metal from the runner -- the riser also acts as a reservoir of metal and heat to feed the shrinking casting. When metal appears running up the riser to the top of the cope box the furnace pouring person realises the mould is full of hot metal and desists feeding the mould.

Art pointing out the particular sections of a ramming ‘dolly’. The tapered wedged section nearest to our instructor is designed to get into the tight corners a multiform pattern will present, the opposite flatter end - more mallet-like - is for when the pattern has been fully embedded in compacted sand and the rest of the void of the box is filled with backing greensand which provides the supporting structure of the fragile mould. Making these dollies in-house is easy and looks a good coproduction learning opportunity (how-to-turn-between-centres) for a Museum of Making volunteer. You Know who you are...
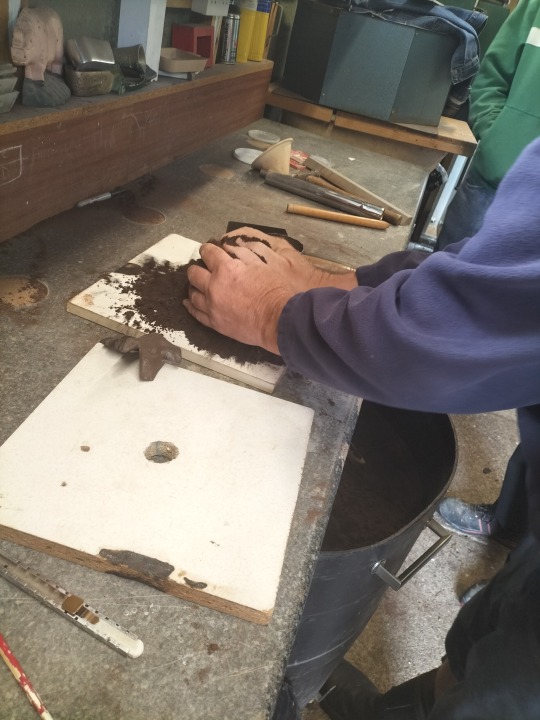
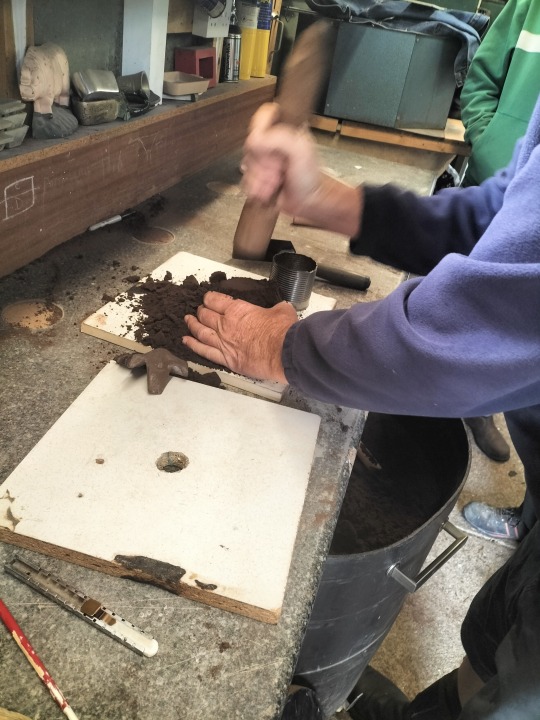
Greensand has to have just the right moisture and natural clay content to make it mouldable -- not too dense. thick sticky sand can prevent dangerous high-temperature chemical gases permeating through mould in the red-hot casting process. Here Art started to explain the properties the sand should have by demonstrating ‘by hand’ and in practice how right-damp sand should feel and behave under compression. At Ilkeston College, as apprentice patternmakers, we had to also complete City &Guilds Foundry Technology and Metallurgy examinations and empirical practice in college micro-foundry was essential. We used a closed flask - a bit like a cocktail shaker with a dial attached - to measure the moisture and chemical contents of greensand. If sand is too wet there can be gas-driven (steam powered) explosions - very dangerous - too dry and sand is friable, and casting will be a ‘scrapper-shitter’ filled with unwanted washed sand (inclusions) from decomposed mould.

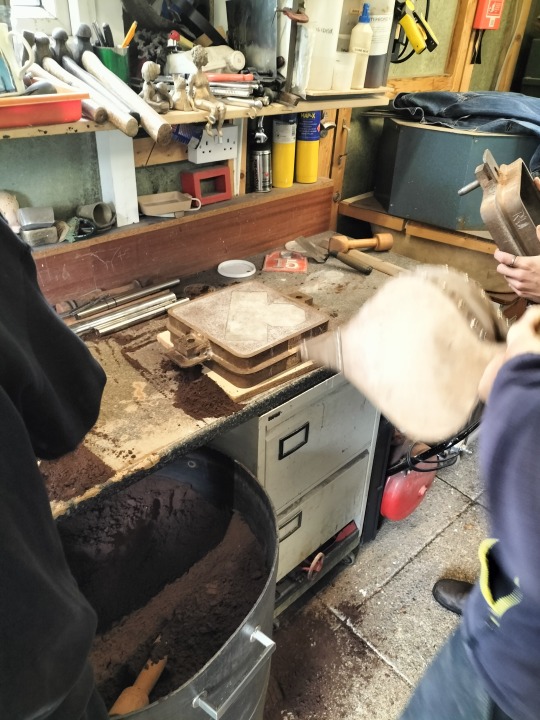
Early stages of moulding: taking sand from Artisan Foundry under-bench greensand storage bin. The bin has a lid and a plastic membrane to retain moisture and keep out contaminating materials. Andy is here taking sand from the bin to start filling his wooden moulding box, the frame you can see on bench placed around the ‘Chicken Doorstop’ pattern. A sieve can be used to sift the sand that ‘faces’ against the pattern or - as here - you simply rub the sand through the palms of the hands feeling carefully to eradicate lumps and spot unwanted stones, even old cast metal amongst the essential fined-out stock material. Arthur has made a hybrid sand and moulding bench crossing Art’s bin with a foundry station he saw when a Derbyshire school D&T Technician for our workshop.
The WORKSHOP pattern is nested in the drag -’eyes down’ box - after ramming with wood dolly on moulding bench top. The welded metal moulding box has been carefully turned over and, before the cope box is located and the cope rammed to make the second section of the complete mould, excess parting powder applied to back of pattern and joint sand is removed with a pair of traditional bellows. This historical-but-still-used old-school air-making device is held away from box to avoid blasting the fragile sand with over-compressed air.
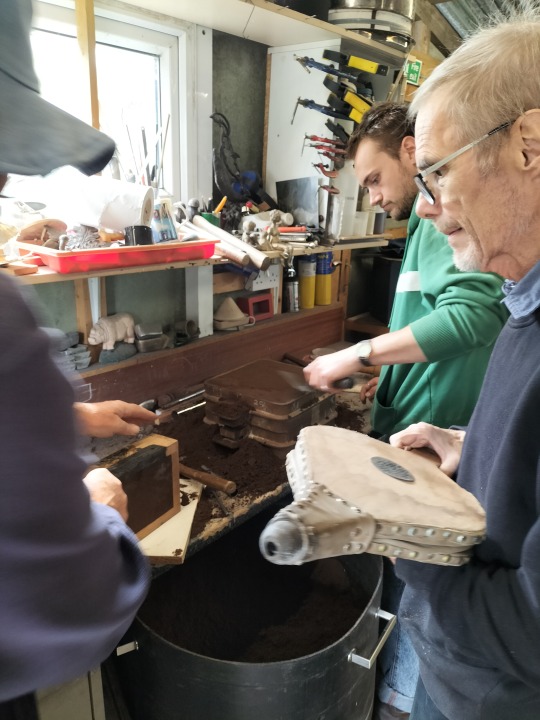
Art coached the Museum of Making team throughout our training visit to Artisan Foundry. Passing on relentless tips and dodges (’hacks’) - learnt through his own empirical practice as a jobbing foundry man and educator - in his thick scouse accent Art passed on priceless knowledge. The background has Arthur ‘sleeking off’ the top of the cope box with a moulders trowel. The next step is to then split the completed mould, withdraw the pattern and cut pouring sprues and risers, as well as vent the cope-section sand where necessary.
Small scale moulding boxes - in the sub-culture of the maverick ‘Background Foundry’ - can be made from simple homemade square section softwood. Not ideal foundry material, in all-ways, as the hot aluminium or (especially) iron can easily set alight the timber box; spot the combusted charred areas on the DIY ‘flasks’ in these images. To avoid this dramatic, though hazardous, outcome post moulding and before casting these boxes can be stripped from the sand blocks before pouring. Look closely and you can see the ‘loose-pinned’ butt hinges. Withdrawal of the thin wire pin ‘hand-grenade’ style releases the knuckle of the hinge and the box can be opened out away from sand. The box-less cope and drag can be reassembled - closed up as if with traditional moulding boxes - and the metal cast into what is termed in foundry jargon a ‘flaskless’ mould stack.
I trained at Stanton and Staveley Ironworks in Derbyshire 1977-1981. As part of our industrial education, we were exposed to the ‘real-life’ of Erewash Foundry. If you have never been inside a dark industrial dirty hot and dangerous foundry, it can seem like a kind of hell-on-earth scene. I recall monster bogeys of hot glowing spitting iron whizzing around the foundry (high in the air suspended from overhead moving cranes) glowing orange against the dark interior of the black sand-dirty foundry. In the late seventies none of the iron casting men or moulders - iron melts at 1200 degree centigrade - were equipped or supplied with regulation protective gear, except perhaps loose moulding boots which had a quick release fastening to allow leather ankle boots to be kicked off when spitted-out dangerous metal splashed inside the shoes and would burn through skin and bone until it came through the bottom of the foundry workers’ foot. Rather than wear thick fire-resistant smocks or leather aprons - as Andy is wearing here - hard Ilkeston men simply sported layers of thick wool jumpers which hopefully slowed down and cooled the ever-present flying spots of molten iron that peppered those pouring iron from oversized industrial ladles into equally oversized industrial-scale sand moulds before they hit skin. PPE advice was a topic Art majored on.

In the spirit of DIY renegade Backyard Foundrydom, Art had improvised a blast furnace from what looked like an old stainless steel camper-van oven and some square refractory bricks. The metal is heated by a propane-gas-bottle generated -flame through a hole in the contrived cupola to play on the small melt-crucible into which the raw aluminium has been placed. In this image Art is plunging a ‘de-gassing’ agent into the red-hot non-ferrous metal to chemically purify molten material before casting. A small section of a broken-up 50mm x 20mm round tablet (about the size of a walnut) is forced to the bottom of the hot melting metal until dissolved. The resulting dross (slag) is then skimmed of the surface of liquidised aluminium.
Empty moulding box awaiting pattern. In fact the dowel locating pins at the end of the fabricated-steel box indicate that this is the ‘cope’ top box. The cope pins are dropped through the receiving accurately-machined hardened-steel bushes on the base ‘drag’ box of the two-part mould which has already been rammed up with pattern in situ. Because the drag has no protruding pins the metal container which holds the green sand can be placed around the pattern on the same flat ramming board. As Art pointed out, and I pointed out above, a good aid to remembering that the drag is rammed-up first is the bingo catchphrase “eyes down”.
Here you can see the metal ‘shell pattern’ of the ingot mould bedded (post-ramming) in the drag which has been turned over ready to take the cope box and then filled with greensand compacted with the dolly so completing the two-part mould. The pattern is again dusted with parting powder as is the sand mould joint to avoid sand adherence to either surface. Facing sand is riddled onto the pattern for a finer cast finish before un-riddled sand is used to build up the back of the mould.

Sand is kept in a plastic bin covered with polythene and a tight-fitting lid to help sand remain damp and so clay-sticky for successful mould-making. Note the chalk X-X marks on both boxes. This is done to ensure mould is reassembled - post-pattern withdrawal, and pre-casting re-closing of mould - in correct position, i.e. closed in the same end-to-end ‘handed’ relation as the boxes were when rammed up.


Parting dust, like scotch mist, rising from earthy mould. (It takes your breath away.) Pretty sure in the heyday of Foundry life and Northern Soul ( early-mid1970s) them lad dancers - many of whom would’ve worked in Midland foundries-would have filched parting powder from work to save on the more infamous talcum powder sprinkled on floors of soul all-dayers and all-nighters. Art where you a Casino-Soul Star?

Andy drives the Dolly into the un-sieved greensand to ram up the cope section of mould, taking care to make sure sand is evenly rammed - but not over-rammed since over-compaction of sand leaves fewer micro apertures for hot gases and steam to rise through greensand created by hot metal poured into closed mould - Iron, Aluminium, Bronze, gun metal etcetera. (To allow gases to escape - which can blow cope and drag apart in large moulds - floor hand-moulders used/use a fine sharp rod of about 1.5mm diameter to pepper the sand above the pattern (but not hit the pattern) with vent channels. Art showed us this process using his pinched fingers holding the venting spike as a depth stop to create deep vents, but vents stopping above mould surface.

Cope and drag boxes rammed successfully, the boxes are split, pattern ‘rapped’ and lifted carefully from fragile surrounding sand revealing requisite negative impression of positive pattern into which hot molten metal will run after reclosing boxes.
Because this ingot mould is a two part mould in which the ‘cods’ or ‘cores’ which form the metal troughs of the finished ingot casting are ‘self left’ and so would ‘hang down’ if the standard Drag and Cope order had been followed, experienced Art inverted the order and so the cods are raised up from the sand by making the rammed up cope the drag. As in all forms of making there are general rules but no unbreakable ones. In making the cods stand or sit up in the mould this avoids potential situation in which unsupported cods would be suspended - merely held together and to the backing sand by moisture and sticky clay - and as such could snap off when inverted pre-casting. In Art’s right hand can be seen a short section of hollow metal pipe (Ikea wardrobe rail) he has just used, as can be seen in right aperture of mould, to bore a runner hole through the rammed sand to the top of the (upside down) cope. Hot metal will be poured (cast) through the runner - metal running downwards with gravitational forces - into the negative empty cavity of the pattern-formed ingot mould ready to shape liquid plastic metal.

Art boring out the riser through which the metal and air are expelled under diametric pressure from runner and elevated poring basin.
The runner we are to pour the metal down is approximately 20mm in diameter and exits the mould through the top of cope and is connected to underside of finished ingot casting. However, it is difficult to aim the viscous heated aluminium into such a constricted channel from an often cumbersome pouring flask. To aid filling the mould with metal and avoid hot aluminium running free and dangerously over the top of the glassy flat cope sand, down the side of the moulding box, onto the floor, potentially splashing casting-person’s boots - a pouring basin is made up with a wider tapering channel through which the hot metal can enter the narrow runner. The extra height also gives favourable downwards header pressure - like a water tank in a loft - to drive the immediately -cooling-now-unheated metal ‘faster’ into the mould and up the riser. This is often called a basin. The top reservoir of hot metal also aids the shrinkage of the casting. As the aluminium or iron cools down it dimensionally contracts, as I said. As it contracts against the cool sand of the damp mould it needs to be ‘fed’ with molten material. The basin then acts as a surplus tank supplying the hot-thirsty nascent casting with the metal feed it requires. Many larger castings require internal ‘feeders’ which are made to prevent shrinkage in a casting, which means a cast object becomes a failure or ‘scrapper’. As a first-year apprentice I was made to make feeder patterns for the first six months of my training as a patternmaker.

In the maverick spirit of the Back-yard Founder, Art has used an old pineapple ring tin as a flask for his pouring basin; the sprue cutters were crafted from truncated chrome Ikea wardrobe hanging rails.

Casting or moulding boxes don’t have to be heavy metal. This small flask has a removable pin and so the wood frame can be deconstructed and removed from sand mould leaving a ‘flask-less’ block of green or core sand that hot metal can be poured into. Working this way a backyard foundry can make multiple small moulds - and thus cast artefacts - from a single pattern and moulding box in readiness for a serial pouring and crucible firing. The box is clearly made from some simple stock softwood and hinges buyable from a DIY store but painted with red pattern varnish to avoid deterioration from wet sand.
Art and Artisan cast in a variety of materials. Plaster kept out back of workshop.

Small flask used in shrinking casting chicken doorstop with articulated flask.

Artisan foundry shop sells aluminium and bronze ingots for backyard casting community and homemade DIY foundry punks. We have spoken in workshop about the potential clever buzz around running short casting courses at Museum of Making wherein attendees bring in their own used beer cans. Post-weekend binge, smelt the used-up Brew Dog and Special Brew aluminium tins into interesting new products: chicken doorstops, nameplates or other unimagined contemporary material wants. Art cautioned against this: ‘Paint’s toxic lad’, ‘poor quality ally to be fair lads’, ‘you don’t want sticky booze-smelly ally cans hanging around a workshop do yer lad’. In the above photograph the- casting newly-knocked-out-of-steaming-hot-sand-mould is a casting poured into the mould taken from the ingot mould Art uses to cast sellable ingots, used as a pattern. Thus on the day we cast our own ingot mould for Museum of Making workshop for casting ingot bars. The ingot mould was cast from reclaimed aluminium core-wire that is used in high voltage electricity cables -- so you can use recycled ‘found’ metal. A casting course offering potential neo-backyard founders to make their own ingot mould might not grab audience. But if I modify physically the form of the ingot pattern to make a partitioned ingot-like casting and reconfigure (recast) it descriptively as a object into a pistachio-Bombay-mix-Italian caper-kimchi presentation receptacle for table top appetisers, things sound more appetising. As the Italian saying ‘L’appetito vien mangiando’ wisely advocates ‘with eating comes appetite’. I also think casting a small aluminium pie dish has potential. The silvery stems you see poking from the sand are the runner and riser connected to pouring basin.

Various tools and casting ladles needed for backyard foundries. Make your own kit if you can

Steve Smith
Workshop-Studio Manager
Museum of Making
February 2023
3 notes
·
View notes
Text
Cedar Trunk


The trunk's lid had separated along a crack, so I drilled small holes into each side of the separation and rejoined them with dowels.


Three of the four legs were lightly damaged, but one had already begun to pull nails through the trunk's base. I removed more than 50 nail gun nails from this trunk, none of which were original.


I used a hard wax finish for the trunk after sanding and conditioning. The previous owner had drilled raw holes entirely through the base to house bolts of the previous feet. To avoid further compromising the wood, I drilled holes into a supporting plank and inserted housing for the bolt, both in the new feet and in the new plank. The planks are each attached to the base with four narrow moulding/trim nails.
0 notes
Text
Planning and Research For My Current Story
The Playground:
Split between a jungle gym and a sand box. The jungle gym is full of swings, slides, ramps, and climbing frames, along with accommodations that allow those with mobility aids can still join in the fun. And sits on soft squishy floor padding. While the sand box was full of shovels, buckets, tonka trucks and moulds to make 3D images in the sand. Under a wooden shelter.
Concept For Inclusive Playground1:
Website name: mustdobrisbane.com
URL: https://www.mustdobrisbane.com/kids-outdoors-kids-parks/city-botanic-gardens-playground-cbd
Diggers: Has a platform seat with arm that had a bucket on the end that can be moved by two levers to pick up sand and drop it again. They can also swivel left and right.
Sand Fountain: A series of circular trough that is filled with sand and refilled at the end of each day by fancy pipping and high pressure that pushed sand out the top. Trickling down till each trough was filled.
Wheel Chair Inclusive Carousel:
It has three spaces for a wheel chair, complete with metal arm rests and locking mechanisms on the floor to keep the wheels in place. It can be pulled around by an able bodied person via handles connected the metal arm rests, or someone can use the metal disc steering wheel in the middle of the carousel.
Jungle Gym:
There are three towers that are all at kid level but were all still at notable different heights: small, medium, and tall. The small tower is connected to two lower platforms with ramps that had a number of ship steering wheels and cannons that shot small soft balls.
The small tower has a small twisty slide coming off it and on the inside on it’s platform there is a steering wheel and console of buttons-mirroring a spaceship.
The medium towers is connected to the small tower via a metal bridge and on the inside on its platform there are U shaped steering wheels, a console of buttons and to leavers- mirroring a plane cockpit. And the tall tower is connected to the medium tower via another metal bridge and had a huge tunnel slide coming off it.
Between the towers there is a climbing frame net made out of thick ropes and in a pattern of a massive spider web. All the buttons and leavers had different textures on the tops and handles, all the bridges had hand rails, and all ramps and walkways have 4 rows of small raised dots running up the middle so those that uses a cane to navigate could still do so.
Interactive Play Board:
Three circular disc board that have different items to play with. One has a large xylophone with a thick long dowel stick attached visa a long piece of rope, one had all different types of gears that when you crank a handle the gears turned, and one has a massive hour glass encased in glass and attached to an axes so it could be spun.
Wheelchair Friendly Swing2:
Website Name: Glam Adelaide
URL: https://glamadelaide.com.au/wheelchair-friendly-swing-opens-in-keiths-don-moseley-park/
The frame is a long bar with two legs coming out off it at both ends and in opposite directions.
Four poles- two each side- connected to the middle bar with chains looped over and to the bar on the other side. The free ends then connected to the sides of the chair.
The chair itself has tall sides and a short back rest. It had tracks for the wheels and a locking mechanism attached to the back rest to keep the it in place.
There is a ramp so the user can get on and the chair can detached once the user is ready to swing.
0 notes
Text
Fortifying Your Fence: Winterproofing Tips for Long Life
Your fence is more than just a line between properties; it's a guardian of your privacy, a safety barrier, and sometimes even a decorative touch. But come winter, harsh weather can put a strain on your fence panels and fencing. With a bit of TLC (tender loving care) before the cold sets in, you can ensure your fence weathers the winter storms and continues to stand strong for years to come.

Bracing for Battle: Pre-Winter Fence Maintenance
1. Inspection is Key: Before winter tightens its grip, become a fence detective! Walk the perimeter of your fence, checking each panel and post for signs of weakness. Look for loose boards, cracks, rust (for metal fences), or any warping or leaning. Remember, a small problem now can snowball into a bigger one later, so nip them in the bud!
2. Trim Those Troublesome Twigs: Overhanging branches are a double whammy for your fence in winter. The weight of snow and ice buildup on these branches can put extra stress on your fence panels and posts, potentially causing them to bend or break. Additionally, these branches can act like icy battering rams during storms, causing scratches and dents. So, grab your trusty pruning shears and give those branches a trim, keeping them at least a foot away from your fence.
3. Banish the Debris Brigade: Leaves, twigs, and other debris love to gather around the base of your fence. This can trap moisture and create a breeding ground for mould and rot. Take some time to rake and clear away any debris, allowing for good air circulation around the fence posts.
4. Weatherproofing Warriors: For wooden fences, a fresh coat of weatherproofing sealant is like a suit of armour against the elements. This sealant helps repel moisture and protects the wood from the harsh effects of freezing and thawing temperatures. Remember, a clean and dry surface is essential for good sealant adhesion, so give your fence a good scrub before applying the sealant.
5. Metal Marvels Need Maintenance Too: Fence Panel company not often uses Metal fences are susceptible to rust, especially during the winter months. To keep your metal fence in tip-top shape, check for any rust spots and address them promptly. You can use a wire brush to remove loose rust and then apply a coat of rust-oleum paint for extra protection.

Winter Watch: Maintaining Your Fence Through the Cold
Even with the best pre-winter prep, winter can still throw some curveballs. Here's how to be a vigilant fence warden throughout the cold season:
1. Snow Removal: Heavy snowfall can put a significant strain on your fence panels, especially if it accumulates. Regularly clear snow off your fence, particularly after heavy snowfalls. Use a soft brush or a broom to avoid damaging the fence.
2. Icy Situations: Ice buildup on your fence can be a real pain (literally!). If you notice thick ice build-up, try to break it off carefully using a blunt object like a wooden dowel. Be careful not to use sharp tools, as you could damage the fence.
3. Post-Winter Checkup: Once the spring thaw arrives, it's time for another fence inspection. Look for any damage caused by the winter weather, such as loose boards, cracks, or rust. Address any issues promptly to prevent them from getting worse.
By following these simple tips, you can ensure your fence stands strong and proud throughout the winter and for many years to come. Remember, a well-maintained fence is an investment that will protect your property and add value to your home. So, grab your tools, embrace your inner handyman, and give your fence the winter protection it deserves!pen_sparktunesharemore_vert
0 notes
Text
The thinking behind a brick wall
Decisions about which brick to use, moving from plaster to ceramic and back to plaster, mould making with plaster and silicon, interior mould making to make the brick hollow, light and drillable. Every stage hits its own obstacles which mean re-thinking, re-working and a loss of time. Every night I go to sleep thinking about solutions for that days various problems. If the deadline wasn't so close and the shadow of a grade wasn't haunting me, I think i would be enjoying the process, I am learning so much. Not least that repetition and size, when moving from ideas and ideals into reality is about determination and hard work. It is an interesting opposition to the result I hope to achieve in terms of silence and stillness. The process holds little of the experience of previous works that contain those elements within the making. i thought that those elements of the process where contained within the work affecting the view experience. That view or hope is now challenged.
My current dilemma is the ability to suspend my chose brick shape because the indentation in the front would that the steel wire would be visible if i choose a running as opposed to stacked brick bond - which would absolutely be my preference.
At this point I am wondering if I will have to give up the suspension or choose another brick shape - bearing in the length of time it will take me to get to this place with a new brick!!!
Although incredibly frustration, I can feel the value in the process and am allowing that to be as important as the end result. for about a minute and then fall into despair of not being able to achieve what i set out to do.
If i don't suspend how would I build the wall and still keep a hint at invisible grout - I could still use perspex tube spacers or white dowel spacers. But if i can't suspend would I go back to a wall on wheels, perhaps a wall with a hole in an carry out the decreasing circles???
0 notes
Text

Page 11 out of 20
When coming up with my final design, i particularly looked at his painting of the fritillaria flower and the Hill House chair. This is because, when i was looking at the checkered pattern of the flower, it reminded me of the top part of the Hill House chair, so i decided to merge these two together.

Page 12 out of 20
This page is the making process of my model. This section was my favourite part of the creative process, being able to see my designs come life, brings me so much joy.

Page 13 out of 20
For the final page of my fritillaria lamp, i wrote a design evaluation. Writing improvements for the form and function of the lamp, and taking these into mind for future projects.

Page 14 out of 20
For the next part of my portfolio, i made a product inspired from the form in nature, specifically looking at various sea life.
I drew a tonal pencil drawing of a blue glaucus (blue sea slug), i really liked how unique it’s features were such as it’s tapered body and six appendages branching out into finger-like cerata.
Next, i used ink to draw an octopus. Looking back, i regret using purple ink in this as it ruins the piece. Nonetheless, i like the tentacles of octopus as it is mouldable and can wrap around an object without it looking out of place.
I used colouring pencils for my last drawing of a leafy sea dragon. I like how it’s able to camouflage with the environment with its leaf-like appendages protruding from its head, body, and tail.

Page 15 out of 20
In the end, i decided to make a product inspired from the form of an octopus. I wanted to make an octopus candle holder and here are two designs i came up with.
The first design is an octopus holding onto 3 large candles.

Page 16 out of 20
And the second design is it holding onto 6 taper candles. I went for this design because i like how neat and uniform it looks, and the way the tentacles wrap around each candle.

Page 17 out of 20
Here i made a clay model. I took advantage of the material’s pliability and will be using this for future models that has organic forms.

Page 18 out of 20
After making a prototype, i made the final product. Using heat, i was able to mould the tentacles around the wooden dowels, i had to be quick before it cooled down.

Page 19 out of 20
Here is that last page of the making process. In the future, if i were to make this again, i would change the dimensions of the the candle holder, making it big enough for it to fit the entire length of the taper candles.

Page 20 out of 20
For the final page of my portfolio, i wrote a product evaluation of things i liked and things i would add/change to the design. I am quite pleased with the outcome of this and hope i can carry on making products in the future.
Thank you for reading my portfolio.
0 notes
Text

Batch 6 - 1/3/23
Sized and rolled. I did better on chasing out the air bubbles with the sponges. Ran out of pulp by sheet 7 which was too thin and tore when I took it off the drying board.
The internal size I used for all the sized batches was a cornstarch and sugar glue I made in the microwave and I think undercooked. I just dumped it in with the boiling water in the next round of recycled paper pulp.
METHOD FOR ALL BATCHES
1/3 filled my biggest stainless steel mixing bowl with shredded office paper. Poured a kettle full of boiling water (about 1.7L) over the paper and gave it a little stir with a butter knife because I'm impatient. I left one overnight before blending with a stick mixer and didn't notice any difference between that batch and the ones I blended right away.
2/3rds filled a (clean!) kitty litter tray with water. Added pulp, about 2 cups full to start (NOT the entire batch of pulp, that's silly, what were you thinking).
The mould and deckle kit I have makes A5 sheets and came with 8 thick reusable cardboard drying boards. The mould has a metal screen that supports a separate fibreglass mat to sandwich between the mould and deckle.
I assembled the mould and deckle and pulled a sheet from the vat and let it drain off a bit before removing the deckle, and then drain a little more. As soon as the sheet could be held on an angle without deforming I did that, so it would drain quicker (see above re. impatience).
When enough water had drained off that I was confident the sheet wasn't going to fall apart from being turned over the drying board, I laid the drying board over the mould and turned the whole thing over onto the table. I had to smack the mould down a bit to get the fibreglass mat to lift off the metal screen and fall onto the drying board.
I removed the mould and sponged the back of the sheet through the fibreglass mat until no more water came off the sheet. Then I peeled the mat off the sheet and replaced it on the mould for the next sheet pull.
When I had all 8 drying boards filled, I set them out in the sunshine to dry.
When they were half dry, I rolled the sheets with a 50mm diameter wooden dowel to compress them onto the drying board, unless I forgot. The rolled sheets were thinner and had a better writing surface on the back.
0 notes
Note
For the fusion AUs: now that eddie is a canon good/decent cook, what would a buddie masterchef or cooking competition au look like?
okay so true confession, the only cooking competition show I've ever watched in my life is the original Great British Bake-Off so it's gonna be that kind of competition (set in America, I guess?? I know that sort of exists but I haven't seen it) so!
Buck would be that one contestant who gets really technical and does cool engineering type stuff with his bakes
but he gets marked down on style over substance a lot of time, because yeah, they look cool but they taste just kinda...functional.
Eddie's the guy who just started cooking last year and is already good enough to qualify for the show and gets the judges to be like ??? because it's so unexpected
like Buck he gets dinged for substance vs style, but backwards because his stuff tastes amazing but often looks like someone took a baseball bat to it
anyway, it's Bake-Off, so there are some good moments in the early weeks where Buck is having difficulty getting stuff out of a mould and Eddie's already finished with his bake or is waiting for stuff to cool and helps him out, and there's some stuff where Eddie's tiered cake is on the verge of collapse and Buck basically teaches him to dowel on the spot
and it's like...clear? from the b-roll footage type stuff of all the contestants hanging out that they're always sitting together when they've got breaks and they're getting to be really, really close
They both make it to quarter-finals, which is when Buck's style over substance issue finally catches up to him.
his exit interview has him kinda teary eyed but he can't say enough good things about his fellow contestants, and keeps mentioning that he's made life-long friendships here in the tent
Eddie scrapes through the semi-final by the skin of his teeth to become one of the finalists.
he doesn't actually win, though. He gets second, because the winner's final cake was just a little more finished than his was, in terms of style, but their flavour profiles were equally good
at the garden party at the end, when the winner is announced and all the other contestants from the season get to attend, the crowd footage shows Eddie and Buck basically glued together at all the major joints
the "where are they now" section is where we really find out what's gone on
because they send in a video someone's taken of the two of them in the kitchen together baking and being goofy and plainly, blatantly in love, while they teach Eddie's son Christopher how to bake
the epilogue note for them is that they're going to be opening a bakery together where Eddie is in charge of the flavour and Buck is in charge of the structure
it becomes a matter of Bake-Off legend
#the ghost ship celebrates#the ghost ship fuses realities#9-1-1#anon I hope this works for you despite my lack of knowledge of other cooking shows
179 notes
·
View notes
Text
Antique oak lowboy
The antique 19th century oak lowboy come in for restoration, the lowboy was constructed from drown oak, unfortunately the top made from two planks of timber had shrunk and split. Their was some loose and missing cross grain mouldings to its edge . Along with quarter sawn crossbanding.
The top was removed , this was held in place by glue blocks from underneath the top and four dowel joints…

View On WordPress
#18th century furniture#aniques#antique#antique furniture#Antique furniture restoration#antique restoration#antiques#Bedfordshire#french polisher#furniture#furniture repair#furniture restoration#Milton Keynes#period furniture#restoer#restoration#restoration furniture restoration#restorer
6 notes
·
View notes
Text
https://www.dowellmoulds.com/blog/processes-for-molding-thermosetplastics-and-thermoplastics
#Dowell Moulds#plastic mould manufacturers in India#Injection molding#Compression molding#Transfer molding#Blow molding#Extrusion molding#Thermoset#Thermoplastic#Mold cavity#Gate#Pellets
0 notes
Text
Hand Casting


It was difficult to get a slot in the mould making&casting workshop so I bought a kit off of Amazon and made a mould of my hands. I also made a stand using a jigsaw cutter and carved a dowel to hold the hands up and act as a base for the flowing sand.


4 notes
·
View notes
Photo


I moved at the start of July and the new house was full of ants and mould and the previous tenants’ trash. My room has a weird L-shaped layout -- such that there’s nowhere else for the bed to go -- and one narrow window. I’m super proud of how I’ve made the space work for me! This corner has my only sliver of natural light so I’m putting it to the best use I can, with both music and spinning fitting snugly but comfortably here.
The shelf and stool were here when I moved in but that’s it. I’m not allowed to drill holes in the walls or otherwise make big alterations, so everything has to hang or clamp or stand somewhere. The awful curtain and curtainrod were replaced by the landlord, and the mould was treated professionally, but all the other furnishings in this photo I either made (cardboard recorder rack, dowels in the hanging shelf as a recorder stand, shelf out of a matchbox for spinning wheel oil) or picked up secondhand (bedframe, table, hanging shelf, light, drawers, clock, basket under stool for spinning fibre).
The bookshelf has all my nonfiction books, sorted first by category then by colour+size. The categories are instructional -> biography/memoir -> general nonfiction -> library loans. I used to hate the concept of sorting books by colour or size, but now I appreciate how it reduces visual noise. This shelf is what I can see from my bed, so putting some smooth curves in it helps a lot.
This is my home for the coming year and I just adore it, okay?
5 notes
·
View notes
Photo


Tooth’s face flesh will be cast in silicone. Silicone costs more than latex but it is more durable, doesn’t smell and some people are allergic to latex.To make the mould we have taken the white plaster head front that was used earlier for the vacuum forming of the head shell, applied a layer of brown clay about 3mm thick and resculpted the face. We need to keep the clay soft and moist. As it is thin, if it dries it will crack, so we had about an hour to work. The pattern was sprayed with release agent and two dowel pins were fitted to the base board. A box was constructed around the head and filled with plaster. It was a warm day and it set a bit faster than I was expecting! After a couple of hours the box was removed and the two parts separated. The soft clay was scooped out, so now I have a two-part mould with a gap where the clay was, which is where the silicone will be cast. The dowel pins locate into the holes formed in the other part to ensure accurate alignment. Hope to cast the silicone in the next few days.
9 notes
·
View notes
Text
I have had the most bizarre shift at work today, which has consisted of:
A lady coming in who was very clearly tweaking or on cocaine, who proceeded to silently stroll around with a cvs bag like she was casing the joint, who proceeded to fill her water bottle up with the... EMPLOYEE??? WATER DISPENSER? She didn't react to literally anything I said, until she finally responded to my THIRD "Ma'am, can I help you with anything?" With, "Oh, I'm just looking..!"
My old high school vice principal coming in to get all of his diplomas framed. This is the VP who heard me shout "FUCKING DICKHEAD!" At full volume at a kid in the hall who had shoved me during a class switch, and did absolutely NOTHING because I had murder in my eyes. I was a very aggressive high schooler.
A man insisting my coworker told him his order was like $55 when it was, in fact, nearly $80. And it said so right on the ticket the price of every single item we used. And I'm just like, "Sir... I have no idea what my coworker told you. I wasn't here. I wasn't even here when you dropped your order off. I literally only work here two days a week. I have absolutely no control over the pricing of our frames." This is something that I've dealt with frequently, including two weeks ago when some southern babyboomer got all hissy with me about it. Like ma'am, if you don't want to pay it, we can always just uhhh. Keep it. We have that right, actually.
A VERY old couple coming in asking if we had supplies to properly hang a scroll(??? It deadass was nearly impossible to understand what they were saying). They said they needed rods, like dowel rods. And I had to explain to them for 15 minutes that no, we don't have those, I'm not even sure we offer that kind of service, no sir, that is not a dowel rod, that is an uncut moulding stick for a frame, NO you absolutely CANNOT have it because it was ordered by another customer!!! To use to frame their piece!!! NO, THIS CANVAS PAINTING IS NOT HANGING ON FUCKING DOWEL RODS, IT'S ON A FUCKING STRETCHER FRAME! LIKE ALL CANVAS PAINTING IN THIS SHOP ARE!!! HOLY SHIT YOU DIDN'T EVEN BRING YOUR PROJECT IN FOR ME TO LOOK AT? LMAO SORRY PAL I SERIOUSLY CAN'T HELP YOU. They started getting kinda huffy and exasperated so I got that way right back because fun fact! Seeing as how I'm literally THE ONLY PERSON IN THE SHOP, I'm technically the manager! And if I feel uncomfortable or threatened, fun fact! I can legally kick your ass out because this is a private business and I have that right! Fuck you, lmao!
... and i still have like 2 and a half hours of my shift left!!!
I have gotten NOTHING done, I've been jittery all day.
#work stuff#retail#working at a small shop is.... weird#fuck man i almost MISS the daycare I worked at#just on these weird days tho
7 notes
·
View notes
Last Seen Blogs

qaqgbaaa
제목 없음

gfsis-blog
Untitled

romulanxale
Romulan Ale

downtonabbeyaddicts
Downton Abbey Addicts

truenorthmovie
映画『トゥルーノース』