#Easy Cricut Projects
Explore tagged Tumblr posts
Visit Tumblr Blog
Explore Tumblr blogs with no restrictions, modern design and the best experience.
Last Seen Tumblr Blogs


Fun Fact
The most popular pages on Tumblr are about Minecraft, GIFs, and David J. Peterson.
Text
10 Easy Cricut Projects for Beginners to Try in 2024
Hey! Want some easy Cricut projects for this year? Today, I have a list of Cricut projects that are easier than ever. Also, I received many comments on my previous blog, and many readers wanted me to write on Cricut projects for beginners. Hence, I decided to pile up all such projects without a second thought.
So, what will you find in this blog? Well, I have included 10 easy beginner Cricut projects. They are all very different from each other and may require additional resources to make. But do you know that all projects have one thing in common? You guessed it right! It’s a Cricut machine. Without a craft machine, the projects I mention below would be impossible to create.
Hence, grab your Cricut, search for your favorite projects, and make them using different materials and blanks. You will find everything from personalized shirts to keychains in this post. Now, let’s dive in!
1. Jar Labels
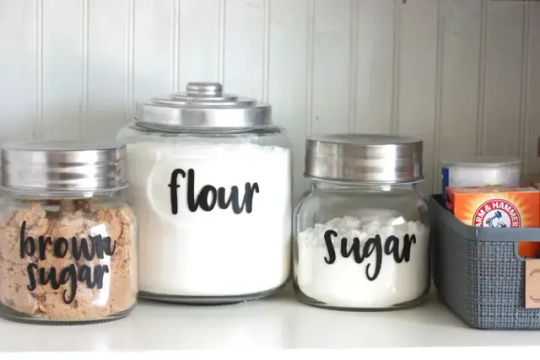
Want some easy Cricut projects? Here are the labels that I created with my Cricut Joy. This is the best idea I can give you if you are a beginner and want to make something easy. This project hardly consumed my time, so I created something useful for my kitchenware. My mom also loves these labels as they help her find the necessary items instantly. So what are you waiting for? Give it a try, and let your mom find the required items immediately.
2. Happy Birthday Acrylic Sign
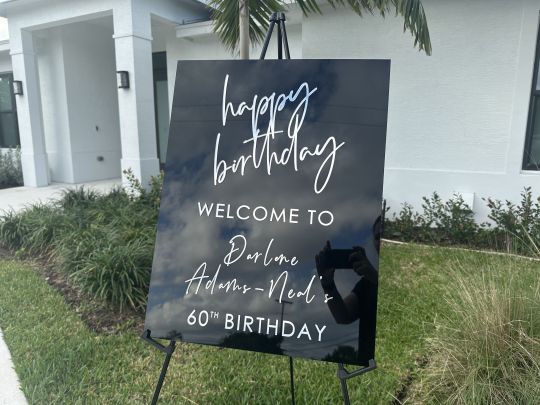
Every year, we have to celebrate our loved one’s birthday. Why don’t you create something using your Cricut? This will add more love and value to your celebration. As you can see in the picture above, I made this on my grandma’s 60th birthday. And I remember when she asked me to make something on her birthday using my Cricut. She was excited and happy when I got her this birthday acrylic sign. If you want, you can make these signs in advance for upcoming loved ones’ birthdays.
3. Personalized Mug
Personalizing a coffee mug is the best gift idea for all age groups. This is easy and simple to make. Also, you don’t need so much of materials to create this amazing mug. I have only used my Cricut Mug Press and the sublimated Cricut mug. The poly-coated mug works well with vinyl material.
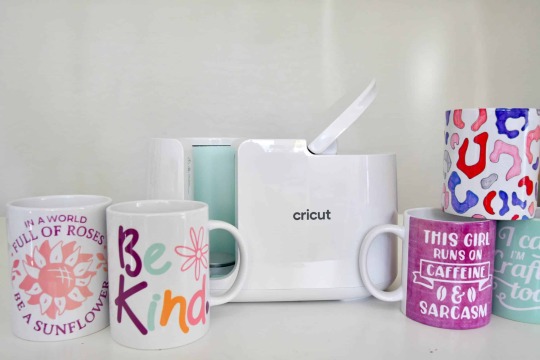
Simply put, vinyl cannot adhere to any mug. Therefore, you will need a mug with a sublimation coating. In short, easy Cricut projects mean personalized mugs because they are easy to create and are considered the best for gifts.
4. Coasters
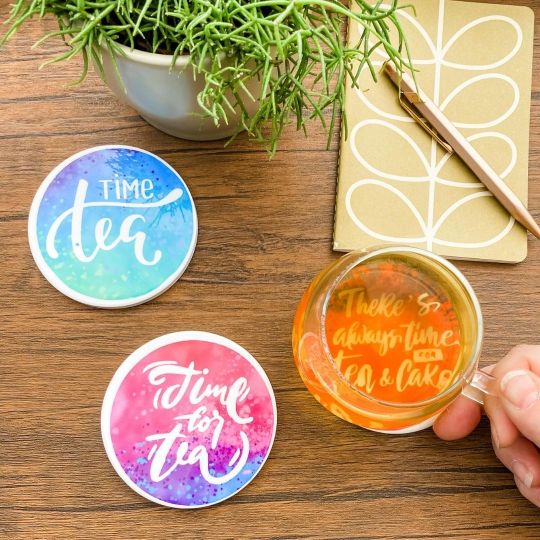
Do you want to create personalized coasters for your office or home? All you need is infusible ink and Cricut coasters. But wait, you need something! This is nothing but a Cricut machine. Yes, you get that right! A Cricut machine is required to cut your intricate design. Besides, use colorful or single-colored vinyl to transfer it to your coasters blank.
5. Holographic Cricut Vinyl Water Bottles
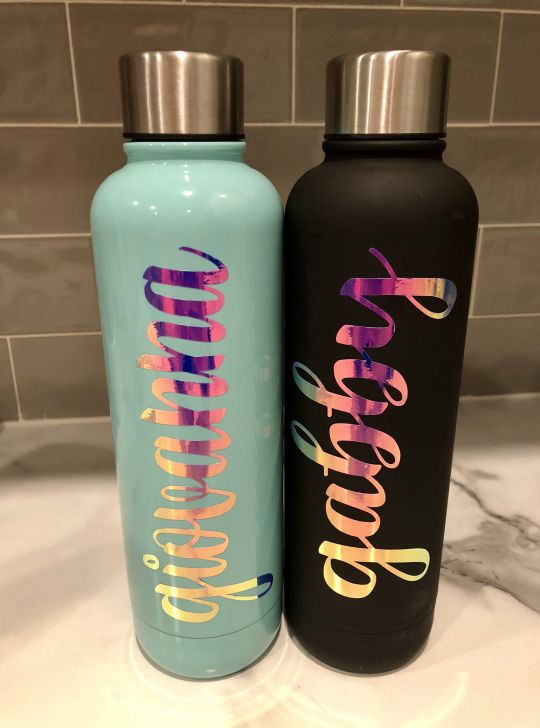
My children and I love personalized bottles. But our happiness doubles when they are made of holographic Cricut vinyl. This vinyl works like a cherry on the cake! It gives the bottles a gleam and appeal that no one can ignore. So if you are planning to make something similar, then I would suggest you choose a dark-colored bottle, as I have chosen a black bottle. However, try sky blue or light pink if you want a little lighter. Since we all use water bottles, I love making such easy Cricut projects every year.
6. T-Shirt
Want to make something beautiful for your mom? Whether it is her birthday or you want to make her feel special, you can make this simple vinyl T-shirt with the text ‘Blessed Mama.’ In addition, this top-notch quality cut of the Cricut cutting machine will give it a professional look on the T-shirt. So, don’t wait; try this today, as you don’t want to miss a chance to see her smiling.
7. Dog Paw Stickers
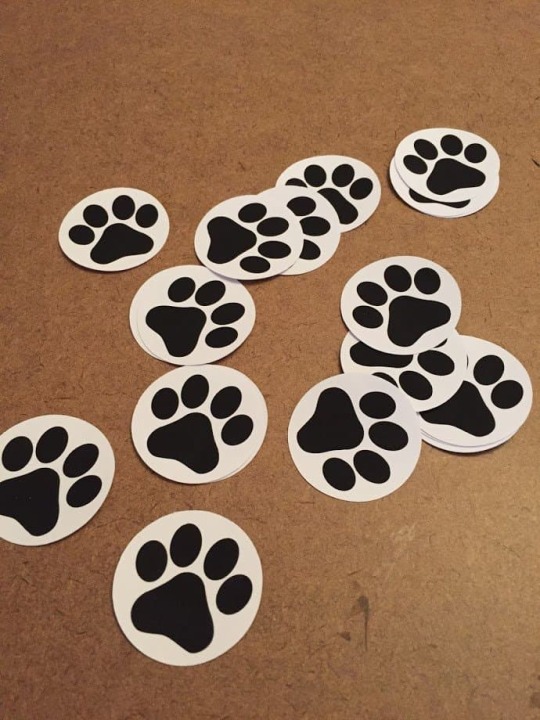
Stickers are simple and easy beginner Cricut projects. All of us make stickers for personalizing our diaries or journals. I use them in my planner, too. But wait! Here, there is something different. Recently, I created new paw stickers for my dog’s kennel. I wanted to personalize my dog’s home. But it doesn’t matter what type of stickers you are making; making such easy Cricut projects is always effortless.
8. Keychain
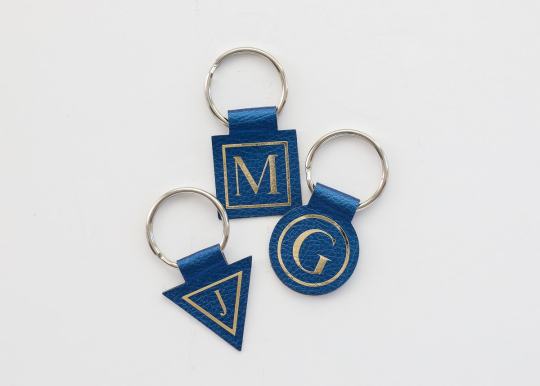
Now, you can also personalize your key chain using acrylic and vinyl. You can transfer the vinyl design made with your Cricut machine to acrylic. However, the key chain I created in the above picture is not made with acrylic but faux leather. Previously, I created many acrylic keychains, but I craved something different this time. Thus, I created a leather-based key chain and used vinyl to make it personalized.
9. Gift Card Holder
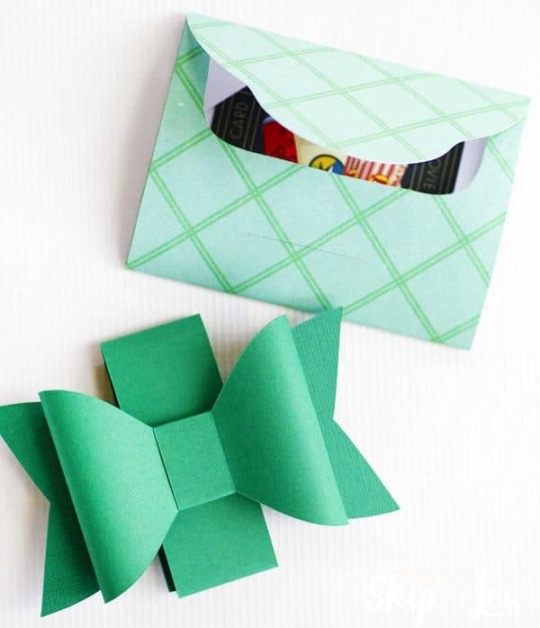
Have Cricut but have yet to try this paper gift holder? If so, you must give it a try! This card holder can be used for special occasions such as weddings, birthdays, or festivals. I created this holder using my handy Cricut Maker and cardstock. I don’t know why, but I love making things on cardstock because cutting them on a Cricut seems interesting. Anyway, if you are interested in making this Cricut project, you should never hesitate.
10. Butterfly Birthday Card
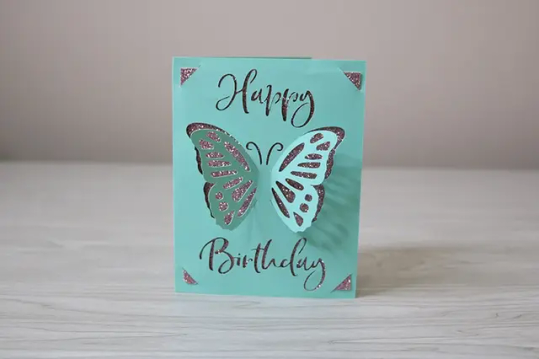
Making such a birthday card using an insert card is my favorite one. The insert card gives it a unique and gleaming look that I love. My cutie, the small Cricut Joy, helped me so much in making this easy card. So try this card for your loved ones’ birthday and send them to bring a smile to their face. Also, you can modify the design easily on your Cricut Design Space. Try this on Cricut Joy and add joy to your celebration.
Final Words
In this blog, I have included 10 easy Cricut projects that are simple as well as unique to create on a Cricut cutting machine. So, whether it is jarring labels or butterfly birthday cards, the Cricut does everything you need. Besides, these projects are those that I created when I was a beginner, so they will be useful for you as a beginner. However, if you want to add your creative touch, you are free to do so.
#Easy Cricut Projects#Easy beginner Cricut projects#cricut explore air 2#cricut design space app#cricut software#install cricut design space app#cricut.com/setup#www.cricut.com/setup login#cricut.com sign in#cricut design space login
0 notes
Text
Easy Cricut Projects to Sell for Beginner Crafters
Want easy Cricut projects to sell? I’ve got your back! In this blog, you will find a list of project ideas that are a cakewalk. So, you only need to explore the projects you want to create.
I made these 7 crafts in February 2024 when I was up to nothing and had enough time to create DIY projects so that I could sell them online. So, I started crafting using my Cricut machine. But this time, I also called one of my best friends, John, who used to study together at school. We always worked on a project together. He also enthusiastically supported me, and the results of working with our friend are commendable.
Want to see what sorts of projects we have created so far? Check out this blog and find unique Cricut projects to sell.
1. Acrylic Keychains

It is one of the best easy Cricut projects to sell and one that you will want to create with ease. In these beautiful keychains, you can add various types of embellishment. Keychains should look good as they are the most widely used daily. Try these easier crafts projects and use your Cricut cutting machine to create them in no time. Besides, leather or wooden material was used to create these keychains. However, I have used an acrylic material that you can also use if you want.
2. Water Bottles

Who won’t love a personalized bottle like this? John is adept at digital marketing, so he knows our target audience. He figured out that custom bottles would be one of the easy Cricut projects to sell. He also discovered that more than 50% of customers buy custom bottles. So, we planned to create these projects in huge numbers so that we could sell them and make money hassle-free
.
3. Cosmetic Bags

Keeping cosmetics items can be daunting, especially when traveling frequently. I created this for my mom, who travels a lot on her business trip. She said — this is one of the most wonderful gifts I could ever receive.
Whatever, I can create a lot of gifts like this. Thus, if you want to gift something to someone, you must try these cosmetic bags. You can also add a receiver’s name to make it personalized.
4. Welcome Signs

If you want something like easy Cricut projects to sell, you must consider these welcome signs. People love to add decorations to their homes, so they often look for projects like this. You can easily help them elevate their home with these beautiful yet simple welcome signs. Believe it or not, it can be one of the best-selling items in your digital shop.
5. Home Decor

Here’s another home decor item. A wall decal is one of the easiest things that I have made for decorating my home. I have added many such designs to my Amazon shop. Yes, people want premium-looking home wall decals that elevate their room and every corner of their house. So what are you waiting for? Create this item with unique designs and list them on your online shopping platform.
6. Apparel
I made this T-shirt while learning to transfer the design to fabrics. I mainly ordered a blank T-shirt from Etsy and counted this vinyl design. For this T-shirt, I used Iron-On in three different colors and had to cut them separately by changing the material. To make it easier, you can use the exact vinyl color. I recommend using white-colored vinyl, as it looks great on darker clothes.
7. Stickers

Do you wonder about creating stickers on Cricut? This is one of my easy Cricut projects to sell. You might need the printer to print and cut the design, then cut it further on your Cricut. Using Cricut machines like Cricut Joy or another cutting machine, you can get customized stickers. Since there are various stickers to make and sell, you can try this simple one. The material I needed for this sticker is Iron-On, which you can easily get from Cricut’s official site.
FAQs
Question 1: What are unique Cricut projects to sell?
Answer: Number of ideas you can try to make on your Cricut. They are easier and require less effort in making these projects. So, if you are looking for some crafts that are unique and for the deal, then you will need to see the following list of projects:
Stickers
Leather earrings
Keychains
Animal shirts
Apparel
Tumblers
Coasters
Signs
Cake toppers
Question 2: Which Cricut do I need to create all types of projects?
Answer: The Cricut Maker 3 is the most robust and versatile machine in Cricut’s lineup. This machine can cut over 300 materials, including Smart Materials that don’t need a cutting mat. Although you can use a cutting mat for most projects, it supports Smart Materials so that you won’t need it. However, you may need to buy accessories, such as a cutting mat and roll holder.
Question 3: How to make Cricut coasters with Cricut?
Answer: In order to make Cricut coasters, you will need to use adhesive vinyl, transfer tape, and wooden coasters. You can also find a pre-made design from Cricut Design Space. Lastly, you must have a compatible device with the Cricut app installed. Once you have ensured these, follow the steps below:
Create or choose a Design on Cricut Design Space.
Send the design to your Cricut and cut it on adhesive vinyl.
Then, apply the vinyl design to your coasters using transfer tape.
Now, smooth out any bubbles present in the project.
Visit here Fir More Information: Easy Cricut Projects to Sell
Cricut Venture
Pinterest
0 notes
Text
Argentina 50 Años Jersey Font – Celebrate a Legacy in Style

Celebrate the golden legacy of Argentine football with the exclusive Argentina 50 Años Jersey Font – a tribute to the nation’s rich history and its collaboration with Adidas. Perfect for custom jerseys, Cricut projects, or football-themed gifts, this font echoes the design of Argentina's 50th Anniversary Kit and honors their 1978 World Cup win.
👉 Get the Argentina 50 Años Jersey Font on Etsy
🏆 Adidas x Argentina 50th Anniversary Kit – On-Pitch Tribute
Kit Release & Debut: Adidas released the Argentina 50th Anniversary Kit on November 14th, 2024, and the national team debuted it during a match against Peru on November 19th.
Design & Features: The kit blends classic white and light blue stripes with gold details, including the Adidas Trefoil logo and AFA lettering. It features a special collar graphic, black and gold shorts, and matching socks. The look is both modern and nostalgic.
Historical Significance: This is Argentina’s first-ever anniversary kit, celebrating 50 years of partnership with Adidas, which began in 1974. Though Argentina worked with other brands like Le Coq Sportif in the past, the Adidas connection was renewed in 2001 and remains iconic today.
Color Palette:
Main color: Ambient Sky
Gold accents for the Trefoil, AFA, and laurel wreath
3 stars symbolizing Argentina’s World Cup wins
🎨 What You’ll Get – Argentina 50 Años Font
This font is inspired by the unique number and name styling seen in the anniversary kit. You’ll receive:

✅ OTF & TTF files for easy installation
✅ Complete A–Z and 0–9 set
✅ Retro feel blended with modern block design
✅ High-resolution quality for vinyl and fabric use
👉 Get the Argentina 50 Años Jersey Font on Etsy
🖨️ How to Customize Your Jersey
Whether you're a collector or a fan who loves to wear your pride, you can apply this font to your own kit using:
Install the font on your computer
Open your software (like Canva, Illustrator, Cricut)
Create your name + number using this font
Export it for print
Use HTV or DTF printing with a heat press for best results

🛠️ 5 Best Tools for Using Football Jersey Fonts
To create your custom designs professionally, try:
Canva – Quick and easy mockups
Cricut Design Space – For vinyl cutting and layout
Adobe Illustrator – Vector editing and pro design
CorelDRAW – Great for large-format printing
Inkscape – A free alternative for SVG editing

youtube
🛍️ Why Buy from Etsy?
Our fonts are listed on Etsy, a safe and trusted marketplace for creatives. With instant download and secure checkout, Etsy gives you:
🔐 Trusted payments
📥 Immediate access to your files
✉️ Easy communication and support
🌍 Global accessibility
👉 Get the Argentina 50 Años Jersey Font on Etsy
❓ Frequently Asked Questions (FAQ)
Can I use this font with Cricut or Silhouette? Yes – the SVG and vector files are fully compatible.
Is this an official AFA font? No. This is a fan-made recreation inspired by the 50 Años kit for personal use.
Can I sell jerseys made with this font? The font is for personal use only. Contact us if you need a commercial license.
What formats are included? You’ll get OTF, TTF, SVG, AI, EPS files in a zip download.
How do I install the font? Just double-click the OTF or TTF file and click "Install" on your Mac or PC.
—
Unlocking the Style: The Significance of the 🇦🇷 Argentina 50 Años Jersey Font
The Historical Context of the 🇦🇷 Argentina 50 Años Jersey
Argentina football history, 50 years celebration, soccer jersey design, iconic sportswear
The Design Elements that Make the 🇦🇷 Argentina 50 Años Jersey Font Unique
jersey typography, font design in sportswear, visual identity, branding in jerseys
Why the Right Font Matters in Sports Jerseys: A Look at Impact and Recognition
sports branding, jersey recognition, fan engagement through design, typography importance in sports
The Influence of Typography on Team Spirit and Fan Culture
fan loyalty symbols, cultural significance of fonts, community identity through jerseys
A Closer Look at How to Acquire Your Own 🇦🇷 Argentina 50 Años Jersey Font Design
where to buy jerseys online, custom jersey options, limited edition sportswear availability
Conclusion: Celebrate Argentine Football Legacy with the Iconic 50 Años Jersey Font Today!
👉 Get the Argentina 50 Años Jersey Font on Etsy
Unlock the Nostalgia: Discover the Argentina 50 Años Jersey Font
Introduction: The Significance of the Argentina 50 Años Jersey
Argentina football history, commemorative jersey, sports design, football culture, jersey typography
The Unique Style of the Argentina 50 Años Jersey Font
jersey font design, typography in sports, unique athletic fonts, visual identity, custom jersey fonts
How to Incorporate the Argentina 50 Años Jersey Font into Your Designs
graphic design tips, sports branding, using jersey fonts in projects, personalizing jerseys, font applications
The Legacy of Argentina's Football Achievements Celebrated Through Design
football achievements history, Argentine football legends, cultural impact of sports jerseys, iconic designs in football history
Where to Find and Download the Argentina 50 Años Jersey Font for Your Projects
font download sources, free font resources for designers, where to buy jersey fonts online, creative marketplace options for fonts
Conclusion: Celebrate Argentine Football History by Using the Iconic 50 Años Jersey Font Today!
👉 Get the Argentina 50 Años Jersey Font on Etsy
#argentina#Argentina 50 Años#messi font#messi custom#leo messi#Messi jersey#world cup#world cup 2026#font#font design#fonts#fonts & typography#football#football jerseys#football numbers#jersey#soccer font#soccer#Soccer ttf#Soccer otf#Custom jersey#Youtube
4 notes
·
View notes
Text
Experiments with Edge Decoration
So, I try to learn something new with every project. And one thing I find quite interesting is decoration of the Fore Edge. I did some experiments on books I got from a public book shelf (a public place, in my case an old phone booth, that gets used to distribute used books) that I wanted to bring back if the result was pretty enough (it was not, sadly).
Here are the results:
First I tried to coat the edge with vinyl. I've seen videos of this, so it is probably possible. It failed horribly. This book is now forever sealed shut (and also trashed). I like this idea, because I think you can get cool effects with it. But I have to revise this at a later time...

After that, I tried marbling it. This was my test subject:


These are in the same order I did them. I didn't use enough color in the beginning. I was quite pleased with the last one.
I had a lot of problems with the paint, though. It was kinda like laquer and didn't really want to mix and also didn't stick well to the paper.
My setup:

I still used this in a real project and am reasonably pleased with it.
I also learned that I should probably use different paint. So I will try this one again.
After that I tried to transfer a pattern with heat transfer ink and my Cricut. That works well on fabric. Not so much on paper, sadly. Would have been cool.

Then I tried monocoloring with different types of paint:


The red is oil color, which was very thick and flaked off. The orange is acryl and worked quite well. The black is drawing ink and a little to wet for this purpose. Green is Liquid Water Color, also a little too wet. Blue is Gouache, which behaved similar to the oil color.
(Disclaimer: I have no idea how different colors work or are to be handled. Please excuse any major errors.)
All in all the acryl worked best. I also had a lot of colors from my sister, so I started experimenting with that.


I really liked the color, but again the pages stick together quite badly. So I tried again and this time, immediately after finishing I took the book out of the press and paged through it. That helped a lot.


I used this technique for my next project. It's quite easy and works well, but it's also a little limited. I will continue with other ideas, I think.
11 notes
·
View notes
Text
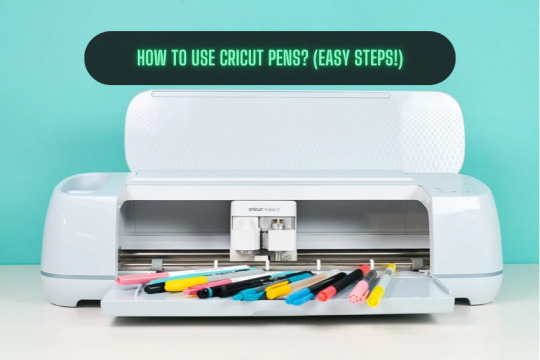
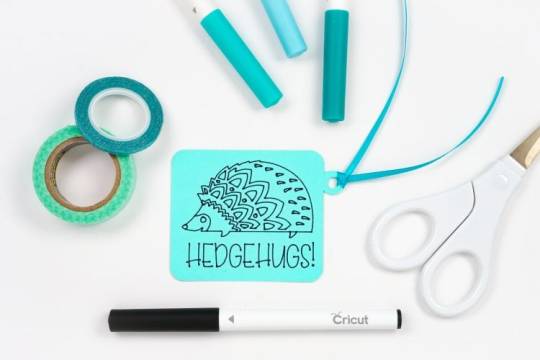
How to Use Cricut Pens? (Easy Steps!)
If you are a Cricut user, then surely you know that this brand makes some smart tools and machines. You know about its capabilities and how useful it is. But did you know that apart from cutting materials, you can use pens to simplify the crafting process significantly? But how to use Cricut pens? Cricut machines are not only used for cutting different shapes out of paper or vinyl. These machines use pens to create doodles, illustrations, and intricate designs. However, you need to know some basic steps you need to perform when you are designing your projects to make them better.
Using the pens is easy and straightforward, but the important thing is that you know the process. Read this blog to discover all about Cricut pens and what projects you can make with them.
What Types of Cricut Pens Are Available?
All of the current Cricut machines can use a pen, whether Maker, Explore, or Joy. The Maker and Explore machines have interchangeable pens, and Joy has a lineup of small pens. Joy pens are incompatible with other machines due to their unique, smaller size. Before you proceed with how to use Cricut pens, here is the list of pens that you can use with the machine:
Fine Point Pens
This has an F stamped on it for fine, has a 0.4mm tip, and comes in multiple colors.
Extra Fine Point Pens
These are finer, and the pens are just 0.3mm thick.
1.0 Pens and Markers
They have a thickness of 1.0mm and can be called markers, too.
Gel Pens
Gel Pens have a roller ball instead of a tip and are 0.8 mm in size.
Glitter Gel Pens
It has a roller ball and is 0.8 mm in size.
Calligraphy Pens
These pens have a gray barrel and have C stamped to denote calligraphy.
Infusible Ink Pens
It has a 1.0mm tip, and it is used for sublimation and infusing the ink on the surfaces.
How to Use Cricut Pens: Easy and Simple Steps
Placing or installing pens is easy, but if you are a beginner, then it will be a new thing for you. Always use the pens carefully, and pens should always be fitted to the clamp A of the cutting machine. Here, I am going to show you something different about using Cricut pens to create a simple gift tag. Now, let’s look at the below process to understand how to use it:
First, go to the Design Space and click on a new project to create a design.
Then, create a design, or you can choose a text that you want to use with your pen. Cricut Design Space has its own vast library of images for your DIY projects.
Now, remember you have to draw, not cut the image. So, go to the Edit toolbar, and from there, select the Draw option in the Layers panel.
When you click the colored square box next to the line type dropdown, you can select the type of pen and choose the Fine Point pen.

After you have completed drawing your design, it is time to add text. In the Font menu, you can filter by Cricut Writing fonts. Choose the writing style font.
You can insert a shape into your Canvas. Then, using the Align tool, you can change its size and color and move it to the back of your Canvas.
Next, select your drawing and text layer and click Attach on the right-hand side of the Layers panel.
On the preview screen, your image will appear on the mat. Click Continue, and in the Make screen option, select the material you are using. Here, I am using cardstock. The Cricut Design Space app will prompt you to insert your pen, and you can use a fine-point blade.
In the last step, you have to insert your mat into the machine, and your machine will draw and cut the tag.
Conclusion
Now you know how simple it was to learn ‘how to use Cricut pens‘.? In this post, I have explained the types of pens and how you can craft your project with the pen. After reading this blog, you can choose a pen for your project, load it into the machine, and start crafting. Start crafting with your pen and unlock the full potential of the machine.
FAQs
How Do You Load the Pen Into Cricut Machine?
When you open the machine, you will see two clamps: Clamp A and Clamp B. To load the pen into your cutting machine, open Clamp A and insert the pen into it. Gently press the pen into the clamp until it fits properly, and you hear a click sound. Then, close the cover, and you are ready to use the machine.
What Are Cricut Pens?
Cricut makes different types of pens, which are great ways to add drawn or handwritten details to your projects. Cricut pens come in different sizes and can be easily loaded into the machine. This can be used for various creative projects, such as writing on gift tag cards or adding doodles.
What Is the Difference Between Cricut Pens and Markers?
A Cricut pen usually has a fine tip, which allows it to create a thinner line, compared to a marker, which has a thick tip and creates a thicker line. Pens are ideal for writing detailed text, signatures, or fine lines within a design, whereas markers are better for filling large areas with color.
Source: How to Use Cricut Pens
#how to use Cricut pens#cricut design space download#cricut design space app#cricut maker#cricut joy#cricut pens
4 notes
·
View notes
Text

chayscribbles writing recap 2023!
i feel like tacky wordart kind of encapsulates how i've been feeling lately about my writing. if that makes any sense.
as you guys may or may not have noticed i've really been nonexistent around here lately. this past year has been really weird in terms of both my personal life and my creative life. i've been a lot more blocked than in the past few years and did not meet and at the point i am now it's easy to look at the past year and be disappointed. but i will force myself to see SOME positive, goddammit.
☆stats.
words written: 102 380
projects worked on: andromeda rogue, the gemini heist, and a few Secret Projects
accomplishments: finished the 2nd draft of andromeda rogue; sent said draft out for beta reading (which was fucking terrifying, btw); crocheted two sweaters (okay that's not writing but i'm really proud of them okay)
☆looking back on 2023 goals.
i dug out my recap post from last year and looked at the goals i had set at the beginning of the year (which i had completely forgot about tbh jkgfjksd), so let's see how they measured up:
to continue polishing up Andromeda Rogue (at least just the first book) with the goal of perhaps having some eyes on it by the end of the year👀 - well i certainly did get some eyes on it, so that was accomplished ✅
to continue working on The Gemini Heist, wherever that may lead me - okay so i didn't get nearly as far as i had hoped but i worked on it, didn't i? i'm checking it off ✅
to not pressure myself too much in my writing; to be kind to myself when i’m in a slump and to take regular breaks - LOL. still working on that.
to try new things and challenge myself - getting betas was challenging. not finding them but the actually making myself do it lol. let's go ahead and check that one off ✅
to have fun and be myself! 😀 - LMAO. yeah, sure, let's give that a check. ✅
☆setting new goals for 2024.
i'm gonna have only two goals but they're pretty big ones.
publish andromeda rogue by the end of the year, assuming editing through beta comments doesn't kill me first.
this isn't writing but i'd really like to open an online shop for my art, i think it would be an interesting venture. i got a cricut machine for christmas so there might be stickers in my future 👀
so that's all my rambling! hope you guys have a wonderful 2024!!! <3
general taglist:
@dgwriteblr @the-orangeauthor @onomatopiya @quilloftheclouds @ashen-crest @writeblrfantasy @celestepens @stardustspiral @pepperdee @extra-magichours @avi-why @lefttigerobservation @chazzawrites @bardolatrycore @innocentlymacabre
20 notes
·
View notes
Text

Cricut Pride Month Project, Updated.
Got the colours sorted out. Now I just need to recut the whole-thing (easy) and reattach it, properly lined up with the black border (also easy), or that misalignment will keep me up at night.
7 notes
·
View notes
Text
Freezer Paper Stencils

Do you ever need to paint a design onto your fabric, but don’t want to try and free hand the design? Freezer paper stncils may be the answer for you! They are an easy technique and they use items that you may already have around your home. Painting directly on to fabric can be scary, but I’ve had a lot of luck with stencils. I like them as a cheap alternative to buying something like a Cricut to cut designs from HTV. It also has a unique look! I made the designs below using freezer paper stencils.


Supplies Needed:
Freezer Paper
Pencil/Pen for Tracing
Xacto Knife/Scissors
Paint
And of course the fabric that you want to paint designs on!
Freezer paper is a kitchen supply that you might already have on hand! One side has regular paper texture, but the other side is slightly waxy! The idea is to trace the design onto the paper Sadie and then iron it on to the frantic. The wax will melt and stick to the fabric, but it is a loose adhesive and the stencil can easily be pealed off.


Step 1:
Draw or trace your design on to the freezer paper.

Step 2:
Carefully cut out the inside of the design. The cleaner your cuts on the stencil, the cleaner your end product will be. If you make a mistake you may want to start over as paint can bleed through any knicks or tears.

Step 3:
Iron the freezer paper waxy side down onto your fabric. Be sure that the paper doesn’t wrinkle when applying it. You may also want to turn off any steam settings that your iron has.

Step 4:
Once the stencil is in place, paint on the fabric! I like to go very slowly and gently so that no paint seeps through beneath the freezer paper.

Step 5:
Remove the freezer paper! You should be left with a beautifully crisp design.

Extra tips:
You may want to test this technique out on a scrap of the fabric to see how the paint behaves with the stencil and the fabric. Depending on your paint it will act differently and you will want to know how it works before putting it on your actual project!
This technique works best when you have more freezer paper. The greater the surface area of the paper, the better the adhesion. Small pieces of paper may peal away too easily.
Sometimes when you peal away the paper it may leave a white residue. To remove this take some scotch tape, or clear packing tape and dab the residue with the sticky side. This will pull off what was left behind.
If your stencil overlaps any seams or darts this may cause problems while painting on the fabric. Use extra care so that the paint doesn’t smear into the crevices
11 notes
·
View notes
Text
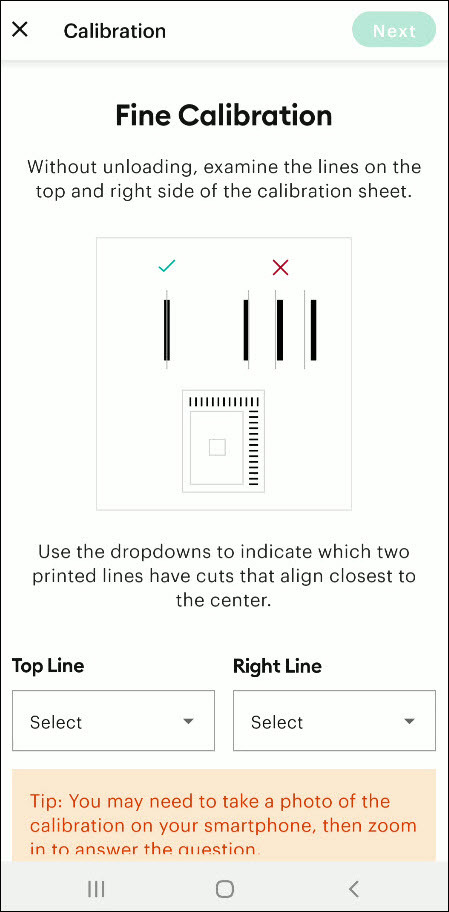
How to Calibrate Cricut Explore Air 2? (Full Guide!)
Cricut Explore Air 2 is a worthwhile machine for crafters who want to make pro-level crafting projects. The machine offers precise cuts for more than 100 different types of materials, including Cricut Smart Material, leather, wood, glass, metal, etc. With its easy-to-use interface, the machine allows users to work on DIY projects even if they are novices. Moreover, sometimes crafters may need to perform Cricut Explore Air 2 calibration before a cut.
Calibration is a process that helps set the machine’s blade to cut the design accurately without any flaws. Many users don’t know the procedure and struggle to get the perfect cut. If you have the same problem, then the follow-up blog will provide you with all the information about calibrating your machine.
Cricut Explore Air 2 Calibration on Windows/Mac
If you are using your Cricut Explore Air 2 machine on a computer, then the following is the extensive guide that will help you perform the calibration process.
Step 1: Selecting the Printer
Open the ‘Cricut Design Space app‘, sign in to your account, and then click on the Settings option.
Then, follow the path Machines > Machine Calibration, and select Cricut Explore Air 2.
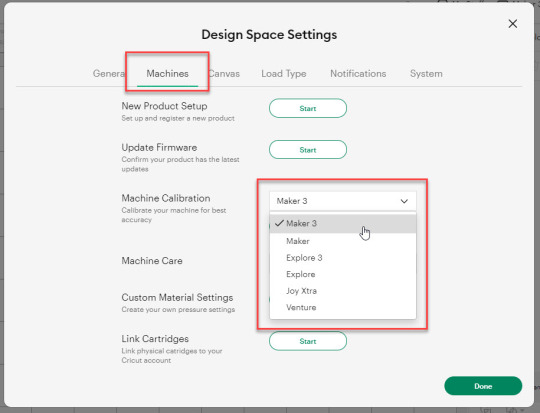
After selecting your crafting machine, click on the Start option.
Depending on the machine you choose, you will be asked to complete the calibration; select the Print Then Cut option.
In the next step, choose what you like to use with your printer machine for the process.
After that, click on the Continue option.
Step 2: Starting the Calibration Cut
Now, you should place the printed calibration sheet on the mat, position it perfectly, and select the Continue option.
For the next step, ensure that your machine is ON and connected to your computer using USB or Bluetooth. Select the machine from the drop-down menu, insert the cutting mat into your crafting machine, and click Go.
Furthermore, the device will start scanning the markings for the calibration.
After the cutting is complete, check if the cut-makings are touched without unloading the mat from the machine. (If the markings are touched, then choose the Yes option in the app and select Continue to move to the next step.)
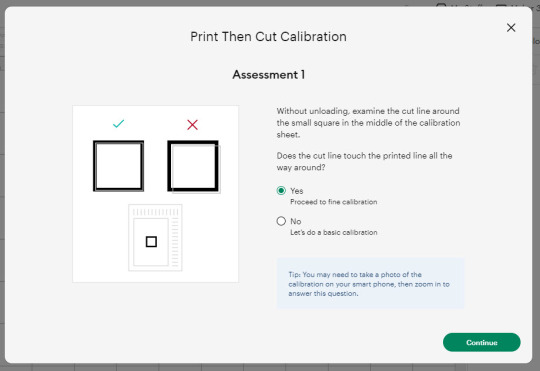
Note: If you choose the No option, then the machine will perform a cut for the next time for the accurate cut.
Also, the machine will start the calibration cut at the top and side of the page.
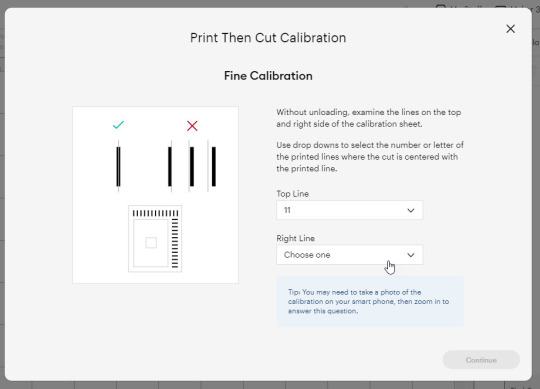
Now, check if the markings are correct without unloading the mat from the device. (The cut should be on or before line 1 and on or before line 21.)
If your cut meets all the conditions, choose the line closest to the center of the printed lines, the same as the following image; when you are done, select the Continue option.
In the next step, the Cricut Explore Air 2 machine will perform a confirmation cut around the large sheet. When this step is complete, unload the mat from the machine and remove the calibration sheet; now, you need to answer the final question on the app.
You need to choose Yes, cut is close enough to the center if you are happy with the cut. (Select no and follow the further process if you are not happy with the cut.)
Cricut Explore Air 2 Calibration On iOS/Android
The follow-up method will allow you to Calibrate your Explore Air 2 machine without any hassle. So, let’s begin the process.
Step 1: Connecting the Printer to Your Machine
Start by signing into your Cricut account on the app and selecting the menu option from the upper right corner.
After that, tap on Settings and then select Print Then Cut Settings.
Also, tap on the Calibration.
Next, you have to choose the Send to Printer, or I have a calibration sheet option.
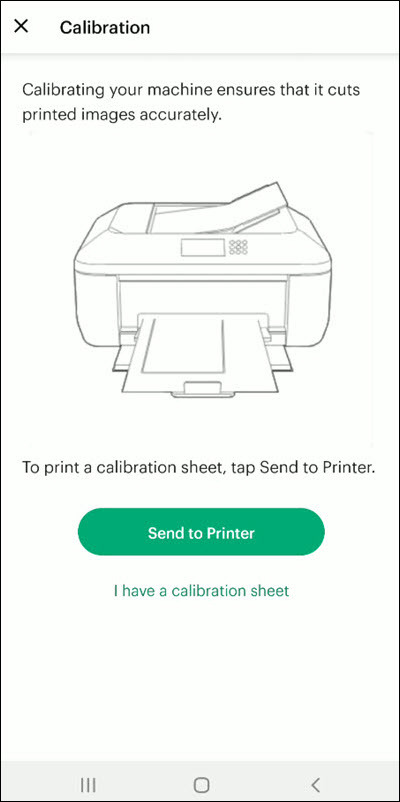
Now, the preview of the calibration sheet will appear on the screen (it can be a little different depending on the device you are using.)
Afterward, tap “Select a printer” and select the printer device you are using. Then, choose Next.
Step 2: Perform Sheet Calibration Process
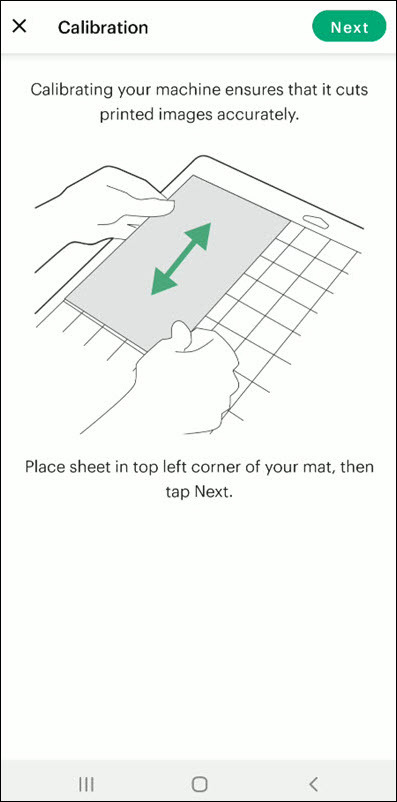
After that, take the printed calibration sheet, place it onto the machine mat perfectly, and select Next.
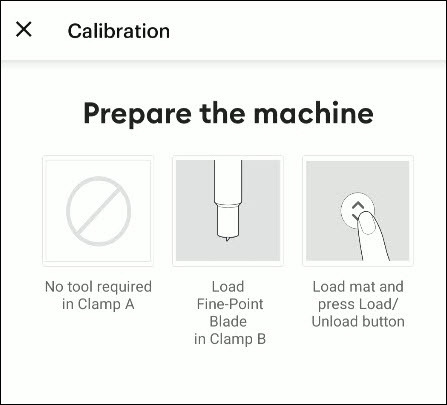
Specify the appropriate material setting for your machine.
Then, after loading the mat into the machine, press the Go button on it.
Also, the machine will look for the marking for the calibration and then start the cutting process near the small square.
Afterward, without unloading the mat from the machine, check for the cut to ensure the cut touches the marked lines all the way around. (If the lines touch the cut, then tap Yes in the app, then select Next to proceed with the next step.)
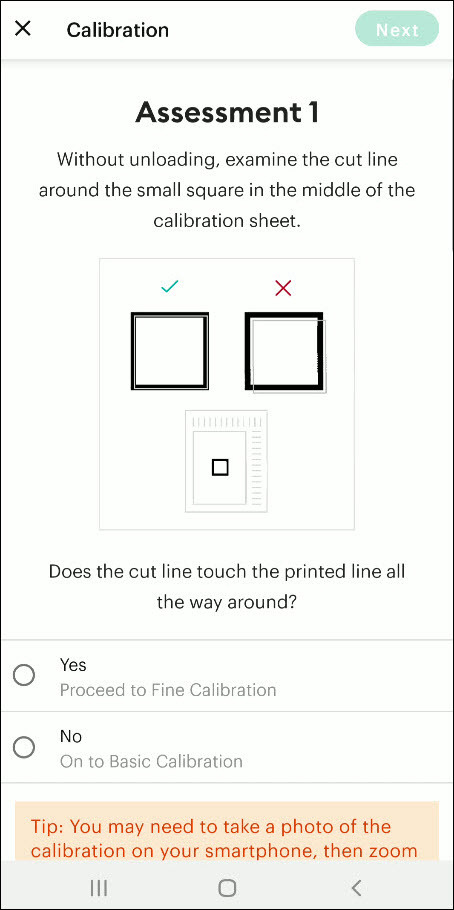
However, if you select the No option, then the machine will try to cut close to the top and sides of the page. (Once done, look closely without unloading the mat; there should be a cut before line 1 and on or after line 21.)
If the cut meets these lines, you need to specify which cut is closest to the center of the printed lines and the right side of the calibration sheet.
Once you are done, select Next to move forward.
After that, keep following the instructions on the screen to complete the procedure.
Once the process is complete, you can start cutting materials on your machine.
Final Words
Cricut Explore Air 2 calibration is the best way to get the pin-point cuts. These methods will help you to perform the calibration process on computer and smartphone devices. With these methods, you cannot only calibrate your Explore Air 2 but also any other cutting machine of the brand. Furthermore, if you have any doubts regarding the procedure or have any issues, then it would be good to ask for more assistance and guidance.
Frequently Asked Questions
Why Is My Cricut Explore 2 Not Cutting Properly?
Cricut Explore machines are known for their flawless and fast-cutting results. Sometimes, it is due to the material you are trying to cut on your device. Also, in some cases, the machine faces technical issues. To get your machine out of this problem and start cutting properly, you can use the calibration procedure. The process to calibrate your machine is simple.
Why Should I Calibrate My Cricut Machine?
However, the cuts can sometimes be misaligned due to various reasons. Crafters can calibrate their devices to get the blades and cuts aligned to their initial position. After the calibration, the machine starts to provide flawless cuts once again. However, the calibration process is a little complex and differs from device to device. So, you must know the whole process before performing it.
What Is the Thickest Setting on Cricut Explore Air 2?
We all know that Cricut cutting machines are known for their fast and flawless cuts, even for intricate designs. Thus, the Cricut Explore machine can cut a wide range of materials of a certain thickness. If you want to cut the wood, metal, leather, etc., then your machine can cut up to 2mm. However, different materials need to use specific blades to get the desired results.
Source: How to Calibrate Cricut Explore Air 2
#how to calibrate cricut explore air 2#cricut design space app#cricut design space download#cricut design space software#cricut machine setup#cricut explore air 2 setup
2 notes
·
View notes
Text

Adorable Cute Bunny SVG PNG
Looking for an adorable Cute Bunny SVG to enhance your creative projects? This bunny digital file is available in SVG, PNG, and DXF formats, making it ideal for t-shirts, stickers, decals, tattoos, and Cricut designs. Whether you're crafting for nursery decor, baby shower gifts, or Easter decorations, this high-quality cut file is versatile and easy to use. Compatible with Cricut, Silhouette, and other cutting machines, it’s great for printable wall art, greeting cards, scrapbooking, and personalized gifts.
This cute rabbit clipart features a minimalist black-and-white outline, making it perfect for coloring pages and vinyl decals. If you love woodland animals, kawaii designs, or springtime themes, this bunny vector file is a must-have. Get your instant digital download today and start creating something adorable!
#Bunny#Rabbit#BunnySVG#BunnyCricut#BunnyVector#BunnyClipart#RabbitSVG#BunnyPNG#BunnyPrintable#BunnyShirt#digitaldownload#shirtdesign#SVGDesign#VectorArt#EtsyShop#CraftIdeas
3 notes
·
View notes
Text
ADULT HALLOWEEN STICKERS
Bring the eerie and playful essence of Halloween to your crafts with our Haunted Halloween Character Stickers. This exclusive digital download bundle features 10 high-resolution PNG stickers of iconic Halloween characters such as witches, pumpkins, mummies, vampires, and more. Each character is designed with vivid details and spooky charm, specifically crafted to appeal to an adult audience. These stickers add a sophisticated, yet fun, Halloween vibe to your projects—perfect for grown folks who appreciate a touch of the macabre. Sized for easy printing at home or professionally, these stickers are also compatible with cutting machines like Cricut and Silhouette Cameo for seamless crafting. Whether you're preparing for a Halloween party, creating a haunted house ambiance, or adding a spooky touch to your personal belongings, these stickers are a must-have for adults looking to elevate their Halloween decor. SOURCE
#soft black girls#black woman#black artist art#black artists on tumblr#black women in femininity#contemporary art#soft black women#melanin#black girl magic#black girl beauty#digital art#digital painting#black femininity#summer vibes#painting#woman portrait#beautiful black women#gorgeous#stunning#pretty black woman#feminine beauty#AIArtWerk#stable diffusion#ai art community#ai art generation#black art#black tumblr#black love#ai artist#ai artwork
2 notes
·
View notes
Text
♡ FREE ♡ Nutcracker & Ballerina Christmas Aesthetic Watercolor Stickers - Cricut Print Ready | Make Your Christmas More Magical

Christmas is just around the corner, and you might be looking for some creative ways to decorate your home, gifts, cards, and more.
These stickers are not only gorgeous, but also versatile and easy to use. They are digital and printable, so you can download them instantly and print them as many times as you want. They are also editable, so you can customize them to your liking. And they are Cricut print ready, so you can cut them precisely and effortlessly with your machine.
You can get 20 stunning stickers in this collection, featuring the Nutcracker, the Ballerina [ LINK ]. They come in SVG, EPS, PNG, and JPG formats, so you can choose the best option for your project.
You can also download ♡ FREE ♡ stickers from one of the sticker collections. [ LINK ] Happy Planning!
#digital planner#free planner#free resources#handmade#journal#planner#stickers#stickershop#print#printable#freebies#christmas#holidays#xmas#merry christmas#merry xmas#festive#nutcracker#ballerina#ballet#aesthetic#aestheitcs#cute#cute art#cuteness#kawaii
16 notes
·
View notes
Text
Barcelona 2024-2025 Home Kit and Custom Jersey Design with the Official Font

The FC Barcelona 2024-2025 home kit honors the club's history with a mix of old and new. It takes inspiration from the original 1899 design . The kit has a striking half-and-half blue and maroon pattern with gold accents for a premium look. Fans can design their own custom jerseys with the Barcelona 2024/25 Font , designed to match this iconic kit.
👉 Download on Etsy the Barcelona Font Here
🌟 Design Inspiration: A Tribute to Heritage
The 2024-25 home kit is inspired by the club's original 1899 jersey . It features a bold half-and-half design of Deep Royal Blue and Noble Red . The kit also includes a rich Midnight Navy tone for depth. The Nike Swoosh and Spotify sponsorship logos are in Club Gold for a touch of prestige.
The kit celebrates Barcelona's historic milestones. It has a 125th-anniversary logo on the inside collar. This is a subtle but meaningful tribute to the club's legacy. The design's clean lines remind fans of the centenary shirt from Barcelona's 100th anniversary, making it a fan favorite.
🎨 Customize Your Own Barcelona Jersey with the 24/25 Font
Want to bring the official Barcelona jersey design to life on your own creations? Now, you can do it with ease. Our Barcelona 2024/25 Font is the perfect match for this kit's design.
Whether you're making a personalized football font jersey for yourself, a gift for a loved one, or a fan merchandise line, this font allows you to design custom names and numbers, just like the official Barcelona kit.
🧰How to Use the Barcelona Font:
Download the Font Get the OTF/TTF and Vector files instantly upon purchase.
Customize Your Jersey Use software like Canva , Illustrator , or Cricut Design Space to add your favorite name and number, whether it's Lewandowski 9 , Pedri 8 , or even a custom name for your own jersey.
Print Your Design Once you've created your design, you can print it using DTF (Direct To Film) or Heat Transfer Vinyl (HTV) . Make sure you're using the right materials for a professional finish!
⚙️ La Liga Font – The Official Football Font for Spain's Top Clubs
The Barcelona 24/25 jersey font is part of the official La Liga font family . It's known for its bold and modern design. This font is optimized for readability and team branding. It's the perfect complement to Barcelona's prestigious kit, ensuring that every name and number stands out clearly on the pitch or in your own designs.
✨ Perfect for Your Custom Barcelona Kit
With the official Barcelona 2024/25 Font pack, you can make a design that looks just like the real kit. It's easy to use, so you can design for yourself or as a gift for a Barça fan. Your design will look professional and spot-on.
👉 Get Your Barcelona Font Now!
🔥 Why Choose Our Barcelona Font Pack?
✅ Versatile and Easy to Use : Works with Canva, Cricut Design Space, Illustrator, and more. ✅ Editable : You can change it for any name or number. ✅ High-Quality Vector Files : Great for printing on any jersey material. ✅ Perfect for Gifts : Personalize jerseys for birthdays, special occasions, or for yourself.
🏆 Get Ready for Matchday – Customize Your Barcelona Jersey Today!
The Barcelona 2024-25 Home Kit takes inspiration from the club's history. It's perfect to complete the look with an official, customizable Barcelona jersey . The Barcelona 24/25 Font lets you make a statement on the pitch or in the stands.
Don't wait — download your Barcelona 24/25 font here and start creating your custom jersey today!
❓ FAQ
Can I use the Barcelona font for commercial projects? Yes! Our font is good for personal use and small commercial projects. For bigger projects, please contact us.
How do I print my custom jersey? Print your design with DTF paper or Heat Transfer Vinyl (HTV) for a top-notch finish.
What software do I need to use this font? Use free tools like Canva or professional software like Illustrator and Cricut Design Space .
2 notes
·
View notes
Text

My daughter runs a D&D group for teens. She needed a way to keep all her supplies together and organized. So, I used the large Cricut cosmetics bag, Glowstick iron-on vinyl, and a couple of graphics from Design Space to make an easy to grab kit for her. I searched dice and found graphics that fit my blanks, switched the colours to the ones I wanted to use and cut & iron-on. When layering iron-on, you heat the layers for only 5 seconds, until the last layer when you press for the full time, for this project 30 seconds.


Here is my project
3 notes
·
View notes
Text
How Do I Set Up My Cricut Maker? [Ultimate Guide]
Buying a new Cricut Maker can be overwhelming for all of us. Initially, setup can be daunting, but once you do it, you will love the overall process. However, you can easily set up any Cricut machine without needing much assistance.
The post is all about how do I set up my Cricut Maker. Through this write-up, we will see the items while unboxing the new Cricut Maker. Further, you will explore the Cricut Maker and its types. Afterward, we will explain the complete process of setting up your Cricut Maker machine.
What Do You Get in the Cricut Maker Box?
Unboxing a new product is always an exciting task. While unboxing the Cricut Maker machine, we got several items that we will be discussing here. However, you always have the option to select the bundles when you buy the machine from Cricut's official website.
Following are the items that you get in the box of the new Cricut Maker:
Apart from these, you will get the following:
The best thing is that we get the blades and tools along with the new Cricut machine. These blades allow us to try various products before buying more blades.
How Do I Set Up My Cricut Maker on a Computer?
When we talk about setting up Cricut Maker machine, it means we want to connect it to our devices like computers or mobile phones. However, there are certain ways to connect these machines to our devices. For example, we can connect our Cricut Maker to our computer or phone via Bluetooth or USB cable. So, it is the users’ choice to choose which way is the most suitable for them.
Below, we explain how to set up Cricut Maker. This method is only applicable for Windows or Mac users only:
How Do I Set Up My Cricut Maker on a Mobile?
Here's how to set up your Cricut Maker on Mobile devices with iOS or Android operating systems:
Cricut Maker is the most advanced and versatile in Cricut's lineup. However, the box contains various items that you can use to make several projects uninterruptedly. In this write-up, we explained the Maker and its features in detail. It helps the users to get an overview of machines so that they can use them without any hassle. After exploring the Maker cutting machine, the blog found out how do I set up my Cricut Maker.
FAQs
Question 1: Can I set up the Cricut Maker easily?
Answer: People think the setup is daunting, but this is not the case. Cricut machines are just like printers. The only difference is that Cricut has blades to cut. However, when you go through the notice period, you will find the setup is too easy and complete in less time. While setting up, you will need to download and install the Design Space app. This app will guide you through the further setup process, making it easy for beginners to set up the machine in one go.
Question 2: How do I connect my mobile phone to my Cricut?
Answer: Here, we are going to show you the method to connect your mobile device to the Cricut machine. Here, we are using iPhone or iOS devices. So, ensure you have an iOS device.
Question 3: Can I use the Cricut without its software?
Answer: No, you must use the Cricut Design Space app to send your design to your Cricut device. The machine is the companion for your Cricut cutting machine. Without this machine, you can't cut anything. However, the Design Space is essential for creating intricate designs and then sending them to the machine. Also, the app is the only way to maintain communication between your computer and Cricut.
Visit: cricut.com/setup
cricut.com/setup
Source: https://cricutmakersetup.wordpress.com/2023/10/21/how-do-i-set-up-my-cricut-maker-ultimate-guide/
#cricut explore air 2#design space setup#cricut maker#cricut.com/setup#cricut.com design space#cricut.com/create#cricut.com sign in#design cricut.com download#digital design
2 notes
·
View notes
Text
Cricut login design space
Unleash your creativity with Cricut machines for custom projects. Whether you're crafting for fun or small business, Cricut's versatile machines and Design Space offer endless possibilities. Visit cricut.com/setup to download and install the Cricut software and access a wide range of free and subscription-based designs. From customizing materials to crafting various projects, Cricut makes creativity easy and enjoyable.
#Cricut.com/setup#design.cricut.com#www.cricut.com/setup#Cricut Design Space#cricut.com/setup windows#Cricut.com setup mac#Cricut setup#Cricut.com setup download#Cricut.com sign in
2 notes
·
View notes