#Failover setup guide
Text
TrueNAS SCALE Network Configuration Tips for Home Server
TrueNAS SCALE Network Configuration Deep Dive for Home Server #homeserver #TrueNASScaleNetworkConfiguration #FailoverSetupGuide #LoadbalancingOnTrueNAS #VLANConfigurationTrueNAS #BridgeInterfaceGuide #TrueNASStaticIPAddressSetup #TrueNASSystemSettings
When you set up a TrueNAS SCALE server, one of the first configuration items you will want to tackle is the network configuration. This helps make sure you achieve optimal performance and security. If you are struggling to configure your TrueNAS SCALE home server networking, this post will help you configure a static IP address, Link Aggregation (Failover, LoadBalance, LACP), VLAN, and Bridge…
View On WordPress
#Bridge interface guide#Configure static routes#Dynamic Host Configuration Protocol#Failover setup guide#Loadbalancing on TrueNAS#Network interface configuration#Static IP address setup#TrueNAS Scale network configuration#TrueNAS system settings#VLAN configuration tutorial
0 notes
Text
Home WAN Failover with UDM Pro
If recurring cloud service fees for hobby projects cause death by a thousand cuts, I'm feeling like I did the first few times Ashina Elite - Jinsuke Saze kicked my ass in Sekiro:
...but my SRE day job long ago scared me off single points of failure, so I've been hesitant to host services that real users depend on--mostly https://life4ddr.com and https://truebpm.dance--at home.
But then we moved to our new home, where the prior owners had installed a couple of 13.5 kWh Tesla Powerwalls in the garage, and I realized I had power redundancy for the first time. This got me thinking about what it would take to build a sufficiently HA environment at home for hosting community projects and, well, there's work left to do to answer that question.
Might as well start with...
Redundant ISPs!
Step 1: ISPx2
Step 1 is easy: We pay $80/mo for AT&T Gigabit fiber as our primary ISP. I've had a (deactivated) Starlink RV dish and have been waiting for the chance to use it.
The primary downsides of Starlink for RVs are a) the slightly higher cost than residential Starlink ($135/mo vs. $110/mo for residential), and b) RV users are throttled during periods of high demand. In practice, this has never happened to me; I'm on the waitlist for a residential plan.
Starlink is fairly fast:
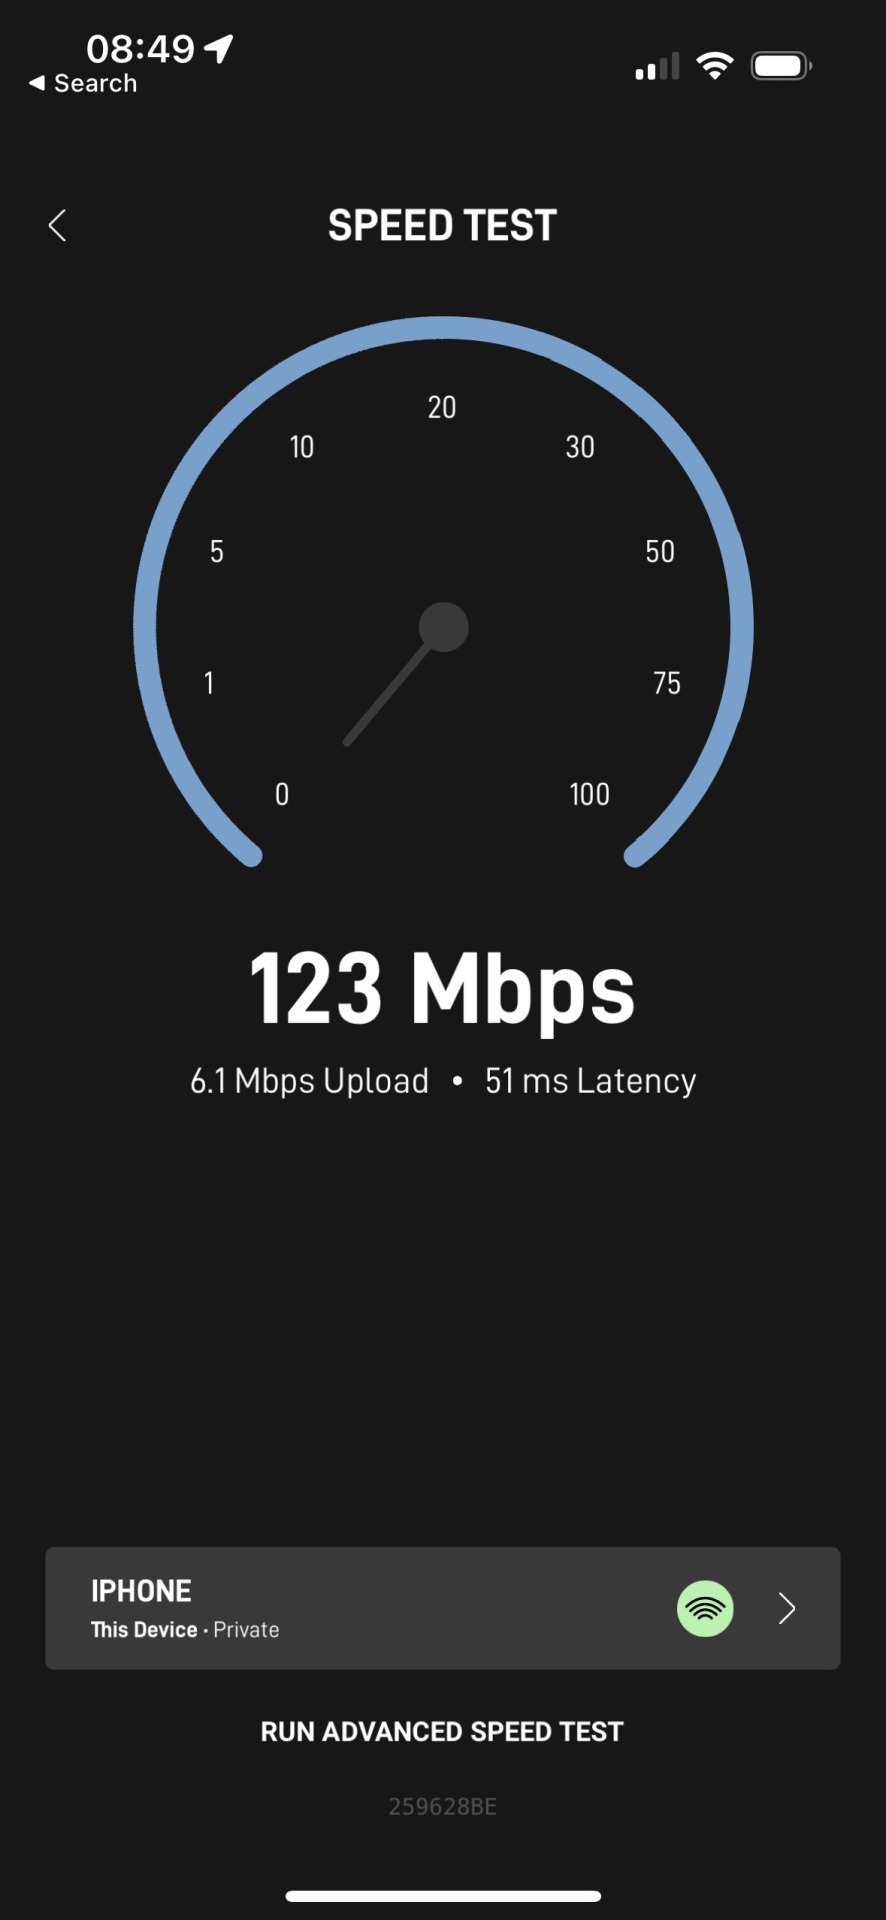
And the latency to google.com is eehhh, ok:

So why not another fiber or broadband provider?
I've been enjoying not paying Comcast too much
The Starlink dish was sitting in my closet
They're hobby projects, not payment processors that need 5+ 9s of availability and sub 10ms latency
(the primary line kinda never goes down anyway)
Off the griiiiidddd
etc.
Installation is a cinch if you cut corners:
Put it on the roof

Do a great job running and hiding the cables, definitely no eyesores here (not pictured)
(sorry to devon)
Through the wall and into the router
First time using this stuff to seal the hole drilled for the cable, plus some Sikaflex concrete sealant since, unlike regular silicone caulk, it can be painted once dried.
There may be an embarrassing part omitted here involving drilling into an "electrical wire", panicking, and in the end discovering that it was chicken wire & part of the stucco...

Not pictured: cable grommet for the 1" hole that has not yet arrived from Amazon
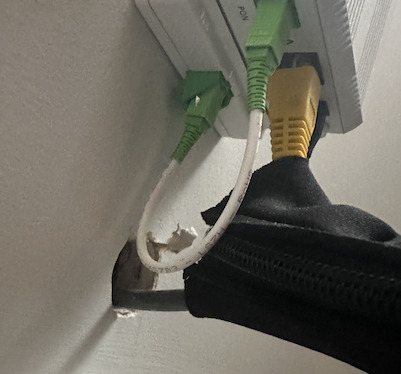
"That's a giant hole"
Yeah, because of this thing :(

The official routing kit comes with a 3/4" drillbit. I used the 1" drillbit I had on hand.
Final result:

Step 2: Automated failover
At this point, I had a separate SSID that I could manually switch devices to, but I didn't want to have to deal with doing that manually when I'm away from home. And I might not always be available, and don't want users waiting until I am...
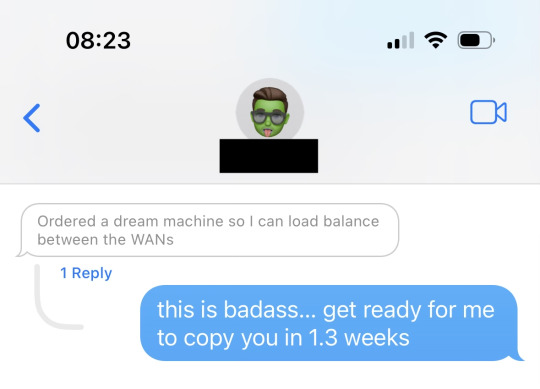
Enter the Ubiquiti Dream Machine (UDM) Pro!
Ok, so I really just copied a friend here without doing a ton of research:
But it ticks the boxes:
WAN failover (WAN load balancing not supported... but we can handle a few seconds of downtime)
Remote management interface
...That's it?
It does way more than this, but my goals are not lofty.
Once it arrived, it only took a few minutes for initial setup:
Plugged primary modem into WAN port 2, SFP+ 10gb (with an RJ-45 adapter)
Plugged Starlink router into WAN port 1 (with a Starlink ethernet adapter)
Turned on the UDM Pro, paired via bluetooth and finished guided setup through the iOS app
I then changed the port configuration to make WAN 2 primary and WAN 1 secondary. In my head this felt like a step toward >1Gb home Internet (AT&T offers 5 Gb today 😱). In practice, this led to a lot of packet loss and continual failovers to the backup link; it's probably an issue with the adapter or cable somewhere in the chain but i didn't feel like figuring it out.
I then discovered that you can configure port 8 as the secondary WAN link, and shuffled connections around so both WANs were cabled without the need for an adapter. This fixed the failover flapping and packet loss.
Somewhere along the way I also changed the echo server from the default Ubiquiti server to Google DNS (8.8.8.8). Ubiquiti pings the echo server to make the decision to fail over or not. I'm not sure this contributed to solving my issues, but it has for some
Success!

And kind of a sick name...
I didn't have to simulate failover because I broke things plenty of times during the setup process:
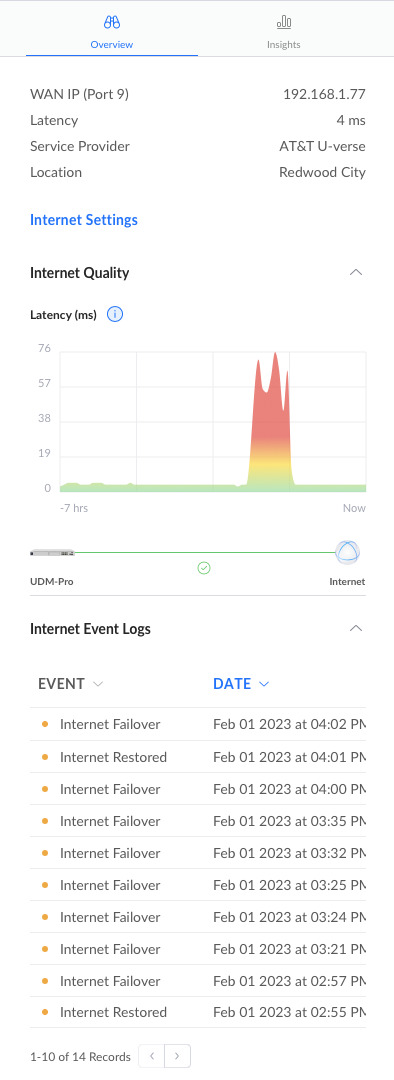
In practice, I saw 5-10 seconds of packet loss before Starlink took over. And automated recovery when AT&T started pinging again! More than adequate for users of a DDR BPM calculator.
What's left?
Ok, redundant power + Internet. But how do users get to a server deployed in my house when the IP changes on failover? Dynamic DNS? Do I go full Brad Fitzpatrick and shell out $12k+ on a /24 of IPv4 space, and create my own ASN + anycast from my house? (probably not)
Am I going to deploy CRITICAL DANCE GAME SERVICES on a SINGLE DESKTOP MACHINE!? (obviously not)
I don't know. Hopefully we will find out together in a subsequent post.
7 notes
·
View notes
Text
The Insider's Guide to Flawless Virtual Machine Backups

Introduction
Virtual machines have become indispensable in modern IT environments, offering flexibility, scalability, and efficiency in deploying various applications and services. However, the integrity and availability of the data within these VMs are paramount. A well-designed backup strategy is crucial for data protection, disaster recovery, and business continuity.
Understanding VM Backup Challenges
Before diving into the strategies, it's essential to understand the unique challenges that virtual environments pose:
Data Volume: VMs can generate large amounts of data, making backups time-consuming and storage-intensive.
Consistency: Ensuring data consistency within a VM backup, especially for databases and applications in use during the backup process.
Infrastructure Diversity: Diverse virtualization platforms (e.g., VMware, Hyper-V) may require specific backup solutions or approaches.
Automation and Scalability: As the number of VMs grows, manually managing backups becomes impractical, necessitating automated and scalable solutions.
Backup Strategies
Incremental vs. Full Backups: Implementing a mix of full and incremental backups can balance between recovery time objectives (RTO) and backup storage efficiency.
Snapshot-based Backups: Taking snapshots of VMs provides a point-in-time state, useful for quick recoveries, but should be complemented with traditional backups for long-term storage.
Replication: For critical VMs, replication to a secondary site provides immediate failover capabilities in case of a primary site failure.
Essential Best Practices
Regular Testing: Regularly test backup and recovery processes to ensure they meet business requirements and to familiarize the IT team with the procedures.
Backup Storage: Use reliable and redundant storage solutions for backups. Off-site or cloud storage can provide additional protection against site-wide disasters.
Optimize Backup Windows: Schedule backups during off-peak hours to minimize impact on VM performance.
Data Encryption: Encrypt backup data both in transit and at rest to protect sensitive information.
Tools and Solutions
Several leading tools and solutions cater to VM backups, each with its strengths and specific capabilities. Selecting the right tool depends on your virtualization platform, budget, and specific needs. Popular options include:
Veeam Backup & Replication: Known for its robustness and ease of use, suitable for both VMware and Hyper-V environments.
VMware vSphere Data Protection: A solution specifically designed for VMware environments, offering deep integration.
Acronis Cyber Backup: Offers comprehensive backup and recovery for multiple environments, including cloud options.
Troubleshooting Common Issues
Backup Failures: Investigate logs for errors, check network connectivity, and ensure sufficient storage space.
Slow Backup Performance: Optimize the network setup, consider changing the backup window, and ensure hardware resources are adequately provisioned.
Recovery Issues: Verify the integrity of backup files and test recovery processes regularly to ensure they meet RTOs.
Conclusion
Flawless virtual machine backups are attainable with a well-thought-out strategy, adherence to best practices, the right tools, and regular testing. By understanding the unique challenges of VM backups and employing effective solutions, organizations can protect their critical data and ensure business continuity, even in the face of disasters. As technology evolves, staying informed about new backup techniques and tools will help maintain a robust defense against data loss.
0 notes
Text
Best IVR Service Provider in Jaipur for Your Business 2023
In today's fast-paced business environment, effective communication with customers is paramount. Interactive Voice Response (IVR) systems have emerged as a vital tool for businesses to streamline their communication processes and enhance customer experiences. If you're in Jaipur and looking for the best IVR service provider for your business in 2023, this blog post will guide you through the selection process.
Understanding the Importance of IVR
Before delving into the selection of an IVR service provider, it's essential to understand the significance of IVR systems for your business:
Enhanced Customer Service: IVR systems allow businesses to efficiently route calls, provide information, and even resolve simple inquiries without the need for human intervention. This enhances customer service and reduces response times.
Cost Efficiency: By automating routine customer interactions, ivr service provider agency in jaipur can help reduce operational costs associated with customer support.
24/7 Availability: IVR systems can handle customer inquiries round the clock, ensuring that your business is accessible to customers at all times.
Professional Image: A well-designed IVR system can give your business a professional and organized image, making a positive impression on callers.
Now, let's explore the factors to consider when choosing the best IVR service provider Jaipur for your business in 2023:
1. Features and Customization
Different businesses have unique requirements when it comes to IVR systems. Look for a service provider that offers a range of features and allows customization to tailor the IVR to your specific needs. Features to consider may include call routing, multi-level menus, voice recognition, and integration with CRM systems.
2. Reliability and Uptime
Downtime can be detrimental to your business, so choose a service provider with a reputation for reliability and high uptime. Check for redundancy and failover mechanisms to ensure uninterrupted service.
3. Scalability
Your business may grow, and your IVR system should be able to scale with it. Ensure that the service provider can accommodate your future needs without significant disruptions or costs.
4. Integration Capabilities
Consider how easily the IVR system can integrate with your existing phone system, CRM software, and other business applications. Seamless integration can streamline processes and enhance efficiency.
5. Analytics and Reporting
Comprehensive analytics and reporting tools are valuable for monitoring the performance of your IVR system. Look for a provider that offers insights into call volumes, call patterns, and customer interactions.
6. Voice Quality
Clear and natural-sounding voice prompts are essential for providing a positive caller experience. Ensure that the IVR service provider uses high-quality voice recordings and technology.
7. Security and Compliance
If your business deals with sensitive customer information, security and compliance are paramount. Ensure that the IVR service provider adheres to industry standards and regulations, such as Payment Card Industry Data Security Standard (PCI DSS) compliance.
8. Customer Support
Prompt and reliable customer support is crucial, especially if you encounter technical issues or need assistance with configuration. Choose a provider known for excellent customer service.
9. Cost and Pricing Structure
Evaluate the pricing structure of the IVR service provider, including setup fees, monthly charges, and any additional costs for extra features or usage. Ensure that the pricing aligns with your budget.
10. Reviews and Reputation
Research customer reviews and the reputation of the IVR service provider in Jaipur. Recommendations from other businesses can provide valuable insights into the quality of service.
Real Also:-
Leading IVR Company In Jaipur
Benefits Of IVR Service
Conclusion
Choosing the best IVR service provider in Jaipur for your business in 2023 involves a thorough evaluation of features, reliability, scalability, integration capabilities, analytics, voice quality, security, customer support, pricing, and reputation. By carefully considering these factors and aligning them with your business needs, you can make an informed decision that enhances your customer communication and ultimately contributes to your business's success.
0 notes
Text
Quality Assurance for Clear Conversations: The Essential Guide to VOIP Testing
Whether it’s business conferences, remote meetings, or personal conversations, VOIP enables us to connect and collaborate seamlessly across vast distances. However, ensuring the clarity and reliability of voice communications over IP networks requires meticulous testing and quality assurance. In this comprehensive guide, we will delve into the essential aspects of VOIP Testing to help you achieve clear conversations and superior call quality.
Understanding VOIP Testing: VOIP testing involves evaluating the performance, reliability, and quality of voice communications over IP networks. It aims to identify and rectify potential issues that may impact call quality, latency, jitter, packet loss, network connectivity, and overall user experience.
Types of VOIP Testing:
Functional Testing: This verifies the basic call functionality, including call setup, tear-down, call transfer, hold/resume, and conferencing. It ensures that all essential features and functionalities are working as expected.
Performance Testing: Performance testing measures the quality parameters of VOIP networks, such as call quality, latency, jitter, and packet loss. It helps determine the maximum call capacity that the network can handle without compromising quality.
Security Testing: Security testing evaluates the robustness of VOIP systems, including encryption protocols, authentication mechanisms, and vulnerability assessments. It ensures the confidentiality and integrity of voice communications.
Load Testing: Load testing simulates high call volumes to evaluate how the VOIP system handles heavy traffic loads. It helps identify bottlenecks, scalability issues, and ensures optimal performance during peak usage.
Interoperability Testing: Interoperability testing tests the compatibility between different VOIP devices, software, and networks. It ensures seamless communication across different platforms and devices.
Failover and Redundancy Testing: This type of testing evaluates the system’s ability to switch to backup servers or alternate routes in case of network failures. It verifies the effectiveness of redundancy mechanisms and ensures uninterrupted service.
Key Testing Parameters:
Call Quality: Call quality measures the audio clarity, echo, noise, delay, and distortion. The Mean Opinion Score (MOS) is commonly used to assess voice quality.
Latency: Latency refers to the delay between the transmission and reception of voice packets. Excessive latency can cause communication issues and affect user experience.
Jitter: Jitter assesses the variation in packet arrival times. High jitter can lead to audio distortion and quality degradation.
Packet Loss: Packet loss measures the percentage of lost voice packets during transmission. High packet loss can result in choppy or incomplete audio.
Testing Tools and Techniques:
Network Performance Measurement: Tools like Wireshark, PRTG, and Iperf capture and analyze network traffic to identify performance issues and bottlenecks.
Voice Quality Measurement: MOS testing tools, such as PESQ (Perceptual Evaluation of Speech Quality), assess voice quality and provide MOS scores.
Simulation and Load Testing: Tools like Hammer, SIPp, and Asterisk simulate multiple concurrent calls to evaluate system performance and scalability.
Security Testing: Tools like Wireshark, Metasploit, and Nessus help identify vulnerabilities, analyze network traffic, and test encryption protocols.
Test Plan and Execution:
Define Test Objectives: Determine the specific goals and objectives of VOIP testing, such as call quality optimization or system scalability.
Identify Test Scenarios: Define various test scenarios to cover different aspects of VOIP functionality, performance, and security.
Develop Test Cases: Create detailed test cases covering different test scenarios, including both positive and negative cases.
Take your VoIP quality to the next level with Synsoft Global’s comprehensive VoIP Testing Services. Our expert team will ensure that your voice calls are crystal clear and reliable, providing an exceptional communication experience for your customers.
0 notes
Text
vCloud Availability for Cloud-to-Cloud DR 1.5 Reference Architecture
Overview
The vCloud Availability Cloud-to-Cloud DR solution provides replication and failover capabilities for vCloud Director workloads at both VM and vApp level.

VMware vCloud Availability for Cloud-to-Cloud DR Reference Architecture (PDF format here)
This blog demonstrates the reference architecture of vCloud Availability for Cloud-to-Cloud Disaster Recovery 1.5, VMware vCloud Availability for Cloud-to-Cloud DR 1.5 allows tenant and service provider users to protect vApps between different virtual data centers within a vCloud Director environment and across different vCloud Director based clouds.
The architecture diagram illustrates the needed solution components between cloud provider’s two data centers which are backed by different vCloud Director cloud management platform, it also shows the network flow directions and port number required for communication among components in the vCloud Availability for Cloud-to-Cloud DR solution. Architecture supports symmetrical replication operations between cloud environments.
The service operates through a VMware Cloud Provider Program, and each installation provides recovery for multiple cloud environments. The vCloud Availability for Cloud-to-Cloud DR provides:
Self-service protection and failover workflows per virtual machine (VM).
Single installation package as a Photon-based virtual appliance.
The capability of each deployment to serve as both source and recovery vCloud Director instance (site). There are no dedicated source and destination sites.
Symmetrical replication flow that can be started from either the source or the recovery vCloud Director site.
Replication and recovery of vApps and VMs between vCloud Director sites.
Using a single-site vCloud Availability for Cloud-to-Cloud DR installation, you can migrate vApps and VMs between Virtual Data Centers that belong to a single vCloud Director Organization.
Secure Tunneling through a TCP proxy.
Integration with existing vSphere environments.
Multi-tenant support.
Built-in encryption or encryption and compression of replication traffic.
Support for multiple vCenter Server and ESXi versions.
Architecture Explained
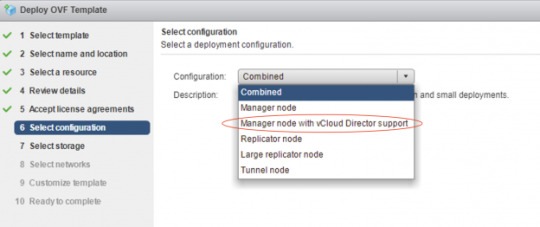
When you implement this solution from the ova file in your production environment, make sure you are not choosing the “Combined” configuration type, instead you need to choose the “Manager node with vCloud Director Support’ configuration (icon # 6 in the RA), you’ll see the configuration description showing “The H4 Management Node. Deploy one of these if you need to configure replications to/from vCD”, H4 represents the vCloud Availability Replicator or Manager (C4 is for vCloud Availability vApp Replication Service or Manager), by selecting this configuration type, the ova will install three vCAV components all together in a single appliance:
1. vCloud Availability Cloud-to-Cloud DR Portal (icon # 5 in the RA)
2. vCloud Availability vAPP Replication Manager (icon # 4 in the RA)
3. vCloud Availability Replication Manager (icon # 3 in the RA)

The above three components are located in a white-colored rectangle box (icon # 6) in the reference architecture diagram, all the communications between those three components are happened internally and will never route through outside this appliance, for example, vCloud Availability vAPP Replication Manager will use REST API calls to vCloud Availability Replication Manager in order to perform required replication tasks.
vCloud DirectorWith the vCloud Director, cloud provider can build secure, multi-tenant private clouds by pooling infrastructure resources into virtual data centers and exposing them to users through Web- based portals and programmatic interfaces as fully automated, catalog-based services.
vCloud Availability Replicator Appliance
For production deployments, You deploy and configure dedicated vCloud Availability Replicator appliance or appliances, it exposes the low-level HBR primitives as REST APIs.
vCloud Availability Replicator ManagerA management service operating on the vCenter Server level. It understands the vCenter Server level concepts for starting the replication workflow for the virtual machines. It must have TCP access to the Lookup Service and all the vCloud Availability Replicator appliances in both local, and remote sites.
vCloud Availability vApp Replication ManagerProvides the main interface for the Cloud-to-Cloud replication operations. It understands the vCloud Director level concepts and works with vApps and virtual machines using vCD API calls.
vCloud Availability C2C DR PortalIt provides tenants and service providers with a graphic user interface to facilitate the management of the vCloud Availability for Cloud-to-Cloud DR solution. It also provides overall system and workload information.
Manager node with vCloud Director Support
Single appliance that contains the following services:vCloud Availability Cloud-to-Cloud DR Portal
vCloud Availability vAPP Replication Manager
vCloud Availability Replication Manager
vCenter Server with Platform Services ControllerThe PSC provides common infrastructure services to the vSphere environment. Services include licensing, certificate management, and authentication with VMware vCenter Single Sign-On.
vCloud Availability Tunnel ApplianceThis solution requires that each component on a local site has bidirectional TCP connectivity to each component on the remote site, If bidirectional connections between sites are a problem, you configure Cloud-to-Cloud Tunneling, you must provide connectivity between the vCloud Availability Tunnel appliances on each site. It simplifies provider networking setup by channeling all incoming and outgoing traffic for a site through a single point.
Network Address TranslationYou must set an IP and port in the local site that is reachable for remote sites and forward it to the private address of the vCloud Availability Tunnel appliance, port 8048, for example, by using destination network address translation (DNAT).
Coexistence
Based on the product release nodes, vCloud Availability for Cloud-to-Cloud DR 1.5 and vCloud Availability for vCloud Director 2.X can be installed and can operate together in the same vCloud Director environment. You can protect virtual machines either by using vCloud Availability for Cloud-to-Cloud DR 1.5 or vCloud Availability for vCloud Director 2.X.
vCloud Availability for Cloud-to-Cloud DR 1.5 and vCloud Director Extender 1.1.X can be installed and can operate together in the same vCloud Director environment. You can migrate virtual machines either by using vCloud Availability for Cloud-to-Cloud DR 1.5 or vCloud Director Extender 1.1.X.
Interoperability
vSphere Hypervisor (ESXi) – 5.5 and above
vCenter Server – 6.0, 6.5 and 6.7
vCloud Director for Service Providers – 8.20, 9.0, 9.1 and 9.5
* Please visit VMware Product Interoperability Matrices website to check the latest support products version.
Notes
There’s a comprehensive vCloud Availability Cloud-to-Cloud DR Design and Deploy Guide available here, which was published by my colleague, Avnish Tripathi, you can find detail design guidelines for this solution.
VMware official vCloud Availability for Cloud-to-Cloud DR Documentation is here.
0 notes
Text
Advantages of a Premise Based PBX
The age of Voice over IP (VoIP) has become the new standard in telecom. The increasing advantages of connecting your phone system, such as the New Rock pbx system, to the internet is obvious, but that doesn't mean you're required to give up control of the system to a third-party.
VoIP comes in many forms, With SIP trunking, the IP Office can send your calls over the internet. This provides much of the savings you would recognize going to a 100% VoIP phones solution, without moving all of your equipment to an offsite data center while maintaining control and uptime.
CARRIER VERSATILITY. Why would you need different types of dial tone service for your business? You may have services that require landline phone service such as lifeline systems, HVAC, security, etc. However, for a business that requires a High Availability solution, carrier redundancy is an important consideration. Similar to ISP failover, an HA environment should consider diversity in dial tone (SIP, PRI, POTS) to ensure your calls are always flowing. The IP Office can service multiple carriers at once, offering failover in the event of carrier downtime.
COST OF OWNERSHIP. By purchasing the equipment and licensing, your business can drastically reduce its telecommunications expense over time. This will depend on the businesses plan to keep the phone system in place, however, it is a great option for businesses that can properly forecast their technology needs over the life of the IP Office.
TOTAL CONTROL. Control of the phone system equipment is ideal for larger organizations that already have the infrastructure setup to host their own platform. Controlling simple tasks like re-routing phone numbers or adding extensions is something any organization can benefit from. However, you're not alone. Third party service agreements are available that will only increase uptime.
REDUCED FEATURE COSTS. Complexity equals cost, but it doesn't need to be excessive. If your feature requirements include technologies like Call Recording, Contact Center, Advanced or Custom Reporting, the IP Office offers this in a cost effective manner instead of expensive recurring user fees that can add up quickly on larger systems.
PBX IP PBX and VoIP technology Advantages
PBX phone systems for small businesses
Guide to Business VOIP PBX
0 notes
Text
Openvpn For Mac Os

Important
Openvpn Macos Viscosity
Openvpn For Mac Os X
This document will guide you throught the installation process of OpenVPN for Mac OS X. For other operating systems, visit here. Remote access requires the use of Multi-Factor Authentication. If you haven't set this up for your IAS account, please see our information page or contact the Computing Helpdesk for DuoSecurity before continuing. Sep 09, 2020 Enter your Mac admin account password and press OK. The configuration files that you just installed will appear in the Configurations section on the Tunnelblick app. Connect to the VPN. To connect to a VPN location, click on the configuration file of a specific location. Then press Connect. Enter Surfshark service credentials and click OK. OpenVPN (OS X) for Mac. Free OpenVPN Mac OS X 10.3/10.4 Version 2.3.2 Full Specs. Average User Rating: 1 User Votes 1.0. Download.com offers no downloadable file for this product. Open VPN Client starts operating as an automatic system once it is installed on your Open VPN Mac Setup. Keep a closer look at the step by step phases of its installation and usage. Follow the steps below for Open VPN on Mac Os installation.
Netgate is offering COVID-19 aid for pfSense software users, learn more.
There are three client options for Mac OS X.:
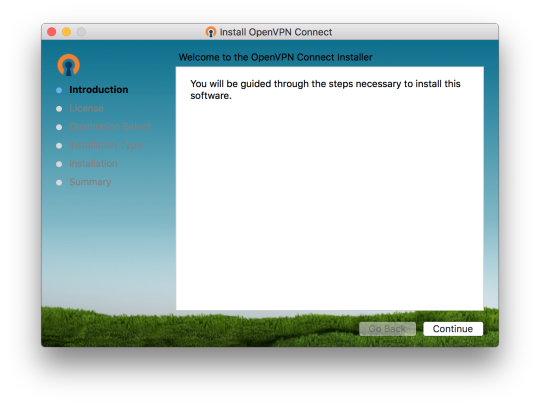
The OpenVPN command line client. Most users prefer a graphical client, so thisoption will not be covered.
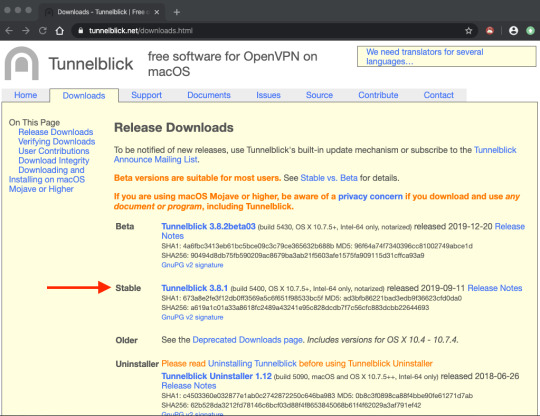
Tunnelblick, a free option available for download at the Tunnelblick Website.
The commercial Viscosity client. At the time of this writing, it costs $14USD for a single seat. If OpenVPN is used frequently, Viscosity is a muchnicer client and well worth the cost.
Both Tunnelblick and Viscosity are easily installed, with no configurationoptions during installation.
Configuring Viscosity
When using the Viscosity client, it can be configured manually or the OpenVPNClient Export package may be used to import the configuration. Viscosityprovides a GUI configuration tool that can be used to generate the underlyingOpenVPN client configuration. The CA and certificates can be imported manually,and all of the parameters can be set by hand. This section cover importing aViscosity bundle from the export package.
Download a copy of the Viscosity bundle for the client from the OpenVPNClient Export package
Locate the saved file, which will end in .visc.zip indicating that it is acompressed archive
Copy this exported bundle to a folder on the Mac
Double click this file and it will expand to Viscosity.visc
Double click Viscosity.visc and Viscosity will open and import theconnection as shown in Figure Viscosity Import
Delete the Viscosity.visc directory and the .zip archive
Viscosity will be running after import, and may be found in the menu bar
Click the lock icon added to the menu bar at the top of the screen
Click Preferences to check that the configuration was imported as shown inFigure Viscosity Preferences
Viscosity Preferences
Check the Connections area to see if the connection imported successfullyas shown in Figure Viscosity View Connections.
Close the Preferences screen
Click the lock in the menu bar
Click the name of the VPN connection to connect as shown in FigureViscosity Connect. After a few seconds, the lock in the menu barwill turn green to show it connected successfully.
Viscosity Connect
Click on it and then click Details as shown in FigureViscosity Menu to see connection information
On the first screen (Figure Viscosity Details), the connectionstatus, connected time, the IP assigned to the client, and the IP of the serverare all displayed. A bandwidth graph is displayed at the bottom of the screen,showing the throughput in and out of the OpenVPN interface.
Viscosity Details
Clicking the up/down arrow button in the middle of the details screen displaysadditional network traffic statistics. This shows the traffic sent within thetunnel (TUN/TAP In and Out), as well as the total TCP or UDP traffic sentincluding the overhead of the tunnel and encryption. For connections usingprimarily small packets the overhead is considerable with all VPN solutions. Thestats shown in Figure Viscosity Details: Traffic Statistics are from only afew pings traversing the connection. The traffic sent in bringing up theconnection is also counted here, so the initial overhead is higher than what itwill be after being connected for some time. Also, the typical VPN traffic willhave larger packet sizes than 64 byte pings, making the total overhead anddifference between these two numbers considerably less.
Clicking on the third icon in the middle of the Details screen shows theOpenVPN log file (Figure Viscosity Details: Logs). If there is any troubleconnecting, review the logs here to help determine the problem. See alsoTroubleshooting OpenVPN.
Viscosity Details: Logs
Latest Version:
OpenVPN 2.4.9 LATEST
Requirements:
Mac OS X 10.8 or later
Author / Product:
OpenVPN Inc. / OpenVPN for Mac
Old Versions:
Filename:
openvpn-2.4.9.zip
Details:
OpenVPN for Mac 2020 full offline installer setup for Mac
OpenVPN for Mac is an award-winning and fully-featured SSL VPN solution that can allow everyone from computing novices to large companies to configure the way they are accessing the internet, unlocking powerful services for safer and more stealthier browsing experience. Built from the ground up to support latest encryption methods, this app allows you to connect your Mac to VPN for macOS servers without the fear that anyone will intercept and spy on your data, from where your data requests will be distributed across the rest of the web in a safe and controlled manner.
By default, the app can distribute your data traffic across many of its servers, making your online location masked and unrecognizable to Internet Service Providers and the rest of the internet in general. In addition to that, It also comes with the large offering of customization tools that can be used for setting up remote access privileges, site-to-site VPNs, enterprise-scale remote access, adaptive load-balancing, advanced Wi-Fi security, failover services, fine-grained user access control, and much more.
Presence of both automated VPN services and advanced tools have made OpenVPN for macOS into #1 secure browsing software of choice for both regular users, organizations of all sizes and many Fortune 500 companies.
Installation and Use
It comes in a small package that will after installation re-configure the way your computer is accessing the internet. The configuration window of this app is actually very lightweight, and it holds only the most basic of tools for setting the type of your VPN setting (config file, system proxy settings or manual configuration) and a dropdown menu for selecting user interface language (with over 15 available translations).
Originally built for use in enterprise environments, the personal tier of OpenVPN retains the highly advanced technologies and lightweight tools. The core security feature of OpenVPN is based upon OSI layer 2 or 3 secure network extension that is utilizing SSL/TLS protocols. It installs deep into the Windows OS, enabling all the user apps to take advantage of the security features, firewall rules, authentication certificates, and more.
In real-world, ordinary non-business users can encounter various roadblocks that can prevent them from taking full advantage of their home internet connection. This may include ISP data rate throttling, website content region blocking, or even government-imposed firewalls. It allows users to circumvent these issues, offering you stable and secure data stream to their servers, from which you will be re-routed to any major region in the world, and be able to access its “local” content. No matter if you want to simply access region-specific sites and services (such as streaming platforms content offering) or to read censored news outlets, It can allow you to do that in just a few clicks.
Another benefit of Open VPN is a unified virtual presence. No matter where you physically are, if you are using Open VPN, the rest of the internet will be able to detect you originating from a single region.
Features and Highlights
Openvpn Macos Viscosity
Core – With over 50 million downloads, the core technology of Open VPN has proven to be one of the leaders in the field of VPN security.
Advanced AES encryption – It encrypts all outgoing and incoming internet data with the world’s leading standard for encryption.
Fortified privacy – Effortlessly protect your personal and online identity by location spoofing your IP address.
Wireless hot spot protection – Prevent unauthorized access to your data while connecting to public and unsecured Wi-Fi sports.
Travel protection – Mask your online location no matter where you are.
Worldwide server connection – Gain access and establish your virtual presence at servers that are in 12 regions around the world.
Unrestricted access – Access OpenVPN servers from any location in the world.
24/7 support – Gain access to support 24/7 via email or live web chat.
Full Windows compatibility – Available on all modern versions of Windows, ranging from Windows 2003 to Windows 7 (both 32-bit and 64-bit).
Openvpn For Mac Os X
Also Available: Download OpenVPN for Windows
0 notes
Text
Migrating SQL Server databases from Microsoft Azure to AWS in near-real time with CloudBasic
There are multiple ways to migrate SQL Server databases hosted in Microsoft Azure into Amazon RDS for SQL Server. For use cases such as migrating from a Azure SQL managed instance or SQL Server on a Azure virtual machine to Amazon RDS for SQL Server or SQL on Amazon Elastic Compute Cloud (Amazon EC2), you can use AWS Database Migration Service (AWS DMS). When it comes to migrating Azure SQL databases, because they don’t support change data capture (CDC), instead of AWS DMS, you can use a technology partner solution called CloudBasic for Amazon RDS for SQL Server read replicas and disaster recovery. In addition to migration, you can also use CloudBasic for deploying and testing cross-Region Amazon RDS for SQL Server disaster recovery in an AWS environment (prior to migration cutover). CloudBasic is available on AWS Marketplace. In this post, we highlight a solution that uses CloudBasic and other AWS services to facilitate a seamless, near-zero-downtime migration of Azure SQL databases into Amazon RDS for SQL Server. The solution also comes with a deployment option of enabling fully automated Amazon RDS for SQL Server cross-Region disaster recovery. This migration strategy is applicable to the following use cases: Migrating databases from an Azure SQL managed instance to Amazon RDS for SQL Server or SQL on Amazon EC2. Migrating databases from a Azure SQL virtual machine to Amazon RDS for SQL Server or SQL on Amazon EC2. Migrating Azure SQL databases or an elastic pool to Amazon RDS for SQL Server or SQL on Amazon EC2. All SQL Server editions in Amazon RDS, including SQL Server Enterprise, Standard, and Web, are supported. Moreover, CloudBasic facilitates seamless migration between SQL Server versions and editions. Sample use cases include: Modernization – Migration from SQL Server Enterprise 2012 on Azure to the latest SQL Server Enterprise 2019 on Amazon RDS TCO Reduction – Migration downgrade from SQL Server Enterprise on Azure to SQL Server Standard on Amazon RDS, deploying multiple in-Region and cross-Region read replicas In addition, you can orchestrate a fully automated cutover from Azure to AWS plus fully automated cross-Region disaster recovery within AWS, by integrating CloudBasic with other AWS services, such as AWS Lambda and Amazon Route 53 (chained Azure[Region]-AWS[Region A] – AWS[Region B] replication), prior to final cutover from Azure to AWS. Whenever ready, you cut over to AWS by performing a planned failover. At time of cutover to primary AWS [Region A], the fully automated AWS cross-Region solution (AWS[Region A] – AWS[Region B]) is fully operational. Solution overview The following diagram illustrates the solution architecture. CloudBasic is a cloud-native solution, which is launched into your Amazon Virtual Private Cloud (Amazon VPC). You operate with CloudBasic’s web console and API just like you would with any other AWS service. The following screenshot shows a view of read replicas on the CloudBasic console. Configuring migration and cross-Region RDS SQL Server disaster recovery with CloudBasic You can quickly configure new migration and cross-Region read replicas from any version or edition of SQL Server in Azure into any version or edition of SQL Server in AWS, in most cases without the need to select advanced options or any custom scripting. In complex migration and disaster recovery deployment cases, advanced configuration options and scripting capabilities are available in the advanced section of the CloudBasic console. CloudBasic automatically handles any necessary schema conversions, accounts for SQL Server version and edition incompatibilities, and creates SQL Server read replicas in Amazon RDS for SQL Server or Amazon EC2 in a fully automated manner. The following screenshot shows a replication job’s connection configuration on the CloudBasic console. If you’re migrating Azure SQL databases, which don’t support CDC, CloudBasic defaults the tracking of changes method to Change Tracking. You can use other tracking methods in the cross-Region disaster recovery part of the architecture. The following screenshot shows the configuration of a replication job in CloudBasic with the Change Tracking method. For a continuous replication mode to work, all the tables in the source database need to have primary keys (PKs) or unique indexes. Before a continuous replication is started, the Quick Setup wizard analyzes all the tables and lists tables without PKs or unique indexes. At this point, you can create PKs for the listed tables or choose to proceed as is. However, after the initial replication and seeding is complete, the tables without PKs or unique indexes are ignored for continuous data replication. After the initial database seeding is complete, the replication job is transitioned to continuous change tracking with a connection pool defaulted to an automatically determined size based on CloudBasic instance size and database size. To further fine-tune the replication process, and to support larger databases and high rate of transactions, you can increase or decrease the connection pool size to lower latency or reduce workload on the primary, respectively (see the following screenshot). Ongoing monitoring of migration pending data and schema changes is facilitated by runtime reports, runtime logs, and system alerting. The following screenshot highlights the replica count of the source and target datasets and timestamp of the last sync. The pending changes column displays the number of records yet to be replicated. Database schemas are tracked for changes. New tables, stored procedures, views, functions, constraints, foreign keys, new columns, altered columns changes, and more are all replicated. Summary Performing Azure SQL to AWS migration by leveraging Cloud Basic’s cloud-native Amazon RDS for SQL Server disaster recovery solution delivers great advantages over traditional migration tools. With CloudBasic, the initial focus is on achieving intercloud disaster recovery on a database level via creating Amazon RDS for SQL Server read replicas. This approach allows extended testing to be performed against the actual AWS environment over a prolonged period of time. You can cut over whenever you’re ready by performing a planned disaster recovery failover. To deploy CloudBasic from AWS Marketplace, visit AWS Marketplace. For deployment instructions, see the CloudBasic deployment guide. In addition, you can use CloudBasic to deploy cross-Region RDS SQL Server read replicas to achieve disaster recovery within the AWS environment. About CloudBasic CloudBasic is a cloud technology firm headquartered in Irvine, California. It’s an AWS advanced technology partner that has achieved AWS Workloads Competency status for its CloudBasic for Amazon RDS SQL Server read replicas and disaster recovery cloud-native solution. About the Authors Sudarshan Roy is a Senior Database Specialist Cloud Solution Architect with the AWS Database Services Organization (DBSO), Customer Advisory Team (CAT). He has led large scale Database Migration & Modernization engagements for Enterprise Customers to move their on-premises database environment to Multi Cloud based database solutions. RJ Petroff is the Product Manager, Founder and CEO of CloudBasic. Although remaining deeply involved in product design and management, he created CloudBasic from the ground up, and evolved it into an enterprise cloud product company with international customers across some of the most demanding verticals. Prior to founding CloudBasic, RJ was involved in fintech product development and disaster recovery management at leading wall street firms.
https://aws.amazon.com/blogs/database/migrating-sql-server-databases-from-microsoft-azure-to-aws-in-near-real-time-with-cloudbasic/
0 notes
Text
Data Recovery Dubai
Be Prepared to respond to inquiries concerning your Strike including:If you submit a case to a Data recovery dubai, you will finish a ticket with essential subtleties in your situation. A delegate in the rebuilding administration will react to the initial information by supplying you with the upcoming moves to make to begin the Strike recovery process.Know precisely what's in store when you submit a case to an Attack recovery companyMeasure 3. Survey the metadata on each Attack driveHow to Initiate the Assault recovery processWe've made a breakdown of normal Strike levels and disappointments that will help answer any inquiries that you may have about the perplexing arrangement of your RAID.Step 5. Use filesystem to Find informationThe Strike rebuilding engineers in Demonstrated Data are standing by day in and day out to respond to your inquiries and offer the experience you have to fathom the intricate Attack recovery measure. We're committed to providing you with everything the particular recovery strategy you will require to effectively recover and reunite your Strike information for you.Now that you comprehend the commonplace system to reestablish information from shared Assault designs, exactly what amount will Attack recovery cost you? We've built up a breakdown of Attack recovery expenses to give you insight into the variables that lead to how far you will pay to recoup your information and how long Assault recovery will require.
Precisely the number of hard drives are in the RAID?What's the creator of this server?Once the sum total of what blunders have been found and fixed as vital, the data rebuilding engineer will examine the metadata. Metadata gives information on the measurements, kind and grouping of each hard drive in Assault. Metadata likewise uncovers when the latest data had been written to the carport. It is especially critical in the rebuilding cycle to comprehend which drive has the most current data. Employing the metadata, a recovery engineer may likewise reveal and avoid some rotten drives (if applicable in Attack's with a few drives).To begin with Strike recovery, start a case and converse with one of our specialists today! What is the entire stockpiling capacity of each drive?Measure 6. Concentrate and examine test filesAfter reviewing your answers, you'll be given with an expected Attack recovery cost and a choice of test types.Below you will find an outline of the main case assessment system utilized by Assault rebuilding engineers so you see absolutely what's in store.
Have there been any earlier recovery attempts?Step-by-step Attack recovery processThese steps sum up the run of the mill Assault recovery measure. Because of the complexity of Assault setups, the rebuilding cycle changes from case to case. Varieties from the recovery cycle are normally determined by elements, for example, the severity and kind of disappointment alongside the measure of drives in your RAID.Measure 7. Concentrate all accessible data in the Strike arrayJust what amount can Attack recovery cost?The measures outlined underneath are normal convention for the basic Assault types managed in this report.By the finish of this Report, you will:What kind of data is generally significant (records, databases, email, etc.)?A data recovery engineer will direct an investigation on all drives from the Assault to find any drives that are harmed. This cycle checks in any event, working drives to ensure an extensive image of this damage is introduced and no detail has been disregarded. Any essential repairs the reclamation engineer can hurry to permit a more effective recovery will likewise be addressed.Example of new instance ticketUsing the legitimate units found through replicating the Attack structure, the recovery engineer can recognize and utilize the Assault's filesystem. An Attack filesystem is intended to plan the assortment of sensible course of action to distinguish your records' areas. Uncovering the filesystem of a fallen Attack is fundamental to data recovery.
The filesystem contains key information regarding the spot of information that may have been harmed or lost because of the Assault breakdown. In the event that the filesystem itself is harmed, at that point an Attack rebuilding engineer will run a crude reclamation. Crude Strike recovery is possibly utilized if the recovery engineer can't develop a report index because of the extraordinary level of the damage. The crude reclamation method filters your whole determination and gets documents dependent on their record type (jpeg, docs, and so forth.). Lamentably, if the breakdown is sufficiently extreme, a recovery expert won't have the option to restore your own organizer structure. In any case, your information will at present be effectively gotten back to you in volume envelopes dependent on record type.Step 1. Make a duplicate of drivesOnce you take the appraisal offer, you'll be given instructions about the most ideal path best to get your Assault drives to the recovery administration place.Step 2. Run diagnostics on all forcesHow can Assault recovery function?Understand the Bit by bit Strategy for Strike recoveryNow that you realize exactly how Attack capacities and how it can come up short, let us talk about the genuine Strike recovery process.The last proportion of Strike recovery is the point at which the recovery expert concentrates all accessible information in the Assault and transports it into a solid drive to re-visitation of you. Ordinarily a record of recuperated reports is conveyed to you actually to ensure you know decisively what information was recovered from your ineffective Assault. Our goal is to give a straightforward, straightforward clarification of this strategy you may expect when working with an Attack recovery support.
As an Assault reclamation specialist organization since 2011, we realize that the Attack recovery measure inside and out. Our recovery engineers adhere to the best principles and procedures in the business to proficiently and effectively return your data to you.Step 4. Duplicate the physical Assault You've gone to the page on the grounds that your Strike stockpiling contraption has fizzled and you wish to comprehend approaches to have your data back. You may be wondering precisely what strategies Attack recovery engineers use to recoup your data. What precisely is Strike Data recovery dubai, and how does this operate?To find the sensible units of the choice, a reclamation engineer will reproduce the physical drive course of action and modify the data tree. This method empowers the engineer to find the data documents and structures that are as yet noticeable following the disappointment. Reproducing the physical course of action of your Strike determines the amount of this information is recoverable. By and large, the greater the intensity of the capacity drive, the more legitimate parts it will have. Examining and rebuilding these units prompts the timeframe it will take for healing.This can be a widespread practice for a few data recovery situations. Duplicating all drives gives the recovery engineer using a similar duplicate of the entirety of the information in your RAID.RAID drives are a typical data stockpiling choice for both home clients and businesses the same. The benefits of Assault's multi-drive design include broadened ability, reliability and adaptation to internal failure in examination with a single drive stockpiling framework. Despite their namesake data repetition abilities, many shared Attack disappointments may leave you without admittance to your information.
At that point you will be mentioned to choose an assessment type: customary assessment (generally 1-3 business days) or emergency assessment (typically 3-6 hours for an additional expense). This decision will determine the degree of priority a rebuilding engineer will give your case.Be arranged the following stages to take to get your information got back to youData repetition infers that data in the majority of Strike levels are spared in two distinct areas to make adaptation to internal failure. This design considers at least one push disappointments to happen without information misfortune, in light of the Attack level.RAID's multi-drive arrangement gives more noteworthy reliability than a single drive stockpiling technique. All things considered, no Attack sum is safeguard and Assault's various failover levels make recovering data from Strike complicated.Next, you'll be asked to answer numerous inquiries concerning your data misfortune situation. These worries are utilized by data recovery engineers to rate the disappointment, comprehend the issue of the reclamation and give you an expected expense and time span to recover your information.Step-by-step Strike recovery ProcedureYou'll be guided to discontinue all use of your failing mechanical assembly to forestall additional harm. This is a vital initial phase in all data recovery cases to keep away from irreversible harm and diminish chances for data recovery.
Following the Strike is reproduced and the filesystem dissected, a reclamation engineer may extricate a report and test it to check whether it's practical. Since most Assault levels use data striping and information is dispersed over multiple areas to offer excess, the information tree must be reconstructed appropriately. Recovery engineers utilize this testing measure to check the accomplishment of the remake and the availability of usable information before moving forward with information extraction. You will find out about the bit by bit cycle of data recovery for shared Attack types including Assault 5, Strike 1, Strike 0, Assault 6, and Strike 10.Now that you know just precisely what's in store when you submit your Assault for investigation, what occurs straightaway? We've made a seven-venture manual to the Assault recovery measure that will assist you with understanding the manner in which your data gets restored and got back to you.
0 notes
Text
We recently covered the installation of FreeIPA Server on Ubuntu server. In this guide, I’ll show you how you can install and configure FreeIPA Client on Ubuntu 20.04/18.04/16.04 & CentOS 7 Linux system. FreeIPA is an open source Identity management system sponsored by Red Hat. It aims to provide an easily managed Identity, Policy, and Audit.
For Vanilla LDAP, use: How to configure LDAP Client on Ubuntu
Setup Prerequisite
Install FreeIPA Server
Installed and updated Ubuntu 20.04/18.04 / Ubuntu 16.04 server / CentOS 7
Root access
If you don’t have FreeIPA server ready, check:
How to Install FreeIPA Server on Ubuntu
How to install FreeIPA Server on CentOS 7
Once the installation of FreeIPA Server is complete, setup FreeIPA Client using steps covered here.
Step 1: Update system
We always start server configurations by doing an update of system packages:
Ubuntu:
sudo apt-get update
sudo apt-get upgrade
CentOS:
Update CentOS with the following commands:
sudo yum -y update
If you get kernel updates, consider rebooting the server for changes to take place.
Configure valid client hostname (FQDN) :
sudo hostnamectl set-hostname node-01.computingpost.com
Step 2: Install FreeIPA Client
FreeIPA client is available on repositories for Ubuntu / CentOS Linux. Install it using the command:
Ubuntu:
Below are the commands you’ll use to install FreeIPA Client on Ubuntu system.
sudo apt-get install freeipa-client
CentOS 7:
Install FreeIPA Client on CentOS 7 with the command below.
sudo yum -y install ipa-client
When prompted to provide a Kerberos realm for the server, just skip by pressing key.
Install FreeIPA Client on CentOS 7
Run the command below to install FreeIPA Client on CentOS 7.
sudo yum install ipa-client
This will be configured in the next step:
Step 3: Configure FreeIPA Client on Ubuntu 20.04|18.04 / CentOS 7
Once the installation of client package is complete. Add hostname and IP address of your IPA Server to /etc/hosts file:
$ sudo vim /etc/hosts
# Add FreeIPA Server IP and hostname
192.168.58.121 ipa.computingpost.com ipa
Replace:
192.168.58.121 IP address of your FreeIPA replica or master server.
ipa.computingpost.com with its hostname:
Then configure IPA client on this server so that users can start authenticating against it:
root@node-01:~# ipa-client-install --hostname=`hostname -f` \
--mkhomedir \
--server=ipa.computingpost.com \
--domain computingpost.com \
--realm computingpost.com
Autodiscovery of servers for failover cannot work with this configuration.
If you proceed with the installation, services will be configured to always access the discovered server for all operations and will not fail over to other servers in case of failure.
Proceed with fixed values and no DNS discovery? [no]: yes
Client hostname: node-01.computingpost.com
Realm: computingpost.com
DNS Domain: computingpost.com
IPA Server: ipa.computingpost.com
BaseDN: dc=computingpost,dc=com
This will start configuring FreeIPA Client on your server:
Synchronizing time
No SRV records of NTP servers found and no NTP server or pool address was provided.
Using default chrony configuration.
Attempting to sync time with chronyc.
Time synchronization was successful.
User authorized to enroll computers: admin
Password for [email protected]:
Successfully retrieved CA cert
Subject: CN=Certificate Authority,O=computingpost.com
Issuer: CN=Certificate Authority,O=computingpost.com
Valid From: 2018-06-30 08:27:06
Valid Until: 2038-06-30 08:27:06
Enrolled in IPA realm computingpost.com
Created /etc/ipa/default.conf
New SSSD config will be created
Configured sudoers in /etc/nsswitch.conf
Configured /etc/sssd/sssd.conf
Configured /etc/krb5.conf for IPA realm computingpost.com
trying https://ipa.computingpost.com/ipa/json
.......................
If everything went as expected, you should get a successful message like below:
The ipa-client-install command was successful
Step 4: Enable mkhomedir ( For Ubuntu only)
By default, sssd service will not create a home directory for the user on the first login, we need to enable this feature by modifying PAM configuration file.
sudo bash -c "cat > /usr/share/pam-configs/mkhomedir"
0 notes
Text
NetApp NCDA ONTAP Certification NS0-161 Study Guide | Killtest 2020
Promote Your Career With Network Appliance NS0-161 PDF Questions - Killtest Online
Now, you need to go through study material given by Killtest. After getting NetApp NCDA ONTAP Certification NS0-161 Study Guide start your NS0-161 exam preparation, you are guaranteed to have great marks in Network Appliance NCDA ONTAP Certification certification exam. Killtest has updated the newest NetApp NCDA ONTAP Certification NS0-161 Study Guide, which is published by the experienced IT experts and specialists. There are numerous NS0-161 practice exam and NS0-161 training materials providers that would guarantee you to pass Network Appliance Certification NS0-161 exam using their products. In comparison to all those, Killtest NetApp NCDA ONTAP Certification NS0-161 Study Guide have been around for a while and has been reliable resource for NS0-161 preparation, offering training materials for different Network Appliance certifications.
Read Killtest NS0-161 Exam Demo Questions First Online
You are provisioning a LUN for a new host. In this scenario, which three objects must exist?(Choose three.)
A. igroup
B. volume
C. LUN
D. export policy
E. interface group
Answer: ABC
What are two capabilities of Vserver setup?(Choose two)
A. It configures an existing Vserver
B. It licenses Vserver functionality
C. it creates a new Vserver that can host FCP LUNs.
D. It creates a new cluster Vservers
E. It joins an exisiting Vserver to the cluster.
Answer: AD
A storage administrator moves a LUN from one volume to another In this scenario, what is left behind in the volume?
A. clones of the LUN
B. Snapshot copies of the volume
C. LUN geometry settings
D. all of the deduplicated blocks from the base LUN
Answer: D
Which logical interface does not have migration nor failover migration capabilities?
A. node management
B. data
C. target
D. cluster management
Answer: A
What is the compression group size for adaptive compression?
A. The group size is always 32k, regardless of the workload.
B. The group size is always 8k, regardless of the workload.
C. The group size is determined based upon the workload.
D. The group size is always 4k, regardless of the workload.
Answer: C
A volume is created named vs2_vol2 on aggregate netappu-02. It is mounted in the vs2 namespace at /vs2/vol2. Volume move moves this volume to the netappu-01 aggregate.
What is the path to this volume after the move?
A. /netappu-01/vs2/vs2_vol2
B. /vs2/vol2
C. /vol/vs2/vs2_vol2
D. /vol/vs2_vol2
Answer: B
High-Quality NS0-161 Exam Questions - Pass In The First Attempt, Or Full Money Back
Network Appliance NS0-161 exam is known for its worldwide value and integrity. Network Appliance NS0-161 exam are fashioned in such way that with some hardcore work and determination anyone will be able to fulfill their hesitation toward their career. NetApp NCDA ONTAP Certification NS0-161 Study Guide helps you to prepare NS0-161 exam confidently and it encourages you to attempt. Killtest NetApp NCDA ONTAP Certification NS0-161 Study Guide include Network Appliance NS0-161 study materials, NS0-161 test questions, NS0-161 Network Appliance certification exam, NS0-161 practice exam. We fulfill all your certification needs here at Killtest. The salary quotient will also be on the rise and your future outlook will have a remarkable turn about. You can find a variety of Network Appliance NS0-161 practice exam on the internet to prepare yourself for your NS0-161 Network Appliance certification Exam.
Be Ready To Pass NS0-161 Exam By Using Killtest NS0-161 Test Questions
It is a necessary job for Network Appliance candidates to pass NS0-161 NetApp Certified Data Administrator, ONTAP exam to get Network Appliance NCDA ONTAP Certification certification. Killtest NetApp NCDA ONTAP Certification NS0-161 Study Guide provide you everything you will need to take your NS0-161 NetApp Certified Data Administrator, ONTAP Exam. The NS0-161 Exam details of Killtest are researched and produced by Professional Certification Experts who are constantly using industry experience to produce precise, and logical. Killtest NetApp NCDA ONTAP Certification NS0-161 Study Guide provide you with an opportunity to test your knowledge and skills in a simulated, certification-testing environment. Killtest provides the most up-to-date information on the entire NS0-161 study guide, NS0-161 test questions and NS0-161 practice exam will help you in the shortest possible time with maximum efficiency to pass NetApp Certified Data Administrator, ONTAP exam.
Prepare With NS0-161 Practice Test - Killtest NS0-161 Exam Questions Online
Being a NS0-161 certified professional helps you gain the skills needed to open a new career heights in the fields of IT. It applies to the whole fields as well as NS0-161 NetApp Certified Data Administrator, ONTAP area of computers such as operating system, hardware and others NS0-161 Network Appliance certification exam. It is significance and NetApp NCDA ONTAP Certification NS0-161 Study Guide performance this examination also known as NS0-161, NetApp Certified Data Administrator, ONTAP is suggested. Tackle the multiple tests and huge time commitment needed to learn the NetApp NCDA ONTAP Certification NS0-161 Study Guide, including the Network Appliance NS0-161 questions and answers. The primary way for research of NetApp Certified Data Administrator, ONTAP NS0-161 exam is studying NetApp NCDA ONTAP Certification NS0-161 Study Guide with appropriate subjects.
Network Appliance NS0-161 Latest Exam Questions | Read NS0-161 PDF File
One of the best ways of succeeding in NS0-161 exam is to look around the internet for latest Network Appliance NS0-161 test questions that can be helpful for the preparation of Network Appliance NS0-161 exam. So you can choose an appropriate quick training from Killtest to pass Network Appliance NS0-161 exam. Killtest is doing a phenomenal job as it has created NetApp NCDA ONTAP Certification NS0-161 Study Guide helped me a lot in passing Network Appliance NS0-161 Network Appliance NCDA ONTAP Certification certification exam. Killtest provides valid answers and questions of Network Appliance NS0-161 exam. High passing rate of NS0-161 exam with NetApp NCDA ONTAP Certification NS0-161 Study Guide from Killtest has been proven, just pass NS0-161 exam in first attempt with Killtest now.

0 notes
Text
Review: Tenda 4G680 V2.0 4G LTE Router with WiFi

In times like these the thoughts of a broadband outage are enough to make you shudder. So here’s a look at the Tenda 4G LTE Broadband Router which could just save your sanity.
4G to WiFi
The 4G680V2.0 N300 is a router with VoLTE (Voice over LTE) and Tenda say it will “support over 300 mobile/cellular networks in over 135 countries”.
It is everything you need, in a single box, to receive 3G or 4G LTE cellular broadband and turn it into a WiFi network that you can use to share an Internet connection with up to 32 of your devices.
The 2.4GHz 802.11 b/g/n wireless LAN it creates can transfer data at speed of up to 300Mbps down and up to 50Mbps up, where supported by your local cellular network.
As well as being a backup for when your road is dug up or some other outage, it could also be perfect for a temporary office, holiday homes or rural houses that have rubbish broadband. I’ve even read of people using them in their car as a WiFi Hotspot too.
Setup
The box includes the 4G680V2.0 unit, Quick Install Guide, Two antennas
the 12v/1A Power supply, Ethernet cable and an RJ11 phone cable.
Within a minute or two the unit had booted and I was able to connect to its WiFi network and access the Internet.
Our install actually lived up to the advertised ‘zero config’. I just took it out of the box, slotted one of these Three Data Sims (it’s unlocked for any network) into the bottom of the unit and turned it on.
You can set a maximum monthly data usage limit via the mobile app which will automatically disconnect for the cellular network to avoid overcharges.
Two hidden internal antennas handle the Wi-Fi, whilst the two external ones are for 3G / 4G. As the unit has removable cellular antennas (SMA connectors) you have to option of changing them for a high gain antenna like this or even an external one like this to really maximise your signal strength.
As long as your SIM supports it (not data only) you can also simultaneously make phone calls as well by plugging a regular handset into the RJ11 phone port on the rear. You can make calls and use the WiFi data network simultaneously.
You can manage the router via a browser (default 192.168.0.1 admin:admin) or Telnet. It can provide DHCP (or not) although it’s worth pointing out that the router does not allow Port Forwarding of any kind.
the WAN port allows you to connect your hardwired broadband instead, using the unit as for WiFi and moving the cellular feature to become a failover backup option.
Verdict

Rating: 4.5 out of 5.
This unit was superb in our tests. It worked straight out of the box with zero configuration and established a reliable WiFi network from the 4G cellular network. I’m dropping a half star for no port forwarding capabilities but all in all highly recommended.
Available from Amazon
tendacn.com
Share this:
Last update on 2020-06-04 / Affiliate links / Images from Amazon Product Advertising API
Source
The post Review: Tenda 4G680 V2.0 4G LTE Router with WiFi appeared first on abangtech.
from abangtech https://abangtech.com/review-tenda-4g680-v2-0-4g-lte-router-with-wifi/
0 notes
Text
How to setup enterprise-grade WiFi network for INR 50,000 (USD 650)
It is not possible to overstate how significant the internet is nowadays, both for individuals and companies as a whole. With the COVID-19 pandemic exposing severe loopholes in our home and office networks, and most of us requiring to work from home has led to the realization of having a dependable internet connectivity, and just how thin our patience can be stretched if things go awry.
While setting up an office network, a common practice is to look up for a router online, and purchase it on the basis of popularity, price, reviews etc. Usually a Small office or Home office (SOHO) router like Tenda or TP-Link can comfortably host a maximum of 10-12 concurrent devices over WiFi and use multiple of them if there are more than 12 users on the premises. This setup is viable when only a few people are to be connected to the internet, after which it becomes difficult to manage with frequent disconnection and speed issues.
At this point hiring an outsourced IT manager either full-time or on-call becomes the next obvious step. The IT manager will be in charge of managing the entire network and resolving daily internet issues. For bigger setups (>100 seating capacity), usually the only option is to opt for a License-based, Enterprise-grade Networking Setup that includes special hardware and software requiring timely licence renewal, the cost of which is usually not very economical to the companies using them.

This has been the only way of doing it since time immemorial, either buy a cost effective product and invest in having someone to be physically available to handle it or pay exorbitant amounts for features that you don’t understand let alone use in an enterprise grade setup.
However, the spaces need to optimize their costs as well as internet experience to maximize their profits with 100% customer satisfaction. Below setup guide can drastically reduce your WiFi network cost with almost ZERO maintenance or license costs.
If you wish to get a budget friendly enterprise grade network (customized for your own space) you can follow this simple guide or you can get in touch with us to get a FREE Network survey for best recommendations for your space.
Here are few recommendations for the WiFi network setup of a maximum 100 concurrent devices-
Controller/Router Choice - It is important to choose a device that can be configured easily and does not require an extensive networking skill set to operate. We recommend Mikrotik as the best, inexpensive choice of hardware and used by ISPs worldwide. Most firewall features available in other enterprise-grade network controllers can also be configured on MikroTik. The RB750GR3 device can handle upto 100 concurrent devices (cost USD 70 ~ INR 5,000)
Access Points - It is important to make use of Wireless Access Points where multiple devices such as laptops require wireless connectivity to the internet, here the SoHo routers will not be of much use as the capability of handling multiple wireless clients is far less than specialized Access Points. Some manufacturers like Ubiquiti allow onboarding of the access point onto a cloud platform from where the network administrators will be able to remotely monitor and configure them. Here are a few AP models which we recommend. (Choose wall-mount POE-based Access Points)
TP-Link EAP Series (cost INR 3,000 - INR 5,000 per AP)
UniFi AC-Lite (cost ~ INR 7,000 per AP)
UniFi AC-LR (cost ~ INR 10,000 per AP
Configuration - Most of these hardware are rather simple to configure to your requirements. You can follow our website blog and FAQ to refer to configuration tutorials and learn how to set up the devices easily. And in case this is too difficult, you can always get a network engineer to come set-up the devices (approximately each configuration should cost you about INR 500 roughly)
LAN Cabling - We recommend CAT6 Cables only as investing in good cables will prevent performance degradation later on and will reduce other associated issues. The CAT6 requirement depends on the access points’ positioning, however, one thing to keep in mind is to have CAT6 connectivity between two devices to be less than 100 meter to avoid packet losses.
Server Rack - provision a 4U 0r 8U rack Cost varying from 2500/- to 10,000/- select depending on the requirement. Keeping it in a rust free and dust free environment is important while keeping it in an air-conditioned room will only optimize the lifetime and efficiency of the setup.

Internet Lines - This is the most important factor to ensure the highest uptime for your space. Always try to have a small backup broadband line with internet failover implemented on your network to ensure 100% uptime on your network. For the Main line, you will have to choose depending on the concurrent users and their bandwidth requirements.
Firewall - Custom internet firewall that prevents malicious data from entering the network along with blocking data from websites like Torrents and Adult websites can go a long way in improving the quality of the internet experience that you provide for your users. You can refer to our Website FAQ section for different types of firewall configuration.
This Setup will give you a basic enterprise grade network for a fraction of the cost and would not require any recurring license costs. However, if you wish to have a centralized setup to manage internet connectivity at multiple locations and optimize your internet spends, then you can also explore our cloud portal. We’d be happy to offer a FREE Trial of our product which handles the next part of having a robust enterprise grade network and providing 100% Uptime for any kind of network.
0 notes
Text
Windows Admin Center 1910

Windows Admin Center 1910.
User Experience
Add connections: A new entry page for the add connection experience simplifies the process of adding any supported connection type in the Windows Admin Center.
Platform
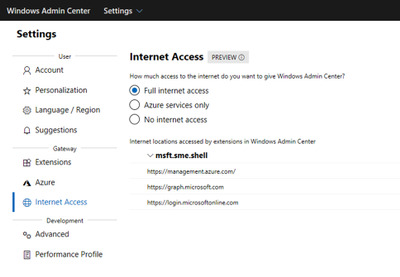
Connectivity settings: Under Settings, Internet Access lets users in completely disconnected environments specify that they are offline so that Windows Admin Center does not try to perform any actions that require internet access.
WinRM over HTTPS: A top user request, you now have the option to choose WinRM over HTTPS (port 5986) as the method of connection to your managed nodes. Optionally select this configuration when installing Windows Admin Center 1910, on the Configure Gateway Endpoint page when running the installer.
Core Tools
Virtual machines tool: Import/Export VM – We’ve added Import/Export buttons to the Virtual Machines tool for importing VMs from and exporting VMs to a local volume or remote file share. When importing VMs, you have the option to create a new VM ID, and copy the VM files or use them in-place. You can also rename VMs during the import process if we detect that the VM’s name already exists.VM tagging – Similar to the UI for tagging connections in Windows Admin Center, you can now tag VMs on a Hyper-V server! In the Virtual machines tool’s Inventory tab, an “Edit tags” button has been added to manage tags. These tags are saved on the Hyper-V host server and can be accessed by other admins. VM tags are also supported for Hyper-V clusters.VM live migration – VM live migration is now supported for Hyper-V clusters and standalone servers! You can live migrate a VM from a server or cluster, to a server or cluster in any combination and Windows Admin Center will take care of clustering the role and live migration configuration if necessary.Performance improvements – Significant performance improvements have been made to reduce page load time in the Virtual machines tool. Updates tool: You can now select individual Windows updates to install.Overview tool: Windows Admin Center now includes a banner on the Overview tool that notifies you when a reboot is pending on the server/computer being managed.Performance Monitor tool: PerfMon has been part of Windows for over 25 years, and in all those years, it hasn’t changed much. For the first time ever, Microsoft is re-imagining the experience of working with performance counters from scratch.

Packet Monitor tool: Packet Monitoring is a new feature that allows you to diagnose your server by capturing and displaying network traffic through the networking stack in a log that is filtered, organized, and easy to follow and manipulate. Currently, only recent SAC versions of Windows Server are supported, but support for Windows Server 2019 is coming soon.IIS tool: A preview release of the IIS tool is now available in the Extensions feed. It provides much of the functionality in IIS Manager to administer and manage your web servers.
Hybrid
Azure hybrid services tool: Content now loads from an online feed to ensure the latest available services are always shown.Switch accounts: From the Account menu in Settings, you can now switch between multiple Azure accounts.Cost estimates: Azure hybrid integrations within Windows Admin Center now include a hyperlink to Azure, to discover and understand the estimated cost of that service once onboarded.Add Azure VM: Azure VMs are now a top-level connection type. When a server is added this way, it appears in the connections list as “Server (Azure VM)” so you can easily see which of your servers are Azure VMs.Create Azure VM: Azure VMs can now be provisioned directly from within Windows Admin Center.Azure Arc for servers: Leverage Azure policies and solutions to manage your servers. Inventory, organize, and manage on-premises servers from Azure. You can govern servers using Azure policy, control access using RBAC, and enable additional management services from Azure. Azure Security Center: Get unified security management and advanced threat protection with Azure Security Center. Monitor security across hybrid workloads, apply policy to ensure compliance, find and fix vulnerabilities, block malicious activity, detect attacks, and simplify investigation for rapid threat response.Azure File Sync: Sync your file server with the cloud. Centralize file shares in Azure while caching frequently accessed files on your local file servers. The updated version of the Azure File Sync extension now enables end-to-end provisioning and configuration within Windows Admin Center.S2S VPN / Azure Extended Network: Previewing in the Extensions feed, added ability in Gateway Connections extension to setup Site to Site VPN connection between SDN virtual network and Azure virtual network, enabling seamless migration of on-prem applications to Azure without any IP address changes thanks to private IP carryover (extends your SDN virtual network into Azure vNet).Azure Monitor: Windows Admin Center can now onboard Cluster connections to Azure Monitor: To configure Azure Monitor for your cluster, navigate to Settings -> Monitoring Alerts. The onboarding process will help set up the log analytics workspace in Azure and install the appropriate local agents on each server in your cluster to help you collect events and performance counters for analysis, reporting, and alerting.Storage Migration Service: Storage Migration Service helps migrate on-premises file servers to Azure, and upgrade to newer versions of Windows Server in the process. You can now create Azure Virtual Machines on the fly during migration, automatically size them, provision them with formatted storage, and join them to your domain – while allowing you to migrate from legacy operating systems, Samba on Linux, and standalone servers to the latest versions of Windows Server and failover clusters.Storage Replica: You can now use Azure as your secondary site for Storage Replica. Windows Admin Center now supports creating Azure Virtual Machines on the fly during setup of new asynchronous replication partnerships so that Azure can help protect your business from disasters with minimal data loss.Azure Cloud Shell: Cloud Shell is now accessible from within Windows Admin Center via the Extensions feed. Cloud Shell provides a browser-based, authenticated, interactive shell experience to manage your Azure resources. Cloud Shell comes with common command-line tools by default, and any new tools or files that you save will be persisted and available during your next session.
Hyperconverged infrastructure (HCI)
Deploy Azure Stack HCI: Get the Cluster Creation preview from the Extensions feed to use Windows Admin Center version 1910 to deploy an Azure Stack HCI cluster using two or more suitable Windows Servers. This new feature takes the form of a multi-stage workflow that guides you through installing features, configuring networking, creating the cluster, and deploying Storage Spaces Direct and/or software-defined networking (SDN) – reducing what used to take hours of complex, error-prone PowerShell to something straightforward even for relative newcomers. This feature is in Preview so you can try it early and share your feedback.
Clustering:Unified connection type - The two separate connection types for hyper-converged clusters and failover clusters have been merged into a single, unified connection type. Clusters can be added as a “Windows Server cluster” and the appropriate tools will be loaded and available, primarily based on whether Storage Spaces Direct is enabled or not. Hyper-converged cluster connections and failover cluster connections added from previous versions of Windows Admin Center will be automatically migrated to the new cluster connection type.New tools – Azure Monitor and Performance Monitor tools for clustersCluster settings – Rename cluster, node shutdown behavior, cluster traffic encryption, VM load balancing, quorum witness, in-memory cache, and Get-ClusterS2D Hyper-V: All new features described in the Core Tools section above for standalone Hyper-V hosts are also applicable for hyperconverged clusters: Import/Export VMs, VM tagging, VM live migration, and performance improvements.Storage Spaces Direct: Identify noisy VMs - You can now more easily identify which VMs are consuming resources. For example, on the volume page, VMs using that volume are listed under the Related heading, where you can sort by IOPS, IO throughput, and capacity usage. Likewise, on the server page, related VMs and can be sorted by processor, memory, and network usage. There is also bi-directional cross-linking between the pages for servers, volumes, and VMs to streamline navigation.Storage tiers - You can see individual storage tiers (if any) on the volume detail page. Software Defined Networking: FlowLog Audit - Flowlog auditing is a new capability for the SDN firewall in Windows Server 2019. When you enable SDN firewall, any flow processed by SDN firewall rules (ACLs) that have logging enabled gets recorded. These logs can be used for diagnostics or archived for later analysis. With the new “Flowlog Audit” extension in Windows Admin Center, you can easily manage, search and filter the SDN logs for analysis and diagnostics. It can be difficult to gain insights into flow logging data by manually searching the log files. In this extension, you can also upload the log to Azure Blob, then use Power BI to visualize your most recent flow logs and learn about traffic on your network.SDN Load Balancer - Allows users to create LBs that evenly distribute tenant customer network traffic among virtual or physical network resources. The SDN Load balancer enables multiple servers to host the same workload, providing high availability and scalability.SDN Public IP - Public IPs enable inbound and outbound communication between SDN resources and the Internet. Public IP Addresses can be associated with SDN Gateway pools, Internet-facing load balancers, as well as network interfaces.
Ecosystem
The Windows Admin Center ecosystem continues to grow! Dell EMC, HPE, Thomas-Krenn.AG and BiitOps have newly released Windows Admin Center extensions in the past few months.
Dell EMC released the Dell EMC OpenManage Integration v1 extension earlier this year in August. The Dell EMC extension provides a dashboard view of hardware component health, component inventory, iDRAC information and update compliance report for servers and Azure Stack HCI solutions.HPE released preview versions of the HPE Proliant Server extension and HPE Azure Stack HCI extension today. The HPE Proliant Server extension displays server health and remediation options, server component info and BIOS settings. The Azure Stack HCI extension additionally highlights firmware and driver version inconsistencies between nodes.Thomas-Krenn.AG released their Azure Stack HCI extension earlier this year in May. This extension provides detailed information on cluster nodes and drives, cluster information and cluster network connectivity.BiitOps extension provides configuration change tracking for on-premises servers and clusters. Easily zoom in and see full details for software and hardware changes made across your servers using the BiitOps extension’s powerful graphical interface.
In addition, the Lenovo XClarity Integrator extension became generally available in August, and DataON, QCT, Pure Storage have also released extension updates recently.
Read the full article
#MicrosoftAzure#MicrosoftHyper-V#MicrosoftWindowsAdminCenter#MicrosoftWindowsServer#Network#WindowsServer2019
0 notes
Text
Licensed Cannabis Producer

https://www.cropsoft.ca/home

Requirements
“Based on your proposal and our understanding of your solution, we believe that there are significant features that need to be designed and implemented. Please overview the process and expected timing for requirements to be implemented in your solution.”
Change requests are submitted to our product manager for discovery before they are queued up for the next release. If you have something which is higher priority than can wait for our internal planning, then we can bring on more resources to jump the queue for you at a cost; each feature request will be quoted for you.
Currently we are just finished a new feature to allow for individual plant identification, labeling, and counting with scanner gun.
This week we started working on planning and analysis features which will allow setting benchmarks, quota planning, and lot production planning; all working together to estimate total yields and schedule resources to deliver on time sales orders.
Next, we plan to enhance our financial module to add a sale product purchase order schema.
Then we plan to add multi-site management.
We continually work on small improvements to the user interface to improve the user experience which will include future add-ons built on a modern reactive framework.
Risks
“How will risks be managed including business fit, timing and costs?”
See the development life-cycle as described below for information on how we manage version control; build, test, then release.
New features will be delivered at your convenience to coincide when your effected team(s) are available for and have completed training.
We can complete the training on our test server or we can offer you an optional 3rd instance for training so your users can use familiar data and experiment until they are fully competent at the new features and comfortable with the changes before deployment to your live production server.
Financial
“What is your strategy for addressing financial needs in your customer base and your approach to integrating with third party financial systems? With which financial systems have you integrated?”
Currently our accounting module allows you to create a chart of accounts which can match any third-party platform; and CROPSoft allows to export accounts and transactions to a csv file to be used for import into the third-party system.
We may also integrate with third party applications which offer an API for example:
Sage https://developer.sage.com/api/accounting/guides/overview/
If Atlas would like us to prioritize any specific change request like this accounting integration, we can bring in more resources to do so on a fee basis; which will be estimated upon request.
Approach
“Is there a single go-live at the end of the 8 week project? Could you describe the activities in setup and training (e.g. 4 sessions for cultivation, 1 for finance, etc)? Are these the topics you covered in section 4.5 of your proposal? How will new features/releases be managed?”
There is no set “go live” date; once the initial server is up we begin walking through the setup; once you have completed the facility configuration and training then you will go live.
Yes, setup and training is summarized in section 4.5; the following is a more detailed description of the training required.
Once the server is live the first session(s) will be with your accounting and procurement departments to setup your chart of accounts, and default accounting schemas, vendor list, supply catalog, and import critical materials.
The next session will be with your designated System Administrator to walk through the Initial Setup outlined in the updated diagrams provided in this email, plus hardware setup and testing.
The next session will be with your cultivation and quality assurance team to walk through lot creation, daily tasks, labeling, waste, harvest, drying, bulk storage, curing, holding, testing, & release.
· We can setup the following sessions to coincide with the timing of when your first yield is ready, or we can continue training immediately.
The next session will be with your packaging and order fulfillment team to walk through creating finished packaged products, labeling, excise stamps, retail & wholesale order fulfillment and shipping.
The next session will be with your management and accounting team to review the reporting module.
Updates
We use Jira to manage our development workflow. Development sprints are managed on a Scrum Board where each issue must go through the following steps before it is added to our master branch:
1. Open
2. In Progress
3. Code Review
4. Ready for QA
5. In QA
6. Ready for Release
7. Released
Training for major version upgrades will be scheduled and user acceptance should be signed off prior to the version update to your production environment.
We offer an optional staging environment if you wish to complete training with current copy of your live data so your personnel are familiar with the data and can experiment with the new feature; this requires a third instance to be installed at an extra cost for setup and monthly cost for server upgrade.
Bug fixes and minor improvements which do not impact usability will be pushed to your instance after quality testing is complete on a regular basis after hours.
Team
“Who from CROPSoft would be working with us? How many consulting days are included in the proposal?”
Atlas would be working with myself, Dallas Devam, as the main point of contact; we may have another support person come on board within the next 6 months.
We will provide regular support 5 days per week which includes 3 hours per month. We also offer after hours support 24/7 at an hourly rate of $80.
We also offer ticketed support and change request tracking.
Technology
“Is the solution provided in a multi-tenant environment? Is the second cloud server for failure/recovery?”
Our partner cloud host provides a solution which focuses on high security standards and they are located in Canada so a great fit for Licensed Producers.
The host uses multiple data centers to conduct hourly off-site backups as well they create a copy the server image once per day.
The host provides failover in the case a server hardware faile; CROPSoft runs HAproxyon two servers to provide failover in the case the web server software, Tomcat, fails.
0 notes
Last Seen Blogs

knaenae
My lost memo

kootenaicountyhandyman
Kootenaicountyhandyman

jwintix
GlobalValve

1001scoganmusings
Lovely Fantasies
