#Fastvideo SDK
Explore tagged Tumblr posts
Visit Tumblr Blog
Explore Tumblr blogs with no restrictions, modern design and the best experience.
Last Seen Tumblr Blogs


Fun Fact
Tumblr Inc. is using 66 technologies for its website.
Text
JPEG XS – modern visually-lossless low-latency lightweight codec
Authors: Fyodor Serzhenko and Anton Boyarchenkov
JPEG XS is a recent image and video coding system developed by the Joint Photographic Experts Group and published as international standard ISO/IEC 21122 in 2019 [1] (the second edition in 2022 [2]). Unlike many former standards developed by the JPEG committee, JPEG XS addresses video compression. What makes it stand out from the rest video compression techniques are different priorities. Improving coding efficiency was the highest priority of previous approaches, while latency and complexity have been, at best, only secondary goals. That’s why the uncompressed video streams have still been used for transmission and storage. But now JPEG XS have emerged as a viable alternative to the uncompressed form.

Background of JPEG XS
There is a continual fight between the benefits of uncompressed video, and very high bandwidth delivery requirement. Network bandwidth continues to increase, but so does resolution and complexity of video. With the emergence of such formats as Ultra-High Definition (4K, 8K), High Dynamic Range, High Frame Rate, panoramic (360), both the storage and bandwidth requirements are rapidly increasing [3] [4].
Instead of costly upgrade or replacement of deployed infrastructure we can consider using transparent compression to reduce video stream sizes of these demanding video formats. Surely, such compression should be visually lossless, low latency and low complexity. However, the existing codecs (see short review in section 3) were not able to satisfy all the requirements simultaneously, because they were mostly designed with the coding efficiency as the main goal.
But solely improving the coding efficiency is not the only motivation for video compression. A lightweight compression scheme can achieve energy savings, when energy required for transmission is greater than energy cost of compression. In addition, the delay could even be reduced if compression overhead is less than the difference of transmission time of uncompressed and compressed frames.
For non-interactive video systems, such as video playback, the latency is not important as long as the decoder provides the required frame rate. On the contrary, interactive video applications require low latency to be useful. When network latency is low enough, the video processing pipeline can become the bottleneck. The latency is even more important in the case of fast-moving and safety-critical applications. Besides, sufficiently low delay will open up space for new applications, such as cloud gaming, extended reality (XR), or internet of skills. [5]
Use cases
The most common example of uncompressed video transport is through standard video links such as SDI and HDMI, or through Ethernet. In particular, massively deployed 3G-SDI was introduced with SMPTE ST 2018 standard in 2006 and have throughput of 2.65 Gbps, which is enough for video stream in 1080p60 format. Video compression with ratio 4:1 would allow sending 4K/60p/422/10 bits video (requiring 10.8 Gbps throughput) through 3G-SDI. 10G Ethernet (SMPTE2022 6) have throughput of 7.96 Gbps, while video compression with ratio 5:1 would allow sending two video streams with 4K/60p/444/12 bits format (requiring 37.9 Gbps) through it [3] [4] [6].
Embedded devices such as cameras use internal storage, which have limited access rates (4 Gbps for SSD drives, 400–720 Mbps for SD cards). Lightweight compression would allow real-time storage of video streams with higher throughput. Omnidirectional video capture system with multiple cameras covering different field of view, transfer video streams to a front-end processing system. Applying lightweight compression to these streams will reduce both the required storage size and throughput demands [3] [4] [6].
Head mounted displays (HMDs) are used for viewing omnidirectional VR and AR content. Given the computational (and power) constraints of such a display, it can not be expected to receive omnidirectional stream and locally process it. Instead, the external source should send to HMD that portion of the media stream which is within the viewer’s field of view. An immersive experience also requires very high-resolution video, and the quality of experience is crucially tied to the latency [3] [4] [6].
Other target use cases include broadcasting and live production, frame buffer compression (inside video processing devices), industrial vision, ultra high frame rate cameras, medical imaging, automotive infotainment, video surveillance and security, low-cost visual sensors in Internet of Things, etc. [6]
Emerging of the new standard
Addressing this challenge, several initiatives have been started. Among them is JPEG XS, launched by the JPEG committee in July 2015 with Call of Proposals issued in March–June 2016 [6]. The evaluation process was structured into three activities: objective evaluations, subjective evaluations, and compliance analysis in terms of latency and complexity requirements. Based on the above-described use cases the following requirements were identified.
Visually lossless quality with imperceptible flickering between original and compressed image.
Multi-generation robustness (no significant quality degradation for up to 10 encoding-decoding cycles).
Multi-platform interoperability. In order to optimally support different platforms (CPU, GPU, FPGA, ASIC) the codec needs to allow for different kinds of parallelism.
Low complexity both in hardware and software.
Low latency. In live production and AR/VR use cases the cumulative delay required by all processing steps should be below the human perception threshold.
It is easy to see that none of the existing standards comply with the above requirements. JPEG and JPEG-XT make a precise rate control difficult and show a latency of one frame. With regard to latency, JPEG 2000 versatility allows configurations with end-to-end latency around 256 lines or even as small as 41 lines in hardware implementations [4], but it still requires many hardware resources. VC-2 is of low complexity, but only delivers limited image quality. ProRes makes a low latency implementation impossible and makes fast CPU implementations challenging.
Out of 6 proposed technologies one was disqualified due to latency and complexity compliance issues, and two proponents was selected for the next step of standardization process. It was decided that JPEG XS coding system will be based on the merge of those two proponents. This new codec provides a precise rate control with a latency below 32 lines and fits in a low-cost FPGA. At the same time its fine-grained parallelism allows optimal implementation on different platforms, while the compression quality is superior to VC-2.
JPEG XS algorithm overview
The JPEG XS coding system is a classical wavelet-based still image codec (see more detailed description in [4] or in the standard [1] [2]). It uses reversible color transformation and reversible discrete wavelet transformation (Le Gall 5/3), which are known from JPEG 2000. But here DWT is asymmetrical: the specification allows up to two vertical decomposition levels and up to eight horizontal levels.
This restriction on number of vertical levels ensures that the end-to-end latency does not exceed maximum allowed value of 32 screen lines. In fact, algorithmic encoder-decoder latency due to DWT alone is 3 or 9 lines for one or two vertical decomposition levels, so there is a latency reserve for any form of rate allocation not specified in the standard.
The wavelet stage is followed by a pre-quantizer which chops off the eight out of 20 least significant bit planes. It is not used for rate-control but ensures that the following data path is 16 bits wide. After that the actual quantization is performed. Unlike JPEG 2000 with a dead-zone quantizer, a data-dependent uniform quantizer can be optionally used.
The quantizer is controlled by the rate allocator, which guarantees compression to an externally given target bit rate, which is strict in many use cases. In order to respect target bit rate together with maximum latency of the 32 lines, JPEG XS divides image into rectangular precincts. While in JPEG 2000 precincts are typically quadratic regions, a precinct in JPEG XS spans across one or two lines of wavelet coefficients for each band.
Due to latency constraints the rate allocator is not precise, but rather heuristic algorithm without actual distortion measurement. Moreover, the specific way of rate allocator operating is not defined in the standard, so different algorithms can be considered. Algorithm is ideal for low-cost FPGA where access to external memory should be avoided, and it can be suboptimal for high-end GPU.
The next stage after rate allocation is entropy coding, which is relatively simple. The quantized wavelet coefficients are combined in coding groups of four coefficients. For each group, the three datasets are formed: bit-plane counts, quantized values themselves and the signs of all nonzero coefficients. From these datasets only bit-plane counts are entropy coded, because they require a major part of the overall rate.
The rate allocator is free to select between four regular prediction modes per wavelet band – prediction on/off, significance coding on/off. Besides, it can select between two significance coding methods, which specifies whether zero predictions or zero counts are coded. “Raw fallback mode” allows disabling bit-plane coding and should be used when the regular coding modes are redundant.
A smoothing buffer ensuring a constant bit rate at the encoder output even if some regions of the input image are easier to compress. This buffer can have different size according to the selected profile. This choice affects the rate control algorithm, which uses it to smooth out rate variations.
JPEG XS profiles
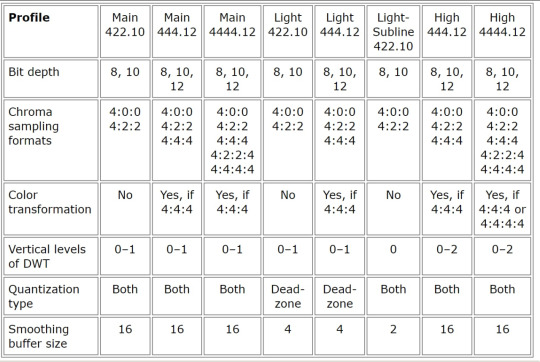
Particular applications may have additional constraints on the codec, such as even lower complexity or buffer size limitation. So, the standard defines several profiles to allow different levels of latency and complexity. In fact, the entire part 2 of the standard (ISO/IEC 21122-2 “Profiles and Buffer Models” [7]) is devoted to specification of profiles, levels and sublevels [4].
Each profile allows to estimate the necessary number of logic elements, the memory footprint, and whether chroma subsampling or an alpha channel is required. They are structured along the maximum bit depth, the quantizer type, the smoothing buffer size, and the number of vertical DWT levels. Other coding tools such as choice of embedded/separate sign coding or insignificant coding groups method insignificantly increase decoder complexity, so they are not restricted by the profile. As such, the standard defines eight profiles, whose characteristics are summarized in Table 1.
The three “Main” profiles target all types of content (natural, CGI, screen) for Broadcast, Pro-AV, Frame Buffers, Display links use cases. The two “High” profiles allow for second vertical decomposition and target all types of content for high-end devices, cinema remote production. The two “Light” profiles are considered suitable for natural content only and target Broadcast, industrial cameras, in-camera compression use cases. Finally, the “Light-subline” with minimal latency (due to zero vertical decomposition and the shortest smoothing buffer) is also suitable for natural content only and target cost-sensitive applications.
Profiles determine the set of coding features, while levels and sublevels limit the buffer sizes. In particular, levels restrict it in the uncompressed image domain and sublevels in the compressed domain. Similar to HEVC levels, JPEG XS levels constrain the frame dimensions and the refresh ratio (e.g., 1920p/60).
Table 1. Configuration of JPEG XS Profiles [4].
Performance evaluation
This section shows experimental results on rate-distortion comparison against other compression technologies with PSNR as the distortion measure. We are focused on RGB 4:4:4 24-bit natural content here, as it was shown that results for subsampled images and images with higher bit depth are similar.
Figure 1. Compression ratio dependence of image quality measured by PSNR for different codecs and profiles.
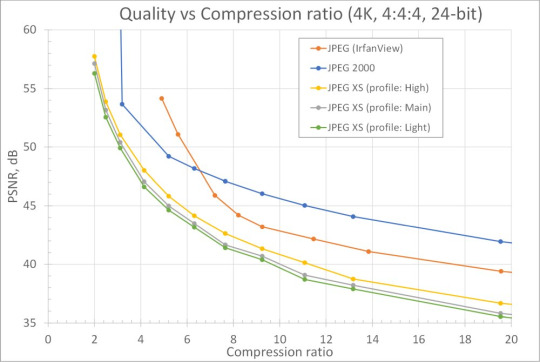
On Figure 1 we've compared rate-distortion dependencies for JPEG XS and two classical image codecs: JPEG and JPEG 2000. The testing procedure was as follows. Our test image 4k_wild.ppm (3840 × 2160 × 24bpp) with natural content was compressed multiple times with several compression ratios in the range from 2:1 to 20:1. These ratios are equal for JPEG XS and JPEG 2000, which allows the direct comparison. But ratios are different for JPEG, because it has no precise rate control functionality. The highest point of JPEG 2000 curve (with infinite PSNR) shows compression ratio of reversible algorithm. The test image is visually lossless for all cases when PSNR is higher than 40 dB.
As we can see on the figure, among the three image codecs, JPEG 2000 shows the highest quality (visually lossless even for ratio 30:1 with this image), but it comes with much greater computational complexity. The quality of the classical JPEG images is even higher for ratios 6:1 or less (and visually lossless for ratio 14:1), and it has low complexity, but the lack of precise rate control can be critical in some applications, and the minimum latency is one frame. That’s why it cannot substitute uncompressed video and JPEG XS. Although JPEG XS curves lay below curves of other two codecs, the image quality is still high enough to be visually lossless when the ratio is below 10:1.
The average PSNR difference is 5.4 dB between JPEG 2000 and the “high” profile JPEG XS, and 4.5 dB between JPEG 2000 and the “main” profile JPEG XS (for compression ratios up to 10:1). The average difference is 0.75 dB between the “main” and “high” profiles and only 0.45 dB between the “main” and “light” profiles.
Patents and RAND
Please bear in mind that JPEG XS contains patented technology which is made available for licensing via the JPEG XS Patent Portfolio License (JPEG XS PPL). This license pool covers essential patents owned by Licensors for implementing the ISO/IEC 21122 JPEG XS video coding standard and is available under RAND terms. You can find more info at https://www.jpegxspool.com
We've implemented the high-performance JPEG XS decoder on GPU as an accelerated solution for JPEG XS project from iso.org (Part 5 of the international standard ISO/IEC 21122-5:2020 [8]) which is done for CPU and show performance way below real-time processing. That was done to show the potential for GPU-based speedup for such a software. We can offer our customers high performance JPEG XS decoder for NVIDIA GPUs, though all questions concerning licensing of JPEG XS technology the customer must settle with JPEG XS patents owners.
References
1. ISO/IEC 21122-1:2019 Information technology — JPEG XS low-latency lightweight image coding system — Part 1: Core coding system. https://www.iso.org/standard/74535.html
2. ISO/IEC 21122-1:2022 Information technology — JPEG XS low-latency lightweight image coding system — Part 1: Core coding system. https://www.iso.org/standard/81551.html
3. JPEG White paper: JPEG XS, a new standard for visually lossless low-latency lightweight image coding system, Version 2.0 // ISO/IEC JT1/SC29/WG1 WG1N83038 http://ds.jpeg.org/whitepapers/jpeg-xs-whitepaper.pdf
4. A. Descampe, T. Richter, T. Ebrahimi, et al. JPEG XS—A New Standard for Visually Lossless Low-Latency Lightweight Image Coding // Proceedings of the IEEE Vol. 109, Issue 9 (2021) 1559.
5. J. Žádník, M. Mäkitalo, J. Vanne, and P. Jääskeläinen, Image and Video Coding Techniques for Ultra-Low Latency Image and Video Coding Techniques for Ultra-Low Latency // ACM Computing Surveys (accepted paper). https://doi.org/10.1145/3512342
6. WG1 (ed. A. Descampe). Call for Proposals for a low-latency lightweight image coding system // ISO/IEC JTC1/SC29/WG1 N71031, 71th Meeting – La Jolla, CA, USA – 11 March 2016. https://jpeg.org/downloads/jpegxs/wg1n71031-REQ-JPEG_XS_Call_for_proposals.pdf
7. ISO/IEC 21122-2:2022 Information technology — JPEG XS low-latency lightweight image coding system — Part 2: Profiles and buffer models. https://www.iso.org/standard/81552.html
8. ISO/IEC 21122-5:2020 Information technology — JPEG XS low-latency lightweight image coding system — Part 5: Reference software. https://www.iso.org/standard/74539.html
Original article see at: https://fastcompression.com/blog/jpeg-xs-overview.htm Subscribe to our mail list: https://mailchi.mp/fb5491a63dff/fastcompression
0 notes
Photo

"NVIDIA Jetson Nano performance benchmarks for image processing"- Detail: Please have a look at NVIDIA Jetson Nano performance measurements for image processing modules from Fastvideo SDK, which correspond to conventional camera application.http://bit.ly/2JLQezZ a solution could be utilized as preprocessing stage to convert raw frames from a camera to RGB. After such preprocessing, many ML tasks could be solved in realtime at the same GPU.. Caption by fyodorser. Posted By: www.eurekaking.com
0 notes
Text
GPU HDR Processing for SONY Pregius Image Sensors
Author: Fyodor Serzhenko
The fourth generation of SONY Pregious image sensors (IMX530, IMX531, IMX532, IMX532, IMX535, IMX536, IMX537, IMX487) is capable of working in HDR mode. That mode is called "Dual ADC" (Dual Gain) which means that two raw frames are originated from the same 12-bit raw image which is digitized via two ADCs with different analog gains. If the ratio of these gains is around 24 dB, one can get one 16-bit raw image from two 12-bit raw frames with different gains. This is actually the main idea of HDR for these image sensors - how to get extended dynamic range up to 16 bits from two 12-bit raw frames with the same exposure and with different analog gains. That method guarantees that both frames have been exposured at the same time and they are not spatially shifted.
That Dual ADC feature was originally introduced at the third generation on SONY Pregius image sensors, but HDR processing had to be implemented outside the image sensor. The latest version of that HDR feature is done inside the image sensor which makes it more convenient to work with. Dual ADC mode with on-sensor combination (combined mode) is applicable for high speed sensors only.

fastcompression.com
Fastvideo blog
HDR for SONY Pregius IMX532 image sensor on GPU
GPU HDR Processing for SONY Pregius Image Sensors
Author: Fyodor Serzhenko
The fourth generation of SONY Pregious image sensors (IMX530, IMX531, IMX532, IMX532, IMX535, IMX536, IMX537, IMX487) is capable of working in HDR mode. That mode is called "Dual ADC" (Dual Gain) which means that two raw frames are originated from the same 12-bit raw image which is digitized via two ADCs with different analog gains. If the ratio of these gains is around 24 dB, one can get one 16-bit raw image from two 12-bit raw frames with different gains. This is actually the main idea of HDR for these image sensors - how to get extended dynamic range up to 16 bits from two 12-bit raw frames with the same exposure and with different analog gains. That method guarantees that both frames have been exposured at the same time and they are not spatially shifted.
That Dual ADC feature was originally introduced at the third generation on SONY Pregius image sensors, but HDR processing had to be implemented outside the image sensor. The latest version of that HDR feature is done inside the image sensor which makes it more convenient to work with. Dual ADC mode with on-sensor combination (combined mode) is applicable for high speed sensors only.

In the Dual ADC mode we need to specify some parameters for the image sensor. There are two ways of getting the extended dynamic range from SONY Pregius image sensors:
In the combined mode the image sensor can output one 12-bit raw frame with applied merge feature (when we combine two 12-bit frames with Low gain and High gain) and simple tone mapping (when we apply PWL curve to 16-bit merged data). That approach allows us to have minimum camera bandwidth because in that case the image size is minimal - this is just a 12-bit raw frame.
In the non-combined mode the image sensor outputs two 12-bit raw images which could be processed later outside the image sensor. This is the worst case for the camera bandwidth, but it could be promising for high quality merge and sofisticated tone mapping.
Apart from that, there are two other options:
We can process just Low gain or High gain image, but it's quite evident, that dynamic range in that case will be not better than in the Dual ADC mode.
It's also possible to apply our own HDR algorithm to the results of the combined mode as an attempt to improve image quality and dynamic range.
Dual Gain mode parameteres for image merge
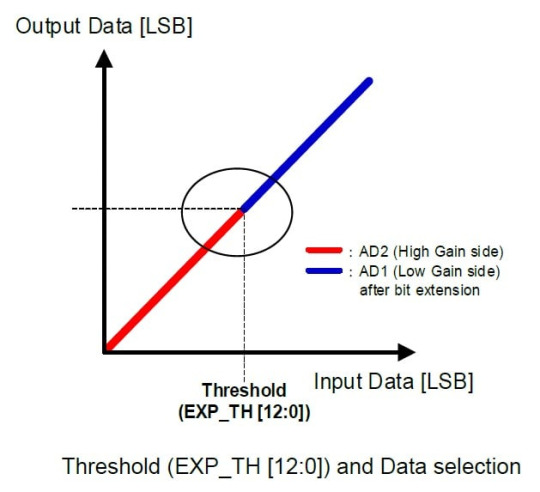
Threshold - this is an intensity level where we should start utilizing Low gain data instead of High gain
Low gain (AD1) and High gain (AD2) - these are values for analog gain (0 dB, 6 dB, 12 dB, 18 dB, 24 dB)
Dual Gain mode parameteres for HDR
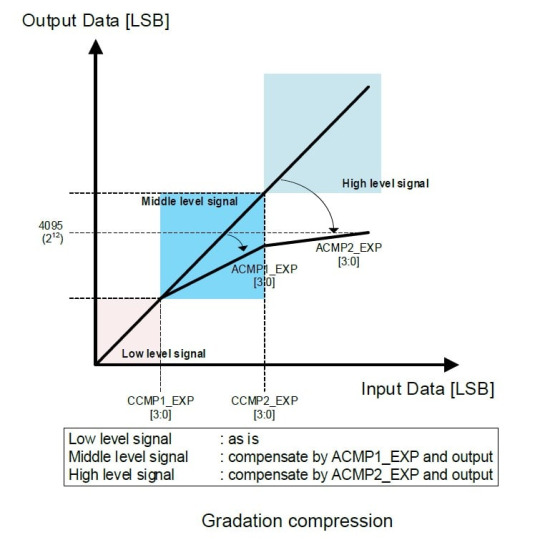
Two pairs of knee points for PWL curve (gradation compression from 16-bit range to 12-bit). They actually come from Low gain and High gain values, and from parameters of gradation compression.
Below is the picture with detailed info concerning PWL curve which is applied after image merge, and it's done inside the image sensor. We can see how gradation compression is implemented at the image sensor.
This is an example of real parameters for Dual ADC mode for SONY IMX532 image sensor
Dual ADC Gain Ratio: 12 dB
Dual ADC Threshold: 40%
Compression Region Selector 1:
Compression Region Start: 6.25%
Compression Region Gain: -12 dB
Compression Region Selector 2:
Compression Region Start: 25%
Compression Region Gain: -18 dB
For further testing we will capture frames from IMX532 image sensor at XIMEA camera MC161CG-SY-UB-HDR with exactly the same parameters of Dual ADC mode.
If we compare images with gain ratio 16 (High gain is 16 times greater than Low gain) and exposure ratio 1/16 (long exposure for Low gain and short exposure for High gain), then we clearly see that images are alike, but High gain image has the following two problems: it has more noise and more hot pixels due to strong analog signal amplification. These issues should be taken into account.
Apart from the standard Dual ADC combined mode, there is a quite popular approach which could bring good results with minimum efforts: we can use just Low gain image and apply custom tone mapping instead of PWL curve. In that case dynamic range is less, but that image could have less noise in comparison with images from the combined mode.
Why do we need to apply our own HDR image processing?
It makes sense if on-sensor HDR processing in Dual ADC mode could be improved. That could be the way of getting better image quality due to implementation of more sofisticated algorithms for image merge and tone mapping. GPU-based processing is usually very fast, so we could still be able to process image series with HDR support in realtime, which is a must for camera applications.
HDR image processing pipeline on NVIDIA GPU
We've implemented image processing pipeline on NVIDIA GPU for Dual ADC frames from SONY Pregius image sensors. Actually we've extended our standard pipeline to work with such HDR images. We can process on NVIDA GPU any frames from SONY image sensors in the HDR mode: one 12-bit HDR raw image (combined mode) or two 12-bit raw frames (non-combined mode). Our result could be better not only due to our merge and tone mapping procedures, but also due to high quality debayering which also influences on the quality of processed images. Why we use GPU? This is the key to get much higher performance and image quality which can't be achieved on the CPU.
Low gain image processing
As we've already mentioned, this is the simplest method which is widely accepted and it's actually the same as a switched-off Dual ADC mode. Low gain 12-bit raw image has less dynamic range, but it also has less noise, so we can apply either 1D LUT or more complicated tone mapping algorithm to that 12-bit raw image to get better results in comparison with combined 12-bit HDR image which we can get directly from SONY image sensor. This is a brief info about the pipeline:
Acquisition of 12-bit raw image from a camera with SONY image sensor
BPC (bad pixel correction)
Demosaicing with MG algorithm (23×23)
Color correction
Curves and Levels
Local tone mapping
Gamma
Optional JPEG or J2K encoding
Monitor output, streaming or storage
Fig.1. Low gain image processing for IMX532
Image processing at the Combined mode
Though we can get ready 12-bit raw HDR image from SONY image sensor at Dual ADC mode, there is still a way to improve the image quality. We can apply our own tone mapping to make it better. That's what we've done and the results are consistently better. This is a brief info about the pipeline:
Acquisition of 12-bit raw HDR image from a camera with SONY image sensor
Preprocessing
BPC (bad pixel correction)
Demosaicing with MG algorithm (23×23)
Color space conversion
Global tone mapping
Local tone mapping
Optional JPEG or J2K encoding
Monitor output, streaming or storage
Fig.2. SONY Dual ADC combined mode image processing for IMX532 with a custom tone mapping
Low gain + High gain (non-combined) image processing
To get both raw frames from SONY image sensor, we need to send them to a PC via camera interface. It could cause a problem for interface bandwidth and for some cameras it could be a must to decrease frame rate to cope with camera bandwidth limitations. If we use PCIe, Coax or 10/25/50-GigE cameras, then it could be possible to send both raw images at realtime without frame drops.
As soon as we get two raw frames (Low gain and High gain) for processing, we need to start from preprocessing, then to merge them into one 16-bit linear image and to apply tone mapping algorithm. Usually good tone mapping algorithms are more complicated than just a PWL curve, so we can get better results, though it definitely takes much more time. To solve that issue in a fast way, high performance GPU-based image processing could be the best approach. That's exactly what we've done and we can get better image quality and higher dynamic range in comparison with combined HDR image from SONY and with processed Low gain image as well.
HDR workflow for Dual ADC non-combined image processing on GPU
Acquisition of two raw images in non-combined Dual ADC mode
Preprocessing of two images
BPC (bad pixel correction) for both images
RAW Histogram and MinMax for each frame
Merge for Low gain and High gain raw images
Demosaicing with MG algorithm (23×23)
Color space conversion
Global tone mapping
Local tone mapping
Optional JPEG or J2K encoding
Monitor output, streaming or storage
In that workflow the most important modules are merge, global/local tone mapping and demosaicing. We've implemented that image processing pipeline with Fastvideo SDK which is running very fast on NVIDIA GPU.
Fig.3. SONY Dual ADC non-combined (two-image) processing for IMX532
Resume for Dual ADC mode on GPU
Better image quality
Sofisticated merge for Low gain and High gain images
Global and local tone mapping
High quality demosaicing
Better dynamic range
Less artifacts for brightness and color
Less noise
High performance processing
We believe that the best results for image quality could be achived in the following modes:
Simultaneous processing of two 12-bit raw images in the non-combined mode.
Processing of one 12-bit raw frame in the combined mode with a custom tone mapping algorithm.
If we are working in the non-combined mode, then we can get good image quality, but camera bandwith limitation and processing time could be a problem. If we are working with the results of the combined mode, image quality is comparable, the processing pipeline is less complicated (the performance is better), and we need less bandwidth, so it could be recommended for most use cases. With a proper GPU, image processing could be done in realtime at the max fps.
The above frames were captured from SONY IMX532 image sensor at Dual ADC mode. The same approach is applicable to all high speed SONY Pregius image sensors of the 4th generation which are capable of working at Dual ADC combined mode as well.
Processing benchmarks on Jetson AGX Xavier and GeForce RTX 2080TI in the combined mode
We've done time measurements for kernel times to evaluate the performance of the solution in the combined mode. This is the way to get high dynamic range and very good image quality, so the knowledge about performance could be valuable. Below we publish timings for several image processing modules because full pipeline could be different in general case.
Table 1. GPU kernel time in ms for IMX532 raw frame processing in the combined mode (5328×3040, bayer, 12-bit)
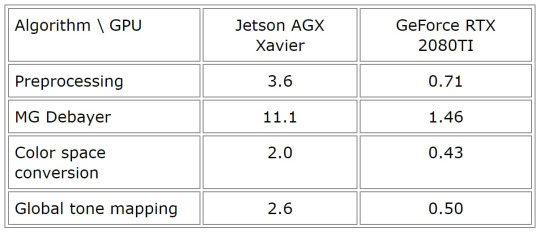
This is just the part of the full image processing pipeline and this is to show a level of how fast it could be on the GPU.
References
Fastvideo SDK for Image & Video Processing on GPU
RAW to RGB conversion on GPU
XIMEA high speed color industrial camera with Sony IMX532 image sensor
Original article see at: https://fastcompression.com/blog/gpu-hdr-processing-sony-pregius-image-sensors.htm
0 notes
Text
Image Processing Framework on Jetson
Author: Fyodor Serzhenko
Nowadays quite a lot of tasks for image sensors and camera applications are solved with the centralized computing architecture for image processing. Just a minor part of image processing features is implemented on the image sensor itself, so all the rest is done on CPU/GPU/DSP/FPGA which could reside very close to the image sensor. The latest achievements at hardware and software solutions allow us to get enhanced performance of computations and to enlarge the scope of tasks to be solved.
From that point of view, NVIDIA Jetson series is suited exactly for the task of high performance image processing from RAW to YUV. Image sensor or camera module can be connected directly to any Jetson via MIPI SCI-2 (2lane/4lane), USB3 or PCIe interfaces. Jetson could offer high performance computations either on ISP or on GPU. Below we show what could be done on GPU. We believe that raw image processing on GPU can offer more flexibility, better performance, quality and ease of management in comparison with hardware-based ISP for many applications.
What is Image Processing Framework for Jetson?
To get high quality and max performance at image processing tasks on Jetson, we've implemented a GPU-based SDK for raw processing. Now we are expanding that approach by creating an effective framework to control all system components, including hardware and software. For example, it means that image sensor control should be included in the workflow at realtime to become a part of general control algorithm.
Image processing framework components
Image Sensor Control (exposure, gain, awb)
Image Capture (driver, hardware/software interface, latency, zero-copy)
RAW Image Processing Pipeline (full raw to rgb workflow)
Image Enhancement
Image/Video Encoding (JPEG/J2K and H.264/H.265)
Compatibility with third-party libraries for image processing, ML, AI, etc.
Image Display Processing (smooth player, OpenGL/CUDA interoperability)
Image/Video Streaming (including interoperability with FFmpeg and GStreamer)
Image/Video Storage
Additional features for the framework
Image Sensor and Lens Calibration
Quality Control for Image/Video Processing
CPU/GPU/SSD balance load, performance optimization, profiling
Implementation of image sensor control at the workflow brings us additional features which are essential. For example, integrated exposure and gain control will allow to get better quality in the case of varying illumination. Apart from that, calibration data usually depend on exposure/gain and it means that we will be able to utilize correct processing parameters at any moment for any viewing conditions.
In general, standard RAW concept eventually lacks internal camera parameters and full calibration data. We could solve that problem by including image sensor control both in calibration and image processing. We can utilize image sensor abstraction layer to take into account full metadata for each frame.
Such a solution depends on utilized image sensor and task to be solved, so we can configure and optimize the Image Processing Framework for a particular image sensor from SONY, Gpixel, CMOSIS image sensors. These solutions on Jetson have already been implemented by teams of Fastvideo and MRTech.
Integrated Image Sensor Control
Exposure time
AWB
Gain
ROI (region of interest)
Full image sensor control also includes bit depth, FPS (frames per second), raw image format, bit packing, mode of operation, etc.
GPU image processing modules on Jetson for 16/32-bit pipeline
Raw image acquisition from image sensor via MIPI/USB3/PCIe interfaces
Frame unpacking
Raw image linearization
Dark frame subtraction
Flat field correction
Dynamic bad pixel removal
White balance
RAW and RGB histograms as an indication to control image sensor exposure time
Demosaicing with L7, DFPD, MG algorithms
Color correction
Denoising with wavelets
Color space and format conversions
Curves and Levels
Flip/Flop, Rotation to 90/180/270 or to arbitrary angle
Crop and Resize (upscale and downscale)
Undistortion via Remap
Local contrast
Tone mapping
Gamma
Realtime output via OpenGL
Trace module for debugging and bug fixing
Stream-per-thread support for better performance
Additional modules: tile support, image split into separate planes, RGB to Gray transform, defringe, etc.
Time measurements for all SDK modules
Image/Video Encoding modules on GPU
RAW Bayer encoding
JPEG encoding (visually lossless image compression with 8-bit or 12-bit per channel)
JPEG2000 encoding (lossy and lossless image compression with 8-16 bits per channel)
H264 encoder/decoder, streaming, integration with FFmpeg (8-bit per channel)
H265 encoder/decoder, streaming, integration with FFmpeg (8/10-bit per channel)
Is it better or faster than NVIDIA ISP for Jetson?
There are a lot of situations where we can say YES to this question. NVIDIA ISP for Jetson is a great product, it's free, versatile, reliable, and it takes less power/load from Jetson, but we have our own advantages which are also of great importance for our customers:
Processing performance
Image quality
Flexibility in building custom image processing pipeline
Wide range of available image processing modules for camera applications
Image processing with 16/32-bit precision
High-performance codecs: JPEG, JPEG2000 (lossless and lossy)
High-performance 12-bit JPEG encoder
Raw Bayer Codec
Dynamic bad pixel suppression
High quality demosaicing algorithms
Wavelet-based denoiser on GPU for Bayer and RGB images
Flexible output with desired image resolution, bit depth, color/grayscale, rotation, according to ML/AI requirements
We've built that software from the scratch and we've been working in that field more than 10 years, so we have an experience and we can offer reliable solutions and support. Apart from that we are offering custom software design to solve almost any problem in a timely manner.
What are benefits of that approach?
That approach allows us to create embedded image processing solutions on Jetson with high quality, exceptional performance, low latency and full image sensor control. Software-based solution in combination with GPU image processing on NVIDIA Jetson could help our customers to create their imaging products with minimum efforts and maximum quality and performance.
Other blog posts about Jetson hardware and software
Benchmark comparison for Jetson Nano, TX2, Xavier NX and AGX
Jetson Image Processing
Jetson Zero Copy
Jetson Nano Benchmarks on Fastvideo SDK
JPEG2000 performance benchmarks on Jetson TX2
Jetson AGX Xavier performance benchmarks
Remotely operated walking excavator on Jetson
Low latency H.264 streaming on Jetson TX2
JPEG2000 performance benchmarks on Jetson TX2
Performance speedup for Jetson TX2 vs AGX Xavier
Fastvideo SDK vs NVIDIA NPP Library
Original article see at: https://fastcompression.com/blog/jetson-image-processing-framework.htm
Subscribe to our mail list: https://mailchi.mp/fb5491a63dff/fastcompression
0 notes
Text
Web Resize on-the-fly: up to one thousand images per second on Tesla V100 GPU
Fastvideo company has been developing GPU-based image processing SDK since 2011, and we also got some outstanding results for software performance on NVIDIA GPU (mobile, laptop, desktop, server). We’ve implemented the first JPEG codec on CUDA, which is still the fastest solution on the market. Apart from JPEG, we’ve also released JPEG2000 codec on GPU and SDK with high performance image processing algorithms on CUDA. Our SDK offers just exceptional speed for many imaging applications, especially in situations when CPU-based solutions are unable to offer either sufficient performance or latency. Now we would like to introduce our Resize image on the fly solution.

JPEG Resize on-the-fly
In various imaging applications we have to do image resize and quite often we need to resize JPEG images. In such a case the task gets more complicated, as soon as we can't do resize directly, because images are compressed. Solution is not difficult, we just need to decompress the image, then do resize and encode it to get resized image. Nevertheless, we can face some difficulties if we assume that we need to resize many millions of images every day and here comes questions concerning performance optimization. Now we need not only to get it right, we have to do that very fast. And there is a good news that it can be done this way.
In the standard set of demo applications from Fastvideo SDK for NVIDIA GPUs there is a sample application for JPEG resize. It's supplied both in binaries and with source codes to let users integrate it easily into their software solutions. This is the software to solve the problem of fast resize (JPEG resize on-the-fly), which is essential for many high performance applications, including high load web services. That application can do JPEG resize very fast, and user can test the binary to check image quality and performance.
If we consider high load web application as an example, we can formulate the following task: we have big database of images in JPEG format, and we need to perform fast resize for these images with minimum latency. This is also a problem for big sites with responsive design: how to prepare set of images with optimal resolutions to minimize traffic and to do that as fast as possible?
At first we need to answer the question “Why JPEG?”. Modern internet services get most of such images from their users, which create them with mobile phones or cameras. For such a situation JPEG is a standard and reasonable choice. Other formats on mobile phones and cameras do exist, but they are not so widespread as JPEG. Many images are stored as WebP, but that format is still not so popular as JPEG. Moreover, encoding and decoding of WebP images are much slower in comparison with JPEG, and this is also very important.
Quite often, such high load web services utilize sets of multiple image copies of the same image with different resolutions to get low latency response. That approach leads to extra expenses on storage, especially for high performance applications, web services and big image databases. The idea to implement better solution is quite simple: we can try to store just one JPEG image at the database instead of image series and to transform it to desired resolution on the fly, which means very fast and with minimum latency.
How to prepare image database
We will store all images in the database at JPEG format, but this is not a good idea to utilize them “as is”. It’s important to prepare all images from the database for future fast decoding. That is the reason why we need to pre-process at off-line all images in the database to insert so called “JPEG restart markers” into each image. JPEG Standard allows such markers and most of JPEG decoders can easily process JPEG images with these markers without problem. Most of smart phones and cameras don’t produce JPEGs with restart markers, that’s why we can add these markers with our software. This is lossless procedure, so we don’t change image content, though file size will be slightly more after that.
To make full solution efficient, we can utilize some statistics about user device resolutions which are most frequent. As soon as users utilize their phones, laptops, PCs to see pictures, and quite often these pictures need just a part of the screen, then image resolutions should not too big and this is the ground to conclude that most of images from our database could have resolutions not more than 1K or 2K. We will consider both choices to evaluate latency and performance. In the case if we need bigger resolution at user device, we just can do resize with upscaling algorithm. Still, there is a possibility to choose bigger default image resolution for the database, general solution will be the same.
For practical purposes we consider JPEG compression with parameters which correspond to “visually lossless compression”. It means JPEG compression quality around 90% with subsampling 4:2:0 or 4:4:4. To evaluate time of JPEG resize, for testing we choose downscaling to 50% both for width and height. In real life we could utilize various scaling coefficients, but 50% could be considered as standard case for testing.
Algorithm description for JPEG Resize on-the-fly software
This is full image processing pipeline for fast JPEG resize that we've implemented in our software:
Copy JPEG images from database to system memory
Parse JPEG and check EXIF sections (orientation, color profile, etc.)
If we see color profile at JPEG image, we read it from file header and save it for future use
Copy JPEG image from CPU to GPU memory
JPEG decoding
Image resize according to Lanczos algorithm (50% downscaling as an example)
Sharp
JPEG encoding
Copy new image from GPU to system memory
Add previously saved color profile to the image header (to EXIF)
We could also implement the same solution with better precision. Before resize we could apply reverse gamma to all color components of the pixel, in order to perform resize in linear space. Then we will apply that gamma to all pixels right after sharp. Visual difference is not big, though it's noticeable, computational cost for such an algorithm modification is low, so it could be easily done. We just need to add reverse and forward gamma to image processing pipeline on GPU.
There is one more interesting approach to solve the same task of JPEG Resize. We can do JPEG decoding on multicore CPU with libjpeg-turbo software. Each image could be decoded in a separate CPU thread, though all the rest of image processing is done on GPU. If we have sufficient number of CPU cores, we could achieve high performance decoding on CPU, though the latency will degrade significantly. If the latency is not our priority, then that approach could be very fast as well, especially in the case when original image resolution is small.
General requirements for fast jpg resizer
The main idea is to avoid storing of several dozens copies of the same image with different resolutions. We can create necessary image with required resolution immediately, right after receiving external request. This is the way to reduce storage size, because we need to have just one original image instead of series of copies.
We have to accomplish JPEG resize task very quickly. That is the matter of service quality due to fast response to client’s requests.
Image quality of resized version should be high.
To ensure precise color reproduction, we need to save color profile from EXIF of original image.
Image file size should be as small as possible and image resolution should coincide with window size on the client’s device: а) If image size is not the same as window size, then client’s device (smart phone, tablet, laptop, PC) will apply hardware-based resize right after image decoding on the device. In OpenGL such a resize is always bilinear, which could create some artifacts or moire on the images with high-frequency detail. b) Screen resize consumes extra energy from the device. c) If we consider the situation with multiple image copies at different resolutions, then in most cases we will not be able to match exactly image resolution with window size, and that's why we will send more traffic than we could.
Full pipeline for web resize, step by step
We collect images from users in any format and resolution
At off-line mode with ImageMagick which supports various image formats, we transform original images to standard 24-bit BMP/PPM format, apply high quality resize with downscale to 1K or 2K, then do JPEG encoding which should include restart markers embedding. The last action could be done either with jpegtran utility on CPU or with Fastvideo JPEG Сodeс on GPU. Both of them can work with JPEG restart markers.
Finally, we create database of such 1K or 2K images to work with further.
After receiving user’s request, we get full info about required image and its resolution.
Find the required image from the database, copy it to system memory and notify resizing software that new image is ready for processing.
On GPU we do the following: decoding, resizing, sharpening, encoding. After that the software copies compressed image to system memory an adds color profile to EXIF. Now the image is ready to be sent to user.
We can run several threads or processes for JPEG Resize application on each GPU to ensure performance scaling. This is possible because GPU occupancy is not high, while working with 1K and 2K images. Usually 2-4 threads/processes are sufficient to get maximum performance at single GPU.
The whole system should be built on professional GPUs like NVIDIA Tesla P40 or V100. This is vitally important, as soon as NVIDIA GeForce GPU series is not intended to 24/7 operation with maximum performance during years. NVIDIA Quadro GPUs have multiple monitor outputs which are not necessary in the task of fast jpg resize. Requirements for GPU memory size are very low and that's why we don’t need GPUs with big size of GPU memory.
As additional optimization issue, we can also create a cache for most frequently processed images to get faster access for such images.

Software parameters for JPEG Resize
Width and height of the resized image could be arbitrary and they are defined with one pixel precision. It's a good idea to preserve original aspect ratio of the image, though the software can also work with any width and height.
We utilize JPEG subsampling modes 4:2:0 and 4:4:4.
Maximum image quality we can get with 4:4:4, though minimum file size corresponds to 4:2:0 mode. We can do subsampling because human visual system better recognizes luma image component, rather than chroma.
JPEG image quality and subsampling for all images the database.
We do sharpening with 3×3 window and we can control sigma (radius).
We need to specify JPEG quality and subsampling mode for output image as well. It’s not necessary that these parameters should be the same as for input image. Usually JPEG quality 90% is considered to be visually lossless and it means that user can’t see compression artifacts at standard viewing conditions. In general case, one can try JPEG image quality up to 93-95%, but then we will have bigger file sizes both for input and output images.
Important limitations for Web Resizer
We can get very fast JPEG decoding on GPU only in the case if we have built-in restart markers in all our images. Without these restart markers one can’t make JPEG decoding parallel algorithm and we will not be able finally to get high performance at the decoding stage. That’s why we need to prepare the database with images which have sufficient number of restart markers.
At the moment, as we believe, JPEG compression algorithm is the best choice for such a task because performance of JPEG Codec on GPU is much faster in comparison with any competitive formats/codecs for image compression and decompression: WebP, PNG, TIFF, JPEG2000, etc. This is not just the matter of format choice, that is the matter of available high-performance codecs for these image formats.
Standard image resolution for prepared database could be 1K, 2K, 4K or anything else. Our solution will work with any image size, but total performance could be different.
Performance measurements for resize of 1K and 2K jpg images
We’ve done testing on NVIDIA Tesla V100 (OS Windows Server 2016, 64-bit, driver 24.21.13.9826) on 24-bit images 1k_wild.ppm and 2k_wild.ppm with resolutions 1K and 2K (1280×720 and 1920×1080). Tests were done with different number of threads, running at the same GPU. To process 2K images we need around 110 MB of GPU memory per one thread, for four threads we need up to 440 MB.
At the beginning we've encoded test images to JPEG with quality 90% and subsampling 4:2:0 or 4:4:4. Then we ran test application, did decoding, resizing, sharpening and encoding with the same quality and subsampling. Input JPEG images resided at system memory, we copied the processed image from GPU to the system memory as well. We measured timing for that procedure.
Command line example to process 1K image: PhotoHostingSample.exe -i 1k_wild.90.444.jpg -o 1k_wild.640.jpg -outputWidth 640 -q 90 -s 444 -sharp_after 0.95 -repeat 200
Performance for 1K images
N | Quality | Subsampling | Resize | Threads | FPS
1 | 90% | 4:4:4 / 4:2:0 | 2 times | 1 | 868 / 682
2 | 90% | 4:4:4 / 4:2:0 | 2 times | 2 | 1039 / 790
3 | 90% | 4:4:4 / 4:2:0 | 2 times | 3 | 993 / 831
4 | 90% | 4:4:4 / 4:2:0 | 2 times | 4 | 1003 / 740
Performance for 2K images
N | Quality | Subsampling | Resize | Threads | FPS
1 | 90% | 4:4:4 / 4:2:0 | 2 times | 1 | 732 / 643
2 | 90% | 4:4:4 / 4:2:0 | 2 times | 2 | 913 / 762
3 | 90% | 4:4:4 / 4:2:0 | 2 times | 3 | 891 / 742
4 | 90% | 4:4:4 / 4:2:0 | 2 times | 4 | 923 / 763
JPEG subsampling 4:2:0 for input image leads to slower performance, but image sizes for input and output images are less in that case. For subsampling 4:4:4 we get better performance, though image sizes are bigger. Total performance is mostly limited by JPEG decoder module and this is the key algorithm to improve to get faster solution in the future.
Resume
From the above tests we see that on just one NVIDIA Tesla V100 GPU, resize performance could reach 1000 fps for 1K images and 900 fps for 2K images at specified test parameters for JPEG Resize. To get maximum speed, we need to run 2-4 threads on the same GPU.
Latency around just one millisecond is very good result. To the best of our knowledge, one can’t get such a latency on CPU for that task and this is one more important vote for GPU-based resize of JPEG images at high performance professional solutions.
To process one billion of JPEG images with 1K or 2K resolutions per day, we need up to 16 NVIDIA Tesla V100 GPUs for JPEG Resize on-the-fly task. Some of our customers have already implemented that solution at their facilities, the others are currently testing that software.
Please note that GPU-based resize could be very useful not only for high load web services. There are much more high performance imaging applications where fast resize could be really important. For example, it could be utilized at the final stage of almost any image processing pipeline before image output to monitor. That software can work with any NVIDIA GPU: mobile, laptop, desktop, server.
Benefits of GPU-based JPEG Resizer
Reduced storage size
Less infrastructure costs on initial hardware and software purchasing
Better quality of service due to low latency response
High image quality for resized images
Min traffic
Less power consumption on client devices
Fast time-to-market software development on Linux and Windows
Outstanding reliability and speed of heavily-tested resize software
We don't need to store multiple image resolutions, so we don't have additional load to file system
Fully scalable solution which is applicable both to a big project and to a single device
Better ROI due to GPU usage and faster workflow
To whom it may concern
Fast resize of JPEG images is definitely the issue for high load web services, big online stores, social networks, online photo management and sharing applications, e-commerce services and enterprise-level software. Fast resize can offer better results at less time and less cost.
Software developers could benefit from GPU-based library with latency in the range of several milliseconds to resize jpg images on GPU.
That solution could also be a rival to NVIDIA DALI project for fast jpg loading at training stage of Machine Learning or Deep Learning frameworks. We can offer super high performance for JPEG decoding together with resize and other image augmentation features on GPU to make that solution useful for fast data loading at CNN training. Please contact us concerning that matter if you are interested.
Roadmap for jpg resize algorithm
Apart from JPEG codec, resize and sharp we can also add crop, color correction, gamma, brightness, contrast, rotations to 90/180/270 degrees - these modules are ready.
Advanced file format support (JP2, TIFF, CR2, DNG, etc.)
Parameter optimizations for NVIDIA Tesla P40 or V100.
Further JPEG Decoder performance optimization.
Implementation of batch mode for image decoding on GPU.
Useful links
Full list of features from Fastvideo Image Processing SDK
Benchmarks for image processing algorithms from Fastvideo SDK
Update
The latest version of the software offers 1400 fps performance on Tesla V100 for 1K images at the same testing conditions.
Original article see here: https://www.fastcompression.com/blog/web-resize-on-the-fly-one-thousand-images-per-second-on-tesla-v100-gpu.htm
1 note
·
View note
Text
Jetson image processing: ISP libargus and Fastvideo SDK
Jetson image processing for camera applications
Jetson hardware is absolutely unique solution from NVIDIA. This is essentially a mini PC with extremely powerful and versatile hardware. Apart from ARM processor it has a sophisticated high performance GPU with CUDA cores, Tensor cores (on AGX Xavier), software for CPU/GPU and AI.
Below you can see an example of how to build a camera system on Jetson. This is an important task if you want to create realtime solution for mobile imaging application. With a thoughtful design, one can even implement a multicamera system on just a single Jetson, and some NVIDIA partners showcase that this is in fact achievable.
How image processing could be done on NVIDIA Jetson
ISP inside Jetson (libargus library on the top of hardware solution)
V4L2 framework instead of argus/nvcamerasrc to get bayer data like v4l2-ctl
Image processing on CUDA (NPP library, Fastvideo SDK)
Image processing on ARM (C++, Python, OpenCV)
Hardware-based encoding and decoding with NVENC
AI on CUDA and/or Tensor cores
Here we consider just ISP and CUDA-based image processing pipelines to describe how the task could be solved, which image processing algorithms could be utilized, etc. For the beginning we consider NVIDIA camera architecture.
Camera Architecture Stack
The NVIDIA camera software architecture includes NVIDIA components for ease of development and customization:

Fig.1. Diagram from Development Guide for NVIDIA Tegra Linux Driver Package (31.1 Release, Nov.2018)
NVIDIA Components of the camera architecture
libargus - provides low-level API based on the camera core stack
nvarguscamerasrc - NVIDIA camera GStreamer plugin that provides options to control ISP properties using the ARGUS API
v4l2src - standard Linux V4L2 application that uses direct kernel IOCTL calls to access V4L2 functionality
NVIDIA provides OV5693 Bayer sensor as a sample and tunes this sensor for the Jetson platform. The drive code, based on the media controller framework, is available at ./kernel/nvidia/drivers/media/i2c/ov5693.c, NVIDIA further offers additional sensor support for BSP software releases. Developers must work with NVIDIA certified camera partners for any Bayer sensor and tuning support.
The work involved includes:
Sensor driver development
Custom tools for sensor characterization
Image quality tuning
These tools and operating mechanisms are NOT part of the public Jetson Embedded Platform (JEP) Board Support Package release. For more information on sensor driver development, see the NVIDIA V4L2 Sensor Driver Programming Guide.
Jetson includes internal hardware-based solution (ISP) which was created for realtime camera applications. To control these features on Jetson hardware, there is libargus library.
Camera application API libargus offers:
low-level frame-synchronous API for camera applications, with per frame camera parameter control
multiple (including synchronized) camera support
EGL stream outputs
RAW output CSI cameras needing ISP can be used with either libargus or GStreamer plugin. In either case, the V4L2 media-controller sensor driver API is used.
Sensor driver API (V4L2 API) enables:
video decode
encode
format conversion
scaling functionality
V4L2 for encode opens up many features like bit rate control, quality presets, low latency encode, temporal tradeoff, motion vector maps, and more.
Libargus library features for Jetson ISP
Bad pixel correction
Bayer domain hardware noise reduction
Per-channel black-level compensation
High-order lens-shading compensation
3A: AF/AE/AWB
Demosaic
3x3 color transform
Color artifact suppression
Downscaling
Edge enhancement (sharp)
To summarize, ISP is a fixed-function processing block which can be configured through the Argus API, Linux drivers, or the Technical Reference Manual which contains register information for particular Jetson.
All information about utilized algorithms (AF, AE, demosaicing, resizing) is closed and user needs to test them to evaluate quality and performance.
ISP is a hardware-based solution for image processing on Jetson and it was done for mobile camera applications with high performance and low latency.
How to choose the right camera
To be able to utilize ISP, we need a camera with CSI interface. NVIDIA partner - Leopard Imaging company is manufacturing many cameras with that interface and you can choose according to requirements. CSI interface is the key feature to send data from a camera to Jetson with a possibility to utilize ISP for image processing.
If we have a camera without CSI support (for example, GigE, USB-3.x, CameraLink, Coax, 10-GigE, PCIE camera), we need to create CSI driver to be able to work with Jetson ISP.
Even if we don't have CSI driver, there is still a way to connect your camera to Jetson.
You just need to utilize proper carrier board with correct hardware output. Usually this is either USB-3.x or PCIE. There is a wide choice of USB3 cameras on the market and one can easily choose any camera or carrier board you need. For example, from NVIDIA partner - XIMEA GmbH.

Fig.2. XIMEA carrier board for NVIDIA Jetson TX1/TX2
To work further with the camera, you need camera driver for L4T and ARM processor - this is minimum requirement to connect your camera to Jetson via carrier board.
However, keep in mind that in this case ISP is not available. Next part deals with such situation.
How to work with non-CSI cameras on Jetson
Let's assume that we've already connected non-CSI camera to Jetson and we can send data from the camera to system memory on Jetson.
Now we can't access Jetson ISP and we need to consider other ways of image processing. The fastest solution is to utilize Fastvideo SDK for Jetson GPUs.
That SDK actually exists for Jetson TK1, TX1, TX2, TX2i and AGX Xavier.
You just need to send data to GPU memory and to create full image processing pipeline on CUDA. This is the way to keep CPU free and to ensure fast processing due to excellent performance of mobile Jetson GPU on CUDA. Based on that approach you can create multicamera systems on Jetson with Fastvideo SDK together with USB-3.x or PCIE cameras.
For more info about realtime Jetson applications with multiple cameras you can have a look the site of NVIDIA partner XIMEA, which is manufacturing high quality cameras for machine vision, industrial and scientific applications.

Fig.3. NVIDIA Jetson with multiple cameras on TX1/TX2 carrier board from XIMEA
Image processing on Jetson with Fastvideo SDK
Fastvideo SDK is intended for camera applications and it has wide choice of features for realtime raw image processing on GPU. That SDK also exists for NVIDIA GeForce/Quadro/Tesla GPUs and consists of high quality algorithms which require significant computational power.
This is the key difference in comparison with any hardware-based solution. Usually ISP/FPGA/ASIC image processing modules offer low latency and high performance, but because of hardware restrictions, utilized algorithms are relatively simple and have moderate image quality.
Apart from image processing modules, Fastvideo SDK has high speed compression solutions: JPEG (8/12 bits), JPEG2000 (8-16 bits), Bayer (8/12 bits) codecs which are implemented on GPU. These codecs are working on CUDA and they were heavily tested, so they are reliable and very fast.
For majority of camera applications, 12 bits per pixel is a standard bit depth and it makes sense to store compressed images at least in 12-bit format or even at 16-bit.
Full image processing pipeline on Fastvideo SDK is done at 16-bit precision, but some modules that require better precision are implemented with float.

Fig.4. Image processing workflow on CUDA at Fastvideo SDK for camera applications
To check quality and performance of raw image processing with Fastvideo SDK, user can download GUI application which is called Fast CinemaDNG Processor. The software is fully based on Fastvideo SDK and it could be downloaded from www.fastcinemadng.com together with sample image series in DNG format.
That application has benchmarks window to check time measurements for each stage of image processing pipeline on GPU.
High-resolution multicamera system for UAV Aerial Mapping
Application: 5K vision system for Long Distance Remote UAV
Manufacturer: MRTech company
Cameras
One XIMEA 20 MPix PCIe camera MX200CG-CM
Two XIMEA 3.1 MPix PCIe cameras MX031CG-SY
Hardware
NVIDIA Jetson TX2 or TX2i module with custom carrier board
NVMe SSD 960 PRO M.2 onboard
Jetson GPU image processing
Full processing workflow on CUDA: acquisition, black level, white balance, LUT, high quality demosaicing, etc.
H.264/265 encoding, RTSP streaming via radio channel
Streaming of 4K images at 25 fps and 2× Full HD 1080p (1920 × 1080) images at 30 fps simultaneously
Save high resolution snapshot images to SSD
Power usage 35W (including all cameras)

Fig.5. NVIDIA Jetson TX2 with XIMEA MX200CG-CM (20 MPix) and two MX031CG-SY (3.1 MPix) cameras.
More information about MRTech solutions for Jetson image processing you can find here.
AI imaging applications on Jetson
With the arrival of AI solutions, the following task needs to be solved: how to prepare high quality input data for such systems?
Usually we get images from cameras in realtime and if we need high quality images, then choosing a high resolution color camera with bayer pattern is justified.
Next we need to implement fast raw processing and after that we will be able to feed our AI solution with good pictures in realtime.
The latest Jetson AGX Xavier has high performance Tensor cores for AI applications and these cores are ready to receive images from CUDA software. Thus we can send data directly from CUDA cores to Tensor cores to solve the whole task very fast.
Links:
XIMEA cameras for Jetson applications
MRTech software solutions for Jetson imaging systems
Fastvideo Image & Video Processing SDK for NVIDIA Jetson
Low latency H.264 streaming on Jetson TX2
Original article see here: https://www.fastcompression.com/blog/jetson-image-processing.htm
0 notes
Text
Jetson TX2 and AGX Xavier performance comparison
Performance comparison for Jetson TX2 and AGX Xavier
Imaging applications benefit from the latest NVIDIA mobile GPUs: Jetson TX2 and AGX Xavier. Nevertheless, general benchmarks can't answer the question about performance comparison for the latest NVIDIA Jetson hardware. Anyway, this is very practical issue for many imaging applications, including aerial imaging, UAV, robotics, self-driving cars, etc. To provide you with real numbers, we've done comparative studies with Fastvideo SDK, which has lots of image processing modules for camera applications. and this SDK is compatible with full line of Jetson hardwdare.

How we've done Jetson TX2 vs Xavier performance comparison
We've done time measurements for most frequently used image processing algorithms like demosaic, resize, denoise, jpeg encoder and decoder, jpeg 2000 codec, etc. This is just a small part of Fastvideo SDK modules, though they could be valuable to understand the performance speedup with Jetson AGX Xavier.
We've utilized the same images and the same parameters for comparison. Xavier boost is very important issue, because in many cases of camera applications we could switch from offline to realtime mode of operation. This is also viable for multiple camera systems on Jetson Xavier.
We can conclude that performance speedup is in the range of 1.7 - 3 for imaging applications on Jetson. This is impressive boost for practitioners. Quite often the results of raw image processing go further as the input for AI applications, which have also been significantly boosted by new Volta hardware cores on Jetson AGX Xavier.

Original article see here: https://www.fastcompression.com/blog/xavier-vs-tx2.htm
0 notes
Text
How to break the speed barrier for machine vision image processing?
Author: Fyodor Serzhenko
What do we usually overlook to speed up real-time image processing?
Machine vision cameras are widely used in industry, science, and robotics. However, when working with them, the same question invariably arises: "How to process the data received?" And that's a really good question. But why does it arise at all?
The point is that cameras usually transmit raw data (RAW) at high frame rate, which takes up a lot of memory and needs to be converted to the required image format in realtime. Image processing algorithms must provide the quality and speed necessary for the task at hand. Unfortunately, it is sometimes not easy to ensure both quality and speed at the same time.
That’s why, whenever there’s a task which requires processing a lot of images in real time, experts put a high priority on optimizing computer vision-related algorithms. It’s even more important when there’s a limited budget, or the physical size or power consumption of the device is constrained for practical reasons.
Generally, high-quality algorithms that perform computations on Intel/AMD processors do well with this task. However, there are special cases:
Case 1. Processing of images from high data rate machine vision cameras, which is the case for high image resolution or a high frame rate.
Case 2. Multi-camera system with real-time image processing.
For such situations, the capabilities of a CPU are not enough. CPU just can't handle the huge data stream quickly enough (for example, when it’s dealing with gigapixels per second), and this leads to the unavoidable loss of some data. Unfortunately, it’s difficult to speed things up further on a CPU without a trade-off for quality.
So, how can we speed up image processing without losing quality? The main idea for the solution was to transfer most of the computations from the central processor (CPU) to the graphics processor (GPU). To solve that task, we utilized our in-house developed Fastvideo SDK, which works on NVIDIA GPU. This approach has significantly accelerated the necessary algorithms and greatly simplified the software architecture, because computations in this case no longer interfere with system functions based on the CPU.
Let's look at the advantages of image processing on a GPU instead of a CPU:
A graphics card is a more specialized device than a CPU, and due to its architecture, it can perform many tasks much faster.
Memory access speed — A graphics processor can offer significantly faster memory access than a central processor.
The algorithms can be run in parallel — Graphics cards are known to have a much greater ability to perform parallel computing than a central processor.
Transferring computations to the graphics card does not mean that the CPU is completely free. The CPU is responsible for I/O and system control. The proposed solution is heterogeneous, since it uses all the available resources of both the CPU and GPU for image processing, which in turn leads to high performance.
In addition to increasing the speed of image processing, using a graphics processor has allowed us to implement more complicated algorithms to increase the image quality and color reproduction. Our workflow is similar to that used in filmmaking, where the colors in the frame are given special attention.
Fig.1. XIMEA xiB high performance machine vision cameras
One of the best examples where this solution can be applied is image processing for XIMEA cameras. XIMEA manufactures high-quality industrial cameras with the latest image sensors, which provide exceptionally high data rates. The Fastvideo SDK solution offers an excellent approach for real-time image processing for high performance cameras.
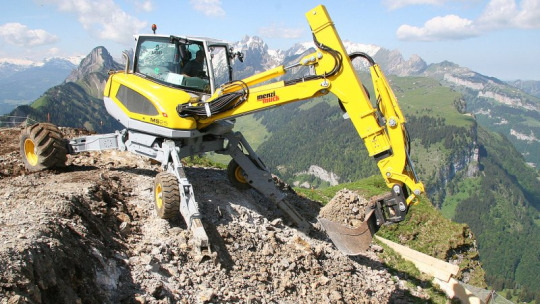
Fig.2. Menzi Muck walking excavator
XIMEA cameras are used, for example, in the Menzi Muck remote-controlled walking excavator. For this particular project, the Fastvideo SDK solution allowed:
up to 60 fps of synchronized image acquisition from each of the two 3.1 MP XIMEA cameras;
real-time processing with H.264/H.265 encoding and streaming (including black level, white balance, demosaicing, auto exposure, etc.);
glass-to-glass video latency over 4G/5G network ~50 ms.
Fig.3. Wind turbine inspection drone from Alerion with XIMEA camera
Let's take as an example another project using XIMEA cameras: the wind turbine inspection drone from Alerion. This drone is intended to fully automate the inspection of wind turbines for damage. For this task, it is very important to ensure good quality of images, based on which a 3D model is subsequently built. Using XIMEA cameras in conjunction with the GPU image processing solution made it possible to achieve the required image quality and high processing speed, which in turn made it possible to automate the inspection process. As a result, the time spent on inspection of one turbine was reduced from 2-3 hours to 10 minutes. Here, of course, process automation played a big role. However, this would not have been possible without high processing speed and excellent image quality that allows even very small damage to be noticed.
In conclusion, it’s worth noting the versatility of the Fastvideo SDK for GPU image processing: it can work on both stationary and mobile graphics cards. However, when choosing a solution for your task, don’t forget about the price-performance ratio. If you configure the solution to meet your needs (download source codes from GitHub), you’ll get high performance and high quality software for real time applications and avoid unnecessary costs for hardware.
Original article see at: https://www.fastcompression.com/blog/high-performance-machine-vision-image-processing.htm Subscribe to our mail list: https://mailchi.mp/fb5491a63dff/fastcompression
0 notes
Text
Fastvideo SDK vs NVIDIA NPP Library
Author: Fyodor Serzhenko
Why is Fastvideo SDK better than NPP for camera applications?
What is Fastvideo SDK?
Fastvideo SDK is a set of software components which correspond to high quality image processing pipeline for camera applications. It covers all image processing stages starting from raw image acquisition from the camera to JPEG compression with storage to RAM or SSD. All image processing is done completely on GPU, which leads to real-time performance or even multiple times faster for the full pipeline. We can also offer a high-speed imaging SDK for non-camera applications on NVIDIA GPUs: offline raw processing, high performance web, digital cinema, video walls, FFmpeg codecs and filters, 3D, AR/VR, DL/AI, etc.

Who are Fastvideo SDK customers?
Fastvideo SDK is compatible with Windows/Linux/ARM and is mostly intended for camera manufacturers and system integrators developing end-user solutions containing video cameras as a part of their products.
The other type of Fastvideo SDK customers are developers of new hardware or software solutions in various fields: digital cinema, machine vision and industrial, transcoding, broadcasting, medical imaging, geospatial, 3D, AR/VR, DL, AI, etc.
All the above customers need faster image processing with higher quality and better latency. In most cases CPU-based solutions are unable to meet such requirements, especially for multicamera systems.
Customer pain points
According to our experience and expertise, when developing end-user solutions, customers usually have to deal with the following challenges.
Before starting to create a product, customers need to know the image processing performance, quality and latency for the final application.
Customers need reliable software which has already been tested and will not glitch when it is least expected.
Customers are looking for an answer on how to create a new solution with higher performance and better image quality.
Customers need external expertise in image processing, GPU software development and camera applications.
Customers have limited (time/human) resources to develop end-user solutions bound by contract conditions.
They need a ready-made prototype as a part of the solution to demonstrate a proof of concept to the end user.
They want immediate support and answers to their questions regarding the fast image processing software's performance, image quality and other technical details, which can be delivered only by industry experts with many years of experience.
Fastvideo SDK business benefits
Fastvideo SDK as a part of complex solutions allows customers to gain competitive advantages.
Customers are able to design solutions which earlier may have seemed to be impossible to develop within required timeframes and budgets.
The product helps to decrease the time to market of end-user solutions.
At the same time, it increases overall end-user satisfaction with reliable software and prompt support.
As a technology solution, Fastvideo SDK improves both image quality and processing performance at the same time.
Fastvideo serves customers as a technology advisor in the field of fast image processing: the team of experts provides end-to-end service to customers. That means that all customer questions regarding Fastvideo SDK, as well as any other technical questions about fast image processing are answered in a timely manner.

Fastvideo SDK vs NVIDIA NPP comparison
NVIDIA NPP can be described as a general-purpose solution, because the company implemented a huge set of functions intended for applications in various industries, and the NPP solution mainly focuses on various image processing tasks. Moreover, NPP lacks consistency in feature delivery, as some specific image processing modules are not presented in the NPP library. This leads us to the conclusion that NPP is a good solution for basic camera applications only. It is just a set of functions which users can utilize to develop their own pipeline.
Fastvideo SDK, on the other hand, is designed to implement a full 16/32-bit image processing pipeline on GPU for camera applications (machine vision, scientific, digital cinema, etc). Our end-user applications are based on Fastvideo SDK, and we collect customer feedback to improve the SDK’s quality and performance. We are armed with profound knowledge of customer needs and offer an exceptionally reliable and heavily tested solutions.
Fastvideo uses a specific approach in Fastvideo SDK which is based on components (not on functions as in NPP). It is easier to build a pipeline based on components, as the components' input and output are standardized. Every component executes a complete operation, and it can have a complex internal architecture, whereas NPP only uses several functions. It is important to emphasize here that developing an application using built-in Fastvideo SDK is much less complex than creating a solution based on NVIDIA NPP.
The Fastvideo JPEG codec and lots of other SDK features have been heavily tested by our customers for many years with a total performance benchmark of more than million images per second. This is a question of software reliability, and we consider it as one of our most important advantages.
The major part of the Fastvideo SDK components (debayers and codecs) can offer both high performance and image quality at the same time, leaving behind the NPP alternatives. What’s more, this is also true for embedded solutions on Jetson where computing performance is quite limited. For example, NVIDIA NPP only has a bilinear debayer, so it can be regarded as a low-quality solution, best suited only for software prototype development.
Summing up this section, we need to specify the following technological advantages of the Fastvideo SDK over NPP in terms of image processing modules for camera applications:
High-performance codecs: JPEG, JPEG2000 (lossless and lossy)
High-performance 12-bit JPEG encoder
Raw Bayer Codec
Flat-Field Correction together with dark frame subtraction
Dynamic bad pixel suppression in Bayer images
Four high quality demosaicing algorithms
Wavelet-based denoiser on GPU for Bayer and RGB images
Filters and codecs on GPU for FFmpeg
Other modules like color space and format conversions
To summarize, Fastvideo SDK offers an image processing workflow which is standard for digital cinema applications, and could be very useful for other imaging applications as well.
Why should customers consider Fastvideo SDK instead of NVIDIA NPP?
Fastvideo SDK provides better image quality and processing performance for implementing key algorithms for camera applications. The real-time mode is an essential requirement for any camera application, especially for multi-camera systems.
Over the last few years, we've tested NPP intensely and encountered software bugs which weren't fixed. In the meantime, if customers come to us with any bug in Fastvideo SDK, we fix it within a couple of days, because Fastvideo possesses all the source code and the image processing modules are implemented by the Fastvideo development team. Support is our priority: that's why our customers can rely on our SDK.
We offer custom development to meet specific our customers' requirements. Our development team can build GPU-based image processing modules from scratch according to the customer's request, whereas in contrast NVIDIA provides nothing of the kind.
We are focused on high-performance camera applications and we have years of experience, and our solutions have been heavily tested in many projects. For example, our customer vk.com has been processing 400,000 JPG images per second for years without any issue, which means our software is extremely reliable.
Software downloads to evaluate the Fastvideo SDK
GPU Camera Sample application with source codes including SDKs for Windows/Linux/ARM - https://github.com/fastvideo/gpu-camera-sample
Fast CinemaDNG Processor software for Windows and Linux - https://www.fastcinemadng.com/download/download.html
Demo applications (JPEG and J2K codecs, Resize, MG demosaic, MXF player, etc.) from https://www.fastcompression.com/download/download.htm
Fast JPEG2000 Codec on GPU for FFmpeg
You can test your RAW/DNG/MLV images with Fast CinemaDNG Processor software. To create your own camera application, please download the source codes from GitHub to get a ready solution ASAP.
Useful links for projects with the Fastvideo SDK
1. Software from Fastvideo for GPU-based CinemaDNG processing is 30-40 times faster than Adobe Camera Raw:
http://ir-ltd.net/introducing-the-aeon-motion-scanning-system
2. Fastvideo SDK offers high-performance processing and real-time encoding of camera streams with very high data rates:
https://www.fastcompression.com/blog/gpixel-gmax3265-image-sensor-processing.htm
3. GPU-based solutions from Fastvideo for machine vision cameras:
https://www.fastcompression.com/blog/gpu-software-machine-vision-cameras.htm
4. How to work with scientific cameras with 16-bit frames at high rates in real-time:
https://www.fastcompression.com/blog/hamamatsu-orca-gpu-image-processing.htm
Original article see at: https://fastcompression.com/blog/fastvideo-sdk-vs-nvidia-npp.htm
Subscribe to our mail list: https://mailchi.mp/fb5491a63dff/fastcompression
0 notes
Text
Fastvideo SDK vs NVIDIA NPP Library
Author: Fyodor Serzhenko
Why is Fastvideo SDK better than NPP for camera applications?
What is Fastvideo SDK?
Fastvideo SDK is a set of software components which correspond to high quality image processing pipeline for camera applications. It covers all image processing stages starting from raw image acquisition from the camera to JPEG compression with storage to RAM or SSD. All image processing is done completely on GPU, which leads to real-time performance or even faster for the full pipeline. We can also offer a high-speed imaging SDK for non-camera applications on NVIDIA GPUs: offline raw processing, high performance web, digital cinema, video walls, FFmpeg codecs and filters, 3D, AR/VR, AI, etc.
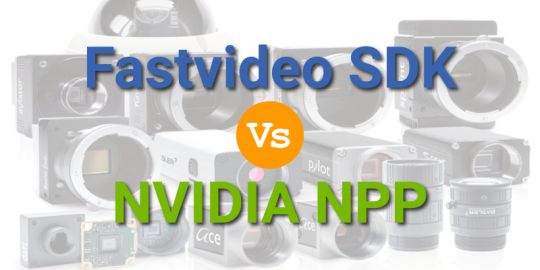
Who are Fastvideo SDK customers?
Fastvideo SDK is compatible with Windows/Linux/ARM and is mostly intended for camera manufacturers and system integrators developing end-user solutions containing video cameras as a part of their products.
The other type of Fastvideo SDK customers are developers of new hardware or software solutions in various fields: digital cinema, machine vision and industrial, transcoding, broadcasting, medical, geospatial, 3D, AR/VR, AI, etc.
All the above customers need faster image processing with higher quality and better latency. In most cases CPU-based solutions are unable to meet such requirements, especially for multicamera systems.
Customer pain points
According to our experience and expertise, when developing end-user solutions, customers usually have to deal with the following obstacles.
Before starting to create a product, customers need to know the image processing performance, quality and latency for the final application.
Customers need reliable software which has already been tested and will not glitch when it is least expected.
Customers are looking for an answer on how to create a new solution with higher performance and better image quality.
Customers need external expertise in image processing, GPU software development and camera applications.
Customers have limited (time/human) resources to develop end-user solutions bound by contract conditions.
They need a ready-made prototype as a part of the solution to demonstrate a proof of concept to the end user.
They want immediate support and answers to their questions regarding the fast image processing software's performance, image quality and other technical details, which can be delivered only by industry experts with many years of experience.
Fastvideo SDK business benefits
Fastvideo SDK as a part of complex solutions allows customers to gain competitive advantages.
Customers are able to design solutions which earlier may have seemed to be impossible to develop within required timeframes and budgets.
The product helps to decrease the time to market of end-user solutions.
At the same time, it increases overall end-user satisfaction with reliable software and prompt support.
As a technology solution, Fastvideo SDK improves image quality and processing performance.
Fastvideo serves customers as a technology advisor in the field of fast image processing: the team of experts provides end-to-end service to customers. That means that all customer questions regarding Fastvideo SDK, as well as any other technical questions about fast image processing are answered in a timely manner.
Fastvideo SDK vs NVIDIA NPP comparison
NVIDIA NPP can be described as a general-purpose solution, because the company implemented a huge set of functions intended for applications in various industries, and the NPP solution mainly focuses on various image processing tasks. Moreover, NPP lacks consistency in feature delivery, as some specific image processing modules are not presented in the NPP library. This leads us to the conclusion that NPP is a good solution for basic camera applications only. It is just a set of functions which users can utilize to develop their own pipeline.
Fastvideo SDK, on the other hand, is designed to implement a full 16/32-bit image processing pipeline on GPU for camera applications (machine vision, scientific, digital cinema, etc). Our end-user applications are based on Fastvideo SDK, and we collect customer feedback to improve the SDK’s quality and performance. We are armed with profound knowledge of customer needs and offer an exceptionally reliable and heavily tested solution.
Fastvideo uses a specific approach in Fastvideo SDK which is based on components (not on functions as in NPP). It is easier to build a pipeline based on components, as the components' input and output are standardized. Every component executes a complete operation, and it can have a complex architecture, whereas NPP only uses several functions. It is important to emphasize here that developing an application using built-in Fastvideo SDK is much less complex than creating a solution based on NVIDIA NPP.
The Fastvideo JPEG codec and lots of other SDK features have been heavily tested by our customers for many years with a total performance benchmark of more than million images per second. This is a question of software reliability, and we consider it as one of our most important advantages.
The major part of the Fastvideo SDK components (debayer and codecs) can offer both high performance and image quality, leaving behind the NPP alternatives. What’s more, this is also true for embedded solutions on Jetson where computing performance is quite limited. For example, NVIDIA NPP only has a bilinear debayer, so it can be regarded as a low-quality solution, best suited only for software prototype development.
Summing up this section, we need to specify the following technological advantages of the Fastvideo SDK over NPP in terms of image processing modules for camera applications:
High-performance codecs: JPEG, JPEG2000 (lossless and lossy)
High-performance 12-bit JPEG encoder
Raw Bayer Codec
Flat-Field Correction together with dark frame subtraction
Dynamic bad pixel suppression in Bayer images
Four high quality demosaicing algorithms
Wavelet-based denoiser on GPU for Bayer and RGB images
Filters and codecs on GPU for FFmpeg
Other modules like color space and format conversions
To summarize, Fastvideo SDK offers an image processing workflow which is standard for digital cinema applications, and could be very useful for other imaging applications as well.
Why should customers consider Fastvideo SDK instead of NVIDIA NPP?
Fastvideo SDK provides better image quality and processing performance for implementing key algorithms for camera applications. The real-time mode is an essential requirement for any camera application, especially for multi-camera systems.
Over the last few years, we've tested NPP intensely and encountered software bugs which weren't fixed. In the meantime, if customers come to us with any bug in Fastvideo SDK, we fix it within a couple of days, because Fastvideo possesses all the source code and the image processing modules are implemented by the Fastvideo development team. Support is our priority: that's why our customers can rely on our SDK.
We offer custom development to meet specific our customers' requirements. Our development team can build GPU-based image processing modules from scratch according to the customer's request, whereas in contrast NVIDIA provides nothing of the kind.
We are focused on high-performance camera applications and we have years of experience, and our solutions have been heavily tested in many projects. For example, our customer vk.com has been processing 400,000 JPG images per second for years without any issue, which means our software is extremely reliable.
Software downloads to evaluate the Fastvideo SDK
GPU Camera Sample application with source codes including SDKs for Windows/Linux/ARM - https://github.com/fastvideo/gpu-camera-sample
Fast CinemaDNG Processor software for Windows and Linux - https://www.fastcinemadng.com/download/download.html
Demo applications (JPEG and J2K codecs, Resize, MG demosaic, MXF player, etc.) from https://www.fastcompression.com/download/download.htm
Fast JPEG2000 Codec on GPU for FFmpeg
You can test your RAW/DNG/MLV images with Fast CinemaDNG Processor software. To create your own camera application, please download the source codes from GitHub to get a ready solution ASAP.
Useful links for projects with the Fastvideo SDK
1. Software from Fastvideo for GPU-based CinemaDNG processing is 30-40 times faster than Adobe Camera Raw:
http://ir-ltd.net/introducing-the-aeon-motion-scanning-system
2. Fastvideo SDK offers high-performance processing and real-time encoding of camera streams with very high data rates:
https://www.fastcompression.com/blog/gpixel-gmax3265-image-sensor-processing.htm
3. GPU-based solutions from Fastvideo for machine vision cameras:
https://www.fastcompression.com/blog/gpu-software-machine-vision-cameras.htm
4. How to work with scientific cameras with 16-bit frames at high rates in real-time:
https://www.fastcompression.com/blog/hamamatsu-orca-gpu-image-processing.htm
Original article see at: https://www.fastcompression.com/blog/fastvideo-sdk-vs-nvidia-npp.htm Subscribe to our mail list: https://mailchi.mp/fb5491a63dff/fastcompression
0 notes
Text
Software for Hamamatsu ORCA Processing on GPU
Author: Fyodor Serzhenko
Scientific research demands modern cameras with low noise, high resolution, frame rate and bit depth. Such imaging solutions are indispensable in microscopy, experiments with cold atom gases, astronomy, photonics, etc. Apart from outstanding hardware there is a need for high performance software to process streams in realtime with high precision.
Hamamatsu Photonincs company is a world leader in scientific cameras, light sources, photo diodes and advanced imaging applications. For high performance scientific cameras and advanced imaging applications, Hamamatsu introduced ORCA cameras with outstanding features. ORCA cameras are high precision instruments for scientific imaging due to on-board FPGA processing enabling intelligent data reduction, pixel-level calibrations, increased USB 3.0 frame rates, purposeful and innovative triggering capabilities, patented lightsheet read out modes and individual camera noise characterization.
ORCA-Flash4.0 cameras have always provided the advantage of low camera noise. In quantitative applications, like single molecule imaging and super resolution microscopy imaging, fully understanding camera noise is also important. Every ORCA-Flash4.0 V3 is carefully calibrated to deliver outstanding linearity, especially at low light, to offer improved photo response non-uniformity (PRNU) and dark signal non-uniformity (DSNU), to minimize pixel differences and to reduce fixed pattern noise (FPN).
The ORCA-Flash4.0 V3 includes patented Lightsheet Readout Mode, which takes advantage of sCMOS rolling shutter readout to enhance the quality of lightsheet images. When paired with W-VIEW GEMINI image splitting optics, a single ORCA-Flash4.0 V3 camera becomes a powerful dual wavelength imaging device. In "W-VIEW Mode" each half of the image sensor can be exposed independently, facilitating balanced dual color imaging with a single camera. And this feature can be combined with the new and patented "Dual Lightsheet Mode" to offer simultaneous dual wavelength lightsheet microscopy.
Applications for Hamamatsu ORCA cameras
There are quite a lot of scientific imaging tasks which could be solved with Hamamatsu ORCA cameras:
Digital Microscopy
Light Sheet Fluorescence Microscopy
Live-Cell Microscopy and Live-Cell Imaging
Laser Scanning Confocal Microscopy
Biophysics and Biophotonics
Biological and Biomedical Sciences
Bioimaging and Biosensing
Neuroimaging
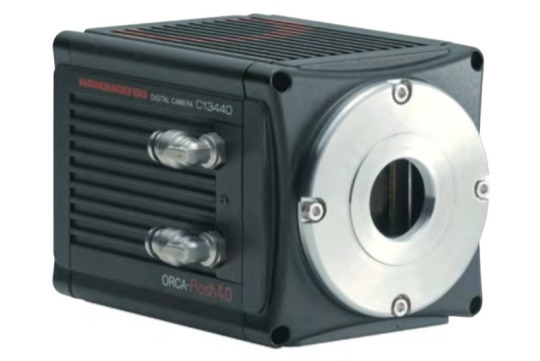
Hamamatsu ORCA-Flash4.0 V3 Digital CMOS camera (image from https://camera.hamamatsu.com/jp/en/product/search/C13440-20CU/index.html)
Hamamatsu ORCA-Flash4.0 V3 Digital CMOS camera: C13440-20CU
Image processing for Hamamatsu ORCA-Flash4.0 V3 Digital CMOS camera
That camera generates quite high data rate. Maximum performance for Hamamatsu ORCA-Flash4.0 V3 could be evaluated as 100 fps * 4 MPix * 2 Byte/Pix = 800 MByte/s. As soon as these are 16-bit monochrome frames, that high data rate could be a bottleneck to save such streams to SSD for two-camera system for long-term recording, which is quite usual for microscopy applications.
If we consider one-day recoding duration, storage for such a stream could be a problem. That two-camera system generates 5.76 TB data per hour and it could be a good idea to implement realtime compression to cut storage cost. To compress 16-bit frames, we can't utilize either JPEG or H.265 encoding algorithms because they don't support more than 12-bit data. The best choice here is JPEG2000 compression algorithm which is working natively with 16-bit images. On NVIDIA GeForce GTX 1080 we've got the performance around 240 fps for lossy JPEG2000 encoding with compression ratio around 20. This is the result that we can't achieve on CPU because corresponding JPEG2000 implementations (OpenJPEG, Jasper, J2K, Kakadu) are much slower. Here you can see JPEG2000 benchmark comparison for widespread J2K encoders.
JPEG2000 lossless compression algorithm is also available, but it offers much less compression ratio, usually in the range of 2-2.5 times. Still, it's useful option to store original compressed data without any losses which could be mandatory for particular image processing workflow. In any way, lossless compression makes data rate less, so it's always good for storage and performance issues.
Optimal compression ratio for lossy JPEG2000 encoding should be defined by checking different quality metrics and their correspondence to a particular task to be solved. Still, there is no good alternative for fast JPEG2000 compression for 16-bit data, so JPEG2000 looks as the best fit. We would also recommend to add the following image processing modules to the full pipeline to get better image quality:
Dynamic Bad Pixel Correction
Data linearization with 1D LUT
Dark Frame Subtraction
Flat Field Correction (vignette removal)
White/Black Points
Exposure Correction
Curves and Levels
Denoising
Crop, Flip/Flop, Rotate 90/180/270, Resize
Geometric transforms, Rotation to an arbitrary angle
Sharp
Gamma Correction
Realtime Histogram and Parade
Mapping and monitor output
Output JPEG2000 encoding (lossless or lossy)
The above image processing pipeline could be fully implemented on GPU to achieve realtime performance or even faster. It could be done with Fastvideo SDK and NVIDIA GPU. That SDK is supplied with sample applications in source codes, so user can create his own GPU-based application very fast. Fastvideo SDK is avalilable for Windows, Linux, L4T.
There is also a gpu-camera-sample application which is based on Fastvideo SDK. You can download source codes and/or binaries for Windows from the following link on Github - gpu camera sample. Binaries are able to work with raw images in PGM format (8/12/16-bit), even without a camera. User can add support for Hamamatsu cameras to process images in realtime on NVIDIA GPU.

Fastvideo SDK to process on GPU raw images from Hamamatsu ORCA sCMOS cameras
The performance of JPEG2000 codec strongly depends on GPU, image content, encoding parameters and complexity of the full image processing pipeline. To scale the performance, user can also utilize several GPUs for image processing at the same time. Multiple GPU processing option is the part of Fastvideo SDK.
If you have any questions, please fill the form below with your task description and send us your sample images for evaluation.
Links
Hamamatsu ORCA-Flash4.0 V3 Digital sCMOS camera
GPU Software for camera applications
JPEG2000 Codec on NVIDIA GPU
Image and Video Processing SDK for NVIDIA GPUs
GPU Software for machine vision and industrial cameras
Original article see at: https://www.fastcompression.com/blog/hamamatsu-orca-gpu-image-processing.htm
Subscribe to our mail list: https://mailchi.mp/fb5491a63dff/fastcompression
0 notes
Text
JPEG Optimizer Library on CPU and GPU
Fastvideo has implemented the fastest JPEG Codec and Image Processing SDK for NVIDIA GPUs. That software could work at maximum performance with full range of NVIDIA GPUs, starting from mobile Jetson to professional Quadro and Tesla server GPUs. Now we've extended these solutions to be able to offer various optimizations to Standard JPEG algorithm. This is vitally important issue to get better image compression while retaining the same perceived image quality within existing JPEG Standard.
Our expert knowledge in JPEG Standard and GPU programming are proved by performance benchmarks of our JPEG Codec. This is also a ground for our custom software design to solve various time-critical tasks in connection with JPEG images and corresponding services.
Our customers have been utilizing that GPU-based software for fast JPEG encoding and decoding, JPEG resize for high load web applications and they asked us to implement more optimizations which are indispensable for web solutions. These are the most demanding tasks:
JPEG recompression to decrease file size without loosing perceived image quality
JPEG optimization to get better user experience while loading JPEG images via slow connection
JPEG processing on users' devices
JPEG resize on-demand:
Implementations of JPEG Baseline, Extended, Progressive and Lossless parts of the Standard
Other tasks related to JPEG images
to store just one source image (to cut storage costs)
to match resolution of user's device (to exclude JPEG Resize on user's device)
to minimize traffic
to ensure minimum server response time
to offer better user experience
The idea about image optimization is very popular and it really makes sense. As soon as JPEG is so widespread at web, we need to optimize JPEG images for web as well. By decreasing image size, we can save space for image storage, minimize traffic, improve latency, etc. There are many methods of JPEG optimization and recompression which could bring us better compression ratio while saving perceptual image quality. In our products we strive to combine all of them with the idea about better performance on multicore CPUs and on modern GPUs.
There is a great variety of image processing tasks which are connected with JPEG handling. They could be solved either on CPU or on GPU. We are ready to offer custom software design to meet special requirements that our customers could have. Please fill the form below and send us your task description.
JPEG Optimizer Library and other software from Fastvideo
JPEG Optimizer Library (SDK for GPU/CPU on Windows/Linux) to recompress and to resize JPEG images for corporate customers: high load web services, photo stock applications, neural network training, etc.
Standalone JPEG optimizer application - in progress
Projects under development
JPEG optimizer SDK on CPU and GPU
Mobile SDK on CPU for Android/IOS for image decoding and visualization on smartphones
JPEG recompression library that runs inside your web app and optimizes images before upload
JPEG optimizer API for web
Online service for JPEG optimization
Fastvideo publications on the subject
JPEG Optimization Algorithms Review
Web resize on-the-fly on GPU
JPEG resize on-demand: FPGA vs GPU. Which is the fastest?
Jpeg2Jpeg Acceleration with CUDA MPS on Linux
JPEG compress and decompress with CUDA MPS
Original article see at: https://www.fastcompression.com/products/jpeg-optimizer-library.htm
Subscribe to our mail list: https://mailchi.mp/fb5491a63dff/fastcompression
0 notes
Text
Fast RAW Compression on GPU
Author: Fyodor Serzhenko
Recording performance for RAW data acquisition task is essential issue for 3D/4D, VR and Digital Cinema applications. Quite often we need to do realtime recordings to portable SSD and here we face questions about throughput, compression ratio, image quality, recording duration, etc. As soon as we need to store RAW data from a camera, the general approach for raw image encoding is not exactly the same as for color. Here we review several methods to solve that matter.
Why do we need Raw Image Compression on GPU?
We need to compress raw stream from a camera (industrial, machine vision, digital cinema, scientific, etc.) in realtime at high fps, for example 4K (12-bit raw data) at 60 fps, 90 fps or faster. This is vitally important issue for realtime applications, external raw recorders and for in-camera raw recordings. As an example we can consider RAW or RAW-SDI format to send data from a camera to PC or to external recorder.
As soon as most of modern cameras have 12-bit dynamic range, it's a good idea to utilize JPEG compression which could be implemented for 12-bit data. For 14-bit and 16-bit cameras this is not the case and for high bit depth cameras we would recommend to utilize either Lossless JPEG encoding or JPEG2000. These algorithms are not fast, but they can process high bit depth data.
Lossy methods to solve the task of Fast RAW Compression
Standard 12-bit JPEG encoding for grayscale images
Optimized 12-bit JPEG encoding (double width, half height, Standard 12-bit JPEG encoding for grayscale images)
Raw Bayer encoding (split RGGB pattern to 4 planes and then apply 12-bit JPEG encoding for each plane)
The problem with Standard JPEG for RAW encoding is evident - we don't have slowly varying changes in pixel values at the image and this could cause problems with image quality due to Discrete Cosine Transform which is the part of JPEG algorithm. In that case the main idea of JPEG compression is questionable and we expect to get higher level of distortion for RAW images with JPEG compression.
The idea about "double width" is also well-known. It's working well at Lossless JPEG compression for RAW bayer data. After such a transform we get the same colors for vertical pixel neighbours for two adjacent rows and it could decrease high-frequency values after DCT for Standard JPEG. That method is also utilized in Blackmagic Design BMD RAW 3:1 and 4:1 formats.
If we split RAW image into 4 planes according to available bayer pattern, we get 4 downsized images, one for each bayer component. Here we can get slowly varying intensity, but for images with halved resolution. That algorithm looks promising, though we could expect slightly slower performance becase of additional split algorithm in the pipeline.
We focus on JPEG-based methods as soon as we have high performance solution for JPEG codec on CUDA. That codec is capable of working with all range of NVIDIA GPUs: mobile Jetson Nano, TK1/TX1/TX2, AGX Xavier, laptop/desktop GeForce series and server GPUs Quadro and Tesla. That codec also supports 12-bit JPEG encoding which is the key algorithm for that RAW compression task.
There is also an opportunity to apply JPEG2000 encoding instead of JPEG for all three cases, but here we will consider JPEG only because of the following reasons:
JPEG encoding on GPU is much faster than JPEG2000 encoding (approximately ×20)
Compression ratio is almost the same (it's bigger for J2K, but not too much)
There is a patent from RED company to implement J2K encoding for splitted channels inside the camera
There are no open patent issues connected with JPEG algorithm and this is serious advantage of JPEG. Nevertheless, the case with JPEG2000 compression is very interesting and we will test it later. That approach could give us GPU lossless raw image compression, which can't be done with JPEG.
To solve the task of RAW image compression, we need to specify both metric and criteria to measure image quality losses. We will try SSIM which is considered to be much more reliable in comparison with PSNR and MSE. SSIM means structural similarity and it's widely used to evaluate image resemblance. This is well known image quality metric.
Quality and Compression Ratio measurements
To find the best solution among chosen algorithms we have done some tests to calculate Compression Ratio and SSIM for standard values of JPEG Quality Factor. We've utilized the same Standard JPEG quantization table and the same 12-bit RAW image. As soon as Compression Ratio is content-dependent, this is just an example of what we could get in terms of SSIM and Compression Ratio.
For the testing we've utilized uncompressed RAW bayer image from Blackmagic Design URSA camera with resolution 4032×2192, 12-bit. Compression Ratio was measured with relation to the packed uncompressed 12-bit image file size, which is equal to 12.6 MB, where two pixel values are stored in 3 Bytes.
Output RGB images were created with Fast CinemaDNG Processor software. Output colorspace was sRGB, 16-bit TIFF, no sharpening, no denoising. SSIM measurements were performed with these 16-bit TIFF images. Source image was compared with the processed image, which was encoded and decoded with each compression algorithm.
Table 1: Results for SSIM for encoding with standard JPEG quantization table
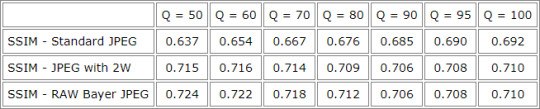
These results show that SSIM metrics is not really suitable for such tests. According to visual estimation, we can conclude that image quality Q = 80 and higher could be considered acceptable for all three algorithms, but the images from the third algorithm look better.
Table 2: Compression Ratio (CR) for encoding with standard JPEG quantization table
Performance for RAW encoding is the same for the first two methods, though for the third it's slightly less (performance drop is around 10-15%) because we need to spend additional time to split raw image to 4 planes according to the bayer pattern. Time measurements have been done with Fastvideo SDK for different NVIDIA GPUs. These are hardware-dependent results and you can do the same measurements for your particular NVIDIA hardware.
How to improve image quality, compression ratio and performance
There are several ways to get even better results in terms of image quality, CR and encoding performance for RAW compression:
Image sensor calibration
RAW image preprocessing: dark frame subtraction, bad pixel correction, white balance, LUT, denoise, etc.
Optimized quantization tables for 12-bit JPEG encoding
Optimized Huffman tables for each frame
Minimum metadata in JPEG images
Multithreading with CUDA Streams to get better performance
Better hardware from NVIDIA
Useful links converning GPU accelerated image compression
High Performance CUDA JPEG Codec
12-bit JPEG encoding on GPU
JPEG2000 Codec on GPU
RAW Bayer Codec on GPU
Lossless JPEG Codec on CPU
Original article see at: https://www.fastcompression.com/blog/fast-raw-compression.htm
0 notes
Text
Benchmark comparison for Jetson Nano, TX2, Xavier NX and AGX
Author: Fyodor Serzhenko
NVIDIA has released a series of Jetson hardware modules for embedded applications. NVIDIA® Jetson is the world's leading embedded platform for image processing and DL/AI tasks. Its high-performance, low-power computing for deep learning and computer vision makes it the ideal platform for mobile compute-intensive projects.
We've developed an Image & Video Processing SDK for NVIDIA Jetson hardware. Here we present performance benchmarks for the available Jetson modules. As an image processing pipeline, we consider a basic camera application as a good example for benchmarking.
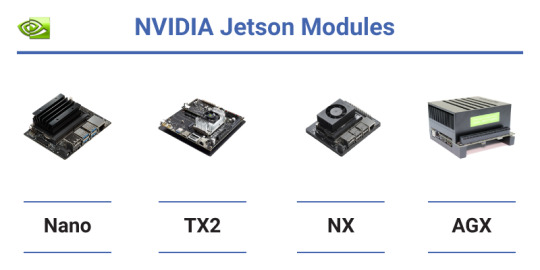
Hardware features for Jetson Nano, TX2, Xavier NX and AGX Xavier
Here we present a brief comparison for Jetsons hardware features to see the progress and variety of mobile solutions from NVIDIA. These units are aimed at different markets and tasks
Table 1. Hardware comparison for Jetson modules
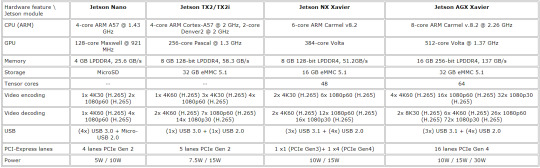
In camera applications, we can usually hide Host-to-Device transfers by implementing GPU Zero Copy or by overlapping GPU copy/compute. Device-to-Host transfers can be hidden via copy/compute overlap.
Hardware and software for benchmarking
CPU/GPU NVIDIA Jetson Nano, TX2, Xavier NX and AGX Xavier
OS L4T (Ubuntu 18.04)
CUDA Toolkit 10.2 for Jetson Nano, TX2, Xavier NX and AGX Xavier
Fastvideo SDK 0.16.4
NVIDIA Jetson Comparison: Nano vs TX2 vs Xavier NX vs AGX Xavier
For these NVIDIA Jetson modules, we've done performance benchmarking for the following standard image processing tasks which are specific for camera applications: white balance, demosaic (debayer), color correction, resize, JPEG encoding, etc. That's not the full set of Fastvideo SDK features, but it's just an example to see what kind of performance we could get from each Jetson. You can also choose a particular debayer algorithm and output compression (JPEG or JPEG2000) for your pipeline.

Table 2. GPU kernel times for 2K image processing (1920×1080, 16 bits per channel, milliseconds)

Total processing time is calculated for the values from the gray rows of the table. This is done to show the maximum performance benchmarks for a specified set of image processing modules which correspond to real-life camera applications.
Each Jetson module was run with maximum performance
MAX-N mode for Jetson AGX Xavier
15W for Jetson Xavier NX and Jetson TX2
10W for Jetson Nano
Here we've compared just the basic set of image processing modules from Fastvideo SDK to let Jetson developers evaluate the expected performance before building their imaging applications. Image processing from RAW to RGB or RAW to JPEG are standard tasks, and now developers can get detailed info about expected performance for the chosen pipeline according to the table above. We haven't tested Jetson H.264 and H.265 encoders and decoders in that pipeline. As soon as H.264 and H.265 encoders are working at the hardware level, encoding can be done in parallel with CUDA code, so we should be able to get even better performance.
We've done the same kernel time measurements for NVIDIA GeForce and Quadro GPUs. Here you can get the document with the benchmarks.
Software for Jetson performance comparison
We've released the software for a GPU-based camera application on GitHub, and it's available to download both binaries and source codes for our gpu camera sample project. It's implemented for Windows 7/10, Linux Ubuntu 18.04 and L4T. Apart from a full image processing pipeline on GPU for still images from SSD and for live camera output, there are options for streaming and for glass-to-glass (G2G) measurements to evaluate real latency for camera systems on Jetson. The software currently works with machine vision cameras from XIMEA, Basler, JAI, Matrix Vision, Daheng Imaging, etc.
To check the performance of Fastvideo SDK on a laptop/desktop/server GPU without any programming, you can download Fast CinemaDNG Processor software with GUI for Windows or Linux. That software has a Performance Benchmarks window, and there you can see timing for each stage of image processing. This is a more sofisticated method of performance testing, because the image processing pipeline in that software can be quite advanced, and you can test any module you need. You can also perform various tests on images with different resolutions to see how much the performance depends on image size, content and other parameters.
Other blog posts from Fastvideo about Jetson hardware and software
Jetson Image Processing
Jetson Zero Copy
Jetson Nano Benchmarks on Fastvideo SDK
Jetson AGX Xavier performance benchmarks
JPEG2000 performance benchmarks on Jetson TX2
Remotely operated walking excavator on Jetson
Low latency H.264 streaming on Jetson TX2
Performance speedup for Jetson TX2 vs AGX Xavier
Source codes for GPU-Camera-Sample software on GitHub to connect USB3 and other cameras to Jetson
Original article see at: https://www.fastcompression.com/blog/jetson-benchmark-comparison.htm
Subscribe to our mail list: https://mailchi.mp/fb5491a63dff/fastcompression
0 notes
Text
Gpixel GMAX3265 Image Sensor Processing
Gpixel is a turn key supplier of advanced off-the-shelf, customized and full custom CMOS image sensors, developed by a multi-disciplinary team of image sensor experts in CMOS image technology. From the offices in Changchun, China (headquarters) and Antwerp, Belgium is Gpixel specialized in providing high-end CMOS image sensor solutions for industrial, professional, medical and scientific applications.
Founded in 2012 by experienced CMOS image sensor designers and semiconductor physicists, Gpixel is committed to continuously innovate and work in close cooperation with its customers and business partners to deliver the most state-of-art CMOS image sensor technologies and products to the global market.
One of the latest releases of Gpixel is GMAX3265 image sensor. This is high resolution (65 MPix) image sensor featured with the latest low noise 3.2 µm charge domain global shutter pixel architecture.
Fig.1. GMAX3265 image sensor from Gpixel
GMAX3265 is defined in close collaboration with leading industry partners in inspection vision systems, as such are we confident that the unique features of GMAX3265 will meet the most demanding requirements for industrial camera applications.
GMAX3265 offers 9344 × 7000 resolution, global shutter with ultra-low read noise of 2e-, more than 70 dB dynamic range, and very small dark current at room temperature. Thanks to the light pipe technology, the sensor exhibits excellent shutter efficiency of 1/30,000 and large angular response.
GMAX3265 image sensor solution is offered in high speed version and normal speed version. High speed version delivers 71 fps at 10-bit output, normal speed version delivers 31 fps at 12-bit output. GMAX3265 is designed with on-chip sequencer, supporting various exposure and Region of Interest (ROI) modes, tailored to inspection imaging needs, enabling easy and cost-effective integration for camera manufactures. GMAX3265 is assembled with 239-pin micro-PGA ceramic package for reliability and good heat dissipation and a double-sided ARC D263 glass lid.
The image sensor has 56 pairs sub-LVDS data output channel, each running at maximum 1.08 Gbit/s. GMAX3265 image sensor is capable to offer 71 fps at 10-bit output or 53 fps at 12-bit output. High resolution and fast frame rate lead to significant increase of system throughput various camera applications.
XIMEA CB654 camera with color GMAX3265 high speed image sensor
This is compact >8K camera for industrial and scientific applications:
Flat panel display (FPD) inspection
Printed circuit board (PCB) examination
Pill sorting (laser 3D method)
Solar panel analysis
Persistent stadium and border security
Wide area surveillance
Cinematography
Sports broadcast and entertainment
AV and Autonomous, Unmanned Remotely operated vehicles
Photogrammetry
Surveying, aerial or city mapping
360 panorama
Metrology
Digital zoom

Fig.2. XIMEA high resolution color camera CB654 with GMAX3265 image sensor
XIMEA CB654 Camera Specification
That camera is based on 65 megapixel image sensor GMAX3265 from Gpixel, has optical format 2.3" and global shutter. This is both high resolution and high speed CMOS camera with PCIe interface (no grabber is needed) which is working at 64 Gbps bandwidth. The camera has high dynamic range, low noise, minimal latency. Data transfer is implemented via DMA.

How to process frames from XIMEA CB654 camera?
That camera generates very high data rate. Maximum performance for the camera could be evaluated as 71 fps * 65 MPix = 4.6 GPix/s. This is very complicated task just to send that data stream from camera to host PC. PCI-Express Gen 3 x8 is the only choice to cope with such a stream. That's what XIMEA has brilliantly implemented and the task has been solved. By XIMEA API we can send all frames to PC in realtime.
If we don't need just to get a ROI from that high resolution image sensor, the task becomes much more complicated. Raw data stream of 4.6 GPix/s (which is equal to 5.8 GB/s, because we have 10-bit pixels) after demosaicing is tripled, so at the end of image processing pipeline we will have almost 14 GB/s stream in 24-bit RGB format! As soon as we do computations at 16 bits per color channel, we should process two times more. There are no chances to solve that task on CPU, though it is not easy to get a solution on GPU either. Still, such solutions exist, we just need several GPUs for parallel image processing.

Fig.3. Fastvideo SDK to process raw images from XIMEA GMAX3265 mono and color cameras
In most cases there is no need in realtime image processing for such applications, though the question about the performance is the key issue, especially for that GMAX3265 image sensor. We do need to get it as high as possible. If we consider for comparison, how Fastvideo SDK on good GPU can process frames from 48 MPix CMOSIS camera, we can get rough understanding about expected performance and utilized image processing pipeline.
The performance is strongly depends on GPU model and on complexity of the pipeline. In general, we can get the performance around 1-2 GPix/s per GPU and that gives us an idea of how many GPUs we will need for processing. Multi-GPU solution with Fastvideo SDK is the right choice for that task.
You can get trial version of Fastvideo SDK to check image quality and performance for your sample images to evaluate processing time for your image processing pipeline.
Links
Gpixel image sensors
GPU Software for camera applications
XIMEA xiB-64 high performance industrial cameras
XIMEA CB500 realtime software on GPU
Fastvideo Image and Video Processing SDK for NVIDIA GPUs
Original article see at: https://www.fastcompression.com/blog/gpixel-gmax3265-image-sensor-processing.htm
0 notes
Text
Jetson Nano Benchmarks on Fastvideo SDK
Embedded imaging applications can definitely benefit from the latest release of NVIDIA Jetson Nano hardware. NVIDIA Jetson Nano is a small, powerful computer with embedded GPU that lets you run multiple neural networks in parallel for applications like image classification, object detection, segmentation, and speech processing.
We've tested Image & Video Processing SDK from Fastvideo with NVIDIA Jetson Nano Developer Kit and here we present our results of benchmarking for software modules which are specific for camera applications.

Fig.1. Jetson Nano Module
NVIDIA Jetson Nano hardware: Quad Core, 4GB RAM, GPU
128-core Maxwell GPU (for display and compute)
Quad-core ARM A57 @ 1.43 GHz (main CPU)
4 GB LPDDR4 (rated at 25.6 GB/s)
Gigabit Ethernet
4x USB 3.0, USB 2.0 Micro-B (the Micro USB port could be utilized both for 5V power input and for data)
HDMI 2.0 & eDP 1.4 (4K monitor support, HDMI or Display Port)
Support of MIPI CSI-2 and PCIe Gen2 high-speed I/O
DC Barrel jack for 5V power input
Storage microSD
Dimensions: 100 mm × 80 mm × 29 mm (carrier board is included)
It's interesting to note that according to CUDA Device Query application, the name of tested Jetson Nano module is "NVIDIA Tegra X1" with CUDA Capability 5.3. So it reminds Jetson TX1, but with half of CUDA Cores.
Video Encoding and Decoding Options (NVIDIA NVENC and NVDEC benchmarks)
Video Encode 4K @ 30 fps, 4x for 1080p @ 30 fps, 9x for 720p @ 30 fps (H.264/H.265)
Video Decode 4K @ 60 fps, 2x for 4K @ 30 fps, 8x for 1080p @ 30 fps, 18x for 720p @ 30 fps (H.264/H.265)

Fig.2. Jetson Nano Developer Kit
Hardware and software for benchmarking
CPU/GPU NVIDIA Jetson Nano Developer Kit
OS L4T (Ubuntu 18.04)
JetPack 4.2 with CUDA CUDA Toolkit 10.0
Fastvideo SDK 0.14.1
Jetson Nano Power Consumption and Power Management
In Jetson Nano hardware, NVIDIA uses Dynamic Voltage and Frequency Scaling (DVFS) approach. That power management technology is utilized in most of modern computer hardware to maximize power savings, where the voltage used in a component is increased or decreased, depending upon external conditions.
Jetson Nano Developer Kit is configured to accept power via the Micro USB connector. Some Micro USB power supplies are designed in such a way to output slightly more than 5V to account for voltage loss across the cable. The critical point is that the Jetson Nano module requires a minimum of 4.75V to operate. It's recommended to use a power supply capable of delivering 5V at the J28 Micro-USB connector.
There are some other power supply options for Jetson Nano. If total load is expected to exceed 2A, e.g., due to peripherals attached to the carrier board or due to high performance computational tasks, you have to lock the J48 Power Select pins disable power supply via Micro USB and enable 5V-4A via the J25 power jack. Another option is to supply 5V-6A via the J41 expansion header (two 5V pins can be used to power the developer kit at 3A each). The Jetson Nano Developer Kit is equipped with a passive heatsink, to which a fan can be mounted.
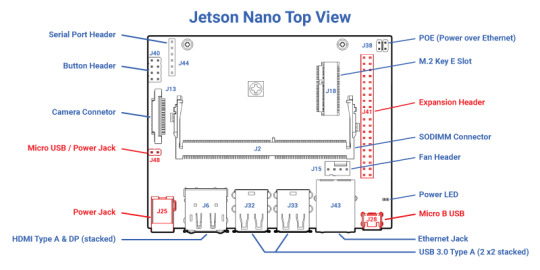
Fig.3. Top View of Jetson Nano Developer Kit
In general, total power usage comprised of carrier board, Jetson Nano module and peripherals. It is determined by particular use case. The carrier board consumes between 0.5W (at 2A) and 1.25W (at 4A) with no peripherals attached.
Jetson Nano module is designed to optimize power efficiency and it supports two software-defined power modes. The default mode provides a 10W power budget for the modules, and the other, a 5W budget. These power modes constrain the module to near their 10W or 5W budgets by capping the GPU and CPU frequencies and the number of online CPU cores.
Individual parts of the CORE power domain, such as video encode (NVENC) and video decode (NVDEC), are not covered by these budgets. This is a reason why power modes constrain Jetson Nano module to near a power budget, but not to the exact power budget. Your particular use case determines the module’s actual power consumption.
According to the performed tests with Fastvideo SDK, normal operation of Jetson Nano Developer Kit in 10W mode required more power than USB can offer (5V and 2A). USB-powered Jetson Nano can't work continuously under heavy workload on default clock (no jetson_clocks applied). It hanged up in 30-60 seconds after workload began. It seems to be due to power consumption by carrier board and other periphery devices. USB-powered Jetson Nano is working perfectly in 5W mode, but with less performance.
For Jetson Nano benchmark measurements was used external power supply with 5V and 4A. This is more than we could get from a standard Micro USB power adapter (5V and 2A), but it's necessary to get high performance. As we understand, one could get even better performance by supplying more power to Jetson Nano.
To manage the speed and the amount of power consumed on the NVIDIA Jetson Nano, we use nvpmodel -m0 and jetson_clocks to get maximum performance.
Jetson Nano Benchmark Performance for Camera Applications
For Jetson Nano we've done benchmarks for the following image processing kernels which are conventional for camera applications: white balance, demosaic, color correction, LUT, resize, gamma, jpeg / jpeg2000 / h.264 encoding, etc. It's not a full set of Fastvideo SDK features, but this is just an example of what we could get with Jetson Nano.
We've measured GPU kernel time for each image processing module to get understanding of how fast it could be done on Jetson Nano. This is the way to evaluate total time for the chosen set of modules from Fastvideo SDK. As soon as for some modules the performance depends on image content, you can request Fastvideo SDK for NVIDIA Jetson Nano (or for any othe NVIDIA GPU) for evaluation and to carry on with your own tesing.
CUDA initialization and GPU memory buffers allocations are not included in the benchmarks. Usually we do that just once, before the measurements, so it doesn't affect GPU performance.
For testing we've utilized 2K raw image (1920×1080, 8-bit) and 4K raw image (3840×2160, 8-bit), though all computations were carried out with 16-bit precision. Before JPEG compression we've converted 16-bit data to 8-bit per channel to comply with JPEG Standard. JPEG2000 compression benchmarks were measured for 24-bit images with 4:4:4 subsampling.
We've marked with gray color those rows in the Tables which are included in the simplest image processing pipeline of camera application for 2K and 4K resolutions. That pipeline consists of Host to Device Transfer, White Balance, HQLI Debayer, Color Correction, Gamma, JPEG compression, Device to Host Transfer. In the latest row of each Table we have shown the total GPU kernel time in ms, performance in MB/s and achieved FPS for the pipeline.
Table 1. Jetson Nano performance benchmarks for 2K raw image processing (1920×1080, 8-bit)
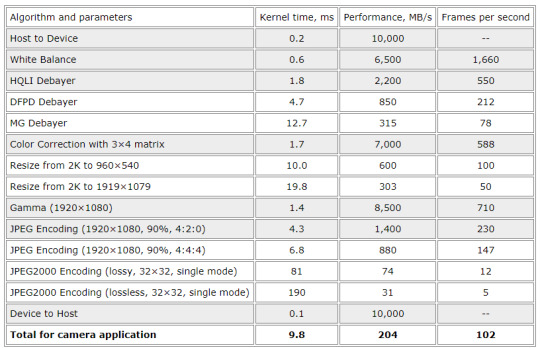
In real life camera application, there is a possibility to eliminate Host to Device copy by utilizing Jetson Zero-Copy. In that case, image from a camera is written via DMA directly to pinned buffer in system memory. Pinned buffer is accessible in both CPU and GPU. As other option, Device to Host copy could be hidden by overlapping of data transfer and computations in multi-thread application. Jetson Nano can do concurrent copy and kernel execution with 1 copy engine.
We can see that for the simplest image processing pipeline for 2K image on NVIDIA Jetson Nano we can reach 100 fps performance. If we utilize H.264 encoding via hardware-based NVENC (instead of Fastvideo CUDA-based Motion JPEG encoding) for the same pipeline, we could get 120 fps performance, which is the limitation of H.264 encoder (NVENC) for 2K resolution.
Table 2. Jetson Nano performance benchmarks for 4K raw image processing (3840×2160, 8-bit)
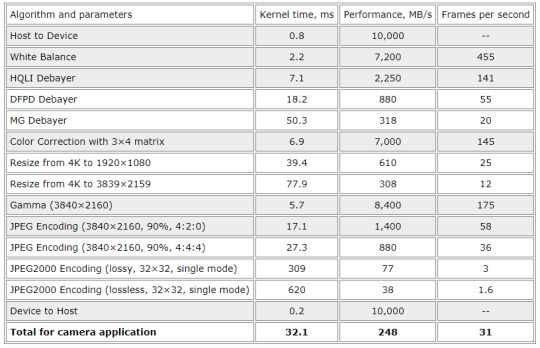
The same image processing pipeline for 4K RAW image on NVIDIA Jetson Nano could bring us the performance 30 fps. If we utilize H.264 encoding via hardware-based NVENC (instead of Fastvideo JPEG or MJPEG on GPU), we still get not more than 30 fps, which is the maximum for H.264 encoder (NVENC) for 4K resolution, but GPU occupancy in that case would be less.
We can see that Jetson Nano has sufficient performance for image processing in camera applications. For resolutions up to 4K we can get realtime performance to convert RAW to RGB with JPEG or H.264 compression.
Here we've published just a small part of Jetson Nano benchmarks that we've actually got with Fastvideo SDK. We would suggest to test that SDK with your image processing pipeline. You can send us your request to get evaluation version of Fastvideo Image Processing SDK for Jetson Nano, TK1, TX1, TX2 or AGX Xavier to carry out your testing for your images and your pipeline. Just fill the Contact Form below to get that SDK for your Jetson.
Other blog posts from Fastvideo about Jetson hardware and software
Jetson Image processing
Jetson Nano vs TX1 vs TX2 vs Xavier Benchmark Comparison
Jetson Zero Copy
Low latency H.264 streaming from Jetson TX2 to PC
Performance speedup for Jetson TX2 vs AGX Xavier
Remotely operated walking excavator on Jetson
Jetson AGX Xavier performance benchmarks
Original article see at: https://www.fastcompression.com/blog/jetson-nano-benchmarks-image-processing.htm
0 notes