#Free Sewing Pattern PDF
Explore tagged Tumblr posts
Visit Tumblr Blog
Explore Tumblr blogs with no restrictions, modern design and the best experience.
Last Seen Tumblr Blogs


Fun Fact
Celebrities use Tumblr as well.
Text
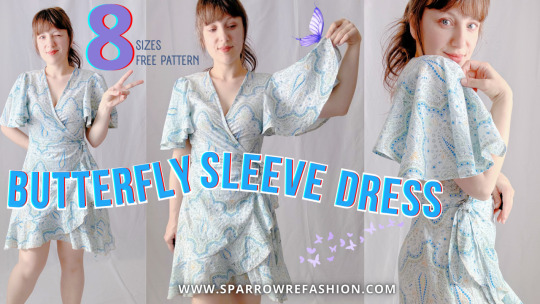
Butterfly Sleeve Dress Sewing: Free Sewing Pattern PDF &Video
In this post, you will learn how to create your stunning butterfly sleeve dress with free sewing pattern PDF in 8 sizes for beginners. Love what you see ? Support me by snagging some cool items from my shop! Every purchase helps me bring you more awesome content. Thank you! Shop Now Welcome to my latest sewing tutorial! Today, I’m going to create a beautiful butterfly sleeve dress that’s…
View On WordPress
#butterfly sleeve#butterfly sleeve dress#flounce hem#flounce hem dress#free sewing pattern for beginners#Free Sewing Pattern PDF#midi wrap dress#sewing for beginners#sewing tutorial#v neck midi dress
7 notes
·
View notes
Text
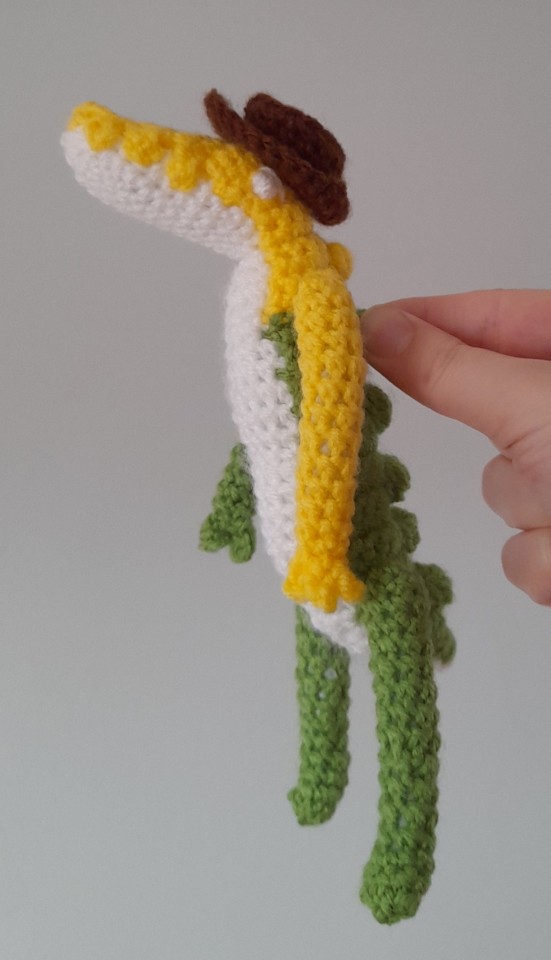
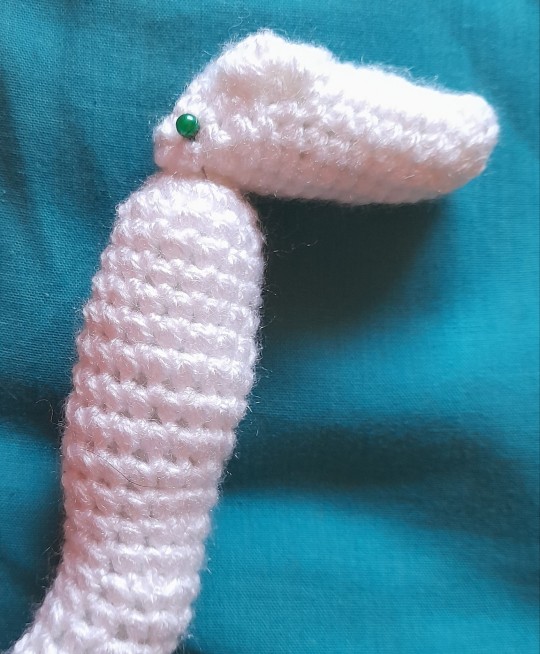
FREE TO DOWNLOAD MINI SPAMTON SEWING PATTERN PDF
Behold! a free pdf for your very own, self-inflicted salesman infestation! Estimated to have taken a grand total of 9 hours of work

support me just by sharing my work!
some sewing progress pictures and notes to help you along under the cut:


sewing the face together first is probably the best bet
safety eyes take up lots of space
hair was easy enough to sew on but the side panels are tricky.... USE PINS


connect siding edges before sewing back of the head on and then flip right side out!


stuff body and head separately use a chop stick or a wooden skewer (THE BLUNT END PLEASE BE SAFE) to stuff the nose use an invisible ladder stitch to attach head to body make sure to wash your new computer virus to stress test it's seams and prep the fabric for any dyes, paints or other such cosmetics you'll be giving your new Zip Bomb
corners on this pattern are not very sharp, you can add additional seams to better shape the head.
arms are a little short! if you want to use premade 10cm doll clothes try adding a little extra length to the arms, legs are fine
i sourced the plastic safety eyes from here: https://www.etsy.com/listing/1846283517/ready-to-ship-pastels-handpainted-safety?ref=share_ios_native_control theyre a size 14mm
I sourced the premade 10cm doll clothes from here: https://www.amazon.com/dp/B0D6LFFTB3?ref_=ppx_hzod_image_dt_b_fed_asin_title_0_0&th=1
I suggest a tool to help comfortably apply safety eyes but its not required! (I don't own a tool and just used my body weight to snap the backs on)
I used red eye shadow for the blush marks
#deltarune chapter 2#art#spamton fanart#spamton neo#deltarune spamton#sneo#spamton deltarune#deltarune#spamton#spamton g spamton#spamplush#spam plush#spamton plush#spamton plushie#fangamer plush#sewing project#free pdf#sewing pdf#sewing pattern#sewing patterns#sewing#crafting#hand sewing#stuffed animals#miniton#heal deal
85 notes
·
View notes
Text
Open Source Trans Masculine Clothing Tech Packs
no idea if this interests anyone but Both& Apparel has made most of (if not all) their tech packs free/open source. The company is shutting down but, their clothes where designed with the intent of fitting trans masc bodies. The sizes range from XS-4XL. So any trans masculine folks handy with a sewing machine or with interest in fashion now is the time!
I have no idea how to sew nor do I really know how to read tech packs but I'm definitely now intrigued!
#you literally just download a pdf for free#super easy#my words#sewing#textile art#tech packs#sewing patterns#trans masc#I'm tagging this a lot bc I feel like this is important!#both& apparel#save tag
13 notes
·
View notes
Text

Tilda Flower Wreath Quilt Yellow - Free Pattern https://www.lovecrafts.com/en-us/p/tilda-flower-wreath-quilt-yellow-downloadable-pdf
#crafts#gifts#decor#sewing#quilting#briar rose quilts#bedding#shopping#quilters of tumblr#tilda#flower#wreath#quilt#yellow#free pattern#love crafts#pdf#free quilt pattern#quilt block#block pattern#tilda quilt pattern#flower wreath pattern
4 notes
·
View notes
Text
No-Sew Crochet Rainbow: Quick and Easy Crochet Plushie
Introducing the cuddly crochet rainbow – a delightful, hanmade plushie perfect for cuddling! Crafted from ultra-soft, colorful yarn, this cheerful rainbow is designed to bring joy to little ones and brighten any occasion. Its vibant arc features a soft and smooth gradient of colors and whimsy. This cuddly toy is perfect as a gift or to sell at your next market. Gently, cozy, and bursting with…
#beginner crochet#crochet#crochet cloud#crochet pdf pattern#crochet plushie#crochet-pattern#easy crochet#free crochet pattern#free crochet patterns#free crochet pdf#free-pattern#No-Sew Crochet#patterns#yarn
1 note
·
View note
Note
Hello! Just wanted to say that your art is so beautiful, I was just feeling quite stressed and just looking at your recent post made me calm down so quickly. Thank you for making beautiful things, it is very inspiring. Do you ever plan to make merchandise in the future? I also like to sew, so I thought is there any chance you would adapt your art as a cross stitch pattern to sell? Regardless, hope you have a wonderful day and thanks
Hey there! I always love making pieces that people can take comfort in, the same way that I do whenever I see the inspirations from it.

And speaking of cross stitch.. I have tons of patterns for free on my Ko-Fi! These are my contributions to the cross stitch community for their never-ending piles of PDFs of patterns. Here are some photos of the finished pieces people have sent me!
Free Cross-Stitch Patterns on my Ko-Fi! 🔥🔥
162 notes
·
View notes
Text


AI and PDF Crochet Patterns
AI generated images can be great for inspiring projects, but most of the time it's used online to generate revenue for scammers and the like.
Just scrolling through Etsy rn looking for crochet patterns, I've come across several listings (some with false 5 star reviews to boost engagement/trust) where the patterns and images are clearly AI generated and people, unfortunately, have fallen for the listings.
Some of the images might look totally obvious to you, but to the untrained eye they can be convincing.
SOOO, how do you spot AI crochet patterns?
Look at the stitches. Are there pieces that don't seem to stitch into one another? Are the lengths and sizes inconsistent? Some are more obvious than others, but AI fails to replicate consistent textures.
Lighting and saturation. AI images often are vibrant and cartoon-ish. Especially the eyes of projects - usually this is a pretty good giveaway. Additionally, is the image smooth? What's in the background? Does it make sense?
Limited photos on listing. Most legitimate shops are going to have multiple photos of the finished project on the listing - AI is fairly advanced, but not the best at recreating exact images. Does the listing only have one photo? Does it have multiple but with variants between projects (that are meant to be the same)? Are there any videos?
Is it even possible? This can be tricky if you are new to crochet, but as above, take a moment to look at the stitches and the overall shape of the project. Does it look plausable? Especially if they projects say 'no sew'. Additionally, if you have already purchased the pattern - does it tell you how much material you need, and does it make sense? Does it tell you crochet hook size?
Legit photo but AI generated pattern. Sometimes the images are real - but they've been stolen from another creators account and the scam shop has simply asked AI (such as ChatGPT) to write up a crochet pattern. These are less obvious at a glance, but most reputable shops will have social media, consistent themes of crochet projects and reviews with pictures of finished products uploaded by customers.
6. Ok, but what if they use AI but the reviews seem legit? Crochet Baby Duck - this is an AI generated picture and pattern, and while the shop has posted several pictures of the finished project it is clear that it does not match up with the AI generated duck pictured in the listing. The hat, feet, and bill are all different sizes and this is even noted in some of the customer reviews. While this isn't as scammy as straight up using AI generated images/patterns without showing how the finished project looks - it is still taking away from legitimate pattern makers. Being able to design and execute good patterns is a skill, and the prices of legitimate patterns often reflect this. Why does the shop even use AI pictures if they post the real life projects anyway? Cus it drives traffic, and lets be real - the real life plush dolls look no where near as good as the AI images.
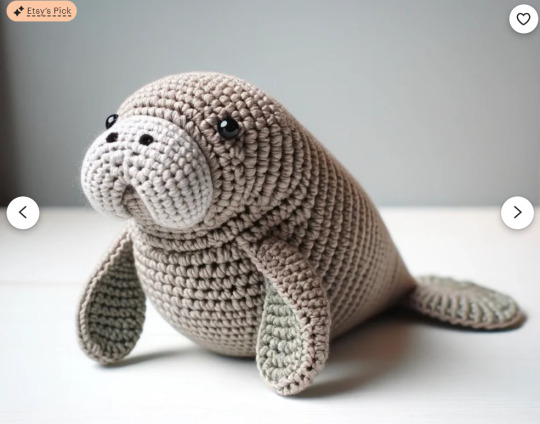
This is the same as the walrus - AI generated image and pattern, this is even endoresed by Etsy so you cannot rely on 'Etsy picks' being legitimate as they choose profits over morals.
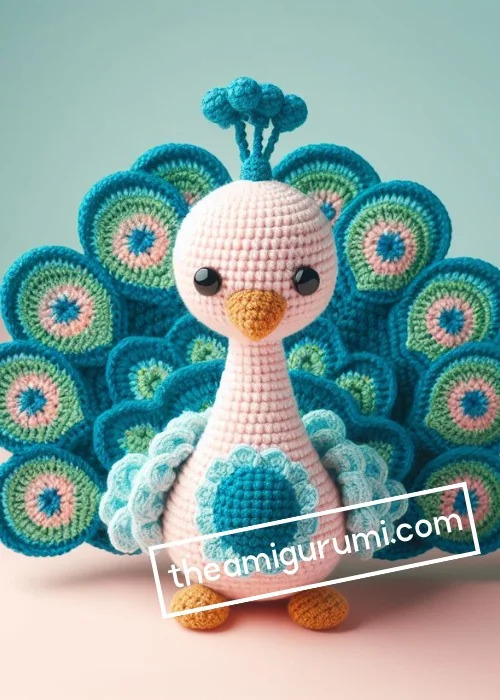
These patterns are not just limited to Etsy, they are often on Pinterest or websites for 'free' to generate traffic and collect data (asking for your e-mail for the free pattern). Such as this Peacock Crochet IRL figure by u/Echo-o_0 on Reddit.
This is not just limited to crochet, I've seen it in sewing, knitting, and any other PDF downloads that you can purchase or get for free. Unfortunately, it is a simple way for people to make a quick but and face little to no consequences as their store *might* get deleted and even then, they can just start a new one up.
487 notes
·
View notes
Text
Great news! After a ton of work, I've got my business's 2024 Kickstarter up and running! It's live now until Sunday, November 17.
I have a lot of projects underway that this project will help me see to fruition, including:
Embroidery/historical costume kits with good materials and accessible instructions
A digital sewing pattern for what can be a partlet, if you're feeling nerdy, or a way to bring damn cool sleeves to whatever outfit you want if we're being modern about it
A system of patterns and stencils that bring intricate freehand Elizabethan embroidery down from (imo) terrifying complexity to an accessible art project
And/yet/also, I know myself. I am a bit of an ADHD chaos goblin with chronic pain. So I've learned from Kickstarters past, and made sure to center the campaign around rewards that I can be certain of delivering. That is, this campaign absolutely will include vouchers for free or discounted copies of those projects if they're funded and they happen! But I know they will take time and definitely not arrive by Christmas 2024.
Therefore: I've been designing a bunch of new items that I can be sure of! I wanted to be able to show off my embroidery patterns in new and interesting ways, and find different methods of fulfillment that are ready to roll out the moment the campaign ends and I get your shipping information.
If you've ever wanted to get all the unique patterns I design for my Etsy shop in a charted PDF format? Backing my Kickstarter is the way you get that.
Some of my most popular designs will be available as decorative stickers, paper bullet journal-style productivity stickers, and a mug!


There are a lot of others, and I'll probably detail more about them over the next week and a half, but it's past 4am so I'll keep this relatively short. The outlines are up on the Kickstarter. Here's the one I'm the most excited about:
Motherfucking CUSTOM-WOVEN throw blankets!

I made the design myself, as the intersection of my obsessions with medieval celestial ceilings, sacred geometry, marine navigation, Tolkienian Elvish heraldry, and quilting. It's called "Mariner's Star", and I'm incredibly excited about it. If you don't know about jacquard looms and how they were 19th century punch card proto-computers, I think you're missing out.
Kickstarter link here!
It ends Sunday, Nov 17!
#haberdashery#2024 kickstarter#costuming#embroidery#historical costuming#cottagecore#blackwork embroidery#embroidery for beginners#visible mending#diy
270 notes
·
View notes
Text


the last 2 dragons i made :) the bee one is for a friend and i’m keeping the sea dragon because he’s just too cute
i made this sewing pattern myself so once i work the issues out, i’ll make a PDF and some instructions so people can try it themselves for free!! just lmk if that interests you because i work a lot faster when im motivated by other people haha
129 notes
·
View notes
Text
Gummigoo free crochet pattern
FREE pattern at my Ravelry link and under the cut! Pattern includes photo references.
My boy is done! I started making myself a Gummigoo right after seeing episode 2 of The Amazing Digital Circus. While I was making it I realised that you guys might want one too. This doll and this pattern weren't nearly as tough to make as I thought they would be, and I really enjoyed making them.
PDF now edited to remove typo and add another couple of photos.
Pattern and photos under cut!
You need:
(less than) 50g/150m of the following colours of yarn: white, yellow, green, brown
3.5mm hook
Stuffing
Pins
Scissors
Special stitches used:
Picot: chain 3, then slip stitch into the back loop of the first chain.
Bobble: Yarn over. Pull up a loop, yarn over and pull through two, do 4 more times until you have 6 loops on the hook. Yarn over and pull through all six. Pull stitch a little tight.
Triple bobble (regular bobble stitch but twice as tall): Yarn over twice. Pull up a loop, yarn over and pull through two, yarn over and pull through two again, do 4 more times until you have 6 loops on the hook. Yarn over and pull through all six. Pull stitch a little tight.
Double decrease (a decrease over 3 stitches): Pull up a loop through each of 3 stitches, yarn over and pull through all three.
HEAD (white)
1. 6sc into a magic ring [6]
2. 6 inc [12]
3. sc around [12]
4. 2sc, 2 dec, 6sc [10]
5. 2sc, 2inc, 6sc [12]
6-8. sc around (3 rounds) [12]
9. (2sc, inc) x2, 6sc [14]
See special stitches for how to do a bobble stitch -- it's five double crochets to create one stitch.
10. 4sc, bobble stitch, 2sc, bobble stitch, 6sc [14]
11. 4sc, bobble stitch, 2sc, bobble stitch, 6sc [14]
12. 1sc, dec, 6sc, dec, 3sc [12]
13. (2sc, dec) x3 [9]
Stuff.
14. 1sc, dec) x3 [6]
Cut a tail long enough to sew with. Thread the yarn through the front loops of each remaining stitch and pull to cinch the hole shut. Leave the tail out until needed for sewing.
BODY (white)
1. 6sc into a magic ring
2. 6 inc [12]
3. (5sc, inc) x2 [14]
4-5. sc around (2 rounds) [14]
6. (6sc, inc) x2 [16]
7. (7sc, inc) x2 [18]
8-10. sc around (3 rounds) [18]
Stuff as you go. It's hard to stuff long pieces at last minute.
11. (7sc, dec) x2 [16]
12. sc around [16]
13. (6sc, dec) x2 [14]
14. sc around [14]
15. (5sc, dec) x2 [12]
16. sc around [16]
17. (5sc, inc) x2 [14]
18. sc around [14]
19. 1sc, 4dec, 1sc, 4inc [14]
20. 1sc, 4hdc, 9sc [14]
21. 1sc, 4hdc, 9sc [14]
22. 1sc, 2dec, 9sc [12]
23. 4hdc, 8sc [12]
24. 2dec, 8sc [10]
25. Dec, 8sc [9]
Finish stuffing.
26. (1sc, dec) x3 [6]
Cut the yarn, cinch the hole shit and hide the end.
Connect the head to the body at the very back of the bottom of the head. It should face forwards levelly with the torso erect (90°). The head and neck should connect smoothly at the back to the body.
OVERLAY (yellow and green)
Start in yellow.
1. 6sc into a magic ring [6]
2. 2sc, inc, 2sc. Leave last stitch unworked. Picot (chain 3 and slip stitch into the back loop of the first chain) and turn. [6]
3. 6sc. Picot and turn. [6]
4. 4sc, inc. Leave last stitch unworked. Picot and turn. [6]
5. 4sc, inc. Leave last stitch unworked. Picot and turn. [6]
6. 2sc, inc, 1sc, inc. Leave last stitch unworked. Picot and turn. [7]
7. 3sc, inc, 1sc, inc. Leave last stitch unworked. Picot and turn. [8]
8. 3sc, inc, 2sc, inc. Leave last stitch unworked. Chain (not picot!) and turn. [9]
9. 4sc, inc, 2sc, inc. Leave last stitch unworked. Chain and turn. [10]
10. 4sc, inc, 4sc, inc. Chain and turn. [12]
11. 10sc, dec. Chain and turn. [11]
12. 9sc, dec. Chain and turn. [10]
13. 4sc, dec, 4sc. Chain and turn. [9]
14. 9sc. Chain and turn. [9]
15. 9sc. Chain and turn. [9]
The next row will start colour changing to green. Always hide yarn on the wrong side of the work. There will also be a triple bobble (same as a bobble stitch but with triples -- see special stitches).
Bobbles aren't exactly sharp, but neither are gummy spikes tbh.
16. (Right side is facing you, hide yarn at back:) Inc, 3sc, triple bobble stitch, 2sc, change to green, sc, inc. Chain and turn. [11]
Careful not to skip stitches. Bobbles like to squish the stitches at the side of them and this makes them easy to skip while you're crocheting.
17. (Wrong side is facing you, hide yarn at front:) Inc, 5sc, change to yellow, 4sc, inc. Chain and turn. [13]
18. 3sc, change to green, 10sc. Chain and turn. [13]
13sc in green. Chain and turn. [13]
There will be no more yellow stitches. Leave enough yellow tail to stitch the yellow part on and cut the yarn.
19. 6sc, triple bobble, 6sc. Chain and turn. [13]
Again, careful not to skip stitches around bobbles. Count the stitches at the end of the row following a bobble.
20-22. 13sc (3 rows) [13]
23. 6sc, triple bobble, 6sc. Chain and turn. [13]
24-26. 13sc (3 rows) [13]
27. 6sc, triple bobble, 6sc. Chain and turn. [13]
28-30. 13sc (3 rows) [13]
31. Dec, 4sc, triple bobble, 4sc, dec. Chain and turn. [11]
32-34. 11sc (3 rows) [11]
35. Dec, 3sc, triple bobble, 3sc, dec. Chain and turn. [9]
36. Dec, 5sc, dec. Chain and turn. [7]
37. Dec, 3sc, dec. Chain and turn. [5]
38. Dec, 1sc, dec. Chain and turn. [3]
39. Double decrease (decrease over 3 stitches). Chain 1.
Pull enough yarn through the chain to stitch the green parts down and cut the yarn.
Pin the overlay in place. It should go from just over the tip of the snout to the very tip of the tail, and should fit snuggly and symmetrically. Remember to shape the angles -- the snout should face forwards, the tail should face backwards, the torso should be upright.
Pin the teeth individually if you have enough pins. This ensures the spaces between are visible when connected. The teeth may be uneven/asymmetrical on opposite sides of the mouth due to the way the picots stagger, but just make sure they're pinned and sewn okay and they'll look even.
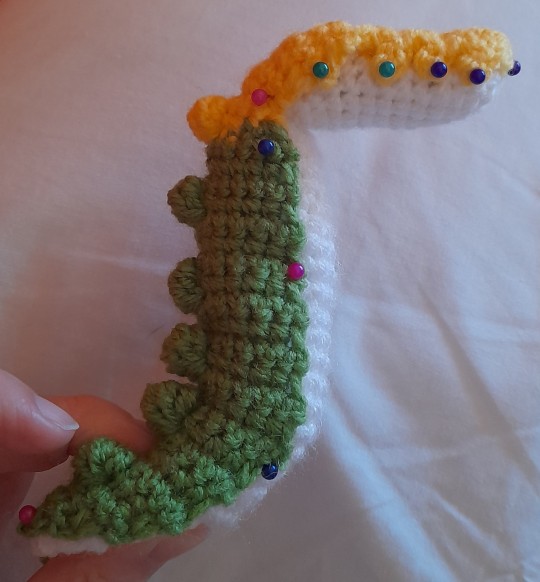
Note the shape -- it'll need to be bent like this when you fit the overlay on or it'll scrunch when bent later.
Sew! You don't have to go into every row, sewing every other stitch of the body should connect it okay with no glaring gaps. Make sure to sew with the correct colour of yarn tail.
Embroider on a couple of white eyes underneath the eyebrow ridges, with small eyebrows in white.
The eyes are embroidered on with an eyebrow each.
ARMS (one yellow, one green)
Start with a magic ring and leave enough of a tail to attach the end. Leave this end hanging outside the arm.
1. 7sc into a magic ring [7]
2-6. sc around (5 rounds) [7]
7. 2sc, dec, 3sc [6]
8-14. sc around (7 rounds) [6]
Stuff.
15. sc, (picot, sc in the next stitch) x4, slip stitch into the last stitch. Cut the yarn and cinch the palm shut, not too tightly. Hide the end inside.
The green arm is sewn on the higher-green shoulder and the yellow arm on the yellower side. Make sure the biggest finger gap is facing inwards to the body, this is like the wrist.
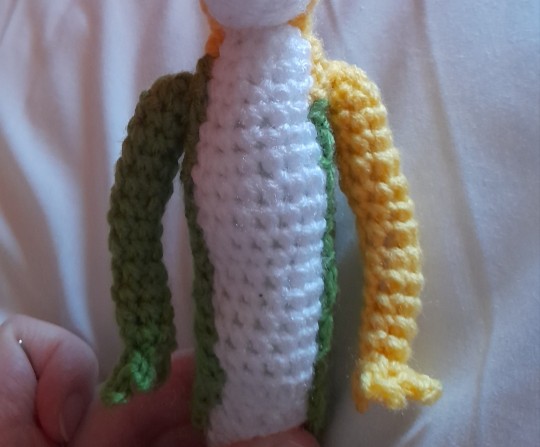
Leave a gap for the neck and match the arms to the shoulders. You'll find that the arms and fingers are a little bit posable.
LEGS (x2 in green)
Start with a magic ring and leave enough of a tail to attach the end. Leave this end hanging outside the leg.
1. 7sc into a magic ring [7]
2-9. sc around (8 rounds) [7]
10. 2sc, dec, 3sc [6]
11-13. sc around (3 rounds) [6]
14. 4inc, 2sc [10]
15. dec, 4sc, 2dec [7]
Stuff.
Cut yarn and cinch hole shut.
The legs should be connected at the hips with the legs pointing straight down and should connect closely at the top of the leg to make the hips look smoothly attached.
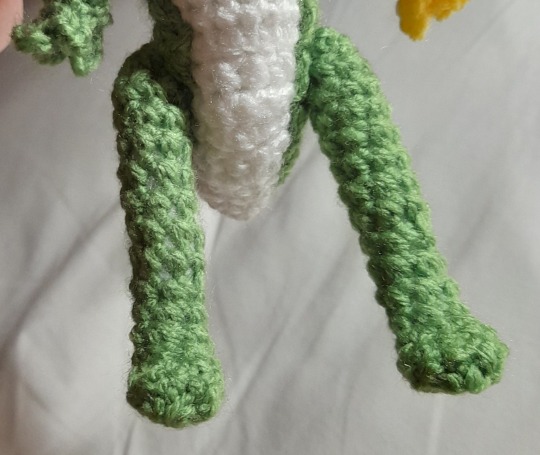
The hips are not at the lowest point of the body, they're where the lower curve begins to happen when the torso is straight upright and the tail points backwards.
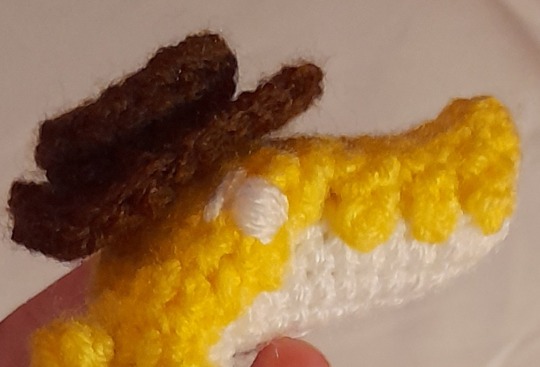
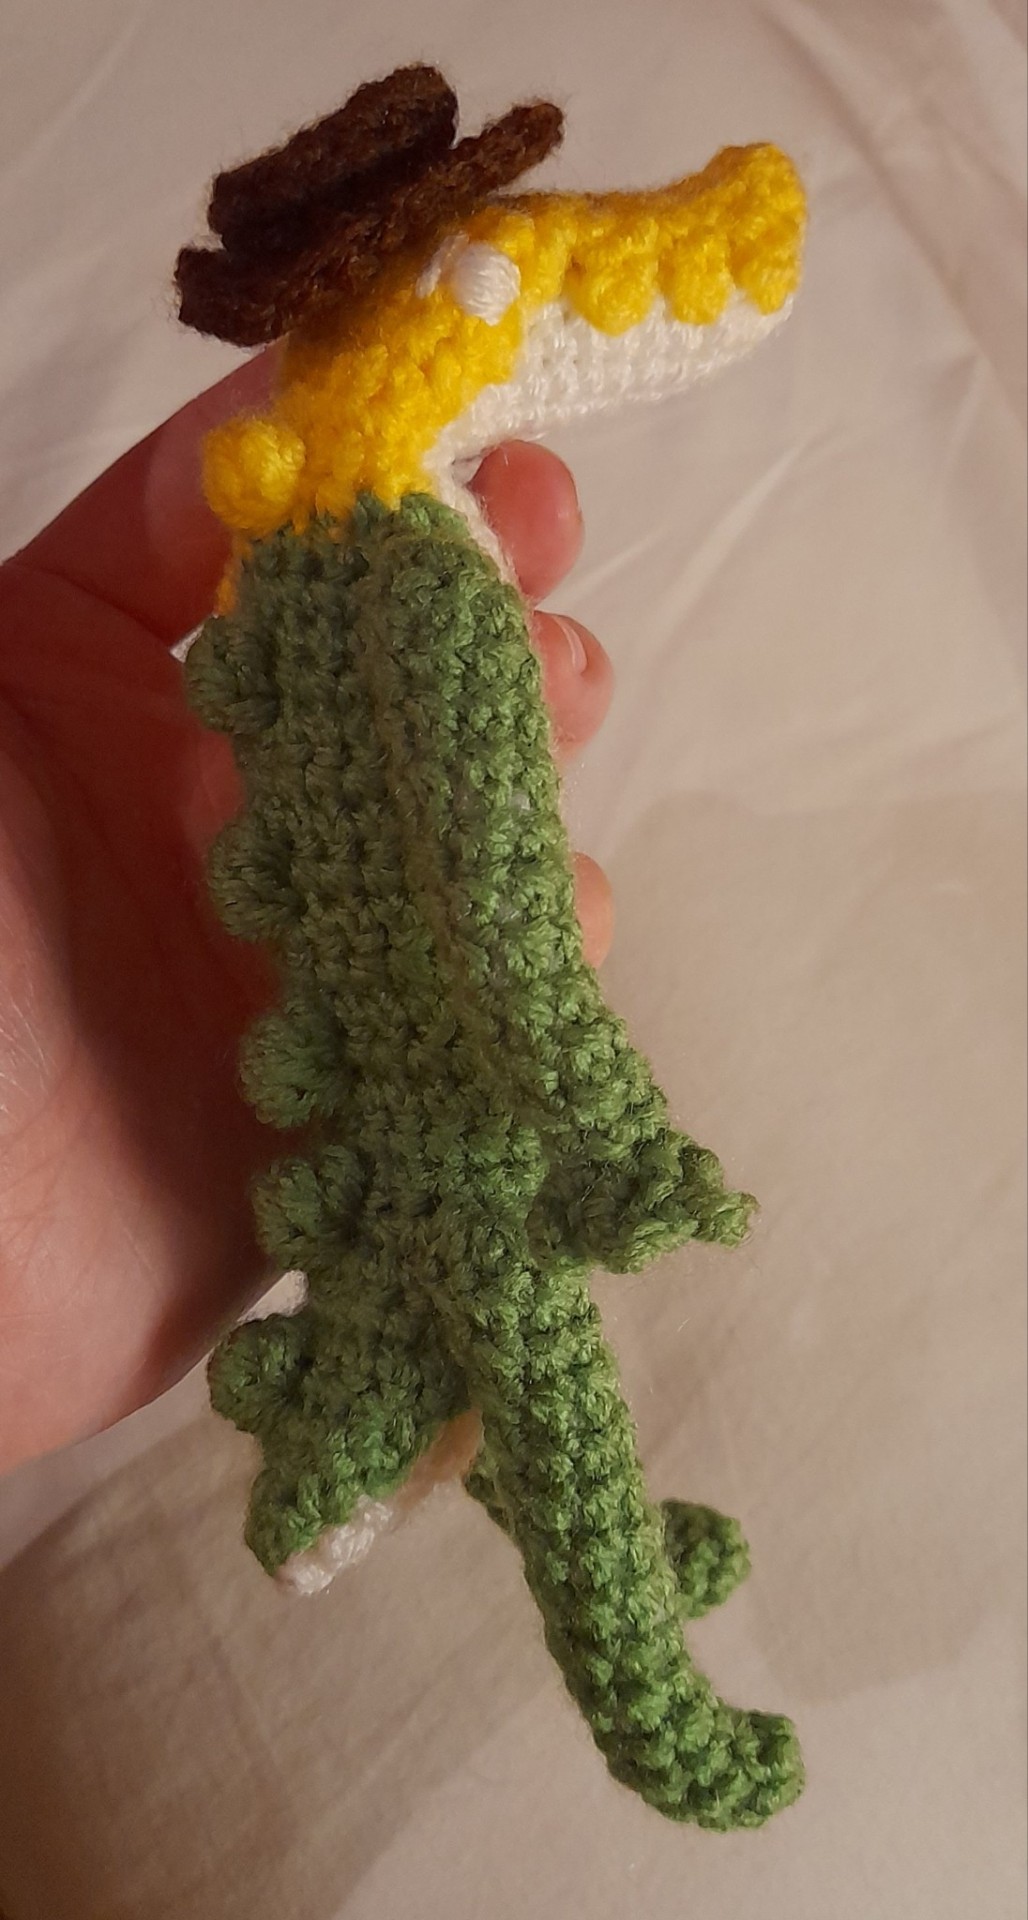
HAT (brown)
1. 8sc into a magic ring [8]
2. (2sc, 2inc) x2 [12]
3. 3sc, 2inc, 4sc, 2inc, 1sc [16]
4. In the back loops only, 4sc, dec, 6sc, dec, 2sc [14]
5-6. In both loops, 14sc (2 rounds) [14]
7. In the front loops only, (1sc, inc) x7 [21]
8. In both loops, 5sc, hdc, 2dc in 1, 2dc in 1, hdc, 7sc, hdc, 2hdc in 1, hdc, 2sc [24]
Slip stitch and finish off.
The wider part of the brim with the dcs is the front of the hat. Attach the hat by either tying a string under the chin, or by sewing a couple of inner rim stitches to the head to keep it in place.
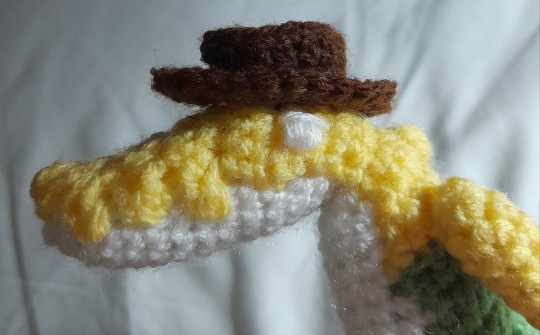
Sewn in place by two stitches at opposite sides of the inner edge. Yeehaw.
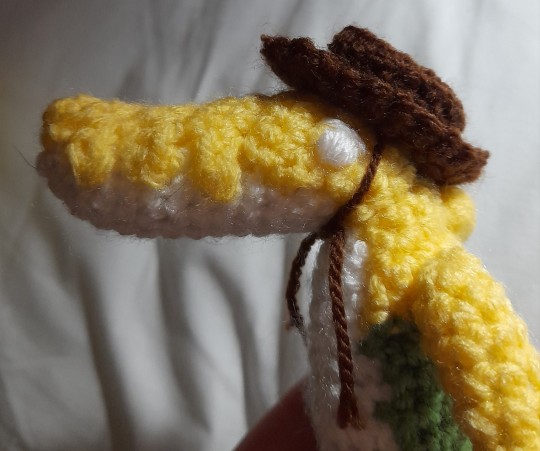
Hat connected by its straps: non-canonical but cute.
And that's it! Gummigoo is done.
I love my lil guy. Hope nothing bad happens to him when I show my friend Caine
#crochet#free crochet pattern#amigurumi#gummigoo#tadc#the amazing digital circus#gumigoo#gummygoo#tadc episode 2#tadc ep 2#tadc gummigoo
171 notes
·
View notes
Text

I’ve never had a tamagotchi. To be honest, it probably would’ve stressed me out trying to keep one alive. But by god the designs are a vibe.
Kuchipatchi is my favorite so I made him into a plushie. I promise this fabric is pale green in person. It doesn’t photograph well. But he has beans in his bottom and I can’t stop squeezing him, so that’s a success.
I want to make the sewing pattern and instructions available for free, but I’m not sure what the best site is for that. It’s a pdf. Any recs?
176 notes
·
View notes
Text
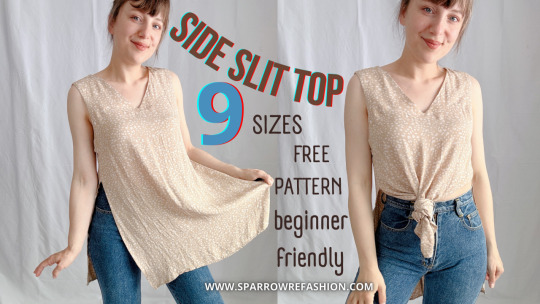
Side Slit Top- Easy Sewing for Beginners with Free Pattern
In this post, you will learn how to sew side slit top with free sewing pattern pdf in 9 sizes. Love what you see ? Support me by snagging some cool items from my shop! Every purchase helps me bring you more awesome content. Thank you! Shop Now Are you ready to elevate your sewing skills with a chic and versatile addition to your wardrobe? In this beginner-friendly tutorial, I’ll show you how to…
View On WordPress
#Free Sewing Pattern PDF#Free Sewing Patterns for Beginners#How to Sew#Long Tunic Top with Side Slits#Maxi Top with Side Slits#Polka Dot Sleeveless Blouse#Side Slit Maxi Top#Side Slit Top#Side Slit Top Outfit
7 notes
·
View notes
Text
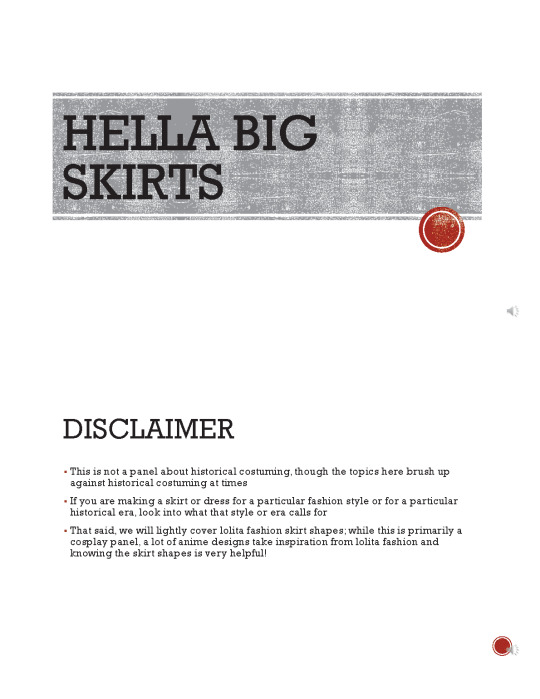
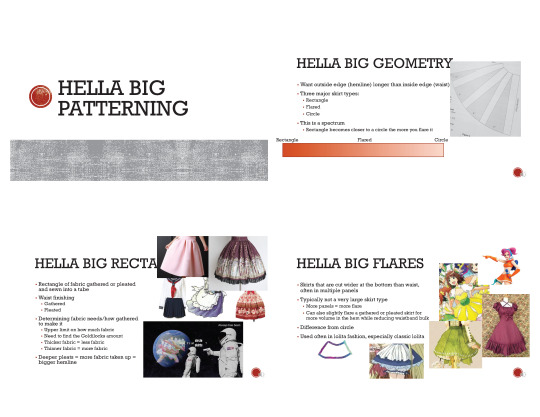
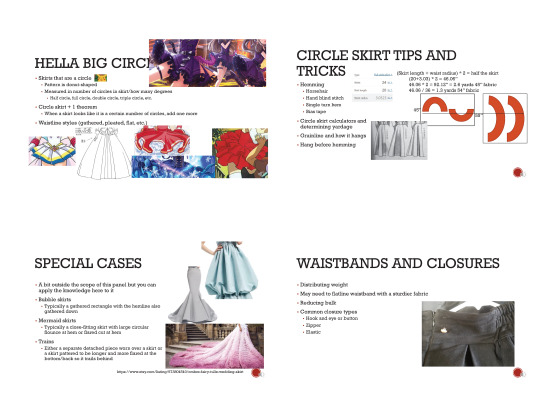
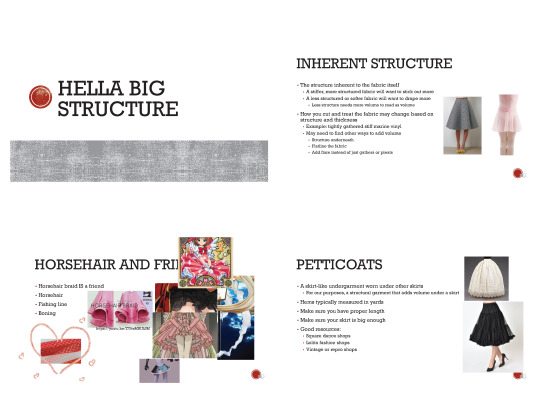

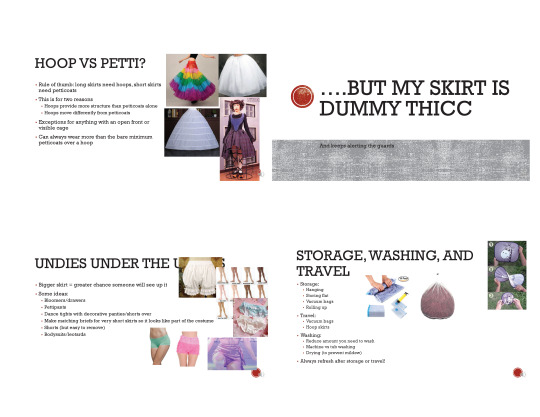

Hella Big Skirts panel
Ever wanted to make a hella skirt? Wondering how to keep your hella big skirt puffy? Join cosplayer fabrickind to learn the ins and outs of patterning, sewing, and supporting the large, fluffy skirts of your dreams!
This is just the bare bones of the panel, as many of the examples were elaborated on in-person, and it is just the slides, not any of my notes. It is not meant to be exhaustive or definitive, and is just meant for general advice and suggestion purposes only. If anyone has feedback they would like to give, feel free to do so. That said, I hope that people find this information useful.
Here is a link to a pdf of the presentation. You may download for personal use, but please do not alter the presentation, repost without permission, or do any sort of other unauthorized use. (If you have a question about how you can use this presentation, please send me a message with your question and we can work it out. I promise I’m not scary. ;]) Feel free to reblog this post as much as you want, though. I do these panels and post them because I want the information to be shared.
I hope someone finds this helpful! :]
#cosplay#cosplay help#cosplay advice#cosplay tutorials#cosplay tips#cosplay tip#skirts#hella big skirts#cosplay panel#cosplay panels#sewing#sewing skirts
496 notes
·
View notes
Text
List of websites with free sewing patterns!!
Usually is difficult to find free sewing patterns that aren't like super basic so here's a list of some stuff I found, hope it's helpful.
http://www.tudorlinks.com/treasury/freepatterns/index.html#Victorian
"otome no sewing book" patters are at the end of the pdf btw
Also, I might share my own patterns at some point in the future
26 notes
·
View notes
Text


SUCCESS!! Now that I've tested out my own pattern draft I can safely say that it was pretty easy to follow. (I still loathe minky fabric though)
I'll be uploading the PDF for the sewing pattern later tonight on my Ko-fi account as a free download with optional pay, I'll put the link on this profile ofc
I'll make a separate post with some progress photos and tips and a few slip ups I encountered whilst sewing so that everyone can be better prepared than me when using the pattern!!
(Clothes, eyes, and blush marks not included with the pattern download, customization is up to the individual creator, safety eye size used: 15mm)
#spamton#deltarune#spamton g spamton#spamton deltarune#deltarune chapter 2#art#spamton fanart#deltarune spamton#spam plush#spamton plush#spamton plushie#sewing#art project#10cm doll
24 notes
·
View notes
Text
I CAN'T SEE THE END OF THE HORIZON
HATSUNE MIKU IS THAT YOU?

Finally finished my biggest crochet project yet! Here she is (with a leek too, of course)


Pattern and extra info under the cut:
Pattern/Tutorial: Hatsune Miku Quick Rundown Crochet Tutorial!
The tutorial requires downloading a pdf pattern from Ravelry for the doll body (it's free and the link is in the video description), but the pattern for the bangs pieces is not free so I freehanded those. The microphone/headphones, 01 symbol, leek, and gun were all freehanded by me with no pattern.
The person in the video uses glue to attach many of the pieces, but I was able to just sew them all on, so glue isn't required. Just leave longer ends so the pieces can't easily be pulled off.
Materials: 4mm crochet hook, plastic needle, scissors, yarn (colors: turquoise, black, white, light tan, hot pink, yellow, red, light green, gray, 10mm safety eyes
25 notes
·
View notes