#Free recording software windows 10
Explore tagged Tumblr posts
Visit Tumblr Blog
Explore Tumblr blogs with no restrictions, modern design and the best experience.
Last Seen Tumblr Blogs


Fun Fact
Women make up for the other 50% of Tumblr’s audience.
Text
Yo, Welcome to my photography blog!
This is a photography project with a focus on older digital cameras sold before the mid 2000s. I've been working with these sorts of cameras since 2022, which grew from my interest in retro computers that I have had since 2020 or so. Here, I'll introduce you to my cameras, my computer rig, and try to convince you that this is a cool hobby.
General Q & A:
Whats in the name? - Kb refers to Kilobyte, all of the photos I take with these cameras only take up a little over 100 Kilobytes of digital storage per photo. FD refers to the physical media the photos are stored in, currently one camera uses floppy disks (FD), the other two use compact flash (CF) and smart media (SM) cards. unfortunately, their shortened forms do not rhyme and so they do not matter.
What can I expect from this blog? - amateur photography using old cameras, I guess. I'll say some nonsense below each photo but you're free to ignore it. I don't plan on reblogging anything here, so don't expect that. I am the star of this blog. me me me. I tend towards finding weird buildings/architecture, "liminal spaces", sunsets, and generally trying to see how well I can make a photo look like a blender render in a Kane pixels video. don't expect any consistency, though. the medium will remain the same but the vibes will absolutely fluctuate with my mood. I'll try and tag things correctly if it's off putting.
Are you a cool person? - I tend to be! I don't want this place to be alienating for anybody but assholes who don't deserve to see the stuff I do. being a tumblr blog, I follow a lot of the standard stuff. jerks are not welcome and I'm not gonna give you the pleasure of an argument if you do turn your head round these parts.
who are you? - trans pan girl. takes pictures. listens to Femtanyl. much unlike Peter Parker.
My Cameras
Mavica FD-7

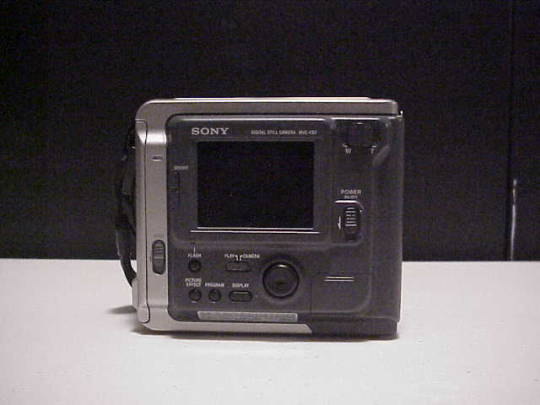
released in 1997, this was the second of Sony's "Digital Mavica" line of cameras. it records photos of around 50Kbs in size to a standard 3 1/2" floppy disk. it has some standard features like a manual focus wheel, 10x optical zoom, and exposure control. I haven't found a strict source but I believe this camera is less than one megapixel. I actually have a few different Mavica cameras (a fd-71/75/83/85/87 and a cd-1000) but they aren't different from the fd-7 enough to justify being used often. I'll make note on individual posts if I use 'em at all.
Kodak DC220

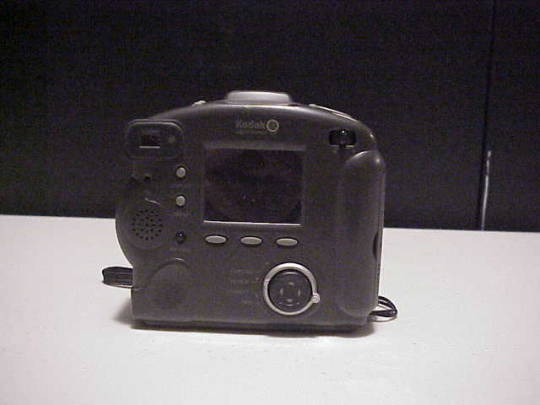
released in 1999, with a quality of exactly one megapixel the DC 220 is a weird little thing. it has custom software, connects to a computer via com ports with a transfer speed of ~11,000 bit/s. (roughly 30-60 seconds per photo in my experience) you can add custom text to your photos in the cameras built in software, and attach custom audio to each photo. it is a pain in the butt to get working, but it's quirks make it worth the frustration.
Olympus E-10
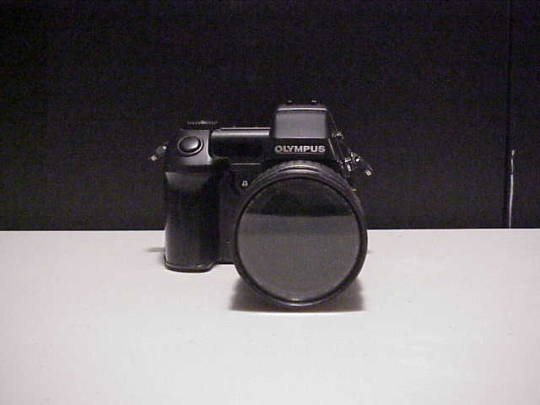
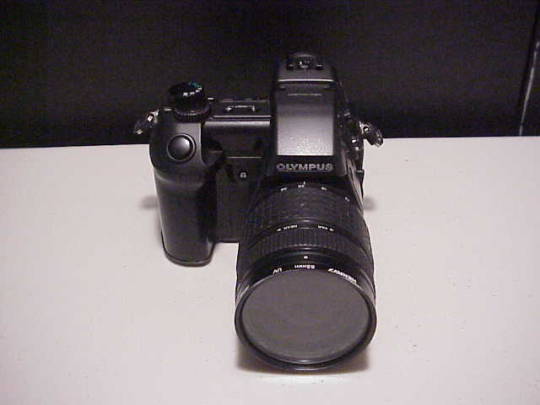

made in 2000 with a quality of a whopping four megapixels, the Olympus E-10 is the newest addition to my collection, and possibly the nicest camera I'll ever own. it's a fixed lens DSLR camera capable of 4x zoom, you can easily adjust the aperture and exposure on the fly, it's photos tend to be a whole 100kb in size (1/10th of a megabyte!) and to be entirely honest I have no idea how to use it. but I will eventually!
My Computer
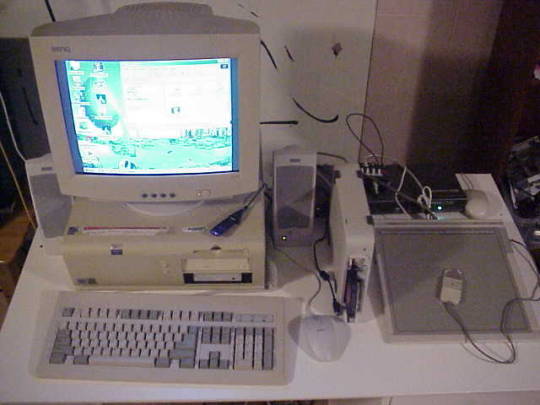
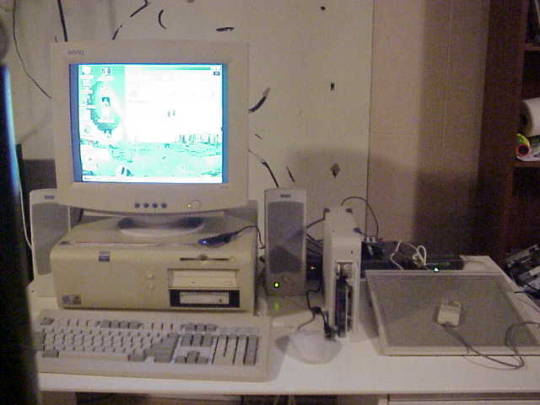

I try to use all era-appropriate tech to transfer photos and do any edits, this is the computer I do all that processing on! its a Dell Optiplex gx1- the daddy of pretty much any computer used in public schools (Chromebooks don't count) It's got a Pentium 3 CPU clocking at 500MHz, 512mb ram, running windows ME. it has all the original Kodak DC220 software installed, and I can't really access the Kodak's photos any other way. I've also got a few other weird bits attached to it -an HP sketch pro cad tablet and an external data cartridge SCSI device. both work, but I don't really bother to use them, they just look neat.
that's about it. have a good one! thanks for reading this all, if you did.
83 notes
·
View notes
Text
How to record videos with Sims 2 in-game camera (HD, no UI, no lag, no file format issues)
I originally planned to include this information in the behind-the-scenes video about Bring Me To Life that I'm currently working on, but it's overly technical and not that interesting. It still might be useful to some people (mostly machinima creators), so I decided to make a separate post about it.
There are two ways to record videos in The Sims 2:
Using screen recording software
This is the most common and probably the easiest way. You just need a program like OBS that will capture whatever happens on your screen exactly as it happened. If this method works for you, it's perfectly fine. No need to follow this guide then.
Using the in-game video capture tool
This way involves capturing videos directly in the game by clicking the video camera icon or pressing V on your keyboard. This method is perfect for machinima creators. It automatically hides the UI, but more importantly, the video will always be perfectly smooth, regardless of the actual performance of your game, i.e. even if it runs like a literal slide show, any videos you capture this way will look perfectly fine.
Okay, so if this method is so great, why do we need a tutorial for it? Well, as is usually the case with this game, the feature works fine, it's just a little bit outdated.
To fix it, we need to do 3 simple* things.
*If you're a Sims 2 player, you're probably used to this kind of stuff anyway
Step 1: Installing a modern codec
In the Camera settings, the game lets you choose if you want the videos to be compressed. I highly recommend choosing that option, as uncompressed videos take up way too much storage space.
The codec that the game uses to handle compression is outdated and most video editing programs will not be able to edit such files. To fix this problem, we need to download and install x264vfw, which is a free an open source codec.
Once installed, open the Configure x264vfw app. No need to change anything there (unless you want to test different settings of course), except for this one small thing:
In the Debug section, go to Log level and change it to None. Otherwise the codec will display a pop-up window each time you record in the game, which is pretty annoying.

Step 2: Making the game use the codec
Locate the VideoCapture.ini file in the installation folder with your latest expansion pack. I have Ultimate Collection, so for me the path looks like this:
D:\Program Files (x86)\Origin Games\The Sims 2 Ultimate Collection\Fun with Pets\SP9\TSData\Res\UserData\Config
Back up your file and open the original version with Notepad. You can either replace the whole thing with my settings, or just update the highlighted parts.
While you're at it, make sure to update the LargeSettings value to 1920x1080 so that the videos are captured in HD (no need to worry about it if you're copying the whole thing):
[Config] PreferredCodec=x264vfw Folder is relative to Res/Userdata Folder=Movies FilenameBase=movie NoFillFrames=0 AudioStereoOutput=0 AudioRateDivisor=4 GlobalSettings = reset, vbr:1, fps:10, keyinterval:30, mode:1, datarate:0 SmallSettings = size: 128x128 MediumSettings = size: 320x240 LargeSettings = size: 1920x1080 LowQualitySettings = minq: 6, maxq: 16, mode:0 MediumQualitySettings = minq: 4, maxq: 10, fps:15, mode:0 HighQualitySettings = minq: 2, maxq: 8, fps: 30, keyinterval: 60 SmallLowSettings = datarate: 75 SmallMediumSettings = datarate: 150 SmallHighSettings = datarate: 300 MediumLowSettings = datarate: 150 MediumMediumSettings = datarate: 300 MediumHighSettings = datarate: 600 LargeLowSettings = datarate: 300 LargeMediumSettings = datarate: 600 LargeHighSettings = datarate: 1200 AllowAntialiasing=0 # some drivers have issues with capture when AA is enabled [Codecs] 0=VP61 # On2 VP6.1 1=VP62 # On2 VP6.2 2=VP60 # On2 VP6.0 3=x264vfw # x264vfw
Save your file.
When in game, go to Camera Options and make sure Video Capture Size is set to Large and Video Quality is set to High.
Also, you might want to change the Maximum Video Recording Time to something higher than 60 seconds.

Credit for this solution goes to this person who left the following comment under this video
Step 3: Changing the file format from avi to mp4
Before doing this step, test if everything works correctly when you try to capture videos in the game. The videos will go to the Movies folder in your Documents folder for TS2.
Try to import the videos into your editing software. If it doesn't work, e.g. the program does not recognize the file or the file appears to be corrupted, you'll need to change the file format from avi to mp4.
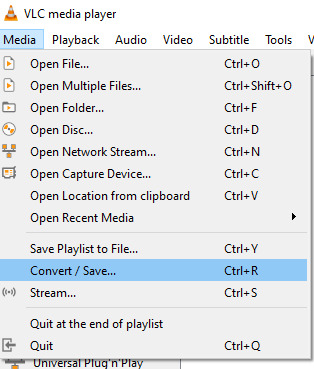
I personally use VLC media player for that, as it's free and open-source.
Go to Media > Convert / Save...
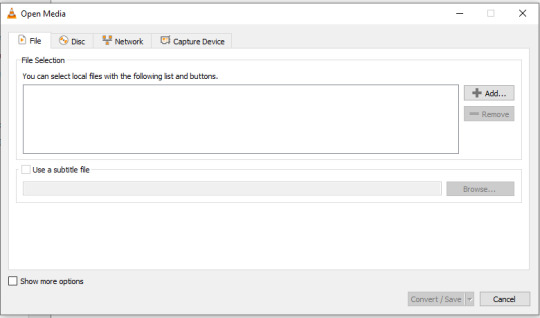
Drag your files into the File Selection section or select them by clicking the + Add button.
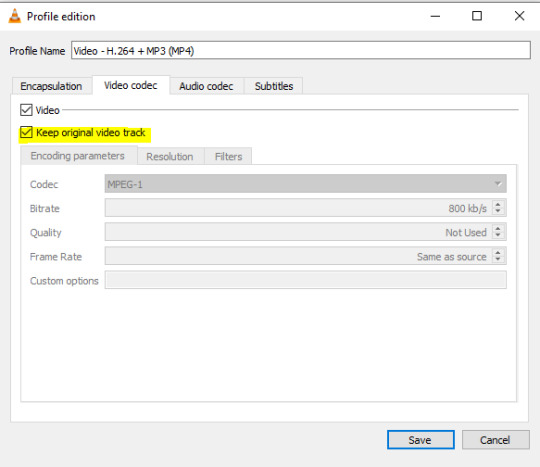
Select the Video - H.264 + MP3 (MP4) profile and click the wrench icon to edit its settings.

In the Video tab, make sure to check the box next to Keep original video track. Go to the Audio tab and check the analogous box.
Save and in the next window specify the destination folder and click Start. VLC will go through each of the files you added.
IMPORTANT:
While Steps 1 and 2 only need to be done once, Step 3 needs to be done for every new video you record (unless, your video editing software doesn't struggle opening the avi files). The good news is, this step is really fast, no more than a second per a single video. This is because we're keeping the original video track intact. The only thing that is changed is the container. That's why this change is fast and does not affect video quality in any way. Ideally, this step wouldn't be needed if we figured out a way to force the game to use mp4 when saving those videos, but I'm not sure if this is possible.
Like I said, outside of machinima creation, it probably makes more sense to just record your screen with OBS. Especially if you want to capture videos in 4K, which I don't think would be possible with this method. But it works for me and as it took me a while to figure it all out, I just wanted to share all the info in a single post!
#sims 2 machinima#ts2#sims2#sims 2 tutorial#ts2 tutorial#sims 2 guide#ts2 guide#my stuff#ts2 simblr#machinima#ts2 machinima
9 notes
·
View notes
Text
OPTIMIZING GRAPHIC SETTINGS FOR BETTER FPS IN WORLD OF WARCRAFT: THE WAR WITHIN

Blizzard has invented and included FSR 2.0 in World of Warcraft, but sadly, it’s still a piece of crap that can’t optimize performance effectively. So, the time has come. Together with the community, all the reddits, my own experience, and the experience of others, I created the first guide for optimizing graphical settings for better FPS in World of Warcraft: The War Within. I’ll strive to show you:
Lighting settings — Which are not important but can increase FPS while you play Warcraft.
Settings you can disable — Without the pain in your eyes.
Potato mode — This was my own creation. It feels like a total buttpain, but you can still do top MDI DPS in raids, tank keys higher than 10+, and do other things.
When we’re talking about real graphic optimization for World of Warcraft on a low-end PC (a potato), we need to remember some unobvious tips that enable you to play Warcraft more comfortably. Optimization here isn’t about achieving 180 FPS on a 144 Hz monitor. It’s about getting more than 20 FPS and being able to play your rotation smoothly.
Stable Operating System — Go back to a stable version of Windows 10 or Windows 7. Windows 11 has Game Bars, recorders, and other services that can impact performance.
Transfer Discord — Move your Discord from your PC to your mobile phone. While it sounds weird, Discord eats not only your internet traffic (which we can’t optimize) but also consumes about 1 to 5 GB of RAM. The mobile version of Discord is much more optimized, so when you’re playing with your mates in raids or Mythic+, it’s better to reduce the load on your PC by using your phone for voice chat.
Remove Unnecessary Apps — Delete all unnecessary apps from your memory. This frees up resources for your game.
Graphics Card Settings — Go into your Nvidia GeForce Experience or Radeon Adrenalin software and set World of Warcraft to high priority. Limit the FPS to 24-27. The fewer FPS your game has to render from the start, the less load on your graphics card/processor, resulting in a more stable and smooth gameplay experience.
By following these small tricks, you can start your gameplay on much lower PC settings than expected. These routines help optimize your PC outside of Warcraft.
Step-by-Step Instructions for Optimizing Graphical Settings in World of Warcraft: The War Within
Zoom Out Command Hack — Use a console command to increase your maximum zoom-out capability by 37%. This helps you see projectiles and mechanics earlier.
Command: /console cameraDistanceMaxZoomFactor 2.6
How to Use: Press Enter in-game, paste the command, and press Enter again.
Camera Smoothness Command Hack — Use a console command to make camera zoom in and out smoother.
Command: /console cameraSmoothStyle 0
How to Use: Press Enter in-game, paste the command, and press Enter again.
Enable Fidelity FX Super Resolution (FSR) — Improve graphical clarity and detail without a noticeable reduction in FPS.
How to Enable: Go to Options > Graphics Settings > Resample Quality > Select Fidelity FX Super Resolution (FSR).
Console Command: /console gxAllowCachelessShader 0
How to Use: Press Enter in-game, paste the command, and press Enter again.
Adjust Particle Density — Increase the visibility of important game mechanics.
Setting: Ultra
How to Change: Options > Graphics > Particle Density > Set to Ultra.
Enable Projected Textures — Ensure all ground effects and spell hits are visible.
Setting: Enabled
How to Change: Options > Graphics > Projected Textures > Enable.
Increase Texture Resolution — Improve the clarity of visual cues for mechanics.
Setting: High
How to Change: Options > Graphics > Texture Resolution > Set to High.
Adjust Contrast — Enhance the distinction between different elements on screen.
Setting: 75-80%
How to Change: Options > Graphics > Contrast > Adjust to 75-80%.
Disable Non-Essential Settings — Lower settings that do not impact game mechanics to improve FPS.
Shadow Quality: Low
Liquid Detail: Low
SSAO: Disabled
Depth Effects: Disabled
Compute Effects: Disabled
Outline Mode: Disabled
View Distance: Low
Environmental Detail: Low
Ground Clutter: Low
For more fine-tuning, you should study the source with its detailed analyzes of the settings.
Good luck on the battlefields, exploration and conquest of Azeroth!
3 notes
·
View notes
Text
Download Ableton Live 11.3.21 Suite
Are you ready to elevate your music production to the next level? Look no further than Ableton Live 11.3.21 Suite, the industry-leading software trusted by professionals worldwide. With its cutting-edge features and intuitive interface, this latest version is a game-changer for musicians, producers, and DJs alike.
Unparalleled Performance and Compatibility
Powered by Apple Silicon and Intel processors, Ableton Live 11.3.21 Suite offers seamless performance on both Mac and PC platforms. Whether you're using the latest macOS or Windows 10/11, rest assured that this software will deliver optimal results. Say goodbye to compatibility issues and experience smooth operation with every session.
Lifetime Activation and Access
When you invest in Ableton Live 11.3.21 Suite, you're not just getting a piece of software – you're gaining access to a world of endless possibilities. Enjoy lifetime activation and unrestricted downloading privileges, ensuring that you can always access the latest updates and features. With Ableton's commitment to innovation, you'll never be left behind.
Feature-Rich Functionality
Discover a wealth of tools and capabilities designed to fuel your creativity. From powerful MIDI sequencing to flexible audio recording and editing, Ableton Live 11.3.21 Suite has everything you need to bring your musical ideas to life. Experiment with virtual instruments, effects, and sound libraries to craft your signature sound with ease.
Effortless Installation and Setup
Gone are the days of lengthy installation processes. With Ableton Live 11.3.21 Suite, you can enjoy instant download and hassle-free installation. Simply follow the straightforward instructions, and you'll be up and running in no time. Whether you're a seasoned pro or a newcomer to music production, getting started has never been easier.
System Requirements
Mac: Compatible with macOS 11 and all new versions.
PC: Compatible with Windows 10 and 11.
Processor: Apple Silicon or Intel processor.
Storage: 5GB hard disk or external drive.
Plugin Formats: VST2, VST3, AU, and standalone host.
Download Now and Elevate Your Music Production
Ready to take your music production to new heights? Don't miss out on the opportunity to download Ableton Live 11.3.21 Suite from saleonplugins.com. With its unmatched performance, lifetime activation, and feature-rich functionality, this software is a must-have for any serious musician or producer. Transform your musical vision into reality and experience the power of Ableton Live today!
#AbletonLive11#MusicProduction#AudioSoftware#DigitalAudioWorkstation#MusicSoftware#CreativeTools#MusicProducers#SoundDesign#AbletonSuite#MusicTech
2 notes
·
View notes
Text
I just figured out that my screen recorder (Xbox GameBar on Windows 10) is messing up the white balance so One Summer's Day is extremely off color-wise 🫠 And I've been looking for days for a fix
In the meantime, I tried OBS, but OBS's audio output is so baaad. It records with the volume I have on, so if I'm listening at 10%, I need to set the audio for the replay at 100% to hear that 10%...
I need other FREE software for recording FaOI 2023 😭
5 notes
·
View notes
Text
Expansion Pack
Back in the day, before the internet, or even when we had the internet but it wasn't doing anything other than Slashdot and gay Star Trek erotica, you could not update your software. You went to the store, bought a box with shrink wrap around it, (unless you had the millions to commission something custom), put the disk into your computer, installed it, and played it. If a game was published with problems, they were permanent.
We literally had shareware, which were disks that you were explicitly told you were allowed to spread, in order to get information passed around through Sneakernet.
Sneakernet is another story.
Anyways. So, the game was published, and initially, you only one two options, tell the player how to fix your game, or sell a new game.
If we take DOOM, DOOM 2 was basically an expansion pack, but the concept didn't exist yet. It was decided afterwards that an iteration of a game, a full version number increase, should have mechanics built from the ground up.

Reminder this is what happened with Super Mario.
Left: Super Mario Brothers 1 (released 1985)
Mid: Super Mario Brothers 3 (released 1988)
Rght: Super Mario World (released 1990)
This is how fast computers were developing back in the day. This was called Moore's Law.
But, there was a middle ground. You could make an Expansion Pack. Xpacs were normally priced at half a normal game, and would add a full new campaign plus a few new units or weapons.
And life was good.
With the proliferation of the internet, games could now be patched. Initially, what they did was either:
Bug Patch: Fixing problems.
Balance Patch: They change the small numbers in the background to improve the playability of the game.
Content Patch: Free content.
But then they figured out that with the internet they could make patches as often as they wanted. Instead of a the great sigh of relief being able to fix the one major problem from the game, it turned into routine. Games no longer had work out of the box, to the point that it sometimes takes years of patches before a game is video game is viewed as even playable.
And then they realized people could pay for individual content. Instead of paying $40 for a whole new campaign that was as good as the original, and a few new playable classes, and a whole new set of items, you could now charge $2 for the dozen items, $10 per character, and $20 for an extremely short campaign that can be beaten in a few hours. Instead of paying half the price for the same amount of content as the original, you pay the full price, if not more, for much worse content. Each item and character is completely separate and not meant to work together, the campaign is about as long as the tutorial was, and every - single - separate piece gets fucked over the next time Microsoft updates their DLLs, and has to be patched, individually.
And we get WoW, that carved out 95% of the original mechanics to make the game easier for casuals, and destroyed the world's lore from the very first expansion pack, that you have to pay for, along with the monthly fee, and then if you want to have anything good, you need to pay real money for it.
For the record, Vanilla WoW spent ridiculous amounts of time and effort to stop any real-money transactions. If you got caught even offering, your account would be banned.
Back in the day, if you had a disappointing expansion pack, (usually on the third+ one), you just... uninstalled it.
to put this into context, the only reason I got rid of my NES/SNES/N64 was not because the games didn't work, and was not because the games were less fun then current names, but because I had played them through so many times that I wasn't even thinking while playing. If you get a working console and working cartridge, (because barbarians cannot take care of their electronics), THEY WILL STILL PLAY.
The only reason I can't play my Windows games, (other than giving them away), is because I realized how much superior Macs are.
And now we have governments discussing how loot boxes are casinos for kids.
#yesteryear#video games#expansion pack#dlc#I turn off my mac once every few months#or when the power goes out#take 2#now with proof reading
1 note
·
View note
Text
AZ Instant PayDay Review – DFY Amazon Royalty Profit System
Welcome to my AZ Instant PayDay Review, Are you looking for a completely passive income stream with little to no upfront work, zero tech skills, and massive scalability? If so, AZ Instant PayDay promises to be the next big opportunity in the online business world.
We are introducing AZ Instant PayDay, a done-for-you profit system that turns simple audiobooks into $25–$50 royalty payments, over and over again, using nothing but a phone and WiFi.

In this detailed and SEO-optimized AZ Instant PayDay review, we’ll take a deep dive into what this system offers, how it works, whether it lives up to the hype, and if it’s the right choice for aspiring entrepreneurs or anyone looking to build passive income streams through Amazon.
What Is AZ Instant PayDay?
AZ Instant PayDay is a done-for-you Amazon royalty commission system that allows users to earn passive income by uploading pre-made audiobooks to a little-known Amazon-owned platform, specifically ACX, which powers Audible. This system requires no writing, recording, or technical skills.

Users are provided with high-quality, ready-to-upload audiobooks that generate recurring royalties each time they are played or purchased. Designed for beginners and side hustlers, AZ Instant PayDay automates the entire process, making it easy to start earning consistent, hands-free income online.
AZ Instant PayDay Review: Overview of Product
Product Creator: Glynn Kosky
Product: AZ Instant PayDay
Launch Date: 2025-Apr-15
Launch Time: 10:00 EDT
Front-End Price: $17 One-Time Payment! (Limited-Time Access)
Official Site: Click Here To Visit Official Salespage
Product Type: Tools and Software
Support: Effective and Friendly Response
Recommended: Highly Recommended
Bonuses: YES, Huge Bonuses
Skill Level Required: All Levels
Discount Coupon: Use Code “AZINSTANT3” for $3 Off Full Funnel
Refund: YES, 180 Days Money-Back Guarantee
AZ Instant PayDay Review: Key Features of AZ Instant PayDay
���Earn by Uploading Audiobooks – From Any Device!
With the AZ Instant Payday system, you can start making money simply by uploading audiobooks. Whether you’re using a Mac, Windows PC, or even just your smartphone or tablet, you’re good to go. This system works seamlessly across all devices.
✍1-Click Monetization That Works Like Magic
Activate AZ Instant Payday and unlock the ability to upload audiobooks and start receiving consistent $25–$50 payments with just one click. It’s truly that simple.
✍Step-by-Step Video Training Included
Worried about where to start? Don’t be. We provide comprehensive A-Z video training to help you set up and launch your AZ Instant Payday system from scratch. Perfect for complete beginners or anyone looking to scale faster.
✍Dedicated Support Team, Ready 24/7
If you ever hit a bump in the road or need help maximizing your results, our professional support team is available around the clock. We’re committed to helping you succeed every step of the way.
✍No Extra Costs or Hidden Fees
Forget about additional expenses like hosting, domain names, or email autoresponders. AZ Instant Payday gives you everything you need to profit—without spending an extra dime.
✍Foolproof System Designed for Success
You can’t go wrong here. Just upload the ready-made audiobooks we provide, follow our simple instructions, and start earning. No guesswork, no technical skills required.
✍Perfect for Beginners
New to making money online? No problem! AZ Instant Payday is specifically built with beginners in mind. We equip you with all the tools, training, and support you need to achieve real results.
✍No Computer? No Problem!
You don’t even need a laptop to get started. Use your smartphone, tablet, or any internet-connected device to operate the system and receive payments—anytime, anywhere.
✍Get Paid From Anywhere in the World
Whether you’re in the U.S., Europe, Asia, or anywhere else, AZ Instant Payday works globally. All you need is internet access and your copy of the system.
AZ Instant PayDay Review: How Does It Work?
You’re Now Just 3 Clicks Away From Receiving $25-$50 In Amazon Royalties Over and Over Again!
STEP #1: ACCESS
Click Any Of The “Get Instant Access Now” Buttons On This Page To Create Your AZ Instant Payday Account.
STEP #2: DOWNLOAD
Download the Done-For-You Audiobooks Given To You.
STEP #3: UPLOAD
Upload The Audiobooks To Amazon & Get Paid $25-50 Royalties Over & Over.
AZ Instant PayDay Review: Who Should Use It?
Affiliate Marketers
Teenagers
College Students
Entrepreneurs
People In Their 20s
Housewives
Freelancers
Stay At Home Dads
Busy People
Marketing Agencies
The Family Man
Old Age Pensioners
Digital Marketers
And Many Others
AZ Instant PayDay Review: OTO’s And Pricing
Front End (FE): AZ Instant PayDay ($17)
OTO1: UNLIMITED ($47)
OTO2: 100% DONE FOR YOU ($67)
OTO3: UNLIMITED TRAFFIC ($97)
OTO4: AUTOMATION ($67)
OTO5: ATM EDITION ($37)
OTO6: License Rights ($197)
AZ Instant PayDay Review: Money Back Guarantee
AZ Instant Payday Iron-Clad 180 Day 100% Money Back PLUS Guarantee
AZ Instant Payday alongside all its resources together with bonuses will be available for the following 180 days under a risk-free guarantee. Watch the app perform its powerful transformation of free traffic into concrete outcomes for yourself. The US-based support staff at AZ Instant Payday stands ready 24 hours to answer your questions. If you make a decision to cancel usage of our services at any time regardless of the reason.
Users have access to six months during which they can request a complete refund without any trouble. If you demonstrate your truthfulness by using AZ INSTANT PAYDAY we will give double your money back after providing individual coaching support for a period of six weeks. We are deeply committed to your achievement therefore we put our heart into your success. We commit to doing all necessary steps for delivering your desired outcomes while you invest with confidence.
AZ Instant PayDay Review: Pros and Cons
Pros:
100% Done-For-You Audiobooks
Real, legal royalty income from Amazon
No selling, no ads, no cold outreach
Easy-to-follow setup and video training
Passive recurring income potential
No prior experience or tech skills needed
Cons:
Requires a one-time investment
You must have internet access.
Nothing wrong with it, it works perfectly!
My Own Customized Exclusive VIP Bonus Bundle
***How To Claim These Bonuses***
Step #1:
Complete your purchase of the AZ Instant PayDay: My Special Unique Bonus Bundle will be visible on your access page as an Affiliate Bonus Button on WarriorPlus immediately after purchase. And before ending my honest AZ Instant PayDay Review, I told you that I would give you my very own unique PFTSES formula for Free.

Step #2:
Send the proof of purchase to my e-mail “[email protected]” (Then I’ll manually Deliver it for you in 24 HOURS).
AZ Instant PayDay Free Premium Bonuses

Frequently Asked Questions (FAQ’s)
Q. What devices does this work on?
AZ INSTANT PAYDAY is web-based so it works on every device out there. All you need is an internet connection.
Q. Is this really beginner friendly?
Absolutely – the majority of our beta testers were brand new to making money online. And you also won’t need any technical skills or previous experience.
Q. Is there a money back guarantee?
Yes, you are covered by our 180-day money back guarantee. There is absolutely no risk when you act now. The only way you lose is if you don’t grab AZ INSTANT PAYDAY at the special discount…
Q. Are there any monthly costs or fees?
Nope! AZ INSTANT PAYDAY includes everything you need. Because there are no extra costs involved, this is as close to a ‘pure profit’ model as you’ll get.
Q. How long does it take to set up?
Even if you’re brand new you can be up and running in 5 minutes. AZ INSTANT PAYDAY is a self-updating system that requires no daily maintenance.
Q. What if I need help or support?
We love helping our customers! Professional, patient & friendly support staff are on hand to answer any questions you may have.
Q. How do I get started?
Easy! Just click the button below to get in at the lowest possible price before the next price increase.
Final Verdict: Is AZ Instant PayDay Legit or Hype?
AZ Instant PayDay is a legitimate and powerful system for anyone looking to tap into Amazon’s booming audiobook platform without the usual barriers. With done-for-you content, clear step-by-step training, and zero need for technical skills or experience, it offers a real passive income opportunity. While results depend on effort and consistency, the potential to earn $25–$50 per audiobook repeatedly makes this system a smart, low-risk investment for long-term royalty profits.
🚀 Don’t miss out guys and start your journey with AZ Instant PayDay today!
>>> Click Here to Visit AZ Instant PayDay and Get Instant Access Now <<<
Check Out My Previous Reviews: AI Coloring Book Creator Review, Cash AI App Review, AI News Avatar Review, Ghibili Videos AI Review, and InfluenX AI Review.
Thank for reading my honest “AZ Instant PayDay Review” till the end. Hope it will help you to make purchase decision perfectly.
#azinstantpayday#azinstantpaydayreview#azinstantpaydaydiscount#azinstantpaydaycoupon#azinstantpaydayreviews2025#azinstantpaydayappreview2025#azinstantpaydaybonusses#azinstantpaydayproduct#azinstantpaydayprice#azinstantpaydayotos#azinstantpaydayoffers#azinstantpaydaybonus#azinstantpaydaybuy#azinstantpaydayWebsite#azinstantpaydaysite#azinstantpaydayapp#azinstantpaydayhonestreviews#azinstantpaydaylatestreviews#azinstantpaydayusersexperience#azinstantpaydayusersreview
0 notes
Text
Oh, did I tell you I'm getting a new computer? (Fuck me... cost more than I'd like. almost half of it was just the graphics card but I guess thank god I bought the parts before these idiot tariffs hit)
Anyway the friend that's helping me build them, Dr Jekyll and Mr Dumbass? He's adamant that I need to put windows on it cause linux is just too hard to use but... 100 of his arguments have failed to persuade me and I'm not gonna
"It's a lot like dos where you have to enter lines of code in to make things work"... ok... so one I grew up using my grandpa's old dos based computer. I'm actually ok with that... also running the server means I often have to do little stuff like that, I'm ok with that if it means no windows
"Linux doesn't have anti cheat software that works, so games that use that will just ban you", cool... pretty sure 99% of those are pvp games which I will never play, and those that aren't... can kinda get bent
"It's just harder to use cause it doesn't auto update drivers", I'd rather have to remember to check for driver updates once a month than have a computer that just decides to shut itself down to update
"With how good this computer will be, you won't feel all the bloatware from windows", oh... it's not about performance... it's about principle. It's also about performance, but that's not the main point
Also uh... I say he has a Mr Dumbass side for a reason, which means I don't know that he's even correct about half of this
Worst case, I decide I can't stand linux and I start dual booting windows... but I'm gonna try all linux before all windows for one thing cause linux is free... also it's not like I won't still have this computer
Like... I basically want a computer that will kick ass at minecraft and that won't take 10 minutes to load thanks to windows (literally)
This computer I'm on is over 10 years old, this next one should last another 10... I fucking hate dropping the kind of money I just dropped, it makes me feel sick and like a bad person, but I also never buy anything and have needed a new computer since forever
But uh... I only play minecraft really these days... with the new computer and the ability to set up either this or another one as a server box for minecraft and Everquest... I may start messing around in Everquest
But um... I just kinda... I don't play that much in the way of games anymore... just minecraft
Honestly, the most pain in the ass thing I'll probably have to deal with is getting recording software working on linux cause I'd like to record minecraft and my current computer is... eh at that
Nah... hell the hardest part will be figuring out what to install cause there's like 50 versions of linux... it's whatever though, I'll plod though it and be happy to be away from windows
1 note
·
View note
Text
Top 10 Time Tracking Apps for Remote Workers Across Different Countries
Remote work is becoming the new norm across the world, making Time Tracking Apps essential for businesses to monitor productivity and ensure fair compensation. Whether it’s for freelancers, small businesses, or large enterprises, time tracking helps in efficient work management. Among the top solutions, Desktrack Demo provides an insightful look into how tracking software can improve workflows. Additionally, Clock-In Clock-Out Apps are crucial for maintaining accurate work records.
In this article, we explore the top 10 Time Tracking Apps used by remote workers globally.
1. Desktrack
Why Choose Desktrack?
Automated time tracking and activity monitoring
Real-time application and website tracking
Desktrack Demo available for testing features before purchase
Screenshot capturing for transparency
Payroll and invoice generation integration
Desktrack is ideal for businesses looking for a detailed monitoring system to improve productivity and optimize workflows.
2. Toggl Track
Key Features:
One-click time tracking
Intuitive and simple UI
Detailed reports and analytics
Works across multiple devices
Toggl Track is a great choice for freelancers and teams that need flexible time tracking with minimal manual input.
Read More: Top 16 Free & User-Friendly Timer Apps for Windows in 2025
3. Clockify
Key Features:
Unlimited users for free
Clock-in and clock-out tracking
Project and task tracking
Integration with multiple work tools
Clockify is perfect for businesses seeking a cost-effective solution with unlimited tracking features.
4. Hubstaff
Key Features:
GPS tracking for remote teams
Screenshot monitoring
Payroll and invoice generation
Productivity measurement tools
Hubstaff is best suited for companies managing large remote teams that require real-time monitoring.
5. Time Doctor
Key Features:
Focused on productivity tracking
Website and application usage monitoring
Automated time tracking
Distraction alerts
Time Doctor is perfect for organizations that want to prevent time wastage and maximize employee efficiency.
6. Harvest
Key Features:
Time and expense tracking
Seamless invoicing features
Integration with project management tools
Easy-to-read reporting dashboards
Harvest is a great tool for freelancers and consultants who need to track both billable hours and expenses.
7. RescueTime
Key Features:
Automatic activity tracking
Productivity analysis
Goal-setting for better time management
Focus mode for distraction-free work
RescueTime is best for individuals and professionals looking to enhance focus and time management.
8. Timely
Key Features:
AI-powered time tracking
Calendar-based tracking system
Easy integrations with work tools
Automatic timesheet generation
Timely is ideal for businesses that need minimal manual intervention and AI-driven tracking for improved accuracy.
9. Everhour
Key Features:
Team collaboration features
Task and project tracking
Works within project management tools
Budgeting and forecasting tools
Everhour is best for teams that need seamless integration with project management software.
10. QuickBooks Time (formerly TSheets)
Key Features:
GPS-based tracking
Clock-in and clock-out options
Payroll and invoicing integration
Mobile-friendly interface
QuickBooks Time is a great choice for businesses needing accurate time tracking and seamless payroll integration.
Read More: 15 Best Computer Tracking Software in India for 2025
How to Choose the Right Time Tracking App?
When selecting a Time Tracking App, consider the following factors:
Ease of Use – Is the app user-friendly?
Features – Does it offer time tracking, invoicing, and reporting?
Integration – Can it integrate with your existing work tools?
Pricing – Is it budget-friendly?
Demo Availability – Try the Desktrack Demo before purchasing to test features.
Conclusion
Time tracking is essential for remote workers and businesses to maintain productivity and ensure accurate billing. From AI-powered solutions like Timely to manual options like Clockify, there is a variety of Clock-In and Clock-Out Apps available to suit different needs. Whether you opt for Desktrack for its advanced tracking features or QuickBooks Time for payroll integration, choosing the right app can significantly impact work efficiency. Start with a demo version to find the best fit for your business!
0 notes
Text
Price: [price_with_discount] (as of [price_update_date] - Details) [ad_1] Audio Recorder and Editor is a professional, easy to use audio recording and editing software. The program is compatible with most common audio formats. Sound can be recorded from sources such as microphones or mixing consoles as well as USB/Firewire devices, streams and many more. Music files can be edited by cutting, copying, pasting and deleting. Mix different pieces of music. Smoothly fade the volume in or out. Manipulate pitch or replay speed. Remove static and other unwanted background noises. Use different filters and tools to change frequencies and add sound effects. Audio files can also be smoothly converted into different formats. Your professional sound studio for recording, editing and playing all common audio files | Open Source & Free to Download Software Create live recordings, digitalize your cassettes and records Comprehensive range of tools, mix any number of tracks and add sound effects Supported formats: WAV, AIFF, FLAC, MP2, MP3, OGG Vorbis For Windows 10, 8, 7 or Vista (32/64 bit) and Mac [ad_2]
0 notes
Text
How to Screen Record on Lenovo Laptop – The Ultimate Guide
Screen recording has become an essential tool for professionals, students, gamers, and content creators. Whether you need to record an online meeting, capture gameplay, or create a tutorial, knowing how to screen record on a Lenovo laptop can be incredibly useful. Fortunately, Lenovo laptops offer multiple built-in screen recording solutions, as well as several third-party tools that provide additional functionalities.
In this comprehensive guide, we will walk you through the best methods to screen record on a Lenovo laptop, using built-in tools like Xbox Game Bar and Lenovo Vantage, along with third-party software like OBS Studio and Screencapture.com.
How to Screen Record on Lenovo Laptop Using Built-in Tools
If you own a Lenovo laptop running Windows 10 or Windows 11, you already have access to pre-installed screen recording tools, eliminating the need for additional downloads.
1. How to Screen Record on Lenovo Laptop Using Xbox Game Bar
The Xbox Game Bar is a built-in Windows feature that allows users to record their screen with ease. Although designed for gaming, it works well for any type of screen recording.
Steps to Screen Record Using Xbox Game Bar:
Press Windows + G to open the Xbox Game Bar
Click on the 'Capture' widget
Select the 'Record' button or press Windows + Alt + R to start recording
A small recording bar appears, displaying recording time
Press Windows + Alt + R again to stop the recording
The recorded file is saved in the Captures folder under the Videos directory
Quick Tips:
✅ Enable microphone recording if you want to record external audio ✅ Xbox Game Bar cannot record File Explorer or the desktop, so use alternative tools if needed
📌 Example Use Case: A Lenovo user recorded their online business meeting using Xbox Game Bar and shared it with colleagues for later review.
2. How to Screen Record on Lenovo Laptop Using Lenovo Vantage
Lenovo Vantage is a pre-installed Lenovo system optimization tool that allows users to manage their device and, in some models, provides a screen recording option.
Steps to Record Using Lenovo Vantage:
Open Lenovo Vantage from the Start Menu
Navigate to My Device Settings > Display & Camera
Enable Camera Privacy Mode
Open the screen you want to record
Press Ctrl + Shift + R to start recording
Press Ctrl + Shift + R again to stop recording
The video will be saved in the Videos folder
Limitations:
❌ Not all Lenovo laptops have a screen recording feature in Vantage ❌ If unavailable, try alternative tools like OBS Studio
📌 Example Use Case: A Lenovo ThinkPad user recorded a step-by-step tutorial using Lenovo Vantage and uploaded it for a training session.
How to Screen Record on Lenovo Laptop Using Free Third-Party Software
For advanced recording options, third-party software provides additional features like custom resolutions, enhanced audio control, and editing capabilities.
3. How to Screen Record on Lenovo Using OBS Studio
OBS Studio is a free, open-source screen recording and live streaming software widely used by professionals.
Steps to Use OBS Studio:
Download & install OBS Studio from the official website
Open OBS Studio, then click + under Sources
Select Display Capture > OK
Adjust settings such as resolution and frame rate
Click "Start Recording"
Click "Stop Recording" when finished
Find the saved recording in the chosen file location
✅ Best for: Professionals who need high-quality recordings with customization
4. How to Screen Record on Lenovo Using Screencapture.com (Online Tool)
If you don’t want to install software, Screencapture.com is a web-based tool that allows users to record their screen online.
Steps to Use Screencapture.com:
Go to Screencapture.com
Set recording preferences (screen only, system audio, microphone input)
Click "Start Recording"
Click "Stop Recording" when finished
Download and save the recording
✅ Best for: Quick, one-time screen recording without downloads
Troubleshooting: What to Do If Screen Recording Is Not Working on a Lenovo Laptop?
🔻 Issue 1: Xbox Game Bar Won’t Open
✔️ Solution: Go to Settings > Gaming > Xbox Game Bar and toggle it ON
🔻 Issue 2: No Sound in Screen Recording
✔️ Solution: Ensure "Record system audio" is enabled in Xbox Game Bar or OBS Studio
🔻 Issue 3: Black Screen While Recording
✔️ Solution: Update your graphics drivers and restart your Lenovo laptop
Why Choose Lenovo Laptop Service Center in Delhi?
If you face technical issues while screen recording, contact the Lenovo Laptop Service Center in Delhi for expert assistance.
✔️ Benefits:
✔️ Certified Technicians – Lenovo-certified experts for software & hardware support ✔️ Genuine Parts – 100% original Lenovo components ✔️ Onsite Support – Doorstep repair service available ✔️ Affordable Pricing – Competitive rates with warranty support
📞 Need help? Call Now: +91-9891868324
Conclusion
Now that you know how to screen record on Lenovo laptop, you can easily capture gameplay, tutorials, and online meetings using built-in or free third-party tools.
📌 For troubleshooting and expert Lenovo support, contact our certified technicians today!
FAQs
1. Can I screen record on a Lenovo laptop without installing software?
Yes! Lenovo laptops with Windows 10/11 support built-in screen recording via Xbox Game Bar and Lenovo Vantage.
2. Where do screen recordings get saved on a Lenovo laptop?
Videos recorded with Xbox Game Bar are saved in File Explorer > Videos > Captures.
3. What is the best free screen recording software for Lenovo laptops?
For basic use, Xbox Game Bar is best. For advanced features, use OBS Studio.
#ScreenRecording#LenovoLaptop#HowToRecordScreen#TechGuide#Windows10#Windows11#XboxGameBar#OBSStudio#ScreenCapture#LenovoThinkPad#TechSupport#GamingVideos#OnlineMeetings#TutorialRecording#LaptopTips#DigitalLearning#VideoEditing#ProductivityTools#ContentCreators#ScreenRecordOnLenovo
0 notes
Text
Download Native Instruments Guitar Rig 7 Pro
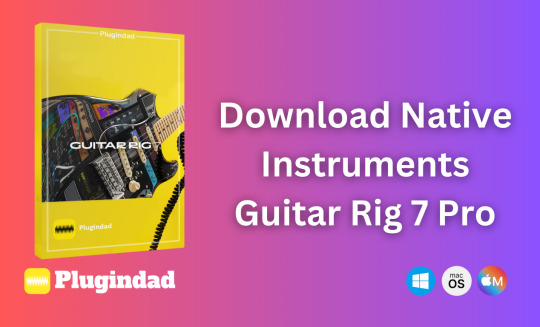
Native Instruments Guitar Rig 7 Pro is a revolutionary tool that brings your musical visions to life with unparalleled precision and creativity. 🎸🔥 Whether you’re a professional guitarist, a budding musician, or a music producer, this software delivers everything you need to craft mesmerizing tones and effects. Let’s guide you on how to download and explore its full potential.
Why Choose Guitar Rig 7 Pro?
Guitar Rig 7 Pro is powered by Intelligent Circuit Modeling (ICM) technology, offering a perfect blend of vintage amplifier vibes and modern precision. Here’s what makes it the ultimate guitar and bass modeling powerhouse:
Iconic Amplifiers: Explore four new amps like the Super Fast 100, Reverb Delight, AC Box XV, and Bass Rage, each modeled to replicate legendary tones with stunning detail.
Cabinet IR Loader: Create authentic soundscapes with impulse responses from top-notch manufacturers.
Next-Level Effects: Unleash creativity with unique pedals and rack effects, including Kolor, Chainsaw, Seattle Fuzz, and more.
100+ Presets: Effortlessly find inspiration with presets designed for diverse genres.
Live-Ready Features: Stream, record, or perform live with tools like Loop Machine Pro and the iZotope Ozone Maximizer.
Step-by-Step Guide to Download
Downloading Guitar Rig 7 Pro is quick and easy. Follow these steps to get started:
Visit the Official Product Page Head over to Plugindad to access the download link for Guitar Rig 7 Pro.
Check System Requirements Ensure your system meets the minimum requirements:
Operating System: macOS 11.5 or later, Windows 10/11
RAM: At least 4GB
Hard Drive Space: 1GB free storage
Plugin Formats: AU, VST, VST3, AAX
Choose Your Version Select the compatible version for your operating system (macOS or Windows).
Add to Cart & Checkout Add the software to your cart, proceed to checkout, and complete the purchase process.
Download and Install After purchase, download the installer file and follow the on-screen instructions to install Guitar Rig 7 Pro on your system.
Activate the Software Use the provided activation code to unlock all features and start exploring.
Features That Set Guitar Rig 7 Pro Apart
Immersive Soundscapes: Utilize the Cabinet IR Loader to achieve legendary speaker cabinet tones.
Unique Effects Palette: Experiment with Vinyl Crackle, Tape Wobble, and Lo-fi vibes using Noise Machine.
Live Looping: Enhance your live performances with Loop Machine Pro.
Seamless Integration: Supports major DAWs, ensuring smooth workflow integration.
Take your music to the next level with Guitar Rig 7 Pro. Download now and redefine your sound! 🎶✨
#GuitarRig7Pro#NativeInstruments#GuitarModeling#ICMTechnology#MusicProduction#GuitarTone#BassModeling#MusicTech#VSTPlugins#AudioEffects#GuitarEffects#Looping
0 notes
Text
Video editing can be a fun and creative process! Here’s a step-by-step guide to get you started
1. Choose Your Software
Beginners: iMovie (Mac), Windows Movie Maker (PC), or online options like Canva or Kapwing.
Intermediate/Advanced: Adobe Premiere Pro, Final Cut Pro, DaVinci Resolve, or HitFilm Express.
2. Gather Your Footage
Record video clips using a camera or smartphone.
Collect any additional media like images, music, or graphics.
3. Import Your Media
Open your editing software and create a new project.
Import your video clips and other media files.
4. Organize Your Clips
Sort your clips in the media library.
Create bins or folders to keep your files organized.
5. Start Editing
Timeline: Drag your clips onto the timeline in the order you want them to appear.
Trimming: Cut out any unnecessary parts of your clips to tighten the video.
Transitions: Add transitions between clips (e.g., fades, cuts) to enhance flow.
6. Add Effects and Titles
Use effects to enhance your video (color correction, filters).
Insert titles or text overlays for context or branding.
7. Include Music and Sound Effects
Add background music and adjust the volume levels.
Use sound effects to enhance the viewing experience.
8. Fine-Tune Your Edits
Watch your video multiple times and make adjustments as needed.
Pay attention to pacing, audio levels, and visual continuity.
9. Export Your Video
Choose the right format and resolution for your audience (e.g., MP4 for online sharing).
Export the final version of your video.
10. Share Your Video
Upload to platforms like YouTube, Vimeo, or social media.
Consider creating a thumbnail for better engagement.
Tips:
Practice: The more you edit, the better you’ll get!
Watch Tutorials: Many tutorials are available on YouTube for specific software.
Experiment: Don’t be afraid to try new effects or styles.
Have fun with your video editing! If you have specific questions about any software or techniques, feel free to ask!
0 notes