#GlutenFreeBaking
Text

Chocolate chip cookies
#chocolate#chocolatechipcookies#vegan#gf#glutenfreecookie#glutenfreebaking#dessert#food#foodpic#cookies
10 notes
·
View notes
Photo
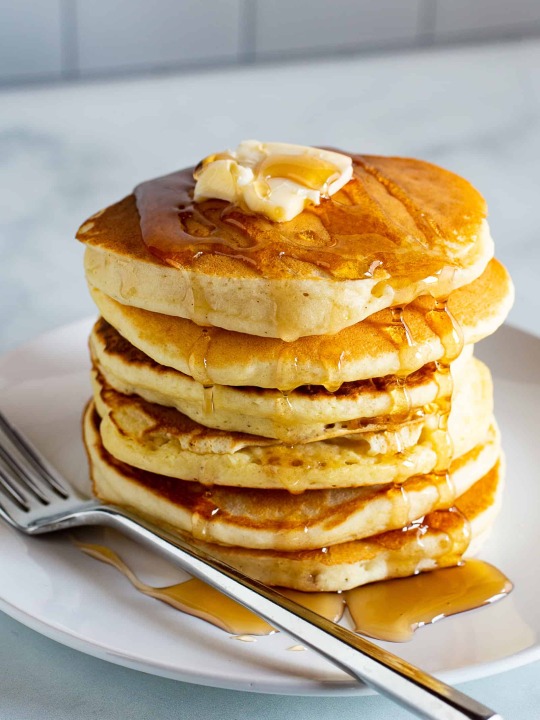
Fluffy GF Pancakes
326 notes
·
View notes
Text
Why Quinoa Flour is Your New Gluten-Free Go-To
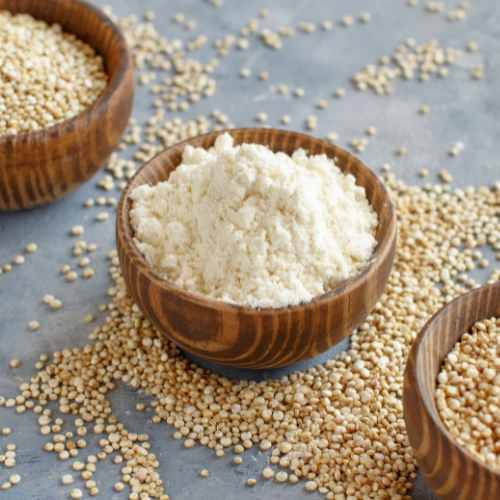
Quinoa flour is a bit of a newcomer but is already proving to be a popular choice amongst those in the know. For those navigating the world of gluten-free cooking, getting to grips with gluten-free flour can sometimes be a daunting task. Packed with all the goodness of quinoa, this flour is a game-changer for those on a gluten-free diet. In this post, we will explore everything you need to know about this fantastic flour alternative. And, for good measure, throw in some tips about how to use it in your favourite recipes.
Introducing Quinoa Flour
Quinoa may be absolutely everywhere but it turns out that it also happens to make a surprisingly good gluten-free flour. Quinoa flour, made from quinoa grain, is rising in popularity due to its excellent nutritional profile and gluten-free credentials. Made by grinding whole quinoa grains into a fine powder, it has a subtle, nutty flavour and can be used as a direct substitute for wheat flour in many recipes. Its versatility makes it an essential ingredient in gluten-free baking, allowing for the creation of delicious, nutrient-dense food items that cater to the needs of gluten-sensitive and health-conscious individuals alike.
Organic quinoa flour
Organic quinoa flour, as the name suggests, is derived from organically grown quinoa grains. This means they are cultivated without the use of synthetic pesticides, or fertilizers, and are non-GMO, ensuring you get the purest form of this nutritious superfood. By choosing organic quinoa flour, you are not only making a healthier choice for your body but also supporting sustainable farming practices that benefit our environment.
Check out our organic quinoa flour
The Nutritional Value of Quinoa Flour
You don't need us to tell you that quinoa is really really good for you, but just in case here's a recap.
Rich in Protein
Quinoa flour stands out in the world of gluten-free alternatives primarily due to its high protein content. Quinoa is in fact made up of 22% protein. Unlike many other actual grains, quinoa is a complete protein, which simply means it contains all nine of the essential amino acids. Pretty exceptional for a plant-based protein! Each serving provides a substantial amount of protein, making it an excellent choice for vegetarians, vegans, or anyone looking to add more plant-based protein to their diet. Unlike traditional grain flours, this high protein content also contributes to the feeling of fullness, making meals more satisfying and aiding in weight management.
This powerful little pseudo-grain is a particularly potent source of the amino acid lysine, which aids in tissue repair.
Vitamins and Minerals
Quinoa flour is not only protein-rich but packed with a variety of essential vitamins and minerals. It contains significant amounts of B vitamins, a wide spectrum of E vitamins, plus a host of minerals including iron, magnesium, potassium, and calcium. A rich source of silica, it can help keep skin strong and elastic. It also has powerful antioxidant properties provided by the E vitamins and flavonoids that appear in high concentrations.
Omega-3 and Fatty acids
Also rich in essential fatty acids, and particularly anti-inflammatory omega-3s, quinoa flour is a rich source of oleic acid which is thought to help lower LDL cholesterol.
Fibre Content
A fantastic source of dietary fibre. Fibre not only keeps everything moving along nicely but also helps to control blood sugar levels by slowing the absorption of sugar into the bloodstream. Plus, high-fibre foods like quinoa flour can help to manage weight by promoting a feeling of fullness and reducing overall calorie intake. So, not only does it provide a gluten-free, protein-packed alternative to traditional flours, but can also contribute to digestive health, blood sugar control, and weight management with its high fibre content.
Gluten-Free
And of course, one of the best things about quinoa is that it is gluten-free.
Is Quinoa Low-Carb?
Quinoa is often thought to be a great choice for those following a low-carb diet. Yet it is important to understand that while quinoa is lower in carbs than some types of grains, it is not strictly a low-carb food. A cup of cooked quinoa contains around 40 grams of carbs, which is more than the daily intake suggested by some low-carb diets. That being said, it's a complex carbohydrate, which means it digests slower than simple carbs and offers sustained energy without causing a rapid spike in blood sugar. Therefore, while not a low-carb food in the strictest sense, it can still be a healthier choice compared to many other grains and is enjoyed by many people following a balanced, healthy diet.
Cooking and Baking with Quinoa Flour
So, while it is good to know just how nutritional this stuff is, what we really want to know is how to cook with it. Right? We will be looking at these things in more detail over time, but here's a quick overview to get you started.
The basics of cooking and baking with quinoa flour
In the realm of gluten-free flour, quinoa flour is high in protein and has a high absorption rate. If you remember from our in-depth guide to using gluten-free flours, these flours can be grouped into two categories. These are protein flours and starches. High protein flours often have more pronounced flavours than starches but they do lend strength and elasticity to a bake. Starches, on the other hand, contribute little in the way of flavour yet they add a fluffy light texture to the heavier protein flours.
Just as some quinoa can be slightly bitter, but not all, the same goes for its flour. Again, the flavour can range from profoundly earthy to pleasingly nutty.
As with most gluten-free flours, this flour is best used alongside other varieties to get the best balance between texture and flavour for your particular recipe needs. That said, your choice of flour will depend very much on what you are making, so there are times when you can directly substitute for all-purpose wheat flour.
Substituting quinoa flour in recipes
Getting to grips with using gluten-free flour is always a bit of a baptism by fire. Recipes and suggestions should be used as a guideline only, largely because such flours can be wholly unpredictable. There is nothing more frustrating than a tried and tested recipe that does not deliver results.
There will be some cases where it is safer to begin with a 1:1 substitution for wheat flour than others. Remember that the protein content makes it denser, and also means it will absorb more water. Gluten is required to build strength, elasticity, and structure into a bake so it is really important in bread making yet can lead to toughness in a pastry. Cakes need little in the way of gluten, yet also require a certain amount of bulk and fluffiness.
And then there is flavour. Quinoa flour has a pronounced flavour. If you find that it tends towards bitterness, then it can be toasted in a moderate oven for about 10 to 15 minutes before cooling and using. So, whilst you may not want to make a delicate Victoria sponge with quinoa flour, it could be perfect for that parmesan pastry you have in mind. Or a more robustly flavoured banana muffin.
So our advice is to begin with a 1:1 ratio in recipes where it may seem appropriate. Like a pastry or a muffin. If you find it too dry, then use a little less flour, or a touch more liquid.
Sauces and batters rely more on the liquid content of the recipe. So substitute your flour slowly, gradually adding more until you reach the desired consistency.
Tips for cooking and baking with quinoa flour
Test small batches first: Before using quinoa flour in large quantities, consider trying it in smaller recipes. This allows you to understand its unique characteristics and adjust your main recipe accordingly.
Blend with other flours: Quinoa flour alone may not suit all recipes. Try blending it with other gluten-free flours to create a balance of flavour and texture.
Adjust liquid levels: Quinoa flour tends to absorb more liquid than wheat flour. Keep an eye on your batter or dough and be prepared to add extra liquid if it seems too dry.
Store properly: Keep your quinoa flour in an airtight container in a cool, dark place. Proper storage preserves the flour's taste and extends its shelf life.
Cooked quinoa flour: If the flavour of quinoa flour is too strong, try toasting it in the oven for 10-15 minutes before cooling and using. This can help to reduce bitterness.
Use in savoury recipes: Quinoa flour can be a wonderful addition to savoury recipes like flatbreads, pizza dough, or pasta, where its unique flavour can shine.
Healthy baking: Use quinoa flour in recipes where health is a priority. It is protein-rich and offers a nutritious alternative to traditional flour.
Quinoa flour in bread-making
It's a whole other subject, but the protein content of quinoa flour makes it an excellent contender in the gluten-free bread stakes. It will need to be used alongside other flours though so we will explore this more fully at a later date.
To sum up, it would certainly seem that even for those without gluten-related disorders, quinoa flour offers a change of pace from traditional flours, allowing for experimentation with diverse, nutrient-rich alternatives in the kitchen.
Have you seen our other gluten-free flours?
This article was reproduced on this site with permission from operafoods.com.au the “Gluten Free Flour Suppliers”.
See original article:- Why Quinoa Flour is Your New Gluten-Free Go-To
Read the full article
2 notes
·
View notes
Photo

📍BioCafe Vegan restaurant 🌱 fully loaded waffle with mix fruits, desiccated coconut, chocolate chips, ice cream, whipped cream, drizzled with maple syrup and chocolate sauce, sprinkled with coconut sugar. 🧇🍨🍇🥥🌱 #cosycafevibes #cosycafe #aberdeencafe #breakfast #breakfastgoals #visitABDN #seeninthedeen #eatinthedeen #societyabdn #vegan #raw #paleo #glutenfreebaking #veganbreakfast #colourfulfood #rainbowfood #rainbow #Monday #tumblr #loveyourself #veganaberdeen #aberdeenfood #aberdream #foodblogger #foodofinstagram #instafood #foodcoma @biocafe_aberdeen https://www.instagram.com/p/CjQQ3DgDJwNbgLrRZKmubvrbsj6pRYYkteoAg80/?igshid=NGJjMDIxMWI=
#cosycafevibes#cosycafe#aberdeencafe#breakfast#breakfastgoals#visitabdn#seeninthedeen#eatinthedeen#societyabdn#vegan#raw#paleo#glutenfreebaking#veganbreakfast#colourfulfood#rainbowfood#rainbow#monday#tumblr#loveyourself#veganaberdeen#aberdeenfood#aberdream#foodblogger#foodofinstagram#instafood#foodcoma
2 notes
·
View notes
Text

Gluten-free quinoa bread made with healthy ingredients is tasty and good for you. If you can't have gluten or just want a healthier option, this bread is perfect for you.
Ingredients: 2 cups quinoa flour. 1 cup almond flour. 1/2 cup flaxseed meal. 1/4 cup chia seeds. 1 teaspoon baking powder. 1/2 teaspoon baking soda. 1/2 teaspoon salt. 3 eggs. 1/4 cup olive oil. 1/4 cup maple syrup. 1 cup almond milk. 1 tablespoon apple cider vinegar.
Instructions: Warm the oven up to 350 F 175C and grease a loaf pan. Flaxseed meal, chia seeds, baking powder, baking soda, and salt should all be mixed together in a large bowl. Add the eggs, olive oil, maple syrup, almond milk, and apple cider vinegar to a different bowl and mix them together using a whisk. Mix the dry ingredients with the wet ones until everything is well mixed. As soon as the loaf pan is ready, pour the batter into it and use a spatula to smooth the top. Put it in the oven and bake for 40 to 45 minutes, or until a toothpick stuck in the middle comes out clean. The quinoa bread should cool in the pan for 10 minutes before being moved to a wire rack to cool all the way down.
0 notes
Text

These gluten-free oatmeal chocolate chip cookies are chewy, gooey, and loaded with melty chocolate chips. They're made with wholesome ingredients and are perfect for satisfying your sweet tooth without any gluten.
Ingredients: 1 1/2 cups gluten-free rolled oats. 1 cup almond flour. 1/2 teaspoon baking soda. 1/4 teaspoon salt. 1/2 cup coconut oil, melted. 1/2 cup coconut sugar. 1 large egg. 1 teaspoon vanilla extract. 3/4 cup dairy-free chocolate chips.
Instructions: Warm the oven up to 175F 350C. Put parchment paper on the bottom of a baking sheet. Oats, almond flour, baking soda, and salt should all be mixed together in a medium-sized bowl. Mix melted coconut oil and coconut sugar together in a large bowl with a whisk. Then, add the egg and vanilla extract and mix everything together until it's smooth. Slowly add the dry ingredients to the wet ones while mixing them together. Do this until a dough forms. Mix in the chocolate chips until they are spread out evenly. Using a cookie scoop or spoon, drop dough onto a baking sheet that has been prepared. Leave about 2 inches between each cookie. Put the cookies in the oven for 10 to 12 minutes, or until the edges are golden brown. Let the cookies cool for 5 minutes on the baking sheet before moving them to a wire rack to cool all the way.
Prep Time: 15 minutes
Cook Time: 10-12
Kelly
0 notes
Text

These flourless peanut butter blueberry muffins are a delightful gluten-free treat that combines the nutty richness of peanut butter with the sweet burst of fresh blueberries. They are easy to make and perfect for a quick and healthy snack.
Ingredients: 1 cup peanut butter. 2 ripe bananas. 2 eggs. 1/4 cup honey. 1 tsp vanilla extract. 1/2 tsp baking soda. 1/4 tsp salt. 1 cup fresh blueberries.
Instructions: Warm your oven up to 350 F 175C and put paper liners in a muffin tin. Put the peanut butter, eggs, honey, vanilla extract, baking soda, and salt in a blender or food processor and blend or process until smooth. Mix and blend until smooth. Mix the fresh blueberries into the batter very slowly. Fill up each muffin tin cup about three quarters of the way to the top with muffin batter. Before you put the muffins in the oven, heat it up. Bake them for 18 to 20 minutes, or until they rise and feel firm to the touch. First, let the muffins cool in the pan for a few minutes. Then, move them to a wire rack to cool completely. Have fun with your tasty peanut butter blueberry muffins that don't need flour.
Elle D
0 notes
Text

This Chocolate Chip Zucchini Paleo Bread is a delightful and healthier treat. It's grain-free, gluten-free, and dairy-free, making it perfect for those following a paleo diet. The zucchini adds moisture and nutrition, while the chocolate chips provide a satisfying touch of sweetness.
Ingredients: 2 cups almond flour. 1/4 cup coconut flour. 1/4 cup raw honey or maple syrup. 3 eggs. 1 tsp vanilla extract. 1 tsp baking soda. 1/2 tsp cinnamon. 1/4 tsp salt. 1 cup grated zucchini, squeezed to remove excess moisture. 1/2 cup dairy-free chocolate chips.
Instructions: Preheat your oven to 350F 175C. Grease a loaf pan with coconut oil or line it with parchment paper. In a large mixing bowl, combine almond flour, coconut flour, baking soda, cinnamon, and salt. In another bowl, whisk together the eggs, honey or maple syrup, and vanilla extract. Pour the wet ingredients into the dry ingredients and mix well until you have a smooth batter. Fold in the grated zucchini and chocolate chips. Pour the batter into the prepared loaf pan and smooth the top with a spatula. Bake in the preheated oven for 45-50 minutes, or until a toothpick inserted into the center comes out clean. Allow the bread to cool in the pan for 10-15 minutes before transferring it to a wire rack to cool completely. Slice and enjoy your delicious Chocolate Chip Zucchini Paleo Bread!
Jerry
0 notes
Text

Indulge in a moist and flavorful lemon ricotta cake that is safe for keto dieters. Almond flour gives this recipe a nutty flavor, and ricotta cheese makes it creamy and rich. Lemon zest adds a burst of citrusy freshness. Great for satisfying your sweet tooth while staying gluten- and low-carb.
Ingredients: 2 cups almond flour. 1 cup ricotta cheese. 1/2 cup erythritol or preferred keto-friendly sweetener. 4 eggs. 1/4 cup melted butter or coconut oil. Zest of 2 lemons. Juice of 1 lemon. 1 teaspoon baking powder. 1/2 teaspoon vanilla extract. Pinch of salt.
Instructions: Preheat the oven to 350F 175C. Grease a 9-inch round cake pan with butter or coconut oil and line the bottom with parchment paper. In a large mixing bowl, combine almond flour, erythritol, baking powder, and salt. In another bowl, whisk together ricotta cheese, eggs, melted butter or coconut oil, lemon zest, lemon juice, and vanilla extract until well combined. Fold the wet ingredients into the dry ingredients until just combined. Pour the batter into the prepared cake pan and spread it evenly. Bake for 35-40 minutes, or until the top is golden brown and a toothpick inserted into the center comes out clean. Allow the cake to cool in the pan for 10 minutes, then transfer it to a wire rack to cool completely. Slice and serve. Enjoy your keto lemon ricotta cake!
Maria Chase
0 notes
Text

These gluten-free muffins are full of healthy things like flaxseeds and hemp seeds, and the blueberries make them taste even better. Great for a healthy snack or breakfast!
Ingredients: 2 cups gluten-free all-purpose flour. 1/2 cup ground flaxseeds. 1/2 cup hemp seeds. 1/2 cup sugar. 1 tsp baking powder. 1/2 tsp baking soda. 1/2 tsp salt. 2 eggs. 1 cup unsweetened applesauce. 1/2 cup almond milk or any non-dairy milk. 1/4 cup coconut oil melted. 1 tsp vanilla extract. 1 1/2 cups fresh or frozen blueberries.
Instructions: Warm up the oven to 350F 175C and put paper liners in a muffin tin. Gluten-free flour, ground flaxseeds, hemp seeds, sugar, baking powder, baking soda, and salt should all be mixed together in a large bowl. Add the applesauce, almond milk, melted coconut oil, and vanilla extract to a different bowl. Whisk the eggs together in that bowl. Combine well. Add the wet ingredients to the dry ones and mix them together just until they are mixed. Add the blueberries slowly and carefully. Fill up each muffin tin cup about two thirds of the way to the top with batter. Put the muffins in an oven that has already been heated for 20 to 25 minutes, or until a toothpick inserted into one comes out clean. First, let the muffins cool in the pan for a few minutes. Then, move them to a wire rack to cool completely. Have fun with your gluten-free muffins made with blueberries, hemp, and flaxseed.
Henry
0 notes
Text

Full of real fruit, these Berry Crumble Bars don't have any gluten. They taste great for breakfast or as a snack.
Ingredients: 2 cups gluten-free oats. 1 cup almond flour. 1/2 cup coconut sugar. 1/2 teaspoon baking powder. 1/2 teaspoon salt. 1/2 cup coconut oil, melted. 1/4 cup maple syrup. 2 cups mixed berries such as blueberries, raspberries, and blackberries. 2 tablespoons cornstarch. 1 tablespoon lemon juice.
Instructions: Set the oven to 350F 175C and heat it up. Put parchment paper around the edges of an 8x8-inch baking pan, leaving some overhang to make it easy to take off. Put the oats, almond flour, coconut sugar, baking powder, and salt in a large bowl and mix them together. Melt the coconut oil and maple syrup and then add them to the dry ingredients. Mix until everything is well mixed and crumbly. Making a crust, press two-thirds of the oat mixture into the bottom of the baking pan that has been prepared. Put the mixed berries, cornstarch, and lemon juice in a different bowl. Make sure the berries are covered all the way through. Cover the oat crust in the baking pan with the berry mix. Spread the rest of the oat mixture out evenly on top of the berries. It should be baked in a hot oven for 35 to 40 minutes, or until the top is golden brown and the berries start to bubble. Take it out of the oven and let it cool in the pan for a full hour. When the bars are cool, use the extra parchment paper to lift them out of the pan. Serve it cut up into squares.
Mya
0 notes
Text

You can eat these vegan chocolate chip cheesecake bars without feeling bad about it because they are gluten-free and paleo-friendly. The best dessert or snack is one that has both creamy cashew cheesecake and a chewy chocolate chip crust.
Ingredients: 1 cup soaked cashews. 1/4 cup coconut cream. 1/4 cup maple syrup. 1/4 cup coconut oil, melted. 1 tsp vanilla extract. 1/4 tsp salt. 1/2 cup dairy-free chocolate chips. 1 cup almond flour. 2 tbsp coconut flour. 2 tbsp maple syrup. 2 tbsp coconut oil, melted. 1/4 tsp baking soda. 1/4 tsp salt.
Instructions: Set the oven to 350F 175C and heat it up. If you soak cashews in maple syrup, add them to a food processor along with coconut cream, coconut oil, vanilla extract, and salt. Blend the mixture until it is smooth and creamy. Add the chocolate chips that don't contain dairy. Use a different bowl to mix the coconut flour, maple syrup, baking soda, salt, and baking oil until a dough forms. To make the crust, press the dough into the bottom of a baking dish that has been lined with parchment paper. Spread the cheesecake mix out evenly over the crust. When the edges are golden brown, it's done baking. Let it cool all the way down before cutting it into bars.
Monty
0 notes
Text

This pie crust is made with coconut flour and is gluten-free and keto-friendly. It's great for low-carb desserts or savory pies.
Ingredients: 1 cup coconut flour. 1/2 cup coconut oil, melted. 2 tablespoons powdered erythritol or preferred keto sweetener. 1/4 teaspoon salt. 1/4 cup cold water.
Instructions: Warm the oven up to 175F 350C. Put melted coconut oil, powdered erythritol, salt, and coconut flour in a bowl. Adding cold water little by little while mixing makes a dough. Spread the dough out evenly on the bottom and sides of a pie dish that has been greased. Use a fork to poke holes in the bottom of the crust to keep it from bubbling. After 10 to 12 minutes, the top should be lightly golden. Take it out of the oven and let it cool down before adding any keto-friendly filling you like.
Prep Time: 15 minutes
Cook Time: 12 minutes
Bianca Baker
0 notes
Text
Transform your baking with Guar Gum Powder! Enhance texture, retain moisture, and perfect gluten-free recipes for professional-quality results.
For more information : https://www.agrogums.com/applications
0 notes
Text
youtube
Are you ready for a delicious treat that's vegan, gluten-free, dairy-free, and nut-free? These 5-minute microwave chocolate brownies are made with a surprising ingredient - chickpeas! Packed with protein and fiber, these brownies are healthy and incredibly easy to make. Mix the ingredients, pop them in the microwave for 15 minutes, and voila! You'll have a batch of moist and fudgy brownies ready to devour. And to make them even more irresistible, drizzle some dark chocolate on top. The texture is absolutely divine! Don't wait any longer - join me in making these mouthwatering brownies today.
#15minMom#brownies#chocolate#yummy#chickpeas#veganrecipes#glutenfreebaking#microwavedesserts#vegan#plantbased#easyrecipe#kitchentips#healthyeating#womenshealth#hormonalbalance#energyboost#fatburning#mentalclarity#cycleawareness#nutrition#food#foodblogger#foodvlog#recipe#lowcarb#vegetarian#foodscience#nutritionscience#health#wellness
0 notes
Text
Making The Most of Rice Flour in Your Gluten-Free Kitchen

Rice flour, often a staple in gluten-free pantries, can be a game-changer for those looking to whip up everything from fluffy pancakes to crispy tempura, all without a speck of gluten. So, whether you're celiac, gluten-sensitive, or just cutting back on wheat for personal preference, let's explore some of the ways you can make the most of rice flour in your kitchen too.
What is Rice Flour?
Rice flour is the product of finely milling rice grains to form a flour. It is made from either white or brown rice and has been used for centuries in traditional cuisines, especially in Asian cultures. It should contain nothing other than 100% rice, but it is always worth checking the label to be absolutely sure.
What's the difference between white and brown rice flour?
The key difference between white and brown rice flour lies in the type of rice they're milled from.
White rice flour comes from refined white rice, which has had its bran and germ removed. This process gives it a lighter texture and a milder taste, making it a fantastic thickener for sauces or a sleek base for light cake recipes. Like white rice, it has a sweet, somewhat neutral flavour.
Brown rice flour is made from the entire kernel so it has more nutrients, as well as a richer, nuttier flavour. Added to breads and baked goods, it has a heavier, more textured, wholesome feel.
Is Rice Flour Gluten Free?
Yes, made from 100% rice, both brown and rice flour are gluten-free.
Can I Use Rice Flour Instead of Gluten Free Flour?
Rice flour is made from a single grain, whilst commercial gluten-free flour is made from a blend of more than one ingredient. It is produced that way in order to create an all purpose product with a variety of uses as it is very difficult to mimic the unique properties of wheat flour. The aim is to strike the right balance of starch and protein. You can find out more about this in our article 'an in-depth guide to using gluten free flours'.
Neither wholly starch, or particularly high in protein, the neutral, somewhat sweet, flavour of white rice flour makes it an ideal component of all-purpose gluten-free flour blends, which you can buy off the shelf, or make up yourself.
Used alone, rice flour does have its limitations and will not always be suitable for every purpose, but there are times when it is the perfect flour for the job.
What is Rice Flour Used For?
Rice flour is incredibly versatile and can be used in a number of ways. Here are just a few:
Baking
Rice flour can be an excellent option for gluten-free baking. It's often used in cakes, cookies, and muffins to provide a delicate, fine crumb.
Thickening Agent
Its neutral flavour makes rice flour a go-to for thickening soups, sauces, and gravies without altering the taste.
Noodles
In many Asian cuisines, rice flour is the base for making tender and chewy noodles.
Deep Frying
It's a popular choice for creating a light, crispy batter for fried foods or as a dusting for meats and veggies before sautéing.
Flatbreads
As a staple grain in many parts of the world, rice flour is used for making flatbreads, offering a wheat-free alternative with great texture.
Desserts
It’s a star in sweet dishes too, particularly in making mochi or other traditional sweets.
Advantages of rice flour
One of the standout advantages of rice flour is its relative versatility in the kitchen. Whether you're whipping up a batch of crispy tempura, crafting delicate noodles, or baking a light and fluffy sponge cake, rice flour can rise to the occasion.
A useful store cupboard staple for those with dietary restrictions, ensuring that everyone can indulge in their favourite treats, rice flour has a light texture makes it an excellent choice for recipes that require a subtle finish without overpowering other ingredients.
Disadvantages of rice flour
To be fair, rice flour is not without its drawbacks. While it's a fantastic gluten-free option, it can sometimes result in a crumbly or gritty texture, particularly in baked goods that crave the stretchiness of gluten. It also tends to absorb more moisture than wheat flour, which can be a bit of a balancing act when tweaking traditional recipes.
Rice flour on its own lacks some of the nutritional benefits found in its gluten-containing counterparts and doesn't provide the same rise and elasticity that many baked recipes depend on. So while it is incredibly versatile, it may require a bit of experimentation and patience to perfect its use.
When it comes to using gluten free flour, and rice flour is no exception, it is essential to understand how your chosen ingredient behaves and to use it wisely. By all means experiment to see how far you can push the boundaries, but achieving perfect results in gluten-free cooking is always a fine balancing act.
Using Rice Flour as a Thickener
Rice flour is excellent for thickening sauces and gravies, adding more body than cornflour or other similar starches. Just go slowly though as it takes longer to thicken than starch or wheat flour so it can be easy to add too much.
Using Rice Flour in Baking
There are times in baking when the gluten in wheat flour is not really needed or can actually work against you. Think about the tender crumb of a delicate sponge cake that can so easily become tough when overmixed. Or the crisp crust of a cookie or a pastry that requires the lightest of touches lest the gluten be overstretched. A chewy gooey brownie requires very little flour to begin with, so switching to rice flour is barely even noticed. Sometimes the dreaded sandy texture of rice flour can even work in your favour. Shortbread, anyone?
How to make a basic rice flour mixture for baking
For best results when baking with gluten free flours you should consider adapting each recipe individually, switching out individual flours to achieve the best result possible. But there are times when you can use an all purpose blend that you can store in the cupboard in the same way as you would all purpose wheat flour.
Creating your own basic rice flour mixture for baking is simple. Start with 2 cups of finely ground rice flour. Then, for every cup of rice flour, add 2/3 cup of potato starch and 1/3 cup of tapioca starch to help give it the structure it might miss without gluten. A pinch of xanthan gum (about 1 teaspoon for this mix) can also help mimic gluten’s elastic qualities.
When it comes to substituting gluten-free flour for wheat flour, it's not always a straight one-to-one swap. Gluten-free flours have different textural properties and densities, and they often require a bit of trial and error to get the proportions just right for your recipe.
Adjusting recipes to substitute wheat flour with rice flour
Let's talk about tweaking those recipes when substituting wheat flour with our rice flour blend.
First off, you need to know that rice flour is thirsty; it soaks up moisture like a sponge. So, you might need to add a little more liquid to stop your dough from being too crumbly. And since rice flour is also lighter than wheat flour, your bakes might need a little extra help to rise, so consider increasing your leavening agents slightly. Still, there's nothing daunting about it! Just start slow, perhaps with a 1:1 swap, and then adjust from there. Keep notes of what works (and what doesn't) until you get results you are happy with.
How to prevent grittiness with rice flour
Fortunately grittiness is not as tricky to tackle as you might think.
To steer clear of that sandy texture, a good rule of thumb is to use a finely ground rice flour. The finer the grind, the smoother your baked goods will feel.
Hydrate your rice flour by letting your batter or dough rest for about 30 minutes before baking. This gives the flour time to absorb the liquids fully, resulting in a finer, tender crumb.
Don't skip sifting; it aerates your flour, helping to keep things light and fluffy.
Using Rice Flour for Deep Frying
Rice flour makes an ideal batter for deep frying and is the quickest route to that all important crispy crunchy crust.
The light and fine texture of rice flour helps create an irresistibly crispy coating that turns golden brown and holds up better to sauces and dips without getting soggy. And this is one time where the crunchy, gritty texture can work in your favour. Here's a tip: mixing rice flour with a bit of cornstarch can work wonders for an even crunchier, more durable crust.
It's a gluten-free godsend for those who still want to enjoy perfectly fried chicken, crispy onion rings, or a batch of tempura veggies without the gluten.
Recipe for crispy rice flour batter
Ingredients:
1 cup rice flour
2 tablespoons cornstarch
1 teaspoon baking powder
1/2 teaspoon salt
1/4 teaspoon pepper (or to taste)
1 cup cold sparkling water (for extra lightness!)
Optional seasoning: pinch of paprika or garlic powder to enhance the flavour
Instructions:
In a large bowl, whisk together the rice flour, cornstarch, baking powder, salt, and pepper.
Slowly pour in the cold sparkling water, and stir until just combined.
Let your batter sit for about 10 minutes. This allows any lumps to smooth out and gives the rice flour time to hydrate so it is tender.
And there you have it, it looks like rice flour could be a vital ingredient in your gluten-free kitchen.
Its light texture and neutrality mean it's your perfect partner for a range of recipes, from thickening sauces to baking brownies and beyond. All in all we think its a great kitchen staple.
Where to buy rice flour in bulk
There are many ways to save the pennies here at Opera Foods. Take advantage of bulk buy savings on our organic white rice flour, or register for a wholesale account for even greater discounts.
This article was reproduced on this site with permission from operafoods.com.au the “Gluten Free Suppliers”.
See original article:- Making The Most of Rice Flour in Your Gluten-Free Kitchen
Read the full article
0 notes
Last Seen Blogs

somanysoftshapes
so many soft shapes

big-doodle-time
Untitled

babelpow
bibi

solstice-muse-collective
Solstice Muses

7788tapioka
題名未設定