#HOW TO CROCHET FOR ABSOLUTE BEGINNERS
Text
Least favorite part of teaching someone to crochet is that you teaching yourself weird little tricks that are second nature to you but absolutely make zero sense to a beginner
Or just trying to explain how to do a magic circle
97 notes
·
View notes
Text

Is he wonky? yes Do I still love him? absolutely xddd This took me like a half a year xdd I did not worked on it really intensely but still quite a big project xdd. Plus I am still beginner in crochet. Or I feel like it xddd I made him mostly when I was in town where my uni is and during my rides in train. So yeah he was not priority xddd But now he is my „study buddy“. I partly filled him with beads, so he is my fidget toys. I love the sounds the bead are making and the general „feel „of it? Idk how to describe it xd


#baldur's gate 3#baldur's gate iii#bg3#bg3 fanart#bg#baldurs gate fanart#baldurs gate#handmade plushie#owl bear#owl bear plushie#owlbear#owlbear plush#crochet plush#crochet
16 notes
·
View notes
Note
Don't currently know how to crochet, but will try to learn soon and I really want to make a shark jester opossum, would they work out together or would it not work
Oh yeah, it would work well. You would basically make a jester Posm, but replace the tail with the shark tail, and add fins.
If you're a complete beginner, I recommend HappyBerry Crochet's YouTube channel, as that channel got me started on crocheting 7 years ago! Of course, this is just what worked for me. Other tutorials may work better for you, but I highly recommend this channel. Here is the link to her beginner tutorials:
I also have some simpler patterns for free on my website, they consist of a baby posm crochet pattern and a worm on a string crochet pattern (the worm one even has a video tutorial!) Here is the link to that if you're interested:
Thank you for choosing Nichet Crochet! I hope your crochet journey goes well.
#crochet opossum#crochet possum#crochet pattern#crocheters of tumblr#free crochet pattern#how to crochet#crochet patterns#crocheting#crochet#possum#opossum#opossum memes#happyberry crochet#tutorial#hobbies
47 notes
·
View notes
Text
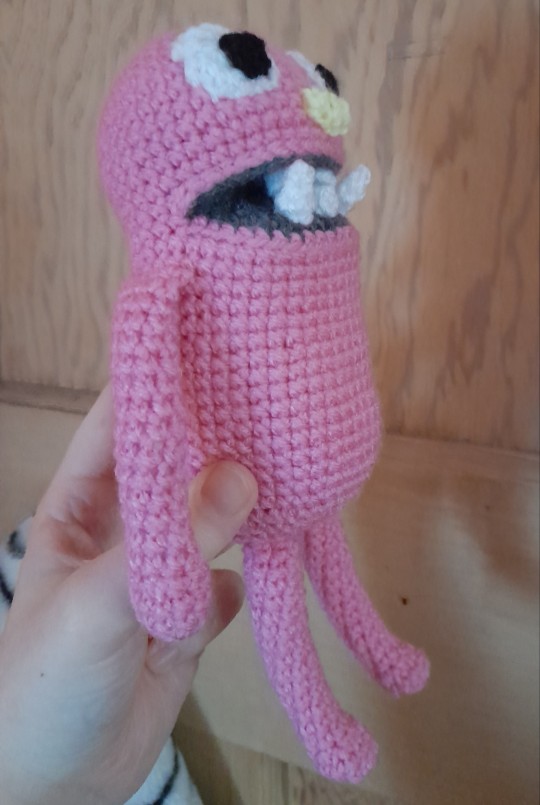
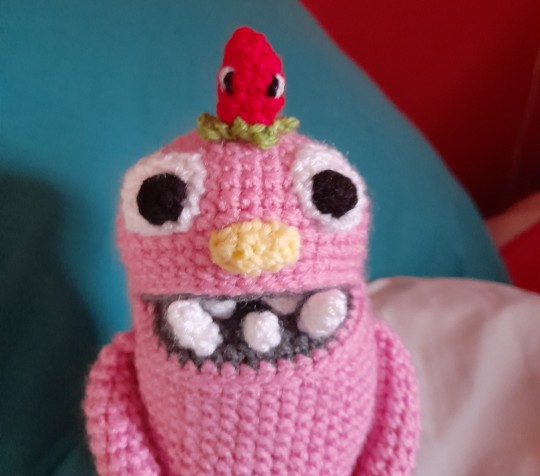
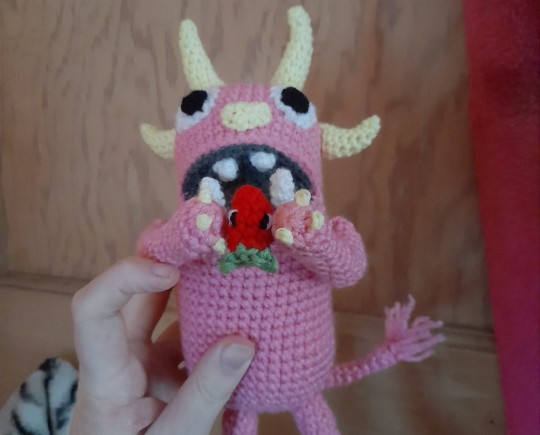
Free Grump crochet pattern!
Ravelry link
Pattern is also under the cut, but there are fewer photos due to Tumblr limits.
My grumpus base pattern is finally done! It's up on Ravelry as a free download in the link above. This pattern was actually fun to create, so I might make more in future.
Included:
- the base Grump (unchanged, it will create the basic Filbo Fiddlepie body type)
- a few different tooth patterns and advice for your own dental config
- extra details: 2 sizes of horns and a fluffy tail
- lil strabby (can change colour for white strabby, razzby, or black razzby)
With a few edits (such as torso and limb length), this pattern can create many different sizes and shapes of Grumpus.
If anyone makes one using this pattern, I'd love to see it!
PATTERN BELOW:
Note: Your DK yarn can be switched out for larger or smaller yarn, and this will change the size of the resulting Grumpus. Make sure to use a slightly smaller hook than the yarn label recommends for the best amigurumi gauge. I used DK and a 3.5mm hook.
Note: This contains instructions of how to make level-jawed Grumpuses, suitable for level or underbite Grumps. A little tucking can make a small overbite possible, but if your Grumpus has a significant overbite, their face would require a different shape.
Note: This pattern will create a Grump with a basic Filbo Fiddlepie body type. See the 'optional' section at the bottom for edits. If you want a drastically altered Grump, this is possible to make with a few edits, but I recommend practicing by making a basic one first following the instructions before you consider large changes in order to reduce errors.
You will need to know:
- how to make single crochets and slip stitches in the round
- how to increase and decrease
- how to attach parts
- how to add simple embroidery (optional)
Some parts are fiddly. This is not a pattern for absolute beginners, but should be possible for most crocheters.
You will need DK yarn in the following:
- in your chosen fur colour (less than one ball)
- in dark grey or another inner mouth colour (way less than one ball)
- in white (way less than one ball)
- in black (small amount)
- in your chosen nose colour (small amount)
Optional yarn:
- chosen claw colour, probably same as nose (small amount)
- chosen horn colour, probably same as nose (way less than one ball)
- red for the Strabby (small amount)
- green for the Strabby (small amount)
You will also need:
A 3.5mm hook
Stuffing/polyfill (I draw from a pillow that ripped)
Scissors
A darning needle
If you have them, pins help a lot
MOUTH DISC (dark grey, black, or another inner mouth colour)
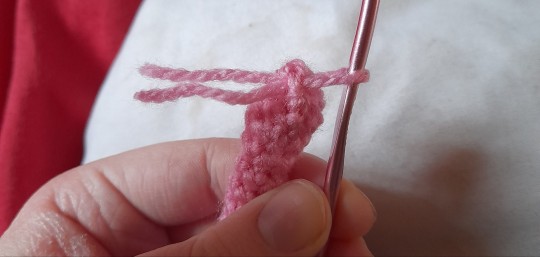
1. Put 8sc into a magic ring (or chain 2 and put 8sc into the second chain from the hook) [8 stitches]
2. 1inc x8 [16]
3. (1sc, 1inc) x8 [24]
4. (2sc, 1inc) x8 [32]
5. (3sc, 1inc) x8 [40]. Finish off, you don't need a long tail because it will be tucked inside. Fold in half with the last stitch at one edge and put aside for later.
(Note: The wrong side of the piece should face inside the Grump, so it should be the outside of the angle, but it doesn't really matter.)
BODY (your chosen fur colour)
1. Put 6sc into a magic ring (or chain 2 and put 6sc into the second chain from the hook) [6 stitches]
2. 1inc x6 [12]
3. (1sc, 1inc) x6 [18]
4. (2sc, 1inc) x6 [24]
5. (3sc, 1inc) x6 [30]
6. (4sc, 1inc) x6 [36]
7. (5sc, 1inc) x6 [42]
8-14. Sc around (7 rounds) [42]
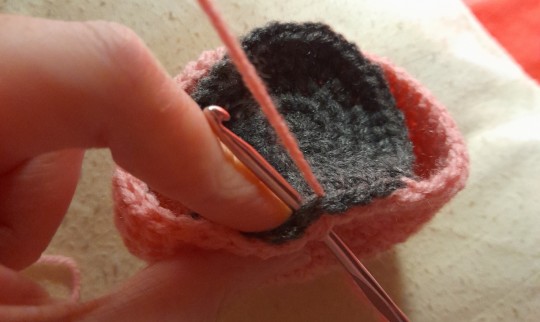
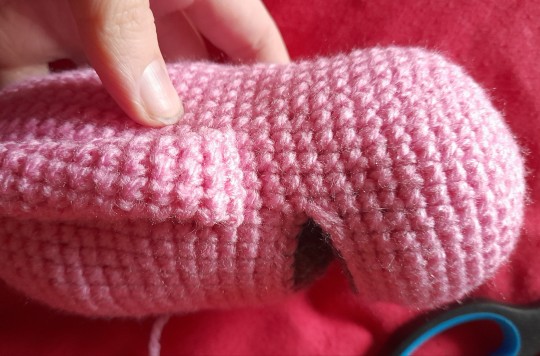
15. Put your hook through the next stitch of the body and up into the final stitch of the mouth piece. Slip stitch (not too tightly) across for a total of 20 stitches. Now half of the mouth disc should be attached to the body. Leaving half of the mouth disc unworked, sc around the remaining 22 body stitches. [42]
16. Sc across only the remaining 20 mouth stitches. Rejoin on the body and sc across the remaining 22 body stitches. The whole mouth should now be inside the Grumpus, though it will look odd at this point. [42]
17. In the back loop only, sc across the next 20 stitches (across the lip). In both loops, sc across the remaining 22 stitches. [42]
18-32. Sc around (15 rounds). [42]
Stuff as you go. Ensure there is stuffing in the head.
33. (5sc, 1dec) x6 [36]
34. (4sc, 1dec) x6 [30]
35. (3sc, 1dec) x6 [24]
36. (2sc, 1dec) x6 [18]
37. (1sc, 1dec) x6 [12]
38. When stuffed, 6dec to finish.
Cut yarn, sew through the 6 outer loops and cinch the hole shut, and hide the yarn end.
ARMS (make 2 in your chosen fur colour)
1. Put 6sc into a magic ring (or chain 2 and put 6sc into the second chain from the hook) [6 stitches]
2. 1inc x6 [12]
3-4. Sc around (2 rounds) [12]
5. (1sc, 1dec) x4 [8]
6-18. Sc around (13 rounds) [8]
Stuff, then flatten the end and sc across both sides of it. Finish off and leave a tail for sewing. Attach the arms flat at the sides, 2 rounds below the mouth level.
LEGS (make 2 in your chosen fur colour)
1. Put 6sc into a magic ring (or chain 2 and put 6sc into the second chain from the hook) [6 stitches]
2. 1inc x6 [12]
3. Sc around [12]
4. 4dec, 4sc [8]
5-18. Sc around (14 rounds) [8]
Slip stitch into the next stitch and finish off. Stuff, then attach just below the hips.
EYES (make 2 in white)
1. 7sc into a magic ring [7]
2. 7inc [14]
Slip stitch and finish off. Attach to the face high and wide, about 4-5 stitches between them. See images.
PUPILS (make 2 in black OR embroider on pupils)
1. 3sc into a magic ring [3]
Slip stitch into the first sc and finish off. Attach to the eyes so that the Grump is looking slightly inwards.
(Optional: You can make eyelids by adding embroidered lines in fur colour over the very top of the eyes.)
ROUNDED NOSE (your chosen nose colour)
(Alternatively, there is an oval nose pattern below.)
1. 6sc into a magic ring [6]
Slip stitch into the first stitch and finish off. Attach.
OVAL NOSE (your chosen nose colour)
Chain 4.
(2sc, 3sc in the end chain), repeat along the other edge of the chain. [8]
Slip stitch and finish off. Attach between and below the eyes.
TEETH (white)
Ok, here's where things really get personalised. Pretty much every Grumpus has their own unique tooth size configuration, and you likely an idea in mind or a reference to work from. Therefore, I'm going to give you several tooth patterns and you can make your own dental configuration.
Canon Grumpuses have 4 teeth on top and 3 below, unless they have missing teeth like Shelda. The outer pairs of teeth often show the greatest size differences but not always.
For my Grump, I've chosen to leave out the outer top teeth for a cleaner look. However many teeth your Grump has is up to you.
TIP: pin your teeth in place and move them around to find the best spacing and configurations before sewing them on.
SMALL TEETH
These will make good tiny teeth. These are typical top middle teeth and the typical bottom middle tooth.
1. 3sc into a magic ring [3]
2. 2sc, leave the last stitch unworked. [3 total]
Finish off. Use the end of the crochet hook to push the centre outwards into a triangle shape.
PLAIN TEETH
These are for those medium-sized unremarkable teeth. (See Filbo's bottom teeth or Wiggle's top middle teeth.)
1. 5sc into a magic ring [5]
2. 5sc [5]
3. (Optional to make them bigger -- 5sc [5])
Finish off.
LARGE WIDE TEETH
These are Fizzlebean style outer bottom teeth.
1. 8sc into a magic ring [8]
2. sc, 1dec, 2sc, 1dec, sc [6]
3. 6sc [6]
Finish off and squeeze to flatten a little.
FANGS/TUSKS
These are Wambus/Chandlo style sharper chompers. Top or bottom outer teeth.
1. 3sc into a magic ring [3]
2. 3sc [3]
3. 1inc, 2sc [4]
4. (Optional to make them bigger -- 1inc, 3sc [5])
Finish off.
Create as many of whatever kind you please and get creative. After the teeth are sewn into their desired places, you've completed the base Grumpus!
Thank Grump!
FURTHER PERSONALISATION
- Look below for extra piece patterns.
- You can add/remove rounds of the body to give your plush a longer or shorter body.
- You can alter the body to flare out at different points by adding increase or decrease rows at the shoulders, hips, belly, wherever.
- The arms typically reach to just below the hips and the legs are typically a similar length, this can be altered by adding/removing sc rounds.
- Using colour changes, try adding splotches or stripes. Or, try variegated yarn.
- If you use acrylic yarn, you can use a wire brush or a stiff plastic hairbrush to brush the fur of the Grump until fluffy. This takes a bit of elbow grease and can cause yarn breakages, so do with caution, and do this to seperate pieces before any sewing or detail work.
- You can use another colour to embroider evenly spaced claws onto the limbs of your Grump. Small lines will do, but 3-wrap French knots can produce good 3D claws.
SIMPLE TAIL (your chosen fur colour)
You don't need to stuff this. Add the tufts to the end before stuffing if you want to stuff it anyways.
1. 6sc into a magic ring [6]
2. (1sc, 1inc) x3 [9]
3. 9sc [9]
4. (1sc, 1dec) x3 [6]
5-17. Sc around (13 rounds) [6]
Finish off with a tail for sewing on. Attach on the lower back/the butt in the desired spot.
Note: add or remove sc rounds to make a longer/shorter tail.
(Optional) To add tufts of fluff to the end, cut a few small bits of yarn (fur colour or another colour) and use your hook to pull it under and out. Pull the ends through the loop and pull tight. You only need a dozen or fewer scraps to do this. Then trim the fluff until it looks as desired.
SHORT HORNS (make 2 in any colour)
1. 3sc into a magic ring [3]
2. 2sc, 1inc [4]
3. 3sc, 1inc [5]
4. 4sc, 1inc [6]
5. 5sc, 1inc [7]
6. 6sc, 1inc [8]
7. 7sc, 1inc [9]
8. 9sc [9]
Slip stitch and finish off. Stuff a little. Position as desired on head.
LONG HORNS (make 2 in any colour)
1. 3sc into a magic ring [3]
2. 2sc, 1inc [4]
3. 3sc, 1inc [5]
4. 4sc, 1inc [6]
5. 5sc, 1inc [7]
6. 7sc [7]
7. 6sc, 1inc [8]
8. 8sc [8]
9. 8sc [8]
10. 7sc, 1inc [9]
11. 9sc [9]
12. 9sc [9]
Slip stitch and finish off. Stuff and position as desired on head.
LIL STRABBY (begin in red, or pink for a Razzby)
1. 4sc into a magic ring [4]
2. (1sc, 1inc) x2 [6]
3. (2sc, 1inc) x2 [8]
4. 8sc [8]
Change colour to green
5. (1dec, picot) x4
Slip stitch and cut the yarn. Embroider two tiny eyes with black and white yarn. Tuck all ends inside.
This can be sewn to the Grump's paws, in its mouth, kept loose, or whatever you please.
Woohoo! Grump done!
#bugsnax#amigurumi#crochet#free pattern#strabby#filbo fiddlepie#tagging filbo because this pattern will create him easily with the right colors
23 notes
·
View notes
Text
plants and bird and rocks and things
I just published a new pattern on Ravelry!

It's a cute cropped t-shirt with everything I love:
RAGLAN SLEEVES!! of course.
nice, rounded neckline because I don't like my neck to feel stuck
short sleeves b/c I'm always hot
just a little positive ease at the bust
lil' pop of color to make things interesting
cropped because layering is fun
When I was still working on it, the Ravelry project page title was "a crop top with no name" and it kept reminding me of America's A Horse With no Name so I turned to the song lyrics to find a name. I went with "plants and birds and rocks and things" and one thing about me is when I find a name that makes me chuckle a bit, I usually keep it. I loved how long it was so it stuck.
How it's knit: cast-on the neck stitches, knit flat to shape the neck, knit in the round until sleeves/body split, finish the body, finish the neckline, finish the sleeves, surface crochet for the vertical lines. So it's all one piece, top down, no sewing, no colorwork. My patterns always have you finish the body before the sleeves but in reality, after I have split the body and sleeves, I knit the body until I finish my ball of yarn, then I do neckline-sleeves-body. That's because I like to maximize the use of my yarn and I am pickier with sleeve length than body length, so often I will knit the sleeves to fit what I have in mind and then whatever's left goes in the body.

I only need three 100g skeins of fingering weight for a 4XL cropped t-shirt so that's why I love crop tops. I can still use nice hand-dyed yarn but it's less expensive. This design needs 2 to 4 skeins only, and is graded to fit from a XS to a 6XL. I follow the Craft Yarn Council charts for sizing, but I add a little more ease to the sleeves.
I don't write my patterns with beginners in mind specifically, but if you're an adventurous knitter, even if you've never knit a sweater, I think this one should be easy enough and you should be able to find resources easily. Plus, it's a short sleeve crop top, so it doesn't take as long as a full length sweater - it might be more encouraging if you've never undertaken a big project like that.
I really hope someone out there uses all different colors for the vertical lines!
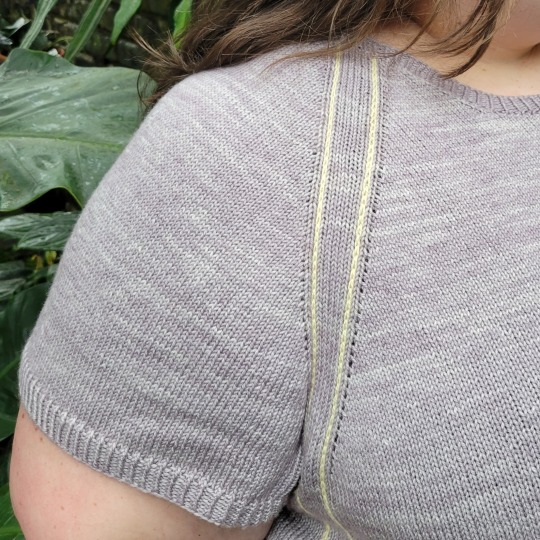
The yarn was generously provided by Julie Asselin, who is a wonderful person and a treasure of the knitting community. I am using her Fino base, which is a lovely mix of merino, cashmere and silk. I love this base for a layering piece, because the cashmere and silk give it delicious drape. The color here is Brume. I absolutely needed a pastel/lavender sweater, and Brume delivered.
My contrasting color is Are U Crazy? from my dear friend Bleu Poussière. Can you believe this pastel neon yellow was obtained with NATURAL DYES? She only uses nature for her colors - flowers, roots, mushrooms. My favorite color of hers is anything dyed with logwood.
149 notes
·
View notes
Text
The Lace Guild Books, review:
Let’s start with “Basic Technical Instruction”. It is very good at making the basics comprehensible for first time needle lacemakers, and it (very fortunately for me) will stop you from making the worst and easiest possible mistakes. I always like to revisit the first part of the pamphlet when I’m tacking down a new cordonnet… Mostly because from experience, I know if I don’t, it will be disastrous. This is because it’s one of the slowest possible things to do, so it can be several months between projects, even if I’m working every day and have multiple ongoing projects at different stages. The diagrams are VERY easy for beginners to understand, the instructions are well-written, in-depth, and build upon each other, the stitches are named so you can research them further, and there are a bunch of patterns with different motifs that get more complex and in-depth as you progress.
It also does assume you’re working with thinner thread (dentelle 80 from DMC, I think) but… like… don’t do that if you don’t have oversight from a professional? I know some people recommend size 3 crochet cotton but size 10 or 12 is fine (and is where I started). As a little tip (and sidenote): don’t use knitting thread. I’ll demonstrate in a video later but if you use knitting thread you are asking for trouble. Knitting thread (and some embroidery thread, I promise I will get threads and film it to show you exactly why) can’t really stand the constant rubbing against paper and metal you’re going to be doing. It’s asking for knots and other problems. Use crochet thread! Or really, really thick sewing thread! Stuff that is made for weirdness and rough handling!!!
Back to the review: the main problem (and the reason people try to skip it or might choose to buy a Doreen Holmes book on the subject instead) is the basic instruction manual is very easy to outgrow. Because it’s for the absolute fundamentals, there’s very, very little talk about stylistic choices and lace traditions.
That’s where the “Intermediate Technical Instruction” comes in. Sort of. It’s not really fully intermediate, but it assumes you’re comfortable making stitches and know basic terminology and are ready for more. It transitions you into intermediate but adding new skills and showing off different traditions a new (but not novice!) lacemaker can theoretically accomplish. I highly recommend doing several patterns from “Basic Technical Instruction” before starting this, but please at least complete the first one before starting on a more advanced pattern!
Speaking of patterns, all of the patterns in these books are basically decorative samplers. It’s more interesting and teaches more skills than simple squares, but it’s not meant to make *make* anything (which you can absolutely ignore). Pat Earnshaw, Margaret Stephens, and Catherine Barley’s books all do have patterns you can put to use, but only Catherine Barley and Margaret Stephens’s teaches how to make traditional lace in the way you think to use traditional lace.
40 notes
·
View notes
Note
Does spinning yarn for thread differ substantially from spinning it for knitting, other than being just very thin? I embroider and I'm considering getting into weaving, but knit and crochet never managed to grab me.
No, not substantially, except that fine spinning requires both practice and skill. So you would need to learn to spin yarn first and then learn to spin thinner from there--I don't think beginners have the necessary control to spin thread weight right off the batt, and you won't find any tutorials or help for learning to spin thread weight as a beginner.
That said, if you were asking as someone who already knew how to spin, my advice would just be: get a supported spindle; it does 99% of the work of fine spinning for you. You absolutely can spin thread weight on mini drop spindles, on specifically calibrated spinning wheels (usually using cross lacing or with a particular type of tension), and on unsupported medieval spindles, among other tools. I've seen my very skilled mutuals spin insanely fine yarn on all of those. But like, then there's me--guy who doesn't even like or want thin yarn, who has put approximately zero effort ever into learning to spin finely, and I can get frog hair on a supported spindle without much trouble. So if you go for the best suited tool, you won't necessarily have to spend like 5 or 6 years getting REALLY good at your craft before you can spin thread. That said, even then I do have 5 years of spinning in general under my belt, just none of it fine spinning. Like I said earlier--it requires more control and understanding of what you're doing than just spinning yarn. But if you worked toward it immediately im sure you'd get there a lot faster than someone who was also trying to learn to spin Yarn.
Other tips for successfully spinning thread weight: don't choose short stapled fibers if you don't have to (ive spun cotton sewing thread, it's not particularly easy though)--longer stapled fibers won't snap as easily, so flax, fine longwools, and silk are your best bet.
For wool choose hand combed top. By far the best way to get a good smooth thread that won't pill and fray as you sew with it. Hand combs aren't very cheap but a pair of minis would be more than enough if you only ever use if for prepping thread.
Also--you could just bypass learning to spin entirely (for now at least) and look into silk reeling instead--that's taking silk cocoons and unwinding the silk, usually a few at a time, to get a very fine thread. I've seen some people then add twist and some not, but either way it would be a much better thread than you'd get from spinning it yourself until you had quite a bit of practice.
Actual practiced fine spinners please weigh in here lol
#i cant actually work with fine yarn in most capacities bc my hands are fucked up#so i am not the best spinner to have asked because i probably have tried it the least of any spinner i know lol#sorry about that#spinning
63 notes
·
View notes
Text
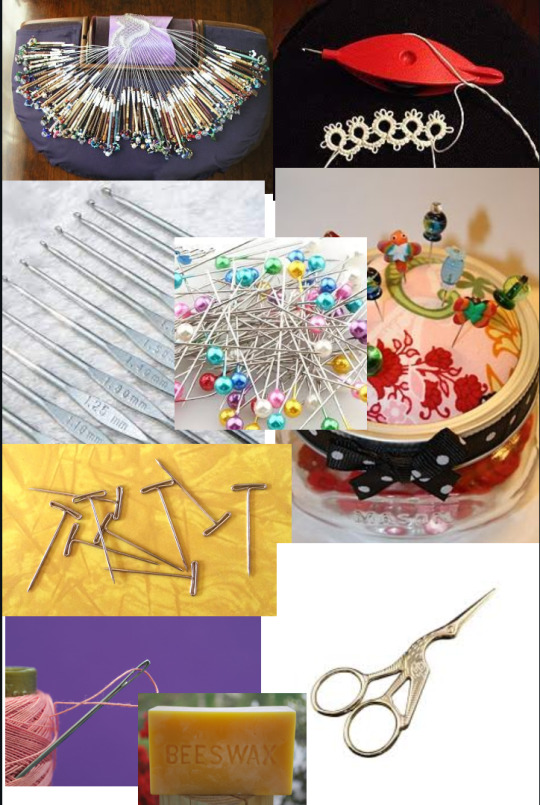

I have been thinking about what types of notions and things the craft dorm (what I've been calling the Shu/Izumi/Kuro/Mao dorm) would have in their respective kits and ended up making some collages with my thoughts. In order it's Shu, Izumi, Kuro, and Mao. Longer explanation below the cut.
Shu:
Since he canonically makes lace I put all sorts of different lace making tools on his. In the english server it got translated as crochet and crochet lace can be absolutely gorgeous and it's pretty portable so it makes sense, hence the steel hooks. The other lace making tools are bobbins and a bobbin pillow and a tatting shuttle. While tatting is the "lesser" form of lace making compared to crochet and bobbins, it's by far the most portable as the thread is wound around the shuttle and to me Shu would probably do tatting on the plane to/from Japan and France. Also included for him are pretty generic sewing notions, your pins and pincushion, scissors, a needle and thread, t-pins, and beeswax. T-pins can be used to block the lace as well, and the beeswax is for hand sewing. Fun fact but if you run your thread over beeswax a few times before starting to sew it'll help strengthen your thread and prevent it from splitting! Shu also heavily prefers working with natural fibers over synthetic.
Izumi:
Guy absolutely uses DPNs (double pointed needles) for his knitting, at least when it comes to socks and hats. I believe in some of the examples of his knitting we've seen he has done cabling so a cable stitch holder is there as well, though I can imagine he does it without it too if it gets lost. He also has a ball winder and I wish I had thought to put a swift on here too but like Shu, he prefers to get natural fibers over synthetic and hand dyed wool is great but it comes in hanks which areeeeeee hard to work with so a swift and ball winder would be necessary for him. Also included are more t-pins, a blocking board, stitch markers, and yarn needles.
Kuro:
To me, Kuro is the type of guy to make scrap quilts with left over fabric from the outfits he makes for his friends (and also out of like old shirts his sister has grown out of), so he has a huge scrap fabric pile he's constantly thinking about what type of blocks to make them into. I feel like he'd also make his own appliques for these quilts and would use basting spray to hold those down, obviously. Also the type of guy who just carries spare buttons on him in case of an emergency. Also has a seam ripper, scissors (thread, fabric), a tailor's measuring tape, and a cutting board.
Mao:
I know he doesn't really craft but to me? He's a crocheter. He tried knitting once and failed very badly but crochet (in my opinion at least) is a lot easier to grasp for beginners and I think he made the dorm a few dish cloths at first but mostly makes amigurumis now of his favorite manga characters, as well as little toys for his friends, hence the safety eyes. Probably works more with synthetic fibers due to ease of accessibility and variety of colors, though he tries not to buy too much of the same color unless he knows what it'll be used for. Also has stuffing, yarn needles, stitch markers, and a little crochet hook carrying case.
General Notes:
There were some things I didn't think to add until after I had already finished all of these collages, and some things that were things I thought everyone would have. To start, Shu would obviously also have a blocking board for his lace blocking, and as mentioned earlier Izumi would have a swift. Shu probably also has a swift and ball winder or just borrows Izumi's when he buys anything heavier than thread for crochet (which isn't often so I'm leaning more towards borrowing). Kuro would also have a bar of beeswax for the same reason as Shu, as well as maybe a thimble? Though I suppose it depends on how much he cares about his fingers being callused from the needle. Shu has a thimble. I also think all four of them would have some sort of project bag, whether it's just an old backpack or something a bit more expensive, they all have something that allows them to take their crafts on the go.
Anyway that's all I had but please tell me your thoughts if you want :3
#shay speaks#enstars#ensemble stars#shu itsuki#izumi sena#kuro kiryu#mao isara#ensemble stars headcanons#enstars headcanons#i want to get a tatting shuttle :( i know how to make nets though with a shuttle and spacer#tatting lace can look really beautiful if you know what you're doing please look up some examples of it#ragh. anyway. i'm gonna stop myself from going off on too much of a tangent rn#i <3 crafting
14 notes
·
View notes
Text
I finally did it, and now I present to you:
Pho's Scuffed Mini Minecraft Axolotl Crochet Pattern! (as seen in this post)

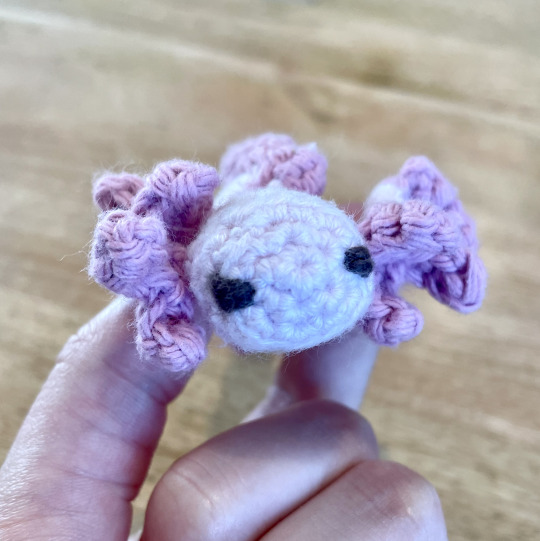
(I'm going to transcribe the pattern I used for Sir Strawberry/the pink axolotl because I personally think it looks better/he's just cuter sorry)
(US) Abbreviations + Tutorials
These are the main stitches/techniques used in this pattern, nothing too hard for a beginner to learn :)
mc: magic circle
sc: single crochet stitch
inc: increase stitch
dec: decrease stitch
ch: chain
sl st: slip stitch
hdc: half double crochet
dc: double crochet
BLO: back loop only
pic: picot stitch
And here's some tutorials to learn how to do them! (I looked at first results, but there are absolutely more out there haha)
Working in the round (magic circle)
Basic stitches (ch, sl st, sc, hdc, dc)
Increase + Decrease stitches
Back Loop Only
Picot Stitch
The Head
Round 1: 5sc in mc (5 stitches)
Round 2: inc around (10)
Round 3: (sc, inc) x5 (15)
Round 4: BLO around (15)
Rounds 5-7: sc around (15)
Round 8: (sc, dec) x5 (10)
Round 9: dec x5 (5)
Slip stitch, tie off end.
The Body
Round 1: 5sc in mc (5)
Round 2: inc around (10)
Round 3: (sc, inc) x5 (15)
Round 4: BLO around (15)
Rounds 5-9: sc around (15)
Round 10: (sc, dec) x5 (10)
Slip stitch, tie off and leave a long yarn tail to be used to attach the body to the head.
The Tail
Start by chaining 8.
Starting in the 2nd stitch from the hook, 4hdc and 3dc to the end. Tie off, leaving a long yarn tail to attach the tail to the body.
For the colored fin edge on the tail + back:
Join at one end of the base of the tail, hdc around, chain 12, and sc back under the chain. (Image in the assembly section of what this piece should look like.)
Legs (x4)
Chain 6, turn and sc back. Tie off, leaving a tail for sewing.
For the toes, 3 picot in mc, tie off and weave ends through arm.
Frills (x2)
Chain 3 in magic circle, sc back and slip stitch into mc. Repeat twice (to make three points) and tie off, leaving a tail for sewing.
Assembly
When you have finished making the pieces, they should look something like this, ignoring the frills and eye pieces.
(Image from this pattern I based mine off of. I did not purchase the pattern and plagiarize it, I only looked at the pictures and experimented until I made something I liked, but if you want to buy a professional pattern with better images/instructions, there you go lol)
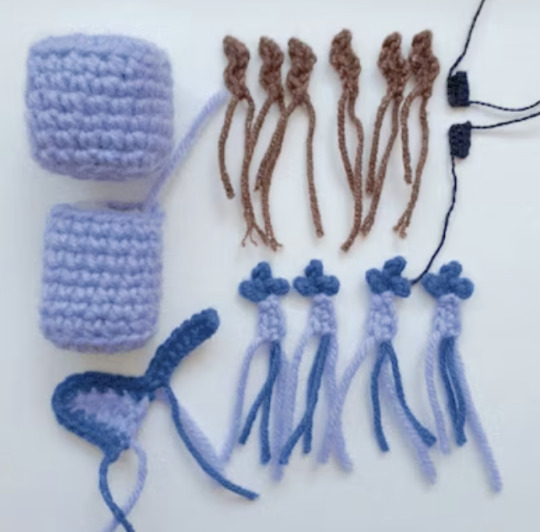
A lot of this assembly is intuitive/based on vibes alone. If something doesn't look right, try something else and see if it looks better! Have fun with it. Make it silly :)
First, sew the body and head together. Use a dark thread or other eye color to wrap around a few stitches to make eyes in front. Attach the frills to the sides of the head.
Sew the tail on the back so the back fin can go up and get sew along the back. Put the legs wherever feels right.
Tuck all the yarn tails from sewing into the body, or leave them hanging out so it looks like an eldritch string monster.
And that's it!! You have a cute baby axolotl for all your nefarious purposes :)
#I've never done a proper pattern before I hope it works okay haha#enjoy!!!!!#pho.posts#pho.doodles#crochet#crochet animal#axolotl#minecraft axolotl#mineblr#minecraft#ldshadowlady#empires s1#(since that's where the inspo is from)#amigurumi#i still don't know how to tag these things ahdsjkfsdfsa#pho.crochets
48 notes
·
View notes
Text
Yarn Over (and Pull Through)

"And that's how he ended up at Daphne's crochet club meeting. They always hosted a meeting with lessons for beginners and that's where Anthony found himself, regretting every life decision which had led him to this moment in time."
_________________________________
Following his therapist's recommendation, Anthony Brigderton ends up finding himself at a crochet class for beginners feeling very stupid about it. At least there was one more person who looked like she was just as miserable about being there as he was. It helped that she had the most beautiful smile as well.
This is silly and funny and kinda self-indulgent bc I'm mixing my two obsessions of the moment together: Kathony and Crochet.
All patterns mentioned are real and I have them if you want lol
thanks for @mimix007 who was an absolute queen and helped me get this going smoothly. Or as smoothly as this silly thing could go. I did not make it into the challenged 5K but it's a one-shot lol <3
Enjoy and don't forget to leave the sad author your love!
#my writing#bridgerton#my fic#kathony#anthony bridgerton#kate sharma#crochet#Yarn over (and pull through)#Crochet AU#Meet Cute#Modern AU#they are idiots your honor#writing
32 notes
·
View notes
Text

I think this is 10 rows. I should have recorded the count as I went, like I did when I was a beginner knitter. I'd done maybe 3-4 rows before I realized I don't know how to read crochet yet. Anyway, my very first time crocheting, I think it went okay. Although I may have spent the whole time absolutely baffled, saying, "This doesn't make any sense!" over and over.
Thanks again to @echobiirds, @followthegleam, and @runerune42, even though I can't seem to tag you, for the advice!
15 notes
·
View notes
Text
Want to learn something new
Want to learn something new in 2022??
Absolute beginner adult ballet series (fabulous beginning teacher)
40 piano lessons for beginners (some of the best explanations for piano I’ve ever seen)
Excellent basic crochet video series
Basic knitting (probably the best how to knit video out there)
Pre-Free Figure Skate Levels A-D guides and practice activities (each video builds up with exercises to the actual moves!)
How to draw character faces video (very funny, surprisingly instructive?)
Another drawing character faces video
Literally my favorite art pose hack
Tutorial of how to make a whole ass Stardew Valley esque farming game in Gamemaker Studios 2??
Introduction to flying small aircrafts
French/Dutch/Fishtail braiding
Playing the guitar for beginners (well paced and excellent instructor)
Playing the violin for beginners (really good practical tips mixed in)
Color theory in digital art (not of the children’s hospital variety)
Retake classes you hated but now there’s zero stakes:
Calculus 1 (full semester class)
Learn basic statistics (free textbook)
Introduction to college physics (free textbook)
Introduction to accounting (free textbook)
Learn a language:
Ancient Greek
Latin
Spanish
German
Japanese (grammar guide) (for dummies)
French
Russian (pretty good cyrillic guide!)

Jan 2, 2023
Want to learn something new in 2023??
Cooking with flavor bootcamp (used what I learned in this a LOT this year)
Beekeeping 101
Learn Interior Design from the British Academy of Interior Design (free to audit course - just choose the free option when you register)
Video on learning to read music that actually helped me??
How to use and sew with a sewing machine
How to ride a bike (listen. some of us never learned, and that's okay.)
How to cornrow-braid hair (I have it on good authority that this video is a godsend for doing your baby niece's black hair)
Making mead at home (I actually did this last summer and it was SO good)
How to garden
Basics of snowboarding (proceed with caution)
How to draw for people who (think they) suck at art (I know this website looks like a 2003 monstrosity, but the tutorials are excellent)
Pixel art for beginners so you can make the next great indie game
Go (back) to school
Introduction to Astronomy (high school course - free textbook w/ practice problems)
Principals of Economics (high school course - free textbook w/ practice problems)
Introduction to philosophy (free college course)
Computer science basics (full-semester Harvard course free online)
Learn a language
Japanese for Dummies (link fix from 2022)
Ukrainian
Portuguese (Brazil)
American Sign Language (as somebody who works with Deaf people professionally, I also strongly advise you to read up on Deaf/HoH culture and history!)
Chinese (Mandarin, Simplified)
Quenya (LOTR fantasy elf language)
Dec 26, 2023
Want to learn something new in 2024??
Beginner-oriented video on how to sail
This guy has so many videos on baking different types of bread. SO very many.
Coding in Python - one of the most flexible and adaptable high-level programming languages out there - explained through projects making video games
Learn to swim! (for adult learners. I don’t care if you live in Kansas or Mali or wherever. LEARN TO SWIM.)
Learn how quantum mechanics works. Then read some more about it
[Learn about quantum mechanics again, but in a more advanced engineering/mathematics class. Then read more about the math and physics of it]
Poetry Handbook, by Mary Oliver
Something I learned this year: how to sew a quilt (Here’s a very easy beginning pattern that looks amazing and can be done with pre-cut fabric!)
How to hit the ball in softball
Tutorial video on what is under the hood of most (gas) cars + weird engine sounds and what they mean
Full beginner mechanics technical training, if you want to go more in depth
Playlist on how car engine physics work if you want to go ultra in depth
Lecture series on architecture design through study of buildings
How (American income) taxes & tax law work (choose “audit course” at checkout for free class)
Pickleball for beginners (so you can finally join your neighbor/friend/distant cousin who is always insisting you join their team)
+ Para-Pickleball for beginners (for mobility aid users!)
School is so much more fun when there’s no tests:
American Law - Contracts
Shakespeare’s Life and Plays
Fairy Tales: Meanings, Messages, and Morals
Modern Poetry
World History [Part 1, Part 2]
Learn a language:
Arabic + Resource Guide compiled from Reddit (includes info on different dialects)
Chinese (Cantonese) (audio)
Urdu (frequently recommended course on Reddit) + Resource Guide
Yucatec Maya
19 notes
·
View notes
Text
September 2, 2024
Honestly? Not really looking forward to the first day of school. I have a lot of anxiety attached to this year in particular. I haven't even opened Canvas which is, frankly, wild for me. Eh, I'll do it tomorrow.
It's an odd thing. So much of my identity was attached to being a big ol' nerd for years. My islander-friend mentioned that it's probably pretty natural, even for people who enjoy learning. As we age, she mused, perhaps we are simply fulfilled in different ways.
Also I spent all day today (not even hyperbole, it's been 12 hours) twisting my hair and still have quite a bit to go. Will give it another couple hours tonight, though I am certainly feeling the pull of sleep. Using a different extension type today, not a huge fan, honestly. It may be that the quality is simply pretty poor. I do think I have enough, though, thankfully. And it's working up relatively quickly. I thought they'd be shorter, though.
I've spent the whole day running through DougDoug videos, starting with the Skyrim challenges and just sort of becoming enamored with the whole community culture. It's fun over there!
Today I'm thankful that I'm entering the crochet world with a sewing background. Designing for a body just makes so much more sense when you understand how to draft flat pieces that, when assembled, will contour to the natural curves of any body. Off-the-rack clothing in general tends to be poorly fitted to any single person's proportions, and the same seems to be true for many of the beginner-intermediate crochet patterns I see on the market. Sometimes boxy is okay! But certainly not all the time.
I'm really interesting in trying (or making) a pattern with a true armscye. Many of the tops I've seen use sloped shoulders which I don't prefer but is absolutely easier to do.
One of these days I shall clean my room.
3 notes
·
View notes
Note
Hiii Mei how did u get into crochet I want to start learning but not sure where to begin!!! Maybe YouTube tutorials??? Love u queen
Yes i used YouTube tutorials! I’d suggest looking up something with the keywords ‘crochet tutorial’ and ‘beginner’ and there’s a lot of videos where people will guide you through a small project while explaining every single stitch for those who know absolutely nothing about it. However, what I did was I learned how to chain first, and then how to single crochet, and I just experimented with that stitch and its mechanics before moving onto double crochet and half-double crochet. I figured out what would happen if I dropped or added a stitch, if I chained between rows or if I didn’t, how it would look depending on how many chains I did between rows, etc until I was confident in the stitch. Either way, you’ll get the hang of it with practice! The good thing about crochet is that 90% of projects will be composed of one or more of the same 5 stitches over and over again and that’s pretty much all you’re gonna need to know. There are more complicated stitches but there are always ways to learn them and 90% of the time you’ll be using basic stitches that you memorize very quickly because you do them over and over again! Go at your own pace and decide what method is right for you, and I hope you enjoy crocheting my love <3
13 notes
·
View notes
Text
EXTRA, EXTRA!Noob-Ass Knitter Goes Rogue, Requests Aid!

So I've been making a pair of practice gloves with commercially spun yarn in preparation for the gloves I want to make with my handspun.
I've been following this pattern (sorta)
I went rogue around the time it tells you to stop stockinette stitching and return to the rib stitch.
Decided I like the look of the stocknette for the remainder of the hand.

I'm currently where I am supposed to make the thumb hole but I would prefer half-fingered gloves and this, dear reader, is where I need help.
Does anyone have a resource that would help me modify this pattern to accomodate this change?
I've made gloves with crochet before but that was always working in the round and this is a flat knit project.
I assumed I would need some of these bad boys but have zero idea of how to utilize them

6 notes
·
View notes
Note
Hello, Esther!
I admire your crafts so much! I have some experience with small projects, like embroidering handkerchiefs and weaving grass, but I'm eager to try for a bigger project... Maybe making a scarf for a big man? I don't even know if it would be better to knit or crochet it, honestly. Do you have any tips for a beginner?
Thank you for your kindness!
~ @maevesgarden
Dear Maeve,
It is lovely hearing from you. I'm flattered that you think of me so highly, but I assure you, it is just the matter of practice. I'm sure that whatever you endeavour to create will be well appreciated.
Now, to the scarf-making! The first thing you should consider is how your gift will be used. You said it is supposed to be for a big man? I suppose it means he... doesn't get cold easily? Unless there are harsh winters where he lives? Whichever the case, that will influence what materials will work best -- cotton and linen are not as warm as wool, but in certain situations, they are sufficient. Likewise, if you wanted to go forward with wool, you should consider its weight. Lighter wools tend to drape like muslin; heavier tend to be chunky. Oh! The thinner the thread, the longer it may take, though... Unless you were working with mohair, but that may not be something a man would want to wear... And then, there are dye lots... You absolutely want to get all your yarn dyed at once, otherwise the colours do not match too well... Unless you want to opt for crocheting squares? Crocheting would likely take more materials than knitting, though.
Oh. It seems I rambled a little. Please, forgive that. I hope any of that was of some use to you. I'd love to see your progress.
With love,
Esther
PS:
Start months in advance, especially if you may need to hide the project. Please.
3 notes
·
View notes
Last Seen Blogs

neighborhooves
NEEEEIIGHHH!!!!

zer0stratus
joanagastopia’s Art Blog
querida-echizera-blog
M A G A 🔮

bocalimos
Airport Limo Services by Avanti Limousines of Boca

pre-diyu
不生不灭