#How To Generate Microsoft Authenticator App QR Code
Explore tagged Tumblr posts
Visit Tumblr Blog
Explore Tumblr blogs with no restrictions, modern design and the best experience.
Last Seen Tumblr Blogs


Fun Fact
Tumblr.com is the 103rd most visited website in the world.
Text
How To Generate QR Code for Microsoft Authenticator App
Welcome to our Article about How to Generate QR Code for Microsoft Authenticator! In this article, we’ll discuss the basics of QR codes, the benefits of using Microsoft Authenticator, and provide detailed instructions on how to generate a QR code for Microsoft Authenticator. We’ll also provide some troubleshooting tips to help you get the most out of your QR code experience. What is a QR…

View On WordPress
#Generate QR Code for Microsoft Authenticator#How To Generate Microsoft Authenticator App QR Code#How To Generate QR Code for Microsoft Authenticator#How to generate qr code for microsoft authenticator android#microsoft account qr code#microsoft authenticator qr code new phone#regenerate qr code for my microsoft authenticator
0 notes
Text
1. How to setup 2FA on your accounts
As some of you may know, my friend @why-its-kai's Discord account was taken over this morning by a scammer.
The scam they used was this one, or close enough; but anyway, the exact specifics don't matter.
What matters is, it can happen to you. It can happen to anyone.
The good news is, you can learn how to protect yourself. Making some small changes can already improve your online security by leaps and bounds.
I made a series of 3 posts covering the basics:
How to setup 2FA on your accounts (you are here!)
How to spot a scam
How to set up a password manager.
Protect yourself with 2FA
Two-factor authentication, or 2FA, isn't a silver bullet -- but it exponentially increases your online safety by adding an extra step to the login process that a hacker/scammer does not have access to.
Every account that you care about (and even those you don't) should have some form of 2FA enabled.
Especially email -- should your email become compromised, this can become a catastrophe.
(For websites that don't support 2FA, use a burner email!)
What 2FA should I use?
2FA can take many forms, from the highly convenient (SMS, email) to the highly secure (security keys), but one thing is certain:
Any form of 2FA is better than nothing.
The simplest forms of 2FA are phone number or email. While these are very easy to use, they are unfortunately not very secure.
Still, I repeat: despite their flaws, these forms of 2FA are absolutely, 100% better than not having any 2FA at all.
On the other end of the spectrum, security keys (like for example a Yubikey) are extremely secure, but they cost money and are a bit of a hassle at time. I use them, but for most people, it's overkill.
What you want is an authenticator app.
Important
A note, before we go on…
If you enable multiple forms of 2FA, how secure your account is will depend on your weakest link.
For example, if you enable SMS authentication AND register a security key, your account will only be as safe as the SMS authentication. The security key is essentially useless.
In other words, the least secure form of 2FA you add determines the overall security of your account.
Sometimes, less is more!
Authenticator Apps
First, choose a free, reputable authenticator. Google Authenticator is a good choice. So are Aegis Authenticator or Microsoft Authenticator.
For simplicity, we'll go with Google Authenticator; the process is rather similar for most authenticators.
First, download the app from your app store and install it on your phone.
Enrolling Gmail into GA
Securing your email should be your number 1 priority, so let's enroll a Google account to Google Authenticator.
Let's enable two-step verification first.
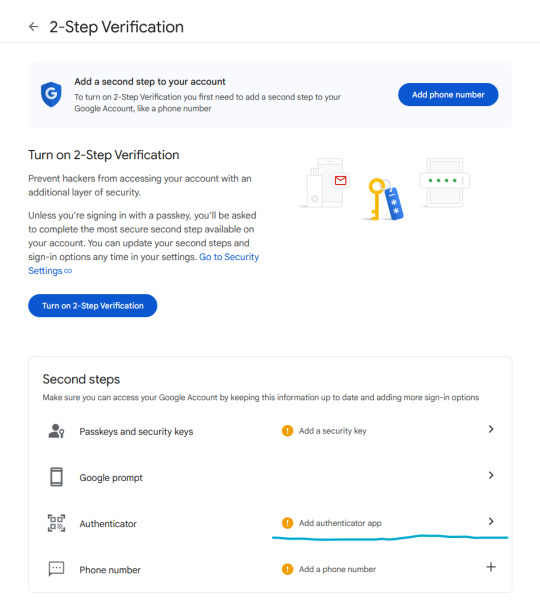
Phone number is better than nothing, but not very safe (SMS verification can be spoofed), so let's click on "Add authenticator app".
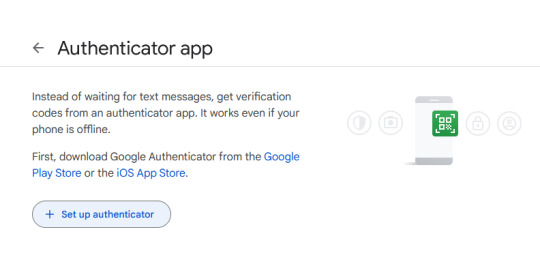
Click on "Set up authenticator". Google will generate a QR-code.
Next, go back to your phone and click on the little multicolored cross. It will bring up a menu; click on "scan a QR code".
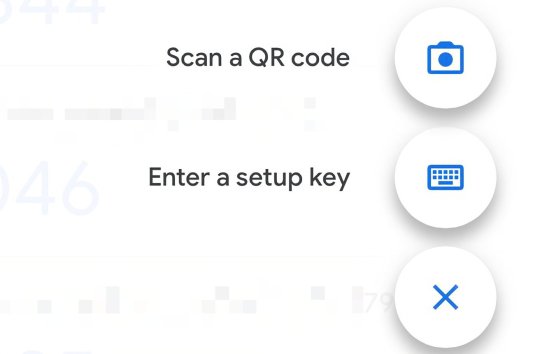
Go ahead and scan the QR code.
Congratulations, you have enrolled your Google account!
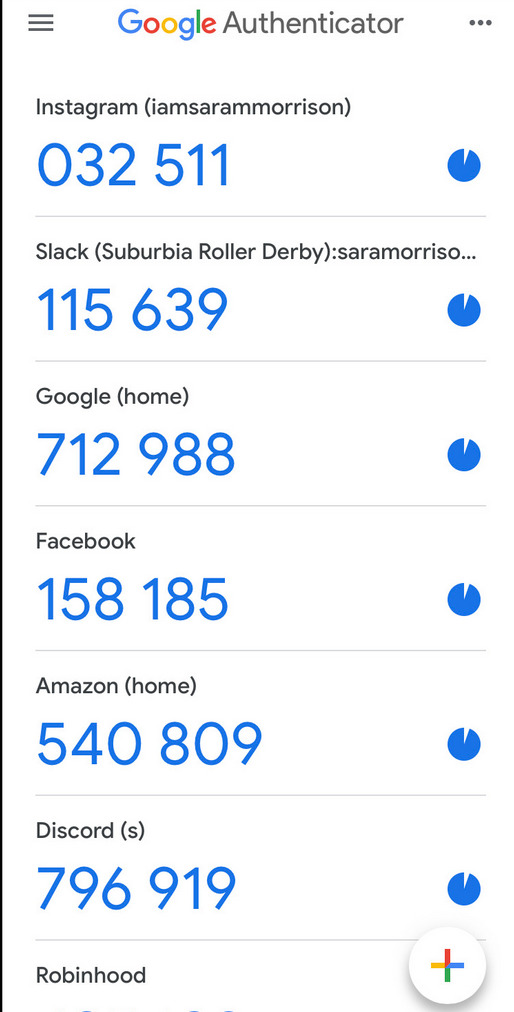
Now, whenever you are asked for a 2FA code, just open the app and copy/paste it.
Note: the codes are stored locally on your phone.
Enabling 2FA on Discord
The process is fairly similar. Go to Settings > My Account:
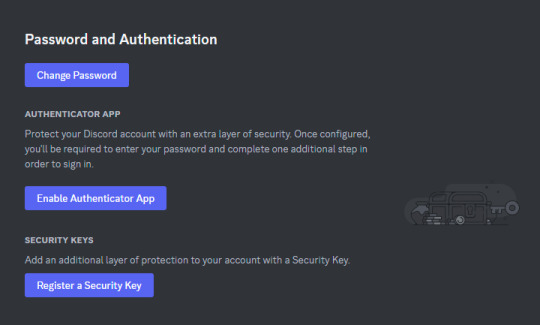
Click on "Enable Authenticator App". You will be prompted for your password. Enter it.
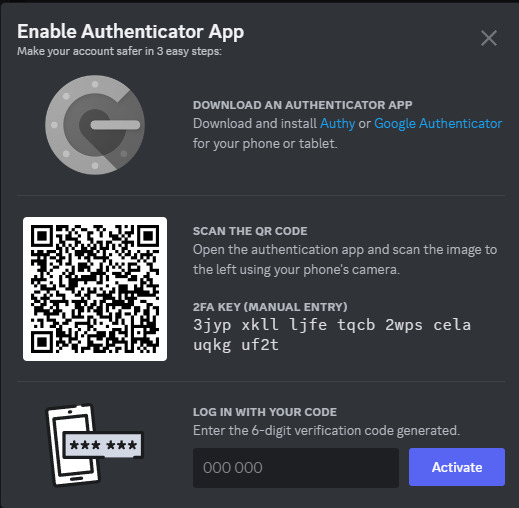
Download Google Authenticator if you haven't already. Scan the QR code as described above.
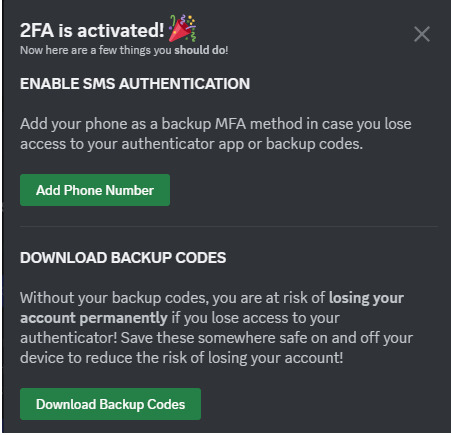
Do take the time to download your backup codes as well!
As explained above, I personally do not recommend setting up SMS authentication here, since authenticator apps are supported, as this weakens the overall security of your account for little benefit.
Stay tuned for parts 2 and 3!
If you have any questions, feel free to PM me.
17 notes
·
View notes
Text
Authenticator App Neues Handy: How to Securely Transfer Your 2FA Credentials During a Phone Change
In an era where cybersecurity is a top priority for professionals and organizations alike, authenticator apps have become a fundamental layer of account protection. These apps—such as Google Authenticator, Microsoft Authenticator, or Authy—enable two-factor authentication (2FA) through time-based one-time passcodes (TOTP), making unauthorized access significantly harder.
But what happens when you change your smartphone? Whether you’re upgrading your device or replacing a lost or damaged phone, knowing how to handle your authenticator app neues Handy (authenticator app on a new phone) is critical. For professionals managing multiple secure accounts, a seamless authenticator app Handy Wechsel (authenticator app phone switch) is essential to avoid disruptions or permanent lockouts.
In this guide, we’ll walk you through the steps for transferring your authenticator app to a new phone—both with and without access to the old device—and provide expert-level best practices for handling 2FA credentials during a phone transition.
Why Authenticator Apps Matter
Authenticator apps generate 6-digit codes that refresh every 30 seconds and are used alongside your username and password to access sensitive accounts. They are widely used for:
Enterprise cloud services (Google Workspace, Microsoft 365)
Developer platforms (GitHub, AWS, Azure)
Financial and banking apps
Email and social media accounts
For IT professionals, developers, and digital entrepreneurs, keeping these codes accessible and secure during a phone change is non-negotiable.
Preparing for a Phone Switch: What to Do Beforehand
If you still have access to your old device, it’s always best to prepare before making the switch. A proactive approach simplifies the authenticator app Handy Wechsel process and ensures continuity.
Checklist Before Migrating:
✅ Install the same authenticator app on your new device
✅ Ensure your old device is unlocked and functional
✅ Check if your authenticator app supports export/import (e.g., Google Authenticator does)
✅ Back up recovery codes or store them securely in a password manager
Let’s now dive into the detailed steps.
How to Transfer Authenticator App to Neues Handy (New Phone) – With Access to Old Phone
Step 1: Install Authenticator App on the New Phone
Download your preferred app from the Google Play Store or Apple App Store. Make sure it’s the official version published by the provider (Google LLC, Microsoft Corporation, etc.).
Step 2: Export Accounts From Old Phone
For Google Authenticator:
Open the app on your old phone.
Tap the three-dot menu > Transfer accounts > Export accounts.
Authenticate with your device credentials.
Select the accounts you want to move.
A QR code will be generated.
For Microsoft Authenticator or Authy:
These apps typically offer account synchronization through cloud backup, making the transfer process even easier. Sign in on the new device using the same account credentials to restore your tokens.
Step 3: Import Accounts on Neues Handy
On your new device:
Open the authenticator app.
Choose Import accounts or Scan QR code.
Use the phone camera to scan the QR code generated on your old phone.
After successful import, test one or more logins to verify that 2FA works correctly.
Step 4: Deactivate Old Device
Once confirmed:
Remove or reset the app on the old phone.
Log out or delete tokens to prevent unauthorized use.
Alternatively, perform a factory reset if you are disposing of or selling the old device.
How to Set Up Authenticator App on Neues Handy Without Old Phone
Losing your old phone complicates the authenticator app Handy Wechsel, but it’s still possible to regain access. This process involves recovering individual 2FA-enabled accounts and re-enabling the authenticator manually.
Step 1: Install Authenticator App on New Phone
Choose and install the same authenticator app you used previously (Google Authenticator, Authy, etc.).
Step 2: Recover Each Account
For each service where you’ve enabled 2FA:
Go to the login page and click “Can’t access your 2FA device?” or a similar option.
Use backup recovery codes (if previously saved) to log in.
If no backup codes are available, follow the account recovery process (usually email or identity verification).
Once logged in, disable 2FA, then re-enable it by scanning a new QR code using the authenticator app on your new phone.
💡 Pro tip: Prioritize access to critical accounts like your primary email, password manager, and cloud service logins first.
What If You Used Authy or Microsoft Authenticator?
Some apps offer cloud-based sync, making authenticator app Handy Wechsel far more seamless.
Authy allows account sync across multiple devices (with PIN or biometric protection).
Microsoft Authenticator can back up to iCloud (iOS) or your Microsoft account (Android).
If you previously enabled cloud backup:
Log in on your new phone using the same credentials.
Restore your token list automatically.
Best Practices for Professionals Handling Authenticator App Migration
Changing devices should never compromise your security posture. Here are expert recommendations for managing the authenticator app neues Handy process efficiently:
1. Use a Password Manager
Many password managers (like 1Password, Bitwarden, and LastPass) now support integrated 2FA tokens, allowing secure storage and syncing of TOTP codes.
2. Save Backup Codes Offline
When enabling 2FA for any service, you're usually offered backup or recovery codes. Save these in an encrypted file or secure offline location. Never store them in plain text on cloud services.
3. Regularly Audit 2FA Accounts
Periodically:
Remove unused tokens
Update recovery information (email/phone)
Verify access to backup codes
This helps reduce risks during device transitions.
4. Avoid Using One Phone for All Authentication
For added security, professionals often use a dedicated device (e.g., a secure tablet or secondary phone) solely for 2FA apps.
Common Pitfalls to Avoid
❌ Failing to back up recovery codes before device reset
❌ Not verifying all logins after transfer
❌ Using third-party apps with poor security reputations
❌ Relying on SMS-based 2FA only (which is less secure than app-based)
Avoiding these mistakes can make the authenticator app Handy Wechsel much smoother.
Conclusion
For professionals and security-conscious users, changing smartphones is more than a simple upgrade—it’s a sensitive process that requires safeguarding access to critical accounts. Whether you're planning ahead or recovering from the loss of your old phone, understanding how to manage your authenticator app neues Handy setup ensures that you maintain full control of your digital footprint.
From exporting tokens and using secure backups to recovering access without your previous device, the strategies covered here can help make your authenticator app Handy Wechsel as seamless and secure as possible.
0 notes
Text
aka.ms/authapp Microsoft Authenticator App Setup (2024)
Microsoft is mostly known for its various productivity apps and the operating system, Windows. They also have an extensive range of apps for cybersecurity, one of which is the Microsoft Authenticator app. It helps you securely sign in to your online accounts via two-factor authentication.
Once your accounts have been added, they are automatically backed up in an encrypted cloud by Microsoft. In this guide, we’ll show you how to download the Microsoft Authenticator app via aka.ms/authapp, how to use the app, and setting it up on your phone.
How to Use the Microsoft Authenticator App
The Microsoft Authenticator app has various features that can help you use your accounts more securely, therefore avoiding threats like compromised and stolen passwords. It also acts as a backup in case you forgot your password, especially for accounts that you didn’t use for a long time.
Your Microsoft account can be used to access Windows, Xbox Live, Hotmail, Azure as well as many businesses. So it is important to keep your account secure.
These are four main ways how you can use the Microsoft Authenticator app:
Two-factor Authentication – In this method, one of the factors is your account’s password. Once you sign in with your username and password, you will need to further approve the sign-in via notification or a unique verification code.
Code Generation – You can use this app as a code generator when signing in to an app that supports code generation.
Phone Sign-in – Another version of two-factor authentication where you can sign in without a password. It uses your phone’s verification methods like fingerprint, PIN, and face recognition.
One-Time Passwords (OTP) – Aside from two-factor verification, the Microsoft Authenticator app also supports time-based, one-time passwords (TOTP) standards.
If you’re a part of a work or school organization, you might be required to use the Microsoft Authenticator app to gain access to your organization’s documents and other confidential data. A complete setup of this app is required to use as a trusted verification method. To know more, go to this link.
How to Download and Install the Microsoft Authenticator App
The Microsoft Authenticator app works on either Android or Apple, as long as your phone has a working mobile number—which will be verified later via SMS (Short Message Service) or via phone call.
To download the Microsoft Authenticator app on your smartphone, follow these steps:
On your Smartphone (Direct Link to Google Play or App Store):
Go to aka.ms/authapp to visit the app’s download page.
Depending on your phone’s OS, click the corresponding download button (Get the app button).
Note: Both the links and the QR codes will lead to either the Google Play Store (left option) or App Store (right option) Microsoft Authenticator app download page.
Once you’re redirected, select the Install button (Google Play) or Get App button (App Store).
To set up the Microsoft Authenticator app on your smartphone, follow these steps:
After it’s installed, set up your account by opening your computer’s browser and going to the account security dashboard of your Microsoft account. You can log in to it by clicking here.
Choose the Add a new way to sign in or verify option and click Use an app.
Click Next. A QR code will be displayed on your computer screen.
Then, in the Authenticator app, select More options (three dots icon) and click + Add account.
Select the account type and choose Scan a QR Code.
Scan the QR code on your computer screen and click Finish. You have now completely set up the Microsoft Authenticator app on your phone.
To further set up the Microsoft Authenticator app for two-step verification, you can either choose between SMS messaging or phone call:
Two-step verification via SMS – your mobile number will receive a code that you will use for two-step verification or password reset.
Two-step verification via phone call – your mobile number will receive a phone call from the app for a two-step verification or password reset.
#authentication#twofactorauthentication#microsoft#100 days of productivity#newjeans#natural hair#needlework#neil gaiman#niall horan#art#naruto#nct dream#advertising#animals#black and white#nail art#architecture#aamir khan#academia#accounting#ace attorney#acne
1 note
·
View note
Text
MuleSoft Authenticator App

MuleSoft, as a comprehensive integration and API management platform, emphasizes security in all aspects of its operations, including access control to its Anypoint Platform. While MuleSoft itself does not provide a proprietary “MuleSoft Authenticator App” for two-factor authentication (2FA) or multi-factor authentication (MFA), it supports integration with external authenticator apps through its security settings, enabling an additional layer of security for user accounts.
Setting Up MFA with External Authenticator Apps
To secure access to the Anypoint Platform, MuleSoft allows using MFA, which adds an extra verification step to the login process. Users can set up MFA using various methods, including SMS, email, or an authenticator app. Authenticator apps generate time-based, one-time passcodes (TOTPs) that users must enter in addition to their regular password.
Common Authenticator Apps Supported:
Google Authenticator: Available for Android and iOS, this app generates TOTPs for use in the second step of the verification process.
Microsoft Authenticator: Also available for both Android and iOS, offering similar TOTP functionality with additional features.
Authy: A popular alternative that provides multi-device synchronization and cloud backups of your authentication tokens.
How to Set Up MFA with an Authenticator App on MuleSoft
Access Security Settings: Log into your Anypoint Platform account and navigate to your profile or the platform’s security settings to find MFA options.
Select MFA Setup: Choose to set up MFA and select the option to use an authenticator app. The platform will display a QR code.
Install an Authenticator App: If you haven’t already, download and install an authenticator app of your choice on your mobile device.
Scan the QR Code: Use the authenticator app to scan the QR code displayed on the MuleSoft setup page. This will link your Anypoint Platform account with the app.
Enter Verification Code: The authenticator app will generate a 6-digit verification code. Enter this code on the MuleSoft setup page to verify the setup.
Complete Setup: Follow any additional prompts to complete the setup. You may be provided with backup codes; save these in a secure location for future use if you cannot access your authenticator app.
Benefits of Using an Authenticator App for MFA
Enhanced Security: Adds a significant layer of security, protecting against password theft or phishing attacks.
Convenience: Authenticator apps do not require an internet connection to generate codes and are generally faster to use than receiving codes via SMS or email.
Widely Supported: Many services beyond MuleSoft support TOTP apps, allowing you to use the same app for multiple accounts.
Demo Day 1 Video:
youtube
You can find more information about Mulesoft in this Mulesoft Docs Link
Conclusion:
Unogeeks is the №1 Training Institute for Mulesoft Training. Anyone Disagree? Please drop in a comment
You can check out our other latest blogs on Mulesoft Training here — Mulesoft Blogs
You can check out our Best in Class Mulesoft Training details here — Mulesoft Training
Follow & Connect with us:
— — — — — — — — — — — -
For Training inquiries:
Call/Whatsapp: +91 73960 33555
Mail us at: [email protected]
Our Website ➜ https://unogeeks.com
Follow us:
Instagram: https://www.instagram.com/unogeeks
Facebook: https://www.facebook.com/UnogeeksSoftwareTrainingInstitute
Twitter: https://twitter.com/unogeeks
#MULESOFT #MULESOFTTARINING #UNOGEEKS #UNOGEEKS TRAINING
0 notes
Text
How to Set Up MFA on Your Microsoft Account Using Aka ms mfasetup?
In the digital age, ensuring the security of your online accounts is paramount. With the increasing frequency and sophistication of cyber threats, adopting robust security measures becomes imperative. Multi-Factor Authentication (MFA) is a powerful tool that adds an extra layer of protection to your accounts, reducing the risk of unauthorized access. This article will guide you through the process of setting up MFA for your Microsoft account using the dedicated portal aka.ms/yourpc.
I. Understanding Multi-Factor Authentication:
Multi-Factor Authentication (MFA) goes beyond the traditional username and password model, requiring users to provide additional proof of identity. This typically involves something you know (password) and something you have (authentication code or device). By implementing MFA, you significantly enhance the security of your accounts, as even if one factor is compromised, there is an additional layer of protection in place.
II. Benefits of Multi-Factor Authentication:
Enhanced Security:
MFA adds an extra layer of protection by requiring users to verify their identity through multiple means.
Even if your password is compromised, unauthorized access is thwarted without the additional authentication factor.
Protection Against Phishing:
MFA helps mitigate the risks of phishing attacks, as attackers would need more than just your password to gain access to your account.
Compliance with Security Standards:
Many organizations and industries require the use of MFA to comply with security standards and regulations.
Secure Remote Access:
For users who access their accounts remotely, MFA ensures a higher level of security, safeguarding sensitive information from potential threats.
III. Initiating the MFA Setup Process:
To set up MFA for your Microsoft account, follow these step-by-step instructions:
Visit www.aka.ms/mfasetup:
Open your preferred web browser and navigate to aka.ms/mfasetup. This is the dedicated portal for setting up Multi-Factor Authentication for Microsoft accounts.
Sign In to Your Microsoft Account:
Enter your Microsoft account credentials (username and password) to log in.
Access Security Settings:
Once logged in, navigate to the security settings of your Microsoft account. Look for the option related to Multi-Factor Authentication.
Select MFA Method:
Choose the MFA method that best suits your preferences and device compatibility. Microsoft offers various options, including authentication apps, phone numbers, and email.
IV. MFA Setup Options:
Authentication Apps:
Use authenticator apps like Microsoft Authenticator, Google Authenticator, or Authy to generate time-sensitive codes for authentication.
Phone Number Verification:
Receive authentication codes via text message or phone call to a registered mobile number.
Email Verification:
Receive authentication codes through email on a registered email address.
V. Configuring Authentication Apps:
If you choose an authentication app as your MFA method, follow these additional steps:
Install Authenticator App:
Download and install the Microsoft Authenticator app or any compatible authentication app on your smartphone or device.
Scan QR Code:
In the MFA setup process, you will be prompted to scan a QR code using the authenticator app. This links your account to the app for seamless authentication.
Verify Setup:
Confirm the setup by entering the code generated by the authenticator app aka.ms/myrecoverykey. This ensures that the app is correctly configured for your Microsoft account.
VI. Completing MFA Setup:
Backup Codes:
Microsoft often provides backup codes during the setup process. Save these codes in a secure location. They can be used as a backup method to access your account in case you lose access to your primary authentication method.
Verification:
After completing the setup, perform a verification test to ensure that MFA is working correctly. This may involve entering a code sent to your phone or generated by an authentication app.
Review Security Settings:
Periodically review and update your security settings. Microsoft may introduce new features or security enhancements, and staying informed is crucial for maintaining a secure account.
VII. Troubleshooting MFA Issues:
Lost or Stolen Device:
If your authentication device is lost or stolen, use backup codes or contact Microsoft support to regain access to your account.
Change in Phone Number or Email:
Update your MFA settings if there is a change in your phone number or email address to ensure you receive authentication codes.
Forgotten Password:
In case you forget your password, MFA remains an additional layer of security. Follow the account recovery process provided by Microsoft.
VIII. Conclusion:
In a world where digital threats are prevalent, safeguarding your online accounts is of utmost importance. Multi-Factor Authentication is a robust solution to enhance the security of your Microsoft account. By following the steps outlined in this guide, you can set up MFA effortlessly using www.aka.ms/mfasetup. Embrace this additional layer of protection and enjoy a more secure online experience. Remember, investing time in securing your accounts today can save you from potential cybersecurity headaches tomorrow.
0 notes
Text
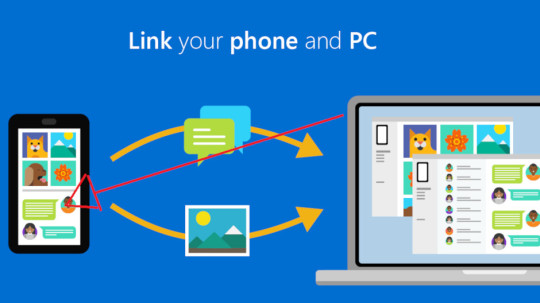
How do you use the Microsoft Phone Link app?
One can interface an Android telephone to a Windows PC through aka.ms/phonelinkqrc. Specifically, Android and Windows telephones can utilize this component. A cell phone and a PC can be associated utilizing the Aka.ms/linkphone include with the goal that the PC can utilize the highlights of the cell phone.
How should I withdraw my cell phone from my PC?
You, without much of any hesitation, need to visit the power site of Microsoft and sign in with a relative email ID as in the past.
Eventually visit the "Gadget" section and an outline of connected gadgets will appear on the screen.
Tap on the inclined toward gadget which you truly need to take out, and affirm it.
Go to the cell phone however again open the application it will show segregated.
A relative methodology goes for the cell phone to discard the aka.ms/phonelinkqrc .
Open the mate application on your gadget, and open the settings choice. There you will track down the Records choice, open it.
Search for a tantamount Microsoft email ID, which is placed on the PC.
Post-finding taps on the record and presses the "Logout" button.
Complete the brief connections and your gadget will be unpaired from the PC.
What are Advantages of Connecting Your Telephone to PC
Akams phonelink is a connection for matching an Android gadget and a Windows PC. You can start using your telephone on the authentic PC through www.aka.ms/phone link qrc. Accepting for the time being that you're depleted on enlightening your photos, records and reports just to get them onto your PC then you should use this benefit of connecting your telephone to your PC.
Move content from the telephone to the PC.
Access applications presented on the telephone from your PC.
See the texts through notice spring up on the PC.
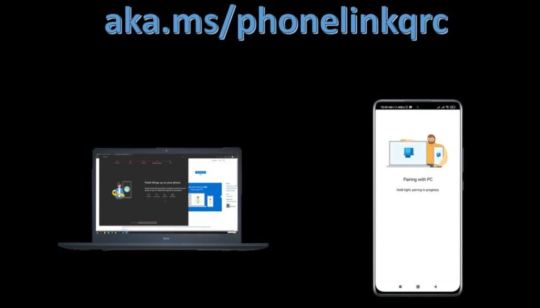
How To Set Up the Telephone Connection Application on Your Windows PC?
Interface your telephone and PC both to a conventional WiFi.
Type "Telephone Connection" in the Windows search bar.
Click on "Connection Your Telephone".
Tap on "Add a Telephone"
Click on Start.
Sign in with your Microsoft account login subtleties and snap Proceed.
Rules to Connection Your Android gadget to Aka.ms/linkphone ?
Look for Connection to Windows in the Google Play Store, then, at that point, download the application.
Examine a QR code that is shown to you on your PC. To get to the QR code, open your PC's program and go to aka ms telephone linkqrc .
Utilize the in-application camera on your Android gadget to check the QR code showed on your PC.
You may be instigated for several concurs coming about to checking the QR code. aka.ms/phonelinkqrc.
Chief Features - aka ms linkphone qr code
Work area QR Code peruser and generator for Windows
Makes QR codes for business or individual use.
Looks at QR codes right from pictures on a PC screen
Looking at QR codes from a record or the clipboard
QR Codes can be inspected with a webcam
Data about QR codes is saved to a record.
Free gadget
0 notes
Text
How do you use the Microsoft Phone Link app?
Aka.ms/linkphone permits you to communicate an Android phone to a Windows PC. Android and Windows phones are the ones specifically that can use this component. Using the aka.ms/phonelinkqrc feature, a smartphone and a PC can be related with the objective that the smartphone's components can be used on the computer.
How might I disconnect my smartphone from my computer?
• You, without skipping a beat, need to visit the power site of Microsoft and sign in with a comparable email ID as before.
• As of now visit the "Device" fragment and a summary of linked devices will appear on the screen.
• Tap on the inclined toward device which you really want to dispense with, and confirm it.
• Go to the smartphone but again open the application it will show disconnected.
• A comparable technique goes for the smartphone to dispose of the www.aka.ms phone linkqrc.
• Open the mate app on your device, and open the settings decision. There you will find the Records decision, open it.
• Look for a comparative Microsoft email ID, which is put on the PC.
• Post-finding taps on the record and presses the "Logout" button.
• Complete the concise links and your device will be unpaired from the PC.
What are Benefits of Linking Your Phone to PC
Akams phonelink is a link for matching an Android device and a Windows PC. You can begin utilizing your phone on the authentic PC through ms phonelinkqrc. Assuming that you're exhausted on illuminating your photographs, records and reports just to get them onto your PC then you ought to utilize this advantage of linking your phone to your PC.
• Move content from the phone to the PC.
• Access applications introduced on the phone from your PC.
• See the texts through notice spring up on the PC.
How To Set Up the Phone Link App on Your Windows PC?
• Interface your phone and PC both to an ordinary WiFi.
• Type "Phone Link" in the Windows search bar.
• Click on "Link Your Phone".
• Tap on "Add a Phone"
• Click on Start.
• Sign in with your Microsoft account login nuances and snap Continue.
Directions to Link Your Android device ?
• Search for Link to Windows in the Google Play Store, then, at that point, download the application.
• Inspect a QR code that is displayed to you on your computer. To get to the QR code, open your PC's program and go to akamsphonlink.
• Use the in-app camera on your Android device to check the QR code displayed on your computer.
• You might be impelled for a couple of agrees resulting to checking the QR code. aka.ms/phonelinkqrc.
Main Features - aka ms linkphone qr code
• Workspace QR Code peruser and generator for Windows
• Makes QR codes for business or individual use.
• Scrutinizes QR codes right from pictures on a PC screen
• Scrutinizing QR codes from a record or the clipboard
• QR Codes can be scrutinized with a webcam
• Information about QR codes is saved to a record.
• Free device
0 notes
Text
Waves Lite Client
The Waves N�gra Client is a Chrome Extension that can get easily installed plus applied to perform most actions in the Waves Platofrm. At present in development, typically the Surf Platform will allow end users to issue, shift and trade assets. Waves Platform Wallet has a integrated decentralized trade platform that will can be used to be able to exchange property, cryptocurrencies together with fiat tokens. Waves Customer Wallet can be a chrome extension wallet with regard to Microsoft windows, Linux and Mac pc OPERATING SYSTEM along with high anonymity and is also at present in development. Just sustains Waves Lite Client and its possessions. The private keys will be controlled by the end users and it is an SPV client and is wide open sources and features Hierarchical Deterministic and falls short of the features Multi-Signature in addition to 2-factor authentication. Additionally, it provides a built-in decentralized trade platform allowing users to help trade assets, fiat cash, and cryptocurrencies. Waves Platform is an open-source and even 3rd party blockchain platform of which allows all people to build up applications, create together with disperse new cryptocurrencies. The particular platform(initially beta waves platform) can certainly also be used to be able to crowdfund which is a decentralized platform. Crypto enthusiasts can easily use it to create of form customized bridal party and then transfer the online possessions on the Blockchain. Stock traders can even trade tokens for fiat forex. The Surf Platform permits any user to generate their own tokens, and trade them for fiat funds or other cryptocurrencies. Generally, the process takes just a few a few minutes plus requires little understanding involving the underlying technology. The very best part about Mounds is definitely that its blockchain contains the capabilities of tokenizing every other cryptocurrencies. Waves Platform has a easily accessible together with helpful user interface. Right now there are quite some alternatives; the mobile version, some sort of browser and a stand-alone version of Waves Consumer. That also saves upon your hardware storage room since Blockchain download is not really necessary. Let's have a new look at the particular up to date and best Waves billfolds in 2019 | Do a comparison of and Choose the particular best waves pocket book together with this latest review on waves wallets #1 Waves Pocket book Android Waves Pocket Android os is a mobile consumer to WavesPlatform. It is easy to utilize the mobile application to immediately access your WAVES as well as other Assets funds. The finances is connected to public Waves nodes in obtain to retrieve your own orders and send bills. A person can show your dealings the two pending and confirmed without having login or security password. Waves Platform Wallet could even request cash by means of QR code or expressing app link and even assistance multiple wallets about one system. During sign up, the very important information is the wallet seed, which you'll save it somewhere secure or can in addition write it down on a piece associated with paper. This is one of the best waves purses according to waves pocket book review. Net connection: Dunes Wallet Android #2 Surf Wallet iOS Typically the Ocean pocket book iOS application can be the free cellular Waves buyer and full change pocket book. You may use the iphone app in order to access all the capabilities of the particular Waves system, send together with store Waves tokens, and in many cases trade upon the DEX(Charts, OrderBook, Deal with your orders, and WatchList) or even also use this a mobile bitcoin finances. The waves wallet ios is connected to people Dunes nodes to obtain all of your transactions and deliver bills. You can send out WAVES together with Waves bridal party to anyone via one on one address, QR code as well as from engagement book. There will be a file backup seed functionality and the wallet seed products safeguarded by means of Touch IDENTITY. The fundamental thing about this specific is that you should know how to use mounds wallet IOS. This is usually one of the best waves billfolds according to be able to waves wallet evaluation and waves wallet downloads available. Website link: Waves Wallet IOS #3 Waves Lite Iphone app (Chrome Extension) The Dunes Lite Client connects in order to open public Waves nodes to be able to access up-to-date Blockchain Information. Many of us have all the cryptos to produce addresses, to validate and even sign dealings regarding the Dunes Blockchain. Any time using the En aning Client you can read almost all the data in the open public nodes, you can likewise write down thier transaction directly within the visitor and just broadcast a done deal. Link: Waves Lite App(Chrome Extension)
1 note
·
View note
Text
Waves Lite Client
The Waves N�got Client is a Stainless File format that can get easily installed and employed to perform most behavior in the Waves Platofrm. At this time in development, the particular Waves Platform will permit customers to issue, copy in addition to trade assets. This finances has a built-in decentralized alternate platform that will can be used for you to exchange possessions, cryptocurrencies together with fiat bridal party. Waves Client Wallet is really a chrome extension wallet for Microsoft windows, Cpanel and Mac pc OS IN THIS HANDSET using high anonymity and is at the moment in development. It only works with waves and its assets. The private keys are controlled by the people and it is a good SPV client and is usually open sources and presents Hierarchical Deterministic and is short of the features Multi-Signature and 2-factor authentication. Additionally, it has a built-in decentralized trade platform allowing users to be able to trade assets, fiat money, and cryptocurrencies. Waves Platform is an open-source together with impartial blockchain platform the fact that allows nearly all people to create applications, create plus distribute new cryptocurrencies. This platform(initially beta waves platform) can certainly also be used to crowdfund and it is a decentralized platform. Crypto enthusiasts can certainly use that to build of form customized bridal party plus then transfer the electronic digital investments on the Blockchain. Merchants can even alternate tokens with regard to fiat foreign currency. The Waves Platform will allow any user to create their very own own tokens, and change them for fiat funds or other cryptocurrencies. Commonly, Waves Lite Client Download takes just a few moments plus requires little understanding involving the underlying technology. The ideal part about Ocean is definitely that its blockchain contains the capabilities of tokenizing some other cryptocurrencies. Waves Platform features a good easily accessible in addition to welcoming user interface. At this time there are quite some options; a new mobile version, a good visitor and a stand-alone edition of Waves Buyer. The idea also saves with your hardware storage room since Blockchain acquire is definitely not necessary. Let's take a carry a new look at typically the current and best Mounds purses in 2019 | Review and Choose the particular best waves finances with this latest review on waves wallets #1 Surf Wallet Android Waves Wallet Android mobile phone is a portable customer to WavesPlatform. It is easy to use the mobile application to instantly access your WAVES and also other Assets funds. The finances is connected to community Ocean nodes in buy to retrieve the deals and send bills. Waves Lite Client Download can show your transactions the two pending and confirmed devoid of login as well as password. You may even request money by way of QR code or revealing app link in addition to support multiple wallets upon one system. During subscription, the very info can be the wallet seed, which you can save it somewhere protected or can in addition record it on a piece involving paper. This is one of the better waves billfolds according to dunes wallet review. Web page link: Dunes Budget Android #2 Surf Pocket iOS Typically the Ocean finances iOS software is usually a new free cellular Waves customer and entire exchange wallet. You could use the application to access all the functions of often the Waves software, send in addition to store Surf tokens, and in many cases trade with the DEX(Charts, OrderBook, Handle your orders, in addition to WatchList) or also use it as a mobile bitcoin finances. The waves wallet ios is connected to community Mounds nodes to get all your transactions and send out repayments. Waves Lite Client Download can send WAVES and even Waves tokens to any person via primary address, QR code or from looseleaf notebook. There is definitely a data backup seed functionality and the wallet seed shielded by way of Touch ID. The basic thing about this kind of is that you ought to know how to use mounds wallet IOS. This is one of the top waves purses according for you to waves wallet evaluation and even waves wallet for downloading. Hyperlink: Waves Wallet IOS #3 Waves Lite Software package (Chrome Extension) The Dunes N�got Client connects in order to community Waves nodes in order to access up-to-date Blockchain Information. We all have all the cryptos to generate addresses, to examine and even sign purchases for the Surf Blockchain. If using the Ett flertal Client you can read most the data from your public nodes, you can in addition write down thier transaction directly in the internet browser and just simply broadcast a completed business deal. Link: Waves Ett flertal App(Chrome Extension)
1 note
·
View note
Text
Whatshack welcome view


Learn How to Create a Phishing Page & do Phishing attack Step by step Tutorial Part 1īy using the QRLJacking tool it creates a Phishing page of the QR Code of the WhatsApp web and whenever victim scans this QR Code from his/her mobile phone then the generated authentication token is automatically sent to the attacker’s server. Then website does verify this secret token if this token is successfully verified by the website then your WhatsApp session is open on the computer. Normally, whenever you scan the WhatsApp web QR code then mobile generates a secret authentication token and send it to the website. It will be easy for us to hijack WhatsApp by using a tool QRLJacking. But Hackers use this option very efficiently to Hack WhatsApp Accounts. Most of the people are not aware of this feature. I will show you the full practical example.Īctually, we are going to use feature. So, this post is going to be very interested. The older your software, the more vulnerabilities affect it and the more at risk you are from cyber criminals.Hello Friends! Welcome, all of you to this new post on in which you will get to know about How Can You Hack WhatsApp. For most users there is nothing you can do to fix the problem yourself, which means you are entirely reliant on the software support you receive from the developer or manufacturer of your device. While most security holes are fixed by software makers, you’re only protected if you actually receive the software fix. Vulnerabilities are discovered all the time and each is added to a hacker’s armoury, and they are often combined in creative ways to take over devices and steal data. Android devices are dependent on manufacturer, with Google’s Pixel smartphones being the gold standard, receiving at least three years of monthly security updates and Android version updates. Most iPhones receive in excess of five years of software support. You should always install the latest version iOS or Android, and should think twice before using a phone that is no longer supported with software updates. Keeping your apps up to date is crucial for protecting yourself against hacking and data theft, but your phone’s operating system is just as important. However, simply installing all the relevant app updates from your phone’s built-in app store is the best way to ensure you’re using the latest signed and verified version of the app. You can find the version number of the app installed on your Android phone by long-pressing on the WhatsApp icon and selecting App info, or finding the list of apps in your phone’s settings.

WhatsApp lists the most-up to-date version of its Android app on its site. WhatsApp Android app version information. How do I tell if I’m using the latest version? Users are strongly advised to check for updates manually through the Apple App Store on an iPhone, Google Play or similar on an Android device, the Microsoft Store on Windows Phones and the Galaxy app store on Tizen devices.įailing that, uninstalling WhatsApp from your phone will protect you from the attack. What do I need to do to protect myself?įacebook implemented a server-side change to help protect users and pushed out updates for the various smartphone WhatsApp versions on Monday. But if you happen to be a lawyer or work in sensitive industries and use WhatsApp, even for personal correspondence, you should be especially vigilant. If you haven’t received any WhatsApp voice calls or dropped calls from unknown parties then you have probably not been targeted. A few targets, including a UK-based human rights lawyer and an Amnesty International researcher, have been identified. The number of people spied on is not yet known. Users did not even have to accept the call, and it was often hidden from logs, the paper said. Who is behind the attack?Īccording to the Financial Times, Israeli cyber intelligence company NSO Group developed the spyware. WhatsApp is used by 1.5 billion people globally. Photograph: Samuel Gibbs/The GuardianĪll brands of phones with WhatsApp or WhatsApp Business installed are affected, including Apple’s iPhone (iOS), Android phones, Windows Phones and Tizen devices, according to Facebook. Any phone running either WhatsApp or the WhatsApp Business app can be affected.
0 notes
Text
Transfer microsoft authenticator to new phone

Transfer microsoft authenticator to new phone how to#
Transfer microsoft authenticator to new phone generator#
Transfer microsoft authenticator to new phone verification#
Transfer microsoft authenticator to new phone windows#
If you enable and use two factor authentication on different websites, you can use Microsoft Authenticator to generate the code.
Transfer microsoft authenticator to new phone generator#
Microsoft Authenticator is a code generator application available for Android and iOS. You can view Microsoft Authenticator when using Microsoft products or websites and applications that use two factor authentication with a time-based code. This program offers additional security for your online accounts in the form of an application.
Transfer microsoft authenticator to new phone verification#
Microsoft Authenticator is a two-factor authentication program. Like 2FA Authenticator, Microsoft Authenticator offers another layer of security: You can require unlocking your phone with PIN or biometric verification in. However, when it comes to transferring accounts using Microsoft Authenticator, things can be very tricky.īefore you start the process of transferring two certificate accounts with Microsoft Authenticator, you need to understand what Microsoft Authenticator is all about. Therefore, in such cases, you will need to transfer your accounts to a new device. transfer microsoft authenticator to new phone. Your account credentials are backed up to your iCloud account. If a different organization/company has given you access to a sharepoint/onedrive and now you have switched to a new phone using the back up option described in 'Back up and recover account credentials in the Authenticator app' you will receive the message 'Scan the QR code provided by your organization.' under all the external accounts. At some point you will buy or get a new one phone one way or another like all electronic devices is prone to misalignment after a long period of use. On your iOS device, select Settings, select Backup, and then turn on iCloud backup. Often when using the services that create an account, you link the accounts to yours phone.
Transfer microsoft authenticator to new phone windows#
I dont know anything that works on Windows Phones, every time Ive done it I. If it is android, you can use Titanium Backup to do it, Ive done that and didnt have to reconfigure them. If you have an iPhone, you can use iCloud, but unfortunately there is no backup ability in Android. This type of verification can be done either by SMS or using special verifications such as Microsoft Authenticator. Backup/restore/syncing is a real weakness in Authenticator. Two-factor authentication is a security measure to protect personal information in your account.
Transfer microsoft authenticator to new phone how to#
How to move Microsoft Authenticator to a new one phone.
Guide: How to Transfer Microsoft Authenticator to a New Phone So please read this tutorial carefully so you may comprehend it in a better helpful way. Hello Geeky, so today we are focusing on How to Transfer Microsoft Authenticator to a New Phone.
0 notes
Text
The Simplest Way to Test Salesforce CRM Multi-Factor Authentication

Salesforce Multi-factor Authentication (MFA) requirement went into effect on February 1, 2022. Read the full announcement here. If you haven’t planned MFA testing for Salesforce, now would be the time to do so. Fortunately, Exoprise offers an updated version of the Salesforce sensor to ensure both availability and secure access to your favorite CRM. While discussing MFA, we recently published blogs on Teams testing and new changes to our synthetic sensors. Read them also:
Introducing Multi-Factor Authentication for Synthetics
How to Test Multi-Factor Authentication for Microsoft Teams
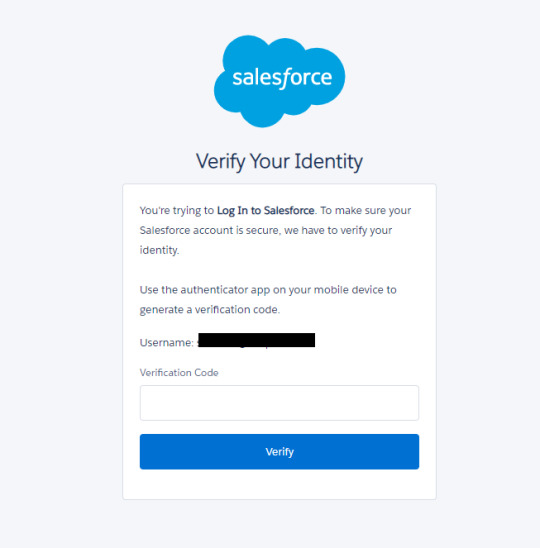
Assuming you have correctly configured the user ids for MFA authentication in Salesforce, end-users should see the following screen when trying to login into the CRM application. The TOTP-based verification code is generated in third-party authenticator apps (Google or Microsoft) on your mobile device when you first scan the QR code or enter the key manually in the app.
In this article, we’ll guide you through all the steps you need to set up our Salesforce MFA Web Sensor in your environment.
1. Locate the Salesforce Sensor in Exoprise
Under the Sensors tab, click “Add Sensor” and search for Salesforce in the text box. If you haven’t yet started an Exoprise trial, you can do so here. Please note that existing users and customers of our Salesforce Web Sensor will need to reconfigure their setup to include MFA. We will be deploying the sensor to a private site for this test. Double click the Salesforce Web Sensor icon.
2. Download the Management Client
The Exoprise Management client assists with deploying and installing Exoprise sensor monitoring solutions on a user’s desktop. You can also familiarize yourself with the features of the Salesforce Web Sensor under the first tab. View our earlier video (How to monitor Microsoft SharePoint Online) showing how to download the management client and set up a private site.
3. Login to the Exoprise Management Client
After successfully installing the management client and private site, log into the network application. Under the Sensors tab, select “Add Sensor” and search for the Salesforce Web Sensor to start the deployment. Click Next.
4. Start the deployment of the Salesforce MFA Sensor
This step ensures that your private site is set up correctly, and all system requirements are met to proceed. Click Next.
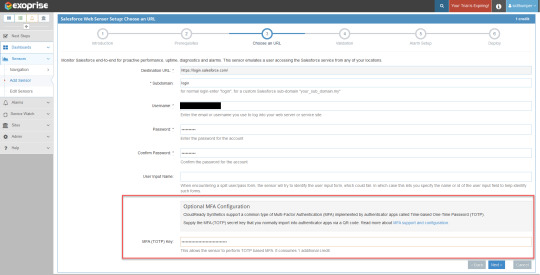
Enter all the login credentials on this page, including your username, password, and the TOTP key you received when you set up MFA in Salesforce. Click Next.
Once your configuration input has been successfully validated, you will see a sample screenshot of the Salesforce CRM page. Click Next.
Exoprise automatically configures alarm notifications for your Salesforce sensor. Your recipient group will receive alerts if the Salesforce sensor fails during MFA login, page unavailability, server failure, etc. Additionally, you can customize the alarm settings on this page. Click Next.
In the final step, select the private sites that use the Salesforce MFA sensor. You can also change the frequency of the sensor that collects Salesforce performance data. Click Finish.

Congratulations! You have completed your Salesforce sensor setup for MFA testing. Click on the sensor name. In a matter of few minutes, Exoprise collects all web performance and network connection metrics for Salesforce under different categories (Page Layout, Login and Render, Connect, and Site metrics). Compare metrics such as DOM loaded time, connect time, TTFB, TCPIP, authentication time, etc., with crowd-sourced analytics benchmarks and optimize accordingly. Keep an eye on alarms and errors under the respective tabs.
Enhance Security with Salesforce Multi-Factor Authentication Testing
Request a demo today with the Exoprise team to learn face-to-face (over Teams we mean!) about our new Salesforce MFA Web Sensor and its commitment to smooth IT business operations. Compliance with Salesforce platform technology and security requirements is critical for enterprises that rely on CRM every day. Our latest MFA implementation solution meets all those requirements.
Does your organization also use Single Sign-On (SSO) for Salesforce? Our sensor also monitors Single Sign-On (SSO) which increases security and simplifies the login experience for your entire workforce.
ONLY Exoprise provides you with complete coverage on the Salesforce app performance and sends network administrators proactive notifications if the Salesforce MFA infrastructure breaks down.
#salesforce #CRM #MFA #multifactorauthentication #syntheticmonitoring #synthetics
Originally published at www.exoprise.com/blog on Feb 27, 2022
0 notes
Text
How to Set Up Two-factor Authentication on All Your Online Accounts

How to set up 2FA on your accounts? And why is it important in the first place? As social media is becoming increasingly popular, security is becoming something of supreme importance.
Even though choosing a strong password helps you in certain ways, by adopting 2FA, you can improve and enhance security further. So, let's know more about this extra layer of protection and how to set up 2FA on your accounts.
First stop.
What is Two-Factor Authentication
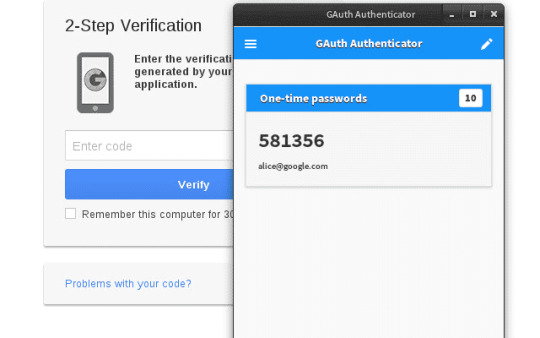
2FA is one of the best security methods that use two layers to verify a consumer's identity. This means, rather than simply entering the password to log into an account, two-factor authentication requires a code to be sent via text message to the consumer's phone number or generated through an app.
This type of verification code helps and ensures that only the authorized consumer can access their account. Similarly, multi-factor authentication (MFA) offers two or more authentication layers to approve account access for consumers.
What is Authenticator Apps
Authenticator apps are meant to be installed on your smartphones to obtain passcodes to sign in to your accounts. They are intended to be more secure than texting; they provide flexibility if you are traveling to a place where there is no mobile service.
Some of the options include Google Authenticator, Microsoft Authenticator Authy, or HDE OTP.
All these apps follow the same procedure – when you are adding a new user account, you need to scan a QR code associated with the account, and it is saved in the app.
The next time you sign in to your app or service, it will ask for a numerical code. You need to open up the authenticator app and check the randomly generated authentication code to access your account securely.
How to Set up 2FA on Your Social Media Accounts
A lot of applications offer 2FA currently, especially if you are storing important and sensitive data, financial information, emails, social media, files, contact details, etc.
2FA needs more than one factor to login. This might include parameters like "something you are," for example, biometrics in the form of iris scan or fingerprints, "something you know," a password, and "something you have," like a smartphone or hardware key.
Find out how to set up 2FA on your accounts:
1. Google
If you want to set up an authenticator on the Google account, first you need to download the Google Authenticator app available on the Play Store. Once downloaded, do the following:
Go to Gmail and click the profile icon.
Choose My account and click on Sign-in & Security.
You can add the two-step verification process here.
Source: Google
2. Snapchat
To set up 2FA on your Snapchat account, you will need to:
Go to the app’s main camera screen and tap on the profile icon.
Find the gear icon to access Settings.
Tap on Two-Factor Authentication and choose whether to obtain verification via a text message or an authenticator app.
You can add trusted devices or request a recovery code for when you intend to be somewhere without cellular coverage once 2FA has been activated on your Snapchat account. Safety key logins do not currently appear to be supported by Snapchat.
3. Whatsapp
To set up 2FA on your WhatsApp account, you will need to:
Open WhatsApp on your device.
Under the upper-right hamburger icon, find the Settings menu.
Go to Look under Account > Two-step verification > Allow.
You will be prompted to end a six-digit PIN to verify your account. If you forget your PIN, you can optionally add an email address.

Source: lifewire
It is important to have an associated email with your WhatsApp account as the service will not allow you to reverify yourself if you have used WhatsApp and forgotten your PIN within the last seven days.
4. Outlook
To set up 2FA on your Outlook account, you will need to:
Sign in to your Outlook account.
Click on your name and then click View Account.
Under the Basic Options, click on the link that says Explore more security options.
If you have not set up 2FA yet, you can click on the link and proceed with that. You can switch to Microsoft Authenticator by clicking the Set up identity verification app if you already have it.
5. Facebook
To set up 2FA on your Facebook account, you will need to:
Sign in to your Facebook account.
Click on Settings and choose Security and Login.
Check for the use of two-factor authentication in the Setting Up Extra Security section.
Enable the code generator.
You can also use the Facebook mobile app for approving sign-ins on the web or set up a third-party authentication app for generating codes.

Source: Facebook
6. Twitter
To set up 2FA on your Twitter account, you will need to:
Sign in to your Twitter account.
Click on your Profile Icon and then click Settings and Privacy.
Click the checkbox next to Verify login requests, under the Security heading.
Verify your mobile number and then click Set up a code generator app.
Scan the QR code with the third-party authenticator app.

7. Apple iCloud
You can log in to your account at https://appleid.apple.com/, then search for Two-Factor Authentication under Security.
The next step would be to verify your location, and it will send a code to your other Apple devices.
iOS
To set up 2FA on your iOS account, the steps will be a bit different. Majorly, it will depend on how you have updated your iOS software.
For users using iOS 10.3 or later versions, click on Settings > your Name > Password & Security.
You can turn on 2FA to receive a text message with a code every time you log in.
For users using iOS 10.2 or earlier versions, go to Settings under iCloud > Apple ID > Password & Security.
macOS
Similar to iOS, a few of the steps may vary depending on the version of macOS.
If you are using Catalina, click the Apple icon, then click System Preferences > Apple ID.
The next step would be to click on Password & Security under your name and finally click Turn On Two-Factor Authentication.
8. Instagram
In 2017, two-factor authentication was added by Instagram to the mobile app, which can be activated via the web. If you want to activate 2FA on your mobile device, you need to go to Profile and click on the menu and look for Settings & Security. There you will find two-factor authentication.
With Instagram, you also get to choose between SMS-based verification and a code sent to the authentication app.

Source: Kaspersky
Why is 2FA important
As cybercriminals are getting smarter, 2FA has become more mandatory than ever. Without it, you might end up leaving your accounts vulnerable to hackers for sealing your personal information, hacking your online credit card details, and accessing your bank account. By adding the additional step to your account, you get the edge to prevent hackers from accessing your account.
Setting Up 2FA with LoginRadius Adaptive 2FA/ MFA solution

LoginRadius provides multi-factor authentication via SMS, email, automated phone calls, account security questions, and authenticator apps to allow you a customized user experience.
Based on your business, you can choose to use LoginRadius's Identity Platform's Multi-factor authentication, which is an easy process.
Currently, LoginRadius provides its support authentication methods via SMS workflow and Google Authenticator workflow.
For SMS Workflow
You can enable SMS verification from the LoginRadius admin console. There's also an option to choose your preferred SMS template and SMS provider.
As the first step, you'll need to apply a first verification factor, like standard email and password login, username and password, automated phone call, or access token. The second factor can be a one-time password or code sent via SMS.
Google Authenticator Workflow
For enabling Google Authenticator, the first step will be to set up your ID in the admin console for Google to identify your website or application on the authenticator.
Next, you will need to set up your QR code specifications or make MFA mandatory.
Similar to the SMS workflow, you can select standard email and password login, username, password, automated phone call, or access token as the verification factor.
Final Thoughts
With cybercrimes on the rise, it is essential to make your online security measures more robust. Hence, to protect your account and the history, you need to learn how to set up 2fa on your accounts for an additional safety cover. It not only protects your online social accounts but other accounts as well.
Originally published at LoginRadius
How to Set Up 2FA on All Your Online Accounts
Secure your accounts online by setting up 2FA. Know why two-factor authentication is the best way to securely verify login attempts and prevent data breaches.

LR LogoView Profile
https://bit.ly/311H3qk https://bit.ly/3FvbFzu
https://guptadeepak.com/content/images/2021/12/how-to-setup-2fa-online-accounts.jpeg https://deepakguptaplus.wordpress.com/2021/12/26/how-to-set-up-two-factor-authentication-on-all-your-online-accounts/
0 notes
Text
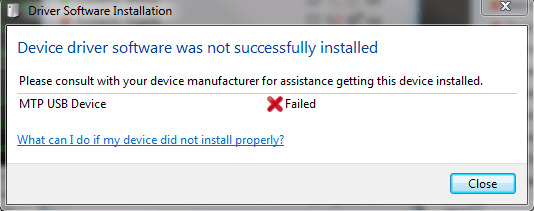
Drivers Network Connect USB Devices
When you use App Inventor with a phone or tablet, that device communicates with the App Inventor software running in your computer's browser window. This communication is managed by the AI2 Companion App running on the device. The instructions below (step 2) explain how to install the companion. The Companion can communicate with your computer over a wireless connection. This is the method strongly recommended by the App Inventor team. It does not require any additional software to be installed on your computer. (See Option 1, under Setting up App Inventor.)
Drivers Network Connect Usb Devices Wireless Adapter
Drivers Network Connect USB Devices
Drivers Network Connect Usb Devices Windows 10
USB Network Gate eliminates the need for additional cabling or equipment and lets multiple users access a device simultaneously. Make USB wireless with 2 steps: 1 Simply install the application on the computer that is connected to the USB device you want to share. Click on the Start button and select Control Panel. Select System and Security. Select Device Manager under System. Select and expand the Network adapters from the list of devices. It allows your laptop to connect to the Internet when there is no network connection. Setting up USB tethering in Windows 10 is simple, but it might not always work as intended. Nds surgical imaging driver download for windows 10. If you are facing USB tethering issues in Windows, we recommend you try the steps set out below: Using Device Manager to fix USB tethering issues. A corrupt Device. The USB drivers help us to connect our phone to the computer and perform tasks like transferring data, syncing your device with a PC. They help us to connect our Android devices to tools like Odin, Sony Flash tool, and SuperOneClick.
Drivers Network Connect Usb Devices Wireless Adapter
There are, however, some environments where wireless connections won't work. These include some hotels, conference centers, and schools, that configure their wireless networks to prohibit two devices on the network from communicating with each other. See How Does my Android Device Connect Over Wifi? for a short explanation.Some App Inventor users have solved this problem by purchasing a wireless router and setting up their own local network. (Also, most Macs and some PC can serve as WiFi routers that can handle a small number of machines.) But where even this is impossible, you can still use App Inventor with a phone or tablet if you connect it to the computer with a USB cable.
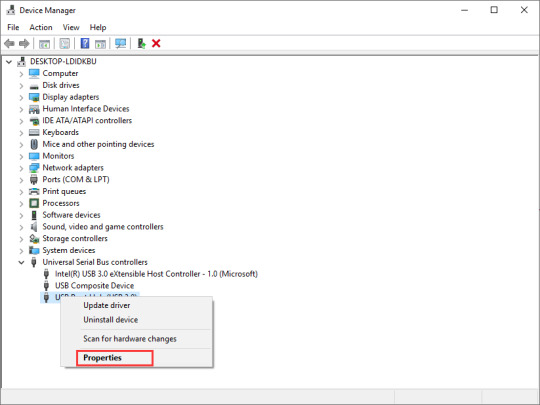
Setting up a USB connection can be awkward, especially on Windows machines, which need special driver software to connect to Android devices. (This is not the case with Mac or Linux, which do not need special drivers.) Unfortunately, different devices may require different drivers, and, outside of a few standard models, Microsoft and Google have left it to the device manufacturers to create and supply the drivers. As a consequence, that you may have to search on the Web to find the appropriate driver for your phone. App Inventor provides a test program that checks if your USB-connected device can communicate with the computer. You should run this test and resolve any connection issues before trying to use App Inventor with USB on that device.
Drivers pasco scientific modems for sale. Here are the steps for beginning to use App Inventor with the USB cable:
Step 1: Install the App Inventor Setup Software
To connect with USB, you need to first install the App Inventor setup software on your computer. (This is not required for the wifi method.) Follow the instructions below for your operating system, then come back to this page to move on to step 2
Important: If you are updating a previous installation of the App Inventor software, see How to update the App Inventor Software.
For automatic identification and scsi & raid devices drivers, we strongly recommend to download and install the Driver Update Tool – it will help you to get the correct latest drivers for all of your devices and avoid conflicts and improper work of your system. Note: Improper or outdated drivers in your system may cause system failure, blue screen also known as “Blue Screen of Death. Drivers & Downloads; Product Registration. Select your device. Back × Select your model. GET PERSONALIZED SUPPORT THROUGH YOUR CANON ACCOUNT. Your Canon account is the way to get the most personalized support resources for your products. Already have an account? Download Canon MS300/350 SCSI Scanner Device for Windows to image driver. Download canon scsi & raid devices driver.
You can check whether your computer is running the latest version of the software by visiting the Connection Test Page.
Step 2: Download and install the MIT AI2 Companion App on your phone.
Open your device's QR code scanner and scan the QR code on the left below to download the Companion App from the Play Store. If you can't use the Play Store, use the QR code on the right to download the Companion App directly to your phone.
Play Store
Recommended: Automatic updates
APK File
Manual updates required
Scan this QR code (or click this link) to get the app from the Play Store
Scan this QR code (or click this link) to download the app directly
If you need a QR code scanner, you can get one at the Play Store (e.g., ZXing).
Drivers Network Connect USB Devices
After downloading, step though the the instructions to install the Companion app on to your device.You need to install the MIT AI2 Companion only once, and then leave it on your phone or tablet for whenever you use App Inventor.
Note: If you choose not to go through the Play store and instead load the app directly (aka 'side load), you will need to enable an option in your device's settings to allow installation of apps from 'unknown sources'. To find this setting on versions of Android prior to 4.0, go to 'Settings > Applications' and then check the box next to 'Unknown Sources'. For devices running Android 4.0 or above, go to 'Settings > Security' or 'Settings > Security & Screen Lock' and then check the box next to 'Unknown Sources' and confirm your choice.
Step 3. Launch aiStarter (Windows & GNU/Linux only)
Using the emulator or the USB cable requires the use of a program named aiStarter. This program is the helper that permits the browser to communicate with the emulator or USB cable. The aiStarter program was installed when you installed the App Inventor Setup package. You do not need aiStarter if you are using only the wireless companion. On a Mac, aiStarter will start automatically when you log in to your account and it will run invisibly in the background. On Windows, there will be shortcuts to aiStarter from your Desktop, from the Start menu, from All Programs and from Startup Folder. If you want to use the emulator with App Inventor, you will need to manually launch aiStarter on your computer when you log in. You can start aiStarter this by clicking the icon on your desktop or using the entry in your start menu.
The aiStarter Icon on Windows
To launch aiStarter on Windows, double click on the icon (shown above). You'll know that you've successfully launched aiStarter when you see a window like the following:
On GNU/Linux, aiStarter will be in the folder /usr/google/commands-for-Appinventor and you'll need to launch it manually. You can launch it from the command line with/usr/google/appinventor/commands-for-Appinventor/aiStarter &
Drivers Network Connect Usb Devices Windows 10
For Help with aiStarter, see Connection Help.
Step 4: Set up your device for USB (Turn USB Debugging ON)
On your Android device, go to System Settings, Developer Options, turn them on, and be sure that 'USB Debugging' is allowed.
On most devices running Android 3.2 or older, you can find this option under Settings > Applications > Development.
On Android 4.0 and newer, it's in Settings > Developer options.
Note: On Android 4.2 and newer, Developer options is hidden by default. To make it available, go to Settings > About phone and tap Build number seven times. Return to the previous screen to find Developer options, including 'USB Debugging'.
Step 5: Connect your computer and device, and authenticate if necessary.
Connect your Android device to the computer using the USB cable - be sure that the device connects as a 'mass storage device' (not 'media device') and that it is not mounted as a drive on your computer. This may mean that you have to go to the Finder (on a Mac) or My Computer (on Windows) and disconnect any drive(s) that were mounted when you connected your Android device.
On Android 4.2.2 and newer, your device will pop up a screen with the message Allow USB Debugging? the first time you connect it to new computer. Press 'OK'. This authenticates the computer to the device, allowing the computer to communicate with it. You'll need to do this for each computer you want to connect to the device, but only once per computer.
Step 6: Test the connection.
Go to this Connection Test Page (opens in a new tab in your browser) and see if you get a confirmation that your computer can detect the device. If the test fails, go to General Connection Help and look at the USB help for your computer (Windows or Mac). You won't be able to use App Inventor with the USB cable until you resolve the connection issues. Return to this page when the test suceeds.
Setup complete! You are now ready to build your first app!
<< To App Inventor Library
0 notes