#How to change directory permissions in Linux with chmod?
Explore tagged Tumblr posts
Visit Tumblr Blog
Explore Tumblr blogs with no restrictions, modern design and the best experience.
Last Seen Tumblr Blogs


Fun Fact
Tumblr was the first site to host the blog for President Barack Obama in 2011.
Text
How to change Permission file and folder in the Linux?
Introduction
Linux is renowned for its robust security features and the level of control it offers to users over their system. One fundamental aspect of this control is the ability to manage permissions for files and folders. Properly understanding and utilizing Linux file and folder permissions is crucial for maintaining the integrity of your system and ensuring that sensitive data remains protected. In this comprehensive guide, we will walk you through the process of changing permissions for files and folders in Linux, step by step.
The Linux operating system uses access permission to maintain security on files directories. When we create a file or directory, Linux assigns default permissions to them. In this tutorial, we’ll discuss different ways of changing permissions for directories and files within the directory. Privacy is an essential part of someone’s life, whether social media or the workplace. Read More
#How to change Permission file and folder in the Linux?#How to change directory permissions in Linux with chmod?#How to Change File Permissions
0 notes
Text

SYSTEM ADMIN INTERVIEW QUESTIONS 24-25
Table of Content
Introduction
File Permissions
User and Group Management:
Cron Jobs
System Performance Monitoring
Package Management (Red Hat)
Conclusion
Introduction
The IT field is vast, and Linux is an important player, especially in cloud computing. This blog is written under the guidance of industry experts to help all tech and non-tech background individuals secure interviews for roles in the IT domain related to Red Hat Linux.
File Permissions
Briefly explain how Linux file permissions work, and how you would change the permissions of a file using chmod. In Linux, each file and directory has three types of permissions: read (r), write (w), and execute (x) for three categories of users: owner, group, and others. Example: You will use chmod 744 filename, where the digits represent the permission in octal (7 = rwx, 4 = r–, etc.) to give full permission to the owner and read-only permission to groups and others.
What is the purpose of the umask command? How is it helpful to control default file permissions?umask sets the default permissions for newly created files and directories by subtracting from the full permissions (777 for directories and 666 for files). Example: If you set the umask to 022, new files will have permissions of 644 (rw-r–r–), and directories will have 755 (rwxr-xr-x).
User and Group Management:
Name the command that adds a new user in Linux and the command responsible for adding a user to a group. The Linux useradd command creates a new user, while the usermod command adds a user to a specific group. Example: Create a user called Jenny by sudo useradd jenny and add him to the developer’s group by sudo usermod—aG developers jenny, where the—aG option adds users to more groups without removing them from other groups.
How do you view the groups that a user belongs to in Linux?
The group command in Linux helps to identify the group a user belongs to and is followed by the username. Example: To check user John’s group: groups john
Cron Jobs
What do you mean by cron jobs, and how is it scheduled to run a script every day at 2 AM?
A cron job is defined in a crontab file. Cron is a Linux utility to schedule tasks to run automatically at specified times. Example: To schedule a script ( /home/user/backup.sh ) to run daily at 2 AM: 0 2 * * * /home/user/backup.sh Where 0 means the minimum hour is 2, every day, every month, every day of the week.
How would you prevent cron job emails from being sent every time the job runs?
By default, cron sends an email with the output of the job. You can prevent this by redirecting the output to /dev/null. Example: To run a script daily at 2 AM and discard its output: 0 2 * * * /home/user/backup.sh > /dev/null 2>&1
System Performance Monitoring
How can you monitor system performance in Linux? Name some tools with their uses.
Some of the tools to monitor the performance are: Top: Live view of system processes and usage of resource htop: More user-friendly when compared to the top with an interactive interface. vmstat: Displays information about processes, memory, paging, block IO, and CPU usage. iostat: Showcases Central Processing Unit (CPU) and I/O statistics for devices and partitions. Example: You can use the top command ( top ) to identify processes consuming too much CPU or memory.
In Linux, how would you check the usage of disk space?
The df command checks disk space usage, and Du is responsible for checking the size of the directory/file. Example: To check overall disk space usage: df -h The -h option depicts the size in a human-readable format like GB, MB, etc.
Package Management (Red Hat)
How do you install, update, or remove packages in Red Hat-based Linux distributions by yum command?
In Red Hat and CentOS systems, the yum package manager is used to install, update, or remove software. Install a package: sudo yum install httpd This installs the Apache web server. Update a package: sudo yum update httpd Remove a package:sudo yum remove httpd
By which command will you check the installation of a package on a Red Hat system?
The yum list installed command is required to check whether the package is installed. Example: To check if httpd (Apache) is installed: yum list installed httpd
Conclusion
The questions are designed by our experienced corporate faculty which will help you to prepare well for various positions that require Linux such as System Admin.
Contact for Course Details – 8447712333
2 notes
·
View notes
Text
These days, graphical user interfaces rule our screens. As such, the command line may appear to be a thing of the past. It is still a powerful tool, though, for anyone who wants to fully utilise a computer's potential. Greetings from the Linux command line universe. Here, we will uncover the tips and tricks that can transform you from a casual user into a command line maestro. Essential Command Line Basics for Linux We'll lay the groundwork for your exploration of the Linux command line in this article. In order to make sure you are comfortable using the terminal and carrying out commands successfully, we will start with the fundamentals. Open a Terminal You can use the terminal application that comes with most Linux distributions. Usually, you can locate it by looking for "Terminal" in the Applications menu or using the system search bar. Basic Commands: ls: List files and directories in the current directory. bashCopy code ls cd: Change the current directory. bashCopy code cd Documents pwd: Print the current working directory. bashCopy code pwd mkdir: Create a new directory. bashCopy code mkdir NewFolder touch: Create an empty file. bashCopy code touch myfile.txt Navigating the File System: Using cd to navigate through directories. bashCopy code cd .. Using ls to list the contents of a directory. bashCopy code ls /home/user/Documents File Manipulation: cp: Copy files or directories. bashCopy code cp file.txt /path/to/destination/ mv: Move or rename files or directories. bashCopy code mv oldfile.txt newfile.txt rm: Remove files or directories. bashCopy code rm myfile.txt Viewing File Content: cat: Display the entire content of a file. bashCopy code cat myfile.txt less or more: View file contents one screen at a time. bashCopy code less myfile.txt head and tail: Show the first or last few lines of a file. bashCopy code head myfile.txt File Permissions: Use chmod to change file permissions. bashCopy code chmod 755 myscript.sh chown changes the owner of a file or directory. bashCopy code sudo chown user:group myfile.txt File Searching: find: Search for files and directories. bashCopy code find /path/to/search -name "*.txt" grep: Search for text within files. bashCopy code grep "keyword" myfile.txt Managing Users and Permissions: passwd: Change your password. bashCopy code passwd sudo: Execute a command with superuser privileges. bashCopy code sudo command useradd and userdel: Add and delete user accounts. bashCopy code sudo useradd newuser sudo userdel olduser Help and Manuals: To get help for a command, use the --help option. bashCopy code ls --help Use the man command to access comprehensive manuals. bashCopy code man ls Keyboard Shortcuts: Up and Down arrow keys for command history. Tab key for auto-completion. Package Management: For Debian/Ubuntu systems (using apt): bashCopy code sudo apt update sudo apt upgrade For CentOS/RHEL systems (using yum): bashCopy code sudo yum update These examples should help you get started with the Linux command line and understand how to perform basic operations. How to Use the Linux Command Line Productively We're going to look at some methods and resources that will help you work with the Linux command line environment more effectively and efficiently. Therefore, mastering these abilities is crucial to optimising your workflow and developing your command-line skills. Tab Completion in Linux command line By pressing the "Tab" key, you can quickly and efficiently complete file and directory names, command names, and other arguments in the Linux command line thanks to a powerful feature called tab completion. It saves you time and prevents you from manually typing lengthy and possibly mistake-prone names. Here's how tab completion functions and some advice on how to use it efficiently: File and Directory Names: When you start typing the name of a file or directory, you can press the "Tab" key to autocomplete it.
If there's a single matching option, it will be completed for you. If there are multiple matching options, pressing "Tab" twice will display a list of all possible matches for you to choose from. For example, if you have files named "file1.txt" and "file2.txt," and you type cat f and then press "Tab," it will complete to cat file. Command Names: Tab completion also works for command names. When you start typing a command, pressing "Tab" will attempt to complete it. If you press "Tab" twice, it will list all available commands that match what you've typed so far. For example, if you start typing su and press "Tab," it might complete to sudo or sum. Pressing "Tab" twice will show you all available commands that start with "su." Directory Paths: Tab completion works with directory paths as well. You can start typing a directory path, and it will complete both directory names and the path itself. For example, if you want to navigate to the "/var/www" directory, you can type cd /v and then press "Tab" to autocomplete to cd /var/. Options and Arguments: Tab completion can also help you complete command options and arguments. For example, if you type ls -l /ho and press "Tab," it can autocomplete to ls -l /home/. Custom Tab Completion: You can create custom tab completion scripts or functions for specific commands or tasks. These scripts can provide tab-completable options and arguments based on your needs. Custom tab completion scripts are typically stored in files like /etc/bash_completion.d/ or loaded in your shell's profile configuration (e.g., .bashrc or .zshrc). Escaping Spaces: If you have spaces in your file or directory names, you can use backslashes or quotes to escape them. For example, if you have a file named "my file.txt," you can type cat my\ file.txt or cat "my file.txt" to use tab completion. Linux Command History and Recall Ever use a command only to find yourself in need of it again a short while later? Command history and recall allow you to quickly access commands that you have already run. A list of recent commands, each with a number attached, is displayed by the history command. An exclamation point (!) followed by the command number can be used to rerun a command (e.g.,!42 will rerun the 42nd command in your history). By pressing Ctrl + R and then entering a keyword from the command you're looking for, you can also search your command history. By using this feature, you can avoid typing lengthy, intricate commands again. Using Aliases in the Linux Shell Aliases are like custom shortcuts for your commands. You can create your own shorthand for frequently used or complex commands. For example, if you often find yourself typing ls -l to list files in long format, you can create an alias like this: bashCopy code alias ll='ls -al' After creating the alias, you can use ll instead of ls -al to list files. Linux Command Line Shortcuts Command line shortcuts are quick key combinations that help you navigate, edit, and control your terminal more efficiently. Here are a few essential shortcuts: Keyboard Shortcut Description CTRL + A Moves the cursor to the beginning of the line. CTRL + E Moves the cursor to the end of the line. CTRL + U Deletes text from the cursor to the beginning of the line. CTRL + K Deletes text from the cursor to the end of the line. CTRL + L Clears the terminal screen. CTRL + C Interrupts (stops) the current command. CTRL + D Exits the current shell or terminal session. CTRL + Z Suspends the current command (resumable with the fg command). Pipelines and Redirections in Linux command line Pipelines and redirections are powerful features in the Linux command line that allow you to manipulate input and output streams of commands, enabling you to perform complex tasks efficiently. Here's some examples of pipelines and redirections: Pipelines (|): Pipelines allow you to chain multiple commands together, passing the output of one command as the input to another.
This can be incredibly useful for processing and transforming data on the fly. For example, let's say you have a list of files in a directory, and you want to find all the files that contain a specific keyword: bashCopy code grep "keyword" *txt In this example, grep searches for the keyword in all txt files in the current directory. However, if you want to narrow down the results to only show the filenames containing the keyword, you can use a pipeline: bashCopy code grep -l "keyword" *txt | xargs -I basename Here, the grep command searches for the keyword and uses the -l option to list only the filenames. The | symbol passes this list of filenames to xargs, which then extracts the basename of each file, giving you a cleaner list of matching filenames. Redirections (>, >>, : Redirects the output of a command to a file, overwriting the file if it already exists. bashCopy code echo "Hello, world!" > output.txt >>: Redirects the output of a command to a file, but appends it to the file if it already exists. bashCopy code echo "Appended text" >> output.txt and 2>>: Redirects standard error (stderr) output to a file, overwriting or appending as needed. bashCopy code command_that_generates_error 2> error.log command_that_generates_error 2>> error.log Combining Redirection and Pipelines: You can combine redirection and pipelines to perform more complex operations. For instance, you can redirect the output of a command into a file and then use that file as input for another command. For example, you can sort the lines in a file and save the sorted result to another file: bashCopy code sort < input.txt > sorted_output.txt These are just a few Linux command line examples for pipelines and redirections. These facilitate data manipulation and process automation by enabling you to carry out an extensive array of tasks with efficiency and flexibility. Searching and Manipulating Text in the Linux Terminal Let us look at powerful tools and techniques available in the Linux command line for searching and manipulating text. These skills are useful in parsing log files, extracting specific information, and performing various text-related tasks efficiently. Searching for Text: grep: grep is a versatile command-line tool for searching text in files. It's often used with regular expressions for more complex searches. Basic usage: bashCopy code grep "pattern" file.txt Using regular expressions: bashCopy code grep -E "pattern1|pattern2" file.txt find: The find command is used to search for files and directories based on various criteria, including text content. Searching for files containing a specific text: bashCopy code find /path/to/search -type f -exec grep -l "pattern" \; ag (The Silver Searcher): An alternative to grep, ag is faster and more efficient for searching large codebases. Install it if it's not already available on your system. Basic usage: bashCopy code ag "pattern" /path/to/search Text Manipulation: sed (Stream Editor): sed is a powerful tool for text manipulation and transformation. It can be used to replace text, delete lines, and perform other operations. Replace text in a file: bashCopy code sed 's/old_text/new_text/g' file.txt awk: awk is a versatile text-processing tool that allows you to perform operations on text data, including filtering, formatting, and calculations. Print specific columns from a file: bashCopy code awk 'print $1, $3' file.txt cut: The cut command is used to remove sections from lines of files. Extract specific columns from a file: bashCopy code cut -d' ' -f1,3 file.txt sort: The sort command is used to sort lines in text files. Sorting a file alphabetically: bashCopy code sort file.txt uniq: uniq is used to remove duplicate lines from a sorted file. Removing duplicate lines from a sorted file: bashCopy code sort file.txt | uniq tr (Translate): tr is used for character-level text manipulation, such as translating or deleting characters.
Translate characters to uppercase: bashCopy code tr '[:lower:]' '[:upper:]' < file.txt cut and paste: The cut and paste commands can be used together to manipulate columns of text. Combining columns from two files: bashCopy code cut -f1 file1.txt > col1.txt cut -f2 file2.txt > col2.txt paste col1.txt col2.txt > combined.txt These are just a few examples of the many text-processing commands available in the Linux terminal. Depending on your specific needs, you can combine these commands and use them in scripts to perform more complex text manipulation tasks. Linux System Information and Troubleshooting In this chapter, we will explore essential tools and techniques for gathering system information, troubleshooting common issues, and monitoring resource usage in a Linux environment. These skills are convenient for maintaining system health and resolving problems effectively. Checking System Information (uname, df, free) To gain insights into your system’s configuration and resource utilization, you can use a variety of commands: Command Description Example uname Displays basic system information such as the kernel version and system architecture. Uname -a df Shows disk space usage, including information about disk partitions and their available space. df -h free Displays memory (RAM) usage information, including total, used, and available memory. free -m Linux System Logs and Troubleshooting (journalctl, dmesg) Troubleshooting system issues often involves examining logs and messages. Two key commands for this purpose are: – journalctl: The journalctl command provides access to the systemd journal, which contains logs for various system services and events. This tool enables you to view and filter log entries, making it invaluable for diagnosing system issues. To display recent system logs: bashCopy code journalctl -xe – dmesg: Additionally the dmesg command displays kernel ring buffer messages, which can be useful for diagnosing hardware-related problems. It specifically shows messages related to hardware detection, driver initialization, and system boot. To view kernel messages: bashCopy code dmesg | less Monitoring Resource Usage (htop) htop is an interactive and feature-rich process viewer and system monitor. Furthermore, it provides a real-time overview of system resource usage, including CPU, memory, and processes. It looks like this: To install htop use the following command: Debian/Ubuntu: bashCopy code sudo apt update sudo apt install htop CentOS/RHEL: bashCopy code sudo yum install epel-release # This is needed for EPEL repository on CentOS/RHEL 7 and earlier. sudo yum install htop Fedora: bashCopy code sudo dnf install htop htop is an excellent alternative to the basic top command. In addition, it offers a more user-friendly interface and additional features for monitoring and managing processes and system resources. How to Customize the Linux Terminal (color schemes, fonts) Customizing the Linux terminal can make your command-line experience more enjoyable and efficient. Here are several ways to customize the terminal to suit your preferences: Customizing the Prompt (PS1): To customize your command prompt, you can modify the PS1 environment variable in your shell configuration file (e.g., .bashrc for Bash). Here's an example of a custom Bash prompt: bashCopy code # Add the following line to your .bashrc file PS1='\[\e[32m\]\u@\h\[\e[m\]:\[\e[34m\]\w\[\e[m\]\$ ' \u displays the username. \h displays the hostname. \w displays the current working directory. \[\e[32m\] and \[\e[m\] change text color (in this case, green for the username and blue for the directory). Customizing Terminal Colors: Most terminal emulators allow you to customize text and background colors in their preferences. For example, in GNOME Terminal, you can navigate to "Edit" > "Preferences" > "Profiles" and click the "Edit" button for your profile. There, you can customize colors under the "Text" and "Background" tabs.
Aliases: Create aliases for frequently used commands or command sequences. Here's an example: bashCopy code # Add the following line to your .bashrc file alias ll='ls -al' After adding this alias, you can use ll in the terminal to list files and directories in long format with hidden files. Customizing Tab Completion: You can create custom tab completion behavior for specific commands. For example, let's create a simple completion for a custom script named my_script: bashCopy code # Add the following lines to your .bashrc file _my_script_completion() COMPREPLY=($(compgen -W "option1 option2 option3" -- "$COMP_WORDS[COMP_CWORD]")) complete -F _my_script_completion my_script This completion script suggests options ("option1," "option2," "option3") when you tab-complete my_script in the terminal. Customizing Key Bindings: You can customize key bindings in your shell by adding entries to your shell's configuration file. For example, to bind the Ctrl+L key combination to clear the terminal screen: bashCopy code # Add the following line to your .bashrc file bind -x '"\C-l": clear' After adding this line, pressing Ctrl+L will clear the terminal screen. Using Oh My Zsh or Powerline: If you're using Zsh, you can install Oh My Zsh or Powerline to customize your prompt and add plugins. Here's how to install Oh My Zsh: bashCopy code sh -c "$(curl -fsSL https://raw.github.com/ohmyzsh/ohmyzsh/master/tools/install.sh)" After installation, you can change the Zsh theme and customize plugins in the ~/.zshrc file. Using a Custom Terminal Font: You can change your terminal font through your terminal emulator's settings. For example, in GNOME Terminal, go to "Edit" > "Preferences" > "Profiles" > "Text" to select a custom font.
0 notes
Link
Hello, guys welcome to the next session on Linux command line tutorial. In this session, we will see how we can use File permissions in Linux. And especially I'm going to talk about symbolic permissions. So let's get started, First of all, I'm going to change the directory to the desktop.
1 note
·
View note
Text
How to Install PuTTY on Ubuntu Linux

Introduction
PuTTY is a popular terminal emulator for Windows, but it is not only limited to Windows operating system. Being free and open source, it is popular among Linux users too.
PuTTY supports a wide range of protocols such as serial, SSH, Telnet, rlogin, SCP, SFTP etc. PuTTY is used by seasoned sysadmins and hobbyists/maker-crowd alike.
PuTTY ships with a command line tool named “psftp”, the PuTTY SFTP client, which is used to securely transfer files between computers over an SSH connection.
Sysadmins generally use PuTTY as an SSH and telnet client whereas the Maker community widely uses PuTTY for interfacing with the serial ports on their hardware.
The simplest way to install PuTTY in Ubuntu Linux is via terminal i.e, the command line.
Follow the steps below to install PuTTY on Ubuntu.
Step 1
Login into Ubuntu Desktop. Press Ctrl + Atl + T to open GNOME terminal. If for some reason the shortcut didn’t work, run the Terminal from the Ubuntu Dash.
Step 2
Run the following command in the terminal.
>> sudo apt-get update

This command updates the Ubuntu package list with latest one. If this command is skipped, there is a good chance that Ubuntu might install older version of the softwares instead of the latest version due to the fact that it only had the older list with older version of softwares.
So, whenever installing new software or intending to upgrade the software versions, it is a good idea to run this command first.
The sudo prefix at the start of the command instructs the terminal to run the command as root since installing and upgrading softwares is a privilege operation and should not be performed by users which do not have sufficient access.
Provide the user password when prompted by sudo and hit Enter.
Step 3
Install PuTTY using the command below.
>> Sudo apt-get install -y putty

Step 4
PuTTY should be installed. Run it from the terminal using “putty” as a command, or from the Dash.
>> putty

As visible in the PuTTY screenshot above, it provides a range of connection types to choose from Raw, Telnet, Rlogin, SSH, and Serial.
It also ships with command-line tools for SCP (pscp), SFTP (psftp), RSA and DSA key generator (putty keygen), etc, which can be run from the terminal.
Connecting to Ubuntu Server using SSH Keys and Putty:
This tutorial shows you how to connect to your Ubuntu server using ssh with keys. The advantage is that you can connect to your server without passwords. .
First, install an SSH server on the server if not already installed:
sudo apt-get install ssh Open SSH-server
For increased security change the SSH port to something else (Eg. 2222) by editing /etc/ssh/sshd_config (optional). The default port (22) would work as well. sudo nano /etc/ssh/sshd_config
Save and restart the server:
sudo /etc/init.d/ssh restart
Then navigate to the following folder:
cd ~/.ssh
Generate a pair of keys:
ssh-keygen -t dsa
You could also use "RSA" instead of "dsa". When asked for a file name you may provide a file name for the keys (Eg. passkey) or just press enter for default naming.
You may also choose to enter a passphrase for increased security (recommended). However, remember that you will have to enter this passphrase every time to connect to the ssh server.
Then create a key file as described below and set its permissions:
touch authorized_keys chmod 600 authorized_keys
Then add the public key (Eg. passkey.pub) to the key file:
cat passkey.pub >> authorized_keys
Then for security remove the passkey.pub from the server. Now login to your other computer and move the other key (Eg. passkey) to this computer. In Ubuntu,
you can copy the private key (passkey) to the .ssh folder in your home directory. In Windows, you can copy it to any folder.
In Ubuntu/Linux edit ~/.ssh/config file to use the private key for connections.
In Windows, use PuTTYgen.exe to load the passkey to generate a private key file. Use this key file while connecting to a remote ssh server using Putty.
1 note
·
View note
Text
Troubleshooting the 'zsh permission denied' Error: Tips and Tricks for Zsh Shell Users

Understanding the "zsh permission denied" error
I would like to discuss the common error message that many Zsh shell users encounter: "zsh permission denied". This error message typically appears when users try to execute certain commands or scripts, and it can be caused by a variety of factors.
Common causes of "zsh permission denied"
One of the most common causes of the "zsh permission denied" error is incorrect file permissions. If the file or directory in question does not have the correct permissions set, users may encounter this error when trying to access it. Other possible causes include insufficient user privileges, problems with the zsh shell itself, or conflicts with other system components.
Resolving the "zsh permission denied" error
To resolve the "zsh permission denied" error, there are several steps that users can take. First, it's important to ensure that the file or directory in question has the correct permissions set. This can be done using the chmod command, which allows users to modify file permissions to allow for reading, writing, and executing. Another potential solution is to check the user's current privileges and make sure that they have sufficient access to the file or directory. This can be done by checking the user's group memberships and modifying them if necessary. Finally, if all else fails, it may be necessary to troubleshoot the Zsh shell itself to identify any underlying issues or bugs that may be causing the "zsh permission denied" error.
Tips for avoiding the "zsh permission denied" error in the future
To avoid encountering the "zsh permission denied" error in the future, users should take care to ensure that they have the necessary permissions and privileges before attempting to access or modify files or directories. It's also a good idea to regularly review and update file permissions to ensure that they remain accurate and up-to-date.
What is zsh permission denied in Kali Linux?
"zsh permission denied" is an error message that occurs in Kali Linux when the user does not have sufficient permissions to access a file or directory using the Zsh shell. This error can be caused by incorrect file permissions, insufficient user privileges, or issues with the Zsh shell. To resolve the error, users may need to adjust file permissions, modify user privileges, or troubleshoot the Zsh shell.
How do I fix permission denied in Terminal Mac?
If you encounter a "permission denied" error in Terminal on a Mac, there are several steps you can take to resolve the issue: - Check the file permissions: Use the "ls -l" command to check the permissions of the file or directory in question. If the file or directory has incorrect permissions, use the "chmod" command to modify the permissions accordingly. - Use sudo: If the file or directory requires elevated privileges to access, use the "sudo" command before the command that you want to execute. This will allow you to execute the command with administrator privileges. - Change the ownership: If you don't have permission to access a file or directory because it is owned by another user, use the "chown" command to change the ownership of the file or directory to your user account. - Disable SIP: If you are trying to access a system file or directory that is protected by System Integrity Protection (SIP), you may need to disable SIP temporarily to gain access. Note that disabling SIP can potentially compromise the security of your system, so use this option with caution. - Use Recovery Mode: If none of the above solutions work, you can try booting into Recovery Mode and using the Terminal there to fix the permission issue. By following these steps, you should be able to fix the "permission denied" error in Terminal on your Mac.
How do I unlock Zshrc files on Mac?
To unlock the .zshrc file on a Mac, you can use the "chmod" command to modify the file permissions. Here's how you can do it: - Open Terminal on your Mac. - Navigate to the directory where the .zshrc file is located by using the "cd" command. For example, if the file is located in your home directory, you can use the command "cd ~". - Once you are in the directory where the .zshrc file is located, use the "ls -l" command to check the current file permissions. - Use the "chmod" command to modify the file permissions. For example, if you want to give read, write, and execute permissions to the file owner, you can use the command "chmod 700 .zshrc". - Check the file permissions again using the "ls -l" command to confirm that the file has been unlocked. Note that unlocking the .zshrc file can potentially compromise the security of your system, so it's important to be careful when making changes to this file. Make sure you understand the potential implications of modifying the file before you proceed.
Conclusion
In conclusion, while the "zsh permission denied" error can be frustrating and confusing for users, there are several steps that can be taken to resolve the issue and regain access to the requested file or directory. By understanding the common causes of this error and following best practices for managing file permissions and user privileges, users can avoid encountering this issue in the future and continue using the powerful and versatile Zsh shell with confidence.
FAQs
What is the .zshrc file?The .zshrc file is a configuration file for the Zsh shell, which is a popular alternative to the default Bash shell on Unix-based systems. The .zshrc file contains settings and configurations that customize the behavior of the Zsh shell.Why do I need to unlock the .zshrc file?The .zshrc file may be locked by default to prevent accidental or unauthorized modifications. If you need to make changes to the file, you will need to unlock it first.How do I know if the .zshrc file is locked?You can check the file permissions of the .zshrc file using the "ls -l" command in Terminal. If the file permissions show that the file is not writable, it may be locked.What are the potential risks of unlocking the .zshrc file?Unlocking the .zshrc file can potentially compromise the security of your system, especially if you make changes that affect system-wide settings or configurations. It's important to understand the potential risks and implications of modifying this file before you proceed.How do I lock the .zshrc file again?If you want to lock the .zshrc file again after making changes, you can use the "chmod" command to modify the file permissions. For example, if you want to lock the file so that only the file owner can read and write to it, you can use the command "chmod 600 .zshrc". Read the full article
0 notes
Link
0 notes
Text
Top 50 Linux Commands You Must Know as a Regular User...
1. ls - view contents of directory (list)
2. pwd - path of the current directory
3. cd - change directoryn
4. mkdir - make new directory
5. mv - move files / rename files
6. cp - copy files
7. rm - remove files
8. touch - create blank new file
9. rmdir - delete directory
10. cat - list content of file to terminal
11. clear - clear terminal window
12. echo - move data into a file
13. less - Read text file one screen at a time
14. man - show manual of Linux commands
15. sudo - enables you to perform tasks that require administrative or root permissions
16. top - task manager in terminal
17. tar - used to archive multiple files into a tarball
18. grep - used to searching words in specific files
19. head - view first lines of any text file
20. tail - view last lines of any text file
21. diff - compares the contents of two files line by line
22. kill - used for killing unresponsive program
23. jobs - display all current jobs along with their statuses
24. sort - is a command line utility for sorting lines of text files
25. df - info about system disk
26. du - check how much space a file or directory takes
27. zip - to compress your files into a zip archive
28. unzip - to extract the zipped files from a zip archive
29. ssh - a secure encrypted connection between two hosts over and insecure network
30. cal - shows calendar
31. apt - command line tool for interaction with packaging system
32. alias - custom shortcuts used to represent a command
33. w - current user info
34. whereis - used to locate the binary, source, manual page files
35. whatis - used to get one-line man page description
36. useradd - used to create a new user
37. passwd - used to changing password of current user
38. whoami - print current user
39. uptime - print current time when machine starts
40. free - print free disk space info
41. history - print used commands history
42. uname - print detailed information about your Linux system
43. ping - to check connectivity status to a server
44. chmod - to change permissions of files and directories
45. chown - to change ownership of files and directories
46. find - using find searches for files and directories
47. locate - used to locate a file, just like the search command in Windows
48. ifconfig - print ip address stuff
49. ip a - similar to ifconfig but shortest print
50. finger - gives you a short dump of info about a user
1 note
·
View note
Text
Current business needs continue to advance owing to the increased security breaches worldwide. As a result, every organization pulls up their socks as they tighten and reduce their attack surface as much as possible. Be it applications, networks, servers or databases, security standards are key requirements that should not be evaded at all. As a result of that we are going on a journey involving securing your powerful, open source object-relational PostgreSQL database. PostgreSQL is a powerful, open source object-relational database system that uses and extends the SQL language combined with many features that safely store and scale the most complicated data workloads. Source: PostgreSQL Page We are going to look at how to enable SSL/TLS connection to your PostgreSQL database by first enabling SSL on the database then adding the certificate to the client for secure connection. Additionally, we are going to enable SCRAM-SHA-256 password authentication in our PostgreSQL database. So that we are all on the same page, we shall describe SCRAM-SHA-256 password authentication. The scram-sha-256 password authentication method performs SCRAM-SHA-256 authentication, as described in RFC 7677. It is a challenge-response scheme that prevents password sniffing on untrusted connections and supports storing passwords on the server in a cryptographically hashed form that is thought to be secure. Source: PostgreSQL Page Now that the formalities are out of the way, we shall proceed to enabling SSL and SCRAM-SHA-256 password authentication by following the steps below. NOTE: We shall be using CentOS for this example, the directory paths presented may differ in different distributions. Step 1: Install PostgreSQL database In case you do not have a PostgreSQL database, the guides listed below will bring it up in your server as soon as possible. Install PostgreSQL 13 on Fedora How To Install PostgreSQL 13 on CentOS / RHEL 8 Install PostgreSQL 13 on Debian How To Install PostgreSQL 13 on CentOS 7 After you are done, we can proceed to implement SSL on your PostgreSQL database. Step 2: Create Certificates PostgreSQL has native support for using SSL connections to encrypt client/server communications for increased security. In case you do not have purchased certificates, create a server certificate whose identity can be validated by clients. To do that, first create a certificate signing request (CSR) and a public/private key file like so openssl req -new -nodes -text -out root.csr \ -keyout root.key -subj "/CN=root.computingforgeeks.com" Make sure you change “root.computingforgeeks.com” to match your domain name. After the root key has been created, make sure its permissions are set as secure as possible. Make sure “group” and “others” will not be able to read, write and execute. sudo chmod og-rwx root.key After that is done, sign the request with the key to create a root certificate authority (using the default OpenSSL configuration file location on Linux). You can check OpenSSL configuration file location on Linux by running “openssl version -d” command. openssl x509 -req -in root.csr -text -days 3650 \ -extfile /etc/pki/tls/openssl.cnf -extensions v3_ca \ -signkey root.key -out root.crt Finally, create a server certificate signed by the new root certificate authority: \##Generate private server key and set secure permissions openssl req -new -nodes -text -out server.csr \ -keyout server.key -subj "/CN=datab.computingforgeeks.com" sudo chmod og-rwx server.key Then also create the server certificate signed by the new root certificate authority openssl x509 -req -in server.csr -text -days 365 \ -CA root.crt -CAkey root.key -CAcreateserial \ -out server.crt The above commands will produce server.crt and server.key. These are the server certificates that we shall be adding to PostgreSQL. On the other hand, root.crt should be stored on the client so the client can verify that the server’s certificate was signed by its trusted root certificate.
root.crt should now be embedded in your applications written in Java and any other programming language. For Java, this should be added in its keystore. Keep root.key in a secure location for it can be used in creating future certificates. For convenience, we shall copy the server and root certificates into the place PostgreSQL keeps its main configuration files. That way, Postgres will be able to read them in the same location it reads its configuration files. The locations in CentOS are /var/lib/pgsql/13/data/ for PostgreSQL 13, /var/lib/pgsql/12/data/ for PostgreSQL 12 and /var/lib/pgsql/11/data/ for PostgreSQL 11. We shall use PostgreSQL 11 in this example. sudo cp server.* root.crt /var/lib/pgsql/11/data/ ##For PostgreSQL 11 Step 3: Configure PostgreSQL database to enable SSL Now that we have our certificates, nothing denies us the chance of enabling SSL in our PostgreSQL Server. Depending on the version of your PostgreSQL Database, open up its configuration file. We shall use version 11 as an example here. Look for the ssl related lines that are commented in the file and uncomment them. The lines are shared below. $ sudo vim /var/lib/pgsql/11/data/postgresql.conf ssl = on ssl_ca_file = 'root.crt' ssl_cert_file = 'server.crt' ssl_key_file = 'server.key' ssl_ciphers = 'ALL:!ADH:!LOW:!EXP:!MD5:@STRENGTH' ssl_prefer_server_ciphers = on ssl_ecdh_curve = 'prime256v1' After that is done, we need to enable hostssl record in pg_hba.conf file which will match connection attempts made using TCP/IP, but only when the connection is made with SSL encryption. Open the file and edit as follows: $ sudo vim /var/lib/pgsql/11/data/pg_hba.conf hostssl all all 10.38.87.40/32 md5 clientcert=verify-full hostssl all all 10.38.87.41/32 md5 clientcert=verify-full hostssl all all 10.38.87.42/32 md5 clientcert=verify-full hostssl all all 10.38.87.43/32 md5 clientcert=verify-full To persist the changes we have made thus far, we need to restart PostreSQL service thus: sudo systemctl restart postgresql- Verify that SSL is enabled To make sure that the SSL settings are working, we are going to login to the database and check the message it will present to us. You can run the command below inside the server or from another server with psql installed and allowed to connect to the database. You should see a message like the one shared below and SSL should be successfully enabled. $ psql -U postgres -h 10.38.87.46 -d postgres Password for user postgres: psql (11.11) SSL connection (protocol: TLSv1.2, cipher: ECDHE-RSA-AES256-GCM-SHA384, bits: 256, compression: off) Type "help" for help. postgres=# Step 4: Configure PostgreSQL database to enable SCRAM-SHA-256 Now that SSL is enabled and working as configured, let us now add another layer of security by enabling SCRAM-SHA-256 password authentication. This is a very simple process. First, open main postgresql configuration file and change the line below to be as shown. $ sudo vim /var/lib/pgsql/11/data/postgresql.conf password_encryption = scram-sha-256 Once that is done, we need to enforce clients to authenticate via this new scheme by editing pg_hba.conf file as shown below. You will notice that all occurrences of md5 have been replaced with scram-sha-256. $ sudo vim /var/lib/pgsql/11/data/pg_hba.conf hostssl all all 10.38.87.40/32 scram-sha-256 clientcert=verify-full hostssl all all 10.38.87.41/32 scram-sha-256 clientcert=verify-full hostssl all all 10.38.87.42/32 scram-sha-256 clientcert=verify-full hostssl all all 10.38.87.43/32 scram-sha-256 clientcert=verify-full To persist the changes we have made thus far, we need to restart PostreSQL service thus: sudo systemctl restart postgresql-11
Once those changes have been made, we will have to update passwords for all users in your database or you will not be able to login. To do so, access your database as follows. You must have sudo rights. $ sudo su - postgres Last login: Fri Feb 19 17:16:16 EAT 2021 on pts/0 -bash-4.2$ psql psql (11.11) Type "help" for help. postgres=# Then run the password command like so, then press enter. You will be prompted to enter the password twice. You can enter the same same password that was there before. It will now be encrypted using the new scram-sha-256 scheme. postgres=#\password Enter new password: Enter it again: postgres=# Once that is done, the only step remaining is to add certificates to the client applications. For *nix systems, you can place the client certificate under $user.home/.postgresql/ directory. How to embed the client certificate in various applications written in various languages is beyond the scope of this guide. An example for Java has been provided in PostgreSQL JDBC Documentation When making connection using JDBC driver, the connection string should conform to the following format. Notice the ssl=true option added. jdbc:postgresql://:/?ssl=true ##For example jdbc:postgresql://datab.computingforgeeks.com:5432/all_cent_customers?ssl=true Last Words Ensuring your organization remains secure should remain top priority as you continue to administer and steward their dear systems. As a custodian of their infrastructure, it is incumbent upon you to protect, prevent and pro-actively fight against any form of vulnerability. Seal them as much as you can. We hope the guide was beneficial and in case you have further ideas, feel entirely free to point them out. Finally, we are very grateful for visiting the site and we continue to appreciate the colossal support you relentlessly extend.
0 notes
Text
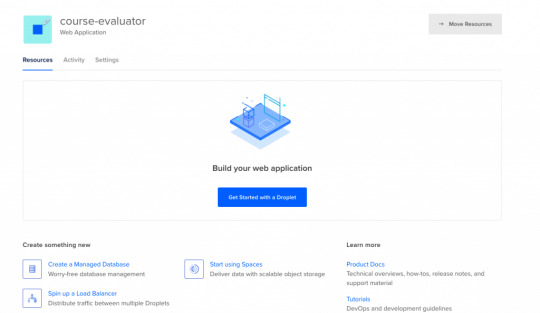
How to Deploy a Node.js App – From Server Setup to Production
In this tutorial, we are going to learn everything we need to know before deploying a Node app to a production server.
We will start by renting a server on Digital Ocean. Then we'll configure this server, connect to it, install Nginx and configure it, pull or create our Node app, and run it as a process.
As you can see, there is a lot to do and it will be an action-packed tutorial. So let's get started without wasting any time.
You should have some basic knowledge on how the Terminal works and how to work in Vi/Vim before getting started. If you are not familiar with basic commands, I would advise you to read up on them a bit.
I will run the commands in MacOS. If you want to follow this tutorial in Windows, you can use Powershell or some other Unix emulator of your choice.
Although I will use Node.js as the platform of our example application, most of the steps are the same for any web application.
Why Digital Ocean?
I choose Digital Ocean because it is cheap and the interface is really easy to use, compared to the likes of AWS. Also, a $100 credit is included in the GitHub student pack so you do not have to pay anything for a couple of months. It is ideal for deploying a course or hobby project.
It has a concept called Droplets, which is basically your share of a server. You can think of the server as an apartment in which you own or rent a flat.
Droplets work with the help of Virtual Machines which run on the server. So a Droplet is your Virtual Machine on a shared server. Since it is a VM, its CPU and memory share can be easily increased, usually by throwing more money at your provider.
How to Create a Digital Ocean Project

I am assuming that you have already signed up and logged in to Digital Ocean before proceeding. We should first create a project that will contain our droplets. Let's click on the new project button on the left side menu. It will ask you to name your project.

Enter whatever name you want. It will also ask you if you want to move any resources, but for now just click Skip – we will create the droplet later.
How to Create a Droplet on Digital Ocean
Let's create our droplet by clicking the Get Started button.
After clicking the button, it will ask us to choose a VM image.

Choosing an Image
On this page, I will select Ubuntu 20.04 since it is the latest LTS version at the time I am writing this post. LTS means "Long Term Support". It is best to go with the LTS version for actual projects, because the provider guarantees that it will be supported and maintained for a long time. This means you will not have problems in the long run.
I have chosen Ubuntu, and would recommend it to you since it is the most commonly used Linux distribution. This means it's also the easiest to find answers to your future questions.
You can also choose to have a Dedicated CPU if you need it. If you are building your own startup or any business project, I would recommend reading this post which contains detailed instructions about how to pick the right option for you.
I will go with the cheapest option in this case.
Then you will need to select a Datacenter region. You should pick the one that is closest to you to minimize network delay.

Select a Datacenter
Next let's select SSH Keys as the Authentication Method, since it is much more secure than basic password authentication.
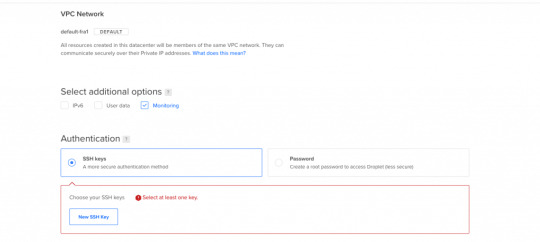
Authentication Method
To connect to the server we need to generate a new SSH key on our own device and add it to Digital Ocean.
How to Generate an SSH Key
I will generate the key on my macOS device. If you are using Windows you can refer to this article. Open your terminal and move into the ssh folder:
cd ~/.ssh
Then create your SSH key:
ssh-keygen
If your computer says that it does not know this command, you should install it via brew.

It will ask you to name the file and enter a passphrase. Do not enter a name, just press enter and go with the defaults. You should have these files generated. I have named mine digital-ocean-ssh in this screenshot, so do not get confused by that.
❯ lsid_dsa id_rsa known_hosts
Our public key is the id_dsa and the id_rsa is our private key. If you forget which one is private, you can always print one of them to see.
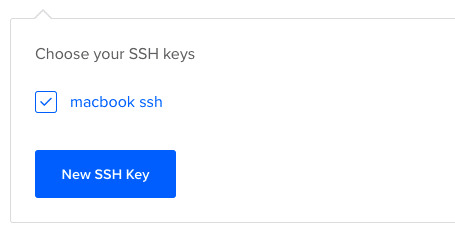
How to Add Your SSH Key to Digital Ocean
Now we want to copy our public key and upload it to Digital Ocean so they will know which key to use in authentication.

Copy this whole key including the ssh-rsa part.
Click on "New SSH Key":

Paste the key in the textbox that appears after you click the button and you should see your SSH key.
How to Connect to the Server
We will use the terminal to connect to our server with SSH. You can also take a look at Termius for a nice interface if you want.
Run this command in your terminal after replacing the IP_ADDRESS with your server's IP address (you can look it up from Digital Ocean's panel).
ssh root@IP_ADDRESS
If everything goes well, now you should be in the server's terminal. We have successfully connected to server. If there is any error, you can debug it by running the command with the "-v" option or "-vv" for even more verbosity.
How to Set Up the Server
We need to do some initial setup before deploying the Node app to the server.
Update and Upgrade Software
We want to update the server's software to make sure we are using the latest versions.
Many servers are vulnerable to attacks because they are using older versions of software with known vulnerabilities. Attackers can search for the vulnerabilities in those software and try to exploit them in order to gain access to your server.
You can update Ubuntu's software using the "apt update" command.
apt updateHit:1 https://repos.insights.digitalocean.com/apt/do-agent main InReleaseGet:2 http://mirrors.digitalocean.com/ubuntu focal InRelease [265 kB] Hit:3 http://mirrors.digitalocean.com/ubuntu focal-updates InRelease Get:4 http://security.ubuntu.com/ubuntu focal-security InRelease [109 kB]Hit:5 http://mirrors.digitalocean.com/ubuntu focal-backports InReleaseFetched 374 kB in 1s (662 kB/s) Reading package lists... DoneBuilding dependency tree Reading state information... Done96 packages can be upgraded. Run 'apt list --upgradable' to see them.
If you read the message, it says that "96 packages can be upgraded". We have installed the new software packages but we have not upgraded our software to those versions yet.
To do that, let's run another command:
apt upgrade
Type y when it prompts you and it will upgrade the software.
Create a User
We have connected to the server as the root user (the user with the highest privileges). Being the root is dangerous and can open us up to vulnerabilities.
Therefore we should create a new user and not run commands as root. Replace $username with a username of your choice.
whoamiroot
adduser $username
You need to enter a password for the user. After that point, it will ask a bunch of questions, so just input y until the prompting is over.
The new user has been created but we also need to add this new user to the "sudo" group so that we can perform any action we need.
usermod -aG sudo $USERNAME
We add group with the -aG (add group) option, and we add the group name sudo to our username.
We are still root, so let's switch our user to the newly created user, using the su (switch user) command.
su $USERNAME
After this point, if you run whoami command, you should see your username. You can confirm the existence of the sudo group by running this command:
sudo cat /var/log/auth.log
Only superusers can view this file and OS will ask for your user password after you run this command.
Copy the SSH Key
We have successfully created the user but we have not enabled SSH login for this new user yet.
Therefore, we have to copy the public key that we previously created on our local computer and paste it into this user's SSH folder so SSH can know which key should it use to authenticate our new user.
mkdir -p ~/.ssh
The -p argument creates the directory if it does not exist.
vi ~/.ssh/authorized_keys
We will use vi or vim to create a file and call it authorized_keys.
Copy your public key (`id_dsa` file) then press "i" to go into insert mode. Then just paste it into this file with CMD + V.
Press esc to quit insert mode, type :wq to save and quit.
If you have any problems about using Vim-Vi, you can check out one of the many tutorials that explain how to use it.
Connect to Server as New User
Now we should be able to connect to the server without any problems using ssh. You can use this command to connect, just remember to insert your username and IP_ADDRESS.
ssh $USERNAME@IP_ADDRESS
If you are having any problems at this point, you should just delete the droplet and start over. It does not take a lot of time to start over but debugging server problems can be difficult.
How to Disable Root Login
It is a good practice to disable Root login as a security precaution, so let's do that now.
It can be useful to change the file permission just in case so that we won't run into problems regarding permissions in the future.
chmod 644 ~/.ssh/authorized_keys
Let's now open our sshd_config file:
sudo vi /etc/ssh/sshd_config
Find this line and change the yes to no in the same way we did earlier with vi.
PermitRootLogin no
Save and quit vi.
How to Install Node.js and Git
We can now go ahead and install Node.js and Git:
sudo apt install nodejs npm
sudo apt install git
We are now ready to create a Node app and run it. You can either pull your Node project from Github or create a Node app here just to test if it works.
Move to a directory of your choice and create an "app.js" file:
sudo vi app.js
You can paste the following snippet into your app.js file:
const express = require('express');const app = express();const port = 3000;app.get('/', (req, res) => { res.send('Hello World');});app.listen(port, () => console.log(`Example app listening on port ${port}!`));
Now we can run it with the command:
node app.js
You should see "Example app listening on port 3000!" on your terminal.
We can confirm that it is working by sending a request to our server:
GET http://IP_ADDRESS:3000/
Send this request either from an HTTP client like Postman or your browser and you should see the "Hello World" message.
At this point, you should notice that something is wrong: Regular users do not know how to send requests to port 3000.
We should redirect the requests that come to our web server from our IP to port 3000. We can accomplish this with the help of Nginx.

How to Install and Configure Nginx
We will use Nginx as a Reverse Proxy to redirect the requests to our Node app.

Nginx as a Reverse Proxy
Let's install Nginx:
sudo apt install nginx
Start the Nginx service:
sudo service nginx start
We can test to see if it is working by sending a request to our server's IP address from the browser. Type your server's IP address to your browser and you should see this:

It is important to know that Nginx serves from "/var/www/html" by default and you can find this HTML file in that directory as well.
I also advise you to create a folder under "/var/www", call it app, and move your Node app to that folder so it will be easy to find.
How to Configure the Nginx Reverse Proxy
We will edit the Nginx config file to configure a reverse proxy:
sudo vi /etc/nginx/sites-available/default
In this file you need to find the location / block and change it as follows:
location / { # First attempt to serve request as file, then # as directory, then fall back to displaying a 404. proxy_pass http://127.0.0.1:3000/; }
The proxy_pass directive proxies the request to a specified port. We give the port that our Node application is running on.
Let's restart Nginx so the changes can take effect:
sudo service nginx reload
After this step, we should be able to see the message when we send a request to our server. Congratulations, we have completed the minimum number of steps to deploy a Node app!

But I still advise you to complete the following bonus step as well, as I believe it's quite important.
If you can't see the hello world message, you can check if your app and Nginx are running and restart them.
How to Run your App as a Process
We do not want to start our application manually every time something goes wrong and our app crashes. We want it to restart on its own. Also, whenever the server starts, our app should start too.
To make this happen, we can use PM2. Let's install PM2 and configure it.
sudo npm i -g pm2
We are installing pm2 globally by using the "-g" option so that it will be accessible from every folder.
pm2 start app.js
This makes sure that the app will restart if it exits due to an error.
Let's save the current process list.
pm2 save
We also need to convert it to a daemon that runs whenever the system starts:
pm2 startup systemd
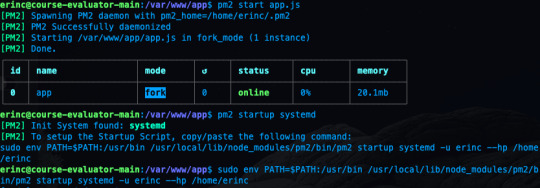
As a reminder, in this tutorial, I'm using the commands for Ubuntu. If you are using any other Linux distro, you should replace systemd in this command.
We can confirm that the service is getting restarted by rebooting the server and sending a request without running app.js by hand:
sudo reboot
After sending a request as we did earlier, you should be able to see the hello world message.
Conclusion
In this tutorial we started from scratch, rented a server for ourselves, connected to it, and configured it in a way that it serves our Node.js app from port 80.
If you have followed along and were able to complete all steps, congratulations! You can be proud of yourself, as this was not the easiest topic :). I hope that you have learned a lot. Thank you for your time.
I am planning to explore this topic further by connecting the server to a domain name, then connecting it to CircleCI for continuous integration. I'll also go through the required steps to make your Node.js/React app production ready. This post had already gotten long enough, though, so those topics are reserved for another post :)
If you have enjoyed reading and want to get informed about my future posts, you can subscribe to my personal blog. You can see my previous posts there if you are interested in reading more. I usually write about web development-related topics.
0 notes
Text
Iproxy Download

Languages: English • français • ไทย
Download and Run checkra1n on your device. Open two terminal tabs. One: iproxy 2222 44 device udid Two: ssh root@localhost -p 2222. Mount -o rw,union,update /. Welcome to Proxy-List.Download. We provide great lists of free public proxy servers with different protocols to unblock contents, bypass restrictions or surf anonymously. Enjoy the unique features that only our page have on all the internet. 35648 Proxies available. 13552 HTTP Proxies. Download iproxy for free. Kubernetes Cluster Explorer gives you full visibility—and peace of mind.
1SSH over USB using usbmuxd
1.1Using binary
SSH over USB using usbmuxd
You can either download a binary and run that or use a python script. The python script is a lot slower than the binary version. On Linux the python method is mostly deprecated, use the binary version provided by libimobiledevice. There is also a newer solution called gandalf.
Using binary
On Windows, ensure iTunes is installed, then download itunnel_mux_rev71.zip from Google Code. Unzip to a directory of choice.
On OS X and Linux, install usbmuxd from your package manager.
Then:
X-Proxy 6.2.0.4 add to watchlist send us an update. 4 screenshots: runs on: Windows 10 32/64 bit Windows 8 32/64 bit Windows 7 32/64 bit.
Windows: Run path/to/itunnel_mux.exe --iport 22 --lport 2222
OS X/Linux: iproxy 2222 22
Connect to localhost -p 2222 as you would over wifi.
If you have multiple devices connected, it may be useful to run multiple instances, specifying UDIDs and ports like so:
Making iproxy run automatically in the background on OS X
Install it with Homebrew (brew install libimobiledevice).
Create the file ~/Library/LaunchAgents/com.usbmux.iproxy.plist with the contents:
Run launchctl load ~/Library/LaunchAgents/com.usbmux.iproxy.plist.
You now don't have to run the iproxy binary every time you want to SSH over USB as the iproxy software is always running in the background.
If you have several devices you can create a daemon with a specific port for each one.
Create a file in ~/Library/LaunchAgents/ but name it using the device UDID, name or an identifier of your choice (like com.usbmux.iproxy.iPhone7,2.plist).
Replace UDID_HERE in the following snippet with the device UDID. The label should be unique and is best to match the filename you used.
Run launchctl load ~/Library/LaunchAgents/FILE_NAME_OF_YOUR_CHOICE.
You now don't have to run the iproxy binary every time you want to SSH over USB as the iproxy software is always running in the background.
Using python
Tested on OS X and Windows.
You will need to have Python installed on your system.
Get usbmuxd source package and unpack. (Or if the linked usbmuxd package doesn't work, try libusbmuxd.)
Go into folder python-client
chmod +x tcprelay.py
Run ./tcprelay.py -t 22:2222
Now you can log into your device via ssh mobile@localhost -p 2222
The -t switch tells tcprelay to run threaded and allow more than one ssh over the same port.
Proxy Download For Google Chrome
See ./tcprelay.py --help for further options.
Using gandalf
Tested on OS X and Linux, each with up to 29 devices connected at the same time. The advantage of using gandalf is that it is written in a functional programming language, which practically means that it won't give you seg faults and it is actively maintained https://github.com/onlinemediagroup/ocaml-usbmux
Installation
You need to have opam installed, it is OCaml's package manager.
On OS X you can do:
(If on Linux, then get opam via your package manager, details available https://opam.ocaml.org/doc/Install.html, Ubuntu users please pay attention, need to use a ppa for opam). It is important that your compiler is up to date, you cancheck with opam switch, make sure its at least >= 4.02.0
then
This will install the command line tool gandalf and an OCamllibrary.
gandalf usage.

The following are a series of usages of gandalf, all short formarguments have long-forms as well and -v can be added at any time.
1) See with realtime updates what devices are connected
This will start up gandalf in listen mode, that is it will printout whenever a device connects or disconnects and more crucially it will print out the UDID of each device.
2) Start with a mapping file which is of the form
So an example mapping file would be:
and the gandalf invocation is:
2.1) You can also daemonize gandalf with the -d flag. *NOTE*: You might need to end up doing that under sudo as gandalf needs tomake a pid file under /var/run.
3) To see a pretty JSON representation of devices and their ports that are currently connected, do:
4) To reload gandalf with a new set of mappings, do:
This will cancel all running threads and reload from the originalmappings file, so make your changes there.
5) To cleanly exit gandalf, do: *NOTE* This might require super user permissions.
Check out the man page, accessible with:
or
Simple invocation:
Important Notes and Catches
1) If you are running this on Linux, then you might get issues withusbmuxd having issues when more than around 7 devices are pluggedin. This is because multiple threads are trying to call variouslibxml2 freeing functions. I have a forked version of libplistthat usbmuxd uses, sans the memory freeing calls. Its availablehere. Compile and install that, then compile and install usbmuxdfrom source. This will leak memory but its not that much at all andI believe it to be a fixed amount.
2) Another issue you might have is USB3.0. The Linux kernel might crapout on you after 13 devices. This is a combination of the kernelnot giving enough resources and the host controller on yourmotherboard being crappy. The solution to this problem is todisable USB3.0 in your BIOS. To verify that USB3.0 isn't workingcheck with lsusb
SSH over USB using the iFunBox GUI (Windows only)
This feature only exists in the Windows build of iFunBox.
Get the latest Windows build of iFunBox and install it.
Click on 'Quick Toolbox,' then 'USB Tunnel.'
Assign ports as you see fit.
SSH over USB using iPhoneTunnel Menu Bar Application (macOS only)
Turn Tunnel On
Tools -> SSH
Theos usage
Export the following variables in your shell in order to deploy builds to the connected device:
export THEOS_DEVICE_IP=localhost
export THEOS_DEVICE_PORT=2222
SSH without password
Run the following commands one time and you will not be asked to type your password again.
You must create an SSH key with ssh-keygen if you have not created one. A passphrase isn’t required but still recommended. You can use ssh-agentas described here to keep the passphrase in memory and not be prompted for it constantly.
Then run the following command:ssh-copy-id root@DEVICE_IP
On OS X, ssh-copy-id will need to be installed with brew install ssh-copy-id.
Retrieved from 'https://iphonedevwiki.net/index.php?title=SSH_Over_USB&oldid=5201'

Q: What is checkra1n? A: checkra1n is a community project to provide a high-quality semi-tethered jailbreak to all, based on the ‘checkm8’ bootrom exploit.
Iproxy Download
Q: How does it work? A: Magic hax.
Proxy Download For Pc
Q: Why was the beta release delayed? A: We didn't want the release quality to end up like iOS 13.2, you deserve better.
Q: wen eta? A: bruh we're past that.
Q: How do I use it? A: Open the checkra1n app, and follow the instructions to put your device into DFU mode. Hax happens auto-magically from that point and the device will boot into jailbroken mode. If you reboot the device without checkra1n, it will revert to stock iOS, and you will not be able to use any 3rd party software installed until you enter DFU and checkra1n the device again.
Q: Ugh, I don't like GUI? A: Ok, you can use './checkra1n.app/Contents/MacOS/checkra1n -c' from the console, or download a Linux CLI build.
Q: Is it safe to jailbreak? Can it harm my device / wipe my data? A: We believe jailbreaking is safe and take precautions to avoid data loss. However, as with any software, bugs can happen and *no warranty is provided*. We do recommend you backup your device before running checkra1n.
Q: I have a problem or issue to report after jailbreaking. A: Many problems and bootloops can be caused by buggy or incompatible tweaks. Remember many tweaks never saw iOS 13 in the pre-checkra1n era. If you suspect a recently installed tweak, you may attempt to enter no-substrate mode by holding vol-up during boot (starting with Apple logo until boot completes). If the issue goes away, a bad tweak is very likely the culprit, and you should contact the tweak developers.
Q: I have a problem or issue to report and I don't think it's related to a bad tweak. A: Please check here and follow the bug report template.
Proxy Download For Free
Q: I lost my passcode. Can checkra1n decrypt my data or get access to a locked device? A: No.
Q: Can I ssh into my device? A: Yes! An SSH server is deployed on port 44 on localhost only. You can expose it on your local machine using iproxy via USB.
Q: I love the project! Can I donate? A: Thanks, we love it too! The project does not currently take any donations. If anyone asks for donations, it's a scam.
Iproxy Download Mac
Q: Where are the sources? I want to write a dark-mode theme and publish the jailbreak as my own. A: checkra1n is released in binary form only at this stage. We plan to open-source later in 2020.
Proxy Download Roblox
Q: When is Windows support coming? A: We need to write a kernel driver to support Windows (which is a very complex piece of code!) which will take time. Rest assured however, we are working hard on it.
0 notes
Text
Mac Os X Yosemite Iso For Vmware

. LOOK HERE. 1. Download MAC OS X Yosemite: - Google Drive 3 parts: - MediaFire: Part 1: Part 2: http://adf.ly. Download mac OS X Yosemite VirtualBox and VMware Image. The image file of macOS X Yosemite is only to install in VMware and VirtualBox. Therefore, the file is completely compressed with Winrar and 7Zip. And the image file of macOS X Yosemite is uploaded on Google Drive and MediaFire. Therefore, Google Drive and MediaFire is a safe place for this.
Mac Os X Yosemite Iso For Vmware Download
Mac Os X Download Iso
Mac Os X Yosemite Iso For Vmware Iso
Install Mac Os X Vmware
Now ensure that the scripts has execute permissions by running chmod +x yosemite.sh and run with sh./yosemite.sh. This will take some time, so just be patient. Once done it should have created a file called Yosemite.iso on your desktop. Create a virtual Mac OS X VM. The next step should be fairly simple if you have used ESXi before. Apr 04, 2016 Install Mac OS X El Capitan 10.11 on VMware; Install Mac OS X Yosemite 10.10 on VMware; Install Mac OS X Mavericks 10.9 on VMware. There are several versions and types of Mac OS X like: Mac OS X El Capitan, OS X Yosemite, OS X Mavericks, OS X Snow Leopard. Before start installing OS X Mavericks, you need to download and extract the files. Installation Process of Mac OS X Yosemite on VMware. When you have done each and everything successfully. Now you are ready to install Mac OS X Yosemite on VMware Workstation. Therefore, launch VMware and click on the power on this virtual machine. Power on the virtual machine. On the welcome screen choose your country then click Continue.
Ever wanted to run Mac OS X in a virtual machine for developing or educational purposes? It’s actually quite easy to do.
This post is outdated! Please take a look at my revised post
One of the main reason for me to use ESXi instead of other hypervisors such as Hyper-V is the broad amount of different operating systems it supports. Not only is it able to run Windows and Linux, but I’ve been running Mac OS X and even Android for quite some time with great result. In this tutorial I’ll cover how to install Mac OS X on ESXi 5.5 or 6.0.

Mac Os X Yosemite Iso For Vmware Download
Prerequisites
You will need a server running ESXi 5.5 or 6.0 (obviously). I haven’t made a guide on installing it yet, but I might do that as well in the upcoming days. Meanwhile there are a lot of guides all over the web and the installation itself is actually much simpler then most. You will also need a real mac in order to download and convert the Yosemite installation disk.
Prepare ESXi for running Apple OS X operating systems
ESXi doesn’t support OS X out of the box. The first thing you will have to do is to download a unlocker tool from insanelymac.com. If you have ESXi 5.5 this tool is for you, or if you are running 6.0 as I am, download this version instead. Please note that you will need to register on the site in order to download these files. In order to install the unlocker tool follow these instructions:
You need to enable SSH on your ESXi host. In order to do that, login to your host using the VMware vShpere Client and navigate to Configuration->Security Profile. From here click on Properties in the upper right corner where it says Services. The dialog Services Properties should appear and from here you can click on SSH->Options and choose Start and stop with host. Click Start and then close all the open dialogs.
Depending on your operating system, you will need to download WinSCP or another SCP-client in order to transfer the unlocker-files. Make sure you extract the files somewhere on your client and connect to your ESXi host using the IP-address and the user root. Once connected navigate to /vmfs/volumes/datastore01/ , replacing datastore01 with your actual datastore name. Create a new folder called tools and transfer your unlockerXXX directory.='lang:default>
Now cd into the uploaded directory and ensure the ESXi scripts have execute permissions by running chmod +x esxi-install.sh and chmod +x esxi-uninstall.sh. Now run ./esxi-install.sh in order to install the unlocker.='lang:default>='lang:default>='lang:default>
Reboot your ESXi host
Note: 1. Any changes you have made to local.sh will be lost. If you have made changes to that file, you will need to merge them into the supplied local.sh file. 2. The unlocker runs at boot time to patch the relevant files and it now survives an upgrade or patch to ESXi as local.sh is part of the persisted local state.
Enable SSH on EXSiUpload unlocker files to ESXi

Download and create the Yosemite ISO
Now that ESXi is ready, we need to create the Yosemite ISO. For this step I use a real MacBook because I want to grab the latest and greatest Yosemite.dmg from the Appstore. From your Mac, open the Appstore and download Yosemite. Once downloaded minimize the installer.
Open the terminal and change directory to /tmp:
Create a new file for our script:
Paste the following into the file and save:
Now ensure that the scripts has execute permissions by running chmod +x yosemite.sh and run with sh ./yosemite.sh. This will take some time, so just be patient. Once done it should have created a file called Yosemite.iso on your desktop.='lang:default>='lang:default>
Create a virtual Mac OS X VM
The next step should be fairly simple if you have used ESXi before. As usual open your datastore and transfer the iso to wherever you normally store your installation files. Then create a new vm, select Typical and you should be able to select Other and then Apple Mac OS X 10.10 (64-bit). Complete the wizard, mount the ISO and install Mac OS X as usual. Please note that you must format the hard drive using the disk utility before it will be visible in the install wizard.
Configure Mac OS X
It’s very important to install the VMware Tools as soon as possible after the install has finished. Without it Mac OS X might not awake from sleep and in general be very unreliable. I also recommend to turn off sleep and the screensaver in settings as these may cause issues. Especially the screen saver takes up quite a lot of resources.
Known issues
The only known issue so far is that the virtual machine is stuck with a low resolution of 1024 x 768 unless you add a GPU to your server and use pass-through mode. I haven’t tested it, but it should work according to other users. If anyone figures out another workaround for this issue, please share it!
There’s now a way to overcome the resolution limitation using this workaround.
Related Posts
Installing OS X El Capitan or later on ESXi
Workaround for changing Mac OS X VM display resolution
Install Chrome Remote Desktop Host on OS X El Capitan
SickRage won’t start after last update
How to remove the Windows 10 Upgrade Notifications
Benjamin Krause
Mac Os X Download Iso
GeneralESXi, OS X, Software, Tutorial
Share this:
Download Niresh Mac OS X Yosemite 10.10.1 free standalone DVD ISO image offline setup. The Niresh Mac OS X Yosemite Zone 10.10 is a powerful operating system with different security updates and enhancements.
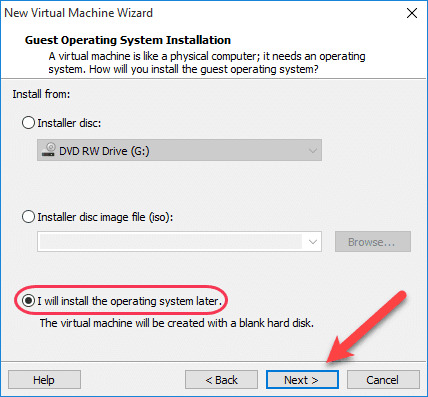
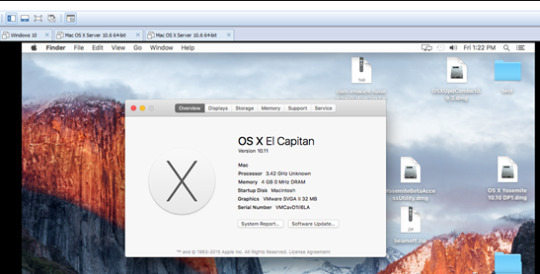
Niresh Mac OS X Yosemite 10.10.1 Review
Mac Os X Yosemite Iso For Vmware Iso
Niresh Mac OS X Yosemite 10.10.1 is a reliable environment with different security and stability updates. It provides a powerful environment with latest updates to improve the performance of the operating system. It comes up with a straightforward user interface so the users can easily work using this operating system. This release focuses in the reliability and the performance of the system.
Moreover, there are various hardware and software improvements such as Wi-Fi reliability, Microsoft Exchange Server enhancements, Mail messages improvements, remote connection improvements and much more. Additionally, various fixes are also there to make it an error-free operating system. All in all, it is among the latest operating systems for Macintosh. All in all, it is a stable operating system with a bundle of improvement and different fixes.
Features of Niresh Mac OS X Yosemite 10.10.1
A stable Mac OS X release
A familiar and attractive user interface
Improves Wi-Fi usability
Reliable Microsoft Exchange Server connection
Remote connection improvements
Improves performance and reliability
Better connectivity with the remote computers
A stable operating system with different enhancements
Various update fixes and sharing service fixes
Mac App store app fixes and Notification Center updates
Different fixes and enhancements to increase the stability
Different other powerful features and options
Technical Details of Niresh Mac OS X Yosemite 10.10.1
File Name: Yosemite_Zone.iso
File Size: 5.11 GB
Developer: Apple
Install Mac Os X Vmware
System Requirements for Niresh Mac OS X Yosemite 10.10.1
9 GB free HDD
2 GB of RAM
Intel Pentium 4 or later
Niresh Mac OS X Yosemite 10.10.1 Free Download
Download Niresh Mac OS X Yosemite 10.10 latest version free standalone offline DVD ISO image installer. You can also download Mac OS X Yosemite 10.10.5
0 notes
Text
Migrating Google Cloud SQL for MySQL to an On-Prem Server
Google Cloud SQL for MySQL is a fully-managed database service that helps you set up, maintain, manage, and administer your MySQL relational databases on Google Cloud Platform. However, there are differences between Cloud SQL and standard MySQL functionality like limited control, restricted resources, data locality, budget and security, which may influence your final decision to move out from the Google Cloud SQL instances and host the database service in the on-premises infrastructure instead. This blog post will walk you through how to perform online migration from Google Cloud SQL to an on-premises server. Our target database on the on-premises server is a Debian server, but the steps and procedures shall apply on other versions of Linux as well as long as packages are properly installed. Our Google Cloud MySQL instance is running on MySQL 5.7 and what we need is: A replication slave user created on the master. The slave must be installed with the same major version as the master. SSL must be enabled for geographical replication for security reasons. Since Google Cloud by default enabled GTID replication for MySQL, we are going to do a migration based on this replication scheme. Hence, the instructions described in this post should also work in MySQL 8.0 instances. Creating a Replication Slave User First of all, we have to create a replication slave user on our Google Cloud SQL instance. Log in to the Google Cloud Platform -> Databases -> SQL -> pick the MySQL instance -> Users -> Add User Account and enter the required details: The 202.187.194.255 is the slave public IP address located in our on-premises that is going to replicate from this instance. As you can see, there is no privileges configuration since users created from this interface will have the highest privileges Google Cloud SQL can offer (almost everything except SUPER and FILE). To verify the privileges, we can use the following command: mysql> SHOW GRANTS FOR [email protected] *************************** 1. row *************************** Grants for [email protected]: GRANT SELECT, INSERT, UPDATE, DELETE, CREATE, DROP, RELOAD, SHUTDOWN, PROCESS, REFERENCES, INDEX, ALTER, SHOW DATABASES, CREATE TEMPORARY TABLES, LOCK TABLES, EXECUTE, REPLICATION SLAVE, REPLICATION CLIENT, CREATE VIEW, SHOW VIEW, CREATE ROUTINE, ALTER ROUTINE, CREATE USER, EVENT, TRIGGER, CREATE TABLESPACE ON *.* TO 'slave'@'202.187.194.255' WITH GRANT OPTION It looks like our slave user has the required permission to run as a slave (REPLICATION SLAVE). Taking a mysqldump Backup Before we create an external mysqldump backup, we need to configure the client's SSL certificates because of the risk of connecting the instance via a public network. To do this, go to Connections -> Configure SSL client certificates -> Create a client certificate: Download the above files (server-ca.pem, client-cert.pem and client-key.pem) and store them inside the slave server. We are going to use these certificates to connect to the master securely from the slave serve. To simplify the process, all of the above certificates and key file will be put under a directory called "gcloud-certs": $ mkdir -p /root/gcloud-certs # put the certs/key here Make sure the permissions are correct, especially the private key file, client-key.pem: $ chmod 600 /root/gcloud-certs/client-key.pem Now we are ready to take a mysqldump backup from our Google Cloud SQL MySQL 5.7 instance securely: $ mysqldump -uroot -p -h 35.198.197.171 --ssl-ca=/root/gcloud-certs/server-ca.pem --ssl-cert=/root/gcloud-certs/client-cert.pem --ssl-key=/root/gcloud-certs/client-key.pem --single-transaction --all-databases --triggers --routines > fullbackup.sql You should get the following warning: "Warning: A partial dump from a server that has GTIDs will by default include the GTIDs of all transactions, even those that changed suppressed parts of the database. If you don't want to restore GTIDs, pass --set-gtid-purged=OFF. To make a complete dump, pass --all-databases --triggers --routines --events." The above warning occurs because we skipped defining the --events flag which requires the SUPER privilege. The root user created for every Google Cloud SQL instance does not come with FILE and SUPER privileges. This is one of the drawbacks of using this method, that MySQL Events can't be imported from Google Cloud SQL. Configuring the Slave Server On the slave server, install MySQL 5.7 for Debian 10: $ echo 'deb http://repo.mysql.com/apt/debian/ buster mysql-5.7' > /etc/apt/sources.list.d/mysql.list $ apt-key adv --keyserver pgp.mit.edu --recv-keys 5072E1F5 $ apt update $ apt -y install mysql-community-server Then, add the following lines under the [mysqld] section inside /etc/mysql/my.cnf (or any other relevant MySQL configuration file): server-id = 1111 # different value than the master log_bin = binlog log_slave_updates = 1 expire_logs_days = 7 binlog_format = ROW gtid_mode = ON enforce_gtid_consistency = 1 sync_binlog = 1 report_host = 202.187.194.255 # IP address of this slave Restart the MySQL server to apply the above changes: $ systemctl restart mysql Restore the mysqldump backup on this server: $ mysql -uroot -p < fullbackup.sql At this point, the MySQL root password of the slave server should be identical to the one in Google Cloud SQL. You should log in with a different root password from now on. Take note that the root user in Google Cloud doesn't have full privileges. We need to make some modifications on the slave side, by allowing the root user to have all the privileges inside MySQL, since we have more control over this server. To do this, we need to update MySQL's user table. Login to the slave's MySQL server as MySQL root user and run the following statement: mysql> UPDATE mysql.user SET Super_priv = 'Y', File_priv = 'Y' WHERE User = 'root'; Query OK, 1 row affected (0.00 sec) Rows matched: 1 Changed: 1 Warnings: 0 Flush the privileges table: mysql> FLUSH PRIVILEGES; Query OK, 0 rows affected (0.00 sec) Exit the current terminal and re-login again. Run the following command to verify that the root user now has the highest level of privileges: mysql> SHOW GRANTS FOR root@localhost; +---------------------------------------------------------------------+ | Grants for root@localhost | +---------------------------------------------------------------------+ | GRANT ALL PRIVILEGES ON *.* TO 'root'@'localhost' WITH GRANT OPTION | +---------------------------------------------------------------------+ Setting up the Replication Link For security reasons, the replication slave user has to connect to the master host (Google Cloud instance) via an SSL encrypted channel. Therefore, we have to prepare the SSL key and certificate with correct permission and accessible by the mysql user. Copy the gcloud directory into /etc/mysql and assign the correct permission and ownership: $ mkdir -p /etc/mysql $ cp /root/gcloud-certs /etc/mysql $ chown -Rf mysql:mysql /etc/mysql/gcloud-certs On the slave server, configure the replication link as below: mysql> CHANGE MASTER TO MASTER_HOST = '35.198.197.171', MASTER_USER = 'slave', MASTER_PASSWORD = 'slavepassword', MASTER_AUTO_POSITION = 1, MASTER_SSL = 1, MASTER_SSL_CERT = '/etc/mysql/gcloud-certs/client-cert.pem', MASTER_SSL_CA = '/etc/mysql/gcloud-certs/server-ca.pem', MASTER_SSL_KEY = '/etc/mysql/gcloud-certs/client-key.pem'; Then, start the replication slave: mysql> START SLAVE; Verify the output as the following: mysql> SHOW SLAVE STATUSG *************************** 1. row *************************** Slave_IO_State: Waiting for master to send event Master_Host: 35.198.197.171 Master_User: slave Master_Port: 3306 Connect_Retry: 60 Master_Log_File: mysql-bin.000003 Read_Master_Log_Pos: 1120160 Relay_Log_File: puppet-master-relay-bin.000002 Relay_Log_Pos: 15900 Relay_Master_Log_File: mysql-bin.000003 Slave_IO_Running: Yes Slave_SQL_Running: Yes Replicate_Do_DB: Replicate_Ignore_DB: Replicate_Do_Table: Replicate_Ignore_Table: Replicate_Wild_Do_Table: Replicate_Wild_Ignore_Table: Last_Errno: 0 Last_Error: Skip_Counter: 0 Exec_Master_Log_Pos: 1120160 Relay_Log_Space: 16115 Until_Condition: None Until_Log_File: Until_Log_Pos: 0 Master_SSL_Allowed: Yes Master_SSL_CA_File: /etc/mysql/gcloud-certs/server-ca.pem Master_SSL_CA_Path: Master_SSL_Cert: /etc/mysql/gcloud-certs/client-cert.pem Master_SSL_Cipher: Master_SSL_Key: /etc/mysql/gcloud-certs/client-key.pem Seconds_Behind_Master: 0 Master_SSL_Verify_Server_Cert: No Last_IO_Errno: 0 Last_IO_Error: Last_SQL_Errno: 0 Last_SQL_Error: Replicate_Ignore_Server_Ids: Master_Server_Id: 2272712871 Master_UUID: 8539637e-14d1-11eb-ae3c-42010a94001a Master_Info_File: /var/lib/mysql/master.info SQL_Delay: 0 SQL_Remaining_Delay: NULL Slave_SQL_Running_State: Slave has read all relay log; waiting for more updates Master_Retry_Count: 86400 Master_Bind: Last_IO_Error_Timestamp: Last_SQL_Error_Timestamp: Master_SSL_Crl: Master_SSL_Crlpath: Retrieved_Gtid_Set: 8539637e-14d1-11eb-ae3c-42010a94001a:5611-5664 Executed_Gtid_Set: 8539637e-14d1-11eb-ae3c-42010a94001a:1-5664, b1dabe58-14e6-11eb-840f-0800278dc04d:1-2 Auto_Position: 1 Replicate_Rewrite_DB: Channel_Name: Master_TLS_Version: Make sure the Slave_IO_Running and Slave_SQL_Running values are 'Yes', as well as Seconds_Behind_Master should be 0, which means the slave has caught up with the master. Notice the Executed_Gtid_Set has two GTIDs: 8539637e-14d1-11eb-ae3c-42010a94001a:1-5664 b1dabe58-14e6-11eb-840f-0800278dc04d:1-2 The first GTID represents the changes coming from the current master (Google Cloud SQL instance), while the second GTID represents the changes that we have made when we modified the privileges for the MySQL root user on the slave host. Pay attention to the first GTID to see if the database is replicating correctly (the integer part should be incrementing while replicating). Verify if our slave host is part of the replication from the master's point-of-view. Login to the SQL Cloud instance as root: $ mysql -uroot -p -h 35.198.197.171 --ssl-ca=/root/gcloud-certs/server-ca.pem --ssl-cert=/root/gcloud-certs/client-cert.pem --ssl-key=/root/gcloud-certs/client-key.pem And run the following statement: mysql> SHOW SLAVE HOSTS; *************************** 1. row *************************** Server_id: 1111 Host: 202.187.194.255 Port: 3306 Master_id: 2272712871 Slave_UUID: b1dabe58-14e6-11eb-840f-0800278dc04d At this point, you may plan your next move to redirect the database workload from the applications to this slave server as the new master and decommission the old master in Google Cloud. Final Thoughts You can perform an online migration from Google Cloud SQL for MySQL to an on-premises server without much hassle. This gives you the possibility to move your database outside of the cloud vendors for privacy and control when the right time has come. Tags: MySQL Google Cloud google cloud sql google database migration migration cloud https://severalnines.com/database-blog/migrating-from-google-cloud-sql-to-mysql-onprem-server
0 notes
Text
New Post has been published on Strange Hoot - How To’s, Reviews, Comparisons, Top 10s, & Tech Guide
New Post has been published on https://strangehoot.com/top-linux-commands-for-hosting-shell-access-command/
Top Linux Commands For Hosting - Shell Access Command
Linux is an open operating-system. Almost 60% of the website’s backend is operated by Linux os. Either you are a web developer, or hosting provider. You must have knowledge regarding Linux top Commands. To understand basics, continue reading
Linux OS operates through different working commands. Any Individual should know its top basic commands in case of troubleshooting its web apps.
In this blog post, we will be covering top Linux commands for hosting. To help a Sysadmin to troubleshoot whenever an error occurs. The lists of some very basic Linux commands may help you out.
Top Linux Commands for Hosting- for Sysadmins
Many hosting admins, so-called sysadmins, do not know much about Linux OS. But, as a sysadmin, if you are looking for top Linux commands that can help you in solving fundamental problems. Let’s be us.
We have mentioned-below some basics but necessary commands of Linux that are worth knowing. After understanding the following top 10 commands of Linux, you will become able to handle your hosting os system. That is based on Linux.Also You will learn fundamental commands that will help you to navigate through your Linux based OS system. To help you become able to make little changes by yourself. However, the more you use Linux commands, the more you will understand it better.
useradd – Linux command to add users
To add another user to your Linux OS. Use this Command. Multi-users can use Linux OS at the same time. However, Admin has to create a new profile and password for the guest user.
The Command Useradd would be helpful if you are facing trouble in your web server app and could not find the right solution. To hire an expert to solve the error out, you may need to give him guest mode access.
Creating a new user profile with this Command is not rocket science. Just Use Command ‘Useradd Name’ And Enter a New password using this command ‘passwd 12234564’.
The thing to note here is that the passwd command always follows the Useradd Command.
To remove the New added User, use this Command Userdel. Doing this will force the user to logout.
History Command – Linux command to check the history of commands.
Operating VPS or Hosting using Linux, you may think about how many commands you have used. To see the history here is the Command. “History”
The history command is not only useful for checking the history of your previously added commands but also it allows you to return those commands by adding numbers to that. For instance, after checking the lists, you can enter the number that will be there.
Each Command will be in the number of lists.
To access any of them, use this command “history !3” It will take you there in a hassle-free way.
PWD command – Linux command to check the current working directory
Sometimes it becomes frustrating to work on Linux OS. Many sysadmins often use the PWD command to check the current directory name. To understand in which directory they are.
PWD command is pretty essential to understand Linux better.
Web Server admins use it whenever they forget the path in which they are surfing. For instance, the PWD command will prompt up the name of the directory to see if this is the right folder. in case you are finding your file somewhere. The Command will make it easy to get the work done.
Cd Command – Linux command to change directory
Use the cd command if you want to jump to a new directory. By means that it makes it easy to navigate through all of your directories.
In a Linux operating system, we create many folders; each folder consists of new files. For example, there are three folders. Each has its specific name. If you want to jump to any of the folders, simply write the title, followed by the CD command.
This is one of the TOP Linux commands that helps sysadmins to navigate all of the folders easily. Please write the name, and it magically lets you enter the folder instantly. Example “cd mp4 Files”
ls Command – Linux command to list folders and file in current directory
To list all files in a directory, use the ls command. It will automatically create a list of all the files that are stored in a folder.
ls command is meaningful, no matter for what purposes you are using the Linux OS. Ironically, the command helps sysadmin to look at all the files of a folder.
For example, If you want to see the audio files. Use the command like this “ls /home/username/audio” All the audio files will appear in the list.
rm command – Linux command to remove folder or file
Linux OS users frequently use the rm command. The command helps to delete the files in a directory along with all the files.
However, in any case, you only want to delete the directory, not the files it contains. use the rmdir command
Before using practically this command, double-check the files you will delete because it is a one time process.
mkdir command – Linux command to make directory
Mkdir command lets the users create a new directory. Sysadmin quite often uses this command when they are bound up with the directories, so for creating a new directory, the command helps them out.
For Instance; mkdir Videos. A new folder/ directory will be created.
Same for generating a sub-Directory, you can use this command with the folder’s name. mkdir Video/mp4. A subdirectory mp4 will be created.
cp Command – Linux command to copy file or folder
This is another top useful command in Linux. The Cp command can copy the file from a directory to anywhere you want. Imagine if you want to duplicate a file and place it in any different directory. Simply, use the Cp command “filename. (extension name)”.
And the command for moving a file is CV; the rest of the process is the same as the CP command follows.
locate command – Linux command to search file or folder
To locate a file in your Linux Hosting server, use locate Command. It will find any file for you in just a matter of seconds.
But there are some tips:
To find a file with a single word name like Apple, use locate command and write the same name. Locate Apple
To find a file with two or more than two words, use an asterisk (*), for example. The file name you want to find on your Linux system is Apple Phones. In this case, you should cover the space between words with (*). Just like this, locate command Apple*Phones.
wget command – Linux command to download a file from web location
Last but not least, the command is handy for downloading a file from the Internet. Use the wget command and put the URL of that file you want to download.
Process Management Command
process is the program currently running on the server. Sometimes, system admins are required to stop or kill a program that is taking a lot of resource. Follow the steps to display all the processes running and then kill specific program.
To display all running processes, ‘top‘ keyword is used . It displays complete information about the program like the load on the central processor, RAM, disk space and network etc.
The ‘ps‘ utility displays the processes of the current user .
The ‘kill‘ command stops (kills) the running program. However, it is not recommended to use in production environment. Use only when you know what you are doing.
Date Command for Shell
Date command displays the date, time and day of the week. If you enter it without parameters, then it displays the current date, time and day of the week.
To get help on how to run date command, you can run sudo date –help or sudo man date.
Using SSH Command on Shell
SSH allows secure transfer of data over encrypted channel. It launces the application from remote server using secure connection. Following are three different ways to connect to SSH:
Connecting to the server: Using the login and password of a user with right access sudo ssh user_name @ IP_server. After entering the command and specifying the password, the secure connection is established.
Executing the command using port: sudo ssh user_name @ IP_server -p:22. Default port to connect to ssh is 22.
Accessing SSH with key and without password: If the user has private key, user can run following command to create SSH connection without providing the password. sudo ssh-copy-id user_name @ IP_server.
Working with File Access
The chmod command changes the permission of the files and directories. It allows to enable or disable the execution of the file. Admins can also restrict the read-write access by using certain commands.
ls -lh : View the permissions of files and directories in the current directory.
To add read-write permission on a directory – chmod 777 folder_name.
Remove permissions for a directory (read only) – chmod 400 folder_name.
Assigning a user to the folder owner – chow user_name folder_name.
Removing user rights to a folder – chow -R user_name folder_name.
User and System Information
Sometimes it becomes necessary to obtain the information about the users and the system. Use following commands.
whoami: information about the currently logged in user .
who: information about all users of the current operating system. The command also allows to find out the IP address of the current logged in users.
uname: information about the operating system .
hostname: is the network name of the machine.
Installing Packages using Shell commands
Tow major types of packages can be installed through Shell command.
Deb package handling
Install or upgrade – dpkg -i package_name.deb
Removal - dpkg -r package_name
Show all packages – dpkg –l
APT package manager
Installation and update – apt-get install package_name
Getting updated package lists – apt-get update
Upgrading packages installed on Ubuntu – apt-get upgrade
uninstallation of package – apt-get remove package_name
Checking the integrity dependencies of packages – apt-get check
Managing DNS settings from Shell
The hostname command displays the computer name and the domain name server
hostname is a name assigned to the computer connected to a network that uniquely identifies it on the network and thus allows access to it without using its IP address.
hostname -i displays the network IP address.
hostname -d displays the fully qualified domain name(FQDN) of the computer
sudo hostname new_hostname changes the hostname on Linux server.
Please note that changes made using the above command will only take effect until the next reboot. To change the host name permanently, you can run hostnamectl from systemd in system and services manager
Read: How to Set Cron Job on Linux Server – Cron Job Working & Scheduling
0 notes
Text
Continuous Deployments for WordPress Using GitHub Actions
Continuous Integration (CI) workflows are considered a best practice these days. As in, you work with your version control system (Git), and as you do, CI is doing work for you like running tests, sending notifications, and deploying code. That last part is called Continuous Deployment (CD). But shipping code to a production server often requires paid services. With GitHub Actions, Continuous Deployment is free for everyone. Let’s explore how to set that up.
DevOps is for everyone
As a front-end developer, continuous deployment workflows used to be exciting, but mysterious to me. I remember numerous times being scared to touch deployment configurations. I defaulted to the easy route instead — usually having someone else set it up and maintain it, or manual copying and pasting things in a worst-case scenario.
As soon as I understood the basics of rsync, CD finally became tangible to me. With the following GitHub Action workflow, you do not need to be a DevOps specialist; but you’ll still have the tools at hand to set up best practice deployment workflows.
The basics of a Continuous Deployment workflow
So what’s the deal, how does this work? It all starts with CI, which means that you commit code to a shared remote repository, like GitHub, and every push to it will run automated tasks on a remote server. Those tasks could include test and build processes, like linting, concatenation, minification and image optimization, among others.
CD also delivers code to a production website server. That may happen by copying the verified and built code and placing it on the server via FTP, SSH, or by shipping containers to an infrastructure. While every shared hosting package has FTP access, it’s rather unreliable and slow to send many files to a server. And while shipping application containers is a safe way to release complex applications, the infrastructure and setup can be rather complex as well. Deploying code via SSH though is fast, safe and flexible. Plus, it’s supported by many hosting packages.
How to deploy with rsync
An easy and efficient way to ship files to a server via SSH is rsync, a utility tool to sync files between a source and destination folder, drive or computer. It will only synchronize those files which have changed or don’t already exist at the destination. As it became a standard tool on popular Linux distributions, chances are high you don’t even need to install it.
The most basic operation is as easy as calling rsync SRC DEST to sync files from one directory to another one. However, there are a couple of options you want to consider:
-c compares file changes by checksum, not modification time
-h outputs numbers in a more human readable format
-a retains file attributes and permissions and recursively copies files and directories
-v shows status output
--delete deletes files from the destination that aren’t found in the source (anymore)
--exclude prevents syncing specified files like the .git directory and node_modules
And finally, you want to send the files to a remote server, which makes the full command look like this:
rsync -chav --delete --exclude /.git/ --exclude /node_modules/ ./ [email protected]:/mydir
You could run that command from your local computer to deploy to any live server. But how cool would it be if it was running in a controlled environment from a clean state? Right, that’s what you’re here for. Let’s move on with that.
Create a GitHub Actions workflow
With GitHub Actions you can configure workflows to run on any GitHub event. While there is a marketplace for GitHub Actions, we don’t need any of them but will build our own workflow.
To get started, go to the “Actions” tab of your repository and click “Set up a workflow yourself.” This will open the workflow editor with a .yaml template that will be committed to the .github/workflows directory of your repository.

When saved, the workflow checks out your repo code and runs some echo commands. name helps follow the status and results later. run contains the shell commands you want to run in each step.
Define a deployment trigger
Theoretically, every commit to the master branch should be production-ready. However, reality teaches you that you need to test results on the production server after deployment as well and you need to schedule that. We at bleech consider it a best practice to only deploy on workdays — except Fridays and only before 4:00 pm — to make sure we have time to roll back or fix issues during business hours if anything goes wrong.
An easy way to get manual-level control is to set up a branch just for triggering deployments. That way, you can specifically merge your master branch into it whenever you are ready. Call that branch production, let everyone on your team know pushes to that branch are only allowed from the master branch and tell them to do it like this:
git push origin master:production
Here’s how to change your workflow trigger to only run on pushes to that production branch:
name: Deployment on: push: branches: [ production ]
Build and verify the theme
I’ll assume you’re using Flynt, our WordPress starter theme, which comes with dependency management via Composer and npm as well as a preconfigured build process. If you’re using a different theme, the build process is likely to be similar, but might need adjustments. And if you’re checking in the built assets to your repository, you can skip all steps except the checkout command.
For our example, let’s make sure that node is executed in the required version and that dependencies are installed before building:
jobs: deploy: runs-on: ubuntu-latest steps: - uses: actions/checkout@v2 - uses: actions/[email protected] with: version: 12.x - name: Install dependencies run: | composer install -o npm install - name: Build run: npm run build
The Flynt build task finally requires, lints, compiles, and transpiles Sass and JavaScript files, then adds revisioning to assets to prevent browser cache issues. If anything in the build step fails, the workflow will stop executing and thus prevents you from deploying a broken release.
Configure server access and destination
For the rsync command to run successfully, GitHub needs access to SSH into your server. This can be accomplished by:
Generating a new SSH key (without a passphrase)
Adding the public key to your ~/.ssh/authorized_keys on the production server
Adding the private key as a secret with the name DEPLOY_KEY to the repository

The sync workflow step needs to save the key to a local file, adjust file permissions and pass the file to the rsync command. The destination has to point to your WordPress theme directory on the production server. It’s convenient to define it as a variable so you know what to change when reusing the workflow for future projects.
- name: Sync env: dest: '[email protected]:/mydir/wp-content/themes/mytheme’ run: | echo "$" > deploy_key chmod 600 ./deploy_key rsync -chav --delete \ -e 'ssh -i ./deploy_key -o StrictHostKeyChecking=no' \ --exclude /.git/ \ --exclude /.github/ \ --exclude /node_modules/ \ ./ $
Depending on your project structure, you might want to deploy plugins and other theme related files as well. To accomplish that, change the source and destination to the desired parent directory, make sure to check if the excluded files need an update, and check if any paths in the build process should be adjusted.
Put the pieces together
We’ve covered all necessary steps of the CD process. Now we need to run them in a sequence which should:
Trigger on each push to the production branch
Install dependencies
Build and verify the code
Send the result to a server via rsync
The complete GitHub workflow will look like this:
name: Deployment on: push: branches: [ production ] jobs: deploy: runs-on: ubuntu-latest steps: - uses: actions/checkout@v2 - uses: actions/[email protected] with: version: 12.x - name: Install dependencies run: | composer install -o npm install - name: Build run: npm run build - name: Sync env: dest: '[email protected]:/mydir/wp-content/themes/mytheme’ run: | echo "$" > deploy_key chmod 600 ./deploy_key rsync -chav --delete \ -e 'ssh -i ./deploy_key -o StrictHostKeyChecking=no' \ --exclude /.git/ \ --exclude /.github/ \ --exclude /node_modules/ \ ./ $
To test the workflow, commit the changes, pull them into your local repository and trigger the deployment by pushing your master branch to the production branch:
git push origin master:production
You can follow the status of the execution by going to the “Actions” tab in GitHub, then selecting the recent execution and clicking on the “deploy“ job. The green checkmarks indicate that everything went smoothly. If there are any issues, check the logs of the failed step to fix them.

Check the full report on GitHub
Congratulations! You’ve successfully deployed your WordPress theme to a server. The workflow file can easily be reused for future projects, making continuous deployment setups a breeze.
To further refine your deployment process, the following topics are worth considering:
Caching dependencies to speed up the GitHub workflow
Activating the WordPress maintenance mode while syncing files
Clearing the website cache of a plugin (like Cache Enabler) after the deployment
The post Continuous Deployments for WordPress Using GitHub Actions appeared first on CSS-Tricks.
Continuous Deployments for WordPress Using GitHub Actions published first on https://deskbysnafu.tumblr.com/
0 notes
Text
How to (attempt to) secure your Raspberry Pi against IoT hacker attacks
*Gee, that doesn’t look difficult, painful, or time-consuming.
https://makezine.com/2017/09/07/secure-your-raspberry-pi-against-attackers/
Why would anyone hack a Raspberry Pi?
Its computing power can be abused for operations like mining cryptocurrency.
It can be used as a bounce point to attack other hosts, in order to cover the attacker’s tracks.
It’s an entry point to the rest of an internal network. An attacker can easily reach the file servers and try to install ransomware, obtain documents for blackmail, or manipulate the firewall and router settings to ensure persistent access in the future for later nefarious actions, either by attacking the web console of the router or performing uPNP manipulation to open up more ports to the Internet for attack.
Passwords
Change the default passwords — If you are installing a recent version of NOOBS or Raspbian, be sure to change the default password of the “pi” user to something that is long and hard to guess. A passphase like “iamasuckerfor5dollarmojitos” is much better than P@assword1! Even if you plan on disabling the account, this first step is basic protection in case you forget.
User Accounts
Your next step should be to disable the default Pi account in Raspbian. Before doing this, create a new account on the system. You can use the useradd command to do this, with some extra flags to specify that a new home directory be created for the user. Log in as the Pi user and issue the command:
$ sudo /usr/sbin/useradd --groups sudo -m makezine
Use your own username instead of “makezine.” This will create a new account, create a directory for the account (such as /home/makezine), and add the new account to the sudo group so the user can use the sudo command. Once the new user account is created we need to set a password for the account. You can do this using the command:
$ sudo passwd makezine
Next, reset the root password. Choose something long and hard to guess.
$ sudo passwd root
Finally, you’ll want to disable the Pi account:
$ sudo passwd --lock pi
Now you can log out of the Pi account and log in with your new account and password.
Securing SSH
By default, Raspbian installs a remote access shell (SSH) that can be accessed from anywhere. You can disable this by setting up SSH so that only machines with an authorized SSH key can log in. Back up your private keys in at least two locations you trust.
To set them up, edit the SSH configuration file using vi, or another text editor, with the command:
$ sudo vi /etc/ssh/sshd_config
Make sure the following lines are set and uncommented — meaning that the lines are in the file and they aren’t preceded with a hash tag symbol, which marks a line as a comment and ignores it for configuration purposes:
# Authentication: LoginGraceTime 120 PermitRootLogin no StrictModes yes RSAAuthentication yes PubkeyAuthentication yes AuthorizedKeysFile %h/.ssh/authorized_keys # To enable empty passwords, change to yes (NOT RECOMMENDED) PermitEmptyPasswords no # Change to yes to enable challenge-response passwords (beware issues with # some PAM modules and threads) ChallengeResponseAuthentication no # Change to no to disable tunnelled clear text passwords PasswordAuthentication no UsePAM no
The last line is very important since it will disable Pluggable Authentication Modules (PAM), or native Linux authentication, and only allow users to log in with a key. Next, generate an SSH key. You can do this with PuTTY on Windows or with the ssh-keygen command on Linux. Create a .ssh directory in your user’s home directory and an authorized_keys file with the following commands. Be sure to set the permissions properly (otherwise the key based authentication will fail):
$ mkdir ~/.ssh $ chmod 0700 ~/.ssh $ touch ~/.ssh/authorized_keys $ chmod 0600 ~/.ssh/authorized_keys
Next use your text editor to edit the authorized_keys file and paste in the public key you generated so you can log in. Be sure to restart SSH to ensure the changes take effect using the command:
$ sudo systemctl restart ssh
Firewall
Once you’ve locked down SSH, you’ll want to ensure that the iptables firewall is running on your Pi. For good measure, you can configure the firewall so that it logs a message whenever a firewall rule is activated and a connection is blocked. First make sure that iptables is installed using the command:
$ sudo apt-get install iptables iptables-persistent
Note that using the iptables firewall will require new kernel modules to be loaded. The easiest way to load them is to reboot your Pi. Once iptables is installed, go ahead and check the current iptables rules with the command:
$ sudo /sbin/iptables -L
This will list the rules, which are probably empty. You can save these rules off to a text file and edit it using the command:
$ sudo /sbin/iptables-save > /etc/iptables/rules.v4
This is the file that iptables-persistent uses when your system boots or reboots to make sure that the firewall is still running. Save, then edit the file so that it looks somewhat like the following (altering whatever rules you need):
$ sudo cat /etc/iptables/rules.v4 :INPUT ACCEPT [0:0] :FORWARD ACCEPT [0:0] :OUTPUT ACCEPT [0:0] # Allows all loopback (lo0) traffic and drop all traffic to 127/8 that doesn't use lo0 -A INPUT -i lo -j ACCEPT -A INPUT ! -i lo -d 127.0.0.0/8 -j REJECT # Accepts all established inbound connections -A INPUT -m state --state ESTABLISHED,RELATED -j ACCEPT # Allows all outbound traffic # You could modify this to only allow certain traffic -A OUTPUT -j ACCEPT # Allows SSH connections # The --dport number is the same as in /etc/ssh/sshd_config -A INPUT -p tcp -m state --state NEW --dport 22 -j ACCEPT # log iptables denied calls (access via 'dmesg' command) -A INPUT -m limit --limit 5/min -j LOG --log-prefix "iptables denied: " --log-level 7 # Reject all other inbound - default deny unless explicitly allowed policy: -A INPUT -j REJECT -A FORWARD -j REJECT COMMIT
Next, ensure your iptables are working properly. This can be tricky (((etc etc etc etc)))
3 notes
·
View notes