#How to install Windows 10 on PC through USB?
Explore tagged Tumblr posts
Visit Tumblr Blog
Explore Tumblr blogs with no restrictions, modern design and the best experience.
Last Seen Tumblr Blogs


Fun Fact
US Tumblr user growth rate is estimated to slow down to 4.1%.
Text
How to Install Windows on PC Using a USB Drive
How to Install Windows on PC Using a USB Drive Title: How to Install Windows on a PC Using a USB Drive: A Step-by-Step Guide Introduction Installing Windows on a PC is a crucial step in setting up or upgrading your computer’s operating system. While traditional methods like using DVDs or CDs are becoming less common, installing Windows via a USB drive has become the preferred method due to its…

View On WordPress
#How to boot PC from USB?#How to install Windows 10 on PC through USB?#How to Install Windows on PC Using a USB Drive#Install Windows#Install Windows on PC Using a USB Drive
0 notes
Text
I got a Steam Deck last year, and it’s such a great machine. It’s obviously inspired by Nintendo Switch, but it’s a lot better than a Switch.
The most important part is that it runs PC games. It’s fundamentally a Linux gaming PC in the form of a handheld console. There are a lot more games available than any console and and PC games both on Steam and GOG are a lot cheaper than console ones. You can get old or indie games for as cheap as 1-3 euro during sales. It’s a tremendous advantage for the deck over its console competitors.
And while the obvious intent of the deck is to get more people to buy games from Steam, it isn’t a walled garden at all. The deck launches into Steam when you boot it up, but you can go into desktop mode, and then it functions as a normal PC running a Linux distro. From there you can install Lutris or Heroic Games Launcher, and use it to easily install games you bought from GOG and Itch.io.
You can also do things like use the official dock or an unofficial usb-c hub to hook the deck up to a monitor, mouse and keyboard to use it as a desktop PC. Or you can hook it up to a tv to use it as home console.
The hardware is also a lot more powerful than a switch, the demanding triple-a games it can play is actually impressive. Although this comes with the natural disadvantage that it’s bulkier too. Putting more powerful PC parts demands more space for them. The deck is not something I bring with me outside. But then again I didn’t even do that with the 3DS, which was actually of a practical size to do that. The deck is portable enough that I can comfortably play lying in bed, which is how I always used my handheld consoles. So it’s perfect for me, but maybe not if you want to play it on the bus or something. It can probably be a fun addition to your luggage on longer trips though.
Of course, as mentioned, the Steam Deck uses Linux. This has both advantages and disadvantages. The main advantage is that it allows Valve to customize the operating system to make it fit with the machine it’s running on. The Deck’s SteamOS feels really well-integrated into the hardware, like how a proper console OS should be like. It’s not that dissimilar to how Sony used FreeBSD to make Playstation’s OS. Windows would not allow for this amount of customization and would not integrate as well.
And the open source nature of most Linux development allows Valve and the user to use existing open-source Linux software to their advantage. For example, the desktop mode is largely not a Valve creation, it’s an existing desktop environment for Linux, KDE Plasma. Yet it extends what the user can do with the deck to a great extent, like for installing non-steam games.
The main disadvantage to the Deck using Linux is that most PC games are built for Windows and don’t run natively under Linux. To run games built for Windows, the Deck has to run it through Proton, a compatibility layer which is Valve’s own gaming-focused version of Wine. Wine/Proton is far from perfect, sometimes games require extensive tinkering to work, or only run with serious issues, or don’t run at all, no matter what you do. Sometimes a game not working with Wine due to some random but serious issue that comes naturally from running a Windows executable on a Linux system via a compatibility layer. Sometimes it’s due to things like a multiplayer’s game anti-cheat system requiring access to the Windows kernel, and it will block a Linux pc from running the game because it has no Windows kernel.
This is however not as big a problem as it might otherwise be. Most games work, more or less. Valve has put a lot of work and money into both their own Proton and the Wine project as a whole, and they work a lot better than they did 10 years ago. Many run perfectly out of the box, because they are native, or play nice with Proton. Some require mere minor tinkering, like using a different version of Proton. And I generally don’t play multiplayer games, or if I do they don’t have draconian anti-cheats, so the games that are blocked because of anti-cheat are no big loss to me. The Steam Deck not running Fortnite is a plus in my book.
And we shouldn’t forget the Steam Deck verified system. Basically Valve employees check if the game runs out of the box with no issues on the Deck. They get a verified rating if they work with no issue, including both proton compatibility but also things like the controls working nice and the text being legible on the deck’s small screen. They also get a “playable” rating if the game runs to an acceptable standard but with tinkering required or other minor issues.
This is a good system. If you dislike tinkering, you can just buy and play games on steam with a verified rating, and the deck will work like a normal console for you, but with a lot cheaper games. It’s a good way to get people used to consoles into PC gaming, which is probably the point of the Deck.
And if you want more than deck verified games from Steam on the Deck, you are given the freedom to do it. I’ve gotten officially non-supported steam games to run on the deck by installing and using proton-GE and I’ve installed and played games from GOG.
The Steam Deck is really how a Linux PC for the common people should work. An easy and slick experience for casual users, but freedom and customization given to those that want it.
82 notes
·
View notes
Text
Ok so I talked about this in tags of a post earlier but I need to talk about it properly
So a couple weeks ago I finally pulled the trigger, I dual booted Linux Mint on my laptop
It has less of my vital files on it then my pc, but I use it more for videos and general Internet stuff, so I would know if I liked it
Installing was scary but after a bit of trouble shooting with disabling bit locker it was easy, and let me be clear, that's a windows thing, because Microsoft really really doesn't want you to have freedom over your machine.
So I booted in
And like
I literally love it so much
I knew people talked about how much better Linux is and how it speeds up literally anything it's put on over windows, but like WOW
It doesn't take 2 minutes to boot up or shut down, my CPU doesn't idle at 25% for no reason, the search for files feature doesn't take 40 minutes only to show me Internet results instead of files, its wonderful.
The default theme is (in my opinion) pretty ugly, sorry whoever made it, it's just not for me.
But that's the great thing, you can literally customize this almost however you would like.
Maybe you shouldn't trust my opinion on what looks nice because I instantly installed a theme that replicated Windows 7
But I got bored of the default colors so I literally found the files where the home bar is saved and changed them to be more "minty"
That along with some CSS color editing gave me this:

You just can't do anything like this in Windows 10/11. You can change the color on windows but if I wanted, in Mint, I could completely change everything, centered icons on the taskbar, icons left justified on the taskbar, no taskbar, make it look like windows 95, it's all yours to do with whatever you want.
There are issues, I won't lie, the biggest one that will probably haunt Linux forever is compatibility.
Simply put most developers don't make native Linux versions of their software, you are lucky if there is a Mac version.
Lots and lots of Windows software CAN work on Linux through compatibility layers like Wine and Steam's Proton, but it's not 100%
My biggest problem is FL Studio and Clip Studio, neither of these I could get working with Wine or Proton so far. I'm hoping in the future I will find a way to make this work, or transition to their free and open source alternatives, but for now I'm stuck with a win 10 pc.
The other issue I've faced is that Linux seems to have a hard time recognizing and remembering my wired headphones. Like sometimes it just works, but most of the time it fails to do so.
My solution to this until I have time to troubleshoot more is to use my stupid headphone jack to USB C dongle that I bought for my stupid phone with no headphone jack.
Luckily it works fine and the type C port on my laptop literally doesn't get used otherwise.
All in all, I'm like excited to use a computer again. I used to only be excited for the programs it allowed me to use, but for the first time in a long time, the "magic" of the PC has returned for me.
Once I save up the money, my next PC will be Linux, Windows doesn't cut it anymore for me.
Ok now I'm going to kinda just talk about Linux for a bit, unrelated to my experience because my brain has been buzzing about this topic lately.
I get why guys who run Linux are so annoying about it now, because it's me now, I love this stupid OS and everyone has to hear about it.
And chances are, you've used Linux before already!
Linux is used in a ridiculous number of places because of its open source nature.
Most servers and other cloud computing systems are running Linux, many public terminals and screens run Linux, every supercomputer in the world runs Linux, if you were in the education system for the past 13~ years you might have used ChromeOS, which is built on Linux, if you have ever used an Android device you have used Linux.
It's never going to take over Windows as the go to operating system in the home, most people don't even know they could switch, and if they don't know that there's no way they are willing to put up with some of the headaches Linux brings.
Although I've spent way more time troubleshooting Windows issues then I have Linux ones so far, so maybe Microsoft stuffing so much bloated spyware into their system is starting to cause windows to rip at the seams, idk.
When I try to explain Linux to people who literally don't understand any of this I use a car metaphor
Windows is like a hatchback SUV, you buy it from a dealer and it mostly works for everyone good enough that they don't complain.
Linux is like a project vehicle in a lot of ways, the mechanic can tune it up exactly to the specifications they want, tear a bit out and put a diffrent one in, it requires some work under the engine but once that mechanic gets it the way they want it, it's incredible.
It's not a perfect metaphor but I think it gets the idea across.
Uh IDK how to finish this post, please try Linux if you can, changed my life.
#Long post about Linux ahead don't click read more if you don't want that#Linux#Linux mint#open source#Mantis thoughts
26 notes
·
View notes
Text
y̶͙̍o̶̳̚ṵ̶́r̵͓͗ ̵͚̔m̷͖̋o̴̳͆v̵̧̓e̴̦̒ ̴͕́S̵̭̎M̵͙̓G̶̖͘4̷̬̆
IGBP REFERENCES & CONNECTIONS IN "THE MARIO PC VIRUS" EPISODE
[spoilers ahead]
✧
✧
✧
✧
✧
Ambition
the project SMG4 is working on and motive

[The Mario PC Virus // timestamp 0:10]


[It's Gotta Be Perfect movie // timestamp 0:56]
"Say the line, SMG4!"


[The Mario PC Virus // timestamp 0:10]

[It's Gotta Be Perfect movie // timestamp 0:20]
Need Some Editing Help?
Computer buddy

[The Mario PC Virus // timestamp 2:04 to 2:25]

[It's Gotta Be Perfect movie // timestamp 4:02 to 4:19]
Leave A Note
oh hey, Windows Notepad
[The Mario PC Virus // timestamp 2:28 to 2:43]

[It's Gotta Be Perfect movie // timestamp 4:02 to 4:19]
(and the fact that SMG4 uses a Windows PC ~Ink)
Every Mario's Worried for SMG4

[The Mario PC Virus // timestamp 3:28]

[SMG4: Mario Steals The Constitution // timestamp 2:50]
A Loss of Work and Patience
An event cuts off Four from his progress and noise being what ultimately pushes him to take action

Plus, Mario Buddy plays "relaxing" music for SMG4, which 4 is not a fan
[The Mario PC Virus // timestamp 3:30 to 3:50]
SMG4: "SHUT UP!! CAN YOU ALL SHUT UP?!?! LOOK AT WHAT YOU'VE DONE!!!"
[It's Gotta Be Perfect movie // timestamp 3:25 to 3:55]
They're Always Watching

File Names (as much as I could decipher) from left to right, top to bottom:
[Default]
Blue Screen
Green Screen
Pure Red Screen
Pure Green Screen
Pure Blue Screen
Green 1
Green 2
purple 1
purple 1\puzzle
[The Mario PC Virus // timestamp 6:11]

Left to right, top to bottom:
[Default]
Blue Screen
Pure Red Screen
Pure Green Screen
Pure Blue Screen
green screen
purple screen
vn
vnooom(??)
name(??)
[It's Gotta Be Perfect movie // timestamp 1:07 to 1:09, 2:44]

(Gonna do a whole theory dedicated to Goop!4 and bring back my analysis of the eye designs ~Ink, again)
[It's Gotta Be Perfect movie]
PC Takeover Through Mother Board and Mind
Four's PC controlling its system vs the PC controlling Four

[The Mario PC Virus // timestamp 0:05 to 0:10, 8:03 to 8:16]

[It's Gotta Be Perfect Movie Countdown stream]
Did Somebody Call For (Military) Backup?

[The Mario PC Virus // timestamp 9:30 to 13:53]

[It's Gotta Be Perfect movie // timestamp 13:39 to 13:53]
A Sacrifice
Time, sweat, and tears went into his work but he was forced to left behind (the virus, to save 3)

[The Mario PC Virus // timestamp 11:58]

[It's Gotta Be Perfect movie // timestamp 1:07 to 1:09, 2:44]
Your End of the Deal
a deal offered through the computer buddy to aid Four's work but they demand something in return (star of Four's videos vs. control over Four)

[The Mario PC Virus // timestamp 12:06 to 12:40]

[It's Gotta Be Perfect movie // timestamp 30:58 to 31:11]
The Choice
knowing his self-worth :)

[The Mario PC Virus // timestamp 12:44 to 12:50]

[It's Gotta Be Perfect movie // timestamp 34:00 to 35:00]
.・-: ✧ :--: ✧ :-・.
Ink here! That's all the ones I could find, but if I missed one, let me know, and I'll add it to the list. Four has really come a long way, and, believe it or not, he learned his lesson from IGBP.
Of course, he accidentally installed Mario Buddy, not a suspicious keyboard offered by Mr Puzzles. But once he realized what he had done, he tried everything he could to get rid of the program (after some fun).

By the end, when Bonzi offered to give Four's files back while in turn allowing the PC buddy to be the star of his video, Four had a choice. Past Four wouldn't have hesitated because that literally was his work. I've been in a situation like this and golly, I would've done anything to get it all back. Instead, Four gave his PC up, similar to how Four gave up the USB with the perfect video (one he has worked on for WEEKS nonstop) to save SMG3.
(...should I even count all the scenes where SMG4 and SMG3 caring for one another?)
AND despite everything, he is still SMG4, a content creator with the wish to make people happy. Well, of course he wants his videos to be higher quality. It's his job as a YT creator and meme guardian, you can't just ask him to NOT make videos. The whole reason IGBP happened in the first place is because he felt that he wasn't good enough for his friends, driving himself to be perfect to prove that he deserves the Crew. But lesson learned, through Three's speech: he doesn't need to be perfect, his friends will always be there for him regardless. They care for him and it was worth risking their lives to save him from the possession.
He can always make another video but they can't have another SMG4.
Whatever his next big project is (the Castle, Meme Factory, videos in general), he'll do it with passion but never alone. Just as Four said at the end of IGBP: "...it may be different, but as long as we're all together, I'm sure it's gonna be perfect!"
So, he made his choice, giving up his PC because there is nothing to prove to anyone.
so.... SMG4 Team....
WHAT'S WITH THE IGBP CALLBACKS—
#smg4#smg4 its gotta be perfect#smg4 igbp#smg4 spoilers#puzzlevision 2#goop!SMG4#ink rambles#chanting GOOP!4 GOOP!4
41 notes
·
View notes
Text
How to Use www.aka.ms/linkpc to Connect Your Phone to a PC
With the increasing need for seamless connectivity between devices, Microsoft has introduced www.aka.ms/linkpc, a simple yet powerful way to link your smartphone to your Windows PC. Whether you want to sync notifications, transfer files, or even make calls from your computer, this feature enhances productivity by creating a unified experience across devices.
This article will cover the following:
What www.aka.ms/linkpc is
Benefits of linking your phone to your PC
System requirements
Step-by-step guide to setting up the connection
Common troubleshooting tips
Advanced features you can use once connected

What is www.aka.ms/linkpc?
www.aka.ms/linkpc is a short URL provided by Microsoft that redirects users to the setup page for connecting their Android phone or iPhone to a Windows PC. This connection is made possible through the Phone Link app (previously known as Your Phone Companion).
The feature enables users to:
View and reply to SMS messages
Access phone notifications
Transfer photos and files between devices
Mirror the phone screen onto the PC
Make and receive calls from the PC
Use Android apps directly from Windows (for selected Samsung and Surface devices)
This integration creates a seamless experience for users who frequently switch between their smartphones and PCs, improving efficiency and accessibility.
Benefits of Using www.aka.ms/linkpc
Connecting your smartphone to your PC via www.aka.ms/linkpc provides multiple advantages, including:
1. Seamless File Sharing
Transferring files between your phone and PC is as simple as dragging and dropping. This eliminates the need for cables, USB drives, or third-party apps.
2. Instant Notifications
Once connected, your PC will display all phone notifications, ensuring you never miss important alerts even when your phone is not nearby.
3. Messaging from Your PC
You can send and receive SMS messages directly from your computer, making typing easier with a full keyboard.
4. Screen Mirroring
For select devices, the feature allows you to mirror your phone screen onto your PC, enabling you to interact with mobile apps using a keyboard and mouse.
5. Call Management
You can make and receive phone calls directly from your PC, reducing the need to switch devices frequently.
6. Better Productivity
With your phone connected, you can work without interruptions, keeping all your necessary communications in one place.
System Requirements for www.aka.ms/linkpc
To use www.aka.ms/linkpc, ensure your devices meet the following requirements:
For Windows PC
Windows 10 (October 2018 update or later) or Windows 11
Bluetooth support (for call features)
Internet connection
For Android Phones
Android 7.0 (Nougat) or later
The Link to Windows app installed from the Google Play Store (pre-installed on some Samsung and Surface devices)
For iPhones (Limited Features Available)
iOS 14 or later
The Phone Link app installed on Windows 11 (only supports messaging and notifications)
How to Set Up www.aka.ms/linkpc
Follow these steps to successfully connect your phone to your Windows PC:
Step 1: Open the Link on Your PC
Open a web browser on your Windows PC.
Type www.aka.ms/linkpc in the address bar and press Enter.
The page will redirect you to the Phone Link app. If it’s not installed, you’ll be prompted to download it.
Step 2: Install the App on Your Phone
On your Android device, go to the Google Play Store.
Search for Link to Windows and install the app.
Open the app and sign in with your Microsoft account (use the same one as on your PC).
Step 3: Connect Your Devices
On your PC, open the Phone Link app.
Click Get Started and select Android or iPhone based on your device.
Follow the on-screen instructions to scan the QR code displayed on your PC using your phone’s Link to Windows app.
Step 4: Grant Permissions
For the connection to work properly, allow the following permissions on your phone:
Notification Access (to sync notifications)
Contacts & Messages Access (to enable calling and messaging)
Storage Access (to transfer files)
Step 5: Complete the Setup
Once permissions are granted, tap Done on your phone.
Your PC will confirm the connection, and your phone’s notifications, messages, and other features will start syncing.
Common Troubleshooting Tips
If you encounter issues while setting up www.aka.ms/linkpc, try the following fixes:
1. Ensure Both Devices Are Connected to the Internet
A stable internet connection is required for syncing. Check your Wi-Fi or mobile data.
2. Restart Both Devices
Restarting your PC and phone can resolve connectivity issues.
3. Update the Apps and System Software
Ensure your Phone Link and Link to Windows apps are updated. Also, keep your Windows and Android OS up to date.
4. Check Bluetooth and Permissions
For calling features, ensure Bluetooth is enabled and the necessary permissions are granted.
5. Reset the Connection
If issues persist, unlink your phone from the Phone Link app and restart the setup process.
Advanced Features of Phone Link
Once your phone is connected to your PC via www.aka.ms/linkpc, you can access several advanced features:
1. Access Android Apps on PC
For select Samsung and Surface devices, you can launch Android apps directly from Windows and use them as if they were installed on your PC.
2. Drag-and-Drop File Transfers
Easily move photos, documents, and other files between devices without using third-party apps.
3. Clipboard Sync
Copy text on your phone and paste it on your PC (and vice versa).
4. Personalized Notifications
Choose which notifications appear on your PC to reduce distractions.
5. Call History & Contacts Integration
View recent call logs and manage contacts directly from the Phone Link app.
0 notes
Text
Price: [price_with_discount] (as of [price_update_date] - Details) [ad_1] Item Descriptions:-Brand new.-USB 2.0 Video Capture Adapter.-Capture audio without sound card.-It supports all formats recorded in DVD+/-R/RW, DVD+/-VR , and DVD-Video and worldwide video systems.-Excellent Video Selector/Switcher : Smooth video source switching between PC , Composite Video input or S-Video input instantly.-For files¡¯ saving , you can simply record it on DVD , web, and mobile devices.-This product pulls you out of complex devices which are in high costs , as it turns your PC into full-featured video recording and editing workstation.-Supports high quality video resolution ( NTSC : 720¡Á480@30fps ; PAL : 720¡Á576@25fps ).-Compatible with: Windows 98 / ME, Windows 2000, Windows XP, Windows VISTA, Windows 7,Windows 8. (32 & 64 bit)Package:1x Easycap USB 2.0 Video Adapter with Audio1x CD-ROM1x USB Pure Copper Cable1x User ManualItem Specifications:Material:PlasticColor:Black 𝗡𝗢𝗧𝗘 - The CD is not necessary, if you don’t have a CD drive, we recommend that you download OBS (or potplay). It can be downloaded for free online. If you use on Mac, there is no need to downlaod any drive or software. MAC's own software - QuickTime player which can handle video conversion. (You can Google how to use QuickTime player, or contact us to get help).The Installation instructions and CD (there is a file called KEY, which contains the product key) are in the cardboard sandwich. 𝗧𝗜𝗣𝗦 - The current length of the cable will work the best, so we don’t suggest to use USB extension cable, it will weaken current and sometimes cann’t offer enough power to run. But you can still use it if you really need. Don't hesitate to contact us if you have any problem. We have professional technicians to solve your problems USB 2.0 Video Capture Adapter provides a link between a PC and a video device with RCA connector or S-Video connector, such VHS, VCR, DVD.Capture High-quality Video & Audio through popular USB 2.0 interface and not need external power. Plug and Play, Support Brightness, Contrast, Hue, and Saturation Control. Capture audio without the sound card. Support Win 2000/Win Xp/ Win Vista /Win 7/Win 8/ Win 10 Linux Mac/Android Support All Video Formats: DVD+/ -R/RW, DVD+/-VR, and DVD-Video. Applying to internet conference / net meeting. Support NTSC, PAL Video format. NTSC: 720 x 480 @ 30fps,PAL: 720x576 @ 25fps. Note: Products with electrical plugs are designed for use in the US. Outlets and voltage differ internationally and this product may require an adapter or converter for use in your destination. Please check compatibility before purchasing. [ad_2]
0 notes
Text
How to Connect Cricut Wirelessly: A Guide for Beginners
Are you a Cricut enthusiast planning to start your crafting journey? Well, you have come to the right place! I am going to walk you through all the essential info you need to learn in order to connect Cricut wirelessly.
Cricut crafting machines come with Bluetooth and USB connectivity to provide the utmost comfort in setting up the device. Crafters familiar with the machine can easily get started with the machine. On the other hand, some new users can find it difficult to complete the setup. In this case, it is best to have a thorough understanding of the process beforehand. So, get through the whole blog and grasp all the vital details and steps to wirelessly set up heat presses and cutting machines.
How to Setup Cricut Cutting Machines Wirelessly?
You can wirelessly connect your cutting machine to both computer and smartphone devices. So, here you will find a quick guide to completing the setup on both devices.
Method 1: Connect Cricut Wirelessly to Your Computer
Begin by unboxing the cutting machine and placing it near your computer device. (Make sure both devices are within the 10-15 feet range.)
(If you are using the Explore One machine, then you should insert the Bluetooth toggle to establish the connection.)
Next, attach the machine plug to a power socket and turn it on by pressing the power button.
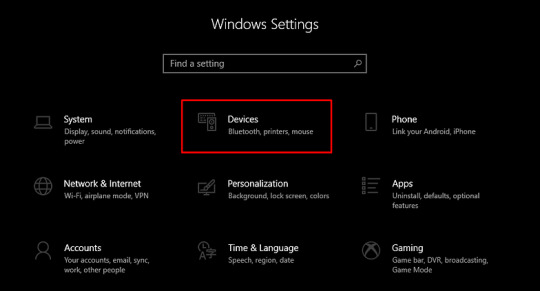
From the Settings window on your PC, choose the Devices option.
After that, go to “Bluetooth and other devices,” turn on the Bluetooth toggle, and select “+Add Bluetooth or other device.”
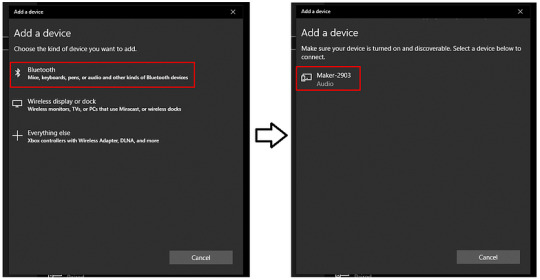
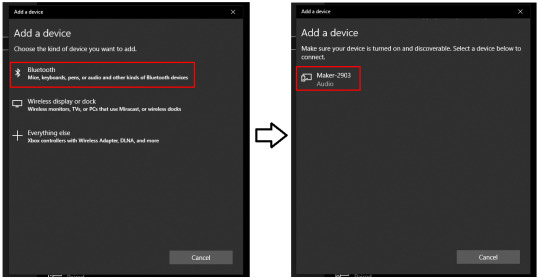
On the next open page, select the Bluetooth option and move forward.
Henceforth, the printer will start looking for the available printers within its range.
Once you see your cutting machine model number on the screen, click on it.
If a prompt comes on the screen to type a PIN, you need to enter 0000 to move forward.
Afterward, the wireless connection process will be complete.
In order to use the cutting machine, you need to complete the setup process through the Design Space app. In the next step, you will learn about the setup process.
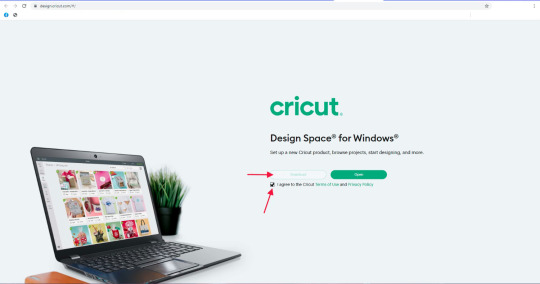
Begin by visiting the Cricut official website on your PC.
From the screen, click on the Apps option, which will take you to the Design Space download page.
In the open window, you will see that the Download button is greyed out.
To enable the download button, move to the terms and conditions checkbox and click on it.
After that, you will see that the Download button is now green; click on the button to initiate the download process.
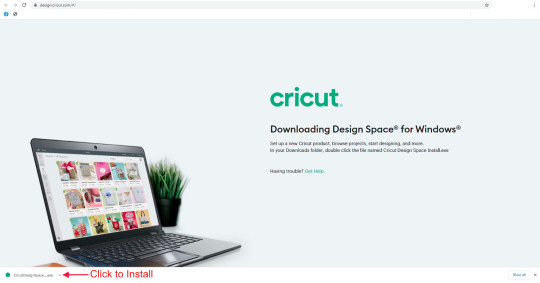
Wait for the design app download process to complete, and then open it after that. (Or you can access the file from the Downloads folder on your device to install it.)
Before the app installation process begins, it will ask if you trust this app and want to open it; click on the correct option to start the installation.
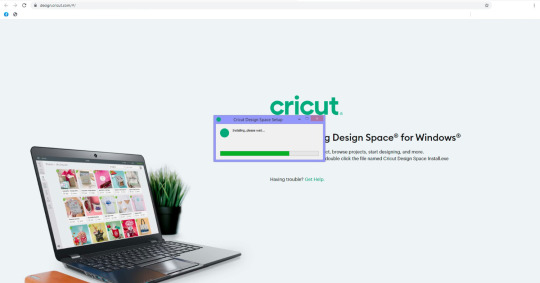
Afterward, a box will show up on the screen to indicate installation progress.
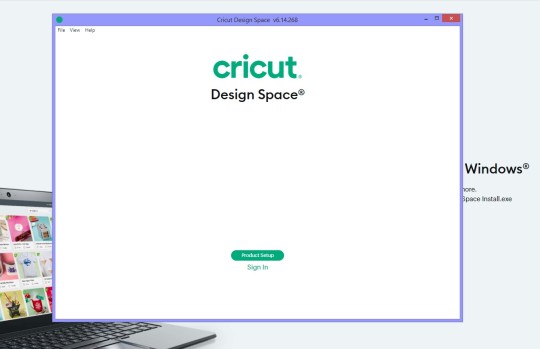
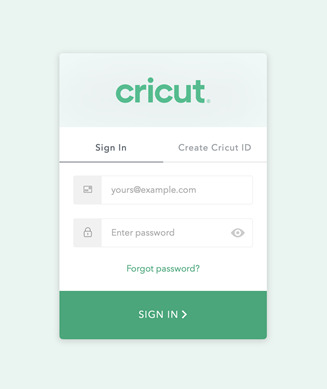
Once the installation process is complete, launch the software/app and complete the login process. (Or create a new account if necessary)
Then, choose the Machine Setup option to search for the cutting machine you are using.
From the result, click on your machine’s name, and the setup process will be complete.
Method 2: Connect Cricut to a Smartphone Wirelessly
The following method will allow you to get complete knowledge of how to connect Cricut wirelessly to a smartphone device.
For the first step, power on your cutting machine and bring the mobile device within its 10-15 feet range.
On the smartphone, tap on the Settings icon and then go to Bluetooth.
Now, turn on the Bluetooth toggle and tap on your machine name based on the result.
Follow the instructions to complete the machine’s Bluetooth connection process.
After completing the Bluetooth connection, the same as the computer device, you need to download the app on your mobile phone. Follow the below guide to do that.
First and foremost, launch the Apple App Store or Google Play Store app on your mobile phone device.
Next, type cricut design space in the search section by tapping on the search bar.
After that, tap on the Search option.
From the list of open results, tap on the correct app icon and then tap on Get to start the downloading. (You might need to type your iTunes password if you are downloading the app on your iOS device.)
Once the downloading is finished, the app icon will appear on your system home screen.
You can open the app from the home screen or from the application downloader you are in.
After opening the app, you are required to complete the account sign-in process. (If you are using the machine for the first time, you need to create a new account.)
On the app, you can tap on the Machine Setup option to search for your cutting machine.
Afterward, follow the on-display instructions, and your machine setup process will be complete.
Here you go! Your machine is ready to create beautiful and stunning DIY projects.
How to Set up Cricut Heat Press Wirelessly?
If you are planning to connect Cricut wirelessly to a heat press machine, then you can do it easily without using any app except EasyPress 3. The following guide will help you complete the process without any issues.
First of all, connect your heat press machine’s plug to a power outlet.
Afterward, go to the Bluetooth page on your phone and establish a wireless connection between both devices.
On your smartphone device, download the Cricut Heat app from the App or Play Store.
Once that process is complete, launch the heat app on your device.
Also, you need to tap on the Sign Up option to initiate the machine setup process.
From the heat press names open on the screen, select your machine’s name, and select Connect.
Now, the app will verify the heat press with your registered email address.
Moreover, select the Activate option after reading the terms and conditions.
Once the machine setup process is complete, a notification will show up on the screen.
Finally, you can use your machine to apply icon-on designs on various products.
Final Words
This piece of content shares all the need-to-know info about the machine setup. You can effortlessly complete the setup process of your device without any issues. However, before downloading the Design Space app, make sure to check the device compatibility and system criteria to avoid any complications. If everything is as required, you are good to go to start using the crafting devices. I wish you a happy crafting journey!
Frequently Asked Questions
Does Cricut Require Bluetooth?
All the newer models of the Cricut machines come with both USB and Bluetooth connectivity technology. However, if you are using the first model of the Explore series, then you need to use the Bluetooth adaptor to establish the wireless connection. All other devices come with built-in Bluetooth to set up the device to a smartphone and computer.
Why Can’t I Connect Cricut Machine Wirelessly?
There could be various reasons if you are unable to make a wireless connection to your machine. Some common ones are given below.
The machine is not compatible with your PC or mobile phone.
The OS of your device has not been updated.
Using the outdated or incompatible Design Space app.
Either of your devices is facing a technical problem.
You are not following the correct connection process.
If you are having these types of problems, then ensure that everything is required or seek help if the problem seems too complex.
Does My Cricut Need to Be Connected to Wi-Fi?
There is no need to connect your machine to Wi-Fi in order to use it. These devices have Bluetooth and USB connectivity options. However, you might need to connect your computer or smartphone to Wi-Fi while downloading the Design Space app to complete the setup.
Source :- https://cricuthelpcenter.wordpress.com/2024/08/29/how-to-connect-cricut-wirelessly-a-guide-for-beginners/
0 notes
Text
How to Set up Cricut Maker: A Step-by-Step Guide
Setting up the machine requires you to do a few steps, like preparing the machine, downloading Design Space, and connecting the machine to your device. Once you have completed these things, your setup process will be complete. So, follow along with the blog and get your machine ready to use!
Unboxing and Preparing Cricut Cutting Machine
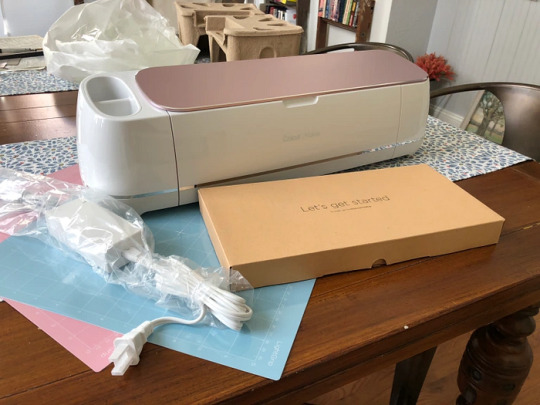
In the process of learning how to set up Cricut Maker, you have to start with unboxing the new machine. After unboxing and checking for all the items, you will need to prepare your machine for the setup.
To begin with the process, unbox the machine, remove the safety tapes, and check the materials inside. You will need the items shown in the picture below to set up and use the machine. You will get some of the things along with the machine, and the others must be purchased by yourself.
The tools that you will get inside the box are:
USB cable
Power adapter
Fine-point blade
LightGrip mat
FabricGrip mat
Rotary blade
Welcome Book,
Start guide
Some materials for the test cut and other tools.
The tools that you will have to purchase from the outside are:
Scissors
Tweezers
Weeder
Scraper
Spatula
Trimmer
Scoring stylus
Download Cricut Design Space on a Computer
In the process of learning , downloading Design Space is essential. It is the necessary app for using your machine to start crafting. You can download it on any device you are using with Cricut. Here, you will learn how to do it on a Windows computer.
On an internet browser, open cricut.com/setup and navigate through the Design Space app.
Next, agree to the terms & conditions and then click on Download. The app will start to download on your computer.
Then, the app will be downloaded very soon.
Now, visit the Downloads folder and look for the downloaded file.
When you find the file, click on it twice and start to install.

After the app is installed on your computer, create an account and log in.
Connect Cricut Maker to Your PC Using Bluetooth
In the process of learning how to set up Cricut Maker, you finally have to connect your machine to a device. Although you can use both USB and Bluetooth to connect your machine to your computer, you will see the Bluetooth connection below.
Turn on your machine and make sure the distance does not exceed the limit of 10–15 ft from your computer.
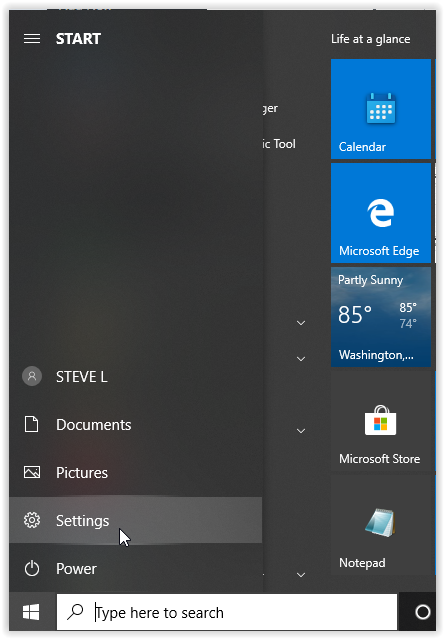
After that, open Settings from the Start menu and go to Bluetooth settings.
Then, enable Bluetooth and then click on Add Bluetooth or other device.
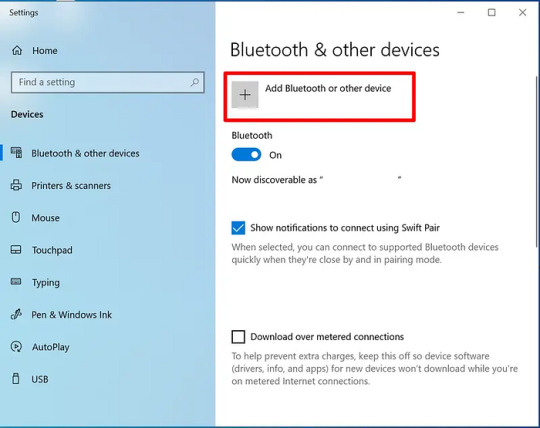
Next, select Bluetooth and let the computer detect the machine.
Click on the machine upon seeing it, and it will be connected.
To ensure the connection, check it on the Design Space app.
Conclusion
After reading the blog, you learned how to set up Cricut Maker on your Windows computer. With its versatility, it is a great machine for making projects, and the knowledge of how to set it up is important. Now, you know that you need to unbox the machine and prepare it for the setup. Downloading the Design Space app and connecting your operating system to Cricut are the final steps for the setup procedure.
FAQs
Does Cricut Maker Work with a Phone?
Yes, it does! If you want to use this machine and you just have a phone instead of a computer, that’s fine! You can use your cutting machine on a mobile, so you just have to connect it to the machine either via Bluetooth or a USB cable. Once your device is connected to the machine, you have to download the Design Space software, and then you will easily be able to use the machine with your smartphone.
What Materials Can I Cut With Cricut Maker?
You can use more than 300 materials on this cutting machine. The Cricut Maker is a powerful machine, so you can cut various materials like leather, wood, plastic, and metal. With this machine, you can also cut materials like paper, foil, and cards. Other materials include cardstock, art board, foam, felt, and fabric.
What Tools Do I Need to Work With Cricut Maker?
The Cricut Maker, like other machines, works with multiple tools. You will get some of these things along with the machine when you purchase it. But you will have to buy other tools separately to use the machine. The tools you will get inside the machine are an adapter, a USB cable, a fine-point blade, and some test materials. The other materials you will have to buy from outside are scissors, a weeder, a scraper, a machine mat, and a spatula.
Source: how to set up Cricut Maker
Visit here to Know More: Cricut.com/setup
Pinterest
0 notes
Text
Cricut Design Download: A Beginner’s Setup Guide
Cricut Design download steps are easy to follow when explained by a craft expert. Needless to say, a professional can be the best person who can make complex things easier. I also learned a lot of things about crafting from my teacher. He taught me whatever was necessary to learn. After finishing my crafting classes, I considered starting my own venture.
When I first bought my Cricut machine, I had to go through a lengthy setup process. Initially, it seemed daunting, but it became easier for me later. Also, the setup is incomplete without the use of Design Space. This software is essential for the machine setup. We can perform many operations easily without any hassle. So, let’s dive into this blog and learn how to download Cricut Design Space on Mac and Windows.
Check Minimum System Compatibility
Before Cricut Design download, confirm if your device is compatible with your machine. If not, make sure you use the latest computer with the latest operating system. Otherwise, you might encounter various issues, such as frequent application crashes and others.
Here are the system requirements for Windows:
Windows 10 or later
CPU: Intel Dual-Core or equal to AMD processor
RAM: 4 GB
2 GB free disk space
Display: at least 1024px x 768px
USB port or Bluetooth connection
Here are the system requirements for MacBook:
Windows 10 or later
CPU: Intel Dual-Core or equal to AMD processor
RAM: 4 GB
Disk Space - 2 GB free
Display: at least 1024px x 768px
USB port or Bluetooth connection
How to Download Cricut Design Space on Windows?
As part of the setup, Cricut Design download is a must and hence you need to download the software first. Once done, you can start your setup. Let’s get started with the following steps described below. I am going to explain how to install it separately to make it easy to understand.
Step 1: Downloading the Software
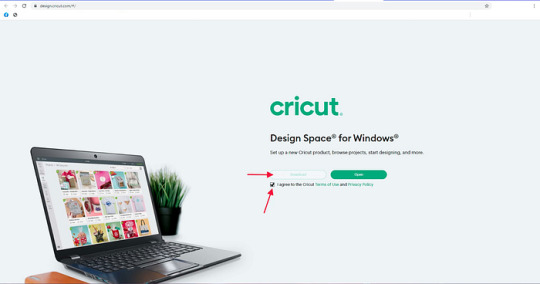
Turn on your PC, and open your browser.
On the browser’s search bar, you have to paste a link: design.cricut.com.
Then, you will move to a new screen where you have to select a checkbox.
Check this checkbox for accepting the Cricut Terms of Use and Privacy Policy. As you accept this, you will see your Download button is activated.
After that, tap on the Download tab to download your app.
It will start downloading.
See downloading progress through the downward arrow in the upper right corner.
After downloading, you have to install the software.
Step 2: Installing the Software
After downloading, go to the folder where the download file is saved. (For example, you can go to your Downloads folder because most downloaded files are saved here by default.)
On your Downloads folder, you will see your downloaded file. Double-click on it to install it.
When you double-click on it, Windows will ask whether you trust this application source. Click Yes to start the installation.
A new window pop-up will appear, showing the progress of the installation.
Once installed, you will have to create an account or log in to your Cricut ID if you already have one.
Cricut Design Download on Your Mac Computer
The setup is almost the same for any desktop. Whether it is a Windows or Mac computer, you have to follow similar steps. However, the installation steps for software are different. Hence, I will show you how to download and install the app on a Mac below.
Step 1: Downloading the Application
Power on your MacBook.
Launch the browser and visit the URL: design.cricut.com.
On the next screen, accept the Cricut Terms of Use and Privacy Policy and click the Download button.

Once the download starts, you need to wait until it ends.
After downloading, start installing your software.
Step 2: Installing the Application
After the Cricut Design download, head to your Downloads folder.
On the Downloads folder, click on the .dmg file.

On the screen, drag the Design Space icon towards the Applications folder.

After that, if you want to launch your software, double-click on it in your Applications folder.
You might be asked whether you want to open your Cricut app.

Then, you can start signing to your account using your email address and password.
FAQs
Question 1: Do I need internet to use Cricut Design Space?
Answer: Not actually! The Internet is a must only when you want to sign in or sign up for your Design Space. Besides, if you want to access fonts, ready-made projects, and images, you need the internet. In a nutshell, the internet is a must when signing in and accessing Cricut online resources.
Question 2: Is Cricut Design download possible on mobile devices?
Answer: Absolutely, yes! Downloading the application on your Android and iOS devices is possible. All you need to do is navigate to your App Store and then look for the Design Space on the search bar. Select the app from the results and start installing it right away on the device of your choice.
Question 3: how can I use my Cricut software offline on my desktop?
Answer: In order to use the app offline on a desktop, follow the steps given below:
Disconnect from the internet network.
Go to your My Stuff page.
Select the three dots you want to save.
Now, you need to click on Save for Offline.
#how to download cricut design space on mac#Cricut Design Download#Setup Cricut.com#www.cricut.com/setup#Cricut Design Space Login
0 notes
Text
How to Setup Cricut Maker: Getting Started for First Project!
If you wonder how to setup Cricut Maker, you need to follow this tutorial! In this guide, I will teach you the complete Cricut machine setup in 4 simplified steps. Although you can use this post to set up any model, I will use the Cricut Maker machine in this blog.
The Cricut setup can be daunting in the beginning, but you don’t have to worry. I have been crafting using Cricut for many years, and I am capable of teaching you how to do it. However, in this blog, I will only discuss the procedure of setting up Cricut Maker.
Let’s start with the basic steps to download Cricut, connect it to a Windows computer, and finally set up the machine. Let’s delve into it.
Step 1: Check System Requirements
Are you using a Windows PC? Well, you can’t use it without knowing the system requirements. This is a must before you learn how to set up Cricut Maker. Since the setup will be done on the Windows system, let’s see what we need to run the software on it.
Please take note of the following system requirements:
Operating System: Windows 10 or later (64-bit)
RAM: Minimum 4 GB
Disk Space: At least 2 GB free
CPU: Intel Dual Core or equivalent AMD processor
Display: Minimum screen resolution of 1024px x 768px
Connection: A USB port or Bluetooth connection is required.
Step 2: Download & Install Cricut Software
In order to learn how to set up Cricut Maker, you have to download Cricut Design Space software on your PC. Since all the setup steps are to be done on the app, you must download it beforehand.
On your PC, open your browser and enter this URL: cricut.com/setup.
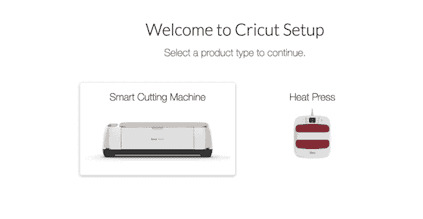
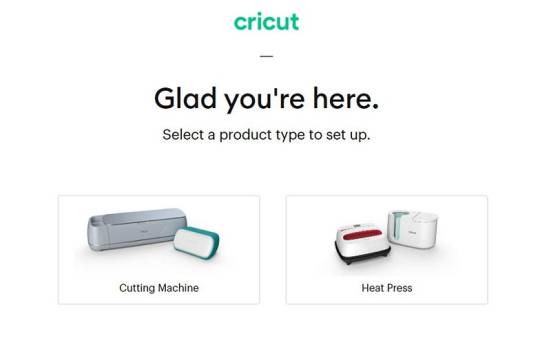
After that, you will need to choose the product type: Cutting Machine.
Then, accept Cricut’s Terms of Use and click on the Download button. Now, your Cricut software will start downloading.

Once downloaded, you have to go to the Downloads folder and open it.
Just double-click on the downloaded file and begin the installation.

Finally, you will have your Cricut software downloaded to your PC.
Step 3: How to Set up Cricut Maker
Finally, I will walk you through the steps to set up a Cricut machine stepwise. Make sure you have downloaded the Cricut software on your PC and checked its compatibility.
Launch the Design Space app on a Windows PC and click on Product Setup.
Now, you should create your Cricut account.
Once done, you have to select a Smart Cutting Machine.
Next, click on the Cricut Maker machine.
After that, you need to follow the screen’s prompts for further setup.
Once you complete the above steps, you will need to connect your Cricut to your PC. I have explained this separately in the next step for your convenience. Please follow the steps carefully.
Step 4: Connect Cricut to PC Using Bluetooth
To complete the Cricut setup, you must connect it to your PC. Then, you will be able to use your machine.
Here’s how to connect Cricut cutting machine to a PC wirelessly:
Take your power cable out and plug it into your PC and machine.
After that, press the power button located on the top of the machine.
Once you have powered on your machine, go to your PC.
On your Windows desktop, press the Windows logo icon + I keys to enter Settings.
On the following screen, choose Devices.

Now, enable Bluetooth and select Add Bluetooth or other device.

Next, you will see a pop-up asking you to add a device. Choose the Bluetooth option.
Wait for a while and pair your machine with your PC.

Once it is found, select it and pair the machine with the PC.
Kudos to you😍! You have learned how to set up Cricut Maker on your Windows computer. From checking system requirements to connecting Cricut to a PC, it might not be as daunting as it seemed to be. Good luck with your first project; now you are all set to create your first project on Cricut.
FAQs
Question 1: Is it necessary to set up Cricut on PC?
Answer: No, it depends on whether you have any compatible device or not. According to Cricut, there are four compatible devices on which you can use Cricut software, and hence, you can use your Cricut hassle-free. These are Windows, MacBook, Android, and iOS devices. So, make sure you have one of the devices available.
Question 2: How is setting up Cricut Maker possible on Android?
Answer: To set up your Cricut on your Android phone, follow the steps below:
Plug the power cable into your Cricut and wall outlet.
Pair your machine with your Android phone using Bluetooth.
After that, you have to download the Cricut software.
Now, launch the app on your phone and create or sign in using Cricut ID.
Next, click on the menu and choose Machine Setup.
Then, choose the Cricut model.
Lastly, follow the rest of the steps displayed on the screen.
Question 3: How to connect Cricut Maker to a PC using a USB cord?
Answer: Follow the steps mentioned below and connect your machine to your Windows PC using the USB cable:
Make sure you have turned on your Cricut and PC.
After that, use one end of the cord and insert it into the back of the machine.
Then, take another end and insert it right into the PC.
Finally, your Cricut is connected to your PC with a USB cord.
Visit: www.cicut.co setup login
install cricut design space app
Source: https://cricutmakermachines.com/how-to-setup-cricut-maker-getting-started-for-first-project/
#cricut.com/setup#www.cricut.com setup login#www.cricut.com/setup login#www.cricut.com/setup#cricut design space app login#install cricut#install cricut explore air 2#install cricut design space#install cricut design space app#cricut install setup#cricut setup#cricut setup on computer#cricut setup maker#cricut setup explore air 2 setup#cricut setup for pc#cricut create connect to computre#cricut create connect to computer
0 notes
Text
Cricut Installation Software: Easy Steps to Get Started
Are you in need of Cricut installation software? If you’re a beginner looking to download and install Cricut Design Space on your desktop or smartphone, you’re in the right place. As a professional Cricut crafter, I’m here to guide you through the step-by-step process.
I rely heavily on my Cricut machine for all sorts of crafts. To do this, we need to set up our machine. Whether it’s a heat press or cutting machine, all require a setup before we can use them. But do you know which software we need to use for this setup? It is a Cricut Design Space that is compatible with Mac, Windows, Android, and iPhone/iPad devices.
So, whichever device you are using, installing the Cricut app is a piece of cake for me. Be a part of my journey, and let’s delve into this blog to install the software.
Cricut Installation Software on Desktops
Installing the Cricut Design app on my desktop computer is really a piece of cake. But before you download this app, you must know whether your device is compatible enough to run it. Thus, it’s important to ensure that your desktop, whether it’s a Windows or Mac computer, is running the most up-to-date operating system.
For Mac
Initially, you will need to open an internet browser.
After that, visit the site design.cricut.com.
On the next screen, you will see a checkbox saying I agree to Cricut’s Terms of Use and Privacy Policy. Click on the checkbox and select the Download button.
Next, you will need to wait and let it download the app in your default file folder.
Once downloaded, you have to open the downloaded .dmg file by double-clicking on it
Then, double-clicking the .dmg file will start the installation.
For the Cricut installation software, you will have to drag the Cricut icon to the Applications folder.
In the last step, your Cricut software will be added to the Applications folder.
That’s all you need to do if you want to download and install the Cricut app on your MacBook.
For Windows
The downloading steps are the same as those explained for the Mac above.
Once you have downloaded the Cricut software on your desktop, go to the Downloads folder or any file folder where you have saved your downloaded file.
Next, you have to double-click on the downloaded file to install it.
As you double-click on it, it will start showing the installation progress, meaning your Cricut app is being downloaded.
After that, you are ready to create your Cricut account and then set up your machine.
By now, you might have understood how to download Cricut Design Space on Mac and Windows. I am sure you found the steps easy and helpful.
Cricut Installation Software on Your Mobile
The best thing about Cricut is that we can use it on our mobile devices, including iOS and Android smartphones. All you need is the latest operating system on your device. Then, learn the basic steps below to install the Cricut Design app on your suitable device.
For iOS
To start, open the App Store and navigate to the search bar.
On the search bar, you have to type Cricut Design Space and hit Enter.
After tapping the Enter button, you will notice multiple results. Choose the one with a green Cricut icon in the center of the white box.
Then, hit the Get button and start the Cricut installation software.
After installation, you are ready for the Cricut machine setup.
For Android
In the beginning, launch the Play Store and search for Cricut Design Space.
Then, choose the app from the result and hit the Install button.
After that, the installation will start.
Finally, it will be added to your home screen.
FAQs
Question 1: What are Cricut system requirements for PC & Mac?
Answer: You should know the system requirements for your PC and Mac before downloading the Cricut app:
For Windows
● Operating System — Windows 10 or later (64-bit)
● RAM — Minimum 4 GB
● Disk — 2 GB free
● CPU — Intel Dual Core or equivalent to AMD processor
● Display — Minimum 1024px x 768px screen resolution
● A USB port or Bluetooth is required
For Mac
● Operating System — macOS 11 or later
● CPU — 1.83 GHz
● RAM — Minimum 4 GB
● Display — Minimum 1024px x 768px screen resolution
● A USB port or Bluetooth \is required
● Disk — 2 GB
Question 2: Can I use Cricut software on a Chromebook?
Answer: No, Cricut doesn’t support Chromebook laptops. However, it is only compatible with four platforms, including Windows, MacBook, Android, and iPhones. Plus, the Cricut software is incompatible with Unix/Linux. So, make sure you check the system compatibility of the Cricut Design app before downloading it to any device.
Question 3: How to download Cricut Design Space on Linux?
Answer: You can’t use the Cricut Design Space app on your Linux operating system as it is incompatible with the software. Cricut has officially launched its app for four devices, including MacBook, Windows 10/11, Android, and iPhone/iPad. Therefore, you should know the system requirements of the software before downloading and installing it.
Read more: cricut.com/setup
cricut.com/setup mac
Cricut Design Space
Cricut New Machine Setup
Source: Cricut Installation Software
#Cricut Installation Software#Cricut New Machine Setup#Cricut Design Space#cricut.com/setup mac#cricut.com/setup
0 notes
Text
Cricut Maker 3 Set Up: Getting Started With 5 Easy Steps
Are you in search of a Cricut Maker 3 set up guide? I’ve got your back! Remember the day you made up your mind to start crafting with Cricut? You would have been thinking about the moment when you could make your own crafts hassle-free. In addition, you don’t have to buy anything from outside. Just create your own customized projects easily. I know it must have taken a lot of time to think it over. But better late than never!
Now, the question is how to get started with Cricut Maker 3. Buying a new machine is not enough. Therefore, I will walk you through every step of the Cricut machine setup. From unboxing to downloading the Cricut Design Space app or connecting the machine to a Windows PC, I will explain everything that you need. Let’s start learning how to set up Cricut Maker 3 on your Windows computer.
Step 1: Unboxing Cricut Maker 3
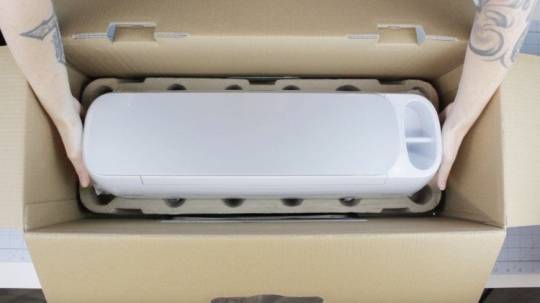
Here, I am going to show you the list of items that I received while unboxing my trust Cricut machine:
Maker 3 machine
Power adapter
Material for a test cut
Power cord
Quick Start Guide
Warranty document
Accessory Adapter (already installed in the clamp A)
USB cable
Bonus materials
Premium fine-point blade and blade housing (already installed in clamp B)
Safety document
Step 2: Verify System Compatibility
Okay, now it’s time to check for compatibility. In it, you need to find out whether your computer or any device you are using for the Cricut Maker 3 set up. Ensure your device or computer meets the basic system requirements.
In order to make it easier for you, I have added some information below for Windows computers only. Go through it and verify with your PC.
Operating System: Windows 10 or later
CPU: Intel Dual-Core or equivalent AMD processor
RAM: 4GB
Disk Space: 2 GB free
PC with Bluetooth in-built or USB port
Display: 1024px x 768px screen resolution
Now that you have checked the system needs, you should proceed further to download the Cricut Design Space app.
Step 3: Download & Install Cricut Software
Once you know whether your system is compatible with running this software, you can start downloading it on your PC. Don’t worry; I will keep the steps beginner-friendly. Let’s start!
First of all, you need to turn on your PC.
After that, open any browser that you prefer and visit cricut.com/setup.
As you enter the site, you will be prompted to select your product type: Cutting Machine.
After that, you have to click on to check the I agree checkbox.
Then, just click on the Download button.

Head to the Downloads folder to install your software when it is downloaded.
To install it, you have to click on the downloaded file and start the installation.

All right, you have downloaded the software now. What’s next? The next step is the fun part: setting up the Cricut machine.
Step 4: Cricut Maker 3 Set Up
After downloading and installing the software, you have to launch it on your desktop. After launching the app, follow the steps in the section below and finish setting up your machine in no time.
Here’s how to set up Cricut Maker 3:
On your Design Space, click on Product Setup.
Then, create a Cricut account or sign in.
Next, select the Smart Cutting Machine.
Now, choose the Cricut model.
After that, follow the next step.
Step 5: Connect Cricut Maker 3 to PC via Bluetooth
Connecting Cricut to your PC is a piece of cake. All you need is a PC with built-in Bluetooth. However, you can connect your PC and machine using a USB cord. But here, I will explain how to connect Cricut to a PC via Bluetooth.
Here’s how to connect Cricut to Bluetooth:
Start by turning on your Cricut cutting machine.
After that, plug all the power cables into the wall outlet.
Then, you need to open Settings on your device.
After that, select the Devices option from settings.
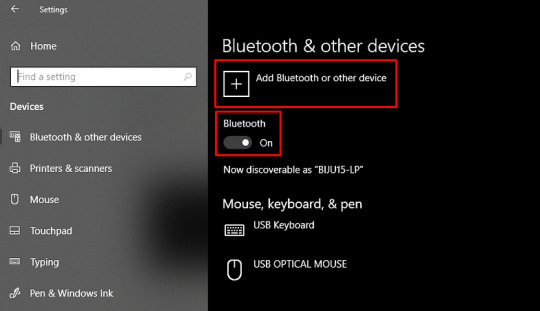
Finally, it will be paired in a while. Now, you are ready to use your machine to make any project you want.
That’s all in Cricut Maker 3 set up! If required, you might need to follow some screen prompts. Don’t worry, they are easier, and you can do it.
FAQs
Question 1: Which computer is compatible with Cricut setup?
Answer: The list is endless if you are looking for a particular computer. However, you can use a computer that runs the Windows operating system. In addition, MacBook is compatible with the Cricut Design Space software, meaning you can easily set it up using these two devices. No matter which brand of laptop you are using with Windows OS, the only thing you require is the Windows operating system.
Question 2: How do I connect Cricut Maker 3 to a PC via a USB cord?
Answer: In order to connect your machine to the USB cable, you have to follow the steps given below:
Insert one end of the USB cable into your machine’s USB port.
Then, insert another end to your PC.
Once connected, you can easily send your design to your machine.
Question 3: Why is my Cricut Maker 3 not connecting to Bluetooth?
Answer: If you found your machine not connecting to your PC via Bluetooth, then you need to check the following points:
Check the power connection to see whether your device is properly turned on.
Ensure the distance between your machine and PC is not more than 15 feet.
Check for Bluetooth connection and confirm whether you have turned it on.
Final Words
Finally, you have learned the Cricut Maker 3 set up. In this blog, I explain each step, from unboxing the Cricut cutting machine to the final setup; I’ve got your back. As mentioned above, don’t forget to check the system compatibility; this is a must otherwise, the Cricut Design Space will not run on your PC. Lastly, you have two ways to connect Cricut: Bluetooth or USB cable.
Source: Cricut Maker 3 set up
Visit here For More Information: Cricut Joy Xtra
Twitter
0 notes
Text
Unveiling the Power of Your Logitech Webcam: A Guide to Video Calls and Beyond

Long gone are the days of grainy video chats and muffled audio. Logitech webcams offer a crystal-clear solution for elevating your video conferencing experience. Whether you’re a seasoned professional connecting with colleagues on Zoom or a student attending virtual classes on Google Meet, a Logitech webcam can ensure you appear sharp and your voice is heard loud and clear. This guide unlocks the potential of your Logitech camera, walking you through the setup process for both Windows PCs and Macs. We’ll explore how to access your webcam’s settings, adjust video resolution and microphone volume, and ensure everything is working seamlessly with external webcam and your chosen video conferencing app. Additionally, we’ll delve into troubleshooting tips to address any connection issues. By the end of this guide, you’ll be a confident video chat pro, ready to conquer your next virtual meeting with crystal-clear video and flawless audio.
In today’s digital age, video conferencing has become an indispensable tool for communication and collaboration. Logitech webcams empower users of all backgrounds – from professionals attending virtual meetings to students participating in online classes – to connect with others face-to-face, fostering a sense of presence and engagement even when miles apart. This comprehensive guide equips you with the knowledge and steps to unlock the full potential of your Logitech camera, ensuring seamless video calls on both Windows PCs and Macs.
Getting Started: Connecting Your Logitech Webcam
Plug and Play Simplicity: Most Logitech webcams boast a user-friendly plug-and-play setup. Locate a free USB port on your computer (desktop or laptop), and firmly insert the webcam’s USB connector. Your operating system (Windows 10 or macOS) will typically detect the new device automatically and install any necessary drivers.
Verifying Connection: Once connected and plugged in, a small notification window might appear on your screen, indicating successful driver installation. Alternatively, you can manually check for device recognition:
Windows: Open the Start Menu and search for “Device Manager.” Expand the Imaging devices section. Your Logitech webcam should be listed here.
Mac: Navigate to System Preferences and select Security & Privacy. Click on Privacy and then Camera. Ensure the box next to your Logitech webcam is checked, granting camera access to authorized applications.
Testing Your Webcam: Before diving into video calls, it’s wise to test your laptop camera webcam and ensure it’s working properly.
Windows PC: Open the Start Menu and search for “Camera app.” The app should launch a pop up window, displaying a live feed from your webcam. Play around with adjusting the angle and position of your webcam to achieve the desired view.
Mac: Open the Photo Booth app. This built-in app allows you to preview your webcam’s video feed. Similar to the Windows Camera app, adjust the webcam’s position for optimal framing.
Configuring Your Webcam Settings for Video Conferencing Apps Now that you’ve established a successful connection, it’s time to delve into camera settings within your preferred video conferencing application. While specific steps might differ slightly depending on the app, the general principles remain consistent. Here’s a breakdown of configuring your Logitech webcam for popular apps like Zoom and Microsoft Teams
Accessing Video Settings:
Zoom: Open the Zoom app and join or start a meeting. Click on the small up arrow next to the “Stop Video” button in the bottom left corner. Select “Video Settings” from the menu.
Microsoft Teams: Open the Teams app and join or start a meeting. Click on the three dots (…) next to the “Mute microphone” button. Select “Device settings” from the menu.
Selecting Your Webcam:
Both Apps: Within the video settings menu, locate the section labeled “Camera” or “Video device.” A drop-down menu should display all detected camera devices. Ensure your Logitech webcam is selected.
Adjusting Video Resolution and Frame Rate:
Both Apps: Most video conferencing apps allow you to adjust the video resolution (e.g., 720p, 1080p) and frame rate (e.g., 30fps, 60fps). Higher resolutions and frame rates generally provide a sharper image but require a stronger internet connection. Experiment with these settings to find the optimal balance between video quality and bandwidth usage.
Additional Settings (Optional):
Background Blur: Many apps offer a “Background Blur” feature that helps obscure your background during video calls, enhancing privacy and professionalism.
Microphone Settings: While not directly related to your webcam, video conferencing apps often have integrated microphone settings. Ensure your desired microphone (often the built in microphones on your laptop or the microphone on your Logitech webcam, if applicable) is selected and the volume level is adjusted appropriately.
Lighting: Proper lighting is crucial for achieving a clear and professional image during video calls. Ideally, position yourself facing a natural light source like a window. Avoid sitting with harsh backlighting, which can create an unflattering silhouette. If natural light is unavailable, consider using a desk lamp with adjustable brightness to illuminate your face.
Background: Choose a clean and uncluttered background for your video calls. A busy background can be distracting for both you and the other participants. Virtual backgrounds are also an option offered by some video conferencing apps, allowing you to replace your actual background with an image or video.
Camera Position: Adjust the position of your Logitech webcam to achieve a flattering and centered view. Ideally, the camera should be positioned slightly above eye level, creating a natural and engaging look. Most webcams come with adjustable clips or stands, allowing you to fine-tune the angle.
Sound Check: Before joining a meeting, ensure your microphone is properly configured and the volume level is adjusted appropriately. Most video conferencing apps allow you to test your microphone within the settings menu.
Privacy Settings: Review the privacy settings within your video conferencing app and operating system. These settings determine which applications have access to your webcam and microphone.
Software Updates: Keeping your Logitech webcam’s drivers and the video conferencing app you use updated is crucial for optimal performance and security. Logitech’s website typically provides instructions and downloads for the latest drivers for your specific webcam model. Video conferencing apps often prompt you to update to the latest version when available.
Unveiling the Power of Your Webcam: The Final Frame By following this comprehensive guide, you’ve transformed your Logitech webcam from a simple peripheral into a powerful tool for communication and creativity. Gone are the days of wrestling with grainy video and muffled audio. You’ve learned how to configure camera and sound settings, on both Windows PCs and Macs, ensuring a clear and professional presence during video conferences on apps like Zoom and Microsoft Teams.
This newfound knowledge empowers you to move beyond video calls. You can now leverage your Logitech webcam for live streaming, content creation, and even video recording. Whether you’re a seasoned professional connecting with colleagues across the globe or a budding YouTuber embarking on your creative journey, your Logitech webcam is now an extension of your digital identity.
So, the next time you double-click to join a Zoom meeting, remember the power built in camera you hold at your fingertips. With a few clicks in your video settings (accessible through the gear icon on Windows or the Apple menu on Mac), you can transform your desktop computer or laptop into a versatile communication and content creation studio. No longer a mere replacement for a built-in webcam, your Logitech webcam is now a gateway to a world of possibilities, empowering you to connect, create, and share your vision with the world – one pixel at a time.
ORIGINALLY FOUND ON- Source: Logisofter(https://logisofter.com/how-to-use-logitech-webcam/)

1 note
·
View note
Text
How to Install Cricut Explore Air 2: A Complete Guide
Cricut Explore Air 2 is a magnificent machine if you are looking to get into the world of crafting. It is a budget-friendly Cricut machine that you can use to cut different types of materials and work on various DIY projects. To install Cricut Explore Air 2, you will need to follow a few simple steps. In this blog, I am going to write about them, and after reading them, you will be ready to go.
In this guide, I will introduce you to the Explore Air 2 machine, explain the installation process, how to download Cricut Design Space, and so much more. Without any further delay, let’s get started.
Introduction to Cricut Explore Air 2
Cricut Explore Air 2 is an amazing cutting machine and the best addition to the Cricut family. The machine gives you a great opportunity to cut and craft your materials. With the help of the Explore Air 2 machine, you can cut more than 100+ materials, such as cardboard, leather, paper, cardstock, vinyl, fabric, and more. You can rely on this Cricut machine for your daily crafting.
It comes with an automatic function that allows you to cut a range of materials. This machine can do complex projects in a very simple way, so it’s a great choice for your DIY projects. Let’s move on to the installation procedure in the section below.
Install Cricut Explore Air 2: Quick and Easy Steps
To install the Cricut cutting machine, the first thing you have to do is unbox it and set everything up, like the power supply and internet connectivity. I will tell you all the basic steps you need to follow.
Download Cricut Design Space on Your Operating System
Cricut Design Space is the software that you can use to choose designs, fonts, and projects for your crafting. Downloading the app is crucial to install Cricut Explore Air 2 on your device. To download the software, follow these steps:
Create a New Cricut Design Space Account
When downloading the Cricut app is done, then log into your Cricut ID. In case you are new to Cricut and do not have an account, you can create one. Simply follow these steps:
Conclusion
In short, you read everything you need to know to install Cricut Explore Air 2. It is a great machine if you want to explore the world of crafting. This was an important procedure for you if you want to install the Cricut cutting machine. In this blog, you learn how to unbox the machine after buying it and then set it up. Once the Cricut machine is set up, you have to download the Cricut Design Space app and log in with the Cricut ID and password. Once the process is complete, you are ready to begin your crafting journey.
FAQs
How Do I Install Cricut Design Space on My PC?
To install the Design Space app on your computer, you should first connect your device to a stable WiFi network. After that, open your computer’s browser, then go to cricut.com/setup, and click on Download to start the app downloading. Now, go to the Downloads folder and start the app installation process. Once the app is installed, open it and log in with the Cricut username and password.
What Are the System Requirements to Install Cricut Explore Air 2?
To install the Cricut machine, you need to download the Design Space app. To run the software on your computer, you should have at least 4GB RAM and 2GB free disk space. The computer must have a USB port or Bluetooth connectivity option. If you are using a Windows computer, then it should be Windows 10 or the latest operating system. The screen resolution of the computer’s display should at least be 1024x768 pixels.
How Do I Pair My Cricut Explore Air 2 to My Computer?
You can pair your Explore Air 2 machine using a USB cable or via Bluetooth. To connect with a USB cable, you have to connect one side of the cable to the machine and the other side to your computer. To connect through wireless Bluetooth, go to the Start menu on your computer and open Bluetooth settings. After that, search for your device. When you see the name of your machine, then select it, and you will see that your Cricut machine is connected.
Visit: cricut design space setup
design.cricut.com/setup
Source: https://cricricutdesigncut.wordpress.com/2024/05/29/how-to-install-cricut-explore-air-2-a-complete-guide/
#design space setup#digital design#cricut.com/setup explore air 2 setup#cricut.com/setup windows#cricut.com/setup#cricut joy extra#cricut.com/setup mac#www.cricut.com setup#www.cricut.com/setup#www.cricut.com/setup login#install cricut explore air 2#install cricut explore air 2 setup#cricut design space setup#cricut machine set up#cricut new machine setup#cricut.com setup windows#cricut setup#cricut design space#design.cricut.com/setup
0 notes
Text
Cricut Set up: A Complete Guide for Easy Installation
If you have multiple questions about Cricut set up on a computer, then this is the perfect guide for you. Are you a non-tech person who just bought a Cricut machine? Then, you need to set it up first. Last month, my daughter told me that I was going to be a grandmother soon, and I was on cloud nine. For her baby shower, I am planning to make all the decor items by myself, and my Cricut is going to help me out with that.
Apart from cutting materials into any shape or size, I can easily connect my Cricut model to PCs and smartphones. I need to connect both devices to start my machine and create it myself. Other than setting up, I need to download the Cricut Design Space and connect the Cricut machine to a device.
If you are a quick learner, take advantage of this opportunity to learn the details about getting the Cricut app, connecting it, and setting it up on the Windows system.
Download Cricut Design Space on a Windows PC
The first step of the Cricut set up method includes downloading the Cricut software on a Windows computer. Take a look at the following steps to learn about how you can get this software on your computer:
First, switch on your computer and open the search engine you are using.
Second, navigate to design.cricut.com and read the Terms & Conditions.
Third, tick the checkboxes and then tap the Download option.

Following this, open the downloaded Cricut Design Space file from the browser or Downloads folder.

In case a small-up window asks you to trust the app, then click the Trust the application option.
After a few seconds, you will see the installation display status window in front of you.
Now, close the web browser and open the installed Cricut Design Space app.
At this point, sign in or create your account via Cricut ID & password.
Conclude the process by starting drawing new designs by using tools & other features.
After downloading and installing the Cricut app, get going by connecting the Cricut machine to your Windows computer.
Connect Cricut Machine to Windows via Bluetooth
You are around the corner to come across with the Cricut set up process. After downloading the Cricut software on your computer, let's discuss wirelessly connecting both devices. Below are the steps you need to follow to finish up the connection process without making any serious mistakes:
Kick start the method by confirming that your cut-die machine is on.
After checking that, ensure that it is placed within the range of 10-15 ft. under your computer.
Next, open the Start menu > click the Settings > and hit the Devices option.

Now, check that Bluetooth is on and then select Add Bluetooth or other device option.

At this point, an Add a Device window will appear on your desktop screen.
Following this, select Bluetooth and then hit your model name from the shared list.
Afterward, open the Cricut New Product Setup page.
Now, your cut-die machine will be shown as connected during the setup process.
Once you are done wirelessly connecting your craft plotter to the computer, let's focus on the method of setting up both devices.
Cricut set up on Your Windows Computer
Are you ready to go on a journey where you will learn how to set up Cricut on your Windows system? If yes, then brace yourself as this section has covered all the steps of the process:
Start the process by unboxing your machine and other supplies.
Now, plug your machine into the nearby wall socket and turn it on.
Afterward, connect your Cricut to your Windows via a USB cable or Bluetooth.
Next, download & install Cricut Design Space from design.cricut.com/setup.
At this time, go through the instructions, sign in, or create your Cricut ID & connect your machine.
Lastly, you will be called for a test cut to check whether the setup has been done successfully or not.
As a result of this blog, you must understand that it's compulsory for Cricut set up on your Windows system. Without the proper setup, you won't be able to design DIY projects or use the Design Space app.
Frequently Asked Questions
Question: Do I Need a Computer to Use My Cricut Machine?
Answer: No, you don't need a computer to use the Cricut machine. Since Cricut is a multi-tasking craft plotter, you won't face any issues if you don't connect it to the computer. But it would help if you had a smartphone to communicate with the Cricut machine and make customized projects.
Question: How Do I Set up My Cricut Machine on Smartphones?
Answer: Follow these steps for Cricut set up on your smartphone:
Start the process by plugging your machine cable into the socket and switching it on.
After doing that, pair your device to your smartphone via Bluetooth.
Next, download the Cricut Design app on your device and launch it.
Now, open the Menu tab and choose the Machine Setup option.
Following this, choose your Cricut model and go through the setup instructions.
Finally, you will be informed to do a test cut on the material.
Question: Can I Start a Business With My Cricut?
Answer: Yes, you can start your own business after buying a Cricut machine. Before everything, download and install the Cricut Design Space software and then set up the machine. After the successful Cricut set up, connect it to a computer and smartphone, and you're all ready to start creating new DIY projects and making money by selling them.
0 notes
Text
Cricut Setup on Computer: A Complete Guide for New Crafters
I have been waiting to write something about Cricut for a long time. However, I was actively writing and posting about my latest Cricut projects on my Instagram. Being a full-time crafter and blogger, it’s always difficult to manage things. But I try to be consistent. For a long time, I was getting queries related to the Cricut setup on computer. As an expert, I always listen to my audience and provide them with the best answers. Through this blog, I will share with you the steps involved in the setup process on your computer.
As you are a Cricut user, you must be familiar with the Cricut machine’s capabilities. You can set it up on any device, whether a computer or a mobile device. But, I will only address the process for computers. Let’s get started with the blog and learn something you’ve been waiting for.
How to Download Cricut Design Space on a Computer?
Before you start learning about the Cricut setup on computer, I want you to introduce a key element in the setup process. The Cricut Design Space software is a crucial factor while setting up a Cricut machine. You can quickly install this software on your device. Below are the instructions you need to follow.
Windows
All Windows users must follow the steps below to set up their Cricut machine.
Let’s start with launching an internet browser on your Windows PC.
Then, navigate to design.cricut.com/setup (Cricut’s official website).
After that, accept the Cricut Terms of Use and click on the Download button.
Next, go to the Downloads location where you save your files.

Double-click on the Cricut software file and extract it.
Now, allow the installation process to complete.
When the installation is complete, use your Cricut ID details to sign in to your Cricut account. Once your PC shows you the icon for Design Space, right-click on it and select the Pin to Taskbar option.
Finally, the Cricut app is on your Windows PC.
That’s how you can get the Cricut Design Space app on your PC and get one step closer to setting up Cricut on your computer.
Mac
Mac users can use the steps mentioned below to get the Cricut app on their computer.
In the beginning, launch an internet browser and navigate to www.cricut.com/setup login.
Tick the checkbox to accept Cricut Terms of Use.
Now, hit the Download button.
After that, save your file to a Downloads folder.
Let the download finish, and when it is complete, go to the Downloads location and double-click on it.
When your screen has the Cricut icon, drag it to your Applications folder and start the installation.
When your system asks you to open the application, choose the Open option to proceed.
Then, use your Cricut credentials to sign in to your Cricut ID.
Finally, enjoy your Cricut Design Space app.
That’s how you can get the Cricut app on your device and start with the Cricut machine setup.
Cricut Setup on Computer (Windows and Mac)
To setup your Cricut machine on your computer such as Windows and Mac, follow the steps below to proceed with the setup.
Windows
If you have a Windows PC, proceed with the instructions below to setup your Cricut on it.
Start by unpacking your brand-new machine and take off its protective tapes and covers.
Now, ensure that your machine’s box has all the necessary equipment including a power cord, instruction manual, USB cables etc.
After that, connect your machine via a USB cable or Bluetooth.
Since I’m using a Bluetooth connection, place your devices only 10-15 feet apart from each other.
Now, head to the Start menu and hit the Settings icon.

Then, select the Devices option.
After that, turn on the Bluetooth option.
When the Bluetooth option is ON, tap on the Add Bluetooth or other device option.
Next, choose the Bluetooth option and allow your machine to appear on the list.
When you see your machine on the screen, select and continue.
Lastly, the pairing will be completed.
That’s how to do Cricut setup on computer on a Windows PC.
Mac
Check the steps below to learn the Cricut machine setup on your Mac computer.
In the beginning, turn on your Cricut and the Mac computer.
Then, place your devices only 10-15 feet away from each other.
Now, go to the Apple menu and launch the System Preferences option.

Next, check for the Bluetooth option on your computer.
Now, verify whether the Bluetooth is ON.
In the last step, pick your Cricut model from the on-screen list.
Conclusion
Finally, I have shared with you the steps for setting up your Cricut machine on your computer. You have two options to connect your devices: USB or Bluetooth, which allows you to connect your devices conveniently. All the Cricut machines are excellent and can be connected to any device. However, you must check whether your Cricut comes with the Bluetooth feature or not. If not, you can get a Bluetooth adapter and continue with the process. When you know the procedure for the Cricut setup on computer, let’s start with your machine and design something.
FAQs
How Do I Setup My Cricut Machine on Android?
To setup a Cricut product on Android, follow these steps:
In the beginning, head to the Google Play Store on your Android.
Now, search for the Cricut Design Space in the search bar.
After that, click on the Install button to get the Cricut software.
When the installation is complete, you’ll see the app on the home screen.
Lastly, click to Open the app and sign in to your Cricut account.
How to Download Cricut Design Space on My iOS Device?
To download the Cricut software on an iOS device, follow the steps below:
Initially, launch the App Store and search for the Cricut Design Space.
Then, hit the Get button when you see the application on the screen.
After that, you can verify your app using the iTunes email ID and password.
Now, your device will have the Cricut software installed.
Lastly, sign in or log in to the Cricut account.
Can I Connect a Cricut Machine Without Bluetooth?
Yes, you can! As there are both wired and wireless connection options for Cricut machines, you can connect your Cricut to a USB cable and Bluetooth connection. However, Cricut Joy doesn’t support a wired connection like USB. Apart from this machine, all Cricut machines are eligible for a wired connection.
Source :- https://cricutsetupprocess.online/cricut-setup-on-computer-a-complete-guide-for-new-crafters/
0 notes