#How to Install Windows on PC Using a USB Drive
Explore tagged Tumblr posts
Visit Tumblr Blog
Explore Tumblr blogs with no restrictions, modern design and the best experience.
Last Seen Tumblr Blogs


Fun Fact
Users from the US are the majority of Tumblr visitors.
Text
How to Install Windows on PC Using a USB Drive
How to Install Windows on PC Using a USB Drive Title: How to Install Windows on a PC Using a USB Drive: A Step-by-Step Guide Introduction Installing Windows on a PC is a crucial step in setting up or upgrading your computer’s operating system. While traditional methods like using DVDs or CDs are becoming less common, installing Windows via a USB drive has become the preferred method due to its…

View On WordPress
#How to boot PC from USB?#How to install Windows 10 on PC through USB?#How to Install Windows on PC Using a USB Drive#Install Windows#Install Windows on PC Using a USB Drive
0 notes
Text
I don't think people realize how absolutely wild Linux is.
Here we have an Operating system that now has 100 different varieties, all of them with their own little features and markets that are also so customizable that you can literally choose what desktop environment you want. Alongside that it is the OS of choice for Supercomputers, most Web servers, and even tiny little toy computers that hackers and gadget makers use. It is the Operating System running on most of the world's smartphones. That's right. Android is a version of Linux.
It can run on literally anything up to and including a potato, and as of now desktop Linux Distros like Ubuntu and Mint are so easily to use and user friendly that technological novices can use them. This Operating system has had App stores since the 90s.
Oh, and what's more, this operating system was fuckin' built by volunteers and users alongside businesses and universities because they needed an all purpose operating system so they built one themselves and released it for free. If you know how to, you can add to this.
Oh, and it's founder wasn't some corporate hotshot. It's an introverted Swedish-speaking Finn who, while he was a student, started making his own Operating system after playing around with someone else's OS. He was going to call it Freax but the guy he got server space from named the folder of his project "Linux" (Linus Unix) and the name stuck. He operates this project from his Home office which is painted in a colour used in asylums. Man's so fucking introverted he developed the world's biggest code repo, Git, so he didn't have to deal with drama and email.
Steam adopted it meaning a LOT of games now natively run in Linux and what cannot be run natively can be adapted to run. It's now the OS used on their consoles (Steam Deck) and to this, a lot of people have found games run better on Linux than on Windows. More computers run Steam on Linux than MacOS.
On top of that the Arctic World Archive (basically the Svalbard Seed bank, but for Data) have this OS saved in their databanks so if the world ends the survivors are going to be using it.
On top of this? It's Free! No "Freemium" bullshit, no "pay to unlock" shit, no licenses, no tracking or data harvesting. If you have an old laptop that still works and a 16GB USB drive, you can go get it and install it and have a functioning computer because it uses less fucking resources than Windows. Got a shit PC? Linux Mint XFCE or Xubuntu is lightweight af. This shit is stopping eWaste.
What's more, it doesn't even scrimp on style. KDE, XFCE, Gnome, Cinnamon, all look pretty and are functional and there's even a load of people who try make their installs look pretty AF as a hobby called "ricing" with a subreddit (/r/unixporn) dedicated to it.
Linux is fucking wild.
11K notes
·
View notes
Text
Installing Linux (Mint) as a Non-Techy Person
I've wanted Linux for various reasons since college. I tried it once when I no longer had to worry about having specific programs for school, but it did not go well. It was a dedicated PC that was, I believe, poorly made. Anyway.
In the process of deGoogling and deWindows365'ing, I started to think about Linux again. Here is my experience.
Pre-Work: Take Stock
List out the programs you use regularly and those you need. Look up whether or not they work on Linux. For those that don't, look up alternatives.
If the alternative works on Windows/Mac, try it out first.
Make sure you have your files backed up somewhere.
Also, pick up a 5GB minimum USB drive.
Oh and make a system restore point (look it up in your Start menu) and back-up your files.
Step One: Choose a Distro
Dear god do Linux people like to talk about distros. Basically, from what all I've read, if you don't want to fuss a lot with your OS, you've got two options: Ubuntu and Linux Mint. Ubuntu is better known and run by a company called Canonical. Linux Mint is run by a small team and paid for via donations.
I chose Linux Mint. Some of the stuff I read about Ubuntu reminded me too much of my reasons for wanting to leave Windows, basically. Did I second-guess this a half-dozen times? Yes, yes I did.
The rest of this is true for Linux Mint Cinnamon only.
Step Two: Make your Flash Drive
Linux Mint has great instructions. For the most part they work.
Start here:
The trickiest part of creating the flash drive is verifying and authenticating it.
On the same page that you download the Linux .iso file there are two links. Right click+save as both of those files to your computer. I saved them and the .iso file all to my Downloads folder.
Then, once you get to the 'Verify your ISO image' page in their guide and you're on Windows like me, skip down to this link about verifying on Windows.
Once it is verified, you can go back to the Linux Mint guide. They'll direct you to download Etchr and use that to create your flash drive.
If this step is too tricky, then please reconsider Linux. Subsequent steps are both easier and trickier.
Step Three: Restart from your Flash Drive
This is the step where I nearly gave up. The guide is still great, except it doesn't mention certain security features that make installing Linux Mint impossible without extra steps.
(1) Look up your Bitlocker recovery key and have it handy.
I don't know if you'll need it like I did (I did not turn off Bitlocker at first), but better to be safe.
(2) Turn off Bitlocker.
(3) Restart. When on the title screen, press your Bios key. There might be more than one. On a Lenovo, pressing F1 several times gets you to the relevant menu. This is not the menu you'll need to install, though. Turn off "Secure Boot."
(4) Restart. This time press F12 (on a Lenovo). The HDD option, iirc, is your USB. Look it up on your phone to be sure.
Now you can return to the Linux Mint instructions.
Figuring this out via trial-and-error was not fun.
Step Four: Install Mint
Just follow the prompts. I chose to do the dual boot.
You will have to click through some scary messages about irrevocable changes. This is your last chance to change your mind.
I chose the dual boot because I may not have anticipated everything I'll need from Windows. My goal is to work primarily in Linux. Then, in a few months, if it is working, I'll look up the steps for making my machine Linux only.
Some Notes on Linux Mint
Some of the minor things I looked up ahead of time and other miscellany:
(1) HP Printers supposedly play nice with Linux. I have not tested this yet.
(2) Linux Mint can easily access your Windows files. I've read that this does not go both ways. I've not tested it yet.
(3) You can move the taskbar (panel in LM) to the left side of your screen.
(4) You are going to have to download your key programs again.
(5) The LM software manager has most programs, but not all. Some you'll have to download from websites. Follow instructions. If a file leads to a scary wall of strange text, close it and just do the Terminal instructions instead.
(6) The software manager also has fonts. I was able to get Fanwood (my favorite serif) and JetBrains (my favorite mono) easily.
In the end, be prepared for something to go wrong. Just trust that you are not the first person to ever experience the issue and look it up. If that doesn't help, you can always ask. The forums and reddit community both look active.
178 notes
·
View notes
Text
Have YOU got an old Windows PC Microsoft has told you can't run Windows 11? It's time to give it a new life!
How to install Windows 11 on unsupported PC Hardware using Rufus. You can also disable some other Windows 11 bullshit like data harvesting and needing a Microsoft account.
It has been in the news a lot lately that Windows 11 isn't allowed to be installed on PCs without certain requirements, including the TPM 2.0, a chip that was only included in PCs made in 2018 or later. This means that once Windows 10 stops receiving security updates, those PCs will not be able to (officially) run a safe, updated version of Windows anymore. This has led to an estimated 240 million PCs bound for the landfill. Thanks Microsoft! I get you don't want to be seen as the insecure one, but creating this much waste can't be the solution.
(I know nerds, Linux is a thing. I love you but we are not having that conversation. If you want to use Linux on an old PC you are already doing it and you don't need to tell me about it. People need Windows for all sorts of reasons that Linux won't cut.)
So lately I have been helping some under privileged teens get set up with PCs. Their school was giving away their old lab computers, and these kids would usually have no chance to afford even a basic computer. They had their hard drives pulled so I have been setting them up with SSDs, but the question was, what to do about the operating system? So I looked into it and I found out there IS actually a way to bypass Microsoft's system requirement and put Windows 11 on PCs as old as 2010.
You will need: Rufus: An open source ISO burning tool.
A Windows 11 ISO: Available from Microsoft.
A USB Flash Drive, at least 16GB.
A working PC to make the ISO, and a PC from 2018 or older you want to install Windows 11 on.
Here is the guide I used, but I will put it in my own words as well.
Download your Windows 11 ISO, and plug in your USB drive. It will be erased, so don't have anything valuable on it. Run Rufus, select your USB drive in the Device window, and select your Windows 11 ISO with the Select button. (There is supposed to be a feature in Rufus to download your ISO but I couldn't get it to work.?
Choose standard windows installation, and follow the screenshot for your settings. Once you are done that, press Start, and then the magic happens. Another window pops up allowing you to remove the system requirements, the need for a microsoft account, and turn off data collecting. Just click the options you want, and press ok to write your iso to a drive.
From there you just need to use the USB drive to install windows. I won't go into details here, but here are some resources if you don't know how to do it.
Boot your PC from a USB Drive
Install Windows 11 from USB Drive
If you had a licensed copy of Windows 10, Windows 11 will already be licensed. If you don't, then perhaps you can use some kind of... Activation Scripts for Microsoft software, that will allow you to activate them. Of course I cannot link such tools here. So there you go, now you can save a PC made from before 2018 from the landfill, and maybe give it to a deserving teen in the process. The more we can extend the lives of technology and keep it out of the trash, the better.
Additional note: This removes the requirement for having 4GB Minimum of RAM, but I think that requirement should honestly be higher. Windows 11 will be unusable slow on any system with below 8GB of RAM. 8GB is the minimum I think you should have before trying this but it still really not enough for modern use outside of light web and office work. I wouldn't recommend trying this on anything with 4GB or less. I am honestly shocked they are still selling brand new Windows 11 PCs with 4GB of ram. If you're not sure how much RAM you have, you can find out in the performance tab of Task Manager in Windows, if you click the More Details icon on the bottom right. If you don't have enough, RAM for old systems is super cheap and widely available so it would definitely be worth upgrading if you have a ram starved machine you'd like to give a new life.

#Windows#Windows 11#tech#tech advice#pc#TPM 2.0#rufus#open source#open source software#technology#tech tips
725 notes
·
View notes
Note
stone faced anon (💫 anon if it's free) here; as someone who has a hyperfixation in IT and coding I also think it would be very funny if Boothill had an s/o who wasn't necessarily a mechanic but like a software engineer or just a real big nerd about coding or something. He'll be experiencing a malfunction or a memory leak and go "oh yeah this happens sometimes don't worry about it" and then 10 minutes later he's sitting down plugged into a laptop listening to his s/o rant about how terrible his code is (crack hc: boothill's code was written in javascript) and how it's a wonder he hasn't bricked* yet
Would also be mad funny if Boothill ever got hacked and his s/o basically says "no you're not" and uses a previously made system restore point or something because of course they would both use and design every feature imaginable to keep Boothill in control of his own body, can you imagine the stress that losing control would cause him?? Even better if whoever designed him originally intentionally left a backdoor incase he ever went against their orders and when they try to use it his s/o just goes "oh yeah I quarantined and encrypted all the old files related to that backdoor and whatever else you were planning on a partition as bait and personally rewrote every file and function involved since your code is *an actual crime against technology*. by the way i'm going to go ahead and format that partition i mentioned, boothill- we won't be needing anything on it now that we can trace whoever made it. trust me, this won't be happening ever again."
*(bricking is a term mostly used to refer to hardware that's been rendered basically completely nonfunctional and beyond saving by using it wrong, mostly by messing with system files. Kinda like how windows can't even repair itself if you delete the system32 folder. Though i guess you could still install it with a usb stick if you formatted your pc- i digress you get what I mean. also since this almost happened to me recently: if you manage to fill up a hard drive to the brim, with literally 0 bytes of space left, that bricks it. reminder to check your storage thoroughly and often!)
Honestly wow I read it all and I'm a little bit speechless 🥹 thank you 💫 anon, it was great 🙏

Boothill would DEFINITELY appreciate a s/o who's a tech savvy in general! I think at some point, he'd be pretty shocked you're so knowledgeable and just sit there, listening to you rant.. and just letting you do your thing.
Don't get me wrong, he definitely knows a lot about his body, his system and the way he works, but once you start to get in the zone and explain stuff to him, berate his code even, he just sits next to you, plugged in to your laptop, leaning his cheek against his hand listening to you like he obviously understands everything you say.
His other hand begins to gently play with a stand of your hair, humming deeply when the soft clicking sounds of your keyboard reach his ears; he twirls your hair with his fingers and chuckles, "mmm, really now?" Boothill raises an eyebrow, "encryptin' this, encryptin' that... How about we do somethin' more fun instead?" And then you shut him down from your laptop (😭).
Jokes aside, he'd feel very secure with you especially when he first got his new body, just knowing you'll probably fix a lot of things that could possibly blow up his face in no time, maybe even improve his life even more.
#honkai star rail#honkai star rail x reader#hsr x reader#boothill x reader#boothill hsr#boothill#.💫 anon#.anon thirst
245 notes
·
View notes
Note
So Warframe added a "Pom-2" Alternate 1999 computer (that's needed for weird void magic future science wizardry). Thoughts?


Only thing I have that's a sort of question mark is that I don't know of many setups that would have needed a 5 1/4" floppy in 99 (or why it has both the tower and the under monitor unit)
ugh. OKAY, so... the tower and desktop combination is just weird. I have, on one occasion, run a "server" that was two towers, and the original PC supported a DUAL-DESKTOP mode, but both types together? nonsense.
dual monitor was rare but possible in 1999 (win98 added native support), so I think the best interpretation here is that this is actually two computers. maybe the one on the left is missing the keyboard and mouse because it's being used as some kind of server for the other computer? I used a little case like that to run my first linux server, which was also acting as a router for my internal network.
The OS is weird. The icons above the menu-bar look like win98, the dialog box is windows 3.x, the menu-bar icons on the bottom are pure os X (although they remind me of like a web-TV kinda system, like hotkeys for email/internet/etc), but the greyscale is very classic mac system. Actually it kinda reminds me of C64's GEOS, but GEOS was very classic-mac.

Like most CRT-filters, they turned the scanlines up WAY TOO HIGH. No CRT I've ever seen looked that fucking terrible. The monitor buttons are a bit odd: You didn't get monitors with buttons on the front until long after they were all color... but maybe it's a color monitor that's showing a monochrome OS?
as for the floppies: yeah. There are multiple mistakes here.
5.25" in 1999 is just silly. If you still had 5.25" disk drives in 1999, you were intentionally doing some retrocomputing stuff. For reference, around 2001 my PC repair job would specifically ask me to copy data off 5.25" disks, because they didn't have any 5.25" drives anymore, and I was their only tech who did.
The other mistake is that they have THREE floppy drives. so the PC doesn't really support that, natively? You can do some tricks and make it work (The youtuber Tech Tangents did a video on how it could be done), but realistically two was the normal max.
The final mistake is that all the drive activity lights are on. Those are only supposed to be on while the drive is reading or writing... and I don't see any disks in those drives! Let alone a situation that would involve turning all three on at once (I don't think that's even possible on most floppy controllers!)
In fact, the main time you'd end up with the drive lights stuck on like that is when you've installed the drive cable upside down. That ends up with them getting stuck on and non-functional. So this computer looks, to me, like it was put together incorrectly and no one noticed.
I don't believe that font would be on a black & white retro computer. Nope. Too smooth and too big.
There's also a USB icon on that OS: I don't think there's ever been a monochrome OS that supported OS, and looking at that computer case I don't believe that it has USB. Maybe the tower would, but the desktop? no.
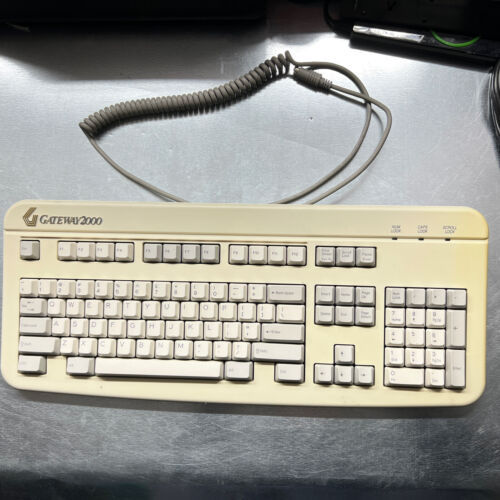
That keyboard is off a Gateway 2000 computer. Something like this:
162 notes
·
View notes
Text
also share your names with me I'm curious :3
down below is a heartfelt sob story about my favorite hard drive and also reason why I did the poll
For the longest time I only had one external drive containing everything. It was an old 256GB drive that I just named "BACKUP".
When I got my SSD I took out the old hard drive and used that as my main backup source. Because it had more storage I named it "BACKUP EXTENDED".
That drive got corrupted when I was in rehab because some guy named Kevin borrowed it for movies and used in a micro usb phone cable instead of the real one that was right on top of the drive.
So BACKUP EXTENDED was no more. A few months later I tried some usb partitioning tools (GParted my beloved) because I had some computer issues and thought I try to revive that old drive again and it fucking worked. From that day on my backup drive was known as "THE UNDEAD" (I've also been a huge Hollywood Undead fan at that time).
That name stuck with me, even after I accidentally formatted the whole drive when installing Arch, It persisted through each repartitioning session.
When I fucked up my partitioning table so hard it took several tries of fiddling to get the drive to work again, I renamed my trusty old drive to UNDEAD REVIVED because, well, I had to revive it again. Is it really undead at this point? Or is a revived thing alive again. What is a revived zombie, really? Maybe that's something for another poll...
A few weeks ago I got a few terabytes of storage for cheap and the biggest drive I got right now is 3TB. It's my new backup drive and I called it "UNDEAD EXTENDED",
But I've reached a point where having only one partition for everything isn't enough anymore. I have a macbook for work which can't write to NTFS partitions, so I had to create an exFAT for shared storage. That doesn't allow me to symlink things though, and I still need to have a Windows backup that I can just attach to any PC and boot from it, so I also need an NTFS drive. But Windows does things to the NTFS drive so that sometimes I have to sudo mount the partition which is really annoying and kinda sucks. I only use Linux on my main machine and just want to keep some of its files somewhere without other systems interacting with it at all so now I also have a ext4 partition for system backup and some games.
So, my trusty UNDEAD* hard drive that I lovingly kept and revived and extended and revived again, which stores everything that I own and love and need is now cut up into pieces and none of the partitions feel like the drive that it once was that makes me sad.
I grew very attached to that hard drive and to that name but even when the physical drive is still next to me it feels like I've outgrown it. I've had my Undead drive when I was at my lowest and it was a part of my digital life up until now. I've had iterations of it for almost half of my life. If that thing could talk, it would scream.
So, how did I name my partitions instead now?
I've named my exFAT partition "CYBERSLUT" the way it plugs into any computer and gets manhandled by it, it made me smile when I made the tough decision to retire the undead naming scheme.
My NTFS drive is called "WHYDOS" because I always ask myself why I still keep up with Windows sometimes, and I just recreated my ext4 partition that I named "PLAYGROUND", because it's only used for Wine bottles and some steam games so far, so they don't take up most of my limited SSD space.
#Is this how it feels like to outgrow your marriage?#getting sentimental over a fucking hard drive#where in the body is the soul located?
41 notes
·
View notes
Text
Backup Your Kindle Books!
Amazon is getting rid of the "download and transfer via usb" option on Feb 26th!

So what this means is you can no longer get hard copy files to your kindle device with this method.
Where to start:
Calibre is a free ebook management software, available on windows, mac, and linux - but also comes in a portable version you can put on a flash drive. Ebooks are very small files, 100s of books can easily take less than 1GB of space.
And if you want and alternative reading app for your phone:
ReadEra app is an ad free reading app that is a good alternative to the kindle app if you need it. They also have a premium version for a one time payment of $15 which has a few extra features if you want them.
How to backup your books:
Details on your options to get your files this post has the most updated information and links needed.
what is DRM? TLDR: digital rights management (DRM) is meant to prevent piracy, however, this also means you never really own your ebooks. If Amazon decides to take down a book you bought? That's it, it's gone and it doesn't matter that you paid for it.
Removing DRM (extra instructions if needed) If you're on PC and don't have a kindle device, you'll want kindle version 2.4.0 or it won't work in Calibre.
In Calibre, navigate to Preferences > Plugins > Load Plugin From File - DeDRM - Use the latest Beta or Alpha release, follow instructions on the github page
Preferences > Plugins > Get New Plugins
Look up: KFX Input
You'll have to restart Calibre once you install so just add them all at once before you restart it.
You can find the folders with your ebooks under documents -> my kindle content, each book will have it's own folder and you're looking for the .azw file. If it says .azw3 double check the pc app version because that format will not work with DeDRM. Download a single book first, drag and drop it into Calibre and double click it to open and test that DeDRM is working properly. You should be to convert all the .azw files to epubs or any other format you want. To do this, either look in the top menu for 'convert books' or right click on the individual file to convert it, you can do this one at a time or select to convert in bulk. If you have 100s or even 1000+ books? focus on getting the files backed up first, once you have the book files you can take your time actually getting them into calibre.
If you need some troubleshooting help setting anything up just ask and I'll try to help!
#kindle#amazon kindle#ebooks#drm#e reader#amazon#ebook library#calibre#posting cause the other posts I'm seeing don't have enough info on everything that's needed
13 notes
·
View notes
Text
Setting Up Calibre + FanFicFare
I've talked before about using Calibre to download fic off of fiction archives, so that's where I decided to start with this series. If you're interested in learning more about how to download fanfic for offline reading/local archiving, then watch the #ficArchiving tag. And if you're not interested in seeing these posts then that's also the tag to block.
Edit (3/22/25) - I've updated the post due to changes in how FanFicFare works with regards to site ratings metadata - the type of column this information needs to be stored in has changed as it no longer works with selectable, pre-set options as originally outlined. Also adding note that additional plugins are required to make FanFicFare's anthology options available.
(Since this is a long post, I'm sticking it under the cut.)
First some background on what Calibre is. It's an open source eBook manager and is really quite versatile for it's usage, thanks in part to the robust library of plugins that it utilizes. The default Calibre app comes bundled not only with management software but an e-reader, server options for locally hosting your library (or libraries), and a whole host of options for managing metadata. Default metadata being tracked include title, author, series, publishing data, synopsis, and tags, but you can manually add columns for any additional data you want - which comes in handy when managing a local fanfiction archive. You can add columns for the fandom the fic is written for, the included ships, characters, completion status, whether it's a single fic or a series turned into an anthology. If the information is useful for you, then you can add a method to track it.
Now, for what Calibre does not do. Because it only runs on Windows/Mac/Linux systems - aka it only runs on a PC - you cannot install it on your phone or tablet. There's no official Calibre apps for Android or iPhones either, though there are unofficial ones that can work with Calibre in server mode. I've never tried the unofficial apps, however, as they tend to cost money that I don't really think they're worth. That's largely because in server mode you can log in to the local instance of Calibre with a regular old browser. Just book mark the page and, so long as your on a network where the local instance is running, your phone or tablet will have access to every book on your Calibre's library (or libraries, depending on how you set things up). You can then either read the eBook directly on the browser or, my preferred method, download the file and read it on the e-reader app of your choice. (You can also make the server available outside your local network, but I've never bothered to learn to set that up.)
Given everything Calibre can do, I'm not particularly bothered by the lack of official apps for phones or tablets - as far as I'm concerned it doesn't need one.
This post is going to be focused on using Calibre for fanfictions specifically, but if you want more information on the other things it can be used for, the Calibre FAQ pages are quite extensive and goes into detail about it's format support, eBook conversion abilities, device integration, news download services, library management, and more.
Alrighty, so first thing you'll want to do is download the version of Calibre that works with your computer. You can also create a portable version that runs off a USB drive if you prefer. Once you've downloaded and installed Calibre, it's time to decide where you want your fanfics to live. Do you want all your eBooks to live in one spot or do you want separate libraries for fanfiction vs original fiction? Since I like to collect more metadata for my fanfic collection than for my regular eBooks - and then completely different extra data for tracking my Star Trek books, or Doctor Who books - I like to have multiple libraries for managing my eBook files. And Calibre makes managing multiple libraries at one time very, very simple.
In Calibre's header there are going to be a lot of icons - I’ve modified the header toolbar for my Calibre instance, but most of the default options are still visible in the picture below.

Specifically you want the one that looks like four books leaning against each other on a shelf. It should have the default library name displayed there - Calibre Library.
Clicking on that will open the menu used for maintaining multiple libraries. While the application only sets up one library by default, it can link to multiple libraries located anywhere on your computer's filesystem. Since I like to use Dropbox to back up my libraries, I usually locate mine in my local Dropbox folder. You can import existing libraries from one instance of Calibre to another, which makes moving from one computer to another, or maintaining the same library across multiple computers, very simple.
Let’s assume you want to have a separate library just for fanfiction. To that end, you'll want the first option on the menu - labeled "Switch/create library".
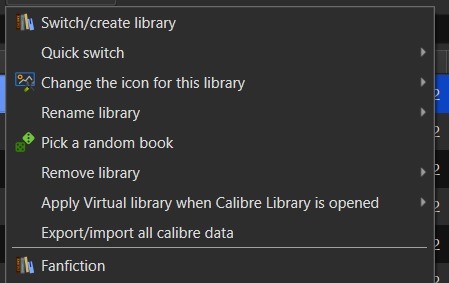
From there you'll want to select the folder - or create a new folder - with the name of the library you want to use in Calibre. I'd recommend something straightforward and call it "Fanfiction". Then you'll select the radio button labeled "Create an empty library at the new location".
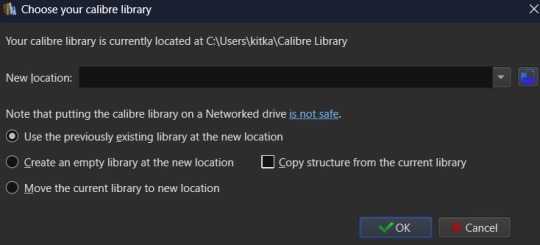
You don't need to copy the current library's structure since every library is created with Calibre's default structure and you won't have added any specialized data tracking at this point to copy over. Once you've set your library location and selected the option for creating a new library, hit the OK button. It'll create the new library and immediately change so that it's managing that library instance instead of the default Calibre Library instance.
If you aren't sure which library is currently open in the Calibre app, then the icon with the four books in the header is where you want to check. It will always be labeled with the name of the currently open library. The most recently opened libraries will be listed at the bottom of the menu opened by that icon for easy switching between libraries and the "Quick switch" option will list all the available libraries registered to your Calibre instance. The icon with the four books is the default icon for a library - if you change the icon for a library then keep in mind that the icon will change in the header when the library is the currently selected on.
Alright, so step one is completed. You now have a dedicated Fanfiction library for maintaining any fics you choose to download. But the default metadata being tracked for the books isn't as robust as it could be. Time to bulk that information up. You'll want to look back at the header again, this time for an icon that looks like a crossed screwdriver and wrench. It's labeled Preferences. Click on that in the center of the icon to bring up the Preferences modal instead of just the menu (which you can access by clicking the associated down arrow beside the icon instead).
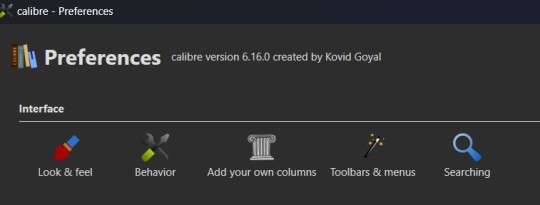
The Preferences modal is where you can access options to tweak the appearance, behavior, and various other functions of Calibre. And I certainly encourage experimenting with the application as it can be customized to your heart's desire to make it meet your accessibility needs. For now, however, we're only interested in the "Add your own columns" option on the top layer of the modal, under "Interface". The associated icon for the "Add your own columns" option is, appropriately, a small Greek column.
This will open the column maintenance modal which presents with a table listing all the existing columns - these all track some kind of metadata for the ebook - and will have checkboxes on the left most of the table indicating whether these columns are displayed on the main interface or are accessible only through the Edit Metadata modal. (We'll get to the Edit Metadata modal later.)
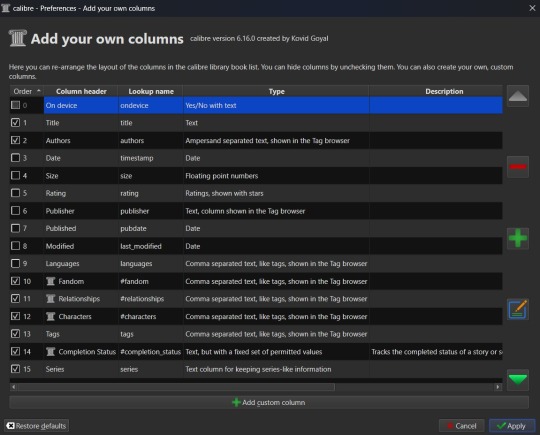
To the right of the table are options for moving a column up or down in the list order, a minus sign used for deleting unnecessary columns, a plus sign for adding new columns, and an edit option for editing existing columns. I'd recommend unchecking columns you don't want displayed in the main table, but not deleting columns. That way you can still store the metadata - and search on it - in that column, but it won't clutter up the main page.
Alright, so now it's time to add some columns. Click the plus button to bring up a custom column form.
The "Lookup name" is what Calibre uses to do searches, so it needs to be something that can be safely saved in a database. "Column heading" is the pretty name that displays either as a column heading in the main Calibre table or as the metadata entry name in the "Edit metadata" modal. "Column type" has a dropdown of the different types of metadata that can be stored in a column and has an option to show checkmarks (a checkbox) for additional true/false parsing. There are a lot of options in the dropdown for metadata types, some of which will offer up additional column creation form options, and this is something that cannot be changed once a column has been saved. If you select the wrong one and realize it later, you'll have to delete the column and create a new one to take it's place. "Description" is there to help clarify things if the "Column header" isn't descriptive enough to make clear what the metadata being tracked by the column is for. And, finally, you can use the optional "Default value" if you want that column to be auto filled with a value you can update later.
Note that the form may add further fields to it, depending on the selected “Column type”.
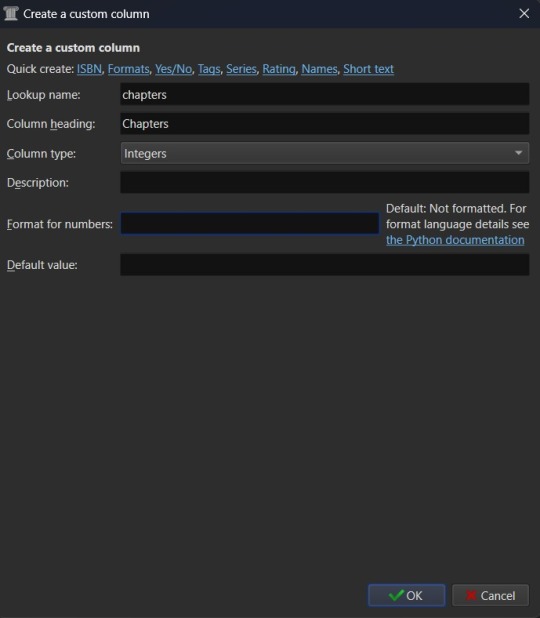
Since this is going to be tracking fanfiction metadata, some good ideas for creating tag-type metadata columns would be "Fandom", "Ship", and "Characters". You might also consider "Rating", "Content Warnings", “Chapters”, or other data which might be better suited for other types of metadata. We'll start with the "Fandom" column.
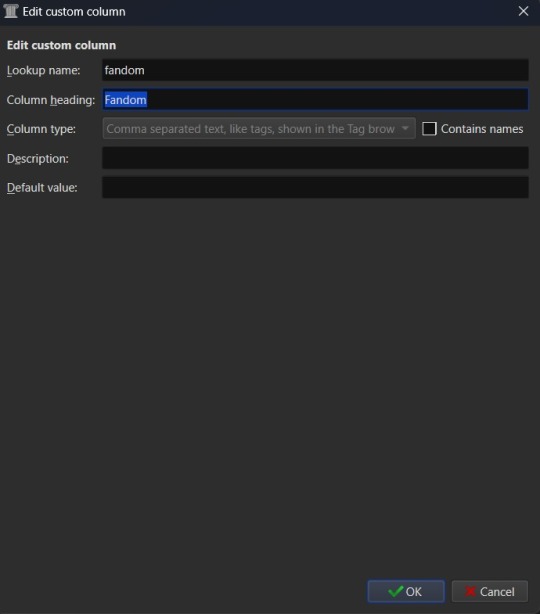
You'll want to set the "Lookup name" to "fandom" (note the lowercase here), the "Column heading" to "Fandom" (uppercase this time), and the "Column type" to "Comma separated text, like tags, shown in the Tag browser". The "Description" is optional, so add what you like (or don't) there and the same goes for "Default value", which you might want to list as "Unsorted" or simply leave blank to indicate the fandom is currently unlisted. Once you're satisfied with your selections, click "OK" and you can either then "Apply" your settings changes or continue on to add more columns.
The "Ship" and "Character" data also work best as comma separated data, so I recommend making those columns in the same fashion as the "Fandom" column. “Chapters” you may want to add as an integer column, shown below.
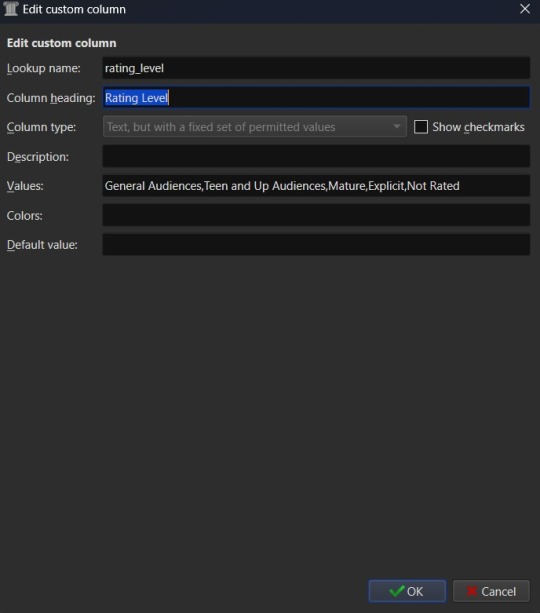
If you're wanting to add "Rating" as a column, then you might want to have specific options for rating a fic, such as limiting the options to the same ones used by Ao3. To this end, you'd fill out the form more like this. "Lookup name" as "rating_level" so as not to confuse it with the existing rating column for star ratings, "Column heading" as "Rating" or maybe "Rating Level", and "Column type" as "Text, but with a fixed set of permitted values". This "Column type" selection will bring up two more inputs on the column creation form - "Values" and "Colors". These two inputs work together and can be edited later. In the "Values" input, you can add a list of comma separated values. In this case the list for "Values" would look like "General Audiences, Teen and Up Audiences, Mature, Explicit, Not Rated". "Colors" is an optional list that will assign a different color to every option on the "Values" list that corresponds to an entry in the "Colors" list. So if you want General Audiences to be blue and no other option to have a color, you'd list "blue" for colors. Or "blue, blue, red, red, red" to have the first to options on the "Values" list as blue and the last three as red. You can play around with this more or leave it blank to have the options all be the same default colors.
Once you've finalized your selections, hit OK to create the column.
Edit (3/22/25) - FanFicFare currently no longer accurately scrapes ratings data into a column setup as "Text, but with a fixed set of permitted values". Instead you will need to use the "Comma separated text, like tags, shown in the Tag browser" option. Fixed values should still work for things like fic status, which have the Completed and In-Progress settings only, but changes either to FanFicFare or Ao3 (and thus any Ao3 clones) have made the fixed values option for ratings fail to correctly connect site tags to the preset values. The good news is that this will now set the ratings for an anthology fic made from a series page with the ratings of all fics within the series - so if some are General Audiences and others are Mature within a single anthology, that will be accurately reflected in your captured metadata after downloading a fic.
After creating all your new columns and selecting which ones you want present on the main table, hit the "Apply" button. You'll likely be prompted to restart Calibre. Do so and when the program reloads it should display the main table with all the columns exactly how you set them up. Which means step two is complete. At this point if you have any fanfiction eBooks already, you can drag and drop them into the table from folder files or use the "Add books" option at the left most side of the header toolbar to start adding those. You can manually update the metadata either by clicking on newly added book and then selecting a column or by clicking the book and then selecting the "Edit metadata" option in the header. So now it's time to take a quick look at the metadata editor modal.
By default, the metadata modal will only have one screen but, because you've added custom columns, there should be tabs at the top. One for "Basic metadata" and one for "Custom metadata". The "Basic metadata" includes options for title, title sort, author(s), author sort, series, series number, file versions (for tracking if you have epub, mobi, pdf, etc files of the same book), cover management options, the star-based rating system, tags, ids, upload date, published date, associated publisher, languages, and "Comments" which is where the story summery/synopsis should go. For regular, non-fanfiction eBooks, you might also take note of the "Download metadata" button which allows for scrapping official metadata off of sites like Barnes and Noble, Amazon, or other eBook sellers or archives.
The "Custom metadata" is where your custom column data will be found. It should be found at the top of the page and fill space downwards with however many custom columns you've added. Inputs that allow for comma separated values will still have a dropdown option associated to allow adding tags you've entered previously for other ebooks. Columns that only allow using preselected data are more likely to appear as select boxes or other form types. This is where you might notice you created a column type incorrectly, so make sure to check over all the data entry options for each metadata type you're collecting. If it doesn't look like it's set up the way you wanted it to be, you can go back to the column editing modal and try again.

The big draw of using Calibre to manage fanfiction eBooks, however, is being able to use Calibre to download the fanfictions from the web and convert them to eBook format for you. And that's where Calibre's plugin library comes in handy.
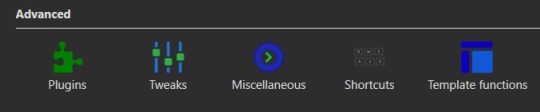
If you were making any edits to an existing eBook, save those and close the metadata editor. Head back over to the Preferences modal and check the Advanced settings options at the bottom of the modal. There should be a green puzzle piece icon labeled "Plugins" - click that to open the Plugins modal.
It will take you to a table used for monitoring and controlling existing plugins and, yes, it does already have 'plugins' installed. These are really more the application's default modules, but because of how Calibre works they can be edited and controlled in the same way that external plugins are. At the bottom of the page you'll see three buttons - "Get new plugins", "Check for updated plugins", and "Load plugin from file". These are concerned with the external plugins that you can add to Calibre. "Get new plugins" will allow you search through the official library of third party plugins available to Calibre - plugins that the Calibre team have vetted to confirm aren't actually malware. But they're by no means the only plugins you can install, as the "Load plugin from file" will allow you to load pretty much any plugin you want to. Such as a plugin for, say… stripping DRM off of purchased eBooks.

In this case, you want to select the "Get new plugins" option. This brings up a modal for User plugins and the displayed list will automatically be filtered by available plugins that have not yet been installed. You can filter this list further by typing "FanFicFare" into the "Filter by name" text input.
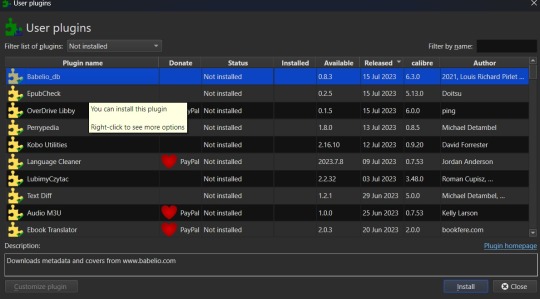
You can then select the FanFicFare plugin and install it. After installing the plugin, you should select the option to restart the application, to ensure that it installed properly. I'd also recommend adding the FanFicFare icon to the optional bottom toolbar instead of the header toolbar, since that'll make it much easier to find since, unless you add more plugins and assign them to that toolbar, it should be the only option on the bar right now.
Edit (3/22/25) - In addition to the FanFicFare plugin, you'll want to include two additional plugins so that FanFicFare can make it's anthology options available. These two plugins are EpubMerge and EpubSplit. These plugins can be used on their own to create anthologies by creating a new epub file from multiple epubs or splitting anthology books into separate epubs for each book contained within. Without these plugins FanFicFare's anthology options will be hidden, as it utilizes them for merging fics in a series together after downloading them separately.
So, full disclosure, you don't need Calibre to run FanFicFare. You could download it and run it from a command line interface instead. However, I prefer it's Calibre interface, especially since it really lets you take advantage of the best Calibre has to offer in metadata tracking, as it can be set up through Calibre to auto fill those columns I walked you through setting up earlier. But I'll get to more on that in a minute.Once Calibre has restarted, you should now have FanFicFare available on one of your toolbars. It's associated icon is a green text bubble with the letters "FF" in it pointing down at a picture of a book.
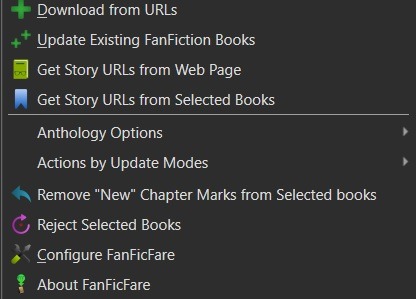
It'll have a small down arrow next to it, which you'll want to select in order to bring up FanFicFare's menu. At this point you can start downloading fics if you want - but let's do a little customizing first. Select the "Configure FanFicFare" option to bring up the configuration modal.
So this modal has a lot going on. And I do encourage doing some exploration on your own, because FanFicFare is a powerful tool made all the more powerful here in conjunction with Calibre's built in tools. Cover generation is very useful, "Reading lists" can be used to auto send new books to any devices you've linked to Calibre when they're connected to the computer, you can tie into email accounts to pull fanfics from email or pull URL links for downloading... there is just so much this plugin can do.
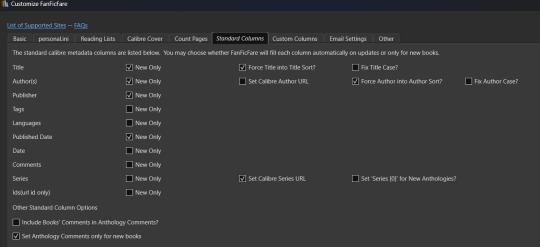
For now, however, we're interested in the column related options. First, check out the tab for "Standard Columns". Look over the options there carefully to make sure that the default settings are actually what you want. They're pretty straight foward - most are determining whether the metadata gets scraped and updated every time you update a fanfic eBook or if they're only scraped for new books. The rest have to do with title and author sorting, setting series related data, and setting the comment data for anthologies.
Once you've set that data how you want, head over to the "Custom Columns" tab where things get more interesting.
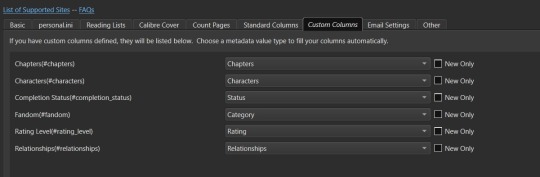
You should now be looking at a list of all those custom columns you created earlier, in alphabetical order. Each column will have a corresponding select box with nothing selected and an unchecked checkbox marked "New Only". This works in a pretty straightforward manner. Let's use "Fandom" as the example. Click the associated select box to open the dropdown and you'll see a bunch of potential metadata that FanFicFare scrapes listed there. It'll all go into the default tags column - found over in the "Standard Columns" section - but you can also parse it out to specific custom columns here. It might give you a few ideas for more columns you want to add for metadata sorting purposes. "Fandom" you'll want to link to "Category". I left "New Only" unchecked so that if I update an eBook later and it has a new fandom attached to the fic then that new metadata will be picked up and added to my Fandom tags for the fic.
Go through each custom column and set them up to be auto filled with the data you think fits it best. Select OK to save your changes and congratulations, this library has now been set up to import fanfiction.
Do keep in mind that FanFicFare's settings are on a per-library basis. So if you decide to do a separate library for different types of fanfics then you'll need to configure FanFicFare separate for every library. You may want separate libraries for different repositories, for example. Though FanFicFare is often smart enough to recognize when it already has an eBook version of a fanfiction from one repository - such as FFnet - when trying to download the same fic from another place - like Ao3.
You may need to make changes later to the personal.ini file associated with the library (which is also set up on a per-library basis) but I'll write up a separate post for that later. While sites protected by Cloud Flare more stringent protections will likely result in 403 responses and failed downloads, most fanfiction sites are going to work with the default FanFicFare settings. You could head over to, say, Archive of Our Own or Twisting the Hellmouth and grab a URL for a story from there. Or a URL for a series, which has links to multiple stories.
Now that the set up is done, it's time for the fun part. Downloading and maintaining fanfiction in your library. I'll be using a few of my fanfictions on Ao3 as example URLs. Awaken, which is already in my fanfiction library. What Balance Means, which is not already in my library. And the two series Hartmonfest 2023 and Eobard vs Eobard.
We'll start with the single URL uploads.
Click on the FanFicFare down arrow to bring up the menu and select the first option on the menu, labeled "Download from URLs". If you have a URL in your clipboard and have the option to grab URLs from the clipboard selected in the FanFicFare configuration (it's a default option, so you most likely do) then you should see that URL prepopulated in the text area when the Story URLs modal loads. You can add more URLs, one per line, to this text area and when you select OK each one will be individually downloaded as a separate epub file. For multi-chapter fics you only need to provide the url for the first chapter. FanFicFare will be able to detect the additional chapters and download them into the same epub file as the first chapter. All providing additional chapter URLs will do is lead to FanFicFare attempting to create multiple epubs of the same fanfic.
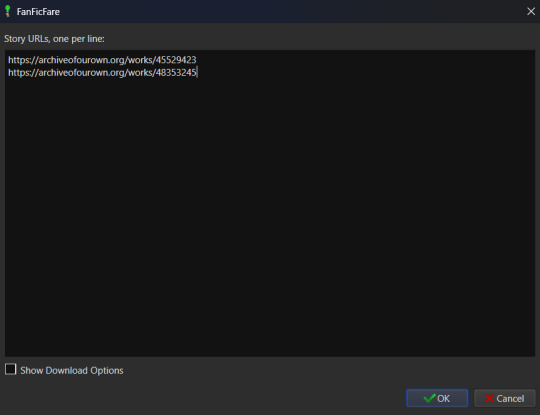
Once you've added your list of URLs to the text area, select OK. FanFicFare will do the rest, fetching metadata for the fic (or fics) and compiling the epub file(s). When it's finished compiling the data but hasn't officially saved the epubs, it will pop up a message letting you know how many "good" and "bad" entries it found.
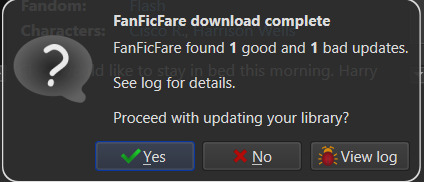
"Good" means it made an epub file and it's good to go. "Bad" could mean that you've already got the fanfic downloaded and no updates - such as new chapters - were available. Or it could mean that it failed to grab the web pages for whatever reason… like Cloud Flare blocking the download. You can go forward with the download at this point, adding the good epubs to your library. Or you could cancel the download, meaning none of the epubs are saved. Before choosing one of those options you can also choose to look at the job output, seen in the pop up as a button labeled "View log". This will display a list of every url you tried to download a fanfic for and information on either it's success or why it failed, the associated URL, and how many chapters were downloaded.
Since I already had Awaken downloaded and there have been no updates since the last time I downloaded it, that is the bad update from my list and the result I was expecting. What Balance Means hadn't been downloaded before, so it was the expected good update. Once Yes is selected in the dialog, the new fanfiction eBooks will be added to the library and will appear at the top of the main list in the application.
That's great for updating one fic at a time or copy-pasting in a list of fanfictions, but let's get ambitious. Maybe you want to import an entire page of bookmarked fanfictions at once or a series of fanfictions as individual books. Instead of copying every single URL by hand, you can take the URL for the series main page or the Bookmarks URL. With that URL copied, you can head over to the FanFicFare menu again, but this time select the option "Get Story URLs from Web Page"
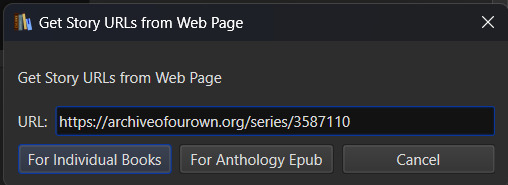
The modal that pops up only allows for inputting one URL - the URL for the page you want it to scour for fanfic URLs. Once you've inputted that URL click the button labeled "For Individual Books." It might take a bit but it's going to pull up the same Story URLs modal from before, this time prepopulated with every URL from the page you gave it. Pretty cool, right? Click OK and watch it run the job just like before.
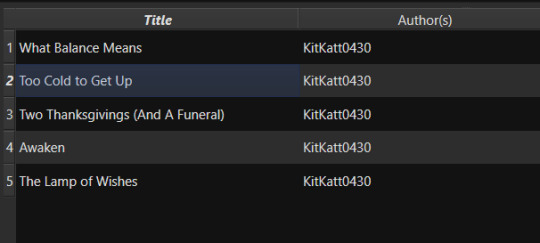
I gave it the URL for my Hartmonfest 2023 series, which is a complete series and it downloaded all three books. Once they're populated on the list, I could scroll over to the Series column to see that they all are listed as being part of the Hartmonfest 2023 series in the same series order they're listed in on Ao3.
However, what if I'm uploading an unfinished series, like Eobard vs Eobard, and want to be able to track when it updates later on? Single books can track when new chapters are updated; is there any way to do the same thing but on a larger scale? The answer is yes, but you have to upload the series as an anthology.
Head back to the "Get Story URLs from Web Page" option on the FanFicFare menu and give it another series URL. But, this time, click the button labeled For Anthology Epub. This will trigger the Story URLs modal again once it's gathered all the story URLs, but this time it looks a little different.
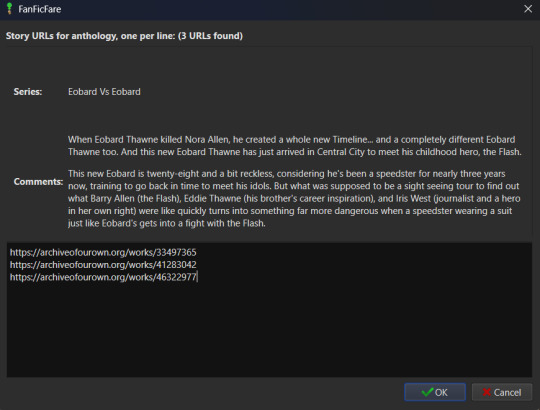
This time there will be text indicating the Series and Comments/description, the information for which will have been taken from the series metadata. The series story URLs will be present in the text area, allowing you to remove a story from the anthology if there's a fic in there you don't want included. Click OK to run the import job, which will run like normal.
When the job completes, there should be multiple good updates listed - one for every URL - but when you click yes to add the eBook to the library, you'll only see one added. It should be named following the convention "<Series Name> Anthology". So now I've got the "Eobard vs Eobard Anthology" in my library.
Last but not least, how to check for updates to incomplete fanfictions or series. It's generally pretty easy to do. Select the fanfiction(s) on the list that you want to check for updates on. If it's a single fanfiction (or several single fanfictions), you go to the FanFicFare menu and click the option "Update Existing FanFiction Books"
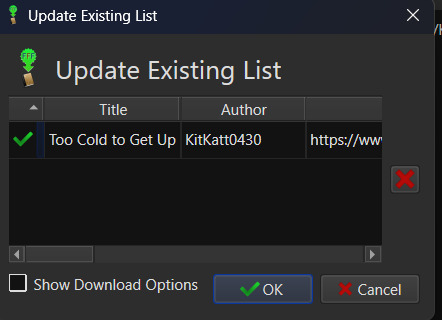
Click OK and let it run. Any fanfictions that don't have new chapters will return as bad entries. Any that have new chapters will be listed as good. Selecting Yes to add the good entries to the list will update the existing epub files with the new chapters.
However, if it's a series you want to update, I recommend doing those one at a time. Select the anthology from the eBook list and head back over to the FanFicFare menu. This time select "Anthology Options"; it'll open a fly-out menu. You want the bottom option, labeled "Update Anthology Epub". The associated URL for the series is saved as part of the eBook's metadata already, so it will pull the series metadata and associated URLs again, before returning you to that same modified Story URLs modal seen before. When you click OK, it'll pull all the fanfictions in the series - new and old - and any new chapters as well, bundling it up in a new eBook file that will replace the old one.
There's still a lot to talk about when it comes to managing fanfictions in Calibre, but I think I'll end here for now. You should be able to download, and manage, fanfiction from most websites at this point. So go back up your bookmarked fics and rest easy knowing that from this point forward a missing bookmark on your bookmarks list is no longer cause for sadness - it'll still be in your local archive to enjoy offline. Just don't go abusing this power, okay guys?
#kitkatt0430 explains#ficArchiving#calibre#fanficfare#the images all have alt text but if you find my image descriptions lacking feel free to add additional descriptions
61 notes
·
View notes
Text
Linux/Fedora and Sims 2....
SO, as I had mentioned before, I had planned to put linux on an old potato laptop I had laying around that doesn't get used. My bestfriend came over about a week or so ago and helped me with putting Ubuntu, Lutris and wine on the laptop. I was super stoked to get started playing the Sims 2 without pink or crashing.. I folllowed Osab's installation guide for linux off of github and when I finished, I launched the game and....nothing. I tried a few different things with no luck so I cried to my bestfriend about it and he got me to get teamviewer and did some stuff in the terminal and read the logs for the game to see what was going on. Turns out there was a missing dll file and then that lead to finding out that there was a conflict with Wine and Lutris.. he had to go so he kinda told me what to do, i asked in some of the sims discord servers if anyone had experience with playing sims on linux, someone responded and helped me a bit.. she was super nice and said if i had any questions, to ask her which I completely appreciate. I got to thinking, maybe I should just bite the bullet and install fedora 41 onto an ssd I have in my computer that I don't generally use that much except for storing some editing stuff that I was doing for a youtuber friend.. I cleared it out, followed a video tutorial on how to do it. When I tried to boot Fedora onto my ssd to test it out(not install it) an error came up and it wouldn't load.. I didn't want to fuck with it incase I did something to screw with my Windows stuff so I left it. I told my bestfriend about it the next day and he said to do something about the usb and I told him I was done messing around with it because it was giving me anxiety and I literally just want to play my game. SO, this morning I called a PC place and asked if they were able to do Linux installs as a partition and they said they could but they don't install programs or anything like that, which is fine with me cause I know how to install the other two programs that I need... he said that he will do it and will teach me how to unplug my main ssd that has windows on it so no corruption ensues, I'm sure it may be a little overkill but if it protects all my stuff on my windows drive, I'll do it, lol. I take it on Friday morning and hopefully will get it back by the afternoon. it's going to cost me like 85$ or so to do it but I rather a professional handle it and not have to worry about screwing it up. SO hopefully I'll have Sims 2 running on my pc by next week and I couldn't be more excited. Here's to hoping I can finally play, I'm getting desperate LOL.
4 notes
·
View notes
Text
HOW TO BACK UP YOUR SHIT ON A FUBAR PC
So, I have a lil linux know how. Someone I know's Windows Boot SSD died on em. I helped unfuck it, but it still got me thinkin. "Do people know how to back up stuff after their PC commits seppuku?"
So What you'll need is:
-A friend's PC to create the usb tool -A USB drive (preferably USB 3.0) with 16 GB or more of storage -An external hard drive to store the backup image -An internet connection.
FIRST
Borrow your friend's pc or laptop.
Download balena-etcher or Rufus
Download a copy of ubuntu linux. Get a coffee, eat a sandwich. This'll take a while.
Once it's done, use Etcher or Rufus to install Ubuntu on the flash drive. Eject the usb, thank your friend, and go back to your malfunctioning compy and plug the usb in.
NOTE: THIS PRESUMES THAT THERE IS A SOFTWARE ERROR PREVENTING YOUR MACHINE FROM BOOTING. IF THE HARDWARE ITSELF IS BROKEN, THIS WONT WORK.
Ok, you're going to boot your PC into BIOS. How? Depends on who made the computer. Google "How to open bios on a [Blank] pc", and you should be able to find the answer pretty quick. Its usually by either spamming the delete key or f10 while your computer turns on.
Once you're in the BIOS, there should be a menu with boot options. Select the usb. It will boot your computer into ubuntu linux, running off that lil usb stick. Neat, huh? You'll get the option to try or install ubuntu as an operating system. You want to click "try".
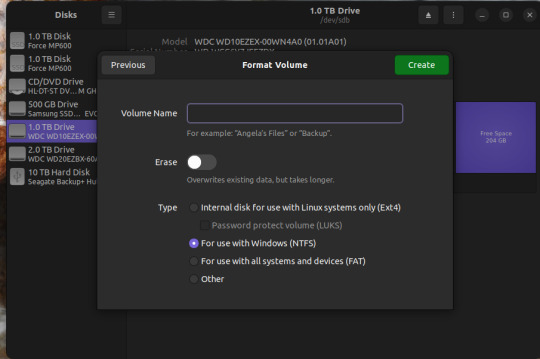
Plug in the external drive you're putting the backup image of your drive on.
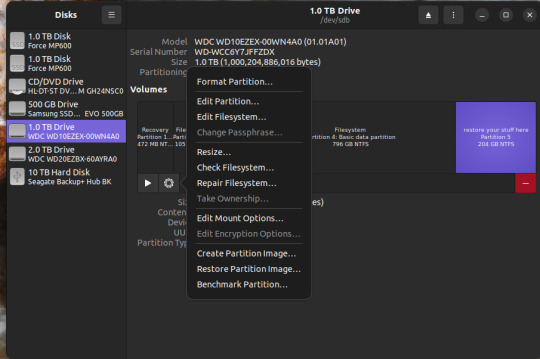
Hit the windows key and it should pull up a search bar. type "Disks" or "Gparted". it's the same program either way so, open it.
You should see something like this.
Depending on the size of your Boot SSD in windows, you may need to shrink the partition a bit. like If you have a 500gb drive handy, but the drive you need to back up is 1TB. So click on the bit that says "basic data partition"
click the gear icon
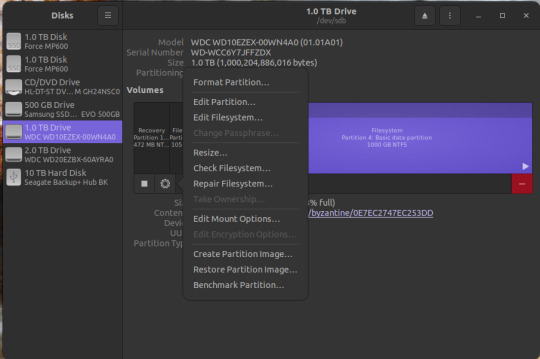
Click "Resize..."
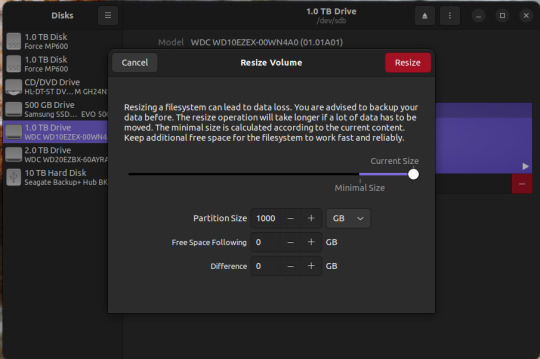
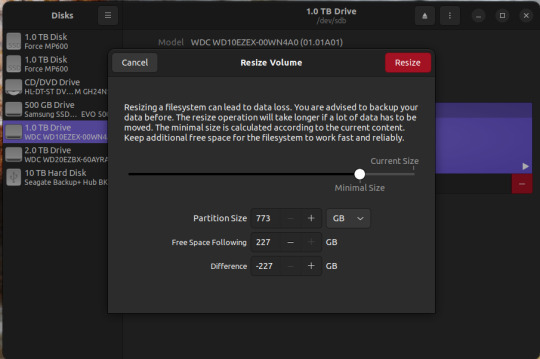
Resize. if the external drive you're backing up to is BIGGER than the boot drive you're trying to back up, you can skip this.
Now there's two things you can do. The first is to simply create an image of the basic data partition where all your files are. The second is to back up the whole disk.
To back up the partition,
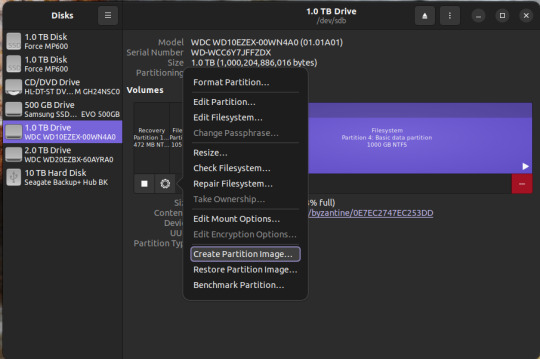
Select the basic data partition, click the gear icon, and select "create partition image"
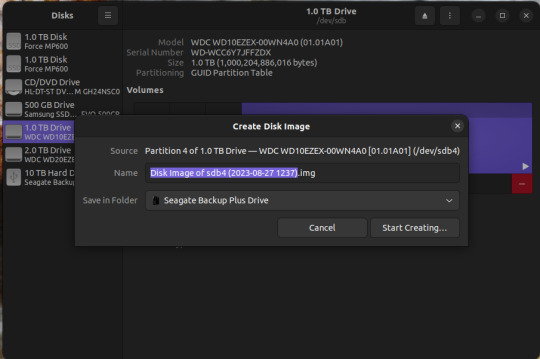
Name it whatever you want, save it on the external drive. Go get another coffee and a sandwich, this may take awhile as well.
To make a backup of the whole disk, click on the three vertical dots in the upper right corner, and select "create disk image"
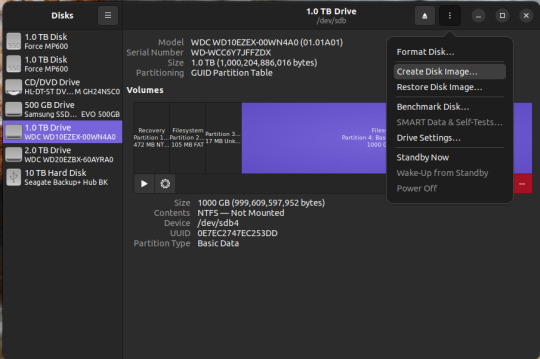
Same as before. name it what you want, save it to the external drive.
There you go.
To access the data, you need to restore that image to a new SSD or hard drive. You can do this using the same program. I recommend doing this AFTER you've done whatever was needed to fix windows.
if you're just restoring a partition image, not the whole disk, here's what you do.
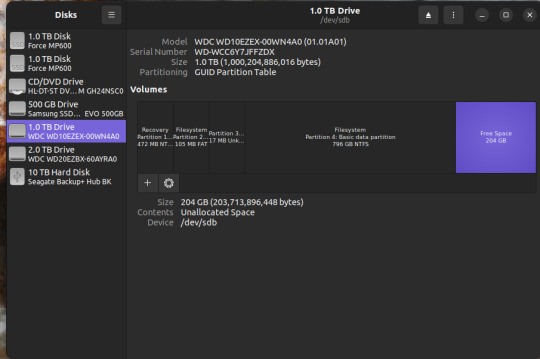
If you have FREE SPACE on a drive, or new drive, you can click on the "+" button, create a new empty partition
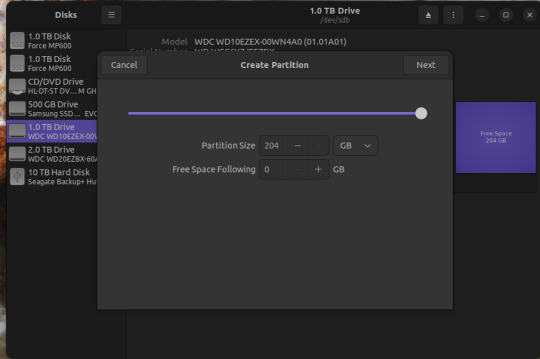
and click "restore partition image" to make it readable. Then you can mount it as a new drive in windows and copy your stuff over. WARNING: THE PARTITION YOU'RE RESTORING TO MUST BE AS BIG OR BIGGER THAN THE PARTITION IMAGE
For a disk image, similar steps.

Three vertical dots on the upper right, select "restore disk image".
Select the full disk image from wherever you saved it and restore.
WARNING: Restoring a disk image will nuke anything already on the drive you're restoring it TO. So don't restore the disk image to your fixed boot drive, or to the drive you saved the disk image on.
Anywhomst. I hope this helps someone save their stuff or avoid being charged out the nose by a computer repair shop.
16 notes
·
View notes
Text
I have two hard drives in my computer: one 500GB SSD (disk 0), and one 1TB SSD (disk 1). Based on my personal experience, I've found this computer to be horribly incompatible with just about everything. For whatever reason, I tried installing Linux Mint, and it went pretty good. That was until it installed the bootloader on disk0 without detecting my Windows installation on disk1, pretty much making my Windows installation inaccessible. This would've been easy to fix if I could make Windows 10 boot media, but I couldn't get an ISO or any software to make boot media because the Wi-FI just decided to stop working when I restarted the computer (I don't even have an Ethernet port in my house). I have a physical copy of Windows 10 lying around, but it's from 2016, so it has a USB driver that causes all of the connected USB devices on my computer (including keyboard/mouse) to stop working. I'm so fucking sick of how incompatible this garbage custom-build tower PC is, I'm so close to just getting a ThinkPad or something.
Hopefully, I'll be able to use one of my spare computers to make Windows 10 boot media and save the Windows 10 installation on my PC, but I honestly just don't want to at this point.
4 notes
·
View notes
Text
For those looking for a change, and i cannot stress this enough i've been repeatedly telling people to change because windows 11 is starting to go off of the seriously terrible to handle end, GET A LINUX DISTRO
Here's some counter arguments for every person making excuses
I'm too used to windows!
Here's a distro you might like, it's called Winbuntu, it is Ubuntu with a full on windows skin to make the transition to linux smoother!
I'm not smart enough to use the command line!
First off, stop talking yourself down, everything is learnable. Second off, With modern linux distros you actually have to use the command line VERY LITTLE, as always, everything wants to make it as easy as possible for you
But how will i play my games made for windows??
Wine or Proton. Steam will allow you to play any game you want with an EXE using their new proton system!! To use it, simply install steam, and you're done! For wine, it can practically emulate any EXE now, and its incompatibilities are pre windows 7 games, much like modern windows versions can't handle. Again, just install from the website, and you're done.
I'm not sure how to change!
Simple solution! You find the installer, create a bootable disk, plop in a USB, make it on the USB, then simply restart your computer and you're done.
Scared of losing your old data? That's fair! Wait until you can get your hands onto another drive or SSD, if you know anything about computers you can probably make out the wires that are supposed to fit together, then in your pc you can use that one to install linux on it!
Seriously! The way windows 11 is going is not good for the health of your pc AT ALL and i use it only because i don't yet have a place to install linux on safely. Consider switching if you can, i know i will.
"windows 11 upgrade ready!" "your computer is eligible for windows 11!" "download windows 11 now!"

56K notes
·
View notes
Text
Price: [price_with_discount] (as of [price_update_date] - Details) [ad_1] From the brand How we get our start? PiBOX India was formed to primarily address the gap in Electronics quality that we saw between western countries and India.We make premium products and IOT enablement devices at affordable prices. How are we different ? We truly think of you as a customer and not the top line or bottom line. We always try to create true value while doing ZERO compromise for quality. We do everything to help our community as we extend reach ! PiBOX India was established by a group of IT engineers with the intention of making next-generation technology accessible, all the while prioritizing premium quality. Every product we launch is crafted with you, the customer, in mind. 【Practical Hard Drive Enclosure for SATA SSDs & HDDs】 PiBOX India presents a 2.5-inch external hard drive enclosure designed for 7mm and 9.5mm SATA SSDs and HDDs. It is compatible with major brands such as Western Digital, Toshiba, Samsung, and supports various devices including TV, PS4/5, Xbox, PC, and laptops. 【Super Fast 6Gbps & UASP Protocol】Experience high-speed data transfers with up to 6Gbps using the UASP accelerated transmission protocol. Achieve a 30% faster performance than traditional USB 3.0, provided both your devices support UASP. The enclosure is backward compatible with USB 2.0 or 1.1 ports. 【All-round Protection & Security】Crafted with high-quality ABS plastic and equipped with a high-performance chip, the PiBOX India 2.5" hard drive enclosure ensures all-round protection. It features over-current protection, over-voltage protection, and overheating protection to safeguard your drives and valuable data. The attached EVA foam pad also protects your hard disks from shaking and crashing issues. 【Universal Compatibility】This SATA to USB 3.1 drive enclosure offers broad compatibility with Windows, Mac, Linux, and most operating platforms. It is designed for 2.5-inch 7mm/9.5mm SATA HDDs & SSDs up to 4TB, providing quick connectivity to your laptop, PC, TV, PS4/5, and more. Compatible with brands like Western Digital, Toshiba, Samsung, Kingston, Crucial, Hitachi, and others. 【Easy to Use & Installation】Enjoy a tool-free experience with no drivers needed—simply plug and play. The enclosure features a user-friendly design, allowing you to easily open the cover, insert the drive, and close the cover. It supports hot-swapping, and the LED indicator shows the working status. The detachable USB cable (USB C to USB A) facilitates easy connection and storage. 2.5" External Hard Drive Enclosure -- Effortlessly connect your 2.5-inch SSD & HDD to a PC, laptop, game console, router for data transfer or expanding storage. This enclosure provides protection for your hard disk from scratches, offering a portable SATA data storage solution. Ideal for booting up old HDD/SSDs and recovering essential files from older PCs. [ad_2]
0 notes
Text
Build My Computer: A Step-by-Step Guide to Creating Your Dream PC
In today’s tech-driven world, building a custom computer has become a rite of passage for gamers, professionals, and tech enthusiasts alike. The phrase “build my computer” isn’t just a search query — it's a declaration of independence from generic, pre-built systems. Whether you’re after blazing-fast performance, budget-friendly computing, or something uniquely yours, building a PC offers flexibility, education, and satisfaction that off-the-shelf machines simply can’t match.
In this guide, we’ll walk you through everything you need to know to build your own computer — from planning and picking parts to assembling and powering on your custom rig.
Why Build Your Own Computer?
Before diving into the how, let’s tackle the why. Here are a few compelling reasons to build your own PC:
Customization: Choose exactly what you need — CPU, GPU, RAM, storage, and even aesthetics.
Performance Optimization: Tailor your build to your specific needs, be it gaming, video editing, programming, or general use.
Cost Efficiency: Get better performance per dollar compared to many pre-built systems.
Upgradability: Future-proof your system with easy upgrades over time.
Learning Experience: Understand the inner workings of a computer, which can be empowering and useful long-term.
Step 1: Define Your Needs
Start by asking yourself what you want the computer to do. Is it for high-end gaming? Video editing? General home or office use? Your purpose will dictate the performance requirements and budget.
Common use cases:
Gaming PC: Powerful GPU, strong CPU, fast RAM.
Workstation (e.g., editing or design): High-core CPU, large RAM, fast storage.
Home/Office PC: Modest specs, focus on reliability and efficiency.
Step 2: Choose Your Components
Here’s a checklist of core components you’ll need:
CPU (Processor): The brain of your PC. Choose Intel or AMD based on your needs and budget.
Motherboard: Make sure it’s compatible with your CPU and has all the features you need (Wi-Fi, USB ports, expansion slots).
RAM (Memory): 16GB is great for most users, 32GB+ for heavy multitasking or professional use.
GPU (Graphics Card): Essential for gaming and creative work. NVIDIA and AMD are the primary options.
Storage: SSDs (faster) for operating system and frequently used files; HDDs (cheaper) for bulk storage.
Power Supply (PSU): Choose a reputable brand with enough wattage for your build.
Case: Make sure it fits your motherboard and components; consider airflow and aesthetics.
Cooling: Stock coolers are fine for many CPUs, but high-performance builds may need aftermarket coolers or liquid cooling.
Operating System: Windows, Linux, or even dual-boot options depending on your preference.
Step 3: Gather Tools and Prepare Workspace
You’ll need:
A clean, static-free workspace
A Phillips-head screwdriver
Thermal paste (often included with CPUs or coolers)
Zip ties for cable management
Anti-static wrist strap (optional, but recommended)
Step 4: Assemble Your PC
Here’s a high-level overview of the build process:
Install the CPU and RAM onto the motherboard.
Mount the motherboard inside the case.
Install the PSU and route power cables.
Install storage drives (SSD/HDD).
Install the GPU in the appropriate PCIe slot.
Connect all cables: power, data, front panel connectors, etc.
Check everything is secured and cable-managed.
Step 5: First Boot and BIOS Setup
Once everything is connected:
Power on your system.
Enter BIOS/UEFI (usually by pressing DEL or F2 during boot).
Ensure components are recognized and configure boot settings.
Install your operating system via USB or DVD.
Step 6: Install Drivers and Software
After the OS is installed:
Download and install drivers for your motherboard, GPU, and peripherals.
Install essential software (browser, antivirus, etc.).
Run system updates.
Final Thoughts
When you say "build my computer," you’re embarking on a rewarding journey. Not only will you get a machine perfectly suited to your needs, but you'll also gain valuable insight into the technology you use every day. Plus, there's nothing quite like the feeling of hitting the power button and seeing your own creation come to life.
So go ahead — do your research, pick your parts, and start building. Your dream PC awaits.
0 notes
Text
Portable Outlook Mac Backups with Mail Backup X: Built to Move
Data that lives in one machine, tied to one setup, often becomes fragile. You may not notice this until something shifts, such as acquiring a new device, changing your workspace, traveling, or needing a repair. Outlook for Mac does its job well inside its own environment, but its data doesn’t travel easily. Mail Backup X shifts the balance by creating portable Outlook Mac backups independent of the client or the system.

You can take your archives with you, store them on multiple platforms, and open them independently of Outlook. This creates a working model where your information remains accessible wherever you are.
Setting Up an Outlook Mac Backup That Moves with You
So, first, let’s see how exactly you can do that with the help of “Mail Backup X.”
Begin by opening Mail Backup X and clicking on “My Backup Profiles.” Select “Add New Backup” to begin.
Choose Outlook Mac and then the tool will locate and link to the local database without needing a manual path.
Pick the folders you want to back up.
Give the backup profile a name that reflects its purpose or contents.
Select a storage location. This might be your Mac’s internal drive, an external USB drive, or a connected cloud account. All options create the same .mbs format.
Since portability is the goal, use cloud or external drives as your primary or mirror location. You can add one or more mirrors by clicking the “Add Mirror” button and selecting additional destinations.
Set the schedule. Automatic backups can detect new emails and act as needed. Recurring backups can run at fixed times, every hour, daily, weekly, based on your preference.
If you plug in a USB drive and register it, the tool can automatically copy your Outlook Mac backups to that drive each time it connects.
Click save. The first backup starts immediately. You can continue using Outlook Mac while it runs in the background.
Accessing Your Portable Outlook Mac backups
Once the backup of your Outlook Mac data exists, you can move it anywhere. If you open the software on another Mac or a Windows PC with Mail Backup X installed, you can import the archive using the “Open Archive” button. This creates a new profile in the viewer, where your emails appear exactly as they were backed up, folders intact, attachments preserved, timestamps in place.
You can search through the archive as though it were still part of your live email. The search bar handles both basic queries and complex expressions. This makes it easy to locate a specific piece of information, even inside a large, multi-year archive.
Exporting to Other Formats Without Losing Portability
Let’s say you’re no longer using Outlook or need to switch to a different client. The export feature allows you to convert your Outlook Mac backed up data into formats compatible with the most popular email platforms. You can export an entire folder to PST for Microsoft Outlook or choose EML files for clients like Thunderbird or Apple Mail.
If you want to create a fixed record for documentation, legal, or archival purposes, exporting to PDF offers a practical option.
Each export happens within the viewer itself. Select the folders or messages you want, choose the format, and designate an output location. The software handles the conversion, keeps the structure intact, and reports progress in real time.
How Portable Are Mail Backup X Archives?
Q: What format does the tool use for Outlook Mac backups?
On macOS, each backup profile creates a compressed archive saved as an .mbs package. This archive contains your backed-up Outlook Mac data and can include all folder structures, metadata, and attachments. Unlike standard exports from Outlook, this format is recognized by the tool on any supported machine. That means you can copy it to another system, open it using the app there, and continue working with it just as before.
Q: How can you access the contents of an archive on a new computer?
You launch Mail Backup X on the new system, click “Open Archive,” and select the .mbs file. The app then reindexes the archive, rebuilding the folder view and search-index, so everything appears as it did on the original machine. There is no need to restore anything to Outlook or import it into another mail client. The archive opens as a viewable and searchable profile within the app. Note, seeing the contents of backed up package can also be done through the free version of the tool.
Q: What makes this system more flexible than native Outlook export options?
Outlook’s own export tools produce files like .olm, which are not readable outside the client itself. Mail Backup X archives are readable without Outlook, searchable through the built-in viewer, and transferable between Mac and Windows. If you use different devices at home and at work, or if your machine changes, you won’t lose access to your mail.
Q: Can the tool export Outlook Mac backed up data to standard formats for use elsewhere?
Yes. You can export individual messages or entire folders or the entire profiles into formats like PST, EML, MBOX, and PDF. This means you can migrate your email data into a different client or share selected parts without sending the whole backup. The export function doesn’t require you to unzip or decode the archive manually. Everything happens from within the interface, with folder selection, target format, and destination handled in a few steps.
The Value of Data That Travels Well
There’s freedom in knowing your data is not locked to one interface, one operating system, or one machine. For people who work across platforms, this means fewer technical blocks and smoother handoffs. If you’re handing over a project to someone else, switching devices, or simply archiving years of communication, you want that archive to open and function wherever needed.
Mail Backup X does not build walled gardens. It gives you a way to create Outlook Mac backups that are light to carry and easy to read. From compressed .mbs files to cloud mirrors, from USB snapshots to export tools, everything is shaped with mobility in mind.
A free trial version is available for you to explore these features and see how portable your Outlook Mac email backups can become. The process starts simply but opens into a much larger system of access and control. Once you see your archive appear, complete, structured, and untied from your machine, you begin to understand what portability really looks like.
You don’t start over each time the device changes, or the setup evolves. With Mail Backup X, the Outlook Mac backup remains intact, readable, and ready, wherever your work moves next. What stays with you, in the end, is access without interruption.
0 notes