#How to boot PC from USB?
Explore tagged Tumblr posts
Visit Tumblr Blog
Explore Tumblr blogs with no restrictions, modern design and the best experience.
Last Seen Tumblr Blogs


Fun Fact
Tumblr posted its first advertisements in May 2012 and subsequently earned $13M in revenue.
Text
How to Install Windows on PC Using a USB Drive
How to Install Windows on PC Using a USB Drive Title: How to Install Windows on a PC Using a USB Drive: A Step-by-Step Guide Introduction Installing Windows on a PC is a crucial step in setting up or upgrading your computer’s operating system. While traditional methods like using DVDs or CDs are becoming less common, installing Windows via a USB drive has become the preferred method due to its…

View On WordPress
#How to boot PC from USB?#How to install Windows 10 on PC through USB?#How to Install Windows on PC Using a USB Drive#Install Windows#Install Windows on PC Using a USB Drive
0 notes
Text
Installing Linux (Mint) as a Non-Techy Person
I've wanted Linux for various reasons since college. I tried it once when I no longer had to worry about having specific programs for school, but it did not go well. It was a dedicated PC that was, I believe, poorly made. Anyway.
In the process of deGoogling and deWindows365'ing, I started to think about Linux again. Here is my experience.
Pre-Work: Take Stock
List out the programs you use regularly and those you need. Look up whether or not they work on Linux. For those that don't, look up alternatives.
If the alternative works on Windows/Mac, try it out first.
Make sure you have your files backed up somewhere.
Also, pick up a 5GB minimum USB drive.
Oh and make a system restore point (look it up in your Start menu) and back-up your files.
Step One: Choose a Distro
Dear god do Linux people like to talk about distros. Basically, from what all I've read, if you don't want to fuss a lot with your OS, you've got two options: Ubuntu and Linux Mint. Ubuntu is better known and run by a company called Canonical. Linux Mint is run by a small team and paid for via donations.
I chose Linux Mint. Some of the stuff I read about Ubuntu reminded me too much of my reasons for wanting to leave Windows, basically. Did I second-guess this a half-dozen times? Yes, yes I did.
The rest of this is true for Linux Mint Cinnamon only.
Step Two: Make your Flash Drive
Linux Mint has great instructions. For the most part they work.
Start here:
The trickiest part of creating the flash drive is verifying and authenticating it.
On the same page that you download the Linux .iso file there are two links. Right click+save as both of those files to your computer. I saved them and the .iso file all to my Downloads folder.
Then, once you get to the 'Verify your ISO image' page in their guide and you're on Windows like me, skip down to this link about verifying on Windows.
Once it is verified, you can go back to the Linux Mint guide. They'll direct you to download Etchr and use that to create your flash drive.
If this step is too tricky, then please reconsider Linux. Subsequent steps are both easier and trickier.
Step Three: Restart from your Flash Drive
This is the step where I nearly gave up. The guide is still great, except it doesn't mention certain security features that make installing Linux Mint impossible without extra steps.
(1) Look up your Bitlocker recovery key and have it handy.
I don't know if you'll need it like I did (I did not turn off Bitlocker at first), but better to be safe.
(2) Turn off Bitlocker.
(3) Restart. When on the title screen, press your Bios key. There might be more than one. On a Lenovo, pressing F1 several times gets you to the relevant menu. This is not the menu you'll need to install, though. Turn off "Secure Boot."
(4) Restart. This time press F12 (on a Lenovo). The HDD option, iirc, is your USB. Look it up on your phone to be sure.
Now you can return to the Linux Mint instructions.
Figuring this out via trial-and-error was not fun.
Step Four: Install Mint
Just follow the prompts. I chose to do the dual boot.
You will have to click through some scary messages about irrevocable changes. This is your last chance to change your mind.
I chose the dual boot because I may not have anticipated everything I'll need from Windows. My goal is to work primarily in Linux. Then, in a few months, if it is working, I'll look up the steps for making my machine Linux only.
Some Notes on Linux Mint
Some of the minor things I looked up ahead of time and other miscellany:
(1) HP Printers supposedly play nice with Linux. I have not tested this yet.
(2) Linux Mint can easily access your Windows files. I've read that this does not go both ways. I've not tested it yet.
(3) You can move the taskbar (panel in LM) to the left side of your screen.
(4) You are going to have to download your key programs again.
(5) The LM software manager has most programs, but not all. Some you'll have to download from websites. Follow instructions. If a file leads to a scary wall of strange text, close it and just do the Terminal instructions instead.
(6) The software manager also has fonts. I was able to get Fanwood (my favorite serif) and JetBrains (my favorite mono) easily.
In the end, be prepared for something to go wrong. Just trust that you are not the first person to ever experience the issue and look it up. If that doesn't help, you can always ask. The forums and reddit community both look active.
178 notes
·
View notes
Text
Have YOU got an old Windows PC Microsoft has told you can't run Windows 11? It's time to give it a new life!
How to install Windows 11 on unsupported PC Hardware using Rufus. You can also disable some other Windows 11 bullshit like data harvesting and needing a Microsoft account.
It has been in the news a lot lately that Windows 11 isn't allowed to be installed on PCs without certain requirements, including the TPM 2.0, a chip that was only included in PCs made in 2018 or later. This means that once Windows 10 stops receiving security updates, those PCs will not be able to (officially) run a safe, updated version of Windows anymore. This has led to an estimated 240 million PCs bound for the landfill. Thanks Microsoft! I get you don't want to be seen as the insecure one, but creating this much waste can't be the solution.
(I know nerds, Linux is a thing. I love you but we are not having that conversation. If you want to use Linux on an old PC you are already doing it and you don't need to tell me about it. People need Windows for all sorts of reasons that Linux won't cut.)
So lately I have been helping some under privileged teens get set up with PCs. Their school was giving away their old lab computers, and these kids would usually have no chance to afford even a basic computer. They had their hard drives pulled so I have been setting them up with SSDs, but the question was, what to do about the operating system? So I looked into it and I found out there IS actually a way to bypass Microsoft's system requirement and put Windows 11 on PCs as old as 2010.
You will need: Rufus: An open source ISO burning tool.
A Windows 11 ISO: Available from Microsoft.
A USB Flash Drive, at least 16GB.
A working PC to make the ISO, and a PC from 2018 or older you want to install Windows 11 on.
Here is the guide I used, but I will put it in my own words as well.
Download your Windows 11 ISO, and plug in your USB drive. It will be erased, so don't have anything valuable on it. Run Rufus, select your USB drive in the Device window, and select your Windows 11 ISO with the Select button. (There is supposed to be a feature in Rufus to download your ISO but I couldn't get it to work.?
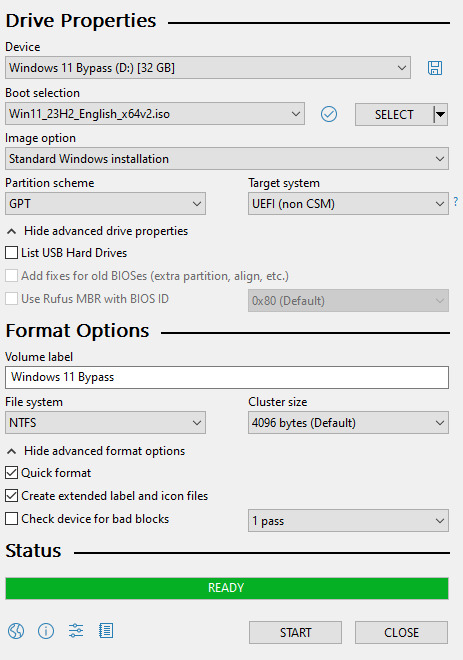
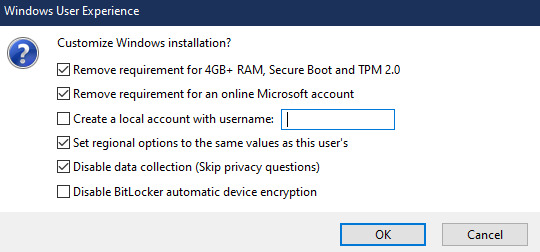
Choose standard windows installation, and follow the screenshot for your settings. Once you are done that, press Start, and then the magic happens. Another window pops up allowing you to remove the system requirements, the need for a microsoft account, and turn off data collecting. Just click the options you want, and press ok to write your iso to a drive.
From there you just need to use the USB drive to install windows. I won't go into details here, but here are some resources if you don't know how to do it.
Boot your PC from a USB Drive
Install Windows 11 from USB Drive
If you had a licensed copy of Windows 10, Windows 11 will already be licensed. If you don't, then perhaps you can use some kind of... Activation Scripts for Microsoft software, that will allow you to activate them. Of course I cannot link such tools here. So there you go, now you can save a PC made from before 2018 from the landfill, and maybe give it to a deserving teen in the process. The more we can extend the lives of technology and keep it out of the trash, the better.
Additional note: This removes the requirement for having 4GB Minimum of RAM, but I think that requirement should honestly be higher. Windows 11 will be unusable slow on any system with below 8GB of RAM. 8GB is the minimum I think you should have before trying this but it still really not enough for modern use outside of light web and office work. I wouldn't recommend trying this on anything with 4GB or less. I am honestly shocked they are still selling brand new Windows 11 PCs with 4GB of ram. If you're not sure how much RAM you have, you can find out in the performance tab of Task Manager in Windows, if you click the More Details icon on the bottom right. If you don't have enough, RAM for old systems is super cheap and widely available so it would definitely be worth upgrading if you have a ram starved machine you'd like to give a new life.

#Windows#Windows 11#tech#tech advice#pc#TPM 2.0#rufus#open source#open source software#technology#tech tips
725 notes
·
View notes
Text
I'm in!

That only took what like 3 hours to get to this screen? Maybe shouldn't have chose a laptop I quit using for being slow to do my test run with because every time I signed in or shut down windows took ~15 minutes each. Had to do it a lot because first I couldn't figure out how to get into BIOS, then I couldn't figure out how to get into Boot Menu. Then I did but there was no option for my usb. Then it did but there were two and I didn't know which was which so my dad suggested I just change the boot order in BIOS. Mind you, each of these is a 20-30 min shutdown and restart. Got in BIOS again and it said the name of the usb option so I was like oh so it's that one not the other one and got too nervous to change the boot order so shutdown and restarted again to choose it from the Boot Menu. My dad has been checking on me every so often to see if I've broke anything yet (so kind) and finally it was on the Linux mint logo. Also, from said logo to that screenshot was less than a minute so maaaaaaybe I won't have 15 minute startup anymore? My dad also said he was amazed at how many people still play sims 2 and then also said sims 2 was the best sims game...despite not getting to play it since 2004 because 8 year old me hijacked the family pc the first time I played it and never let he or my mom touch it again 😅 Anyway idk if I'm gonna get to the sims 2 portion of this tonight because I'm tired but I'm totally getting somewhere here!
38 notes
·
View notes
Text
I got a Steam Deck last year, and it’s such a great machine. It’s obviously inspired by Nintendo Switch, but it’s a lot better than a Switch.
The most important part is that it runs PC games. It’s fundamentally a Linux gaming PC in the form of a handheld console. There are a lot more games available than any console and and PC games both on Steam and GOG are a lot cheaper than console ones. You can get old or indie games for as cheap as 1-3 euro during sales. It’s a tremendous advantage for the deck over its console competitors.
And while the obvious intent of the deck is to get more people to buy games from Steam, it isn’t a walled garden at all. The deck launches into Steam when you boot it up, but you can go into desktop mode, and then it functions as a normal PC running a Linux distro. From there you can install Lutris or Heroic Games Launcher, and use it to easily install games you bought from GOG and Itch.io.
You can also do things like use the official dock or an unofficial usb-c hub to hook the deck up to a monitor, mouse and keyboard to use it as a desktop PC. Or you can hook it up to a tv to use it as home console.
The hardware is also a lot more powerful than a switch, the demanding triple-a games it can play is actually impressive. Although this comes with the natural disadvantage that it’s bulkier too. Putting more powerful PC parts demands more space for them. The deck is not something I bring with me outside. But then again I didn’t even do that with the 3DS, which was actually of a practical size to do that. The deck is portable enough that I can comfortably play lying in bed, which is how I always used my handheld consoles. So it’s perfect for me, but maybe not if you want to play it on the bus or something. It can probably be a fun addition to your luggage on longer trips though.
Of course, as mentioned, the Steam Deck uses Linux. This has both advantages and disadvantages. The main advantage is that it allows Valve to customize the operating system to make it fit with the machine it’s running on. The Deck’s SteamOS feels really well-integrated into the hardware, like how a proper console OS should be like. It’s not that dissimilar to how Sony used FreeBSD to make Playstation’s OS. Windows would not allow for this amount of customization and would not integrate as well.
And the open source nature of most Linux development allows Valve and the user to use existing open-source Linux software to their advantage. For example, the desktop mode is largely not a Valve creation, it’s an existing desktop environment for Linux, KDE Plasma. Yet it extends what the user can do with the deck to a great extent, like for installing non-steam games.
The main disadvantage to the Deck using Linux is that most PC games are built for Windows and don’t run natively under Linux. To run games built for Windows, the Deck has to run it through Proton, a compatibility layer which is Valve’s own gaming-focused version of Wine. Wine/Proton is far from perfect, sometimes games require extensive tinkering to work, or only run with serious issues, or don’t run at all, no matter what you do. Sometimes a game not working with Wine due to some random but serious issue that comes naturally from running a Windows executable on a Linux system via a compatibility layer. Sometimes it’s due to things like a multiplayer’s game anti-cheat system requiring access to the Windows kernel, and it will block a Linux pc from running the game because it has no Windows kernel.
This is however not as big a problem as it might otherwise be. Most games work, more or less. Valve has put a lot of work and money into both their own Proton and the Wine project as a whole, and they work a lot better than they did 10 years ago. Many run perfectly out of the box, because they are native, or play nice with Proton. Some require mere minor tinkering, like using a different version of Proton. And I generally don’t play multiplayer games, or if I do they don’t have draconian anti-cheats, so the games that are blocked because of anti-cheat are no big loss to me. The Steam Deck not running Fortnite is a plus in my book.
And we shouldn’t forget the Steam Deck verified system. Basically Valve employees check if the game runs out of the box with no issues on the Deck. They get a verified rating if they work with no issue, including both proton compatibility but also things like the controls working nice and the text being legible on the deck’s small screen. They also get a “playable” rating if the game runs to an acceptable standard but with tinkering required or other minor issues.
This is a good system. If you dislike tinkering, you can just buy and play games on steam with a verified rating, and the deck will work like a normal console for you, but with a lot cheaper games. It’s a good way to get people used to consoles into PC gaming, which is probably the point of the Deck.
And if you want more than deck verified games from Steam on the Deck, you are given the freedom to do it. I’ve gotten officially non-supported steam games to run on the deck by installing and using proton-GE and I’ve installed and played games from GOG.
The Steam Deck is really how a Linux PC for the common people should work. An easy and slick experience for casual users, but freedom and customization given to those that want it.
82 notes
·
View notes
Text
also share your names with me I'm curious :3
down below is a heartfelt sob story about my favorite hard drive and also reason why I did the poll
For the longest time I only had one external drive containing everything. It was an old 256GB drive that I just named "BACKUP".
When I got my SSD I took out the old hard drive and used that as my main backup source. Because it had more storage I named it "BACKUP EXTENDED".
That drive got corrupted when I was in rehab because some guy named Kevin borrowed it for movies and used in a micro usb phone cable instead of the real one that was right on top of the drive.
So BACKUP EXTENDED was no more. A few months later I tried some usb partitioning tools (GParted my beloved) because I had some computer issues and thought I try to revive that old drive again and it fucking worked. From that day on my backup drive was known as "THE UNDEAD" (I've also been a huge Hollywood Undead fan at that time).
That name stuck with me, even after I accidentally formatted the whole drive when installing Arch, It persisted through each repartitioning session.
When I fucked up my partitioning table so hard it took several tries of fiddling to get the drive to work again, I renamed my trusty old drive to UNDEAD REVIVED because, well, I had to revive it again. Is it really undead at this point? Or is a revived thing alive again. What is a revived zombie, really? Maybe that's something for another poll...
A few weeks ago I got a few terabytes of storage for cheap and the biggest drive I got right now is 3TB. It's my new backup drive and I called it "UNDEAD EXTENDED",
But I've reached a point where having only one partition for everything isn't enough anymore. I have a macbook for work which can't write to NTFS partitions, so I had to create an exFAT for shared storage. That doesn't allow me to symlink things though, and I still need to have a Windows backup that I can just attach to any PC and boot from it, so I also need an NTFS drive. But Windows does things to the NTFS drive so that sometimes I have to sudo mount the partition which is really annoying and kinda sucks. I only use Linux on my main machine and just want to keep some of its files somewhere without other systems interacting with it at all so now I also have a ext4 partition for system backup and some games.
So, my trusty UNDEAD* hard drive that I lovingly kept and revived and extended and revived again, which stores everything that I own and love and need is now cut up into pieces and none of the partitions feel like the drive that it once was that makes me sad.
I grew very attached to that hard drive and to that name but even when the physical drive is still next to me it feels like I've outgrown it. I've had my Undead drive when I was at my lowest and it was a part of my digital life up until now. I've had iterations of it for almost half of my life. If that thing could talk, it would scream.
So, how did I name my partitions instead now?
I've named my exFAT partition "CYBERSLUT" the way it plugs into any computer and gets manhandled by it, it made me smile when I made the tough decision to retire the undead naming scheme.
My NTFS drive is called "WHYDOS" because I always ask myself why I still keep up with Windows sometimes, and I just recreated my ext4 partition that I named "PLAYGROUND", because it's only used for Wine bottles and some steam games so far, so they don't take up most of my limited SSD space.
#Is this how it feels like to outgrow your marriage?#getting sentimental over a fucking hard drive#where in the body is the soul located?
41 notes
·
View notes
Text
How to bypass Microsoft Account when installing Windows 11

Microsoft has confirmed that the popular “bypassnro” command, which let users to skip connecting to the Internet and signing into a Microsoft Account, is being removed, when setting up a new Windows 11 PC.
Microsoft is now requiring every Windows 11 device be set up with an internet-connected account.
Windows 11 PCs that have already been set up without a Microsoft Account will be unaffected. This change only affects the Windows 11 install and setup experience, where the OS requires an internet connection and a Microsoft Account to progress.
There are still ways to bypass these requirements, Currently, it’s also possible to manually re-add the bypassnro command to your system by typing the following into a command prompt: “reg add HKLM\SOFTWARE\Microsoft\Windows\CurrentVersion\OOBE /v BypassNRO /t REG_DWORD /d 1 /f shutdown /r /t 0”
However, there’s no guarantee Microsoft will allow this additional workaround for long. There are other workarounds as well, such as using the unattended.xml installation, but this requires a lot more work and includes creating a new Windows installation image from scratch.
Steps to Create an Unattended XML File for Local Account
1. Basic unattend.xml to Skip Microsoft Account:
Here’s a minimal XML file that configures a local administrator account and skips OOBE (Out-of-Box Experience) prompts:
<?xml version="1.0" encoding="utf-8"?> <unattend xmlns="urn:schemas-microsoft-com:unattend"> <settings pass="oobeSystem"> <component name="Microsoft-Windows-Shell-Setup" processorArchitecture="amd64" publicKeyToken="31bf3856ad364e35" language="neutral" versionScope="nonSxS" xmlns:wcm="http://schemas.microsoft.com/WMIConfig/2002/State" xmlns:xsi="http://www.w3.org/2001/XMLSchema-instance"> <OOBE> <HideEULAPage>true</HideEULAPage> <HideOEMRegistrationScreen>true</HideOEMRegistrationScreen> <HideOnlineAccountScreens>true</HideOnlineAccountScreens> <!-- Skips Microsoft account --> <HideWirelessSetupInOOBE>true</HideWirelessSetupInOOBE> <NetworkLocation>Work</NetworkLocation> <ProtectYourPC>1</ProtectYourPC> </OOBE> <UserAccounts> <LocalAccounts> <LocalAccount wcm:action="add"> <Password> <Value>YourPassword123</Value> <!-- Change this --> <PlainText>true</PlainText> <!-- Set to false if hashed --> </Password> <DisplayName>LocalAdmin</DisplayName> <Name>LocalAdmin</Name> <Group>Administrators</Group> </LocalAccount> </LocalAccounts> </UserAccounts> <AutoLogon> <Password> <Value>YourPassword123</Value> </Password> <Enabled>true</Enabled> <Username>LocalAdmin</Username> <LogonCount>999999</LogonCount> </AutoLogon> </component> </settings> </unattend>
2. Save the File
Save as autounattend.xml (for USB boot) or unattend.xml (for deployment tools).
Place it in the root of your Windows 11 installation USB or inject it into the ISO.
3. Use the File During Installation
Boot from the USB, and Windows Setup will automatically apply the settings.
No Microsoft account prompt will appear.
Get a Windows 11 Product key at keyingo.com for half price !
5 notes
·
View notes
Text
funny thing with retro PC hardware is how the further back in history you go, the less you can really expect the mainboard to do for you.
you take a modern mainboard and it'll likely have most functions and features you're likely to need already integrated by default, be it sound, network, WiFi... there's usually even going to be video out from whatever barebones GPU is very likely integrated into the CPU by default, as well as a plethora of USB ports for whatever peripherals or other devices you might possibly want. It's basically almost a complete system in and of itself - just add a CPU, RAM, and some kind of storage medium and off you go. Plenty of boards of today will even have built-in support for plugging in fancy chassis RGB lighting straight into the mainboard itself.
Not so with older mainboards - the one I'm looking at using for my retro build project supports basically the typical two channels of IDE/Parallel ATA for a total of four main drives of whatever combination of hard- and optical, a single floppy drive, two PS/2 ports, one keyboard one mouse, a parallel LPT port, a few serial COM ports, an old AT DIN-5 keyboard port, and - shockingly - two USB ports that I'm guessing are ancient 1.0 standard. And that's it. There's no sound, no graphics, no networking - that's all stuff you have to add via expansion cards. You basically cannot use this computer at all without adding at least a graphics card - the Power On Self Test (or POST) will fail and straight up refuse to boot the system if no graphics card is detected. You go back far enough in history to the original IBM PC and it won't even have integrated hard drive support, necessitating an expansion card just to add fixed storage space.
And this is basically why the PC is such an inherently flexible platform - it was and is built pretty much grounds up to be extensible, providing the option to add just about whatever functions and features you might require via expansion slots built on open standards, allowing pretty much anyone with the prerequisite know-how and manufacturing capabilities to build their own. With the relative ease and low cost of circuit board manufacture of today combined with the ready access to powerful microcontrollers like the Raspberry Pi Pico, there's a good number of hobbyists making expansion cards that can more or less be programmed to do pretty much whatever.
Though this is technically still possible to do on modern PCs, the relative speed and complexity involved with modern PCI Express interfaces makes it far less accessible than making your own ISA expansion cards.
8 notes
·
View notes
Text
So! I broke my computer yesterday. So let's talk about how I did that because it's probably the most unusual way you're going to hear.
Me and my boyfriend were reinstalling windows, my motherboard was made for the PC it's in, so it's not very well documented and has a bunch of not-completely-standard stuff which makes it hard to modify or upgrade. This also means that to do firmware updates, it's manufacturer generally pushes them with windows updates. And sometimes you don't know it's doing firmware updates because it's at the same time, downside of this: if a firmware update is interrupted (when the PC tells you not to turn it off during an update) then it can lead to hardware failure.
I'm sure you can see where this is going.
When a computer powers on it initially goes to the bios which perform a POST (power on self test) which checks the state and functionality of the hardware in your computer. If there's an issue then it produces beeping sounds, which align to an issue with the PC. If a computer fails to POST, it doesn't boot into the operating system.
At the same time the PC was being turned on I unplugged my keyboard from the back, this usually should not make a BIOS fail it's POST, however for some reason in my BIOS, if you unplug something from a USB during boot, it can cause it to fail.
I unplugged the keyboard at just the wrong moment, the BIOS failed to post, because it was in the middle of an update it got corrupted, and then we got to spend the next 7 hours or so wondering why my PC was making 1 long-1 short beep due to my motherboard not having proper documentation of it's BIOS (it's based on AMI but AMI doesnt have that beep code, we later realised that because AMI doesnt have a motherboard issue beep code, they had taken IBMs beep code for it).
So I bricked my entire motherboard, by unplugging a keyboard.
Quite luckily both my boyfriend and father are quite tech proficient, there is a possible way to fix a bricked motherboard and it's to reflash the BIOS. Doing so requires specific equipment and has the potential to destroy your motherboard. You have to use a programmer to do it, my dad's had to remove my bios and all sorts, which is stuff that most people wouldn't be able to do, so most people would just definitely be left with a bricked pc for a simple mistake.
Annoyingly with my dad looking at the motherboard, there is actually a place on motherboard specifically for a dual bios so that if one fails there's a backup, except the manufacturer didn't put it on
3 notes
·
View notes
Text
a list of fun things about my fuckass pc
-duct tape was applied to the inside of the case at some point during the building process and I still don't know why
-I'm pretty sure my gpu is from the scp foundation

-Because my old monitor uses a different kind of cable than my gpu, I have to use an old TV set as a monitor. This does come with some advantages, mainly the fact it's funny and has built in speakers, it also has a kinda poor resolution when close up, it genuinely hurts my eyes to use in in the dark, and I need to use a TV remote to turn it on or off (also it retains its ability to search for channels and doing so will result in me needing to unplug the monitor)
-Just before I woke up this morning, the gpu decided to just straight up stop working because it "required further installation" while both the computer was shut down and the power was off so I'm pretty sure it's sentient, but restarting the computer fixed it so it's probably fine
-the wifi antenna that came with one of the parts, either the case or the motherboard iirc, just straight up does not work (that or we couldn't get it to work) but using the shitty tplink USB thing I got like four years ago does.
-speaking of the wifi, I get a better connection if i put my antenna on the ground just outside my closet. I dont even know for this one.
-when we started it up for the first time it just didn't turn on except for the fans on the liquid cooler system. I dont know how this issue got fixed, as far as I understand it basically just started working completely fine after like a day
-it has about nine fans total and yet the only times it made any significant noise are when I boot it up and when I tried running rain world while my gpu was up to funny buisness. (Also this might be completely normal but also the fans in the case need a SATA cable, which I was under the impression was for like hard drives but maybe not)
-the current setup for sound is a device that plugs into a USB then I put my earbuds into the headphone jack on it, as opposed to using the headphone jack on the computer. Probably normal but convoluted.
There's probably more but this is everything I could think of atm
3 notes
·
View notes
Text
HOW TO BACK UP YOUR SHIT ON A FUBAR PC
So, I have a lil linux know how. Someone I know's Windows Boot SSD died on em. I helped unfuck it, but it still got me thinkin. "Do people know how to back up stuff after their PC commits seppuku?"
So What you'll need is:
-A friend's PC to create the usb tool -A USB drive (preferably USB 3.0) with 16 GB or more of storage -An external hard drive to store the backup image -An internet connection.
FIRST
Borrow your friend's pc or laptop.
Download balena-etcher or Rufus
Download a copy of ubuntu linux. Get a coffee, eat a sandwich. This'll take a while.
Once it's done, use Etcher or Rufus to install Ubuntu on the flash drive. Eject the usb, thank your friend, and go back to your malfunctioning compy and plug the usb in.
NOTE: THIS PRESUMES THAT THERE IS A SOFTWARE ERROR PREVENTING YOUR MACHINE FROM BOOTING. IF THE HARDWARE ITSELF IS BROKEN, THIS WONT WORK.
Ok, you're going to boot your PC into BIOS. How? Depends on who made the computer. Google "How to open bios on a [Blank] pc", and you should be able to find the answer pretty quick. Its usually by either spamming the delete key or f10 while your computer turns on.
Once you're in the BIOS, there should be a menu with boot options. Select the usb. It will boot your computer into ubuntu linux, running off that lil usb stick. Neat, huh? You'll get the option to try or install ubuntu as an operating system. You want to click "try".
Plug in the external drive you're putting the backup image of your drive on.
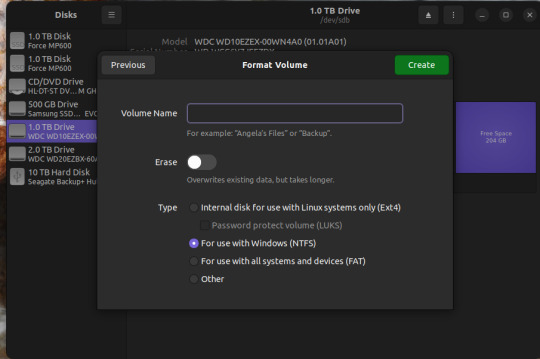
Hit the windows key and it should pull up a search bar. type "Disks" or "Gparted". it's the same program either way so, open it.
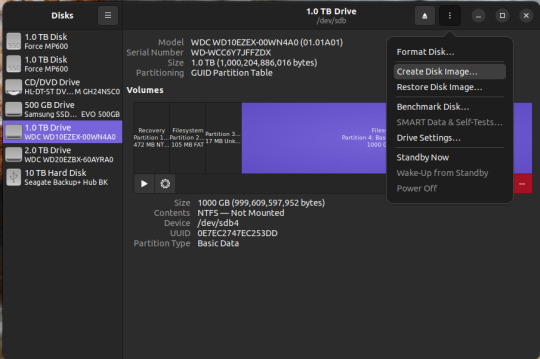
You should see something like this.
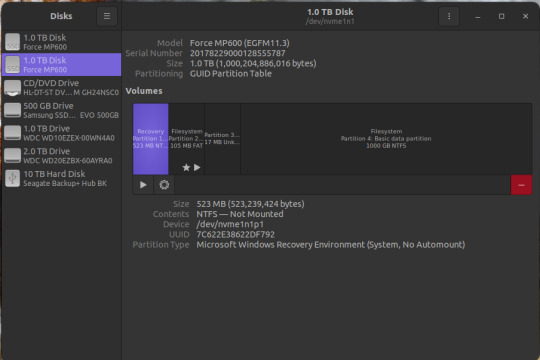
Depending on the size of your Boot SSD in windows, you may need to shrink the partition a bit. like If you have a 500gb drive handy, but the drive you need to back up is 1TB. So click on the bit that says "basic data partition"
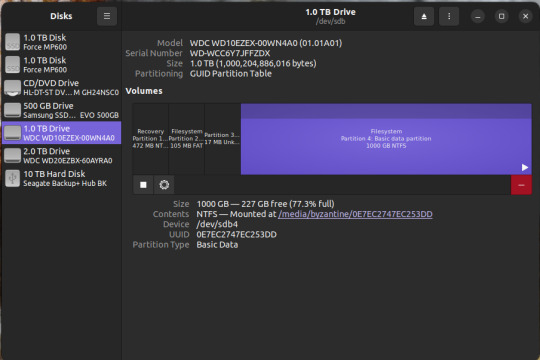
click the gear icon
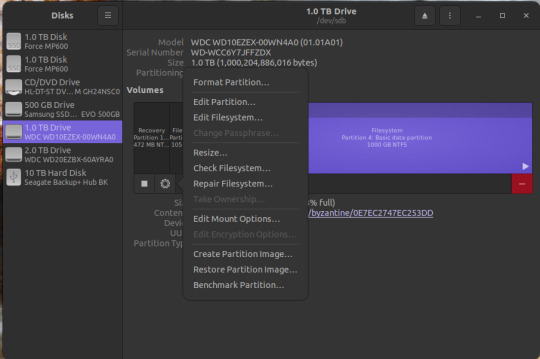
Click "Resize..."
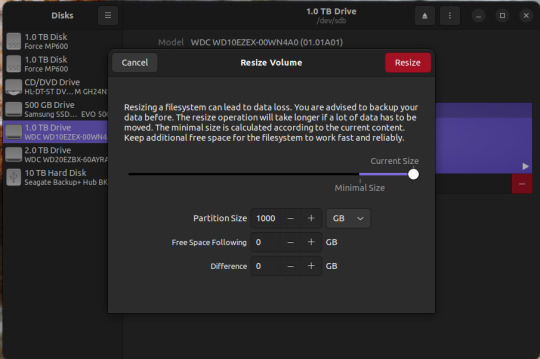
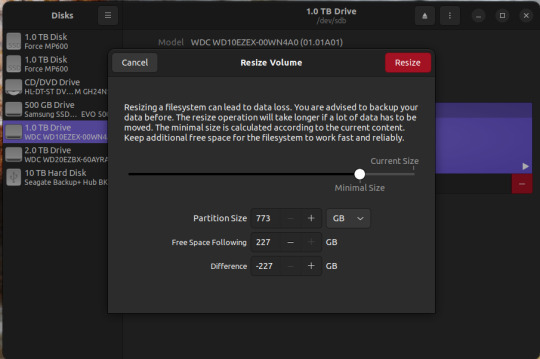
Resize. if the external drive you're backing up to is BIGGER than the boot drive you're trying to back up, you can skip this.
Now there's two things you can do. The first is to simply create an image of the basic data partition where all your files are. The second is to back up the whole disk.
To back up the partition,
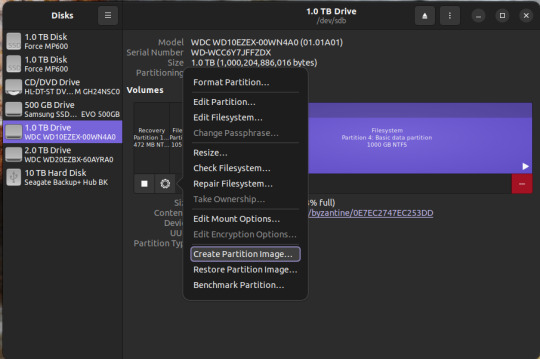
Select the basic data partition, click the gear icon, and select "create partition image"
Name it whatever you want, save it on the external drive. Go get another coffee and a sandwich, this may take awhile as well.
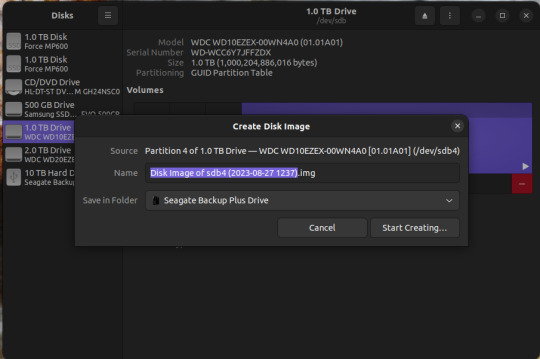
To make a backup of the whole disk, click on the three vertical dots in the upper right corner, and select "create disk image"
Same as before. name it what you want, save it to the external drive.
There you go.
To access the data, you need to restore that image to a new SSD or hard drive. You can do this using the same program. I recommend doing this AFTER you've done whatever was needed to fix windows.
if you're just restoring a partition image, not the whole disk, here's what you do.
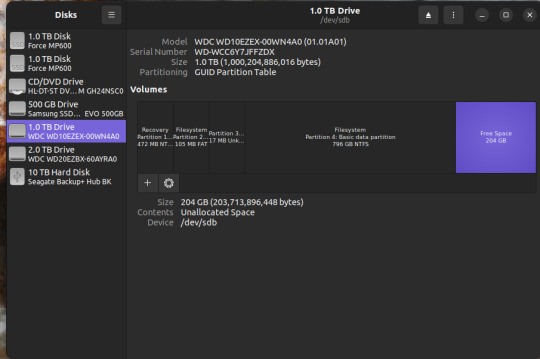
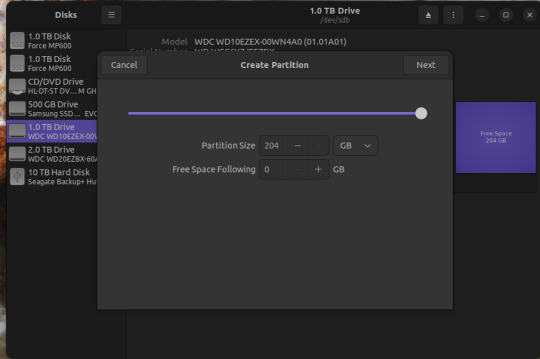
If you have FREE SPACE on a drive, or new drive, you can click on the "+" button, create a new empty partition
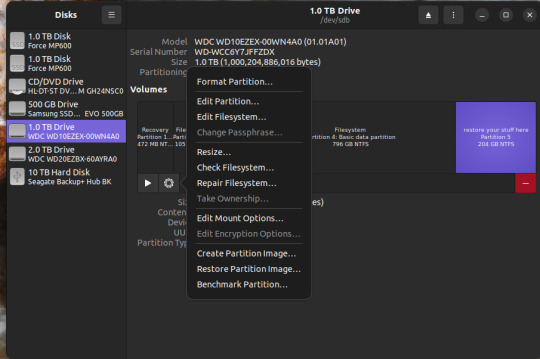
and click "restore partition image" to make it readable. Then you can mount it as a new drive in windows and copy your stuff over. WARNING: THE PARTITION YOU'RE RESTORING TO MUST BE AS BIG OR BIGGER THAN THE PARTITION IMAGE
For a disk image, similar steps.

Three vertical dots on the upper right, select "restore disk image".
Select the full disk image from wherever you saved it and restore.
WARNING: Restoring a disk image will nuke anything already on the drive you're restoring it TO. So don't restore the disk image to your fixed boot drive, or to the drive you saved the disk image on.
Anywhomst. I hope this helps someone save their stuff or avoid being charged out the nose by a computer repair shop.
16 notes
·
View notes
Text
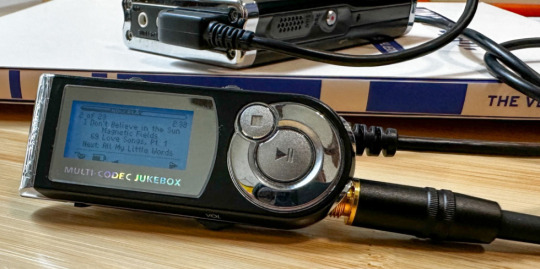
An ode to the iRiver iHP-120
For whatever reason, I've found myself deeply nostalgic for high school as of late. And for me, that is intractable from nostalgia for what is perhaps the peak mp3 player ever made:
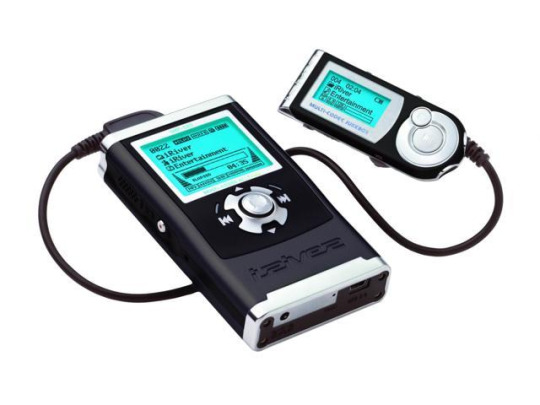
The iRiver iHP-120 was released in 2003, my sophomore year of high school, and it changed my life. This thing held an astounding 10GB of music—for comparison, most mp3 players at the time were flash based, and held 128 or 256 MB of music. The only big competitor at the time was the 1st generation iPod, a mac-exclusive device that transferred data over firewire and had to be synced using the fledgling iTunes. Juxtapose that to iRiver, who took what I like to call the "we don't give a fuck" approach:
When you plugged in the iHP-120 with USB 2.0, it just showed up as an external hard drive—you could throw whatever you wanted on there. Naturally, it could read mp3 files, but this thing introduced me to the world of audio codecs and processing in a way nothing could have prepared me. WMA files worked fine (a big deal at the time because of DRM issues, during the heyday of KaZaA and Limewire). You want to play uncompressed .WAV files? No problem, put them on there. FLAC files? Absolutely, let your audiophile freak flag fly. Fucking OGG Vorbis files played on this thing. Hell, you could put text files on here and read them.
(The firmware for these was also basically open-source, and people did even crazier stuff with them. By the time I retired my player, it could do gapless playback, crossfading, 10-band equalizing, normalization and more. I think I also changed the boot screen to a picture of Sailor Moon.)
But the magic didn't end at uploading music to the iHP-120—controlling this thing was more intuitive than any other device around at the time. All of your music was displayed on the player in whatever folder structure you loaded onto the device—navigating the music was as simple as using Windows Explorer. You had your standard play/pause, skip forward/back and volume controls on the front joystick, but what are the other buttons for?
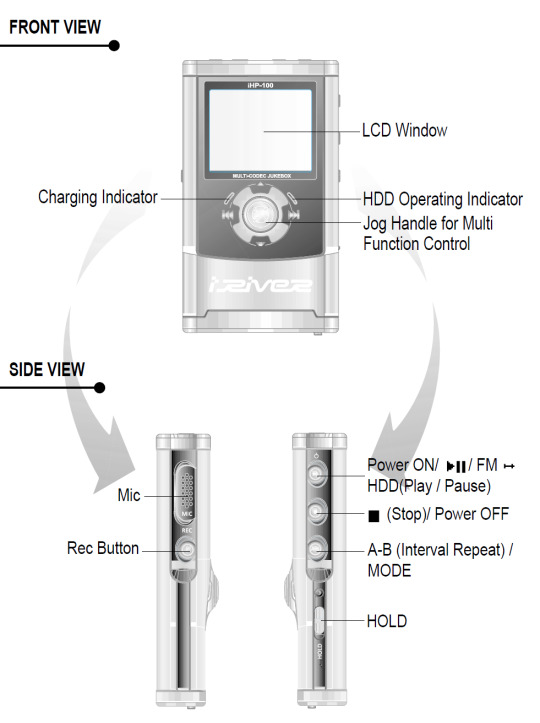
Yeah. This thing was also a portable recorder. At anytime you could just hold down the Rec button and start recording with the onboard mic, or using an external input (more on that later). On the right side, an A-B Interval control. You ever wanted to just listen to one part of a song on repeat to learn the lyrics? Just hold down the button. Lastly a hold switch to disable control inputs while it was in your pocket—no accidentally pausing the music.
Okay, back to the external input mentioned before. The top of the iHP-120 is wild.
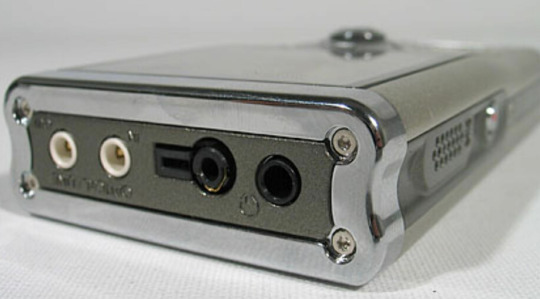
The top I/O panel of the iRiver iHP-120, with 4 jacks.
From right to left, you have a 3.5mm headphone jack (naturally), a 2.5mm microphone jack, the remote control port (more on this in a bit), and in white you have Line In/Out jacks which you could use to record as well as just plug in a second pair of headphones for a friend—jacks which support both 3.5mm analog input, as well as 3.5mm TOSLINK optical cables.

The TOSLINK 3.5mm male plug. A plug I only ever encountered on this device and the Sound Blaster X-Fi Titanium, a sound card I wrote a review of in 2009 which seems to still be up at PC Gamer and reading it now I don't know how any of my writing was ever published, let alone in print.
Chances are good you've never encountered this, it's phenomenally uncommon, and TOSLINK as a whole largely died with the emergence of HDMI—but this fucking mp3 player could both record and transmit fiber optic audio in uncompressed stereo or lossy 7.1 surround sound. In high school, I would plug the iHP-120 into our home theatre and listened to Porcupine Tree's Stupid Dream on repeat (side tangent, I'm pretty sad 5.1 album recording never really caught on, but the Dolby Atmos music format is better in every way, and I'm grateful Apple is bringing it into the mainstream).
"Okay, so we have an music player/text reader/voice recorder with optical audio, and basically every codec under the sun, what else could you go on about Erika?"
-you, the person reading this
THE REMOTE
Let me take you back to 2003. I was a depressed theatre kid teenager who would listen to Rooney on repeat on my Koss UR40s while crying over a girl who wanted nothing to do with me.

The Koss UR40 Headphones I wore like a fashion accessory everyday.
The other thing I wore everyday besides those headphones? Baggy cargo pants (it was acceptable at the time, I swear). Inside the right cargo pocket was my iRiver iHP-120, and clipped to the velcro flap of that cargo pocket was the iHP-115R remote control.
The iHP-120 remote unit
Every function of the iHP-120 could be controlled from this little fucker. Play/pause and stop buttons. Volume, skip track and recording are all here on rocker switches. You could even change the fucking bitrate of playback on this little thing, all without taking the actual mp3 player out of your pocket because the LCD screen on the remote has all the same info you'd get on the main unit.
The remote itself connected to the iRiver with that big plug you can see in the picture above (shamelessly stolen from Nathan Edwards who I worked with at PC Gamer in the late 2000s and only while writing this post discovered has already written a much more professional ode to the beauty of the iHP-120 this year).
You would plug your headphones into the remote, (or in my case you could also plug in your 1988 Chevrolet 2500 suburban's tape deck adaptor and have controls at your fingertips. No more distracted driving).
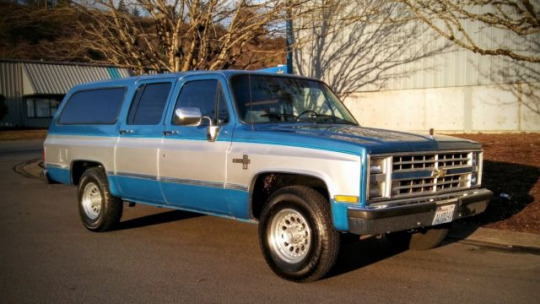
An image of a 1988 Chevorlet 2500 diesel Suburban. Not super relevant but god I miss my high school suburban. We would take the rear and middle benches out and put a queen-size mattress in the back, which 9 of my friends would ride on as we went to Little Caesar's for lunch. Also, cars just looked way fucking better back then.
I think I'm about done waxing nostalgic, but I really do miss the days of discrete devices—I kind of find myself fighting back against my smartphone. I have a camera I carry around, a pen and paper planner and writing notebook, and a kindle for reading. There's something appealing about not having my phone be my access to music either—rather, having a device that I just threw my music on and it plays it really well was rad. The iHP-120 was really fucking rad.
12 notes
·
View notes
Text
I have two hard drives in my computer: one 500GB SSD (disk 0), and one 1TB SSD (disk 1). Based on my personal experience, I've found this computer to be horribly incompatible with just about everything. For whatever reason, I tried installing Linux Mint, and it went pretty good. That was until it installed the bootloader on disk0 without detecting my Windows installation on disk1, pretty much making my Windows installation inaccessible. This would've been easy to fix if I could make Windows 10 boot media, but I couldn't get an ISO or any software to make boot media because the Wi-FI just decided to stop working when I restarted the computer (I don't even have an Ethernet port in my house). I have a physical copy of Windows 10 lying around, but it's from 2016, so it has a USB driver that causes all of the connected USB devices on my computer (including keyboard/mouse) to stop working. I'm so fucking sick of how incompatible this garbage custom-build tower PC is, I'm so close to just getting a ThinkPad or something.
Hopefully, I'll be able to use one of my spare computers to make Windows 10 boot media and save the Windows 10 installation on my PC, but I honestly just don't want to at this point.
4 notes
·
View notes
Text
Being a rhythm gamer is suffering
So let me tell you about my Quest To Just Play Some Fucking Guitar Hero. This is an ongoing tale of suffering and betrayal. There is no honor here. There certainly isn't any Guitar Heroing happening.
Last October I went to Anime Weekend Atlanta, which used to be located in the Cobb Galleria across from the Cumberland Mall. Unbeknownst to me, the mall had installed an entire arcade some time post pandemic. And in that arcade there was a Guitar Hero cab. "Huh," I found myself thinking, "I haven't played Guitar Hero in years. How nostalgic. I wonder if I'm still any good at it." So I payed two entire American dollars to play a song (in my defense I thought it would be at least a couple of songs, not just one). And I discovered to my great surprise that I am in fact still fairly decent at Guitar Hero. The song ended and I realized I had payed $2 to play Muse's Supermassive Black Hole once, decently, and I felt kind of ripped off.
But then I spent the whole weekend, and subsequent weeks, itching to play Guitar Hero again. I did a little bit of research and discovered that I could either purchase a plastic guitar controller peripheral and a copy of the game for one of the sytems I still own... or I could download a free fanmade game called Clone Hero and try to find one of the many guitar controllers capable of connecting to PC via dongle, USB or bluetooth.
A few months later I found myself in a thrift shop staring down a guitar. It was one of the Wii Rock Band guitars, and according to the internet I had a roughly 50/50 shot at it actually connecting to my PC with no problems. It was only like $12 so I bought it. Of course I got it home and no luck connecting. More research. That particular model of Wiitar has a dongle that you can use to connect it to the Wii and/or PC via bluetooth. There are a few different auctions on Ebay for the dongle in question. I checked and rechecked the listing to be almost certain that I was bidding on the correct model of dongle. I win the bid, with shipping the dongle has cost me more than double the cost of the guitar. This is fine, I think. I still have a Wii, so maybe I can pick up some of the Wii Guitar Hero or Rock Band games as well. I eagerly await the arrival of the dongle.
The dongle arrives, I put batteries back in the Wiitar, I connect the dongle to my PC. I try to connect the Wiitar to the dongle. Nothing. More research. Apparently this just happens sometimes, nothing to be done about it. I throw my hands up in frustration and give up on the idea of getting to actually play Guitar Hero.
A couple months pass. I am at Southeast Game Exchange. I scour the vending area for working guitars and find none that are 100% the type that connect automatically to PC via bluetooth. I give up again, frustrated but accepting of my fate.
And then I find a sealed copy of Dance Dance Revolution Supernova for the PS2 that includes the dance mat. And let me tell you, I loooooove DDR and I've had 0 luck finding a working dance mat, too. So of course I buy that shit. My PS2 works! I still have the older DDR games too! What a great find, I can't wait to play DDR at home again!
After the show I'm stewing on my inability to find a goddamn guitar controller to play Guitar Hero or Clone Hero. I obviously still have a working PS2 which I just bought a dance mat for. I look on Ebay to see if someone is selling one of the PS2 Guitar Hero controllers and happen to find someone selling a used copy of Guitar Hero 2 with the guitar included! Lucky! The seller even gives me a discount! Finally, I can play Guitar Hero! I hit buy with no remorse and eagerly await the arrival of the guitar.
I finally get the guitar in the mail. I eagerly open the box up, take out the guitar controller, plug it in to my still functioning, very recently tested PS2 slim. I put the Guitar Hero 2 disc in my PS2. It boots up, how nostalgic! I still have save data from when I played this game all the way back in college! Oh hey, this game is the reason I still have Monkey Wrench by the Foo Fighters in my frequently played playlists! I select the song on medium difficulty and start playing. I've been having a terrible week, so I really needed this. I stumble a bit at first, but by the chorus I've got the hang of-
The game freezes.
Okay, uh. I try to go back to the main menu. Nothing. I reset the PS2. Is it the game? It's got a couple of scratches, but otherwise the disc is fine.
The disc cannot be read.
Huh. Am I about to leave a bad review on Ebay? I mean, the guitar and the game both worked until they didn't, right?
I try a different disc. Same thing, cannot be read. Well, that one has some scratches too. What about the sealed copy of DDR Supernova? I open it up, no scratches, pristine. I put it in the PS2. Nothing.
Some frantic Googling suggests that the laser might be dying. I try a PS1 game, same thing. It's definitely the laser. Well, that sucks. Fortunately, the internet assures me, this is an easy fix! I can get a replacement laser from Ebay for under $20, I just have to wait for it to be shipped from China. Oh, and I'll need a soldering iron. And I'll need to completely take the PS2 apart.
Yeah, no. So I search for places nearby that I might be able to mail the PS2 to in order to get it repaired, and wow, what luck! There is one such place that is only a 2.5 hour drive away from me! And their website reassures me that it's such an easy fix that it should only take about 30 minutes, 2 hours at most! At this point I am feeling like a 5 hour round trip to get my beloved PS2 back in working order so that I can play some fucking Guitar Hero is worth it. If I stay in my apartment for any longer I'm going to scream.
I should have called ahead, in hindsight.
So I get the car, which is it's own ordeal. I get on the road. I like longish drives, so really 5 hours in the car isn't so bad. The place also sells a lot of used games and stuff, so surely I can find something interesting there to make it worth my while. And there's a used CD shop nearby too. This is going to be a fun day trip.
I get there and they tell me the repair will take about two months.
Well, I've got no choice, so I leave the PS2 with them. And feeling like I need to get something out of a 5 hour day trip, I browse their wares. They just so happen to have a used PS2 slim model for sale. "Works perfectly, just has some paint damage!" it claims. I ask them if they'd be willing to give me any amount of store credit for the PS2 I brought in, even knowing the laser needs to be replaced. They cut me a deal. I ask them, repeatedly, if they are sure the PS2 works and the only problem is the paint damage. They reassure me that it works fine, the discount is because it has the paint damage and comes with no cords or controllers. I decide that I really just want to play some fucking Guitar Hero some time in the next two months, so I do the trade and I leave the shop with the other PS2.
(And then on the way home I drive through an actual monsoon and my car battery dies at a rest stop, forcing me to wait on roadside assistance to jump the battery, but that is unrelated to this tale.)
Today I unwrapped the replacement PS2. I plug it in, I put the Guitar Hero 2 disc in, I turn it on.
It won't. Fucking. Read. Discs.
I just want to play some Fucking Guitar Hero! And now I've got that brand new dance mat and so many copies of DDR that I also cannot play because NOTHING IS BACKWARDS COMPATIBLE WITH PLAYSTATION 2 GAMES. I call the shop and try to leave a polite voice mail, but after about 30 seconds I get cut off. I call the shop back and leave a much less polite voice mail. And now we wait, because of course a shop run by gamers doesn't open until 12 noon. And it's not like I can even drive back up there (not that I want to) because my car is in the shop getting the battery replaced.
B͉̤̘͙̖̳̙͋̽ͣ̏ͫE̟͚͖͕ͪ̉͆̽Ị̮͕͆̏̾̓N̹̭̾͂̈͑̚G͔̠̮̮͎ ͨĀ̰̼͕̟̭̯̺ ̪̓ͧͩ́��͕̘͓͙͇R̼̱̯̤̬̊̄̈́ͨ̆̇͂H̰͓͈̭̲̄̆ͪ͌͐Ȳ̝̖̩̯̤̳Ț̺̳̼H̟̫͎͙ͬ̈̾̈͌ͮM̞ͪ̓̓͆͌ ̳ͣG̽̂̐̆A̯͈͉̭̪M͕͕͈̰̬̼̝ͥ͂Ë͉̮͇́̍̂͑͗Ṟ͈̭͖̪̥ͧͭ ̦̍ͨ͆ͬͦ̈̚I̦ͭͤS͉̝̞͍̞͙͑̀̌̊̌̈́ͅ ͍͖Sͮ͗ͨͨ̓ͩU̜̬̪̯F̳̐̿͛F̦ͦͣͬ͆̏ͧE͍͙̫͔̞͗Ŕ͔̮͌ͯͩ͋̈́̚ͅI̦͔̭̠͒N̼̥ͣͅG͚̹̳͕̮̮͈̍̓̎ͧ
4 notes
·
View notes
Text
Howdy been a bit busy not only from the job hunt but also cause I've been making the switch to Linux specifically Kubuntu. I should be back to my art soon. Luckily I should have an easier time adapting as I've never really used much Windows only software LibreOffice/Krita have always been my go to etc.
Also figured I'd add if y'all wanna make the switch with Kubuntu as the sole operating system here's what I did in the end.
IMPORTANT NOTE I AM NOT IN ANYWAY RESPONSIBLE FOR WHAT YOU AS A HOPEFULLY SANE PERSON DO TO YOU COMPUTER.FOR THE LOVE OF GOD RESEARCH SHIT BEFORE SWITCHING TO A DIFFERENT OPERATING SYSTEM.
Optional but suggested use Oracle VM to test if Kubuntu is right for you!If not maybe try out some other distros Linux Mint for instance is considered a wonderful choice for new bros. Flash Kubuntu's ISO to a Usb I used BalenaEtcher. Optional With important files use Winrar/7Zip to compress em down. Archive any files important to you this can be done via Blank DVDS,USBS,CLOUD STORAGE SYSTEMS.I used mega.io. Prepare ze purge get KillDisk on a DVD/USB and wipe the Windows partition to scorched earth. Insert the Kubuntu USB then Restart your PC. Boot into Kubuntu (I also had to spam repeat press ESC whilst the computer was restarting to boot it, this which is something to do with HP from what I understand???) Install it how you'd like it!
ALSO LITERALLY NOT EVEN JOKING IT TOOK ME 8 HOURS TO FIGURE ALL THIS SHIT OUT I MAY BE A DUMBASS STILL I GOT IT IN THE END!

2 notes
·
View notes
Text
Millennial: "Oh I'm not very good with computers" (Can boot Linux from usb to jailbreak pc's but doesn't know how to code)
Gen Z: "Oh I'm not very good with computers" (Doesn't know how to right click something)
4 notes
·
View notes