#HttpServletRequest
Explore tagged Tumblr posts
Visit Tumblr Blog
Explore Tumblr blogs with no restrictions, modern design and the best experience.
Last Seen Tumblr Blogs


Fun Fact
In 2020, Tumblr had 29.4 million users in the US.
Text
How to upload Images from rest API in Spring boot
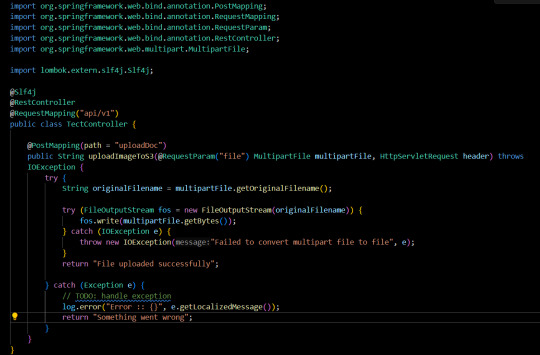
Hello Everyone, If you want to upload the image from the rest api in the sprint boot application then first we have to setup the spring boot application first install the postman for the testing of the api. Below are the steps to upload the document Get the original file name from the multipart file String originalFilename = multipartFile.getOriginalFilename();Java Create a FileOutputSteam object to get the original file name FileOutputStream fos = new FileOutputStream(originalFilename)Java Now write the file with the same name from the mutipartFile file fos.write(multipartFile.getBytes());Java After creating the new file we can delete this file also originalFilename.delete(); These are the important steps to upload an image through Spring boot rest API Now let's implement the above code in a rest API “api/uploadDoc” Create a rest Controller with the name CommonController.java
upload imge in spring boot rest api Now test the upload doc API from the postman,
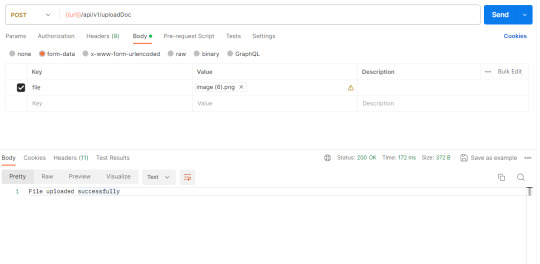
test upload doc api in Postman To delete the uploaded file in Spring boot First, we have to create a file object with the same file name and file path. Then you can delete the image from the uploaded path. File file = new File(originalFilename); file.delete();Java You can copy the content of the testController given below. @Slf4j @RestController @RequestMapping("api/v1") public class TectController { @PostMapping(path = "uploadDoc") public String uploadImageToS3(@RequestParam("file") MultipartFile multipartFile, HttpServletRequest header) throws IOException { try { String originalFilename = multipartFile.getOriginalFilename(); File file = new File(originalFilename); try (FileOutputStream fos = new FileOutputStream(originalFilename)) { fos.write(multipartFile.getBytes()); } catch (IOException e) { throw new IOException("Failed to convert multipart file to file", e); } file.delete(); return "File uploaded successfully"; } catch (Exception e) { // TODO: handle exception log.error("Error :: {}", e.getLocalizedMessage()); return "Something went wrong"; } } }Java Read the full article
0 notes
Text
Servlets: Atributos de petición, sesión, aplicación y cookies
Servlets: Atributos de petición, sesión, aplicación y cookies
Durante la programación de una aplicación web nos encontramos que tenemos necesidad de conservar el valor de las variables. En una aplicación de escritorio, podemos controlar cuando queremos borrar una variable, por lo que no aparece ese problema, pero en una aplicación web, el tema es bastante mas delicado. Recordemos que el protocolo http no esta orientado a sesion, eso hace que en cada conexion
View On WordPress
0 notes
Text
Servlet Filter and Servlet Chain
Servlet Filter and Servlet Chain
Servlet Filter and Servelt Chain -We have looked at servlets that take requests directly from the server and return their results directly to the client. Servlets were designed as a generic server extension technology, however, rather than one devoted solely to performing CGIlike functions.
Most web servers that implement servlets have also implemented a feature called servlet chaining, where the…
View On WordPress
#AuthenticationFilter#DateFilter servlet#getReader() method#HttpServletRequest#PrintReader#rvlet Chaining and Filters#Servlet API#Servlet Chaining#Servlet Filters#Servlets
0 notes
Text
AdminController.java
package com.masterprojectoriginal.controller;
import java.io.File; import java.text.ParseException; import java.text.SimpleDateFormat; import java.util.Calendar; import java.util.Date; import java.util.List;
import javax.servlet.http.HttpServletRequest; import javax.servlet.http.HttpSession;
import org.springframework.beans.factory.annotation.Autowired; import org.springframework.stereotype.Controller; import org.springframework.ui.Model; import org.springframework.web.bind.annotation.RequestMapping; import org.springframework.web.multipart.MultipartFile;
import com.masterprojectoriginal.ExceptionResolver.CustomException; import com.masterprojectoriginal.pojo.Member; import com.masterprojectoriginal.pojo.PageModel; import com.masterprojectoriginal.pojo.QueryVo; import com.masterprojectoriginal.service.MemberService; import com.masterprojectoriginal.utils.UUIDUtil;
@Controller @RequestMapping("admin") public class AdminController {
@Autowired private MemberService memberService; /** * Go to the main page * @param num * @param model * @return */ @RequestMapping("mainPage") public String mainPage(String num, Model model) { PageModel page = memberService.getLimitedMemberList(num); page.setUrl("mainPage.action"); model.addAttribute("page", page); return "main"; } /** * Go to the admin member list page * @param num * @param model * @param request * @return */ @RequestMapping("adminMemberList") public String adminMemberList(String num, Model model, HttpServletRequest request) { //Remove query result list(memberList) HttpSession session = request.getSession(); if (session.getAttribute("memberList") != null) { session.removeAttribute("memberList"); } PageModel page = memberService.getLimitedMemberList(num); page.setUrl("adminMemberList.action"); model.addAttribute("page", page); return "admin_member_list"; } /** * Go to the add member page * @param request * @return */ @RequestMapping("insertMemberPage") public String insertMemberPage(HttpServletRequest request) { //Remove query result list(memberList) HttpSession session = request.getSession(); if(session.getAttribute("adminMemberList") != null) { session.removeAttribute("adminMemberList"); } return "admin_insert_member"; } /** * Create a new member * @param member * @param pictureFile * @param request * @return * @throws IllegalStateException * @throws IOException */ @RequestMapping("insertMember") public String insertMember(Member member, MultipartFile pictureFile, HttpServletRequest request) throws Exception { if (pictureFile != null) { // Picture new name String newName = UUIDUtil.getId(); // Picture original name String originalName = pictureFile.getOriginalFilename(); // suffix String suf = originalName.substring(originalName.lastIndexOf(".")); File file = new File("D:\\memberPhoto\\" + newName + suf); //Write image file to disk pictureFile.transferTo(file); //Save the image address to the database member.setPhoto(newName + suf); } else { throw new CustomException("You have not uploaded a member avatar, please re-do it"); } //check the member's info this.checkMemberInfo(member); member.setId(UUIDUtil.getId()); memberService.insertMember(member); return "redirect:/admin/adminMemberList.action?num=1"; } /** * Check member's informations * @param member * @throws CustomException */ private void checkMemberInfo(Member member) throws CustomException { if(member.getAddress() == null || member.getAddress() == "") { throw new CustomException("Did not fill in the member's address, please re-do it"); } if(member.getBirthday() == null || member.getBirthday().after(new Date())) { throw new CustomException("Did not fill in the member's birthday or it is a wrong birthday, please re-do it"); } if(member.getCompany() == null || member.getCompany() == "") { throw new CustomException("Did not fill in the member's company, please re-do it"); } if(member.getEmail() == null || member.getEmail() == "") { throw new CustomException("Did not fill in the member's email, please re-do it"); } if(member.getPassword() == null || member.getPassword() == "") { throw new CustomException("Did not fill in the member's password, please re-do it"); } if(member.getJob() == null || member.getJob() == "") { throw new CustomException("Did not fill in the member's job, please re-do it"); } if(member.getFs() == null || member.getFs() == "") { throw new CustomException("Did not fill in the member's functional scope, please re-do it"); } if(member.getHonors() == null || member.getHonors() == "") { throw new CustomException("Did not fill in the member's honors, please re-do it"); } if(member.getProfile() == null || member.getProfile() == "") { throw new CustomException("Did not fill in the member's profile, please re-do it"); } if(member.getWorked() == null || member.getWorked() == "") { throw new CustomException("Did not fill in the member worked company, please re-do it"); } if(member.getName() == null || member.getName() == "") { throw new CustomException("Did not fill in the member's name, please re-do it"); } } /** * Query member information by id and go to the admin member information page * @param id * @param model * @param request * @return */ @RequestMapping("adminMemberInfo") public String adminMemberInfo(String id, Model model, HttpServletRequest request) { //Remove query result list(adminMemberList) HttpSession session = request.getSession(); if(session.getAttribute("adminMemberList") != null) { session.removeAttribute("adminMemberList"); } //Call the service Member member = memberService.findMemberById(id); //Store the obtained members in the model model.addAttribute("member", member); //Separate the members' values of the fs, honors, and profiles attributes into # and save them in an array. String[] fsArr = member.getFs().split("#"); String[] honorsArr = member.getHonors().split("#"); String[] profileArr = member.getProfile().split("#"); //Store these arrays in the model model.addAttribute("fs", fsArr); model.addAttribute("honors", honorsArr); model.addAttribute("profile", profileArr); return "admin_member_info"; } /** * Query member information by id and go to the member information page * @param id * @param model * @param request * @return */ @RequestMapping("memberInfo") public String memberInfo(String id, Model model, HttpServletRequest request) { //Remove query result list(memberList) HttpSession session = request.getSession(); if(session.getAttribute("memberList") != null) { session.removeAttribute("memberList"); } //Store the obtained members in the model Member member = memberService.findMemberById(id); model.addAttribute("member", member); //Separate the members' values of the fs, honors, and profiles attributes into # and save them in an array. String[] fsArr = member.getFs().split("#"); String[] honorsArr = member.getHonors().split("#"); String[] profileArr = member.getProfile().split("#"); //Store these arrays in the model model.addAttribute("fs", fsArr); model.addAttribute("honors", honorsArr); model.addAttribute("profile", profileArr); return "member_info"; } /** * Query member information by id and go to the edit member information page * @param id * @param model * @return */ @RequestMapping("editMemberPage") public String editMemberPage(String id, Model model) { //Get the member by id Member member = memberService.findMemberById(id); //format the birthday of a member SimpleDateFormat sdf = new SimpleDateFormat("yyyy-MM-dd"); model.addAttribute("birthday", sdf.format(member.getBirthday())); model.addAttribute("member", member); return "admin_edit_member"; } /** * Upload updated member information * @param member * @param pictureFile * @return * @throws Exception */ @RequestMapping("editMember") public String editMember(Member member, MultipartFile pictureFile) throws Exception { if (pictureFile.getOriginalFilename()!="" && pictureFile.getSize()>0) { // Picture new name String newName = UUIDUtil.getId(); // Picture original name String originalName = pictureFile.getOriginalFilename(); // suffix String suf = originalName.substring(originalName.lastIndexOf(".")); File newImg = new File("D:\\memberPhoto\\" + newName + suf); //Write image file to disk pictureFile.transferTo(newImg); //Save the image address to the database member.setPhoto(newName + suf); } //check the member's info this.checkMemberInfo(member); //Call the service memberService.updateMemberInfo(member); return "redirect:/admin/adminMemberList.action?num=1"; } /** * Query members by conditions (main page) * @param vo * @param model * @return * @throws ParseException */ @RequestMapping("queryResult") public String queryResult(QueryVo vo, Model model) throws ParseException { //Processing the age data if(vo.getAge()!=null && vo.getAge()!="") { String[] split = vo.getAge().split("-"); String age1 = split[0].substring(1, 3); String age2 = split[1].substring(1, 3); Calendar cal = Calendar.getInstance(); int yearNow = cal.get(Calendar.YEAR); //Converts the passed age parameter to Date type data(birthday) int yearBirth1 = yearNow-(Integer.parseInt(age1)); int yearBirth2 = yearNow-(Integer.parseInt(age2)); String strBirth1 = Integer.toString(yearBirth2)+"-1-1"; String strBirth2 = Integer.toString(yearBirth1)+"-12-31"; Date birthday1 = new SimpleDateFormat("yyyy-MM-dd").parse(strBirth1); Date birthday2 = new SimpleDateFormat("yyyy-MM-dd").parse(strBirth2); //Store the resulting data in the QueryVo vo.setBirthday1(birthday1); vo.setBirthday2(birthday2); } //Call the service List<Member> memberList = memberService.getLimitedMemberListByQueryVo(vo); model.addAttribute("memberList", memberList); return "main"; } /** * Query members by conditions (admin page) * @param vo * @param model * @return * @throws ParseException */ @RequestMapping("adminQueryResult") public String adminQueryResult(QueryVo vo, Model model) throws ParseException { //Call the service List<Member> memberList = memberService.getLimitedMemberListByQueryVo(vo); model.addAttribute("adminMemberList", memberList); return "admin_member_list"; } /** * logout * @param request * @return */ @RequestMapping("logout") public String logout(HttpServletRequest request) { //Clear all data in the session HttpSession session = request.getSession(); if (session.getAttribute("loginAdmin") != null) { session.invalidate(); } return "redirect:/admin/mainPage.action?num=1"; } }
1 note
·
View note
Text
Corel paradox call library


Here is the simple test I am trying to run but it's not working, I don't know what I am doing wrong: Hi I tried your suggestions but still I am not able to connect. }while((sqle=sqle.getNextException())!=null) Īny help is really appreciated as I am now kind of stuck. Int iNumCols = resultSetMetaData.getColumnCount() ResultSetMetaData resultSetMetaData = rs.getMetaData() Public void service(HttpServletRequest request, HttpServletResponse response) throws ServletException, IOException Public void init(ServletConfig config) throws ServletException Private static final String CONTENT_TYPE = "text/html charset=windows-1252" Public class Servlet1 extends HttpServlet String url = "jdbc:Paradox:///////testdb//Data" Ĭonnection con = DriverManager.getConnection(url, "user", "password") SmbFile root = new SmbFile( "smb://testdb/Data/", new NtlmPasswordAuthentication( "NA", "user", "pwassword" )) īut next when I do the following gives error even though using the above I am logged-in but somehow the following still gives error:Ĭlass.forName(".ParadoxDriver").newInstance()

I tried the following but still am not able to do database operations, I don't know what am I doing wrong. I did tried using CIFS but am lost on what exactly to do. Isn't there some soultion that I may use along with the drivers from inside the servlet and connect to the specific box. 300+ windows boxes, then I need to have Paradox Server running on all the boxes that will be hard from maintainability wise as my code is deployed on a Unix box there a multiple servlets and web services that are trying to access those boxes. ByVal is the default if you don't specify which is changed from VB Classic (in VB Classic, ByRef was the default).ParadoxServer to run on Windows but what if I have over 300 hundred shared folders that all are on different boxes i.e. s is a constant read-only parameter.įor parameters, you can optionally specify ByVal or ByRef. You cannot assign a value to a constant parameter. A constant parameter is like a read-only parameter the compiler can optimize. ObjectPAL also offers constant parameters where you add const in front of the parameter. For by reference, add var in front of the parameter. This is an OOP-like technique for implementing a subtyping-like polymorphism which is also known as inclusion polymorphism.Īlso, some developers like to pass an array and then handle the array for a pseudo technique. However, you can have the same named method or procedure so long as they are in different libraries. This is important if you use libraries in a class-like OOP way and wish to implement some form of polymorphism (i.e. Custom operator overloading is sometimes referred to as ad-hoc polymorphism. For example, in some languages the + operator is used both to add numbers and to concatenate strings. Operater Overloading allows an operator to behave differently based on the types of values used. Method overloading is a type of polymorphism and is also known as Parametric Polymorphism. Method Overloading is where different functions with the same name are invoked based on the data types of the parameters passed or the number of parameters. Types of overloading include method overloading and operator overloading.
0 notes
Text
Comparison between Java's Struts 1 and Struts 2 frameworks
In This article, we are going to see the Comparison of struts 1 and struts 2 in an easy manner. struts are one of the Frameworks in Java. Let us get into the article.

1 Strut
It is a flexible control layer based on technologies like Java Beans, XML, Java Servlets, and others. With the aid of this framework, you may establish an environment that is extendable and based on tried-and-true design principles for apps.
2 Struts
It is a flexible, attractive framework that can be used to build web applications suitable for business usage. This framework supports the entire application lifecycle, from development to deployment to timely maintenance. It was previously known as "web work 2."
Comparing Struts 1 and Struts 2:
Action Classes are the primary distinction between Struts 1 and Struts 2. It is required to extend an abstract base class in Struts 1. This is a pretty typical issue with Struts 1, as programming is done to abstract classes rather than interfaces. To support extra and customized services, Struts 2 may implement an Action interface in addition to a number of other interfaces. However, using Action interfaces is not required; any POJO object with an execute signature can be used as an Action object.
Because Struts 1 Actions are singletons and only one instance of a class will be handling all requests for that Action, there must be thread safety issues. Therefore, action resources need to be synchronized or thread-safe. Since action objects are created for each and every request in Struts 2, thread safety is not a significant concern.
Configuration files are another significant distinction between Struts 1 and Struts 2. In Struts 2, the most popular configuration file is struts.xml, but Struts 1 uses struts-config.xml as well.
Servlet dependency is another distinction between Struts 1 and Struts 2. Because the HttpServletRequest and HttpServletResponse are supplied to the execute method when an action is invoked, the Struts 1 action is dependent on the Servlet API. Struts 2 eliminates the need to access HttpServletRequest and HttpServletResponse by allowing actions to be tested independently from the other architectural components.
Testability is the following point. Testing Struts 1 Action is a significant challenge because the execute method in Struts 1 exposes the Servlet API. A collection of dummy objects are provided via an extension Struts Test Case. Struts 2 makes it simple to test actions by instantiating them, calling methods, and setting properties.
Struts 1 uses the JSTL EL since it incorporates JSTL. The EL supports object graph traversal but has limited support for index and collection properties. Struts 2 employs JSTL, but it also offers Object Graph Notation Language, a more adaptable and potent expressive language (OGNL).
An ActionForm object is used in Struts 1 to collect input. All ActionForms in this case needs to extend a base class. Because other JavaBeans cannot be utilized as ActionForms, the developers write redundant classes to capture input. DynaBeans can be used as an alternative to standard Action classes, but they're also being used by developers to re-explain JavaBeans that already exist. Struts 2 does away with the necessity for a second input object by using Action properties as input properties. Using taglib, the webpage may access the Action properties. POJO Actions and POJO form objects are also supported by Struts 2.
JSP is used in Struts1 to bind objects to the page. We employ ValueStack technology for a similar purpose in Struts 2. With the use of this technology, views from a variety of kinds that may have a different property type but the same property name can be reused.
The type of conversion is the following significant distinction. OGNL is used for type conversion in Struts 2, as opposed to Commons Beanutils in Struts 1. The basic and common object types and primitives are used by Struts 1 and Struts 2, respectively.
In Struts, one manual validation is supported by utilizing the common validator's extension or the validate function on the Action form. The validate function and the XWork validation framework both provide manual validation in Struts 2.
Struts 1 supports distinct request lifecycles for each module, but Struts 2 supports different life cycles based on the action. All actions in a module should follow the same lifespan in Struts 1, whereas Struts 2 allows for the creation of custom stacks and their use with varied actions.
Action Servlet is the front controller in Struts 1, whereas Filter Dispatcher is the front controller in Struts 2.
Struts 1 has a number of tag libraries, including HTML, Bean, and others. Instead of having several tag libraries, Struts 2 only has one.
Struts 2 now has lots of new features. Among them are:
An AJAX theme was added to Struts 2 to create more dynamic web applications.
It allows for the use of annotations to configure Action classes.
It is simple to integrate with Hibernate and Spring.
Its design is more straightforward.
It makes testability simpler.
Checkboxes in Struts 2 do not need specific handling for incorrect values.
Struts 2 does not require manual configuration; extensions are simply dropped into a jar to be added.
It has excellent support for a variety of view alternatives, including Freemarker, JSP, Velocity, and others.
In Struts 2, changing tags is simple.
If You want to learn more about struts in the most efficient way, Kindly check this out!!!
#coding#software#programmer#technology#webdevelopment#coder#ai#python#programming#analytics#java script#javadeveloper#reactjs#html#java#javascript#javafullstackdeveloper#program#php
0 notes
Text
SpringMVC Digging Road 2 - DispatcherServler + Controller
###Role of DispatcherServlet
DispatcherServlet is the implementation of the front-end controller design pattern, which provides the centralized access point of SpringWebMVC, is responsible for the assignment of responsibilities, and can be seamlessly integrated with SpringIoC container, so as to obtain all the capabilities of Spring.
DispatcherServlet is mainly used for duty scheduling, and it is mainly used for process control. Its main duties are as follows:
```
1:File upload resolution, if the request type is multipart, file upload resolution will be performed through MultipartResolver
2:Map the request to the processor through HandlerMapping (return a HandlerExecutionChain, which includes a processor and multiple HandlerInterceptor interceptors)
3:Many types of processors (processors in HandlerExecutionChain) are supported through HandlerAdapter
4:Resolve the logical view name to the concrete view implementation through ViewResolver
5:Localization analysis
6:Render a specific view
7:If an exception is encountered during execution, it will be handed over to HandlerExceptionResolver for resolution
```
###DispatcherServler Configure
DispatcherServlet can also configure its own initialization parameters, that is, <init-param> can be configured in servlet configuration.

###The relationship of context
The general context configuration of SpringWeb project is as follows:
<listener>
<listener-class>
org.springframework.web.context.ContextLoaderListener
</listener-class>
</listener>
<context-param>
<param-name>contextConfigLocation</param-name>
<param-value>classpath:applicationContext.xml</param-value>
</context-param>
```
contextConfigLocation : Represents the configuration file path used to load Bean;
contextClass : Represents the ApplicationContext implementation class used to load Bean, the default WebApplicationContext```
###Initialization order of DispatcherServlet
```
1:HttpServletBean inherits HttpServlet, so its init method will be called when the Web container starts
2:FrameworkServlet inherits HttpServletBean, initialize the Web context through initServletBean ()
3:DispatcherServlet inherits FrameworkServlet, and implemented onRefresh () method to provide some front-end controller related configurations
```
>In the DispatcherServlet of SpringMVC framework, around line 470:
/**
* This implementation calls {@link #initStrategies}.
*/
@Override
protected void onRefresh(ApplicationContext context) {
initStrategies(context);
}
/**
* Initialize the strategy objects that this servlet uses.
* <p>May be overridden in subclasses in order to initialize further strategy objects.
*/
protected void initStrategies(ApplicationContext context) {
initMultipartResolver(context);
initLocaleResolver(context);
initThemeResolver(context);
initHandlerMappings(context);
initHandlerAdapters(context);
initHandlerExceptionResolvers(context);
initRequestToViewNameTranslator(context);
initViewResolvers(context);
initFlashMapManager(context);
}
**The whole DispatcherServler initialization process mainly does two things:**
> * Initialize the Web context used by SpringMVC, and possibly specify the parent container (ContextLoaderListener loads the root context)
> * Initialize the policy used by DispatcherServlet, such as HandlerMapping、HandlerAdapter
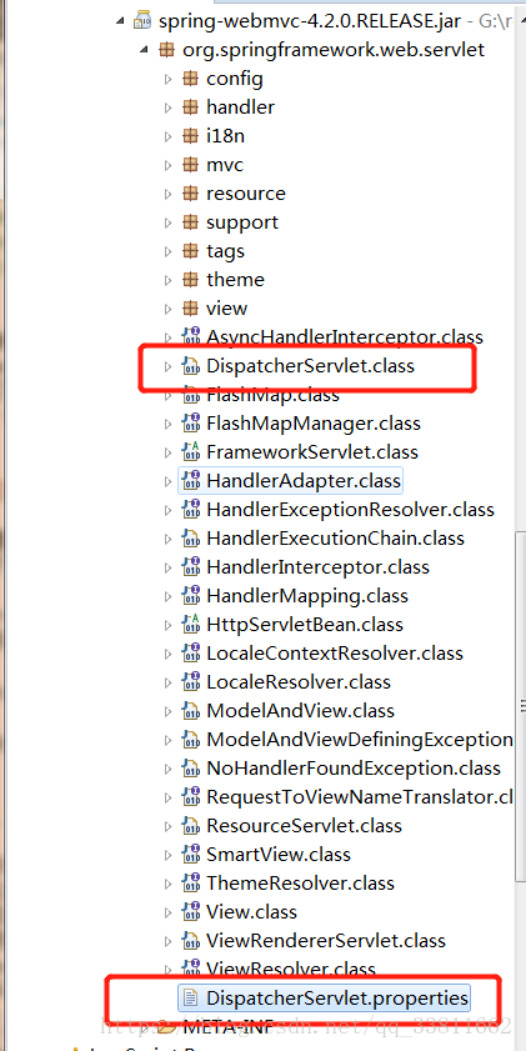
###DispatcherServler Default Configure:
The default configuration of DispatcherServlet is in DispatcherServlet.properties (under the same package as DispatcherServlet class), and it is the default policy used when no configuration is specified in Spring configuration file.
It can be seen from the configuration that the DispatcherServlet will automatically register these special Bean when it starts, so we don't need to register. If we register, the default will not be registered.
###The special Bean which in DispatcherServlet
DispatcherServlet uses WebApplicationContext as the context by default, and there are some Bean in this context as follows:
####Controller
Processor/page controller, doing C in MVC, but the control logic is transferred to the front-end controller for processing requests;
####HandlerMapping
The mapping from processor is requested, and if the mapping is successful, a HandlerExecutionChain object (including a Handler processor (page processor) object and multiple HandlerInterceptor interceptors) is returned; For example, BeanNameUrlHandlerMapping maps URL and Bean name, and the Bean that is successfully mapped is the processor here;
####HandlerAdapter:
HandlerAdapter will package the processor as an adapter, thus supporting many types of processors, that is, the application of adapter design pattern, thus easily supporting many types of processors; For example, SimpleControllerHandlerAdapter will adapt the Bean that implements the Controller interface and call the handleRequest method of the processor for functional processing;
####ViewResolver
The ViewResolver will resolve the logical View name into a concrete view, for example, the InternalResourceViewResoulver will map the logical view name into a jsp view;
####LocalResolver
Localized parsing, because Spring supports internationalization, the LocaleResolver parses the Locale information of the client to facilitate internationalization;
####ThemeResolver
Theme analysis, through which multiple styles of a page can be realized, that is, the common effect similar to software skin;
####MultipartResolver
File upload analysis, used to support file upload;
####HandlerExceptionResolver
Processor exception resolution, which can map exceptions to the corresponding agreed error interface, so as to display a user-friendly interface (instead of showing users specific error information);
####RequestToViewNameTranslator
Automatically mapping the request URL to the logical view name when the processor does not return the relevant information such as the logical view name;
####FlashMapManager
It is used to manage the policy interface of FlashMap, which is used to store the output of one request, and when entering another request, it is used as the input of the request, which is usually used to redirect the scene.
###Controller brief introduction
Controller, which is the part C in MVC, is mainly responsible for the function processing part
```
1、Collect, validate and bind request parameters to command objects
2、Give the command object to the business object, and the business object will process and return the model data
3、Return ModelAndView(Model model part is the model data returned by the business object, and the view part is the logical view name)
```
###DisaptcherServler + Controller
DispatcherServlet is responsible for entrusting the request to the Controller for processing, and then selecting a specific view for rendering according to the logical view name returned by the Controller (and passing in the model data)
**The complete C (including logic control and function processing) in MVC consists of (DispatcherServlet+Controller)
###Controllerannotation
Before Spring2.5, we all defined our processor class by implementing the Controller interface or its implementation class (which is no longer recommended).
Spring2.5 introduces annotated processor support, and defines processor classes through @Controller and @RequestMapping annotations. And provides a powerful set of annotations:
> * @Controller
> * @RequestMapping
> * @RequestParam
> * @ModelAttribute
> * @SessionAttributes
> * @InitBinder
Spring3.0 introduces Restful architecture style support (supported by @PathVariable annotation and some other features), and introduces more annotation support
> * @CookieValue
> * @RequestHeader
> * @RequestBody
> * @ResponseStatus
> * @ExceptionHandler
> * @PathVariable
Spring3.1 use new HandlerMapping and HandlerAdapter to support @Controller and @RequestMapping annotation processors, Use the combination of processor mapping RequestMappingHandlerMapping and processor adapter RequestMappingHandlerAdapter to replace the processor mapping defaultannotationhandlermapping and processor adapter AnnotationMethodHandlerAdapter started in Spring2.5.
###Annotation implementation Controller
The configure of HandlerMapping and HandlerAdapter
> * Previous versions of Spring3.1:
DefaultAnnotationHandlerMapping and AnnotationMethodHandlerAdapter
> * The version starting with Spring3.1:
RequestMappingHandlerMapping and RequestMappingHandlerAdapter
###Example code:
Code structure reference:
https://blog.csdn.net/qq_33811662/article/details/80658813
Modify the content of spring-mvc.xml as follows:
<?xml version="1.0" encoding="UTF-8"?>
<beans xmlns="http://www.springframework.org/schema/beans"
xmlns:xsi="http://www.w3.org/2001/XMLSchema-instance"
xmlns:mvc="http://www.springframework.org/schema/mvc"
xmlns:context="http://www.springframework.org/schema/context"
xsi:schemaLocation="http://www.springframework.org/schema/beans
http://www.springframework.org/schema/beans/spring-beans-4.2.xsd
http://www.springframework.org/schema/mvc
http://www.springframework.org/schema/mvc/spring-mvc-4.2.xsd
http://www.springframework.org/schema/context
http://www.springframework.org/schema/context/spring-context-4.2.xsd">
<context:component-scan base-package="mvc1"></context:component-scan>
<mvc:annotation-driven></mvc:annotation-driven>
</beans>
Modify the contents of HelloController as follows:
package mvc1;
import javax.servlet.http.HttpServletRequest;
import javax.servlet.http.HttpServletResponse;
import org.springframework.stereotype.Controller;
import org.springframework.web.bind.annotation.RequestMapping;
import org.springframework.web.servlet.ModelAndView;
@Controller
public class HelloController {
@RequestMapping("/hello")
public ModelAndView handleRequest(HttpServletRequest request, HttpServletResponse response) throws Exception {
System.out.println("进入后台控制器");
ModelAndView mv = new ModelAndView();
mv.addObject("content", "SpringMVC 初体验");
mv.setViewName("/WEB-INF/jsp/hello.jsp");
return mv;
}
}
Run the Server, enter the URL:
0 notes
Text
Post Form Data With Axios in Vue
in the vue file the methods is below:
function() { run().catch(err => console.log(err)); async function run() { const blob = await fetch(imgDataUrl).then(res => res.blob()); const formData = new FormData(); formData.append('png', blob);
// Post the form, just make sure to set the 'Content-Type' header const res = await axios.post('/api/upload/png', formData, { headers: { 'Content-Type': 'multipart/form-data' } }); console.log(res.data); } }
you must import axios before the vue:
var axios = require('axios')
in the java backend:(/api will be rewrite in vue.config.js)
@PostMapping("/upload/png") @ResponseBody public Result pngUpload(HttpServletRequest request) { MultipartHttpServletRequest multipartHttpServletRequest = (MultipartHttpServletRequest) request; MultipartFile mulFile = multipartHttpServletRequest.getFile("png"); System.out.println("png file:" + mulFile);
// get file name String fileName = mulFile.getOriginalFilename();
0 notes
Link
こんにちは、エムスリー エンジニアリンググループ マルチデバイスチームの藤原です。 昨年末に医師向けのスマホアプリを新たにリリースしました。 スマホアプリ向けの BFF(Backends For Frontends) も新規に開発したのですが、そこには SpringBoot + Kotlin + GraphQL なアプリケーションを採用しています。 GraphQL はチームでの採用は初めてで、私もこのプロジェクトで初めて触りました。 そのような状況だったので GraphQL 周りについては試行錯誤を重ねることとなったのですが、今回はその開発の中で見えてきた プラクティス をいくつか紹介したいと思います。 これから SpringBoot + Kotlin + GraphQL な開発をされる方の参考になれば幸いです。 ボネリークマタカ(某GraphQLの入門書*1の表紙にもこの鳥が描かれている) (Godbolemandar [CC BY-SA 4.0], ウィキメディア・コモンズより) スカラー型の入力チェックは Custom Scalar を使おう 認証結果は GraphQLContext に保存しよう ユーザ情報のフィールドにするべきものとそうじゃないもの 認証が必要であることは Directive で表現しよう エラーハンドリング フィールドで Nullable or Non-null を迷うようなら Nullable フィールドの引数で Nullable or Non-null を迷うようなら Non-null 要素追加の可能性がある Enum を使うときは細心の注意を 解決策1. unknown だった場合にどうするか決める 解決策2. フィールドを変える 解決策3. Enum を使わない 先人の知恵を借りる We are hiring ※ この記事に登場する graphql-java 依存のクラス等は以下のライブラリとバージョンを元にしています。 graphql-java 13.0 *2 graphql-java-servlet 8.0.0 *3 graphql-java-tools 5.6.1 *4 graphql-spring-boot-starter 5.10.0 *5 スカラー型の入力チェックは Custom Scalar を使おう GraphQL スキーマのフィールドには引数を渡すことができますが、実行時に入力チェックをしたい場合があります。 GraphQL クエリを発行すると対応するリゾルバーが実行されるので、愚直にやるとリゾルバーで入力チェックのロジックを実装することになります。 以下はメッセージ一覧をページネーションで取得するスキーマとリゾルバーの例です。 type Query { # メッセージ一覧を取得する messages( # 取得件数 first: Int! # 指定した文字列が表すメッセージ以降を取得する after: String ): [Message!] } class QueryResolver : GraphQLQueryResolver { fun messages(first: Int { // first に100以上の数値が指定されたらエラーにしたい if 100) throw IllegalArgumentException() ... } } リゾルバーで取得件数の上限チェックを行なっていますが、他のリゾルバーでも同じような入力チェックを何回も実装しないといけなくなるかもしれず、あまりよくない匂いがします。 GraphQL では独自に任意のスカラー型を定義することができ、スカラー型に入力チェックを実装することでリゾルバーで入力チェックをする必要がなくなります。 スカラー型で入力チェックするようにした場合、スキーマとリゾルバーの実装は以下のようになります。 # ページネーション用の量指定型(1から99の数値) scalar PaginationAmount type Query { # メッセージ一覧を取得する messages( # 取得件数 first: PaginationAmount! # 指定した文字列が表すメッセージ以降を取得する after: String ): [Message!] } typealias PaginationAmount = Int // エイリアスでスキーマ上と型名を合わせると味がいい class QueryResolver : GraphQLQueryResolver { fun { // この処理が実行される時点で first が 100未満であることは保証される ... } } 独自のスカラー型を作成する方法は以下の2ステップです。 Coercing インタフェースを実装したクラスを作成する 作成した Coercing を元に GraphQLScalarType を作成し、Bean に登録する class PaginationAmountCoercing : Coercing<Int, Int { override fun parseLiteral(input: Any): Int? { // 入力チェックを失敗させる場合は CoercingParseLiteralException を throw する ... } ... } @Bean val PaginationAmount = GraphQLScalarType.newScalar() .name("PaginationAmount") .description("A positive integer with an upper bound") .coercing(PaginationAmountCoercing()) .build()!! 認証結果は GraphQLContext に保存しよう SpringBoot をベースにアプリケーションを作っていると認証結果のユーザ情報はリクエストスコープの Bean に保存するような形になりそうですが、 GraphQL には同一リクエストで使いまわすことができるコンテキストの仕組みが用意されています。 AuthContext という独自のクラスに User を持たせる例は以下のようになります。 GraphQLContext インタフェースを実装した AuthContext クラスを作成 build メソッドで AuthContext のインスタンスを返すような GraphQLContextBuilder を作成し Bean に登録 class AuthContext(val user: User?) : GraphQLContext { ... } @Bean fun authContextBuilder(): GraphQLContextBuilder = object : DefaultGraphQLContextBuilder() { override fun build( request: HttpServletRequest, response: HttpServletResponse ): GraphQLContext { // ユーザの情報を取得 val user = ... return AuthContext(user) } } AuthContext の生成はリクエストごとに1回実行されて、結果はリゾルバーで取得することができます。 class QueryResolver : GraphQLQueryResolver { fun messages( first: PaginationAmount, after: String?, environment: DataFetchingEnvironment // 引数に指定することで、ここからコンテキストの取得もできる { val() val user = authContext.user ... } } ユーザ情報のフィールドにするべきものとそうじゃないもの 認証済みユーザ専用の「おすすめコンテンツ」をスキーマで表現しようとすると、ユーザ情報の型におすすめコンテンツのフィールドを追加する形が考えられます。 type Query { # 現在のユーザ(未認証の場合は null) currentUser: User } # ユーザ情報 type User { # 会員の名前 name: String! ... # おすすめコンテンツ一覧 recommendedContents: [RecommendedContent] } ユーザ情報とおすすめコンテンツを取得するクエリは以下のようになります。 query { currentUser { name recommendedContents { ... } } } facebook が提供している GraphQL のサンプル*6と同じ設計方針となっていて一見自然な対応に見えますが、 今後の機能追加の方向によっては問題になってくる可能性があります。 例えば、未認証のユーザに対してもおすすめコンテンツを返さなければならなくなるかもしれません。 おすすめコンテンツ一覧を会員情報のフィールドとしていると��会員ではないユーザについてはそのフィールドにアクセスすることができなくなってしまいます。 このような場合は、会員情報とおすすめコンテンツのリレーションを断つのがシンプルです。 スキーマ定義の一部を修正したものは以下のようになります。 type Query { # 現在のユーザ currentUser: User # おすすめコンテンツ一覧 recommendedContents: [RecommendedContent] } ユーザ情報のフィールドにするものは ユーザを構成している要素である(e.g. メールアドレスなどの登録情報) ユーザの状態を表す要素である(e.g. 保有ポイント数) 他のユーザからも関連が見える必要がある(e.g. SNSの友達一覧) のいずれかの条件を満たすものにするのが良いでしょう。 認証が必要であることは Directive で表現しよう 未認証の場合に結果を返さないフィールド、もしくは型であることを示したいことがあります。 そのような時は Directive という機能を使えば宣言的に情報を付加することができます。 # 認証済みの場合のみアクセス可能 directive @auth on OBJECT | FIELD_DEFINITION type User @auth { name: String! } 実行時の振る舞いを変えるような Directive の実装方法は以下の2ステップです。 SchemaDirectiveWiring インタフェースを実装したクラスを作成する SchemaDirective として Bean に登録する 認証が必要なことを示す Directive の実装は以下のようになります。 class AuthDirective : SchemaDirectiveWiring { override fun): GraphQLFieldDefinition { val originalDataFetcher = environment.fieldDataFetcher val authDataFetcher = DataFetcher<Any { dataFetchingEnvironment val() if (authContext.user != null) { // 認証済みの場合。元のリゾルバーを呼び出す originalDataFetcher.get(dataFetchingEnvironment) } else { // 未認証の場合。 ... } } return environment.setFieldDataFetcher(authDataFetcher) } } @Bean fun = listOf( SchemaDirective("auth", AuthDirective()) ) エラーハンドリング graphql-java でのエラーハンドリングの方法はいくつかありますが、 GraphQLErrorHandler をカスタマイズする方法を紹介します。 デフォルトでは DefaultGraphQLErrorHandler が使われるようになっていて、リゾルバーからスローされた例外は "Internal Server Error(s) while executing query" というメッセージの1つのエラーに集約されてしまい詳細不明となってしまいますが、自由にカスタマイズすることが可能です。 実装方法は GraphQLErrorHandler インタフェースを実装したクラスを作成し、Bean に登録するのみです。 @Component class CustomGraphQLErrorHandler : GraphQLErrorHandler { override fun { // エラーハンドリングを実装する ... } } GraphQLErrorHandler をカスタマイズする以外の方法では、 SpringBoot の @ExceptionHandler アノテーションを使う方法*7 GraphQLError インタフェースを実装した例外をスローする方法 などがありますが、それらと比べると GrphQL の標準的なエラー表現である path や locations の情報がデフォルトで設定されている(他の方法では独自実装が必要) バリデーションエラーについてもカスタマイズ可能 エラーの数もカスタマイズ可能(レスポンスJSONの errors フィールドに任意の要素数で格納できる) などのメリットがあります。どこまでカスタマイズしたいか次第なところもありますが、おそらく一番自由度が高いカスタマイズ方法です。 フィールドで Nullable or Non-null を迷うようなら Nullable Non-null である必要がないフィールドを Non-null で定義してしまうと、取得できたはずのデータを返せなくなる可能性があります。 先ほども例に出したスキーマを例にして説明します。 # Schema type Query { # 現在のユーザ currentUser: User # おすすめコンテンツ一覧 recommendedContents: [RecommendedContent] } # Query query { currentUser { name } recommendedContents { title } } 上記のようなクエリを発行した際に何かしらエラーが発生し、おすすめコンテンツの情報が取得できず以下のような JSON を取得できたとします。 { "data": { "currentUser" : { "name": "エムスリー 太郎" }, "recommendedContents": null }, "errors": [ { "message": "failed to get recommended contents title", "path": ["recommendedContents"] } ] } この時、もし recommendedContents の型が [RecommendedContent]! のように Non-null だった場合、null になるはずだったフィールド��親のオブジェクトが null になります。つまりこの場合は data が null になり、取得できていたはずの currentUser のデータさえもクライアントに返らなくなります。 { "data": null, "errors": [ { "message": "failed to get recommended contents title", "path": ["recommendedContents"] } ] } (data フィールドは最上位のフィールドで Nullable です。) 上記のようなケースが考えられるため、 Nullable か Non-null か迷った時は Nullable とするのが良いと思われます。 また、複数のクエリが同時に問い合わせされた時のことを考えると、Query および Mutation 配下のフィールドは Nullable にしておくのが無難なのかもしれません。 Null可否についての考察はこちらの記事*8がとても参考になりました。 エラーとなった場合を例に出して少し詳しく見てみましたが、互換性の観点でも Nullable の方が望ましいです。 GraphQLをスマホアプリのAPIとして動かしつつスキーマ定義を変更することを考えます。その時、すでにリリースされているバージョンのアプリの互換性を保ちつつ変更する必要が出てきます。 サーバから null が返ってくるとクラッシュする可能性があるので危険! サーバが null を返さなくなっても問題ないので安全 フィールドの引数で Nullable or Non-null を迷うようなら Non-null 前のセクションではサーバからのレスポンスについては迷うようなら Nullable ということを述べましたが、 クライアントから送られる値については逆のことが言えます。つまり「Nullable or Non-null を迷うようなら Non-null」です。 互換性の観点で再び整理すると以下のようになるためです。 サーバが null を受け取れるようになっても問題ないので安全 サーバが null を受け取れなくなるとクエリ実行できない可能性があるので危険! 要素追加の可能性がある Enum を使うときは細心の注意を Enum の要素追加はサーバとクライアントで非互換になる可能性があります。 サーバ側は新しい Enum 要素を実装したバージョンをリリースすればいいですが、クライアント側(スマホアプリ)は、新しい Enum 要素を解釈できるバージョンのアプリをリリースし、ユーザの端末に新しいバージョンのアプリをダウンロードしてもらうところまでが必要になります。 Enum をクエリの結果として使う場合、要素追加される前のスキーマ定義を元にコードを生成した旧バージョンのアプリではサーバから返された新しい Enum 要素が解釈できないためです。 アプリの強制アップデート機能によって解消するという手段もありますが、エンジニアの都合でそれをやるのは避けたいです。 4つ目の要素が追加されようとしている Enum を例にして、いくつか解決策をあげます。 enum UserStatus { # 医師 DOCTOR # 医学生 MEDICAL_STUDENT # 薬剤師 PHARMACIST # 薬学生(これから追加される. 古いバージョンのアプリはこの値を知らない) # PHARMACY_STUDENT } 解決策1. unknown だった場合にどうするか決める Appoloクライアントの場合、未定義の Enum が返ってきたときにクラッシュさせないように unknown という状態にできます。 unknown なときにどうするか決めることができれば特に問題にはならないかもしれません。 解決策2. フィールドを変える 要素追加があるごとにフィールドを変えるという対策が取れます。 type User { # 薬学生を含まないステータス status: UserStatus! # 薬学生を含む新しいステータス(しかしフィールド名のネーミングはとても悪い...) newStatus: UserStatus! } フィールド名は拡張可能な形にしておく必要がありますが、命名はとても難しくなることが予想されます。 また、フィールドが増え続けるようなら、それはそれでアンチパターンにハマってしまっていると思われます。。 この方法を取る場合、サポートするクライアントのバージョンがわかっているようならコメント等で残しておくと良いでしょう。 そのバージョンの利用者がいなくなった時にフィールドを削除するのに使えます。 解決策3. Enum を使わない 上記の例であれば Enum にせずに同等の情報を返すフィールドを作る方法も取れます。 type User { # 学生かどうか isStudent: Boolean! # 薬学系ステータスかどうか isPharmacyStatus: Boolean! } 今後拡張の可能性が高いものは Enum として表現するよりも、それ以外のフィールドとして返してクライアント側で決定する方法の方が安全だと思われます。 先人の知恵を借りる 冒頭で述べました通り、GraphQL についてのナレッジがチームにはなかったため悩みどころは多かったです。 特にスキーマ設計についてはサーバサイド、クライアントサイドのエンジニアを交えて議論を重ねました。 スキーマ設計についての指針が欲しいと思っていたところで参考になったドキュメント・書籍を紹介します。 Relay Server Specification*9 Relay Server Specificationは GraphQL の拡張仕様です。スキーマ設計についていくつかの規約を定めています。 Relay に準拠した実装のライブラリも少なくないため、合わせておいて損はないでしょう。 GraphQL 公式サイト*10 GraphQL の一通りの機能についてドキュメントがあり、完全に理解した気分にさせてくれます。機能の説明となっているため使い所などわかりにくいところもありますが、やはり公式ドキュメントは読むべきです。 GraphQL スキーマ設計ガイド*11 あまり日本語化されていない GraphQL の設計周りについて書いてあります。 この書籍が配布された頃にちょうど悩んでいるところだったエラーハンドリングについて特に参考にさせていただきました。 We are hiring 今回は新規アプリのBFFにまつわる話をさせていただきました。 マルチデバイスチームではリリースされたばかりのアプリを成長させるべく一緒に開発に参加してくれる仲間を募集中です。 もちろんサーバサイドに限らず iOS / Android アプリのエンジニアも募集しています。 お気軽にお問い合わせください。 jobs.m3.com *1:初めてのGraphQL, Eve Porcello Alex Banks 著, 尾崎 沙耶 あんどうやすし 訳 *2:https://github.com/graphql-java/graphql-java *3:https://github.com/graphql-java-kickstart/graphql-java-servlet *4:https://github.com/graphql-java-kickstart/graphql-java-tools *5:https://github.com/graphql-java-kickstart/graphql-spring-boot *6:https://github.com/relayjs/relay-examples/tree/master/todo *7:graphql-spring-boot-starterのExceptionハンドリングがめっちゃ便利になってた https://shiraji.hatenablog.com/entry/2019/04/24/080000 *8:When To Use GraphQL Non-Null Fields https://medium.com/@calebmer/when-to-use-graphql-non-null-fields-4059337f6fc8 *9:Relay Server Specification https://relay.dev/docs/en/graphql-server-specification.html *10:https://graphql.org/ *11:GraphQLスキーマ設計ガイド https://github.com/vvakame/graphql-schema-guide
0 notes
Text
300+ TOP STRUTS Interview Questions and Answers
STRUTS Interview Questions for freshers experienced :-
1. What are the components of Struts Framework? Struts framework is comprised of following components: Java Servlets JSP (Java Server Pages) Custom Tags Message Resources 2. What’s the role of a handler in MVC based applications? It’s the job of handlers to transfer the requests to appropriate models as they are bound to the model layer of MVC architecture. Handlers use mapping information from configuration files for request transfer. 3. What’s the flow of requests in Struts based applications? Struts based applications use MVC design pattern. The flow of requests is as follows: User interacts with View by clicking any link or by submitting any form. Upon user’s interaction, the request is passed towards the controller. Controller is responsible for passing the request to appropriate action. Action is responsible for calling a function in Model which has all business logic implemented. Response from the model layer is received back by the action which then passes it towards the view where user is able to see the response. 4. Which file is used by controller to get mapping information for request routing? Controller uses a configuration file “struts-config.xml file to get all mapping information to decide which action to use for routing of user’s request. 5. What’s the role of Action Class in Struts? In Struts, Action Class acts as a controller and performs following key tasks: After receiving user request, it processes the user’s request. Uses appropriate model and pulls data from model (if required). Selects proper view to show the response to the user. 6. How an actionForm bean is created? Surrogate actionForm bean is created by extending the class org.apache.struts.action.ActionForm In the following example we have created an actionForm bean with the name 'testForm': import javax.servlet.http.HttpServletRequest; import org.apache.struts.action.*; public class testForm extends ActionForm { private String Id=null; private String State=null; public void setId(String id){ this.Id=id; } public String getId(){ return this.Id; } public void setState(String state){ this.State=state; } public String getState(){ return this.State; } } 7. What are the two types of validations supported by Validator FrameWork? Validator Framework is used for form data validation. This framework provides two types of validations: Client Side validation on user’s browser Server side validation 8. What are the steps of Struts Installation? In order to use Struts framework, we only need to add Struts.Jar file in our development environment. Once jar file is available in the CLASSPATH, we can use the framework and develop Strut based applications. 9. How client side validation is enabled on a JSP form? In order to enable client side validation in Struts, first we need to enable validator plug-in in struts-config.xml file. This is done by adding following configuration entries in this file: Then Validation rules are defined in validation.xml file. If a form contains email field and we want to enable client side validation for this field, following code is added in validation.xml file: 10. How action-mapping tag is used for request forwarding in Struts configuration file? In Struts configuration file (struts-config.xml), forwarding options are defined under action-mapping tag. In the following example, when a user will click on the hyperlink test.do, request will be forwarded to /pages/testing.jsp using following configurations from struts-config.xml file: This forwarding will take place when user will click on following hyperlink on the jsp page: Controller Example

STRUTS Interview Questions 11. How duplicate form submission can be controlled in Struts? In Struts, action class provides two important methods which can be used to avoid duplicate form submissions. saveToken() method of action class generates a unique token and saves it in the user’s session. isTokenValid() method is used then used to check uniqueness of tokens. 12. In Struts, how can we access Java beans and their properties? Bean Tag Library is a Struts library which can be used for accessing Java beans. 13. Which configuration file is used for storing JSP configuration information in Struts? For JSP configuration details, Web.xml file is used. 14. What’s the purpose of Execute method of action class? Execute method of action class is responsible for execution of business logic. If any processing is required on the user’s request, it’s performed in this method. This method returns actionForward object which routes the application to appropriate page. In the following example, execute method will return an object of actionForward defined in struts-config.xml with the name “exampleAction”: import javax.servlet.http.HttpServletRequest; import javax.servlet.http.HttpServletResponse; import org.apache.struts.action.Action; import org.apache.struts.action.ActionForm; import org.apache.struts.action.ActionForward; import org.apache.struts.action.ActionMapping; public class actionExample extends Action { public ActionForward execute( ActionMapping mapping, ActionForm form, HttpServletRequest request, HttpServletResponse response) throws Exception{ return mapping.findForward("exampleAction"); } } 15. What’s the difference between validation.xml and validator-rules.xml files in Struts Validation framework? In Validation.xml, we define validation rules for any specific Java bean while in validator-rules.xml file, standard and generic validation rules are defined. 16. How can we display all validation errors to user on JSP page? To display all validation errors based on the validation rules defined in validation.xml file, we use tag in our JSP file. 17. What’s declarative exception handling in Struts? When logic for exception handling is defined in struts-config.xml or within the action tag, it’s known as declarative exception handling in Struts. In the following example, we have defined exception in struts-config.xml file for NullPointerException: Read the full article
0 notes
Video
youtube
Rich Hickey rants about HttpServletRequest in 1080p: Death By Specificity from Clojure Made Simple. Great & fun 5 min explanation of the key difference between hiding data in classes vs data as data.
0 notes
Text
HttpServlet Class in Servlet
HttpServlet Class in Servlet
HttpServlet Class is an extension of GenericServlet that includes methods for handling HTTP-specific data. HttpServlet provides a number of methods, such as doGet(), doPost(), and doPut(), to handle particular types of HTTP requests (GET, POST, and so on). These methods are usually called by default implementation of the service() method, which figures out what kind of request is being made and…
View On WordPress
#doGet() method#getLastModified()#getServletInfo()#HttpServlet#HttpServlet Class#HttpServletRequest#Servlets
0 notes
Link
What is httpservletRequest and Response? tccicomputercoaching.com
0 notes
Link
Object Computing, Inc. has introduced Micronaut Servlet, a new Micronaut project that implements a Micronaut HTTP server backed onto the Servlet API that allows popular Servlet containers to run as servers. Micronaut Servlet provides an alternative for developers who are familiar with traditional servlet containers and have a significant investment in the servlet ecosystem. In particular, these developers generally fall into one of three categories: [1] those want to use Micronaut, but the target deployment environment is based on servlets; [2] those who prefer the thread-per-connection model of the Servlet API over the Event Loop model provided by the default Netty-based Micronaut HTTP server; and [3] those who have existing servlets and/or servlet filters that they wish to combine with Micronaut. Originally known as Project Particle, Micronaut is a full-stack JVM-based framework for creating microservice-based, cloud-native and serverless applications that can be written in Java, Groovy, and Kotlin. Micronaut was introduced in March 2018 by Graeme Rocher, principal software engineer and Grails and Micronaut product lead at OCI, and was subsequently open-sourced in May 2018. The specific non-Netty features of Micronaut's HTTP built-in server should work with the supported servlet containers, namely Tomcat, Jetty and Undertow. Micronaut Servlet includes several extensions to simplify working with the Servlet API. This includes the ability to: receive the traditional Servlet API interfaces, HTTPServletRequest and HttpServletResponse, as method parameters; utilize Micronaut interfaces, Readable and Writable, to simplify servlet read/write operations; and support for multipart forms. In traditional Servlet API development, it is required to override the methods, doGet(), doPost(), etc., using the HTTPServletRequest and HTTPServletResponse interfaces for handling HTTP verbs within the lifecycle of the servlet application. These interfaces may now be passed into user-defined methods as shown here:
import javax.servlet.http.HttpServletRequest; import javax.servlet.http.HttpServletResponse; @Get("/hello") void process(HttpServletRequest request, HttpServletResponse response) throws IOException { response.addHeader(HttpHeaders.CONTENT_TYPE, MediaType.TEXT_PLAIN); response.setStatus(HttpStatus.ACCEPTED.getCode()); try (final PrintWriter writer = response.getWriter()) { writer.append("Hello ").append(request.getParameter("name")); writer.flush(); } }
The process() method is decorated with the @Get annotation to define the REST endpoint, /hello, and accepts the two HTTP interfaces to build the server response. This provides a more elegant solution to the Servlet API methods. The new Readable and Writable interfaces in Micronaut Servlet were provided to simplify the operations of reading from the servlet request and writing to the servlet response:
import io.micronaut.core.io.Readable; import io.micronaut.core.io.Writable; @Post(value = "/writable", processes = "text/plain") Writable readAndWrite(@Body Readable readable) throws IOException { return out -> { try (BufferedReader reader = new BufferedReader(readable.asReader())) { out.append("Hello ").append(reader.readLine()); } }; }
The Micronaut annotation, @Part, may be applied to method arguments to indicate they are bound to a specific part of a multipart/form-data POST request. Consider the following method:
@Post(value = "/multipart", consumes = MediaType.MULTIPART_FORM_DATA, produces = "text/plain") String multipart( String attribute, @Part("one") Person person, @Part("two") String text, @Part("three") byte[] bytes, @Part("four") javax.servlet.http.Part raw, @Part("five") CompletedPart part) { return "Ok"; }
The first parameter, attribute, within the multipart() method represents a list of attributes with parameter names that match an attribute. The remaining parameters, decorated with the @Part annotation, are declared as:
content type application/json that may be bound to a POJO
type String
type byte
javax.servlet.http.Part, an Servlet API interface
CompletedPart, a Micronaut interface that represents a completed part of a multipart request.
Multipart handling is disabled by default, but may be enabled by following the configuration properties. GraalVM support is also available for Micronaut Servlet, but only Tomcat and Jetty may take advantage of GraalVM at this time. Applications using Undertow will not compile with GraalVM. Micronaut Servlet joins a host of Micronaut projects such as Micronaut AWS, Micronaut GCP, Micronaut Data, Micronaut for Spring and Micronaut Test.
0 notes
Text
Spring mvc integration with prometheus Example
In this article ,we will see how we can monitor spring MVC applications using prometheus tool . You wont get much documentation for this setup on web. Prometheus is mostly configured with spring boot easily. But in order to configure it with spring MVC based application , it requires some additional configurations - Prometheus Prometheus is a time-series monitoring application written in Go. It can run on a server, in a docker container, or as part of a Kubernetes cluster (or something similar). Prometheus collects, stores, and visualizes time-series data so that you can monitor your systems. You can tell Prometheus exactly where to find metrics by configuring a list of "scrape jobs". Applications that are being monitored can provide metrics endpoints to Prometheus using any one of the many client libraries available; additionally, separate exporters can gather metrics from applications to make them available in Prometheus. Metrics get stored locally for 15 days, by default, and any Prometheus server can scrape another one for data. Additionally, remote storage is another option for Prometheus data - provided there is a reliable remote storage endpoint. Benefits: The option of "service discovery" allows Prometheus to keep track of all current endpoints effortlessly. Outages are quickly detected .The PromQL query language is incredibly flexible and Turing-complete. There's also a very low load on the services monitored (metrics get stored in memory as they get generated), allowing fewer resources to get used. Additionally, Prometheus users can control traffic volumes, access metrics in the browser, and allow for easy reconfiguration. Step 1 : Spring MVC application pom.xml configuration Below prometheus dependencies are required in pom.xml for project - 0.6.0 io.prometheus simpleclient ${prometheus.version} io.prometheus simpleclient_hotspot ${prometheus.version} io.prometheus simpleclient_servlet ${prometheus.version} io.prometheus simpleclient_pushgateway ${prometheus.version} io.prometheus simpleclient_spring_web ${prometheus.version} com.fasterxml.jackson.core jackson-core 2.5.2 Step 2 : Spring MVC application web.xml configuration We need configure MetricsServlet to capture the metrics of our spring mvc application as below - PrometheusServlet io.prometheus.client.exporter.MetricsServlet PrometheusServlet /metrics Step 3: Add an interceptor class This will intercept all the requests coming to application and capture the metrics to be exposed to prometheus - package com.myjavablog.config; import io.prometheus.client.Counter; import io.prometheus.client.Gauge; import io.prometheus.client.Histogram; import io.prometheus.client.Summary; import org.apache.log4j.Logger; import org.springframework.web.method.HandlerMethod; import org.springframework.web.servlet.ModelAndView; import org.springframework.web.servlet.handler.HandlerInterceptorAdapter; import javax.servlet.http.HttpServletRequest; import javax.servlet.http.HttpServletResponse; /** * @author anupb */ public class PrometheusMetricsInterceptor extends HandlerInterceptorAdapter { private static Logger logger = Logger.getLogger(PrometheusMetricsInterceptor.class); private static final Histogram requestLatency = Histogram.build() .name("service_requests_latency_seconds") .help("Request latency in seconds.") .labelNames("systemId", "appId", "type", "name", "method").register(); private ThreadLocal timerThreadLocal; @Override public boolean preHandle(HttpServletRequest request, HttpServletResponse response, Object handler) throws Exception { return super.preHandle(request, response, handler); } @Override public void postHandle(HttpServletRequest request, HttpServletResponse response, Object handler, ModelAndView modelAndView) throws Exception { String name = this.getName(request, handler).toLowerCase(); String method = request.getMethod().toUpperCase(); timerThreadLocal = new ThreadLocal(); timerThreadLocal.set(requestLatency.labels(name, method).startTimer()); super.postHandle(request, response, handler, modelAndView); } @Override public void afterCompletion(HttpServletRequest request, HttpServletResponse response, Object handler, Exception ex) throws Exception { super.afterCompletion(request, response, handler, ex); if (timerThreadLocal.get() != null) { timerThreadLocal.get().observeDuration(); } } @Override public void afterConcurrentHandlingStarted(HttpServletRequest request, HttpServletResponse response, Object handler) throws Exception { super.afterConcurrentHandlingStarted(request, response, handler); } private String getName(HttpServletRequest request, Object handler) { String name = ""; try { if (handler != null && handler instanceof HandlerMethod) { HandlerMethod method = (HandlerMethod) handler; String className = ((HandlerMethod) handler).getBeanType().getName(); name = className + "." + method.getMethod().getName(); } else { name = request.getRequestURI(); } } catch (Exception ex) { logger.error("getName", ex); } finally { return name; } } } Step 4: Add prometheus initialization configuration This will expose the metrics to prometheus server - package com.myjavablog.config; public class PrometheusConfig { private static Logger logger = Logger.getLogger(PrometheusConfig.class); @PostConstruct public void initialize() { logger.info("prometheus init..."); DefaultExports.initialize(); logger.info("prometheus has been initialized..."); } } Step 5: Add an interceptor to spring-mvc.xml You need to first add the schema location as below - http://www.springframework.org/schema/mvc http://www.springframework.org/schema/mvc/spring-mvc-3.0.xsd Then you need to add below tag - Step 6: Add configuration to applicationcontext.xml Once all this configuration is done , you can add the application URL in prometheus. These parameters are useful to monitor your spring MVC application. Read the full article
0 notes
Text
Filter REST resources with partial responses
Sometimes, when we call an endpoint, all we need is one of the fields. A tendency I've seen is to add new methods to access those properties directly and we'll see if there are alternate solutions.
Suppose the settings of the settings in a specific microservice are represented as follows:
public class Settings { private String userId; private String walletAddress; }
It might seem interesting to access the wallet address of this entity through a new endpoint:
GET /settings/{userId}/wallet-address
There are a few thing wrong with this approach.-: * REST is about representing resources, and altough it's not always possible to stick to this, in most cases it is. So a better approach would be to just call /settings/{userId}, get the email and be done with it. * It adds a lot of code if you need to add a method for each field you want to access separately:
[ resource layer ] ↓ [ facade layer ] ↓ [ service layer ] ↓ [ repository layer ]
This is code that is gonna break and that you have to maintain.
You understand the consequences ...
...but you still want only that field.
Well why no use a filter to return a partial response?
API request filters
To circumvent the problem, we are going to implement a filter on the fields of our response. Lets use a nice user example:
GET localhost:8080/users/1?fields=walletAddress
Here is a response example for an extended API of our user resource without the filter:
GET localhost:8080/users/{userId} { "userId": "1", "firstName": "Boba", "lastName": "Fett", "emailAddress": "[email protected]", "address": null }
and with the filter:
GET localhost:8080/users/1?fields=emailAddress { "emailAddress": "[email protected]" }
The magic
Now lets look how to implement this in spring. We'll use an interface here - because I like interface and I do not like annotations - but that choice is up to you:
public interface JsonFilterable { }
Then use ResponseBodyAdvice to filter our responses before sending them on the wire:
@ControllerAdvice public class JsonFieldFilterAdvise implements ResponseBodyAdvice<Object> { @Autowired private JsonFieldFilter jsonFieldFilter; @Override public boolean supports( MethodParameter returnType, Class<? extends HttpMessageConverter<?>> converterType) { return JsonFilterable.class.isAssignableFrom(returnType.getParameterType()); // 1 } @Override public Object beforeBodyWrite( Object body, MethodParameter returnType, MediaType selectedContentType, Class<? extends HttpMessageConverter<?>> selectedConverterType, ServerHttpRequest request, ServerHttpResponse response) { HttpServletRequest httpRequest = ((ServletServerHttpRequest) request).getServletRequest();// 2 if (httpRequest.getParameterMap().containsKey(FIELDS_FILTER)) { return jsonFieldFilter.filter(body, asList(httpRequest.getParameter(FIELDS_FILTER).split(",")));// 3 } else { return body; } } }
The supports() method checks which objects gets filtered
In the beforeBodyWrite() method we recover the fields to filter from the http request
Finally we throw the hot potato of filtering out the fields to a JsonFieldFilter (see below)
The hot potato
Depending on which implementation you use for generating the json, you might need different solutions to filter out the fields.
You can set the fields of the object to null, in that case you'll need to annotate your DTOs with @JsonInclude(Include.NON_NULL) in case you use jakson
You can use reflection to exclude the fields you do not need, a simple solution is to use com.fasterxml.jackson.databind.ObjectMapper:
Object mapper
In case you use the object mapper, the code to implement is straightforward:
public Map<String, Object> filter(Object toFilter, List<String> fields) { final Map<String, Object> map = objectMapper.convertValue(toFilter, Map.class); if (fields == null || fields.isEmpty()) { return map; } map.keySet().retainAll(fields); return map; }
You do lose typing but because it's done before transmitting the object on the wire, so I believe it's not a big deal here.
We'll have to work out the documentation as to not forget that fields filter, but that is for another time.
Happy coding !!
0 notes