#doGet() method
Explore tagged Tumblr posts
Visit Tumblr Blog
Explore Tumblr blogs with no restrictions, modern design and the best experience.
Last Seen Tumblr Blogs


Fun Fact
Tumblr has been banned in Indonesia for providing people with access to pornographic content.
Text
Inside the doGet method, create an array of 20 integers, and fill it with 20
Inside the doGet method, create an array of 20 integers, and fill it with 20
Inside the doGet method, create an array of 20 integers, and fill it with 20 random numbers. Then include in the HTML output a table in which each row contains two columns. The first column counts down from 20 to 1, and the second displays the random numbers in the array, from first to last. (You’ll have to do some slightly fancy arithmetic, since the first column values are decreasing while…
View On WordPress
0 notes
Text
300+ TOP SERVLET Interview Questions and Answers
SERVLET Interview Questions for freshers experienced :-
1. What is Servlet? A servlet is a Java technology-based Web component, managed by a container called servlet container or servlet engine, that generates dynamic content and interacts with web clients via a request & response paradigm. 2. Why is Servlet so popular? Because servlets are platform-independent Java classes that are compiled to platform-neutral byte code that can be loaded dynamically into and run by a Java technology-enabled Web server. 3. What is servlet container? The servlet container is a part of a Web server or application server that provides the network services over which requests and responses are sent, decodes MIME-based requests, and formats MIME-based responses. A servlet container also contains and manages servlets through their lifecycle. 4.When a client request is sent to the servlet container, how does the container choose which servlet to invoke? The servlet container determines which servlet to invoke based on the configuration of its servlets, and calls it with objects representing the request and response. 5.If a servlet is not properly initialized, what exception may be thrown? During initialization or service of a request, the servlet instance can throw an UnavailableException or a ServletException. 6.Given the request path below, which are context path, servlet path and path info? /bookstore/education/index.html context path: /bookstore servlet path: /education path info: /index.html 7.What is filter? Can filter be used as request or response? A filter is a reusable piece of code that can transform the content of HTTP requests,responses, and header information. Filters do not generally create a response or respond to a request as servlets do, rather they modify or adapt the requests for a resource, and modify or adapt responses from a resource. 8.When using servlets to build the HTML, you build a DOCTYPE line, why do you do that? I know all major browsers ignore it even though the HTML 3.2 and 4.0 specifications require it. But building a DOCTYPE line tells HTML validators which version of HTML you are using so they know which specification to check your document against. These validators are valuable debugging services, helping you catch HTML syntax errors. 9.What is new in ServletRequest interface ? (Servlet 2.4) The following methods have been added to ServletRequest 2.4 version: public int getRemotePort() public java.lang.String getLocalName() public java.lang.String getLocalAddr() public int getLocalPort() 10.Request parameter How to find whether a parameter exists in the request object? 1.boolean hasFoo = !(request.getParameter("foo") == null || request.getParameter("foo").equals("")); 2. boolean hasParameter = request.getParameterMap().contains(theParameter); (which works in Servlet 2.3+)

SERVLET Interview Questions 11. How can I send user authentication information while making URL Connection? You'll want to use HttpURLConnection.setRequestProperty and set all the appropriate headers to HTTP authorization. 12.Can we use the constructor, instead of init(), to initialize servlet? Yes , of course you can use the constructor instead of init(). There's nothing to stop you. But you shouldn't. The original reason for init() was that ancient versions of Java couldn't dynamically invoke constructors with arguments, so there was no way to give the constructur a ServletConfig. That no longer applies, but servlet containers still will only call your no-arg constructor. So you won't have access to a ServletConfig or ServletContext. 13.How can a servlet refresh automatically if some new data has entered the database? You can use a client-side Refresh or Server Push 14.The code in a finally clause will never fail to execute, right? Using System.exit(1); in try block will not allow finally code to execute. 15.What mechanisms are used by a Servlet Container to maintain session information? Cookies, URL rewriting, and HTTPS protocol information are used to maintain session information 16.Difference between GET and POST In GET your entire form submission can be encapsulated in one URL, like a hyperlink. query length is limited to 260 characters, not secure, faster, quick and easy. In POST Your name/value pairs inside the body of the HTTP request, which makes for a cleaner URL and imposes no size limitations on the form's output. It is used to send a chunk of data to the server to be processed, more versatile, most secure. 17.What is session? The session is an object used by a servlet to track a user's interaction with a Web application across multiple HTTP requests. 18.What is servlet mapping? The servlet mapping defines an association between a URL pattern and a servlet. The mapping is used to map requests to servlets. 19.What is servlet context ? The servlet context is an object that contains a servlet's view of the Web application within which the servlet is running. Using the context, a servlet can log events, obtain URL references to resources, and set and store attributes that other servlets in the context can use. (answer supplied by Sun's tutorial). 20.Which interface must be implemented by all servlets? Servlet interface. 21.Explain the life cycle of Servlet. Loaded(by the container for first request or on start up if config file suggests load-on-startup), initialized( using init()), service(service() or doGet() or doPost()..), destroy(destroy()) and unloaded. 22.When is the servlet instance created in the life cycle of servlet? What is the importance of configuring a servlet? An instance of servlet is created when the servlet is loaded for the first time in the container. Init() method is used to configure this servlet instance. This method is called only once in the life time of a servlet, hence it makes sense to write all those configuration details about a servlet which are required for the whole life of a servlet in this method. 23.Why don't we write a constructor in a servlet? Container writes a no argument constructor for our servlet. 24.When we don't write any constructor for the servlet, how does container create an instance of servlet? Container creates instance of servlet by calling Class.forName(className).newInstance(). 25.Once the destroy() method is called by the container, will the servlet be immediately destroyed? What happens to the tasks(threads) that the servlet might be executing at that time? Yes, but Before calling the destroy() method, the servlet container waits for the remaining threads that are executing the servlet’s service() method to finish. 26.What is the difference between callling a RequestDispatcher using ServletRequest and ServletContext? We can give relative URL when we use ServletRequest and not while using ServletContext. 27.Why is it that we can't give relative URL's when using ServletContext.getRequestDispatcher() when we can use the same while calling ServletRequest.getRequestDispatcher()? Since ServletRequest has the current request path to evaluae the relative path while ServletContext does not. 28. Whats the advantages using servlets over using CGI? CGI programs run outside the webserver. So a new process must be started to execute a CGI program. CGI programs are designed to handle a single request at a time. After that they return the result to the web server and exit. On the other hand servlets can handle multiple requests concurrently. They run within web servers. They generate dynamic content that is easier to write and faster to run. 29. What is Servlets and explain the advantages of Servlet life cycle? Servlets are the programs that run under web server environment. A copy of Servlet class can handle numerous request threads. In servlets, JVM stays running and handles each request using a light weight thread. Servlets life cycle involve three important methods, i.e. init, service and destroy. Init() Init method is called when Servlet first loaded in to the web server memory. Service() Once initialized, Servlets stays in memory to process requests. Servlets read the data provided in the request in the service() method. Destroy() When server unloads servlets, destroy() method is called to clean up resources the servlet is consuming. 30. What are different Authentication options available in Servlets. There are four ways of Authentication options available in servlets HTTP basic authentication In this, server uses the username and password provided by the client and these credentials are transmitted using simple base64 encoding. HTTP digest authentication This option is same the basic authentication except the password is encrypted and transmitted using SHA or MD5. HTTPS client authentication This options is based on HTTP over SSL. Form-based authentication Form-based authentication uses login page to collect username and password. 31. What is the GenericServlet class? GenericServlet makes writing servlets easier. To write a generic servlet, all you need to do is to override the abstract service method. 32. What is the difference between an Applet and a Servlet? Applets: Applets are applications designed to be transmitted over the network and executed by Java compatible web browsers. An Applet is a client side java program that runs within a Web browser on the client machine. An applet can use the user interface classes like AWT or Swing. Applet Life Cycle Methods: init(), stop(), paint(), start(), destroy() Servlets: Servlets are Java based analog to CGI programs, implemented by means of servlet container associated with an HTTP server. Servlet is a server side component which runs on the web server. The servlet does not have a user interface. Servlet Methods: doGet(), doPost() 33. List out the difference between ServletConfig and ServletContext? Both are interfaces in the package javax.servlet: ServletConfig is a servlet configuration object. It is used by a servlet container to pass information to a servlet during initialization. The ServletConfig parameters are specified for a particular servlet and are unknown to other servlets. The ServletContext object is contained within the ServletConfig object. It is provided by the web server to the servlet when the servlet is initialized. ServletContext is an interface which has a set of methods like getServletName(), getServletContext(), getInitParameter(), getInitParameterNames(). The servlet uses to interact with its servlet container. ServletContext is common to all servlets within the same web application. So, servlets use ServletContext to share context information. 35. What is the difference between using getSession(true) and getSession(false) methods? getSession(true) will check whether a session already exists for the user. If yes, it will return that session object else it will create a new session object and return it. getSession(false) will check existence of session. If session exists, then it returns the reference of that session object, if not, this methods will return null. 36. List out difference between a JavaBean from a Servlet? Servlets are Java based analog to CGI programs, implemented by means of a servlet container associated with an HTTP server. Servlets run on the server side. Beans are reusable code components written in Java that one can use in a variety of programming environments. JavaBeans are to Java what ActiveX controls are to Microsoft. Javabeans can run on server side, client side, within an applet etc. So, both have nothing in common except Java. 37. Define servlet mapping? Servlet mapping controls how you access a servlet. It is recommended that you don’t use absolute URLs. Instead usage of relative URLs should be done. If you try to deploy the application with a different context root, you might have to change all the urls used in all the JSP programs. Relative URLs is the solution so that you can deploy your application with different context root with out changing the URLs. 38. What is Servlets and explain the advantages of Servlet life cycle? Servlets are modules that run within the server and receive and respond to the requests made by the client. Servlets retrieve most of the parameters using the input stream and send their responses using an output stream. Servlets are used to extend the server side functionality of a website. They communicate with various application on the server side and respond to the request made by the client. 39. What is the difference between Difference between doGet() and doPost()? A doGet() method is limited with 2k of data to be sent, and doPost() method doesn't have this limitation. A request string for doGet() looks like the following: http://www.allapplabs.com/svt1?p1=v1&p2=v2&...&pN=vN doPost() method call doesn't need a long text tail after a servlet name in a request. All parameters are stored in a request itself, not in a request string, and it's impossible to guess the data transmitted to a servlet only looking at a request string. 40. What is the difference between ServletContext and ServletConfig? ServletContext: Defines a set of methods that a servlet uses to communicate with its servlet container, for example, to get the MIME type of a file, dispatch requests, or write to a log file.The ServletContext object is contained within the ServletConfig object, which the Web server provides the servlet when the servlet is initialized. ServletConfig: The object created after a servlet is instantiated and its default constructor is read. It is created to pass initialization information to the servlet. 41. What are all the protocols supported by HttpServlet? HttpServlet supports HTTP and HTTPS protocol. 42. Which exception is thrown if servlet is not initialized properly? Servlet Exception or Unavailable Exception is thrown if servlet is not initialized properly. 43. Who is responsible for writing a constructor? Container is responsible for writing constructor without arguments in servlet. 44. What are all the advantages of Servlet over CGI? Following are the advantages of Servlet over CGI: Cannot be run in an individual process. Servlet stays in the memory while requests. For every CGI request, you must load and start a CGI program. web.xml conveniences 45. What are the different mode that servlets can be used? Following are the modes that servlets can be used: Filter chains can be used to collect servlets together Support HTTP protocol Used for CGI based applications Dynamic generation of servlets 46. What are the uses of servlets? Servlets are used to process and store data submitted by HTML form, dynamic content, handle multiple request concurrently and manage state information on top of stateless HTTP. 47. Whether we can get deadlock situation in Servlets? Yes, it can be achieved by writing doGet method in doPost method and writing doPost method in doGet method. 48. What is the default HTTP method in the servlet? Default method is GET method for HTTPservlet. 49. Whether thread can be used in Servlets? Yes, Single thread can be used in servlets. 50. What exception should be thrown when servlet is not properly initialized? Servlet exception or an Unavailable exception is thrown when it is not properly initialized. 51. What is a filter? A filter is nothing but a piece of code which can be reusable that will be transforming the content of HTTP requests, response and header information. 52. What are the features added in Servlet 2.5? Following are the features added in Servlet 2.5: Dependency on J2SE 5.0 Support for annotations Loading the class Several web.xml Removed restrictions Edge case clarifications 53. When servlet is loaded? A servlet can be loaded when: First request is made Auto loading and Server starts up There is a single instance that answers all requests concurrently which saves memory Administrator manually loads. 54. When Servlet is unloaded? A servlet is unloaded when: Server shuts down Administrator manually unloads 55. What is life cycle of Servlet? Following is life cycle of Servlet: Loaded Initialized Destroy Unloaded SERVLET Questions and Answers Pdf Download Read the full article
0 notes
Text
【30分でやる】Google Spread Sheetで管理するLINE BOTの作り方
from https://qiita.com/WdknWdkn/items/b78ae572e7cb5c9dfdca?utm_campaign=popular_items&utm_medium=feed&utm_source=popular_items

// 利用しているシート var SHEET_ID = '(①スプレッドシートのIDをコピペ)'; // 利用しているSSのシート名(※変えるとみえなくなる) var SHEET_NAME = 'faq'; // 利用しているもしかしてSSのシート名(※変えるとみえなくなる) var SHEET_NAME_MAYBE = 'maybe';
// LINE Message API アクセストークン var ACCESS_TOKEN = '(②LINEのdevelopersアカウント上で取得したTOKENをコピペ)'; // 通知URL var PUSH = "https://api.line.me/v2/bot/message/push"; // リプライ時URL var REPLY = "https://api.line.me/v2/bot/message/reply"; // プロフィール取得URL var PROFILE = "https://api.line.me/v2/profile";
/** * doPOST * POSTリクエストのハンドリング */ function doPost(e) { var json = JSON.parse(e.postData.contents); reply(json); }
/** * doGet * GETリクエストのハンドリング */ function doGet(e) { return ContentService.createTextOutput("SUCCESS"); }
/** * push * botからメッセージを送る */ function push() { // リクエストヘッダ var headers = { "Content-Type" : "application/json; charset=UTF-8", "Authorization" : "Bearer " + ACCESS_TOKEN };
// メッセージ(確認テンプレートサンプル) var postData = { "to" : "U9b2a595da4f15b8781e53898e2b03644", "messages" : [ { "type" : "template", "altText" : "もしかして検索キーワードは「SUUMO」ですか?", "template": { "type": "confirm", "actions": [ { "type": "message", "label": "はい", "text": "SUUMO" }, { "type": "message", "label": "いいえ", "text": "いいえ、違います。" } ], "text": "もしかしてこちらの検索キーワードですか?" } } ] }
// POSTオプション作成 var options = { "method" : "POST", "headers" : headers, "payload" : JSON.stringify(postData), muteHttpExceptions: true, }; return UrlFetchApp.fetch(PUSH, options); }
/** * reply * ユーザからのアクションに返信する */ function reply(data) { // POST情報から必要データを抽出 var lineUserId = data.events[0].source.userId; var postMsg = data.events[0].message.text; var replyToken = data.events[0].replyToken; var action = data.events[0].message.action; // 記録用に検索語とuserIdを記録 // debug(postMsg, lineUserId); debug(action, lineUserId);
// 検索語に対しての回答をSSから取得 var answers = findResponseArray(postMsg);
// 回答メッセージを作成 var replyText = '「' + postMsg + '」ですね。かしこまりました。以下、回答です。'; // 回答の有無に応じて分岐 if (answers.length === 0) { // 「類似の検索キーワード」がないかチェック var mayBeWord = findMaybe(postMsg); if (typeof mayBeWord === "undefined") { // 回答がない場合の定型文 sendMessage(replyToken, '答えが見つかりませんでした。別のキーワードで質問してみてください。'); } else { sendMayBe(replyToken, mayBeWord); } } else { // 回答がある場合のメッセージ生成 answers.forEach(function(answer) { replyText = replyText + "\n\n=============\n\nQ:" + answer.key + "\n\nA:" + answer.value; });
// 1000文字を超える場合は途中で切る if (replyText.length > 1000) { replyText = replyText.slice(0,1000) + "……\n\n=============\n\n回答文字数オーバーです。詳細に検索キーワードを絞ってください。"; } // メッセージAPI送信 sendMessage(replyToken, replyText); } }
// SSからデータを取得 function getData() { var sheet = SpreadsheetApp.openById(SHEET_ID).getSheetByName(SHEET_NAME); var data = sheet.getDataRange().getValues();
return data.map(function(row) { return {key: row[0], value: row[1], type: row[2]}; }); }
// SSから「もしかして」データを取得 function getMayBeData() { var sheet = SpreadsheetApp.openById(SHEET_ID).getSheetByName(SHEET_NAME_MAYBE); var data = sheet.getDataRange().getValues(); return data.map(function(row) { return {key: row[0], value: row[1], type: row[2]}; }); }
// 単語が一致したセルの回答を配列で返す function findResponseArray(word) { // スペース検索用のスペースを半角に統一 word = word.replace(' ',' '); // 単語ごとに配列に分割 var wordArray = word.split(' '); return getData().reduce(function(memo, row) { // 値が入っているか if (row.value) { // AND検索ですべての単語を含んでいるか var matchCnt = 0; wordArray.forEach(function(wordUnit) { // 単語を含んでいればtrue if (row.key.indexOf(wordUnit) > -1) { matchCnt = matchCnt + 1; } }); if (wordArray.length === matchCnt) { memo.push(row); } } return memo; }, []) || []; }
// 単語が一致したセルの回答を「もしかして」を返す function findMaybe(word) { return getMayBeData().reduce(function(memo, row) { return memo || (row.key === word && row.value); }, false) || undefined; }
// 画像形式でAPI送信 function sendMessageImage(replyToken, imageUrl) { // replyするメッセージの定義 var postData = { "replyToken" : replyToken, "messages" : [ { "type": "image", "originalContentUrl": imageUrl } ] }; return postMessage(postData); }
// LINE messaging apiにJSON形式でデータをPOST function sendMessage(replyToken, replyText) { // replyするメッセージの定義 var postData = { "replyToken" : replyToken, "messages" : [ { "type" : "text", "text" : replyText } ] }; return postMessage(postData); }
// LINE messaging apiにJSON形式で確認をPOST function sendMayBe(replyToken, mayBeWord) { // replyするメッセージの定義 var postData = { "replyToken" : replyToken, "messages" : [ { "type" : "template", "altText" : "もしかして検索キーワードは「" + mayBeWord + "」ですか?", "template": { "type": "confirm", "actions": [ { "type":"postback", "label":"はい", "data":"action=detail", }, { "type": "message", "label": "いいえ", "text": "いいえ、違います。" } ], "text": "答えが見つかりませんでした。もしかして検索キーワードは「" + mayBeWord + "」ですか?" }
} ] }; return postMessage(postData); }
// LINE messaging apiにJSON形式でデータをPOST function postMessage(postData) { // リクエストヘッダ var headers = { "Content-Type" : "application/json; charset=UTF-8", "Authorization" : "Bearer " + ACCESS_TOKEN }; // POSTオプション作成 var options = { "method" : "POST", "headers" : headers, "payload" : JSON.stringify(postData) }; return UrlFetchApp.fetch(REPLY, options); }
/** ユーザーのアカウント名を取得 */ function getUserDisplayName(userId) { var url = 'https://api.line.me/v2/bot/profile/' + userId; var userProfile = UrlFetchApp.fetch(url,{ 'headers': { 'Authorization' : 'Bearer ' + ACCESS_TOKEN, }, }) return JSON.parse(userProfile).displayName; }
// userIdシートに記載 function lineUserId(userId) { var sheet = SpreadsheetApp.openById(SHEET_ID).getSheetByName('userId'); sheet.appendRow([userId]); }
// debugシートに値を記載 function debug(text, userId) { var sheet = SpreadsheetApp.openById(SHEET_ID).getSheetByName('debug'); var date = new Date(); var userName = getUserDisplayName(userId); sheet.appendRow([userId, userName, text, Utilities.formatDate( date, 'Asia/Tokyo', 'yyyy-MM-dd HH:mm:ss')]); }
https://cdn.qiita.com/assets/qiita-fb-2887e7b4aad86fd8c25cea84846f2236.png
0 notes
Text
HttpServlet Class in Servlet
HttpServlet Class in Servlet
HttpServlet Class is an extension of GenericServlet that includes methods for handling HTTP-specific data. HttpServlet provides a number of methods, such as doGet(), doPost(), and doPut(), to handle particular types of HTTP requests (GET, POST, and so on). These methods are usually called by default implementation of the service() method, which figures out what kind of request is being made and…
View On WordPress
#doGet() method#getLastModified()#getServletInfo()#HttpServlet#HttpServlet Class#HttpServletRequest#Servlets
0 notes
Text
What is servlet ? Explain GET and POST methods of servlet.
What is servlet ? Explain GET and POST methods of servlet.
A servlet is a class of Java programming language used to extend the capabilities of servers that host applications accessed via a request-response programming model.
सर्वलेट जावा प्रोग्रामिंग भाषा का एक वर्ग है जिसे सर्वर की क्षमताओं का विस्तार करने के लिए उपयोग किया जाता है, जो कि अनुरोध-प्रतिक्रिया प्रोग्रामिंग मॉडल के माध्यम से होस्ट अनुप्रयोगों ���ो होस्ट करता है।
Although servlets can respond…
View On WordPress
#difference between get and post in java#difference between get and post method in servlet with example#doget method in servlet example#dopost method in servlet#get and post method in servlet with example#how to send form data to servlet#http servlet request and response example#java servlet form example#What is servlet ? Explain GET and POST methods of servlet.
0 notes
Link

Whenever you hear the word 'Bot' you probably imagine a robot like they show in the movies. They are bots too, rather smart ones. But we are referring to a different kind of bot here.
We can define a bot as a script that can be used to automate certain tasks which are either tedious or difficult for humans. There are good bots and bad bots, and there is a very fine line between them.
Before we start, let me tell you one thing, This tutorial only discusses the part which involves uploading videos to YouTube. We will be using a sample video here.
If you create a bot which uploads video regularly (like Webdriver Torso, which we will talk more about at the end of the article) you need a source for the video.
Also, a warning: make sure you check the copyrights of all videos you upload. The version of the bot I first created uploaded others' videos to YouTube – and you won't believe what happened. I got series of copyright claims and strikes and my channel was ultimately deleted.
So in this tutorial I'll show you how it's done. But if you want to implement it, first find a good source of videos that you can upload without copyright issues.
Why Google Apps Script?
Google Apps Script is a scripting platform developed by google for running light-weight applications. Its syntax is based on JavaScript. If you already know Javascript you will find it really easy.
The reason we are using Google Apps Script is because it makes it really easy to build this bot. It has in-built support for most Google products like Gmail, Sheets, Forms, and Youtube. And it's free.
Overview of Google Apps Script
Google Apps Script has an online editor and filesystem. It doesn't need any deployment, you just have to save your code and it's running.
If you open the Apps Script editor, it will look something like this:
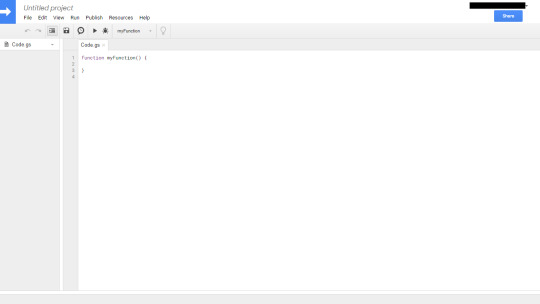
Google Apps Script Editor
Just like any other text editor, it has a sidebar with list of files, a menu, and space for writing code. The code files have a .gs extension (probably for Google script). And most important, all the code must be inside some function – anonymous code won't be executed.
There are two special functions, doPost() and doGet(). As the name suggests, they are used for handling POST and GET requests, respectively. We won't be using them here, but if you want to create this bot like an API that can be called using HTTP requests, it would be useful.
Getting Started
Unlike other tutorials, I won't tell you to clone a GitHub repository. First, because I want you to learn and code along with me. Second, the code isn't that big, and you need to understand how it works.
This is the function that uploads a given video to a YouTube channel:
function upload(url, title, description, topics) { try { var video = UrlFetchApp.fetch(url); YouTube.Videos.insert({ snippet: { title: title, description: description, tags: topics }, status: { privacyStatus: "public", }, }, "snippet,status", video); return ContentService.createTextOutput("done") } catch (err) { return ContentService.createTextOutput(err.message) } }
Enabling YouTube API
Before you run this function, you have to enable YouTube Data API V3. You must be familiar with what an API is, so let me try to explain that with an example.
Google Maps is a great service. It has lots of amazing tools. Suppose you want to use those features in your app, let's say for building a smart digital invitation card with an embedded map.
Normally, to do this you need the source code of Maps. But that code is not open-source. And it would be foolish to give someone source code just because they want to use some feature. That's where an API comes handy.
APIs or Application Programming Interfaces, are a way for developers to allow others to use your app's features without disclosing the source code.
In this case, YouTube's API allows developers to use YouTube's features in their apps, or to control some YouTube channel after authentication. If you have an idea of what an API is, let's continue.
To enable the YouTube Data API, navigate to Resources > Advanced Google Services. You will see something like the below. It may ask you to accept Google Cloud's terms before proceeding if you don't have a project already set up. If asked, accept the terms.
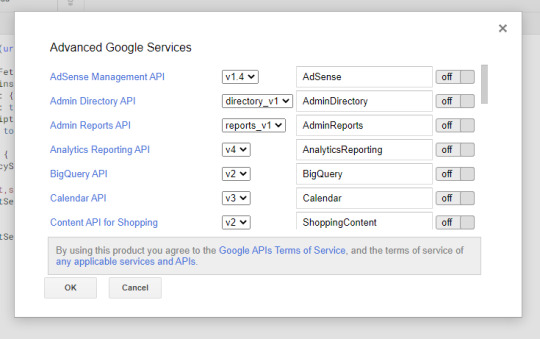
Enabling YouTube Data API
Scroll to the bottom. You will see YouTube Data API V3. Usually, you need to create a Google Cloud Project to use it. But App Script creates a project for itself, so you don't need to create something separate. Enable it and close the popup. Now you are good to go.
Running the function
You have to paste the code given below (same as above) into the text editor and save it from the File > Save menu.
function upload(url, title, description, topics) { try { var video = UrlFetchApp.fetch(url); YouTube.Videos.insert({ snippet: { title: title, description: description, tags: topics }, status: { privacyStatus: "public", }, }, "snippet,status", video); return ContentService.createTextOutput("done") } catch (err) { return ContentService.createTextOutput(err.message) } }
After saving it, you have to navigate to the Run > Run function > Upload menu. It will look something like this:

Running the function
On clicking the upload button, you will receive a popup like this:
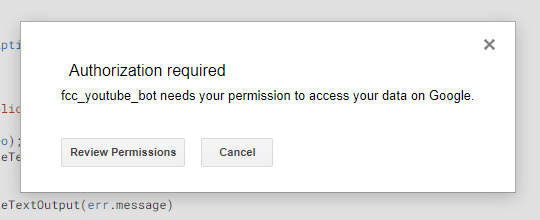
Popup asking for permission
Now this is where the usefulness of App Script becomes apparent. Here, you can give it permission to upload videos to your account. It will show you warnings that the app is not verified – but don't worry, that's a security step Google takes to prevent malicious apps.
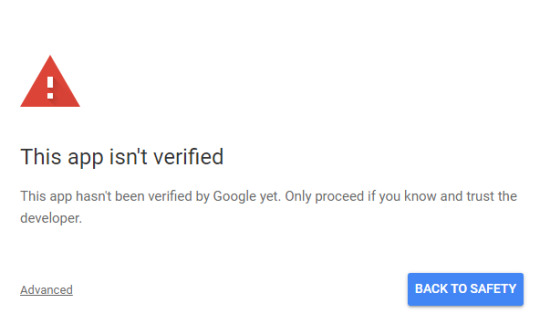
Google Security Warning
But here, you are the developer, so you can ignore the warning and give permission from the Advanced button on the bottom left. It will ask you for two permissions, as shown:
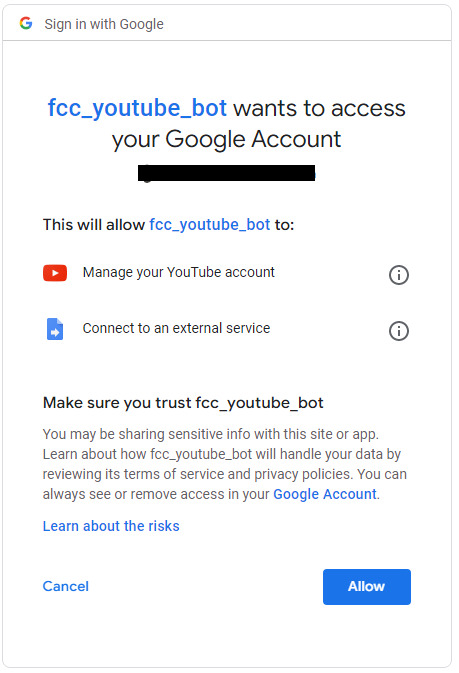
Asking for Permission
Permission to manage your YouTube account is a serious permission. Though it's safe in this particular instance, never give this permission to any app you don't trust. It will give the app complete access to your YouTube account.
And this isn't just the case for YouTube. You should be extra careful before you allow sensitive scopes on any platform, like Twitter, Facebook, GitHub and other social sign-in methods.
After you give that permission, the function will be executed. But nothing will happen as we didn't specify what should be uploaded.
Here, you need to give values to the URL, title, description, and tags variables. Let us take a sample video for our use (remember those copyright issues?).
This is the modified upload() function:
function upload() { try { var video = UrlFetchApp.fetch("https://www.w3schools.com/html/mov_bbb.mp4"); YouTube.Videos.insert({ snippet: { title: "Big Buck Funny", description: "This Is The Description", tags: ["funny"] }, status: { privacyStatus: "public", }, }, "snippet,status", video); return ContentService.createTextOutput("done") } catch (err) { return ContentService.createTextOutput(err.message) } }
You can Save it and Run the function again. You can see that we changed the URL to a video URL, the title and description were set, and the tags are also set as an array. You can also set privacyStatus to private for testing.
Let's see the results:
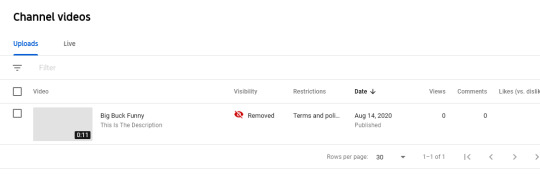
Remember those copyright issues?
As I told you at the start of the tutorial, copyright infringement is a big deal. The above video was removed by YouTube within minutes of uploading.
So, find a good video source first. If you want to generate videos programatically, there are libraries like ffmpeg, but let's not discuss that here. The aim of this article was to create a bot and we did.
Bot that regularly uploads videos
Suppose you find a source for videos and want your bot to regularly upload videos. Google Apps Script has an inbuilt Cron service which will execute your function at regular intervals, like daily, or once a week. You can create a trigger from the dashboard:
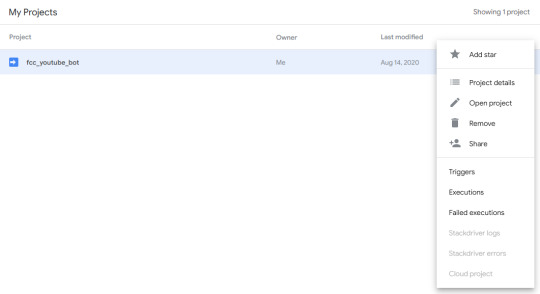
Creating Triggers
You will get an option to add a trigger on the bottom right. The options will look something like this:
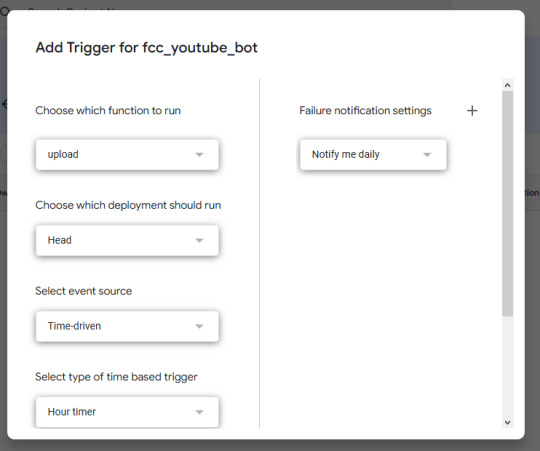
setting up triggers
You can set the function to be called, the frequency, and other options. Thus we have successfully created a YouTube Uploader Bot.
This was just one use of Google Apps script – you can use it for other tasks like:
Modifying Google Forms
Creating extensions for Google Sheets
Creating Blogger posts programatically
You may try other projects too, There is a lot you can do with it.
Webdriver Torso
You may not have heard about it, but this bot (or maybe a superhuman) has uploaded more than 70,000 videos on its youtube channel over a relatively short period of time. And although they are procedurally generated videos, it's still very cool.
These are the most viewed videos on this channel:
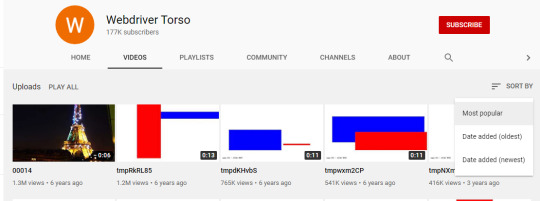
most viewed video on webdriver torso's channel
You can see that the Eiffel Tower at night video (which is illegal) has the most views. There are conspiracy theories that this channel is owned by YouTube for testing purposes.
Either way, don't get inspired – if you upload this many videos, YouTube will most probably suspend you.
0 notes
Text
Servlet Life Cycle- Tcci.com
A servlet life cycle can be defined as the entire process from its creation till the destruction. The following are the paths followed by a servlet.
· load or instantiation
· The servlet is initialized by calling the init() method.
· The servlet calls service() method to process a client's request.
· The servlet is terminated by calling the destroy() method.
· Finally, servlet is garbage collected by the garbage collector of the JVM.
Now let us discuss the life cycle methods in detail.
1.Instantiation: - At the time of starting the web container, it searches for the deployment descriptor (web.xml) for every web application. - Once the servlet is found in the deployment descriptor, the container creates an instance of the Servlet class, which is considered as the loading of the servlet class.
The init() Method
The init method is called only once. It is called only when the servlet is created, and not called for any user requests afterwards. So, it is used for one-time initializations, just as with the init method of applets.
The servlet is normally created when a user first invokes a URL corresponding to the servlet, but you can also specify that the servlet be loaded when the server is first started.
The init() method of GenericServlet class is invoked by the HttpServlet class which is the sub class of the GenericServlet, meaning that the HttpServlet inherits the init() method of GenericServlet. - The init() method performs some specific actions like a constructor of a class which initializes an instance at the start up. - It is automatically be invoked by the servlet container. - This action causes the parsing by the application context (web.xml). - The init() method is overloaded with zero parameters and with a parameter that takes a ServletConfig parameter. - The init() method is invoked only once when the servlet is first loaded.
When a user invokes a servlet, a single instance of each servlet gets created, with each user request resulting in a new thread that is handed off to doGet or doPost as appropriate. The init() method simply creates or loads some data that will be used throughout the life of the servlet.
The init method definition looks like this –
public void init() throws ServletException {
// Initialization code...
}
The service() Method
The operations of a servlet is performed by the service () method. - This method has HttpServletRequest and HttpServletResponse parameters. - The service () method is invoked by the container and is called for each request processed. - By default the method returns / dispatches the requests to the appropriate methods, usually a developer’s overridden helper methods such as doGet() and doPost().
The service() method is the main method to perform the actual task. The servlet container (i.e. web server) calls the service() method to handle requests coming from the client( browsers) and to write the formatted response back to the client.
Each time the server receives a request for a servlet, the server spawns a new thread and calls service. The service() method checks the HTTP request type (GET, POST, PUT, DELETE, etc.) and calls doGet, doPost, doPut, doDelete, etc. methods as appropriate.
Here is the signature of this method –
public void service(ServletRequest request, ServletResponse response)
throws ServletException, IOException {
}
The service () method is called by the container and service method invokes doGet, doPost, doPut, doDelete, etc. methods as appropriate. So you have nothing to do with service() method but you override either doGet() or doPost() depending on what type of request you receive from the client.
The doGet() and doPost() are most frequently used methods with in each service request. Here is the signature of these two methods.
The doGet() Method
A GET request results from a normal request for a URL or from an HTML form that has no METHOD specified and it should be handled by doGet() method.
public void doGet(HttpServletRequest request, HttpServletResponse response)
throws ServletException, IOException {
// Servlet code
}
The doPost() Method
A POST request results from an HTML form that specifically lists POST as the METHOD and it should be handled by doPost() method.
public void doPost(HttpServletRequest request, HttpServletResponse response)
throws ServletException, IOException {
// Servlet code
}
The destroy() Method
The destroy() method is called only once at the end of the life cycle of a servlet. This method gives your servlet a chance to close database connections, halt background threads, write cookie lists or hit counts to disk, and perform other such cleanup activities.
After the destroy() method is called, the servlet object is marked for garbage collection. The destroy method definition looks like this –
public void destroy() {
// Finalization code...
}
Architecture Diagram
The following figure depicts a typical servlet life-cycle scenario.
· First the HTTP requests coming to the server are delegated to the servlet container.
· The servlet container loads the servlet before invoking the service() method.
· Then the servlet container handles multiple requests by spawning multiple threads, each thread executing the service() method of a single instance of the servlet.
Call us @ 98256 18292.
Visit us @tccicomputercoaching.com
#Online computer course-TCCI Java Language Course In Ahmedabad Java Course In Satellite - Bopal Ahme
0 notes
Text
Inside the doGet method, create an array of 20 integers, and fill it with 20
Inside the doGet method, create an array of 20 integers, and fill it with 20
Inside the doGet method, create an array of 20 integers, and fill it with 20 random numbers. Then include in the HTML output a table in which each row contains two columns. The first column counts down from 20 to 1, and the second displays the random numbers in the array, from first to last. (You’ll have to do some slightly fancy arithmetic, since the first column values are decreasing while the…
View On WordPress
0 notes
Text
Java Servlet lifecycle
A servlet is managed through a well-defined life cycle that defines how it is loaded and instantiated, initialized, handled customer requests and removed from service. This life cycle is expressed in the API by the init, service and destroy methods of the javax.servlet.Servlet interface that all servlets must implement directly or indirectly through the abstract classes GenericServlet or HttpServlet.
Stages of Servlet Lifecycle:
A servlet goes through the following stages in its life.
• Initialize
• Service
• Destroy

Initialize
When the servlet is created for the first time, it is in the start phase. The web server invokes the init () method of the servlet at this stage. It should be noted here that the init () is called only once and is not called for each request. As there is no constructor available in the servlet, this makes it be used for a single boot, as well as the init () method of the applet
Initialize stage has the following characteristics and usage
• Run once when the servlet loads for the first time
• Each customer request is not called
• The two previous points make the ideal location to perform the boot tasks performed in the constructor in a normal class.
Service
The service () method is the servlet mechanism, which actually processes the client's request. In each client request, the server generates a new subprocess and calls the service () method, as shown in the following figure. This makes it more efficient compared to technologies that become a single subprocess to respond to requests.

The following figure shows the version of the service cycle implementation. At the top of the diagram, we assume that the servlet is subclassing in GenericServlet (Remember, GenericServlet is used to build protocol-independent servlets). To provide the desired functionality, the service () method is replaced. The client sends a request to the Web server, a new chain is created to satisfy this request, followed by the call to the service () method. Finally, a response is prepared and sent back to the user according to the request.

The second part of the figure illustrates a situation in which the servlet is made using the HttpServlet class. Now, this servlet can only serve HTTP requests. In these servlets, doGet () and doPost () are replaced to provide the desired behaviors. When a request is sent to the web server, the web server after creating a chain passes this request to the service () method. The Service () method checks the type of HTTP requests (GET, POST) and calls the doGet () or doPost method, depending on how the request is sent. After forming the response by the method doGet () or doPost (), the response is sent back to the service () method that is finally sent to the user by the web server.
Destroy
The web server may decide to remove a previously loaded servlet instance, perhaps because it is explicitly requested by the server administrator, or the servlet container may be shut down or the servlet idle for a long time or the server may be overloaded. Before that, however, call the servlets destroy () method. This makes it a perfect place to release the acquired resources.
The following figure can help to summarize the life cycle of the Servlet

The sever web creates a servlet instance. After the correct creation, the servlet enters the boot phase. Here, the init () method is invoked once. If the Web server fails in the previous two stages, the servlet instance is downloaded from the server. After the start stage, the servlet becomes available to satisfy customer requests and generate responses accordingly. Finally, the servlet is destroyed and downloaded from the web server.
To getting expert-level training for Java Training in your location – java training in chennai | java training in bangalore | java training in pune | java training in chennai | java training in bangalore | java training in tambaram | java training in omr | java training in velachery | java training in annanagar | java training in chennai | java training in marathahalli | java training in btm layout | java training in jayanagar | java training in chennai | java training in usa | For getting java online training | java online training
0 notes
Text
Building Java Web Applications
Building Java Web Applications
Gradle includes a war plugin for building Java web applications, and the community supplies an excellent plugin called grettyfor testing and deploying web applications on Jetty or Tomcat. This guide demonstrates how to build a simple web app and deploy it on Jetty using the gretty plugin. You’ll also learn how to write a unit test for a servlet using the Mockito framework and how to write a functional test for the web app using gretty and Selenium.
Contents
What you’ll need
Create the structure of a web application
Add a Gradle build file
Add a servlet and metadata to the project
Add JSP pages to the demo application
Add the gretty plugin and run the app
Unit test the servlet using Mockito
Add a functional test
Run the functional test
Summary
Next steps
Help improve this guide
What you’ll need
About 21 minutes
A text editor or IDE
A Java distribution, version 7 or higher
A Gradle distribution, version 4.6 or better
Create the structure of a web application
Gradle includes a war plugin that is documented in the Web Application Quickstart and the WAR plugin chapter of the user manual. The war plugin extends the Java plugin to add support for web applications. By default, it uses a folder called src/main/webapp for web-related resources.
The "Web Application Quickstart" section in the User Manual still refers to the jetty plugin, which is deprecated in favor of the gretty plugin used here. The parts specific to the war plugin are fine, however, and the section will be updated soon.
Therefore, create the following file structure for a project called webdemo:
Sample project layout
webdemo/ src/ main/ java/ webapp/ test java/
Any servlets or other Java classes will go in src/main/java, tests will go in src/test/java, and other web artifacts will go in src/main/webapp.
Add a Gradle build file
Add a file called build.gradle to the root of the project, with the following contents:
build.gradle
plugins { id 'war' } repositories { jcenter() } dependencies { providedCompile 'javax.servlet:javax.servlet-api:3.1.0' testCompile 'junit:junit:4.12' }
Using the war plugin
Current release version of the servlet API
The war plugin adds the configurations providedCompile and providedRuntime, analogous to compile and runtime in regular Java applications, to represent dependencies that are needed locally but should not be added to the generated webdemo.war file.
The plugins syntax is used to apply the java and war plugins. No version is needed for either, since they are included with the Gradle distribution.
It is a good practice to generate a Gradle wrapper for the project by executing the wrapper task:
$ gradle wrapper --gradle-version=4.6 :wrapper
This will produce gradlew and gradlew.bat scripts and the gradle folder with the wrapper jar inside as described in the wrapper section of the User Manual.
If you are using Gradle 4.0 or later you may see less output from the console that you might see in this guide. In this guide, output is shown using the --console=plain flag on the command-line. This is done to show the tasks that Gradle is executing.
Add a servlet and metadata to the project
There are two options for defining web application metadata. Prior to version 3.0 of the servlet specification, metadata resided in a deployment descriptor called web.xml in the WEB-INF folder of the project. Since 3.0, the metadata can be defined using annotations.
Create a package folder org/gradle/demo below the src/main/java folder. Add a servlet file HelloServlet.java, with the following contents:
src/main/java/org/gradle/demo/HelloServlet.java
package org.gradle.demo; import javax.servlet.ServletException; import javax.servlet.annotation.WebServlet; import javax.servlet.http.HttpServlet; import javax.servlet.http.HttpServletRequest; import javax.servlet.http.HttpServletResponse; import java.io.IOException; @WebServlet(name = "HelloServlet", urlPatterns = {"hello"}, loadOnStartup = 1) public class HelloServlet extends HttpServlet { protected void doGet(HttpServletRequest request, HttpServletResponse response) throws ServletException, IOException { response.getWriter().print("Hello, World!"); } protected void doPost(HttpServletRequest request, HttpServletResponse response) throws ServletException, IOException { String name = request.getParameter("name"); if (name == null) name = "World"; request.setAttribute("user", name); request.getRequestDispatcher("response.jsp").forward(request, response); } }
Annotation-based servlet
GET request returns a simple string
POST request forwards to a JSP page
The servlet uses the @WebServlet annotation for configuration. The doGet method responds to HTTP GET requests by writing a "Hello, World!" string to the output writer. It reacts to HTTP POST requests by looking for a request parameter called name and adding it to the request as an attribute called user, then forwarding to a response.jsp page.
The war plugin supports the use of the older web.xml deployment descriptor, which by default should reside in the WEB-INF folder under src/main/webapp. Feel free to use that as an alternative to the annotation-based approach.
You now have a simple servlet that responds to HTTP GET and POST requests.
Add JSP pages to the demo application
Add an index page to the root of the application by creating the file index.html in the src/main/webapp folder, with the following contents:
src/main/webapp/index.html
<html> <head> <title>Web Demo</title> </head> <body> <p>Say <a href="hello">Hello</a></p> <form method="post" action="hello"> <h2>Name:</h2> <input type="text" id="say-hello-text-input" name="name" /> <input type="submit" id="say-hello-button" value="Say Hello" /> </form> </body> </html>
Link submits GET request
Form uses POST request
The index.html page uses a link to submit an HTTP GET request to the servlet, and a form to submit an HTTP POST request. The form contains a text field called name, which is accessed by the servlet in its doPost method.
In its doPost method, the servlet forwards control to another JSP page called response.jsp. Therefore define a file of that name inside src/main/webapp with the following contents:
src/main/webapp/response.jsp
<%@ page contentType="text/html;charset=UTF-8" language="java" %> <html> <head> <title>Hello Page</title> </head> <body> <h2>Hello, ${user}!</h2> </body> </html>
The response page accessed the user variable from the request and renders it inside an h2 tag.
Add the gretty plugin and run the app
The gretty plugin is an outstanding community-supported plugin that can be found in the Gradle plugin repository at https://plugins.gradle.org/plugin/org.akhikhl.gretty. The plugin makes it easy to run or test webapps on either Jetty or Tomcat.
Add it to our project by adding the following line to the plugins block inside build.gradle.
Updating build.gradle to add gretty
plugins { id 'war' id 'org.akhikhl.gretty' version '1.4.2' }
Adding the gretty plugin
The gretty plugin adds a large number of tasks to the application, useful for running or testing in Jetty or Tomcat environments. Now you can build and deploy the app to the default (Jetty) container by using the appRun task.
Executing the appRun task
$ ./gradlew appRun :prepareInplaceWebAppFolder :createInplaceWebAppFolder UP-TO-DATE :compileJava :processResources UP-TO-DATE :classes :prepareInplaceWebAppClasses :prepareInplaceWebApp :appRun 12:25:13 INFO Jetty 9.2.15.v20160210 started and listening on port 8080 12:25:13 INFO webdemo runs at: 12:25:13 INFO http://localhost:8080/webdemo Press any key to stop the server. > Building 87% > :appRun BUILD SUCCESSFUL
You can now access the web app at http://localhost:8080/webdemo and either click on the link to execute a GET request or submit the form to execute a POST request.
Although the output says Press any key to stop the server, standard input is not intercepted by Gradle. To stop the process, press ctrl-C.
Unit test the servlet using Mockito
The open source Mockito framework makes it easy to unit test Java applications. Add the Mockito dependency to the build.gradlefile under the testCompile configuration.
Adding the Mockito library to build.gradle
dependencies { providedCompile 'javax.servlet:javax.servlet-api:3.1.0' testCompile 'junit:junit:4.12' testCompile 'org.mockito:mockito-core:2.7.19' }
Adding Mockito
To unit test the servlet, create a package folder org.gradle.demo beneath src/test/java. Add a test class file HelloServletTest.java with the following contents:
src/test/java/org/gradle/demo/HelloServletTest.java
package org.gradle.demo; import org.junit.Before; import org.junit.Test; import org.mockito.Mock; import org.mockito.MockitoAnnotations; import javax.servlet.RequestDispatcher; import javax.servlet.http.HttpServletRequest; import javax.servlet.http.HttpServletResponse; import java.io.PrintWriter; import java.io.StringWriter; import static org.junit.Assert.assertEquals; import static org.mockito.Mockito.*; public class HelloServletTest { @Mock private HttpServletRequest request; @Mock private HttpServletResponse response; @Mock private RequestDispatcher requestDispatcher; @Before public void setUp() throws Exception { MockitoAnnotations.initMocks(this); } @Test public void doGet() throws Exception { StringWriter stringWriter = new StringWriter(); PrintWriter printWriter = new PrintWriter(stringWriter); when(response.getWriter()).thenReturn(printWriter); new HelloServlet().doGet(request, response); assertEquals("Hello, World!", stringWriter.toString()); } @Test public void doPostWithoutName() throws Exception { when(request.getRequestDispatcher("response.jsp")) .thenReturn(requestDispatcher); new HelloServlet().doPost(request, response); verify(request).setAttribute("user", "World"); verify(requestDispatcher).forward(request,response); } @Test public void doPostWithName() throws Exception { when(request.getParameter("name")).thenReturn("Dolly"); when(request.getRequestDispatcher("response.jsp")) .thenReturn(requestDispatcher); new HelloServlet().doPost(request, response); verify(request).setAttribute("user", "Dolly"); verify(requestDispatcher).forward(request,response); } }
The test creates mock objects for the HttpServletRequest, HttpServletResponse, and RequestDispatcher classes. For the doGet test, a PrintWriter that uses a StringWriter is created, and the mock request object is configured to return it when the getWriter method is invoked. After calling the doGet method, the test checks that the returned string is correct.
For the post requests, the mock request is configured to return a given name if present or null otherwise, and the getRequestDispatcher method returns the associated mock object. Calling the doPost method executes the request. Mockito then verifies that the setAttribute method was invoked on the mock response with the proper arguments and that the forward method was called on the request dispatcher.
You can now test the servlet using Gradle with the test task (or any task, like build, that depends on it).
$ ./gradlew build :compileJava UP-TO-DATE :processResources UP-TO-DATE :classes UP-TO-DATE :war :assemble :compileTestJava :processTestResources UP-TO-DATE :testClasses :test :check :build BUILD SUCCESSFUL
The test output can be accessed from build/reports/tests/test/index.html in the usual manner. You should get a result similar to:
Add a functional test
The gretty plugin combines with Gradle to make it easy to add functional tests to web applications. To do so, add the following lines to your build.gradle file:
Gretty additions to build.gradle for functional testing
gretty { integrationTestTask = 'test' } // ... rest from before ... dependencies { providedCompile 'javax.servlet:javax.servlet-api:3.1.0' testCompile 'junit:junit:4.12' testCompile 'org.mockito:mockito-core:2.7.19' testCompile 'io.github.bonigarcia:webdrivermanager:1.6.1' testCompile 'org.seleniumhq.selenium:selenium-java:3.3.1' }
Tell gretty to start and stop the server on test
Automatically installs browser drivers
Uses Selenium for functional tests
The gretty plugin needs to know which task requires a start and stop of the server. Frequently that is assigned to your own task, but to keep things simple just use the existing test task.
Selenium is a popular open-source API for writing functional tests. Version 2.0 is based on the WebDriver API. Recent versions require testers to download and install a version of WebDriver for their browser, which can be tedious and hard to automate. The WebDriverManager project makes it easy to let Gradle handle that process for you.
Add the following functional test to your project, in the src/test/java directory:
src/test/java/org/gradle/demo/HelloServletFunctionalTest.java
package org.gradle.demo; import io.github.bonigarcia.wdm.ChromeDriverManager; import org.junit.After; import org.junit.Before; import org.junit.BeforeClass; import org.junit.Test; import org.openqa.selenium.By; import org.openqa.selenium.WebDriver; import org.openqa.selenium.chrome.ChromeDriver; import static org.junit.Assert.assertEquals; public class HelloServletFunctionalTest { private WebDriver driver; @BeforeClass public static void setupClass() { ChromeDriverManager.getInstance().setup(); } @Before public void setUp() { driver = new ChromeDriver(); } @After public void tearDown() { if (driver != null) driver.quit(); } @Test public void sayHello() throws Exception { driver.get("http://localhost:8080/webdemo"); driver.findElement(By.id("say-hello-text-input")).sendKeys("Dolly"); driver.findElement(By.id("say-hello-button")).click(); assertEquals("Hello Page", driver.getTitle()); assertEquals("Hello, Dolly!", driver.findElement(By.tagName("h2")).getText()); } }
Downloads and installs browser driver, if necessary
Start the browser automation
Shut down the browser when done
Run the functional test using the Selenium API
The WebDriverManager portion of this test checks for the latest version of the binary, and downloads and installs it when it is not present. Then the sayHello test method drives a Chrome browser to the root of our application, fills in the input text field, clicks the button, and verifies the title of the destination page and that the h2 tag contains the expected string.
The WebDriverManager system supports Chrome, Opera, Internet Explorer, Microsoft Edge, PhantomJS, and Firefox. Check the project documentation for more details.
Run the functional test
Run the test using the test task:
$ ./gradlew test :prepareInplaceWebAppFolder UP-TO-DATE :createInplaceWebAppFolder UP-TO-DATE :compileJava UP-TO-DATE :processResources UP-TO-DATE :classes UP-TO-DATE :prepareInplaceWebAppClasses UP-TO-DATE :prepareInplaceWebApp UP-TO-DATE :compileTestJava UP-TO-DATE :processTestResources UP-TO-DATE :testClasses UP-TO-DATE :appBeforeIntegrationTest 12:57:56 INFO Jetty 9.2.15.v20160210 started and listening on port 8080 12:57:56 INFO webdemo runs at: 12:57:56 INFO http://localhost:8080/webdemo :test :appAfterIntegrationTest Server stopped. BUILD SUCCESSFUL
The gretty plugin starts up an embedded version of Jetty 9 on the default port, executes the tests, and shuts down the server. If you watch, you’ll see the Selenium system open a new browser, access the site, complete the form, click the button, check the new page, and finally shut down the browser.
Integration tests are often handled by creating a separate source set and dedicated tasks, but that is beyond the scope of this guide. See the Gretty documentation for details.
Bootstrap Animated Alerts Tutorial. Bootstrap Buttons Style Tutorial. Bootstrap Buttons Size Tutorial. Bootstrap Block Level Buttons tutorial. Bootstrap Buttons States Tutorial. Bootstrap Button Groups Tutorial. Bootstrap Vertical Button Groups tutorial. Bootstrap Justified Button Groups Tutorial. Bootstrap Nesting Button Groups Tutorial. Bootstrap Split Button Dropdowns tutorial. Bootstrap Badges Tutorial. Bootstrap Contextual Badges Tutorial. Bootstrap Pill Badges tutorial. Bootstrap Labels Tutorial. Bootstrap Contextual Labels Tutorial. Bootstrap Basic Progress Bar tutorial. Bootstrap Progress Bar With Label Tutorial. Bootstrap Colored Progress Bars Tutorial. Bootstrap Striped Progress Bars Tutorial. Bootstrap Animated Progress Bars tutorial. Bootstrap Stacked Progress Bars Tutorial. Bootstrap Pagination Tutorial. Bootstrap Pagination – Active State. Bootstrap Pagination – Disabled State. Bootstrap Pagination – Sizing Tutorial. Bootstrap Pagination Breadcrumbs Tutorial. Bootstrap Pager Tutorial. Bootstrap Align Buttons tutorial. Bootstrap Basic List Group Tutorial. Bootstrap List Group With Badges Tutorial. Bootstrap List Group With Linked Items. Bootstrap Active Item in a List Group. Bootstrap Disabled Item in a List Group. Bootstrap Group Contextual Classes. Bootstrap Basic Panel Tutorial. Bootstrap Panel Heading tutorial. Bootstrap Panel Footer Tutorial. Bootstrap Panel Group Tutorial. Bootstrap Panels with Contextual Classes. Bootstrap Glyphicon Tutorial. Bootstrap Dropdowns Tutorial. Bootstrap Dropdowns Divider tutorial. Bootstrap Dropdowns Header Tutorial. Bootstrap Dropdowns Active items. Bootstrap Dropdowns Disable items. Bootstrap Dropdowns Position Tutorial. Bootstrap Dropup Tutorial. Bootstrap Simple Collapsible items. Bootstrap Collapsible Panel Tutorial. Bootstrap Collapsible List Group. Bootstrap Vertical Form items. Bootstrap Inline Form. Bootstrap Horizontal Form. Bootstrap 4 Overview. Bootstrap 4 package tutorial. Bootstrap 4 CDN link tutorial. Create First Web Page With Bootstrap 4. Bootstrap 4 Grid System tutorial. Bootstrap 4 grid equal columns example. Bootstrap 4 grid responsive equal columns example. Bootstrap 4 grid responsive unequal columns example. Bootstrap 4 Jumbotron tutorial. Bootstrap 4 Full Width Tutorial. Bootstrap 4 Page Header Tutorial. Bootstrap 4 Well tutorial. Bootstrap 4 Alert Tutorial. Bootstrap 4 Alert Link Tutorial. Bootstrap 4 Closing Alerts tutorial. Bootstrap 4 Animated Alerts Tutorial. Bootstrap 4 Buttons Style Tutorial. Bootstrap 4 Buttons Outline Tutorial. Bootstrap 4 Buttons Size Tutorial. Bootstrap 4 Block Level Buttons tutorial. Bootstrap 4 Buttons States Tutorial. Bootstrap 4 Button Groups Tutorial. Bootstrap 4 Vertical Button Groups Tutorial. Bootstrap 4 Justified Button Groups Tutorial. Bootstrap 4 Nesting Button Groups Tutorial. Bootstrap 4 Split Button Dropdowns tutorial. Bootstrap 4 Badges Tutorial. Bootstrap 4 Basic Progress Bar Tutorial. Bootstrap 4 Progress Bar Height Tutorial. Bootstrap 4 Progress Bar With Label Tutorial. Bootstrap 4 Colored Progress Bars Tutorial. Bootstrap 4 Striped Progress Bars tutorial. Bootstrap 4 Animated Progress Bars Tutorial. Bootstrap 4 Stacked Progress Bars Tutorial. Bootstrap 4 Pagination Tutorial. Bootstrap 4 Pagination – Active State Tutorial. Bootstrap 4 Pagination – Disabled State Tutorial. Bootstrap 4 Pagination – Sizing tutorial. Bootstrap 4 Pagination Breadcrumbs Tutorial. Bootstrap 4 List Groups Tutorial. Bootstrap 4 List Group With Linked Items Tutorial. Bootstrap 4 Active Item in a List Group Tutorial. Bootstrap 4 Disabled Item in a List Group Tutorial. Bootstrap 4 Group Contextual Classes tutorial. Bootstrap 4 Basic Panel Tutorial. Bootstrap 4 Panel Heading Tutorial. Bootstrap 4 Panel Footer Tutorial. Bootstrap 4 Cards Tutorial. Bootstrap 4 Contextual Cards tutorial. Bootstrap 4 Card Titles, Text and Links Tutorial. Bootstrap Card Image Tutorial. Bootstrap Card Image Overlay Tutorial. Bootstrap 4 Dropdowns Tutorial. Bootstrap 4 Dropdowns Divider tutorial. Bootstrap 4 Dropdowns Header Tutorial. Bootstrap 4 Dropdowns Header Tutorial. Bootstrap 4 Dropdowns Position Tutorial. Bootstrap 4 Dropup Tutorial. Bootstrap 4 Simple Collapsible tutorial. Bootstrap 4 Collapsible Panel Tutorial. Bootstrap Collapsible List Tutorial. Bootstrap 4 Stacked Form Tutorial. Bootstrap 4 Inline Form Tutorial. Maven Spring Eclipse Tutorial. Maven Hibernate Eclipse Tutorial. Codesjava
0 notes
Text
Starting Points In Associate Marketing
youtube
Numerous web marketing expertshave actually been at the forefront of associate marketing in Singapore, and also one of one of the mostprominent people in this field has actually been our own home-grown talent, Ewen Chia. As anassociate marketing expert, he has not just attained amazing results, he is likewise amongst themillionaire elite in web marketing. Rosalind Gardner, another popularaffiliate marketing expert, has actually additionally generated powerful outcomes, often making in excess of$ 50,000 in a single day as an affiliate.If you plan to achieve the very same sort of outcomes as they have, you will need youconcentrate on a number of beginning factors.First, you should have a team that could support you technically. It is actually real estate Lafayette IN impossible for you, especially if you are not practically smart, to startaffiliate marketing without webhosting and also technological support. To do this, registerfor a cheap webhosting account, and then employ a decent technical support individual toaid you in different matters. As a newbie, you probably want to have your pagessubmitted and also your server backed up in case anything occurs (often, web servers doget hacked, and the only way to safeguard on your own is to have regular backups).Second, you have to begin being able to locate great products. If you know ways todiscover products, you would certainly be surprised at what does it cost? you can market. After all, half the fightis currently won, and currently you only have to focus on the advertising and marketing facet of things. Ifyou plan to sell anything as an affiliate, one of the two best-known items on themarket that will certainly provide you a terrific headstart on associate advertising and marketing are (1) RosalindGardner's Super Associate Handbook. This is a really good overview on how you can obtainbegun on affiliate advertising and marketing and also has actually been quite possibly arranged and also upgraded. I.believe that if you are looking to start affiliate advertising, you will certainly require this.manual. (2) Ewen Chia's Secret Affiliate Tool. This product is an actual.no-brainer, since it is loaded with information about just how you establish your.web marketing capacities using some extremely intriguing methods. I.consider this of strategic relevance, and should be utilized when you want to enhance.your sales. I'm discussing an item package that probably costs you no greater than.$ 60 for your education, as well as $100 for webhosting for a whole year.How many organisations can you actually begin on such a shoestring? This is possibly.among the fastest expanding companies in any field, and to begin, plough through.everything you review, and working from it on your computer. Keep in mind that if you have to.run a website, you do not need to set up web pages one at a go. You can have a blog site to.manage your associate program, and also one of the optional (however really effective) systems.is Wordpress. If you are ready to begin on this, you truly must get yourself a.duplicate of this Wordpress guidebook that can assist you to achieve a great deal much more with a.whole lot much less.
0 notes
Text
Starting Points In Affiliate Advertising
youtube
Several online marketing specialists Home have actually been at the center of affiliate advertising in Singapore, and among the mostprominent people in this arena has actually been our own home-grown talent, Ewen Chia. As anassociate marketing professional, he has not only achieved impressive outcomes, he is likewise among themillionaire elite in web marketing. Rosalind Gardner, an additional preferredaffiliate marketing professional, has likewise produced powerful results, commonly making in excess of$ 50,000 in a solitary day as an affiliate.If you plan to accomplish the exact same sort of outcomes as they have, you will require youconcentrate on numerous beginning points.First, you need to have a group that could sustain you practically. It is essentiallyimpossible for you, specifically if you are not practically wise, to start offaffiliate marketing without webhosting as well as technical assistance. To do this, registerfor an affordable webhosting account, and then hire a decent technological support individual toassist you in numerous issues. As a beginner, you possibly wish to have your web pagesposted and also your web server supported in case anything takes place (often, web servers doget hacked, as well as the only method to secure on your own is to have normal backups).Second, you need to begin having the ability to find excellent items. If you understand how tolocate items, you would certainly be surprised at how much you could sell. Besides, half the battleis currently won, as well as now you only need to concentrate on the advertising and marketing facet of things. Ifyou prepare to offer anything as an associate, one of both best-known products on themarket that will certainly provide you a great headstart on associate advertising are (1) RosalindGardner's Super Associate Manual. This is a really good overview on the best ways to getbegun on affiliate marketing as well as has actually been very well arranged and upgraded. I.believe that if you are planning to begin associate marketing, you will certainly need this.handbook. (2) Ewen Chia's Secret Associate Tool. This product is an actual.no-brainer, since it is full of details about just how you develop your.web marketing abilities utilizing some extremely intriguing methods. I.consider this of strategic significance, as well as need to be utilized when you want to increase.your sales. I'm discussing a product package that most likely costs you no more than.$ 60 for your education, and also $100 for webhosting for a whole year.The amount of organisations can you really start off on such a shoestring? This is most likely.among the fastest expanding companies in any kind of field, and to start, plough through.every little thing you read, and work at it on your computer system. Remember that if you should.run an internet site, you don't need to set up web pages one at a go. You could have a blog site to.manage your affiliate program, and also among the optional (but really powerful) systems.is Wordpress. If you prepare to start on this, you really ought to obtain a.duplicate of this Wordpress manual that could aid you to accomplish a whole lot much more with a.lot much less.
0 notes
Text
Starting Points In Associate Advertising
youtube
Numerous internet marketing professionals Home have actually gone to the forefront of affiliate advertising and marketing in Singapore, as well as one of one of the mostprominent individuals in this arena has actually been our own home-grown ability, Ewen Chia. As anaffiliate marketer, he has not only achieved remarkable results, he is likewise amongst themillionaire elite in internet marketing. Rosalind Gardner, an additional preferredaffiliate marketing professional, has also generated effective results, commonly making over of$ 50,000 in a single day as an affiliate.If you prepare to accomplish the same sort of results as they have, you will need youfocus on several starting points.First, you have to have a team that could support you practically. It is essentiallyimpossible for you, particularly if you are not technically wise, to startassociate advertising without webhosting as well as technological support. To do this, registerfor a low-cost webhosting account, and then work with a suitable technical assistance individual toaid you in various matters. As a beginner, you probably wish to have your web pagessubmitted and your server backed up in situation anything takes place (sometimes, web servers doget hacked, as well as the only method to protect yourself is to have regular back-ups).Second, you should begin being able to locate great products. If you know how you canlocate items, you would certainly be amazed at how much you can market. Besides, half the fightis already won, and also currently you just should focus on the advertising aspect of points. Ifyou plan to sell anything as an associate, one of both best-known items on themarket that will certainly give you a fantastic headstart on associate marketing are (1) RosalindGardner's Super Associate Manual. This is a really good overview on ways to getbegun on associate marketing and has been extremely well organized and updated. I.think that if you are wanting to start associate advertising and marketing, you will certainly need this.manual. (2) Ewen Chia's Secret Associate Tool. This product is a genuine.no-brainer, since it is filled with info about exactly how you establish your.web marketing capabilities making use of some extremely intriguing approaches. I.consider this of calculated relevance, as well as need to be used when you intend to boost.your sales. I'm discussing a product package that probably costs you no more than.$ 60 for your education and learning, and also $100 for webhosting for a whole year.The amount of organisations can you truly start on such a shoestring? This is possibly.one of the fastest expanding companies in any kind of field, as well as to start, slog.everything you read, as well as work at it on your computer system. Remember that if you need to.run a site, you do not have to establish web pages one at a go. You could have a blog to.manage your associate program, and one of the optional (however really effective) systems.is Wordpress. If you are ready to begin on this, you really must get yourself a.duplicate of this Wordpress guidebook that could assist you to complete a whole lot a lot more with a.great deal much less.
0 notes
Text
Java Servlet Tutorial
Preface
All java web application based on servlet, knowledge about servlet it is basic for start develop web apps on the Java. Inside all java web frameworks use servlets.
Let’s start
First you need to add to your pom.xml dependency on Servlet API. Scope value is provided - this means that this library which be provided by servlet container such as Tomcat or Jetty. Java web app should be packaged in war. Servlet Container provide for environment, sockets, manage resources and class loading for servlets. All java application which use maven should have three dirs at the src/main, it is java - hold source code, resources - hold config files and webapp - contains file which describe that this is web app. Third directory interesting for us. At this should be WEB-INF directory which must contain web.xml - deployment descriptor which needs for servlet container.
Configuration
When I try make my first servlet app, I get stuck - xml configuration does not works and I am start using annotations. XML configuration must be placed at the web.xml, otherwise annotations based configuration should be placed at the class file. XML Configuration: <web-app> <servlet> <servlet-name>HelloServlet</servlet-name> <servlet-class>me.vrnsky.HelloServlet</servlet-class> </servlet> <servlet-mapping> <servlet-name>HelloServlet</servlet-name> <url-pattern>/hello</url-pattern> </servlet-mapping> </web-app> Annotations configuration @WebServlet("/hello") public class HelloServlet {
}
Some code
Let’s create a first servlet - create a package at the java directory and create on it Index class. It must extends HttpServletClass which contains method for handle HTTP requests. And another three interesting method is init, service and destroy. What does this method ? First of it is create servlet object, second run at the endless loop and serve HTTP requests and last it call when servlet container shut down. Note that servlet container do not instant servlet object until receive request for servlet. It may change by set load-on-startup parameter. Another important thing that on all servlet container exist ONLY ONE object of servlet.
Override one of servlet method
By default servlet call doGet method, try to override it. We want to get some response from server in utf-8. For this we should write this code. Notice that servlet have a PrintWriter and OutputStreamWriter do not use it together, if you try to use this together you get an exception.
@WebServlet("/hello") public class HelloServlet {
@Override public void doGet(HttpServletRequest req, HttpServletResponse resp) throws Exception { resp.setContentType("text/utf-8"); PrintWriter writer = resp.getWriter(); writer.append("hello, I am a servlet!"); writer.flush(); } }
At this time most used method is doGet and doPost, other uses but less at the real web app.
doTrace - check trace of request
doPut - update data on the server
doDelete - delete data from server
doGet - get data from server
doPost - send data to server(not idempotent method, because produce different data)
doHead - ask about header without message
doOptions - return server options
doPatch - frequency update data on server
Another important thing
When servlet container receive an request it create two object HttpServletRequest and HttpServletRespone and give it to the thread of Servlet by this way servlet may serve a few user at one time, this thing allow improve speed of responding to the user.
A small task to the servlet and it’s solution
How to count how many users ask about some servlets? For solution I have two idea - thread local - which allow contains variable for current thread and atomic constant. First is not suitable for this and second is very suitable for it.
@WebServlet("/counter") public class Counter {
private static final AtomicInteger COUNTER = new AtomicInteger(0);
@Override public void doGet(HttpServletRequest req, HttpServletResponse resp) throws Exception { resp.setContentType("text/utf-8"); PrintWriter writer = resp.getWriter(); writer.append(String.format("%s user visit this page", COUNTER.incrementAndGet())); writer.flush(); } }
Related links
Oracle Servlet Docs
0 notes
Text
Get paid ($$$) : For what purpose doGet() method of a servlet is used?
http://dlvr.it/N2FJSs
0 notes