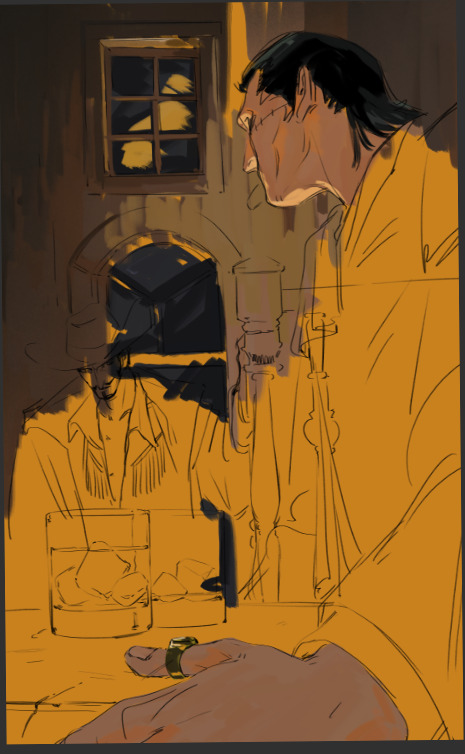
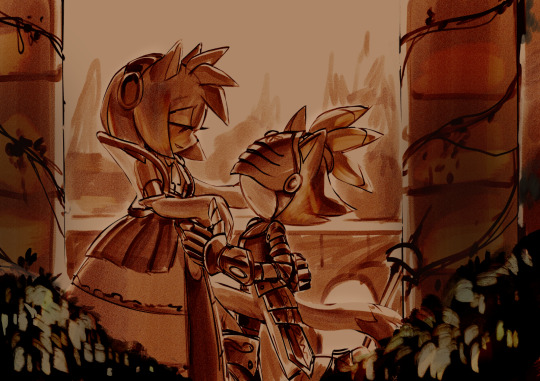
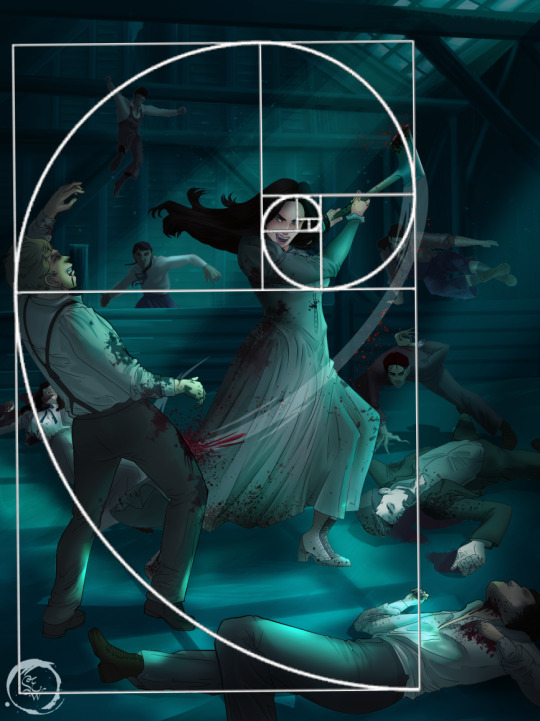
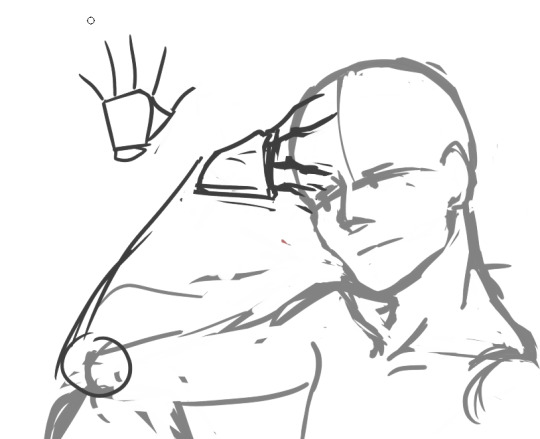
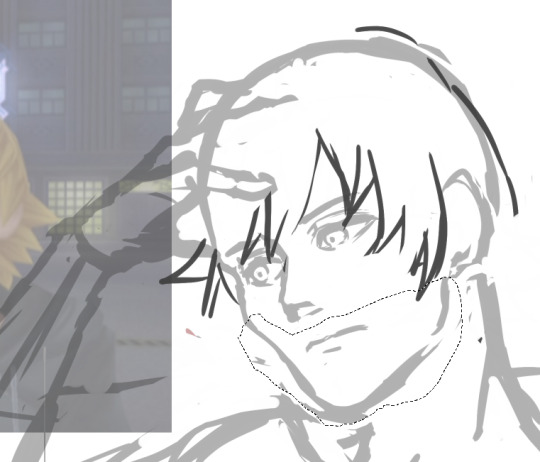
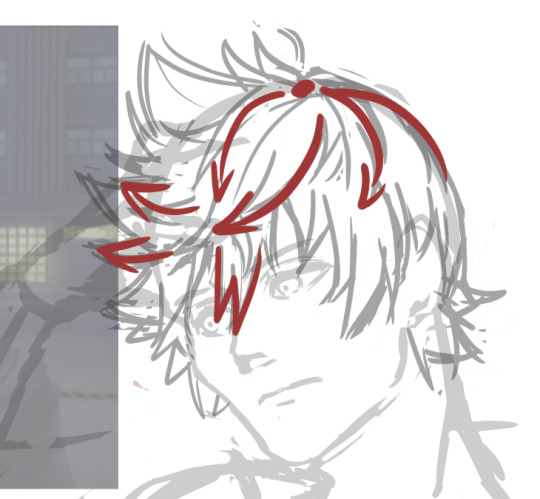
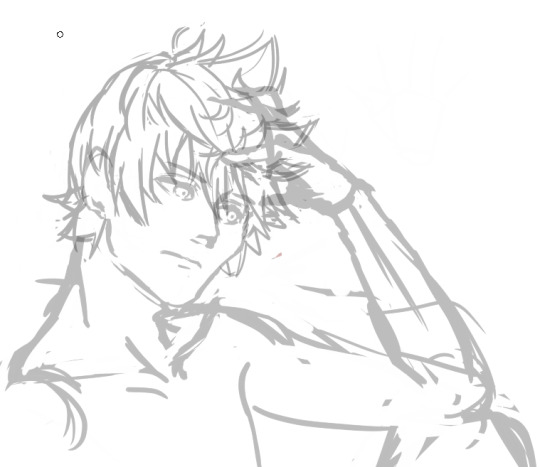
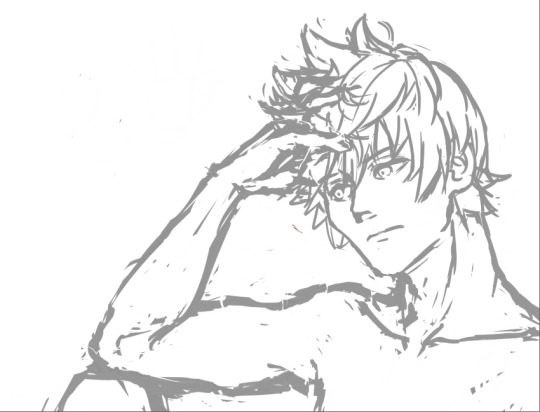
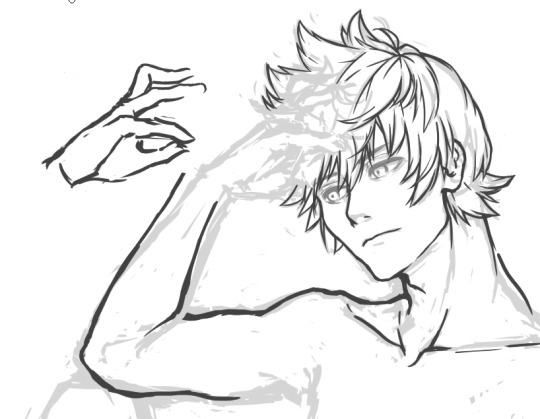
#I prefered the sketch but it’s always hard to make a perfect lineart
Text

{Tired naivety}
*manifesting Hong Lu’s past*
There is no doubt in my mind that behind all this cheerfulness is hidden a horrible backstory.
#limbus company#hong lu limbus company#digital art#fan art#my art#project moon#young Hong Lu#tw: abuse#tw: reference to abuse#click for better quality#discovering that Hong Lu's hair was not done in a ponytail but in a Half up ponytail was the biggest revelation of my week#inking#I prefered the sketch but it’s always hard to make a perfect lineart
28 notes
·
View notes
Note
Hello !
As a fellow artist, I really admire your style, and would like to study it.
In that spirit, would you be OK to tell us a little bit about your process ?
I hope you have a great day and I look forward to seeing your future pieces !
Woah, this is high praise, thank you so much 🥹 And thank you for allowing me to nerd abt process hahaha, I love to talk abt this stuff! Drawing is so much fun honestly
For process, I'm not sure if you mean more the actual process of crafting the art, or rather the thought-process that goes into it, so I'll briefly cover both! I'll just talk abt my personal/fanart practice since I think this is what the "style" part refers to? As in, I won't mention process for, say, storyboards or backgrounds I make for animation.
Under the cut bc long answer!!
A piece usually begins with an idea, it's often inspired by something I see or hear, by something that comes up in a conversation with friends, by something I read in a fic, etc. And imo, the most crucial aspect of my creative practice is narration; it's the thing I strive to perfect and polish the most. What do I want to say with this piece, which story do I want to tell. Before I even start sketching, I usually have an idea of the intention I want for a piece, and with enough experience, at some point you start guessing what "visual devices" you should use to render that mood. E.g. if I have an idea that involves a really suffocating mood, a feeling of tension, one of the basic ways to go about it is to crowd your piece, have it more zoomed-in and in longer focal length so the perspective is flattened. Similarly, you'll often choose not to show your character whole (especially not their feet, with which they could flee!) or the floor (which is a way out for the character), you have many overlapping objects, etc. Knowledge of these "visual devices" honestly come with time, and sometimes they sound super basic, but they do the trick, and they're not hard to spice up and make more original when you keep your mood/intention in mind.
Then comes storyboarding/sketching! It's the most important part to me, because this is where you decide how you're going to tell your story. Sketching is the most exciting part, you can let your mind speak and find creative ways to spice up the "visual devices" you've figured out at the initial thinking step. I think one of the greatest advices I got, ever, was from my storyboard professor, who told us to always keep in mind that a picture (moving or not) is ALWAYS a 2D surface, and that it should be treated as such when storyboarding. I.e. when you board, think of your image as an arrangement of shapes on a flat surface, rather than a 3D scene. You can figure out the logistics and the perspective in lineart, but for storyboard, composition has to be prioritised over a well-constructed room, bc otherwise you'll just draw the same things over and over.
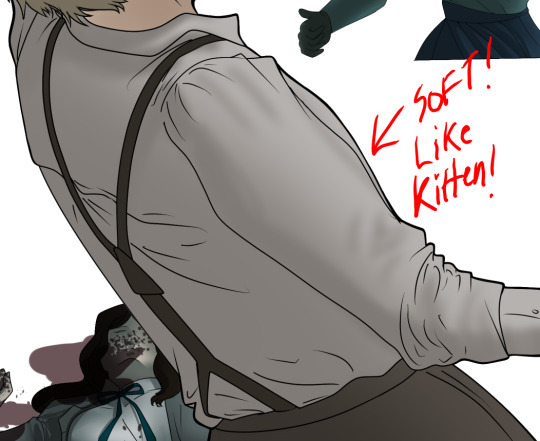
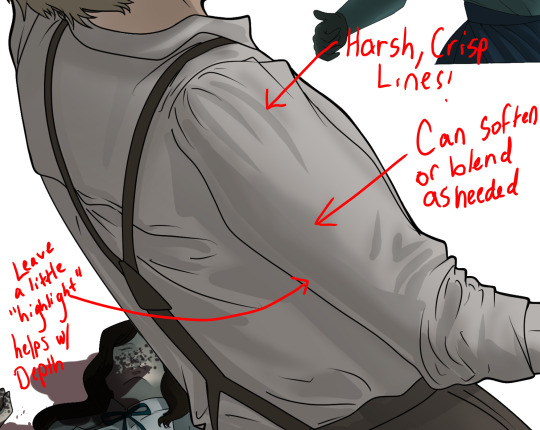
It depends on the pieces, but nowadays I prefer to just clean up the sketch rather than do a whole clean line on top of it, as not to lose the spontaneity and dynamism of the sketch. Lineart is about making things look pretty and nice to look at, but it's also a step where you can reinforce your initial intention with details. It can be details of anatomy (giving an expression, working on your characters' anatomy to make it expressive (what story does this body tell)), or of environment (what does this place mean for my characters, why are they here, what does it tell about them). For this I use truckloads of references!!!! Super important. Either from other artists, especially for anatomy details or line efficiency (matanai_ke, nisir0, nonebrainer on twt, whose styles I've been really digging recently), or from pictures/real life for enviros. No one's born with the ability to come up with a plausible baroque interior so get those refs! Lineart is honestly one of the steps I enjoy most, I spend the longest time on it because I need it to be perfect and tell exactly what I want to tell. I'm working on improving my linework quality because I feel terrible abt it ahjdsf
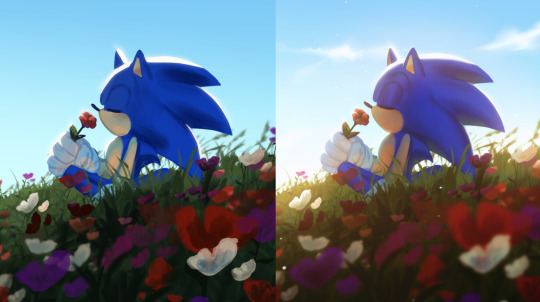
Then I do a coloursketch. My approach of colours is painterly (applying colours directly as they appear) rather than the neutral flats + coloured filters workflow, which do work great for beginners however, and I did my time in the mines with it as well asdjfh...... I usually apply an underpaint layer as shown below, usually then place lights first, and then work my way through all the elements.
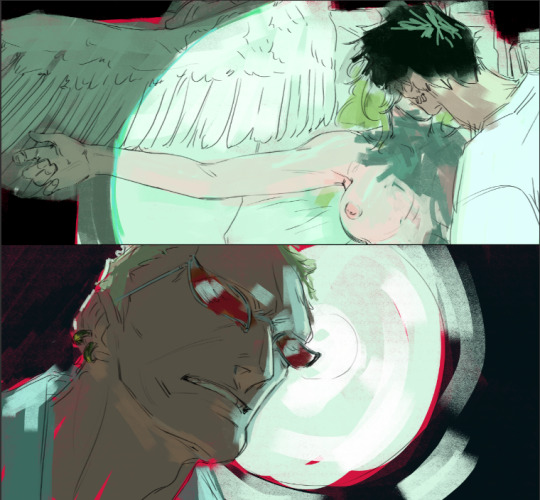
Sometimes my underpaint is bright and saturated, sometimes it's more muted and darker: again, it all depends on the intention of the piece! I do this to visualise better and to contextualise the colours I'll paint on top of this base. The yellow in the top-left screenshot gives a warm touch to the wood-browns, even though they're not actually super saturated! With the bottom-right, the pink gives a colder aspect to the teals/greens and makes them more "aggressive", as it's their complementary colour. It also bears a narrative purpose: on the bottom-right screenshot, I wanted pink to seep from the edges of every shape, and purposefully left the edges jagged and rough instead of cleaning up the painting perfectly. Bright pink like this is not only a crazed colour, but it also represents Doflamingo, and in this case, it fit the intention to have him and this madness as the backdrop of a scene that doesn't involve him, but to which he is the unspoken key and center (Monet is hallucinating/projecting that it's Dof looking down on her, when it's actually Law). As if his presence was underlying the very materiality of the scene.
God that was long. Then comes rendering, which I hate with my guts because I don't know how to do it and if I could get away with only colour sketches for the rest of my life I would!!!! I hate spending time on colour details and rendering materials and polishing brushwork I just hate this step :')
And finally, compositing!! Slap some grain* on this bad boy, slight chromatic aberration in the corners if we're feeling fancy, perhaps a bit of field blur... chromatic aberration is to mimic cameras! it's a physical effect of the lens, and having it on illustrations give them a more cinematographic quality.
*in a non-destructive way I BEG!!!! Quick grain tutorial for the poor souls who still merge everything -> filter -> noise!!! 1. Create a gray layer with HSV at 0, 0, 50 2. filter -> noise as you'd normally do 3. set blending mode to overlay so your grain is more visible the darker your colours are (like for a real camera! grain is an artifact created when there isn't enough light in your captor) (I won't get into the maths of overlay but it's quite fascinating, basically it multiplies the value of pixels that are V>50 and "divides" the value of pixels that are V<50, while pixels that are V=50 like our initial grey layer, it doesn't change the value of the pixel underneath it) and 4. set opacity to ~20% depending on what you want or need
and tadah! you have an illustration. how cool!! there are still many things I need to work on, but it's a very fun exploration everytime :'D I feel glad that I've reached a point where I somewhat know what I'm doing, it made drawing so much more fun in the past year. Good luck w your own endeavours!!!
15 notes
·
View notes
Note
i unfortunately don’t have any questions i just want to hear you talk about art supplies 😔
oh well. thats not particuarly hard to do.
im real hyped because in the ‘my child is autistic and i have zero idea how to shop for him’ manner my mother let me pick my own gifts this year for xmas so i will be in possession of some sennelier oil pastels shortly. ive used them several times before, but theres really no competition. i say this about almost no media because i believe theres something for everyone- but there is one oil pastel brand and its sennelier. working with them will make you feel like you are working with a completly unfamillar medium even if you’ve only ever drawn in oil pastel before. They’re just incredible. incredibly pricy too.. oh well. I’m also planning on picking up a box of Carandache neocolor I. they’re wax pastels, basically crayons but actually good. my mother lives by the Neocolor II, their watersoluable cousin, but i enjoy water resistance as much as i do soluablity. and as someone who works in so much wet media, its nice to work with a sketching media that provides resist as i do not lose or smudge the sketch as heavily. Plus, i love sketching with crayons and other chunky media. Also on my mind is a new lightboard -_- only had my old one for a year and a half before it died.. sigh. I want a bigger, heavy duty one sometime but i do not have the studio space for that.. one day.
In terms of pens, my special interest within a special interest, my kaweco sport is still my baby in terms of writing pens. Used to think i was more of a lamy guy.. but whew! im a convert. Kaweco pens are so well designed it makes my jaw drop sometimes. I just adore them. Love their lead holders too! And no, my brush pen rotation has not changed. I use my kuretake no.40 and kuretake no.13 interchangably.. i do not know better brush pens on the market, they’re just perfect in every way possible. made the switch fully to platimum carbon cartridges about a year ago and i do not regret it one bit, they’re the only ones i’ll use from this point forward. The ink darkness, permenance and waterproofing is just perfect, and it’s given me much less feathering than i had with kuretake, Akashiya (as much as i love akashiya in every other regard) and pentel cartridges. I tell people this all the time, but the ink you put in your pen is as crucial as the pen itself. Akashiya Sai Thinline, of course, is my preferred colored disposable brush pen. just wish the color range was wider! They’re truly special tho, the muted pallete, the fact they’re waterproof, the long thin shape of the bristles.. gorgeous. because of the recent trend of ‘watercolor brush markers’ (big fan, dont get me wrong) its pretty difficult to find colored brush pens that aren’t waterbased. I’ve had a scheme to make my own brush pens someday using my personal ink collection, but that depends on my ability to find a bristle tip body that is leakproof, cheap enough to get several of, and actually retains a point. People rave about just filling aquash style brushes with ink, but those leak.. a LOT. and keeping their tips consistantly wet has a habit of making their sharpness go away, which is fine if you’re painting, not so much for lineart. So. while i do get real autistic trying to find the best brush pens for lineart.. at the end of the day, i always end up just hand lining with a paintbrush and ink lol. it’s still the best way. (if you’re curious i normally do my colored lineart in liqutex acrylic ink, specifically the muted colors series because they’re perfect in every way shape and form.)
like i said. not hard to do. it’s like asking me to talk about music. i will, just can’t promise it will be understandable to anyone but me.
#im hyping myself up to focus my efforts on one or two sustained peices rather than a million little peices like usual#i have a potential commission i hope my client is serious about this time because they’ve asked a few times#but if not or even if its small im hoping to start a lifesize nude self portrait in mixed media with a focus on oil pastel lol#ive been having a really strong image of mounting kitchsy tacky patterned fabric on wood panel and then painting totally over it nearly#obscuring it.. kinda like how artists tone their canvas but pattern
21 notes
·
View notes
Note
Hello! Do you have any advice with painting? Every time I start I end up just doing lineart with colours underneath, and when I do kindles art it looks kind of like plastic. Am I supposed to merge the two layers and then start shading? What would you recommend?
Hey anon!! I actually do have some advice for that!! I'll shove it under a cut because it got way longer than I thought it would, sorry for the infodump everyone _(:3 」∠)_
quick tl;dr: painting process should consider both personal taste & the desired aesthetic of a painting, & to avoid plastic-y colours, make sure your hues vary within your values (and layer modes are ur friend) ♥
there's a million ways to start paintings & its all down to personal preference -- the end goal for the illustration can often influence the approach you take; a crisp digital painting might call for meticulous layering & sharp edged flats, but if you want something to look like an oil painting, you should try and mimic that process as close as you can! here's some examples:
this is the sketch for my FYR zine piece from last year; i intentionally approached it in a way that looks like traditional underpaintings so that when I worked directly on top, those orange tones would peek through like this:

after doing that undersketch, i manually painted everything -- no fancy layer modes, just me, one layer, and screaming ಥ_ಥ it was hard but it worked for the vibe i wanted!!
now v.s something like this:
simple shapes, roughly blocked in shading that just gets merged and painted over, as well as lots of layer modes on top for those colour changes! this is by far the easier one & the one i'd probably recommend, solely because it lets you keep more control. i go more in depth here on that -- but to quickly answer, i personally block everything (including shading) in before I merge & render!
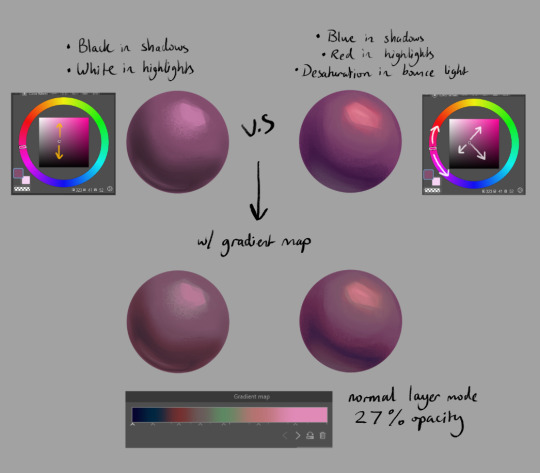
for the other thing you mentioned, a lot of the times that 'plastic' feeling can come from either a lack of transitional shades or only using white/black for your value tones. this tweet thread (direct image links 1, 2 & 3) by frozensoba demonstrates it incredibly well -- by adding certain colour shifts in your values, it can create extra depth which is what makes stuff look more alive!! don't be afraid to really push it and get wacky
an easy way to add it while you're learning is using gradient maps to add richness in your midtones. It's not perfect since different surfaces & materials diffuse light differently, but adding one at the end of a drawing can help tie everything together. If you can do both at once though it always looks best; here's some very quick 2 minute orbs as an example:
ok I'm almost done (and im so sorry for how long this got... special interest moment TM) -- one last thing is to try varying your brush strokes & adding textures if you want. using only an airbrush or heavily relying on blurring brushes can make things look plastic too; sometimes you want that, but for the times you don't, adding some texture & leaving brush marks in can do a lot!!
lastly, since this is just me rambling, here are some artists that are incredibly talented & i highly recommend looking at for their advice & processes because it will be much more coherent than this:
Marco Bucci -- amazing educational content. if you check out any of these artists, he's the one to look at first imo. his 10 minutes to better painting series is a great place to start
Sinix Design has some amazing tutorials on anatomy & the mechanics of painting! This video & the intermediate part 2 are super
Dao Trong Le -- a veritable goldmine of speedpaints
Bo Chen & any of the riot splash artists. If that's the vibe you're after, you can't go wrong with the LoL splashes as reference
i hope that helps!!!
#tutorial#any time i have the opportunity to barf out art talk i will do it#tysm for the question too ♥#not art#asks
91 notes
·
View notes
Note
Hello, do you have a guide to drawing faces? I'm going through an artstyle revision to be more soft around the edges and less sharp and I've always struggled with faces...
oh my... that's a very broad question to ask and hard to give any usefull answer without actually seeing your work. But it's good that you have concrete goals and can pinpoint what exactly you want to change about your work. It's a very professional attitude.
Which is why I may be a bad choice of person to be asked for advice. Because I'm not a professional and I want very much for drawing to stay just my hobby to keep me sane. I never consciously thought about my artstyle beyond maybe making it less manga (but residue it's still there, art teachers were right lol XD). It's about having fun in the process for me.
That's why I can only give you some fun things to try out. Maybe one or two will work for you.
If you want to soften your faces in generally paintery way best way I tried is to gradually unblurr your picture. Like take the most basic round brush with soft edges and make it very big. Turn down the opacity a bit and try to sculpt basic shapes of the face using the main limited pallette colors of your reference. Then use slightly smaller big brush to add bit more details. Then gradually make the brush smaller and smaller. And gradually add new details and colors if necessary.
This actually does wonders because helps you stop being precious about some sketch details because there is no sketch. It helps you stop seeing face as face so you don't draw what you know but what you actually see.
Actually speaking of that. Another great trick is to put your reference upside down. Our brains are lazy and just extrapolate the information and our brains are great at face shapes so it's actually harder to draw them. But if you put them upside down you actually need to focus on proportions of this new unknown shape. It actually does wonders!
When it comes to lineart (because after all this rambling I figured that's most likely why you've written to me, sorry) i have 2 suggestions.
Try to figure out if you draw with only your wrist. It doesn't decide if you draw more in straight or in curved lines (I guess in that department we have opposite problems :D) but it's good idea to try consciously draw using more of your elbow. It works well with bigger canvases and actually taught me to draw really long straight lines (yay architecture, it was useful for that and learning how to do really tough boxes XD) but actually it's about stability which is crucial in doing curved lines too.
On smaller scale try using different media or have fun with new pens. It will help you get out of your used path and is an excuse to raid nearby cheap art store.
I guess many people would recommend doing lineart with brushes. The varying thickness will encourage you to use more round lines and so on buuuuut.... actually I think brushes are very discouraging when you don't have the muscle memory to control them properly. My advice here would be to use felt tip pens actually. They are more springy thus more forgiving. Try the ones that are soft and more spongy than actually felt. Idk how to describe them. If that's something you think may be interesting let me know and I'll try to dig up the ones I used.
Generally let me know if you want more details in certain direction because all above is kind of rambly stream of consciousness answer and idk how usefull it actually is but I prefer to post it that way otherwise I'll get stuck in perfecting the reply limbo >.<
20 notes
·
View notes
Note
1, 7, 12, and 19 for that ask game!! :]
1. what is your favorite color to work with?
hmmm well... i don't have a big preference to just one colour (specifically for art, otherwise i'd say blue is my favorite). i usually sketch with a blue pencil (both digitally and traditionally), sometimes a red one. but when coloring... idk! i like bright warm colours. i especially like the colour palettes of professor layton games and hilda (the netflix show), so i stole some colours from both. so like, blue, red, orange, green..... i guess i'm happy with any colour? LOL. i haven't been coloring properly much these day so it's really hard to say...
7. do you prefer sketching, outlining, or coloring?
sketching! at least that's what i've been doing mostly these days. i do love lining though. it's really relaxing for me. but when i line i always strive for perfection which means i take a long time on it.... honestly lately i've been thinking of keeping my lines sketchier, at least for the time being. i never know how to color in a perfect lineart without resorting to flat colours or simple cell shading (THAT I DON'T KNOW HOW TO DO STILL)
12. draw one of your favorite characters in 15 seconds.
good ol ernest! his head seems a bit squashed...

19. do you like drawing short hair or longer hair more?
i was a girly kid, so any girl i drew always had to have loooong hair. i still really love drawing long hair. i just enjoy making long straight or curly lines, it's relaxing
5 notes
·
View notes
Note
👀 may we know more about rhythm man?
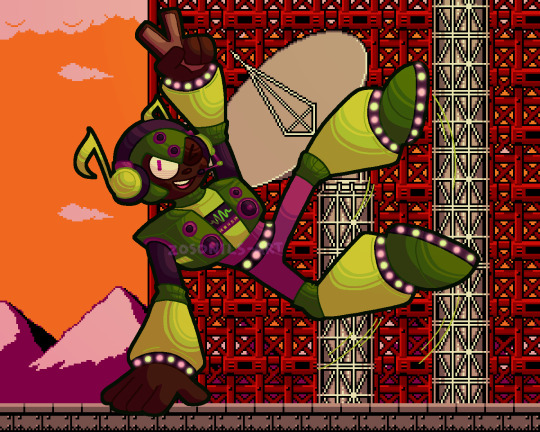
we sure may!!!!! rhythm dump under the cut as always
rhythm man was made to do a variety of tasks relating to sound! mostly he either does sound checks for important devices like hydrophones, sonar, seti listening devices, stuff like that, or he analyses the audio that they pick up in greater detail than any human or almost any computer can. someone [probably dr light, who created him] showed him a rhythm game pretty early in his life, and he instantly fell in love with the game genre and, more significantly, the concept of music itself. he's still doing the job he was designed for, but his real passion and arguably what he's better known for in-universe is creating music, which he uses his intricate understanding of audio to excel at
he makes a point of being a cool guy to be around! he's nice, fun-loving, and always has a joke ready. he's very encouraging of others, and thinks everyone should get to chase their dreams and do what makes them happy. when there's no bright side for him to look on, though, he doesn't really know how to act, and as such he feels uncomfortable confronting serious emotional situations and has a bad habit of repressing any negative feelings he doesn't know how to deal with and just letting them get worse. he might be developing some resentment towards his work for how much of his time it takes up that he'd rather be spending pursuing his interests, but oops that's not a fun feeling! better bottle it up and not think about it
all robots are neurodivergent but rhythm in particular has SO much undiagnosed adhd. he [probably] doesn't mind his job, but he can't pretend to be nearly as enthusiastic about it as he is his music, and tends to come off as distracted and spacey when he's at work. he's also capable of entering a hyperfocus-like state that temporarily re-allocates computing power usually dedicated to spatial awareness and sensory processing to focus on something else, which was designed to let him analyse audio with even more precision. rhythm occasionally uses this feature as intended, but more often finds himself turning it on while he's making music or playing a game to get into the groove more
he'll gladly enjoy any genre of music, but anything under the electronic umbrella is his favourite to listen to and create, especially bass music and all its subgenres! outside of genre preferences he likes songs with a lot of tiny bits and pieces and intricate details to notice - i think he'd really enjoy bill wurtz's music, for instance, due to just how much is going on in almost every song. he posts the music he makes online, and has a pretty sizeable following for both the novelty of a robot that makes music and the fact that everything he makes genuinely slaps super hard. being a robot, his criteria for 'good' music is all very simple and objective stuff like whether it's in key or has a time signature that makes sense or follows a pattern rather than just being random sounds, so he's able to appreciate almost any music for what it is and can name the number of songs he actively dislikes on one hand, although despite his best efforts to be forgiving he's a bit of an audio quality snob
the only sound he genuinely doesn't like is white noise, because the total lack of a discernable pattern or anything notable freaks him out. it's hard-coded into him to try and find meaningful noise in very fuzzy sound, and even if he analyses it back and forth on every level and concludes that it's just random aural static he's still left with a feeling of unease about it. his headphones have a sort of noise-cancelling mode that completely blocks out most background noise so he can maintain a conversation without constantly pausing to overanalyse everything he hears - without the noise cancelling he's got the world's worst case of auditory processing disorder. he's weak to psychic cry because it's just a really violent blast of white noise, and is one of the only bosses susceptible to its stunning effect because the sound freaks him out so badly he has to stop for a moment to force himself to ignore it
almost everything about rhythm came from the idea i had for his stage! i imagine it functioning as a sort of rhythm platformer where almost every moving part is timed to the beat of the stage music. it's the obligatory yoku block-spamming stage of the game, but in theory if you follow the music and jump across in time with the beat you'll make it through without much trouble [and maybe even have fun! in a stage with *yoku blocks!!*]. other stuff like constantly-spawning enemies and the attack patterns of rhythm himself would also be on that same beat cycle! as for theming, his stage is a mostly-vertical climb up a radio tower - wily's reprogramming takes his repressed frustration over not always getting to focus on his passion and upgrades it to outright spite, and he decides that actually you WILL listen to his mixtape whether you want to or not and proceeds to hijack the biggest radio tower in mosteropolis and override every single station with lofi beats to take over the world to
rhythm is the first robot master idea i ever had that wasn't a reference to something else, although for a pretty long time he was only a stage idea and a name. maybe that's why his design changed more throughout his development than any of the other guys [even between the sketch and the final lineart for this art i refined his look like 3 times]. initially he had a more 'tough'/punk-ish look, with spikes on his helmet and around his wrists and ankles, but i ended up phasing most of those elements out in favour of the led lights and generally less intimidating look. i briefly considered having his design reference rhythm heaven somehow, since it's my favourite rhythm game and the only one i'm any good at lmao, but nothing came of that - perhaps his stage enemies could have some rh references in their ranks instead, chuck some screwbots up there or something. he also had massive anime sunglasses at some point but it's better for that design to never see the light of day
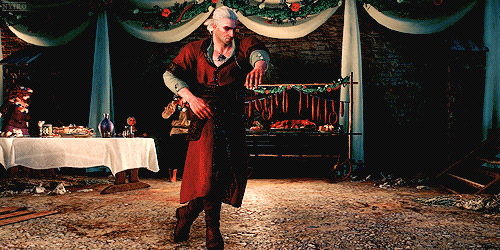
he also likes dancing! hence his funky moves in the art. his body shape isn't compatible with every dance style what with the clunky robot limbs and having a stereo for a chest, and he definitely wasn't built for physical agility, but with a little practice he can pick up most dance moves no problem. he's definitely a dance battler, and i think he would love rhythm games that trick you into exercising like dance dance revolution or just dance. rhythm man does a frame perfect ddr tas in real-time on an actual cabinet
that about wraps it up for the rhythm infodump, thank you for asking about him!! as always here's the unfiltered and transparent versions of his artwork


#i'm really proud of myself for coming up with the quaver headphones. i think those look neat#zos draws#mega man#mega man oc#robot master oc#rhythm man#zos answers#zos talks#anon#zoriginal characters
30 notes
·
View notes
Text
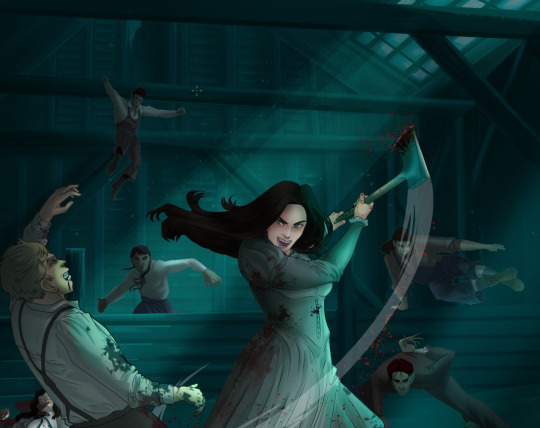
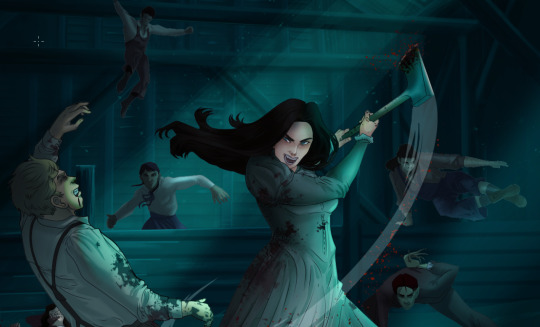
How I Digitally Paint like a Scenic Artist/Designer
Aka: how I did this and put my degree to good use.
LONG POST WARNING
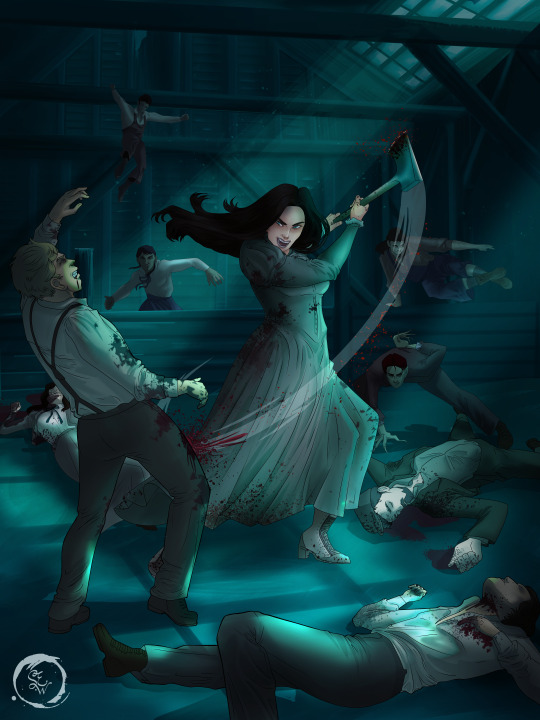
Step 1: Research.
First off, get to your image search. If you are going to be using Google, you may want to type “-pinterest” in the search to eliminate the countless boards.
I had to figure out clothing that is vaguely late 1800s. I found a multitude of reference images that were fancier clothes- but I wanted to find images of clothing for kindred across all social classes. Photographs from the era and paintings are your friend. They will more accurately showcase what was worn.
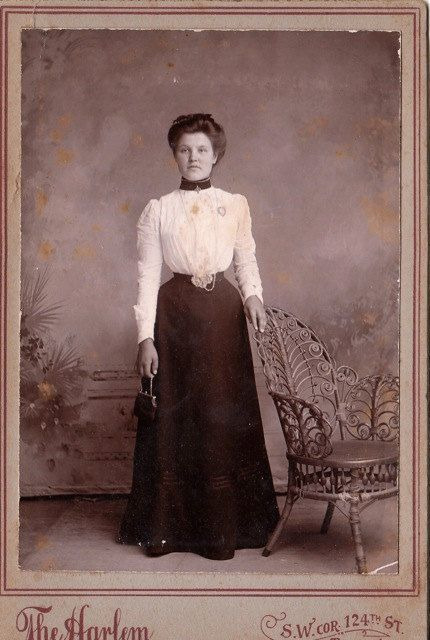

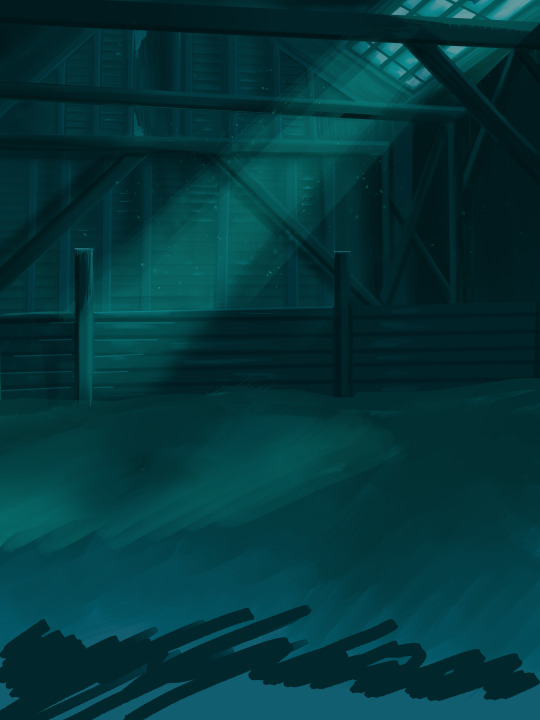
After Fashion research comes location research. The 1890s in America is known for the rapid industrialization. Factories were getting bigger and work days were getting longer. But, I wanted the moonlight to be cascading into the place, illuminating the scene. This means I needed to find a structure that had skylights or let sunlight in. And the best images I found? Slaughterhouses. Fitting, huh?
The same rule for fashion still stands- if you can find photographs or paintings from the era- they’re better. There are tons of places still standing today from the 1800s. But today, they look WAY different. Ya know, Abandoned! So just be sure to take this into consideration if you search “abandoned slaughterhouses” or go trespassing like I did.

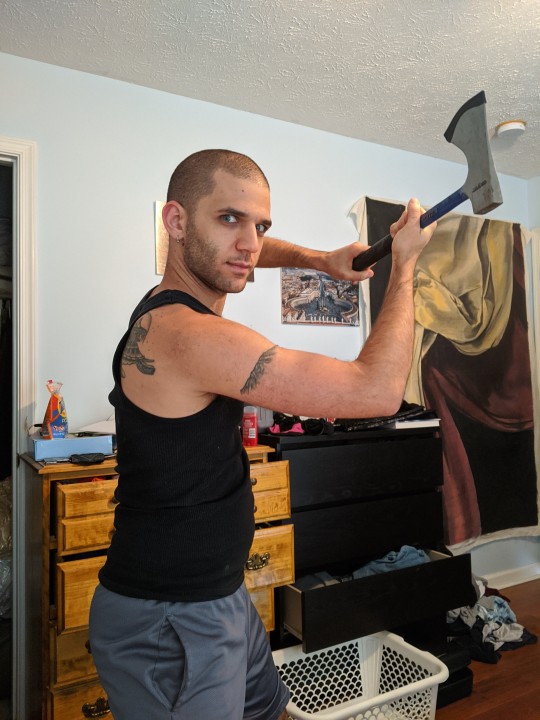
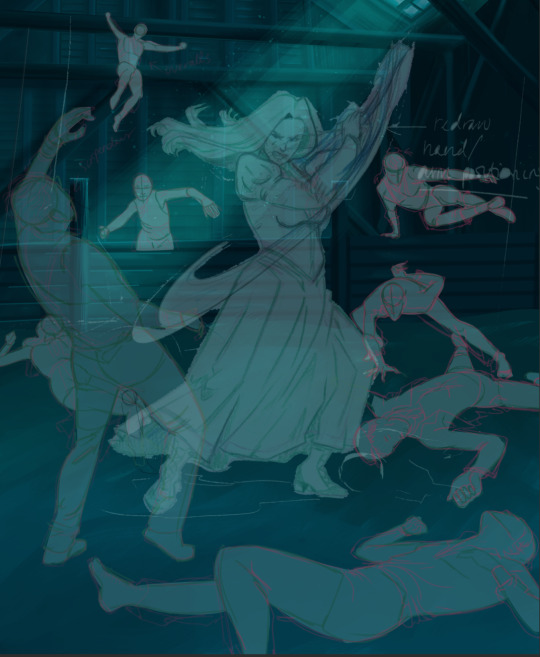
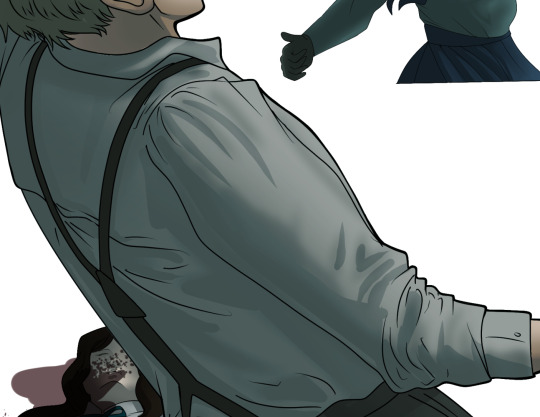
Lastly, pose research. Finding the poses for a fight scene can be tedious. So, I enlisted some help from a few fight choreographers and stunt men. You can record their fights and play them back at quarter or half speed. You can also get a mirror and flop on the floor a bunch. I did both. This lets you see the action/motion lines you are going to replicate in the drawing. Heres how we initially did fina’s pose:
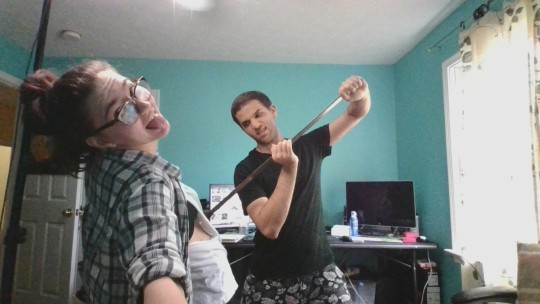

And sometimes you have to go back and get a clean shot. I ended up using this pose for the axe.
Step 2: Set up and Background!
When you open a new file, set it to the dimensions and resolution you want. I was working at 600. Usually, I’m working at 300-350. You can always reduce resolution. Its hard to prevent fuzzy lines if you increase it later.
I cannot stress the following enough:
You work background to foreground. Big Shapes and areas to little shapes. Work your way forward. What this means is you need to fill in as much space as possible first. Then build your details. I prefer working as follows: Big Solid tones, Soft shadows, Dark Shadows, Highlights, then final blend. Once you finish this, put an overlay on top. This knocks everything back and helps create the illusion of depth. See this at work with the video below or here
Step 3: Figure Drawings + Composition
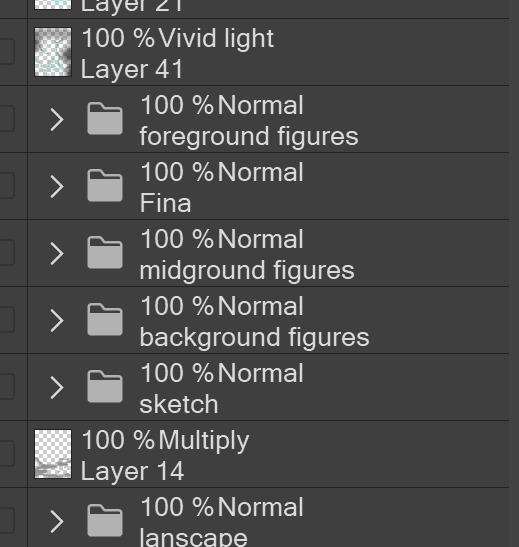
Utilize that research and images you collected to pose your characters. I create subfolders for each set of figures. Organization is important here. This will help keep you on the right layer and prevent the eternal digital artist struggle of “Fuck that was on the wrong layer!”
Even after you move on to lineart and shading, Keep the sketch layer as a reference. You may need to see what youre original notes/ figures looked like as you do the lineart and shade. Don’t be afraid to move them around and alter the composition rn. You want to be able to make changes. Make notes! Detail light sources!
I’m about to through out some art jargon:
You want to think about asymmetric balance. The easiest way to achieve this in an eye-pleasing manner is to use the Fibonacci spiral. Yeah. This boi:

Place your figures and actions in a similar sequence to the spiral and the viewer’s eye tends to naturally follow it. This is sometimes called the Golden Ratio in the art world.
Doesn’t need to be perfectly on the spiral. You can break it- but its an excellent tool to plan how things move in the piece.
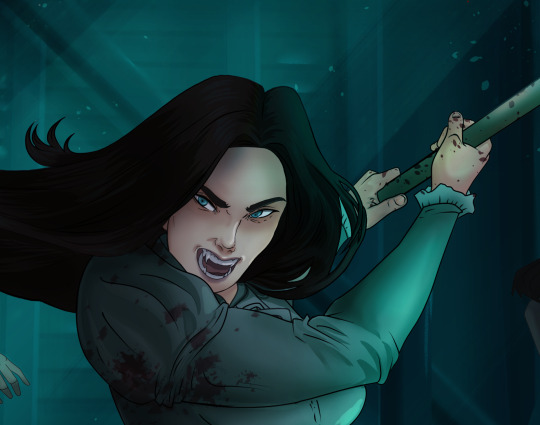
Step 4: Lineart
Once you got things sketched- its time to do the lineart. I’m using clip studio paint’s standard brushes. Nothing fancy. I often switch between the G-pen and the For Effect Liner. Mapping and Turnip are for thicker lines.

Usually I set these pens to a specific thickness depending on where I’m drawing.
My background figures are lined at 0.05 thickness, the midground is .1 to .2, Fina is .3 and the foreground is .4. I set my stabilization high to help keep my lines smooth. Stabilization 100 means there’s a significant delay between where the pen is and the cursor. I like the stabilization to be at 20 for freehanding and at 50 ish for outlining. Dont become completely reliant on the stabilization though. Good and smooth lineart is drawn from the arm not the wrist. Your range of motion is severely limited if you only move your wrist. Practice moving from your elbow and you’ll be surprised how much smoother your lines get.

Once I finish lining the figures, I usually go around it with an outline. This does three things:
1. Solidifies the figure and cleans lineart for paint bucket tool. More on that in the next step.
2. Its a stylistic choice. Helps give it that comic book feel with a heavy outline.
3. Pushes figures forward or back in the composition. Thicker outline helps denote that a figure is farther forward than another. My background figures have no outline to push them away
Step 5: Digitally coloring
For each figure you are going to select outside the lineart.
Create a new layer under the lineart
Invert the selection. Paint bucket. You should now have a solid shape of the figure under the lineart. Do not deselect.
Create a new layer above the one color. Title it solid colors. Paint in thick, solid tones. I like to use the mapping pen and turnip pen to color in my solid tones: skin, clothing, hair, etc.
After that, deselect. Create a multiply layer if you can. If your program does not have a multiplier function, Pick a tone you want to use for shadows and lower the opacity (usually 30-40% I like to use lavenders or blue tones). It will not be as vibrant, but you can edit it in post. Select off of the solid colors layer. I like to start with skin tones. Use the airbrush tool to create soft shadows. You don’t want to create harsh lines on this layer.
Then repeat this process with harsh lines.
Then knock it all back with an overlay. If you dont have the ability to create an overlay, you can again drop a solid color and lower the opacity, but you’ll have to mess with the color balance/ brightness/contrast to let all the hard work come through.
You’re going to repeat this for every single figure. Here’s a few color theory tips though.
Your overlay colors should be darker (not more vibrant) in the foreground and lighter (avoid using pure white) in the background. This helps with the depth of the piece. Things closer tend to be darker (not always true, depends on lighting)
You can choose to use color theory to aid your shadows. Instead of choosing black or grey for shadows, choose a complimentary color. I used a lot of green for this piece, I used red for really dark shadows. Its not that black drains color- its just loses some depth if not used carefully.
Keep your colors consistent. Helps unify the piece. You can strategically break the consistency to draw focus. For example, Fina is the only figure with a true blue overlay. This helps her stand out from the other figures who have reds and greens.
Step 6: Touch Ups and Final Renderings
Now comes the most tedious part. If you’re like me, your computer fans have been whirring for the last few hours trying to render this monster of a file. If you havent already, SAVE FOR THE LOVE OF ALL THINGS GOOD

These are the last four layers I have for the entire piece. Here, I am trying to create effective and believable lighting. This kind of work I have only been able to achieve in clip studio or photoshop. You can do it with normal layers, but choose your colors CAREFULLY. Stay away from pure white. Carefully utilize your knowledge of light and shadow to create soft highlights. Harsh lines tend to be a stylistic choice for me. The final layer, subtract, dulls out harsh red tones. I used this as a final overlay to help put everyone and everything in the scene. Without it, things are a little too green and skin tones are a little too blushed for vampires.
The challenge here is I want to tone down the red, but not lose the vibrancy of the blood. So, shift it to a blue. This also helped reinforce the “nighttime” effect. Its only a slight change.
Final thoughts:
Whenever you finish something, its important to reflect.
1. I am so FUCKING PROUD OF MYSELF. This is easily one of the most complicated pieces I’ve done in a while- and I’ve made 16′ tall faux stained glass. Brag. Let yourself feel awesome cuz you just made something awesome.
2. I timed myself on the piece. I could have easily spent another 7 hours on it. But its important to know when to stop messing with it. Partially for budget reasons but also when you get down to the details you can make yourself go insane. Theres also a ton of detail work I lost cuz of overlays or its just too small to notice. Fina’s face? hard to see cuz its not close enough.
3. I needed to take frequent breaks for this piece. That was good. Resting and stretching was very important. That is one of the reasons why I was able to work so fast.
4. I started doing more digital art in April 2020. I have to say, practice makes perfect. I practice drawing and digital painting for at least 3 hours a day.
That discipline has allowed me to improve so rapidly. So- I don’t wanna hear shit about I can’t possibly get this good! Or I couldn’t even draw a stick figure! BULLSHIT. You can. Get yourself some free software like Krita or Autodesk sketchbook and start playing!
And thats what I got! Thanks for coming with me on this long post!
27 notes
·
View notes
Note
Oh great and powerful art mom, please teach me the ancient secrets of traditional lineart
Ooooooh yeah baby we gettin traditional wit it! First of all, my biggest tip is to DRAW LIGHT. Always have a base sketch when you go in to a piece and keep it light so that you can fix mistakes and eventually erase the pencil/base fully. I tend to draw quite dark, so I start out my bases with a harder lead pencil. Once you have a base, you can gradually build up on details and stuff slightly darker and go over the lines you know you want to keep (NOT TOO DARK). Once you are confident with your drawing, then go over it in your ink/preferred lining medium.
It’s also very hard to fix mistakes you make when lining, so I suggest making sure everything seems perfect to you in your sketch! While it may be tempting to put it off and say “I’ll fix it when I do lineart,” it rarely works out in your favor. Keep working with your sketch until you are fully satisfied!
As for the act of lining itself, it can be extremely intimidating. You may have some stress going into it and anxiety about making it perfect. Because of this, people tend to line very slowly and deliberately. This usually ends up looking shaky and hesitant. STAY LOOSE WITH IT. It seems scary, but it can make your lineart SO MUCH better! Trust me I know 😂. I recommend sort of miming the motion of the line you want to make above the paper, with the pen not touching. Once you feel comfortable with the movement then go in with that broader stroke.
I’m not sure how well I phrased this?? If you want, I could make a vid?? But hopefully this helps out! Goodluck amigo! ❤️
8 notes
·
View notes
Note
Oml please teach me your ways, how are you so good at linework?? I can never get my hand to get linework to look nice no matter what settings I use. How are you so good??
OMG
First ofall – thank you! I’m so flattered (and a little surprised because I alwayshave a feeling that I struggle with lineart way too much XD). I’ll try to answerthe best I can.
DISCLAIMER:Everything written below is based only on my personal, amateur experience +various tips and tutorial I’ve seen over the years. I don’t claim this is the“right” way to do lineart, it’s just how I do it and what I find helpful.
Please prepare for a long “Rainhowls tries to explain things” post under the cut.
Ok, let’sbegin.
Tools
I use Wacom Bamboo Pen CTL-470 and Krita software (which is GREAT and FREEand I recommend this program with all my heart).
Here is a legit graphical representation of what makes my lineart.
Nice and clear. And now let’s get into details.
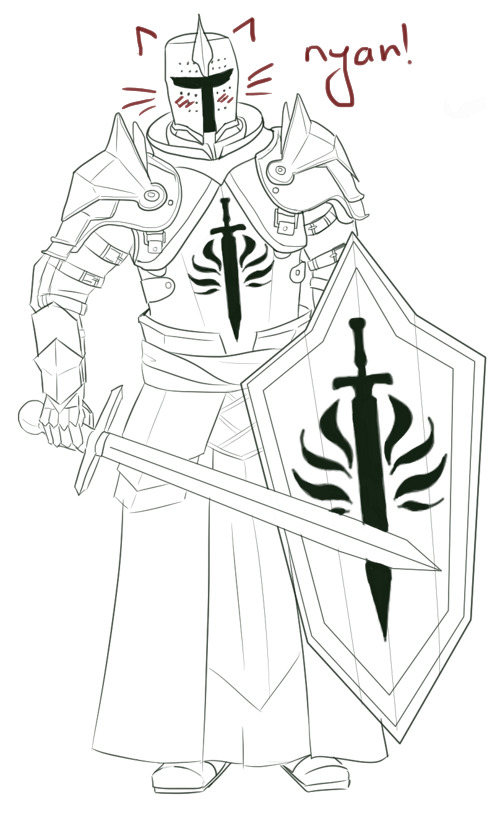
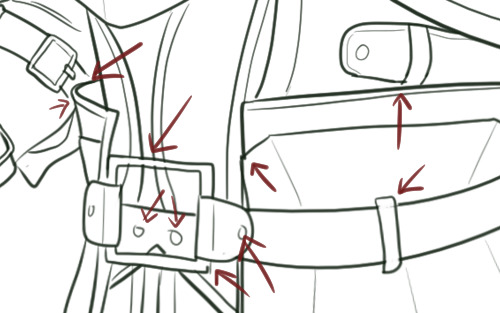
1. Cheating
No, I don’tmean paying someone else to do your lineart and claiming it as your own. I meanusing the powers of digital painting for your advantage. So, let’s begin. As amodel, we’ll use Templar kun from the recent lineart I was making.
Use the simpleround brush with enabled pressure size but withoutpressure opacity. My two fav brushes for lineart are Ink brush 25 andInk-3G pen. The first one is better to imitate traditional brush and ink butthe second one is slightly easier to control.

Now, lookat the bottom left corner of the screen, where the tools options are – you’llsee the brush smoothing is set to Basic.
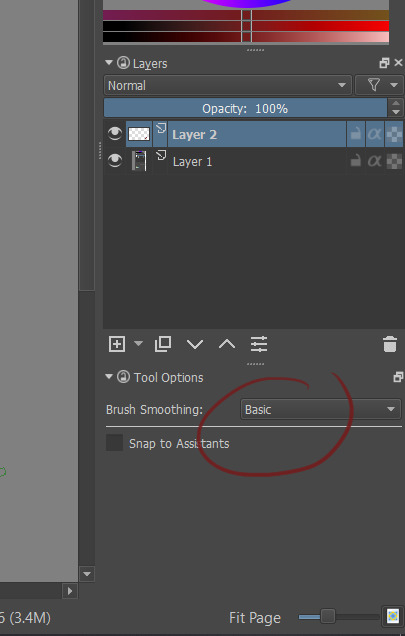
It is a default setting and it works alrightwith most of the short lines and small details (like Templar kun’s beltbuckles). Also good for eyes and other face features – IMO these little messylines make a face more interesting.
Let’schange the settings into Stabilizer.

Stabilizeris great for lineart because it „forgives” the small, unwanted hand movements thatoften make lines messy. You have a lot more control over the line and thissetting is great to draw things like hair and fabric. Templar kun’s helmet androbes were made with Stabilizer.
Butsometimes even the Stabilizer isn’t enough – we want a geometrical shape. Forthat we want to choose Bezier Curve Tool.

Simply byclicking, you show where the edges are and voila! You can also make large, softcurves with that tool (although it’s tricky – I personally prefer Stabilizer).I used Bezier Curve to draw most lines in the pauldrons and the shield.
Important – don’t overuse this tool! If too many of yourlines look perfectly straight it can make your drawing look stiff andunnatural.
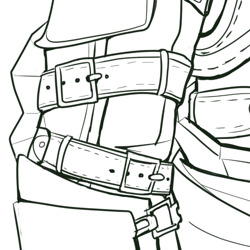
- Beforedrawing lineart make your sketch twice as big as you’ve planned in on the finalpicture. It will make small mistakes almost invisible. Templar kun is already abackground character, so let’s use Aveline here.
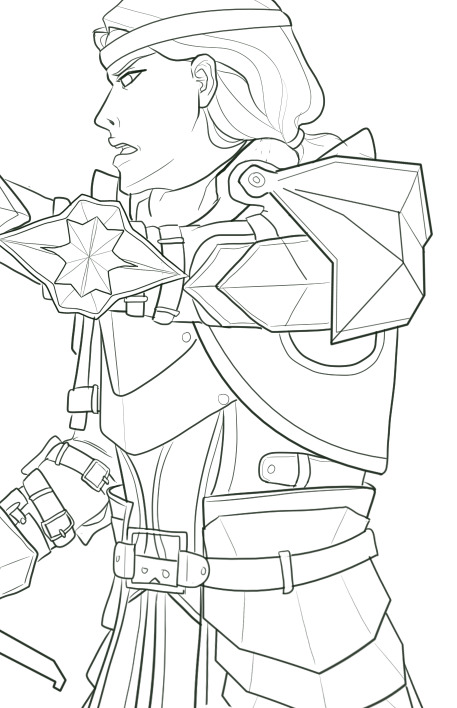
She looksquite ok.
But let’ssee her on 100% size and try not to cringe.
BUT! All thesesmall mistakes are here and I don’t have to care because human eye won’t catchit in a final drawing anyway! :D
- Play withline weight. Objects that are smooth, thin or far away will look good with thinlines, objects on the foreground can have bolder lines.
Templar kunis a background character so I didn’t bother with line weight. But KnightCaptain Cullen is much closer to the viewer and deserves a better treatment.That’s why I’ve tried to make his lines more interesting.

- Don’t work only onone layer when drawing more complicated elements of your lineart. I usuallydraw hair on a different layer than face and small details on different layerthan bigger shapes. It helps when you need to erase something – like parts ofthe face covered by hair – and don’t want to worry about your beautiful, smoothlines. When you are completely satisfied you can merge all the layers into one.
2. Practice
I know,everyone is sick of this advice but, well, it’s kinda true? Draw some lines,circles, get used to the pen pressure, experiment with different settings ofStabilizer to find the one that suits you best.
3. Time
Now, nomatter how good you are, clean lineart requires time and patience. You probablywant to make yourself a coffee and choose a 2 hour long song playlist inadvance.
- Don’tstart your lineart over a messy sketch. Sketching is fun because you usually usemany lines instead of one to convey a certain shape. In lineart, you have toconvey the same effect but with only one line. It’s often hard to find outwhich one would be the best and that’s why we often like our messy sketches alot more that inked final product.
So, let’slook at my first sketch of Templar kun.
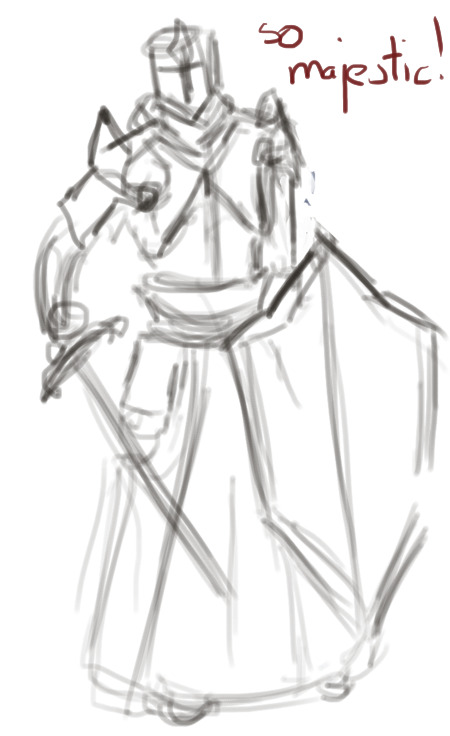
I have apose, I know where the arms are, I know he has a sword and a shield but when itcame to details I was like „meh, it’s just a sketch”.
If I wastrying to put a lineart on this, even with a ton of references under my nose, Iwould be confused as hell. So – I need to draw another sketch. This timewithout a „meh”
Here it is.
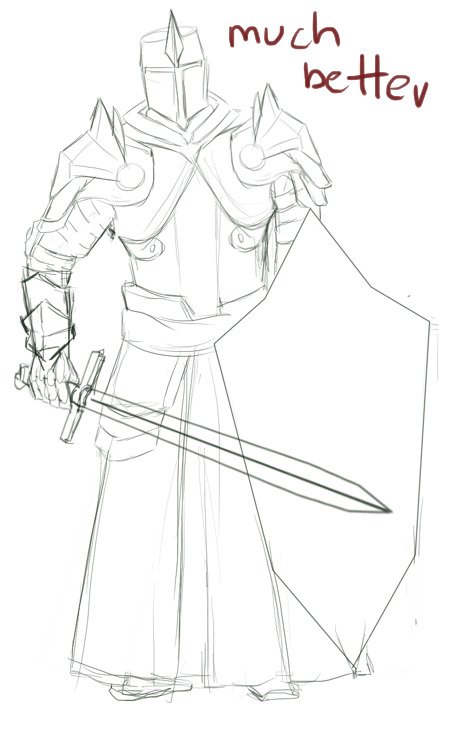
The majorshapes of the armour are here, the lines are quite clear. We still don’t havethings like fabric prints or belt buckles but these minor details can be easilyadded.
Sometimesyou need only two sketches. Sometimes three or more. It will take time to drawthem but in the end it makes your lineart look more deliberate.
- Ctrl+Z isyour friend. Really. You’re going to treat almost all your lines with thosekeys. Several times. At best.
Remember,lines should be drawn in single, quick movements. The tricks I’ve mentionedearlier are useful, especially in simple, large shapes, but they won’t domiracles. You have to keep drawing this one damn perfect line until you’resatisfied.
I’vesketched this little heart and tried to make a lineart in 2 smooth movements.
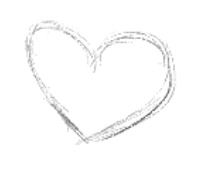
First try.

Ugh.
Second try.

Fuck.
Third try.

Ok I guess.
Basically,smashing Ctrl+Z like a madman also takes time.
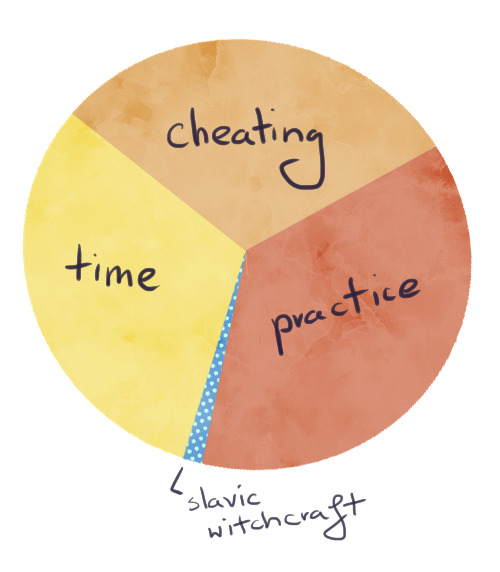
4. Slavicwitchcraft
Put warmslippers on your feet, get a bowl of pierogi and play the Witcher 3 OST – themagic will fall on you.
And…that’s all, really. I hope it helps :)
37 notes
·
View notes
Note
Yo yenrz, I love your work and I was curious if you could show like a step by step process for what you do?
I really need to stop answering asks so quickly I have a LIFe tO LivE
So here’s a step by step blog about how I draw stuffs
Keep in mind that the end piece is still a WIP however. I’ll post it in full later.
Also if you’re asking about how I construct my text blogs I’m sorry I misconstrued the meaning of your message
So let’s start with what kind of brush I use:
I use the default pen brush on a little program called Krita. It’s free if you want to try it out.
Here’s said brush in action:
I always start with a rather huge brush size, since It’s easier to make larger, longer, broader strokes. Also that way I don’t have to constantly change my brush strokes to erase large areas (which happens a lot when you sketch) The main detractor for this method is that you get really messy sketches however >.>
And like most pansies, I don’t go full on black. We artists have too much anxiety to deal with that.
TIME TO DRA-
wait I forgot to put on some music

youtube
K, so I’m going to be drawing our boy Roxas today because I made a screenshot for the previous text blog I did and I thought he looked really freaking fine in that shot. So I wanted to make a quick body study with facial expressions giving that same kind of edgy mood.
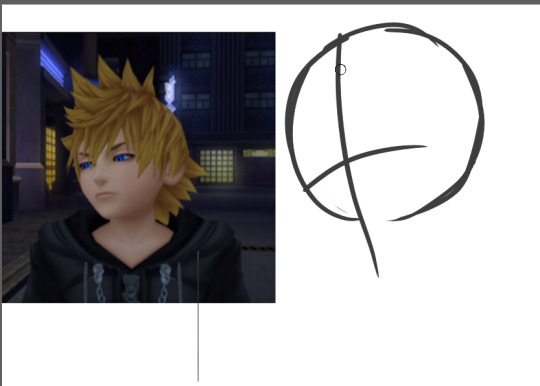
So I first start out with a circle, mapping out the direction that circle is pointing towards.

An important thing to keep in mind when drawing ANYTHING, especially if you’re a beginner, always remember to map out where the parts of your face are going to be. That way you don’t get trapped in a rabbit hole getting sucked into drawing your perfect eyes/nose/whatever facial feature and then realize when you zoom out that it looks like your person underwent a botched plastic surgery.
Rules of thumb to keep in mind about faces:
Eyes are at the midway point of your head
Distance between eyes should be about an eye wide
Ears are around the same level of your eyes
CHEEKBONES EXIST and Jawlines are square
So moving on, I go on and start sketching out the pose. Keep in mind that during the process, I usually don’t really know what I’m going for, so I test out different angles and positions and etc.
So while I settle in, I finish deciding how I want the shoulders to look.
But-

I notice something looks…off.
If you’re a beginner, it can be hard to tell when something is wrong with your drawing. Or even worse, you’re an early intermediate and you know something’s wrong but you have no idea how to fix it. And then you start going down a very, very deep rabbit hole trying to fix it and no matter how you fiddle with it…it never quite looks right. Yes I know the struggle.
So here’s the solution:
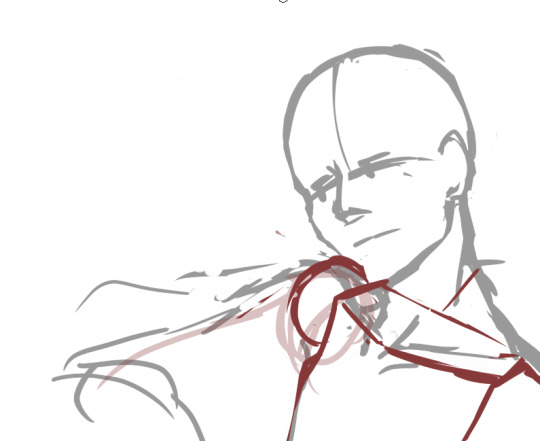
Break down the figure into simple forms. The key to making this work is that you must have ample knowledge of proportions of body parts respective to one another.
So here are rules of thumb for drawing most bodies (teenage or older and your figure isn’t larger or shorter than average)
Each half of the arm is about the length of a single head
The arm should reach to the halfway point between the hip bone and the knee
The torso(from the base of the neck to the pubic bone) is about two heads
Each half of the leg is about the length of the torso starting from the hipbone(not the end of the torso)
Boobs don’t jut out the sides unless you’re drawing really big boobs
Also, in this case, i’m utilizing a bit of foreshortening because the shoulders are in perspective, as in they’re facing away from the viewer a little.
So now it’s time to add the arms and hands. And like any other body part, I break it down to basic forms first (when you become an uber drawing deity, something I’m clearly not, you’ll be used to this and can skip over this step )
Hands are one of the things you see beginner (and even advanced) artists cry about for days. For good reason.
So the basic forms are like this:
Draw out your fingers as lines first. Also reminder that fingers are three segments long. Not two, which was evil propaganda that I was fed when I only drew anime.
Also and size should be about the length from the chin to a little above the eyebrows
Also I forgot to mention…
ALWAYS CHECK YOUR PROPORTIONS THROUGHOUT DRAWING. ALWAYS.
And once I decided on the placement, I start mapping out the actual shapes.
Also I wanted Roxas to look more manly and such so I looked a reference image to make his jawline/cheekbones more manly so yeah
So now that I’ve decided on the overall pose, I start on the details.
Also another rule to draw by that I’ll shove down your throat
DETAILS SHOULD BE YOUR LOWEST PRIORITY WHEN STARTING OUT. Start simple and get the whole form first, then start adding details. This ups your productivity and prevents you from getting lost in rabbit holes
It’s called rendering for a reason.
So I start adding the eyes and such and I’m overall satisfied with the face. And now I get started on the hair on a new layer. I don’t want the face lines to interrupt with drawing the hair, so I lower the opacity of the face layer.
I check how it looks by zooming out to see if everything looks alright. Oh noes he looks a bit too manly
Shrink that seme crap
Much better I know I didn’t follow the meme format shoot me
K now time for the fun part: the hair.
….
I just want to give a moment of silence for all of the times people have suffered from drawing Roxas’s hair.
….
because by golly his hair is the one I see beginners dun goof up the most out of all kh characters.
K moving on, the keyword for Rucksack’s hair is WINDSWEPT. And funny enough, there’s actual logic to how his hair works. Everyone’s hair has a center line/point where said hair flows from, whether it be a part in the hair or a eye of a hurricane thing because I don’t know what the name for that is.
Roxas’s is the latter. Demonstrated below:
See what I mean? It’s like an upside down wave going like whooooosh
Come to think of it, all hair should follow this rule. It should either be flowy or whooshy
Unless you’re Tetsuya Nomura, then you get to break all the rules
like seriously what the fu-
So now that’s done, I go and check for the gazillionth time, mirroring the image to see what I screwed up this time.
Oh noes something’s wrong with that shoulde-
Also I forgot here’s how I draw ears
-r it looks off.
That super spidey sense of knowing something’s wrong with your drawing is there for a reason. Heed its call.
Also if you think there’s nothing wrong with that neck, draw naked people for a couple of months and you’ll see why.
So when something’s wrong you do the usual. Break it down to simple fo-
Or just use a reference.
Looks acceptable now. Time to start the lineart.
Out of personal preference, I like to lower the opacity to
Even as I do the lineart, nothing is set in stone. The sketch, at times, isn’t enough to go off of. So in that case, let’s go back to the reference.

Also I hit a roadblock when drawing the hand so move it out in the open so I can get a clearer look at it.
Also I use my own hand as reference a lot so I accidentally make make my manly men have delicate pansy hands.
This hand pose isn’t natural at all but I’m okay enough at this that I’m able to make it look okay
Study hands kids. They’ll do you good.
….
I forgot to draw him clothes daMMIT
Whatever i’ll just slap some cel-shade lighting on it and call it a day. This is still a WIP so expect a not-naked-Roxas later this week
Thank you for reading! Here’s a link to my twitter, And if you would be so kind, please consider supporting my patreon.
127 notes
·
View notes
Photo
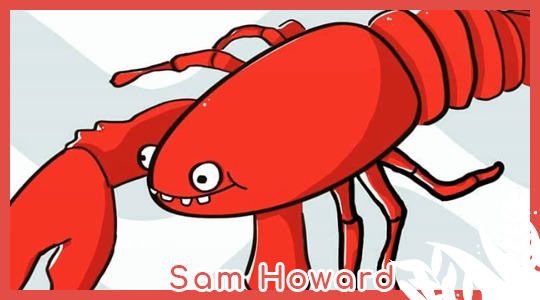
Artist spotlight: Sam Howard!
✿ Instagram ✿
Header source: [X]
Introduce yourself
Hello! I am a university student studying geeky drawings and how to make them, sometimes including doodles of games like Night in the Woods, Stardew Valley, and, more recently, Maplestory 2. I love drawing cute beasts and other humanoid-monsters and their individual melodrama with routine. Also I worship chocolate covered raisins and hope that doesn't negate any cool thoughts you might've had about me until this sentence.
When did you start drawing? Are you a digital or traditional artist?
I started drawing about 3 years ago when I decided I wanted to pursue art as a career (and worked mad hard to build skills to feel "worthy"). I work mostly digitally, but I adore doing traditional work for sketches and conceptualizing.
Do you use any traditional mediums? If so, which are your favorites?
I'm very simple, I mostly just use graphite and the occasional markers and ink pens. I love cartoony looks, so it works well for me!
Why do you prefer traditional over digital? (or viceversa)
I get a lot cleaner colors for digital and overall the crisper look I yearn for. I prefer to sketch things out traditionally sometimes, but digitally allows me to save multiple renditions of sketches for me to compare to very easily within the same file without mess or struggle with color picking/matching! I also adore the ranges of doing more dramatic lighting and comparing which I like better haha.
What do you think is the most challenging part about being a traditional/digital artist?
With digital art, it is harder to maintain loose sketches or lines. I hate using smoothing in Photoshop because of the inherent (and purposeful) lag that comes with it, but with the tablet I've got it's necessary or else the lines jitter insanely due to the nibs for the tablet not exactly working (especially since this isn't exactly a drawing tablet). On that same note, having your medium being expensive but durable (as opposed to traditional being over time) isn't the most convenient or adaptable.
What inspires your pieces?
Goofy mishaps in day-to-day life. When I or other friends tell silly, seemingly small stories about their day or my day I feel a melodramatic urge to be romantically artsy with their/my entertaining 5 to 20 seconds!

image source: [X]
Explain your "everyday" drawing process
My first thoughts are usually "What would be bouncy fun" or "What's something this character would do odd in a normal situation" to at least get the ball rolling. If neither of those work for my goal then I ask what has happened to me or someone else similarly that I can draw from, and then I make 3 thumbnails.
Do you have an artist you admire (or more than one)?
Saira Vargas (https://www.instagram.com/sairasays/) is a huge inspiration to me due to the fluidity of all of her character drawings. They all swoop the viewer in and follow them out of their form with amazing line-less grace I wish to have! Jewel Suan (https://www.instagram.com/swansgarden/) also has stunning art that conveys human body motion in such dramatic and silhouette-perfect ways, it's like feeling a good stretch!
Is there an artwork you are most proud of? Why?
I was in my first zine recently and I finished this piece https://www.instagram.com/p/BxHeJLUlfWq/ for it. I feel like I colored it exactly the way I want to continue doing so, and as something that matches my style. I was also really proud of the lineart being crisp, since I had struggled to find a brush that I was comfortable enough with the maintain a look like this. I did it within a couple of weeks, and though I'm disappointed I didn't try shading it very much, I love the overall mood and movement of it!
Do you listen to music (or tv shows/films/anything else) when drawing?
I often listen to Jenna Marbles podcasts or video game soundtracks, such as Night in the Woods or Pokemon Colosseum!
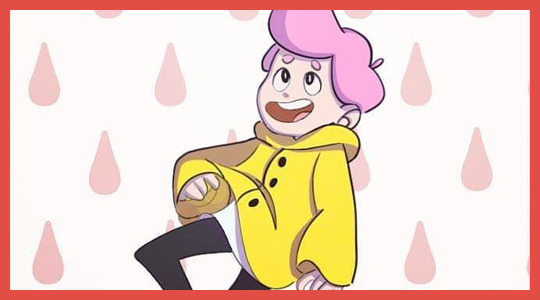
image source: [X]
What makes art interesting for you?
The fact I can make silly thoughts comprehensible in an organized way! Sometimes in a goof-infused organized way.
What do you do when art block strikes?
It's not often, but when this happens I try and take breaks so I can focus on my surroundings and genuinely absorb all the things I appreciate in life. This knocks me out of my funk, but I always take an extra minute to realize my art is from people whose hearts I love and remember it's not all for the art, but for those who watch/look at it, so I can make sure I don't forget the reason I make it.
What’s the most valuable art advice you’ve ever received?
Make multiple iterations of everything you do! Your first idea will always suck, your second will have already been thought of, and your third can be the rock ready for polish.
2 notes
·
View notes
Note
Do you have any advice for someone who wants to try digital art? Like‚ is there anything you wished you knew when you first started or what programs are best for beginners? I want to try it I just have not idea where to start. Sorry for the stupid questions. (I really love your art btw)
Sure! I’m not the best with this since I’m not professionally trained but I’ll tryThis got long so I’m putting it under a cut
Program
For me the best free program out there for digital artists is Medibang Paint It is very extensive and constantly getting updates! I would still be using it if clipstudio pro wasn’t so good.
Speaking of Clipstudio, It is a very good program but I wouldn’t recommend it to beginners because it does not have a beginner friendly UI and it is not free.
Tablet
As for starting out what to draw that’s up to you but personally I would start out with a cheap and reliable tablet! Some people prefer using Ipads but I like having pen pressure. So the best cheap and reliable tablets is Huion. I honestly think Huion is miles ahead of wacom.
For your first tablet do not get wacom. They are much more expensive than they need to be and not even better quality.
I would still be using Huion if they had pen computers but only Wacom has that right now. My first tablet from Huion was this one (which isnt on their official store for some reason?) I think this type of model that’s cheap and has no shortcut buttons is perfect for a beginner! but there’s a wide variety you can get for a good price! Size is important! I wouldn’t get anything smaller than 8x5 inches. You need enough space to comfortably move your arm. Not just your wrist, that’s how you get cramps
Shortcuts (your best friend)Why do I say no shortcut buttons on a tablet is perfect for a beginner? Because Keyboard shortcuts are so so much better and easier. There’s a lot more buttons you can use and hook up a certain shortcut too. Even if you do get a tablet with shortcut buttons I suggest using the keyboard shortcuts. Use Shortcuts Here’s a good video on the medibang shortcuts
Stretch
Carpal tunnel syndrome is a serious issue. Always do a quick stretch before drawing and I’d suggest just doing it sporadically throughout the day
here’s some good stretches
Anatomy
Anatomy is tricky! I still don’t get it and I’ve been drawing most of my life
When I started out I watched and followed these videos
I would also suggest doing plenty of body studies. Something I used to do is just input terms like “egyptian model” find a random image from that and draw that person. or I would put in “cutest dog” and draw that image. These are just studies for practice but if they spur an idea thats all the better
I think the most important part of figuring out anatomy is the ability to break things down into shapes. This tutorial series helped me understand shapes better but there’s plenty of good tutorials out there that break the body into shapes like this
I do have a dedicated art tutorial tag that you can peruse
General advice
Use Layers - the best part of digital drawing is layers! When starting out a piece use one layer per item. First do the sketch. Then do a layer on top of that of the body. Then of the hair. Then of the clothes. Don’t be afraid to make a new layer just for some extra details. I always merge finished layers (never with the sketch) for easier tracking but you don’t have to.
The internet’s your friend - The best thing about this modern age we live in is the vast amount of information we can get! If you ever think “man how do i draw x?” Hop into a search platform and type in “how to draw x” read as many tutorials as you can and you’ll always know a little bit more than you did before (though you should make sure safesearch is on)
it’s okay to trace sometimes - A lot of people say don’t trace! but there is a tme and pace to trace. When you’re learning its okay to take real life pictures of objects or people and trace over them to understand porportions and feel. However, never post anything you trace and claim it as your own. Don’t trace for every picture. Tracing should only be used as a learning tool, just like anatomy practice
You don’t need shading - if you’re like me and you hate shading you really don’t need to do it! Look at all of my art pieces I think I’ve only shaded for like 3 or four of them? and I only shaded for effect. Shading is really not that important. If you have nice lineart you don’t even need color!
The bad advice
here’s bad “advice” I got from art tutorials when I was younger that you should really ignore
“men and women’s bodies look drastically different, women are all curves men are all hard lines” - this is so so so wrong I don’t even know why tutorials say this. If you want to draw people look at real people! I think it’s best to think about the type of character you are drawing. If you are drawing lets say a short man type in “short man” into a search platform and draw from there. If you want to draw a muscular women search up “muscular woman”. this is also good for drawing characters of different ethnicities
“Don’t use oversaturated colors” - saturated colors are super fun! You jsut have to use them right, when drawing or coloring with saturated colors make sure to keep the color palette consistent. Aka either draw in all satruated colors, Or have only one thing in a saturated color to make it pop, or have only one thing non saturated for effect. Don’t have an even mix of unsaturated and saturated colors that can look confusing
And that’s everything I can think of right now! Thanks for the ask and for the compliment! I hope some of this helps you!
7 notes
·
View notes
Last Seen Blogs
casada-com-o-tedio
Technooo boy

saphirya
Saphirya [Haeraen]

crownlawgroup
Tristan Crown
storymade
saved4

herbsnhoney
mentally unstable