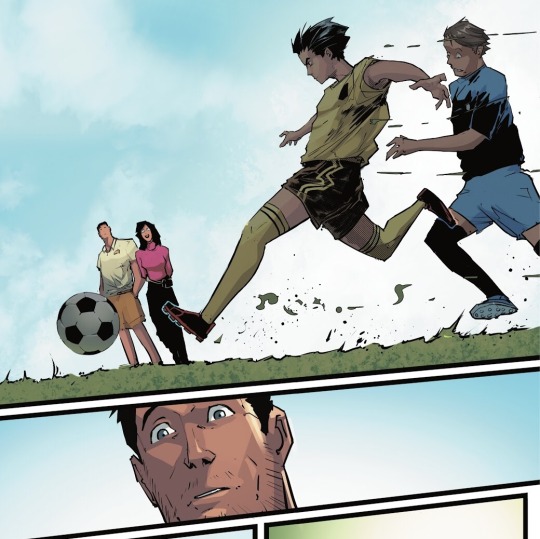
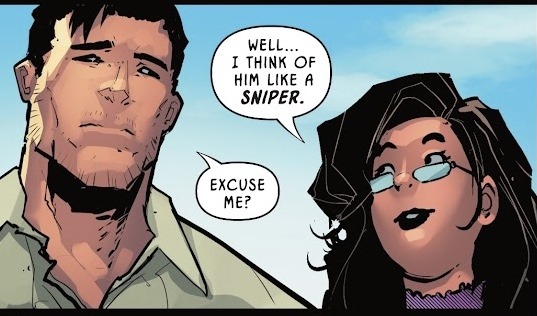
#I thought this scene was really neat
Text
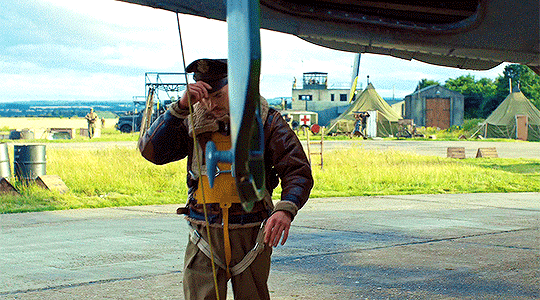

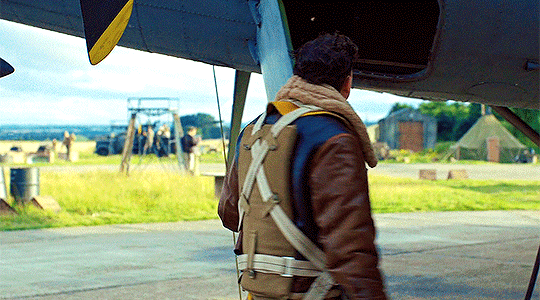
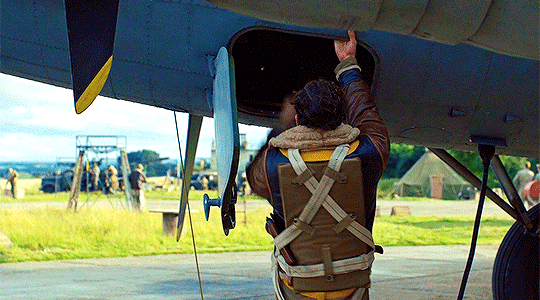
#masters of the air#mota#motaedit#mastersoftheairedit#mota spoilers#masters of the air spoilers#rosie rosenthal#basilcreations#rosieedit#I thought this scene was really neat#also yeah y'all are getting a lot of Rosie content from me I'm not even sorry
254 notes
·
View notes
Text
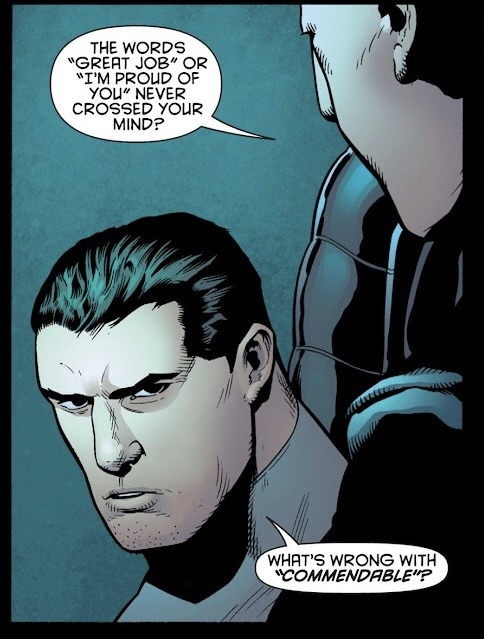
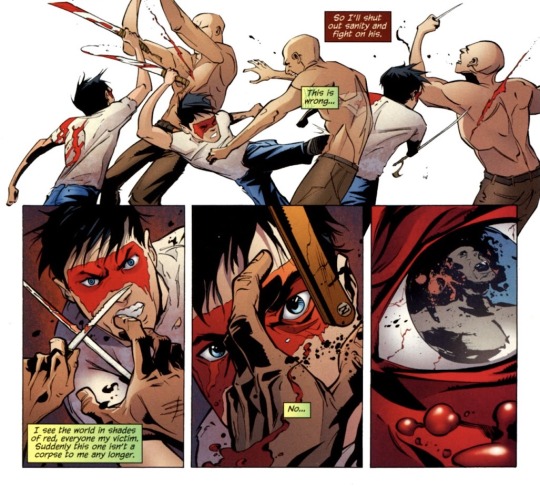
🦇🐥 Batman and Robin (2023) #5 rambling and a conspiracy theory lol
tbh this is the most exciting issue for me since…the first one 💀 i’m going to talk about the story and art separately because Nikola Cizmesija’s one of my favorite action focused comic artists so this issue’s a treat 😭
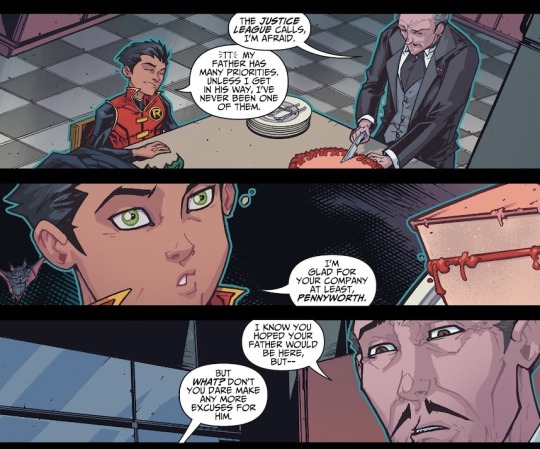
Alfred used to mediate during a lot of Bruce and Damian’s early relationship, so it’s refreshing to see Bruce take more initiative involving himself in Damian’s life even if it’s for a case lol
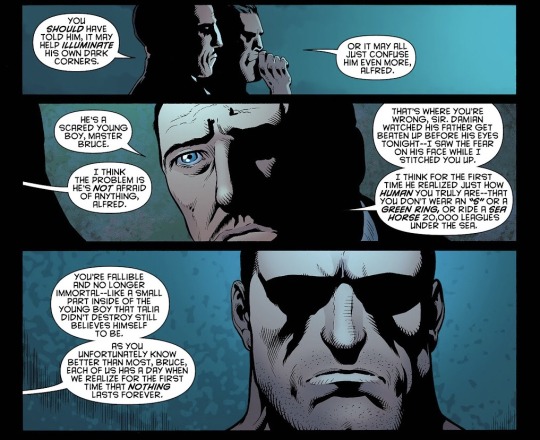
a couple instances of Alfred’s fatherly support on behalf of Bruce and Damian from Batman and Robin (2011) #2, 4, 39 and Teen Titans (2016) #1
Damian seems to take Bruce's involvement more as a sign he’s not reliable rather than Bruce finally just. being around to help him. which is fair 😭
this is complementary to Cizmesija’s art, but i love this half of the page so bad 😭 the negative space and the shaded foreground with Damian mid-run gives this feeling of time kinda stopping for us to really feel the impact of Damian’s entrance AND the effect it has on Bruce, like!! that wide eyed expression in the below panel!! 😭

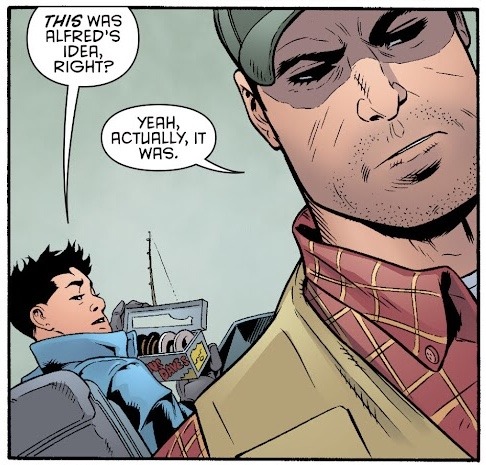
Bruce’s quiet “you can do it, son” to A FULL BODY CHEER OF “GO, DAMIAN!” Bruce witnessing Damian be great outside of Robin, and on top of that it’s just another mundane moment that Bruce has wanted with Damian 😭
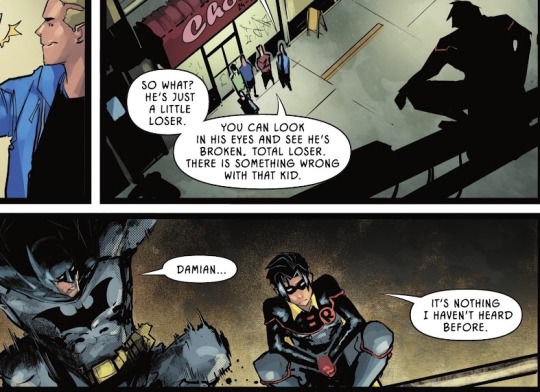
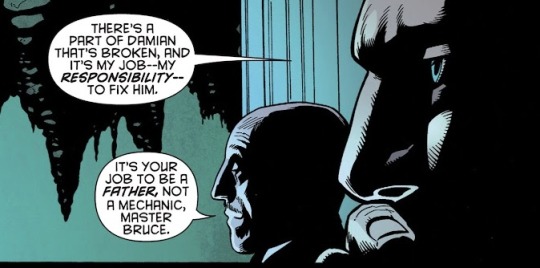
this is such a goofy bully line sdfgh though the whole “broken” bit might be a callback to Batman and Robin (2011) #1, in that Bruce is really trying to do his job as a father here or i'm likely reading way too into it
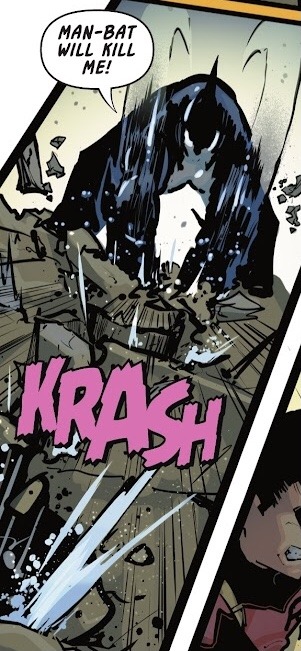
SO the “shocking ending” of Zach being Zsasz’s kid was definitely a surprise but then got me wondering what is up with Williamson doing reveals of new kids for villains lol otherwise, the hints in the issue were neat!
the tally marks!! at least tallying blocks is pretty innocent compared to kills 😭
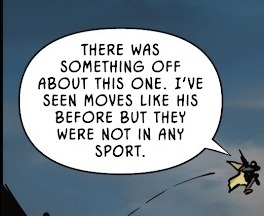
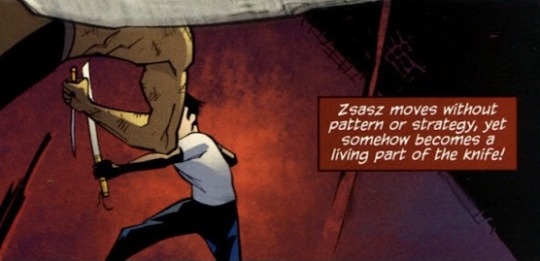
and Damian would recognize how Zsasz moves, since he’s personally fought him before in Streets of Gotham (2009)!! very much not in a sport, but uh maybe it was to Zsasz
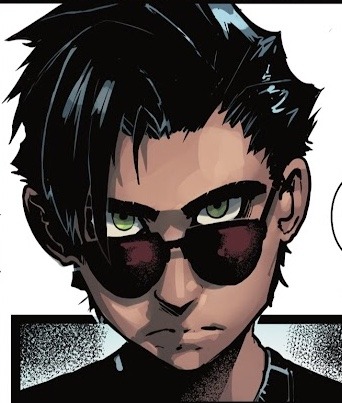
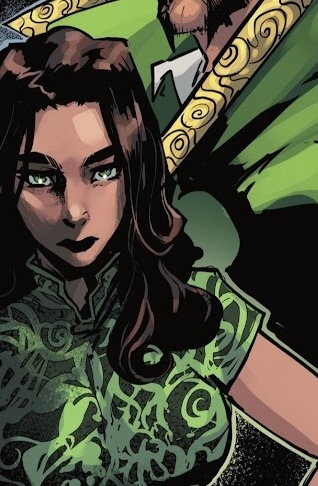
the art!! first a shoutout to the colorist Rex Lokus for giving Damian his green eyes and maybe melanin (it didn’t look consistent throughout so i say maybe)!! 😭 also a Talia by Cizmesija!! even though this panel calls her a “not great” teacher…💀
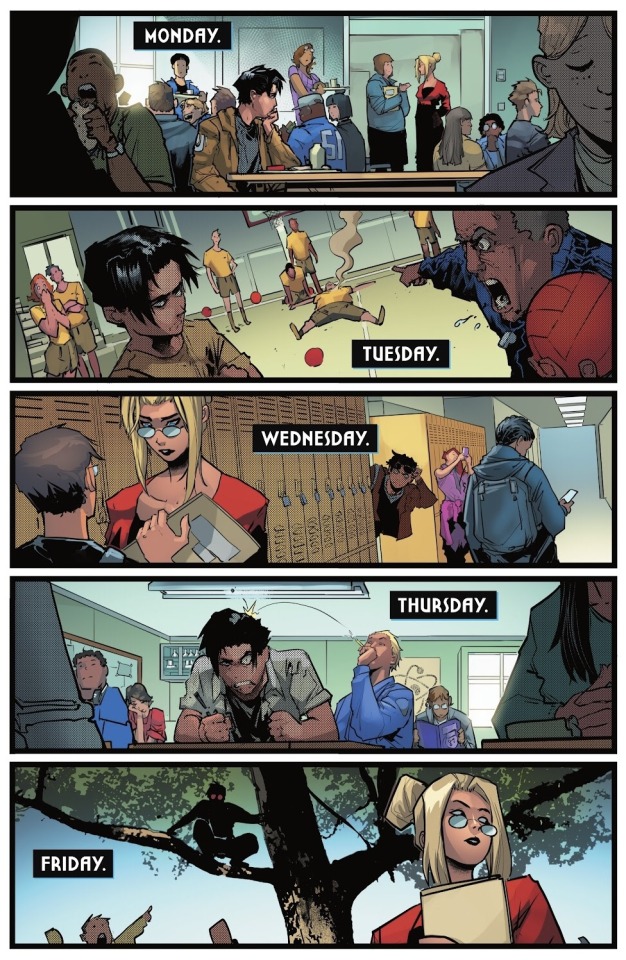
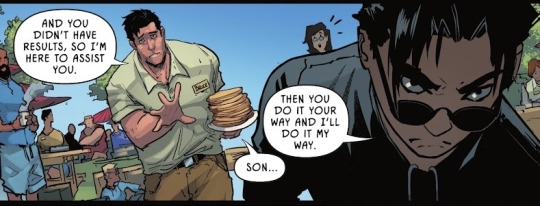
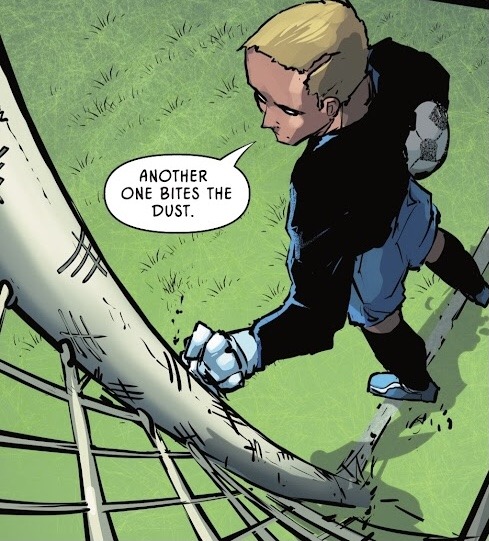
SUCH A FUN PAGE 😭 i’ve been into montage scenes lately lol and i love how quickly Cizmesija establishes Damian’s routine - Tues, Wed, and Fri are the funniest for me!! Damian grumpily getting lectured by his teacher in the foreground while his classmate’s still visibly steaming from the hit he took LOL, DAMIAN’S BUG EYED STARE WITH HIS SUNGLASSES UP, and then Damian looming. stealthily. in a tree. while some kid is blatantly pointing him out HAHA 😭
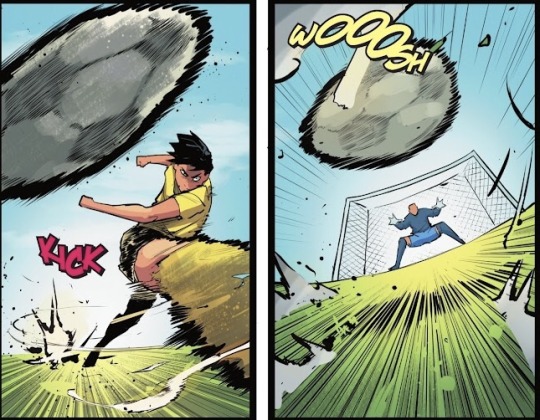
Cizmesija’s use of motion lines and effects when conveying movement is so cool!! the shonen manga vibes jumps out!! the smoke/dust trails following the movements; the limbs and soccer ball having a sort of blur effect with the motion lines. V COOL.
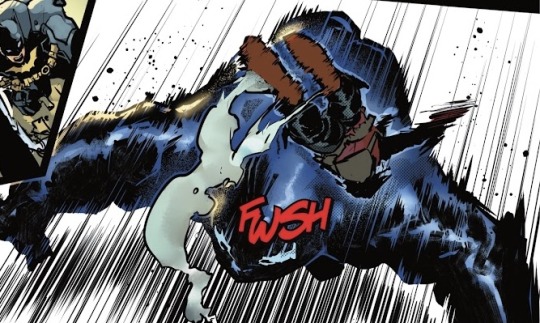
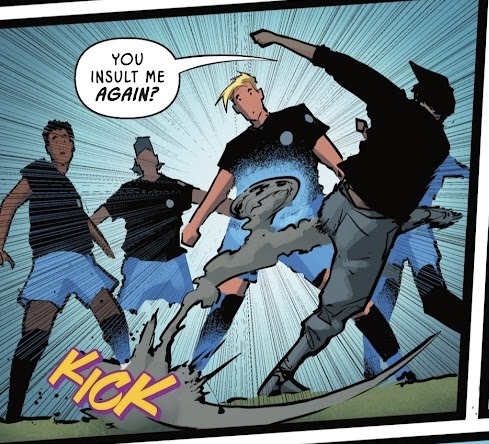
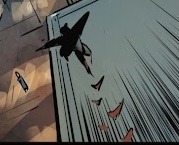
which leads to my favorite part of Cizmesija’s work - HIS IMPACT SHOTS!!
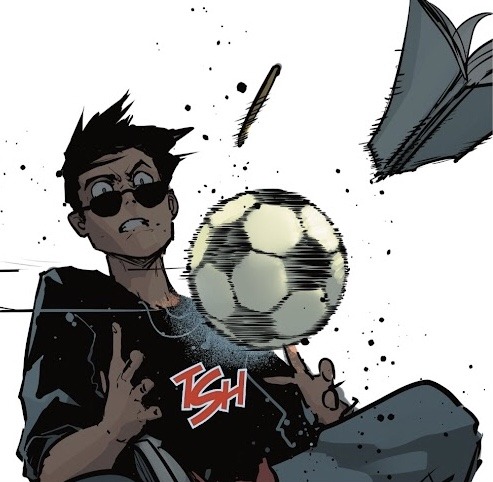
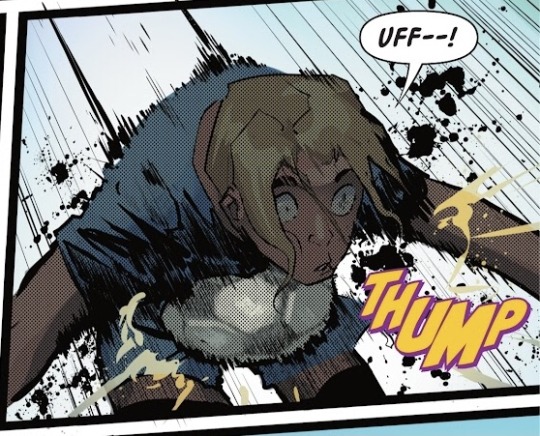
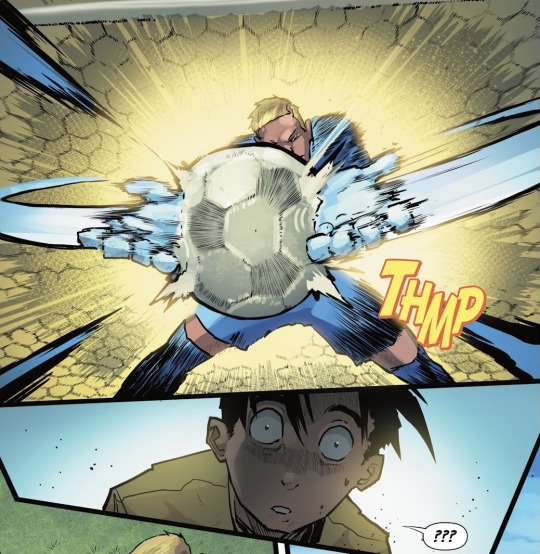
more motion lines and effects!! the splatter effects!! the arcs!! the jolting impacts!! GRRAAHH!! the setup to that impact shot of Zach's block is so great, and then following with Damian's reaction!! i almost wish that "???" wasn't there, just because that expression of stunned silence already feels so loud!!
last thoughts about Cizmesija's art is that i'm really hoping for a showdown between Damian and Zach next issue because i need to see a Damian fight scene in Nikola Cizmesija-fashion 😭 we get a taste of it with Orca and soccer but i NEED MORE LOL for now, dropping the moment when Damian overpowers Zsasz, in Batman: Streets of Gotham #11 since it was such an epic moment
okay SLAPPING MY CONSPIRACY BOARD!! so on another note Principal Stone being Shush is starting to feel like a red herring and Ms. Heather Hall could actually be Shush. Shush’s main point about Damian as his instructor was emphasizing how much potential he has, but the “wrong” influence could affect that
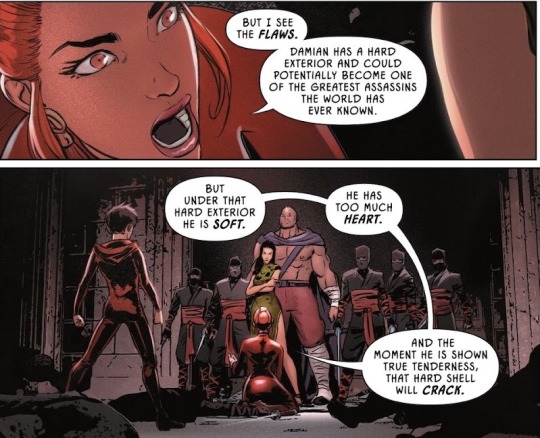
Stone and Hall have made the same observation about Damian’s potential, but the difference is how they address that - one wants Bruce to be more involved while the other wants Bruce to back off
Stone acknowledged Damian can take care of himself but still wants Bruce to step up in Damian’s life; Hall says it’s okay to be a helicopter parent BUT implies giving Damian space (which we already know Bruce has given so much of after Alfred’s death to the point of neglect 😭)

Hall even suggests moving Damian on to college, which would estrange Damian further. also idk how Damian kicking his teammates/bullies asses at soccer is really “making friends” lol
and of all the subjects she’s teaching, it’s AP Biology - according to the current case Batman and Robin are working on, which is centered around DNA-sequencing, it makes Hall the perfect accomplice to Langstrom
this is where my brain started reaching because i laughed at first at how specific that comparison is, but then it just made me think of how Shush’s first introduction was sniping Bruce LOL anyway, Bruce’s reaction is me 😭
one more Cizmesija appreciation panel - the lil running effects behind Damian :)
#rambling#CONTINUING CONSPIRACY THOUGHTS adding an anomaly like Zach to the soccer team would justify Damian joining them#otherwise he’d join and then he would find nothing but soccer if Stone really isn’t Shush#if im wrong then WHOOPS LOL i do find Ms. Hall's support for Damian sweet so i wouldnt mind tho Damian being wrong would suck asdfg#now that i think about it Damian going to college would be a neat development. let him study to be a veterinarian or artist or smth lol#the other action focused artist i would LOVE to see give Damian a fight scene is Daniele Di Nicuolo 😭#I EAT HIS ART UPPP#where Cizmesija is heavily shonen manga influenced Nicuolo is heavily shonen anime influenced esp like Trigger studio artists YUM
56 notes
·
View notes
Text
something something red thread something something


#dead friend forever#dff the series#idk the red camera strap just REALLY stood out to me in this scene!#maybe all the characters have some kind of red string and i just didn't notice#but i thought this was Neat
38 notes
·
View notes
Text

This gave me similar vibes to:

Bonus: glowy "cracks" forming on someone's face.... hmmmmmmmmm


#tf earthspark#earthspark spoilers#the eps have been out a while but you never know lmao#i couldn't stop myself from having an adhd moment where i connect these things in my mind...#they are not the same type of scene. not really.#the pearls are confronting their issues with a complex person who did bad things#Starscream isn't even really at that stage yet lol... but just the theme of having someone explicitly acknowledge abuse#that's it that's the only thread here really lol#also the glowing lines things happens for different reasons too obviously but i thought it was a neat coincidence
83 notes
·
View notes
Text
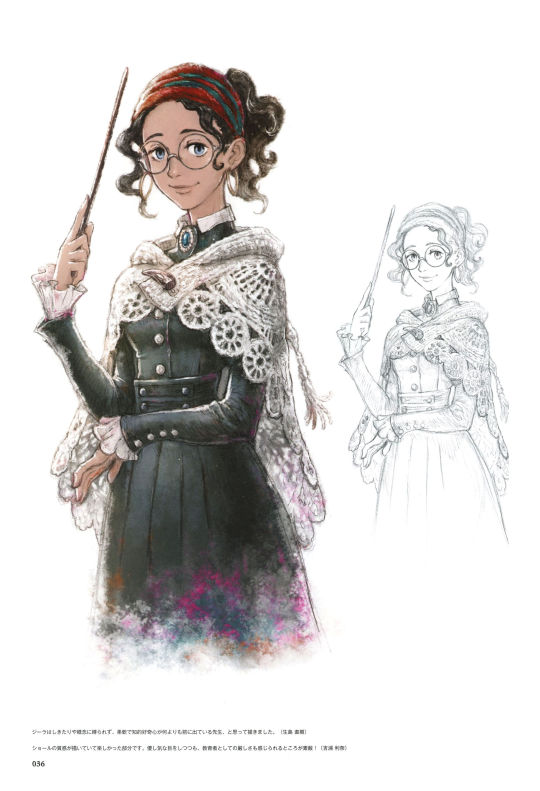

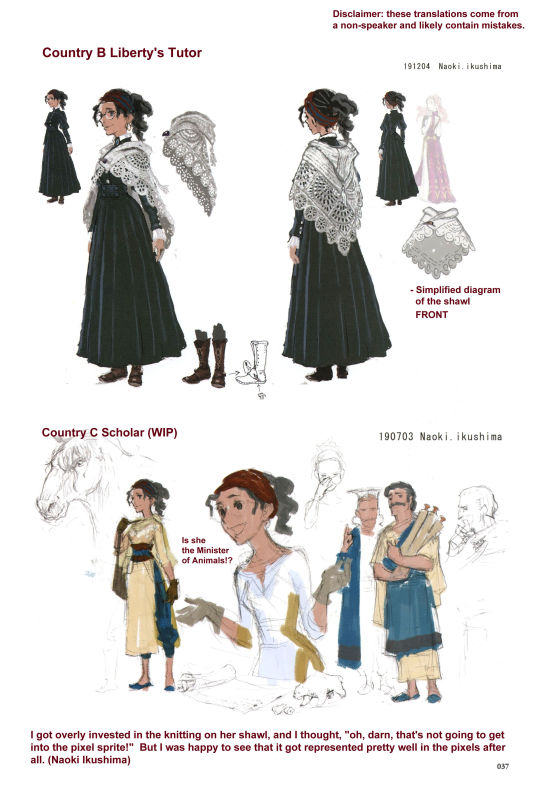
Geela's reference/concept art!
Translation notes under the cut.
I'm really not sure about the "Is she the Minister of Animals!?" caption. The sequence of characters there appear to be "さま大臣動物!?" The first two characters (さま) are the sama- honorific, indicating it's referencing someone of higher status. The last two characters (動物) mean "animal." The middle ones, however, are kinda weird. "大" can be read as "large," or possibly "university," and "臣" means "retainer or attendant." So, taken at face value, this would read something like, "Sir/Ma'am, [are you/am I/is this] the retainer of large animals?!"
However, for what I'm guessing were grammatical reasons, no automatic translator would translate it that way no matter how much I fiddled with things; and would always default back to just spitting the Japanese words back out. However, if two of the characters are switched around (臣大 becoming 大臣), every automatic translator was suddenly able to interpret it, and I could successfully find the characters as words in a dictionary--but it was translated as "Minister of animals" instead of "retainer of large animals." So it would have read more like, "[Are you/am I/is she] the Minister of Animals?!"
Given the sama- prefix and the way the sentence is formed (as well as the fact that "Minister" is the big title we see used in Hyzante), I decided to go with the "minister" translation, but I'm making the assumption that there was a little bit of a typo there. There's a pretty good chance that this is just a grammatically-shorthanded version of "Ma'am, are you the retainer of large animals?!" Or, as always, it's possible there's a completely different potential meaning that I missed.
#triangle strategy#triangle strategy artbook#geela breisse#also I was really hoping I could figure out who those guys were off to her right#friends??? family??? coworkers??? the world may never know#I do really love the thought they put into her characterization tho as far as being both kind and strict#I went back and re-watched her character story scenes after translating this and she's just. so good#like her whole thing with not really caring much about frederica to begin with and then slowly learning to love her is so neat#and it's always so interesting to me how geela went from hyzante -> aesfrost -> being the aesfrosti princess's royal tutor#like! she's ambitious!! she's clever enough to do pretty much anything she wants!!! and yet she still chooses to remain an attendant#because she feels like that's where she can make the most impact on the world#anyways! I love her#ts artbook character ref sheets
52 notes
·
View notes
Note
any hopes for kiwami 3? like things u wanna see added or changed stuff like that
if they dont keep kiryu's goofy walk stance and the hoof-like walk sounds i dont wanna play it
#snap chats#no one understands how much i love that from y3 and y4 its genuinely one of my favorite things about the game#oh but i guess i have to give an actual answer now. HMPH.#id scream if they revived kanda calling mine limp wristed. homophobia in 4k#OK BUT TO BE SERIOUS uhhhh i dont know. im a real simple guy i think#my only like. If This Isnt There Im Leaving deal is mine's palette and im so serious#rgg's scaring me with all the black-hair/purple-suit mine stuff as of late and i cant stress how hard ill vomit if thats in the final#HYPOTHETICAL final anyways. yk3 isnt coming out for. IDK A WHILE#i wanna say i hope they highlight daigo and mine's relationship more but i dont know how theyd do that#i really like how mine's handled in y3 as is so i dont think i want scenes injected like what they did with yk1 and nishiki#someone said a Mine Saga after the game and... hm ... sounds too unrealistic for me to hope for it#like im REALLY trying to think how they could possibly reference the rggo stories in y3 since those are EXCELLENT but#i think . MAYBE. you could reference the story where richardson calls mine as he's driving to the hospital#the only thing you'd have to exclude though is mine stopping by the bar- like JUST keep the phone conversation maybe#cause in that scene that subordinate does question mine if he can really kill daigo and i think thatd be neat. in my opinion.#yeah i dont know. in regards to rggo its hard to think of what i want without intervening things i already like about y3#its a real head scratcher ...#a really good epilogue addition would be adapting that RGGO bit where daigo ruminates on mine. that's a fair ending for him i think#it also fulfills the need to see how daigo saw mine even if its just a little#and to non-rggo readers it could start to answer 'how does daigo feel about everything that happened'#im still so curious as to if daigo was briefed on EVERYTHING that happened but .... anyways....#sorry all my hopes for y3 are just mine/minedai centric fLVKELKA BUT LIKE. i really am content with everything else with y3 surprisingly#idk. i want kiryu fucking up that curry in high definition tho. thats important to me#THEY HAVE TO KEEP THE QTES DURING THE RICHARDSON FIGHT ILL BE PISSED#i need the fight to be AS CAMPY and unnecessary as it was in the og. INCLUDING richardson's voice acting i need it wack as hell#is it weird i actually appreciate the Diet Building Loredumping being like. in replayable-cutscene form#i thought id prefer just One Long cutscene but im glad theres the option to skip those segments#BUT being able to get a refresher in case you missed something somehow#im running out of tags jesus christ i shouldve put this in the main text but vjALjlagj those are all my thoughts for now bYE
12 notes
·
View notes
Text

my brain for the past like 2 weeks
#.txt#trigun#specifically#trimax#i am rotating her in my head always she is so fascinating to me i have so many thoughts i could write a novel#shes captivating to me. as a person#tbh her and tesla and the dependant plants as like. catalysts for so many emotions in the story but we dont get real insight into#their internal lives#and rem captivates me specifically bc shes so complicated wrt her actions with tesla but also the way she talks about leaving earth#and the idea of giving up on her home planet and putting her whole fresh start into seeds and then immediately making#the worst mistake of her life (tesla) and then starting over blank Again with vash and knives and how that all turned out#like!!!! the emotions going on there for her must be insane. i think about it Literally Constantly#and how it all ties into the mangas theme of the potential to be better vs the people you hurt before getting there#im literally obsessed with her#also she dresses like a lesbian electrician and i really like that vibe for her. im not immune#rem saverem#holding her in my hands i just think shes neat#also i have a whole incoherent google doc filled with random scenes from idk iguess the rem pov novel that lives in my brain??#maybe ill clean them up and post them one day that is a threat#also i love fat baby knives in the itty bitty manga screencap i chose. i just know hes the densest baby alive#normal looking baby who you pick up and handles like a bag of wet cement
33 notes
·
View notes
Photo
Everyone thinks ED1 Ash is just a wimp, but consider the following
#blood tw#evil dead#ash williams#my art#I really like him ok#don't ask why I gravitate toward the first movie so much#I just think he's neat#the other movies Ash kills demons and cracks one liners#my guy here kills demons while basically dissociating#relatable#saw a while back someone say that ED1 Ash didn't react to his friends dying and in my head I was like ???#what do you expect he's actively being attacked by demons he's kinda busy#part of it's also his reaction here is to freeze up in terror instead of straight up screaming like in ED2#and even then he's still screaming in the first movie#and if you really want to get into it there's a deleted scene where he starts crying in frustration#after Scotty ditches him and deadite Cheryl taunts him for being useless to save them#so the intent was there#sorry for going off in the tags over something inconsequential again but I have thoughts and I've already written this much I'm not deleting
145 notes
·
View notes
Text
THEATRE ‼️ 💛 💥🔥✨🧡⚡️
#theatre gives me shrimp emotions that are sometimes hard to articulate other than ‘THEATRE ‼️💛💥🔥✨🧡⚡️’ but yeah! theatre! i love it so much!#the other week in the theatre class i’m taking this semester we got in groups and in turn performed a scene from twelfth night#which was super fun! it was the scene where viola and and olivia meet for the first time#and it was really neat to see how each group interpreted it#i was the olivia of my group and i made her really assertive / almost kind of aggressive because i interpreted her as trying to hide her#curiosity about viola beyond a very confident/assertive exterior; but some people played her as openly curious; or super mysterious;#or what have you; and it was so interesting!#the department is currently doing twelfth night (which is why we’re studying it in class) so a few classes later the actors playing olivia#and viola came in and performed the same scene; which was also very unique! it was SO COOL :D#they also talked a bunch about their interpretations of their characters and i got some really interesting insight into the characters that#i hadn’t considered before (for example viola’s actor said that she and the director are throwing around the idea of viola dressing as a#man in order to keep her brother alive; because at that point in time she thinks he’s dead)#and when they were done the costume designer for the same show talked to us about her process and showed us a slideshow of her renderings#+ some other relevant stuff which was super cool as i don’t know very much about costume design in general#i learned so much it was soooo cool :D#AND THEN today i saw the production of firebringer i’m working on which was also so cool but i think i’ll make a separate post about that#once i can gather my thoughts#but yeah! THEATRE ‼️💛💥🔥✨🧡⚡️#my words#elliott’s theatre adventures
3 notes
·
View notes
Text
I just: finished my translation work 😭😭😭😭😭😭😭😭
#thoughts#IT'S DONE!!!!!!#IT'S DONE!!!!#I've been working on this game since almost exactly 2 years#two years and one month to be exact#so I'm a little emotional!!#it's going to be a really sweet game I'm happy I got to work on it#with a story that is simple and approachable but with pretty neat character depth#like a hot cocoa and cinnamon cookie during a rainy day kind of game#ALSO I got my first feedback on the unmanageable thralls outline#and the issues weren't where I expected them to be#it's always the thing I assumed I had nailed...................#actually once I secure an acceptable v2#I Might look for people willing to give me feedback#especially on the most sensitive parts (but also overall)#I just need to be more sure of myself + have some kind of sample scene that I can slide alongside so people can get an idea of#what it actually looks like re: medium and mood etc#ANYWAY
5 notes
·
View notes
Text
.
#. hm.. thinking about la chopper ……. mayb he shud look like a capybara#fucked up deer looking human thing whatever creature#solar-talks#i was talking abt this w my sister but like i think it was a really fun choice not to disclose how kuina died in la#like when i first watched his backstory in la i really thought he was going on some revenge quest or something#so watching ep19 was really fucked up actually i remember being real iffy about it but god the Layers#zoro’s thing with fate and not really luck but his acceptance of wtvr outcome he gets is doing some cocomelon shit tio my brain#itd b so neat if they revealed her death in loguetown like Come On having it right beside the kitetsu scene would b such a smart choice#WITH TASHIGI god i hope they give tashigi a little more something#ok now im thinking abt the la changes …#what iv noticed is how they seemed to isolate the eastblue kids from their islands a little more .. not exactly a flaw tho#zoros basically the same but usopp didnt have his oh my god i just realised usopp didnt have his babyguy gang oh my godddd THAT was what was#missing my whole train of thoughts derailed NOOO USOPPS BABYSITTER CHARACTER TRAIT …….i get it they couldnt fit the vegetable kids bc#of the tone but waugh…. primarily hanging out w a bunch of 8yos says so much abt him………. it was cute#anyways back to it yeah they didnt syrup village noticing his absence and the rest of baraties connection w 3ji which honestly i dont#really mind either i think the only ): to me was how they did cocoyashi#lost a bit of it’s depth my making them hostile to nami tbh#its a good thing i watched the anime After la bc i feel like i wouldve been way sadder abt that decision#these arent real complaints btw the la did a reaaallyy great job#if they didnt i really wouldnt be here thinking about this show . in depth . god how did it come to this SKFHDJFJSHF#anywho . they missed some bits of course but oughhh they did baratie really good ..#ill b honest zeff n 3jis backstory is seriously my favorite thing about the la#some absolutely breathtaking execution it really Got Me ..#the all blue speech …. taz skylr yuoure line delivery skills are insane#whats rlly crazy is how when u take away 3ji’s 1 flaw hes fucking unstoppable . why r u favorite character material . explode forever#head in hands its the themes of hunger .. hate it here so bad …..#ack he grows on u like mold . it was the stupid curry filler episode that got me i rewatched a while ago goddd hes so annoyinggggggg#the curry filler ep was cute . i liked it . <- mad about it#ugh spent 2 hrs writing these tags i dont wanna do my psychology essay .. nico robin save me ……. save me nico robin ……………..
3 notes
·
View notes
Text
You know, something I think about sometimes... There’s not that many Guild Halls to choose from. Two in Heart of Thorns that look fairly similar, one in Path of Fire, and now one in End of Dragons. That makes a total of four options.
Maybe it’s just me, but I’d love to see a Mists-themed one. Or, at least, a few more unique locations to choose from-- like Halls set in Ascalon and the Shiverpeaks, for example. Having some futuristic Mists pocket that feels similar to the Mistlock Observatory and Dessa’s Fractal lab, or a repurposed Ascalonian fortress still shimmering with the light of ever-burning foefire, or a forgotten Deldrimor outpost carved deep into the side of a snowy mountain, overlooking the frozen wastes below...
C’mon, it’d be neat! And offer a bit more theming options for guilds, too.
So, let’s hear it: what sort of locations would you like to see as a Guild Hall?
#my posts#Guild Wars 2#GW2#add this to the 'missed potential' list with player housing tBH#largely thinking about this because i made a guild just to have the Tideturners#as a tag/name for in-game rp purposes (it'll go on Sidewinder when she's IC)#but also none of the current Guild Halls make any sense for them. agony#i'd LOVE to have a Mists-themed tech location that i could pretend is the Turnabout...#but just in general it'd be really cool to have more options for folks to pick what fits their guild and preferred aesthetic#especially since the rp scene has been using halls more often lately. it'd be a Gift for that#anyway. feel free to throw your own thoughts out there too i'm curious what other neat places people would think of to put their Guild
19 notes
·
View notes
Text
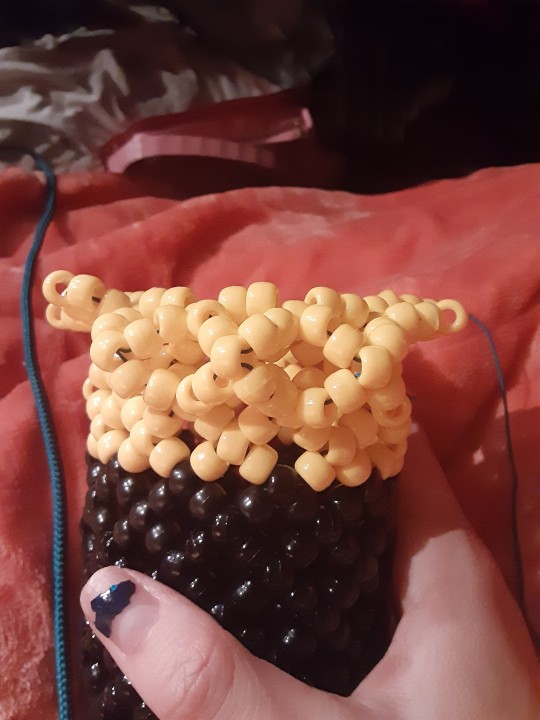
Hourglass
oh yeah. it's time
rough estimate of materials here. this is a VERY BIG project and I ran out of some supplies (like string, so I changed the amount from 100yds to 300 just to be safe)
i highly suggest setting a timer for two hours so you can remember to eat and such, especially if you're prone to hyper-focus like i am.
also, if you want more pictures of this, i have a bunch of them on my ko-fi. they're absolutely free to view. if you're stuck, DM me or send me an ask, or check there!
you know this video??
i saw it and went 'oh my god i need to have it'
and now it looks a bit like this
im making another one for my boyfriend for christmas. better to go big than go home, right? so, while i was doing that, i decided to do a write-up on it. but first..
design creds go to ghostinthecrowd on tiktok. their linktree is right here, so you can buy them a coffee or check out their instagram. they also have a BLM carrd linked. i 100% suggest their page if you're looking for any big projects.
now... this hourglass took me about a month of on/off work. this is a hefty project. it sizes about forearm length, and its probably 5ish inches wide. this would make a great centerpiece for decoration, or an amazing trade! anyone who receives this is sure to be over the moon about it!
pre-emptive warning: this post isn't going to contain many pictures. im writing this assuming that you have basic kandi knowledge (ufo cuffs, carousel cuffs, x bases). if you don't, or this is your first project, i admire your determination! ill link various tutorials for things next to what i'm doing so you can follow along too! my first project was an x-base, and i'm not going to tell people to do something easy if they're that determined. i think you've got this.
in addition, i made this a bit out-of-order. if my pictures look like i jumped ahead, or didn't finish a part, don't stress out about it.
without further ado...
hourglass!! time!!!
hold ur horses. first. compare with these pictures as you go to see if ur doing it right. it should look roughly like these when ur done (i say roughly, because i assume youre using diferent colors). also, as you go, im gonna reference my hourglass pictures a LOT. reference those as you go

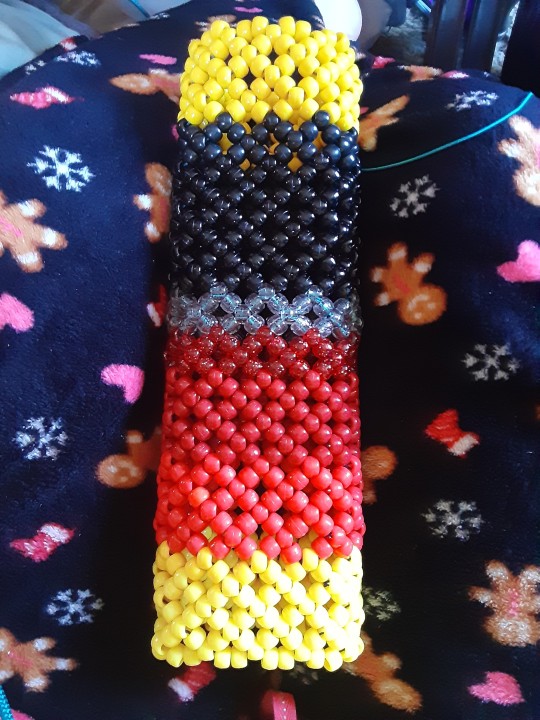
i started by putting 33 beads on a string. whatever you go with, i'd suggest that it fits around the bottom of your forearm, near your elbow, if you want to wear it. if not, just go with 33 honestly. the amount you go with has to be a multiple of three. (33,36,39,42, etc). this color will be the top of your cuff, that's in a carousel cuff style, and we need two Xes. (x-base tutorials here, and here, and here). don't finish it off after you have two Xes, after that we're just changing colors. at the end, actually, we'll have 14 Xes (thats a LOT of Xes).
change colors to the first main color of your hourglass. mine was green. now it's red. make 4 Xes from that.
change colors to the sparkly bead you'll use in the future. mine was a sparkly green. make one X from that.
change colors to the second sparkly bead you'll use, this one was pink. make one X from that.
change colors to the second color of your hourglass, mine was just a light pink. make 4 Xes from that
change colors back to the color of the carousel cuff, or the color that you first used. in the pictures, it's black. make 2 Xes. finish and tie off.
Carousel Time Pt. 1
carousel cuff tutorials here and here. if you don't know how to make them, watch that, then come back here. if you know how to make them, still read through this. it's a carousel, yes, but it's a bit different.
we're doing this with two columns! that's right baby, this is multi-layered. for reference, here's pictures of it when done.
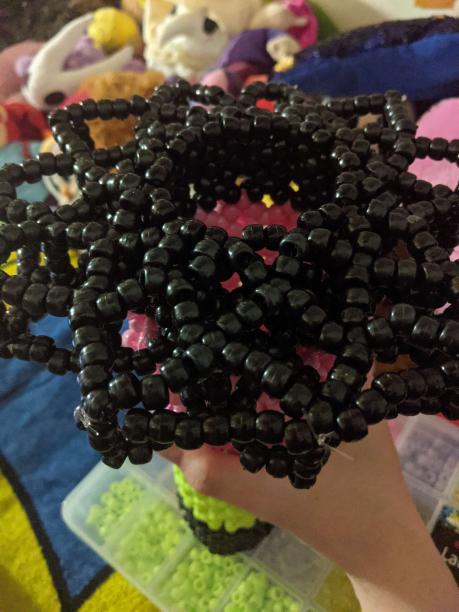
you know when you make ufo cuffs, and you start by making those Xes? like you have spikes, then you bring them down a bit to make, like, 3d Xes? we're starting by doing that. ufo tutorials here and here.
3d x example
through connector beads (the middle of the xes on the x base), string 5 beads, and go through the connector to the side of it. do this all the way around and you'll get nice spikes. go through the middle bead on those spikes, string 2 beads, and go through the connector below. i do not know any better way to describe this, honest to god.
go through that first black connector bead, right below the yellow. make more yellow spikes. bring it up by going through the same connectors as before. beading needles help a lot here. actually, i'd call them necessary. don't have one? a bent paperclip works perfectly. just straighten it out and make a loop at a end so it works as one. pliers are good for that.

those r some sick xes. lets make them sharper. stick ur string through one of the points sticking up in the middle of a 3d x, string 7 beads on, and go to the next middle. do this all the way around on the top and bottom. it might look kind of wonky, just keep rolling with it. when ur done, your spikes should look like those red ones on the bottom
columns! the ones described in carousel cuff videos. this is what makes a carousel cuff a carousel cuff. on the point that's sticking out (or the fourth bead) put a string through it. put both of the ends together, put on three beads, put both ends through the bead on the opposite spike, left string through left side, right to right. do two square knots, and do this all the way around.
also, a tip. make sure your strings dont cross when putting on beads. they have to stay parallel otherwise itll be jankey.
do this same thing to the bottom of your cuff. itll look something like this when done

there's more, though! through that fourth bead, string through, add 9 beads, and string through the next spike. do this to the top and bottom, all the way around. make more columns of three on the 5th bead. it'll look like this when done (ignore the black, thicker portion. we'll get to that later)

do this to the bottom, too. connect the points with 8 beads on the top and bottom of both carousels. for the 8 beads, dont pull the string that tightly. it keeps it from being stiff, it looks better if you just pull it together.

i do not know why the image is pasting sideways. just turn your phone or find the correct version on my ko-fi.
the middle. this is the main bulk of the cuff. start by making spikes of 5 beads that go through the first connector bead near the top. make Xes there.

make another row of Xes through the bottom connector bead, going upward.
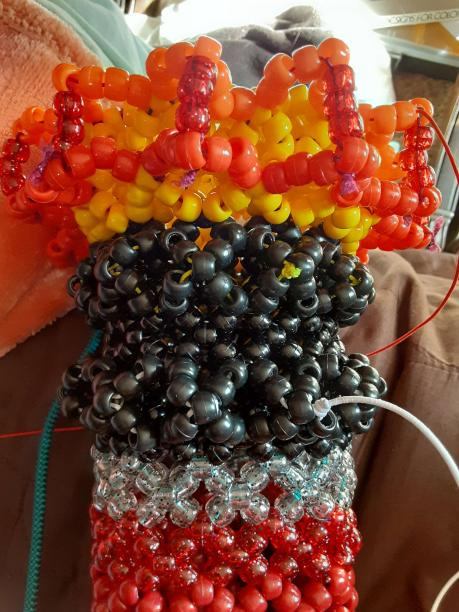
and in the place where you made the spikes for the bottom-- string through there and make more spikes that'll go up into the bottom of the top Xes. spikes picture below...

it's a tight fit-- that's ok. that's part of what makes this project look really bulky. it might look kinda scuffed but keep going, that's normal.

do that all the way around, making three Xes
i do not know when i will hit the image limit; however, i am horrified to find out so i refuse to count my images
at this point, it's really connecting everything. that was the hardest part (to understand at least). put your string through the center of an X on the top, string 5 beads, and make a spike going to the next X center. do this all the way around...

and bring it down like this
make spikes on the bottom and bring them up, and then we're done with this section!

cool. do this again on the lower half
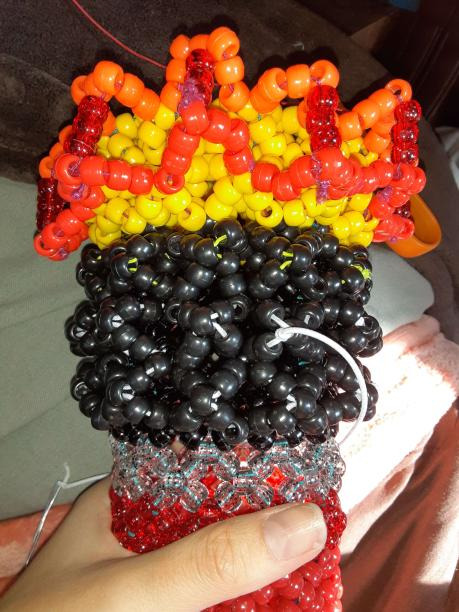
string through the last red connector bead, closest to the yellow part. add 5, go to the next one. do this all the way around, and bring it up to make a 3D X to the connectors vertical and right above it.

make another row right below it, stringing through the connectors you used to bring down the top spikes. bring it down to the connector vertically below the one you just strung through
once again, no fucking idea why it's sideways ._.
go through the bead you were using to bring it down-- it's the same connectors you were just using. pick one, go through it, do more spikes of 5. bring that last one down to the connector vertically below the one you were using to make spikes.
also, dont worry about it looking weird. itll be buried later anyway, it doesnt have to look great.

make spikes of 5, bring them down. make spikes of 5 on the bottom, bring them up.

ok. we're 3/4 of the way there. this is the final stretch!
go through the center of one of the upper layers of Xes. it doesn't matter if you do the top or the bottom. put one bead on, and string around and through that same center bead from before. string 5 to the next point. string one, go around. repeat all the way around on the top and bottom. pull this part REALLY tight. tie off at the end, snip. do the other side.

this is where i say good luck if you chose to use thick string.
go through the connector where the first spikes, closest to the yellow, started. it's on the base on the cuff, right about here
as you can see, add 5 beads and go through the next connector. do this all the way around. go to the other side and go through the last solid connectors and do the same thing: 5 all the way around.
on the top, string three through a spike, go to the bead sticking out below it, string 3 more, go to the next top spike. here's an illustration demonstrating this.

the purple line is the bead to go through. that one is the one that was put on top of a solid red spike. the blue lines are the three strung beads. thee green are the spikes you're moving through on the top, and the yellow-green is the rest of the top spike. do this all around the top.
do this on the bottom too, except stringing through the third bead in the straight string of 5. 3, string, 3, spike.

make these columns of two using the same method to make the carousel cuff columns. make one, skip two, make another. do this all the way around.
this might sound complicated so bear with me: thread through the same beads you were using for the top of the shiny red spikes, and make more spikes of 5.

if this doesn't make sense, PM me or send me an ask.
do that all the way around.
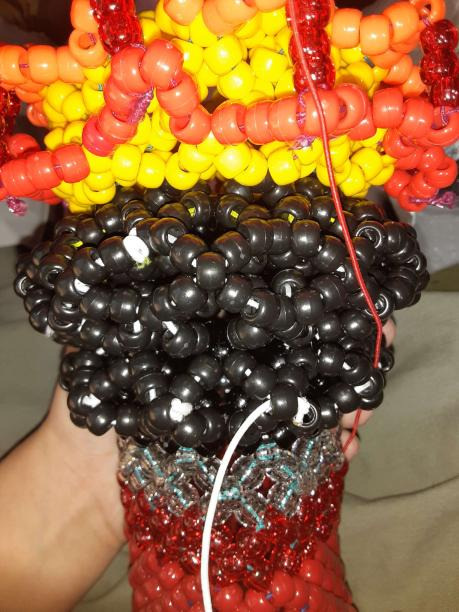
UPDATE: ok i ran outta supplies. and i kinda can't buy more at the moment, money's tight. so we're pictureless now! i'll try my best to be clear and consise.
After making those five, connect them down to the next section by stringing through that solid black bead on the base, stringing 2, going through the center of the 5 from before, and stringing 2 again. Do this all the way around.
This is essentially doing the same thing that we did on the top. From the black connectors on the base near the very top, string 5 all around. From there, string 7 around. Start stringing those parts together and making bars. Here's pictures of what it should roughly look like


For the side parts where they connect the top carousel to the bottom, pick a bead on the lower side of the carousel, connecting to a bar, and bead it going all the way down. original video used wire for this, but it was too hard for me to work with and i used non-stretchy cord instead. It should connect down at another bead connecting to a bar on the other side.
The rest from here is flare. I liked stringing through some beads toward the top of the clear, sparkly overlay and just stringing down. That's the clear sparkles/rainbow sparkles you see in the photo. After, I decided to make a single that I just threw on there (The pearl rainbow in the middle in the photo).
Get creative! Maybe add something that's really 'you'. Special charms or small perlers come to mind.
...
Hoo. Okay. That's it. I originally wanted to make this for my boyfriend for Christmas, and this post is going out mid-March. I seriously hope this isn't gibberish. Depending on how I feel down the line (likely years from now) I might make this tutorial into a video.
DM me or send me asks for questions. I'll try my best to get to your question ASAP. and as always, pictures of your kandi are always welcome in my inbox, i'll be sure to post them :)
best of luck, you got this.
#long post#like REALLY long#kandi hourglass#tutorial#kandi tutorial#scenecore#scene#kandi#buy me a kofi if you're feeling nice :) but no pressure ofc#also i'm thinking about expanding this blog into more than kandi#obv i still love kandi but that hourglass burnt me tf out and i have other neat hobbies!#idk it's a thought#hourglass#3d art#art
11 notes
·
View notes
Text
Posting on Tumblr is hard because sometimes to get to 30 tags you need to just make shit up
#ok#now that i have your attention#how was your day?#mine basically just started#but it's going alright#hope you're doing well#anyways#has anyone here seen the#fnaf movie#i thought it was pretty neat#there were a lot of things to notice#as a movie i think it's just ok#but as a fnaf fan i really loved it!#i won't spoil anything here obviously#but some scenes get really cute#very enjoyable experience#would recommend to any fan#still a lot of tags to go...#if i dont do all of them...#the joke wont be funny!#how about we talk vegetables?#have you ever had#kohlrabi#it's really interesting to me honestly#oh I'm almost done!#goodbye for now#if you want to see more funny things#follow me here on#tumblr#have fun!
2 notes
·
View notes
Text
y'know okay. Shrek the third does have some neat Worldbuilding elements and some interesting concepts and it wasn't as well executed as the rest of the movies but tbh I think it would be a better movie if edited with a little less of the uhhh idk cringe humor ? It's not the worst cringe humor but a lot of it is cringeworthy enough to send my anxiety off.
I'm also not the first one to point out that charming isn't as strong as a standalone villian compared to the other main line villians. and also there was a LOT of things they Almost did with Artie and then they didn't. The whole point is having Shrek being sort of a father figure to him so like he can actually Learn that but from what I understand from the deleted scenes available and what some ppl talk about on the behind the scenes is that a lot of that got cut.
Sorry this post is several different thoughts going everywhere.
Anyway if I could change only one thing. Just one. It would be taking out the baby dream sequence.... ESPECIALLY the vomit gags.
#I think there's lots of neat small bits but they don't fit together well as a whole picture.#The fact you can watch 1 2 and 4 in a row and not really need 3 says a lot#I like Shrek the halls more than the actual theaterical release movie!!!#The world building is still good. But mdbdjdbf#There's this weird thing for me between regular cringe humor and oh god I have to leave the room because it's setting off my social anxiety#....also I feel like Artie and Fiona should've had like at least A Scene. They're cousins!#Shrek the third#Shrek thoughts#Thoughts on the matter
8 notes
·
View notes
Photo

One fateful fight~
@neoma-eltanin
#Glimpses of the Journey#Auro'usk Hydrae#Neoma Eltanin#neoma-eltanin#I just thought they looked really neat#Was a fun scene too to write#Flowers and Butterflies#Also relevant to the last ffxivwrite story!
7 notes
·
View notes
Last Seen Blogs

avengers-age-of-fanfics
this is the fight of our lives

elianimationblog
Eli's Stop Frame Animation Blog 2020

mumpsetc
🌦

wordpressvip
WordPress VIP

certainnightmoon
thanks for nothing