#Image Compression and Optimization
Text
Found it
: 3
#there's no button to change the part of the image that the pfp focuses on so get used to loong neck#I remember when I first drew it thinking that everything was so well proportioned but the second I started making it my pfp I saw neck long#rip max tag size#just means if I really want to run on in one I get to optimize for space and do some compression instead of going lossless#also enjoy the blinding colours of my blog now I have the default command prompt on all of my machines be those colours so I'm used to it#I also realized I have just about zero clue how tumblr actually works but like that's ok I don't care that much
0 notes
Text
Optimize with Ease: ImageOptim
ImageOptim is a powerful online tool crafted to optimize and compress images, enhancing website performance and reducing load times. With its straightforward interface and effective optimization algorithms, it offers users a convenient solution to enhance their online content effortlessly.
Features:
Lossless and lossy image compression options
Batch processing for optimizing multiple images…
View On WordPress
#Batch Processing#Compressor#Image Optimization#Image Optimizer#Imageoptim#Integration#Lossless Compression#Online Tool#Photo
0 notes
Text
Discover simple tips and effective tools to reduce the size of JPEG files with 'How to Reduce the Size of JPEG File? Simple Tips & Tools' on Coupon Stopper. Whether you're looking to optimize images for your website, email attachments, or social media posts, our comprehensive guide provides easy-to-follow strategies for shrinking JPEG file sizes without compromising quality. Explore various online tools and software options tailored to meet your specific compression needs. With Coupon Stopper's expert tips and recommended tools, you can efficiently manage and minimize JPEG file sizes, ensuring faster loading times and smoother online experiences. Start optimizing your images today with Coupon Stopper.
#Reduce#Size#JPEGFile#TipsAndTools#CouponStopper#Optimization#Images#Compression#Quality#LoadingTimes
0 notes
Text
0 notes
Text
0 notes
Text
#PNG vs JPEG#Image File Formats Comparison#Image Compression#Lossless Compression#Lossy Compression#Graphic Design#Image Quality#Digital Images#Image Format Selection#Visual Content#Image Optimization#Web Graphics#File Size Reduction#Digital Photography#Multimedia Formats#Transparency in Images#Visual Effects#Image Loading Speed#Image Compatibility#Format Choice
0 notes
Text
Image Optimization Services - eCommerceally
Looking for image optimization services? Our experts can help you optimize, compress, and clean up your images.

#image optimization services#image seo optimization#image optimization service#alt tag optimization#image compression service
0 notes
Text
Image Compressor Tool with colorful styling and all its features , image
optimization, file size reduction
0 notes
Text
Convert Images Between WebP and PNG Formats for Free
As someone who runs a small business online, I'm always looking for ways to optimize my images without sacrificing quality. That's why I was excited to find webppng.com, a free online image converter that lets you quickly switch between WebP and PNG file formats.
For those not familiar, WebP is an advanced compressed image type created by Google that can drastically reduce file sizes compared to PNGs. The only catch is that some older browsers don't support WebP.
That's where webppng.com comes in! Their free WebP to PNG converter lets me upload my WebP product photos and download optimized PNG versions compatible with more websites and apps. And when I have PNGs, their PNG to WebP converter lets me benefit from the smaller file sizes of the WebP format.
I love that webppng.com offers:
Fast bulk conversion right in your browser
Preserved image quality with customizable compression
An easy drag and drop interface that's simple to use
Unlimited usage with no hidden costs or limits
Being able to seamlessly switch between WebP and PNG has been a huge help for my small online store. I can have smaller WebP files for modern browsers while still supporting PNGs for maximum compatibility across platforms.
If you work with lots of product images like me, I'd definitely recommend checking out webppng.com's free WebP and PNG converter. It's an easy way to optimize your site's images for speed and performance.
2K notes
·
View notes
Text
I had a breakthrough yesterday that I've been fervently working on. With what I know about image compression and terminals I was able to implement image and animation display in terminals with color. I'll show a few examples and then explain the significance (I can't show the animation right now because I can't record it at the moment).
Note: These images were automatically optimized not manually, better quality is possible these are samples


The reason this matters is we now have a way to transport graphics in a very optimized way in which we only have to store the indexed colors and the positional data for the colors (which we have a novel method of optimizing) notably you only have to send the indexed colors once for an animation or stream of images. This provides us the ability to render graphics with no GUI so with far less overhead.
TLDR: We have an entirely new way to send and receive images/animations/streamed sequences
For the more technically interested read on
This uses the Python Curses wrapper, unicode block elements and Pillow to achieve this. The limitations are loose but input images will automatically be posterized to handle the 255 color limit of Curses (a little fuzzy on if there are ways around this beyond the fg/bg doubling idea I'm thinking qbout, I'll look into it soon) and your image needs to be a width and height that can be displayed within your particular terminal setup ex: a 32x32px image needs 32 lines and 32 columns.
To accommodate this for PierMesh we can use the ShrinkRay optimizations.
230 notes
·
View notes
Text
GIFMAKING TUTORIAL: PHOTOPEA (for Windows)

Screencapping
Gif Width/Size Limit/Ezgif
Loading Frames
Cropping and Resizing
Rasterize/Make Frames
Sharpening
Coloring (not detailed. Links to other tutorials included)
Exporting
Obligatory Mentions: @photopeablr ; @miwtual ; @benoitblanc ; @ashleysolsen
Definitely check out these blogs for tips, tutorials and resources, they're a gold mine. Finally I recommend browsing the PHOTOPEA TUTORIAL / PHOTOPEA TUTORIAL GIF tags.
DISCLAIMER: English is not my first language and I'm not an expert on what I'm going to discuss, so if anything's unclear feel free to drop another ask.
1. SCREENCAPPING -> PotPlayer (the one I use) or MVP or KMPlayer
INSTALL PotPlayer (tutorial)
Play your movie/episode and press Ctrl + G. The Consecutive Image Capturer window will pop up. Click Start to capture consecutive frames, Stop when you got what you needed.
Where it says "Image Type -> Format" I recommend picking PNG, for higher quality screencaps.
To access the folder where the screencaps are stored, type %appdata% in windows search, open the PotPlayerMini64 folder (or 32, depending on your system) and then the Capture folder. That's where you'll find your screencaps.

Admittedly MVP is a lot faster but I prefer Potplayer because it generates (at least in my case) higher quality screencaps. MVP kind of alters the hue and it made it harder for me to color my gifs. Still, if you're interested in how to use it, I recommend this tutorial.
As for KMPlayer, every tutorial out there is outdated and I couldn't figure out the new version of the software.
2. GIF WIDTH/HEIGHT, SIZE LIMIT, EZGIF OPTMIZER
At this point you should already know how big your gifs are going to be. Remember the ideal gif width(s) on tumblr are 540 px / 268 px / 177 px. These specific numbers take into account the 4 px space between the gifs. No restrictions on height. Here are some examples:
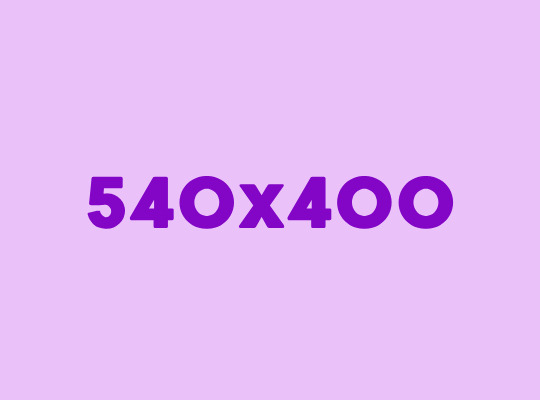
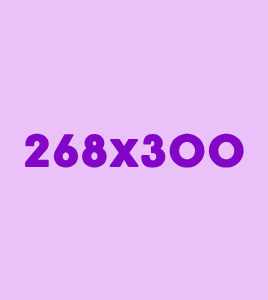

You can play around with the height (177x400, 177x540, 268x200, 268x268, 268x350, 268x400, 540x440, 540x500, 540x540 etc) but if you go over the 10 MB limit you'll either have to make your gifs smaller/delete some frames.
OR you can go on ezgif and optimize your gif, which is usually what I do. The quality might suffer a little, but I'm not really (that) obsessed with how crispy my gifs look, or I'd download photoshop.

Depending on the gif size, you can decrease the compression level. I've never had to go over 35. It's better to start at 5 (minimum) and then go from there until you reach your desired ( <10mb) gif size. Now that I think about it I should have included this passage at the end of the tutorial, I guess I'll just mention it again.
3. LOAD YOUR FRAMES
File -> Open... -> Pick one of your screencaps. The first one, the last one, a random one. Doesn't matter. That's your Background.
File -> Open & Place -> Select all the frames (including the one you already loaded in the previous passage) you need for your gif and load them.
(I recommend creating a specific folder for the screencaps of each gif you're going to make.)
WARNING: When you Place your screencaps make sure the Crop tool is NOT selected, especially if you've already used it and the width/height values have been entered. It will mess things up - I don't know why, could be a bug.
You can either select them all with Ctrl+A or with the method I explained in the ask: "when you want to select more than one frame or all frames at once select the first one, then scroll to the bottom and, while pressing Shift, select the last one. this way ALL your frames will be selected".
WARNING: Depending on how fast your computer is / on your RAM, this process may take a while. My old computer was old and slow af, while my new one can load even a 100 frames relatively fast, all things considered. Even so, I recommend ALWAYS saving your work before loading new frames for a new gif, because photopea might crash unexpectedly. Just save your work as often as you can, even while coloring or before exporting. Trust me, I speak from experience.
Now you can go ahead and delete the Background at the bottom, you won't need it anymore.
4. CROPPING AND RESIZING
Right now your screencaps are still smart objects. Before rasterizing and converting to frames, you need to crop your gif.
Technically you can rasterize/convert to frames and then crop, BUT if you do it in that order photopea will automatically delete the cropped pixels, even if you don't select the "Delete Cropped Pixels" Option. Might be another bug, unclear.
Basically, if you crop your gif and then realize you cropped a little too much to the left or the right, you can go ahead, select the Move Tool (shortcut: V) and, after selecting ALL YOUR FRAMES, move them around on your canvas until you are satisfied. You won't be able to do this if you rasterize first and then crop, the excess pixels will be deleted. I don't know why, I found out by accident lol.
CROPPING
(Cropped pixels: the gray/opaque area outside of the selected area. That area disappears once you press enter and crop, but the pixels are retained, so you can move the frames around and reposition them as you like. In this case I could move the frames to the left and include Silver's figure [curly guy in the foreground] in the crop)
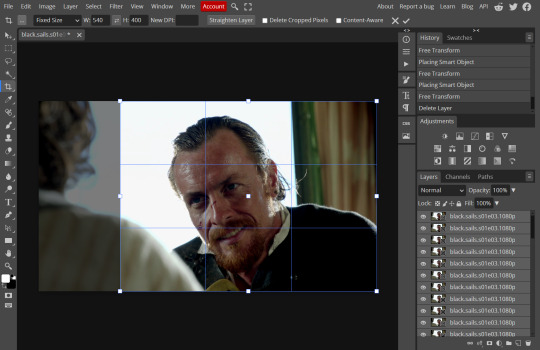
After deleting the Background, you will need to select all your frames (using the Shift key), use the C shortcut on your keyboard to choose the Crop tool. Or you can click on it, whatever's more convenient. Once you do that, a dropdown menu is going to appear. You need to select the "FIXED SIZE" option, as shown in the following screencap.
Once you do that, you can type in your desired width and height. Do not immediately press enter.

Your work area should now look like this. Now you can click on one of the white squares and enlarge the selected area until the edges are lined up. You can then move it around until it covers the area you wish to gif.
WARNING: to move the big rectangle around, you're gonna have to click on a random point of the work area, PREFERABLY not to close to the rectangle itself, or you might accidentally rotate it.

See? When your cursor is close to the selected area it turns into this rotating tool. Move it away until it reverts to your usual cursor, then you can start moving the rectangle. Press Enter when you're satisfied with the area you selected.
RESIZE
This isn't always necessary (pretty much never in my case) - and it's a passage I often forget myself - but it's mentioned in most of the tutorials I came across over the years, so I'd be remiss if I didn't include it in mine. After cropping, you'll want to resize your image.
IMAGE -> Image Size...

This window will pop up. Now, should the values in the Width and Height space be anything other than 540 and 400 (or the values you entered yourself, whatever they might be) you need to correct that. They've always been correct in my case, but again. Had to mention it.
5. RASTERIZE & MAKE FRAMES
Now that your screencaps are cropped, you can go ahead and convert them.
LAYER -> Rasterize (if you skip this passage you won't be able to Sharpen (or use any filter) on your frames at once. You'll have to Sharpen your frames one by one.
Photopea doesn't feature a timeline and it's not a video editor, which makes this passage crucial. When you select all your smart objects and try to apply a filter, the filter will only by applied to ONE frame. Once you rasterize your smart objects and make them into frames, you can select them all and sharpen them at once.
Unfortunately this also means that you won't be able to - I don't know how to explain this properly so bear with me - use all smart filters/use them in the same way a photoshop user can. For example, you can sharpen / remove noise / add noise / unsharp mask... but you can't act on those filters in the same way a photoshop user can.
When you work on smart objects you can change the blend mode - which is critical if you decide to use a filter like High Pass. If you simply apply a high pass filter on photopea you won't be able to change the blend mode and your gif will look like this (following screencaps). Or rather, you will be able to change the blend mode by clicking on the little wheel next to "High pass" (circled in green in the 2nd screencap), but you'll have to apply the filter to each frame manually, one by one.

Then you can rasterize/make into frames, but it's extremely time consuming. I did it once or twice when I first started making gifs and it got old pretty soon haha.
Layer -> Animation -> Make frames. This passage will add "_a_" at the beginning of all your frames and it's what allows you to make a (moving) gif. As I said in the ask, if you skip this passage your gif will not move.
6. SHARPENING
Some people prefer to color first and sharpen later, but I found that sharpening filters (more or less) dramatically alter the aspect of your gif and already brighten it a bit (depending on your settings) and you may end up with an excessively bright gif.
Now, sharpening settings are not necessarily set in stone. The most popular ones are 500/0.4 + 10/10, which I use sometimes. But you may also need to take into account the quality of the files you're working with + the specific tv show you're giffing. I've been using different settings for pretty much every tv show I gif, especially in the last couple months. Some examples:

followed by
OR
AMOUNT: 500% RADIUS 0.3px
followed by
AMOUNT: 20% (or 10%) RADIUS 10px
You'll just need to experiment and see what works best for your gifs.
Some gifmakers use the UNSHARP MASK filter as well (I think it's pretty popular among photopea users?) but it makes my gifs look extra grainy, makes the borders look super bright and it clashes with my coloring method(s), so I use it rarely and with very moderate settings. Something like this:

Again, depends on the gif and on what you like. I've seen it used with great results by other gifmakers!
REDUCE NOISE
Sometimes - and this is especially the case for dark scenes - your gif may look excessively grainy, depending on how bright you want to make it. Reducing noise can help. Keep it mind, it can also make it worse and mess up the quality. BUT it also reduces the size of your gif. Obviously, the higher the settings, the more quality will suffer.

These are my standard settings (either 2/70% or 2/80%). It's almost imperceptible, but it helps with some of the trickier scenes.
ADDING NOISE
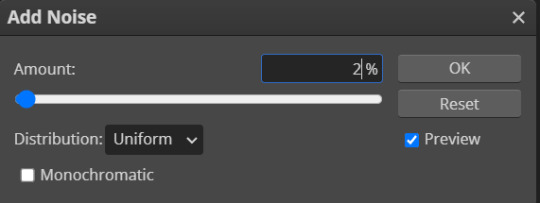
Adding noise (1% or 2% max) can sometimes help with quality (or make it worse, just like reduce noise) but it will make your gif so so so much bigger, and occasionally damage the frames, which means you won't be able to load your gif on tumblr, so I rarely use it.
You'll also want to create ACTIONS which will allow you to sharpen your gifs much faster.
HOW TO CREATE AN ACTION ON PHOTOPEA
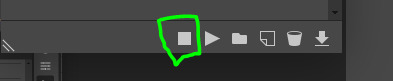
The Action Button (shaped like a Play button as you can see in the following screencaps) may not be there if you're using photopea for the first time. If that's the case click on the magnifiying glass next to "Account" (in red) and type "actions". Press Enter and the button should immediately show up.
Once you do that, click on the Folder (circled in yellow)

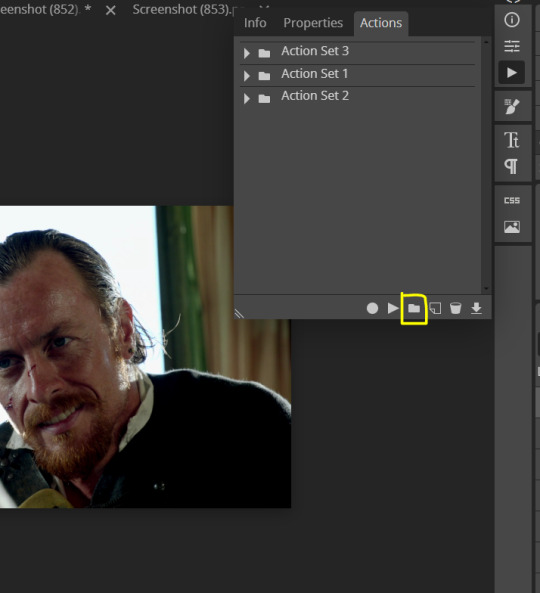
and rename it however you like.

now click on New Action (circled in red). now you can press the Recording button (circled in green)

Now
FILTERS -> Smart Sharpen
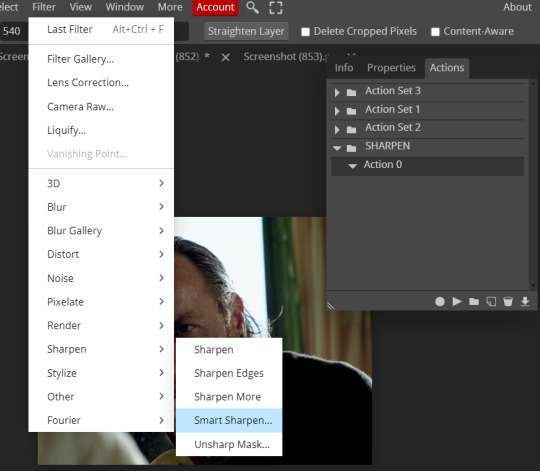
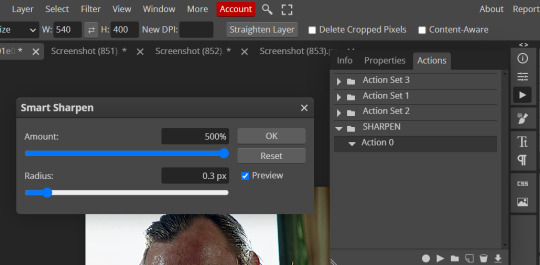
and you can enter your values. Then you repeat this passage (WITHOUT pressing rec, WITHOUT pressing new action or anything else, you just open the smart shapen window again) and, if you want, you can sharpen your gif some more (10%, 10px, or anything you want.)
Maybe, before creating an action, experiment with the settings first and see what works best.
When you're satisfied, you can PRESS STOP (it's the rec button, which is now a square) and you can DOWNLOAD your action (downwards facing arrow, the last button next to the bin. Sorry, forgot to circle it) .
You need to download your action and then upload it on your photopea. When you do, a window will pop up and photopea will ask you whether you wish to load the action every time you open the program. You choose "Okay" and the action will be loaded in the storage.
When you want to sharpen your gif, you select all your frames, then you click on the Play button, and select the Action, NOT the folder, or it won't work.

Actions can also be created to more rapidly crop and convert your frames, but it doesn't always work on photopea (for me at least). The process is exactly the same, except once you start recording you 1) crop your gif as explained in step 4, 2) convert into frames. Then you stop the recording and download the action and upload it. This won't work for the Rasterize step by the way. Just the Animation -> Make Frame step.
7. COLORING
Now you can color your gif. I won't include a coloring tutorial simply because I use a different method for every tv show I gif for. You normally want to begin with a brightness or a curve layer, but sometimes I start with a Channel Mixer layer to immediately get rid of yellow/green filters (there's a tutorial for this particular tool which you will find in the list I mention in the link below)
[Plus I'm not really an authority on this matter as my method is generally... fuck around and find out. Two years of coloring and I still have no idea what I'm doing. 70% of the time.]
Simple Gif Coloring for Beginners -> very detailed + it includes a pretty handy list of tutorials at the bottom.
8. EXPORTING
Now you can export your gif. Some gifmakers export their (sharpened) gifs BEFORE coloring and then load the gifs on photopea to color them. I'm not sure it makes any difference.
FILE -> EXPORT AS -> GIF
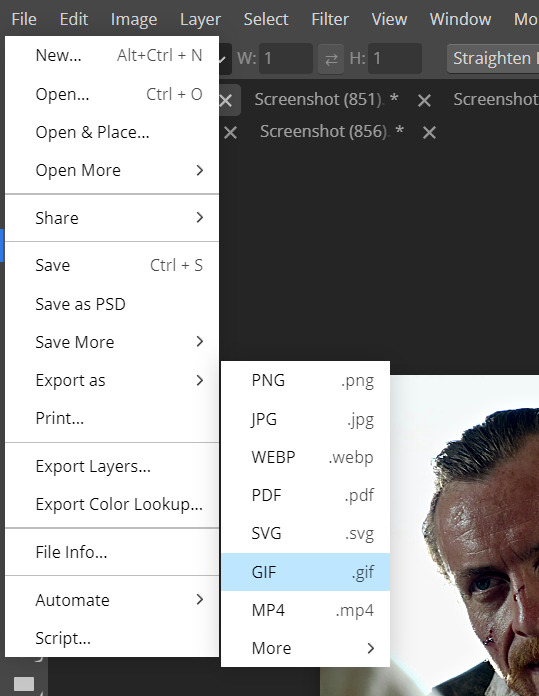
(not colored, just sharpened)
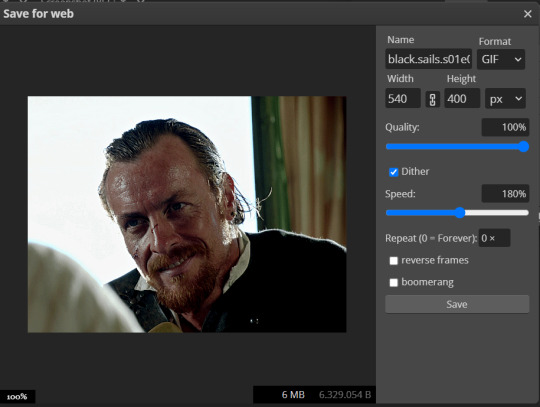
As you can see, unlike photoshop the exporting settings are pretty thread bare. The only option available is dither - it sometimes help with color banding - which, and I'm quoting from google for maximum clarity:
"refers to the method of simulating colors not available in the color display system of your computer. A higher dithering percentage creates the appearance of more colors and more detail in an image, but can also increase the file size."
SPEED
When you export your gif, it will play at a very decreased speed (100%). I usually set it at 180/190%, but as for every other tool, you might want to play around a little bit.
GIF SIZE/EZGIF OPTIMIZER (See Step 2)
And that's it.
P.S.: worth repeating
Save your work as often as you can, even while coloring or before exporting.
#photopea#my inbox is open if you have any questions <3#image heavy under the cut#photopeablr#tutorials#gif tutorial#allresources#photopea tutorial#completeresources#gifmaking
345 notes
·
View notes
Text

I couldn't fit the tutorial on a reply lmao, here's a full post explaining my process :]]
STAMP TUTORIAL (TF2 edition, but works for everything)
99% of the process is done on the website ezgif. Ezgif carries the stamp-making process lmao
1. Get your GIF
Tenor: Ok place to grab your GIFs. Average quality of the GIFs is good enough, and looks ok when resized to the size of the stamp. You'll find like 1 normal GIF every 4 buff characters GIF tho.
GIPHY: Average quality of the GIF is better (I don't think the web compresses the GIFs that are uploaded)… If you find what you're looking for. You'll have to SCROLL before finding what you're looking for because there are always non-related GIFs on the top of your searches or the same GIF multiple times, it's crazy.
makeagif: You will find cool GIFs, but the quality is pretty low (I think the web itself compresses the GIFs a lot). It looks bad even when resized down. And it has a watermark, which I recommend cropping because it's not even visible when resized, it just looks like a gray blob on the corner.
Google: Best option by far, quality is pretty good and the ratio of “things I was looking for/things I actually find” is SLIGHTLY in favor of “things I was looking for” (and most of “things I actually find” are just the characters rotating, not NSFW, so that's only a nice change from Tenor). You won't have to scroll much to see different and interesting GIFs. JUST REMEMBER TO FILTER BY GIFS.

You search whatever > Images > Tools > Type > GIF
Make it on your own: Aka, you download your video, go to ezgif's “Video to GIF” (then you can crop it, CUT IT. THIS IS IMPORTANT, YOU DON'T NEED TO GO ANYWHERE ELSE TO CUT YOUR CLIP, YOU CAN DO IT ON EZGIF ITSELF). Ok, I lied, it wasn't Google, this is the best oftion by far. You get exactly what you want, the best quality if you don't compress it much until after the GIF has been resized into the size of a stamp… It's just super time-consuming, and you'll have to spend like an entire hour just watching a video to find the clips.
OK, I HAVE MY GIF NOW
Hehe, his legs go pipupipu
2. Resize
Go to ezgif, this is where the fun begins (if you weren't on ezgif already). You download your GIF, or copy the link and insert it, or you'll have it there if you made it yourself.
A STAMP MAKES 99px × 56px
THE INNER PART OF THE STAMP MAKES 91px × 47px
I RECOMMEND MAKING YOUR GIF 92px × 48px
BTW, THESE MEASURES ARE FOR THE TEMPLATE I'LL GIVE YOU LATER. If you use another template, just go to an image editor and see what the inner size of the stamp is.
So, you set your GIF's width to 92px.

Then crop it, so your height is 48px.

Or you can resize it so it's directly 92px × 48px, but the crop will be in the center, and SOMETIMES YOU DON'T WANT THAT.
For example:

It's a vertical GIF whose area of interest is not in the center, so if we resize it directly-

oops-
ANYWAY
Once you have your GIF resized:
IMPORTANT: BEFORE THE NEXT STEP, REMEMBER TO CONVERT TO GIF IF THE FILE YOU'RE WORKING ON ISN'T A GIF ALREADY
Sometimes you'll be working with a webp without even noticing (EW, I hate webp) and transparencies don't work particularly well with that extension.
3. Overlay

Click on this icon.
Ok, now that that's fixed:

Extend the size of the canvas.

Select your template and Upload image!

This is the template, btw.

Then move the overlay around until it contains the GIF nicely, or just set Left to 43, Top to 20 and Generate image! (I have these numbers memorized, it saves you like 20 seconds lmao)
Also, again, these numbers work on MY template, if you use another one, you'll have to figure it out yourself.
4. Crop

THIS OPTION IS A TIME-SAVER FR
5. Optimize (optional, highly recommend)

I always set my optimization method to Lossy GIF and level 10 because I find that there is no quality loss, and the file size might drop by 30%-70% (actually crazy). These percentages don't change much in higher compressions, even though you'll start seeing a drop in quality around level 35 of compression (the default).
6. Save

YIPPE!!! Your stamp is done :D
You can save it and look at it and place it on your profile or website.


Here it is btw, in case someone wanted it :]]
The Sniper GIF but correctly cropped and made into a stamp as well.
Now do that another… eleven times, and you'll have a stamp pack to make into a Tumblr post... Oof TT
There's no website that lets you make stamps faster lmao (I wish)
@sir-broken-bones (I'm @ them so they actually see it, I made this tutorial for them after all lol)
#team fortress 2#tf2#tf2 scout#tf2 sniper#stamps#da stamps#tutorial#graphics#old graphics#neocities#old web graphics#old web
69 notes
·
View notes
Text
Welcome to Our Image Compression Tool
Effortlessly compress and resize your images while maintaining high quality. Optimize your images for faster load times, reduced bandwidth, and better user experience. Our tool is easy to use and completely free!
Our Image Compression Tool is designed to simplify the process of optimizing images for various purposes. Whether you're a web developer aiming for faster load times or a designer looking to conserve bandwidth without compromising quality, our tool offers a seamless solution. With just a few clicks, you can compress and resize your images while ensuring they retain their visual appeal. Explore the features below to see how our tool can enhance your digital projects.
76 notes
·
View notes
Text
I don't think androids store memories as videos or that they can even be extracted as ones. Almost, but not exactly.
Firstly, because their memories include other data such as their tactile information, their emotional state, probably 3d markers of their surrounding...a lot of different information. So, their memories are not in a video-format, but some kind of a mix of many things, that may not be as easily separated from each other. I don't think a software necessary to read those types of files are publicly available.
Even if they have some absolute massive storage, filming good-quality videos and storing them is just not an optimal way to use their resources. It's extremely wasteful. I think, instead, their memories consist of snapshots that are taken every once in a while (depending on how much is going on), that consist of compressed version of all their relevant inputs like mentioned above. Like, a snapshot of a LiDAR in a specific moment + heavily compressed photo with additional data about some details that'll later help to upscale it and interpolate from one snapshot into the next one, some audio samples of the voices and transcript of the conversation so that it'd take less storage to save. My main point is, their memories are probably stored in a format that not only doesn't actually contain original video material, but is a product of some extreme compression, and in this case reviewing memories is not like watching HD video footage, but rather an ai restoration of those snapshots. Perhaps it may be eventually converted into some sort of a video readable to human eye, but it would be more of an ai-generated video from specific snapshots with standardised prompts with some parts of the image/audio missing than a perfectly exact video recording.
When Connor extracts video we see that they are a bit glitchy. It may be attributed to some details getting lost during transmission from one android to another, but then we've also got flashbacks with android's own memories, that are just as "glitchy". Which kinda backs up a theory of it being a restoration of some sort of a compressed version rather than original video recording.
Then we've also got that scene where Josh records Markus where it is shown that when he starts to film, his eyes indicate the change that he is not just watching but recording now. Which means that is an option, but not the default. I find it a really nice detail. Like, androids can record videos, but then the people around them can see exactly when they do that, and "be at ease" when they don't. It may be purely a design choice, like that of the loading bar to signalise that something is in progress and not just frozen, or mandatory shutter sound effect on smartphones cameras in Japan.
So, yeah. Androids purpose is to correctly interpret their inputs and store relevant information about it in their long term memory, and not necessarily to record every present moment in a video-archive that will likely never be seen by a human and reviewed as a pure video footage again. If it happened to be needed to be seen — it'll be restored as a "video" file, but this video won't be an actual video recording unless android was specifically set to record mode.
117 notes
·
View notes
Note
I hope you don't mind me asking. But how do you create PDF files that you can search through them? Your method is so unique, so I'm curious.
Hi anon!
After I scan a book and have a PDF saved, it can’t be searched. It has to be edited and made that way. So I open it up in Adobe Acrobat. There’s a tool called “Optimize PDF” which has a lot of different features you can fine tune the settings of but essentially what it does is:
Straighten out the text to be perfectly horizontal and level (I try to scan two pages at a time then crop, so raw scans can be a little wonky)
Recognizes the text on the page (which allows key word search, highlighting, commenting, everything you can do with a word document)
Reduces file size (I scan at 300 or 400 dpi, which makes a sharp image, but a huge file, so this compresses it to be easier to store and share)
I find this aspect of scanning to be very valuable, personally, as it can make researching and referring back much easier. Even though I’ve already read these books, searching through for a specific scene is vastly more efficient when you can pinpoint the exact sentence based on a remembered phrase. It’s also nice to be able to highlight those to emphasize a point. Furthermore by reducing the file size it’s much easier to share the information with others. I’m able to attach files to messages without going over limits and I can open the books right from the google drive mobile app wherever I go.
Like if I’m out and about wondering just how much Cherith Baldry loves Kay, I can crack open Exiled From Camelot and do this
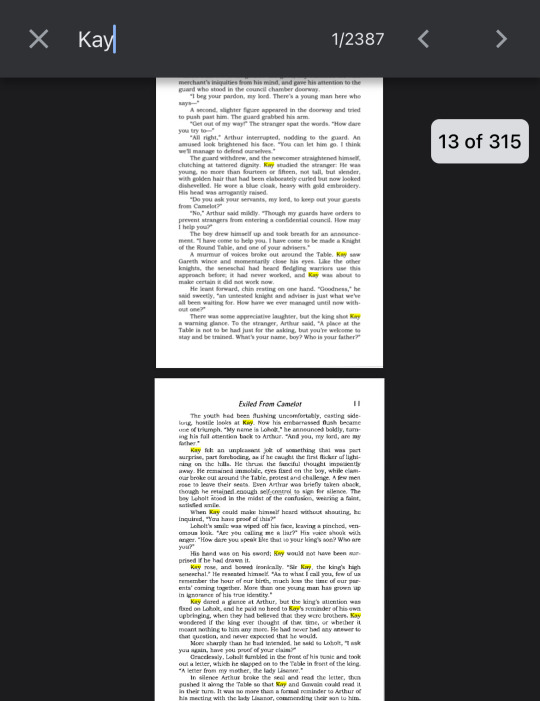
2,387 mentions of Kay? Yeah. He’s kind of a big deal. ;^)
But real talk accessibility is an important aspect of my archival work. I try to provide the best version of a scan I can with my limited resources because I don’t know that the book will survive otherwise. Ruth PM Lehmann has passed away, so scanning Blessed Bastard, which only had a limited printing to begin with and now lacks a beneficiary, felt significant to me. The same goes for Peter Hanratty’s The Book of Mordred, which is an English translation of a German story and hasn’t been in print for decades. As for medlit, La Tavola Ritonda and my janky scanner tested my will to live but it ended up being so worth it to see everyone’s thoughts on it! I couldn’t find PDFs of these texts available anywhere, so I wanted to make sure they were preserved in the most accessible state possible for everyone to enjoy.
Anyway I hope that answers your question. I’ve got two books on the way I’m going to scan next and looking forward to sharing! :^) Take care.<3
#arthurian preservation project#exiled from camelot#cherith baldry#blessed bastard#ruth pm lehmann#the book of mordred#peter hanratty#la tavola ritonda#arthurian legend#ask#anonymous
31 notes
·
View notes
Last Seen Blogs

titobafev
Untitled

neurotic-xcontrolfreak-blog
Want some Tea?

archicad-24-crack-5f
🏅 archicad 24 crack only download Archives - Download Pro Cra
emjoy398
Oh! Hippopotomodes!

persi-tra-noi
𝑁𝑂𝐼