#lossless image compression
Explore tagged Tumblr posts
Visit Tumblr Blog
Explore Tumblr blogs with no restrictions, modern design and the best experience.
Last Seen Tumblr Blogs


Fun Fact
130K people were victims of a chain letter scam that affected Tumblr in May 2011.
Text
0 notes
Text
Bluetooth earbuds have convinced the public that 'lossless audio' is somehow expensive tech for true audiophiles when literally if you listen to a CD player with wired headphones you're getting lossless audio
#also lossless audio is the same as like. a .png file#it's possible to have a low quality .flac in the same way it's possible to have a low resolution .png#algorithmic compression isn't the only way to make a tiny#shitty image
9 notes
·
View notes
Text
I attract giant transgender mango 🥭🏳️⚧️🦑 to my LITTLE life. I manifest joyful and pleasuntly misty produce aisle experiences 🌬️🥝. I am freshly squeezed 🧃, and all my entire days are full with FRUIT gleefulness🌴😊. I sit atop my massive JPG prince throne 🤴, for I am Prince Wikimango of uncorrupt JPG monarchy 🏳️⚧️🏳️⚧️🏳️⚧️
TYPE “YES” TO RECEIVE 100,000 TROPICAL FRUIT NOW
Reblog to give a trans person a fresh and perfectly ripe mango wait huh

It's the wikipedia image??? How big could it be

What

Huh???
110K notes
·
View notes
Text
This is how you know it's going to be a high quality CBZ file.

I really should add in some jpeg or webp compression huh?
#fyi this happens mostly when the pdfs I'm extracting aren't using lossless images inside the pdf#so that lack of compression is because the compression artifacts already present are inflating the lossless png extraction I'm doing#:p
0 notes
Text
Found it
: 3
#there's no button to change the part of the image that the pfp focuses on so get used to loong neck#I remember when I first drew it thinking that everything was so well proportioned but the second I started making it my pfp I saw neck long#rip max tag size#just means if I really want to run on in one I get to optimize for space and do some compression instead of going lossless#also enjoy the blinding colours of my blog now I have the default command prompt on all of my machines be those colours so I'm used to it#I also realized I have just about zero clue how tumblr actually works but like that's ok I don't care that much
0 notes
Text
Optimize with Ease: ImageOptim
ImageOptim is a powerful online tool crafted to optimize and compress images, enhancing website performance and reducing load times. With its straightforward interface and effective optimization algorithms, it offers users a convenient solution to enhance their online content effortlessly. Features: Lossless and lossy image compression options Batch processing for optimizing multiple images…
View On WordPress
#Batch Processing#Compressor#Image Optimization#Image Optimizer#Imageoptim#Integration#Lossless Compression#Online Tool#Photo
0 notes
Text
#WebP#Image format#Compression#Overview#Explained#How it works#Comparison#WebP vs other formats#Lossless#Lossy#Browser support#Efficiency#Quality#WebP advantages
1 note
·
View note
Text
Trans girl invents new lossless image format
Over the course of a couple of days I put together something pretty significant: a new image format and compression technique. I'm calling it ShrinkRay (the extension being .sr) and it is made for a more efficient representation of pixel art. With this image: https://www.tumblr.com/potionslushie/759045761554055168/ as a test it compresses ~17% better then png and when converted back to png it still has some (albeit smaller) compression gains. Additionally since part of the compression is indexing colors I was able to trivially implement palette swapping with palette files (so far .hex only which means a lot of Lospec palettes).
So what does this have to do with p2chat? Well the compression gains will make sending and receiving chat images significantly faster but also the recommended limitations of ShrinkRay: maximum 256x256 px (with a scaling factor), maximum 10 colors including black and white as presets, will form the basis for p2chat's prototype limitations.
Whats next: cleaning up the code, documenting it, running further tests and putting up a repository. Later on though I have further compression ideas regarding simple shape implementation and a layer/frames system that's highly optimized. Though I'll be doing more important PierMesh work before that.
All that said I'll leave you with one last detail: all the code for this comes in at just under 128 lines.
Addition: it now supports animation/layers
363 notes
·
View notes
Note
this is a little random so i hope it isn't too much of a bother...i was wondering if you had any tips for preserving image quality when you post art?
there's not much you can do about image compression on socmed sites... but you can try:
check overall image resolution - i usually post images in the 1000px - 2000x range for any single side
diff btwn jpg (lossy) and png (lossless) file formats - jpgs discard unnecessary data resulting in smaller file sizes than png, but can lose image quality; conversely, pngs retain all data and result in larger file sizes, but support transparency and sharper quality and colors
i heard before that twt/tmblr compress images over 1mb. i don't know if that's actually true though.
save a websize version (72 dpi) - that's just so it's harder to take and print stuff if you don't wish for ur art to be used that way
depending on your drawing program (e.g. photoshop) it might have options for the quality/compression level when you save your image. if this is an option on csp i don't know how to find it yet lol
#ASK EVER#frankly i gave up on trying to keep my files under 1mb a long time ago#whatever you see is whatever twtbskytmblr have decided that image should look like
90 notes
·
View notes
Note
top five file formats :3
5. .tar – I've come to appreciate it more after all these years on linux. I like how it preserves file system parameters.
4. .obj – Among 3D geometry formats, is straight up just a text file. I admire the panache of that. Great for when you want to generate objects dynamically in a pinch, quite reliable for what it does.
3. .mkv – Versatile, easy to use. What else is there to say? Soft-subbed anime package my beloved.
2. .png – It's lossless, it's transparent, It compresses quite well for some large uniform images.
1. .gif – The moving image, to which I owe everything. Dang thing is almost 40 years old, still nobody quite does it like her. Has limitations, sure, but that only serves to better foster creativity in the user, to engender an appreciation for each and every color in the palette. Also, did you know that GIFs can be much lighter than even PNGs, for very small icons and images?
97 notes
·
View notes
Text
I just realised they changed the photo file format from png to jpeg in this 1.5 version... That literally changes the quality of your Infinity Nikki photo.
For those that are unaware:
PNG compression is Lossless, meaning no image quality is lost. JPEG compression is Lossy, meaning there will be quality loss in order to reduce file size.
TLDR: Infinity Nikki Photo file quality is worse now...
#i cant believe that papergames once again did a shady move that i just realised#the lack of transparency by them is really concerning...#infinity nikki
12 notes
·
View notes
Text
Tidbit: The “Posterization” Effect of Panels Due to the Consequences of GIF Color Quantization (and Increased Contrast (And Also The Tangential Matter of Dithering))
There’s this misconception that the color banding and patterned dithering found in panels is an entirely deliberate, calculated effect Hussie manipulated the image into looking with some specific filter, but this isn’t the case, exactly. It wasn’t so much a conscious decision he took but rather an unavoidable consequence of the medium he partook in: digital art in an age where bandwidth and storage was at a premium.
Not to delve too deeply into the history and technicalities of it, but the long and the short of it is back in the early nineties to late aughts (and even a bit further into the 10s), transferring and storing data over the web was not as fast, plentiful, and affordable as it is now. Filesize was a much more important consideration than the fidelity of an image when displaying it on the web. Especially so when you’re a hobbyist on a budget and paying for your own webhosting, or using a free service with a modest upload limit (even per file!). Besides, what good would it be to post your images online if it takes ages to load them over people's dial-up Internet? Don't even get me STARTED on the meager memory and power the average iGPU had to work with, too.

The original comic strip's resolution was a little more than halved and saved as a GIF rather than a large PNG. That's about an 82.13% reduction in filesize!
So in the early days it was very common for people to take their scans, photographs, and digital drawings and scale them down and publish them as smaller lossily compressed JPEGs or lossless GIFs, the latter of which came at the cost of color range. But it had a wider range of browser support and the feature to be used for animations compared to its successor format, PNG ("PNG's not GIF").
You'd've been hard-pressed to find Hussie use any PNGs himself then. In fact, I think literally the only times he's ever personally employed them and not delegate the artwork to a member of the art team were some of the tiny shrunken down text of a character talking far in the distance and a few select little icons.
PNGs support semi-transparency unlike GIFs, which is why Hussie used them to preserve the anti-aliasing on the text without having to add an opaque background color.
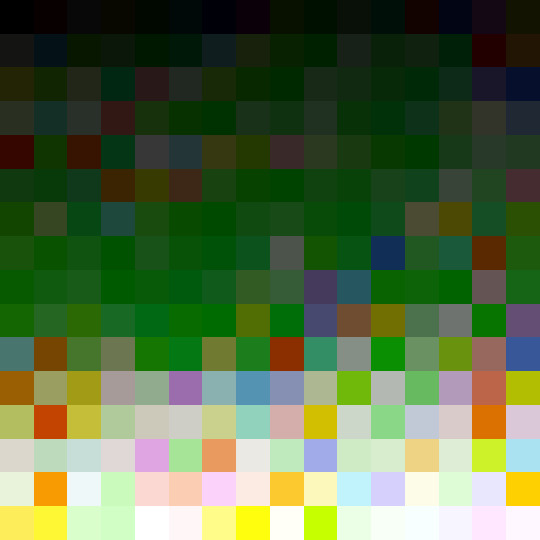
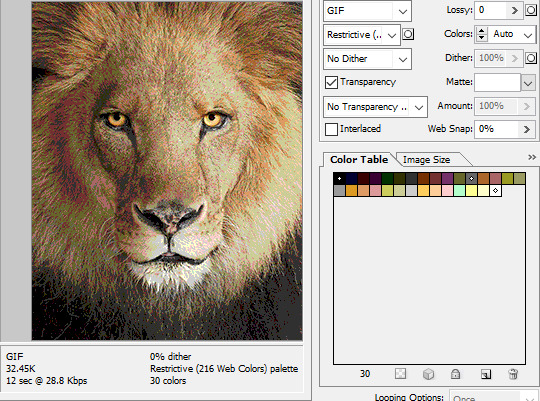
While PNGs can utilize over 16 million colors in a single image, GIFs have a hard limit of 256 colors per frame. For reference, this small image alone has 604 colors:

For those who can't do the math, 256 is a pretty damn small number.
Smaller still were the palettes in a great deal of MSPA's panels early on in its run. Amazingly, a GIF such as this only uses 7 colors (8 if you count the alpha (which it is)).

Not that they were always strictly so low; occasionally some in the later acts of Homestuck had pretty high counts. This panel uses all 256 spots available, in fact.
If he had lowered the number any smaller, the quality would have been god-awful.
To the untrained eye, these bands of color below may seem to be the result of a posterization filter (an effect that reduces smooth areas of color into fewer harsh solid regions), but it's really because the image was exported as a GIF with no dithering applied.

Dithering, to the uninitiated, is how these colors are arranged together to compensate for the paltry palette, producing illusory additional colors. There are three algorithms in Photoshop for this: Diffusion, Pattern, and Noise.

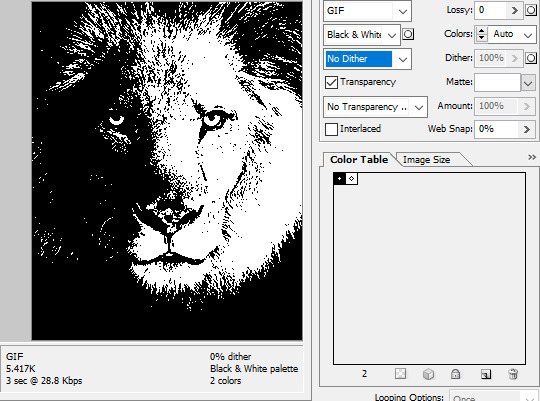
Above is the original image and below is the image reduced to a completely binary 1-bit black and white color palette, to make the effect of each dithering algorithm more obvious.

Diffusion seemingly displaces the pixels around randomly, but it uses error diffusion to calculate what color each pixel should be. In other words, math bullshit. The Floyd-Steinberg algorithm is one such implementation of it, and is usually what this type of error diffusion dithering is called in other software, or some misnomer-ed variation thereof.
The usage of Pattern may hearken back to retro video game graphics for you, as older consoles also suffered from color palette limitations. Sometimes called Ordered dithering because of the orderly patterns it produces. At least, I assumed so. Its etymological roots probably stem from more math bullshit again.
True to its name, Noise is noisy. It’s visually similar to Diffusion dithering, except much more random looking. At least, when binarized like this. Truth be told, I can’t tell the difference between the two at all when using a fuller color table on an image with a lot of detail. It was mainly intended to be used when exporting individual slices of an image that was to be “stitched” back together on a webpage, to mitigate visible seams in the dithering around the edges.
To sate your curiosity, here's how the image looks with no dithering at all:
People easily confuse an undithered gif as being the result of posterization, and you couldn't fault them for thinking so. They look almost entirely the same!
Although I was already aware of this fact when I was much younger, I'm guilty of posterizing myself while editing images back then. Figured I may as well reduce the color count beforehand to help keep the exported GIF looking as intended. I view this as a complete waste of time now, though, and amateurish. Takes away a bit of the authenticity of MSPA art, how the colors and details are so variable between panels. As for WHY they were so variable to begin with, choosing the settings to save the image as requires a judicious examination on a case-by-case basis. In other words, just playing around with the settings until it looks decent.
It's the process of striking a fine balance between an acceptable file size and a "meh, good enough" visual quality that I mentioned earlier. How many colors can you take away until it starts to look shit? Which dithering algorithm helps make it look not as shit while not totally ruining the compression efficacy?
Take, for example, this panel from Problem Sleuth. It has 16 colors, an average amount for the comic, and uses Diffusion dithering. Filesize: 34.5 KB.

Then there's this panel right afterwards. It has 8 colors (again, technically 7 + alpha channel since it's an animated gif), and uses Noise dithering this time. Filesize: 34.0 KB.
The more colors and animation frames there are, and the more complicated dithering there is, the bigger the file size is going to be. Despite the second panel having half the color count of the first, the heavily noisy dithering alone was enough to inflate the file size back up. On top of that, there's extra image information layered in for the animation, leaving only a mere 0.5 kilobyte difference between the two panels.
So why would Hussie pick the algorithm that compresses worse than the other? The answer: diffusion causes the dithering to jitter around between frames of animation. Recall its description from before, how it functions on nerd shit like math calculations. The way it calculates what each pixel's color will be is decided by the pixels' colors surrounding it, to put it simply. Any difference in the placement of pixels will cause these cascading changes in the dithering like the butterfly effect.
Diffusion dithering, 16 colors. Filesize: 25.2 KB
This isn't the case with Noise or Pattern dithering, since their algorithms use either a texture or a definite array of numbers (more boring nerd shit).
Noise dithering, 16 colors. Filesize: 31.9 KB
Pattern dithering, 16 colors. Filesize: 23.1 KB
There's a lot more I'd like to talk about, like the different color reduction algorithms, which dither algorithms generally compress better in what cases, and the upward and downward trends of each one’s use over the course of a comic, but since this isn’t a deep dive on GIF optimization, I might save that for another time. This post is already reaching further past the original scope it was meant to cover, and less than 10 images can be uploaded before hitting the limit, which is NOWHERE near enough for me. I should really reevaluate my definition of the word “tidbit”… Anyway, just know that this post suffers from sample selection bias, so while the panels above came from an early section of Problem Sleuth that generally had static panels with diffusion dithering and animated panels with noise dithering, there certainly were animated panels with diffusion later on despite the dither-jittering.
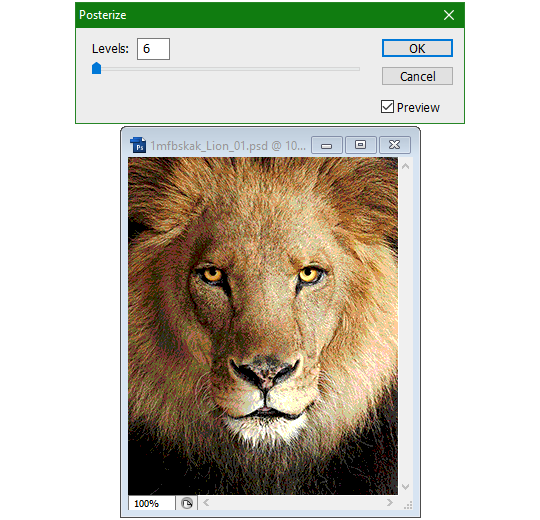
Alright, time to shotgun through the rest of this post, screw segueing. Increasing the contrast almost entirely with “Use Legacy” enabled spreads the tones of the image out evenly, causing the shadows and highlights to clip into pure black and white. The midtones become purely saturated colors. Using the Levels adjustment filter instead, moving both shadow and highlight input level sliders towards the middle also accomplishes the same thing, because, you know, linear readjustment. I'm really resisting the urge to go off on another tangent about color channels and the RGB additive color model.
Anyway, there aren't any examples in MSPA that are quite this extreme (at least in color, but I'll save that for a later post), but an image sufficiently high in contrast can be mistaken for being posterized at a glance. Hence the Guy Fieri banner. In preparation for this post, I was attempting to make a pixel-perfect recreation of that panel but hit a wall trying to figure out which and how many filters were used and what each one's settings were, so I sought the wisdom of those in the official Photoshop Discord server. The very first suggestion I got was a posterization filter, by someone who was a supposed senior professional and server moderator, no less. Fucking dipshit, there's too much detail preserved for it to be posterization. Dude totally dissed me and my efforts too, so fuck that moron. I spit on his name and curse his children, and his children's children. The philistines I have to put up with...
In the end, the bloody Guy Fieri recreation proved to be too much for me to get right. I got sort of close at times, but no cigar. These were some of the closest I could manage:

You might be left befuddled after all this, struggling to remember what the point of the blogpost even was. I had meant for it to be a clarification of GIFs and an argument against using the posterization filter, thinking it was never used in MSPA, but while gathering reference images, I found a panel from the Felt intermission that actually WAS posterized! So I’ll eat crow on this one... Whatever, it’s literally the ONE TIME ever.

I can tell it's posterization and not gif color quantization because of the pattern dithering and decently preserved details on the bomb and bull penis cane. There would have had to have been no dithering and way fewer colors than the 32, most of which were allotted to the bomb and cane. You can't really selectively choose what gets dithered or more colors like this otherwise.
Thank you for reading if you've gotten this far. That all might have been a lot to take in at once, so if you're still unclear about something, please don't hesitate to leave a question! And as always, here are the PSDs used in this post that are free to peruse.
371 notes
·
View notes
Text
This is a total shot in the dark, but is anyone familiar with Figma?
I'm trying to export some pages on Figmas for an art book as PDFs, but all the raster image artwork in the PDF are coming out as JPEGs instead of PNGs, which is causing distortion/compression/artifacting in them. I know it's possible to export PDF with PNG raster images because I did it last year for a previous book––it was completely lossless––but I can't seem to do it now.
I specifically need it as a PDF export because I need the text to stay vectors.
#ask you#personal#delete later#i know figma's not for print design but we've been using it for years and other options cost money
72 notes
·
View notes
Note
Aspiring artist here and super new to it, and absolutely no pressure, but I was wondering how you go about sizing your comics for best quality + sharing? Your art is always so CRISP and gorgeous what's ur secret to defeating the Compression Gods *eyes emoji*
Hahaha, I don’t really have a lot of Hot Tips but I’ll do my best.
When I’m laying out my canvas for a comic I’ll usually go by pixel and start with 850X9000. When I tried doing a little Webtoon for a minute the images they let you upload are 850x1100, and that’s really close to phone screen size so it’s a good starting place to make art for that size specifically.
I draft the comic by just handwriting and sketching out panels without worrying about spacing. Once I have a draft I’ll go through and organize it better, I start with speech bubbles cause they always take up a ton of room. Then I add panel frames and often I’ll move the sketches around to accommodate the speech bubbles.
Finally I go through and chop up the comic by cropping down on the panels I want to include for each image and saving it as a png which is a lossless format. I’ve varied the size I crop to depending on how long a comic is. Sticking around 1100 pixels tall is best because again it’s close to phone screen size and your art won’t get too crunchy.
Then I post it!
For non comics I make things very pixel dense, like 6000x6000 or more and always try to save as PNG. JPEG is a format that will always lose some data every time you copy and paste it, so some artists post those on purpose to make sure people can’t easily make off with their art. I’m a ding dong and I just post the high resolution most of the time cause ¯\_(ツ)_/¯.
Once I have a finished piece I’ll make a blank black panel at 850x1100 to position over the art and that’s what I crop down to to make closeups.
36 notes
·
View notes
Text
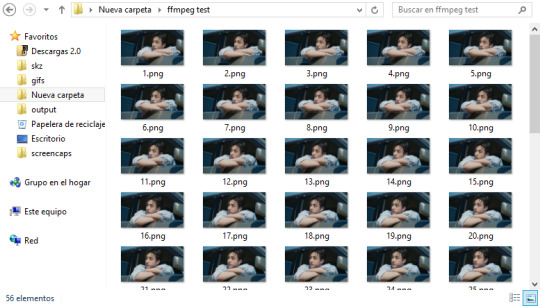
screencapping with ffmpeg
hey friends, long time no write! today i'm gonna explain how to get image sequences (aka screencaps) from any video files using ffmpeg in the command line.
First, if you don't have ffmpeg please go an download from HERE and install it, here's how WINDOWS / MAC and once you're good to go we can start!
i have a windows os so i'm going to explain for that but i don't think it should be more complicated for macs if you know how to work on the command line, under the read more bc i used a lot of images lol
what we need:
a video player to get the proper timestamps we need, i use mpv but any video player will help tbh
make a folder for our screencaps
okay! so i'll be taking caps from a 4k video and i find my timestamps, this is my start (i don't have 4k movies on my computer, so you'll see my kpop boy lmao)

and this is the ending
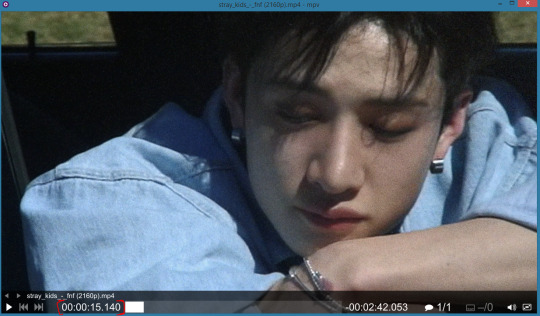
i would recommend to set the timestamps a second earlier and a second after the video ends so there isn't frames missing if you want a complete scene, deleting caps from a folder is easier than doing the whole process again lol
on the folder your video is while having it selected, click on this icon to copy its path

now i go to the folder i made! in the path bar it should be like this on windows

we click on the blank part and write cmd and hit enter

the command line should open right now
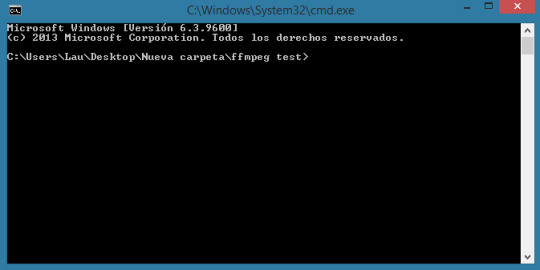
we proceed to write the following command
ffmpeg -ss hh:mm:ss -to hh:mm:ss -i [paste path to the video] -compression_level=0 output_%04d.png
hh:mm:ss is how you imput your timestamp, it's the most accurate way of doing it
output_%04d.png: name the files will have, if you're capping several timestamps from the same video i would change the name output to anything (example part1_%04d.png for scene 1, part2_%04d.png for scene 2 and so on) otherwise ffmpeg will overwrite your caps every time, i know there's probably a workaround but i haven't researched to that point yet, i'll update later!
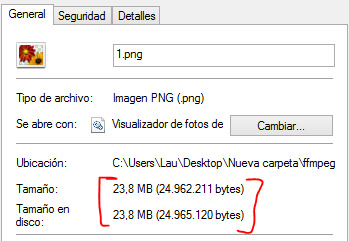
compression_level=0 : makes the png the highest quality possible, pngs are essentially lossless, but without this command i've found the file size is rather small even if the finished image doesn't have much difference. you could try not putting the command and see if there's a difference for you, the files will just be smaller
Update (240402): my ffmpeg doesn't seem to recognize the command for compression level as it's written here anymore, but fear not! If yours doesn't either it's just a matter of adding a space instead of an equal sign between the command and the 0. It works as it's supposed to!
on your command line should look like this

you hit enter and ffmpeg should start processing, once it's done it'll open a new line for you to keep doing things on that folder, but if you don't want to do anything else just close it. your folder should be filled now with your screencaps
to compare, i capped the same scene with mpv to see if there was any frame drop and i was pleasantly surprised that the amount of caps was basically the same (there wasn't frame dropping! just the regular more frames bc you were a little slow on stopping the process on mpv)
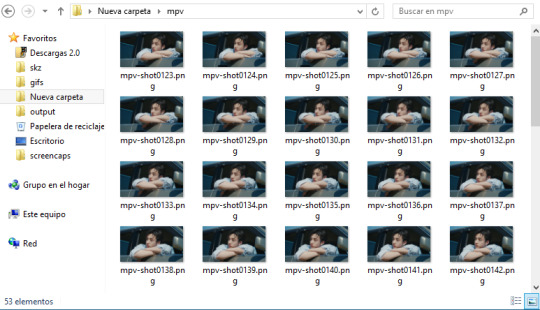
and the size is what mpv usually gives when screencapping too so it was a win for me
if you have any doubts ask me! or if you know more about ffmpeg and want to add on to the command i shared please do!
37 notes
·
View notes
Text
Frequently asked questions:
[Anything related to dual-booting]
Shit idk I have literally never dual-booted. I have never dual-booted Linux and Windows, I have never dual-booted Linux and other Linux, and I have never dual-booted Linux with any BSD distro. My condolences for any struggles you may experience in your journey, of putting two operating systems on one computer.
What do you have against physical media?
Putting aside for a moment that as a pedant I am not a huge fan of the term (all storage is physical storage, but I understand the intended meaning) nothing in particular. There are some major disadvantages compared to sticking shit on a hard drive but by the same token, there are some notable advantages depending on the situation.
The actual problem I have is that the conversations around this topic around these parts are ill-informed and I wish people would stop having them in my notes. If you are going to say something along the lines of "physical is forever" (inaccurate: x, x, x, x, etc) please either distill that into a more accurate statement or put it on your own posts instead of mine. If you are going to tout physical as a format that is safer from DRM consider not doing that. Thank you.
Why are you a defender of the .webp format?
webp offers significantly smaller filesizes compared to the older png and jpeg formats, and it's a versatile format with the option of lossless compression (like pngs), lossy compression (like jpegs) as well as animation (with very significant filesize reduction compared to gifs)
So you can get smaller filesizes on images with larger dimensions or more detail, allowing for one to have both faster-loading webpages and fancier graphics at the same time. While some image editors and defunct operating systems still do not natively support webp display, the number of major image editors with zero support is increasingly small and at some point support for dated systems needs to take a backseat to consideration for the bandwidth of users with slow internet and/or data caps. PNG used to not have wide support either and it's a well-liked format now.
Links of interest: nuwen.net png introduction, webp vs png comparison by tumblr user breadstyx
(I link the nuwen png page as an example of how and why we've made transitions like this in posting images on the web before! It can be a bit awkward and painful, but the benefits are worth it)
About Me:
Haver of Ritsu Syndrome (Instead of brain, there is Ritsu Shikishima from Caligula (anime))


VNs on my hill: Sweet Pool, Masquerade, Flowers, NO, THANK YOU!!!, Hanachirasu
Currently reading: Lkyt., Fate/Stay Night, Full Metal Daemon Muramasa, Tsukihime, Slow Damage
Plan to read: LipTrip ~My Boss Is My Heat Suppressant?!~
40 notes
·
View notes