#Inseam Pocket Tutorial
Explore tagged Tumblr posts
Visit Tumblr Blog
Explore Tumblr blogs with no restrictions, modern design and the best experience.
Last Seen Tumblr Blogs


Fun Fact
Tumblr.com rank in the US is 25.
Text
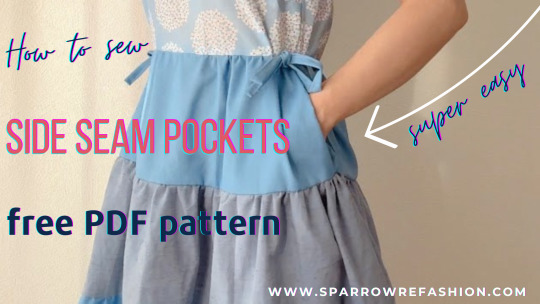
Pocket Sewing Pattern in Side Seam: to Dresses and Skirts + PDF
In this post, you will learn how to use my free pocket sewing pattern and sew side seam dress pockets with an ease. Are you looking to infuse functionality with style in your wardrobe? Discover the art of pocket creation with my free pocket sewing pattern. This oversized, inseam pocket is not just a trendy addition; it’s a practical enhancement for your favorite dresses and skirts. Whether…
View On WordPress
#Beginner Sewing Projects#DIY Dress Pockets#Dress customization#fashion DIY#Free Sewing Pattern#How to Add Pockets#Inseam Pocket Tutorial#Pocket Sewing Pattern#sewing tips and tricks#Side Seam Pocket Guide
12 notes
·
View notes
Text
How to extend the already existent "pockets" on your jeans:
https://www.instructables.com/How-to-Extend-Your-Pants-Pockets/
An alternate tutorial from the same site if you need to ADD pockets:
https://www.instructables.com/sew-new-pockets-in-jeans/
How to add pockets to any skirt PATTERN (you make the skirt yourself but bonus that you can exactly match the fabrics. Once again remove spaces when putting into search bar):
Adding pockets to skirts or dresses:
(Sewing machine required on tut but you can prob see it by hand too. Remove spaces it kept making it a picture and not a link like I wanted)
https :// weallsew .com/ how-to-add-pockets-to-a-dress-or-skirt/
Adding pockets to any skirt PATTERN (this means you're making the skirt yourself from scratch. Once again remove spaces when putting into search bar):
https:// seekatesew .com/ sewing-101-adding-pockets-to-any-skirt-pattern/
How to add in seam pockets to "any" garment, so claims this article. Do I know what inseam pockets are? No. Don't care POCKETS FOR ALL. And for the final time, remove the spaces:
https:// www.tillyandthebuttons. com/2017/10/ how-to-add-in-seam-pockets-to-garment .html?m=1
Remember, when first trying any of these tutorials, use a garment you don't care if you accidentally fuck up, or one you know you can repair easily. You don't want to ruin your favorite pants, skirt, or dress during your practice runs. Also maybe don't use a sentimental item either, like your mother wedding dress or use it on your prom dress last minute. I can't control you but I feel that's probs a bad idea.

25K notes
·
View notes
Text
The Ultimate Jeans Sewing Pattern: Make Your Own Jeans with Stitch Perfect

In a world dominated by mass-produced fashion, the quest for individuality propels many to explore unique avenues of self-expression. Designing your own men’s jeans is a remarkable opportunity to showcase your style, and at Stitch Perfect, we elevate this experience by offering tailored denim creations that resonate with your uniqueness.
Choosing the Right Fabric:
As a jeans manufacturer, Stitch Perfect takes pride in the quality of denim used in every pair of jeans. Denim comes in various weights, weaves, and compositions, each contributing to the overall look and feel of the final product. Whether you prefer a classic, heavier weight for durability and warmth or a lighter weight for a more casual vibe, our extensive range caters to diverse preferences.
The Fitting Process:
Precision is paramount when it comes to creating a pair of jeans that fits like a second skin. Our skilled artisans at Stitch Perfect emphasize the importance of accurate measurements for the waist, hips, inseam, and thighs. For a truly bespoke experience, we encourage you to consult with our professional tailors or follow our detailed online guides for self-measurement. If crafting jeans as a gift or for someone else, effective communication about body shape and style preferences ensures a tailored fit that aligns seamlessly with the wearer’s unique style.

The Crafting Process:
For those less experienced in the art of crafting, our online customization services offer a seamless process. Submit your design, measurements, and fabric choices, and let our professionals handle the rest. DIY enthusiasts can also find a wealth of resources, tutorials, and patterns online, empowering them to take on the challenge of creating jeans that tell their unique story.
Let’s present those customization options in a varied way
Pockets: Opt for a personalized pocket arrangement — whether it’s adding coin pockets for functionality or embracing a sleek look with fewer pockets.
Button-Fly: Make a style statement by choosing between the timeless button-fly for a classic touch or the modern convenience of a zipper closure.
Stitch Craft: Infuse personality into your jeans with a play of contrasting or harmonious stitching. Consider a double or triple stitch for both durability and a dash of flair.
Metalworking: You can add a touch of sophistication to your jeans by opting for custom metal finishes for buttons and rivets. You can choose from brass, copper, or silver to complement your jeans’ overall aesthetic.
Distressing: Tailor the level of distressing or fading to suit your taste. Whether it’s a pristine pair or a vintage, worn-in look, this customization adds a unique character to your jeans.
Feel free to mix and match these options to create jeans that truly reflect your style! If you have any more questions or need further assistance, let me know.

Stitch Perfect stands as your go-to jeans manufacturer and wholesale jeans supplier in Mumbai, India. Our commitment to quality, customization, and sustainable practices makes us the preferred choice for B2C businesses seeking distinctive denim creations. From crafting your own jeans to exploring our wholesale jean jackets collection, Stitch Perfect is your partner in fashioning a wardrobe that speaks volumes about your style.
At Stitch Perfect, we redefine denim fashion by providing cutting-edge designs that resonate with the latest trends in the market. Our commitment to innovation ensures that each pair of denim jeans tells a unique story, blending contemporary aesthetics with timeless comfort. Discover the perfect blend of style and substance with our trendy denim designs that set you apart in the fashion landscape.
For more details visit our website https://stitchperfect.co.in/
0 notes
Text

Alright now that we got the basic important stuff outta the way lets get into the heart of the construction of a fursuit!
There's a few different type of bodysuit shapes of fursuits:
Digitgrade: (walking on toes has padding on knees, butt, and hind legs)
Plantigrade: Flat legs no padding just regular plain anthro body
Unguligrade: walking on hooves (which is pretty close to MLP suits)
Once you figure out the "leg style" you like for a fursuit you can plan out the rest. I'd say any combination works well but you will need to space out enough room for feet/hand hooves.
Matrices.net is also a GREAT resource for fursuit making info and maintenance. Which i got most of the info from for this blog.
Getting your patterns together:
Getting your patterns together: I found several ways to go about making fursuit patterns even for ponies some have not known about.
In this case the following measurements are important:
Neck to knee: (So you know where the digi knee padding goes and help size the leg pattern)
neck to inseam:
neck to floor:
waist:
hips:
Foot size:
shoulder to finger tip: (possibly add a few inches so the hand hooves are comfortable)
MugiwaraCosplay on Etsy sells a digitgrade bodysuit pattern in PDF format! So if you got photoshop skills. you can resize the body to your measurements using the rulers and stretching it out and using the markings to line up the pieces.
https://www.etsy.com/listing/695122557/digital-digitigrade-bodysuit-pattern-for
So your pattern pieces should look more like this:


Duct Tape Dummy: Requires also a painters suit from the hardware store, a big roll of duct tape, and paper towel, and scissors. Its a 2 person job so you will need help from a friend. Use paper towels on the armpits and on the ankles as well. Basically you need to cut many pieces of duct tape to the painters suit and be sure to not tape up the zipper of the suit in case you need to take a break.


The tutorial for a bodysuit from matrices.net suggests using an animal costume here and pinning it to a test pattern so it matches up to your measurements. then for digi padding you would tape foam to your knees and lower back legs.
Digitgrade padding: The pillow inserts for the digi padding will look like this. And you can use spandex and velcro to set up the pockets


Zipper:

Lastly, you'll need a fursuit zipper with big teeth and bias tape. This should prevent the zipper getting stuck on fur. I also cut out a strip of fur and velcro to cover up the big zipper since its more noticeable than the smaller zippers
42 notes
·
View notes
Note
Hello! I hope you’re well! I am back to ask of breeches once again.. I got costume close up & it is v helpful thanks for the rec! I practiced period techniques by making a shirt entirely by hand- heavily depending on yr great tutorial. The breeches however still elude me, I’ve got to the point of drafting a pattern that fits somewhat in toile, I have to ask, im getting a lot of creases/ gathering in the crotch, which is definitely not right but if I reduce it they won’t fit so i’m stumped 1/2
2/2 I’m going to check that its not because it needs to be snipped or something stupid like that. I really feel I’m going in blind trying to put them together and fit them costume close up doesn’t have enough details on the fall front breeches and as you must definitely know it is really difficult to find 18th century menswear references so I’m hoping you can help, thank you!!
Hello! Glad to hear Costume Close Up was helpful!
Which way do the wrinkles go? I can’t tell what’s wrong with the pattern if I can’t see it, but it might be that you need to change the angle or curve of the crotch seam, or maybe adjust the location of that point where the crotch seam and inseam meet.
As for the construction, I have a tutorial on how to do fall plackets! It’s a machine sewn method, and I don’t know how exactly the 18th century ones were done. I know they were constructed differently from these ones but I haven’t learned how yet.
The post about my 1730′s breeches is the one that has the most construction information. Those are a bit different from the later ones, but the construction is mostly the same except for the front closure. (And the two weird pockets on the front, and the waistband having two lacing holes instead of four.) I also don’t think I have a good post on how I do those weird buttoned corner pockets on breeches, but simple pockets in the side seam (pressed towards the back, where there’s more room) are also an option.
7 notes
·
View notes
Photo


Navy Skirt - Darts and Pockets Pt 1
I made a skirt! In one day!
I cut out all my fabric pieces to test myself to see if I could make a simple skirt in one day, and I started just after lunch and finished it a little after seven which I’m really proud of.
So first off I drew over the pattern markings I put on roughly last night and sewed all four darts on the front and two back pieces.
I also (in case you missed some of my rambles last night) added pockets!!!! They weren’t on the original pattern but I am determined to add pockets to as many of my general sewing projects as I can. I followed this amazing inseam pocket sewing tutorial using this free pocket pattern. I do want to upgrade to front pockets eventually, but for now inseam pockets work just as well on skirts and pyjamas (which I also did on a pair of pyjamas bottoms I made last year!)
I’m terms of what I did for the pockets I’ll lave that to the linked tutorial, but what I can say is that I highly recommend doing the pressing and stay stitching step, I noticed a huge difference between when I made my pyjamas and my skirt today, it just looks so much cleaner.
6 notes
·
View notes
Note
Hey I'm cosplaying Poison Ivy and I'm not sure how to go about carrying my phone and wallet and I don't want to use a purse. Do you have any idea or tutorials for hidden pockets?
I guess it depends on which version of her you’re cosplaying. There have been some designs where she has a large belt for her poisons or even has a fanny pack type thing on her. Or she’s wearing clothes that aren’t all leaves. Here’s a video tutorial for inseam pockets if you’re wearing pants of some kind.
There use to be a bunch of tutorials about hidden pockets for bras and tanktops but I’m having a hard time finding them.
Another suggestion is what a lot of cosplayers do and have a designated ‘holder’. Usually a trusted best friend or a partner.
12 notes
·
View notes
Photo


GIGGLES overall pattern for baby girls, boys, infant, toddler. Children's sewing pattern. Pattern designed with the room to grow. PLEASE adjust pants length accordingly to your child's height before finishing hem. Sizes: 0m, 3m, 6m, 9m, 12m, 18m, 24m. Dungaree pattern includes: professionally graded pattern and how-to-make tutorial (Letter (USA) and A4) with every-step pictures. Instant Download. Dungaree features: This cute dungaree is designed for baby boys and girls. Make it with pockets on the front and back or no pockets at all for a quick and easy project. Playful ruffles add extra charm to these classic dungaree. The straps feature an adjustable snap closure for easy dressing and room to grow. The side closure will help to tuck a shirt inside and inseam snaps will help to change a diaper easily. FABRICS for summer: linen, poplin, quilting fabrics, light weight denim, gauze. FABRICS for winter: twill, corduroy, quilting fabrics, denim. Coupon codes are available below. Please choose baby size by height, not by age. Sizes included in PDF : 0m - height 22" - chest 16" 3m - height 25" - chest 17" 6m - height 28" - chest 18.5" 9m - height 30" - chest 19" 12m - height 31.5" - chest 19.5" 18m - height 34" - chest 20.5" 2y - height 36" -chest 21" Check out our PATTERNS SHOP: http://www.etsy.com/shop/5Berries
#sewing#sewing machine#sewing patterns#sewing project#sewing tools#pdf patterns for girls#pdf patterns for boys#pdf#baby dungaree#dungaree pattern#baby overall#baby girl overall pattern#jumpsuit#jumper#children clothing patterns#patterns#Etsy Patterns#etsy#etsylove#etsyfinds#DIY Projects#diy tutorial#Easy pattern#easy sew#easy to sew#easy crafts#fun sewing#fun crafts
2 notes
·
View notes
Text
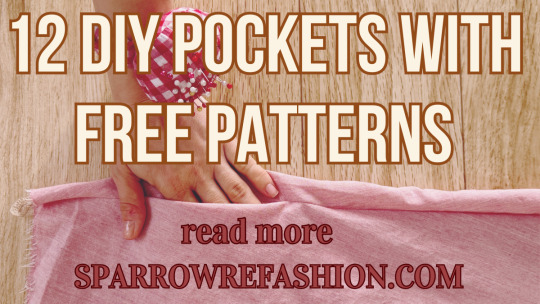
Learn How to Sew 12 Types of Pockets for Dresses, Jackets, Coats, and More (Free Patterns Included)
In this post, you will learn how to self draft and sew 12 types of pockets with free PDF patterns. Pockets are one of the most useful and versatile features of any garment. They can add style, functionality, and convenience to your clothes. Whether you want to store your essentials, keep your hands warm, or make a fashion statement, pockets are the way to go. But how do you sew pockets? And what…
View On WordPress
#how to sew cargo pockets#how to sew flap pockets#how to sew hidden pockets#how to sew inseam pockets#how to sew kangaroo pockets#how to sew patch pockets#how to sew slanted pockets#how to sew welt pockets#how to sew zipper pockets#sewing pockets for beginners#sewing pockets for coats#sewing pockets for dresses#sewing pockets for jackets#sewing pockets patterns#sewing pockets tutorial
9 notes
·
View notes
Photo

Le meilleur tuto pour coudre des poches dans la couture et surtout quand surjeter. Super clair, sans chichi résultat nickel garanti RS = endroit, WS = envers 🧵 Best inseam pocket tutorial. Includes overlocking steps. Super simple, no nonsense guaranteed good results. 🧵#Repos t @ithacamaven ・・・ Here is the tutorial to sew an inseam pocket. This pocket is designed for home sewers to add a pocket before OR after the side seam has been fitted. The side seam will be pressed open. If you already know the fit of the side seam and where you want the pocket to be located then the front pocket bag can be attached to the side seam before sewing the side seam (STEP 2 after STEP 4). Either way, using the pattern pieces outlined in the previous post together with this tutorial will result in a pocket installation that is accurate and straightforward to execute. I want to thank @wzdreams for pointing out how important it is to include seam finishing instructions in sewing procedures. I also thank her and @thesewmelier for pointing out the problems with most standard inseam pocket construction instructions. I used illustrator brushes from Vecteezy.com available with a free license. #inseampockets #sewingtutorial #sideseampockets #diysewing #sewover50 https://ift.tt/2R8bVO8
0 notes
Text
How to Sew an Invisible Zipper // Amy Jumpsuit
The Amy Jumpsuit pattern features a classic invisible zipper to help make getting in and out of your jumpsuit quick and easy. The addition of the bodice lining ensures a clean, professional finish both on the inside and outside of the garment as well. Despite the zipper, some of you may still bemoan or debate the practicality of a jumpsuit when it comes to taking your jumpsuit out in the wild and encountering say, public washrooms. We say don’t knock the jumpsuit before giving it a try- the feeling of swanning around in a drapey breezy fabric may outweigh these washroom-related complications! (Note: we do suggest basting your jumpsuit together to test the fit- some straight sizes may find that a zipper closure is unnecessary and can skip this step.)
In this sewing tutorial we will be showing you how to install the invisible zipper on the left side, as this is traditional for most ready-to-wear garments. If you’d prefer to open your jumpsuit on the right side, go for it! You can mirror the steps to switch the zipper to the other side. We will also show you how to attach the lining.
INSTALLING THE INVISIBLE ZIPPER
You are ready to install your zipper closure when your front and back pieces are fully assembled: the jumpsuit’s center front and center back seams have been sewn, and your pockets have been attached and understitched in place. If you are not including pockets, the left side seam allowance for both the front and back jumpsuit needs to be finished separately, using either a serged or zig zag stitch. If serging, do not trim the seam allowance where the zipper will be placed.
Begin by pressing the left side seam allowances of the front and back pieces in by 5/8″ from the armscye to the zipper notch. The pressed creases will serve as a guide for your zipper position. When we refer to the left or right side of the garment, it is always in reference to how it is worn on the body.
Open your invisible zipper, and press the coils of each side of the zipper flat by pressing them away from the zipper tape with the zipper face down (use low heat so you don’t melt your zip!) This will help the zipper feed smoothly under the guides of your invisible zipper foot, and will also help ensure correct placement along the side seam so your zipper will be… invisible!
Open the invisible zipper, and place it face down along the left front side seam with the right side of the fabric facing up. The top of the zipper teeth should start just below the 5/8″ seam allowance of the armscye, and the coil will be positioned along the pressed crease of the seamline. Pin in place. (The pink pin in the photo below indicates the zipper notch.)
Time to sew! Every sewing machine is a little different, but with our machine, I line the edge of my fabric up with the 5/8″ seam guide on my stitch plate. My needle is in center position, and the zipper coil is under the left hand groove of the invisible zipper foot. Sew from the top of the zipper down as far as you can go, and backstitch at the end.
If you do not have an invisible zipper foot for your machine, it’s possible to use a regular zipper foot. Shift your needle as far to the left as it goes, and stitch as close as possible to the zipper coil without catching the teeth in your stitch line.
Pin the other side of the zipper to the left back side seam, using the pressed crease as a placement guide for the zipper coil. The zipper will be face down on the right side of the fabric. (Again, the pink pin in the photo below indicates the zipper notch.)
Ensure the zipper matches up evenly on both front and back. The zipper notches should match on either side.
Sew the zipper in place. The zipper coil will be under the right groove of the invisible zipper foot. My machine’s stitch plate has seam guides on both left and right sides, so I can line up the edge of my fabric with the 5/8″ seam guide to make sure the zipper is sewn in the correct position.
Sew from the top of the zipper down as far as you can. I stopped stitching at the zipper notch on both front and back, so the zipper would be sewn evenly on both sides.
Do the zipper up to check both sides match evenly, and that you can slide the zipper pull easily without catching the fabric.
Now that the zipper is installed, it’s time to finish sewing the side seams. With right sides together, pin the front and back pieces together along the left side seam from the end of the zipper, around the pocket, and down to the hem. (If you are not including the pockets, you can pin from below the zipper straight down to the hem.)
Switch to a regular zipper foot, and shift your needle to the right. Starting about a 1/2″-3/4″ above the end of where the zipper is attached, sew as close as you can to the existing zipper stitchline for a few inches. Your new stitchline should be close to the 5/8″ seam allowance. Backstitch at the beginning and end of your sewing.
Switch to a regular sewing machine foot, and continue sewing the remainder of the left side seam at 5/8″ seam allowance. Keep your needle down to pivot around the pockets.
Press the left side seam and pockets to the front from below the zipper to the hem. Finish your right side seam and inseam as per the instructions, and we will show you how to attach the lining next!
ATTACHING THE BODICE LINING
If you haven’t tested the length of your straps, baste them to your jumpsuit now and try it on. Once the length of the straps is confirmed, remove the straps so they don’t get tangled with the lining in the next step.
Prepare the bodice lining following the instructions: sew the front darts, pressing them down towards the waistline. With right sides together, sew the front and back lining pieces together along the right side seam. Remember the wrong side of the lining will end up against the wrong side of the jumpsuit, so be mindful of this when you sew this right side seam! Finish the side seam and press to the back. You will need to finish the bottom raw edge and left seams of the lining piece. We serged around the three sides without trimming any fabric.
Open the zipper. We’ll start by attaching the lining to the left front side seam, so position the jumpsuit front right side up and unfold the seam allowance.
With right sides together, pin the front lining along the left front side seam, extending the edge of the lining past the edge of the jumpsuit by 5/8″. The zipper will be sandwiched between the two layers.
This part can be difficult to understand, so here is another visual from the other side. The lining extends past the edge of the jumpsuit front by 5/8″. When the lining is pinned to the jumpsuit like this, it is normal that the armscye notches do not line up at this point. Not to worry- everything will line up when the lining is fully attached and the jumpsuit is turned right side out!
Using a regular zipper foot, shift your needle to the far right and sew the lining to the jumpsuit using the original zipper stitchline as a guide. Sew just inside the original stitching.
The front side of the zipper is now neatly encased inside the lining. Do the zipper up to make sure the zipper pull still slides freely without catching the lining.
Open the zipper and match the lining to the jumpsuit with right sides together. Pin the other side of the lining to the left back side seam, again extending the edge of the lining past the edge of the jumpsuit by 5/8″.
Shift your needle to the far left and stitch the lining to the jumpsuit just inside the original zipper stitchline.
When you turn the lining and jumpsuit right side out, the zipper is fully enclosed. The next step is to attach the straps and secure the lining to the jumpsuit along the neckline. You can sew the neckline in one pass if you like, but we find the pinned straps can easily tangle or pull your work, so it may be easier to sew in stages. Sewing the V neckline in stages as we’re about to show you will also help prevent this point from stretching out or gaping.
Baste one end of each strap in place along the jumpsuit front. Turn everything wrong side out and pin the lining to the jumpsuit along the front neckline and armscyes. The straps will be sandwiched between the jumpsuit and front lining. At the side seam where the zipper is, roll the seam allowance around the zipper towards the lining. This will pull the lining and jumpsuit so the armscye notches are aligned properly. In the photo below, the armscye notch is indicated by the yellow pin. You can draw in a helpful stitching guideline at the V point with a removable marking tool, as we’ve done with yellow chalk. Starting an inch from the opposite of the V point, stitch around the V, keeping your needle down to pivot. Sew up around the strap and down the armscye to the zipper.
Sew the other side of the front neckline, overlapping the stitching on the other side of the V point. Ensure the right side seams of both the jumpsuit and lining are aligned. Stop stitching at or just past the right side seam.
If the opposite ends of your straps are not yet basted to the back of the jumpsuit, do so now, ensuring they are not tangled. Repeat the same steps as above to secure the back lining to the back jumpsuit. Roll the zipper seam allowance towards the lining to properly match the armscye notches.
When the lining has been completely sewn to the jumpsuit, turn things right side out to make sure the straps are not twisted and there is no puckering. Once you have confirmed everything is sewn correctly, grade and notch the seam allowance so everything will lie flat when turned right side out and pressed.
Be very careful not to trim too much of the corner at either side of the zipper. This area will experience a lot of wear and tear as you open and close the zipper each time you wear your jumpsuit. Instead of trimming down the excess zipper tape, try trimming just the jumpsuit and lining seam allowances. You may have to undo a few stitches.
Using a pair of tweezers, fold the zipper tape and seam allowance down in a 45 degree angle. Keep this corner pinched in place with your tweezers as you turn everything right side out to keep it in place.
Voila! A nice, precise corner!
Because the side seam allowances were rolled around the zipper, you should have a clean finish on the inside too!
The last step is to understitch the lining to the seam allowance around the neckline to prevent it from peeking out. It will be impossible to sew around the neckline and armscyes in one pass because of the straps. Start and stop stitching an inch or two away from either side of each strap. If understitching isn’t your game, you can topstitch all the way around as an alternative.
You can also handtack the lining to the seam allowance of the jumpsuit at center front, center back, and the right side seam to help keep the lining in place.
Hopefully you’ve got the hang of installing invisible zippers now! In some ways they are even easier than regular zippers, since the invisible zipper foot grooves do most of the work for you!

Source: https://closetcasepatterns.com/how-to-sew-an-invisible-zipper-amy-jumpsuit/
0 notes
Text
Wide Leg Pants and Inseam Pockets
How to sew your own wide leg pants! Plus an easy inseam pocket tutorial. from craftgawker https://ift.tt/2MuEhgt
0 notes
Text
The Square Circle Skirt
After my husband had gone to work, I sent my children to school and went to store.I was too excited to do any housework that morning because I saw a beautiful skirt.Though the skirt consist only of a square piece of fabric,it is very effective. The square cut made it fall uneven at the ends. So I wanted to make by myself.b
You may also like:Hand-woven bamboo basket with sea shell
How to Make a Handkerchief Skirt Dress
How to Make a Handkerchief Skirt Dress, using an old tank top
INSTANT DOWNLOAD- Willow Dress (Size 12/18 mos to Size 6) PDF Sewing Pattern and Tutorial
Willow Dress PDF Sewing Pattern and Tutorial by sewsweetpatterns, $6.00
Samantha Suspender Skirt
This vintage length, full skirt pattern comes in size 1/2 – 14. Choose a flat front or faux button placket, optional inseam pockets and suspenders. The suspenders are adjustable and tie in a bow through loops in the back. Leave the suspenders off for an adorable, fast sew! The skirt is all measurements, the only pattern piece to print is for the optional pocket. This makes for a quick sew since you just need to snip and rip or use a rotarty blade and mat to cut. The deep 1 inch hem and f…
Kinley’s Cascading Flounce Top & Dress. PDF sewing pattern for toddler girl sizes 2t – 12
Simple Life Pattern Company Kinleys Cascading Flounce Top & Dress Sizes 2t – 12 Difficulty Level: Advanced Beginner This pattern features
Lillys Lapel Party Dress. PDF sewing pattern for toddler girl sizes 2t – 12
Lillys Lapel Party Dress. PDF sewing pattern for toddler girl | Etsy
Toddler Sundress Tutorial
cute dress…looks pretty easy to make. (the hardest part might be dusting off the sewing machine)
Sullivan Dress PDF Pattern
Sullivan Dress PDF Pattern – Sew Much Ado
Criss Cross Pinafore Dress and Buttercup Bloomers
Criss Cross Pinafore Dress and Buttercup Bloomers – Baby Girl dress sewing pattern by Blank Slate Patterns
L&P 1032: Desert Sunrise Maxi Dress, Halter Top and Beaded Choker Pattern for 18 inch dolls such as American Girl — summer boho doll fashion
Make glorious gifts with Lee & Pearl patterns. As easy to make as they are beautiful! Your favorite American Girl doll fans will LOVE dresses and tops made using L&P Pattern 1032: Desert Sunrise Maxi Dress, Halter Top and Beaded Chokers for 18 Inch Dolls. What will you make with #leeandpearl patterns for dolls?
GIRLS DRESS PATTERN, “The Maddie Lou Dress”, sizes included to fit ages 2-6, instant digital download, 22 picture photo tutorial included
GIRLS DRESS PATTERN The Maddie Lou Dress sizes
Powder Pink Flower Girl Gown
Dress of the Day: Powder Pink Flower Girl Gown Here is mini model Bonnie looking cuter than a cream puff in our soft pink flower girl edition And with 50% OFF this sweet pink style, Monday just got a whole lot more magical! @davidcharleschildrenswear #LookoftheDay #CuteandColourful #Pastels #SuperSavings
Nadia’s Square Neck Dress PDF Pattern Sizes 6-12m to 8 girls
Nadia’s Square Neck Dress PDF Pattern Sizes 6-12m to 8 girls
The post The Square Circle Skirt appeared first on Diy Script.
from WordPress https://ift.tt/33NVIlm via IFTTT
0 notes
Photo

ALEX Shortie Tutorial and Pattern. Sizes: 0m, 3m, 6m, 9m, 12m, 18m, 24m. PDF Pattern includes: professionally graded pattern and how-to-make tutorial (Letter (USA) and A4) with every-step pictures. Instant Download. Dungaree features: This cute shortie-dungaree is designed for baby boys and girls. Make it with pockets on the front and back or no pockets at all for a quick and easy project. The optional contrast ruffles on the girl’s dungaree add a quiet charm to the design. The straps feature an adjustable chest snap closure for easy dressing and room to grow. The side closure will help to tuck a shirt inside easily and inseam snaps will make a diaper change a breeze. FABRICS for summer: linen, poplin, quilting fabrics, light weight denim, gauze. FABRICS for winter: twill, corduroy, quilting fabrics, denim. Coupon codes are available below. Please choose baby size by chest and height, not by age. Sizes included in PDF : 0m - height 22" - chest 16" 3m - height 25" - chest 17" 6m - height 28" - chest 18.5" 9m - height 30" - chest 19" 12m - height 31.5" - chest 19.5" 18m - height 34" - chest 20.5" 2y - height 36" -chest 21" Check out our PATTERNS SHOP: http://www.etsy.com/shop/5Berries
#baby dungaree#dungaree pattern#shorts pattern for kids#baby romper#romper pattern#girl romper#sewing patterns#sewing#sewing machine#sew#patterns#children clothing patterns#baby overall#overalls#baby girl overall pattern#baby boy#pdf patterns for boys#pdf patterns for girls#pdf#etsylove#etsyfinds#etsy#Etsy Patterns#buzzfeed
1 note
·
View note
Link
Tried my hand with a sewing machine, happy with the results. Quick fit, lower detailsUnfortunately I didn't document my process because I tried many things (I actually starting sewing by hand but with my skill it was way too slow and inaccurate) and didn't know what I was doing half the time. Made lots of mistakes, but learned a lot. Maybe I can do a fleshed out tutorial when I have better technique. Total time of work was ~5 hours.Inspired by Acronym P10TS-DS pants, key features include a technical fabric, pockets everywhere, roomy fit in the seat to an extreme taper (but not form fitting on the legs), and ankle zips.Purchased CQR cargo pants in black from Amazon, I am a true 28" waist but I like wearing 29". Unfortunately they don't sell 29" so I went with a 30"W 32"L. Also bought a pack of brass 8" YKK zips. Quick fit 1 and fit 2General procedureWear pants inside out, pinch and feel where I want to take in the fabric for one leg. Mark with a pencil (chalk would be much much better).Get a ruler and draw lines. Using the sewing machine, do a basting stitch along the line.Try on the pants, think of what I would change, rip out the basting stitch and repeat steps 1 and 2 until I like the fit.My finalized dimensions. All straight tapers, no arcs. [EDIT] 9.5" for thigh measurement not 11"Do a moderately tight backstitch along the final measurements (on my sewing machine has settings from 0 to 5, I chose 2.5). Stitch starting from crotch area, and stop the stitch exactly 12" from the leg opening, in preparation for adding the 8" zip.Cut excess fabric, leaving 0.5" inch of fabric from the newly made seamUndo the hem, sew on the zipper. I experimented on this step for a few hours. My method comes closest to this guy but I don't hide the zips and I didn't have the existing folds that the inseam of his jeans had. So I took an iron and made them myself.Redo the hem, finish the seam, and reinforce the area where the zipper starts with some perpendicular stitching. So around the zipper you can see a rectangle of stitches. I tried my best, positioning the fabric was really awkward at times.Zig-zag stitch on that 0.5" of fabric left over from the trim to stop future fraying.Repeat on other leg.FrontBackAdjusted exposure frontAdjusted exposure back (it was hard..)Side zip done halfwaySuper stoked to put this on a real coordinated fit, lighting was good this afternoon so took some quick pictures to show detailing and shape on usually-difficult-to-see black fabric. via /r/streetwear
0 notes
Photo

ALEX Shortie Tutorial and Pattern. Sizes: 0m, 3m, 6m, 9m, 12m, 18m, 24m. PDF Pattern includes: professionally graded pattern and how-to-make tutorial (Letter (USA) and A4) with every-step pictures. Instant Download. Dungaree features: This cute shortie-dungaree is designed for baby boys and girls. Make it with pockets on the front and back or no pockets at all for a quick and easy project. The optional contrast ruffles on the girl’s dungaree add a quiet charm to the design. The straps feature an adjustable chest snap closure for easy dressing and room to grow. The side closure will help to tuck a shirt inside easily and inseam snaps will make a diaper change a breeze. FABRICS for summer: linen, poplin, quilting fabrics, light weight denim, gauze. FABRICS for winter: twill, corduroy, quilting fabrics, denim. Coupon codes are available below. Please choose baby size by chest and height, not by age. Sizes included in PDF : 0m - height 22" - chest 16" 3m - height 25" - chest 17" 6m - height 28" - chest 18.5" 9m - height 30" - chest 19" 12m - height 31.5" - chest 19.5" 18m - height 34" - chest 20.5" 2y - height 36" -chest 21" Check out our PATTERNS SHOP: http://www.etsy.com/shop/5Berries
#sewing#sew#sewing patterns#sewing machine#dungaree pattern#baby dungaree#baby romper#romper pattern#baby boy romper pattern#baby girl romper pattern#baby overall pattern#baby dress pattern#children clothing patterns#Childrens sewing Patterns#baby shorts pattern#pdf patterns for boys#pdf patterns for girls#pdf#easy crafts#Easy pattern#easy sew#easy patterns#etsyfinds#etsylove#Etsy Patterns#etsy
0 notes