#Install Node.JS on Windows
Explore tagged Tumblr posts
Visit Tumblr Blog
Explore Tumblr blogs with no restrictions, modern design and the best experience.
Last Seen Tumblr Blogs


Fun Fact
Average visit duration of Tumblr.com is 10 mins and 25 secs.
Text
Mini React.js Tips #1 | Resources ✨

I thought why not share my React.js (JavaScript library) notes I made when I was studying! I will start from the very beginning with the basics and random notes I made along the way~!
Up first is what you'll need to know to start any basic simple React (+ Vite) project~! 💻
What you'll need:
node.js installed >> click
coding editor - I love Visual Studio Code >> click
basic knowledge of how to use the Terminal

What does the default React project look like?

Step-by-Step Guide
[ 1 ] Create a New Folder: The new folder on your computer e.g. in Desktop, Documents, wherever that will serve as the home for your entire React project.
[ 2 ] Open in your coding editor (will be using VSCode here): Launch Visual Studio Code and navigate to the newly created folder. I normally 'right-click > show more options > Open with Code' on the folder in the File Explorer (Windows).
[ 3 ] Access the Terminal: Open the integrated terminal in your coding editor. On VSCode, it's at the very top, and click 'New Terminal' and it should pop up at the bottom of the editor.


[ 4 ] Create the actual React project: Type the following command to initialize a new React project using Vite, a powerful build tool:
npm create vite@latest
[ 5 ] Name Your Project: Provide a name for your project when prompted.

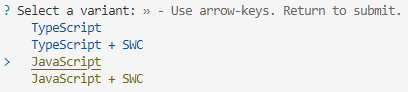
[ 6 ] Select 'React' as the Framework: Navigate through the options using the arrow keys on your keyboard and choose 'React'.

[ 7 ] Choose JavaScript Variant: Opt for the 'JavaScript' variant when prompted. This is the programming language you'll be using for your React application.
[ 8 ] Navigate to Project Folder: Move into the newly created project folder using the following command:
cd [your project name]
[ 9 ] Install Dependencies: Execute the command below to install the necessary dependencies for your React project (it might take a while):
npm install

[ 10 ] Run the Development Server: Start your development server with the command (the 'Local' link):
npm run dev

[ 11 ] Preview Your Project: Open the link provided in your terminal in your web browser. You're now ready to witness your React project in action!
Congratulations! You've successfully created your first React default project! You can look around the project structure like the folders and files already created for you!
BroCode's 'React Full Course for Free' 2024 >> click
React Official Website >> click
Stay tuned for the other posts I will make on this series #mini react tips~!
#mini react tips#my resources#resources#codeblr#coding#progblr#programming#studyblr#studying#javascript#react.js#reactjs#coding tips#coding resources
116 notes
·
View notes
Text
this is missing the absolute worst one, the absolute all-consuming shadow cast across the entire industry
webapp -> app
Electron is honestly one of my least favorite libraries ever. I hate it so, SO much. This is the reason why computing power keeps increasing yet windows keeps feeling less and less responsive, and SO many developers half-ass their desktop web clients with it.
My graphics driver (and yours too if you're on windows and have an nvidia card) shouldn't install a permanently active copy of node.js just to run a local web server which it uses to draw its UI (which it never shuts down because this is also used for the task tray).
Discord's desktop app is also bundled through electron. Launch it, look at the task manager, and notice that it's using over 500MB of ram just to display the login screen.
not to enforce gender roles but a computer should NOT fucking have apps okay. if I wanted an app I'd go on my phone my laptop is for Programs. I mean this.
#tbh i've never seen most of the other ones referred to as apps#application; program; game; software are all 'app' now though consistently#there is a time and place for electron: when you want a giant webapp offline and need to bundle like 800MB of resources; e.g. pokerogue
139K notes
·
View notes
Text
so the computer project of the last couple days has been finishing up one i started about a month ago, setting up a dedicated machine running windows 7 for the less than legal copy of specific software containing some specific technical manuals i occasionally need to reference. i've been running it on one of my regular machines and its awful, sloppy software. mostly utilizing node.js. dozens of background processes are required to make it run. 2000 dollar software built like a house of cards made from open source software. i guess it's the information contained therein, stored in a weird encrypted proprietary database format that makes it so expensive.
anyway it takes up way to much hard drive space, cpu and ram on an everyday general use computer for something that might get used a couple times a year, so i'm putting on it's own private machine.
the main user interface for this software is in the web browser. it requires internet explorer. it works ok in other browsers, but can get buggy sometimes. it requires the adobe reader plugin. the pdf readers built into most browsers wont work. also whatever webserver it's using seems to be hardcoded to only accept connections on the local machine. i already knew this, and accepted i'd probably just leave this computer on a shelf and bring it out and plug it in when i needed it.
then i remembered ip tunneling. that's what i needed the software from 2007 for. way back when i was still in high school i set up a proxy server to get around the blocks on the school computers. can't remember where i found the instructions, but it used copssh and putty. putty is still readily available and free, but not copssh, that's what i had to find a copy of. i basically did that again, now i can tunnel into that computer and access the webpage based ui for the software from any other computer in the house. im fairly certain this violates the license agreement, but i assume no more so than using a pirated copy lol. also if i ever manage to get the proprietary hardware that goes with the software, it would need to be physically connected to the real machine, but for just using it as a technical library, this is great.
as for getting rid of the software on the computer i already had it installed on, given how many services it installs and how much crap it drops all over the system, a full reinstall of windows 10 will probably be required, but that's a job for another day. for now i can just disable all it's services and let it sit dormant.
1 note
·
View note
Text
How to Install
Looking for easy, step-by-step guides on how to install everything from software to home devices? Our "How to Install" blog provides clear, beginner-friendly instructions to help you get things up and running without the hassle. Whether you're setting up a new app, assembling tech gadgets, or configuring tools, we simplify the process for you. Each post is written with accuracy and user convenience in mind.
How to Install How to Install Printers Without CD How to Install Webcam Drivers How to Install SSH How to Install Pixelmon How to Install OptiFine How to Install Fabric How to Install Zend Framework with XAMPP on Windows How to Install Roblox on Chromebook How to Install Roblox Studio How to Install Firefox on Mac How to Install Firefox on Linux How to Install Firefox on Windows How to Install Java Step-by-Step Guide for Beginners How to Install Java on Mac Follow Full Process Ultimate Guide How to Install Java for Minecraft Easy Step Guide for How to Install VPN for Privacy How to Install VPN Server Virtual Private Network How to Install VPN on Router A Step-by-Step Guide : Complete Guide for How to Install Anaconda How to Install Anaconda on Linux Complete Guide How to Install Anaconda on Mac: A Step-by-Step Guide How to Install Anaconda on Ubuntu: A Step-by-Step Guide How to Install Anaconda on Windows How to Install npm A Step-by-Step Guide for Beginners How to Install npm on Ubuntu Step-by-Step How to Install NVM on Ubuntu Tips, and Explanations How to Install npm on Windows Solve Common Issues How to Install NVM on Windows Troubleshooting Tips How to Install npm on Visual Studio Code How to Install Node.js on Your Machine How to Install Node.js on Linux Step-by-Step Guide How to Install Node.js on Mac Step-by-Step Guide How to Install Node Modules on Angular How to Install Node.js on Ubuntu The Latest Version How to Install Node.js on Windows Get started Full Method How to Install APK File on Your Android Device Complete Guide on How to Install APK on Android TV How to Install APK on Chromebook Step by Step Process How to Install APK on iOS A Comprehensive Guide How to Install IPA on iPhone A Complete Guide How to Install APK on Windows 10 Complete Guide How to Install Git A Step-by-Step Guide for Beginners How to Install Git Bash A Complete Step-by-Step Guide How to Install Git on Visual Studio Code How to Install GitHub Simple Step-by-Step Process How to Install Git on Mac Step-by-Step Guide How to Install Git on Linux A Step-by-Step Guide How to Install Git on Ubuntu Step-by-Step Guide How to Install Git on Windows A Simple Guide How to Install Docker How to Install Docker on Linux How to Install Docker on Mac How to Install Docker Daemon Mac How to Install Docker on Ubuntu How to Install Docker Compose on Ubuntu 20.04 How to Install Docker Compose on Windows How to Install Docker on Windows How to Install WordPress How to Install WordPress on Ubuntu How to Install WordPress Plugins How to Install WordPress on Windows 10 How to Install Kodi on Firestick How to Install Exodus on Kodi How to Install The Crew on Kodi How to Install XAMPP on Mac
0 notes
Text
Node.js 24 Released: Key Features and Developer Benefits
Node.js 24 is now available with powerful updates that boost app speed, security, and developer productivity. It includes the new V8 13.6 engine, which adds better performance and features like Float16Array, safer regular expressions, and smarter error handling.
This release also comes with npm 11, making package installs faster and more secure. Developers using Windows will now need to switch to the ClangCL compiler, which brings faster builds and fewer errors.
Other highlights include global access to the URLPattern API, better async context tracking, improved testing with automatic subtest handling, and the modern Undici 7 HTTP client with HTTP/2 support.
Node.js 24 also removes outdated APIs to improve security and performance. Upgrading helps future-proof your apps and ensures they run faster and more reliably.
Ready to upgrade your app stack?
#Nodejs24#JavaScript#WebDevelopment#npm11#Undici#AsyncProgramming#SoftwareUpdate#NodejsUpgrade#PerformanceMatters#DevTools
0 notes
Text
Docker Tutorial for Beginners: Learn Docker Step by Step
What is Docker?
Docker is an open-source platform that enables developers to automate the deployment of applications inside lightweight, portable containers. These containers include everything the application needs to run—code, runtime, system tools, libraries, and settings—so that it can work reliably in any environment.
Before Docker, developers faced the age-old problem: “It works on my machine!” Docker solves this by providing a consistent runtime environment across development, testing, and production.
Why Learn Docker?
Docker is used by organizations of all sizes to simplify software delivery and improve scalability. As more companies shift to microservices, cloud computing, and DevOps practices, Docker has become a must-have skill. Learning Docker helps you:
Package applications quickly and consistently
Deploy apps across different environments with confidence
Reduce system conflicts and configuration issues
Improve collaboration between development and operations teams
Work more effectively with modern cloud platforms like AWS, Azure, and GCP
Who Is This Docker Tutorial For?
This Docker tutorial is designed for absolute beginners. Whether you're a developer, system administrator, QA engineer, or DevOps enthusiast, you’ll find step-by-step instructions to help you:
Understand the basics of Docker
Install Docker on your machine
Create and manage Docker containers
Build custom Docker images
Use Docker commands and best practices
No prior knowledge of containers is required, but basic familiarity with the command line and a programming language (like Python, Java, or Node.js) will be helpful.
What You Will Learn: Step-by-Step Breakdown
1. Introduction to Docker
We start with the fundamentals. You’ll learn:
What Docker is and why it’s useful
The difference between containers and virtual machines
Key Docker components: Docker Engine, Docker Hub, Dockerfile, Docker Compose
2. Installing Docker
Next, we guide you through installing Docker on:
Windows
macOS
Linux
You’ll set up Docker Desktop or Docker CLI and run your first container using the hello-world image.
3. Working with Docker Images and Containers
You’ll explore:
How to pull images from Docker Hub
How to run containers using docker run
Inspecting containers with docker ps, docker inspect, and docker logs
Stopping and removing containers
4. Building Custom Docker Images
You’ll learn how to:
Write a Dockerfile
Use docker build to create a custom image
Add dependencies and environment variables
Optimize Docker images for performance
5. Docker Volumes and Networking
Understand how to:
Use volumes to persist data outside containers
Create custom networks for container communication
Link multiple containers (e.g., a Node.js app with a MongoDB container)
6. Docker Compose (Bonus Section)
Docker Compose lets you define multi-container applications. You’ll learn how to:
Write a docker-compose.yml file
Start multiple services with a single command
Manage application stacks easily
Real-World Examples Included
Throughout the tutorial, we use real-world examples to reinforce each concept. You’ll deploy a simple web application using Docker, connect it to a database, and scale services with Docker Compose.
Example Projects:
Dockerizing a static HTML website
Creating a REST API with Node.js and Express inside a container
Running a MySQL or MongoDB database container
Building a full-stack web app with Docker Compose
Best Practices and Tips
As you progress, you’ll also learn:
Naming conventions for containers and images
How to clean up unused images and containers
Tagging and pushing images to Docker Hub
Security basics when using Docker in production
What’s Next After This Tutorial?
After completing this Docker tutorial, you’ll be well-equipped to:
Use Docker in personal or professional projects
Learn Kubernetes and container orchestration
Apply Docker in CI/CD pipelines
Deploy containers to cloud platforms
Conclusion
Docker is an essential tool in the modern developer's toolbox. By learning Docker step by step in this beginner-friendly tutorial, you’ll gain the skills and confidence to build, deploy, and manage applications efficiently and consistently across different environments.
Whether you’re building simple web apps or complex microservices, Docker provides the flexibility, speed, and scalability needed for success. So dive in, follow along with the hands-on examples, and start your journey to mastering containerization with Docker tpoint-tech!
0 notes
Note
hey I hope this isn't super annoying, but do u have any tips for that neocities template situation u made a while ago? ive been stuck at setting up my node environment (it wont recognize it as an internal/external command operable program or batch file, if that helps.)
again i TOTALLY understand if this is just my problem to figure out but I cant find helpful info elsewhere...
i'm assuming you're on windows!
so, windows has an "environment variable" called PATH. an environment variable is basically just a value that can be used by any program that can see it. your command line uses PATH to look for executable files that it can run as commands
so for example, imagine you have an executable (.exe) file at, say: -> C:/FileMaker/filemaker.exe in this case, if you add "C:/FileMaker/" to your PATH, then you can go in your command line and type "filemaker", and it would run filemaker.exe.
i'm assuming you're trying to run npm in your command line. however, if there is no npm.exe in your PATH, and you try to run npm i, then it'll give you "not recognized as an internal/external command".
this means one of the following:
npm is not installed. it can be installed bundled with node.js at the node.js website, or through nvm (or nvm-windows). when you install it with node.js, make sure "add to PATH" is enabled!
2. npm IS installed, but it is not in your PATH. this is weird and i'm not sure why it would happen, but if you can find npm.exe, this is quite easily remedied.
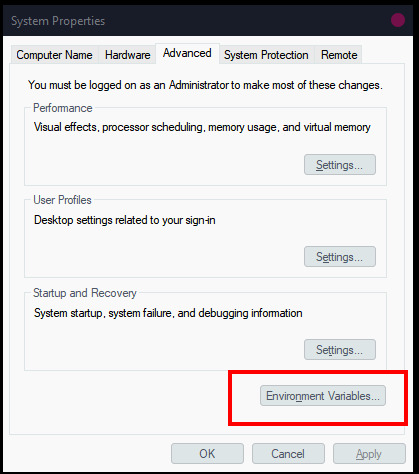
search for system "environment variables" in your computer. i use win10; for win10, there is a button called "Environment variables..." that opens a second window. then you find Path and then double click that, which opens a third window, then you wanna add the folder path to the end of the list

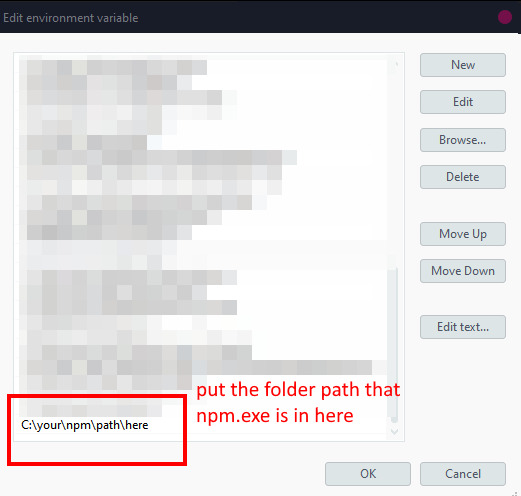
in case it helps and you need to track down npm.exe manually, i have two npm.exe files at these places, which might match your setup:
C:/Program Files/nodejs/npm.exe C:/Users/[user]/AppData/Roaming/npm/npm.exe
3. npm IS installed and it IS in your path, but your command line cannot see the environment variables. the primary reason for this would be that you did not restart the command line after installing node and/or updating the environment variables; go ahead and do that if you haven't. the secondary reason for this would be you're using a command line in something else (like vs code), and for some reason in that situation updating the environment variables can be very finnicky. try using your system's command line instead.
worst case scenario, you can also replace "npm" in your command line with the full path to npm. like: "C:/Program Files/nodejs/npm.exe i". this would work!
(sometimes using the "where" command helps to locate stuff, like "where npm", but i dont know how where actually works; for all i know it could be using PATH as well, in which case it would be useless for finding things not already in your PATH.)
0 notes
Text
Using Docker for Full Stack Development and Deployment

1. Introduction to Docker
What is Docker? Docker is an open-source platform that automates the deployment, scaling, and management of applications inside containers. A container packages your application and its dependencies, ensuring it runs consistently across different computing environments.
Containers vs Virtual Machines (VMs)
Containers are lightweight and use fewer resources than VMs because they share the host operating system’s kernel, while VMs simulate an entire operating system. Containers are more efficient and easier to deploy.
Docker containers provide faster startup times, less overhead, and portability across development, staging, and production environments.
Benefits of Docker in Full Stack Development
Portability: Docker ensures that your application runs the same way regardless of the environment (dev, test, or production).
Consistency: Developers can share Dockerfiles to create identical environments for different developers.
Scalability: Docker containers can be quickly replicated, allowing your application to scale horizontally without a lot of overhead.
Isolation: Docker containers provide isolated environments for each part of your application, ensuring that dependencies don’t conflict.
2. Setting Up Docker for Full Stack Applications
Installing Docker and Docker Compose
Docker can be installed on any system (Windows, macOS, Linux). Provide steps for installing Docker and Docker Compose (which simplifies multi-container management).
Commands:
docker --version to check the installed Docker version.
docker-compose --version to check the Docker Compose version.
Setting Up Project Structure
Organize your project into different directories (e.g., /frontend, /backend, /db).
Each service will have its own Dockerfile and configuration file for Docker Compose.
3. Creating Dockerfiles for Frontend and Backend
Dockerfile for the Frontend:
For a React/Angular app:
Dockerfile
FROM node:14 WORKDIR /app COPY package*.json ./ RUN npm install COPY . . EXPOSE 3000 CMD ["npm", "start"]
This Dockerfile installs Node.js dependencies, copies the application, exposes the appropriate port, and starts the server.
Dockerfile for the Backend:
For a Python Flask app
Dockerfile
FROM python:3.9 WORKDIR /app COPY requirements.txt . RUN pip install -r requirements.txt COPY . . EXPOSE 5000 CMD ["python", "app.py"]
For a Java Spring Boot app:
Dockerfile
FROM openjdk:11 WORKDIR /app COPY target/my-app.jar my-app.jar EXPOSE 8080 CMD ["java", "-jar", "my-app.jar"]
This Dockerfile installs the necessary dependencies, copies the code, exposes the necessary port, and runs the app.
4. Docker Compose for Multi-Container Applications
What is Docker Compose? Docker Compose is a tool for defining and running multi-container Docker applications. With a docker-compose.yml file, you can configure services, networks, and volumes.
docker-compose.yml Example:
yaml
version: "3" services: frontend: build: context: ./frontend ports: - "3000:3000" backend: build: context: ./backend ports: - "5000:5000" depends_on: - db db: image: postgres environment: POSTGRES_USER: user POSTGRES_PASSWORD: password POSTGRES_DB: mydb
This YAML file defines three services: frontend, backend, and a PostgreSQL database. It also sets up networking and environment variables.
5. Building and Running Docker Containers
Building Docker Images:
Use docker build -t <image_name> <path> to build images.
For example:
bash
docker build -t frontend ./frontend docker build -t backend ./backend
Running Containers:
You can run individual containers using docker run or use Docker Compose to start all services:
bash
docker-compose up
Use docker ps to list running containers, and docker logs <container_id> to check logs.
Stopping and Removing Containers:
Use docker stop <container_id> and docker rm <container_id> to stop and remove containers.
With Docker Compose: docker-compose down to stop and remove all services.
6. Dockerizing Databases
Running Databases in Docker:
You can easily run databases like PostgreSQL, MySQL, or MongoDB as Docker containers.
Example for PostgreSQL in docker-compose.yml:
yaml
db: image: postgres environment: POSTGRES_USER: user POSTGRES_PASSWORD: password POSTGRES_DB: mydb
Persistent Storage with Docker Volumes:
Use Docker volumes to persist database data even when containers are stopped or removed:
yaml
volumes: - db_data:/var/lib/postgresql/data
Define the volume at the bottom of the file:
yaml
volumes: db_data:
Connecting Backend to Databases:
Your backend services can access databases via Docker networking. In the backend service, refer to the database by its service name (e.g., db).
7. Continuous Integration and Deployment (CI/CD) with Docker
Setting Up a CI/CD Pipeline:
Use Docker in CI/CD pipelines to ensure consistency across environments.
Example: GitHub Actions or Jenkins pipeline using Docker to build and push images.
Example .github/workflows/docker.yml:
yaml
name: CI/CD Pipeline on: [push] jobs: build: runs-on: ubuntu-latest steps: - name: Checkout Code uses: actions/checkout@v2 - name: Build Docker Image run: docker build -t myapp . - name: Push Docker Image run: docker push myapp
Automating Deployment:
Once images are built and pushed to a Docker registry (e.g., Docker Hub, Amazon ECR), they can be pulled into your production or staging environment.
8. Scaling Applications with Docker
Docker Swarm for Orchestration:
Docker Swarm is a native clustering and orchestration tool for Docker. You can scale your services by specifying the number of replicas.
Example:
bash
docker service scale myapp=5
Kubernetes for Advanced Orchestration:
Kubernetes (K8s) is more complex but offers greater scalability and fault tolerance. It can manage Docker containers at scale.
Load Balancing and Service Discovery:
Use Docker Swarm or Kubernetes to automatically load balance traffic to different container replicas.
9. Best Practices
Optimizing Docker Images:
Use smaller base images (e.g., alpine images) to reduce image size.
Use multi-stage builds to avoid unnecessary dependencies in the final image.
Environment Variables and Secrets Management:
Store sensitive data like API keys or database credentials in Docker secrets or environment variables rather than hardcoding them.
Logging and Monitoring:
Use tools like Docker’s built-in logging drivers, or integrate with ELK stack (Elasticsearch, Logstash, Kibana) for advanced logging.
For monitoring, tools like Prometheus and Grafana can be used to track Docker container metrics.
10. Conclusion
Why Use Docker in Full Stack Development? Docker simplifies the management of complex full-stack applications by ensuring consistent environments across all stages of development. It also offers significant performance benefits and scalability options.
Recommendations:
Encourage users to integrate Docker with CI/CD pipelines for automated builds and deployment.
Mention the use of Docker for microservices architecture, enabling easy scaling and management of individual services.
WEBSITE: https://www.ficusoft.in/full-stack-developer-course-in-chennai/
0 notes
Text
Install Node.js on Windows in 4 Simple Steps
Want to install Node.js on Windows? Follow this step-by-step tutorial to get Node.js up and running quickly for your development projects.
0 notes
Text
How to Use Proxies for Web Scraping in Node.js: A Step-by-Step Guide
Using a proxy in Node.js for web scraping is a common technical method. It can not only bypass the geographical restrictions of some websites, but also improve the efficiency and success rate of crawlers. This article will introduce in detail how to use a proxy in Node.js for web scraping, including setting up a proxy, using a proxy for HTTP requests, and handling proxy failures.
Setting up the proxy
To use a proxy for web scraping in Node.js, you first need to set up the proxy. This can be achieved in a variety of ways, including environment variable settings, the use of a proxy library, and configuring the proxy directly in the request.
1. Environment variable settings
You can configure HTTP and HTTPS proxies by setting environment variables. This applies to global proxy configuration and applies to all HTTP and HTTPS requests.# Linux/macOS export HTTP_PROXY=http://proxy.example.com:8080 export HTTPS_PROXY=http://proxy.example.com:8080
# Windows set HTTP_PROXY=http://proxy.example.com:8080 set HTTPS_PROXY=http://proxy.example.com:8080
2. Use a proxy library
For more fine-grained control, you can use a library like proxy-agent or global-agent to configure the proxy.npm install proxy-agent
Then use it in your Node.js script:const ProxyAgent = require('proxy-agent');
const agent = new ProxyAgent('http://proxy.example.com:8080'); const axios = require('axios'); axios.get('https://example.com', { httpAgent: agent }) .then(response => { console.log(response.data); }) .catch(error => { console.error('Error fetching data:', error); });
3. Configure the proxy directly in the request
If you are using a specific request library (such as axiosor node-fetch), you can also configure the proxy directly in the request.
Take axios as an example:const axios = require('axios');
axios.get('https://example.com', { proxy: { host: 'proxy.example.com', port: 8080, auth: { username: 'proxyUser', password: 'proxyPass' } } }) .then(response => { console.log(response.data); }) .catch(error => { console.error('Error fetching data:', error); });
Using a proxy for HTTP requests
After configuring the proxy, you can use it to make HTTP requests. This can be achieved through various HTTP request libraries, such as axios, node-fetch, etc.
Example: Web scraping using axios and proxyconst axios = require('axios');
async function fetchData(url, proxy) { try { const response = await axios.get(url, { proxy: { host: proxy.host, port: proxy.port, auth: { username: proxy.username, password: proxy.password } } }); console.log(response.data); } catch (error) { console.error('Error fetching data:', error); } } const proxy = { host: 'proxy.example.com', port: 8080, username: 'proxyUser', password: 'proxyPass' }; fetchData('https://example.com', proxy);
Dealing with proxy failures
When using a proxy for web scraping, you may encounter proxy failures. In this case, you need to have a corresponding handling mechanism, such as retrying or changing the proxy.
Example: Dealing with proxy failuresconst axios = require('axios');
async function fetchDataWithRetry(url, proxy, retries = 3) { try { const response = await axios.get(url, { proxy }); console.log(response.data); } catch (error) { console.error('Error fetching data:', error); if (retries > 0) { console.log('Retrying...'); return fetchDataWithRetry(url, proxy, retries - 1); } else { console.error('Max retries reached. Failed to fetch data.'); } } } const proxy = { host: 'proxy.example.com', port: 8080, username: 'proxyUser', password: 'proxyPass' }; fetchDataWithRetry('https://example.com', proxy);
Dynamic web scraping with Puppeteer
For dynamically loaded web pages, you can use Puppeteer, a powerful headless browser automation tool that can simulate user behavior in a Node.js environment.
Example: Dynamic web scraping with Puppeteer and a proxyconst puppeteer = require('puppeteer');
const proxy = { host: 'proxy.example.com', port: 8080, username: 'proxyUser', password: 'proxyPass' }; (async () => { const browser = await puppeteer.launch({ args: [ `--proxy-server=${proxy.host}:${proxy.port}`, `--proxy-bypass-list=<-loopback>` ] }); const page = await browser.newPage(); await page.authenticate({ username: proxy.username, password: proxy.password }); await page.goto('https://example.com'); const content = await page.content(); console.log(content); await browser.close(); })();
Conclusion
Using a proxy in Node.js for web scraping is a very effective technical means, which can not only bypass geographical restrictions, but also improve the efficiency and success rate of crawlers. By properly configuring the proxy and handling the proxy failure problem, you can build an efficient and scalable crawler system to meet various web scraping needs.
0 notes
Text
Difference Between Java and JavaScript
When it comes to programming, Java and JavaScript are two of the most widely used languages. Despite their similar names, they are quite different in terms of functionality, usage, and even underlying principles. This often leads to confusion among beginners who may assume that the two technologies are related. However, understanding the differences between Java and JavaScript can give developers the clarity they need to decide which tool is best suited for their specific needs.
In this blog, we will explore the key differences between Java and JavaScript by discussing their features, syntax, platforms, and use cases. By the end, you will have a clearer understanding of when and why to use each of these languages.
1. What is Java?
Java is a powerful, object-oriented programming (OOP) language developed by Sun Microsystems (now owned by Oracle). It was first released in 1995 and is designed to be a platform-independent language that allows developers to "write once, run anywhere." This means that Java code can be written on one platform (e.g., Windows, macOS, Linux) and run on any device that has a Java Virtual Machine (JVM) installed. The JVM translates the compiled Java bytecode into machine-specific code, making it platform-independent.
Java is primarily used for developing standalone applications, large enterprise systems, Android applications, and server-side applications. It’s known for its stability, scalability, and performance.
2. What is JavaScript?
JavaScript, on the other hand, is a lightweight, interpreted scripting language that was created for web development. Originally designed to run in web browsers, it allows developers to create dynamic and interactive elements on websites. JavaScript was created by Brendan Eich at Netscape Communications in 1995 and has since evolved into one of the most important languages in web development.
JavaScript is a client-side language, which means it runs in the browser, but it can also be used on the server side through Node.js. Unlike Java, JavaScript is not a strictly object-oriented language; it supports multiple programming paradigms such as procedural, functional, and event-driven programming.
3. Syntax Differences Between Java and JavaScript
One of the most noticeable differences between Java and JavaScript lies in their syntax. While they may share some similar constructs (like curly braces for code blocks), the syntax rules and programming paradigms they follow are quite different.
Java is a statically-typed language, meaning that you must declare the type of variable before using it. For example:javaCopyint number = 10; String message = "Hello, World!"; The types (like int and String) must be specified and can’t be changed once the variable is declared.
JavaScript, on the other hand, is dynamically typed. This means you do not have to specify the type of the variable before using it, and the type can change as the program runs. For example:javascriptCopylet number = 10; let message = "Hello, World!"; Here, the type of number and message is determined dynamically at runtime.
4. Compiling vs. Interpreting
Another significant difference between Java and JavaScript is how they are executed.
Java is a compiled language. This means that Java code is first written and then compiled into bytecode by a Java compiler. The bytecode is platform-independent and can be run on any device that has a Java Virtual Machine (JVM). This provides portability and allows Java applications to run across different systems without modification.Steps in Java Execution:
Write Java source code (.java file).
Compile the code using a Java compiler, which converts it into bytecode (.class file).
The bytecode is then executed by the JVM.
JavaScript, on the other hand, is an interpreted language, which means the code is executed line-by-line by an interpreter (usually within a web browser). The JavaScript engine in a browser reads the JavaScript code, interprets it, and executes it in real-time.Steps in JavaScript Execution:
Write JavaScript code (.js file).
The code is directly interpreted and executed by a web browser or JavaScript runtime environment like Node.js.
5. Execution Environment
Java and JavaScript also differ greatly in terms of their execution environments:
Java is typically used for building standalone applications that run on the JVM. These applications can be anything from mobile apps (Android) to large-scale enterprise applications or even desktop software.
JavaScript, on the other hand, is designed for web development. It is mostly used to create dynamic web pages, handle user interactions, and perform client-side tasks. JavaScript code runs within a web browser (Chrome, Firefox, Safari, etc.) and can also run on the server side through Node.js.
6. Object-Oriented vs. Multi-Paradigm
Java is primarily an object-oriented programming (OOP) language, which means it is based on the principles of encapsulation, inheritance, and polymorphism. Java focuses heavily on classes and objects, and most Java programs are organized around these core concepts.
JavaScript, however, is a multi-paradigm language. While it can support object-oriented programming (OOP) through prototypes, it also supports functional programming and event-driven programming. JavaScript uses prototypes for inheritance rather than classes (though modern JavaScript has introduced classes, they are syntactic sugar over prototypes).
7. Memory Management
Both Java and JavaScript have automatic memory management, but they handle it differently:
Java uses garbage collection to automatically manage memory. The JVM’s garbage collector automatically frees up memory that is no longer in use. Java also allows developers to manually control memory management through various memory allocation techniques.
JavaScript also uses garbage collection for memory management, but since JavaScript runs in a single-threaded environment (in the browser), memory management is typically more lightweight and less complex compared to Java.
8. Use Cases
The primary use cases for each language highlight their distinct roles in the software development landscape.
Java:
Enterprise Applications: Java is often used in large-scale business systems due to its scalability, robustness, and extensive libraries.
Mobile Development: Java is the official language for Android app development.
Backend Systems: Java powers many server-side applications, particularly in environments that require high performance.
Embedded Systems: Java is used in various embedded systems due to its portability and efficiency.
JavaScript:
Web Development: JavaScript is essential for front-end web development, enabling dynamic and interactive web pages.
Backend Development: With the rise of Node.js, JavaScript can also be used on the server side to build web servers and APIs.
Mobile Apps: JavaScript frameworks like React Native and Ionic allow developers to create mobile applications for both iOS and Android.
Game Development: JavaScript is increasingly used in building browser-based games or game engines like Phaser.js.
9. Performance
Performance is another area where Java and JavaScript differ significantly.
Java generally performs better in comparison to JavaScript because it is a compiled language. The compiled bytecode is optimized by the JVM and can be executed more efficiently. Java is well-suited for large-scale applications that require high performance.
JavaScript is typically slower than Java due to its interpreted nature and the overhead involved in real-time interpretation. However, JavaScript has made significant strides in performance, especially with modern engines like V8 (used in Google Chrome and Node.js), which optimize execution.
10. Learning Curve
Java can be more difficult to learn for beginners because it’s a statically-typed language with a focus on OOP principles. The syntax and structure are more complex, and it requires understanding various programming concepts such as classes, interfaces, and inheritance.
JavaScript is often considered easier to learn, especially for web developers, because it is dynamically typed and has a simpler syntax. Additionally, JavaScript is very forgiving with variable types, making it easier to experiment with code.
Conclusion
While Java and JavaScript have similar names, they are fundamentally different languages with different uses, execution models, and ecosystems. Java is a versatile, platform-independent, and high-performance language primarily used for backend applications, mobile development, and large-scale enterprise solutions. JavaScript, on the other hand, is a lightweight, interpreted language that powers the dynamic, interactive elements of the web.
Choosing between Java and JavaScript depends on the specific needs of your project. If you are working on a web-based application or interactive front-end elements, JavaScript will be the way to go. If you are building complex back-end systems, enterprise software, or mobile apps, Java might be more appropriate. Both languages are crucial in their own domains, and mastering them can open up a world of development opportunities.
1 note
·
View note
Text
CookAgent

CookAgent is an artificial intelligence "AI" chatbot that helps you cook. For now is Windows Only.
How to install CookAgent.
Download this repo zip file.
Unzip the file.
Install Nodejs. If you do not know how, go to this URL
Open the folder you downloaded and double-click the install.bat file.
Your browser will open the CookAgent application.
This project is for fun. Play and test the CookAgent its for free.
0 notes
Text
Nextjs vs Nodejs: Which Backend Framework to Choose in 2025
Today, businesses rely on interactive and dynamic web applications to improve their online presence. One of the most popularly used backend technologies is JavaScript which not only creates real-time web apps but also helps developers improve their coding experience.
As of 14 June 2024, nearly 98.8% of websites use JavaScript.
63.61% of developers use JavaScript for client-side and server-side app development.
Global brands (Google, YouTube, Facebook, LinkedIn, Twitter, etc.) use JavaScript to develop compelling websites.
JavaScript offers several frameworks for efficient developer experience.
Choosing the right JavaScript framework is a strategic decision for overall success. Two popular backend JavaScript frameworks are- Next.js vs. Node.js.
However, Node.js is a runtime environment that runs JavaScript code outside the browser. And Next.js is a React-based framework for building dynamic and hybrid applications. Both offer unique benefits and are suitable for different use cases.
To build modern-age applications, developers must understand where both technologies differ and which one to choose in 2025.
What is Node.js?
GitHub- 108k+ stars, 3500+ contributors
40.8% of backend developers prefer Node.js to build high-end, dynamic, and real-time applications. Since 2009, Node.js has evolved with a strong community improving it over the years.

Source
Here are a few things that you must know about Node.js.
A runtime environment that executes JavaScript on the server side.
Built on Chrome's V8 engine, which is the main reason behind Node.js’s high-speed and efficient applications.
Can handle many concurrent connections.
Has npm (Node Package Manager)- a set of libraries and tools for extended functionalities.
Works well for data-intensive applications that need quick responses.
Supports both vertical and horizontal scaling to meet growing demand.
Easily integrates with JSON for seamless data exchange.
Supported on most platforms, including Linux, Windows, Unix, macOS, and more.
Key Features
Here are some key features of Node.js

Source
Event-driven, asynchronous, non-blocking I/O Model- allows Node.js to handle many concurrent connections efficiently. It also manages resources and I/O operations asynchronously. It means the system will process other requests without waiting for the response from a slower I/O process. It improves the app’s performance and responsiveness. It makes Node.js apps highly scalable.
Modular design- Node.js modular design allows developers to share and reuse code, significantly reducing development time and improving the developer’s experience.
Compatibility across platforms- you can use Node.js across platforms like Mac OS X, Linux, and Windows. It helps developers create a single codebase and deploy it across platforms ensuring the same functionality and responsiveness.
Built-in debugging tools- one of the most prominent features is its built-in debugging tools, allowing developers to identify and fix issues instantly.
NPM (Node Package Manager)- it comes with Nodejs installation. It is a package manager that allows developers to access millions of packages to add more functionalities to a simple app. You can simply install a package for any functionality and use it within your app without developing it from scratch.
Built on Chrome’s V8 engine- it is the reason that Node.js is extremely powerful, efficient, and fast, allowing faster execution of JS code while handling heavy applications with great ease.
Benefits of Using Node.js for Your Business
High performance- Node.js can handle multiple concurrent requests without consuming many resources, making it suitable for developing applications that require high performance and scalability. The V8 engine improves performance and response time. PayPal reduced its response time by 35% using Node.js.
Improves developer's experience- with Node.js, developers can easily use the programming language (JavaScript) to create both backend and frontend. It means developers do not have to switch to another language and frameworks. Node.js has a large ecosystem that allows developers to create a wider range of applications, improving developer’s experience.
Cost-efficient development- Node.js can save up to 58% of development costs. As it can handle many requests at the same time, it requires less resources. It lets you reuse the code, reducing time-to-market and development expenses. This is why, Node.js has become the go-to option for businesses that need cost-efficient yet powerful modern-age solutions.
Growing community- since 2009, Node.js has grown with strong community support. This community has contributed towards Node.js improvements, making it a better technology to meet modern-age development needs. As a developer, you will find packages and libraries to stay ahead by incorporating the latest trends in web app development.
Easy deployment and hosting- Node.js makes it easy to deploy applications on cloud platforms like Heroku, AWS, and Azure. These services simplify the deployment process, allowing businesses to scale their apps as their user base grows. With hosting providers tailored for Node.js, companies can install and manage their apps with minimal setup and maintenance.
Disadvantages of Node.js
Performance bottleneck- Node.js is great at handling many requests at once. But the challenge is, that it uses a single thread to process tasks, impacting performance when dealing with complex calculations. These tasks can create a "bottleneck," slowing down the entire system.
Limited support for databases- Node.js was first created to work with web apps, which meant it didn't support many databases except for MongoDB. It might find it difficult to use Node.js with other types of databases or in different kinds of applications. It limits its flexibility in some cases.
Callback hell- Node.js uses asynchronous tasks and callbacks, but this can make the code messy and hard to follow, especially in complex apps. When callbacks are nested too many times, it creates a "callback hell," that is difficult to manage.
Memory leaks- Node.js relies on a garbage collector to manage memory, but sometimes has memory leaks. It means they don't release memory properly, resulting in performance issues and making the app unstable.
Despite its challenges, top brands like LinkedIn, eBay, Netflix, GoDaddy, Groupon, Uber, NASA, and Walmart, use Node.js for seamless experiences. Today. More than 1 million websites use Node.js.

Source
What is Next.js?
GitHub- 127k stars and 3500+ contributors.
As a new technology in the market, Next.js has gained much popularity since 2017. 17.9% of developers prefer it. Unlike Node.js, Next.js is a React-based server-side rendering framework.

Source
Here are a few things you must know about Next.js.
Developed by Vercel
Open-source framework
Used for creating server-side rendered (SSR) apps and static site generation (SSG) web apps
Based on the principle of “Build once, runs everywhere”
Offers unique features like route pre-fetching and automatic code splitting
built on top of React and runs on top of Node
Offers tools and features for building high-performance, scalable, and optimized web applications.
Improves developer's experience to build fast and efficient web applications
Features of Next.js
Here are some key features of Next.js.
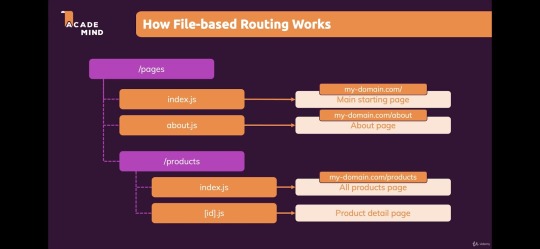
App Directory (New File System Routing)- The new App directory introduces a new file-based routing system, which offers better flexibility and improved server-side rendering (SSR). It allows developers to organize components and pages more efficiently and to define layouts that are shared across different pages. This feature is part of the move towards a more modular and composable approach to building applications.
Source
React Server Components (RSC)- it allows developers to render some parts of the app on the server and send only the required HTML to the client. This results in faster page loads and better SEO, as the server can handle complex logic. Server components allow for a more optimized rendering process, minimizing the amount of JavaScript sent to the client.
Automatic code splitting- Next.js automatically splits your code into smaller parts, so only the necessary CSS and JavaScript files are loaded for each page. This makes the files smaller and helps the page load faster. As a result, developers can build fast and efficient web apps with Next.js.
Edge Functions & Middleware- Edge Functions are small, fast-running server-side functions deployed closer to the user on the edge network, improving performance, especially for globally distributed applications. Middleware runs on the edgel, allowing developers to handle tasks like authentication, redirects, and A/B testing with low latency.

Source
Image Optimization Enhancements- it automatically optimizes images based on the user's device and network conditions. The latest updates have improved performance and flexibility in how images are handled, with automatic WebP conversion and better support for blur-up effects.
Hybrid Rendering- With Next.js, developers can use different types of rendering approaches- SSR (server-side rendering), SSG (static site generation), and CSR (client-side rendering) within a single app for optimizing performance, SEO, and user experience.
API Routes- Next.js allows you to create backend API endpoints directly within the project, enabling full-stack development without needing a separate server. This makes building complex applications easier by simplifying data fetching, processing, and handling.
Better SEO and Head Management- Head Management improvements in Next.js allow developers to control meta tags, titles, and other important SEO elements more efficiently. This helps in improving SEO by making the meta tags dynamic and context-specific.
Webpack 5 Support- Next.js now fully integrates Webpack 5, offering better build performance, improved caching, and support for the latest JavaScript features, resulting in faster builds and smaller bundle sizes.
Turbopack (Alpha)- Turbopack is a new bundler from the creators of Next.js, designed to replace Webpack. It's faster and more efficient, especially for large projects. Currently, in alpha, it promises significantly faster build times and hot module reloading (HMR).
Incremental Static Regeneration (ISR)- This allows developers to update static pages without rebuilding the entire app, ensuring up-to-date content without impacting the speed of static generation.
Benefits of using Next.js

Source
Improved SEO- Next.js can generate fully rendered HTML on the server using Server-Side Rendering (SSR). This means pages load faster and search engines can easily read and rank them. With Static Site Generation (SSG), pages are pre-built as static HTML during the build, making them even faster and better for SEO.
Blazing fast speed and performance- Next.js has helped streaming app Twitch to reduce its initial load time by 50%. It uses many features like SSR, SGR, and automatic code splitting to load pages quickly and offer a smooth user experience.
Accessibility- due to SSR, web apps have more accessibility. Users can use a reader screen to access the web page content easily.
Improved developer’s experience- Next.js features like a flexible and powerful routing system, an optimized build system, and a large ecosystem of resources, tools, and libraries, lead to the developer’s productivity and experience to build more robust apps.
Enhanced security- as Next.js SSG pre-generates the content and serves the static HTML file. It reduces the risk of security vulnerabilities and attacks.
Disadvantages of Next.js
Complexity- Next.js has many powerful features, but setting it up can be tricky, especially for new developers. It might take longer to get started and configure everything, which can slow down development.
Browser Compatibility- Next.js uses modern JavaScript, which may not work well with older web browsers. Developers need to make sure their app works on the browsers their users are likely to use.
Dependency on React- Next.js is built on React, so you need to understand React well to use Next.js effectively. If you're new to React, this can be challenging.
Next.js can be used to build many different types of projects, such as:
Complex Web Applications
Web Platforms
Multi-Market Solutions
Advanced eCommerce and Retail Platforms
SaaS Products
Interactive User Interfaces
This is why brands like Nike, Hulu, Binance, Twitch, TikTok, and Vercel use Next.js for better performance.
Next.js vs. Node.js: Detailed Comparision
Here is a detailed Next.js vs Node.js comparison.
1. Next.js vs Node.js performance
Web Performance is necessary to keep users engaged. About 40% of online users tend to leave a website that takes longer than three seconds to load.
Node.js is a suitable option for building fast apps as it can handle many tasks at once. It uses an event-driven system, meaning it doesn’t get “stuck” waiting for things to happen. To make your code even faster, you can write asynchronous code that lets multiple tasks run at the same time. Node.js also helps you store and retrieve data efficiently and can avoid issues like memory leaks. Tools like caching and content delivery networks (CDNs) improve load times by serving files closer to users. For high-traffic apps, load balancing spreads the work across multiple servers.
Next.js is a framework built on top of React that makes websites even faster. It has built-in tools for improving performance, like lazy loading images and loading pages in the background for smoother transitions. It also lets you control SEO elements like page metadata, helping search engines understand your content better.
For large apps, Next.js provides monitoring tools to track performance and identify issues before they cause problems. It also includes a bundle analyzer to help you reduce the size of your app and send only the necessary data to the browser. By using CDNs to serve static files, Next.js helps further speed up your site.
2. Next.js vs Node.js scalability
Scalability in web apps means making sure your app can handle many users at once without slowing down or costing too much. It’s about increasing app performance as more people use it, without using too many resources. However, scalability differs from response time—your app can handle many requests but still take longer to respond, or it can respond quickly but struggle with heavy traffic.
In Node.js, scalability challenges include serving files, scheduling tasks, and using resources effectively. To solve these:
Use a CDN (Content Delivery Network) like CloudFront to serve files faster.
For repeating tasks, use a task scheduler like Agenda.js instead of basic timers.
Use Node.js clustering to divide the work between multiple processes, improving performance without overloading.
For Next.js, scalability is achieved by:
Caching: Use CDNs for static content, server-side caching for dynamic content, and client-side caching for API calls.
Load Balancing: Spread user traffic across multiple servers to avoid overloading.
Optimizing Databases: Use techniques like indexing, query optimization, and caching to reduce database load.
Auto-Scaling: Set up your app to automatically add or remove server instances based on traffic or usage.
3. Node.js vs Next.js: Development Speed
Node.js provides a basic platform to build server-side applications using JavaScript. You have to set up a lot of things manually, like routing, handling requests, and serving static files. This means you have more flexibility, but takes more time to set up and develop the app from scratch.
Next.js: It is a framework built on top of Node.js and React. It offers many built-in features like server-side rendering (SSR), static site generation (SSG), routing, and image optimization. These features make development faster because a lot of common tasks are already handled for you. You don’t have to set up everything from scratch, so you can focus more on building the app itself.
Next.js is faster for development because it provides ready-made tools and features, while Node.js gives you more flexibility but requires more setup.
4. Node.js or Next.js for frontend
Node.js: Node.js is mainly used for backend development, meaning it runs on the server to handle things like saving data to a database, managing user logins, and processing API requests. While it can be used to build parts of the front end (like rendering web pages on the server), it's not specifically designed for that purpose.
Next.js: Next.js is a framework built on top of React and is specifically designed for front-end development. It helps you build fast websites with features like server-side rendering (SSR) and static site generation (SSG). These features make websites faster and better for SEO (search engine optimization). Next.js also makes it easier to manage routing (pages) and other common frontend tasks.
If you're building a website's frontend (what users see and interact with), Next.js is the better choice because it’s made for that. Node.js is mostly for backend work, but it can help with some frontend tasks if needed.
5. Routing
Routing is like a map for your website. When a user asks for a specific page (like by typing a URL), routing decides where the request should go and what should be shown in response. It helps direct the user's request to the right place in your application.
There are two main ways to handle routing in Node.js: with a framework or without one.
With a Framework (like Express.js): Express is the most popular framework in Node.js for routing. It makes things easier by giving you a set of tools to handle routing quickly. You can use methods to define routes (like /home or /about), and each route can have a function that runs when someone visits that page. For example, if someone goes to /home, the app will show the homepage content.
Without a Framework: If you don't use a framework, you have to build your own server and routing system. You'll manually handle the URLs and decide what happens when a user visits different pages.
Next.js Routing: In Next.js, routing is simpler. It uses a file-based routing system. This means that every file you put in the pages folder automatically becomes a route. For example, if you create a file called about.js, Next.js will automatically link it to /about on your website. This system also handles dynamic pages, where parts of the URL can change based on data, like showing a user’s profile page based on their ID.
6. Developers experience
Developer experience (DX) is about how easy and enjoyable it is for developers to work with tools and technologies. If tools are good, developers can build things faster and with fewer problems.
Node.js and Next.js both focus on improving the developer experience in different ways:
Node.js: Node.js lets developers create anything they need, but it can be a bit complex at first. It has NPM, a huge library of tools and packages, making it easy to find solutions for problems. While it’s flexible, beginners might find it tricky until they get used to it.
Next.js: Next.js is simpler and more ready-to-use. It helps build fast websites with features like SEO-friendly pages and easy routing. It does a lot of the work for you, so you don’t have to set things up manually. It’s great for developers who want to build apps quickly without dealing with too many details.
When to Use: Next.js vs. Node.js
Use Next.js when:
E-commerce Websites: Real-time updates, fast performance, and SEO optimization.
Marketing Websites: Highly optimized for fast loading and SEO to attract visitors.
Portfolio Sites: Ideal for showcasing projects and personal portfolios with great performance.
Blogs: Use for content-heavy websites with SEO and fast page loads.
Entertainment & News Apps: Perfect for media-heavy applications with incremental static generation.
Community-driven Websites: Platforms with user-generated content (e.g., forums, social media).
Booking Apps: Websites that require fast interactions and real-time data updates.
Documentation Sites: Ideal for creating fast, SEO-friendly, and easy-to-update documentation.
Information Hubs: Centralized websites for information aggregation and display.
Auction Sites: Real-time data and quick updates, perfect for online auctions.
Minimum Viable Products (MVPs): Quickly build and deploy scalable MVPs with Next.js.
SaaS Platforms: Create fast, scalable, and SEO-friendly SaaS products.
Data Dashboards: Build real-time, data-driven dashboards with fast performance.
Web Portals: For user management, data access, and real-time updates.
Progressive Web Apps (PWAs): Build fast, offline-capable applications for mobile and desktop.
Use Node.js when:
Backend Services: Build and manage server-side applications, APIs, and databases.
Microservices: Create modular and scalable backend architectures for large applications.
APIs: Develop robust RESTful or GraphQL APIs for web and mobile apps.
Real-time Applications: Ideal for building collaborative platforms (e.g., Google Docs), message applications, streaming services, and online gaming apps.
Big Data Analytics: Handle large-scale data processing and analysis.
Wireless Connectivity: Power IoT devices and manage communication with wireless systems.
Web Scraping: Extract data from websites for analytics or aggregation.
Command Line Tools: Create custom CLI tools for automating tasks.
Single-Page Applications (SPA): Build fast and dynamic SPAs using Node.js for backend services.
Internet of Things (IoT): Use Node.js to connect and manage IoT devices and sensors efficiently.
Conclusion
As highlighted earlier, both Node.js and Next.js bring distinct advantages to web development. Next.js, built on React, stands out as a powerful alternative to Node.js for developing fast, dynamic applications. It offers a complete toolset with easy setup, routing, and an enhanced developer experience.
In contrast, Node.js serves as a runtime environment designed for building scalable, real-time applications using an event-driven, non-blocking model. When used together, Node.js and Next.js enable the creation of full-stack web applications, with JavaScript at the heart of the development process.
The choice is completely requirement-based. To build powerful Node.js web applications, connect with a leading app development company. OnGraph sets out to deliver advanced solutions by staying ahead of trends to meet modern-age requirements.
Connect with our experts to make highly performance web apps.
Content Source URL: Check Here
#Next.jsvsNode.js#Node.jsvsNext.jsperformance#Next.jscomparisonwithNode.js#Whichisbetter#Next.jsorNodeJS?#DoesNext.jsreplaceNodeJS?#Isnext.jsfrontendorbackend?#WillNodeJSbediscontinued?
0 notes
Text
Web Development Setup for Beginners
November 11, 2024, by Netbots.tech
A question that comes to mind for every web development beginner: How to set up my web development environment as a web developer? The following guides have you covered, because they will teach you how to set up a minimal web development environment for MacOS or Windows. Even though you will start out with HTML, CSS, and JavaScript as a web development beginner, learning React mostly comes right after these technologies. Hence both guides come with instructions for React as well, however, if you don't care about React, just leave it out.
Setting up your development environment all by yourself is your first challenge as an aspiring web developer these days. It's challenging, with lots of searching on the internet involved, however it will stress you which forces you to improve your core skills and grow as a developer. While many people find setting up tiresome, I hope it sparks some joy for you, because web development is all about tooling and coding. There are many web developers out there, me included, who refine their tooling all the time. So I hope you get excited about this process as well.
Essentially, there are two different philosophies that define your setup as a web developer. While there are developers who prefer to have all their tooling in one Integrated Development Environment (IDE), there are developers who prefer to use multiple lightweight tools (e.g. editor/IDE, standalone terminal) and combine them for their purposes.
Personally, I follow the latter philosophy (see guide above), because it gives me more flexibility. However, for beginners to web development, I recommend using one tool (IDE) to rule them all. The IDE (e.g. VS Code) combines everything that is needed for coding (editor) and executing the code (integrated terminal).
Below you will find both guides for MacOS and Windows to set up a minimal web development environment. As I said, if you are not interested in React (yet), just skip these sections. However, even if you start out with just JavaScript, I encourage you to check out React on the side:
Both setups show you how to install the following tools. Here comes the gist of what's needed and why it's needed:
Node.js and NPM
executing JavaScript code
installing JavaScript libraries
VS Code
editor to write code
integrated terminal to execute code
That's everything you need: Node/NPM + editor/IDE + terminal (also called "the command line"). I hope these guides help you to get started!
Stay Connected with NetBots
Follow NetBots on social media to learn more:
Facebook
Instagram
Pinterest
X (Twitter)
LinkedIn
0 notes
Text
In this article, I’ll be sharing the technical expertise and help you understand all that freaky on the first sight staff. There will be information about stacks, frameworks, programming languages etc., - everything that can help one understand aspects of developing tools that are commonly used in web development agencies.What is MEAN stack development?So, today we are going to talk about MEAN, not the adjective, but the abbreviation for the Javascript web development stack that consists of:MongoDB - database.Express.js - application server, used for the backend.Angular.js - web application framework, used for the frontend.Node.js - web server. The MEAN stack today is a modern and more flexible analog of LAMP (Linux, Apache, MySQL, PHP) web development stack. While LAMP requires special OS, MEAN can be developed on every OS - Windows, Mac, Linux.Technical features of MEAN technology stackMongoDB MongoDB is a document-oriented database specially created to store hierarchical data structures (documents) and is implemented using a NoSQL approach. This NoSQL approach represents a fundamental shift in the persistence strategy.The programmer spends less time writing SQL statements and more writing the map/reduce functions in JavaScript. This eliminates the huge layers of transformation logic since MongoDB initially produces the JavaScript Object Notation (JSON) format. As a result, writing of REST web services is extremely easy.Express.js Express.js is free and open-source web application framework that runs on top of Node.js. It is used for backend development. The huge step from LAMP is a transition from a traditional generation of pages on the server side to targeting single-page applications (SPA) on the client side. Express allows you to manage and route/generate pages on the server side, but other components of MEAN stack such as Angular.js turn it more into client side.Angular.jsAngular.js is frontend MVC (Model-View-Controller) framework in Javascript with an open-source software.The transition to SPA does not simply translate the MVC artifacts from the server to the client device. This is also a jump from the mentality of synchronism to the mentality of asynchronism, which is essentially event-driven. And perhaps, most importantly is the movement from page-oriented applications to component-oriented applications.Node.js JavaScript development platform for server-side. It transforms JavaScript from a highly specialized language to general-purpose language. Node.js replaces Apache from the LAMP stack. But Node.js is much more than just a web server. In fact, the finished application is not deployed on a separate web server; instead, the web server itself is included in the application and automatically installed as part of the MEAN stack. As a result, the deployment process is greatly simplified, since the required version of the web server is explicitly defined along with the remaining dependencies of the execution time.Why we prefer using the MEAN stack over LAMP?During the last 10 years of our existence, we have always been trying to improve our development process. We rejected ineffective, slow or narrow-oriented tools and worked hard to deliver only high-quality results. We tried using LAMP and actually we still use it in some projects, but the transition to MEAN stack development is where we are heading to. Why? Here is the answer: One programming language (JavaScript) - less confusion with syntax.On AngularJS it is convenient to make rich client applications that do not require reloading of pages (MVC, event model, routing, the possibility of creating components + this killer-feature: two-way data binding).On Node.js in conjunction with Express framework, it is good to do RESTful API backend. When the server sends only the data to JSON, and the client itself is engaged in the submission. This reduces the connectivity of the client and server + simplifies the creation of a mobile application in the future (it will come in handy with the same API).
Of course, the RESTful API can be done in PHP, but the PHP process will be created and terminated with each request, spending resources on initialization, while the process on Node.js hangs in memory all the time.Asynchrony. Even the fact that any mean stack example can be implemented two times faster because of asynchrony, make us believe, that is one of the best options. Node.js does not block the current process when accessing external resources (for example, the database). This allows, among other things, to execute several requests in parallel. Node.js has a cool NPM package manager and a cool package community. Under any task, be it PDF generation or Email sending, it's easy to find a package with a concise interface and add it to your application.So with these technologies, the MEAN stack developers can build applications with higher quality in less time so that they can deliver a quick result to the customer while fewer resources are used. The author of this article - Liza Kerimova, internet marketer at Artjoker, software development company, that specializes in web development. Our goal is to turn clients’ ideas only to excellent results!
0 notes
Text
Installing Node.js and npm Node.js is a JavaScript runtime environment that allows you to execute JavaScript code outside of a web browser. npm (Node Package Manager) is a package manager for Node.js, used to install, manage, and share JavaScript packages. Installing on Windows Download the installer: Visit the official Node.js website (https://nodejs.org/en/) and download the latest LTS…
0 notes