#Introduction to IPTables
Explore tagged Tumblr posts
Visit Tumblr Blog
Explore Tumblr blogs with no restrictions, modern design and the best experience.
Last Seen Tumblr Blogs


Fun Fact
In Q3 of 2020, 31% of US users access the Tumblr app daily.
Text
Building a Customizable Web Application Firewall with Ansible and IPtables
Introduction Building a Customizable Web Application Firewall (WAF) with Ansible and IPtables is an essential skill for system administrators and security professionals. A WAF is a critical component of a comprehensive security strategy, designed to protect web applications from various types of attacks, including SQL injection, cross-site scripting (XSS), and cross-site request forgery…
0 notes
Text
Securing Your Systems: RHCE Tips for Linux Security
Introduction: In today's interconnected world, ensuring the security of Linux systems is paramount for businesses and organizations of all sizes. As Red Hat Certified Engineers (RHCEs), it's our responsibility to implement robust security measures to protect sensitive data, prevent unauthorized access, and mitigate potential threats. In this blog post, we'll explore essential tips and best practices for enhancing Linux security, drawing on the expertise gained through RHCE certification.
Understanding the Threat Landscape:
Begin by examining the evolving threat landscape facing Linux systems, including common attack vectors and security vulnerabilities.
Highlight the importance of staying informed about emerging threats and security advisories issued by Red Hat and other industry sources.
Harden Your System Configuration:
Emphasize the significance of a secure system configuration as the foundation of Linux security.
Discuss essential security measures such as disabling unnecessary services, enforcing strong password policies, and configuring access controls using tools like SELinux.
Implement Firewalls and Intrusion Detection:
Explain the role of firewalls in controlling network traffic and preventing unauthorized access to Linux systems.
Provide guidance on configuring firewall rules using iptables or firewall to enforce a secure network perimeter.
Introduce intrusion detection systems (IDS) such as Snort or Suricata for monitoring network activity and identifying potential security breaches.
Manage User Access and Permissions:
Address the importance of user access management in maintaining Linux security.
Discuss best practices for creating and managing user accounts, including least privilege principles and user role assignments.
Demonstrate how to set granular file permissions using chmod and chown to restrict access to sensitive data.
Secure Network Services and Protocols:
Explore strategies for securing network services and protocols running on Linux systems.
Highlight the importance of regular software patching and updates to address known vulnerabilities.
Discuss techniques for securing network services such as SSH, Apache, and MySQL, including encryption, access controls, and configuration hardening.
Monitor and Respond to Security Incidents:
Stress the importance of proactive security monitoring and incident response.
Recommend tools and techniques for monitoring system logs, detecting security incidents, and responding promptly to potential threats.
Provide guidance on developing incident response plans and conducting post-incident analysis to prevent future security breaches.
Conclusion: As RHCEs, we play a vital role in safeguarding Linux systems against evolving security threats. By implementing the tips and best practices outlined in this blog post, we can strengthen the security posture of our organizations and contribute to a safer and more resilient IT environment. Let's continue to stay vigilant, adapt to emerging threats, and uphold the highest standards of Linux security in our roles as Red Hat Certified Engineers. For more details click www.qcsdclabs.com
0 notes
Text
Linux Course in Chandigarh: A Comprehensive Guide for Aspiring IT Professionals
In today’s digital world, Linux has become an essential component of IT infrastructure, powering everything from web servers and cloud systems to embedded devices. As demand for Linux professionals continues to rise, Chandigarh has emerged as a growing hub for quality IT training. This article delves into the importance of Linux, the structure of a typical Linux course in Chandigarh, and how such training can open up a world of opportunities for IT aspirants.
Why Learn Linux?
Linux is a Unix-like operating system that is free, open-source, and widely used in servers, data centers, and cloud computing environments. Here's why learning Linux is a smart career move:
Widely Used: Over 90% of cloud infrastructure and web servers run on Linux.
Career Demand: System administrators, DevOps engineers, cloud professionals, and cybersecurity experts require strong Linux skills.
Open Source Flexibility: Linux allows customization and is at the core of many enterprise technologies including Red Hat, Ubuntu, and CentOS.
Industry Certifications: Linux knowledge is a stepping stone to certifications like RHCSA, RHCE, CompTIA Linux+, and LFCS.
Chandigarh: A Growing IT Education Hub
Chandigarh, with its growing IT infrastructure and educational institutions, is an ideal place for pursuing technical training. The city offers:
Reputed Training Institutes: Several well-established institutes offer Linux and other IT courses.
Affordable Living: Compared to metro cities, Chandigarh is cost-effective for students.
Safe and Student-Friendly: The city has a strong student population and a clean, organized environment.
Who Should Take a Linux Course?
A Linux course is suitable for:
Students pursuing Computer Science or IT.
Working professionals looking to enhance their system administration or DevOps skills.
Fresher graduates who want to enter the IT industry with a specialized skill.
Network administrators aiming to deepen their understanding of Linux-based servers.
Structure of a Linux Course in Chandigarh
Most Linux training programs in Chandigarh are structured to suit both beginners and intermediate learners. Here's what a standard curriculum includes:
1. Introduction to Linux
History and philosophy of Linux
Types of Linux distributions
Installation and configuration
2. Linux Command Line
Basic shell commands
Directory and file manipulation
Text editing using vi or nano
3. File System Management
File types and permissions
Disk partitions and mounting
Logical Volume Manager (LVM)
4. User and Group Management
Creating and managing users/groups
Setting permissions and access control
Understanding /etc/passwd and /etc/shadow
5. Package Management
Using RPM, YUM, DNF (Red Hat-based)
Using APT (Debian/Ubuntu-based)
Installing, updating, and removing software
6. System Services and Daemons
Managing services with systemctl
Configuring startup processes
Working with cron jobs and background tasks
7. Networking Basics
IP addressing and configuration
Configuring DNS, DHCP, SSH
Troubleshooting tools: ping, netstat, traceroute
8. Shell Scripting
Writing and executing bash scripts
Variables, loops, and conditionals
Automating repetitive tasks
9. Security and Firewall Configuration
Setting up a firewall with iptables or firewalld
User authentication and sudo privileges
Securing services and open ports
10. Advanced Topics
Kernel management
Virtualization basics using KVM
Introduction to containers (Docker)
Modes of Training
Chandigarh-based institutes offer various formats of training to suit different needs:
Classroom Training: Instructor-led sessions with hands-on practice in a lab environment.
Online Classes: Live interactive classes or self-paced video modules.
Weekend Batches: Ideal for working professionals.
Fast-Track Courses: Intensive programs for those on a tight schedule.
Certification Support
Many Linux courses in Chandigarh also prepare students for globally recognized certifications, such as:
RHCSA (Red Hat Certified System Administrator)
RHCE (Red Hat Certified Engineer)
LFCS (Linux Foundation Certified System Administrator)
CompTIA Linux+
Certification-oriented training includes mock tests, practical labs, and real-time scenario-based exercises.
Top Institutes Offering Linux Training in Chandigarh
Several reputed training centers offer Linux courses in Chandigarh. While names may vary over time, some consistent features to look for include:
Experienced Trainers with industry background.
Updated Curriculum aligned with Red Hat and Linux Foundation.
Lab Infrastructure to practice real-world scenarios.
Placement Support with interview preparation and resume building.
Some institutes also have partnerships with Red Hat or offer authorized training, giving students access to official courseware and exams.
Career Opportunities After a Linux Course
After completing a Linux course, students can pursue various career roles depending on their skill level and interest:
1. Linux System Administrator
Responsible for installation, configuration, and maintenance of Linux servers.
2. DevOps Engineer
Combines Linux skills with tools like Docker, Jenkins, and Kubernetes to streamline software delivery.
3. Cloud Engineer
Works with cloud platforms like AWS, Azure, and Google Cloud, where Linux is often the default OS.
4. Network Administrator
Manages routers, firewalls, and switches with Linux as the control system.
5. Cybersecurity Analyst
Uses Linux tools for penetration testing, log analysis, and threat detection.
Salary Expectations
Starting salaries for Linux professionals in India typically range from ₹3–6 LPA for freshers, and go up to ₹12–20 LPA for experienced professionals in DevOps or cloud roles.
Benefits of Taking a Linux Course in Chandigarh
Affordable Quality Training: Courses in Chandigarh offer a good balance of cost and content.
Industry-Relevant Curriculum: Most institutes design their syllabus with inputs from industry professionals.
Community and Networking: Access to tech meetups, local developer groups, and hackathons.
Strong Placement Records: Many institutes have tie-ups with IT companies and conduct placement drives.
Tips for Choosing the Right Institute
When selecting a Linux course in Chandigarh, consider the following:
Check the trainer’s credentials and experience.
Ask for a demo class to evaluate teaching style.
Look for hands-on labs and real-world projects.
Ensure they offer certification guidance.
Verify placement support and success stories.
Final Thoughts
With its increasing demand in the job market and wide-ranging applications, Linux has become an indispensable skill for IT professionals. Chandigarh, with its vibrant tech training ecosystem, offers an excellent environment to learn Linux from the ground up.
Whether you are a student planning your career path, a professional looking to upgrade your skills, or an entrepreneur wanting to manage your servers more efficiently, a Linux course in Chandigarh can be your gateway to a successful IT journey.
0 notes
Text
IPTABLES : Introduction to Linux Firewall
IPTABLES : Introduction to Linux Firewall

IPTABLES : Introduction to Linux Firewall
Linux is the most-used open source operating system. Managing network traffic is one of the toughest jobs to deal with. For this, we must configure the firewall in such a way that it meets the system and users requirements without leaving the system vulnerable. The default firewall in most of the Linux distributions is IPTables.
IPTables is a standard…
View On WordPress
#and SSL port firewall#Checking current Iptables status#Checking current Iptables status firewall#Defining chain rules firewall#Defining chain rules iptables#Deleting rules of iptables#Dropping all other traffic iptables#Enabling connections on HTTP#Enabling traffic on localhost firewall#Enabling traffic on localhost iptables#Filtering packets based on source iptables#installing firewall#installing iptables#IPTABLES : Introduction to Linux Firewall#Linux#Save changes to iptables#SSH
0 notes
Text
Introduction to IPTables
This guide is meant as an introduction to iptables and covers basic packet filtering using this tool on Centos 7. The goal is to learn to work with some basic options so you can adapt them to your particular needs. For this reason we will not cover any iptables extensions in this guide. Getting Started
The term iptables is used to define the Linux kernel firewall, part of the Netfilter project…
View On WordPress
#Filtering IP#Firewall#Introduction to IPTables#IPTables#IPTables Policies#Linux Kernel Firewall#Netfilter#Netfilter Framework
0 notes
Text
Linux Firewall Basics

Linux Firewall
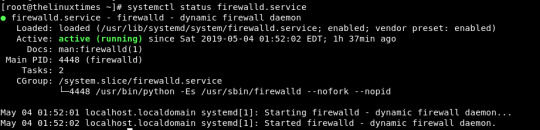
Introduction Firewall Status Stopping Firewall Disable FIrewall Enable Firewall Start Firewall Conclusion > Introduction: A firewall is a network security program that controls the incoming and outgoing connections based on the rules that are set. Linux has a default firewall i.e., iptables. Firewalld is a firewall management solution available for many Linux distributions which acts as a frontend for the iptables service provided by the Linux kernel. Firewalld installed by default in major linux distributions. > Firewall Status: We can check firewall service status by executing the below command. (firewall enabled by default). # systemctl status firewalld ● firewalld.service - firewalld - dynamic firewall daemon Loaded: loaded (/usr/lib/systemd/system/firewalld.service; enabled; vendor preset: enabled) Active: active (running) since Sat 2019-05-04 03:41:57 EDT; 5h 0min ago Docs: man:firewalld(1) Main PID: 4523 (firewalld) .... .... ..... .... Looks like below.
> Stopping firewall: We can stop the firewall by using this command. # systemctl stop firewalld

> Disable Firewall: We can disable the firewall to stop while the system is booting. by using this command. # systemctl disable firewalld

> Enable Firewall: If you want to enable the firewall to configure security rules for your system. then we can use this command to enable the firewall. systemctl enable firewalld

> Start Firewall: To start firewall service or firewall daemon we need to use this command. # systemctl start firewalld

> Conclusion: In this article, we have learned what is the Linux firewall, how to start, stop firewall service, how to enable or disable firewall service. If you have any questions or suggestions, please write on the comment box. Thank you. Read the full article
1 note
·
View note
Text
Due to the increasing complexity of applications in infrastructure, many system admins and developers find it hard to manage the environments which may require a lot of resources and hence expensive. One solution to this challenge was the introduction of a virtualization technique known as containerization. This technology has been highly adopted in the past decade with tools such as Kubernetes, Podman, and Docker playing a significant part. Containerization is the packaging of a portable computing environment that contains everything an application needs to run, from binaries to dependencies. With this technology, virtualization occurs at the host level. This requires no virtual hardware, operating system, or virtual kernel. Podman is a containerization tool developed by RedHat to act as a drop-in replacement for Docker. This daemon-less container engine can be used to develop, manage and run OCI(Open Container Initiative) containers. It can also be used to pull container images and configure containers to run automatically on boot just like Docker. Podman is highly preferred due to the following: No daemon required: this allows for a faster startup and fewer resource requirements Compatibility with Docker, it is possible to pull images from Docker Hub or Quay.io Native systemd integration: you can create systemd unit files and run containers as system services Run containers in rootless mode: this makes it easy to run containers securely without any additional privileges Podman closely works with other tools in container management. These tools include: Skopeo: for sharing/finding container images on Docker registries, the Atomic registry, private registries, local directories, and local OCI-layout directories. Buildah: is used to facilitate the building of OCI images either from scratch or using an image as a starting point. In this guide, we will install Podman 4 on Debian 11 / Debian 10 and also use it to pull images and run containers. Step 1. Install the Required Tools Podman can be installed from the Podman repositories but the available version is Podman 3. To install Podman 4, we need to build it from a source code. Before we begin, ensure your system and the available packages are updated to the latest versions. sudo apt update && sudo apt upgrade -y You also need to install the required tools to build Podman from the source code: sudo apt install btrfs-progs git iptables libassuan-dev libbtrfs-dev libc6-dev libdevmapper-dev libglib2.0-dev libgpgme-dev libgpg-error-dev libprotobuf-dev libprotobuf-c-dev libseccomp-dev libselinux1-dev libsystemd-dev pkg-config runc uidmap make curl vim gcc -y Step 2. Install Golang To build Podman from the source code, you need Golang 1.16 and higher. This version can be installed by downloading the latest binary from the Golang release page. Alternatively, pull the file with the command: sudo -i wget https://storage.googleapis.com/golang/getgo/installer_linux Make the script executabled chmod +x ./installer_linux Now run the installer to download the latest release of Golang: ./installer_linux Persist the new environment variables to your current session: source ~/.bash_profile Verify the installation. # go version go version go1.19.1 linux/amd64 Step 3. Install runc and Conmon The Conmon module is used to monitor OCI Runtimes. It can be installed with the commands: cd ~ git clone https://github.com/containers/conmon cd conmon export GOCACHE="$(mktemp -d)" make sudo make podman cd .. Once installed, proceed and install runc which is picked as the default runtime by Podman. git clone https://github.com/opencontainers/runc.git $GOPATH/src/github.com/opencontainers/runc cd $GOPATH/src/github.com/opencontainers/runc make BUILDTAGS="selinux seccomp" cp runc /usr/bin/runc cd ~/ Verify your installation: # runc --version runc version 1.1.0+dev commit: v1.1.0-272-g4a51b047 spec: 1.0.2-dev go: go1.19 libseccomp: 2.5.1
Step 4 – Configure CNI networking plugins Create a directory to store the CNI networking plugins at /etc/containers sudo mkdir -p /etc/containers Download the config file into the directory. sudo curl -L -o /etc/containers/registries.conf https://src.fedoraproject.org/rpms/containers-common/raw/main/f/registries.conf sudo curl -L -o /etc/containers/policy.json https://src.fedoraproject.org/rpms/containers-common/raw/main/f/default-policy.json Install additional packages on Debian 11 / Debian 10 sudo apt install -y libapparmor-dev libsystemd-dev Step 5 – Install Podman 4 on Debian 11 / Debian 10 Once all the above configurations have been made, download the latest Podman source code. This can be accomplished by visiting the GitHub release page It is also possible to download the file with the commands: sudo apt install curl wget -y TAG=$(curl -s https://api.github.com/repos/containers/podman/releases/latest|grep tag_name|cut -d '"' -f 4) rm -rf podman* wget https://github.com/containers/podman/archive/refs/tags/$TAG.tar.gz Extract the downloaded file: tar xvf $TAG.tar.gz Now build and install Podman 4 from the source code using the commands: cd podman*/ make BUILDTAGS="selinux seccomp" make install PREFIX=/usr Once complete, verify the installation: $ podman version Client: Podman Engine Version: 4.2.1 API Version: 4.2.1 Go Version: go1.19.1 Built: Fri Sep 23 13:38:07 2022 OS/Arch: linux/amd64 To be able to configure network namespaces, you need to install the slirp4netns package. Download the latest release file from the GitHub Release. Alternatively, use cURL as shown cd ~/ TAG=$( curl -s https://api.github.com/repos/rootless-containers/slirp4netns/releases/latest|grep tag_name|cut -d '"' -f 4) curl -o slirp4netns --fail -L https://github.com/rootless-containers/slirp4netns/releases/download/$TAG/slirp4netns-$(uname -m) Make the file executable: chmod +x slirp4netns Copy the binary file to your $PATH: sudo cp slirp4netns /usr/local/bin Step 6 – Use Podman 4 on Debian 11 / Debian 10 Now you can use Podman to build and pull images, spin containers and manage them easily. Manage Container Images To pull an image, use the command with the syntax: podman pull For example, to pull an Nginx image from docker hub, the command will be: $ podman pull docker.io/library/nginx:latest Trying to pull docker.io/library/nginx:latest... Getting image source signatures Copying blob 7247f6e5c182 done Copying blob 7247f6e5c182 done Copying blob 7a6db449b51b done Copying blob ca1981974b58 done Copying blob d4019c921e20 done Copying blob 7cb804d746d4 done Copying blob e7a561826262 done Copying config 2b7d6430f7 done Writing manifest to image destination Storing signatures 2b7d6430f78d432f89109b29d88d4c36c868cdbf15dc31d2132ceaa02b993763 Once pulled, you can view the images with the command: $ podman images REPOSITORY TAG IMAGE ID CREATED SIZE docker.io/library/nginx latest 2b7d6430f78d 8 days ago 146 MB docker.io/library/alpine latest 9c6f07244728 3 weeks ago 5.83 MB docker.io/library/ubuntu latest df5de72bdb3b 4 weeks ago 80.4 MB You can delete a container image, say ubuntu:latest from docker hub with the command: $ podman rmi docker.io/library/ubuntu:latest Untagged: docker.io/library/ubuntu:latest Deleted: df5de72bdb3b711aba4eca685b1f42c722cc8a1837ed3fbd548a9282af2d836d Before you delete an image, you need to ensure the container using it is stopped and deleted. Build Container Images It is also possible to build your win container images. The images can be used locally or uploaded to a registry. To create a container image on Podman, you need to create a Dockerfile. vim Dockerfile In the file, you need to add the commands to be executed. For example: FROM ubuntu:20.04 RUN apt-get up date -y ENV DEBIAN_FRONTEND=noninteractive RUN apt-get install -y gnupg apt-transport-https apt-utils wget
RUN echo "deb https://notesalexp.org/tesseract-ocr5/focal/ focal main" \ |tee /etc/apt/sources.list.d/notesalexp.list > /dev/null RUN wget -O - https://notesalexp.org/debian/alexp_key.asc | apt-key add - RUN apt-get update -y RUN apt-get install tesseract-ocr -y RUN apt install imagemagick -y ENTRYPOINT ["tesseract"] RUN tesseract -v Now build a container image with the command: podman build . -t tesseract:latest The build image will have the name tesseract and tagged as latest. Once complete, check if the image is available: $ podman images REPOSITORY TAG IMAGE ID CREATED SIZE localhost/tesseract latest a98239ee7925 About a minute ago 313 MB docker.io/library/nginx latest 2b7d6430f78d 8 days ago 146 MB docker.io/library/alpine latest 9c6f07244728 3 weeks ago 5.83 MB docker.io/library/ubuntu 20.04 3bc6e9f30f51 4 weeks ago 75.2 MB Manage Containers Containers can be run from existing images or by downloading images from the preferred registry. For example, to run a container from the created Tesseract images, issue the command: $ podman run tesseract:latest -v tesseract 5.2.0 leptonica-1.79.0 libgif 5.1.4 : libjpeg 8d (libjpeg-turbo 2.0.3) : libpng 1.6.37 : libtiff 4.1.0 : zlib 1.2.11 : libwebp 0.6.1 : libopenjp2 2.3.1 Found OpenMP 201511 Found libarchive 3.4.0 zlib/1.2.11 liblzma/5.2.4 bz2lib/1.0.8 liblz4/1.9.2 libzstd/1.4.4 Found libcurl/7.68.0 OpenSSL/1.1.1f zlib/1.2.11 brotli/1.0.7 libidn2/2.2.0 libpsl/0.21.0 (+libidn2/2.2.0) libssh/0.9.3/openssl/zlib nghttp2/1.40.0 librtmp/2.3 You can also run a container using an image available in the registry. podman run docker.io/library/hello-world Sample output: To check if the container is running, use the command: podman ps To list all the containers including the ones not running, issue the command: $ podman ps -a CONTAINER ID IMAGE COMMAND CREATED STATUS PORTS NAMES bff200dbe9b8 localhost/tesseract:latest -v 5 minutes ago Exited (0) 5 minutes ago gallant_mahavira 34c490d56716 docker.io/library/nginx:latest nginx -g daemon o... 5 minutes ago Created 0.0.0.0:80->80/tcp mynginx1 26f64c70d1df docker.io/library/nginx:latest nginx -g daemon o... 3 minutes ago Exited (0) About a minute ago mynginx a51d55a7d880 docker.io/library/hello-world:latest /hello 52 seconds ago Exited (0) 52 seconds ago romantic_jang To stop a container, run the command: podman stop container_name/container_ID To remove a container, first, stop it, then execute the command: podman rm container_name/container_ID That marks the end of this guide on how to install Podman 4 on Debian 11 / Debian 10. Now you are set to pull images and run containers as desired.
0 notes
Text
How to Work with Iptables
iptables: Introduction and top 20 rules
https://8gwifi.org/docs/iptables.jsp
1 note
·
View note
Text
なぜコンテナを導入するのか ~ 各職種への説得材料をまとめる
from https://qiita.com/tomoyamachi/items/dca29f53bc7e20ddd8ba?utm_campaign=popular_items&utm_medium=feed&utm_source=popular_items
はじめに
本記事はディップ Advent Calendar 2019の記事です。
現在、ディップさんに週1回程度お邪魔して、(個人の趣味で)定期的にコンテナに関する勉強会を開催しています。 本記事では、コンテナに触ったことがない人に対して、コンテナ利用時のメリットを説明するための資料を公開します。 なお、ディップ社内ではPHPが利用している部署が多いので、PHPに関する記述が多いです。 注) この記事でことわりがない場合、「コンテナ」は「Dockerコンテナ」を指します。
コンテナ技術とコンテナイメージ
コンテナ技術とは、プロセスを隔離して実行するための技術です。 コンテナイメージ(イメージ)とは、「アプリケーションコードと依存関係を一つにまとめたファイル」です。 コンテナイメージを元に実行された、隔離されたプロセスになったものをコンテナと呼ばれます。

https://www.docker.com/resources/what-container
VMとの違い
VMは一つ一つにゲストOSが必要です。 コンテナは、プロセスを隔離してHostOS上で動作させることができます。 そのためオーバーヘッドや利用するリソースも少なく、高速に起動します。

https://www.docker.com/resources/what-container
コンテナを導入するメリット
新人教育関連
アプリケーションコードと依存関係を一つのイメージにまとめられる
最初の環境構築がめっちゃ楽になる
公式のコンテナイメージを利用すると、だいたいの設定は完了する

サービス開発者
開発環境の構築がコードベースで行える
開発開始までの時間が短い
VMに比べてコンピュータリソースを有効活用できる
既存の環境に影響を与えず、新しい環境を利用できる
実際にプログラムをインストールしなくてよい

以下の例では、PHPをインストールせず、PHP5.6とPHP7.3の各バージョンでPHPのコードを動かしています。 https://github.com/tomoyamachi/docker-tutorial/blob/master/00-introduction-ja.md
# ver5.6環境で実行 $ docker run --rm -it -v $(pwd)/00-php-sample:/app \ --rm php:5.6-cli-alpine \ php /app/main.php NULL # ver7.3環境で実行 $ docker run --rm -it -v $(pwd)/00-php-sample:/app \ --rm php:7.3-cli-alpine \ php /app/main.php Fatal error: Redefinition of parameter $void in /app/main.php on line 3
インフラ担当向け
セキュリティ担当向け
CI/CDを実行すると、自動でパッケージが最新のものになる
アプリケーションに関するパッケージのアップデート非常に楽
コンテナプロセスは非root権限で実行されるので、侵入されたときのリスクが下げられる
アプリケーションコードと依存関係を一つのイメージにまとめた「イメージ」ごとに責任を分割できる → どこで利用されているかわからないパッケージ/ライブラリを減らせる
ただし、Dockerやオーケストレーションツール(Kubernetesなど)に脆弱性が発見されることもある
FAQ
どういう原理で動くの?
Linuxカーネルの機能を組み合わせて動きます。 Mac / Windowsだと、Linuxカーネルの機能を小さくまとめたLinuxKitを動かしています。
これまで覚えた知識は無駄になるの?
無駄になりません。 たとえば、コンテナ間のネットワーク通信では、veth(バーチャルイーサネットデバイス)を用いて通信を実現しています。また、iptablesなどを駆使してコンテナ間の名前解決を行っています。 伝統的な手法を仮想的に行っていることが多いので、トラブルシュートの際は、これまでの知識が必要になってきます。
向いてないことはある?
たとえば以下の場合は向いてません。
複雑なモノリスアプリケーション Dockerは1プロセスごとにコンテナを分けることが推奨されます。そのため、複雑すぎてプロセスの分離が難しいものは向いていません。その場合は、LXCなど1コンテナで複数プロセス起動が許されているコンテナ技術をつかえます。
特殊なデバイス/リソースを利用する たとえば、現在NVIDIA以外のGPUを利用できません。特殊なリソースを利用したい場合、対応できないことがあります。
次のステップ
DockerHubのアカウントを作成
Docker Playground にDockerHubアカウントでログインする
「ADD NEW INSTANCE」でインスタンスをつくって、dockerコマンドを実行する
https://events.docker.com/learndocker-workshop/ の手順に沿ってコマンドを打つ
宣伝
PHPer向けのDockerチュートリアルを作成しました。 日本語で、さっとDockerを動かしたい人はこちらもどうぞ。
まとめ
実際の勉強会だと、最初の10分くらいで概要を説明して、2時間くらいハンズオン形式で実際にdockerを触っていきます。 うちの会社でもやってほしい、みたいなのがあればご相談ください。
0 notes
Text
The Power To Serve: Setting Up FreeBSD
Most would agree that IT and Computer geeks have an intense passion for Open Source Software and quality code. Due to this, Linux is a staple in the tech community... But is it the only option? Enter FreeBSD, an Operating System whose roots trace all the way back to the original UNIX. Buckle up, and prepare for an introduction to FreeBSD and setting it up yourself.
Wait, Slow Down. What's FreeBSD?
Back in the 1970s and 1980s, AT&T Bell Labs invented UNIX and would go on to sell commercial copies of said Operating System to various colleges. The awesome thing was that AT&T shipped source code bundled right in! One of these places was the University of California at Berkeley, who aptly wrote more tools for UNIX such as vi and the original Berkeley Fast Filesystem (what most Linux/UNIX Filesystems are based on nowadays). Eventually UC Berkeley went on to redistribute their own variant of UNIX called BSD, setting up a hotline at 1-800-ITS-UNIX. This ROYALLY pissed off AT&T and they sued for copyright infringement. For reference, around this time Linus Torvalds was beginning the Linux Kernel development.
Needless to say, UC Berkeley won the case almost totally- so much so that AT&T only kept copyright to 3-4 files of the entire UNIX system. This enabled the release of i386BSD, which spawned the FreeBSD, NetBSD and OpenBSD projects. Their licenses are all very close to the original license of the code which is extremely permissive and allows the user to do almost anything except take credit for the work, sue the developer and remove the license.
Cool! Let's Install It!
Awesome! At this time of writing, the latest stable version of FreeBSD is 12.1. If you browse to the FreeBSD Site, you'll notice a big "Download Now" button. For this series of blog posts, we'll install 12.1 because stability matters for a daily-driver laptop. Pick the correct CPU architecture and you'll be taken to a web open directory. There are multiple images available for download, generally DVD1 and memstick images have all installation files embedded into the image so no network connection is needed to install the system.
Now that the image is downloaded, pick an installation medium. For usb, you would insert a thumb drive and type sudo dd if=/path/to/FREEBSDIMAGE of=/dev/sdX status=progress, where the "if" argument is the location of your downloaded FreeBSD installer image and the "of" argument is the name of your drive under Linux.
After this is done, let's yank out our computer and boot into the installer! On most laptops, there is a key combination to enter the BIOS, like spamming F12 or delete on boot. Once you've done this, allow USB booting, disable secure boot, and configure your flash drive to boot first. With the flash drive plugged in, you should be greeted by a FreeBSD bootloader, waiting a moment will take you to a graphical menu that looks like this:
The FreeBSD Installer
Select your responses with the arrow keys, and press enter to continue.
In prompts like this one, you'll need to use the space bar to alter selections.
The menu is very simple and easy to go through... Once you arrive at what disk format to use, the most common option FreeBSD users select is entire-disk ZFS.
Remember to select your disks in the ZFS Pool! The original option is stripe/0 disks, but you still need to go into it's submenu and select a disk even if you don't want to use the mirroring abilities of ZFS. There is an option to enable encryption, enabling it will provide a prompt later for your disk encryption password. If you're content with the settings, continue on.
After this, you'll be greeted by a menu of what packages you'd like to install, selectable by spacebar and arrow keys. Pressing enter will allow you to continue to the installation. Once complete, the interface will drop to a shell for you to set the root user password. Once that's done, the installer will take you back to the UI and offer to create a user account (DO THIS!), where you drop back to the shell to create it. Lastly, there will be system hardening options that you can optionally check. If you're concerned with privacy, it is recommended to enable all of them. Finally, it will provide an option to exit the installer and reboot.
Welcome To FreeBSD!
On fresh installation, FreeBSD is extremely plain and doesn't even have a desktop. Our first priority is to connect to the internet, so we can update our system. Running the ifconfig command will list all devices that are recognized by FreeBSD. If your network card isn't recognized, you will want to search to see if it's supported. If so, there's probably a kernel module that hasn't been loaded for it. To remedy this, a simple kldload xxx (where xxx is the name of the kernel module corresponding to your device driver) will enable your hardware. If this works, you can make this change permanent by editing /etc/rc.conf. FreeBSD makes use of wpa_supplicant and ifconfig to connect- more comprehensive guides on getting connected can be found here:
Wireless Networking in FreeBSD Networking in FreeBSD
Once connected, updating the system and fetching a few apps to get started with configuration is critical. There's three ways a user can install software on FreeBSD: compiling from source by hand, compiling from source through the ports collection (automatically), or using the pkg package manager which feels very much like apt.
Set up the FreeBSD ports tree by running portsnap fetch extract. If you ever wish to use it, cd into /usr/ports and find the proper directory of the application you wish to install. Then type make clean install.
As for pkg, let's update, upgrade and install vim:
pkg update pkg upgrade pkg install vim
Once all the software required for a desktop or whatever use case is necessary, setup is just like any *nix-based system.
So What Makes FreeBSD Different???
FreeBSD has a bunch of unique development tools, such as dtrace, for programming and understanding how the Operating System works and programming good, solid code. On top of that, it comes with pf instead of iptables, which is the de-facto standard on many enterprise networking devices such as Cisco or Palo Alto (they actually ship with FreeBSD installed). The entire Operating System source code can be found in /usr/src, and you can recompile the entire OS with a one-line terminal command. FreeBSD and similar systems are known for having the best TCP/IP networking stack in the world, so much so that even Microsoft still uses FreeBSD code for driving the internet on Windows to this very day.
Be sure to stick around for the next post, where we'll compile a custom kernel on FreeBSD!
Liked This Content? Check Out Our Discord Community and Become an email subscriber!
0 notes
Text
March 18, 2020 at 10:00PM - The Ultimate White Hat Hacker 2018 Bundle (pay what you want) Ashraf
The Ultimate White Hat Hacker 2018 Bundle (pay what you want) Hurry Offer Only Last For HoursSometime. Don't ever forget to share this post on Your Social media to be the first to tell your firends. This is not a fake stuff its real.
In this beginner- and professional-friendly course, you’ll learn how black hat hackers hack Windows using advanced techniques, while improving your knowledge on how to analyze and secure Windows, and detect a hacker’s identity. Across the example-based course, you’ll get hands-on instruction in white hat hacking.
Access 74 lectures & 8 hours of content 24/7
Learn how to download & setup Kali Linux 2.0, Windows 10, & Metasploit as virtual machines
Understand how to gather as much info as possible from your target
Use msfconsole interface like a professional
Encode & combine the payload
Gain full access over a target OS & learn how to interact w/ it using Meterpreter command line
Perform various attacks over WAN network
Detect & protect from all of the attacks discussed
To completely understand computer security, it’s vital to think outside the box. It’s not just about firewalls, Intrusion Prevention Systems, or antivirus. It’s also about tricking people into doing whatever a hacker wishes. A secure system, therefore, is also about informed people. This training is based on a practical approach of day-by-day situations contained labs based on real environments. The aim is to help you learn ethical hacking techniques and methodology used in penetration systems to better protect yourself and those around you.
Access 85 lectures & 12.5 hours of content 24/7
Cover both theoretical & practical aspects of ethical hacking
Work in hands-on labs about hacking systems, networks, wireless, mobile, & websites
WAPTP v3.1 is a highly practical and hands-on training for web application penetration testing that covers the OWASP top 10 vulnerabilities. Starting with various terminologies of web technologies, you’ll build towards mapping an application for insecurities, and understanding how to identify and mitigate threats.
Access 64 lectures & 8 hours of content 24/7
Map an app for insecurities using various tools & tricks, including Burp Suite
Explore serious vulnerabilities like SQL injection, cross-site scripting, cross-site request forgery, XXE attacks, & more
Find & hunt each vulnerability through the points developers use to secure the web app at the time of development
This course aims to teach you in-depth WiFi hacking and security. Upon completion, you’ll be confident in breaking all types of WiFi encryption methods. Starting as a complete beginner with little to no knowledge of WiFi security and Kali Linux, you’ll learn the most important elements of WiFi hacking so you can begin applying them to a career in ethical hacking.
Access 118 lectures & 7 hours of content 24/7
Get an introduction to Kali Linux & network basics
Learn how to passively & actively gather information
Identify vulnerabilities in a target
Overrun buffer memory, perform password attacks, attack WiFi networks, & more
Discuss client side & server side web vulnerabilities
Test & exercise your defenses to ensure they’re up to task by simulating real-world attacks
To break into the world of professional penetration testing, you’ll need to be an ace with Kali Linux. This course will introduce you to the latest ethical hacking tools and techniques with Kali Linux, using a testing lab for practicing different types of attacks. Across the course, you’ll simulate an entire penetration test from beginning to end, giving you verifiable hands-on experience.
Access 80 lectures & 8.5 hours of content 24/7
Get comfortable w/ Kali Linux & learn the penetration testing phases
Manage Kali Linux HTTP & SSH services
Discover essential tools like Netcat & WireShark
Gather passive & active information
Explore how to perform & defend against a variety of attacks
Receive monthly virtual machines as a hacking challenge
This course is focused on the practical side of penetration testing without neglecting the theory behind each attack. As you gain a complex understanding of websites, you will then learn how you can exploit them to carry out a number of powerful cyber attacks. You’ll track from a beginning to advanced level and by the time you finish you’ll be able to launch attacks and test the security of websites and apps the same way that black hat hackers would, and be able to fix these vulnerabilities.
Access 93 lectures & 9 hours of content 24/7
Learn how to gather information about your target site like discovering the DNS server used & subdomains
Discover, exploit, & fix a number of vulnerabilities like file upload, code execution, SQL injection, XSS, & much more
Understand what you can do w/ the access gained from vulnerabilities
Explore the basic exploitation of attacks & the advanced methods to enhance them
Learn how & why vulnerabilities are exploitable, how to fix them, & the right practices to avoid them
Over this course you’ll learn network hacking techniques and vulnerability scanning to discover security risks across an entire network, learning skills for which companies are willing to pay top dollar. Whether you want to protect your own network or protect corporate networks professionally, this course will get you up to speed.
Access 106 lectures & 12.5 hours of content 24/7
Architect your network for maximum security & prevent local & remote attacks
Understand the various types of firewalls available, including layer 4 firewalls like Iptables & PF
Discuss firewalls on all platforms, including Windows, Mac OS, & Linux
Explore wireless security & learn how WiFi is hacked
Use tools like Wireshark, Tcpdump, & Syslog to monitor your network
Dive into search engine privacy & tracking, learning how to mitigate tracking & privacy issues
This course provides a good starting point from which to learn ethical hacking and identify threats and vulnerabilities to secure your IT environment. You’ll begin with an introduction to the best tools around before diving into basic hacking technique, and ultimately going into real-life scenarios to get a hang of how hackers think.
Access 14 lectures & 2 hours of content 24/7
Discuss a basic introduction to reconnaissance
Get hands-on experience working w/ Metasploit & testing the effectiveness of different defenses
Learn about sniffing & how effective Man-in-the-Middle attacks can be
Go through a coffee shop scenario to further your understanding
Understand how hackers use networks to gain access to different systems
from Active Sales – SharewareOnSale https://ift.tt/38ZkUXG https://ift.tt/eA8V8J via Blogger https://ift.tt/33uolEn #blogger #bloggingtips #bloggerlife #bloggersgetsocial #ontheblog #writersofinstagram #writingprompt #instapoetry #writerscommunity #writersofig #writersblock #writerlife #writtenword #instawriters #spilledink #wordgasm #creativewriting #poetsofinstagram #blackoutpoetry #poetsofig
0 notes
Text
POSIX Permissions and Stateful Firewalls Solution
POSIX Permissions and Stateful Firewalls Solution
Contents
Overview
Required Reading
POSIX Permissions
Criticisms
sudo and Alternatives
Software Tools
adduser, chfn, passwd
addgroup
usermod
chown, chgrp
chmod
Firewalls
Policy Design
Firewall and Network Testing Tools
iptables
nmap
ifconfig
telnet
netcat
Introduction
Assignment Instructions
Setup
Saving your work
Restoring your work
Tasks
Home…
View On WordPress
0 notes
Text
Adding an outgoing traffic rules to the firewall
Adding an outgoing traffic rules to the firewall
Adding an outgoing traffic rules to the firewall
Logo.Preferred2c.dark.png
INFA 620 Laboratory 4: Configuring a Firewall In this exercise you will be working with firewalld (see https://www.linode.com/docs/security/firewalls/introduction-to-firewalld-on-centos), a front-end to controlling Iptables. Iptables is a flexible firewall utility built for Linux operating systems (see https://www.howtoge…
View On WordPress
0 notes
Text
Original Post from Security Affairs Author: Pierluigi Paganini
Malware researchers at Cybaze-Yoroi ZLAB observed many attack attempts trying to spread malware abusing the CVE-2019-10149 issue.
Introduction
Figure 1: Exposed EXIM server in Italy (Reference: ZoomEye)
In the past days, a really important issue has been disclosed to the public: “Return of the WiZard” vulnerability (ref. EW N030619, CVE-2019-10149). Such vulnerability affected a wide range of Exim servers, one of the main email server technologies, extremely diffused all around the globe and in Italy too.
Recently, cyber-criminals groups abused this vulnerability to compromise exposed Exim mail server in the wild. During this time, Cybaze-Yoroi ZLAB observed many attack attempts trying to spread malware abusing the CVE-2019-10149 issue, for instance the SSH reverse shell first spotted by Magni R. Sigurdsson (Security Researcher), which abuses ToR network to distribute its payload, or also the 9th June wave which tried to download a particular Linux agent. Yoroi-Cybaze ZLab analyzed this malware threat.
Figure 2: Tweet about first attack wave on Exim server
Technical Analysis
Exim is a message transfer agent (MTA) developed at the University of Cambridge for Unix systems connected to the Internet. It was designed on the assumption that it would be run on hosts that are permanently connected to the Internet. Thanks to the “Return of the WiZard” vulnerability, a malformed email sent to Exim servers allows attackers to execute code under the Exim process access level, root on most servers. The entire infection chain begins with an SMTP dialog containing a specifically crafted “RCPT_TO” field.
For instance:
Figure 3: Piece of exploit used to compromise vulnerable Exim server (Reference: https://github.com/dhn/exploits/tree/master/CVE-2019-10149)
At this point, the vulnerable Exim Server locally executes the crafted part.
The Bash Stealer
Hash 1c8f184c3cf902bafc9df23b13a5d51cf801026bc3bde9d6b05cf047523ac6ed Threat Bash Stealer Brief Description Initial bash payload dropped after Exim exploit Ssdeep 48:r+GMfper8pnPDA7pIgOznRsbb9tanhc6zghOk1Y2y6EYX+UDLBoySval:r+GMfp6ubEmZz6ig0vK
Table 1: Information about sh script
Figure 4: Initial SH file detection
The SH file is not merely a dropper of another stage of the malware. It retrieves information about the infected machine, starting from the hostname and ending into the bitcoin wallets and system configurations, making it look like a quite complete stealer too. In this section we deepen all the features of this sample.
#!/bin/shexport PATH=/bin:/usr/bin:/usr/local/bin:/sbin:/usr/sbin:/usr/local/sbinexport LC_ALL=Cexport HISTFILE=/dev/nullexport HISTSIZE=0
HOME=/rootunset DISPLAYexport UPLOAD_URL=https://85.25.84[.99/up.php
NOLS=0NOETC=0NODUP=1V=2UF=temp3754r97y$V
Snippet 1: Declarations of global variables and IP of the C2
First of all, the script set different variables visible at all child processes thanks to “export” command. An interesting variable is “UPLOAD_URL” containing a first remote location “hxxps://85[.25.84.99/up[.php” part of the attacker infrastructure. The C2 is hosted by a German Managed Cloud Service Provider ️(PlusServer GmbH).
Second interesting part of the script is the function “snd()” defined follow.
snd () { sh -c “UPLOAD_FILE=”$1” UPLOAD_NAME=”$(hostname).tbz2” UPLOAD_URL=$UPLOAD_URL atd &”; }
Snippet 2: “snd()” function used to upload stolen information
This line of the script is one of the most important of all the infection chain. It launches a shell command with three exported variables “UPLOAD_FILE”, “UPLOAD_NAME”, “UPLOAD_URL” and then the “atd” file is executed. It is described in the section “The payload”. Instead, the final part of the script is:
# EXIM
tail -n 100 /etc/*release /etc/version > system.version 2>/dev/nullip addr > ip 2>/dev/nulliptables-save > iptables 2>/dev/nullip6tables-save > ip6tables 2>/dev/null
# /EXIM end exim
hostname > hostnameuname -a > unameecho `date -u` ‘(‘`$(which date)`’)’ > dateuptime > uptimew > wid > id
ps auxwwwwwTH > psps auxwwwwwf > ps-forestps auxwwwwwfe > ps-env
cat /proc/meminfo > meminfo 2>/dev/nullcat /proc/cpuinfo > cpuinfo 2>/dev/nullifconfig -a > ifconfig 2>/dev/nulldf > df 2>/dev/nulldmesg > dmesg 2>/dev/nullmount > mount 2>/dev/nullenv > env 2>/dev/null
lspci -k > lspci 2>/dev/nulllsusb > lsusb 2>/dev/null
netstat -antpuxwenW > netstat 2>/dev/nullroute -en > route 2>/dev/null
# other kernel info
cat /proc/modules > lsmod 2>/dev/nullcp /proc/version /proc/cmdline /proc/filesystems . 2>/dev/nulllscpu > lscpu 2>/dev/null
# copy stuff from /etc?
if [ $NOETC –eq 0 ]; then mkdir $main_dir/root/sysinfo/etc cd $main_dir/root/sysinfo/etc cp -pRL /etc/*release /etc/cron* /etc/*version /etc/issue* /etc/hosts* /etc/motd /etc/passwd /etc/apache2 /etc/httpd /etc/nginx /etc/resolv* /etc/wpa* . 2>/dev/null cd –fi
cd $main_dir/root
# list some dirs
if [ $NOLS –eq 0 ]; then ls -laR /boot > ls-boot 2>&1 ls -laR /etc > ls-etc 2>&1fi
# compress n clean up
cd $main_dirtar -cj –exclude ‘root/sysinfo/etc/httpd/modules*’ –exclude ‘root/sysinfo/etc/httpd/lib*’ –exclude ‘root/sysinfo/etc/httpd/man*’ -f $BASE/rf root
# drop source files
rm -rf $main_dir &
# ready to send!
cd $BASE
wget -q http://173.212.214.137/se -O atd || wget -q http://173.212.214.137/icantgetit -O /dev/nulltest `stat -c %s atd` –eq 610932 && chmod +x atd && snd rf
Snippet 3: Piece of sh script utilized to grab all victim machine
In the “#EXIM” section the script gather the following information: system version, ip, iptables status, ip6tables status. However, the “#EXIM” label is misleading because this piece of code refers only to information about the machine network configuration and no EXIM configuration is retrieved. After this, the script continues to gather other information like:
Name of the host
Operating system name
Date in UTC and CEST format
Server uptime
Summary of every user logged into a computer
User ID
Running process
Information about memory
Info about CPU
IPv4
Disk Space
Message contained in Kernel buffer
Filesystem structure
All current environment variables
All peripherals and PCI bus
All USB bus
State of established connection
Information about routing tables
kernel modules
Information about CPU architecture
In the section labeled “#copy stuff from /etc?”, the script steals all the files stored in /etc/ path. Its loot is stored on “$main_dir/root/sysinfo/etc” where $main_dir is “/var/tmp”. It contains a copy of the whole Apache and Nginx configuration folders, and the system users and groups.
# copy stuff from /etc?
if [ $NOETC –eq 0 ]; then
mkdir $main_dir/root/sysinfo/etc
cd $main_dir/root/sysinfo/etc
cp -pRL /etc/*release /etc/cron* /etc/*version /etc/issue* /etc/hosts* /etc/motd /etc/passwd /etc/apache2 /etc/httpd /etc/nginx /etc/resolv* /etc/wpa* . 2>/dev/null
cd –
fi
Snippet 4: Copy of all files contained in /etc path
In addition, the following piece of code shows the script snippet able to steal cryptocoin wallets and to pillage other interesting files. For instance user’s ssh configs and configuration files of remote management tools, like Remmina, Rdesk and VNC potentially enabling further network compromise. Moreover, it gathers DB client configuration files for DbShell and Redis, along with user command history too.
cd $HOME && tar cf $main_dir/root/root.tar .*coin/w*dat .*Coin/w*dat .dash*/w*dat .dash*/*.conf .*coin/*.conf .*Coin/*.conf *address.txt *coin/w*dat *Coin/w*dat .vnc* .redis* .rdesk* .remmina /home/*/.*coin/w*dat /home/*/.dash*/w*dat /home/*/.dash*/*conf /home/*/.*Coin/w*dat /home/*/.*coin/*.conf /home/*/.*Coin/*.conf /home/*/.ssh /home/*/.remmina /home/*/.vnc* /home/*/.redis* /home/*/.rdesk* /home/*/.remmina /home/*/.bash* /home/*/.zsh* /home/*/.*hist* /home/*/.profile /home/*/.dbshell 2>/dev/null
cd $main_dir/root/
Snippet 5: Grab of all information on ssh, remmina, vnc, redis and rdesk configuration files.
Finally, all these information are compressed, sent to the C2 using the previously mentioned “snd()” function and then removed from the machine. The last lines of the script downloads another piece of malware: an ELF32 executable hosted on the same server at “hxxp://173[.212.214[.137/se”. It is the “atd” file referenced in the “snd()” function.
The ELF Uploader
Hash d8a787dc774748bf26e3dce1b079e9bef071c0327b6adcd8cc71ed956365201c Threat ELF Uploader Brief Description Malware downloaded after exim exploitation packed with UPX compressor Ssdeep 12288:FyqFENCHmitUVm9Q8vvsOjIE7WmUlwUJoAAxgeB2DMX+H0XxDTcKe+DduDkEbAd+:FyqusHBWEQ8vk
Table 2: Information about se (ELF file packed with UPX)
This sample was compressed with the standard UPX compressor. The unpacked payload is:
Hash b4bae03ab71439208b79edfc5eaec42babacee982231dce001b70ec42835063a Threat ELF Uploader unpacked Brief Description ELF Uploader unpacked Ssdeep 49152:VZSOaCFC/z4Amq7DkCteu3VD69+xA1PbHrmFbTZJy:VotCFC/zoq0CguZs5LrmFPy
Table 3: Information about se (ELF file Unpacked)
Analyzing it, we found the malware tries to find three environment variables: “UPLOAD_FILE”, “UPLOAD_NAME” and “UPLOAD_URL”. All those have been declared in the “snd()” function and are used as parameters for the further execution, suggesting this piece of code may be a custom tool prepared by the attacker.
Figure 5: Evidence of “UPLOAD_FILE”, “UPLOAD_NAME” and “UPLOAD_URL” functions
If the three parameters exist, then the malware contacts the remote destination in order to upload all the data through a series of POST request to the “/up.php” resource. As previously mentioned, the three parameters are read as environment variable in the bash command line. So, once loaded the required parameters, we are able to correctly debug the malware. In the figure above, we reported how the malware retrieves one of the defined parameters, the “/var/tmp/temp3754r97y2” folder, which contains the loot gathered by the Bash Stealer. Indeed, Figure 12 shows the routine used by the malware to contact the C2 and it is visible in clear in the address pointed by the ESI register.
Figure 6: Read parameter routine
Figure 7: Read C2 address routine
Conclusion
This attack wave shows how simple can be for an attacker to run a widespread attacks with customized malware, threatening all the unpatched Exim services exposed all around the Internet. In this analysis, we encountered an effective information stealer able to easily gather sensitive information about the compromised system. These information could also enable the crooks behind the campaign to further escalate the attack within victims and victim partners networks.
Anyway, this case represents only one possible attack scenario abusing the “Return of the WiZard” vulnerability: cryptominers, botnets or also ransomwares could also leverage this weakness, along with APT groups. So, the Yoroi-Cybaze researchers recommend to update Exim servers in order to avoid the risk of other attack waves.
Technical details, including IoCs and Yara Rules, are available in the analysis published in the Yoroi blog.
https://blog.yoroi.company/research/the-return-of-the-wizard-vulnerability-crooks-start-hitting/
window._mNHandle = window._mNHandle || {}; window._mNHandle.queue = window._mNHandle.queue || []; medianet_versionId = "3121199";
try { window._mNHandle.queue.push(function () { window._mNDetails.loadTag("762221962", "300x250", "762221962"); }); } catch (error) {}
Pierluigi Paganini
(SecurityAffairs – CVE-2019-10149, Exim)
The post CVE-2019-10149: “Return of the WiZard” Vulnerability: Crooks Start Hitting appeared first on Security Affairs.
#gallery-0-6 { margin: auto; } #gallery-0-6 .gallery-item { float: left; margin-top: 10px; text-align: center; width: 33%; } #gallery-0-6 img { border: 2px solid #cfcfcf; } #gallery-0-6 .gallery-caption { margin-left: 0; } /* see gallery_shortcode() in wp-includes/media.php */
Go to Source Author: Pierluigi Paganini CVE-2019-10149: “Return of the WiZard” Vulnerability: Crooks Start Hitting Original Post from Security Affairs Author: Pierluigi Paganini Malware researchers at Cybaze-Yoroi ZLAB observed many attack attempts trying to spread malware abusing the CVE-2019-10149 issue.
0 notes
Text
An introduction to IPTables and Firewalld in Linux
http://bit.ly/2EF2IHv An introduction to IPTables and Firewalld in Linux, IPTables and Firewalld in CentOS (Redhat).
0 notes